#Lightroom Mobile Tutorial iPhone
Explore tagged Tumblr posts
Visit Tumblr Blog
Explore Tumblr blogs with no restrictions, modern design and the best experience.
Last Seen Tumblr Blogs


Fun Fact
Tumblr Inc. has $15.1M in annual revenue.
Text
Mastering Light Trails with iPhone: A Beginner's Guide to Long Exposure

Capturing the mesmerizing flow of light trails—whether from speeding cars, vibrant cityscapes, or handheld light painting—used to require a DSLR, a tripod, and advanced editing skills. Thanks to advancements in mobile camera technology, particularly with iPhones, you can now shoot professional-looking long exposure images right from your pocket. Whether you're a hobbyist or an aspiring content creator, learning how to master light trails with your iPhone can elevate your mobile photography game.
In this guide, we'll walk you through the essentials of long exposure photography on iPhone, with a special focus on light trails. Plus, we’ll show how platforms like Techiexpert are empowering creators with the latest insights in mobile tech and creative tools.
What Are Light Trails?
Light trails are visual streaks created when a moving light source—such as car headlights or fireworks—is captured using a slow shutter speed. The longer the camera's sensor is exposed to light, the more motion it records, resulting in beautiful lines that convey movement and energy.
Tools You’ll Need
While the latest iPhones come equipped with impressive low-light capabilities and computational photography features, a few extra tools can enhance your results:
iPhone (iPhone 11 and above preferred)
Tripod or a stable surface to avoid motion blur
Long exposure app (like Spectre, Slow Shutter Cam, or ProCamera)
Optional: ND filters for shooting during daylight
Step-by-Step: Capturing Light Trails on iPhone
1. Choose the Right Location
Look for areas with consistent moving lights. Highways, busy intersections, amusement parks, or even nighttime festivals are great choices. Safety is key—make sure you’re in a secure, legal spot for shooting.
2. Stabilize Your iPhone
A shaky hand can ruin a long exposure shot. Use a tripod or brace your iPhone against a flat surface. Even a mini tripod or phone stand can significantly improve clarity.
3. Use the Live Photo Long Exposure Trick (Built-in)
If you're not ready to download third-party apps:
Open the native Camera app.
Switch to Live Photo mode.
Take a shot of moving lights.
Open the photo from your gallery, swipe up, and select “Long Exposure” from the effects.
This method is quick and user-friendly, though it offers limited control over exposure time.
4. Use a Dedicated Long Exposure App
Apps like Spectre Camera use AI and computational exposure stacking to deliver high-quality light trail images.
Open the app and set exposure duration (5s to 30s recommended).
Lock focus and exposure on a bright spot.
Hit the shutter and stay steady.
These apps often allow manual adjustments for ISO, shutter speed, and focus—great for learning the fundamentals of photography.
Tips for Better Results
Shoot just after sunset (blue hour) for dramatic skies and vibrant light trails.
Experiment with different shutter speeds to find the ideal length for your scene.
Use burst mode or take multiple shots to increase your chances of capturing the perfect trail.
Edit with care using apps like Lightroom Mobile or Snapseed to enhance contrast, sharpness, and color balance.
Stay Updated with the Latest in Mobile Photography
As mobile photography continues to evolve, staying informed is essential. That’s where Techiexpert comes in. Whether you're exploring the best new apps for creatives, learning about AI-driven photography tools, or simply looking for hands-on tutorials, Techiexpert is your go-to platform.
Their regular updates and expert reviews help both beginners and pros navigate the fast-changing world of tech—from smartphone innovations to practical guides like this one. If you’re passionate about technology and creativity, Techiexpert ensures you’re always one step ahead.
Final Thoughts
Mastering light trails with your iPhone is both rewarding and accessible. With the right tools, settings, and a bit of patience, you can create captivating images that rival those from professional cameras. Embrace the night, find your light, and let your creativity flow.
And don’t forget—whether you're looking for inspiration, gear tips, or cutting-edge tech insights, Techiexpert has your back.
0 notes
Text
How To Create your Own Lightroom Preset (And Upside Down Preset Tutorial)

I have been using Adobe Lightroom Classic CC for months, and I must say that it is the best photo editor that I have discovered. It’s perfect for basic photo editing because it has the photo manipulation tools that everyone needs.
Before I only use premium presets for my travel photos, and I do some minor tweaks because I am a bit lazy to edit everything manually. Then a friend of mine convinced and inspired me to create my own preset, and I’m happy to share it with you guys.
I called my first travel preset “Upside Down” because of its not too dark and moody tones. The beginning of my 2018 has been a roller coaster ride, but I do believe that better days will always come. God still has better plans for us; just have faith and trust Him.
I also believe that that reason why photography is a form of art because it is a form of expression. You can express how you feel about every photo. It can be the photos you are capturing or how you edit it. It’s how you see it, and how you want other people to see it. It’s how you want them to feel the moment that they understand your photos.
Below are the sample photos using my Upside Down preset


Here are the settings behind my preset. Screenshots are from Adobe Lightroom Mobile, but if you want to make your own preset, you need to use LR (Lightroom) for a desktop.
White Balance
Exposure depends on your photo; that’s why I did not include it in the settings. As you can see, I lessen the contrast, whites, and highlights, then the shadows and black are higher since I want it to look a bit dark and emotional.
I also added clarity and lessen the vignette amount to make the photo clearer.

HSL Panel
I am more comfortable using the color panel to manually adjust every color’s hue, saturation, and luminance. In this preset here’s the adjustment that I made to achieve how I want my present to look like.


Split toning
This is where you can set the color signature of your image. I just added 167 ° in the shadows(blue), because this preset is best in mountain/forest photos.

You can make your own preset depends on what you want, and it also depends on the photos that you will use. Decide if you want a warm or cool preset, then start adjusting the settings manually until you get perfect blending.
It is complicated at first, but everything takes time. Just explore and learn.

Summer is fast approaching, so I decided to create another preset that is perfect for beach photos. Here’s a preview of the images using my newly produced preset.

Let me know what you think, and if you have any recommendations feel free to drop it on the comments section.
#adobe lightroom#photography#photograph#mobile photography#Iphone photography#Photo Editing#Photography Tutorial#how to#tutorial#adventure#philippines#discover Philippines#travel#travel blogger
9 notes
·
View notes
Text
Adobe Lightroom 57 Download Torrent

Adobe Photoshop Lightroom 6 Torrent
Adobe Lightroom 57 Download Torrent Software
Buying Lightroom used to be simple. All you had to do was buy the full version of the program, and upgrade (if you wished) every time a new version came out. But ever since Adobe announced the Creative Cloud subscription service, photographers have been faced with two choices. You can still go for the standalone version, or you can buy Lightroom as part of a Creative Cloud monthly membership. But how do you know which is the best option for you? Read on to find out.
Photoshop tutorials for beginners to experts. Learn tips and tricks on how to use Photoshop for photo editing, manipulations, designs, and more.
Adobe Photoshop Lightroom Classic CC 2019 This release of Lightroom Classic CC rolls out new features and enhancements such as customization of Develop Panel, Add to Collection option in auto-import settings, Grid Snap option in book module, other enhancements, support for new cameras and lenses, and bug fixes.
Oct 25, 2017 - Adobe Photoshop Lightroom Classic CC 2018 32bit-64bit torrent. Adobe Photoshop Lightroom CC is a professional professional photographer who provides a full digital. Download Bittorrent, 33 2 Rating. Eagles Talent Speakers Bureau, 57 West South Orange Avenue, South Orange, NJ 07079.
View 57 replies. These programs are free, yes, but, they won't install on Apple Mac OS 10.13. CC Adobe Photoshop Lightroom – Keep the full spectrum of light. Create incredible images of complex high-contrast scenes. The new HDR Combine dazvaliae combines more recordedimages with different exposure locations in a high dynamic image of a malicious.
Creative Cloud is announced
Adobe’s initial announcement of the Creative Cloud licensing concept was somewhat controversial as the price for a subscription to Photoshop ran at $20 a month (all prices in this article are in US dollars). For photographers who had already purchased the full version of Photoshop this represented a significant price increase. Not only was subscribing more expensive in the long run, compared to upgrading Photoshop regularly, but the license to use the software expired once monthly payments stopped.
There’s little doubt this was a raw deal, but Adobe listened and introduced a new package for photographers – a subscription to both Lightroom and Photoshop CC for $9.99 a month (or $119.88 per year).
Read about this on forums and photography websites and you will still come across a lot of negativity towards the Creative Cloud subscription model, especially from Photoshop users upset at the loss of a perpetual licence. But today, I aim to cut through this negativity and take an objective look at the differences between the two options.
Two types of Lightroom users
To start, we have to acknowledge that there are two types of Lightroom users.
The first uses Lightroom in conjunction with Photoshop and wants access to both programs. For this user, the Creative Cloud option is the only choice if you want the latest version of Photoshop CC. Alternatively, if you own a version of Photoshop CS and are not bothered about upgrading to Photoshop CC, you can buy the standalone version of Lightroom and use them together.
The second type of user carries out the bulk of their image processing in Lightroom. For tasks Lightroom can’t handle, they may use an older version of Photoshop, a less powerful program like Photoshop Elements, or a plug-in such as the Nik Collection or Perfect Photo Suite 9. These users may be wondering whether to continue using the standalone version of the software or to subscribe.
Financial considerations
If you are on a budget, and don’t need Photoshop CC, then it is definitely less expensive to buy the standalone version of Lightroom. At the moment a new version of Lightroom comes out approximately every 18 months. At $9.99 a month, the subscription service would cost you $179.82 over that period. If you are new to Lightroom, the full version (priced at $149 from the Adobe website) saves you money, and if you already own Lightroom, then the upgrade (priced at $79) is even less, saving you a little over $100 over the same time period.
As a standalone version user you get free upgrades until a full new version comes out. So, if you upgraded to Lightroom 5.0 when it first came out, you can upgrade to the latest version (5.7) for free, taking advantage of new features introduced since then. But when Lightroom 6 comes out, you will need to pay the upgrade fee to use it. Upgrading isn’t compulsory, and you can continue to use your earlier version of Lightroom as long as you want.
Adobe have stressed their commitment to continuing the standalone version of Lightroom for the foreseeable future.
Note:The standalone version of Lightroom is a little hard to find on Adobe’s website. You can get there by going to Adobe’s home page and clicking the Menu option at the top. Click the All Products button at the bottom, scroll down to Lightroom and click Buy. Or you can also find it here on Amazon.
What the Creative Cloud subscription gives you
The Creative Cloud subscription is more expensive, so what do you get for that extra money? The two headline features are Photoshop CC, a powerful image editing program that you are likely familiar with, plus access to Lightroom Mobile, a mobile version of Lightroom that works with iPads and iPhones (but not currently with devices using the Android or Windows operating systems).
There are several additional features that may interest some people, such as 2GB of online storage space, access to Lightroom Web and the ability to use Photoshop CC and Lightroom on multiple machines (although not at the same time).
What happens when the Creative Cloud license ends?
If you stop paying your subscription fee you no longer have the right to use the full versions of Photoshop CC and Lightroom. Photoshop will stop working completely (or at least until you renew the subscription).
But Lightroom is different. Bear in mind that with Lightroom your Raw files are untouched. The edits you make are stored in the Catalog. If you lose access to the Catalog, you lose access to all the edits you have made to your images, including all post-processing.
Adobe Photoshop Lightroom 6 Torrent
Adobe doesn’t want that to happen, so it gives you partial access to Lightroom even if you cancel your Creative Cloud subscription. You have full access to the Library, Book, Print, Slideshow and Web modules. The Develop module is severely restricted (you can’t make any adjustments using the right-hand panels) and there is no access to the Map module.
Your Catalog remains intact, including any Collections you’re created and any changes to metadata, including ratings and keywords. So does your post-processing, and the ability to make basic edits to photo files using the Quick Develop panel. You can also export your photos any time you want.
You need to have Lightroom Version 5.5 or later installed for this to work.
Adobe Lightroom 57 Download Torrent Software
Conclusion
Hopefully you are now clearer about how the two ways of buying Lightroom differ, and which is best for you. If you want to use the most up to date version of Photoshop CC, or Lightroom Mobile, then the Creative Cloud subscription service is the choice for you.

However, if you don’t require the latest version of Photoshop CC, or Lightroom Mobile, then buying the standalone version is the least expensive way to go.
What do you think? Have Adobe got it right with the price and services offered for the Creative Cloud Photography plan? Do you use the Creative Cloud version of Lightroom or the standalone version? Please let us know in the comments.
Mastering Lightroom: Book Five – The Other Modules
My new ebook Mastering Lightroom: Book Five – The Other Modulesshows you how to use Lightroom’s powerful features to create fun and interesting projects using the Map, Book, Slide show, Print and Web modules. Whether it’s geotagging, putting together a photo book, printing your best photos or creating web galleries all the information (and inspiration) you require is right here.
1 note
·
View note
Text
THE HIT LIST: 123PRESET.shop’ TOP MOST POPULAR PACKS
Take a deep breath and let this list with 123presets’ top 3 most popular packs guide and inspire you. #123preset.shop

2 notes
·
View notes
Text
HOW TO DOWNLOAD AND USE PRESETS ON IOS + HOW TO IMPORT PHOTOS
P.S.: This is an english translation to this tutorial <3
This is a tutorial of how to download the presets on iOS (Apple). Because it’s a long tutorial, I decided to put it below the line, so just click on “Read more” to view the tutorial! Hope you understand and, if you have any doubt, go to our ask page!
Tutorial made by presetszone.
We used Lightroom CC Mobile, which can be downloadet at Apple Store.
Please like/reblog if it is useful ♥
1: Open Safari and type presetszone (or other tumblr where you can download presets).

2: Search for the preset that you want to download, press on dng and hold for a few seconds, until this options show up on the screen:

TRANSLATION: Open/Open in a new tab/Reading list/Copy/Share/Cancel
3: Press “Open in a new tab” and then a new tab will open GoogleDrive with the preset ready for download
4: Click on the little arrow to download. (The preset I downloaded was “Stronger”)

5: A new page will open. Then choose “Open with Lightroom CC”.

TRANSLATION: Open with “Lightroom CC”/More...
6: Wait a few seconds and the preset will then open on your app. When it opens, touch on the three little dots on the right corner of the screen and go to “create preset”.


TRANSLATION (marked in red): Create preset
7: Name this preset and go to “save”. (I recommend you to name your preset like this: preset name + where it was downloaded from, so you won’t froget which preset is that and the effect that it applies to the photos).
*Pay attention to the preset group that you are saving it, so you can find the preset later.*

TRANSLATION (marked in red): Save/preset name (stronger by presetszone)/preset group
8: Click on the little arrow on the left side of the screen to go back to your gallery and choose the photo you want to edit.

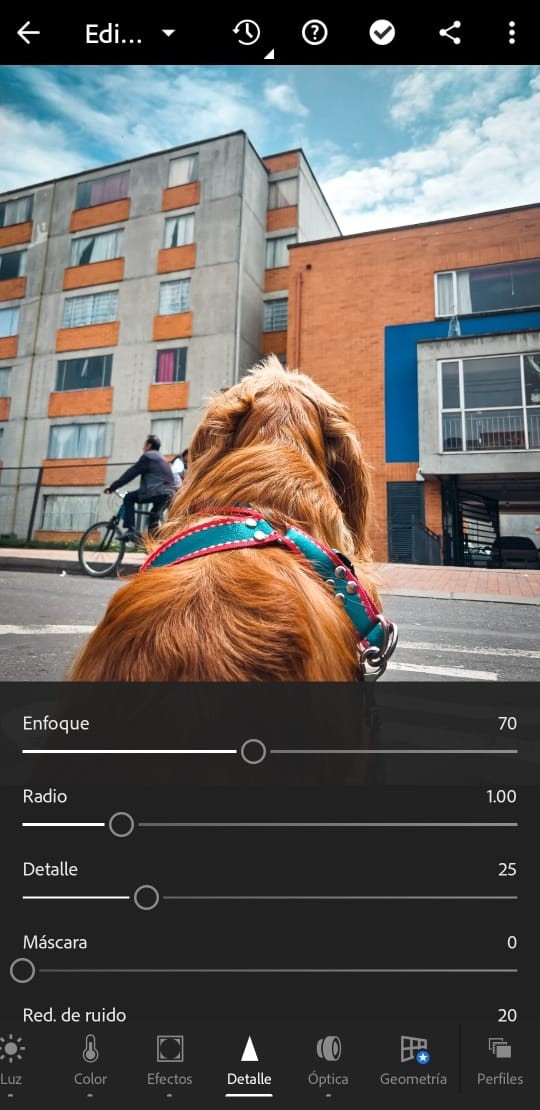
9: Choose the photo you want to edit and touch it to open. Once it opens, go to the tools on the bottom (light, color, etc) and draw to the left side, until you see the presets tool (”Presets”) and click on it.
(I chose a picture of my two dogs because... why not? hahaha)

10: The tool will open and it will show the presets. Some presets come along with the Lightroom app, but they are basic. Go to the group you saved the preset and open it. Search for the preset you saved/you want and click on it to apply, then touch the “ok” sign.
(Usually Lightroom opens the preset group that comes along with it, then you just have to click on the folder (group) name that the other “folders” will appear, next you just have to search for the folder that you saved the preset and choose the preset you want).

TRANSLATION (marked in red): Color

TRANSLATION (marked in red): User presets 75
Search for the preset and touch it to apply it to the photo

11: If you think it is necessary, make changes on tools.

TRANSLATION (marked in red): Auto/Light/Color/Effects/Detail/Geometry/Optics
12: To save, touch the share sign on the top of the screen and choose one folder to save it. (I saved on my camera roll)

TRANSLATION (marked in red): Save on camera roll
Choose the image size as “Highest Available” to save your picture with the highest quality.

TRANSLATION (marked in red): Highest Available
And done!

HOW TO IMPORT PHOTOS TO LIGHTROOM CC MOBILE ON IOS:
1: Open the app and touch on the “plus” sign on the right corner of the screen, next to the little camera

If the app asks for authorization to access your photos, press “OK”.
2: The app will open the camera roll. You will click on the three little dots on the right corner of the screen and go to “SELECT”
(The blue area is where your pictures will show up. It is blue on the printscreen because my gallery is just memes hahahaha)


In case the picture you want to import isn’t on the camera roll, click on the little arrow next to “Camera roll” and choose the folder your picture is.

3: Select your photos and touch on “Add X photos”

And done! Your photos are ready to edit.
I hope this tutorial will be useful for you and that hasn’t been confused. If you have any question, you can always go to our ask page <3
EXTRA TIPS:
If you need to download the preset from another site, as Instagram, you can copy the link, paste on Safari and download it normally.
You can also download the “lrtemplate” preset on your computer, save it as “DNG”, upload it on GoogleDrive and download it on your phone (this is a wonderful tip when you don’t have the dng preset)
To make it easier, create preset groups from where you download more presets, so you won’t be lost on your effects. (For example: a preset group for presetszone, another one to xxx, etc).
#tutorials#tutorial#ios#how to download presets#presets#lightroom#how to use lightroom mobile#how to use lightroom mobile ios#iphone
18 notes
·
View notes
Text
InShot video Editor App Tutorial 9 Add Music to a Video [English]
The free Motion Stills app is an «insider tip» for owners of an iPhone 6S or 6S Plus (and all future Apple mobile devices, which will produce so-called «Live Photos», a kind of moving pictures). With the «Lens Distortions» app, you can pimp smartphone photos so that they look like professional photos. It conjures up lighting effects and smoke at the place of choice and also gives a breeze to boring pictures. With the SKRWT app, photographic perspective distortions caused by the small lenses in smartphone cameras can be corrected. As if you were photographing a high-rise building, for example, the straight lines of the building on the digital photo will be slightly curved at first. We are already working on it and will be back for you as soon as possible. Please come back later. We apologize for this inconvenience and thank you for your understanding. Thousands of deaf people in German-speaking Switzerland can use the this hyperlink a> Create a new emergency call app «DeafVoice» around the clock to establish a direct connection to the local police, fire brigade and other emergency services. Incidentally, VSCO has had features similar to SKRWT for "straightening" buildings since the last update.
5 years after the end of the series - what became of the «Two and a… h2> Apple is making huge strides (not only) in the area of so-called action camcorders (Wikipedia). A technical error occurred while trying to complete your entry. With higher demands (OTs) you can not avoid external technology for the sound, the same applies to the viewfinder screen (reflects, there is little to see in direct sunlight). Take measures against stray light (mini compendium) if there are strong light sources (sun) in the image section. With regard to the FPS to be set, consult the image technician or image engineer belonging to the production beforehand. Be sure to use a case (case, case) when filming while cycling, or while in very shaky modes of transport, so that you have better grip.
With higher demands (OTs) one cannot avoid external technology for the sound, the same applies to the viewfinder screen (reflects, there is little to see in direct sunlight).
Of course, iMovie has a lot more options on the iPad - this will be demonstrated soon.
Most business owners nowadays prefer a semi-transparent watermark because it places the brand well without disturbing the viewer.
The app works without an internet connection and protects sensitive data.
Take measures against stray light (mini-compendium) when there are strong light sources (sun) in the image section.
Die Automatic systems mostly work excellently (98.89 percent).
If the video overlay controls don't appear, click the video overlay settings button. This entry was filed under iPhone, iPhone camera and tagged iPhone 6, camera. It is fabulous how quickly, quietly and without stirring up a lot of dust you can fish the image catcher out of your shirt pocket and put it into operation. I no longer had time to switch off the automatic (if you look very closely, you can occasionally see a very slight "pumping" when the automatic exposure is working). Placing a watermark can be very complicated because if you don't place it correctly it can disturb your viewers.
A large community is connected to the app, and the “Academy” publishes tutorials for ambitious photographers. "Visco" also belongs to the Champions League of image processing programs for smartphones. The free basic version offers some filters, for additional effects please checkout. Stay up to date with App Annie Intelligence in the app market. Watch the top apps from numerous countries, categories and platforms. The new «Deafvoice» app is intended for the deaf, but can also be practical for hearing people in dangerous situations. Anyone who works on the PC with Lightroom and has a cloud subscription will appreciate Lightroom mobile. Set a Bookmark the permalink. If the video camera app is closed via the Home button and later called up again, the Video setting is retained. The situation is different when it is thrown out of the multitasking screen; when restarting, video must be selected again in the scroll line. I'm very satisfied with the high-tech video camera of the iPhone 6. Incidentally, it also creates great photos.
1 note
·
View note
Text
APRENDE SOBRE ESTA GRAN HERRAMIENTA DE EDICIÓN FOTOGRÁFICA 📸📲
Aprovechando la potencia de la tecnológica de Adobe Photoshop, Lightroom para androide e Iphone te permite modificar, organizar y optimizar tus fotografías, en el celular o en tu tablet. Usando los instrumentos que te ofrece esta aplicación móvil, puedes crear y compartir bellas imágenes de calidad profesional, perfeccionando también un simple truco, puedes contar con más de 30 configuraciones predefinidas y jugar con los colores, las viñetas, la luz y las sombras. Todas las funciones de organización y para compartir, en lightroom móvil son gratuitas, pero si te inscribes a la versión premium puedes acceder a un mayor número de instrumentos de edición y modificación. Comprando la suscripción, por ejemplo, puedes modificar los archivos en RAW y sincronizar las fotos en todos tus dispositivos en los cuales tengas instalado lightroom, incluyendo el ordenador. Te recomiendo leer: Mejores aplicaciones para tomar fotos en RAW con el celular.
★・・・・・・★・・・・・・★・・・・・・★ ・・・・・・★・ ◯ Instalación y compatibilidad: Para instalar Lightroom móvil en tu dispositivo, debe ir a la Play Store si usas un Android o a la App Store para dispositivos iOS, e instalar la aplicación con el símbolo Lr verde oscuro.
La aplicación es compatible con teléfonos inteligentes, tabletas y ordenadores, así que puedes instalarla en tu dispositivo preferido. De hecho, es uno de sus puntos fuertes: empieza a trabajar en tus fotos en tu smartphone, y tal vez termine el trabajo una vez en casa (en tu tableta o desde la comodidad de tu PC). La aplicación se sincroniza con tu cuenta en la Nube y hace que todas tus fotos estén disponibles en todos tus dispositivos.
★・・・・・・★・・・・・・★・・・・・・★ ・・・・・・★・ ◯ Importación y gestión de las fotografías: Una de las opciones fundamentales de Lightroom Móvil, es que permite gestionar diferentes tipos de archivos. De hecho, también puedes importar archivos RAW de cualquier cámara, para trabajar con la máxima calidad, así como importar los más comunes JPEG y PNG.
Una función importante, es la del manejo de la foto: Lightroom te permite catalogar, evaluar y archivar fotos de forma fácil y profesional, para mantener una "fototeca" perfectamente ordenada gracias a la inteligencia artificial.
De hecho, la aplicación reconoce rostros de personas y objetos, y busca con una simple palabra clave todas las fotos pertenecientes a "Enrique" o en las que aparecen "Árboles"; particularmente útil si se importan grandes cantidades de fotos sin dividirlas en carpetas o álbumes temáticos.
◯ Funciones gratuitas de Lightroom para smartphone: Entre las funcionalidades previstas de la versión gratuita, te presento algunas, que a mi parecer son las más interesantes. Ajustes preestablecidos: puedes aplicarlas a las fotos con un simple toque Perfiles: para editar las fotos de forma milagrosa con efectos visuales sorprendentes Curva: para intervenir en la exposición, el contraste y tono de la foto Mezcla de colores: para perfeccionar los colores de tus fotos acentuando o reduciendo la saturación de algunos tonos Claridad, Textura y eliminación de neblina; instrumentos de edición profesional, para dar vida a la foto.
★・・・・・・★・・・・・・★・・・・・・★ ・・・・・・★・
◯ CONSEJO: con Lightroom en tu celular, puedes tomar fotos directamente con la cámara dentro del programa. Es particularmente interesante porque permite elegir el archivo DNG, un archivo RAW sin comprimir, como formato de la foto, y así obtener la mejor calidad disponible en nuestro smartphone.
Hay algunos teléfonos inteligentes que no permiten fotografiar en formatos distintos del JPEG sólo con la cámara instalada en el dispositivo, y sin aplicar correcciones automáticas o filtros de saturación/contraste a cada foto.
Así que, si quieres obtener la mejor calidad de tus fotos, abre Lightroom Mobile y dispara directamente con su cámara.


🔴 Enlace para descargar la app: https://play.google.com/store/apps/details?id=com.adobe.lrmobile
🔴 Vídeo tutorial: https://youtu.be/MU90sq6T-hY
Síguenos en nuestro Instagram ☺��� @c.dani_desing
1 note
·
View note
Text
Pixelmator Photo for iPad
This will take awhile to get to the point so if you’re interested, buckle in for a winding, drawn out reason about why I’m not switching to Pixelmator Photo as much as I want to.
I’m an avid Lightroom CC user. I have never used Photoshop, not because I don’t want to but because I’m too stupid.
In the past I was an Aperture user and it never clicked. The catalogue was too confusing to me. Again, stupid. When it was discontinued I switched to Lightroom and have done well with it since. Adobe later released Lightroom Mobile (now the cross-platform Lightroom CC) during the time I had adopted a heavy iPhone/iPad travel workflow and I grew up with the program. Lightroom was straightforward and essentially offers the simple tools that I used in the darkroom- dodging and burning, with digital exposure and color edits. Plus a little more.
I have had a strange fascination with Pixelmator for years. Many times since 2012 I’ve tried to use Pixelmator which is a layers based graphics editor. The price was right and they were an Apple only product that worked to make the most of the Apple hardware. They even released a mobile app with some of the core features. But again it’s a layers based editor and if I couldn’t figure out Photoshop this wasn’t going to help me. I looked often for tutorials to learn the software but they weren’t available like they are for Adobe products.
When Pixelmator Pro for the Mac was being released last year I was fully ready to make an attempt at using it and abandoning Lightroom.
Why would I leave Adobe? I don’t like that I’m boxed into one system. I pay 20 dollars a month for the photography Creative Cloud account with 2 TB of data. I have to be very careful with that catalogue as I go because 2TB isn’t a lot for a full and active catalogue over years, even with mindful archiving. And I’m managing two different photography catalogues- Lightroom and Apple Photos. Finally, the way you import photographs into Lightroom on the iPad or iPhone is plain silly, but that’s really on Apple and we’re not going to get into file management on iOS because that’s a dead horse for now (until some future iOS iteration).
But the big reason was: “minimalism”.
Over 2018 I started doing a deep dive into my life again. A significant breakup, several moves, and a job change made me evaluate everything. I adopted minimalism around 2009 when I started paring down my belongings and moved into a small loft apartment. When I moved to Rhode Island in 2011 I sold almost everything I owned then put an add on Craigslist to come get the rest for free and people swooped in en masse. I kept things lightweight as possible but things creep back in. My digital files were a mess. Papers kept following me around the country. When I lived on the Rez it was like Little House On The Prairie and I bought enough supplies and things to fix anything and felt I needed a lot of comforts. “Things” piled up. Tools, paint, gardening tools, furniture, home gym equipment, entertainment. By late 2016 I was maintaining 3 addresses over 3 states with homes and ‘stuff’ in all of them, a lot of it duplicated. Then I had to pack up all of the places and put them into storage and nothing makes you realize how crazy your life is than rampant disorganization, poor sleep, and putting your hands on every single thing you own. I literally started having recurring dreams about boxes of papers.
While I was traveling I couldn’t manage my physical things but I could manage my finances and digital assets. I was shocked by how many apps and pieces of software I owned or had a subscription to. I made the spreadsheet that showed monthly recurring charges and a lot showed up and were pared down. And this drew my eye to the Adobe subscription. It has jumped up from 9.99 a month to 19.99. 240 dollars a year every year. I can afford it and I use it aggressively but did I need it at that price?
iOS has become my main platform for doing everything. The iPhone alone can do most things you need and when you need the luxury of a bigger screen go to an iPad. When I watch or read reviews of any iPad people talk about how it can’t replace a computer and it makes me nuts. What does anyone do on a computer besides browse the web, shop, message your friends, watch YouTube and Netflix, and check email, and write (in that order)? iOS is fine for 99.99 percent of people except working graphics and video professionals, engineers, architects, and medical professionals (because medical software is the worst on earth and just can’t function on anything except a 12 year old Windows PC). I find working on an iPad is far more efficient than working on a Mac both digitally and physically. The ergonomics of touch with a Smart Keyboard are just better than keyboard and mouse (there is a reason the keyboard is so short- it’s so you can reach the screen easily). I edit photos with a pencil. I manipulate windows and screens like Minority Report. When I want to read something my ‘computer’ turns into a book/magazine/comic book/magical future tablet. I believe that my next Mac upgrade will likely be the last traditional computer I ever buy.
That aside over when I evaluated my tools, a lot of software like Word and Ulysesss, Byword, Simplenote, Evernote and OneNote, were abandoned for free, excellent software that came with my devices. Notes and Pages took over drafting, writing, and note collection. iCloud Drive replaced Dropbox, Music replaced Spotify. It kept everything neat, my data and privacy were secure and organized in one place, and I took the time to master the software. Where I had limped along on Excel for decades, I buckled down and did the full Lynda.com Numbers course and for the first time spreadsheets stopped being mysterious things nerds used to optimize their lives and instead became easily accessible tools that helped me solved real problems. A lot of this was also pushed by many of the privacy concerns arising in digital ecosystems (Facebook, Google, apps sending data out that users are unaware of, etc.).
But besides managing my day to day life and writing what do I use my tech for?
Photography.
Could I get rid of all of these photo editing apps? I adore shooting and editing on my iPhone and I seriously considered selling all of my cameras and becoming an iPhone only photographer. But different working opportunities continue to present themselves and so I kept using ‘real’ cameras and instead focused on addressing the software. Snapseed left. It’s a terrific app but I can do everything in Snapseed with Lightroom, but better. And I don’t trust Google anyway. All of the other silly one off apps disappeared too. They were niche cases and often all I needed was to dig into Lightroom to figure out how to replace them. But could I replace Lightroom with free Apple software?
Aperture was discontinued by Apple in 2015 (and it was definitely not free). The people who fully embraced it loved it, probably in the way people love Final Cut Pro. It was a different beast than their consumer product iPhoto which most people were familiar with and used without issue, mostly for collecting their images but also for doing basic editing. Apple replaced iPhoto with Photos (minimalism) with the emphasis on the iCloud Photos library and cataloguing. But on MacOS they were sneaking some Aperture features in on later releases like curves. It seemed like they were beefing up the Photos app for greater things and these features seemed to be mirrored onto the iOS versions of the app. With the release of the iPad Pro and the Apple Pencil it seemed like any week Apple would release some brushes but they didn’t. Instead you were stuck with very basic global edits (and of course stupid filters) and didn’t even have access to the MacOS features like HSL.
But you could open photos in other apps. Like Pixelmator for iOS. And... it didn’t work. It was a garbage dream and ultimately nothing was able to replace the features I used all the time in Lightroom CC, specifically: editing metadata, the gradient and radial filters, and dehaze. Add to that geometric perspective correction and the fact that on the Mac Lightroom CC was adding in Photoshop/Lightroom Classic features like panoramic merge and more.
When Pixelmator announced they were releasing a photography (vs graphic design) focused app, and that it was for the iPad I was thrilled. I signed up for email updates and trolled the web periodically for information. When it arrived (at the phenomenal price of 4.99) I had already preordered it. I downloaded it and got to work straight away. I love that it uses either Photos or Files for the catalogue (easier to manage and takes out a step used in Lightroom). And that’s it for the good. It uses Machine Learning. They want you to know that. They’ve pushed the hardware in the iPad. I believe it. But their big focus is on automagic edits and cropping, filter presets, and global edits. Honestly I can get that from Photos.app.
There are no brushes, no focal dodging and burning, no radial or gradient filters. It’s 2019, the iPad has this amazing Pencil, and neither Apple nor Pixelmator are taking advantage of it. If I cannot dodge or burn specific areas of a photograph, I am doing worse than I was in the chemical darkroom in 1997.
Photos.app needs to also beef up for me to use Pixelmator, specifically adding brushes and filters and one or the other needs to add the ability to batch edit photos.
In addition they need to add an iPhone app because I often edit only on my phone.
We’ll see what Pixelmator adds in the future. I’m sure I’ll still be paying attention for some reason.
Originally, about 6 months ago, this article was going to be about how I was going to switch from the yearly subscription of Adobe to Pixelmator but every time I tried to move my workflow over with serious photography I stuck with Lightroom CC because the tools are so strong. Without those tools I’m not going to use another photo editor. And I know there are others like Affinity Photo. For some reason I’m not interested. I just had this weird obsession with Pixelmator.
So that leaves me with what this article is about. I started deleting the original version of Pixelmator off of my iOS devices and Mac because I just don’t use it. Pixelmator became the thing to remove. It became an exercise of giving up the goat and not worrying so much about digital minimalism as using a tool that works and I that lets me be an artist. When I’m working professionally I can’t imagine not using Lightroom. And I use Lightroom CC which is considered ‘light’ anyway (but that’s foolish and something I should address later if people want me to). They’ve also recently added the features I wanted like stitching panoramas so for me it’s feature complete. It’s just the duplication of catalogues, online space, and the monthly fee that drive me crazy.
I’ve been making attempts of various strength since 2012 to use versions of Pixelmator and I’m not sure why it has seemed so important to me. I don’t need to use an app that makes global edits to a photo when I need to brighten eyes or increase the contrast in select areas of landscapes. I just need to use Lightroom.
#iPad Pro#Photography#Pixelmator#lightroomcc#Travel Photography#Pixelmator Pro#Apple#Pixelmator Photo#iOS
1 note
·
View note
Text
Free photo cleaner app iphone

#Free photo cleaner app iphone how to#
You can later fine-tune your image, or you can do everything on your own using all the non-destructive photo editing tools. You can use the ML Enhance feature for the smart auto-adjustment for quick edits. So, not only is it one of the best photo editing apps, but it’s also a great photo manager. The included photo browser has a pleasing filmstrip design, and it works in sync with your iPhone’s native Library from the Photos app. Pixelmator Photo is a desktop-class photo editor app, and it supports raw formats from over 600 cameras.
ML Enhance feature for auto adjustments.
You’ll also find lots of tutorials inside the app to improve your skills, and you can access the Lightroom community for inspiration via the Discovery section.īest for: photo editing and management | iOS | Price: $7.99 This is one of the best photo editing apps for iPhone that allows you to work professionally because it communicates with all the Adobe apps in the Creative Cloud ecosystem. Once you get the full version, you get access to the selective edits, geometry tools and the healing brush. This makes it super-easy to work across devices, with all your edits kept in sync. The Adobe Lightroom photo editing app also features a built in camera, with any photo saved automatically to the cloud if you’re a subscriber to one of the Photo plans. However, even the free Lightroom mobile version is very powerful – you can use it for capturing, organization, sharing and many of the editing features.
#Free photo cleaner app iphone how to#
This is only possible if you have a paid Adobe subscription because there isn’t a free Lightroom for desktop – check this guide for how to buy Lightroom. Best for: photo editing and management | Android & iOS | Price: free version (limited) or full version $9.99Īdobe Lightroom mobile is a portable version of the one used on desktop computers – it has all the tools, and you can sync your presets, images, etc.
0 notes
Photo

(Video and photos on this post all shot and edited on iPhone 7 Plus or iPhone 11 Pro Max)Tutorials and mobile photography and videography coming back. Taking better selfies. iPhone photoshoots. Downtown Chicago photo walks doing street photography with your mobile device. Teach how to edit using Lumafusion (number 1 editing app for your mobile devices) show how you can vlog just sing the device you have in your pocket instead of buying another expensive device when you already have one. show you the apps I use to edit photos like snapseed, facetune, vsco,Lightroom mobile. Give you tutorials using @affinitybyserif for iPad and much more. Follow the iPhone icon if you are really interested in learning how to use your mobile device for content creating #vsco #affinityphoto #snapseed #iphonephotographer #iphonography #iphonographer #mobilefilmmaking #mobilephotography #iphoneicon #dannyblvck (at Chicago, Illinois) https://www.instagram.com/p/CcSmmvFu73t/?igshid=NGJjMDIxMWI=
#vsco#affinityphoto#snapseed#iphonephotographer#iphonography#iphonographer#mobilefilmmaking#mobilephotography#iphoneicon#dannyblvck
1 note
·
View note
Text
How to Simulate Long Exposure with an iPhone Without ND Filters
youtube
Right off the bat, I’m going to add the disclaimer that this tutorial will probably not be for every type of photographer out there. If you have no interest in exploring the creative opportunities that mobile photography offers, then this video may not be for you.
But, I’d like to challenge you to at least consider it because mobile photography really has come such a long way over the years — and I’m not advocating that you should replace your camera gear with a smartphone camera.
However, I am advocating those who have been closed off to it, to approach this with an open mind because there are so many fun photographic things that you can do these days with your smartphone camera. Here are two photos that were recently taken with my iPhone 12 Pro Max and the Spectre app (which I’ll share more about in the next paragraph). I imported both photos into Lightroom mobile and edited them on the fly. I mean, that’s just such a cool workflow to have at your disposal, right?
Speaking of photography workflow apps, one of my favorites is called Spectre, made by the same folks who develop the outstanding Halide camera app. It is important to note that both apps only work in Apple’s iOS and iPadOS ecosystems, but I suspect that there are some Android equivalent apps.
Spectre allows you to take simulated long exposure photos using three different shutter speeds: three seconds, five seconds, and nine seconds. What is more impressive is that you can get these photos without having to use an ND filter and the exposures won’t get blown out. The functionality is similar to what you can achieve when recording Live Photos in Apple’s own camera app, but the Spectre interface is much more robust and functional.
With that said, a lot of the real fun happens when you marry creating these mobile photos with the power of desktop apps like Adobe Photoshop. Suddenly, you have access to an arsenal of ridiculously powerful tools that aren’t currently available on mobile devices, or they’re not close to being equivalent in terms of performance, and that’s what the above video is all about.
I wanted to explore a start-to-finish long exposure workflow that starts with my phone (I’ve since upgraded to the iPhone 13 Pro Max) and ends in Adobe Photoshop on my laptop. I’m not necessarily trying to convince anyone, but I’d ask you to keep an open mind. I think the results are really impressive and I’m very curious to hear other photographers’ thoughts on it.
About the author: Brian Matiash is a professional photographer, videographer, and published author based in Coeur d’Alene, Idaho. His passion is to serve other photographers by helping them grow their own visual pursuits. Learn more about Brian by visiting his website, on Instagram, and on YouTube.
from PetaPixel https://ift.tt/3bSjp19
0 notes
Video
youtube
Thanks to everyone who has purchased my Mobile Lightroom Presets! This is part of the video tutorial that's included in the download when you buy my mobile presets. I wanted to share how they work and how I edit with them, for those of you who may not know what you're capable of doing with them, simply from your iPhone! These are my own personal presets, specially formulated to work on mobile based on my own workflow. The presets are based off my Wildfox Lightroom Pack for Desktop, and revamped to work on mobile phone photos! They also work on digital camera photos, for when you need to edit on the go. Highly recommended for traveling! Get the Presets for Yourself! https://ift.tt/2H6JbwV If you want FREE LIGHTROOM PRESETS, I often release some of my popular presets to my Instagram Followers on special occasions. For example, I gave away this Wildfox Preset for 24 hrs on Valentine’s Day! Follow my Instagram Feed - https://ift.tt/1I0BDM7 You can see how I use “Wildfox” to get the chic, aesthetic, rosy/blush/mauve tones as seen on my Instagram feed and Story. My Presets Shop: https://ift.tt/2mUOV5s In this video I put the “Wildfox” Mobile Preset on 6 different types of photos, and walk you through how I make subtle or dramatic adjustments in the mobile app settings to get the final outcome. Learning to use this preset on all your mobile photos will allow you to create a cohesive and beautiful Instagram feed, stick to an aesthetic color scheme, and impress your Instagram follower and clients with better photos. Stalk my Blog for more of my photos - https://ift.tt/2AwkAmz I would love to know what you thought of this Editing Guide, and if you have any other questions about Mobile Presets! If you found this video helpful, be sure to like and subscribe for more! --- --- --- My Photography & Videography Gear Setup: My Camera: https://amzn.to/2E3shxx My Lenses: https://amzn.to/2GTpU3t , https://amzn.to/2E2FNld My Vlog Camera: https://amzn.to/2E2FcA5
2 notes
·
View notes
Text
Mac App Store Preview

Browse and download apps to your iPad, iPhone, or iPod touch from the App Store. The App Store has more than one million apps and games for your iOS device. M app store. Download Windows apps for your Windows tablet or computer. Browse thousands of free and paid apps by category, read user reviews, and compare ratings.
Mac App Store Review Guidelines
Mac App Store Preview App
Mac App Store App Download
Mac App Store Preview 10
Redesign Brings New Look, Rich Editorial and Apps from Microsoft, Adobe and Others
Feb 03, 2020. App Store Preview for Mac provides a snapshot of the App Store right from your OS X Dashboard. An easy-to-use widget, it lets you sort and search for apps based on cost and popularity. QuickLook enables a very quick preview of file contents by pressing the Spacebar. Note: This app does NOT work on Windows 10 S devices. Support Keys: Spacebar: Preview / Close Preview Esc: Close Preview Enter: Run & Close Preview Ctrl+Mouse Wheel: Zoom Images/Documents Mouse Wheel: Adjust Volume.
The second kind of stock market apps are suited for individuals who still prefer using a full computer for their stock trading. You will be surprised to know that you can actually create both kinds of with our no-code app building software –. The second kind of stock market apps are those which are used to look at news about the stock market. App marketing strategies. Essentially, these are complete stock trading apps.
Alongside macOS Mojave, Apple is previewing an all-new Mac App Store featuring a new look and rich editorial content that will make it easier than ever to find great Mac apps. Like the iOS App Store, which was redesigned last year, the new Mac App Store celebrates apps, games and developers with an all-new Discover tab featuring compelling stories, in-depth interviews, helpful tips, collections of must-have apps and more. Users can also explore new Create, Work, Play and Develop tabs to find the perfect app for a specific project or purpose — from music, video and photography apps to business utilities and games.
“Since its launch in 2011, the Mac App Store has become the single largest catalog of Mac apps and today remains the safest and best place to get Mac apps for users around the world,” said Philip Schiller, Apple’s senior vice president of Worldwide Marketing. “We are excited to usher in a new era for the Mac App Store with a beautiful new look, unique editorial content and emphasis on human curation that complements the ways people are using their Macs today.”
Mac App Store Review Guidelines
Create an App Preview Project. To start a new app preview project, launch iMovie then. Dec 29, 2010.
Torrent file downloads. This leads to faster downloads and saves a good amount of your time. You only need to right-click the file you need to prioritise and adjust the bandwidth accordingly.Similarly, you can add new trackers to add both new peers and seeds to the torrent download. In most cases, this will instantly speed up the download process. Can you speed up uTorrent?Unlike other torrent programs like, you can speed up uTorrent with a few simple aspects. The tool gives you the option to allocate more bandwidth to specific torrents.
Great New Apps
The Mac App Store already offers the largest catalog of Mac apps and even more great apps are joining. Apps coming soon include Office from Microsoft, Lightroom CC from Adobe, BBEdit from Bare Bones, Transmit from Panic, Lens Studio from Snap Inc. and Houseparty, among others.
“Office 365 provides the best of both worlds for Mac users — a productivity experience that is unmistakably Office, but specifically designed for the Mac,” said Kirk Koenigsbauer, corporate vice president at Microsoft. “We’re excited to provide our joint customers with easy access to downloads and updates by bringing Office to the newly redesigned Mac App Store.”

“Adobe is looking forward to bringing Lightroom CC, our industry-leading photography service, to the Mac App Store in the next year,” said Bryan Lamkin, executive vice president and general manager of Digital Media at Adobe. “We’re also excited to join the Mac App Store with its new redesign that not only makes it easy for users to find apps like Lightroom CC, but also further showcases the great work of creators and developers.”
“We are very excited about the improvements to curation and discovery that Apple will be bringing to the Mac App Store,” said Rich Siegel, founder and CEO of Bare Bones Software. “Having just marked BBEdit’s 25th anniversary as a leading Mac product, we continue to look ahead, and we believe that a robust Mac App Store is part of a bright future for this great platform.”
“Houseparty for Mac makes lightweight group video chat accessible to more users than ever before,” said Ben Rubin, co-founder and CEO of Houseparty. “We started connecting people meaningfully with our mobile app on the iOS App Store, and now we’re excited to bring Houseparty to Mac users too via the newly redesigned Mac App Store.”
“We’re happy to be bringing Transmit back to the Mac App Store,” said Cabel Sasser, co-founder of Panic Inc. “Apple is listening to developers like us and putting a lot of effort into making the Mac App Store better for everyone. We’re excited to see what the future holds.”
Mac App Store Preview App
With the new Discover tab, each week users can find in-depth editorial about the best Mac Apps through stories and collections and see what’s most popular with top charts. For the first time, helpful videos that autoplay will provide users with dynamic app previews so they can see an app in action before downloading it.
Create, Work, Play and Develop tabs provide helpful recommendations and expertise about apps within each of these themes. These tabs will also help users make the most of apps they might already have with tips and tutorials that even the most expert users will find useful.

The new Mac App Store will be available with macOS Mojave this fall. The developer preview of macOS Mojave is available to Apple Developer Program members at developer.apple.com starting today, and a public beta program will be available to Mac users in late June at beta.apple.com. For more information, visit apple.com/macos/mojave.
Images of Mac App Store
Press Contacts

Mac App Store App Download
Starlayne Meza

Apple
Mac App Store Preview 10
(408) 974-3391
Apple Media Helpline
Application store iphone. From the best apps for cooking healthier meals to action-packed games for keeping the kids entertained, App Store editors have created themed lists of the most download‑worthy games and apps. Game and App of the Day. Get a download of this: Our editors handpick one game and one app that can’t be missed — and deliver it fresh to you every. Discover great apps, games, extensions and themes for Google Chrome. Download Windows apps for your Windows tablet or computer. Browse thousands of free and paid apps by category, read user reviews, and compare ratings. Enjoy millions of the latest Android apps, games, music, movies, TV, books, magazines & more. Anytime, anywhere, across your devices.
(408) 974-2042
0 notes
Photo

Tutorials and mobile photography and videography coming back. Taking better selfies. iPhone photoshoots. Downtown Chicago photo walks doing street photography with your mobile device. Teach how to edit using Lumafusion (number 1 editing app for your mobile devices) show how you can vlog just sing the device you have in your pocket instead of buying another expensive device when you already have one. show you the apps I use to edit photos like snapseed, facetune, vsco,Lightroom mobile. Give you tutorials using @affinitybyserif for iPad and much more. Follow the iPhone icon if you are really interested in learning how to use your mobile device for content creating #vsco #affinityphoto #snapseed #iphonephotographer #iphonography #iphonographer #mobilefilmmaking #mobilephotography #iphoneicon #dannyblvck (at Chicago, Illinois) https://www.instagram.com/p/CcSlL8Ou2kf/?igshid=NGJjMDIxMWI=
#vsco#affinityphoto#snapseed#iphonephotographer#iphonography#iphonographer#mobilefilmmaking#mobilephotography#iphoneicon#dannyblvck
0 notes
Video
youtube
Snapseed Viral Photo Editing | Snapseed Photo Editing | New Trending Photo edit | Best Editing Apps | Snapseed Moody Grey Effect | Snapseed Photo Editing Hope you enjoyed this video ::Keywords:: Snapseed Mobile Photo Editing Tricks, Snapseed Background Change, Editing Tricks, Snapseed New Photo Editing Tricks, Snapseed Photo Editing, Snapseed Best Editing Tricks, Snapseed Best Editing Tutorial, Best photoshop app for android, Best photoshop app for iPhone, Online photo editor app for android, Online photo editor app for iPhone, Online photo editor hd lightroom, Best photoshop picsart photo studio android, #picsartphotoEditing #TECHkotha #Creativephotoediting #photoediting #snapseedbackgroundchange #editing #moodygrey #snapseedtricks #snapseededit #snapseedtutorial #mobileediting #phoneedit ______________________________________________ { ◀️ DOWNLOAD } COLOUR PANEL & PNG:: ______________________________________________ FOLLOW ME ON FACEBOOK:: https://bit.ly/2FGQuAz ______________________________________________ Snapseed Apk linK:: https://bit.ly/3c6OFbZ... ______________________________________________ Don't forget to Like, Share & Subscribe:: 😊😊😊😊😊😊😊😊😊😊😊😊😊😊😊😊 by TECH kotha
0 notes