#NETGEAR GENIE
Explore tagged Tumblr posts
Visit Tumblr Blog
Explore Tumblr blogs with no restrictions, modern design and the best experience.
Last Seen Tumblr Blogs


Fun Fact
Average visit duration of Tumblr.com is 10 mins and 25 secs.
Text
does netgear r7000 support vpn passthrough
🔒🌍✨ Get 3 Months FREE VPN - Secure & Private Internet Access Worldwide! Click Here ✨����🔒
does netgear r7000 support vpn passthrough
Netgear R7000 VPN Compatibility
The Netgear R7000 is a popular router known for its robust features and powerful performance. When it comes to VPN compatibility, the Netgear R7000 offers a wide range of options for users looking to enhance their online security and privacy.
One of the key features of the Netgear R7000 is its support for VPN services. By using a VPN (Virtual Private Network) with the R7000, users can encrypt their internet connection and protect their data from hackers, government surveillance, and other online threats. This is especially important for users who frequently connect to public Wi-Fi networks or who want to access geo-restricted content.
The Netgear R7000 is compatible with a variety of VPN providers, giving users the flexibility to choose a service that meets their specific needs. Whether you prefer a paid VPN service like ExpressVPN or NordVPN, or a free option like ProtonVPN or Windscribe, the R7000 can easily accommodate your choice.
Setting up a VPN on the Netgear R7000 is a relatively simple process, thanks to the router's user-friendly interface and clear instructions. Users can either manually configure the VPN settings on the router or use the Netgear Genie app to set up the VPN connection with just a few clicks.
In conclusion, the Netgear R7000 is an excellent choice for users looking to secure their internet connection with a VPN. With its strong performance and wide range of compatibility options, the R7000 is a reliable and versatile router for enhancing online privacy and security.
VPN Passthrough Netgear R7000
VPN Passthrough allows VPN traffic to pass through a router's firewall securely. Netgear R7000 is a popular router that supports VPN Passthrough, enabling users to establish VPN connections with ease.
To enable VPN Passthrough on the Netgear R7000, users need to access the router's admin interface by typing the router's IP address into a web browser. Once logged in, users can navigate to the settings related to VPN Passthrough and enable the desired VPN protocols such as PPTP, L2TP, and IPSec.
VPN Passthrough is essential for users who wish to connect to a VPN server from behind a firewall or router. By enabling VPN Passthrough on the Netgear R7000, users can ensure a seamless and secure VPN connection without having to worry about any restrictions imposed by the router's firewall.
It's important to note that while VPN Passthrough is a convenient feature, it is not a replacement for a dedicated VPN client or service. Users should still subscribe to a reputable VPN service to ensure their online privacy and security.
In conclusion, VPN Passthrough on the Netgear R7000 is a valuable feature that allows users to establish VPN connections securely and conveniently. By following a few simple steps to enable VPN Passthrough on the router, users can enjoy a seamless VPN experience without any disruptions.
Netgear R7000 VPN Feature
Title: Unveiling the Power of Netgear R7000 VPN Feature
The Netgear R7000 router stands out among its peers not just for its robust performance and reliable connectivity, but also for its advanced VPN (Virtual Private Network) capabilities. In an era where online privacy and security are paramount, the VPN feature of the Netgear R7000 offers users a secure pathway to access the internet, safeguarding their sensitive data from potential threats.
One of the key benefits of the Netgear R7000 VPN feature is its ability to encrypt all internet traffic passing through the router. This encryption ensures that users' data remains confidential and protected from unauthorized access, whether they're browsing the web, streaming content, or engaging in online transactions. By encrypting data at the router level, the Netgear R7000 VPN feature adds an extra layer of security that is particularly valuable for users who frequently connect to public Wi-Fi networks, which are often vulnerable to cyber attacks.
Moreover, the VPN feature of the Netgear R7000 enhances users' online anonymity by masking their IP address. This means that users can browse the internet without revealing their true location or identity, thereby mitigating the risks associated with online tracking and profiling. Whether for personal privacy or professional confidentiality, this capability empowers users to maintain greater control over their online presence and digital footprint.
Furthermore, the Netgear R7000 VPN feature offers seamless integration with popular VPN services, allowing users to leverage their preferred provider's infrastructure and protocols. This flexibility ensures compatibility with a wide range of VPN configurations and ensures optimal performance for diverse user requirements.
In conclusion, the VPN feature of the Netgear R7000 router serves as a potent tool for safeguarding users' online privacy and security. With its robust encryption, anonymity-enhancing capabilities, and seamless integration with VPN services, the Netgear R7000 empowers users to navigate the digital landscape with confidence and peace of mind.
Netgear R7000 VPN Support
Title: Enhance Your Online Security with Netgear R7000 VPN Support
In today's digital age, safeguarding your online privacy and security is paramount. With cyber threats on the rise, utilizing a Virtual Private Network (VPN) has become essential for individuals and businesses alike. Netgear R7000, a leading router in the market, offers robust VPN support, empowering users to establish a secure and encrypted connection to the internet.
The Netgear R7000 VPN support feature allows users to create a VPN tunnel directly from their router, ensuring all data transmitted between their devices and the internet is encrypted and secure. This added layer of protection is especially crucial when accessing sensitive information or connecting to public Wi-Fi networks, where the risk of data interception is high.
Setting up VPN on the Netgear R7000 is a straightforward process, thanks to its user-friendly interface and comprehensive documentation. Users can choose from a wide range of VPN service providers that are compatible with the router, offering flexibility and customization options to suit individual preferences and needs.
By utilizing Netgear R7000 VPN support, users can enjoy numerous benefits, including:
Enhanced Privacy: VPN encrypts your internet traffic, preventing ISPs, hackers, or any other third parties from monitoring your online activities.
Secure Remote Access: Accessing your home network or office resources remotely becomes safer and more secure with VPN, protecting sensitive data from unauthorized access.
Bypassing Geo-Restrictions: VPN allows you to bypass geographical restrictions and access content that may be restricted in your region, enhancing your online freedom.
Protection for All Connected Devices: With VPN support at the router level, all devices connected to the network, including smartphones, tablets, and smart home devices, are automatically protected.
In conclusion, Netgear R7000 VPN support is a valuable feature for anyone looking to enhance their online security and privacy. By encrypting internet traffic at the router level, users can enjoy peace of mind knowing their sensitive information is safe from prying eyes.
Netgear R7000 VPN Configuration
Title: Streamlined Guide to Netgear R7000 VPN Configuration
The Netgear R7000 router boasts robust features, including VPN functionality, enabling users to enhance their online privacy and security. Setting up a VPN on the Netgear R7000 is a straightforward process, ensuring seamless protection for all connected devices.
To initiate the VPN configuration process, access the router's web interface by typing its IP address into a web browser. Upon logging in, navigate to the "Advanced" tab and select "VPN Service" from the sidebar menu. Here, enable the VPN service and choose the desired VPN protocol, such as OpenVPN or PPTP, depending on your preferences and requirements.
Next, configure the VPN settings by entering the necessary information provided by your VPN service provider. This typically includes the server address, username, and password. Additionally, you may need to specify other parameters, such as encryption settings and authentication methods, to ensure optimal security and performance.
After entering the required details, save the settings and proceed to set up VPN client devices. This involves installing the VPN client software on each device or manually configuring the VPN connection settings. Ensure that the VPN connection is established successfully on each device to benefit from encrypted internet traffic and enhanced privacy.
Once the VPN is configured on the Netgear R7000 router and client devices, users can enjoy secure browsing, streaming, and online communication without compromising their sensitive data. Whether it's protecting personal information from hackers or bypassing geo-restrictions to access region-locked content, the Netgear R7000 VPN configuration offers comprehensive online protection and freedom.
In conclusion, configuring a VPN on the Netgear R7000 router is a user-friendly process that significantly enhances online security and privacy. By following these simple steps, users can enjoy a secure and unrestricted internet experience across all their devices.
0 notes
Text
can work vpn detect home router
🔒🌍✨ Get 3 Months FREE VPN - Secure & Private Internet Access Worldwide! Click Here ✨🌍🔒
can work vpn detect home router
VPN detection methods
VPN detection methods are techniques used by websites, online services, and networks to identify when a user is accessing the internet through a Virtual Private Network (VPN). VPNs are commonly used to enhance online privacy, bypass geo-restrictions, and improve security by encrypting internet traffic. However, some platforms may prohibit or restrict VPN usage for various reasons, leading to the development of VPN detection methods.
One common VPN detection method is blacklisting known VPN server IP addresses. Websites and services can maintain a list of IP addresses associated with popular VPN providers and block access from these IPs. This approach is effective in detecting and blocking connections from well-known VPN servers, but it may not always be foolproof as VPN services regularly add new IP addresses to their server pool.
Another method is analyzing network traffic patterns for characteristics typical of VPN connections. VPN traffic often exhibits distinctive patterns due to encryption protocols, tunneling, and routing methods. By monitoring for these patterns, network administrators can flag and block suspicious connections that resemble VPN traffic.
Deep packet inspection (DPI) is a more advanced VPN detection technique that involves inspecting the content of data packets passing through a network. DPI can help identify encryption protocols commonly used by VPNs, such as OpenVPN or IPSec, and block or throttle such traffic accordingly.
In conclusion, VPN detection methods play a crucial role in maintaining network security and enforcing usage policies. As VPN technology continues to evolve, so too will the methods used to detect and circumvent its usage. It is essential for both VPN users and network administrators to stay informed about these evolving detection techniques to ensure a balance between privacy and compliance with platform regulations.
Home router identification
Title: Deciphering Home Router Identification: Understanding Your Networking Hub
In the world of modern connectivity, the home router stands as the cornerstone of our digital lives, orchestrating the flow of data between devices and the internet. However, identifying your home router might seem like a trivial task amidst the myriad of devices cluttering our homes. Yet, understanding your router's identity is crucial for troubleshooting, security, and optimizing your network performance.
Firstly, discerning your router's make and model is paramount. Typically, this information can be found on a label affixed to the device itself. The make, such as Netgear, TP-Link, or Asus, provides a clue to the manufacturer, while the model, like Archer C7 or Nighthawk AC1900, delineates specific features and capabilities.
Moreover, accessing your router's web-based interface unveils a trove of information. By typing the router's IP address into a web browser, often '192.168.1.1' or '192.168.0.1', and logging in with default or customized credentials, you can delve into the router's settings. Here, under 'System Information' or a similar tab, you'll find detailed specifications including firmware version, serial number, and MAC (Media Access Control) address.
Furthermore, mobile apps provided by router manufacturers facilitate identification and management. Apps like 'Netgear Genie' or 'Asus Router' offer intuitive interfaces for monitoring network activity, configuring settings, and identifying connected devices.
Additionally, online resources can aid in identifying your router. Websites like 'RouterPasswords.com' provide extensive databases of default login credentials for various router brands, aiding in accessing the web interface.
In conclusion, identifying your home router is a fundamental step in managing your network effectively. Whether through physical examination, web interface exploration, mobile apps, or online resources, understanding your router's identity empowers you to wield greater control over your digital domain.
Network traffic analysis
Network traffic analysis is a crucial aspect of maintaining the security and performance of any network infrastructure. By examining and monitoring the data that travels through a network, organizations can gain valuable insights into the behavior of connected devices, identify potential security threats, and optimize network performance.
One of the primary benefits of network traffic analysis is its ability to detect malicious activities and potential security breaches. By analyzing patterns in network traffic, security teams can identify unauthorized access attempts, malware infections, and suspicious communication patterns. This allows organizations to respond proactively to threats and prevent potential data breaches.
Additionally, network traffic analysis plays a key role in optimizing network performance. By monitoring traffic patterns and identifying bottlenecks or latency issues, network administrators can make informed decisions to improve the efficiency of data transfer, reduce network congestion, and enhance overall user experience.
In conclusion, network traffic analysis is a critical tool for maintaining the security and efficiency of modern network infrastructures. By leveraging advanced analytics and monitoring tools, organizations can gain real-time insights into network traffic, detect security threats, and optimize performance. Investing in robust network traffic analysis capabilities is essential for organizations looking to safeguard their data, protect against cyber threats, and ensure optimal network performance.
Tracking internet activities
Title: Understanding Internet Activity Tracking: What You Need to Know
In the digital age, our online activities leave behind a trail of digital footprints that can be tracked by various entities, including websites, advertisers, and internet service providers (ISPs). This practice, known as internet activity tracking, raises concerns about privacy and data security among internet users worldwide.
Internet activity tracking encompasses a range of techniques used to monitor and record users' online behavior. One common method is the use of cookies, which are small files stored on a user's device that track their interactions with websites. Cookies can collect information such as browsing history, preferences, and login credentials, allowing websites to personalize content and advertisements. However, they also raise privacy concerns as they can be used to create detailed profiles of users without their consent.
Another form of internet activity tracking is through the use of tracking pixels and web beacons, which are tiny, invisible images embedded into web pages or emails. These tools can track when and where a user opens a webpage or email, providing valuable data to advertisers and marketers.
Furthermore, ISPs have the capability to track users' internet activities across all the websites they visit. This data can be used for various purposes, including targeted advertising and network optimization. However, it also raises concerns about surveillance and the potential for ISPs to sell users' browsing data to third parties without their knowledge or consent.
To protect their privacy and data security, internet users can take several precautions. These include regularly clearing cookies from their browsers, using virtual private networks (VPNs) to encrypt their internet traffic, and being cautious about the websites they visit and the information they share online.
In conclusion, internet activity tracking is a pervasive practice that raises important privacy and security concerns. By understanding how their online activities are being tracked and taking appropriate precautions, internet users can better protect their privacy in an increasingly connected world.
Encryption bypass techniques
Encryption bypass techniques refer to the methods used to circumvent or undermine encryption measures on digital devices and platforms. While encryption is essential for safeguarding sensitive information and securing communications, there are instances where individuals or organizations may seek to bypass these safeguards for various reasons, including gaining unauthorized access to data or systems.
One common encryption bypass technique is known as brute force attacks, where automated tools are used to systematically try all possible key combinations until the correct one is found. This method can be time-consuming but is effective, especially against weak encryption algorithms or short cryptographic keys.
Another technique is known as social engineering, where attackers manipulate individuals into revealing their encryption keys or passwords through deception or coercion. This can be done through phishing emails, phone calls, or other means of communication to trick the target into divulging sensitive information.
Additionally, attackers may exploit software vulnerabilities or backdoors to bypass encryption mechanisms. By exploiting flaws in encryption software or leveraging undocumented access points, individuals with malicious intent can gain unauthorized access to encrypted data.
It is crucial for individuals and organizations to stay vigilant and employ strong encryption practices to mitigate the risk of encryption bypass techniques. Regularly updating encryption software, implementing multi-factor authentication, and providing extensive cybersecurity training to employees can help bolster defenses against potential attacks.
In conclusion, understanding encryption bypass techniques is essential for enhancing cybersecurity measures and protecting sensitive information from unauthorized access. By staying informed about the various methods used by attackers to subvert encryption, individuals and organizations can better defend against potential threats and safeguard their digital assets.
0 notes
Text
can the netgear x10 run a vpn
🔒🌍✨ Get 3 Months FREE VPN - Secure & Private Internet Access Worldwide! Click Here ✨🌍🔒
can the netgear x10 run a vpn
Netgear X10 VPN compatibility
Title: Exploring Netgear X10 VPN Compatibility: A Comprehensive Guide
In the era of heightened online privacy concerns and the necessity for secure internet connections, virtual private networks (VPNs) have become indispensable tools for individuals and businesses alike. Netgear, a renowned name in networking solutions, offers the Nighthawk X10 AD7200 Smart WiFi Router, which raises the bar in terms of performance and features. But what about its compatibility with VPN services?
The Netgear X10 is engineered to support VPN connections, catering to users who prioritize privacy and security. Whether you're looking to safeguard your personal data from potential hackers or access geo-restricted content, integrating a VPN with the Netgear X10 can enhance your online experience.
With its powerful hardware and advanced features, the Netgear X10 seamlessly integrates with various VPN protocols, including OpenVPN, PPTP, and L2TP/IPsec. This flexibility allows users to choose from a wide range of VPN services, ensuring compatibility with their preferred provider.
Setting up a VPN on the Netgear X10 is relatively straightforward, thanks to its user-friendly interface and comprehensive documentation. Users can configure their VPN settings directly through the router's web-based interface or utilize the Netgear Genie app for added convenience.
Furthermore, the Netgear X10's robust performance ensures that VPN usage does not compromise internet speeds or overall network stability. Whether you're streaming 4K content, gaming online, or conducting business operations, the Netgear X10 maintains optimal performance even while connected to a VPN.
In conclusion, the Netgear X10 is not only compatible with VPN services but also optimized to deliver a secure and reliable VPN experience. By leveraging the power of this advanced router alongside a trusted VPN provider, users can enjoy enhanced privacy, security, and accessibility in their online endeavors.
VPN support on Netgear X10
Title: Enhancing Privacy and Security: VPN Support on Netgear X10
In today's digitally interconnected world, safeguarding your online privacy and data security is paramount. Netgear, a leading provider of networking solutions, offers advanced features to meet these needs, including VPN support on its flagship router, the Netgear X10.
The Netgear X10 is renowned for its high-performance capabilities, boasting cutting-edge technology designed to handle the demands of modern internet usage. One standout feature is its built-in support for Virtual Private Networks (VPNs), which adds an extra layer of protection to your online activities.
By enabling VPN support on the Netgear X10, users can enjoy several benefits. Firstly, VPNs encrypt internet traffic, making it virtually impossible for hackers, government agencies, or ISPs to intercept and decipher sensitive information such as passwords, credit card details, or personal messages. This encryption ensures that your data remains confidential and secure, even when using unsecured public Wi-Fi networks.
Additionally, VPN support on the Netgear X10 allows users to bypass geographic restrictions and censorship. By connecting to VPN servers located in different regions around the world, users can access geo-blocked content, stream their favorite shows, and enjoy unrestricted internet access without compromising their privacy.
Setting up a VPN on the Netgear X10 is straightforward, thanks to its user-friendly interface and intuitive configuration options. Users can choose from a wide range of VPN providers and protocols, ensuring compatibility with their specific needs and preferences.
In conclusion, VPN support on the Netgear X10 offers a powerful solution for enhancing privacy and security in today's digital landscape. Whether you're concerned about safeguarding sensitive data or accessing restricted content, the Netgear X10's VPN capabilities provide peace of mind and freedom online.
Netgear X10 VPN configuration
Configuring a Virtual Private Network (VPN) on your Netgear X10 router can enhance your online security and privacy when accessing the internet. By setting up a VPN connection on your router, you can encrypt your internet traffic and protect your data from unauthorized access.
To configure a VPN on your Netgear X10 router, you will first need to choose a VPN service provider. Ensure that the VPN service you select is compatible with your router model and supports router installations. Once you have subscribed to a VPN service, you will receive the necessary configuration details.
Next, access your Netgear X10 router's administrative dashboard by entering the router's IP address in a web browser. Navigate to the VPN section in the router settings and enter the VPN configuration details provided by your service provider. This typically includes the server address, connection type, username, and password.
After entering the VPN configuration details, save the settings and activate the VPN connection on your Netgear X10 router. You may need to restart the router for the changes to take effect. Once the VPN connection is established, all the devices connected to your router will be encrypted and secure.
It is important to regularly update your router's firmware and the VPN software to ensure optimal performance and security. Additionally, if you encounter any connectivity issues, you can contact your VPN service provider for assistance in troubleshooting the configuration. By configuring a VPN on your Netgear X10 router, you can browse the internet with enhanced privacy and security.
Netgear X10 VPN performance
Title: Maximizing Privacy and Performance: Evaluating the Netgear X10 VPN Performance
In the realm of digital security and privacy, Virtual Private Networks (VPNs) stand as formidable guardians against potential threats lurking on the internet. Netgear, a prominent name in networking solutions, presents its flagship router, the Netgear X10, touted for its robust features and enhanced VPN capabilities.
The Netgear X10 is engineered to provide not only blazing-fast internet speeds but also exceptional VPN performance, making it an ideal choice for users prioritizing privacy without compromising on speed. Leveraging advanced technology, this router seamlessly integrates VPN functionalities, ensuring secure connections for all connected devices.
One of the primary metrics for evaluating VPN performance is speed. Users expect VPNs to maintain internet speeds close to their regular connection rates. The Netgear X10 excels in this aspect, delivering impressive throughput even when VPN encryption is enabled. Whether streaming high-definition content, engaging in online gaming, or conducting business transactions, users can rely on the X10 to uphold consistent speeds while safeguarding their online activities.
Moreover, the Netgear X10 offers comprehensive VPN support, allowing users to configure their preferred VPN service effortlessly. Whether opting for a popular VPN provider or setting up a custom VPN solution, the X10 accommodates diverse preferences, ensuring compatibility with various VPN protocols for enhanced flexibility.
Furthermore, the X10 prioritizes security without compromising on convenience. Its intuitive user interface simplifies the VPN setup process, enabling users to establish secure connections with minimal effort. Additionally, robust encryption protocols safeguard data transmission, ensuring end-to-end security for sensitive information.
In conclusion, the Netgear X10 sets a benchmark for VPN performance, combining speed, security, and ease of use in a single, high-performance router. Whether for personal or professional use, investing in the Netgear X10 guarantees unparalleled privacy protection without sacrificing internet speed, empowering users to navigate the digital landscape with confidence.
Netgear X10 VPN setup guide
Setting up a VPN on your Netgear X10 router can provide increased security and privacy for your online activities. A VPN (Virtual Private Network) encrypts your internet connection, making it more secure and anonymous. With the Netgear X10 router, you can easily configure a VPN connection to ensure your data remains protected.
Firstly, you need to access your Netgear X10 router's admin panel. You can do this by opening a web browser and entering the router's default IP address in the address bar. Log in using your username and password.
Once logged in, navigate to the 'Advanced' tab and then select 'Advanced Setup' followed by 'VPN Service'. Here, you can enable the VPN service on your router.
Next, choose the type of VPN service you will be using (e.g., PPTP, L2TP, or OpenVPN) and input the necessary details provided by your VPN service provider. This includes the server address, your username, password, and any other required information.
After entering the VPN configuration details, save the settings and restart your router to apply the changes. Your Netgear X10 router should now be configured to connect to the VPN service.
To test the VPN connection, you can connect a device to your router's network and verify that the VPN is active by visiting a website that can display your IP address.
By following this Netgear X10 VPN setup guide, you can enhance the security and privacy of your online browsing sessions and protect your sensitive information from prying eyes.
0 notes
Text
Netgear Wifi Extender Setup

"Netgear WiFi Extender Setup is simple: plug it in, connect to its network, and use the web browser setup guide or Netgear Genie app for easy configuration. Extend your WiFi coverage effortlessly."
1 note
·
View note
Text
A Guide 2024 on How to Reset Netgear WiFi Extender

Method 1: Soft Reset via Web Interface

Connect to the Extender:
Ensure your device is connected to the Netgear WiFi extender network.
Open a web browser and enter the default web address “http://mywifiext.net" in the address bar.
Log In:
Enter your admin credentials (username and password) to access the extender’s web interface.
Navigate to Reset:
Locate and click on the “Settings” or “Maintenance” option.
Find the “Reset” or “Restore Factory Settings” option.
Confirm Reset:
Follow the on-screen instructions to confirm the reset.
Allow the extender to reboot, and it will be reset to its default settings.
Method 2: Hard Reset Using the Reset Button
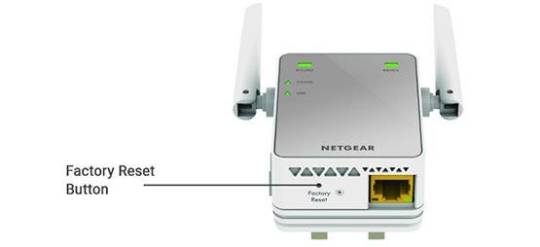
Locate the Reset Button:
On your Netgear WiFi extender, find the reset button. It is usually a small hole labeled “Reset.”
Use a Paperclip or Pin:
With the extender powered on, use a paperclip or pin to press and hold the reset button for about 10 seconds.
Release the Button:
Release the button when the LED lights on the extender start flashing.
The extender will reset to its factory settings.
Method 3: Factory Reset Using Netgear Genie App
Install Netgear Genie:
Download and install the Netgear Genie app on your smartphone or computer.
Launch the App:
Open the Netgear Genie app and log in with your extender’s credentials.
Navigate to Reset:
Find the “WiFi Settings” or “Wireless” option in the app.
Look for the “Reset” or “Restore Factory Settings” option.
Confirm Reset:
Follow the prompts to confirm the reset.
Allow the extender to reboot, completing the factory reset process.
Conclusion:
By following these three methods, you can easily reset Netgear WiFi extender and address various connectivity issues. Remember to reconfigure your extender with the appropriate settings after the reset to ensure optimal performance. Whether you prefer a soft reset through the web interface, a hard reset using the reset button, or a factory reset using the Netgear Genie app, these methods offer flexibility based on your preferences and the extender model you are using.
1 note
·
View note
Link
1 note
·
View note
Text
How do I reset my Netgear Nighthawk router to factory settings?
Are unable to log into your Netgear Nighthawk router? Have you forgotten the user name and password of your WIFI device? Well, the only option left is to implement the reset process on your Netgear Nighthawk router. Often users deal with Netgear Nighthawk setup problems. The issues may range from slow internet connectivity to not getting WIFI proper signal. These all are the requirements that a person needs to reset the router.
Why do we need a Netgear Nighthawk setup to reset?
· If your Netgear Nighthawk device is going offline, again and again,
· it might not be able to connect to the access page by putting in the password.
· The Netgear Nighthawk router might face weak or slow connectivity.
· The WIFI card inserted into your device might not be inserted properly.
· The position of your Netgear Nighthawk router also matters a lot.
· Place the router to an optimal locus where no hurdles are lying around.
· Check whether your router is getting a proper internet connection or not.
· If there are any connection issues, the router will not turn up.
· The power cord of your device should be associated with the modem, computer, and Netgear Nighthawk device.
Netgear Nighthawk Before reset- requirements

Being aware of the fact that a factory reset erases all the personalized information of your device including the WIFI network name, username, and password. SO, if you need any data for later use, make sure you have taken a backup of the data you might need.
· Once you attained Netgear Nighthawk back-up, follow a few more steps before reset:
· Remove your default WIFI password, in case it ever changes or is configured to something else.
· Log out of your previous logged Netgear Nighthawk account which applies to the hard reset.
Perform Netgear Nighthawk Router Factory reset
1. Via Hard reset button

1. Before the reset, verify the router is turned up If not press the power on the button given at the back of the router.
2. Take a survey of your Netgear Nighthawk device to find out the hard reset button on it.
3. Look for a reset pin or a similar object, such as a screw or a match stick.
4. Press the reset button which is hiding under a small hole.
5. Press the reset button with the help of any reset object.
6. Do not release the reset button for up to fifteen seconds.
7. When the power LED light begins blinking, the reset process is going on.
8. When you see the power LED has stopped flickering, the Netgear router has done with the reset process and attained all its default settings.
Netgear Nighthawk Factory reset
2. Via Netgear Nighthawk app
Performing a reset process using the Netgear Nighthawk app is a very simple and smooth process. Just do as following:
· Go to the app basket of your devices, such as the play store or Apple app store.
· Search for the Nighthawk app and as you found, download it.
· When the app is downloaded and installed on your device successfully, launch it.
· On launching the app, log in to your Netgear account.
· Once done, without any delay navigate to the settings of your Netgear Nighthawk settings.
· Locate the reset option under settings and click on it.
· As you select and click the reset option, your Netgear Nighthawk device is set to default factory settings.
How can I log in back to the Netgear Nighthawk dashboard after reset?

1. Initially connect your Netgear Nighthawk device to the computer. For this, you need to use an Ethernet cable.
2. Use the LAN port of your router and the same on your computer to establish this connection.
3. Secondly, use the WAN port of your router and the same of your modem to associate them using another Ethernet cable.
4. If you already had made this setup, leave and proceed to the next step.
5. On your device that you are using for configuration purposes, launch a web browser.
6. Type in the IP key address 192.168.1.1 or the web domain www.nighthawk-app.com and click the enter button.
7. Enter the username and password in the needed field and then click the login tab.
8. If you don't find the username and password, look into the user manual or the label on your device.
9. However, you may use admin as the username and password as the password to complete the username and password field.
10. After that, you can see you have acquired the Basic home page or dashboard of your router.
The Basic Home page of your router is the place where you can set up the entire settings of your router. From here, you may change the WIFI password, Username, and security encryptions. After reset, the router gains all its default login credentials which are not considered safe. You must have changed them to give an extra layer of protection to your device.
Netgear Nighthawk reset- Conclusion
This is how a user can reset his Netgear Nighthawk router. Remember that a factory reset removes all the settings and personal information, so you need to keep a backup off all you need. There are some cautions that each one of us should follow before reset and after reset. Wrong use of the reset process leads to corrupt your firmware of the Netgear Nighthawk router.
If you are not a tech-savvy person, get in touch with our technical experts. They will surely help you to process a reset process on your Netgear Nighthawk device. You should consider all the above-mentioned precautions and suggestions during the reset process. While facing any issue that is given in the above section, go for a reset process. After reset, log in back to the web-based interface of your router is the foremost requirement as the entire device connected to the router will have gone disconnected from the network.
#nighthawk-app.com#netgear nighthawk app#www.nighthawk-app.com#netgear nighthawk#netgear nighthawk router#netgear nighthawk login#netgear nighthawk r7000#netgear nighthawk ac1900#netgear nighthawk setup#netgear nighthawk x10#netgear nighthawk extender#netgear nighthawk mesh#nighthawk netgear#nighthawk x6 r8000 firmware#netgear nighthawk x6 r8000#netgear nighthawk x6 setup#netgear r8000#netgear genie
1 note
·
View note
Photo

nighthawk-app.com
The Nighthawk App is strikingly simple to access and you can download it rapidly from the Apple App Store or Google Play Store. Nighthawk App goes with reestablished highlights like shut off arrangement and this new zone gives you strong control and screens your NETGEAR home relationship from any several phases. You can use by a wide edge by a wide edge by a wide edge a gigantic piece of the highlights from the dashboard of the Nighthawk App, for example, help out Armor Security, share Guest Wi-Fi Guest Network, speed test, stop Wi-Fi stunt and some more.
#nighthawk-app.com#netgear nighthawk app#www.nighthawk-app.com#netgear nighthawk#netgear nighthawk router#netgear nighthawk login#netgear nighthawk r7000#netgear nighthawk ac1900#netgear nighthawk setup#netgear nighthawk x10#netgear nighthawk extender#netgear nighthawk mesh#nighthawk netgear#nighthawk x6 r8000 firmware#netgear nighthawk x6 r8000#netgear nighthawk x6 setup#netgear r8000#netgear genie
1 note
·
View note
Text
How To Setup Netgear Wifi Extender
Struggling with your new Netgear Extender??.. Don’t know how to set up it at your house or office? Well, below are some of the steps you need to follow to ensure the Netgear Extender setup is completed in the correct way. Mywifiext Welcome
• Once you unpack the extender, put it on a place that is near to the router and ensures that both devices are close to another so that you can attach it correctly.
• Connect the best source of power supply to your extender, and make sure that it will not be disconnected. Switch on the power option on your extender when you attach it to your power source.
• Switch on and allow all of the LEDs to glow and become stable. Netgear extender login Visit
• Ensure the effective functioning of your home WiFi network.
• To obtain a reliable internet network, connect the expander with the router with an Ethernet cable.
• Now, be on your computer or laptop and enter the www.mywifiext.net in the search box to open your installation assist.
• Follow the instructions to connect the extender to your existing Wi-Fi network. Router login NetGear
• The extender can now be attached to the power outlet and the Ethernet cable has to be removed from the extender back. Shift the extender to a new location wherein the signal intensity is weak or absent.
• Inspect whether the router LED glows amber or green, and then connect the extender to an outlet where it is slightly nearer to the router than its present position.
• Connect to the Wi-Fi network produced by the extender with your mobile device or computer.
• By switching your mobile device or machine to a place in which you have a low signal power, you can check the quality. New extender setup
Now with full streaming, you can enjoy the best internet services. You will experience faster speed and the best connection of the internet with joy.
Mywifiext Netgear Extender Setup • Connect to the power button of the extender and wait until the system is activated.
• After connecting. Type www.mywifiext.net and press the Enter button on the address bar of your browser form.
• Then click on new Setup Extender and it's time to sign up your Genie Setup NetGear. Having the necessary account. mywifiext.local not working More
• After that you will be asked to pick the Wi-Fi extender network option 'how you want to use your extender?'
• A list appeared of wireless networks. With the available network, choose there. Type the password, and click next.
• Then you would be allowed to change your settings. When the settings are completed, reboot all of your devices and move the extender to a new location where it requires to be located. Netgear login
How To Connect Netgear Extender with WPS Setup
WPS has been one of the simplest ways to set up a New Extender, as well as it means WiFi Protected Setup. See below for WPS methods to configure the extension:
• Ensure that the range extender is powered on.
• Then find the WPS button on the router and press it to be green. Your router is now fully equipped with the extender.
• If the extender does not lighten by you, please check with any experts. Netgear genie …
• When a Wi-Fi dual-band extender is used and the WPS system is used to set up it, the procedure should be the same.
• When the extender is configured using the WPS process, you can connect to the network of the extender using the same passcode as the network of the router.
• Type the default username and passcode to log into the network of the extender. Netgear wifi extender setup
Like that, the WPS approach was used to set up the extender successfully. In case of issues, contact the extender experts to support you perfectly. Netgear login IP See
1 note
·
View note
Link
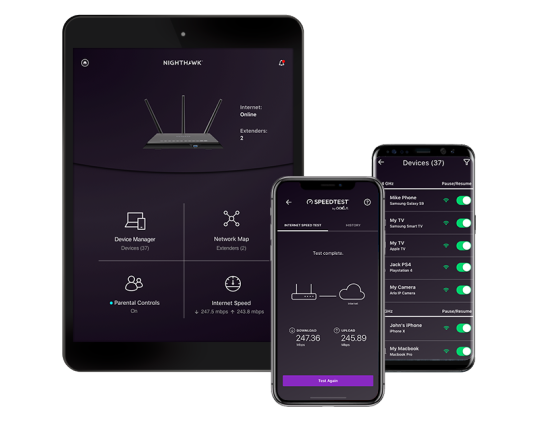
Netgear Genie app helps you monitor, control and handle your office or home wireless network with a single click of mouse. You can access Netgear Genie setup easily on all major platforms like Mac, Windows, android and ios. By using this app you can share and stream videos , music, diagnose and troubleshoot the network problems as well as setup the parental controls.
2 notes
·
View notes
Text
3 Undeniable Reasons Why You Need a WiFi Extender at Home

In this techno-digital era, nobody likes a WiFi dropout. Whether it is education, business or personal work, now everything is dependent on the internet. But when there is no signal bar, it is the most frightening situation. It is just like the whole world suddenly got freeze. In this scenario, all we do is just curse our wireless network. However, Netgear extender setup can be the ultimate solution to this problem.
Yes, there are various possible solutions for WiFi-related issues available in the market. Firstly, you need to understand the reasons why you continue to getting poor signal strength. There can be several reasons. The first is the network quality and performance in your locality. You can compare your WiFi network with neighbors' ones by asking them how their network performs. In the event that some network performs superior in your area, a wise decision is to replace yours with that WiFi network.
In case it's not your WiFi network that is causing issues, the router placement can be the culprit. To make the most out of a router, you must place it to a central position of your house. At times, the building design is not in a manner so that the router can be placed in the most central area. This results in dead zones in your home where you get no or poor signal quality.
No matter what the reason is, you must be looking for a powerful solution to remove poor network issues permanently. That's where, WiFi range extenders come into the picture.
What is a WiFi Range Extender?
A WiFi range extender is a network device which receives the signals incoming from the main router and repeats it to cover hard-to-reach places. Thus, all areas of your home will start getting WiFi signals and you will enjoy fast internet connectivity in a hassle-free manner.
The market is replete with a variety of WiFi extender models offered by various brands. By far, Netgear is deemed as one of the most reputed brands, when it comes to WiFi range extenders. All of its models are easy to set up and use. Just access the mywifiext.net wizard and install your extender without any disruption.
So what are those situations in which you require a WiFi range extender? Let's get to know.
Your Online Work Requires Mobility on Your Part
Although almost all of us love the freedom to move while working on the internet, some particular jobs like YouTubers require internet access in any area of their home. Given that a WiFi extender divides wireless network equally in all areas of a house and even outside of it such as a garage or a courtyard, you can relish mobility in your online experience.
You are a Movie Fanatic or Gaming Freak
Only veteran gamers know how it feels to experience a poor network issue. In case your router is not allowing you to enjoy a hi-end game or an HD movie properly, bring a WiFi range extender into play to overcome such situations. There are many high-quality wireless extenders like Netgear models incorporate Ethernet ports to help you connect wired devices with your WiFi network. Therefore, you can enjoy a gaming console, TV and Blu-ray player with blazing-fast internet connectivity.
Multiple Devices Can Benefit From a WiFi Network
It is a fact that an ineffective router limits the number of users accessing the WiFi network. This is because the WiFi network gets poor and is not able to reach every user equally well. In this scenario, a WiFi extender amplifies the signal strength to make it accessible at fast speeds in every corner of your home. If you own a Netgear extender, access the Netgear genie setup wizard to install it properly and connect multiple devices to your wireless network.
1 note
·
View note
Link
If you see blinking LED lights on your Netgear device, then it means that the device is not ready for Netgear extender setup process. When your lights are on your device are stable, then only you can proceed further with anything else.
#mywifiext#mywifiext.net#netgear extender setup#netgear genie#netgear extender firmware#mywifiext.net setup#mywifiext.net login#192.168.1.250#mywifiext.com#mywifiext.local
1 note
·
View note
Text
#netgear genie#genie setup#mywifiext genie setup#netgear genie smart setup#netgear genie setup#netgear genie smart setup#netgear genie app#netgear genie login#mywifiext net new extender setup
0 notes
Photo

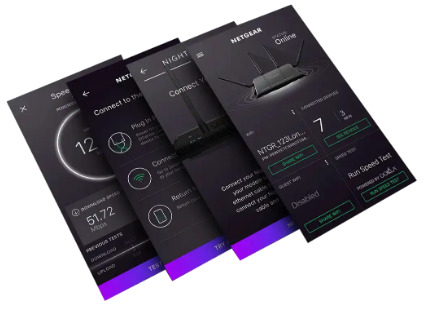
What Is Difference Between Netgear Genie App And Netgear Genie Smart Wizard Setup?
Are you looking at the Difference Between Netgear Genie App And Netgear Smart Wizard Setup and mywifiext? We are here to help you. We are sharing with you a very easy to follow step by step guide in this PDF to make it easier to understand the issues. We have a team of certified technicians who have years of experience and they are always happy and ready to help you and can solve all extended issues in no time, providing you with the best guidance possible about your device. In case you are looking for more help or you face any kind of problem regarding this topic with Netgear extender, you can call us on our Toll-free number +1 888-245-4797 to get some free consultation from our expert technicians.
#Extender setup#my wifi ext#mywifiext setup#netgear extender setup#Netgear Genie#Netgear Genie Smart Wizard
0 notes
Link
In this article ww will learn about Netgear EX6250 Firmware Update. Refreshing Netgear EX6250 AC1750 extender’s firmware with the assistance of Netgear Genie smart arrangement has gotten a lot simpler.
#netgear genie#netgear extender setup#www.mywifiext.net#netgear wifi extender setup#mywifiext.net#login to netgear extender#netgear extender login#how to setup netgear wifi extender#netgear range extender set up#netgear range extender setup#netgear wifi extender login#how to reset netgear extender#netgear_ext
0 notes
Text
Fixing The Common Netgear Router And Extender Issues
The article means to clarify the investigating strategy for a Netgear remote switch. The techniques incorporated here are straightforward and rectify until date. In any case, it is still recommended that these ought to be taken after accurately to abstain from confronting issues. Doing as such will enable clients to spare time and cash that would somehow or another be spent hunting down Netgear switch bolster.
It's very regular to confront issues like web availability, unable to connect to mywifiext.net, visit drops, or perusing and so on while utilizing a remote association. Some of the time, the issues leave with a basic power cycling of the gadgets and now and again these keep on recurring. The beneath specified guide will enable you to determine the issue(s) all alone and without the assistance of Netgear specialized help.
Power cycle every one of the gadgets in particular PC, modem, and Netgear switch by turning on and off them so that it may connect with mywifiext.net. Sit tight for every one of the gadgets to boot legitimately. Watch that all the pertinent lights are lit up on modem and switch. Check the equipment setup if any light on the modem or switch experiences difficulty illuminating. Associate with the system and check in the event that you can peruse web or not.
Download and introduce most recent updates for your PC and switch. Refresh drivers for the switch from the Netgear's authentic site. Recheck if the issue has left.
On the off chance that you as of late rolled out improvements to your PC or switch, at that point endeavor to fix them. Fox illustration, on the off chance that you added another gadget to your PC and from that point the issue set off, at that point evacuate it and recheck the association issue. Another case is that on the off chance that you altered the arrangement settings on mywifiext.net like channel number, SSID and so forth., at that point return these to the first ones or to something unique that cures the issue.
Else tap on the Begin menu and snap to open Run. Sort 'cmd' (without cites) in the clear box in the Run window and hit the Enter key on the console. This will raise the Order Provoke window. Sort 'ipconfig/all' (without cites however with appropriate dispersing) and hit the Enter key. Record all the data like IP address, default passage and so forth under the heading Ethernet connector remote system association. Since it's a remote association, you will take note of the main data identified with remote association and not what's under the Ethernet connector Neighborhood.
On the off chance that the IP address demonstrates 0.0.0.0 or something like 169.254, at that point control cycle the modem, switch, and PC. Sit tight for them to boot up legitimately with every one of the lights lit. Reconnect and check on the off chance that you can peruse web remote or not. On the off chance that the issue has not settled, at that point proceed onward to the following strategy.
Open the Summon Incite window. Sort 'ping 192.168.1.1' (without cites and as seems to be). Check for the subsequent reactions and act in like manner. On the off chance that you think something must be finished with the switch's arrangement, login to its interface. Open you web program, sort 192.168.1.1 in the address bar and hit the Enter key to access mywifiext.net. This will provoke for the switch's username and secret key. Enter the accreditations and check and change settings if required. Spare settings and leave every one of the windows. Your remote association should work fine at this point. In the event that you are as yet unfit to make them work, at that point search for online specialized help alternatives for Netgear switches.The article means to clarify the investigating strategy for a Netgear remote switch. The techniques incorporated here are straightforward and rectify until date. In any case, it is still recommended that these ought to be taken after accurately to abstain from confronting issues. Doing as such will enable clients to spare time and cash that would somehow or another be spent hunting down Netgear switch bolster. It's very regular to confront issues like web availability, unable to connect to mywifiext.net, visit drops, or perusing and so on while utilizing a remote association. Some of the time, the issues leave with a basic power cycling of the gadgets and now and again these keep on recurring. The beneath specified guide will enable you to determine the issue(s) all alone and without the assistance of Netgear specialized help. Power cycle every one of the gadgets in particular PC, modem, and Netgear switch by turning on and off them so that it may connect with mywifiext.net. Sit tight for every one of the gadgets to boot legitimately. Watch that all the pertinent lights are lit up on modem and switch. Check the equipment setup if any light on the modem or switch experiences difficulty illuminating. Associate with the system and check in the event that you can peruse web or not. Download and introduce most recent updates for your PC and switch. Refresh drivers for the switch from the Netgear's authentic site. Recheck if the issue has left. On the off chance that you as of late rolled out improvements to your PC or switch, at that point endeavor to fix them. Fox illustration, on the off chance that you added another gadget to your PC and from that point the issue set off, at that point evacuate it and recheck the association issue. Another case is that on the off chance that you altered the arrangement settings on mywifiext.net like channel number, SSID and so forth., at that point return these to the first ones or to something unique that cures the issue. Else tap on the Begin menu and snap to open Run. Sort 'cmd' (without cites) in the clear box in the Run window and hit the Enter key on the console. This will raise the Order Provoke window. Sort 'ipconfig/all' (without cites however with appropriate dispersing) and hit the Enter key. Record all the data like IP address, default passage and so forth under the heading Ethernet connector remote system association. Since it's a remote association, you will take note of the main data identified with remote association and not what's under the Ethernet connector Neighborhood. On the off chance that the IP address demonstrates 0.0.0.0 or something like 169.254, at that point control cycle the modem, switch, and PC. Sit tight for them to boot up legitimately with every one of the lights lit. Reconnect and check on the off chance that you can peruse web remote or not. On the off chance that the issue has not settled, at that point proceed onward to the following strategy. Open the Summon Incite window. Sort 'ping 192.168.1.1' (without cites and as seems to be). Check for the subsequent reactions and act in like manner. On the off chance that you think something must be finished with the switch's arrangement, login to its interface. Open you web program, sort 192.168.1.1 in the address bar and hit the Enter key to access mywifiext.net. This will provoke for the switch's username and secret key. Enter the accreditations and check and change settings if required. Spare settings and leave every one of the windows. Your remote association should work fine at this point. In the event that you are as yet unfit to make them work, at that point search for online specialized help alternatives for Netgear switches.
http://wifirouterextendersetup.net/netgear_genie.php
1 note
·
View note