#Nodejsinstallation
Explore tagged Tumblr posts
Visit Tumblr Blog
Explore Tumblr blogs with no restrictions, modern design and the best experience.
Last Seen Tumblr Blogs


Fun Fact
The KCSC sent more than 20K requests to delete posts related to prostitution and porn to Tumblr from January to June 2017.
Text
Steps to Install NPM and Node.js on Windows and MAC
JavaScript is an essential component of full-stack development, making it excellent for creating comprehensive commercial apps. It works well with a variety of devices on both the front end (what customers see) and back end (server side) of websites and applications. Node.js is one of these tools, and it’s ideal for developing parts of a website or application that must deal with large numbers of clients or data.
Before we get into the nitty gritty of Node.js, we’d like to address two important questions: how to install npm (Hub Bundle Chief) on a Macintosh and how to do it on Windows.
If you’re having trouble installing Node.js and npm on your Windows or Mac PC, this guide can assist. We’ll make it simple to introduce Node.js and npm to help your project succeed gradually.
To start, you should understand what npm is and why it is significant while utilizing Node.js. Before you start, you want additionally to guarantee that your PC is fit for running Node.js and NPM.
How about we go over the steps for introducing Node.js and npm, making sure you have everything you need to use them in your tasks?
Definition of NPM
NPM (Node Package Manager) is like a big online store for JavaScript programmers. It’s a tool that helps them find and use various code pieces (called packages) that other programmers have created. These packages can do all sorts of useful things, like add new features to a project or help the code run smoothly.
NPM makes it easy for programmers to pick and choose which packages they want to use in their projects. They can also make sure they’re using the right version of a package so everything works well together. In short, NPM helps JavaScript programmers share, find, and use code easily and efficiently.
Key Components of NPM
Website: Think of the NPM website as a big online store, but instead of buying clothes or gadgets, you can find and get small blocks of code, which are called packages. These packages help you build and improve your JavaScript projects. The website is very user-friendly. You can search for different packages, read instructions on how to use them, and see how popular or well-rated they are. Also, if you create your own packages, you can manage them through the website, just like managing your profile on a social media platform.
Command Line Interface (CLI): The NPM Command Line Interface is like a magic wand for developers. It’s a tool you use on your computer’s command line or terminal. With it, you can do a bunch of important tasks just by typing commands. For example, you can add (install) new packages to your project, update them, and remove them if you no longer need them. It’s also used for starting new projects and sharing your bundles with others by uploading (publishing) them to the NPM Vault. This tool is very powerful and helps you manage all the building blocks (packages) of your JavaScript project.
Registry: The NPM Registry is a massive database of the packages and bundles that developers have created. Like a database, keep track of these enormous packages, their formats (like different editions of a book), and the core facts about them, comparable to what different packages they may require to function. When developers create new packages, they save them in this library so that other designers can use them in their projects. This vault ensures that you always get the correct variant of a package you truly want, making it a valuable asset for dealing with these packages in your operations.
What is Node.js?
Node.js is an open-source, cross-platform runtime environment JavaScript code beyond a web browser. Previously, JavaScript was primarily a client-side prearranging language for web browsers. In any case, Node.js has evolved into a useful tool for server-side programming. This move has been crucial, allowing designers to use a single programming language throughout the web development stack, resulting in more proficient and cohesive codebases.
Key Features of Node.js
Asynchronous and Event-Driven
Node.js operates on a non-blocking, event-driven architecture, making it extremely effective and convertible. This is very useful for applications requiring continuous information handling, such as visit applications and internet gaming.
V8 Engine
It runs on Google Chrome’s V8 JavaScript engine, which converts JavaScript directly to native machine code, improving execution.
Extensive Libraries
Node.js boasts an extensive library of JavaScript modules, which further develops the improvement process by lessening the need to compose a lot of code.
NPM: The Backbone of Node.js
NPM stands as the largest software registry in the world. It acts as the default package manager for Node.js, allowing developers to install, share, and manage library dependencies in their projects.
Core Aspects of NPM
Package Management: NPM simplifies the process of managing project dependencies. It simplifies the process of installing, upgrading, and using libraries and tools required for modern web development.
Repository Access
Through NPM, developers gain access to thousands of packages, contributing to a vast repository of solutions and tools. This greatly accelerates development workflows and encourages code reuse.
Project Management
NPM also assists in version control and dependency management of projects. It allows developers to specify which versions of a package their project can use, preventing potential conflicts and ensuring compatibility.
The Synergy of Node.js and NPM
The blend of Node.js and NPM has turned into an establishment in the field of JavaScript improvement. Node.js gives the climate to running JavaScript on a server, though NPM gives the tools and modules expected to construct and oversee applications inside that climate. This synergy has had a significant impact on JavaScript’s ascent to noticeable quality as a full-stack improvement language fit for dealing with both client-side and server-side preparation in a durable way.
Prerequisites
Prior to continuing with the installation of Node.js and NPM on your Windows or Mac machine, it’s vital to guarantee that your system meets specific requirements. These essentials are central to ensuring a smooth establishment process and ideal working of Node.js and NPM.
for Windows Users
Operating System
Windows 7 or later renditions are suggested for better similarity.
Hardware Requirements
RAM: Somewhere near 4GB of RAM, nonetheless, more is great for better execution, especially for greater undertakings.
Processor: An Intel Core i3 processor at 2.5 GHz or higher. Node.js is a lightweight runtime however having a quicker processor helps with speedier execution of errands.
Storage Space: At least 256 GB of free extra storage to guarantee sufficient space for Node.js, NPM, and various task documents.
Administrator Access: Installation might require head honors. Guarantee you have the vital authorizations to put in new programming on your system.
Internet Connection: A steady web association is expected to download Node.js, NPM, and extra packages.
System Update: Guarantee your Windows is fully informed regarding the most recent fixes and updates for a smoother installation.
for Mac Users
Operating System
macOS 10.10 (Yosemite) or later versions are best for ideal similarity with Node.js and NPM.
Hardware Requirements
RAM: At least 4GB RAM, with more suggested for greater improvement work.
Processor: An Intel Core i3 processor or better. Node.js doesn’t request broad computer processor assets, however a quicker central processor works on generally speaking effectiveness.
Storage Space: Something like 256 GB of free stockpiling to oblige Node.js, NPM, and your improvement projects.
Administrator Rights: Like Windows, you might require executive freedoms to introduce Node.js and NPM on macOS.
Internet Connectivity: A dependable web association for downloading vital establishment records and bundles.
Latest macOS Updates: Guarantee your Macintosh is running the most recent variant of macOS for a difficulty-free installation experience.
Installation Guide for Mac
Downloading the NPM Bundle for macOS:

Visit the Official Node.js Site: Open your favored web browser and explore the Node.js official download page.
Select the macOS Installer: You’ll track down choices for different working systems. Pick the macOS Installer, which ordinarily arrives in a .pkg document design, reasonable for Mac.
Download the Installer: Snap on the macOS Installer connect to begin the download. It ought to naturally download the document to your default download area.


Running the Package Manager as per Guidelines:
Locate the Downloaded File: Navigate to where the installer was downloaded, generally the ‘Downloads’ organizer.
Run the Installer: Double-tap the .pkg document to open the establishment wizard. Another window will direct you through the setup process.
Agreeing to License Terms and Conditions:
Read the License: During the installation process, you’ll be given Node.js’ permit agreements. Going through these terms is significant.
Agree to the Terms: If you agree with the terms, then click the ‘Agree’ button. The following step is required to proceed with the installation.
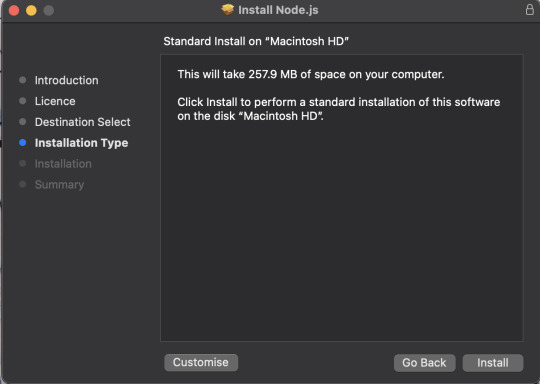
Moving to Final Installation:
Choose the Installation Location: The installer will recommend a default area for Node.js and NPM. You can change this if essential, however for most clients, the default location is adequate.
Start the Installation: After setting the location, click the ‘Install’ button. You might be incited to enter your administrator password to authorize the installation.
Installation Completed:
Wait for the Installation to Finish: The installer will show a progress bar. Hold on for it to wrap up.
Confirmation Message: When the installation is finished, you will get a confirmation message exhibiting that Node.js has been successfully presented on your Mac.
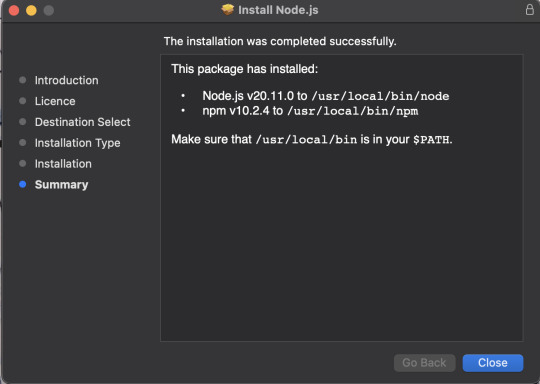
Close the Installer: Click the ‘Close’ button to exit the installer.
Subsequent to completing these means, Node.js and NPM will be installed on your Mac. To check the establishment, you can open the Terminal application and type hub – v and npm – v. This will show the introduced renditions of Node.js and NPM, confirming that they are ready to use. With Node.js and NPM installed, you can now keep on including them in your headway projects on your Mac.
Originally published by: Steps to Install NPM and Node.js on Windows and MAC
#NodeJSInstallation#NpmSetup#DeveloperTools#NPMandNodejssetup#NPMsetuptutorial#InstallingNodejsonWindows#InstallingNodejsonMac
0 notes
Text
How to Install Node.js and NPM on Windows and Mac?

Quick Overview:
This guide gives a fast and simple stroll through for introducing Node.js and NPM on two Windows and Mac. From downloading the right rendition to confirming the establishment, we cover every one of the essential moves toward preparing your set up and to begin creating.
Introduction:
Here is our detailed guide on introducing Node.js and NPM on Windows and Mac! Node.js has turned into a foundation in current web improvement, offering a productive and versatile method for making network applications. Close by it, Node Package Manager (NPM) fills in as the help for overseeing bundles in Node.js. Whether you’re a fledgling venturing into the universe of improvement or an accomplished proficient hoping to find a way to improve your abilities, this guide will walk you through the establishment cycle in a clear, bit-by-bit way.
What is NPM
NPM, or Node Package Manager, is a priority apparatus in the domain of JavaScript and online development. It is the default package manager for Node.js, a Node.js runtime.
NPM is utilized to oversee project conditions by introducing, refreshing, and dealing with the numerous libraries and bundles that an undertaking might require. Little utilities to frameworks are examples of these packages.
Each bundle incorporates a form number and a rundown of conditions, guaranteeing that ventures have all that they need to flawlessly execute. Moreover, NPM provides an enormous assortment of open-source packages, making it a significant asset for developers wishing to utilize existing arrangements or offer their work to others.
This capacity further develops improvement processes as well as empowers a worldwide developer community of sharing and cooperation.
Components of NPM
Package Registry: NPM houses a tremendous online database set of public and confidential packages, permitting developers to transfer and share their code, as well as download and utilize code shared by others. This registry is a broad vault that contains a huge number of bundles, making it an indispensable asset for JavaScript developers.
Command Line Interface (CLI): NPM gives an order line interface that developers use to collaborate with the package registry, oversee project conditions, and run scripts. This CLI instrument is fundamental for introducing, refreshing, and overseeing packages within a project, and it offers different orders to smooth out these processes.
Package.json File: The package.json file is a key component in any Node.js project using NPM.It contains metadata about the task, like name, adaptation, and conditions. This document is utilized to give data to NPM that permits it to distinguish the undertaking as well as handle the venture’s conditions.
What’s NodeJS?
Node.js is a cross-stage open-source runtime climate for executing JavaScript code beyond a program. JavaScript was previously utilized to a great extent for client-side prearranging in web browsers.
Node.js, then again, permits developers to use JavaScript for server-side scripting, which includes running contents on the server to produce dynamic website page content before the page is transmitted to the user’s web browser.
Subsequently, Node.js represents a “JavaScript all over” worldview, uniting on the online application improvement around a solitary programming language as opposed to isolating dialects for server-and client-side contents.
Its non-blocking, occasion-driven architecture is considered magnificent execution, making it ideal for creating versatile network applications, for example, web servers, chat apps, and real-time communication apps.
Node.js utilizes the V8 JavaScript engine, which is the very motor that drives Google Chrome and gives astounding execution and rich capacities for server-side applications.
To begin with Node.js and NPM, you’ll require a couple of fundamental components:
Operating System Compatibility: Node.js and NPM are cross-stage and might be introduced on Windows, macOS, and Linux. For the best similarity and security, ensure your working framework is state-of-the-art.
Node.js Installation: In light of the fact that NPM is incorporated with Node.js, you should initially introduce Node.js. It is accessible for download from the Node.js site. Select the right adaptation for your situation; for the most part, the LTS (long-term maintenance) variant is liked for its unwavering quality and broadened support.
Text Editor or Integrated Development Environment (IDE): A decent code manager or Integrated Development Environment (IDE) is fundamental. Visual Studio Code, Brilliant Message, and Atom are phenomenal decisions for JavaScript and Node.js improvement.
fundamental JavaScript Knowledge: In light of the fact that Node.js is a JavaScript runtime, having a central comprehension of JavaScript is required. Despite the fact that you needn’t bother to be a specialist, knowledge of JavaScript syntax and standards will be very advantageous.
Skills in Command Line Interface (CLI): Node.js and NPM frequently cooperated with utilizing an order line interface. Fundamental CLI capacities are required, for example, directories and running commands.
Internet access is required to download Node.js and NPM packages, as well as to access online resources, documentation, and communities.
Understanding of Version Control (Optional but Recommended): Comprehension of a rendition control framework, for example, Git can be helpful, particularly while dealing with bigger tasks or helping out others.
Curiosity and eagerness to learn: The JavaScript biological system is enormous and steadily evolving. A learning and exploring mentality is pivotal in staying aware of new devices, systems, and best practices.
How to Install Node.js and NPM on Windows and Mac?
Installing Node.js and NPM on both Windows and Mac is a straightforward process. Here’s a step-by-step guide for both operating systems:
For Windows:
Download Node.js:
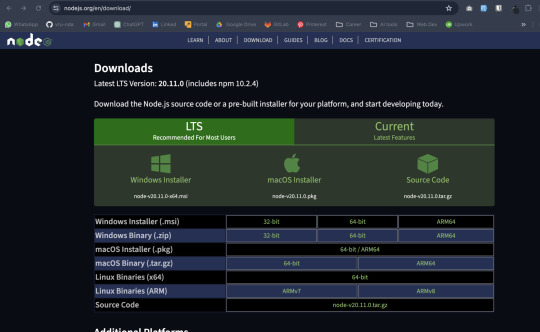
Visit the official Node.js website: nodejs.org.
You’ll see two versions available for download: the LTS (Long Term Support) version and the Current version. Choose the LTS version for stability.
Click on the “Windows Installer” link to download the .msi file suitable for your system (32-bit or 64-bit).
Run the Installer:
After the download, run the .msi file.
Follow the prompts in the Setup Wizard. Accept the license agreement and click ‘Next’.
Choose the installation location and click ‘Next’.
Make sure “NPM package manager” is selected in the components to install. Click ‘Next’.
Allow the installer to add Node.js to the PATH.
This step is crucial for running Node.js from the command line.
Finalize Installation:
Click ‘Install’ to begin the installation.
Once completed, click ‘Finish’ to close the Setup Wizard.
Verify Installation:
Open Command Prompt.
Type node -v to check the Node.js version.
Type npm -v to verify NPM installation.
For Mac:
Download Node.js:
Visit nodejs.org.
Choose the LTS version for stability.
Click on the “macOS Installer” link to download the .pkg file.
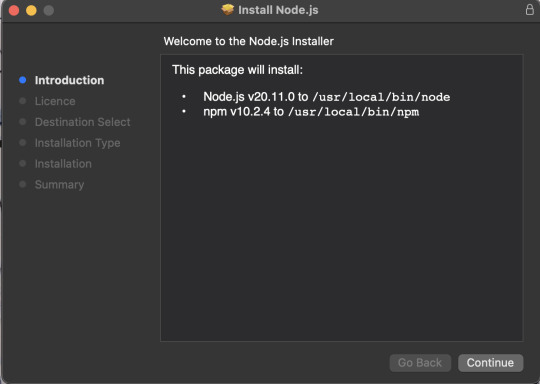
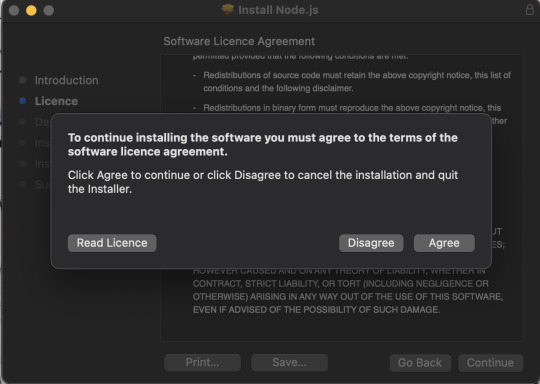
Run the Installer:
Open the downloaded .pkg file.
Follow the prompts in the installation wizard. Agree to the terms, and continue with the default settings.
Using Homebrew (Alternative Method):
If you prefer using a package manager, you can install Node.js and NPM using Homebrew.
First, install Homebrew by opening the Terminal and running:
Then, install Node.js with:
Verify Installation:
Open Terminal.
Run node -v to check the Node.js version.
Run npm -v to ensure NPM is installed.
By following these steps, you will have successfully installed Node.js and NPM on your Windows or Mac computer, setting you up for developing applications with Node.js.
How to Install Node Using “Homebrew”?
Step 1-
Install Node.js and NPM:
Installing Node.js and NPM on your Mac is very easy using Homebrew. Homebrew simplifies the process by managing the download, unpacking, and installation of Node and NPM for you.
First, open your Terminal and run the following command:
brew install node
This command will download and install the necessary files for Node.js and NPM. Wait for the process to complete.
Step 2: Verify Node.js and NPM Installation
After installing Node.js and NPM, it’s important to verify that the installation was successful. This process is similar to verifying the installation on a Windows system.
In your Terminal, run the following commands:
For Node.js, type and run:
node -v
This command displays the installed version of Node.js.
For NPM, type and run:
npm -v
This command displays the installed version of NPM.
Homebrew also helps in keeping Node.js and NPM up to date. Ensure that you have the latest version of Node package available in Homebrew.
If you need to update Homebrew itself, run the following command:
brew update
To upgrade to the latest version of Node.js and NPM, execute
brew upgrade node
This command updates Node.js and NPM to their latest available versions.
By following these steps, you will have successfully installed and verified Node.js and NPM on your Mac using Homebrew, with the added advantage of easy updates in the future.
This format provides a clear and concise guide for Mac users to install and verify Node.js and NPM using Homebrew, along with instructions for keeping their installations up to date.
How to Install Node Using NVM – Node Version Manager?
Installing Node.js using NVM (Node Version Manager) is a great choice, especially if you need to manage multiple versions of Node.js. NVM allows you to install and switch between different Node versions with ease. Here’s how to do it:
For Linux and macOS:
Install NVM:
Open your terminal.
To install NVM, run the following curl or wget command:
curl -o- https://raw.githubusercontent.com/nvm-sh/nvm/v0.39.1/install.sh | bash
or
wget -qO- https://raw.githubusercontent.com/nvm-sh/nvm/v0.39.1/install.sh | bash
The script clones the NVM repository to ~/.nvm and adds the source line to your profile (~/.bash_profile, ~/.zshrc, ~/.profile, or ~/.bashrc).
Activate NVM:
To activate NVM, either close and reopen your terminal or run the following command:source ~/.bashrc
Alternatively, for zsh users: source ~/.zshrc.
Check if NVM Was Installed Successfully:
Run nvm –version to check if NVM was installed successfully.
Install Node.js:
Now, you can install Node.js. To install the latest version, run:
nvm install node
To install a specific version, use:
nvm install 14.17.3
(Replace 14.17.3 with your desired version.)
Switch Between Node Versions:
You can switch between installed versions using:
nvm use 14.17.3
Set a default Node version with:
nvm alias default 14.17.3
Verify Installation:
Check the Node version using node -v.
Check the NPM version using npm -v.
For Windows:
NVM for Windows is a separate project from NVM. To install:
Download NVM for Windows:
Go to the NVM for Windows repository on GitHub (github.com/coreybutler/nvm-windows).
Download the latest installer (nvm-setup.zip).
Run the Installer:
Extract and run the nvm-setup.exe file.
Follow the setup wizard to install NVM for Windows.
Install and Use Node:
Once installed, open the command prompt and use NVM commands similar to Linux/macOS to install and use different Node.js versions.
By using NVM, you gain the flexibility to manage multiple Node.js versions for different projects, making it an ideal tool for any JavaScript developer’s toolkit.
Key Pointers to Consider:
Compatibility with Existing Projects: Ensure the Node version you select is compatible with the libraries and frameworks you’re using in your projects.
Environment Consistency: For teams, maintain consistency in Node versions across development, testing, and production environments to avoid version-related issues.
Access to Latest Features vs. Stability: Balance the need for new features available in the latest Node releases against the stability and support offered by LTS (Long Term Support) versions.
Community and Ecosystem Support: Consider the level of community and technical support available for the Node version you choose, including documentation, forums, and third-party tools compatibility.
Conclusion
Installing Node.js with NPM on Windows and Mac is a simple operation that unlocks a world of possibilities in modern web development. Whether you’re a seasoned developer or just getting started, the procedures detailed in this tutorial give a clear route to efficiently setting up your work environment.
Remember that selecting the proper Node.js version is critical, balancing the latest features with the reliability of LTS versions. After successfully installing Node.js with NPM, you are now ready to build scalable and high-performance apps, manage package dependencies, and contribute to a wide ecosystem of open-source libraries. Accept the adventure that awaits you in the dynamic and thrilling world of JavaScript development!
Originally published by: How to Install Node.js and NPM on Windows and Mac?
#Nodejsinstallation#InstallingNodejsonWindows#InstallingNodejsonMac#NPMsetuptutorial#WindowsNodejsinstallation#MacNodejsinstallationguide#NodejsandNPMsetup#NodejsinstallationGuide
0 notes