#OpenVSwitch
Explore tagged Tumblr posts
Visit Tumblr Blog
Explore Tumblr blogs with no restrictions, modern design and the best experience.
Last Seen Tumblr Blogs


Fun Fact
Tumblr is available in 18 languages.
Text
OpenvSwitch and OpenFlow: What Are They, What’s Their Relationship?
As software defined networking (SDN) becomes popular in high-bandwidth and dynamic applications (for example, cloud computing), related terms such as OpenvSwitch and OpenFlow are talked a lot by IT technicians. Though they have been introduced for a while, OpenvSwitch and OpenFlow still confuse people in some aspects. And the most frequently asked question is what’s the relationship and difference between OpenvSwitch and OpenFlow. Here we will cover these topics on what is OpenvSwitch, what is OpenFlow, and OpenvSwitch vs OpenFlow.
OpenvSwitch vs OpenFlow: OpenFlow Tutorial
Traditionally, networking hardwares from different vendors often have special configuration and management systems, which limits the interacting between routers and switches from different manufacturers. To solve this, OpenFlow is created as an open programmable network protocol for configuring and managing Gigabit network switches from various vendors. It enables us to offload the control plane of all the switches to a central controller and lets a central software define the behavior of the network. Thus network administrators can use OpenFlow software to manage and control traffic flow among different branded switching equipments.

How Does OpenFlow Work?
OpenFlow generally consists of three components: OpenFlow controller, OpenFlow protocol and a chain of flow tables set up on the OpenFlow switch (as shown above). The OpenFlow protocol is like a media for the controller talking securely with OpenFlow switch. The OpenFlow controller can set rules about the data-forwarding behaviors of each forwarding device through the OpenFlow protocol. Flow tables installed on the switch often stores a collection of flow entries. So when a data packet arrives at the OpenFlow switch, the switch will search for matched flow entries in the flow tables and executes corresponding actions. If no match is found, an inquiry event will sent to the OpenFlow controller which then responds with a new flow entry for handling that queued packet.
OpenvSwitch vs OpenFlow: OpenvSwitch Tutorial
OpenvSwitch, sometimes abbreviated as OVS, is an open-source OpenFlow switch that works as a virtual switch in the virtualized environments such as KVM. It also used as a multilayer software for interconnecting virtual devices in the same host or between different hosts. Currently, OpenvSwitch can run on any Linux-based virtualization platform, which includes: KVM, VirtualBox, Xen, Xen Cloud Platform, XenServer.

OpenvSwitch has eight core elements: ovs-vswitchd, Linux kernel module, ovsdb-server, ovs-dpctl, ovs-vsctl, ovs-appctl, ovs-ofctl, and ovs-pki. Ovs-vswitchd is a daemon that implements the switch. Linux kernel module is for flow-based switching. Ovsdb-server is a lightweight database server. Ovs-dpctl is a tool for configuring the switch kernel module. Ovs-vsctl is a utility for querying and updating the configuration of ovs-vswitchd. Ovs-appctl is a utility that sends commands to running Open vSwitch daemons. Ovs-ofctl is a utility for controlling the OpenFlow features of OVS. Ovs-pki is a utility for creating and managing the public-key infrastructure.
OpenvSwitch vs OpenFlow: What's Their Relationship?
OpenvSwitch and OpenFlow are both used for SDN application. OpenFlow is one of the first SDN standards. OpenvSwitch is an OpenStack SDN component. As to their relationship, OpenvSwitch is one of the most popular implementations of OpenFlow. Apart from OpenFlow, OpenvSwitch also supports other switch management protocols such as OVSDB (Open vSwitch Database Management Protocol).
Originally published at http://www.fiber-optic-transceiver-module.com/openvswitch-vs-openflow-what-are-they-whats-their-relationship.html
0 notes
Text
Switch Between OVS and L2/L3 Mode on an Edge-Core AS4610 Without Serial/Telnet Connection
On our Edge-Core AS4610, the switch in OVS mode has been very slow. After a bit of researching, openvswitch is the bottleneck because it’s out of date and cannot handle our workload.
The problem I had with the documentation from the manufacturer was that they wanted me to connect to the serial port and telnet into the device to make this change. This annoys me because I should be able to do the same thing when I have connected to the switch through SSH.
How to set it:
Connect to your switch
use sudo su to become root
use the following command:
picos_boot
Select the function you want to boot into (l2/l3 or ovs)
Restart the picos service
service picos restart
Check the file /etc/picos/picos_start.conf to make sure that what you set it to do will persist if you restart the switch. Next to picos_start, it will say which setting it will boot into.
0 notes
Text
渗透基础——端口转发与代理
渗透基础——端口转发与代理

假设我们有一台主机 B,上面运行着 smtp 服务器,监听的端口号为 25,但是只监听了 localhost 网络接口。随着虚拟化技术的应用,很多环境配置都是在虚拟机中进行的,比如前几天我搭建的 Git 服务器,就是在一个物理机的虚拟机上搭建的,一方面可以做环境隔离,另一方面也方便管理,但是这样会带来另一个新的问题:网络访问。今天我们的实验不使用裸设备,直接使用文件的方式为虚拟机创建硬盘。因为是和KVM相关的VM(虚拟机),所以我们首先为VM新建硬盘。 3、在TL-WR842N路由器的设置界面,设置虚拟服务器。

和流行的OVS(openvswitch)或者基于桥接(bridge)的DHCP动态地址分配相比,该方法的最大优点就是简单快捷,只需要在qemu启动虚拟机时额外添加一个选项即可。如上图所示,使用了端口转发之后,TCP 端口 A 与 B 之间现在并不直接通讯,而是转发到了 SSH 客户端及服务端来通讯,从而自动实现了数据加密并同时绕过了防火墙的限制。这个其实不是我们NAT配置出错,而是要是NAT网络与其他服务器进行正常通信还需要做其他工作。端口转发使你可以使用 Azure 负载均衡器公共 IP 地址和端口号连接到 Azure 虚拟网络中的虚拟机 (VM)。
关于端口转发(虚拟服务),可参考 JCG路由器支持虚拟服务?端口映射:端口映射就是将内网中的主机的一个端口映射到外网主机的一个端口,提供相应的服务。以上就是关于华硕RT-AC86U路由器怎么设置端口转发服务的全部内容。确认是可以访问的,这时候在 ssh 配置文件 config 中配置了上述配置后,使用 git 也确认是可以连接到虚拟机的 git 服务器的。有关VM如何使用裸设备,可以参考我的另外一篇文章《烂泥:KVM使用裸设备配置虚拟机》。这里,海痴选择的是 ubuntu16.04。公共 IP 地址:选择“新建”并在字段中键入“MyPublicIP”。
现在,你可以选择退出重新打开软件或直接打开(Open)连接了! ,它能动态地将各种数据转发到远程的端口上,相当于在本发建立了一个 sock5 的代理。 4、在这里要注意,首先确保花生壳指向的服务器能PING 到IP,如果PING 到后不能访问,就检查服务器防火墙,查看相应端口是否通过。上传reGeorg的tunnel.jsp到服务器。只有在发送 HTTP 请求时才能确定目标服务器的 IP 和端口。通过上图我们发现,此时VM通过NAT网络获取的IP地址无法与其他网段的服务器进行通信。
1 note
·
View note
Text
sdn Group and meter
We want to control the flow use Group and meter in this program. First,write a script for Group. (You also can use OVS to do [1]Multipath routing with Group table at mininet ) In this program ,we add nine flows and one flow to active Group. Explain what is Group? ans: we can define what the Group do, so I can define the group to do select the flow. This four types in Group,"ALL","SELECT", "INDIRECT" and"FASTFAILOVER".[2] second,we can use iperf to send packets and use ovs-ofctl dump-ports to observe the ports.[1](iperf and ovs command) Explain what is meter? ans: we can use meter to control the send rate. first, write meter srcipt and command curl to add meter. second, add a flow on the meter.(control the flow) finally,use iperf to observe the rate. suggestion:upgrade the OVS to 2.11.9 .[3] because, the vesion under 2.11.0 has some problem. when you use iperf ,you should close the tx of h1(sender) and rx of h2(receiver). but I dont know why,I think that the vesion is not complete. so I suggest use new vesion. [1]https://www.hwchiu.com/2014-06-25-multipath-routing-with-group-table-at-mininet.html [2]http://roan.logdown.com/posts/191801-set-openvswitch [3]https://github.com/OSE-Lab/Learning-SDN/tree/master/Switch/OpenvSwitch/InstallwithSourceCode
1 note
·
View note
Text
Best Options for Gns3 Layer 3 Switches
GNS3 support numerous switching options as they range from unmanaged switches to IOS switches, to Nexus switches, to Etherswitch modules & then emerging technologies. A common misconception about the Gns3 layer 3 switch is that GNS3 does not support innovative switching options. Our selection of images & platform will affect what is possible. The Options include:
Cisco IOSvL2 and Etherswitch module
IOU and GNS3 built-in switch
Openvswitch and Others

The best CISCO switches
IOSvL2:
The Recommended switching platform is Cisco VIRL IOSvL2. With a Cisco VIRL IOSvL2 image, you can arrange and test a wide range of progressive switching features. This is the authorized Cisco way of emulating a switch.
Etherswitch:
A Basic witching Etherswitch module is best. While an Etherswitch module does not support progressive layer 2 features, it does let you configure basic VLANs, Spanning Tree & other options.
IOU:
IOU is a lesser resource-intensive alternative to IOSvL2, but the pictures are not publicly available. You will want to get them from somebody who works at Cisco. In addition, as this is a Cisco core tool, IOU mages may be buggy & no support is available.
NON-CISCO:
Unmanaged switching withGNS3 built-in switch. Use this if all you want is a basic switch to connect devices in any GNS3 topology. You can’t configure this switch through a CLI, but you can also set the number of ports supported on the switch & other basic settings. It is not running a switch OS, as the whole thing is emulated from scratch. This means few protocols could be buggy and you can use it only for basic operations
Open vSwitch:
By leveraging GNS3 support for Docker, you can now add Open vSwitch to the GNS3 topologies. To do that, you can use templates. You can also use switches from additional vendors.
0 notes
Text
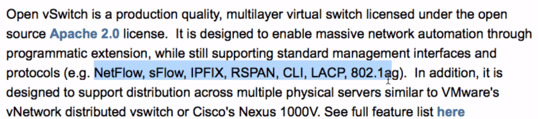
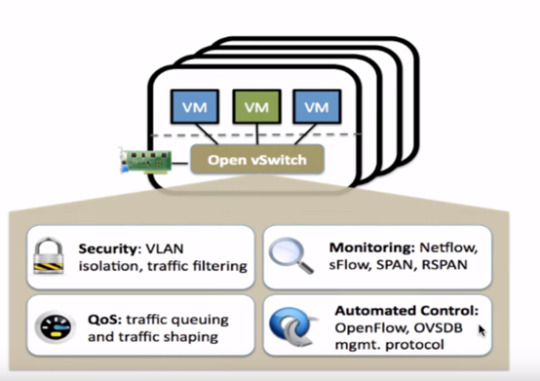
Open vSwitch is a multilayer software switch created to provide an open source, production quality switch platform that supports standard management interfaces and opens the forwarding functions to programmatic extension and control. Open vSwitch is widely used as a virtual switch in Virtual Machines environments such as OpenStack implementation. In this article we will install Open vSwitch on CentOS 8 | RHEL 8. These are the core features provided by Open vSwitch. Visibility into inter-VM communication via NetFlow, sFlow(R), IPFIX, SPAN, RSPAN, and GRE-tunneled mirrors LACP (IEEE 802.1AX-2008) Standard 802.1Q VLAN model with trunking Multicast snooping IETF Auto-Attach SPBM and rudimentary required LLDP support BFD and 802.1ag link monitoring STP (IEEE 802.1D-1998) and RSTP (IEEE 802.1D-2004) Fine-grained QoS control Support for HFSC qdisc Per VM interface traffic policing NIC bonding with source-MAC load balancing, active backup, and L4 hashing OpenFlow protocol support (including many extensions for virtualization) IPv6 support Multiple tunneling protocols (GRE, VXLAN, STT, and Geneve, with IPsec support) Remote configuration protocol with C and Python bindings Kernel and user-space forwarding engine options Multi-table forwarding pipeline with flow-caching engine Forwarding layer abstraction to ease porting to new software and hardware platforms Installation on Rocky / AlmaLinux 8: Install Open vSwitch on Rocky Linux 8|AlmaLinux 8 Install Open vSwitch on CentOS 8/RHEL 8 We’re going to use OpenStack repository to pull Open vSwitch rpm packages. Add OpenStack repository to CentOS Stream 8 sudo dnf install -y https://repos.fedorapeople.org/repos/openstack/openstack-yoga/rdo-release-yoga-1.el8.noarch.rpm Add OpenStack repository to RHEL 8 For RHEL 8, you can use Red Hat OpenStack 16 repositories if you have active subscriptions: sudo subscription-manager repos --enable=openstack-16-for-rhel-8-x86_64-rpms sudo subscription-manager repos --enable=fast-datapath-for-rhel-8-x86_64-rpms sudo subscription-manager repos --enable=rhel-8-server-optional-rpms If you don’t have Red Hat OpenStack subscription, use RDO: sudo subscription-manager repos --enable=rhel-8-server-optional-rpms sudo sudo yum install https://rdoproject.org/repos/rdo-release.rpm Install Open vSwitch on CentOS Stream 8 / RHEL 8 Then install Open vSwitch on CentOS 8 | RHEL 8: sudo yum install openvswitch libibverbs Accept installation prompts that comes your way. Transaction Summary ====================================================================================================================================================================================================== Install 9 Packages Total download size: 16 M Installed size: 48 M Is this ok [y/N]: y Once the packages are installed you can disable repositories used: sudo dnf config-manager --set-disabled centos-rabbitmq-38 ceph-pacific openstack-yoga centos-nfv-openvswitch Start and enable openvswitch service: sudo systemctl enable --now openvswitch Confirm service status: $ systemctl status openvswitch ● openvswitch.service - Open vSwitch Loaded: loaded (/usr/lib/systemd/system/openvswitch.service; enabled; vendor preset: disabled) Active: active (exited) since Fri 2020-06-05 23:24:15 CEST; 24s ago Process: 9704 ExecStart=/bin/true (code=exited, status=0/SUCCESS) Main PID: 9704 (code=exited, status=0/SUCCESS) Jun 05 23:24:15 centos.computingpost.com systemd[1]: Starting Open vSwitch... Jun 05 23:24:15 centos.computingpost.com systemd[1]: Started Open vSwitch. Check if ovs-vsctl command is usable. $ sudo ovs-vsctl show 2b6b3af2-7d50-4156-a4f6-c86b8f45f2ad ovs_version: "2.15.6" Optionally install os-net-config if you plan on configuring Open vSwitch with it. sudo yum install os-net-config Updating Open vSwitch To update the packages first enable disabled repositories: sudo dnf
config-manager --set-enabled centos-rabbitmq-38 ceph-pacific openstack-yoga centos-nfv-openvswitch sudo dnf update openvswitch libibverbs Configure and use Open vSwitch The next article below covers configurations of Open vSwitch bridges and network interfaces for use in your actual virtualization environments such as KVM. Configuring Open vSwitch on CentOS | RHEL | Fedora How To Use Open vSwitch Bridge on KVM Virtual Machines
0 notes
Text
Git add remote subdirectory

Git add remote subdirectory update#
Git add remote subdirectory code#
Git add remote subdirectory update#
name : Git checkout : repo : '' dest : /srv/checkout version : release-0.22 - name : Read-write git checkout from github : repo : :mylogin/hello.git dest : /home/mylogin/hello - name : Just ensuring the repo checkout exists : repo : '' dest : /srv/checkout update : no - name : Just get information about the repository whether or not it has already been cloned locally : repo : '' dest : /srv/checkout clone : no update : no - name : Checkout a github repo and use refspec to fetch all pull requests : repo : dest : /src/ansible-examples refspec : '+refs/pull/*:refs/heads/*' - name : Create git archive from repo : repo : dest : /src/ansible-examples archive : /tmp/ansible-examples.zip - name : Clone a repo with separate git directory : repo : dest : /src/ansible-examples separate_git_dir : /src/ansible-examples.git - name : Example clone of a single branch : repo : dest : /src/ansible-examples single_branch : yes version : master - name : Avoid hanging when http(s) password is missing : repo : dest : /src/from-private-repo environment : GIT_TERMINAL_PROMPT : 0 # reports "terminal prompts disabled" on missing password # or GIT_ASKPASS: /bin/true # for git before version 2.3. Controlling how Ansible behaves: precedence rules.Collections in the Theforeman Namespace.Collections in the T_systems_mms Namespace.
Git add remote subdirectory code#
create new repo, then pick I have code I want to import git remote add. The standard approach to clone is repository is using the git-clone command.
Collections in the Servicenow Namespace git init -This creates a new subdirectory named.
Collections in the Purestorage Namespace This folder contains shorthands for URL and default refnames for use when interacting with remote repositories via git fetch, git pull and git push commands.
For renaming files or folders use nothing.
Collections in the Openvswitch Namespace So it happened to me that I was working on a branch of a project and had to rename a subfolder.
Collections in the Netapp_eseries Namespace.
to push your local repo as an independent repo on your remote server.
Collections in the Kubernetes Namespace add a local repository as a sub directory of remote repository.
Collections in the Junipernetworks Namespace.
Collections in the F5networks Namespace.
Collections in the Containers Namespace.
git commit -m 'Replaced Library1 directory with submodule.' git push origin master References. Finally we can commit and push our changes.
Collections in the Cloudscale_ch Namespace git submodule add gitREMOTEURL:/path/to/git/repos/Library1.git src/libs/Library1.
Collections in the Chocolatey Namespace.
Running this command will create a new subdirectory called containing nothing but the.
Collections in the Check_point Namespace Create an empty Git repository in the specified directory.
Virtualization and Containerization Guides.
0 notes
Text
Amazon s3 buckets

# Note: These examples do not set authentication details, see the AWS Guide for details. See for more information.ĪWS_REGION or EC2_REGION can be typically be used to specify the AWS region, when required, but this can also be defined in the configuration files. Modules based on the original AWS SDK (boto) may read their default configuration from different files. When no credentials are explicitly provided the AWS SDK (boto3) that Ansible uses will fall back to its configuration files (typically ~/.aws/credentials). If parameters are not set within the module, the following environment variables can be used in decreasing order of precedence AWS_URL or EC2_URL, AWS_PROFILE or AWS_DEFAULT_PROFILE, AWS_ACCESS_KEY_ID or AWS_ACCESS_KEY or EC2_ACCESS_KEY, AWS_SECRET_ACCESS_KEY or AWS_SECRET_KEY or EC2_SECRET_KEY, AWS_SECURITY_TOKEN or EC2_SECURITY_TOKEN, AWS_REGION or EC2_REGION, AWS_CA_BUNDLE requester_pays is False, policy, tags, and versioning are None. If requestPayment, policy, tagging or versioning operations/API aren’t implemented by the endpoint, module doesn’t fail if each parameter satisfies the following condition. Controlling how Ansible behaves: precedence rules.Collections in the Theforeman Namespace.Collections in the T_systems_mms Namespace.Collections in the Servicenow Namespace.Collections in the Purestorage Namespace.Collections in the Openvswitch Namespace.Collections in the Netapp_eseries Namespace.Collections in the Kubernetes Namespace.Collections in the Junipernetworks Namespace.Collections in the F5networks Namespace.Collections in the Containers Namespace.Collections in the Cloudscale_ch Namespace.Collections in the Chocolatey Namespace.Collections in the Check_point Namespace.Virtualization and Containerization Guides.
0 notes
Text
[Media] CVE-2022-2639
CVE-2022-2639 Linux kernel openvswitch local privilege escalation. https://github.com/veritas501/CVE-2022-2639-PipeVersion #exploit #linux

0 notes
Text
Debian 10.2, listo para su descarga
Debian 10.2, listo para su descarga.
Debian es una de las mejores distribuciones Linux por derecho propio, pero no es solo eso, también es una base sólida para otras distribuciones. Cuando se lanza una nueva versión de Debian, el impacto en otras grandes distribuciones entre las que se incluye Ubuntu es tremendo. Desde hoy, ya podemos descargar la nueva versión de Debian 10 "Buster"; Debian 10.2. OJO!!!, Debian 10.2 no es la panacea de revoluciones, pero si nos trae algunas mejoras interesantes y otras actualizaciones. La nueva versión 10.2, nos aporta esperadas actualizaciones de seguridad, corrección de errores, y por fin... la desaparición de Mozilla ESR (Extended Support Release), pero no te preocupes, si eres usuario de escritorio no notaras ninguna diferencia. Anuncio oficial de Debian: El proyecto Debian se complace en anunciar la segunda actualización de su distribución estable Debian 10 (nombre en clave 'buster'). Esta versión puntual agrega principalmente correcciones para problemas de seguridad, junto con algunos ajustes para problemas graves. Las advertencias de seguridad ya se han publicado por separado y están todos ellos están referenciados en nuestras listas. Continua: Debes tener en cuenta que el lanzamiento es puntual por motivos de seguridad, y no constituye una nueva versión de Debian 10, sino que solo actualiza algunos de los paquetes incluidos. Después de la instalación, los paquetes se pueden actualizar a las versiones actuales que utilizan un espejo de Debian actualizado. Los usuarios que instalan diariamente actualizaciones desde security.debian.org no tendrán que actualizar a la nueva versión, la mayoría de esas actualizaciones ya están incluidas en el nuevo lanzamiento. Bugfixes y actualizaciones varias: El Proyecto Debian comparte con "sololinux.es" los cambios efectuados en su nueva versión. Paquete Solución a... aegisub Fix crash when selecting a language from the bottom of the Spell checker language list; fix crash when right-clicking in the subtitles text box akonadi Fix various crashes / deadlock issues base-files Update /etc/debian_version for the point release capistrano Fix failure to remove old releases when there were too many cron Stop using obsolete SELinux API cyrus-imapd Fix data loss on upgrade from version 3.0.0 or earlier debian-edu-config Handle newer Firefox ESR configuration files; add post-up stanza to /etc/network/interfaces eth0 entry conditionally debian-installer Fix unreadable fonts on hidpi displays in netboot images booted with EFI debian-installer-netboot-images Rebuild against proposed-updates distro-info-data Add Ubuntu 20.04 LTS, Focal Fossa dkimpy-milter New upstream stable release; fix sysvinit support; catch more ASCII encoding errors to improve resilience against bad data; fix message extraction so that signing in the same pass through the milter as verifying works correctly emacs Update the EPLA packaging key fence-agents Fix incomplete removal of fence_amt_ws flatpak New upstream stable release flightcrew Security fixes fonts-noto-cjk Fix over-aggressive font selection of Noto CJK fonts in modern web browsers under Chinese locale freetype Properly handle phantom points for variable hinted fonts gdb Rebuild against new libbabeltrace, with higher version number to avoid conflict with earlier upload glib2.0 Ensure libdbus clients can authenticate with a GDBusServer like the one in ibus gnome-shell New upstream stable release; fix truncation of long messages in Shell-modal dialogs; avoid crash on reallocation of dead actors gnome-sound-recorder Fix crash when selecting a recording gnustep-base Disable gdomap daemon that was accidentally enabled on upgrades from stretch graphite-web Remove unused send_email function ; avoid hourly error in cron when there is no whisper database inn2 Fix negotiation of DHE ciphersuites libapache-mod-auth-kerb Fix use after free bug leading to crash libdate-holidays-de-perl Mark International Childrens Day (Sep 20th) as a holiday in Thuringia from 2019 onwards libdatetime-timezone-perl Update included data libofx Fix null pointer dereference issue libreoffice Fix the postgresql driver with PostgreSQL 12 libsixel Fix several security issues libxslt Fix dangling pointer in xsltCopyText lucene-solr Disable obsolete call to ContextHandler in solr-jetty9.xml; fix Jetty permissions on SOLR index mariadb-10.3 New upstream stable release modsecurity-crs Fix PHP script upload rules mutter New upstream stable release ncurses Fix several security issues and other issues in tic ndppd Avoid world writable PID file, that was breaking daemon init scripts network-manager Fix file permissions for /var/lib/NetworkManager/secret_key and /var/lib/NetworkManager node-fstream Fix arbitrary file overwrite issue node-set-value Fix prototype pollution node-yarnpkg Force using HTTPS for regular registries nx-libs Fix regressions introduced in previous upload, affecting x2go open-vm-tools Fix memory leaks and error handling openvswitch Update debian/ifupdown.sh to allow setting-up the MTU; fix Python dependencies to use Python 3 picard Update translations to fix crash with Spanish locale plasma-applet-redshift-control Fix manual mode when used with redshift versions above 1.12 postfix New upstream stable release; work around poor TCP loopback performance python-cryptography Fix test suite failures when built against newer OpenSSL versions; fix a memory leak triggerable when parsing x509 certificate extensions like AIA python-flask-rdf Add Depends on python{3,}-rdflib python-oslo.messaging New upstream stable release; fix switch connection destination when a rabbitmq cluster node disappears python-werkzeug Ensure Docker containers have unique debugger PINs python2.7 Fix several security issues quota Fix rpc.rquotad spinning at 100% CPU rpcbind Allow remote calls to be enabled at run-time shelldap Repair SASL authentications, add a 'sasluser' option sogo Fix display of PGP-signed e-mails spf-engine New upstream stable release; fix sysvinit support standardskriver Fix deprecation warning from config.RawConfigParser; use external ip command rather than deprecated ifconfig command swi-prolog Use HTTPS when contacting upstream pack servers systemd core: never propagate reload failure to service result; fix sync_file_range failures in nspawn containers on arm, ppc; fix RootDirectory not working when used in combination with User; ensure that access controls on systemd-resolved's D-Bus interface are enforced correctly ; fix StopWhenUnneeded=true for mount units; make MountFlags=shared work again tmpreaper Prevent breaking of systemd services that use PrivateTmp=true trapperkeeper-webserver-jetty9-clojure Restore SSL compatibility with newer Jetty versions tzdata New upstream release ublock-origin New upstream version, compatible with Firefox ESR68 uim Resurrect libuim-data as a transitional package, fixing some issues after upgrades to buster vanguards New upstream stable release; prevent a reload of tor's configuration via SIGHUP causing a denial-of-service for vanguards protections
Descargar Debian 10.2
Cada vez que se lanza una nueva versión en debian, modifican los directorios de descarga originales, así que en sololinux hemos decidido modificar nuestra política de enlaces, e insertamos el original de la versión CD-LIVE comentada en el articulo. Descargar Debian 10.2. Si por otros motivos, necesitas descargar otra versión, puedes descargarlas todas desde este articulo anterior. Espero que este articulo te sea de utilidad, puedes ayudarnos a mantener el servidor con una donación (paypal), o también colaborar con el simple gesto de compartir nuestros artículos en tu sitio web, blog, foro o redes sociales. Read the full article
#debian#Debian10.2#DescargarDebian10.2#listoparasudescarga#MozillaESR#security.debian.org#sololinux.es#ubuntu
0 notes
Text
SDN basic
Today I will talk about how to use vSwitch to build a simple network for SDN
What is Open vSwitch?
Open vSwitch architecture
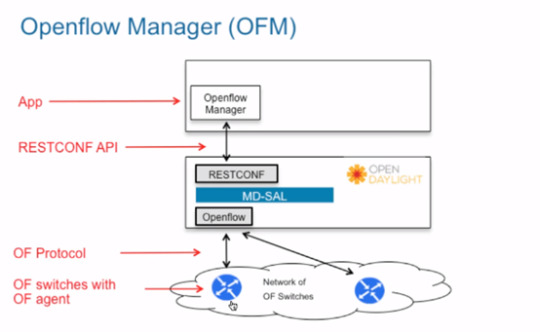
In later blogs, I will show you how to integrity with the OPENDAYLIGHT
First, we need to install GNS3 and GNS3 VM
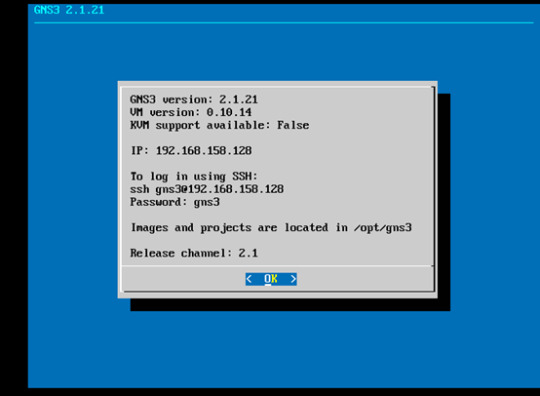
Once we set our VM, we need to download the openvswitch-management file from the GNS3 website marketing field. No worries, totally free for use.
you can also download this file from my GitHub
https://github.com/RickyYhQi/SDN-Software-Defined-Network-/tree/master/SDN%20basic

drag the open switch to the blank area

build a simple topology using router 3725 notice: leave eth0/0 for openvSwitch management
then we can open the openvSwitch console and run some command
you can always check all the command in the page belowing
http://www.openvswitch.org/support/dist-docs/ovs-vsctl.8.txt

this command for checking all ports in the bridge
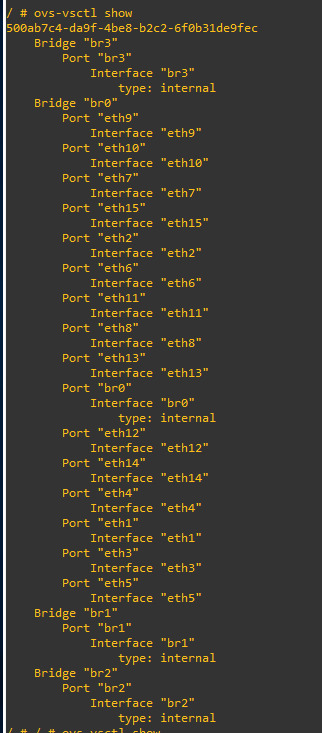
we can see that eth1 and eth2 in bridge 0 witch connecting two routers
===========================================================

this command for checking all ports traffic belong bridge 0
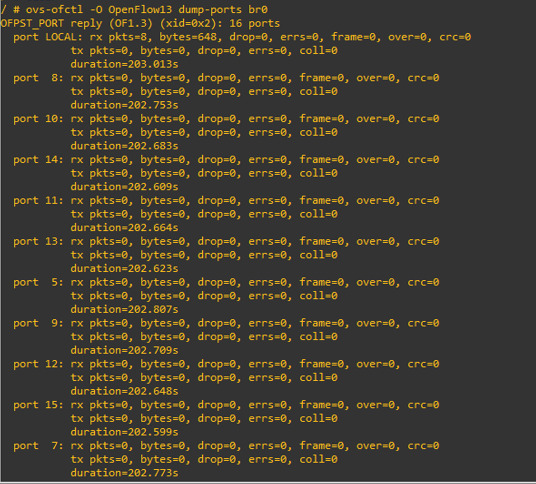
and for port 1 and port 2, the current traffic is 0 because we just start up our topology.

run this command to check all the flows belong br0
=============================================================
I am gonna create some traffic for br0
let’s config R1 and R2 first
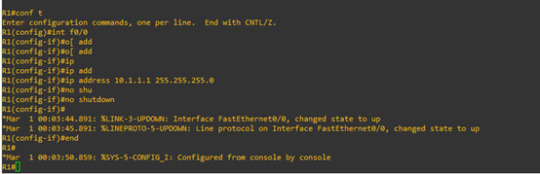
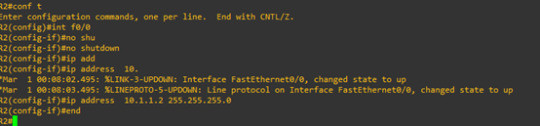

and run ping command from R2
Now we should have some traffic in br0 port
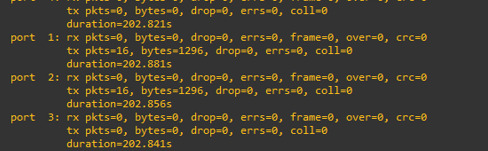
now we re-run the command
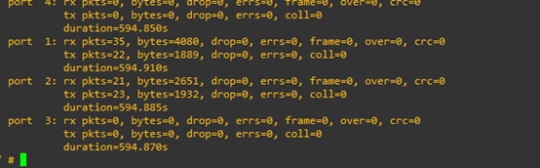
then Port 1 and port 2 are not 0 traffic anymore
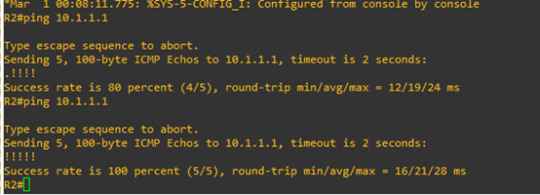
Ping again
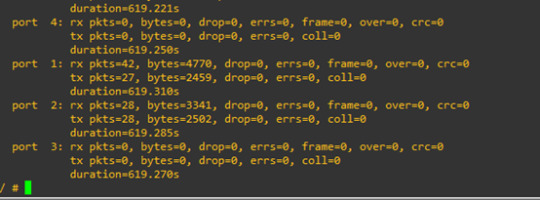
we can see that the traffic value increased.
//
This is a simple network for SDN
good luck :-)
0 notes
Text
What is Kubernetes?
Kubernetes (also known as k8s or “kube”) is an open source container orchestration platform that automates many of the manual processes involved in deploying, managing, and scaling containerized applications.
In other words, you can cluster together groups of hosts running Linux containers, and Kubernetes helps you easily and efficiently manage those clusters.
Kubernetes clusters can span hosts across on-premise, public, private, or hybrid clouds. For this reason, Kubernetes is an ideal platform for hosting cloud-native applications that require rapid scaling, like real-time data streaming through Apache Kafka.
Kubernetes was originally developed and designed by engineers at Google. Google was one of the early contributors to Linux container technology and has talked publicly about how everything at Google runs in containers. (This is the technology behind Google’s cloud services.)
Google generates more than 2 billion container deployments a week, all powered by its internal platform, Borg. Borg was the predecessor to Kubernetes, and the lessons learned from developing Borg over the years became the primary influence behind much of Kubernetes technology.
Fun fact: The 7 spokes in the Kubernetes logo refer to the project’s original name, “Project Seven of Nine.”
Red Hat was one of the first companies to work with Google on Kubernetes, even prior to launch, and has become the 2nd leading contributor to the Kubernetes upstream project. Google donated the Kubernetes project to the newly formed Cloud Native Computing Foundation (CNCF) in 2015.
Get an introduction to enterprise Kubernetes
What can you do with Kubernetes?
The primary advantage of using Kubernetes in your environment, especially if you are optimizing app dev for the cloud, is that it gives you the platform to schedule and run containers on clusters of physical or virtual machines (VMs).
More broadly, it helps you fully implement and rely on a container-based infrastructure in production environments. And because Kubernetes is all about automation of operational tasks, you can do many of the same things other application platforms or management systems let you do—but for your containers.
Developers can also create cloud-native apps with Kubernetes as a runtime platform by using Kubernetes patterns. Patterns are the tools a Kubernetes developer needs to build container-based applications and services.
With Kubernetes you can:
Orchestrate containers across multiple hosts.
Make better use of hardware to maximize resources needed to run your enterprise apps.
Control and automate application deployments and updates.
Mount and add storage to run stateful apps.
Scale containerized applications and their resources on the fly.
Declaratively manage services, which guarantees the deployed applications are always running the way you intended them to run.
Health-check and self-heal your apps with autoplacement, autorestart, autoreplication, and autoscaling.
However, Kubernetes relies on other projects to fully provide these orchestrated services. With the addition of other open source projects, you can fully realize the power of Kubernetes. These necessary pieces include (among others):
Registry, through projects like Atomic Registry or Docker Registry
Networking, through projects like OpenvSwitch and intelligent edge routing
Telemetry, through projects such as Kibana, Hawkular, and Elastic
Security, through projects like LDAP, SELinux, RBAC, and OAUTH with multitenancy layers
Automation, with the addition of Ansible playbooks for installation and cluster life cycle management
Services, through a rich catalog of popular app patterns
Get an introduction to Linux containers and container orchestration technology. In this on-demand course, you’ll learn about containerizing applications and services, testing them using Docker, and deploying them on a Kubernetes cluster using Red Hat® OpenShift®.
Start the free training course
Learn to speak Kubernetes
As is the case with most technologies, language specific to Kubernetes can act as a barrier to entry. Let's break down some of the more common terms to help you better understand Kubernetes.
Master: The machine that controls Kubernetes nodes. This is where all task assignments originate.
Node: These machines perform the requested, assigned tasks. The Kubernetes master controls them.
Pod: A group of one or more containers deployed to a single node. All containers in a pod share an IP address, IPC, hostname, and other resources. Pods abstract network and storage from the underlying container. This lets you move containers around the cluster more easily.
Replication controller: This controls how many identical copies of a pod should be running somewhere on the cluster.
Service: This decouples work definitions from the pods. Kubernetes service proxies automatically get service requests to the right pod—no matter where it moves in the cluster or even if it’s been replaced.
Kubelet: This service runs on nodes, reads the container manifests, and ensures the defined containers are started and running.
kubectl: The command line configuration tool for Kubernetes.
How does Kubernetes work?
Kubernetes diagram
A working Kubernetes deployment is called a cluster. You can visualize a Kubernetes cluster as two parts: the control plane, which consists of the master node or nodes, and the compute machines, or worker nodes.
Worker nodes run pods, which are made up of containers. Each node is its own Linux® environment, and could be either a physical or virtual machine.
The master node is responsible for maintaining the desired state of the cluster, such as which applications are running and which container images they use. Worker nodes actually run the applications and workloads.
Kubernetes runs on top of an operating system (Red Hat® Enterprise Linux®, for example) and interacts with pods of containers running on the nodes.
The Kubernetes master node takes the commands from an administrator (or DevOps team) and relays those instructions to the subservient nodes.
This handoff works with a multitude of services to automatically decide which node is best suited for the task. It then allocates resources and assigns the pods in that node to fulfill the requested work.
The desired state of a Kubernetes cluster defines which applications or other workloads should be running, along with which images they use, which resources should be made available to them, and other such configuration details.
From an infrastructure point of view, there is little change to how you manage containers. Your control over containers just happens at a higher level, giving you better control without the need to micromanage each separate container or node.
Some work is necessary, but it’s mostly a matter of assigning a Kubernetes master, defining nodes, and defining pods.
Where you run Kubernetes is up to you. This can be on bare metal servers, virtual machines, public cloud providers, private clouds, and hybrid cloud environments. One of Kubernetes’ key advantages is it works on many different kinds of infrastructure.
Learn about the other components of a Kubernetes architecture
What about Docker?
Docker can be used as a container runtime that Kubernetes orchestrates. When Kubernetes schedules a pod to a node, the kubelet on that node will instruct Docker to launch the specified containers.
The kubelet then continuously collects the status of those containers from Docker and aggregates that information in the master. Docker pulls containers onto that node and starts and stops those containers.
The difference when using Kubernetes with Docker is that an automated system asks Docker to do those things instead of the admin doing so manually on all nodes for all containers.
Why do you need Kubernetes?
Kubernetes can help you deliver and manage containerized, legacy, and cloud-native apps, as well as those being refactored into microservices.
In order to meet changing business needs, your development team needs to be able to rapidly build new applications and services. Cloud-native development starts with microservices in containers, which enables faster development and makes it easier to transform and optimize existing applications.
Production apps span multiple containers, and those containers must be deployed across multiple server hosts. Kubernetes gives you the orchestration and management capabilities required to deploy containers, at scale, for these workloads.
Kubernetes orchestration allows you to build application services that span multiple containers, schedule those containers across a cluster, scale those containers, and manage the health of those containers over time. With Kubernetes you can take effective steps toward better IT security.
Kubernetes also needs to integrate with networking, storage, security, telemetry, and other services to provide a comprehensive container infrastructure.
Kubernetes explained - diagram
Once you scale this to a production environment and multiple applications, it's clear that you need multiple, colocated containers working together to deliver the individual services.
Linux containers give your microservice-based apps an ideal application deployment unit and self-contained execution environment. And microservices in containers make it easier to orchestrate services, including storage, networking, and security.
This significantly multiplies the number of containers in your environment, and as those containers accumulate, the complexity also grows.
Kubernetes fixes a lot of common problems with container proliferation by sorting containers together into ”pods.” Pods add a layer of abstraction to grouped containers, which helps you schedule workloads and provide necessary services—like networking and storage—to those containers.
Other parts of Kubernetes help you balance loads across these pods and ensure you have the right number of containers running to support your workloads.
With the right implementation of Kubernetes—and with the help of other open source projects like Atomic Registry, Open vSwitch, heapster, OAuth, and SELinux��� you can orchestrate all parts of your container infrastructure.
Use case: Building a cloud platform to offer innovative banking services
Emirates NBD, one of the largest banks in the United Arab Emirates (UAE), needed a scalable, resilient foundation for digital innovation. The bank struggled with slow provisioning and a complex IT environment. Setting up a server could take 2 months, while making changes to large, monolithic applications took more than 6 months.
Using Red Hat OpenShift Container Platform for container orchestration, integration, and management, the bank created Sahab, the first private cloud run at scale by a bank in the Middle East. Sahab provides applications, systems, and other resources for end-to-end development—from provisioning to production—through an as-a-Service model.
With its new platform, Emirates NBD improved collaboration between internal teams and with partners using application programming interfaces (APIs) and microservices. And by adopting agile and DevOps development practices, the bank reduced app launch and update cycles.
Read the full case study
Support a DevOps approach with Kubernetes
Developing modern applications requires different processes than the approaches of the past. DevOps speeds up how an idea goes from development to deployment.
At its core, DevOps relies on automating routine operational tasks and standardizing environments across an app’s lifecycle. Containers support a unified environment for development, delivery, and automation, and make it easier to move apps between development, testing, and production environments.
A major outcome of implementing DevOps is a continuous integration and continuous deployment pipeline (CI/CD). CI/CD helps you deliver apps to customers frequently and validate software quality with minimal human intervention.
Managing the lifecycle of containers with Kubernetes alongside a DevOps approach helps to align software development and IT operations to support a CI/CD pipeline.
With the right platforms, both inside and outside the container, you can best take advantage of the culture and process changes you’ve implemented.
Learn more about how to implement a DevOps approach
Using Kubernetes in production
Kubernetes is open source and as such, there’s not a formalized support structure around that technology—at least not one you’d trust your business to run on.[Source]-https://www.redhat.com/en/topics/containers/what-is-kubernetes
Basic & Advanced Kubernetes Certification using cloud computing, AWS, Docker etc. in Mumbai. Advanced Containers Domain is used for 25 hours Kubernetes Training.
0 notes
Text
What is Kubernetes?
The primary advantage of using Kubernetes in your environment, especially if you are optimizing app dev for the cloud, is that it gives you the platform to schedule and run containers on clusters of physical or virtual machines (VMs).
More broadly, it helps you fully implement and rely on a container-based infrastructure in production environments. And because Kubernetes is all about automation of operational tasks, you can do many of the same things other application platforms or management systems let you do—but for your containers.
Developers can also create cloud-native apps with Kubernetes as a runtime platform by using Kubernetes patterns. Patterns are the tools a Kubernetes developer needs to build container-based applications and services.
With Kubernetes you can:
Orchestrate containers across multiple hosts.
Make better use of hardware to maximize resources needed to run your enterprise apps.
Control and automate application deployments and updates.
Mount and add storage to run stateful apps.
Scale containerized applications and their resources on the fly.
Declaratively manage services, which guarantees the deployed applications are always running the way you intended them to run.
Health-check and self-heal your apps with autoplacement, autorestart, autoreplication, and autoscaling.
However, Kubernetes relies on other projects to fully provide these orchestrated services. With the addition of other open source projects, you can fully realize the power of Kubernetes. These necessary pieces include (among others):
Registry, through projects like Atomic Registry or Docker Registry
Networking, through projects like OpenvSwitch and intelligent edge routing
Telemetry, through projects such as Kibana, Hawkular, and Elastic
Security, through projects like LDAP, SELinux, RBAC, and OAUTH with multitenancy layers
Automation, with the addition of Ansible playbooks for installation and cluster life cycle management
Services, through a rich catalog of popular app patterns
Get an introduction to Linux containers and container orchestration technology. In this on-demand course, you’ll learn about containerizing applications and services, testing them using Docker, and deploying them on a Kubernetes cluster using Red Hat® OpenShift®.
Start the free training course
Learn to speak Kubernetes
As is the case with most technologies, language specific to Kubernetes can act as a barrier to entry. Let's break down some of the more common terms to help you better understand Kubernetes.
Master: The machine that controls Kubernetes nodes. This is where all task assignments originate.
Node: These machines perform the requested, assigned tasks. The Kubernetes master controls them.
Pod: A group of one or more containers deployed to a single node. All containers in a pod share an IP address, IPC, hostname, and other resources. Pods abstract network and storage from the underlying container. This lets you move containers around the cluster more easily.
Replication controller: This controls how many identical copies of a pod should be running somewhere on the cluster.
Service: This decouples work definitions from the pods. Kubernetes service proxies automatically get service requests to the right pod—no matter where it moves in the cluster or even if it’s been replaced.
Kubelet: This service runs on nodes, reads the container manifests, and ensures the defined containers are started and running.
kubectl: The command line configuration tool for Kubernetes.
How does Kubernetes work?
Kubernetes diagram
A working Kubernetes deployment is called a cluster. You can visualize a Kubernetes cluster as two parts: the control plane, which consists of the master node or nodes, and the compute machines, or worker nodes.
Worker nodes run pods, which are made up of containers. Each node is its own Linux® environment, and could be either a physical or virtual machine.
The master node is responsible for maintaining the desired state of the cluster, such as which applications are running and which container images they use. Worker nodes actually run the applications and workloads.
Kubernetes runs on top of an operating system (Red Hat® Enterprise Linux®, for example) and interacts with pods of containers running on the nodes.
The Kubernetes master node takes the commands from an administrator (or DevOps team) and relays those instructions to the subservient nodes.
This handoff works with a multitude of services to automatically decide which node is best suited for the task. It then allocates resources and assigns the pods in that node to fulfill the requested work.
The desired state of a Kubernetes cluster defines which applications or other workloads should be running, along with which images they use, which resources should be made available to them, and other such configuration details.
From an infrastructure point of view, there is little change to how you manage containers. Your control over containers just happens at a higher level, giving you better control without the need to micromanage each separate container or node.
Some work is necessary, but it’s mostly a matter of assigning a Kubernetes master, defining nodes, and defining pods.
Where you run Kubernetes is up to you. This can be on bare metal servers, virtual machines, public cloud providers, private clouds, and hybrid cloud environments. One of Kubernetes’ key advantages is it works on many different kinds of infrastructure.
Learn about the other components of a Kubernetes architecture
What about Docker?
Docker can be used as a container runtime that Kubernetes orchestrates. When Kubernetes schedules a pod to a node, the kubelet on that node will instruct Docker to launch the specified containers.
The kubelet then continuously collects the status of those containers from Docker and aggregates that information in the master. Docker pulls containers onto that node and starts and stops those containers.
The difference when using Kubernetes with Docker is that an automated system asks Docker to do those things instead of the admin doing so manually on all nodes for all containers.
Why do you need Kubernetes?
Kubernetes can help you deliver and manage containerized, legacy, and cloud-native apps, as well as those being refactored into microservices.
In order to meet changing business needs, your development team needs to be able to rapidly build new applications and services. Cloud-native development starts with microservices in containers, which enables faster development and makes it easier to transform and optimize existing applications.
Production apps span multiple containers, and those containers must be deployed across multiple server hosts. Kubernetes gives you the orchestration and management capabilities required to deploy containers, at scale, for these workloads.
Kubernetes orchestration allows you to build application services that span multiple containers, schedule those containers across a cluster, scale those containers, and manage the health of those containers over time. With Kubernetes you can take effective steps toward better IT security.
Kubernetes also needs to integrate with networking, storage, security, telemetry, and other services to provide a comprehensive container infrastructure.
Kubernetes explained - diagram
Once you scale this to a production environment and multiple applications, it's clear that you need multiple, colocated containers working together to deliver the individual services.
Linux containers give your microservice-based apps an ideal application deployment unit and self-contained execution environment. And microservices in containers make it easier to orchestrate services, including storage, networking, and security.
This significantly multiplies the number of containers in your environment, and as those containers accumulate, the complexity also grows.
Kubernetes fixes a lot of common problems with container proliferation by sorting containers together into ”pods.” Pods add a layer of abstraction to grouped containers, which helps you schedule workloads and provide necessary services—like networking and storage—to those containers.
Other parts of Kubernetes help you balance loads across these pods and ensure you have the right number of containers running to support your workloads.
With the right implementation of Kubernetes—and with the help of other open source projects like Atomic Registry, Open vSwitch, heapster, OAuth, and SELinux— you can orchestrate all parts of your container infrastructure.
Use case: Building a cloud platform to offer innovative banking services
Emirates NBD, one of the largest banks in the United Arab Emirates (UAE), needed a scalable, resilient foundation for digital innovation. The bank struggled with slow provisioning and a complex IT environment. Setting up a server could take 2 months, while making changes to large, monolithic applications took more than 6 months.
Using Red Hat OpenShift Container Platform for container orchestration, integration, and management, the bank created Sahab, the first private cloud run at scale by a bank in the Middle East. Sahab provides applications, systems, and other resources for end-to-end development—from provisioning to production—through an as-a-Service model.
With its new platform, Emirates NBD improved collaboration between internal teams and with partners using application programming interfaces (APIs) and microservices. And by adopting agile and DevOps development practices, the bank reduced app launch and update cycles.
Read the full case study
Support a DevOps approach with Kubernetes
Developing modern applications requires different processes than the approaches of the past. DevOps speeds up how an idea goes from development to deployment.
At its core, DevOps relies on automating routine operational tasks and standardizing environments across an app’s lifecycle. Containers support a unified environment for development, delivery, and automation, and make it easier to move apps between development, testing, and production environments.
A major outcome of implementing DevOps is a continuous integration and continuous deployment pipeline (CI/CD). CI/CD helps you deliver apps to customers frequently and validate software quality with minimal human intervention.
Managing the lifecycle of containers with Kubernetes alongside a DevOps approach helps to align software development and IT operations to support a CI/CD pipeline.
With the right platforms, both inside and outside the container, you can best take advantage of the culture and process changes you’ve implemented.[Source]-https://www.redhat.com/en/topics/containers/what-is-kubernetes
Basic & Advanced Kubernetes Certification using cloud computing, AWS, Docker etc. in Mumbai. Advanced Containers Domain is used for 25 hours Kubernetes Training.
0 notes
Text
In our recent guide we discussed installation of Open vSwitch on CentOS / RHEL 8 Linux server. This article will continue to show you how to configure network interfaces for use with Open vSwitch. I’ll demonstrate the creation of VLAN interfaces, creating OVS Bridge and Bonds with Open vSwitch by manually editing configuration files or using helper command line tools such as os-net-config. I find the use of os-net-config script to be best and efficient way of configuring Open vSwitch as opposed to manually editing the configuration files in your CentOS, RHEL or Fedora Linux system. This is the method we’ll stick to in this guide but you can refer to network configuration scripts generated for how the actual lines should be added manually. Step 1: Install Open vSwitch on CentOS | RHEL | Fedora You might already have Open vSwitch installed on the machine that you’re working on. If not installed, refer to our guide below for installation on RHEL / CentOS 8: How To Install Open vSwitch on CentOS 8 | RHEL 8 Install Open vSwitch on Rocky Linux 8|AlmaLinux 8 For CentOS 7, use the commands: sudo yum install -y epel-release centos-release-openstack-train sudo yum install openvswitch libibverbs On Fedora: sudo dnf -y install openvswitch libibverbs Activate and enable openvswitch service: sudo systemctl enable --now openvswitch Validate by checking service status: $ systemctl status openvswitch ● openvswitch.service - Open vSwitch Loaded: loaded (/usr/lib/systemd/system/openvswitch.service; enabled; vendor preset: disabled) Active: active (exited) since Sat 2020-06-06 13:56:42 UTC; 1s ago Process: 5826 ExecStart=/bin/true (code=exited, status=0/SUCCESS) Main PID: 5826 (code=exited, status=0/SUCCESS) Step 2: Install os-net-config network configuration tool Next lets install os-net-config CLI tool which provides configuration of host networking via a YAML or JSON file formats. By default os-net-config uses a YAML config file located at /etc/os-net-config/config.yaml. But this can be customized via the --config-file(-c) CLI option. Option 1: Install os-net-config from OpenStack repository If you have OpenStack repository configured, you can install the tool from it. sudo yum -y install vim os-net-config Check more details about the package: $ rpm -qi os-net-config Name : os-net-config Version : 15.2.0 Release : 1.el8 Architecture: noarch Install Date: Mon Sep 5 15:53:57 2022 Group : Unspecified Size : 3966230 License : ASL 2.0 Signature : RSA/SHA256, Thu Apr 21 17:13:59 2022, Key ID f9b9fee7764429e6 Source RPM : os-net-config-15.2.0-1.el8.src.rpm Build Date : Wed Apr 13 15:51:28 2022 Build Host : x86-06.rdu2.centos.org Relocations : (not relocatable) Packager : CBS Vendor : CentOS Community Build Service URL : http://pypi.python.org/pypi/os-net-config Summary : Host network configuration tool Description : Host network configuration tool for OpenStack. Option 2: Install os-net-config using Pip The os-net-config network configuration tool is distributed as python package that can be installed with pip|pip3: Fedora / CentOS 8: sudo dnf -y install python3-pip CentOS 7: sudo yum install -y epel-release sudo yum -y install python-pip sudo pip install os-net-config If installation is successful, you should see output at the end similar to below. .... Downloading https://files.pythonhosted.org/packages/df/f5/9c052db7bd54d0cbf1bc0bb6554362bba1012d03e5888950a4f5c5dadc4e/scandir-1.10.0.tar.gz Installing collected packages: pbr, anyjson, six, monotonic, dnspython, greenlet, enum34, eventlet, iso8601, netaddr, wrapt, debtcollector, stevedore, oslo.i18n, rfc3986, PyYAML, certifi, idna, chardet, urllib3, requests, oslo.config, pytz, netifaces, pyparsing, oslo.utils, fasteners, oslo.concurrency, pyrsistent, attrs, unknown, unknown, contextlib2, scandir, pathlib2, importlib-metadata, functools32, jsonschema, pyudev, os-net-config
Running setup.py install for anyjson ... done Running setup.py install for wrapt ... done Running setup.py install for debtcollector ... done Running setup.py install for stevedore ... done Running setup.py install for oslo.i18n ... done Running setup.py install for PyYAML ... done Found existing installation: chardet 2.2.1 Uninstalling chardet-2.2.1: Successfully uninstalled chardet-2.2.1 Running setup.py install for oslo.config ... done Running setup.py install for oslo.utils ... done Running setup.py install for oslo.concurrency ... done Running setup.py install for pyrsistent ... done Running setup.py install for unknown ... done Running setup.py install for unknown ... done Running setup.py install for scandir ... done Running setup.py install for functools32 ... done Found existing installation: pyudev 0.15 Uninstalling pyudev-0.15: Successfully uninstalled pyudev-0.15 Running setup.py install for pyudev ... done Running setup.py install for os-net-config ... done Successfully installed PyYAML-5.3.1 anyjson-0.3.3 attrs-19.3.0 certifi-2020.4.5.1 chardet-3.0.4 contextlib2-0.6.0.post1 debtcollector-2.1.0 dnspython-1.16.0 enum34-1.1.10 eventlet-0.25.2 fasteners-0.15 functools32-3.2.3.post2 greenlet-0.4.16 idna-2.9 importlib-metadata-1.6.1 iso8601-0.1.12 jsonschema-3.2.0 monotonic-1.5 netaddr-0.7.19 netifaces-0.10.9 os-net-config-12.3.0 oslo.concurrency-4.1.0 oslo.config-8.1.0 oslo.i18n-5.0.0 oslo.utils-4.2.0 pathlib2-2.3.5 pbr-5.4.5 pyparsing-2.4.7 pyrsistent-0.16.0 pytz-2020.1 pyudev-0.22.0 requests-2.23.0 rfc3986-1.4.0 scandir-1.10.0 six-1.15.0 stevedore-2.0.0 unknown-0.0.0 unknown-0.0.0 urllib3-1.25.9 wrapt-1.12.1 You are using pip version 8.1.2, however version 20.1.1 is available. You should consider upgrading via the 'pip install --upgrade pip' command. Confirm if the command is in your PATH after installation. $ which os-net-config /usr/bin/os-net-config Step 3: Configure Open vSwitch with os-net-config After installation of both openvswitch package and os-net-config command line tool, we can begin to configure OVS interfaces, bridge and bonding as demanded by your use case. Example 1: Single interface configuration with Static IP Address Create a YAML configuration file: vim ovs-interface.yml Configure like below. network_config: - type: interface name: eth1 use_dhcp: false use_dhcpv6: false addresses: - ip_netmask: 172.21.200.10/24 routes: - ip_netmask: 0.0.0.0/0 next_hop: 172.21.200.254 default: true This will configure eth1 interface with static IP Address 172.21.200.10/24 and gateway 172.21.200.254. Apply configuration: sudo os-net-config -c ovs-interface.yml Example 2: Configure OVS bridge with a single attached interface (port) For bridge creation, the configuration file looks like below. $ vim ovs-bridge-single-interface.yml network_config: - type: ovs_bridge name: br-ex use_dhcp: false use_dhcpv6: false addresses: - ip_netmask: 172.21.200.10/24 routes: - ip_netmask: 0.0.0.0/0 next_hop: 172.21.200.254 default: true members: - type: interface name: eth1 Make changes then apply the configuration os-net-config -c Example 3: Configure an OVS bridge on top of an OVS bond Here is the configuration for OVS bridge created on an OVS bond. network_config: - type: ovs_bridge name: br-ex use_dhcp: true members: - type: ovs_bond name: bond1 members: - type: interface name: em1 - type: interface name: em2 Example 4: Configure a tagged VLAN interface on top of an OVS bridge network_config: - type: ovs_bridge name: br-ctlplane use_dhcp: true members: - type: interface name: em1 - type: vlan vlan_id: 20 addresses: - ip_netmask: 192.0.2.1/24
Example 5: Create an OVS Bond This example will only create an OVS bond. network_config: - type: ovs_bridge name: bond1 use_dhcp: true members: - type: interface name: eno1 - type: interface name: eno2 Checking OVS Configurations Once you’ve applied OVS configurations, network configuration scripts will be added automatically to /etc/sysconfig/network-scripts/ directory. $ ls /etc/sysconfig/network-scripts/ You can verify OVS settings and ports connections using the ovs-vsctl command: $ ovs-vsctl show Step 4: Create KVM network with OVS If you’re using Open vSwitch with KVM virtualization, you’ll need to define a network that Virtual Machines will use. Create a new bridge XML file. vim kvm-ovs.xml Add bridge details to the file. ovs-bridge Where: ovs-bridge is the name of libvirt network to be created. br-ex is the name of OVS bridge that created network will use. To define a network from an XML file without starting it, use: sudo virsh net-define kvm-ovs.xml To start a (previously defined) inactive network, use: sudo virsh net-start ovs-bridge To set network to autostart at service start: sudo virsh net-autostart ovs-bridge Check to Confirm if autostart flag is turned to yes – Persistent should read yes as well. $ sudo virsh net-list --all Name State Autostart Persistent ---------------------------------------------------- ovs-bridge active yes yes default active yes yes Stay tuned for more guides on OVS. Here are other interesting guides to go through. How To Use Ansible Playbook With Vagrant up Install Minikube Kubernetes on CentOS 8 with KVM
0 notes
Text
DPDK Summit Bangalore
The agenda will cover the latest developments to the DPDK framework and other related projects such as FD.io, Tungsten Fabric and OpenvSwitch, including plans for future releases by contributors, and will provide an opportunity to hear from DPDK users who have used the framework in their applications.
Learn more
Event Title:
DPDK Summit Bangalore
29 Jan
Learn more
from martinos https://www.linux.com/events/2019/03/09/dpdk-summit-bangalore
0 notes
Photo

New Post has been published on https://default.dev-ops-notes-ru.appspot.com/docker/docker-%d0%b2%d0%b8%d1%80%d1%82%d1%83%d0%b0%d0%bb%d0%b8%d0%b7%d0%b0%d1%86%d0%b8%d1%8f-%d1%81%d0%b5%d1%82%d0%b8-%d1%87%d0%b0%d1%81%d1%82%d1%8c-2-vxlan/
Docker - Виртуализация сети. Часть 2 (VXLAN)
В первой статье, посвященной виртуализации сети в Docker, мы рассмотрели, как Docker создает выделенное пространство имен для оверлей сети и соединяет контейнеры с этим пространством имен. Мы также увидели, что для оверлейной связи между хостами Docker используется VXLAN. В этой статье мы рассмотрим протокол VXLAN более подробно, а также его использование Docker-ом.
VXLAN
Из Wikipedia:
Virtual Extensible LAN (VXLAN) является технологией сетевой виртуализации, созданной для решения проблем масштабируемости в больших системах облачных вычислений.
VXLAN – это технология или протокол туннелирования, который инкапсулирует L2 кадры внутри UDP-пакетов, обычно отправляемых на порт 4789. Этот протокол первоначально был разработан компаниями VMware, Arista и Cisco. Основная задача VXLAN заключалась в упрощении развертывания облачных сред, требующих изоляции на уровне L2 для своих пользователей. Другими словами, для того, чтобы изолировать трафик каждого отдельного пользователя в облачной среде. Он обеспечивает:
Туннелирование L2 поверх L3, чтобы избежать необходимость организовывать L2 связность между всеми хостами в кластере
Более 4096 изолированных сетей (идентификаторы VLAN ограничены 4096)
VXLAN нативно поддерживается OpenvSwitch в ядре Linux, начиная с версии 3.7. Кроме того, VXLAN работает с сетевыми пространствами имен с версии ядра 3.16.
Вот как выглядит пакет VXLAN:
“Исходящий” IP-пакет используется для организации связи между Docker хостами, а исходный L2 кадр, отправляемый контейнером, инкапсулируется в пакет UDP с дополнительным заголовком VXLAN, содержащим метаданные (в частности, VXLAN ID).
Мы можем проверить, что трафик между нашими хостами ходит по VXLAN при помощи tcpdump. Давайте выполним ping до контейнера X-1 из контейнера на docker-2:
$ docker run -it --rm --net demo-network busybox ping 192.168.10.100 PING 192.168.10.100 (192.168.10.100): 56 data bytes 64 bytes from 192.168.10.100: seq=0 ttl=64 time=0.700 ms 64 bytes from 192.168.10.100: seq=1 ttl=64 time=0.370 ms 64 bytes from 192.168.10.100: seq=2 ttl=64 time=0.398 ms ^C --- 192.168.10.100 ping statistics --- 3 packets transmitted, 3 packets received, 0% packet loss round-trip min/avg/max = 0.370/0.489/0.700 ms
И прослушаем трафик на docker0 на хосте docker-1:
$ sudo tcpdump -pni eth0 "port 4789" tcpdump: verbose output suppressed, use -v or -vv for full protocol decode listening on eth0, link-type EN10MB (Ethernet), capture size 65535 bytes 10:11:00.694745 IP 192.168.1.5.45031 > 192.168.1.4.4789: VXLAN, flags [I] (0x08), vni 256 IP 192.168.10.2 > 192.168.10.100: ICMP echo request, id 256, seq 0, length 64 10:11:00.694994 IP 192.168.1.4.49474 > 192.168.1.5.4789: VXLAN, flags [I] (0x08), vni 256 IP 192.168.10.100 > 192.168.10.2: ICMP echo reply, id 256, seq 0, length 64 10:11:01.694855 IP 192.168.1.5.45031 > 192.168.1.4.4789: VXLAN, flags [I] (0x08), vni 256 IP 192.168.10.2 > 192.168.10.100: ICMP echo request, id 256, seq 1, length 64
Каждый пакет генерирует две строки вывода в tcpdump:
“Внешний” кадр (192.168.1.4 и 192.168.1.5, это хосты Docker)
“Внутренний” кадр (IP-адреса 192.168.10.100 и 192.168.10.2, это наши контейнеры) с полезной нагрузкой ICMP. Мы также можем видеть MAC-адреса наших контейнеров.
Определение имен и местоположения контейнеров
Мы видели, что мы можем пинговать контейнеры на docker-1 из контейнеров на docker-2, используя протокол VXLAN, однако, мы пока не знаем, как контейнеры на каждом хосте могут сопоставлять IP-адреса MAC-адресам и как L2-фреймы пересылаются на соответствующий хост.
Давайте создадим контейнер на docker-2 и посмотрим на его таблицу ARP:
$ docker run -it --rm --net demo-network debian bash root@3b10b104b467:/# ip neighbor show
В контейнере нет информации ARP. Если мы выполним ping до контейнера X-1, контейнер сгенерирует ARP-трафик. Давайте сначала посмотрим, как этот трафик просматривается в пространстве имен оверлей сети на хосте docker-1:
$ sudo nsenter --net=/var/run/docker/netns/7-0f222fcb18 tcpdump -pni any "arp"
Возвращаемся к нашему контейнеру и попытаемся выполнить ping X-1, который будет генерировать ARP-пакет:
root@309a2c8ba35d:/# ping 192.168.10.100 PING 192.168.10.100 (192.168.10.100): 56 data bytes 64 bytes from 192.168.10.100: icmp_seq=0 ttl=64 time=0.662 ms ^C--- 192.168.10.100 ping statistics --- 1 packets transmitted, 1 packets received, 0% packet loss round-trip min/avg/max/stddev = 0.662/0.662/0.662/0.000 ms
В tcpdump на docker-1 ничего нет, т.е. трафик ARP не отправляется в туннель VXLAN (вы можете увидеть какие-то ARP запросы, но не для хоста 192.168.10.100). Давайте пересоздадим контейнер на docker-2 и выполним tcpdump в пространстве имен оверлей сети на docker-2, чтобы убедиться, что мы получаем ARP-запросы.
$ docker run -it --rm --net demo-network debian bash
Давайте запустим tcpdump в другом окне. Далее посмотрим список всех пространств имен Docker для определения пространства имен, связанного с нашей оверлей сетью. Это пространство имен при перезапуске контейнера может измениться, поскольку пространство имен оверлей сети удаляется, если в данной сети на хосте больше нет контейнеров. Все так же на docker-2:
$ sudo ls -1 /var/run/docker/netns 36fd4ac0a9c6 9-0f222fcb18 $ sudo nsenter --net=/var/run/docker/netns/9-0f222fcb18 tcpdump -peni any "arp"
Когда мы выполняем ping из окна с контейнером на docker-2, вот что мы видим в tcpdump:
11:42:21.005002 Out 02:42:c0:a8:0a:02 ethertype ARP (0x0806), length 44: Request who-has 192.168.10.100 tell 192.168.10.2, length 28 11:42:21.004977 B 02:42:c0:a8:0a:02 ethertype ARP (0x0806), length 44: Request who-has 192.168.10.100 tell 192.168.10.2, length 28 11:42:21.005006 In 02:42:c0:a8:0a:64 ethertype ARP (0x0806), length 44: Reply 192.168.10.100 is-at 02:42:c0:a8:0a:64, length 28 11:42:21.005016 Out 02:42:c0:a8:0a:64 ethertype ARP (0x0806), length 44: Reply 192.168.10.100 is-at 02:42:c0:a8:0a:64, length 28
Мы можем увидеть ARP-запросы и ответы, что означает, что в пространстве имен оверлей сети есть вся необходимая информация, а также что оно действует как ARP прокси. Мы легко можем проверить это, выполнив команду на docker-2:
$ sudo nsenter --net=/var/run/docker/netns/9-0f222fcb18 ip neigh show 192.168.10.100 dev vxlan0 lladdr 02:42:c0:a8:0a:64 PERMANENT 192.168.10.2 dev vxlan0 lladdr 02:42:c0:a8:0a:02 PERMANENT
Запись помечена как ПОСТОЯННАЯ, что означает, что она является статической и была добавлена “вручную”, а не в результате обнаружения ARP. Что произойдет, если мы создадим второй контейнер на docker-1?
$ docker run -d --ip 192.168.10.200 --net demo-network --name X-2 busybox sleep 3600
Смотрим с docker-2:
$ sudo nsenter --net=/var/run/docker/netns/9-0f222fcb18 ip neigh show 192.168.10.200 dev vxlan0 lladdr 02:42:c0:a8:0a:c8 PERMANENT 192.168.10.100 dev vxlan0 lladdr 02:42:c0:a8:0a:64 PERMANENT 192.168.10.2 dev vxlan0 lladdr 02:42:c0:a8:0a:02 PERMANENT
Запись была добавлена автоматически, даже если в этот новый контейнер еще не был отправлен трафик. Это означает, что Docker автоматически заполняет записи ARP в пространстве имен оверлей сети, а также что интерфейс vxlan действует как прокси для ответа на ARP запросы.
Если мы посмотрим на конфигурацию интерфейса vxlan, то мы увидим, что в нем установлен флаг прокси-сервера, который объясняет это поведение. С хоста docker-2:
46: vxlan0: <BROADCAST,MULTICAST,UP,LOWER_UP> mtu 1450 qdisc noqueue master br0 state UNKNOWN mode DEFAULT link/ether e6:63:36:70:3d:15 brd ff:ff:ff:ff:ff:ff link-netnsid 0 promiscuity 1 vxlan id 256 srcport 0 0 dstport 4789 proxy l2miss l3miss ageing 300 bridge_slave addrgenmode eui64
Кстати, а на каком хосте находится MAC 02:42:c0:a8:0a:64? Давайте посмотрим базу данных переадресации bridge в пространстве имен оверлей сети. Также на хосте docker-2:
$ sudo nsenter --net=/var/run/docker/netns/9-0f222fcb18 bridge fdb show e6:63:36:70:3d:15 dev vxlan0 master br0 permanent 6e:dd:a3:b1:59:83 dev veth0 master br0 permanent 02:42:c0:a8:0a:c8 dev vxlan0 dst 192.168.1.4 link-netnsid 0 self permanent 02:42:c0:a8:0a:02 dev vxlan0 dst 192.168.1.5 link-netnsid 0 self permanent 02:42:c0:a8:0a:64 dev vxlan0 dst 192.168.1.4 link-netnsid 0 self permanent 33:33:00:00:00:01 dev veth0 self permanent 01:00:5e:00:00:01 dev veth0 self permanent
Мы видим, что MAC-адреса для наших двух контейнеров на docker-1 находятся в базе данных с постоянным флагом. Эта информация также динамически заполняется Docker.
Распространение информации MAC/FDB
Мы только что обнаружили, что Docker автоматически заполняет информацию MAC/FDB. Как это делается?
Сначала мы можем взглянуть на содержание ключей, хранящихся в Consul.
Ключ network, который был пуст, когда мы наши эксперименты, теперь содержит информацию, и мы можем легко распознать в ней идентификатор созданной нами оверлей сети: 0f222fcb18197027638550fd3c711c57c0ab6c16fd20456aed0ab38629884b37.
Web-интерфейс Consul не отображает ключи, когда они слишком длинные, однако, мы можем использовать curl для просмотра содержимого нужного нам ключа. Единственное, что нужно иметь в виду, это что Docker хранит информацию в формате JSON, которая закодирована в base64, а Consul в JSON формате отвечает на запросы):
$ network=$(docker network inspect demo-network -f .Id) $ curl -s http://192.168.1.6:8500/v1/kv/docker/network/v1.0/network/$network/ | jq -r ".[0].Value" | base64 -d | jq . "addrSpace": "GlobalDefault", "attachable": false, "configFrom": "", "configOnly": false, "created": "2017-08-28T14:26:37.986950821Z", "enableIPv6": false, "generic": "com.docker.network.enable_ipv6": false, "com.docker.network.generic": , "id": "0f222fcb18197027638550fd3c711c57c0ab6c16fd20456aed0ab38629884b37", "inDelete": false, "ingress": false, "internal": false, "ipamOptions": , "ipamType": "default", "ipamV4Config": "[\"PreferredPool\":\"192.168.10.0/24\",\"SubPool\":\"\",\"Gateway\":\"\",\"AuxAddresses\":null]", "ipamV4Info": "[\"IPAMData\":\"\\\"AddressSpace\\\":\\\"GlobalDefault\\\",\\\"Gateway\\\":\\\"192.168.10.1/24\\\",\\\"Pool\\\":\\\"192.168.10.0/24\\\"\",\"PoolID\":\"GlobalDefault/192.168.10.0/24\"]", "labels": , "name": "demo-network", "networkType": "overlay", "persist": true, "postIPv6": false, "scope": "global"
Мы можем найти все метаданные нашей сети:
Имя: demo-network
ID: 0f222fcb18197027638550fd3c711c57c0ab6c16fd20456aed0ab38629884b37
Диапазон подсети: 192.168.10.0/24
Мы также можем получить информацию о конечных точках подключения. Правда такой вывод curl трудно читается, поэтому мы будем использовать этот небольшой python скрипт для получения этой информации:
import consul import json c=consul.Consul(host="192.168.1.6",port=8500) (idx,endpoints)=c.kv.get("docker/network/v1.0/endpoint/",recurse=True) epdata=[ ep['Value'] for ep in endpoints if ep['Value'] is not None] for data in epdata: jsondata=json.loads(data.decode("utf-8")) print("Endpoint Name: %s" % jsondata["name"]) print("IP address: %s" % jsondata["ep_iface"]["addr"]) print("MAC address: %s" % jsondata["ep_iface"]["mac"]) print("Locator: %s\n" % jsondata["locator"])
Установка Python-модуля для доступа к Consul:
$ sudo yum -y install epel-release $ sudo yum -y install python-pip $ sudo pip install python-consul
Сценарий отображает основные части информации о конечных точках контейнера:
Имя контейнера
IP-адрес контейнера
MAC-адрес контейнера
Хост, на котором находится контейнер
Вот что нам теперь известно о нашей конфигурации:
Endpoint Name: X-1 IP address: 192.168.10.100/24 MAC address: 02:42:c0:a8:0a:64 Locator: 192.168.1.4 Endpoint Name: X-2 IP address: 192.168.10.200/24 MAC address: 02:42:c0:a8:0a:c8 Locator: 192.168.1.4
Consul используется как хранилище-справочник для всей статической информации. Однако, для корректной работы сети в Docker недостаточно простого динамического уведомления всех хостов в процессе создания контейнеров. Docker дополнительно использует Serf и Gossip. Мы можем легко проверить это, если подписавшемся на события serf на хосте docker-1 и создадим контейнер на хосте docker-2:
$ serf agent -bind 0.0.0.0:17946 -join 192.168.1.5:7946 -node demo-node -log-level=debug -event-handler=./event_handler.sh
Серф запускается со следующими параметрами:
bind: слушать порт 17946, (порт 7946 уже используемый Docker)
join: присоединиться к serf-кластеру
node: дать альтернативное имя узлу (т.к. docker-1 уже занят)
event-handler: простой скрипт для отображения serf-событий
log-level: требуется для просмотра вывода сценария обработчика событий
Содержимое event_handler.sh:
#!/usr/bin/bash echo "New event: $SERF_EVENT" while read line; do printf "$line\n"
Давайте создадим контейнер на хосте docker-2 и посмотрим на вывод на docker-1:
$ docker run -it --rm --net demo-network debian sleep 10
При этом на хосте docker-1 в выводе получим:
$ New event: user join 192.168.10.3 255.255.255.0 02:42:c0:a8:00:02
И через 10 секунд:
$ New event: user leave 192.168.10.3 255.255.255.0 02:42:c0:a8:00:02
Демон Docker подписывается на эти события для создания и удаления записей в таблицах ARP и FDB хоста.
В режиме Swarm Docker не полагается на Serf для синхронизации информации между узлами. В этом режиме он полагается на собственную реализацию протокола Gossip, которая работает точно так же.
Альтернативные варианты обнаружения VXLAN
Демон Docker автоматически заполняет таблицы ARP и FDB на основе информации, полученной от протокола Gossip через Serf, и полагается на проксирование ARP через интерфейс VLXAN. Однако, VXLAN тоже дает нам возможности для обнаружения.
Обнаружение точка-точка
Когда VXLAN настроен с опцией «remote», он отправляет весь неизвестный трафик на этот IP-адрес. Эта настройка очень проста, но ограничена только туннелями между двумя хостами.
Обнаружение мультикаст
Когда VXLAN настроен с опцией “group”, он отправляет весь неизвестный трафик в мультикаст группу. Такая настройка очень эффективна, но требует мальтикаст связи между всеми хостами в сети, что не всегда возможно, особенно при использовании публичного Облака.
Для получения более подробной информации о конфигурации VXLAN в Linux.
Заключение
В этой статье были рассмотрены особенности совместной работы VXLAN и Docker, а также управление таблицами MAC и FDB при помощи Serf и Grossip.
0 notes