#Process To Filling ITR Income Tax Return
Link
If you are facing any issues to file your ITR so just follow the below-given step-by-step guide to file your ITR in a hassle-free and comfortable manner.
0 notes
Text
Personal loans serve as a vital tool for individuals seeking to manage their financial needs. For self-employed professionals, securing a personal loan can be challenging due to the unconventional nature of their income. However, with the advent of instant personal loans, self-employed individuals can now access funds quickly and efficiently. This article delves into the nuances of instant personal loan for self employed, highlighting the requirements, benefits, and processes involved.
Understanding Personal Loans for Self-Employed
Personal Loan for Self Employed
A personal loan for self-employed individuals is a type of unsecured loan designed to meet the financial needs of those who run their own businesses or work as freelancers. These loans can be used for various purposes, such as expanding a business, covering personal expenses, or managing emergencies.
Instant Personal Loan for Self Employed
Instant personal loans are characterized by their quick approval and disbursal process. For self-employed individuals, this means access to funds without the lengthy procedures typically associated with traditional loans. Online platforms and digital lending institutions have made it possible to apply for and receive these loans within a short period, often within 24 hours.
Key Features and Benefits
Quick and Easy Approval
One of the primary benefits of an instant personal loan for self-employed individuals is the rapid approval process. With minimal documentation and straightforward eligibility criteria, these loans can be approved quickly, providing immediate access to funds.
No Collateral Required
Most instant personal loans for self-employed individuals are unsecured, meaning they do not require any collateral. This is particularly advantageous for those who may not have substantial assets to pledge as security.
Flexible Repayment Options
Lenders offer flexible repayment options tailored to the unique income patterns of self-employed individuals. This flexibility ensures that borrowers can manage their loan repayments without straining their finances.
Competitive Interest Rates
Despite being unsecured, instant personal loan often come with competitive interest rates. This affordability makes them an attractive option for self-employed individuals seeking financial assistance.
Documents Required for Personal Loan for Self Employed
To apply for an instant personal loan, self-employed individuals need to submit specific documents that verify their identity, income, and business operations. The common documents required for personal loans for self-employed individuals include:
Identity Proof: Aadhar card, PAN card, passport, or voter ID.
Address Proof: Utility bills, rental agreement, or property documents.
Income Proof: Bank statements for the last six months, profit and loss statements, and balance sheets.
Business Proof: GST registration, business registration certificate, or trade license.
Personal Loan for Self Employed Without ITR
One of the significant hurdles for self-employed individuals is providing Income Tax Returns (ITRs) as proof of income. However, many lenders now offer personal loans for self-employed without ITR. Instead, they rely on alternative documents such as bank statements and business proof to assess the applicant's creditworthiness.
Application Process
Applying for an instant personal loan for self-employed individuals involves a few simple steps:
Online Application: Fill out the online application form on the lender's website or mobile app.
Document Submission: Upload the necessary documents for verification.
Approval and Disbursal: Once the application is approved, the loan amount is disbursed directly into the applicant's bank account.
Conclusion
Instant personal loans have revolutionized the way self-employed individuals access funds, offering a lifeline in times of financial need. With quick approval processes, minimal documentation, and flexible repayment options, these loans are tailored to meet the unique challenges faced by self-employed professionals. Whether you need funds for business expansion, personal expenses, or emergencies, an personal loan for self employed without itr, can provide the financial support you need without the hassle of traditional lending procedures.
By understanding the requirements and benefits, self-employed individuals can make informed decisions and secure the funds they need swiftly and efficiently.
#personal loan for salaried employee#loan for salaried employees#instant personal loan for salaried employees
0 notes
Text
ITR filing in Dwarka
At Garg Goyal in Dwarka, we offer expert ITR filing services tailored to individuals, freelancers, and businesses. Our experienced professionals ensure accurate filing, compliance with tax laws, and timely submissions to maximize your benefits. We handle all paperwork and complexities, making the process stress-free for you. Whether you seek advice or complete tax solutions, Garg Goyal is your trusted partner in Dwarka for all your income tax filing needs. Let us simplify your tax journey today.
0 notes
Text
Applying for a high-value personal loan, such as a Rs 50 lakh loan, requires careful planning and understanding of the process. These loans are generally unsecured, meaning they do not require collateral, making them an attractive option for individuals needing significant funds for various personal reasons, such as medical emergencies, home renovations, or large purchases. Here's a comprehensive guide on how to apply for a Rs 50 lakh personal loan.
1. Determine Your Eligibility
Before applying for a high-value personal loan, it's crucial to ensure you meet the lender's eligibility criteria. Common factors that lenders consider include:
Age: Most banks and financial institutions require applicants to be between 21 and 60 years old.
Income: A higher income increases your chances of approval, as it demonstrates your ability to repay the loan. Lenders may have a minimum income requirement, which can vary depending on the lender and the loan amount.
Credit Score: A good credit score (usually 750 or above) is essential for getting approval for a large loan amount. It reflects your creditworthiness and history of repaying debts.
Employment Status: Being employed in a stable job or having a regular source of income (for self-employed individuals) is critical. Lenders prefer applicants with a steady job history and income.
2. Calculate Your Loan Amount and Tenure
Decide how much money you need and the tenure over which you want to repay the loan. While you may qualify for a Rs 50 lakh loan, it’s essential to borrow only as much as you need and can afford to repay. The loan tenure typically ranges from 12 months to 60 months. A longer tenure reduces the EMI amount but increases the total interest paid over the loan period.
3. Compare Lenders
Not all lenders offer the same terms and interest rates. It’s essential to shop around and compare various financial institutions, including banks and NBFCs (Non-Banking Financial Companies). Consider factors such as:
Interest Rates: Even a slight difference in interest rates can significantly affect the total cost of the loan.
Processing Fees: These are one-time fees charged for processing your loan application. Some lenders offer discounts or waive these fees for high-value loans.
Prepayment Charges: If you plan to repay the loan early, check if there are any prepayment penalties.
Customer Service: Opt for a lender known for good customer support and hassle-free loan processing.
4. Prepare Required Documents
To apply for a Rs 50 lakh personal loan, you need to provide various documents to prove your identity, income, and other personal details. Common documents required include:
Identity Proof: Aadhaar Card, PAN Card, Passport, Voter ID, or Driving License.
Address Proof: Utility bills, rental agreements, or bank statements.
Income Proof: Salary slips, bank statements for the last six months, or ITR (Income Tax Returns) for the last two years for self-employed individuals.
Employment Proof: Offer letter, employment certificate, or business registration documents for self-employed individuals.
5. Fill Out the Application Form
Once you have selected a lender, you can proceed with the application. Most lenders offer both online and offline application processes. Fill out the application form with accurate personal, financial, and employment details. Double-check all information to avoid any errors that could delay your loan approval.
6. Submit Your Application and Documents
After filling out the application form, submit it along with the required documents. For online applications, you can upload scanned copies of the documents. For offline applications, visit the bank branch or lender’s office to submit the form and documents in person.
7. Wait for Approval
Once your application and documents are submitted, the lender will verify your details. They may also perform a credit check and assess your repayment capacity. This process can take a few days to a week. If additional information or documents are required, the lender will contact you.
8. Loan Disbursement
Upon approval, you will receive a loan sanction letter detailing the loan amount, interest rate, tenure, and EMI amount. Review the terms carefully before accepting the loan offer. Once you accept, the loan amount will be disbursed to your bank account.
9. Repayment
Start repaying the loan as per the agreed EMI schedule. Ensure timely payments to avoid penalties and maintain a good credit score.
Final Thoughts
Applying for a personal loan 50 lakhs involves several steps, from checking eligibility and comparing lenders to submitting the application and receiving the funds. By following this guide and carefully considering all aspects of the loan, you can secure the funds you need while ensuring that you choose the best loan terms for your financial situation. Always remember to borrow responsibly and only take a loan you can comfortably repay.
0 notes
Text
What Essential Steps Should You Take to Prepare for Tax Filing in the Financial Year 2023-2024?
The financial year 2023-2024 is drawing to a close, and with it comes tax filing season. While it might not be the most exciting prospect, staying organized can make the process smoother. Here are some essential steps to ensure a stress-free tax filing experience for the Assessment Year 2024-2025 with the help of Tax Consultants in Kochi, Kerala.
Gather Your Documents
Income Proofs: Form 16 (salary income), investment statements (dividends, interest), sales receipts (capital gains), and any other income-related documents.
Deduction Proofs: Documents for investments under Section 80C (PPF, ELSS), medical insurance premiums (Section 80D), home loan interest (Section 24), and other eligible deductions.
Tax Forms: Keep your PAN card and Aadhaar card handy, along with Form 26AS (tax credit statement).
Choose the Right ITR Form
There are different Income Tax Return (ITR) forms for various taxpayer categories. Familiarize yourself with the ITR options and choose the one applicable to your income sources (salary, business, capital gains, etc.).
Organize Your Information
Don’t wait until the last minute. Start by making a list of your income sources and deductions throughout the year. This will help you avoid scrambling and ensure accurate filing.
Review Pre-filled Information
The Income Tax Department pre-fills some sections of your ITR form based on information received from employers and banks. Carefully review this pre-filled data and make any necessary corrections.
Don’t Miss Deductions
Many taxpayers overlook eligible deductions that can significantly reduce their tax liability. Explore all potential deductions under various sections (80C, 80D, etc.) to maximize your tax benefit.
Calculate and Pay Tax Dues (if applicable)
Once you’ve determined your tax liability, calculate any taxes owed after considering deductions. Make the payment before the due date to avoid penalties.
E-verify Your Return
E-verification is mandatory for most taxpayers. You can do this electronically using Aadhaar OTP, net banking, or by sending a signed copy of the ITR-V form to the Central Processing Center.
Keep Records for Future Reference
Maintain a well-organized file of all tax documents for at least seven years. This will simplify future tax filings and help in case of any inquiries from the tax department.
By following these essential steps, you can approach tax filing for FY 2023-2024 with confidence. Remember, staying organized and planning ahead can make a significant difference in ensuring a smooth and efficient tax filing process. For additional assistance, consider seeking professional advice from Tax Advisory Services in Kochi.
0 notes
Text
How to Track Your Online Income Tax Return Filing Status
Income Tax Return Filing Online: A Guide to Hassle-free Compliance
Filing income tax returns (ITR) is a crucial annual obligation for every taxpayer in India. The process has been significantly streamlined with the advent of online filing systems, making it more convenient and accessible than ever before. Here’s a comprehensive guide to help you navigate the online ITR filing process seamlessly.
Why File Income Tax Returns Online?
Online filing offers several advantages over traditional paper filing:
Convenience: File from anywhere, anytime, reducing dependency on physical visits to tax offices.
Accuracy: Built-in validation checks minimise errors, ensuring your return is filed correctly.
Speed: Instant acknowledgement and quicker processing by tax authorities.
Security: Data encryption and secure authentication protocols protect your personal and financial information.
Steps to File Income Tax Return Online
1. Preparation: Gather Documents and Information
Before you begin, ensure you have the following:
PAN: Permanent Account Number
Form 16: Issued by your employer, detailing your income and tax deducted at source (TDS).
Bank Statements: Statements showing interest earned on savings accounts and fixed deposits.
Investment Proofs: Details of investments eligible for deductions under Section 80C, 80D, etc.
Other Income Documents: Any income from house property, capital gains, or other sources.
2. Choose the Correct Form
Select the appropriate ITR form based on your income sources:
ITR-1 (Sahaj): For salaried individuals with income up to ₹50 lakh, one house property, and income from other sources.
ITR-2: For individuals and HUFs having income from more than one house property, capital gains, etc.
ITR-3: This is for individuals and HUFs with income from business or profession.
3. Register on the Income Tax Department’s e-Filing Portal
Register on the portal using your PAN if you're a new user. Existing users can log in with their credentials.
4. Fill and Submit the Form
Download the applicable ITR form and fill in the details offline or online.
Validate the form using built-in validation utilities.
Submit the form. You may digitally sign it using Aadhaar OTP or DSC (Digital Signature Certificate) or submit it without a signature.
5. Verification
After submitting the form, verify your return within 120 days of filing. You can verify electronically through Aadhaar OTP or EVC (Electronic Verification Code) or by sending a signed physical copy to the CPC Bengaluru.
6. Acknowledgment and Processing
Upon successful verification, the Income Tax Department will process your return. You will receive an acknowledgement (ITR-V) via email. This serves as proof of filing until the return is processed.
Tips for Smooth Filing
Keep Records: Maintain records of income, deductions, and investments throughout the year.
Stay Updated: Be aware of changes in tax laws and filing procedures.
Seek Assistance: Consult a tax professional for complex scenarios or filing questions.
Filing income tax returns online ensures compliance with tax laws while leveraging technology for a hassle-free experience. Embrace the convenience and efficiency of e-filing to manage your tax obligations effectively.
0 notes
Text
Income Tax Refund - How To Check Income Tax Refund Status For FY 2023-24 (AY 2024-25)?
Missed the ITR deadline? Don't worry! You can still file your Income Tax Return before December 31st, 2024, with a belated return. Need help? Contact us, Taxring experts, and we'll guide you through the process. Avoid penalties and file your belated return with ease. Reach out to us today!
What is an Income Tax Refund?
An income tax refund is a reimbursement from the government when you’ve overpaid your taxes during a financial year. This excess amount is returned to you after the tax authorities review your payments and liabilities.
For example, if a taxpayer pays Rs. 15,000 in taxes for the fiscal year 2023-2024 but has an actual tax burden of just Rs. 10,000, the Income Tax Department will reimburse Rs. 5,000 to the taxpayer. After filing and validating the income tax return, the department will start processing it. Once the return has been processed, the refund is typically credited to the taxpayer's bank account within four to five weeks.
How Does an Income Tax Refund Work?
1. Overpayment:Sometimes, taxpayers end up paying more tax than required through mechanisms such as: - Tax Deducted at Source (TDS)
- Advance Tax Payments
- Self-Assessment Tax
2. Filing Your Return: When you file your income tax return (ITR), you report your total income, deductions, and the taxes you've already paid.
3. Assessment:The tax authorities then assess your return to determine your actual tax liability. This includes reviewing your claims for deductions, exemptions, and tax credits.
4. Refund Calculation: If the tax authorities determine that your actual tax liability is lower than what you’ve already paid, the excess amount is calculated as your refund.
5. Receiving the Refund:Once your return is processed and approved, the excess amount is refunded to you. Note:To receive your income tax refund, you must complete the e-filing of your return. Ensure that all details are accurately filled out to avoid delays in processing.
If you've paid more taxes than you owe, you can request a refund for the excess amount. To track your refund status, simply use the Income Tax Department's online facility.
Here’s how:
1. Check Your Refund Status: Enter your PAN (Permanent Account Number) and the Assessment Year on the official portal to see the progress of your refund.
2. Refund Timeline: Refunds are usually processed within 4-5 weeks after e-verifying your return.
3. If Delayed:
- Review Your Return: Log in to the e-filing portal, go to "e-File" > "Income Tax Returns" > View Filed Returns to check for discrepancies.
- Check Your Email:Look for notifications from the Income Tax Department regarding your refund status.
- Track Your Refund:Use the online tools provided to monitor your refund progress.
How to Claim Your Income Tax Refund
1. File Your Income Tax Return:Submit your return with details of your income, deductions, and taxes paid.
2. Refund Calculation:The refund amount you’re eligible for will be automatically calculated and shown in your return.
Follow these steps to ensure you receive the refund you're due!

To receive an income tax refund, you must complete the e-filing process. Make sure you e-file this year to receive your tax refund sooner.
How to Easily Calculate Your Income Tax Refund
If you’ve paid more tax than you actually owe, you can get the extra amount back as a refund. Here’s a simple way to figure it out:
Refund Calculation:
Refund = Taxes Paid – Tax Liability
Steps to Calculate Your Refund:
1. Add Up Your Taxes Paid: This includes Advance Tax, TDS (Tax Deducted at Source), TCS (Tax Collected at Source), and Self-Assessment Tax.
2. Find Your Tax Liability:This is the total tax you actually owe for the year.
3. Subtract Your Tax Liability from Taxes Paid:This will give you the amount of your refund.
Example:
Let’s say Mr. Gupta paid ₹3,00,000 as advance tax. At the end of the year, he finds out his total tax liability is only ₹2,00,000. Here’s how to calculate his refund:
₹3,00,000 (Taxes Paid) - ₹2,00,000 (Tax Liability) = ₹1,00,000 (Refund)
What To Do Next:
File your Income Tax Return (ITR). The tax department will check your details, and if everything is correct, they’ll send the ₹1,00,000 refund to your bank account.
It’s that simple! Get started and claim your refund today!
How can I Check My Income tax Refund Status for 2024-25?
1. Use the Income Tax Portal.
Step 1: Access the income tax portal and sign in to your account.

Step 2: Click on 'e-File', choose 'Income Tax Returns' and then select ‘View Filed Returns’
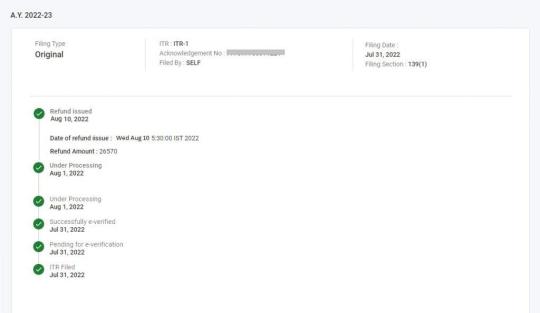
Step 3: You can see the status of your current and past income tax returns.
Step 4: Click on 'View details,' and you'll see the status of your income tax refund, as shown in the picture below.
2. Through NSDL Portal
Step 1: Visit the NSDL Portal
Step 2: Enter your PAN details, select the Assessment Year from the drop-down option for which tax refund is awaited and enter the Captcha Code

Step 3: Click ‘Proceed’ under the ‘Taxpayer Refund (PAN)’ option

You will be directed to a page that displays the ‘Refund Status’.
3. Through TRACES
Step 1: Log in to the income tax portal
Step 2: Click on ‘e-File’, select ‘Income Tax Returns’ and hit ‘View Form 26AS’

Step 3: You will be directed to the TDS Reconciliation Analysis and Correction Enabling System (TRACES) page, and Click on ‘View Tax Credit (Form 26AS/Annual tax statement) at the bottom of the page

Step 4: Select the Assessment Year from the drop-down menu, and select view as ‘text’

You are directed to a page that displays the details of the paid refund
Related Articles:
Old Vs New Tax regime
How to file ITR after the deadline
What are the reasons for Refund Failure?
Income tax Audit under section 44AB
What is a Belated Return & How to file a Belated Return ?
0 notes
Text
How Income Tax Return Online Filling
Filing your income tax return online can feel like navigating a labyrinth, but with the right guide, it’s more like a walk in the park. We’ll break down each step, simplify the jargon, and get you filing with confidence. Let’s dive in!
Why File Your Income Tax Return Online?
Filing your income tax return online isn’t just about following trends; it’s about leveraging modern technology to make your life easier. Here’s why you should consider it.
Convenience and Accessibility
Gone are the days of standing in long queues or filling out mountains of paperwork. Online filing lets you submit your return from the comfort of your home, anytime. It’s like having a tax office at your fingertips!
Accuracy and Efficiency
Online portals are designed to minimize errors. With built-in calculators and validation checks, you’re less likely to make mistakes. Plus, it speeds up the whole process, so you can get your refund quicker.
Step-by-Step Guide to Filing Your Income Tax Return Online
Ready to get started?
Follow these steps to file your income tax return online efficiently and correctly.
Step 1: Gather Necessary Documents
Step 2: Register or Login into the Income Tax Portal
Step 3: Select the Appropriate ITR Form
Step 4: Fill in Your Personal Details
Step 5: Provide Income Details
Step 6: Claim Deductions and Exemptions
Step 7: Review and Verify Your Return
Give your return a thorough once-over. Check for any errors or missing information. Think of it as proofreading an important email.
Step 8: Submit Your Return
Once satisfied, hit the submit button.
Congratulations, you’ve filed your return!
Step 9: E-Verify Your Return
E-verification is the final step to validate your return. You can do this through methods like Aadhaar OTP, net banking, or EVC. It’s like signing off on your work.
Common Mistakes to Avoid
Even with the best tools, mistakes happen. Here are common pitfalls to watch out for.
Incorrect Personal Information
Ensure all personal details are correct. Errors in your name, PAN, or bank details can lead to processing delays.
Misreporting Income
Be accurate with your income details. Misreporting can trigger unwanted scrutiny and penalties.
Not Claiming All Deductions
Maximize your tax savings by claiming all eligible deductions. Missing out means paying more tax than necessary.
Benefits of E-Verifying Your Return
Why bother with e-verification?
It’s not just a formality—it comes with real benefits.
Faster Processing
E-verified returns are processed quickly, meaning you’ll get your refund sooner. Who doesn’t like faster refunds?
Reduced Chances of Manual Errors
E-verification reduces the chances of manual errors in data entry, making your filing experience smoother and more reliable.
Conclusion
Filing your income tax return online doesn’t have to be daunting. With the right preparation and a systematic approach, you can navigate the process smoothly.
Happy filing!
By Paisainvests.com
#digital tax return#e-filing taxes#e-verifying tax returns#filing ITR#filing taxes online#income tax documents#income tax guide#income tax portal#income tax return#online tax filing#online tax return benefits#online tax submission#revised tax return#step-by-step tax filing#tax deductions#tax filing deadline#tax filing mistakes#tax filing tips#tax return process#tax return tips
0 notes
Text
ITR Filing: Step-by-Step Guide
Income tax return filing is an important financial exercise every taxpayer in India needs to undertake annually. It is not only a legal duty but also a part of personal finance management. Knowing the nitty-gritty of ITR filing, especially in these digital times, would help save you both time and stress while ensuring compliance with tax laws. This guide shall seek to provide you everything you need to know about ITR filing, including how to file ITR online and how to learn ITR filing effectively.
What is ITR Filing?
ITR filing is, in effect, a report of your income and tax liabilities sent to the Income Tax Department. Based on the report, the government assesses your tax liability and sees whether you are paying the correct amount of taxes. If there is excess tax paid by you, you can claim a refund through your ITR. If there are dues, you will have to pay them.
Importance of ITR Filing
Legal Obligation: That means filing an ITR is compulsory when the income is more than the basic exemption limit. Failure to do so will attract penalties and other related legal liabilities.
Processing of Refunds: You can process your refund in case you have paid more tax than your actual liability by filing your ITR.
Loan and Visa Processing: ITR receipts are always asked for when one applies for loans or visas. This is because they prove the source of income.
Carrying Forward Losses: Filing ITRs on time helps one carry forward losses to future years set off against income in the coming years.
Proof of Income: ITR filings are considered valid documents to prove your income, especially in the case of self-employed individuals or professionals.
Steps to File ITR Online
Taxpayers can easily meet their tax obligations through e-filing, which happens to be an effortless and convenient way of filing returns. The steps to file ITR online are as follows:
Register on the Income Tax e-Filing Portal
You have to register on the income tax department's e-filing portal to file ITR online. You can do this with your PAN, which will then become your user ID.
Choose the Right ITR Form
There are different ITR forms that are applicable for different categories of taxpayers. For instance, ITR-1 (SAHAJ) is for salaried individuals, whereas ITR-4 (SUGAM) is applicable in cases where the taxpayer has opted for a presumptive taxation scheme. So, select the form based on your sources of income.
Get Ready with all Required Documents
Before you start filing ITR online, keep the following documents handy:
PAN Card
Aadhar Card
Bank Statements
Form 16/16A
Form 26AS
Investment proof
Loan interest certificates
Login and Fill the Form
Login to the e-filing portal and fill in the appropriate form. Fill in all your personal information, your income details, deductions claimed by you, and tax payments made by you. There are also pre-filled forms that include all information available with the Income Tax Department, which you have to check and complete.
Verify Information
Re-check all the information entered for accuracy. Inaccurate information may further delay processing and/or lead to penalties.
Calculate Tax Liability
The tax liability will automatically be calculated on the portal based on the information provided. You can also directly pay any outstanding tax through the portal.
Submit and E-Verify
After filling and scrutinizing the form, submit it. Once submitted, you have to verify your ITR. You can e-verify using methods such as Aadhaar OTP, net banking, or by sending a signed ITR-V to CPC.
Learning ITR Filing
With the increase in online resources and courses, learning ITR filing isn't quite difficult. Here are some ways to learn ITR filing:
Online Courses and Tutorials
A lot of online courses relating to the filing of ITR are available, from basic to expert knowledge on filing ITR online.
Government Resources
The website of the Income Tax Department contains a lot of information on the process, including FAQs, User Manuals, and Video Tutorials that shall help you understand the process.
Professional Training Institutes
Most accounting and tax training institutes have courses on how to file ITR. Such courses not only provide theoretical knowledge but also practical training and a feel of the real thing.
Webinars and Workshops
Webinars and workshops conducted by tax professionals will help you with tips and other valuable inputs needed in filing the ITR efficiently.
Tips for Efficient ITR Filing
File Early: Get rid of the last-minute hassles and file your ITR well before time. This also gives you enough time to make any mistakes right.
Keep Records Organized: Throughout the year, there needs to be a systematic record of the financial documents, which helps in having a smoother filing process.
Seek Professional Help if Required: If you have complex tax situations, then it is always advised to take the services of a tax professional for accuracy and compliance.
Stay updated: Tax laws and rules are subject to frequent changes. Keep updating yourself with new amendments to avoid getting surprised.
Use reliable software: If you choose to do this on your own, use reliable tax filing software that shall guide and minimize errors.
Common Mistakes to Avoid
Wrong choice of form: Ensure the right ITR form is chosen based on sources of income and the category of taxpayers.
Information Mismatch: A mismatch of information regarding PAN, bank accounts, and income figures should not exist.
Ignoring Additional Incomes: It is one of the mistakes of avoiding interest from savings accounts, F.D.s, and other sources like rent received.
Mistake about Bank Details: One should quote bank account details correctly, so that the refund may be processed without hassle.
Non-Verification of ITR: The process is not complete by just submitting your ITR. You need to e-verify it to complete the process. On failure, it can render your filing invalid.
Conclusion
ITR filing is one such thing that every taxpayer needs to know. Indeed, a lot easier with ITR filing online, things have become much simplified. The whole process can be made hassle-free with knowledge of its importance, following the correct steps, and learning from the available resources in this regard. So, be informed, get organized, and meet your tax obligations with confidence.
0 notes
Text
NSSKCA: Simplifying Income Tax Return Filing
Filing income tax returns (ITR) is an essential obligation for all taxpayers in India. At NSSKCA, we understand the intricacies and challenges involved in the Income Tax Return Filing process. This comprehensive guide aims to simplify the process, ensuring that you can file your returns accurately and on time.

Importance of Filing Income Tax Returns
Filing your income tax return is not just a legal requirement but also brings several benefits:
Legal Compliance: Avoid legal penalties and stay compliant with the tax laws.
Financial Proof: Acts as proof of income for various financial transactions, including loan applications.
Refund Claims: Eligible for tax refunds if excess tax has been paid.
Loss Carry Forward: Helps in carrying forward losses to subsequent years, reducing future tax liabilities.
Visa Processing: Required for visa applications to prove your financial stability.
Key Steps in Filing Income Tax Returns
1. Gather Necessary Documents
Before starting the Income Tax Return Filing process, gather the following documents:
PAN Card: Permanent Account Number is essential for all tax-related activities.
Form 16: Issued by your employer, it contains details of your salary and TDS.
Form 26AS: Annual tax statement that includes details of tax deducted and deposited.
Bank Statements: Reflecting your income and investments.
Venture Verifications: Reports for derivations under Segment 80C, 80D, and so on.
Other Income Proofs: Income from other sources like interest, rental income, etc.
2. Choose the Correct ITR Form
Selecting the appropriate ITR form is crucial. Here are the common forms:
ITR-1 (Sahaj): For individuals with income up to ₹50 lakh from salary, one house property, and other sources.
ITR-2: For people and HUFs not having pay from business or calling.
ITR-3: For people and HUFs having pay from business or profession.
ITR-4 (Sugam): For individuals, HUFs, and firms (other than LLP) opting for presumptive taxation scheme.
3. Download and Fill the Form
Download the relevant ITR form from the Income Tax Department's website. Fill in the details accurately, including personal information, income details, deductions, and tax payments.
4. Validate and Submit
After filling the form, validate the information. Guarantee all obligatory fields are filled and there are no blunders.Submit the form electronically on the Income Tax e-filing portal.
5. Verification
Once submitted, verify your ITR using one of the following methods:
Aadhaar OTP: OTP shipped off the enlisted portable number connected with Aadhaar.
EVC: Electronic Verification Code sent to your registered mobile number and email.
Net Banking: Verify through your bank’s net banking account.
Digital Signature Certificate (DSC): For those who have a DSC.
Common Mistakes to Avoid
Incorrect Personal Information: Ensure PAN, name, and address details are correct.
Choosing the Wrong ITR Form: Select the form that matches your income sources.
Not Reporting All Income: Report all sources of income to avoid penalties.
Skipping Deductions: Claim all eligible deductions to reduce your tax liability.
Not Verifying ITR: Ensure to verify your return within 120 days of filing.
Assistance from NSSKCA
At NSSKCA NBFC Services, we offer expert assistance to ensure a hassle-free income tax return filing experience. Our services include:
Tax Consultation: Personalized advice on tax planning and optimization.
Document Preparation: Assistance in gathering and organizing necessary documents.
ITR Filing: End-to-end support in preparing and filing your income tax returns.
Post-Filing Support: Help with any queries or issues post-filing, including refunds and notices.
Conclusion
Filing your income tax return is a critical financial responsibility. With NSSKCA, you can navigate the complexities of the income tax return filing process with ease and confidence. Ensure compliance, maximize your benefits, and avoid penalties by partnering with us for your tax filing needs.
1 note
·
View note
Text
ITR Filing In Rohini | Income Tax Return Filing In Rohini
ITR filing in Rohini. Chartered accountant firm in sec 24 Rohini. Looking for a GST registration, ITR filing, or MSME registration for your business? Call us and consult to the best CA of Rohini
Chartered accounting services, income tax services, accounting and , financial services, auditing and assurance services, business setting services, sales tax, VAT, and service tax are among the services that CA Nakul Singh Associates offers to its clients.
All services are provided following thorough research and the gathering of relevant company data. To achieve the highest level of client satisfaction, we also ensure that these services are provided on time. Our professionals ensure that the services meet industry standards and legal requirements. We provide timely, dependable, adaptable, and credible services since we are aware of our clients' diverse financial needs and expectations.
ITR (Income Tax Return) filing in Rohini
Like in any other region in India, filing an ITR (Income Tax Return) in Rohini entails providing the Income Tax Department with information about your income for a specific fiscal year. This procedure guarantees that people and companies pay the correct amount of tax on their income and abide by tax regulations. An outline of the Rohini ITR filing procedure is provided below:
How to File ITR by CA (ca nakul singhal associates) in Rohini
Step 1: Collect Necessary Documents
Before starting the ITR filing process, gather all the necessary documents. These typically include:
Documentation Required:
PAN card
Aadhaar card
Bank account details
Form 16/16A (issued by employers)
Form 26AS (tax credit statement)
Investment proofs (for claiming deductions)
TDS certificates (for any tax deducted at source)
How to File an ITR in Rohini
Step 2: Select the Appropriate ITR Form
Based on the sources of your income, choose the correct ITR form. Typical forms consist of:
ITR-1 (Sahaj) is for people whose total income does not exceed ₹50 lakh and who receive income from one house property, one salary, and other sources (interest, etc.).
ITR-2 for people and HUFs without a source of income from a business or occupation.
ITR-3 for people and HUFs who make money from their own businesses or occupations.
ITR-4 (Sugam) for those with income from presumed businesses, HUFs, and businesses (other than LLPs).
Step 3: Complete the ITR Application
Fill out the selected ITR form by hand. Make sure that all the information—personal, income, deduction, and tax computation—is filled in precisely. Form errors may result in delays or rejection.
Step 4: Go to the Office of Income Taxation
After completing the form, go to the Rohini income tax office that is closest to you. Bring a printed copy of the completed ITR form and all of your documentation with you.
Step 5: Send in the ITR paperwork
Send the ITR form to the Income Tax Office with the required paperwork. After a successful submission, the tax office personnel will confirm the information and issue an acknowledgment receipt.
Step 6: ITR verification
Your ITR needs to be confirmed after submission. This can be completed in one of two ways: either by delivering a signed physical copy of the ITR-V (acknowledgment) to the Centralized Processing Center (CPC) in Bengaluru within 120 days of filing the return, or online via the Income Tax Department's website using techniques like Aadhaar OTP and EVC.
Step 7: Check the Status of Your ITR
By visiting the official website of theIncome Tax Department or getting in touch with the tax office where your return was filed, you can find out the status of your ITR.
Advice for an Easy ITR Submission Offline
To prevent mistakes, double-check all of the data you supplied on the ITR form.
Make sure you have all of the necessary paperwork.
Consider speaking with a tax expert orRohini taxcounselor if you are not familiar with the procedure.
For future use, preserve copies of all submitted paperwork and the acknowledgment receipt.
You can successfully file your ITR offline in Rohini by following these steps, assuring compliance with tax laws and averting potential penalties.
Your ITR filing will be assisted by CA Nakul Singhal Associates in Rohini.
Chartered accountant and tax consultant:
CA Nakul Singhal is a great resource for assistance of all types. In Rohini, many people and companies turn to chartered accountants for tax advice. The experts in this field can guarantee proper and speedy ITR filing because they have extensive knowledge of tax rules. They also offer advice on compliance issues, deductions, and tax planning.
ITR Submission Services:
You may get all the services, such as GST registration, MSME registration, ITR filing, etc., from CA Nakul in Rohini. These services are convenient and reasonably priced, especially for individuals who are unfamiliar with the complexities of tax filing.
The significance of timely ITR filing
Prevent fines:
You can assist in preventing late filing penalties and interest charges by filing your ITR on time. Individuals typically have until July 31 of the assessment year to file their ITRs, while businesses that need to be audited have until September 30 of the same year.
Request a reimbursement:
If you have overpaid taxes, you can get a refund from the Income Tax Department by filing your ITR on time.
Adherence to the law:
For both individuals and corporations with taxable income, filing an ITR is legally required. Legal repercussions and tax authorities' investigations may result from noncompliance.
To put it briefly, managing financial health and guaranteeing tax compliance need filing ITRs in Rohini. To minimize your tax liability and prevent legal problems, you must file your ITR on time and accurately, whether you decide to do it yourself or hire an expert.
Visit - https://canakulsinghalassociates.com/blog/12/itr-filing-in-rohini
Contact - +9199537 75505
Email ID - [email protected]
0 notes
Video
youtube
How to file Form 10IEA| Opting out of New Tax Regime| Must see File before filing the income tax return
How to file Form 10IEA| Opting out of New Tax Regime| Must see File before filing ITR @cadeveshthakur #form10iea #newtaxregime #incometax #cadeveshthakur Index 00:00 to 03:19 What is Form 10IEA 03:20 to 09:00 How to file Form 10IEA 09:01 to 13:02 Opting out of New Tax Regime Dear Viewers, In this video we have shared the process "How to file Form 10IEA" in case an Assessee is opting out of New Tax Regime and opts Old Tax regime in order to get the more tax exemptions. Taxpayers must see this before filing the ITR for AY 2024-25. Form 10-IEA allows taxpayers to exercise their right to choose between the old and new tax regimes. If you want to opt for the old tax regime, you must file Form 10IEA. Here’s a quick overview: Purpose: Form 10-IEA is used by taxpayers with business income to either opt out of the new tax regime or re-enter it. You can file this form twice in your lifetime—one for opting out and another for re-entering the new regime. Sections of Form 10 IEA: Basic Information: Includes details like your name, PAN, assessment year, and status. The system will auto-select the appropriate option based on your filing history. Additional Information: Provides space for additional details related to IFSC units (if any). Declaration and Verification: The taxpayer declares their choice to opt out or re-enter the new tax regime. Filing Process: Log in to the e-Filing portal. Go to “e-File” - “Income Tax Forms” - “File Income Tax Forms.” Select “Form-10IEA” and fill in the required information. Remember to collect relevant information and mention your choice of tax regime and dates for transparency. If you have any specific questions or need further assistance, feel free to ask! 😊📝 🎥 Hello, lovely viewers! Welcome back to the @cadeveshthakur channel! 🎉 YouTube Channel: https://www.youtube.com/@cadeveshthakur TDS ki कक्षा: https://www.youtube.com/playlist?list=PL1o9nc8dxF1RqxMactdpX3oUU2bSw8-_R E-commerce sellers: https://www.youtube.com/playlist?list=PL1o9nc8dxF1ShUNXkAbYrAYj2Pile1Rim GST Knowledge Bank: https://www.youtube.com/playlist?list=PL1o9nc8dxF1RjdRrG4ZKXeJNed6ekhjoR Goods & Services Tax: https://www.youtube.com/playlist?list=PL1o9nc8dxF1SlBw2kSpZ9ay1jnEOkbDYN TDS: https://www.youtube.com/playlist?list=PL1o9nc8dxF1RXi2GaEckeXGmJy_FYOj9q Shorts for Accountants, Professionals, Finance, Students: https://www.youtube.com/playlist?list=PL1o9nc8dxF1TqoRTWoA1_l0kmtsbyNEB5 Accounting concept, Entries, Final Accounts preparation: https://www.youtube.com/playlist?list=PL1o9nc8dxF1T4GSjBPboXxBgFgkVZmDbQ Direct Taxation: https://www.youtube.com/playlist?list=PL1o9nc8dxF1S7BBNeuL3fzV_fDl9V88C2 🎥 Hello, lovely viewers! Welcome back to the @cadeveshthakur channel! 🎉 I’m thrilled to have you here, and I want to connect with you beyond YouTube. Let’s take our journey together to the next level! 😊 LinkedIn: https://www.linkedin.com/in/cadeveshthakur/ Instagram: https://www.instagram.com/cadeveshthakur/ Twitter: https://twitter.com/cadeveshthakur Facebook: https://www.facebook.com/cadevesh Whatsapp Group: https://whatsapp.com/channel/0029Va6GOVE9MF92Ylmo7e0L #cadeveshthakur https://cadeveshthakur.com/ Remember, our community is more than just a channel—it’s a family. Let’s connect, learn, and grow together! Hit that Subscribe button, tap the notification bell, and let’s spread financial wisdom one click at a time. 🚀 Remember, knowledge empowers us all! Let’s learn together and navigate the complex world of finance with curiosity and diligence. Thank you for being part of the cadeveshthakur community! 🙌 Disclaimer: The content shared on this channel is purely for educational purposes. As a Chartered Accountant, I strive to provide accurate and insightful information related to GST, income tax, accounting, and tax planning. However, please note that the content should not be considered as professional advice or a substitute for personalized consultation. form 10iea,how to file form 10 iea,form 10iea income tax,income tax update,10iea form kaise bhare,form 10ie,how to file form 10iea,how to fill form 10iea,how to file form 10iea income tax,10iea form income tax in hindi,form 10 iea,income tax form 10iea,form 10iea for salaried employees,opting out of new tax regime,cadeveshthakur,form 10iea applicability,form 10iea telugu,form 10iea income tax malayalam,form 10iea in computax software
0 notes
Text
Social Stock Exchange Registration in India
SSE REGISTRATION OF NPO
SSE registration aim is to enable these organizations to get sustainable funding and expansion for their work of transforming people’s lives positively. Listing/Issuing of ZCZP (Zero Coupon Zero Principle) instruments by NPO after registration on social stock exchange. This is a separate segment of the recognized stock exchange that enables Social Enterprises which are NPOs to raise funds through the issuance and listing of ZCZP instruments.
The first step is for the NPO to register itself with SSE and only eligible NPOs can list their instruments for raising funds. There have been certain minimum requirements prescribed for a not-for-profit organization to register on Social Stock Exchange. There is the mandatory criteria that include the mandatory age of NPO being at least 3 years, valid certificate under U/s 12A/12AA/12AB of the income tax, valid 80G registration, annual spending of at least 50 lakhs and a minimum 10 lakh of funds in the past year. This registration is valid for 1 year and renewable after 1 year. In this case, only registered NPO can list or issue ZCZP within the registration validity period, and listing is not mandatory for registered NPO.
Registering Process Of NPO
The NPO needs to register themselves on the SME platforms of the stock exchanges, BSE SSE and NSE SSE. NPOs seeking to register must apply separately to each platform, adhering to the specific checklists and guidelines specified by both exchanges. Compliance with these distinct registration procedures is essential to ensuring successful registration and listing on both the BSE and NSE. This is valid for one year, and it can be renewed after one year. NPO have to be aware that they cannot be linked with Political or religious organization or activities, Infrastructure Company, housing finance, professional trade association and not cover in ineligible activities also.
Not for profits can get SSE Registration. Registration refers to the act of a social enterprise validated by the SSE as being eligible to raise funds. Listing is the process of making a specific type of security available on the SSE for subscription by investors. Listing refers to the specific security instrument (ZCZP/SIB/DIB etc) through which funding is mobilised on the SSE.
Registration Procedure For SSE On BSE
NPOs seeking registration on the BSE SSE must submit a formal application on their official letterhead to the BSE SSE. This application shall go along with the required documents listed below.
Certificate Of Constitution Of NPO
MOA, AOA, Trust Deed, Bye Laws Of Or Any Other Governing Document
Copy Of PAN, TAN, GST
ITR Of Last 3 Years
Audited Financial Statements Including Auditors Report For Last 3 Financial Years.
80G Registration Under Income Tax Act
Registration Certificate Under The Income Tax Act, 1961 Under Section 12AB (Along With Previous Registrations Under 12A/12AA, If Applicable) And/Or 10 (23C).
Annexure I To Be Given On The Letter Head Of The Entity Contains The Confirmation By The Entity That The Entity Is Formed And Registered Under Acts Such As Indian Trusts Act, 1882, Societies Registration Act Etc.
Annexure II Is The Certificate Of Chartered Accountant Stating Annual Spending, Past FY Funding, Filled Annual Returns Within Due Dates, And Other Information As Required Of The NPO.
Annexure III Is The Confirmation Of Eligibility Criteria For Being Identified As Social Enterprise.
Annexure IV Is The Document That Contains The Vision Statement, Mission Statement, Address, NGO Darpan Registration* Details, Its Governing Board, Number Of Staff, Details Of Statutory Auditor, Representative Letter, Key Projects Handled, Social Audit Reports/ Impact Assessment Reports For Projects (If Any)
Details Of Fee
The NGO Darpan (NGO-PS) is a portal provided by the NITI Aayog that connects NGOs, voluntary organizations, and key government ministries. It aims to enhance collaboration, efficiency, transparency, and accountability between the government and the voluntary sector. The portal helps NGOs and the government work together more effectively and offers up-to-date information on new and ongoing government projects and programs, fostering better communication and partnership.
Registration Process Of SSE On NSE
NPOs who want to register on the NSE SSE must submit a formal application on their official letterhead to the NSE SSE. This application should be go along with required documents listed below.
Application As Per Annexure I Contains The Information Of NPO Like Name, Address And Other Information. (PDF Of Annexures To Be Attached With This)
Certificate Of Constitution Under The Relevant Act Such As Public Trust Statue Of The Relevant State, Societies Registration Act, 1860, Indian Trusts Act, 1882, Companies Act, 2013
NPO Must Have Been Registered At Least 3 Years Prior To The Date Of Application
MOA, AOA, Trust Deed, Bye Laws Of Or Any Other Governing Document
Registration Certificate Under Section 12A/12AA/12AB Under Income Tax Act, 1961. Please Note That The Registration Certificate Should Be Valid For At Least Next 12 Months From Date Of Application
80G Registration Under Income Tax Act
Attach Last 3 Financial Years Audited Financial Statement Along With The Fund Flow Statement Of The Registered NPO
Annual Reports For Last 3 Financial Years As Well, In Case The Entity Is A Section 8 Company.
Resolution For Registration On Social Stock Exchange Along With The Annexures Given By The NSE For The Registration.
NPO Can Apply For Its Registration Along With The Fee In Annexure I Which Is The Format For Application Of Registration.
Annexure II Is The Undertaking From The NPO On Their Letterhead Stating The Eligibility Of The NPO To Be Identified As Social Enterprise And Information About Its Promoters.
Social Auditor Or Statutory Auditor Give Undertaking In Annexure III From The Stating Compliances Of Regulation 292E Of SEBI (ICDR) Regulations, 2018, Information In Respect Of The Annual Spending And About The Funding Of The Past FY Of The Entity.
Firstly, there is the same registration process for NSE SSE and BSE SSE by NPO. However, on BSE SSE, we can check our eligibility by filling out the Yes or No question and answers. If you are eligible and give the right answers as per the eligibility criteria, then successful word mention on screen and then register your interest, but on NSE SSE, we need to create a login credential, then we can fill out the application form, and fees are very minimal as per the circular, but we have not been notified yet. On BSE SSE, the process is a little bit easier as compared to NSE SSE.
Generally, the Exchange reverts to the Issuer with the queries/approval on the application within T+5 working days from the receipt of the application which is correct and complete in all respects. However, additional days may be required on case-to-case basis.
Satisfactory response to the queries raised by the exchange shall be submitted on immediate basis which in any way shall not be later than one month from the last requirement raised. Exchange reserves the right to return the applications if not responded satisfactorily within one month. The fees for registering on a SSE can vary depending on specific exchange and SEBI has not notified a separate fee structure for Social Stock Exchanges as of yet.
Note: The documents to be submitted for registration of an NPO are required to be submitted by CEO/Managing Trustee/Statutory Auditor/any authorized signatories from governing body.
There are the different kinds of instruments through which funds can be raised by an NPO on an SSE:
Zero Coupon Zero Principal Instruments
Donation Through Mutual Funds Schemes
Development Impact Bonds
There are the different types of the investors who might invest through SSE.
Only institutional and NPOs from India can invest in not for profit entities. Non institutional investors Companies, family run foundations/trusts and HNIs are qualified to invest in the SSE as non-institutional investors. This means that all philanthropic donors such as Tata Trust, Azim Premji Foundation, Wipro Foundation, Individuals (who will invest more than INR 2 lakhs) and Corporates with CSR obligations would be allowed to make social investments through the SSE.
Conclusion: If NPO want to access the market and explore more for funding, then register on SSE, which can be BSE or NSE. Both have the same registration process, but BSE is a more easy and valuable process that can be easily understood by giving the questions and answers to the eligibility criteria. There is the mandatory registration process for NPOs and providing accurate documents as per above.
DISCLAIMER: The information provided in this article is intended for general informational purposes only and is based on the latest guidelines and regulations. While we strive to ensure the accuracy and completeness of the information, it may not reflect the most current legal or regulatory changes. Taxpayers are advised to consult with a qualified tax professional or you may contact to our tax advisor team through call +91-9871990888 or [email protected].

0 notes
Text
Applying for a personal loan of Rs 50 lakh can be a significant financial decision. Whether you need the funds for a business venture, medical emergency, home renovation, or any other major expense, understanding the application process is crucial. Here's a detailed guide to help you navigate the steps involved in applying for such a large personal loan.
1. Assess Your Eligibility
Before applying for a Rs 50 lakh personal loan, it's important to assess your eligibility. Most financial institutions have specific criteria, including:
Age: Typically, applicants should be between 21 and 60 years old.
Income: A high income is often required to secure a large loan amount. Lenders may require a monthly income of at least Rs 1 lakh.
Employment: Stable employment with a reputable organization, or a well-established business if self-employed, is preferred.
Credit Score: A good credit score (750 or above) increases your chances of approval and helps in securing a lower interest rate.
Debt-to-Income Ratio: Lenders consider your existing debt compared to your income to ensure you can manage additional loan payments.
2. Choose the Right Lender
Selecting the right lender is crucial. Research various banks, non-banking financial companies (NBFCs), and online lending platforms. Compare their interest rates, processing fees, and loan terms. Look for lenders that offer competitive rates and flexible repayment options. Some lenders may have pre-approved loan offers for existing customers, which can simplify the process.
3. Calculate Your EMI
Before proceeding with the application, calculate the Equated Monthly Installment (EMI) for your Rs 50 lakh loan. Most lenders provide online EMI calculators where you can input the loan amount, interest rate, and tenure to get an estimate. Ensure the EMI fits within your monthly budget without straining your finances.
4. Gather Required Documents
Documentation is a key part of the loan application process. Prepare the following documents:
Identity Proof: Aadhaar card, PAN card, passport, or driving license.
Address Proof: Utility bills, rental agreement, or passport.
Income Proof: Salary slips, income tax returns (ITR), and bank statements for the last six months.
Employment Proof: Offer letter, appointment letter, or employment certificate.
Business Proof (if self-employed): Business registration certificate, GST returns, and audited financial statements.
Credit Score Report: Some lenders may ask for a recent credit score report.
5. Fill Out the Application Form
Once you’ve chosen a lender, you can either apply online or visit the branch to fill out the application form. Ensure that all the details are accurate and match the information in your documents. Double-check the loan amount, tenure, and interest rate before submitting the application.
6. Submit the Application and Await Approval
After submitting your application along with the required documents, the lender will verify your details. This process may include background checks, credit score assessment, and income verification. If everything is in order, the lender will approve your loan application. The approval process can take anywhere from a few hours to a few days, depending on the lender.
7. Loan Disbursement
Once your loan is approved, the lender will disburse the amount directly to your bank account. In the case of a Rs 50 lakh loan, disbursement may be done in a lump sum or in tranches, depending on the lender's policy and your needs.
8. Repayment
Repaying a Rs 50 lakh personal loan requires careful financial planning. Ensure that you have a clear repayment strategy to avoid defaults, which can negatively impact your credit score and lead to penalties. Most loans offer the option of prepayment or part-payment, which can help reduce the interest burden.
Conclusion
Applying for a Rs 50 lakh loan involves careful planning, from assessing your eligibility to selecting the right lender and preparing the necessary documentation. By following the steps outlined in this guide, you can streamline the application process and increase your chances of approval. Remember, responsible borrowing and timely repayment are key to maintaining a healthy financial profile.
0 notes
Text
Comprehensive Guide to Essential Business Services: PF ESI Registrations, Monthly Returns, IT Returns, GST Services, and Company Registration
SLNConsultancy #SLNPFConsultancy #SLNESIConsultancy #slnpfesiconsultancy
PF and ESI Registrations
Provident Fund (PF) Registration:
Provident Fund registration is mandatory for organizations with 20 or more employees. This social security initiative by the Government of India helps employees save a portion of their salary each month. The employer also contributes an equal amount, ensuring a secure financial future for the workforce.
Steps for PF Registration:
Employer Registration: Employers need to register on the EPFO (Employees' Provident Fund Organization) portal.
Fill Application Form: Provide essential details about the establishment and employees.
Submit Required Documents: Submit documents such as PAN, incorporation certificate, and employee details.
Verification and Approval: The EPFO will verify the details and issue a PF registration number.
Employee State Insurance (ESI) Registration:
ESI registration is mandatory for organizations with 10 or more employees earning less than ₹21,000 per month. It provides employees with medical, monetary, and other benefits from the ESI Corporation.
Steps for ESI Registration:
Employer Registration: Register the organization on the ESIC (Employee State Insurance Corporation) portal.
Fill Application Form: Provide establishment and employee details.
Submit Required Documents: Submit PAN, establishment registration certificate, and employee details.
Verification and Approval: The ESIC will verify the details and issue an ESI registration number.
PF and ESI Monthly Returns
PF Monthly Returns:
Employers must file monthly returns for Provident Fund contributions through the EPFO portal. The returns should include details of the wages, contributions, and the total number of employees.
Steps for Filing PF Monthly Returns:
Generate ECR: Generate an Electronic Challan Cum Return (ECR) file using employee details.
Upload ECR: Upload the ECR file on the EPFO portal.
Payment of Contributions: Make the payment towards the PF contributions.
Receive Acknowledgment: Download the acknowledgment receipt for future reference.
ESI Monthly Returns:
Employers must also file ESI monthly returns to ensure proper contribution towards employee insurance.
Steps for Filing ESI Monthly Returns:
Login to ESIC Portal: Access the ESIC portal with employer credentials.
Update Employee Details: Ensure employee details are up-to-date.
Generate Challan: Generate a challan for the monthly contributions.
Make Payment: Pay the contributions through the online portal.
Receive Acknowledgment: Download the receipt for records.
Income Tax (IT) Returns
Income Tax Returns (ITR):
Filing Income Tax Returns is an annual obligation for individuals and businesses with taxable income. It helps in declaring income, claiming deductions, and paying taxes.
Steps for Filing IT Returns:
Collect Documents: Gather necessary documents like Form 16, TDS certificates, and investment proofs.
Login to IT Portal: Access the Income Tax Department’s e-filing portal.
Fill ITR Form: Choose the relevant ITR form and fill in the income and deduction details.
Verify and Submit: Verify the details, compute the tax payable, and submit the return.
E-Verification: Complete the e-verification process using Aadhaar OTP, net banking, or other methods.
Goods and Services Tax (GST) Services
GST Registration:
Businesses exceeding the turnover threshold must register for GST. It is a single tax on the supply of goods and services, right from the manufacturer to the consumer.
Steps for GST Registration:
Login to GST Portal: Access the GST portal and choose the registration option.
Fill Application Form: Provide business details, including PAN, address, and bank details.
Upload Documents: Upload necessary documents like proof of business, identity proof, and photographs.
Verification: The GST officer will verify the application and issue a GSTIN (Goods and Services Tax Identification Number).
GST Returns:
Registered businesses must file regular GST returns, documenting their sales, purchases, and tax paid.
Steps for Filing GST Returns:
Login to GST Portal: Access the portal using GST credentials.
Prepare Returns: Prepare the returns using inward and outward supply details.
Upload and Submit: Upload the return data and submit it online.
Pay Tax Liability: Pay any tax liability arising from the returns.
Receive Acknowledgment: Download the acknowledgment for records.
Company Registration
Company Registration:
Registering a company legally recognizes it as a separate entity, providing benefits such as limited liability, credibility, and access to funding.
Steps for Company Registration:
Choose Business Structure: Decide on the type of company – Private Limited, Public Limited, LLP, etc.
Obtain DSC and DIN: Obtain Digital Signature Certificate (DSC) and Director Identification Number (DIN) for the directors.
Name Approval: Apply for the company name approval on the MCA (Ministry of Corporate Affairs) portal.
File Incorporation Documents: File incorporation documents like MOA (Memorandum of Association) and AOA (Articles of Association).
Certificate of Incorporation: Once approved, the Registrar of Companies (RoC) issues the Certificate of Incorporation.
Understanding these essential business services ensures compliance with legal requirements and promotes smooth business operations. Whether it’s registering for PF and ESI, filing monthly returns, managing IT and GST, or registering a new company, each step is crucial for the efficient functioning and growth of a business.
0 notes
Text
How to Choose the Best Platform for Online Income Tax Return Filing
Income Tax Return Filing Online: A Guide to Hassle-free Compliance
Filing income tax returns (ITR) is a crucial annual obligation for every taxpayer in India. The process has been significantly streamlined with the advent of online filing systems, making it more convenient and accessible than ever before. Here’s a comprehensive guide to help you navigate the online ITR filing process seamlessly.
Why File Income Tax Returns Online?
Online filing offers several advantages over traditional paper filing:
Convenience: File from anywhere, anytime, reducing dependency on physical visits to tax offices.
Accuracy: Built-in validation checks minimise errors, ensuring your return is filed correctly.
Speed: Instant acknowledgement and quicker processing by tax authorities.
Security: Data encryption and secure authentication protocols protect your personal and financial information.
Steps to File Income Tax Return Online
1. Preparation: Gather Documents and Information
Before you begin, ensure you have the following:
PAN: Permanent Account Number
Form 16: Issued by your employer, detailing your income and tax deducted at source (TDS).
Bank Statements: Statements showing interest earned on savings accounts and fixed deposits.
Investment Proofs: Details of investments eligible for deductions under Section 80C, 80D, etc.
Other Income Documents: Any income from house property, capital gains, or other sources.
2. Choose the Correct Form
Select the appropriate ITR form based on your income sources:
ITR-1 (Sahaj): For salaried individuals with income up to ₹50 lakh, one house property, and income from other sources.
ITR-2: For individuals and HUFs having income from more than one house property, capital gains, etc.
ITR-3: This is for individuals and HUFs with income from business or profession.
3. Register on the Income Tax Department’s e-Filing Portal
Register on the portal using your PAN if you're a new user. Existing users can log in with their credentials.
4. Fill and Submit the Form
Download the applicable ITR form and fill in the details offline or online.
Validate the form using built-in validation utilities.
Submit the form. You may digitally sign it using Aadhaar OTP or DSC (Digital Signature Certificate) or submit it without a signature.
5. Verification
After submitting the form, verify your return within 120 days of filing. You can verify electronically through Aadhaar OTP or EVC (Electronic Verification Code) or by sending a signed physical copy to the CPC Bengaluru.
6. Acknowledgment and Processing
Upon successful verification, the Income Tax Department will process your return. You will receive an acknowledgement (ITR-V) via email. This serves as proof of filing until the return is processed.
Tips for Smooth Filing
Keep Records: Maintain records of income, deductions, and investments throughout the year.
Stay Updated: Be aware of changes in tax laws and filing procedures.
Seek Assistance: Consult a tax professional for complex scenarios or filing questions.
Filing income tax returns online ensures compliance with tax laws while leveraging technology for a hassle-free experience. Embrace the convenience and efficiency of e-filing to manage your tax obligations effectively.
0 notes
Last Seen Blogs