#Rack and Panel Connector
Explore tagged Tumblr posts
Visit Tumblr Blog
Explore Tumblr blogs with no restrictions, modern design and the best experience.
Last Seen Tumblr Blogs


Fun Fact
There are dozens of funny blogs to kill time on Tumblr.
Text
https://www.futureelectronics.com/p/interconnect--backplane-connectors--backpanel-connectors/188835-1-te-connectivity-5170771
Backplane connector types, Wire connector Receptacles, Power Jacks
Z-PACK Series 154 Position 2 mm Pitch Press Fit Through Hole Backpanel Connector
#TE Connectivity#188835-1#Backplane Connectors#Rack and Panel Connector#Wire connector Receptacles#Power Jacks#card edge connector#high-speed#electronic connector#electric board edge connector#socket mount wire
1 note
·
View note
Text
https://www.futureelectronics.com/p/interconnect--backplane-connectors--backpanel-connectors/188835-1-te-connectivity-3135983
Applications for Backpanel Connector, terminal block, barrier strip, strips
Z-PACK Series 154 Position 2 mm Pitch Press Fit Through Hole Backpanel Connector
#TE Connectivity#188835-1#Backplane Connectors#Rack and Panel Connectors#Applications#terminal block#barrier strip#strips#power connectors#what is a backpanel connector#edge connector#board mount receptacle#Header plug#card edge
1 note
·
View note
Text
Price: [price_with_discount] (as of [price_update_date] - Details) [ad_1] Mevigo DIY Shoe Rack Shelves Plastic Portable and Folding double Dekar Shoe RackIntroduction: A stylish design shoe rack adds a touch of style to entryway or bedroom. It is great and practical in use for home and office. We strongly recommend this Portable shoe Rack which is perfect for organizing shoes, Classic designed, highly functional and collapsible for easy transportation. Really an ideal way to organize your shoes and more. shoe rack for home, shoe rack, shoe rack for home plastic, plastic shoe rack, shoe rack with door, shoe cabinet, plastic shoe rack for home, plastic shelf rack, shoe racks, shoe rack for home with cover, wooden shoe rack for home, shoes rack for home, shoe stand for home, shoe cabinet for home, shoe organiser, shoe box, shoe boxes storage, shoes rack, shoe rack for home metal, shoe stand, shoe organiser space saver, chappal stand for home, branded shoe rack, This plastic modular shelving shoe storage cabinet is an economic but elegant piece for daily use, top rectangular blocks stores your sneakers, high heels and sandals, bottom storage cubes store your boots. Better yet, you can also use it as a storage cabinet to keep your folding clothes, books, CDS and art supplies. Consists of durable ABS connector and high-quality PP panel, this shoe rack features in eco-friendly material, excellent stability and easy maintenance. A lightweight design is convenient for transportation. A practical and attractive shoe rack for the entrance, hallway or small rooms! Features:Provide ample storage for shoes, umbrellas, and accessories. Stylish for your entryway or bedroom and goes well with any piece of your furniture. waterproof, rustproof and easy to clean. Specifications:- Color: Multi - Material: ABS connectors, Soft PP Plastic Panel and Rust-proof Metal Frame - Assembly Required: Yes 【Storage Aplenty】This versatile plastic shoe rack organizer, able to accommodate up to 30 pairs of shoes, doubles as storage for bags and toys. Its space-saving side hooks offer a handy spot to hang hats or keys 【Robust and Secure】This high-quality shoe rack is Crafted with premium connectors, durable plastic panels, and strong steel wire, each cube of this shoe storage shelf holds up to 10 kg. 【Easy Assembly and Disassembly】The shoe rack for home includes a wooden mallet makes assembling this shoe rack quick and easy. This organizer can also be quickly disassembled to store or transport, letting you easily rearrange this around your home 【Adaptable and Versatile】This cube storage rack is portable and can be personalized according to your needs. It can also be split into 2 or 3 separate rows, or separate small shelf units to organize shoes, or belongings in your wardrobe, bathroom, or any other desired space 【EASY TO CLEAN】 : The PP plastic panels are very durable and can be cleaned with water directly. 【MULTIPURPOSE】 : It can be used to store multiple things like shoes, boots, books, clothes, toys and much more 【STRONG STORAGE ABILITY】: 10lbs load-bearing for each cube, this shoe rack can hold shoes from athletic shoes, high heels, or work boots to meet your long-term storage needs; dust-proof PP Plastic Doors with metal ring design for easy opening and closing. [ad_2]
0 notes
Text
5 Critical Mistakes That Cause Network Downtime in Data Centers

Network downtime in data centers isn't just an inconvenience—it's a business catastrophe that can cost companies millions of dollars per hour. According to recent industry studies, the average cost of data center downtime has reached $9,000 per minute, making prevention not just a technical priority but a critical business imperative.
After analyzing hundreds of data center failures over the past decade, we've identified five recurring mistakes that consistently lead to network outages. Understanding these common pitfalls can help your organization implement better system downtime prevention strategies and maintain the reliability your business depends on.
Mistake #1: Inadequate Cable Management and Infrastructure Planning
The foundation of any reliable data center network lies in its physical infrastructure, yet cable management remains one of the most overlooked aspects of data center design. Poor cable organization doesn't just look unprofessional—it creates a cascade of problems that inevitably lead to network failures.
When fiber optic patch cords are haphazardly routed through racks without proper planning, technicians face several challenges. First, identifying specific connections becomes nearly impossible during emergency situations when every second counts. Second, the risk of accidental disconnection increases dramatically when cables are tangled or improperly secured.
More critically, inadequate cable management creates airflow restrictions that can lead to overheating. When network infrastructure components operate outside their optimal temperature ranges, failure rates increase exponentially. We've seen cases where simple cable reorganization reduced equipment failure rates by over 40%.
The solution involves implementing structured cabling systems with proper patch panel solutions that provide clear labeling, organized routing, and easy access for maintenance. Professional-grade patch panels not only improve organization but also provide better signal integrity and easier troubleshooting capabilities.
Mistake #2: Using Substandard Network Components
In an effort to reduce initial costs, many organizations make the critical error of choosing cheap, low-quality network components. This penny-wise, pound-foolish approach almost always results in higher long-term costs due to increased failure rates and more frequent replacements.
Substandard fiber optic cables and connectors are particularly problematic because they're often the last components suspected when network issues arise. Poor-quality cables may work initially but degrade over time due to inferior materials, inadequate shielding, or manufacturing defects. When these components fail, they rarely fail completely—instead, they create intermittent issues that are difficult to diagnose and can plague networks for months.
Quality fiber optic patch cords and adapters use premium materials and undergo rigorous testing to ensure consistent performance over their entire lifespan. While the initial investment may be higher, the reduced maintenance costs, lower failure rates, and improved reliability more than justify the expense.
Consider this real-world example: A financial services company saved $50,000 on network components during their initial build-out by choosing cheaper alternatives. Within eighteen months, they had spent over $200,000 on emergency repairs, replacement components, and lost productivity due to network instability. They eventually replaced their entire infrastructure with enterprise-grade components.
Mistake #3: Insufficient Redundancy and Single Points of Failure
One of the most dangerous assumptions in data center design is that individual components will always function as expected. Networks without proper redundancy are essentially gambling with business continuity, and the house always wins eventually.
Single points of failure can exist at multiple levels of network infrastructure. At the physical layer, having only one path for critical data flows means any component failure results in complete service disruption. At the equipment level, relying on single switches, routers, or even power sources creates unnecessary vulnerability.
Effective redundancy planning requires identifying every potential failure point and implementing backup systems. This includes redundant fiber optic cable paths, backup power systems, and duplicate network equipment. However, redundancy isn't just about having backup components—it's about ensuring those backups can seamlessly take over when needed.
Many organizations make the mistake of implementing redundancy systems but never properly testing them. Regular failover testing is essential to ensure backup systems work correctly when they're actually needed. We recommend monthly testing of all redundancy systems and immediate investigation of any failover delays or issues.
Mistake #4: Inadequate Environmental Monitoring and Control
Data center environments are more fragile than many realize. Temperature fluctuations, humidity changes, and power anomalies can all contribute to network equipment failures. Yet many organizations implement insufficient environmental monitoring, leaving their networks vulnerable to preventable outages.
Temperature control is particularly critical for fiber optic infrastructure. Extreme heat can cause cable jackets to degrade, while rapid temperature changes can create expansion and contraction that stresses connections. Humidity problems can lead to corrosion in metal components and affect the performance of sensitive electronic equipment.
Comprehensive environmental monitoring should include temperature sensors throughout the facility, humidity monitoring, power quality assessment, and air quality measurements. Modern monitoring systems can predict potential problems before they cause failures, allowing for proactive maintenance rather than reactive repairs.
Additionally, proper ventilation design ensures that heat generated by network infrastructure components is effectively removed. Strategic placement of equipment and careful attention to airflow patterns can prevent hot spots that accelerate component degradation.
Mistake #5: Poor Change Management and Documentation
Perhaps the most insidious cause of data center network downtime is poor change management. Well-intentioned modifications, updates, and expansions can have unintended consequences when proper procedures aren't followed.
Undocumented changes are particularly problematic because they create confusion during troubleshooting. When network issues arise, technicians need accurate information about current configurations, recent changes, and equipment specifications. Without proper documentation, diagnosis time increases dramatically, extending outage duration.
Effective change management requires formal procedures for any network modifications, comprehensive documentation of all changes, and thorough testing before implementation. Every change should be traceable, reversible, and fully documented before it's approved.
Furthermore, regular audits of network documentation help ensure accuracy and identify discrepancies before they cause problems. We recommend quarterly reviews of network diagrams, equipment inventories, and configuration documentation.
Building a More Reliable Future
Preventing data center network downtime requires a comprehensive approach that addresses physical infrastructure, component quality, redundancy planning, environmental controls, and operational procedures. While implementing these improvements requires initial investment, the cost of prevention is always lower than the cost of recovery.
Organizations that prioritize network reliability through proper planning, quality components, and rigorous procedures consistently experience fewer outages and lower total cost of ownership. In today's digital economy, network reliability isn't just a technical requirement—it's a competitive advantage that directly impacts business success.
By avoiding these five critical mistakes and implementing robust network reliability best practices, your organization can significantly reduce the risk of costly network downtime and maintain the reliable connectivity that modern business demands.
0 notes
Text
High-Performance PLC Splitters by Nextik: Optimizing Fiber Optic Networks
PLC Splitters | PLC Splitters Suppliers| PLC Splitters Manufacturer
In today's data-driven world, a strong and reliable fiber optic infrastructure is critical for efficient communication. At the center of this infrastructure is the PLC Splitter, a passive optical device that splits optical signals without impacting signal integrity. Nextik, an established name in fiber optic systems, offers a wide selection of PLC splitters to satisfy the changing demands of modern networks, from urban FTTH deployments to large-scale telecom applications.
What is a PLC Splitter?
A PLC (Planar Lightwave Circuit) Splitter is a critical component of fiber optic networks. It equally distributes or divides a single optical signal into many outputs. PLC splitters are designed using modern silicon glass wavelength technology to provide limited insertion loss and great reliability, making them suitable for both central and distributed optical networks.
Compared to typical FBT (Fused Biconical Taper) splitters, PLC splitters have more constant splitting ratios and function better across a broader variety of wavelengths, making them ideal for high-speed, high-capacity systems.
Why Choose Nextik for Your PLC Splitter Needs?
Nextik is a leading PLC splitter manufacturer and supplier in India, providing high-performance solutions designed to customer-specific applications. Nextik's manufacturing experience, tight quality control, and customer-first attitude ensure that you obtain long-lasting, high-precision PLC splitters for any deployment.
Key Benefits of Nextik PLC Splitters:
High Network Capacity: Engineered for demanding network environments, ensuring high bandwidth support.
Low Failure Rate: Built with top-grade materials and tested under extreme conditions.
Excellent Environmental Stability: Consistent performance in diverse weather and temperature variations.
Compact Design: Easy installation in tight or complex network environments.
Low Insertion Loss and Uniform Splitting: Ensures optimal performance across all outputs.
Types of PLC Splitters Offered by Nextik
To meet the wide range of fiber optic applications, Nextik offers various configurations and packaging types. These include:
1. Bare Fiber PLC Splitter
Bare fiber splitters are basic, unprotected versions of PLC splitters that are ideal for integration into larger assemblies. They are lightweight and compact, suitable for use inside fiber distribution units or customized enclosures.
2. ABS Box Type PLC Splitter
Encased in an ABS plastic box, this type of splitter offers enhanced protection against physical and environmental impacts. It is perfect for both indoor and outdoor installations and can be easily mounted in optical distribution boxes or cabinets.
3. Fan-Out Fiber PLC Splitter
Fan-out splitters include connectors on the output fibers, allowing easy connection to other components. This configuration is widely used in FTTH and PON systems due to its convenience and quick deployment.
4. 1U 19-Inch Rack-Mount PLC Splitter
This rack-mounted splitter is designed for standard 19-inch racks and offers a neat and professional appearance. Ideal for central offices or network operation centers, it supports easy management and high-density installations.
5. Cassette or Card Type PLC Splitter
Cassette splitters are compact and modular, designed for integration into fiber patch panels or optical distribution frames (ODFs). They offer high performance and ease of handling in structured cabling environments.
Applications of PLC Splitters
Nextik’s PLC Splitters serve multiple industries and network architectures. They play a vital role in:
FTTH (Fiber to the Home): Distributes optical signals from a central office to multiple homes with high reliability and minimal loss.
Passive Optical Networks (PON): Widely used in GPON and EPON systems to connect Optical Line Terminals (OLT) to multiple Optical Network Units (ONU).
CATV (Cable Television): Ensures the even distribution of optical signals to multiple TV subscribers.
Data Centers and Enterprise Networks: Supports high-capacity, low-latency data transmission across large networks.
Security and Surveillance Systems: Maintains consistent video signal quality across multiple cameras and monitoring points.
Quality Assurance and Testing
Every PLC Splitter from Nextik undergoes rigorous testing procedures to ensure compliance with international standards. Quality assurance processes include:
Optical performance testing for insertion loss, return loss, and uniformity.
Environmental testing to simulate harsh conditions including humidity, temperature fluctuation, and vibration.
Mechanical testing to assess durability during handling and installation.
These strict protocols guarantee that Nextik PLC splitters perform reliably in real-world environments.
Customization and Flexibility
Nextik offers custom splitter configurations to meet specific network requirements. Whether you need different fiber lengths, connector types (SC, LC, FC, etc.), or customized packaging, Nextik can deliver solutions tailored to your infrastructure needs.
Available splitter ratios include standard options such as 1x2, 1x4, 1x8, 1x16, 1x32, and 1x64, as well as 2xN configurations for advanced applications.
Why Network Professionals Trust Nextik
Expert Engineering: Experienced professionals with in-depth knowledge of fiber optics.
Reliable Supply Chain: Quick turnaround times and dependable delivery.
Affordable Pricing: Competitive rates without compromising quality.
Post-Sales Support: Comprehensive customer assistance to ensure satisfaction and product performance.
Serving India and Beyond
Based in Noida, India, Nextik supplies PLC splitters across the country and to global markets. As a preferred choice for telecom companies, system integrators, and government projects, Nextik’s commitment to innovation and quality ensures its continued leadership in fiber optic technology.
Conclusion
As fiber optic networks expand, the value of high-quality components such as the PLC Splitter cannot be overstated. Nextik provides the performance, stamina, and flexibility required for a city-wide FTTH network or an upgrade to a corporate data infrastructure. Nextik is your one-stop shop for PLC splitters, offering a wide selection of options, affordable prices, and dependable customer service. Experience the difference of working with a reliable fiber optic partner who is dedicated to excellence. Book now
0 notes
Text
Must-Have Cable Tray Accessories for Secure & Efficient Installations
Introduction
A well-designed cable tray system is crucial for organized and safe electrical wiring in industrial, commercial, and data center applications. However, the real strength of a cable tray system lies in its accessories—components that ensure stability, safety, and ease of maintenance.
In this guide, we’ll explore the essential cable tray accessories that every installer, contractor, and project manager should consider for secure, efficient, and long-lasting installations.

Cable Tray Accessories
Why Are Cable Tray Accessories Important?
Cable tray accessories enhance: ✔ Safety – Prevent cable slippage, short circuits, and fire hazards. ✔ Durability – Reinforce joints and protect against corrosion. ✔ Flexibility – Allow bends, expansions, and directional changes. ✔ Ease of Maintenance – Simplify inspections and future upgrades.
Without the right accessories, cable trays may fail under stress, leading to costly downtime and safety risks.
Cable Tray Manufacturer
Top 10 Must-Have Cable Tray Accessories
1. Cable Tray Brackets & Supports
Purpose: Securely mount trays to walls, ceilings, or structures.
Types: Cantilever brackets, trapeze hangers, and wall-mounted supports.
Best for: Overhead installations in factories and data centers.
2. Cable Tray Clamps (Straps & Fasteners)
Purpose: Hold cables firmly in place to prevent movement.
Types: Stainless steel clamps, nylon straps, and snap-in clips.
Best for: High-vibration environments like power plants.
3. Splice Plates (Connectors)
Purpose: Join two cable tray sections seamlessly.
Types: Straight, adjustable, and hinge-type splice plates.
Best for: Extending tray runs without weak points.
4. Reducers & Transition Pieces
Purpose: Connect trays of different widths or depths.
Types: Tapered reducers, offset transitions.
Best for: Adapting tray sizes in complex layouts.
5. Elbows & Bends
Purpose: Change direction (90°, 45°, or custom angles).
Types: Horizontal, vertical, and adjustable elbows.
Best for: Routing cables around obstacles.
6. Cable Tray Covers (Lids)
Purpose: Protect cables from dust, moisture, and physical damage.
Types: Solid, ventilated, and lockable covers.
Best for: Outdoor or hazardous locations.
7. Dropout Plates & Cable Entry Plates
Purpose: Allow cables to exit/enter trays neatly.
Types: Knockout plates, gland plates.
Best for: Linking trays to control panels or junction boxes.
8. Grounding Kits & Bonding Jumpers
Purpose: Ensure electrical safety by grounding metal trays.
Types: Copper braids, grounding clamps.
Best for: Compliance with NEC/IEC standards.

9. Cable Tie Mounts & Cleats
Purpose: Organize and bundle cables within trays.
Types: Adhesive mounts, screw-fixed cleats.
Best for: Preventing tangled wires in IT racks.
10. End Caps & Splash Guards
Purpose: Seal tray ends to prevent debris/rodent entry.
Types: Rubber grommets, metal caps.
Best for: Food processing plants and outdoor setups.
Wire Mesh Cable Tray Accessories
How to Choose the Right Accessories?
Consider these factors: 🔹 Material (Stainless steel for corrosive areas, galvanized for general use). 🔹 Load Rating (Match accessories to tray weight capacity). 🔹 Fire Resistance (Critical for tunnels and high-risk zones). 🔹 Ease of Installation (Quick-fit vs. bolt-on designs).
Common Mistakes to Avoid
❌ Ignoring corrosion protection (Use zinc-plated or powder-coated accessories in humid areas). ❌ Overlooking expansion joints (Prevent warping in long runs). ❌ Skipping grounding (Avoid electrical hazards).
Conclusion
The right cable tray accessories make the difference between a safe, efficient installation and a hazard-prone mess. Whether you’re working on a data center, factory, or commercial building, investing in high-quality accessories ensures long-term reliability and compliance.
🚀 Pro Tip: Partner with a trusted manufacturer who provides certified, custom-ready accessories for your project needs!
Call to Action
📞 Need expert advice on cable tray accessories? Contact Less Wire Forms today! 📧 Email: [email protected] | 🌐 Website: www.madewithless.in
#Wire mesh cable tray manufacturer#Industrial cable trays#Cable tray manufacturer#Wire mesh cable tray
0 notes
Text
FIBER PATCH PANELS
Understanding Fiber Patch Panels: The Key to Efficient Fiber Optic Network Management
In today’s high-speed, data-driven world, the demand for faster and more reliable internet connections continues to grow. Central to ensuring this demand is met is fiber optic technology, which has revolutionized the way data is transmitted. As organizations, data centers, and homes rely increasingly on fiber optic networks, the need for efficient management and organization of these networks has led to the widespread use of fiber patch panels.
In this blog, we’ll dive into what fiber patch panels are, their role in fiber optic networks, the benefits they offer, and how they’re used to streamline the connectivity and maintenance of fiber optic systems.
What is a Fiber Patch Panel?
A fiber patch panel is a crucial component in a fiber optic network used to connect, manage, and organize fiber optic cables. It’s essentially a hardware unit that acts as a central hub where fiber optic cables come together, allowing for easy patching, routing, and testing of fiber connections.
Fiber patch panels are typically installed in data centers, telecommunications rooms, or server rooms, where large volumes of network cables need to be organized and managed efficiently. They provide a structured system for distributing fiber optic connections to various devices or endpoints across the network, all while maintaining high performance, reducing clutter, and ensuring a clean and organized setup.
How Do Fiber Patch Panels Work?
Fiber patch panels serve as a central point where all incoming and outgoing fiber optic cables are terminated and connected. Here’s how they generally work:
Fiber Termination: The fiber optic cables are terminated and connected to adapters or ports on the patch panel. This allows for a connection to be made between the fiber optic cable and the network equipment (like routers, switches, or servers).
Patching: Fiber patch cables (shorter fiber optic cables with connectors) are used to establish temporary or permanent connections between ports on the patch panel and other networking equipment. This step is called "patching" because the fiber patch cables are used to make these connections.
Testing & Maintenance: Patch panels make it easy to test and maintain fiber optic connections. Network technicians can simply plug test equipment into the panel’s ports without needing to deal with the messy, complicated task of accessing individual fiber cables within a network.
Cross-Connection: The patch panel allows for easy cross-connections. This is helpful for rerouting or modifying connections without physically changing the fiber optic infrastructure, which is time-consuming and potentially disruptive.
Types of Fiber Patch Panels
There are a few different types of fiber patch panels, each designed to suit specific needs depending on the application and the type of fiber optic cables in use. These include:
1. Rack-Mount Patch Panels
Rack-mount patch panels are designed to be installed in standard 19-inch equipment racks, which are commonly used in data centers and server rooms. These panels can be used to manage large quantities of fiber connections, with different configurations of ports available (e.g., 12, 24, or 48 ports).
Advantages:
Ideal for high-density fiber optic networks.
Space-efficient when mounted in racks.
Can house multiple fiber optic connections in a single unit.
2. Wall-Mount Patch Panels
As the name suggests, wall-mount patch panels are mounted directly to a wall. These are typically used in smaller installations or spaces where a traditional rack setup isn’t practical.
Advantages:
Great for smaller spaces or environments where rack space is limited.
Easier to install and maintain for smaller network setups.
3. Modular Patch Panels
Modular patch panels allow for flexibility in the number of ports and configurations. They typically have removable and replaceable modules that can be swapped out depending on the needs of the network. This makes them ideal for networks that need to scale or change over time.
Advantages:
Highly customizable.
Easily scalable to accommodate growing fiber optic networks.
4. Enclosed Patch Panels
Enclosed fiber patch panels offer additional protection for the fiber optic cables, making them suitable for environments that need to protect equipment from dust, moisture, or physical damage. These panels often come with a hinged cover that can be opened for easy access to the ports.
Advantages:
Added protection for the fiber optic infrastructure.
Ideal for environments where fiber cables need to be protected.
Benefits of Using Fiber Patch Panels
The use of fiber patch panels in fiber optic networks offers several advantages that help ensure the efficiency and organization of these networks:
1. Improved Cable Management
One of the most important benefits of fiber patch panels is their ability to organize and manage fiber optic cables. Fiber optic cables can be tricky to handle, and without proper management, they can become tangled, damaged, or difficult to troubleshoot. Patch panels provide a clean and orderly system for managing cables, helping to reduce clutter and ensuring that cables are easy to trace and identify.
2. Easy Access and Maintenance
Fiber patch panels allow for easy access to fiber optic connections. When network changes or maintenance needs to be performed, technicians can quickly make adjustments without having to disturb the physical fiber cables. Patching, rerouting, and testing fiber connections become more efficient and less disruptive.
3. Scalability
As network demands grow, fiber optic networks need to be scaled up. Patch panels allow for easy expansion, as new ports can be added, and additional fiber connections can be terminated on the patch panel. This scalability ensures that a network can evolve to meet increasing capacity requirements.
4. Flexibility
Fiber patch panels provide the flexibility to modify connections easily. Instead of re-running cables or making permanent changes to the network’s infrastructure, patch panels allow technicians to quickly adjust configurations, reroute signals, or replace faulty connections. This is particularly useful in environments that require frequent changes, such as data centers or telecommunication hubs.
5. Reduced Downtime
Having a central point for managing fiber optic connections helps reduce downtime during maintenance or troubleshooting. Technicians can quickly identify where a fault lies and either repair the issue or reroute connections to maintain network uptime. This is crucial for keeping businesses and services running without significant disruptions.
6. Improved Performance
By maintaining organized, high-quality connections, fiber patch panels help improve the overall performance of a fiber optic network. Properly managed cables reduce the chances of signal degradation, interference, or network errors, ensuring a fast and reliable connection across the network.
Applications of Fiber Patch Panels
Fiber patch panels are used in a wide range of environments and industries, including:
Data Centers: Fiber patch panels are crucial for organizing and managing the vast number of fiber optic connections in data centers, where high-speed data transmission is required across numerous servers and networking equipment.
Telecommunications: Telecom companies use fiber patch panels to manage the fiber optic cables that carry data, voice, and video signals across networks.
Enterprises and Offices: Businesses use fiber patch panels to organize and distribute fiber connections across multiple floors or departments, ensuring reliable connectivity and ease of maintenance.
Home Networking: For large homes or small businesses that use fiber optic broadband, patch panels can help organize and manage the fiber connections in a centralized location, providing easy access for maintenance or upgrades.
Conclusion
Fiber patch panels are a critical component in ensuring the organization, efficiency, and scalability of modern fiber optic networks. By providing a central location for managing and connecting fiber optic cables, patch panels simplify maintenance, increase performance, and allow for easy scalability. Whether you’re building a data center, setting up a small office network, or upgrading your telecommunications infrastructure, investing in a fiber patch panel system will help keep your network clean, organized, and running smoothly.
With the ever-increasing demand for bandwidth and faster data transmission speeds, fiber patch panels are more important than ever. They ensure that fiber optic networks can support the growing needs of businesses, institutions, and consumers alike, all while maintaining the reliability and performance essential for today's connected world.
0 notes
Text
Step-by-Step Guide to Installing Solar Panels in Lucknow

India’s energy landscape is shifting towards sustainable solutions, and solar panels in Lucknow are leading the way. With abundant sunshine, Lucknow is an ideal location for harnessing solar energy. Whether for your home or business, installing rooftop solar panels can reduce electricity bills and promote green energy. Here’s a step-by-step guide to help you through the process.
Steps to Install Solar Panels in Lucknow
1. Site Assessment
Begin by evaluating your rooftop or installation area. Check the structural integrity of the roof to ensure it can support the weight of the solar panels. A proper assessment ensures a seamless installation process.
2. Calculate Energy Needs
Determine your energy requirements. For homes, a 400-watt solar panel may suffice, while businesses may need higher capacity systems. Consulting a trusted solar panel installer in Lucknow can help you design a system tailored to your needs.
3. Design the System
Create a layout for your rooftop solar panels, considering factors like sunlight exposure and roof space. Choose the right inverter, wiring, and mounting system to ensure optimal performance.
Permission to Install Solar Panels
4. Obtain Required Permits
Contact local authorities to secure necessary permits for solar panel installation. Submit your system design and documentation for approval.
5. Interconnection Agreement
Apply for an interconnection agreement with your utility company. This allows you to connect your solar system to the grid and earn credits for excess energy produced.
Final Installation Process
6. Install Mounting System and Solar Panels
Secure mounting racks to your roof and align them properly. Attach the solar panels to the racks and connect them using appropriate connectors.
7. Wire the System
Run wiring from the solar panels to the inverter. Ensure all connections are secure and protected from weather conditions.
8. Install the Inverter and Connect to Grid
Mount the inverter near your electrical panel and connect it to the solar panels. Link the inverter to the grid using a dedicated circuit breaker.
Connections and Activation
9. Turn on the Inverter and Test
Switch on the inverter and test the system using a multimeter. Ensure the system is generating power efficiently.
10. Monitor the System
Install a monitoring system to track energy production and consumption. Schedule regular maintenance to keep your solar panels performing optimally.
Conclusion
Installing solar panels in Lucknow is a smart investment for reducing energy costs and promoting sustainability. By following these steps, you can seamlessly transition to solar energy. For expert assistance, connect with trusted solar panel installers in Lucknow and enjoy the benefits of clean, renewable energy.
0 notes
Text
Top 5 Solar Panel Installation Mistakes to Avoid

Improper Solar Panels Installation can lead to significant energy production shortfalls. Studies show that up to 20% of energy loss can occur due to mistakes made during the setup process. Ensuring your solar panel system is installed correctly is crucial for maximizing energy output, saving on costs, and ensuring a long lifespan for your investment. This article covers the five most common solar panel installation mistakes and provides strategies to avoid them.
Poor Site Assessment and Planning
Inadequate Sun Exposure Analysis
Accurate sun path analysis is vital for optimal energy production. A thorough shading assessment helps identify obstacles like trees or tall buildings that block sunlight. Shading can reduce energy output by 10% to 20%, translating to significant losses over time. Investing time in analyzing sun exposure ensures that panels are positioned for maximum sunlight.
Ignoring Roof Condition and Structural Integrity
A well-structured roof is essential to support the added weight of solar panels. Failing to inspect the roof can lead to leaks or structural failures. For instance, if a roof can’t handle the weight, it may buckle under the pressure, leading to costly damages. Conducting a detailed roof inspection prior to installation prevents potential issues in the future.
Neglecting Local Building Codes and Permits
Each locality has specific building codes and regulations regarding solar panel installations. Skipping this step can result in fines or the need to remove panels. Always check local codes and secure necessary permits to ensure your system is compliant and safe.
Choosing the Wrong Solar Panel System
Selecting Incorrect Panel Type and Size
Not all solar panels are created equal. Factors such as panel efficiency, wattage, and compatibility with your roof's orientation affect performance. For example, monocrystalline panels, while more expensive, are often better for limited space due to their higher efficiency. Understanding your energy needs will help in selecting the right panels.
Inadequate Inverter Sizing
The inverter must match the output of the solar panel array. An improperly sized inverter can lead to performance issues. If the inverter is overloaded, it may fail, leaving your system offline. Sizing your inverter correctly ensures continual operation without interruptions.
Ignoring Microinverter vs. String Inverter Considerations
Choosing between microinverters and string inverters can affect system performance. Microinverters allow individual panel monitoring, which can be beneficial in partially shaded conditions. String inverters, while cheaper, might struggle in similar situations. Deciding on the appropriate system based on your specific circumstances is essential.
Improper Installation Techniques
Incorrect Mounting and Racking
Properly securing and leveling the mounting and racking system is crucial. Panels must be installed with the right hardware and grounded correctly to prevent detachment. According to reports, improper installation is among the leading causes of panel detachment during storms.
Faulty Wiring and Connections
Wiring needs to be done thoughtfully to avoid short circuits or fire hazards. Using appropriate wire sizes and weatherproof connectors is essential for safety. In recent years, faulty wiring led to fire incidents, emphasizing the need for meticulous installation practices.
Neglecting Grounding and Safety Procedures
Proper grounding protects your system and home from electrical surges. Adhering to safety protocols throughout installation is necessary not just for legal compliance, but also for the safety of the entire system.
Lack of Monitoring and Maintenance
Inadequate Post-Installation Inspection
After installation, a thorough inspection can uncover any issues. This includes checking connections and ensuring everything is functioning correctly. Addressing problems early can prevent more significant issues later on.
Neglecting Regular System Monitoring
Monitoring your solar panel system’s performance is crucial. Utilizing software tools can help in tracking output and identifying any dips in production. Regular checks help catch issues early, ensuring consistent energy generation.
Failure to Schedule Preventative Maintenance
Regular maintenance, like cleaning panels and inspecting systems, maximizes efficiency. Data shows that panels without regular maintenance may lose up to 15% of their energy production over time. Scheduling routine upkeep can extend the lifespan of the entire system.
Choosing the Wrong Installer
Selecting Unqualified or Inexperienced Installers
Choosing a qualified installer is critical. Verify credentials, licenses, and insurance before committing. A skilled installer will follow guidelines and ensure a successful setup.
Ignoring Customer Reviews and References
Researching past customer experiences offers insight into an installer's reliability. Online reviews and references from previous clients can guide your decision-making process.
Failing to Secure a Comprehensive Warranty
A strong warranty covering equipment and workmanship protects your investment. It's essential to understand the different types of warranties available and what they entail. This can save you from costly repairs down the line.
Conclusion
Avoiding these top five solar panelinstallation mistakes is vital for achieving optimal performance and longevity. Proper planning, installation, and maintenance ensure that your solar energy system operates efficiently. Don’t overlook the importance of each step in the process. Take the time to educate yourself and work with qualified professionals to maximize your solar investment. Embrace solar energy confidently by steering clear of these common pitfalls.
1 note
·
View note
Text
The Ultimate Guide to Structured Cabling Systems
Introduction
Structured cabling systems form the backbone of modern communication networks, providing a standardized and efficient way to manage data, voice, and video transmissions. This guide covers the fundamentals, benefits, components, installation best practices, and industry standards of structured cabling systems.
What is a Structured Cabling System?
A structured cabling system (SCS) is a comprehensive network of cabling and associated hardware that provides a universal infrastructure for various communication technologies. It supports multiple hardware systems and applications such as computers, telephones, and security devices, ensuring a seamless and scalable network environment.
Benefits of Structured Cabling Systems
Scalability - Easily accommodates growing network demands.
Cost-Effectiveness - Reduces maintenance and operational costs.
Flexibility - Supports multiple applications and technologies.
Improved Performance - Ensures high-speed data transmission with minimal interference.
Simplified Management - Centralized system makes troubleshooting and maintenance easier.
Enhanced Security - Provides a controlled and protected infrastructure.
Components of a Structured Cabling System
A structured cabling system consists of six main components:
Entrance Facilities - The point where external cabling connects to the building's network.
Equipment Room - Centralized space for network and telecommunications equipment.
Telecommunications Room (TR) - Houses connectivity equipment such as patch panels and network switches.
Backbone Cabling - Connects different TRs, equipment rooms, and entrance facilities.
Horizontal Cabling - Connects workstations and end-user devices to the TR.
Work Area Components - Includes cables, connectors, and outlets at the end-user level.
Industry Standards and Compliance
Structured cabling systems adhere to various industry standards, including:
TIA/EIA-568 - Telecommunications Cabling Standards
ISO/IEC 11801 - International Cabling Standards
BICSI Standards - Best practices for cabling installation and maintenance
NEC (National Electrical Code) - Electrical safety regulations
Installation Best Practices
To ensure an efficient and reliable structured cabling system, follow these best practices:
Plan for Future Growth - Design the system with scalability in mind.
Use High-Quality Components - Ensure all cables, connectors, and hardware meet industry standards.
Follow Labeling and Documentation Procedures - Maintain accurate records for easy management and troubleshooting.
Ensure Proper Cable Management - Use cable trays, racks, and pathways to organize cables neatly.
Adhere to Distance Limitations - Follow maximum cable length recommendations for optimal performance.
Test and Certify the System - Perform thorough testing to ensure compliance with performance standards.
Conclusion
A well-designed structured cabling system is essential for a reliable, scalable, and efficient communication network. A network cabling contractor ensures proper installation by adhering to industry standards, implementing best practices, and planning for future expansion. Businesses can optimize their infrastructure and ensure seamless connectivity by leveraging professional expertise. Whether setting up a new network or upgrading an existing one, investing in a structured cabling system is a strategic decision that yields long-term benefits.
1 note
·
View note
Text
Choosing the Right Size and Configuration for a Custom Rack Case
Selecting the right size and configuration for a custom rack case is crucial to ensuring that your equipment is protected, accessible, and organized. Whether you're dealing with audio-visual gear, IT servers, or industrial machinery, a poorly sized or configured rack case can lead to damaged equipment, difficult maintenance, and reduced efficiency. To help you make an informed decision, this guide walks through key considerations and actionable steps for choosing the perfect custom rack case.
8 Steps to Choosing the Right Custom Rack Case
Step 1: Assess Your Equipment Dimensions and Layout Requirements
The first step in choosing the right custom rack case is understanding the physical dimensions of your equipment. Measure the height, width, and depth of all devices you plan to store. Rack cases typically follow standard units of measurement for height, known as rack units (U), where 1U equals 1.75 inches.
Key tips for sizing:
Always add extra height for future equipment upgrades or additional devices.
Allow sufficient depth clearance for cables and connectors.
Consider the overall weight of your equipment, as it affects the type of support structure and materials needed for the case.
For example, if you plan to house a server that is 4U high and requires significant cable routing space, opting for a case with a depth of at least 36 inches and a height of 12U might be ideal to accommodate future expansion.
Step 2: Understand Portability and Handling Needs
Rack cases are used in a variety of environments, from permanent installations in studios to mobile setups in live events. Your intended use case should influence the design:
For stationary use: Focus on rack cases with features that enhance accessibility, such as removable side panels or rear access doors.
For portable setups: Choose lightweight materials like aluminum or high-strength plastics and add durable handles and wheels for easy transport. Shock absorption and vibration isolation are critical for mobile cases, especially when handling sensitive electronics.
If your case will be transported frequently by air or road, consider cases that meet ATA (Air Transport Association) standards to ensure rugged durability.
Step 3: Ensure Proper Ventilation and Cooling
Heat buildup is a significant issue for many types of rack-mounted equipment, particularly electronics and servers. A well-designed custom rack case should allow for proper airflow to prevent overheating.
Ventilation options to consider:
Passive cooling: Ventilation slots or perforated panels allow natural airflow.
Active cooling: Cases with built-in fans or provisions for fan mounting are ideal for high-power equipment setups.
Cable management for cooling: Proper cable routing helps improve airflow and reduces heat pockets.
Pro tip: If your equipment generates substantial heat, choose a rack case with ventilation slots on the top and bottom for optimal convection cooling.
Step 4: Select Materials Based on Durability and Environment
The environment in which your rack case will be used dictates the material choice. Common materials for custom rack cases include:
Aluminum: Lightweight, corrosion-resistant, and ideal for portable use.
Steel: Heavier but more robust, suitable for permanent or high-impact environments.
ABS Plastic: Durable and impact-resistant, often used for smaller, mobile cases.
For outdoor or harsh environments, you may need a case with weather-resistant seals or IP-rated enclosures to protect against dust and moisture.
Step 5: Plan for Cable Management and Access Points
Cable management is often overlooked but plays a vital role in ensuring a clean and functional rack setup. A custom rack case should provide enough space and routing options for organized cabling.
Key features to look for:
Dedicated cable routing channels or clips.
Rear access doors for easy cable management.
Cable entry points with grommets to protect wires from abrasion.
Additionally, ensure that access points for power and data connections are well-positioned for easy maintenance and quick setup.
Step 6: Factor in Security Features
For setups involving expensive or sensitive equipment, security is a major concern. Custom rack cases can include features such as:
Lockable front and rear doors to prevent unauthorized access.
Tamper-resistant panels for added protection.
RFID tags or built-in smart locks for advanced security and tracking.
Step 7: Consider Aesthetic and Branding Options
While functionality is paramount, aesthetics and branding may be important if the case will be used in client-facing environments. Custom colors, logo embossing, and sleek finishes can enhance the professional look of your setup. Many manufacturers offer personalized options that allow you to align the rack case with your company’s brand image.
Step 8: Think About Expandability
Your equipment needs may grow over time. Opting for a rack case that can accommodate future expansions will save you from having to purchase a new one later. Look for modular cases or those with extra rack units available for additional gear.
Conclusion
Choosing the right custom rack box size and configuration depends primarily on your needs and application. By evaluating equipment size, understanding handling requirements, ensuring proper ventilation, selecting the right materials, and planning cable management, you can customize a rack box that not only protects your equipment but also improves efficiency and availability.
For more rack box selection guides, please feel free to contact our rack box experts at [email protected], we will respond to you within 24 hours, and we will also provide you with customized projects!
1 note
·
View note
Text
Price: [price_with_discount] (as of [price_update_date] - Details) [ad_1] From the brand Choose AYSIS Choose the perfect Storage Organizer AYSIS have many years of experience in shoe racks, and are committed to providing our customers with high-quality and cost-effective home products.AYSIS focuses on the research and development of household products, providing humanized design, fashionable appearance and high-quality products.Providing the best products and the most sincere service to every family has always been AYSIS constant goal. Plastic Shoe Rack Transparent Door-Visible Style 12 Shelf Shoerack 6 Shelf Shoerack 【𝟔 𝐒𝐡𝐞𝐥𝐟 𝐒𝐡𝐨𝐞 𝐑𝐚𝐜𝐤】AYSIS 12 Pairs shoe rack provides a large space to store shoes, toys or handbags, etc.It can help you save more space. Dimension: 44cm(L) x 32cm(W) x 96cm(H). The Max. Load Capacity of Each Cube: 10kg. 【𝐒𝐭𝐨𝐫𝐞𝐬 𝐔𝐩 𝐭𝐨 𝟏𝟐 𝐏𝐚𝐢𝐫𝐬】Perfect for sneakers high-heeled shoes boots stilettos ballet shoes flats casual shoes children's shoes; Holds 12 pairs of shoes more than enough for you and your family's needs. 【𝐒𝐭𝐮𝐫𝐝𝐲 𝐒𝐡𝐨𝐞 𝐒𝐡𝐞𝐥𝐯𝐞𝐬】The cube storage organizer is made of PP plastic panels with metal frame and ABS connectors.Shoe organizer for closet, living room, entry, bedroom, office to make your home tidy. 【𝐄𝐚𝐬𝐲 𝐀𝐬𝐬𝐞𝐦𝐛𝐥𝐲】Shoe storage rack with corresponding installation tools, enough connectors,hammer and installation instructions to help you install it quickly and easily.It is worth noting that each plastic diaphragm and connector need to be tightly connected together, which is inseparable from the help of the hammer. 【𝐄𝐚𝐬𝐲 𝐭𝐨 𝐂𝐚𝐫𝐞】The shoe organizer is made of plastic materials, offering excellent waterproof properties that make it easy to clean with water. Door holes feature is designed for air circulation to prevent buildup odor. 【𝐀𝐝𝐚𝐩𝐭𝐚𝐛𝐥𝐞 𝐚𝐧𝐝 𝐕𝐞𝐫𝐬𝐚𝐭𝐢𝐥𝐞】This cube storage rack is portable and can be personalized according to your needs. It can also be split into 2 or 3 separate rows, or separate small shelf units to organize shoes, or belongings in your wardrobe, bathroom, or any other desired space. [ad_2]
0 notes
Text
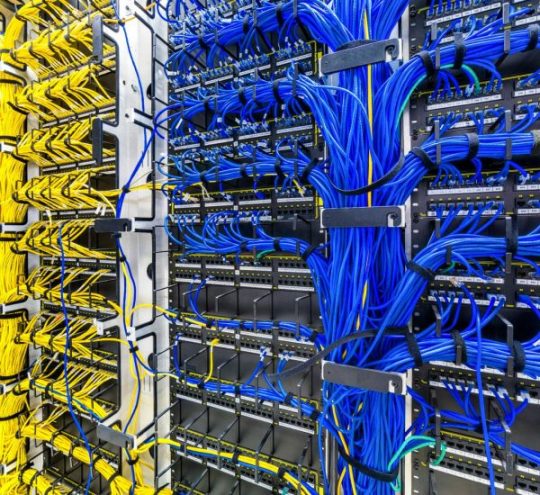
The Ultimate Checklist for Network Cable Organization

Network administrators and IT professionals know the frustration of dealing with tangled cables, unlabeled connections, and chaotic server rooms. Poor cable organization checklist implementation can lead to downtime, maintenance headaches, and reduced network performance. Whether you're setting up a new data center or reorganizing an existing infrastructure, proper network cable management is essential for maintaining a professional, efficient, and scalable network environment.
A well-organized cabling system isn't just about aesthetics—it directly impacts your network's reliability, troubleshooting efficiency, and future expansion capabilities. This comprehensive structured cabling guide will walk you through the essential steps to transform your cable chaos into a well-organized, professional network infrastructure.
Planning Your Cable Organization Strategy
Before diving into physical organization, successful network cable management begins with careful planning. Start by documenting your current network topology and identifying all connection points. This initial assessment helps you understand the scope of work and prevents costly mistakes during implementation.
Create a detailed floor plan that includes rack locations, cable pathways, and connection requirements. Consider both current needs and future expansion when designing your layout. A good rule of thumb is to plan for 30% additional capacity to accommodate growth without major reorganization.
When planning cable routes, prioritize the shortest paths while maintaining proper separation between power and data cables. This approach minimizes signal interference and reduces cable costs. Remember that well-planned cable arrangement tips can save hours of troubleshooting later.
Essential Tools and Materials for Cable Organization
Professional cable organization requires the right tools and materials. Your toolkit should include cable ties, velcro straps, cable labels, cable management arms, and a quality label printer. Invest in proper cable management hardware—it's worth the upfront cost for long-term maintenance benefits.
For fiber optic installations, specialized tools become crucial. Fiber optic patch cords require careful handling and specific organizational methods to prevent damage. Unlike copper cables, fiber connections are more sensitive to bending and stress, making proper support systems essential.
Cable management panels and horizontal cable managers help maintain organized pathways in rack environments. These components work together with your fiber optic patch panel to create clean, professional installations that are easy to maintain and modify.
Color Coding and Labeling System
Implementing a consistent color coding system is one of the most effective cable arrangement tips for maintaining organization. Establish color standards for different cable types, network segments, or departments. For example, use blue for data connections, yellow for voice, and red for critical systems.
Your labeling system should be comprehensive and standardized across the entire organization. Each cable should have labels at both ends, clearly identifying source and destination points. Use a consistent naming convention that includes rack numbers, port numbers, and connection purposes.
When working with fiber optic cables, pay special attention to connector types and specifications. An MPO/MTP cassette system may require different labeling strategies compared to standard SC or LC connections. Document these differences in your organization standards to ensure consistency across teams.
Rack Organization Best Practices
Server rack organization forms the backbone of effective network cable management. Start by installing proper cable management infrastructure, including vertical and horizontal cable management systems. These components provide organized pathways for cables and prevent the spaghetti-like tangles that plague poorly managed installations.
Position your fiber optic patch panel at an appropriate height for easy access while maintaining proper cable bend radius requirements. The patch panel should be easily accessible for maintenance while keeping cables organized and protected.
Implement the "service loop" concept by creating small, organized loops of extra cable length near connection points. This practice allows for future equipment moves without requiring complete cable replacement. However, avoid excessive cable length that creates unnecessary clutter.
Power and Data Separation
One critical aspect of structured cabling guide implementation is maintaining proper separation between power and data cables. Electrical interference from power cables can significantly impact network performance, especially for copper-based connections.
Maintain at least 12 inches of separation between power and data cables when running parallel routes. When cables must cross, do so at 90-degree angles to minimize interference. This separation is particularly important when installing sensitive equipment like fiber optic cables alongside power feeds.
Use separate cable management systems for power and data whenever possible. This separation not only reduces interference but also simplifies troubleshooting and maintenance procedures.
Documentation and Maintenance
No cable organization checklist is complete without proper documentation procedures. Create and maintain accurate cable documentation that includes cable schedules, connection diagrams, and testing records. This documentation becomes invaluable during troubleshooting and future modifications.
Establish regular maintenance schedules to inspect cable organization and update documentation. Cable management isn't a one-time activity—it requires ongoing attention to maintain effectiveness. Regular audits help identify issues before they become major problems.
When working with specialized components like MPO/MTP cassette systems, maintain detailed records of connector types, fiber counts, and polarity configurations. This information is crucial for future expansions or modifications.
Advanced Organization Techniques
For complex installations, consider implementing zone-based cable management strategies. This approach groups cables by function, destination, or service level, making troubleshooting and maintenance more efficient. Zone-based organization works particularly well in large data centers with diverse equipment types.
Implement proper cable support systems throughout the installation. Cables should be supported every 4-6 feet to prevent sagging and stress on connections. Pay particular attention to fiber optic patch cord installations, as these cables are more susceptible to damage from improper support.
Consider implementing intelligent cable management systems that provide automated documentation and monitoring capabilities. These advanced systems can track cable connections, monitor performance, and alert administrators to potential issues.
Troubleshooting and Problem Prevention
Well-organized cables significantly reduce troubleshooting time and improve problem resolution. When cables are properly labeled and organized, technicians can quickly identify and isolate issues without disrupting unrelated systems.
Create troubleshooting procedures that take advantage of your organized cable infrastructure. Include cable tracing procedures, connection verification steps, and escalation protocols in your documentation. This preparation pays dividends during critical outages.
Regular testing and inspection of cable connections helps prevent problems before they impact operations. Establish testing schedules that align with your organization's change management and maintenance windows.
Future-Proofing Your Cable Organization
Design your cable organization system with future growth in mind. Leave space for additional cables, plan for new equipment installations, and consider emerging technologies that might require different cable types or organization strategies.
Stay informed about industry trends and new cable management products. Technologies like high-density fiber optic cable solutions continue to evolve, offering new opportunities for improved organization and performance.
Conclusion
Effective network cable management requires careful planning, proper tools, and ongoing maintenance. By following this comprehensive cable organization checklist, you'll create a professional, efficient, and scalable network infrastructure that supports your organization's current needs while preparing for future growth.
Remember that good cable organization is an investment in your network's long-term reliability and maintainability. The time spent implementing proper cable arrangement tips and structured cabling practices will pay significant dividends in reduced troubleshooting time, improved network performance, and easier future modifications.
Whether you're working with traditional copper connections or advanced fiber optic systems, the principles of good cable organization remain consistent. Plan carefully, implement systematically, and maintain diligently for the best results.
0 notes
Text
تجهیزات پسیو شبکه
تجهیزات پسیو شبکه، اجزای حیاتی زیرساخت فیزیکی هر شبکه کامپیوتری هستند. این تجهیزات برخلاف تجهیزات اکتیو (مانند روترها و سوئیچها) که سیگنالها را پردازش و تقویت میکنند، صرفاً وظیفه انتقال و هدایت سیگنالها را بدون تغییر در آنها بر عهده دارند. در این مقاله به بررسی جامع تجهیزات پسیو شبکه، انواع آنها، کاربردها و نکات مهم در انتخاب و استفاده از آنها میپردازیم.
تعریف تجهیزات پسیو شبکه:
تجهیزات پسیو شبکه به دستهای از تجهیزات گفته میشود که برای انتقال سیگنالهای الکتریکی یا نوری در شبکه بدون نیاز به منبع تغذیه یا پردازش سیگنال استفاده میشوند. این تجهیزات شامل کابلها، کانکتورها، پچ پنلها، رکها و سایر اجزایی هستند که بستری فیزیکی برای ارتباط بین دستگاههای شبکه فراهم میکنند.
انواع تجهیزات پسیو شبکه:
کابلها (Cables): مهمترین جزء تجهیزات پسیو، کابلها هستند که وظیفه انتقال دادهها را بر عهده دارند. انواع مختلفی از کابلها وجود دارد که بر اساس نوع کاربرد و پهنای باند مورد نیاز انتخاب میشوند:
کابلهای زوج به هم تابیده (Twisted-Pair Cables): مانند Cat5e، Cat6، Cat6a و Cat7 که برای شبکههای اترنت استفاده میشوند.
کابلهای کواکسیال (Coaxial Cables): که بیشتر در شبکههای تلویزیون کابلی و شبکههای قدیمیتر استفاده میشدند.
کابلهای فیبر نوری (Fiber Optic Cables): که برای انتقال دادهها با سرعت بسیار بالا و در مسافتهای طولانی استفاده میشوند.
کانکتورها (Connectors): برای اتصال کابلها به دستگاهها و سایر تجهیزات استفاده میشوند. رایجترین کانکتورها عبارتند از:
RJ45: برای کابلهای زوج به هم تابیده
BNC: برای کابلهای کواکسیال
LC، SC، ST: برای کابلهای فیبر نوری
پچ پنلها (Patch Panels): پنلهایی هستند که در رک نصب میشوند و دارای تعدادی پورت RJ45 یا فیبر نوری هستند. از پچ پنلها برای مدیریت و سازماندهی کابلهای شبکه و اتصال آنها به سوئیچها و سایر تجهیزات استفاده میشود.
رکها (Racks): محفظههای فلزی هستند که برای نگهداری و سازماندهی تجهیزات شبکه مانند سرورها، سوئیچها، پچ پنلها و سایر تجهیزات استفاده میشوند. رکها در اندازههای مختلفی وجود دارند و به حفظ نظم و امنیت تجهیزات کمک میکنند.
پچ کوردها (Patch Cords): کابلهای کوتاهی هستند که برای اتصال تجهیزات مختلف به پچ پنل یا سایر دستگاهها استفاده میشوند.
کیستونها (Keystones): نوعی کانکتور هستند که در داخل پچ پنل، فیس پلیت یا سوکت دیواری قرار میگیرند و محل اتصال کابل شبکه هستند.
فیس پلیتها (Face Plates): قطعاتی پلاستیکی هستند که بر روی دیوار یا رک نصب میشوند و محل قرارگیری کیستونها و سوکتهای شبکه هستند.
داکتها و ترانکها (Ducts and Trunks): کانالهایی پلاستیکی یا فلزی هستند که برای عبور �� محافظت از کابلهای شبکه در داخل ساختمان یا بین رکها استفاده میشوند.
کاربردهای تجهیزات پسیو شبکه:
تجهیزات پسیو شبکه در تمامی شبکههای کامپیوتری، از شبکههای خانگی کوچک تا شبکههای بزرگ سازمانی، کاربرد دارند. این تجهیزات بستری فیزیکی برای انتقال دادهها فراهم میکنند و بدون آنها هیچ ارتباطی بین دستگاههای شبکه برقرار نخواهد شد.
نکات مهم در انتخاب و استفاده از تجهیزات پسیو شبکه:
کیفیت: استفاده از تجهیزات با کیفیت و استاندارد، عملکرد و پایداری شبکه را تضمین میکند.
نوع کابل: انتخاب نوع کابل مناسب بر اساس پهنای باند مورد نیاز و مسافت انتقال، از اهمیت بالایی برخوردار است.
استانداردها: رعایت استانداردهای کابلکشی و نصب تجهیزات، از بروز مشکلات احتمالی جلوگیری میکند.
مدیریت کابل: مدیریت صحیح کابلها در داخل رک و مسیرهای کابلکشی، به بهبود جریان هوا و جلوگیری از گره خوردن و آسیب دیدن کابلها کمک میکند.
0 notes