#Reset TCP/IP
Explore tagged Tumblr posts
Visit Tumblr Blog
Explore Tumblr blogs with no restrictions, modern design and the best experience.
Last Seen Tumblr Blogs


Fun Fact
Tumblr has 411 employees.
Text
Why Your Internet Keeps Dropping and How to Fix It: Insights from Computer Repair Tucson Experts
In today’s hyper-connected world, stable internet connectivity is no longer a luxury—it is a necessity. Whether one is attending virtual meetings, streaming high-definition media, managing smart home devices, or engaging in online learning, the reliability of a Wi-Fi or wired connection underpins virtually all digital interactions. Yet, countless users continue to face a persistent and maddening issue: the intermittent loss of internet connectivity. The reasons for this problem are multifaceted, often eluding layperson diagnosis and demanding professional intervention. This is where trusted professionals from the domain of computer repair Tucson, such as the seasoned specialists at Geeks 2 You, step into the fray.
This article dissects the most common causes of intermittent internet disconnections, offers practical troubleshooting strategies, and highlights the value of enlisting professional support for long-term resolution. With digital dependency only set to deepen, understanding and solving these connectivity issues has never been more critical.

The Complexity Behind a Simple Disconnection
An internet drop might seem like a straightforward failure, but it often masks a complex interplay between hardware, software, and signal interference. The reasons for such instability can range from outdated router firmware and faulty cabling to issues with DNS configuration or interference from neighboring networks.
According to the insights gleaned from experienced technicians at Geeks 2 You, a premier provider of computer repair Tucson services, the vast majority of internet connectivity issues stem from a handful of recurring causes. These include:
Weak Wi-Fi signals due to poor router placement
Hardware degradation in modems or routers
Driver conflicts or outdated firmware
ISP service disruptions or inadequate bandwidth provision
Interference from other electronic devices or overlapping Wi-Fi channels
Understanding the precise source of the disruption is the first and most vital step toward achieving a sustainable solution.
Common Causes and Their Respective Remedies
1. Poor Router Placement and Signal Obstruction In residential or office environments, router placement is often an afterthought. However, strategic positioning is vital. Routers placed in enclosed spaces or behind heavy furniture may emit signals that degrade rapidly due to obstructions. Similarly, thick walls or multiple floors can significantly impede signal strength.
The team at Geeks 2 You frequently encounters scenarios where a simple repositioning of the router—or the addition of a mesh networking system—restores stability. Elevating the router, placing it in a central location, and keeping it away from other electronic devices such as microwaves or cordless phones can significantly reduce signal interference.
2. Outdated or Faulty Networking Equipment Like all hardware, routers and modems have finite lifespans. Devices older than five years may struggle to keep pace with modern bandwidth demands or may be incompatible with current ISP standards. Inconsistent firmware updates can also lead to instability.
Professionals specializing in computer repair Tucson often recommend performing a full firmware update or, where necessary, replacing the modem/router with a high-performance dual-band or tri-band model. These devices can handle multiple connections more efficiently and minimize the risk of dropped signals.
3. Software and Driver Conflicts On the software front, outdated or corrupted network drivers on a PC or laptop can lead to erratic connectivity. Conflicts with firewalls, VPNs, or third-party antivirus programs may also interfere with the device’s ability to maintain a stable connection.
Technicians at Geeks 2 You often resolve these problems through rigorous diagnostic procedures, updating network drivers, resetting TCP/IP settings, or reconfiguring DNS servers. For users unfamiliar with advanced network settings, such procedures are best left to qualified professionals.
4. ISP-Related Issues Occasionally, the problem lies not within the user’s equipment or setup, but with the internet service provider. From scheduled maintenance to bandwidth throttling or DNS server outages, ISPs can introduce instability without immediate notice to their customers.
While contacting the ISP is a necessary step, it is also beneficial to involve computer repair Tucson professionals who can rule out internal problems before initiating a potentially time-consuming customer support ticket.
5. Overloaded Bandwidth The proliferation of smart devices—phones, TVs, game consoles, tablets, thermostats—can quickly overwhelm a network if the plan or equipment does not support simultaneous high-speed connections.
Upgrading to a higher-tier internet plan, implementing Quality of Service (QoS) settings on the router, or limiting high-bandwidth activities during peak hours can alleviate this issue. A consultation with firms such as Geeks 2 You can help determine if a bandwidth bottleneck is the culprit.
When DIY Fails: The Role of Professional Support
While many users attempt to resolve connectivity issues independently, the trial-and-error nature of such efforts can be time-consuming and ultimately fruitless. The structured diagnostic processes employed by certified computer repair Tucson specialists offer a more efficient path to resolution.
Geeks 2 You, for instance, combines in-depth knowledge of both hardware and networking protocols with a commitment to customer education and sustainable solutions. Their technicians can identify issues beyond the surface—such as electromagnetic interference, subnet conflicts, or compromised security protocols—that might escape casual observation.
Moreover, professionals bring with them access to specialized tools, software, and testing procedures that ensure not only the restoration of connectivity but also its long-term reliability.
Preventative Measures to Safeguard Internet Stability
Once a connection has been stabilized, it is essential to implement preventative measures to forestall future disruptions. Recommended best practices include:
Regular router and firmware updates
Strong password protection to prevent network hijacking
Scheduled reboots of routers and modems to clear cache
Installation of power surge protectors to shield networking equipment
Periodic bandwidth audits to determine if current usage exceeds plan limits
Technicians from Geeks 2 You frequently emphasize the importance of proactive network management, especially in environments where multiple users and devices compete for limited bandwidth.
Commercial Considerations: Business Continuity and Internet Reliability
In commercial settings, the ramifications of unstable internet extend beyond inconvenience—they can result in revenue loss, customer dissatisfaction, and operational delays. For businesses in Tucson that rely on cloud-based software, VoIP communication, or online transactions, even brief service interruptions can be catastrophic.
The strategic partnership with a reliable provider of computer repair Tucson services ensures immediate troubleshooting, routine maintenance, and scalable solutions for growing connectivity needs. Geeks 2 You stands out in this regard, offering tailored service packages designed to enhance IT infrastructure resilience and minimize downtime.
Final Thoughts: From Frustration to Functionality
Persistent internet disconnections are more than just a nuisance—they are symptomatic of underlying inefficiencies in hardware, software, or infrastructure. While some solutions may lie within reach of the tech-savvy user, truly dependable and comprehensive remediation often requires the skill and experience of a professional.
By entrusting their network concerns to established names in computer repair Tucson such as Geeks 2 You, both residential and commercial clients gain peace of mind, operational continuity, and a digitally empowered lifestyle. As connectivity continues to serve as the backbone of modern productivity and communication, securing a reliable internet connection is not merely a convenience—it is a competitive necessity.
0 notes
Text
E5908 module RJ45 interface communication
How to achieve communication with the E5908 module RJ45, a brief introduction to help you take the next step
Introduction to the module and interface E5908 is an Ethernet communication module with a built-in TCP/IP protocol stack. It supports direct communication with an Ethernet switch or router through the RJ45 interface. The main control MCU can interact with the module through UART (AT command) or SPI/SDIO (depending on the module description).
Hardware connection (RJ45 interface) RJ45 interface (with magnetic transformer): The module's onboard RJ45 interface has an integrated magnetic transformer and can be plugged into a standard network cable without an external transformer. Power and ground: VCC (3.3V/5V) -> module VCC, GND -> module GND. UART connection: MCU_TX -> module UART_RX, MCU_RX -> module UART_TX Reset pin: connected to the MCU GPIO for module hardware reset. Decoupling capacitors: Add 10µF and 0.1µF decoupling capacitors to the module power pins to ensure stable power supply.
Network configuration:
DHCP: AT+NETMODE=DHCP returns +IP:...; Static IP: AT+NETMODE=STATIC,<IP>,<Mask>,<Gateway>. Establish socket: TCP client: AT+TCPSTART="<IP>",<Port>; TCP server: AT+TCPLISTEN=<Port>; UDP: AT+UDPSTART="<IP>",<Port>.
Data sending and receiving: Sending: AT+TCPSEND=<Len> → module prompts > → sending data; Receiving: module serial port pushes +TCP:RECV,..., followed by data.
Typical C code example:
#define UARThuart1 bool at_send(const char *cmd, const char *exp, uint32_t to) {...} void net_init(void) { //reset HAL_GPIO_WritePin(RESET_GPIO_Port, RESET_Pin, GPIO_PIN_RESET); HAL_Delay(50); HAL_GPIO_WritePin(RESET_GPIO_Port, RESET_Pin, GPIO_PIN_SET); HAL_Delay(200); at_send("AT+NETMODE=DHCP", "OK", 2000); } void tcp_client(void) { at_send("AT+TCPSTART=\"192.168.1.50\",8000", "CONNECT", 5000); at_send("AT+TCPSEND=5", ">", 2000); HAL_UART_Transmit(&UART, (uint8_t*)"hello", 5, 100); at_send("", "SENDOK", 2000); at_send("AT+TCPSTOP", "CLOSED", 3000); }

If you want to know more detailed solutions, please read this article: E5908 module Ethernet communication implementation solution
1 note
·
View note
Photo

Hikvision 2MP 2.8mm ColorVu Fixed Bullet IP Camera Camera Image Sensor: 1/2.8" Progressive Scan CMOS Max. Resolution: 1920 × 1080 Min. Illumination: 0.0005 Lux @ (F1.0, AGC ON), 0 Lux with Light Shutter Time: 1/3 s to 1/100,000 s Angle Adjustment: Pan: 0° to 360°, tilt: 0° to 90°, rotate: 0° to 360° Lens Lens Type: Fixed focal lens, 2.8 mm optional Focal Length & FOV: 2.8 mm, horizontal FOV 107°, vertical FOV 56°, diagonal FOV 127° Lens Mount: M12 Iris Type: Fixed Aperture: F1.0 Depth Of Field: 2.8 mm, 1.7 m to ∞ DORI DORI: 2.8 mm, D: 46 m, O: 18 m, R: 9 m, I: 4 m Illuminator Supplement Light Type: White light Supplement Light Range: 40 m Smart Supplement Light: Yes Audio Audio Compression: -U: G.711ulaw/G.711alaw/G.722.1/G.726/MP2L2/PCM/MP3/AAC Audio Bit Rate: -U: 64 Kbps (G.711ulaw/G.711alaw)/16 Kbps (G.722.1)/16 Kbps (G.726)/32 to 192 Kbps (MP2L2)/8 to 320 Kbps (MP3)/16 to 64 Kbps (AAC) Audio Sampling Rate: -U: 8 kHz/16 kHz/32 kHz/44.1 kHz/48 kHz Environment Noise Filtering: -U: Yes Network Protocols: TCP/IP, ICMP, HTTP, HTTPS, FTP, DHCP, DNS, DDNS, RTP, RTSP, NTP, UPnP, SMTP, IGMP, 802.1X, QoS, IPv4, IPv6, UDP, Bonjour, SSL/TLS, PPPoE, SNMP Simultaneous Live View: Up to 6 channels API: Open Network Video Interface (PROFILE S, PROFILE G, PROFILE T), ISAPI, SDK User/Host: Up to 32 users. 3 user levels: administrator, operator and user Security: Password protection, complicated password, HTTPS encryption, IP address filter, Security Audit Log, basic and digest authentication for HTTP/HTTPS, TLS 1.1/1.2, WSSE and digest authentication for Open Network Video Interface Network Storage: NAS (NFS, SMB/CIFS), auto network replenishment (ANR) Client: iVMS-4200, Hik-Connect, Hik-Central Web Browser: Plug-in required live view: IE 10+ Plug-in free live view: Chrome 57.0+, Firefox 52.0+ Local service: Chrome 57.0+, Firefox 52.0+ Image Image Parameters Switch: Yes Image Settings: Rotate mode, saturation, brightness, contrast, sharpness, gain, white balance adjustable by client software or web browser Day/Night Switch: Day, Night, Auto, Schedule Wide Dynamic Range (WDR): 120 dB SNR: ≥ 52 dB Image Enhancement: BLC, HLC, 3D DNR Interface Ethernet Interface: 1 RJ45 10 M/100 M self-adaptive Ethernet port On-Board Storage: Built-in memory card slot, support microSD/SDHC/SDXC card, up to 256 GB Built-In Microphone: -U: Yes Reset Key: Yes Event Basic Event: Motion detection (human and vehicle targets classification), video tampering alarm, exception Smart Event: Line crossing detection, intrusion detection, region entrance detection, region exiting detection (support alarm triggering by specified target types (human and vehicle)) Scene change detection Linkage: Upload to NAS/memory card/FTP, notify surveillance center, trigger recording, trigger capture, send email Deep Learning Function Face Capture: Yes General Power: 12 VDC ± 25%, 0.5 A, max. 6.0 W, Ø5.5 mm coaxial power plug PoE: 802.3af, Class 3, 36 V to 57 V, 0.25 A to 0.15 A, max. 7.5 W Dimension: 215.2 mm × 78.8 mm × 78.6 mm (8.5" × 3.1" × 3.1") Package Dimension: 315 mm × 137 mm × 141 mm (12.4" × 5.4" × 5.6") Approx. 680 g (1.5 lb.): With Package Weight: Approx. 1000 g (2.2 lb.) Storage Conditions: -30 °C to 60 °C (-22 °F to 140 °F). Humidity 95% or less (non-condensing) Startup And Operating Conditions: -30 °C to 60 °C (-22 °F to 140 °F). Humidity 95% or less (non-condensing) Language: 33 languages English, Russian, Estonian, Bulgarian, Hungarian, Greek, German, Italian, Czech, Slovak, French, Polish, Dutch, Portuguese, Spanish, Romanian, Danish, Swedish, Norwegian, Finnish, Croatian, Slovenian, Serbian, Turkish, Korean, Traditional Chinese, Thai, Vietnamese, Japanese, Latvian, Lithuanian, Portuguese (Brazil), Ukrainian General Function: Anti-flicker, heartbeat, mirror, privacy mask, flash log, password reset via email, pixel counter Approval EMC: FCC SDoC (47 CFR Part 15, Subpart B); CE-EMC (EN 55032: 2015, EN 61000-3-2: 2014, EN 61000-3-3: 2013, EN 50130-4: 2011 +A1: 2014); RCM (AS/NZS CISPR 32: 2015); IC (ICES-003: Issue 6, 2016);KC (KN 32: 2015, KN 35: 2015) Safety: UL (UL 60950-1); CB (IEC 60950-1:2005 + Am 1:2009 + Am 2:2013, IEC 62368-1:2014); CE-LVD (EN 60950-1:2005 + Am 1:2009 + Am 2:2013, IEC 62368-1:2014); BIS (IS 13252(Part 1):2010+A1:2013+A2:2015); LOA (IEC/EN 60950-1) Environment: CE-RoHS (2011/65/EU); WEEE (2012/19/EU); Reach (Regulation (EC) No 1907/2006) Protection: IP67 (IEC 60529-2013)
1 note
·
View note
Text
Hướng Dẫn Sửa Lỗi WiFi Limited Access (Chấm Than Vàng) Triệt Để Trong 5 Phút
Trong quá trình sử dụng Internet, chắc hẳn bạn đã từng gặp tình trạng kết nối WiFi hiển thị dấu chấm than vàng với thông báo “Limited Access”. Lỗi này khiến thiết bị không thể truy cập Internet dù đã kết nối WiFi thành công. Vậy nguyên nhân do đâu và làm sao để khắc phục nhanh chóng? Hãy cùng tìm hiểu trong bài viết dưới đây.

1. Nguyên Nhân Gây Ra Lỗi WiFi Limited Access
Lỗi WiFi Limited Access có thể xuất hiện trên các hệ điều hành Windows 7, 8, 8.1 và 10. Khi gặp lỗi này, biểu tượng mạng hiển thị dấu chấm than vàng hoặc thông báo “Limited”. M��t số nguyên nhân phổ biến gồm:
Quá nhiều thiết bị kết nối cùng lúc khiến mạng bị quá tải.
Xung đột địa chỉ IP giữa các thiết bị trong mạng.
Driver WiFi trên máy tính bị lỗi hoặc đã quá cũ.
Tường lửa Windows vô tình chặn kết nối mạng.
Modem hoặc router gặp trục trặc trong quá trình hoạt động.
2. Hướng Dẫn Sửa Lỗi WiFi Limited Access
2.1. Khởi Động Lại Modem/Router Và Thiết Bị Kết Nối
Cách đơn giản nhất để khắc phục lỗi là tắt nguồn modem/router trong khoảng 3-5 phút rồi bật lại. Sau đó, bạn chờ thiết bị khởi động hoàn toàn rồi kiểm tra kết nối Internet.
2.2. Tắt Tạm Thời Tường Lửa Windows
Tường lửa có thể nhận diện nhầm WiFi là không an toàn và tự động chặn kết nối. Bạn có thể tạm thời tắt tường lửa theo cách sau:
Qua Control Panel: Vào Windows Defender Firewall → Turn Windows Firewall on or off → Chọn Turn off Windows Firewall.
Qua Command Prompt: Mở CMD (chạy với quyền Admin) → Nhập lệnh: vbnet CopyEdit netsh advfirewall set allprofiles state off
2.3. Gia Hạn Địa Chỉ IP Bằng Dòng Lệnh
Bạn có thể làm mới địa chỉ IP bằng cách:
Nhấn Windows + R, nhập CMD, chọn Run as administrator.
Nhập lệnh: bash CopyEdit ipconfig /release
ipconfig /renew
Nhấn Enter và kiểm tra lại kết nối.
2.4. Cấu Hình Địa Chỉ IP Tĩnh
Nếu lỗi do xung đột IP, bạn có thể thiết lập IP tĩnh như sau:
Nhấn chuột phải vào biểu tượng mạng → Open Network & Internet Settings.
Chọn Network and Sharing Center → Click vào WiFi đang kết nối.
Nhấp vào Properties → Chọn Internet Protocol Version 4 (TCP/IPv4).
Chọn Use the following IP address và nhập:
IP Address: 192.168.1.X (X là số từ 2 đến 254).
Subnet mask: 255.255.255.0.
Default gateway: 192.168.1.1.
DNS server: 8.8.8.8 và 8.8.4.4.
2.5. Cập Nhật Hoặc Cài Đặt Lại Driver WiFi
Driver WiFi lỗi hoặc quá cũ có thể gây mất kết nối. Bạn có thể cập nhật bằng cách:
Nhấn Windows + X → Chọn Device Manager.
Tìm Network adapters → Nhấp chuột phải vào card WiFi → Update driver.
2.6. Kiểm Tra Và Reset Modem/Router
Nếu đã thử các cách trên mà vẫn không khắc phục được, bạn có thể reset router về trạng thái ban đầu bằng cách nhấn giữ nút Reset trong 10 giây.
3. Mẹo Phòng Tránh Lỗi WiFi Limited Access
Để hạn chế tình trạng WiFi bị lỗi Limited Access, bạn có thể áp dụng các mẹo sau:
Đặt mật khẩu mạnh để tránh bị dùng trộm mạng.
Giới hạn số lượng thiết bị kết nối để tránh quá tải.
Sử dụng tần số 5GHz thay vì 2.4GHz để có tốc độ nhanh hơn.
Cài đặt phần mềm quản lý WiFi để kiểm soát và tối ưu kết nối.
Lỗi WiFi Limited Access có thể gây gián đoạn công việc, nhưng với các cách khắc phục trên, bạn có thể nhanh chóng giải quyết vấn đề chỉ trong vài phút. Nếu đã thử tất cả mà vẫn không kết nối được, hãy liên hệ nhân viên kỹ thuật để được hỗ trợ.
Tìm hiểu thêm: https://vohoang.vn/khac-phuc-loi-wifi-limited
1 note
·
View note
Text
How to Troubleshoot Common Issues in Windows 10 Home and Pro Editions
Windows 10 is one of the most popular operating systems used by millions of users worldwide. While it is known for its stability and performance, like any other software, it can also encounter issues that may hinder its functionality. In this article, we will discuss common issues that users may face in Windows 10 Home and Pro editions and provide step-by-step troubleshooting guides to resolve them.
Issue 1: Slow Performance
One of the most common issues faced by windows 10 home users is slow performance. If your computer is taking too long to start up, launch applications, or perform tasks, it may be due to various reasons such as malware, disk errors, or outdated drivers. To troubleshoot this issue, start by checking for any malware infections using an anti-virus software. Next, run the built-in Disk Cleanup tool to remove temporary files and system files that may be consuming disk space. Additionally, update your drivers to the latest version and consider upgrading your RAM if your computer is running low on memory.
Issue 2: Wi-Fi Connectivity Problems
Wi-Fi connectivity issues are another common problem faced by Windows 10 users. If you are unable to connect to a Wi-Fi network or are experiencing frequent disconnections, try restarting your router and modem. Next, check your Wi-Fi settings to ensure that you are connected to the correct network and that your Wi-Fi adapter is enabled. If the issue persists, try resetting your TCP/IP stack by running the command "netsh int ip reset" in the Command Prompt. You can also try updating your Wi-Fi drivers to the latest version.
Issue 3: Update Errors
Windows 10 is designed to automatically download and install updates to ensure that your system remains secure and up-to-date. However, sometimes updates may fail to install, resulting in error messages. To troubleshoot update errors, start by checking the Windows Update history to identify the specific error code. Next, try running the Windows Update Troubleshooter tool, which can automatically detect and fix common issues. If the issue persists, try resetting the Windows Update components by running the command "net stop wuauserv" and "net start wuauserv" in the Command Prompt.
Issue 4: Blue Screen of Death (BSOD)
The Blue Screen of Death (BSOD) is a critical error that occurs when Windows encounters a problem that it cannot recover from. If you are experiencing frequent BSODs, try running a System File Checker (SFC) scan to identify and replace corrupted system files. Next, check for any driver updates and install the latest version. You can also try running a memory test using the built-in Windows Memory Diagnostic tool to identify any issues with your RAM.
Issue 5: Login Issues
Login issues are another common problem faced by Windows 10 users. If you are unable to log in to your account or are experiencing issues with your password, try restarting your computer in Safe Mode. Next, try running the built-in System Restore tool to restore your system to a previous point when you were able to log in successfully. If the issue persists, try resetting your password using the built-in Password Reset tool.

Issue 6: Audio Issues
Audio issues are common in Windows 10, particularly after installing updates. If you are experiencing issues with your audio, try running the built-in Audio Troubleshooter tool, which can automatically detect and fix common issues. Next, try updating your audio drivers to the latest version. You can also try disabling and re-enabling your audio device in the Device Manager.
Issue 7: Display Issues
Display issues are another common problem faced by Windows 10 users. If you are experiencing issues with your display, such as blurry text or incorrect resolution, try running the built-in Display Troubleshooter tool. Next, try updating your graphics drivers to the latest version. You can also try adjusting your display settings to ensure that they are set to the correct resolution and refresh rate.
Conclusion
Troubleshooting common issues in Windows 10 Home and Pro editions requires patience and a step-by-step approach. By following the troubleshooting guides outlined in this article, you should be able to resolve most issues and get your system up and running smoothly. Remember to always keep your system updated and run regular maintenance tasks to prevent issues from occurring in the first place. If you are still experiencing issues after trying the troubleshooting steps, consider seeking further assistance from Microsoft support or a professional technician.
0 notes
Text

Introducing the latest version of the NodeMcu ESP8266 CH340 Module – a cutting-edge, budget-friendly WiFi technology. This advanced board utilizes modern, high-level LUA based technology and offers an all-in-one design, making it incredibly easy to integrate into your current Arduino projects or any development board with available I/O pins.
Utilizing modern Internet development tools, like Node.js, can effectively accelerate the implementation of your ideas with the assistance of the built-in API provided by NodeMCU. Based on ESP8266 technology, NodeMCU harnesses a wealth of online resources to further enhance its capabilities.
The NodeMCU ESP8266 CH340 Module is equipped with ESP-12 based serial WiFi integration, allowing for easy access to GPIO, PWM, ADC, I2C, and 1-WIRE resources. It also features a built-in USB-TTL serial using the dependable CH340 for superior stability on all compatible platforms. Additionally, this wifi-module is one of the most cost-effective options currently available in the market. Its latest version is known as V3 or Version3. In this tutorial, we will provide instructions to connect any version of ESP8266 NodeMcu (V1, V2, or V3).
Hardware IO similar to Arduino – An advanced API for easily configuring and manipulating hardware, reducing repetitive tasks. Write code in Lua script, just like with Arduino but in a more interactive manner.
The Event-driven API for network applications in Nodejs style enables developers to easily write code for a compact 5mm5mm sized MCU. This greatly accelerates the development process for IOT applications.
The ESP8266 Development Kit combines GPIO, PWM, IIC, 1-Wire, and ADC on a single board. By using the NodeMCU Firmware, it allows for quick and efficient development.
The NodeMcu is a useful tool for creating IoT prototypes. It is an open-source firmware and development kit that allows you to write Lua scripts with ease. This Development Kit is built on the ESP8266 platform and includes integrated features such as GPIO, PWM, IIC, 1-Wire, and ADC, all conveniently housed on one board.
Attributes of NodeMcu ESP8266 CH340 Module are:
Utilizes CH340G in place of CP2102.
The standard for wireless technology, specifically 802.11 b/g/n, eliminates the need for cables.
The WiFi operates at 2.4GHz and offers WPA/WPA2 security mode.
Provide assistance for the three available operating modes: STA, AP, and STA AP.
The TCP/IP protocol stack is integrated to facilitate the handling of multiple connections from TCP Clients (up to a maximum of 5).
The data communication interface supports UART and GPIO.
OTA, or remote firmware upgrade, is a quick and efficient way to update your device’s firmware without having to physically connect it to another device.
Assist the enhancement of Smart Link Smart Networking.
The IO Pin is an integral part of ESP8266.
There is no need to download the reset function.
An excellent toolkit for enhancing ESP8266 capabilities.
The WI-FI with the most affordable price.
For hardware IO compatible with Arduino.
Maximize efficiency in developing your IOT applications.
This product boasts a range of impressive features, including its open-source capability, interactivity, programmability, affordability, user-friendly design, intelligent functions, and WI-FI connectivity.
The integrated WI-FI MCU ESP8266 development kit offers effortless prototyping capabilities.
Our platform offers the most cost-effective solution for developing IoT applications.
NodeMCU ESP8266 CH340 Module features a built-in USB-TTL serial port, equipped with the highly dependable industrial-grade CH340G chip, ensuring unrivaled stability across all compatible platforms.
The Advanced API offers hardware IO capabilities that greatly minimize the need for repetitive tasks involved in setting up and managing hardware.
The network application’s event-driven API enables developers to write Nodejs-style code for a compact 5mm*5mm MCU.
0 notes
Text
HOW TO RESET LAN BY CAMMAND PROMPT ?
To reset your LAN (Local Area Network) settings using Command Prompt in Windows, you can use the following steps:
Open Command Prompt: Press the Windows key + R to open the Run dialog, type "cmd", and press Enter. Alternatively, you can search for "Command Prompt" in the Start menu and open it.
Run Command Prompt as Administrator: Right-click on Command Prompt in the search results and select "Run as administrator". This will ensure that you have the necessary permissions to make changes to the network settings.
Reset TCP/IP Stack: In the Command Prompt window, type the following command and press Enter:
netsh int ip reset
This command resets the TCP/IP stack, which can help resolve network connectivity issues.
Reset Winsock Catalog: Next, type the following command and press Enter:
netsh winsock reset
This command resets the Winsock catalog, which contains information about network protocols and configurations.
Restart Your Computer: After running the above commands, restart your computer to apply the changes.
After restarting your computer, your LAN settings should be reset to their default configurations. This can help resolve various network connectivity issues you may be experiencing.
0 notes
Text
can't connect using tcp ip to vpn server
🔒🌍✨ Get 3 Months FREE VPN - Secure & Private Internet Access Worldwide! Click Here ✨🌍🔒
can't connect using tcp ip to vpn server
VPN server connection troubleshooting
Troubleshooting VPN Server Connection Issues
Virtual Private Networks (VPNs) are essential tools for ensuring online privacy and security. However, like any technology, they can sometimes encounter connection issues. If you're experiencing trouble connecting to a VPN server, here are some troubleshooting steps to help you resolve the issue.
Check Your Internet Connection: Before troubleshooting your VPN, ensure that your internet connection is stable and functioning properly. A weak or unreliable connection can prevent your VPN from establishing a secure tunnel.
Verify VPN Credentials: Double-check your VPN username and password to ensure they are correct. Typos or incorrect credentials can lead to authentication failures.
Select an Alternate Server: Sometimes, the server you're trying to connect to may be experiencing issues. Try selecting a different server location within your VPN client to see if the problem persists.
Update VPN Software: Ensure that your VPN software is up-to-date. Developers often release updates to address bugs and improve compatibility with various systems.
Disable Firewall or Antivirus: Sometimes, security software such as firewalls or antivirus programs can interfere with VPN connections. Temporarily disable these programs and attempt to connect to the VPN again.
Restart VPN Client and Device: Restarting your VPN client and device can resolve temporary glitches. Close the VPN application, restart your device, and then relaunch the VPN client to see if the issue is resolved.
Contact VPN Support: If you've exhausted all troubleshooting steps and still can't connect to the VPN server, contact your VPN provider's customer support for further assistance. They may be able to identify underlying issues or provide additional guidance.
By following these troubleshooting steps, you can often resolve VPN connection issues and enjoy a secure and private online browsing experience.
TCP/IP connectivity issues with VPN
When using a VPN to establish a secure connection over the internet, users may encounter TCP/IP connectivity issues that can disrupt their online activities. TCP/IP (Transmission Control Protocol/Internet Protocol) is the fundamental communication protocol used for transmitting data across networks. When connectivity issues arise with VPNs, it can impact the reliability and speed of the connection.
One common TCP/IP connectivity issue with VPNs is packet loss. Packet loss occurs when data packets being transmitted between the user's device and the VPN server fail to reach their destination. This can result in slow loading times, choppy video streams, and dropped connections. Packet loss can be caused by network congestion, server overload, or signal interference.
Another issue is high latency, which refers to the delay between sending and receiving data packets. High latency can cause laggy connections, making it difficult to browse the web, stream videos, or participate in online gaming. Latency issues can be exacerbated when using a VPN due to the additional encryption and decryption processes involved in securing the connection.
To troubleshoot TCP/IP connectivity issues with VPNs, users can try switching to a different VPN server, checking their internet connection for stability, or adjusting their VPN settings. Updating network drivers, resetting the TCP/IP stack, and disabling conflicting software may also help resolve connectivity issues.
In conclusion, TCP/IP connectivity issues with VPNs can be frustrating but are often solvable with some troubleshooting and adjustments. By understanding the common issues that can arise and taking proactive steps to address them, users can enjoy a more seamless and secure VPN experience.
Troubleshoot VPN server connection problems
When it comes to maintaining a secure and reliable network connection, VPNs (Virtual Private Networks) play a crucial role. However, like any technology, VPNs can encounter issues, leading to connectivity problems. Here are some common troubleshooting steps to resolve VPN server connection issues:
Check Network Connectivity: Ensure that your device is connected to the internet and that other internet-dependent applications are working correctly. If not, troubleshoot your internet connection before addressing VPN issues.
Verify VPN Configuration: Double-check the VPN settings on your device to ensure they are correctly configured. Pay attention to parameters such as server address, authentication credentials, and encryption settings.
Restart VPN Service: Sometimes, simply restarting the VPN service can resolve connectivity issues. Stop the VPN service, wait a few seconds, and then restart it to see if the problem persists.
Switch Servers: If you're unable to connect to a specific VPN server, try connecting to a different server location. Server overload or maintenance could be causing the connection problem.
Update VPN Software: Ensure that your VPN client is up-to-date. Developers regularly release updates to fix bugs and improve compatibility, so installing the latest version of the VPN software may resolve connectivity issues.
Check Firewall and Antivirus Settings: Firewalls and antivirus programs can sometimes interfere with VPN connections. Temporarily disable these security measures and attempt to connect to the VPN again to see if they are causing the problem.
Contact VPN Provider: If you've exhausted all troubleshooting steps and still can't establish a connection, reach out to your VPN provider's support team for assistance. They can provide further guidance and may be able to identify any server-side issues affecting your connection.
By following these troubleshooting steps, you can effectively diagnose and resolve VPN server connection problems, ensuring a seamless and secure browsing experience.
VPN server TCP/IP connection errors
Title: Troubleshooting VPN Server TCP/IP Connection Errors
In the realm of networking, VPN (Virtual Private Network) servers play a crucial role in securing and facilitating remote connections. However, encountering TCP/IP connection errors can impede the seamless functioning of VPN servers, leading to frustration for users and administrators alike. Understanding and resolving these issues is paramount to maintaining a reliable and secure network infrastructure.
One common TCP/IP connection error is the "TCP/IP handshake failure." This occurs when the initial exchange of synchronization (SYN) and acknowledgment (ACK) packets between the client and server fails to establish a connection. Several factors can contribute to this, including misconfigured firewall settings, incorrect routing tables, or network congestion.
Another frequent issue is the "TCP/IP timeout error," where the connection between the client and server is terminated due to prolonged inactivity or packet loss. This can be caused by network latency, inadequate bandwidth, or faulty network equipment. Adjusting timeout settings, optimizing network performance, and upgrading hardware can help mitigate this problem.
Furthermore, VPN servers may encounter "TCP/IP protocol mismatch errors," resulting from inconsistencies in the TCP/IP protocols used by the client and server. Ensuring compatibility between the protocols and updating firmware or software versions can resolve such discrepancies.
To troubleshoot these TCP/IP connection errors effectively, network administrators can employ various strategies, including:
Conducting thorough network diagnostics to identify underlying issues.
Verifying firewall configurations and port settings to allow proper traffic flow.
Monitoring network traffic and performance metrics to pinpoint areas of congestion or packet loss.
Implementing encryption and authentication mechanisms to enhance security without compromising connectivity.
By addressing TCP/IP connection errors promptly and comprehensively, organizations can ensure the uninterrupted operation of their VPN servers, enabling secure remote access for users while safeguarding sensitive data.
Resolving VPN server connectivity via TCP/IP
The utilization of TCP/IP protocols in the context of resolving VPN server connectivity issues is a crucial aspect of troubleshooting for network administrators and users alike. TCP/IP, which stands for Transmission Control Protocol/Internet Protocol, is the fundamental communication protocol utilized on the internet and on most private networks. VPNs, or Virtual Private Networks, rely on this protocol suite to establish and maintain connections securely across the internet.
When encountering connectivity problems with a VPN server, a common approach is to analyze the underlying TCP/IP communication. TCP/IP operates by breaking down data into packets, transmitting them across the network, and reassembling them at the destination. Issues such as packet loss, latency, or misconfigurations can disrupt this process, leading to failed VPN connections.
To troubleshoot VPN server connectivity via TCP/IP, administrators often start by checking network settings, ensuring correct IP addressing, subnet masks, and gateway configurations. They might also examine routing tables to verify proper data transmission paths. Monitoring tools like Wireshark can assist in analyzing packet flow and pinpointing potential issues in the TCP/IP communication.
Additionally, adjusting TCP/IP settings such as adjusting the Maximum Transmission Unit (MTU) size or tweaking TCP window scaling parameters can sometimes improve VPN connectivity. By understanding the intricacies of TCP/IP and its role in VPN communication, network professionals can effectively diagnose and resolve server connectivity issues, ensuring smooth and secure remote access for users.
0 notes
Text
can't connect to wan miniport vpn
🔒🌍✨ Get 3 Months FREE VPN - Secure & Private Internet Access Worldwide! Click Here ✨🌍🔒
can't connect to wan miniport vpn
Wan Miniport VPN troubleshooting
Wan Miniport VPN is a virtual private network adapter used in Windows operating systems to establish VPN connections. While it provides secure communication over the internet, users may encounter some common troubleshooting issues that can disrupt their VPN experience.
One prevalent issue with Wan Miniport VPN is driver conflicts or missing drivers. This can be resolved by updating the drivers through Device Manager or reinstalling them from the manufacturer's website. Another common problem is network configuration errors, where the VPN settings may be incorrectly configured. Users should double-check their VPN settings to ensure they match the requirements of their VPN service provider.
Sometimes, Wan Miniport VPN may face connectivity issues due to firewall or antivirus software blocking the VPN connection. Users should temporarily disable these security software to see if the VPN connection can be established. Additionally, resetting the TCP/IP stack can also help resolve connectivity issues with Wan Miniport VPN. This can be done by running specific commands in the Command Prompt.
If the Wan Miniport VPN is still not working after trying these troubleshooting steps, users can contact their VPN service provider for further assistance. They may provide specific troubleshooting steps or recommend alternative solutions to ensure a smooth VPN connection.
In conclusion, Wan Miniport VPN troubleshooting may require updating drivers, checking network configurations, disabling security software, resetting TCP/IP stack, or seeking help from the VPN service provider. By following these steps, users can overcome common issues and enjoy a secure VPN connection on their Windows system.
Wan Miniport VPN connection issues
Wan Miniport is a type of network driver used in Windows operating systems to manage VPN connections. However, users often encounter issues with Wan Miniport VPN connections that can disrupt their online activities. One common problem is when the Wan Miniport driver becomes corrupted or outdated, leading to connection failures.
When facing Wan Miniport VPN connection issues, there are several troubleshooting steps that users can take to resolve the issue. One of the first things to try is to update the Wan Miniport driver to the latest version. This can be done through the Device Manager in Windows, where users can find the Wan Miniport driver under the "Network Adapters" section. By right-clicking on the driver and selecting "Update driver," users can search for updates online and install them to potentially fix the connection problem.
If updating the driver does not solve the issue, users can also try uninstalling the Wan Miniport driver and then restarting the computer. Windows will automatically reinstall the driver upon reboot, which may help in resolving any underlying issues causing the connection problem.
In some cases, resetting the TCP/IP stack or running network troubleshooting tools provided by Windows can also help in diagnosing and fixing Wan Miniport VPN connection issues. However, if the problem persists despite trying these solutions, seeking further assistance from a technical support professional may be necessary to address more complex networking issues.
Wan Miniport VPN not working
WAN Miniport is a type of network adapter that allows VPN connections on Windows operating systems. However, users may encounter issues where their WAN Miniport VPN is not working properly. There are several reasons why this problem may occur, and understanding these causes can help in troubleshooting the issue.
One common reason for WAN Miniport VPN not working is outdated or corrupt network drivers. In such cases, updating the network drivers through Device Manager can often resolve the issue. Additionally, reinstalling the WAN Miniport adapters may help in fixing any potential driver-related issues.
Another possible cause of the problem could be related to network settings or configurations. Users can check their network settings to ensure that the VPN connection is properly configured and that there are no conflicts with other network adapters.
In some cases, software conflicts or third-party applications may interfere with the WAN Miniport VPN functionality. Disabling or uninstalling any conflicting software can help in resolving the issue.
If the problem persists, users may consider resetting their network settings or performing a system restore to undo any recent changes that could be causing the problem.
Overall, troubleshooting WAN Miniport VPN issues can vary depending on the specific cause of the problem. By following these steps and consulting with technical support if needed, users can often resolve the issue and regain access to their VPN connection.
Wan Miniport VPN error messages
Wan Miniport VPN Error Messages: Understanding and Troubleshooting
Wan Miniport is a crucial component in Windows systems, facilitating the functionality of virtual private network (VPN) connections. However, encountering error messages related to Wan Miniport can be frustrating for users trying to establish VPN connections. Understanding these error messages and knowing how to troubleshoot them can help resolve connectivity issues effectively.
One common error message associated with Wan Miniport VPN connections is the "Error 720: A connection to the remote computer could not be established" message. This error often indicates issues with the VPN server configuration, network adapter settings, or outdated drivers. To address this, users can try updating their network adapter drivers, ensuring compatibility with the VPN server, and resetting TCP/IP settings.
Another frequently encountered error is "Error 800: Unable to establish the VPN connection." This error typically points to firewall or router settings blocking VPN connections, incorrect VPN server settings, or network congestion. Users can troubleshoot this by checking firewall configurations, verifying VPN server settings, and trying alternative VPN protocols.
Additionally, users may encounter "Error 812: The connection was prevented because of a policy configured on your RAS/VPN server." This error indicates issues with VPN server policies, authentication protocols, or user permissions. Troubleshooting steps include reviewing VPN server policies, ensuring correct user authentication settings, and verifying user permissions.
Moreover, "Error 678: The remote computer did not respond" is another common error indicating issues with network connectivity, incorrect dial-up settings, or ISP-related problems. Troubleshooting involves checking modem settings, verifying dial-up configurations, and contacting the Internet Service Provider (ISP) if necessary.
In conclusion, Wan Miniport VPN error messages can disrupt VPN connectivity, but understanding their causes and implementing appropriate troubleshooting steps can help resolve these issues effectively. By addressing network settings, driver updates, and server configurations, users can mitigate VPN connection problems and ensure smooth and secure remote access.
Wan Miniport VPN connectivity problems
Wan Miniport VPN connectivity problems can be a frustrating issue for users trying to establish a secure and stable VPN connection on their Windows systems. Wan Miniport is a virtual adapter that allows VPN clients to connect to a remote server over the internet. However, users often encounter connectivity problems with Wan Miniport, preventing them from establishing a reliable VPN connection.
One common issue with Wan Miniport VPN connectivity is driver-related problems. Outdated or corrupted drivers can cause connection failures and network issues. To resolve this, users should update their Wan Miniport drivers by accessing the Device Manager in the Control Panel and selecting the Wan Miniport adapter for driver update.
Another frequent issue is misconfigured network settings. Users may have incorrect VPN configurations or network settings that prevent Wan Miniport from connecting to the VPN server. To troubleshoot this, users should double-check their VPN settings, such as server address, authentication credentials, and encryption protocols, to ensure they match the requirements for the VPN service they are trying to connect to.
Additionally, firewall and security software may block Wan Miniport VPN connections, leading to connectivity problems. Users should check their firewall settings and ensure that the VPN client is allowed to communicate through the firewall. Disabling security software temporarily can help identify if it is causing the connection issue.
In conclusion, Wan Miniport VPN connectivity problems can be resolved by updating drivers, checking network settings, and configuring firewall and security software appropriately. By following these troubleshooting steps, users can overcome Wan Miniport connectivity issues and establish a successful VPN connection for secure internet browsing and data transmission.
0 notes
Text
can t connect turbo vpn
🔒🌍✨ Get 3 Months FREE VPN - Secure & Private Internet Access Worldwide! Click Here ✨🌍🔒
can t connect turbo vpn
Turbo VPN troubleshooting
Title: Troubleshooting Turbo VPN: Common Issues and Solutions
Turbo VPN stands out as one of the most popular virtual private network (VPN) services, offering users secure and private internet access. However, like any technology, it may encounter issues that can disrupt your browsing experience. Here are some common Turbo VPN troubleshooting tips to help you resolve any problems you may encounter:
Connection Failures: If you're experiencing difficulty connecting to Turbo VPN, try switching between different server locations. Sometimes, servers can become overcrowded or experience temporary outages. Additionally, ensure that your internet connection is stable and that there are no firewall or antivirus settings blocking the VPN.
Slow Speeds: Slow connection speeds can be frustrating when using a VPN. To improve performance, try connecting to servers that are geographically closer to your location. You can also switch to a different protocol within the Turbo VPN settings, such as UDP or TCP, to see if it improves speed.
App Crashes: If the Turbo VPN app keeps crashing or freezing, make sure you have the latest version installed. Updating the app can often resolve stability issues. If the problem persists, try clearing the app's cache or reinstalling it entirely.
IP or DNS Leaks: Ensure that Turbo VPN is properly hiding your IP address and DNS information by performing a leak test. There are several online tools available for this purpose. If leaks are detected, try switching to a different VPN server or protocol.
Compatibility Issues: Turbo VPN may not be compatible with all devices or operating systems. If you're experiencing compatibility issues, check the app's requirements and ensure that your device meets them. You can also contact Turbo VPN's customer support for further assistance.
By following these troubleshooting tips, you can resolve common issues with Turbo VPN and enjoy a smoother and more secure internet browsing experience. Remember to always prioritize your online privacy and security by using a reliable VPN service like Turbo VPN.
VPN connection issues
Title: Troubleshooting Common VPN Connection Issues
Virtual Private Network (VPN) services are essential tools for maintaining online privacy, security, and anonymity. However, users often encounter various connection issues that can disrupt their browsing experience. Understanding and troubleshooting these issues is crucial for ensuring a seamless VPN connection.
One common problem faced by VPN users is slow connection speeds. This can be caused by several factors, including server congestion, network congestion, or limitations imposed by the VPN provider. To address this issue, users can try connecting to different servers or upgrading their subscription to access faster servers with higher bandwidth.
Another frequent issue is connection drops or interruptions. This can occur due to unstable internet connections, firewall settings, or VPN protocol compatibility issues. Users should ensure that their internet connection is stable and check their firewall settings to allow VPN traffic. Additionally, switching to a different VPN protocol, such as OpenVPN or IKEv2, may help resolve compatibility issues and improve connection stability.
Some users may also encounter difficulties accessing certain websites or services while connected to a VPN. This can be due to geo-blocking or IP address blacklisting by the website or service provider. In such cases, users can try connecting to different VPN servers located in different regions to bypass geo-blocking restrictions.
Furthermore, users experiencing authentication failures or login issues should double-check their credentials and ensure they are entering them correctly. Resetting passwords or contacting the VPN provider's support team for assistance may be necessary to resolve authentication issues.
In conclusion, VPN connection issues are common but can usually be resolved with some troubleshooting. By understanding the underlying causes of these issues and implementing appropriate solutions, users can enjoy a secure and uninterrupted VPN experience.
Turbo VPN not connecting
Facing issues with Turbo VPN not connecting? Don't fret, you're not alone. Turbo VPN is a popular choice for securing online privacy and accessing geo-blocked content, but like any software, it can encounter connectivity problems. Here's a guide to troubleshoot and resolve the issue.
Firstly, ensure you're using the latest version of Turbo VPN. Developers regularly release updates to fix bugs and improve performance, so updating may solve your problem.
If you're still experiencing connectivity issues, try switching between different servers. Sometimes, a specific server may be overloaded or experiencing technical difficulties, causing connection failures. Experiment with different server locations until you find one that works.
Additionally, check your internet connection. Turbo VPN relies on a stable internet connection to establish a secure tunnel. If your internet connection is weak or intermittent, it can prevent Turbo VPN from connecting properly. Try switching between Wi-Fi and mobile data to see if that resolves the issue.
Clearing the app's cache and data can also help. Sometimes, corrupted data or cache files can interfere with the VPN's functionality. Navigate to your device's settings, find the Turbo VPN app, and clear its cache and data. Then, relaunch the app and attempt to connect again.
If none of the above solutions work, consider reinstalling the Turbo VPN app. Reinstalling can fix any underlying issues with the app's installation and configuration.
In rare cases, your device's firewall or antivirus software may be blocking Turbo VPN's connection. Temporarily disable any firewall or antivirus software and try connecting again to see if that resolves the issue.
By following these steps, you should be able to troubleshoot and resolve Turbo VPN connection issues, ensuring you can enjoy a secure and private internet browsing experience.
VPN connection errors
When using a Virtual Private Network (VPN) to secure your online activities and protect your privacy, encountering connection errors can be frustrating. There are several common VPN connection errors that users may come across, each with its own potential causes and solutions.
One of the most frequent VPN connection errors is the "Unable to Connect" message, indicating that the VPN client is unable to establish a connection with the server. This error can be caused by issues such as server overloading, server downtime, or network congestion. In such cases, trying to connect to a different server location or contacting your VPN provider for support can often resolve the issue.
Another common error is the "Authentication Failed" message, which typically occurs when there is a mismatch in the login credentials entered or issues with the authentication protocol used by the VPN client. Double-checking the username and password, ensuring that the proper authentication protocol is selected, or resetting your login credentials can help resolve this error.
Furthermore, users may encounter the "VPN Connection Timed Out" error, indicating that the connection attempt took too long to establish. This can be caused by network interruptions, firewall settings, or outdated VPN client software. Troubleshooting network connectivity, adjusting firewall settings, or updating your VPN client can potentially fix this issue.
In conclusion, while VPN connection errors can be bothersome, understanding their potential causes and solutions can help users troubleshoot and resolve these issues effectively, ensuring a seamless and secure VPN connection. If problems persist, contacting your VPN provider's customer support for assistance is always recommended.
Fixing Turbo VPN connectivity issues
If you are facing connectivity issues with Turbo VPN, there are several troubleshooting steps you can take to try and resolve the problem. Here are some common solutions to fix Turbo VPN connectivity issues:
Check your internet connection: Make sure that your device is connected to the internet and that the signal is strong and stable. Turbo VPN requires a stable internet connection to work properly.
Switch servers: Sometimes the server you are connected to may be experiencing high traffic or technical problems. Try switching to a different server location within the app to see if that resolves the connectivity issue.
Update the app: Make sure that you are using the latest version of Turbo VPN. Developers often release updates to fix bugs and improve performance, so updating the app may help resolve any connectivity issues you are experiencing.
Restart the app: Sometimes simply closing the Turbo VPN app and reopening it can help refresh the connection and resolve any temporary glitches that may be causing connectivity problems.
Check for conflicting apps: If you have other VPN or security apps running on your device, they may be conflicting with Turbo VPN. Try disabling or uninstalling other VPN apps to see if that improves connectivity.
By following these steps, you may be able to troubleshoot and fix connectivity issues with Turbo VPN and enjoy a secure and reliable VPN connection for your online activities.
0 notes
Text
can't browse vpn network
🔒🌍✨ Get 3 Months FREE VPN - Secure & Private Internet Access Worldwide! Click Here ✨🌍🔒
can't browse vpn network
VPN connection issues
Title: Troubleshooting Common VPN Connection Issues
Virtual Private Networks (VPNs) have become indispensable tools for maintaining online privacy and security. However, like any technology, they can sometimes encounter connection issues that disrupt their functionality. Understanding and troubleshooting these problems is essential for ensuring a seamless VPN experience.
One of the most common VPN connection issues is slow speeds. This can be caused by various factors, such as network congestion, server overload, or distance from the VPN server. To address this problem, users can try connecting to a different server closer to their location or during off-peak hours when network traffic is lower.
Another frequent issue is intermittent disconnections. This can occur due to unstable internet connections, firewall settings, or outdated VPN software. To resolve this issue, users should ensure they have a stable internet connection, adjust firewall settings to allow VPN traffic, and regularly update their VPN client to the latest version.
Some users may also encounter compatibility issues with certain devices or operating systems. In such cases, it's important to check the VPN provider's compatibility list and ensure that the VPN client is compatible with the device and operating system being used. Additionally, updating the device's firmware or operating system to the latest version can often resolve compatibility issues.
DNS leaks are another concern that can compromise user privacy when using a VPN. This occurs when the device's DNS requests are not routed through the VPN tunnel, potentially exposing browsing activity to third parties. To prevent DNS leaks, users can configure their device to use the VPN's DNS servers or use a VPN provider that offers built-in DNS leak protection.
In conclusion, while VPNs offer numerous benefits, they can sometimes encounter connection issues that need to be addressed. By understanding the common causes of these problems and following troubleshooting steps, users can ensure a reliable and secure VPN connection.
Network browsing problems
Title: Troubleshooting Network Browsing Problems: A Comprehensive Guide
Network browsing problems can be frustrating and disruptive, hampering productivity and causing undue stress. Whether you're unable to access shared folders, experiencing slow browsing speeds, or encountering frequent timeouts, understanding and resolving these issues is crucial. Here's a comprehensive guide to help you troubleshoot network browsing problems effectively.
Check Network Connectivity: Ensure that your device is connected to the network properly. Verify cables, Wi-Fi connections, and router configurations.
Restart Devices: Sometimes, a simple restart can resolve network browsing issues. Restart your computer, router, and modem to refresh connections.
Update Network Drivers: Outdated or faulty network drivers can cause browsing problems. Update your network adapter drivers to the latest version from the manufacturer's website.
Scan for Malware: Malware infections can disrupt network browsing. Use reputable antivirus software to scan and remove any malicious programs.
Review Firewall Settings: Firewalls can block network traffic, causing browsing issues. Check firewall settings to ensure they're not overly restrictive.
Reset TCP/IP Stack: Resetting the Transmission Control Protocol/Internet Protocol (TCP/IP) stack can resolve network communication issues. Open Command Prompt as administrator and type 'netsh int ip reset' followed by 'netsh winsock reset' then restart your computer.
Flush DNS Cache: Flushing the Domain Name System (DNS) cache can resolve DNS-related browsing problems. Open Command Prompt and type 'ipconfig /flushdns' followed by pressing Enter.
Verify Network Shares: Ensure that shared folders are accessible and permissions are set correctly. Check network share settings on both the host and client devices.
Update Firmware: Outdated router firmware can cause network browsing issues. Check for firmware updates on the router manufacturer's website and install them if available.
Contact ISP: If you've tried all troubleshooting steps and still experience network browsing problems, contact your Internet Service Provider (ISP) for assistance. There may be issues with your internet connection that require professional intervention.
By following these steps, you can effectively troubleshoot and resolve network browsing problems, ensuring seamless connectivity and optimal performance for your devices. Remember to approach each step systematically and seek professional help if needed.
Internet access restrictions
Internet access restrictions refer to the various limitations imposed on individuals or groups in terms of accessing certain websites, content, or online services. These restrictions can be put in place by governments, organizations, schools, or even internet service providers. While the reasons behind internet access restrictions may vary, they often aim to regulate online behavior, protect users from harmful content, or prevent illegal activities.
Governments often impose internet access restrictions for political reasons, such as censoring content that goes against their ideologies or blocking certain websites to maintain control over information flow. In some cases, restrictions are also put in place to combat cybercrime, protect national security, or prevent the spread of fake news and misinformation.
Organizations and schools may implement internet access restrictions to increase productivity, prevent employees or students from accessing inappropriate content, or ensure network security. By using firewalls, content filters, or blacklisting certain websites, these entities can control and monitor internet usage within their premises.
Internet service providers may also restrict access to certain websites or services either to comply with regulations, manage network traffic, or offer tiered internet packages. They may throttle or block access to specific types of content, such as streaming services or torrent websites, in order to prioritize bandwidth for other users or push customers towards higher-priced plans.
While internet access restrictions can serve valid purposes, they also raise concerns about censorship, freedom of speech, and privacy. Striking a balance between protecting users and upholding their rights remains a complex challenge in today's digitally connected world.
VPN server connectivity
Title: Enhancing Connectivity: Understanding VPN Server Connectivity
In today's interconnected digital landscape, maintaining a secure and reliable connection is paramount. VPN (Virtual Private Network) servers play a crucial role in ensuring privacy, security, and unrestricted access to online content. Understanding VPN server connectivity is essential for optimizing your online experience.
VPN servers act as intermediaries between your device and the internet. They encrypt your data and route it through a secure tunnel, shielding it from prying eyes and potential threats. Connectivity to these servers is pivotal for enjoying the benefits of VPN technology.
One key aspect of VPN server connectivity is the selection of server locations. VPN providers typically offer a wide array of servers spread across various countries and regions. Users can choose servers based on their specific needs, such as accessing geo-restricted content or minimizing latency.
Furthermore, the reliability and speed of VPN server connections significantly impact user experience. A stable connection ensures seamless browsing, streaming, and downloading, while fast speeds enable swift data transfer without noticeable lag.
It's also important to consider the protocol used for VPN server connectivity. Popular protocols like OpenVPN, IKEv2, and L2TP/IPsec offer varying levels of security and performance. Users should select the protocol that best aligns with their requirements for privacy and speed.
Moreover, VPN server load and capacity play a crucial role in maintaining consistent connectivity. High server loads can result in slower speeds and potential connection drops. Opting for VPN providers with robust infrastructure and sufficient server capacity can help mitigate these issues.
In conclusion, VPN server connectivity is a cornerstone of modern online security and accessibility. By understanding the factors that influence connectivity, users can make informed decisions to enhance their VPN experience. Whether it's selecting the right server location, optimizing connection speeds, or choosing the appropriate protocol, prioritizing connectivity ensures a seamless and secure online journey.
Troubleshooting VPN browsing
Troubleshooting VPN Browsing: Tips to Resolve Connectivity Issues
Virtual Private Networks (VPNs) offer users a secure and private way to browse the internet. However, encountering browsing issues while using a VPN is not uncommon. Here are some troubleshooting tips to help resolve connectivity issues and ensure a smooth browsing experience:
Check your internet connection: Before troubleshooting VPN issues, ensure that your internet connection is stable. Poor internet connectivity can cause browsing problems even when using a VPN. Restart your router or switch to a different network to rule out connection issues.
Verify VPN settings: Double-check your VPN settings to ensure they are configured correctly. Make sure you are connected to the appropriate server location and that your login credentials are accurate. If necessary, reinstall the VPN application to reset settings.
Switch VPN protocols: VPN protocols determine how data is transmitted between your device and the VPN server. If you're experiencing browsing issues, try switching between different protocols (such as OpenVPN, L2TP/IPsec, or IKEv2) to see if one provides better connectivity.
Disable firewall or antivirus software: Sometimes, firewall or antivirus software can interfere with VPN connections, leading to browsing problems. Temporarily disable these programs and see if your VPN connection improves. Remember to re-enable them once troubleshooting is complete.
Clear cache and cookies: Accumulated cache and cookies in your browser can sometimes conflict with VPN connections. Clearing your browser's cache and cookies can help resolve browsing issues and improve VPN performance.
Contact VPN support: If you've tried the above steps and are still experiencing browsing problems, reach out to your VPN provider's customer support team. They can offer personalized assistance and troubleshoot any underlying issues with your VPN connection.
By following these troubleshooting tips, you can resolve VPN browsing issues and enjoy a secure and seamless internet experience. Remember to stay informed about VPN best practices to optimize your online privacy and security.
0 notes
Text
can t connect to l2tp vpn mac
🔒🌍✨ Get 3 Months FREE VPN - Secure & Private Internet Access Worldwide! Click Here ✨🌍🔒
can t connect to l2tp vpn mac
L2TP VPN troubleshooting on Mac
L2TP VPN troubleshooting on Mac can sometimes be necessary when users encounter connectivity issues or are unable to establish a secure connection. Here are some common troubleshooting steps to address L2TP VPN problems on Mac devices.
Check VPN Settings: Ensure that the L2TP VPN settings on your Mac are correctly configured. Verify the server address, account credentials, shared secret, and other necessary details to establish a successful connection.
Restart VPN Service: Sometimes, restarting the L2TP VPN service can resolve connectivity issues. Turn off the VPN connection, wait for a few seconds, and then reconnect to see if the problem is resolved.
Update macOS: Make sure your Mac is running the latest version of macOS. Software updates often include bug fixes and improvements that can address VPN connectivity issues.
Adjust Firewall Settings: Your Mac's built-in firewall or any third-party security software may be blocking the VPN connection. Temporarily disable the firewall and try connecting to the VPN again to see if it resolves the problem.
Reset Network Settings: Resetting your Mac's network settings can sometimes fix connectivity issues. Go to System Preferences > Network > Advanced > TCP/IP and click on "Renew DHCP Lease" to reset network configurations.
Contact VPN Provider: If the issue persists, reach out to your VPN service provider for assistance. They can provide specific troubleshooting steps or check if there are any server-side issues affecting your connection.
By following these troubleshooting steps, you can effectively address L2TP VPN problems on your Mac and ensure a secure and reliable connection for your online activities.
Mac L2TP VPN connection issues
Title: Troubleshooting Common Mac L2TP VPN Connection Issues
Setting up a Virtual Private Network (VPN) on a Mac using the Layer 2 Tunneling Protocol (L2TP) can enhance online privacy and security. However, users may encounter various connectivity issues while establishing or maintaining an L2TP VPN connection. Understanding and troubleshooting these issues is crucial for a seamless VPN experience.
One common problem is authentication failure. This occurs when the username, password, or pre-shared key (PSK) entered during setup is incorrect. To resolve this, double-check the credentials provided by the VPN service provider and ensure they are accurately entered in the Mac's network settings.
Another issue is incorrect server settings. Users must input the correct VPN server address, account credentials, and shared secret key. Verify this information with the VPN provider and update the settings accordingly.
Additionally, firewall and security software may interfere with L2TP VPN connections. Configure the firewall settings to allow VPN traffic or temporarily disable security software to determine if it's causing the problem.
Network congestion or instability can also disrupt L2TP VPN connections. Switching to a different network or restarting the router may alleviate this issue. Furthermore, updating the Mac's operating system and VPN client software can address compatibility issues and ensure optimal performance.
If the problem persists, resetting the L2TP VPN configuration on the Mac and reconfiguring it from scratch can sometimes resolve stubborn connectivity issues. Additionally, contacting the VPN provider's support team for assistance with troubleshooting is recommended.
In conclusion, troubleshooting L2TP VPN connection issues on a Mac involves verifying credentials, adjusting network settings, and addressing potential software conflicts. By following these steps, users can overcome common challenges and enjoy a secure and reliable VPN experience.
Resolving L2TP VPN connection problem on Mac
When trying to establish an L2TP VPN connection on your Mac and facing issues, it can be frustrating. However, there are some troubleshooting steps you can take to resolve the problem and get connected securely.
One common issue with L2TP VPN connections on Mac is the inability to connect to the server. This can be due to various reasons such as incorrect server settings, firewall issues, or even outdated VPN software. To address this problem, first, double-check the server settings provided by your VPN service provider. Make sure the server address, account credentials, and shared secret (if required) are correct.
If the server settings are accurate, the next step is to ensure that your Mac's firewall is not blocking the VPN connection. Go to System Preferences > Security & Privacy > Firewall, and make sure the firewall is not blocking the VPN software. You may need to allow the VPN software to communicate through the firewall.
Additionally, updating your VPN client software on your Mac can also help resolve L2TP VPN connection issues. Check for any available updates for the VPN software in the App Store or from the provider's website.
If you are still experiencing connection issues, you can try restarting your Mac and the router to refresh network settings. Sometimes, a simple restart can help resolve connectivity problems.
By following these troubleshooting steps, you can hopefully resolve the L2TP VPN connection problem on your Mac and enjoy a secure and private internet connection seamlessly.
Mac L2TP VPN setup guide
Setting up an L2TP (Layer 2 Tunneling Protocol) VPN on your Mac offers a secure way to browse the internet and protect your online privacy. This guide will walk you through the step-by-step process of configuring L2TP VPN on your Mac device.
To begin, go to the Apple menu and select System Preferences. From there, click on Network, then the '+' button to add a new network connection. Choose VPN from the interface dropdown menu, then select L2TP over IPSec as the VPN type.
Next, enter the server address provided by your VPN service provider in the Server Address field. Input your username and password in the appropriate fields. You may also need to enter a shared secret if required by your VPN provider.
Click on the Authentication Settings button to configure the authentication method. Choose Password from the dropdown menu and enter your VPN password. Click OK to save your settings.
After configuring the necessary details, click on the Advanced button and tick the Send all traffic over VPN connection checkbox to route all internet traffic through the VPN.
Finally, click Apply to save your settings and connect to the VPN by clicking the Connect button in the Network preferences window. You are now securely connected to the internet through your L2TP VPN on your Mac.
By following this setup guide, you can enjoy a secure and private browsing experience on your Mac using an L2TP VPN connection.
Fixing Mac L2TP VPN connectivity errors
Title: Troubleshooting Mac L2TP VPN Connectivity Errors: How to Fix Common Issues
L2TP (Layer 2 Tunneling Protocol) VPN connections are a popular choice for securing data transmissions over the internet, especially on Mac systems. However, like any technology, they can sometimes encounter connectivity issues that disrupt the user experience. If you're facing problems with your Mac L2TP VPN connection, here are some troubleshooting steps to help you get back online quickly.
Check Network Connectivity: Ensure that your Mac is connected to the internet and that other network-dependent services are functioning properly. Sometimes, a simple network hiccup can cause VPN connection failures.
Verify VPN Server Settings: Double-check the L2TP VPN server settings, including the server address, authentication credentials, and any other required information. Typos or incorrect configurations can prevent successful connections.
Restart VPN Service: Restarting the L2TP VPN service on both your Mac and the server can often resolve connectivity issues. This action refreshes the connection and clears any temporary glitches.
Update macOS and VPN Client: Make sure your Mac's operating system and VPN client software are up-to-date. Software updates often include bug fixes and security patches that can address compatibility issues with VPN protocols.
Adjust Firewall and Security Software Settings: Firewalls and security software may sometimes block VPN connections. Temporarily disable or adjust the settings to allow L2TP VPN traffic through.
Reset Network Settings: If other troubleshooting steps fail, reset your Mac's network settings to default. This action can resolve underlying network configuration conflicts that affect VPN connectivity.
Contact VPN Provider Support: If the issue persists, reach out to your VPN service provider for assistance. They can offer specialized support and guidance tailored to their network infrastructure.
By following these troubleshooting steps, you can resolve common Mac L2TP VPN connectivity errors and regain secure access to your network resources and online services. Remember to document any changes made during troubleshooting for future reference and to streamline the resolution process.
0 notes
Text
Handy Troubleshoots for Windows OS
In this blog, we embark on a journey through the labyrinth of Windows OS troubleshoots, armed with an arsenal of invaluable solutions. Here, we unveil the secrets to resolving the most vexing issues and unveil the lesser-known tips that can elevate your Windows experience from good to extraordinary.
Whether you are a tech-savvy enthusiast or a casual user, this guide will equip you with the knowledge and confidence to tackle any Windows-related conundrum that comes your way.
So, buckle up and prepare to transform into a seasoned troubleshooter, unraveling the mysteries that lie beneath the surface of your Windows OS.
Let's embark on this expedition together, as we explore the landscape of solutions, optimize performance, and unleash the true potential of your laptops/PC. Get ready to embrace the art of troubleshooting and discover the keys to mastering your Windows domain!
1. Fixing Startup Issues:
Is your Windows OS taking ages to boot up or getting stuck at the startup screen? One common culprit behind this inconvenience is a misbehaving startup application or a problematic driver. To resolve this, try booting into Safe Mode and disabling unnecessary startup programs or drivers. Additionally, running a system scan for malware and checking for disk errors using the built-in tools can help address startup woes effectively.
2. Resolving Blue Screen of Death (BSOD) Errors:
The dreaded Blue Screen of Death can strike fear into any Windows user's heart. BSOD errors often occur due to hardware or driver issues. Begin the troubleshooting process by noting down the error code displayed on the blue screen and researching its meaning. Updating drivers, especially for graphics and storage devices, can often resolve these issues. In case the problem persists, conducting memory and hard drive tests can further narrow down the cause.
3. Addressing Software Compatibility Problems:
After a major Windows update or software installation, some applications may act finicky or refuse to launch. Incompatibility issues can arise, but fortunately, Windows has a compatibility mode feature that allows you to run older applications as if they were on an earlier version of the OS. Right-click on the application's executable file, choose "Properties," and navigate to the "Compatibility" tab to enable compatibility mode.
4. Dealing with Slow Performance:
As time passes, your Windows OS might start feeling sluggish and unresponsive. The culprits behind slow performance could range from excessive startup programs to inadequate system resources.
To revitalize your system's performance, consider disabling unnecessary startup programs, running disk cleanup and disk defragmentation tools, and upgrading hardware components like RAM or SSDs.
5. Fixing Wi-Fi Connectivity Issues:
Wi-Fi connection problems can hamper your productivity and online experience. To troubleshoot Wi-Fi issues, start by restarting your router and computer.
Check for any driver updates for your Wi-Fi adapter and ensure that your router's firmware is up-to-date. You can also try running the built-in Network Troubleshooter or resetting the TCP/IP stack to resolve connectivity problems.
6. Resolving Update and Activation Errors:
Windows OS updates are crucial for security and performance improvements, but sometimes they can trigger update errors or activation issues. To tackle update errors, run the Windows Update Troubleshooter and clear the Windows Update cache.
If you encounter activation problems, verify that you are using a genuine license and attempt to activate Windows using the automated phone system if online activation fails.
7. Fixing Windows File System Errors:
Disk errors can lead to data corruption and system instability. To address file system errors, use the built-in "Check Disk" utility (chkdsk) to scan and repair issues on your hard drive. Open a Command Prompt with administrative privileges and run the command "chkdsk /f" to initiate the process.
8. Solving Audio and Sound Issues:
No sound or distorted audio can ruin your multimedia experience. Start by checking your speaker or headphone connections, ensuring they are plugged in correctly. Then, verify that your audio drivers are updated. Windows also provides a Troubleshoot Audio tool that can automatically diagnose and fix common sound-related problems.
9. Handling Application Crashes:
Frequent application crashes can be frustrating, but they are often due to software conflicts or outdated applications. Update your applications to the latest versions and check for compatibility with your current Windows OS version. In extreme cases, reinstalling the problematic application may be necessary.
10. Addressing Unresponsive Windows Explorer:
If Windows Explorer becomes unresponsive or frequently crashes, it could be caused by faulty context menu extensions or corrupt system files. Disable non-essential context menu extensions and perform a System File Checker (SFC) scan by running "sfc /scannow" in Command Prompt as an administrator to repair damaged files.
0 notes
Text
The Crucial Role Of Gate Pass Issuance Systems In Security And Access Control

Gate pass issuance systems play a crucial role in enhancing security and access control in various environments, such as office buildings, factories, educational institutions, and event venues. These systems provide a structured and controlled approach to managing the entry and exit of individuals and vehicles, contributing to overall safety and preventing unauthorized access.
Gate pass issuance systems ensure that only authorized personnel or vehicles are allowed entry. By requiring individuals to have a valid gate pass or authorization, the system helps prevent unauthorized entry, reducing the risk of theft, vandalism, or other security breaches. As the best Gate Barrier Supplier in Dubai, UAE Logit Me Fzco helps you find the exact model for your business. Our gate pass issuance solution helps to securely and efficiently manage the pass requirements of your organisation. The requirement of gate passes are crucial in many logistics companies, ports, construction sites and industries among others. Each client has a unique requirement and workflow.
We’re presenting HuAi access control solutions designed to fulfill the needs of your organization.
HUAI BV – 2120
Fingerprint readers are employed for controlling access to physical spaces such as buildings, rooms, and secure areas. This is especially common in workplaces, government facilities, and high-security environments where only authorized individuals are granted entry. HUAI BV – 2120 is an Advanced Fingerprint reader for attendance and access control solution. The main features include as:
*Finger Capacity: 3000
*Attendance records: 200,000
*RFID Type : EM
*Screen Display: 2.4 inches
* Verification: Fingerprint / ID card / Password
*Fingerprint sensor: Optical Sensor
HUAI BV N-50
HUAI BV N-50, Single leg tripod turnstile is the most cost-efficient in all type turnstiles. The most obvious feature is the slim and delicate design (360*260*980mm) to save space occupation. Exquisite and beauty is the most attractive feature in the first look.
At the top, it’s covered by a high black tempered glass, show up an attractive and impressive character. The tempered glass top cover and swiping card panel is incorporated into the traditional stainless steel design. The combination of tradition and modern art will definitely brighten up our vision and bring an unexpected surprise. The main features include as:
* Single directional or Bi-directional is selectable
* Automatic reset function: turnstile arm will lock automatically within 5s (can be set)
* RFID, Fingerprint and Biometric reader device & Access control Panel
* Arm material: 1304 Stainless Steel, Dimension: 360 *260 * 980mm
HUAI BV N-2210
HuAi BV 2210 is an Ai Dynamic face recognition reader for attendance and access control solution. It offers heightened security, accuracy, and adaptability, making them valuable tools for access control, security enforcement, and identity verification across various sectors. The main highlights include with 4.3” HD 272×480 Capacitive Touch Screen, 256MB DDR3 RAM, eMMC Flash 4GB ROM, 200W colorful WDR+ 200W infrared live camera, and 99.70% Face Recognition Accuracy. The main specifications are:
* Binocular camera: 200W colourful WDR+ 200W infrared live camera
*Face capacity: 5,000 (50,000 optional)
*Face Recognition Accuracy: 99.70%
*Recognition speed: <0.5 sec, support single & multi users at same time (upto 5users)
HUAI BV 2310
BV 2310 – WDR Ai Dynamic Face recognition Attendance & Access Control terminal with 4.3” Touch Screen, HD 1280*720, Real sensor 1/2.9 inch 2MP WDR camera, Sensor 1/5 inch 2mp Live Camera, LINUX 3.10 OS, and USB 2.0, supports import and export of data.
*Operating System: LINUX 3.10
*CPU,NPU : 1.2G Dual core ARM CortexA7, 600G(0.6T)
*Face capacity: 5,000 faces (20,000 optional)
*RFID card capacity: 15,000 cards (50,000 optional)
*Communication: TCP/IP, WiFi, Weigand 26/34 output, Input
In summary, gate pass issuance systems are integral to maintaining security, managing access, and ensuring the safety of personnel and assets within controlled environments. They provide a systematic and efficient way to manage the flow of people and vehicles while minimizing security vulnerabilities. Get in touch with top-notch Access Control System Providers in Dubai, UAE, to enhance your building’s security to new heights.
0 notes
Text
Nguyên Nhân Trùng IP Modem và Router Wifi – Cách Khắc Phục Hiệu Quả
Trùng IP giữa modem và router WiFi là một trong những nguyên nhân phổ biến dẫn đến tình trạng mạng chậm, không ổn định hoặc mất kết nối hoàn toàn. Khi nhiều thiết bị trong cùng một mạng chia sẻ chung một địa chỉ IP, chúng sẽ xảy ra xung đột, khiến dữ liệu bị gián đoạn. Vậy nguyên nhân của tình trạng này là gì và cách khắc phục ra sao? Hãy cùng tìm hiểu ngay sau đây.
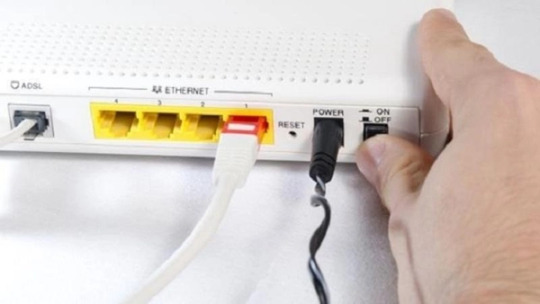
Trùng IP Modem và Router WiFi là gì?
Địa chỉ IP là một dãy số duy nhất được gán cho mỗi thiết bị khi kết nối vào mạng. Khi hai hoặc nhiều thiết bị có cùng một địa chỉ IP, hệ thống không thể phân biệt và dẫn đến lỗi xung đột. Điều này gây ảnh hưởng lớn đến trải nghiệm mạng, bao gồm mất kết nối, tốc độ mạng chậm hoặc lỗi truy cập internet.
Nguyên nhân trùng IP Modem và Router WiFi
Một trong những nguyên nhân chính gây ra lỗi trùng IP là do cấu hình mạng không đúng cách. Mạng hiện đại thường sử dụng DHCP để cấp phát địa chỉ IP tự động cho các thiết bị. Tuy nhiên, nếu một thiết bị được cài đặt IP tĩnh trùng với địa chỉ IP do DHCP cấp phát, sẽ dẫn đến xung đột.
Ngoài ra, sự tồn tại của nhiều máy chủ DHCP trong cùng một mạng cũng có thể gây ra lỗi trùng IP. Khi hai DHCP server cấp phát cùng một địa chỉ IP cho hai thiết bị khác nhau, mạng sẽ gặp sự cố.
Cách xử lý tình trạng trùng IP Modem và Router WiFi
Dưới đây là ba phương pháp hiệu quả để khắc phục lỗi trùng IP trên mạng của bạn:
1. Khởi động lại Modem hoặc Router WiFiĐây là cách đơn giản nhất nhưng thường rất hiệu quả. Bạn có thể:
Truy cập giao diện quản lý của modem hoặc router và chọn chức năng khởi động lại.
Tắt nguồn modem và router, chờ khoảng 30 giây, sau đó bật lại.
Sau khi thực hiện, hãy kiểm tra xem vấn đề đã được khắc phục chưa.
2. Khởi động lại IP Configuration bằng Command PromptNếu lỗi xung đột IP vẫn chưa được giải quyết, bạn có thể làm mới địa chỉ IP trên máy tính Windows bằng cách:
Mở Command Prompt với quyền Admin (Windows + X → Windows PowerShell Admin).
Nhập lần lượt các lệnh sau và nhấn Enter sau mỗi lệnh: pgsql Sao chép Chỉnh sửa netsh int ip reset c:\resetlog.txt
ipconfig /release
ipconfig /renew
Khởi động lại máy tính và kiểm tra kết nối mạng.
3. Cài đặt địa chỉ IP tĩnh theo cách thủ côngNếu cách trên không hiệu quả, bạn có thể thiết lập địa chỉ IP tĩnh:
Mở Network and Sharing Center và chọn kết nối mạng.
Vào Properties → Internet Protocol Version 4 (TCP/IPv4).
Nhập địa chỉ IP tĩnh, subnet mask, default gateway và DNS phù hợp với hệ thống.
Lưu lại và khởi động lại máy tính.
Kết luận
Tình trạng trùng IP giữa modem và router WiFi có thể gây ra nhiều vấn đề về kết nối mạng. Tuy nhiên, bạn có thể dễ dàng khắc phục bằng cách khởi động lại thiết bị, làm mới cấu hình IP hoặc thiết lập địa chỉ IP tĩnh. Nếu vẫn gặp sự cố, hãy liên hệ với chuyên gia kỹ thuật để được hỗ trợ nhanh chóng.
1 note
·
View note
Text
How can I troubleshoot my internet connection problems?
Here are some common troubleshooting steps you can try if you are having problems with your internet connection:
Check for physical connectivity issues. Make sure that all the cables are properly plugged in, including the cables connecting your modem, router, and devices. If you are using a wireless connection, make sure that your device is within range of the router and that the signal strength is good.
Restart your modem and router. This is often the simplest and most effective way to fix internet connection problems. To do this, unplug the power cord from your modem and router for 30 seconds, then plug them back in.
Run the built-in troubleshooter. Windows and macOS have built-in troubleshooters that can help you identify and fix common internet connection problems. To run the troubleshooter in Windows, go to Settings > Network & Internet > Status > Troubleshoot problems. In macOS, go to System Preferences > Network > Advanced > TCP/IP > Renew DHCP lease.
Reset your network settings. This will erase all your network settings and restore them to their defaults. This can be helpful if you have recently made changes to your network settings and are now having problems. To reset your network settings in Windows, go to Settings > Network & Internet > Status > Advanced network settings > Reset network adapter. In macOS, go to System Preferences > Network > Advanced > Reset.
Change your DNS settings. Your DNS (Domain Name System) server is responsible for translating domain names (like www.google.com) into IP addresses (like 172.217.14.238). If your DNS settings are incorrect, you may not be able to connect to the internet. To change your DNS settings in Windows, go to Settings > Network & Internet > Wi-Fi > Manage known networks. Select the network you are connected to and click Edit. In the DNS server section, enter the IP addresses of the DNS servers you want to use. In macOS, go to System Preferences > Network > Advanced > DNS. Enter the IP addresses of the DNS servers you want to use in the DNS Servers field.
Update your drivers. Your network adapter drivers are responsible for communicating with your modem and router. If your drivers are outdated or corrupt, you may experience internet connection problems. To update your network adapter drivers, go to the website of your computer manufacturer or the manufacturer of your network adapter and download the latest drivers.
Contact your ISP. If you have tried all of the above steps and you are still having problems, contact your internet service provider (ISP). They may be able to help you troubleshoot the problem or identify a problem with their service.
I hope these steps help you troubleshoot your internet connection problems.
FOR MORE INFORMATION VISIT THIS SITE - - INOVI - -
0 notes