#computer repair
Text
When you need to drop off your tech devices for a repair, how confident are you that they won't be snooped on?
CBC's Marketplace took smartphones and laptops to repair stores across Ontario — including large chains Best Buy and Mobile Klinik — and found that in more than half of the documented cases, technicians accessed intimate photos and private information not relevant to the repair.
Marketplace dropped off devices at 20 stores, ranging from small independent shops to medium-sized chains to larger national chains, after installing monitoring software on the devices. In total, 16 stores were recorded. (At four stores, the tracking software didn't log anything, or the stores didn't appear to turn the devices on.)
Technicians at nine stores accessed private data, including one technician who not only viewed photos but copied them onto a USB key.
"These results are frightening," said Hassan Khan, associate professor in the school of computer science at the University of Guelph. "It's looking through information, searching for data on users' devices, copying data off the device.... it's as bad as it gets."
Continue Reading.
Tagging: @politicsofcanada
254 notes
·
View notes
Photo

For being a silly little creature, Myno is remarkably single-minded when working on computers. (Especially yours! Don't worry about it.)
This is the seventh yinglet commission I've done in this style! Details and price sheet can be found here.
Patreon - Ko-Fi
Myno! the yinglet belongs to Mynotaurus, and rendering her was an honor -v-
Bonus sketch here
Yinglet species created by Valsalia
Posted using PostyBirb
26 notes
·
View notes
Text
Fixed my second monitor. My portrait fits it perfectly. 🤣😜

#belly expansion#preggie#pregnancy#pregnant#transgender#goth girl#goth model#maternity#trans pride#preggophilia#gaming#computer repair#kitsune#fake belly friday#fake pregnant belly#sexy belly#cute belly#full belly#huge pregnant belly#bellyexpansion#gay belly
53 notes
·
View notes
Text
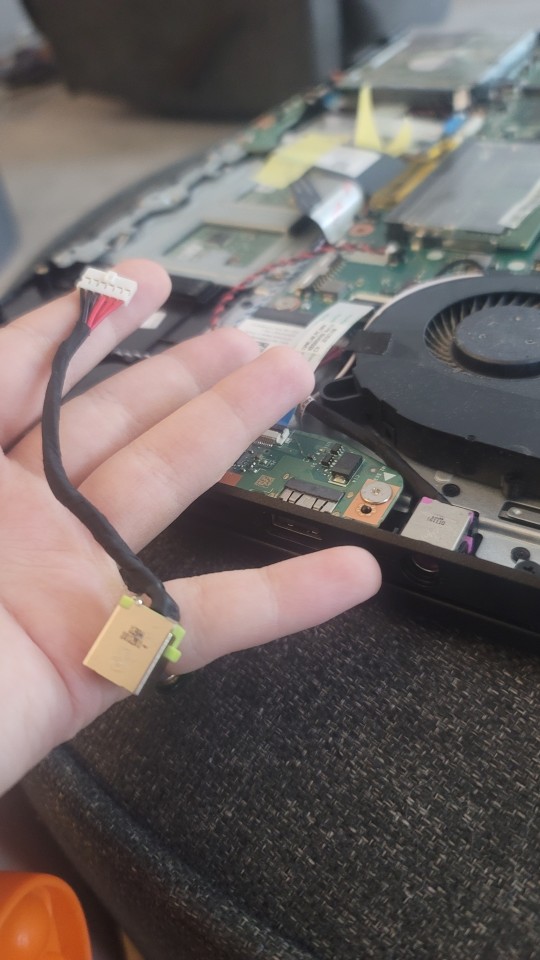
F*ck My Life Sideways
The good news is that I finally got all the parts to fix my Acer Nitro 5. The bad part is that the charging port needs to be soldered in.
So, I used a tiny bit of electrical tape to anchor it, but that is not a permanent fix. I need to take it to a computer repair shop. I just can't afford it right now.
My laptop is my gateway to life. I am disabled and homebound and don't go anywhere. So now I am grounded for the unforeseeable future.
Every time I try to save money, it blows up in my face.
@helly-watermelonsmellinfellon I tried. Now I'm going to go have myself a good cry
#Acer Nitro 5#charging port#FML#laptop#computer repair#acer#help#helly-watermelonsmellinfellon#crying
7 notes
·
View notes
Text
So I have this printer ...

Not that one specifically, that one is beautiful and in great condition, but one like it — Apple ImageWriter II. Specifically mine is the ImageWriter II/L variant, the last revision of the ImageWriter II line, but it looks like this one.
Or at least it did once upon a time.
My family acquired this printer second-hand in the late 90s along with a Mac Classic. It got used regularly for school reports and letters and business documents and tax forms for a few years until we finally were able to get a new computer with a color inkjet printer.
Long story short, like the computer that went with it, ultimately this poor printer ended up sitting in storage without air conditioning in East Texas heat and humidity for nearly twenty years. It's a sad story of slow decay.
My ImageWriter is now yellowed and scuffed and scraped and rusted and missing a piece or two; just a dim reminder of its former beauty. Given the state of it, what hope do we have of ever again hearing it sing the song of its people?
Well, I'm not going to let it go without a fight. Time to dig in and see what we can ...
... oh. Oh dear that won't do at all.
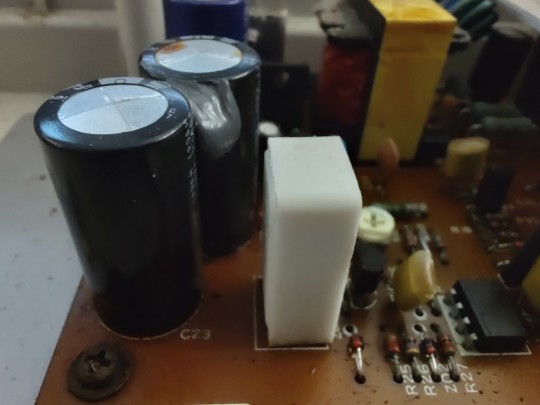
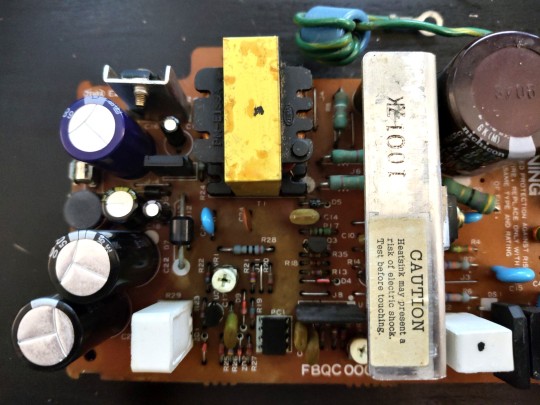
A good rule to follow when working with these 30+ year old systems, is to (carefully!) open and inspect before applying any power. In this case I'm very glad I did. Three large filter capacitors on the power supply have very obviously swollen and burst, spreading their corrosive bile all over the neighborhood.

The back side of the power supply circuit board was a wasteland of rotting solder mask, corroded traces, and displaced silkscreen. The electrolyte has eaten its way down the leads, through the solder, and left carnage in its wake all across the bottom of the board.


First order of business is getting those old capacitors removed from the board so cleanup can begin. If you've never worked with hardware of this vintage, a fair warning — make sure you're working in a well-ventilated area. Sure the solder has lead and the flux ain't great for the lungs, but the big concern here is the unholy stench of heated capacitor electrolyte hitting the nostrils like the revenge of Poseidon's refuse bin. The local fish market has nothing on these things.
The old solder, especially when mixed with the electrolyte, tends to behave in a very un-solder-like fashion. It will refuse to melt and when it does it will slump around like wet sand rather than flow like liquid metal should. While it may seem counter-intuitive, the best way to get rid of it is to add more fresh solder to it. On these single-sided boards with large components like this, a spring-action solder pump works well for getting the old parts removed, and then some solder braid will clean up the pads well.
Once the old parts are out, I like to thoroughly clean the area with isopropyl alcohol to remove the electrolyte and years of grease and dirt and pet hair that may have cemented itself to the board. In this case I also needed to use a mild abrasive to remove that damaged solder mask where it had bubbled up off the corroding copper traces. I was lucky here that none of the traces were actually broken or corroded through completely. Clear nail polish works well for protecting the now bare copper (just make sure it's not the UV-cure gel stuff).
From here I turned my attention to the case, because the power supply is the last item removed and first installed when conducting a complete tear down of this printer, and it didn't make sense to put my newly cleaned power supply into a dirty old case.


I'm not really a fan of retrobrite, and these large case pieces would be a real challenge anyway. So all I want is to clean up the dirt and rust and as many scuff marks as I can. As far as I'm concerned, the rest is just part of the history of the item. Each mark tells a story of how this item was used, not just put up on a shelf to be looked at. And if I didn't have any interest in using the machine until it completely falls to pieces, I wouldn't be bothering with going fishing replacing old capacitors.
This is a good point to do some testing. There may still be more wrong with that power supply. Output voltages could have drifted out of spec from other components aging, or maybe I installed capacitors that don't quite match the originals. The ImageWriter II/L power supply has three outputs — +5VDC, -5VDC, & +26VDC. With no load on the power supply, I measured the outputs at around ±7V and 30V. That seems high, but it's not outside of what I would expect for a power supply that's not actually driving anything. This would be a good point to use an adjustable test load, but since I don't have one of those, I'll just have to move forward with my "well it seems fine'
Spoiler: it was not fine.
As part of its startup sequence, the ImageWriter exercises all of its stepper motors to get everything to a known state. This high current draw immediately after power on was more than its old power supply could give. There's clearly more than bad capacitors on the supply, but identifying what exactly is still beyond my current skill level.
So in the interest of getting the machine working (because I have plans for it), I opted to try replacing the power supply with something more modern. The catch here is the odd assortment of voltages the original supply provided. It's easy to find a ±5VDC supply, but 26V is virtually unheard-of.
Apple's documentation for the printer mentions the +26V supply is for driving the motors. I suspected that the 26V supply was less carefully regulated and probably targeting something more like 24V. Sure enough, the stepper with the highest voltage rating on its label was 24V. With a little extra current capacity available, I figured the printer would function just fine with a 24V supply.
The catch is, 24V & ±5V is not a common configuration. There are plenty of 12V & ±5V supplies, but that won't do here. I settled on a Mean Well 24V & 5V supply with a -5V inverter ... And promptly ordered the wrong part. I had a nice new 12V & 5V supply. That's ok, once I got it in hand it was a bit too large to fit in the space I had anyway.
So I got a different Mean Well 24V supply and a separate 24V-5V DC-DC converter. It's a bit of a mess all crammed into the bottom of the case, but it should give all the right voltages (or near enough).

I did have to remove the power switch from the old supply though. That particular part has long since been discontinued, and compatible replacements proved difficult to find.
Now that it's all assembled, it's time to test. This is the part that always makes me nervous, especially when dealing with mains voltages. There's so much that can go so very horribly wrong.
I started out with a smoke test — switching on power briefly to make sure there were no direct shorts that might cause an explosive failure. No smoke is a good sign, so check the voltages. With no load, the new supply rails read 23.99V, 5.00V, and -5.55V. That's about as good as I could ever ask for. So now there's only one thing left to test … does it actually print?
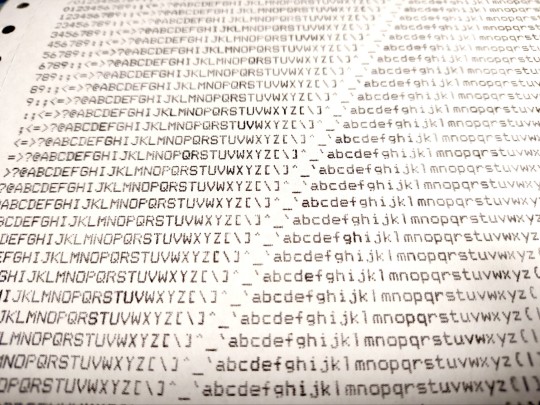
Success!
It's not perfect. Every once in a while it will stutter while printing and get stuck with the carriage on one side or the other. It really needs a complete disassembly, thorough cleaning, and relubrication. That kind of mechanical teardown is a bit beyond what I'm comfortable with at the moment, but I'll happily settle for mostly working over not working at all.
#vintage computing#macintosh#imagewriter#imagewriter ii/l#computer repair#apple#apple computers#dot matrix printer#mean well#it's always the power supply#power supply
40 notes
·
View notes
Text
hey who wants to look at the innards of the laptop i've been tasked with repairing and help me figure out whether i can safely unplug a ribbon cable that's blocking the connection i actually need to switch out for a new one
it's an acer aspire vx5-591g if that helps. or vx 15. idk why there's multiple model numbers. the hard drive replacement was simple enough but i've been connectionblocked here wksjaizhajzhaha

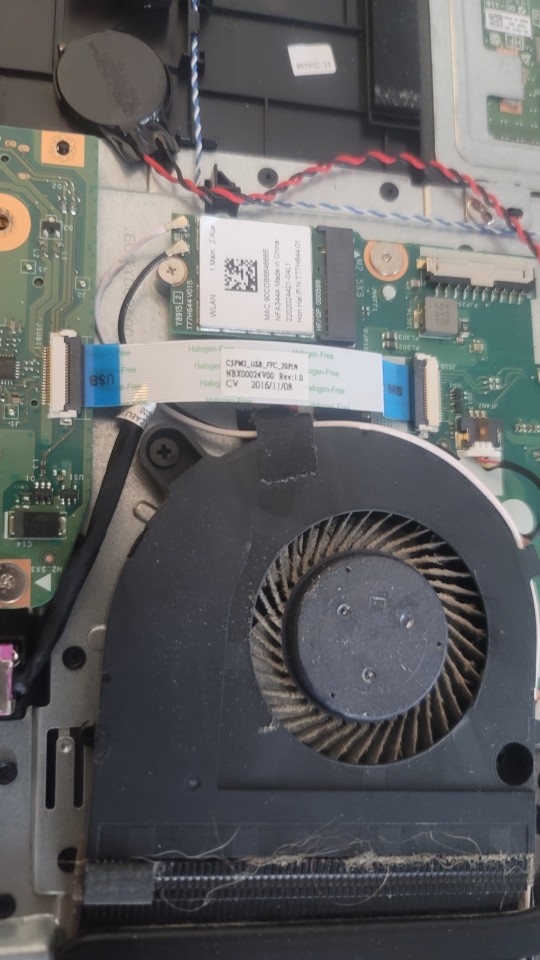

also here's the replacement i wanna put in there. ik it's not completely identical but it looks like it'll fit in the same spot without issue and it's not quite as high wattage so it wouldn't burn anything out so. yeehaw
#undescribed#computer repair#laptop repair#pc repair#tech repair#lighting the beacons lmao#rosie babbles
10 notes
·
View notes
Text
Really bummed that my laptop screen is flickering , and after trying everything may have to switch to a new device. I hope that doesn’t happen. I’ll miss being able to color quickly and comfortably lie in bed with a computer.
17 notes
·
View notes
Text

As you may (or may not) know, my laptop screen broke some 10(?) years ago. We still use this laptop daily connected to our TV screen to watch the news and stream stuff. Recently I installed a new DVD drive (that had also broken down about 10 years ago), so we can play DVD's again too.

Now it was time to replace the screen!

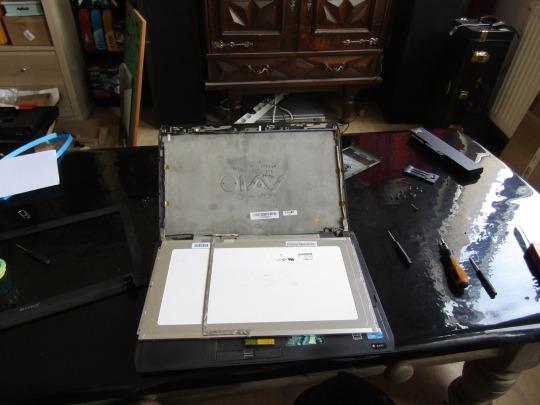
Old screen out, new one in
Testing ...


It work!!! I also inserted some new RAM cards so it has a whole as 8GB memory now (max that this laptop can take)

Now for some new ⬅⬆⬇ keys and he's good as new :)) My old friend, Watson.
#sony vaio#laptop repair#sony laptops#sony vaio laptops#computer repair#fr#long post#watson#his name is watson yes I was in a sherlock fase
8 notes
·
View notes
Text
Consumer dilemma
The tiniest part of my mouse's scroll wheel broke so it doesn't scroll
The mouse still clicks and everything is fine
I want to do the environmentally conscious decision of not throwing away the entire mouse coz of 1 broken piece
But what else can I do? Use its 2/3 functions till it breaks entirely?
Going to see if I can get super glue before I get fed up and just buy a new mouse, but I'll sound like I'm stupid to everyone around me if I insist on putting effort into fixing or replacing the scroll wheel instead of buying a new cheap mouse
The broken piece:

While trying to put it back together, I broke 2 (of the many) pieces that keep the top half of the mouse in place.
And I've been told super glue won't be good on this tiny itty bitty piece.
So gonna buy a new one :/
But I still feel bad about discarding the whole mouse. Doesn't seem possible to find a single scroll wheel for cheap :(
6 notes
·
View notes
Text

4 notes
·
View notes
Text

YOUR computer giving you a migraine Call @nickthefixutah at 8016387331 for honest fast and friendly in home pc and smartphone repair for 50 dollars a hour Fully on site nick the fix can even do Hand built computers :) so call or message today
#utah#pc repair#small business#salt lake city#sandy#computer repair#repairservice#laptop#desktop#computers#technology
3 notes
·
View notes
Text
...Next time anything breaks on my desktop that I know how to fix, I'll order the part and fix it myself.
Last Friday, I took my desktop to a repair shop, as soon as they were open. they started diagnostics on it yesterday; that's fine, they're busy, I get it.
Today, I get a call that they'll need to order the replacement PSU that I told them it needed, back on Friday, and that the part will take 3-5 business days to arrive. I'm going to go walk out into the wilderness a bit and scream, apologies if it disturbs any of y'all.
(why do you not have any replacement PSUs at your computer repair shop!?)
3 notes
·
View notes
Text
The Amputated Franken-Plus
Last year I revived an old Mac Plus that had been destructively robbed for parts over the years. I added sockets for the chips that had been removed, gave it a new power supply, added my SE-VGA card for video, and bodged a few broken traces. But there still remained the most heinously destructive part removal that had been committed against this poor board ...
Long before I had mastery of a soldering iron, and lacking the proper tools for desoldering components successfully, I had a project where I needed n 8-pin mini DIN connector. I had this non-functional Mac Plus board gathering dust so I decided to remove one of its connectors. With a knife. By cutting the board around the connector.

I was young ...
Obviously, there's no repairing that. The board has a permanent chunk removed from it.
However, I find myself wanting to be able to use those serial ports now that I have the rest of the board running. There are lots of fun things to use them for, like LocalTalk networking, printers, zTerm, etc.
So I set out to build a breakout board to add the connectors for these serial ports back to the board. I started by digging up datasheets for the RS-422 & RS-232 transceivers Apple used, as well as schematics for the Plus and similar era Macs so I could trace out how the connectors were originally wired. It turns out all of the signals for both ports are routed to some RC filters in a straight line at the back of the board. This made it fairly easy to solder a ribbon cable to the filter pins on the back side of the board.

I've come to like ribbon cables; they're easy to work with. I can just crimp an IDC connector on one end and attach them to some pin headers. The breakout board itself is just some generic protoboard, and has said pin headers and two female 8-pin mini-DIN connectors.

It's not ideal. The ribbon cable wires are fragile and cold easily be pulled off the motherboard. But hopefully this will restore the last lost functionally for this poor tortured Mac Plus motherboard.
I plan to include the Franken-Plus in my exhibit for VCF Southwest in Richardson, Texas this weekend (23-25 June 2023). If you're in the area, definitely stop by; it's shaping up to be a great show.
25 notes
·
View notes
Text
my writing software isn't working and I casually want to throw my computer in the trash
#author#work in progress#books and libraries#fantasy writing prompts#of royals and rebellion#orar#computer repair
9 notes
·
View notes
Text
Do you guys think I should trust Amazon/some other site or store for repair parts or wait for 6-ish months for the manufacturer to ship them
+
Do you think I should try to fix it myself (I have some experience with digging around inside computers thus far without breaking anything) or wait ≈2-3 months (6+ if asking the manufacturer for official replacement parts) for a professional to fix it
Also if you know any reputable online vendors for replacement parts, specifically fans and specifically acer products, please let me know
#laptop repair#computer repair#advice needed#advice wanted#need advice#this computer is expensive but idk how ill manage any of what i need to get done without a working one for 6-7 months#i know patience is a virtue but idk what to do :(#its specifically the cpu fan#unlikely i need to replace the whole thermal unit bc gpu and everything else is running smoothly#just my cpu fan is fucked
2 notes
·
View notes
Text
How To Diagnose Laptop Motherboard Problems
In the intricate world of laptops and computers, the motherboard takes center stage as a silent yet essential player. With a name as unassuming as “motherboard,” one might overlook its pivotal role in the seamless operation of our devices. This makes diagnosing laptop motherboard problems extremely important.
The motherboard acts as the vital bridge that allows all other components to communicate and collaborate, forming the backbone of your entire device. Consequently, it comes as no surprise that any malfunction or failure of this critical component can lead to significant problems and disruptions in your computing experience.
In this article, we’ll explore how to diagnose laptop motherboard problems so you can get back to work.
What is a Motherboard?

At the heart of your laptop or computer is the motherboard. It plays a pivotal role in ensuring the smooth operation of your device.
Serving as the central hub of your device, it silently facilitates the communication and coordination of all the other essential components within your machine. The motherboard acts as the backbone that links your processor, memory, hard drive, graphics card, and various peripherals, enabling them to work together seamlessly. This unassuming yet vital component is responsible for ensuring that your laptop functions efficiently and effectively.
Diagnosing Laptop Motherboard Problems

If you need to diagnose laptop motherboard problems, it can be a perplexing challenge. This is primarily due to the fact that problems with the motherboard can manifest in a wide array of other issues, often leading users on a wild goose chase to identify the root cause of their computer troubles.
To help shed light on this complex matter, we’ll explore the symptoms of motherboard issues, delve into the common causes of these problems, and discuss troubleshooting steps and potential solutions to get your laptop back on track.
Symptoms of Motherboard Issues
Given the motherboard’s pivotal role in your laptop, any problems with it can be challenging to pinpoint. It serves as the foundation upon which your processor, memory, hard drive, graphics card, and other peripherals rely to communicate with one another. Consequently, symptoms of motherboard failure can easily masquerade as other issues, making it imperative to look beyond the surface.
One telltale sign of motherboard trouble is when your laptop refuses to turn on, even when it’s plugged in and fully charged. Alternatively, your computer may turn on but fail to complete the boot-up process, or it might frequently freeze during use.
Other red flags include the laptop operating more slowly than usual, unusual noises emanating from your device, or the malfunctioning of specific components like the keyboard or touchpad. All of these issues can be indicative of an underlying motherboard problem.
Causes of Motherboard Failure
A variety of factors can contribute to motherboard failure, but there are a few common culprits that regularly surface. Power surges, overheating, and physical damage are some of the primary instigators of motherboard issues.
Power surges can occur during thunderstorms or when you plug and unplug your laptop from a power source. These abrupt spikes in voltage can wreak havoc on the motherboard and other components, such as the hard drive and memory.
Overheating, too, poses a significant risk to your laptop’s internal components, including the motherboard. This can transpire when dust and debris accumulate inside your laptop or when your cooling system malfunctions.
Additionally, like all technological components, age plays a role in motherboard failures as its components can degrade and deteriorate over time.
Troubleshooting Motherboard Failure
If you suspect that your motherboard is the root cause of your laptop’s issues, there are a few initial steps you can take to diagnose laptop motherboard problems and potentially resolve the problem.
Checking for power and attempting to boot up your computer are good starting points. You can also run diagnostic tests or peruse your computer’s event log for error messages that might provide valuable clues about the source of the issue.
Determining physical damage can be a bit trickier, especially if you’re unaware of any significant impacts or drops your laptop has endured. To investigate further, you may need to open up your device and inspect its internal components.
Look for any signs of dust or debris accumulation within the laptop that may have contributed to overheating and damage. If you’re comfortable doing so, consider reseating the RAM or examining any loose connections, as these issues can sometimes mimic motherboard problems.
However, if you’ve explored these avenues and your motherboard issues persist, it’s often advisable to seek the assistance of computer repair professionals. A certified technician can accurately diagnose laptop motherboard problems and guide you toward the best course of action.
The complexity of diagnosing motherboard problems can be intimidating, but the solution hinges on the underlying cause. In some cases, it may be possible to replace a damaged capacitor or fried chip rather than the entire motherboard, saving you time and money.
If overheating is the culprit, cleaning out the internal components or adding additional cooling may be the remedy to revive your laptop’s functionality.
For expert guidance and solutions to your computer issues, don’t hesitate to reach out us. We can assist you in getting your laptop back to peak performance. Your motherboard may be an unsung hero, but with the right support, it can continue to play its vital role in your digital world.
2 notes
·
View notes
Last Seen Blogs

futuristichedge
Sonic Sideblog

palvinw0rld
palvin world

tinychaoticwarrior24
Stop Palestinian Genocide

bottled-campaign
it's pronounced like ☆champagne☆

mistergaslow
And Now a Word From our Sponsor