#Retroarch cores zip
Text
Retroarch cores zip

Retroarch cores zip how to#
Retroarch cores zip update#
Retroarch cores zip archive#
In the specific case of this guide, you can copy the file directory from your open file explorer window, which should be in your RetroArch info folder, and paste it into the one and only text field. You’ll want to click extract (Don’t ask me why it’s represented with a minus sign)
Retroarch cores zip archive#
When you open an archive in 7zip for the first time, this will be what you are presented with (with different files, maybe) They make it pretty dang simple for you to figure it out. What more can a guy ask for?Īnywho, you’re probably wondering which version you need to download. It does it’s job and stays out of your way otherwise. It handles basically every format known to man and it’s free (as in freedom) as well as free (as in cost) software. Once again, don’t overwrite files that already exist, and you should be fine. You can extract info.zip directly to your Steam RetroArch/info folder if desired, or do it the same way you did the cores. If you are not following the guide for the first time, follow the steps necessary to open your Steam RetroArch folder, then open the info folder. If you are following the guide for the first time, go to the file browser window your cores are open in, go up one level, and open the info folder. You will need to download the info files from – You should only need to do this once, unless RetroArch adds support for completely new cores at a later date.
Retroarch cores zip update#
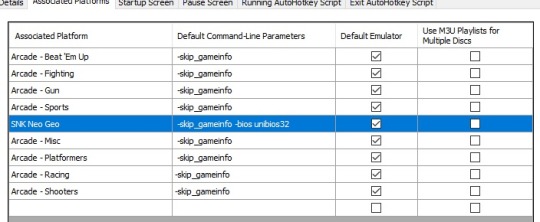
I recommend against overwriting the cores that RetroArch manages via DLC, as they will ‘update’ and fix themselves via Steam Update before launching your game. Open the cores folder that should be here and then PASTE your clipboard. This should open the RetroArch folder in your file browser. Once you have done that, you will need to find where you installed RetroArch to via Steam.Īs seen in the picture, you can do that by finding RetroArch in your Steam Library, right clicking it, clicking properties, clicking Local Files, and clicking Browse. Once you have done that, navigate to your extracted folder, then RetroArch-Win64 (or your architecture), then cores. If you can’t extract the files please scroll all the way down.įirst, extract them to somewhere you can find easily, be it your Downloads folder, your desktop, pretty much anywhere is fine. I will have a section at the bottom of this guide for this. You may need to download 7-zip to do this. Once you have done that, you will need to extract them to where they need to go. Now, you will download RetroArch_cores.7z from the directory you navigated to. If you are one of the few still running a 32-bit computer, click x86. If you don’t know what this means, click Windows. Select the folder for the latest stable version (currently 1.10.1, may vary) You will (probably) need to do this every time RetroArch gets an update, if you want your cores to be as up to date as possible.Įxpand the folder if necessary until it looks like this image:
Retroarch cores zip how to#
In this guide, I will instruct you on how to download and install cores for Steam RetroArch
0 notes
Text
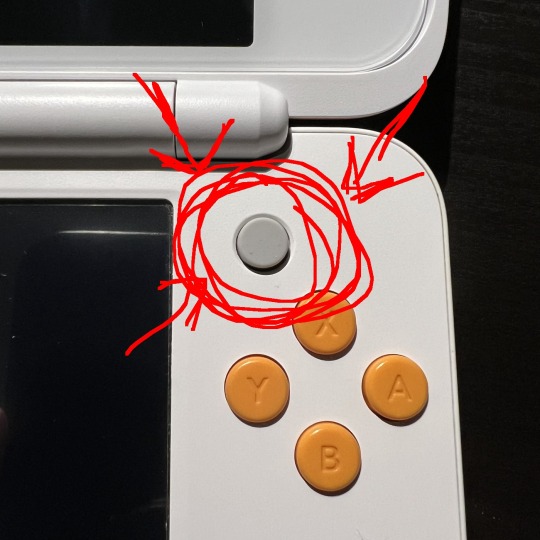
Play Vib-Ribbon on your New 3DS/2DS! (part 1) (updated)
Vib-Ribbon is already a fun little PS1 rhythm game, but what if there were a way to make it more fun- and PORTABLE?!??
Yes, you can indeed play Vib-Ribbon on your modded New Nintendo 3DS! It even supports custom tracks! Getting it set up might be a bit tough and take a while, but don't worry- this tutorial will walk you through the whole process, step by step. Just be patient, take your time, and read the instructions carefully. I believe in you!
To get started with this tutorial, you'll need the following things:
A Nintendo 3DS, preferably a New 3DS or 2DS model. The PS1 emulator runs the game full speed on a "New" model console thanks to their faster CPU, but after testing, I can confirm the "Old" 3DS and 2DS can run PAL version Vib-Ribbon at about 40 fps on average with some settings changes. New 3DS and 2DS consoles have a built-in C Stick "nub" above the face buttons and a second pair of ZL/ZR shoulder buttons, while Old 3DS and 2DS consoles lack these.
Modern custom firmware on your 3DS or 2DS (usually Luma3DS launching via boot9strap). To check if your 3DS has CFW, hold Select while powering on your console. If a menu of some kind pops up (like one titled "Luma3DS configuration") your 3DS already has CFW; make sure it's updated by following 3ds.hacks.guide/restoring-updating-cfw.html If it doesn't have CFW, follow 3ds.hacks.guide to mod your 3DS; it shouldn't be too excruciating. Come back here when you're done.
You'll need to transfer files to and from your SD card and install CIA files to your 3DS with FBI. You should be familiar with doing these if you've already modded your 3DS with the guide above.
7-Zip to open 7z archives and all other kinds of files. You can get it at 7-zip.org.
A disc image of Vib-Ribbon, preferably the Japanese NTSC-J version in CHD format. The European PAL version has frame pacing issues, but it will also work fine. If you haven't seen an earlier version of this post, all I can say is there's a mega-special thread in a certain subreddit...
All the music you like saved to your PC, if you want to play with custom tracks. You'll have to convert it into a Vib-Ribbon compatible format; I'll cover that later in Part 2.
Once you've got all of that ready, let's copy the emulator files! We'll be using the PCSX-ReARMed emulator to emulate the PS1 and Vib-Ribbon. It runs under RetroArch, so you'll need to install that.
(Disclaimer: if you're using an Old 3DS or Old 2DS, Vib-Ribbon might be the only PS1 game you can play on those thanks to its simple wireframe graphics. Most other full 3D games will unfortunately run very slow on those.)
Insert your 3DS's SD or microSD card into your PC's SD card reader or an SD card adapter. (new 3ds/new 3ds xl users lol. lmao.)
Make a folder on the root (top directory) of your SD Card and name it retroarch.
Head over to buildbot.libretro.com/stable/.
Find version 1.17.0 (the latest stable version doesn't work with custom music CHDs- more on that in part 2,) click on nintendo > 3ds, then download the RetroArch_cia.7z file. Extract the files with 7-Zip.
Open the retroarch_cia > retroarch folder that you just extracted.
Copy everything in the retroarch folder except the cores subfolder to your SD card's retroarch folder.
Open up the cores folder on your PC's end. You'll see a lot of cia files.
Copy only the pcsx_rearmed_libretro.cia file and the info folder to the retroarch > cores folder on your SD card.
Get all the "scph55xx.bin" BIOS files from here: gist.github.com/juanbrujo/cf55d223ad01927a48f9ebac9f50bdee and put all three of them into your SD card's retroarch > cores > system folder (make it if it doesn't already exist).
Put your Vib-Ribbon disc image somewhere convenient on your microSD Card. I recommend making a dedicated folder for it (and also any other cool ROMs you might use with other homebrew emulators in the future.)
---------------------------------------
Now you're ready to install and configure the PCSX-ReARMed emulator!
Put the SD card back into your 3DS and turn it on.
Open FBI on your 3DS. Either the Homebrew Launcher or HOME Menu version will work fine.
Navigate to SD > retroarch > cores and select the pcsx_rearmed_libretro.cia file.
Select Install CIA and install the CIA.
Exit FBI.
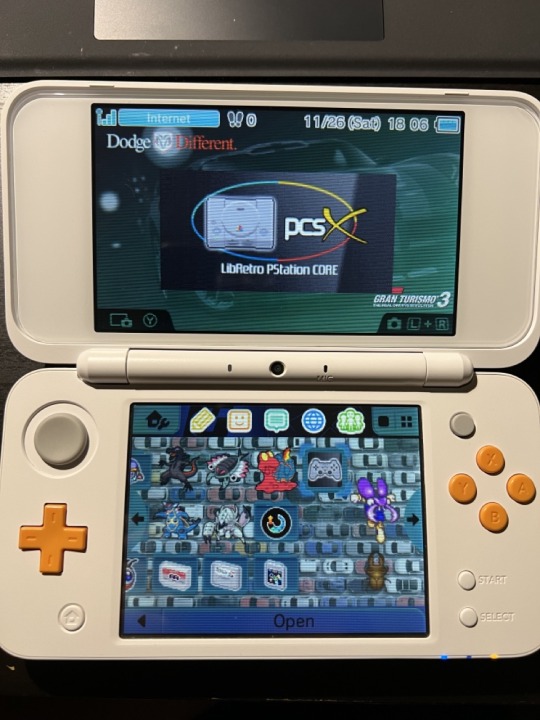
You'll now have the PCSX-ReARMed app on your HOME Menu. Load it up and you'll be greeted with this:
It looks like a lot, I know, but relax. We'll get through this!
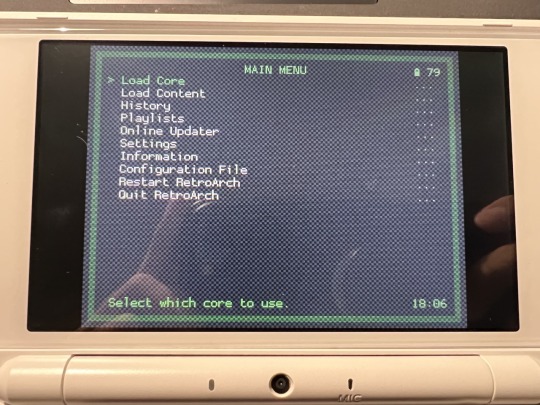
Go to Settings. You should see a lot of settings.
Go to Video. Bilinear Filtering should already be turned on. It's not strictly necessary, but Vib-Ribbon does look better with it on.
Ignore this step if you're on an Old 3DS/2DS. If you're on a New 3DS/New 2DS, you can go to Video Filter and select the Normal2x.filt filter; this will make Vib-Ribbon look sharper on the New 3DS's screen. (Pro tip- you can jump through menus faster with left and right on the D-Pad or the L and R buttons.)
Back out of the Video settings and go to Audio.
In the Output menu, set the second Audio option to dsp_thread. PCSX-ReARMed performs much better with this.
If you're on New 3DS/New 2DS, in the Resampler menu, set the Resampler Quality to Higher, as it will make the game sound slightly better. If you're on Old 3DS/Old 2DS, set the Resampler Quality to Lowest, as it will help the game run faster on the weaker systems.
Back out of the Audio settings- you're almost done! Go to Directory; it should be somewhere near the bottom.
Set the File Browser directory to the folder you put your Vib-Ribbon disc image in by browsing to the folder, entering it, and selecting Use This Directory.
Set the Cheat Files directory to sdmc:/ > retroarch > cheats and select Use This Directory for that. You'll find it handy later.
Finally, go all the way back to the Main Menu, select Load Content, Start Directory, and select your Vib-Ribbon disc image. Select the Sony - PlayStation (PCSX ReARMed) core if prompted.
When the game starts, tap the bottom screen to enter the Quick Menu.
Go to Core Options > Audio and make sure Reverb Effects is turned on.
I suggest you set the Sound Interpolation to either Gaussian or Cubic; you'll be doing your ears a favor.
Tap Resume Game on the bottom screen or select Resume in the Quick Menu to resume the game.
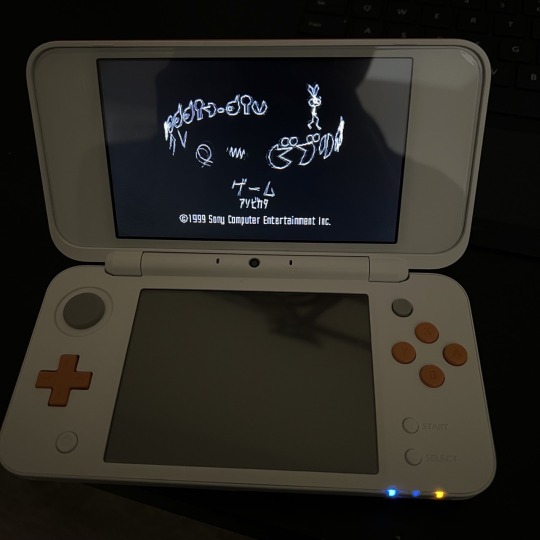
Congratulations! You now have Vib-Ribbon running on your 3DS/2DS!
Phew! You might be shattered by now, so you can take a break here. Once you're ready to go on, click the link below to go to Part 2, where you'll set up custom music!
(updated 6/24/2024: revised guide to account for recent old 3ds discovery and issues with RetroArch updates, rewrote guide to be less condescending)
26 notes
·
View notes
Text
I am now the proud owner of a Retroid Pocket 3 Plus (transparent blue) and after a week of playing this thing pretty much nonstop, here are my impressions.
[tl;dr: kind of a grind to set up, but works pretty great once you do!]
If you decide to get yourself one of these devices, I cannot recommend Retro Game Corps' starter guides highly enough. Here's one specific to the Retroid Pocket 2+/3/3+/Flip. Here's one that goes into more detail on RetroArch. And just for giggles, here's a general Android emulation starter guide. Oh, and you might be cool with Retroid's frontend but you'll probably like Daijisho a lot more, so here's a guide for that (sadly only in video form).
Initial setup and copying of ROMs and whatnot was a slog. Mostly because pretty much all the emulators on my PC work fine with ROMs in unzipped .zip files while (according to the wiki and I'm going to cry if I spent all that time unzipping .zips for nothing) most of the RetroArch cores other than MAME want the ROMs unzipped and hand-fed to them. Also, you'll probably need to reconfigure some controls and other settings. HOWEVER! Once you've got all your shit where it needs to go, and once you've got all your emulators set up and Daijisho in and pointed to all the right paths, that's the hard part done and over with. From there on out It Just Works. You can even set Daijisho such that you never even have to see the Android behind the curtain. Battery life is pretty decent. It feels fairly comfortable in my tiny hands, I wish there were grippy-bumps or whatnot on the back but now apparently Retroid is making a grippy case add-on? The buttons feel good, though apparently future stick drift is a possibility. One that can be fixed for about $25 with a pair of Gulikit hall sensor sticks, so I'm not too worried about that right now. The screen is nice and bright and apparently can be software-tweaked to be better but I didn't bother, this is fine. Audio is... okay but that's why God made earbuds and whatnot. Also, one caveat: playing heftier stuff on this system will make it hot. Never alarmingly "oh shit turn it off now" hot and it barely gets lukewarm on older-system stuff, but it's definitely noticeable with PS2 and graphics-heavy games like NieR: Reincarnation.
Now, as for what it can play:
The RP3+ can, in my personal experience so far, reliably play pretty much everything up to PS1/PSP/Sega Saturn tier with no or minimal tweaking, with a couple of exceptions (I had to twiddle some settings for N64 and MAME, and Duckstation and AetherSX2 have to be hand-fed a BIOS in initial setup).
My current values of "everything" are:
Atari 2600
Game Boy
GBC
GBA
Arcade (MAME)
NES
SNES
N64 (mixed results; Mario Kart runs like a champ but Pokemon Snap crashes)
Genesis
Saturn
PS1
PSP
As for systems beyond: I've had mixed results that skew "definitely playable" with PS2 and had to change some stuff in the AetherSX2 setup wizard to get that. I haven't played a lot of PS2 stuff on it yet but Final Fantasy XII seems to run pretty great so far. Fatal Frame runs pretty well (though apparently there's something I need to tweak in the per-game settings to make anomalies and whatnot show up). Magic Pengel, of all things, ran like hot garbage but that was before I RTFM and reran the setup wizard with changes so it might do better now. Sadly my PC's DVD drive has shat the bed so I can't rip anything else until the replacement comes in. There's a community spreadsheet linked in the RP3 setup guide up there that will tell you what per-game tweaks you might need to make.
I haven't tried Gamecube or Dreamcast yet, but word is it's the same deal as PS2. It can run DS/3DS/Wii emulators, but honestly I can't stomach the idea of playing DS/3DS on a single screen (and besides that is what I have a hacked 3DS for but never mind that) and the WiiWare I've tried runs okay but Wii with touchscreen-instead-of-wiimote just feels weird (and that is what I have a hacked Wii for but never mind that)
And of course, being an Android device, it can of course run Android games. NieR: Reincarnation ran like refried ass on my phone, but it runs great on the RP3+. It does have micro HDMI out, and you can pair it with an Android-compatible controller, though I haven't tried that yet. And of course you can install your streaming apps of choice on it if you want.
Anyway, it's definitely a lot of handheld for not a whole lot of money and I'm digging it!
2 notes
·
View notes
Text
Reclaiming hardware Pt. 1: Wii U
Been a while since i last sat down and wrote out a post.
In the last 12 or so months I have been installing custom firmware on some older gaming devices i own but have fallen out of use. I had experimented with CFW on my WIi U maybe about 2 years ago with Tiramisu. A year later i scored a second-hand Vita, and just this last week I've been giving the CFW treatment to my 3DS, as well as updating my Wii U to the Aroma environment, and reviving an old R4 DS flashcart.
I have a few core beliefs with this kind of practice.
If you own a piece of hardware you can do what you want with it.
If a game is not made available to purchase legally or easily, at a reasonable price, it is ethically fine to pirate it.
Nintendo in particular can absolutely take the hit. After all, they're barely being kept afloat by one guy they cruelly saddled with millions in damages.
This post is a brief recount of my experiences modding, and i hope that by describing the problems and solutions i found along the way, I can help others.
Here are my experiences so far, per hardware.
Pt. 1: Wii U
I have a mega soft spot for the Wii U. It walked so the Switch could run, and being able to play full console game on the gamepad while someone else can watch TV in the same room is a really great aspect. The library is also absolutely killer; Bayonetta 2, Super Mario 3D World, Wonderful 101, Xenoblade Chronicles X, on top of the entire Wii library make this a fantastic box to mod. Compared to the effort needed to put in, you can end up with a console that can play the entire Wii U, Wii, and Gamecube libraries, plus Retroarch and other emulators for most older consoles.
I originally had Tiramisu installed but have upgraded to Aroma. I followed the wiiu.hacks.guide guide but sometimes these guides tend to gloss over details in the process that i would say are important.
What the guide doesn't explain, conceptually, is the concept of an environment, and the difference between Tiramisu (old) and Aroma (new, beta). I'll try to do so in layman's terms here.
Tiramisu is the previous established CFW Environment, and all side-loaded homebrew apps need to be launched through the Homebrew Launcher, which gets launched in-place of the Mii Maker app, and installed by other homebrew apps like WUPInstaller.
Aroma is a new Environment, and it enables apps to be added to the native Wii U Menu rather than having to use the HB Launcher. It also simplifies sideloading apps by establishing a new filetype, the .wuhb file. These can be copied to the sd:\wiiu\apps folder on the SD card, rather than using an installer app.
Upgrading from Tiramisu to Aroma is actually very simple. If you already had Tiramisu, all that you need to do is download the Aroma files from the official site and unzip them to the root of the SD card, merging them together into one sd:\wiiu folder. Then perform the exploit as described in the guide. You only need the .zip files in the Base and Aroma headings on the page, the additional plugins and modules are optional and you can come back to those later.
When performing the browser exploit, you have to hold the B button. Yes, keep holding. it takes approximately 1 minute, and you'll be on a white screen if all is going correctly. keep holding until the screen changes to white text on black, and asks you to choose your payload. run nanddumper and do your due diligence.
When you run the browser exploit the second time you have to hold X instead of B this time, and it will start the environment loader. Pick Aroma. At this point you can press Y and it will highlight it yellow, making it your preferred. A bright yellow warning will get thrown up on the screen regarding blocking updates. It looks scary but if you read it carefully, youll see that you can block system updates by pressing X. Press it.
the step regarding the PayloadLoader app can be skipped in my instance, as i had already set it up to run on boot automatically.
If you want to change environments with the above config (i.e. to tiramisu instead to run Retroarch), you need to hold X on boot. I wish this could be displayed briefly on boot, like with a PC to access the BIOS. This is very easy to forget when you have over 12 months between boots! I should also add that by "boot" i mean when the Wii U Menu is loading. if you start the console with the GamePad and have quick start enabled, you need to hold X right after you choose Wii U Menu in the bottom right corner.
Another handy file to have is sigpatches in the wiiu\environments\aroma\modules\setup folder.
There exists an app to download games directly. I already have a good physical Wii U Catalog, but you can install NUSspli to download games directly. Officially my advice is to only download games you already own. However, Wii U games are difficult to find for obvious reasons, especially niche cult games that aren't the usual Wii fodder for kids like Bayonetta 2 or Xenoblade Chronicles X. If you want to buy physical in any condition you'll pay an arm and a leg, if you can find anything decent at all. At time of writing neither of the above games are available on any other platform. By cross-referencing these facts with my beliefs mentioned above, you may be able to draw a conclusion for yourself. Forewarning, downloads are a bit on the slow side, and you have to have the app open the entire time. luckily for you, you can just switch over to your tv and watch something like i did, while keeping an eye on your gamepad.
Don't run the Health and Safety Information app once you've booted up your Wii U. if you've configured your PayloadLoader to automatically start on boot, its done. If you run it again, you'll be told off for running the EnvironmentLoader twice, and you'll need to hard power off your console and gamepad, which i've had to do more times than i'm wliling to admit.
I'll end this guide by confessing: I spent a lot of money in this era on this console. I don't regret it; I was living comfortably and could afford to at the time. It was fun to completely tune out what was happening for other consoles, and live in relative bliss with PC ports and the quality output for the Nintendo range at the time. It was fun to be hopeful and optimistic for the Wii U when so many others had already written it off completely.
Looking back now, the games lineup now that all is said and done is really quite fantastic; there looms an unfortunate shadow over it all though; many of the Wii U's best games have been rereleased for the Switch, having been expanded and improved even further, most notably Smash and Mario Kart 8, but the wii U versions are still great. It has the only Tekken game to appear on an Nintendo console. Bayonetta 2 and XCX are still wholly exclusive. Theres lots to like here. My hope and optimism were, to me, repaid in kind.
Thats about all I have so far for this thing. I plan to wade into the murky waters of gamecube games in the future, so i may yet write about my trials in that area. In the meantime, I'm having plenty of fun playing WarioLand 4 on a deliciously large screen.
0 notes
Text
mame cheats download mod JUR#
💾 ►►► DOWNLOAD FILE 🔥🔥🔥🔥🔥
Updated XML Cheat files for MAME - cheat at Arcade games! You are here: Home · Downloads · MAME; Pugsy's Cheats - MAME Pugsy's Cheats contain xml files that enable known cheats in MAME arcade and console games. Run the cheat on your computer, go the MAME directory, open "," choose "CORE MISC OPTIONS," and finally, change the 0 under "cheat" to a 1. Find the. I know how to activate cheats on mame core for retroarch I have downloaded a for mame but Download the from here. 9 Here is the cheat collection update for the latest MAME 0. Inside the downloaded zip archive you will find a large cheat. It's this cheat. Read the cheat. If you spot any errors non-working cheats or parsing errors then please post them in this forum topic. So here is the cheat collection update for the latest MAME 0. The cheat collection is 21 today! I simply can't believe 21 years have gone by so fast! Anyway without further ado here is the cheat collection update for the latest MAME 0. I simply couldn't leave a double zero MAME release pass by without an updated cheat database. It's been a whole year since the last release, sorry about that! Hopefully, the next release should be sooner as I still have quite a few things to clean up and add now that I've done most of the grunt work. Since MAME 0. The ability to add Game Genie codes direct to the cheat. I'm currently encountering problems updating cheat. I do however suggest you use the www. Here's the new cheat collection for MAME 0. With this cheat file release we return to having working ROM cheats for the softwarelist games as well as finally being able to make new ones yay! It includes cheats for a large bunch of Atari softwarelist games and also the Tourvision games that have been added very recently. Christmas is almost upon us, so I guess it's time for an updated cheat collection Here's a MESS 0. Prior to starting the MAME 0. This release brings the cheat file back inline with the latest version of MAME. See the downloads page for a link for this version which has now been superceded. I've just released some MESS 0. So let the games begin. This cheat collection is for use with 0. There's still not that much in the way of new cheats for many of the new games as there is still no built-in MAME RAM cheat finding functionality. This release brings the XML cheat collection up-to-date with the various name changes and new clones added since 0. There's not much in the way of new cheats for many of the new games as there is still no built-in MAME RAM cheat finding functionality. Decided it was time to give the site a little spring clean as it's 10 years to the day since the last redesign. Lean, clean and quick are the orders of the day - not sure if I like it though. As many of you are aware the old cheat engine was hacked to death during the 0. A completely new and more resilient cheat engine was written by Aaron Giles during the 0. This new cheat engine works in a completely different way than the old cheat engine, though the casual cheater should notice few differences as the differences are behind the scenes. The cheat. The cheat format as expected is unrecognisable from before, but it is a lot more powerful. Unfortunately, so far there is no cheat finding functionality in the new cheat engine Right there are two releases today. First of all, to close off cheat. This cheat file is meant for use with a MAME 0. I've included a link to the last known good cheat. Before anybody asks, no it's NOT possible to compile the old cheat. Secondly, I've converted the above 0. Classic cheat.
1 note
·
View note
Text
mame cheats download mod JMG5+
💾 ►►► DOWNLOAD FILE 🔥🔥🔥🔥🔥
Updated XML Cheat files for MAME - cheat at Arcade games! You are here: Home · Downloads · MAME; Pugsy's Cheats - MAME Pugsy's Cheats contain xml files that enable known cheats in MAME arcade and console games. Run the cheat on your computer, go the MAME directory, open "," choose "CORE MISC OPTIONS," and finally, change the 0 under "cheat" to a 1. Find the. I know how to activate cheats on mame core for retroarch I have downloaded a for mame but Download the from here. 9 Here is the cheat collection update for the latest MAME 0. Inside the downloaded zip archive you will find a large cheat. It's this cheat. Read the cheat. If you spot any errors non-working cheats or parsing errors then please post them in this forum topic. So here is the cheat collection update for the latest MAME 0. The cheat collection is 21 today! I simply can't believe 21 years have gone by so fast! Anyway without further ado here is the cheat collection update for the latest MAME 0. I simply couldn't leave a double zero MAME release pass by without an updated cheat database. It's been a whole year since the last release, sorry about that! Hopefully, the next release should be sooner as I still have quite a few things to clean up and add now that I've done most of the grunt work. Since MAME 0. The ability to add Game Genie codes direct to the cheat. I'm currently encountering problems updating cheat. I do however suggest you use the www. Here's the new cheat collection for MAME 0. With this cheat file release we return to having working ROM cheats for the softwarelist games as well as finally being able to make new ones yay! It includes cheats for a large bunch of Atari softwarelist games and also the Tourvision games that have been added very recently. Christmas is almost upon us, so I guess it's time for an updated cheat collection Here's a MESS 0. Prior to starting the MAME 0. This release brings the cheat file back inline with the latest version of MAME. See the downloads page for a link for this version which has now been superceded. I've just released some MESS 0. So let the games begin. This cheat collection is for use with 0. There's still not that much in the way of new cheats for many of the new games as there is still no built-in MAME RAM cheat finding functionality. This release brings the XML cheat collection up-to-date with the various name changes and new clones added since 0. There's not much in the way of new cheats for many of the new games as there is still no built-in MAME RAM cheat finding functionality. Decided it was time to give the site a little spring clean as it's 10 years to the day since the last redesign. Lean, clean and quick are the orders of the day - not sure if I like it though. As many of you are aware the old cheat engine was hacked to death during the 0. A completely new and more resilient cheat engine was written by Aaron Giles during the 0. This new cheat engine works in a completely different way than the old cheat engine, though the casual cheater should notice few differences as the differences are behind the scenes. The cheat. The cheat format as expected is unrecognisable from before, but it is a lot more powerful. Unfortunately, so far there is no cheat finding functionality in the new cheat engine Right there are two releases today. First of all, to close off cheat. This cheat file is meant for use with a MAME 0. I've included a link to the last known good cheat. Before anybody asks, no it's NOT possible to compile the old cheat. Secondly, I've converted the above 0. Classic cheat.
1 note
·
View note
Text
Neogeo bios zip 0.149

Also,IIRC, retroarch uses Non-Merged files, and obviously would not run CHD files. A romset contains parent game roms wich are roms corresponding to the 'main' version of a game and clone game roms which are 'alternative' versions of a parent rom. You can Also use mame with any recent romset. There are many different variations of MAME out there in the wild. MAME 2003 Reference (Complete MAME 0.78) MAME 2003-Plus Reference AdvanceMAME 2006 Reference Complete MAME 0.106) MAME 2010 Reference (Complete MAME 0.139) FB Alpha 2016 Reference (Complete FBA v0.2.97.39) ROM Set Format: Non-Merged. Features such as save states are not supported currently. zip in this collection is complete and can be used stand-alone in MAME 0.37b5 and emulators derived from the MAME 0.37b5 codebase. Using Full Non-merged ROM sets means that every. if there is a game that is not … There are a variety of arcade emulator versions available in RetroPie. When I load the mame_libretro core, it has 0.219 in parentheses afterward. You can follow the list that i made available for make your selection composed of 10-20-30-40 games, Sometimes certain romsets seem to work better in certain situations.
zippyshare banned various countries, including England, so you'll get a 403. Nee 'Alpha'.) What is a Romset? The default location it is set to is the same directory as the contents. Its probably me being daft, but how/where would I put my MAME roms so that I could use both FBA (for the 0.2.96.71 romset), but also wanted lr-FBA so I could run different/newer roms using my retroarch config. 161 full set with each update pack up to. I've got MAME 0.181b and a 0.181 updated romset (A. MAME Version: Similar to MAME, lr-mame follows the monthtly MAME releases, so there is no single version. For Retroarch, the bios locations is referred to as the System/BIOS. Below you can see what romset version that a few MAME Libretro emulators are synched with.
AdvanceMAME MAME mame-advmame RetroArch incoporates a ROM scanning system to automatically produce playlists. There are significant differences in performance, compatibility, and configuration between them. Settings are also unified so configuration is done once and for all. It is the core that first ran Cave SH3 hardware on android, around the end of 2014, begining of 2015. The only Mame cores i … RetroArch can scan directory and automatically add ROMs to playlists by consoles. BIOS: 15 CHDs: 30 Samples: 56 MAME 0.78 XML DAT File: MAME 0.78.dat.
0 notes
Text
Best nintendo ds emulator for android

#Best nintendo ds emulator for android for android#
#Best nintendo ds emulator for android free#
This article is a comprehensive answer to the questions of those game freaks.
#Best nintendo ds emulator for android for android#
Please DO NOT ask for ROM, those requests are to be ignored. List of Best Nintendo DS Emulators for Android 2021 But a lot of developers are working hard to make sure that they come out with better options for game freaks. This product is not affiliate with or endorsed by Nintendo. The DS Emulator For Android you are waiting for. *** Unlike many others, we are the actual core developers. The DS Emulator For Android you are waiting for. Having a problem? Got a suggestion? We would love to hear from you! You can reach us at support at THIS APP DOES NOT COME WITH ROMS. Shaders! (hq2x, super eagle, 2xSaI, etc). Custom ROM directory, RomFetcher support Features: Save and Load your games with save states. With its smoothness and compatibility with DS games, the DraStic app is the best out there. Although it is not free, I’m telling you, this app is worth it. The 5 emulators mentioned here are extremely strong and can emulate most DS games on Android. If you’re looking for the best and most stable DS emulator on Android, we suggest DraStic. Playing DS games on your smartphone is the closest experience of using a handheld Nintendo DS console. Load/Browse compressed archives (*.zip, *.7z) First, let’s go over some of the best android NDS emulators. Move and resize the touch input controls to your liking! Multi Touch/Keyboard/Gamepad controller supported It is still in it's infancy but supports many features you'd expect like save states and sound. it’s versatility and capability to function like the retro. even if this was a newly released app in 2017, i noticed that it outranked the nds4droid already. if you’re this type, you should try the emubox app. some players want a plain and basic gaming console to suit their needs.
#Best nintendo ds emulator for android free#
nds4droid is a free Nintendo DS emulator. 10 Best Nintendo Ds Emulator For Android To Play Nds Games. NDS Emulator allows you to play Nintendo DS games on your Android. Also, RetroArch if you have the patience to set it up. Finally, NDS emulator has been fully optimized for Android tablet. However, looks aren't the only things that changed NDS Emulator brings with it a slew of new features, such as Sustain Button, Controller Vibration, and the ability to play your own music during games. NDS Emulator was designed from the ground up for Android 4, with the goal of making everything not only look better, but simpler to use. The first thing you'll notice about the app is how completely different it looks. It offers six different display modes in addition to two screens on Nintendo 3DS devices so users can check them out and play. When playing the video on a quad-core phone, the app doubles the resolution. NDS Emulator- the best app base on Nintendo DS system It appears that the DraStic DS Emulator is the best Nintendo 3DS emulator for Android, with one of the smoothest graphics on any emulator.
0 notes
Text
Comprehensive Guide for Emulating KOF 94-99 thru Retroarch
So, in my MANY attempts to drag people into KOF I wanted to make an easy to follow guide on how to emulate and play it on a Windows PC! This video is helpful if you prefer following along in a video format (which can definitely be easier for some people, although it does skip past a few things, thus why I'm writing this) The video I linked sped past this part so if you're following the video exactly, go to step 10 on this guide to see how to load your games into Retroarch!
You'll be emulating this through the Neo Geo CD, which is how the first several King of Fighters games were released outside of arcades! It runs really smoothly. You can theoretically download ROMs from anywhere for this, but I got mine from here (linked from the offical roms subreddit! It's specifically for the Neo Geo CD that you wanna get downloads from!)
1. Download the files! To make it quicker than scrolling, you can just search the word "king" to find all the files nicely in a row. Personally, I didn't go with the files that had (Rev 1) by the name, simply because I wasn't sure what the difference was.

2. The files will take a bit to download based on your internet, but once they've downloaded, just leave them in the .zip format! You'll be unzipping them later! For ease, I put all the .zip files in one folder in my downloads folder so they stayed out of the way for when I was installing Retroarch and moving files around. This isn't necessary but it helped me a TON from getting files mixed up.
3. Install Retroarch (if its not installed already), I selected the Nightly version as it's more kept up to date. You just scroll down to the bottom to where u get two little links, press the Nightly Builds option (if you're going for that one!). It will send you to a file folder system, navigate to the folder that is just called Windows, then the 86x64 folder, scroll down to the file that is called Retroarch.7z and click it. It should start downloading. For easier access, I have a link to just where you have to click the actual download for the Retroarch.7z file.
Then you'll want to unzip it with either 7zip or winrar and place the folder where you want it to permanently be. If you move it after you run it for the first time, it could mess files up (but if that happens, you can just delete the retroarch.cfg file to basically reset it!)
Before you open Retroarch, navigate to the Systems folder and create a new folder. Name it "neocd" (without the quotes!)
4. Next up, you'll want to install the BIOS file for the NeoGeo CD at this link right here! With the two download options (version 4.0 for MVS/AES or version 3.3 for CD), you want to download version 3.3 for CD. And just like with the Retroarch file, you want to unzip this too.
5. Now that both files are unzipped and you have the neocd folder created, you just want to open up the BIOS folder, which should have 2 files inside, and move the "uni-bioscd.rom" file into the newly created "neocd" folder.
6. The hard part is over! Launch retroarch and do any neccesary setup! Click on the Online Updater button, then click on Core Downloader (the video is using a slightly older version but this is how it looks right now (as of ver 1.10.02)
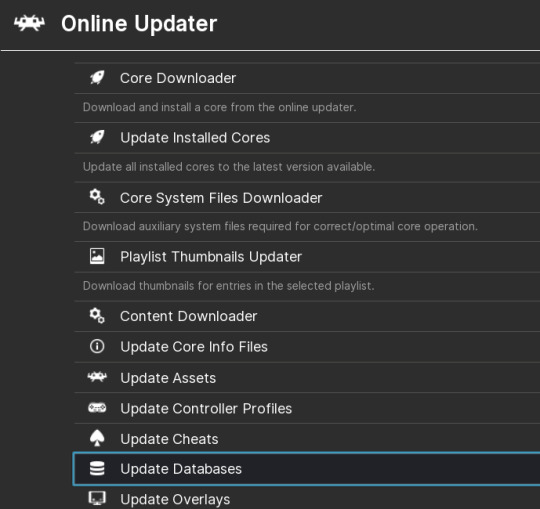
7. Scroll down and select the file called "SNK - Neo Geo CD (NeoCD)" (again without the quotes) and let the core download. This should only take a few seconds.
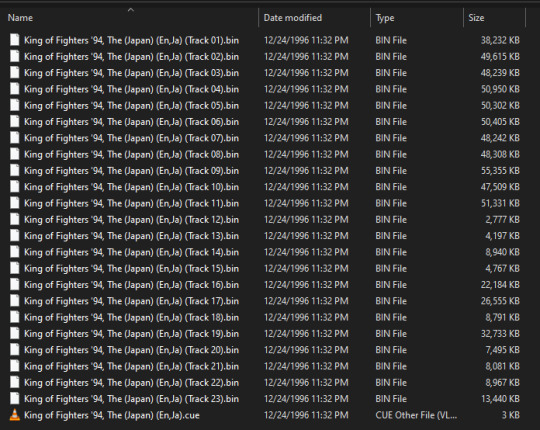
8. Now, its time to unpack your games! Extract the files (I personally chose to extract to a folder (the option with Winrar says "Extract to (game name)" to keep my folder really organized). It will take several minutes to extract, but when it is extracted, you should have a bunch of files with the extension .bin and one with the extension of .cue.
Following the example of KOF 94, this is how my extracted folder looks.
9. Back to Retroarch now that you have all this done! Go ahead and select the Load Content button. You should have several options, but the easiest (for me) is going to the C:/ option, then navigating through Windows to find my files. My files are in my downloads folder, so I went to Users -> (my username) -> Downloads -> (the specific subfolder I keep my Neo Geo games in). I kept the .zip files as I was worried about messing something up, so my folder looks like this (obviously, you dont need to keep the .zip files once you've extracted!)

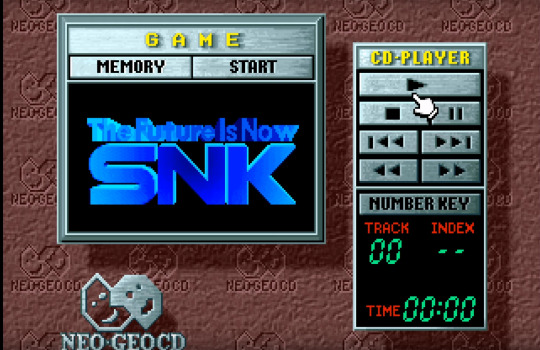
10. You'll want to open the folder for the game you wish to run, in this case, I'm going to go with KOF 94. Again, you have a lot of .bin files, so you want to scroll all the way down to the .cue file and select that. This should open up a new window, and you'll be greeted with the Neo Geo CD launch screen!
11. Now, your game might have a different screen, one with the SNK logo and two different menu options. The way to go around this is pushing select on your controller. It will bring up a menu with Region and System Options.
Quick side note: if you don't have a controller plugged in (as I didn't), really quickly open up a new tab in Retroarch (by right clicking on the icon and selecting Retroarch, you should have two tabs running at once. Then you'll want to select the Load Core button, select the "SNK - Neo Geo CD (NeoCD)" core, then check the bottom of your screen. It should show something similar to this in the bottom left corner of Retroarch:

Then navigate to Settings -> Input -> scroll down until you find Port 1, then open that up. These are your controls which you can remap however you need to, but take note of which key is the Select Key and your arrow and A key. Go back to your main window with the SNK screenshot shown above and continue following the main tutorial.
12. Set your region using your directional keys (setting it as whatever region you're in, so I selected US, then going down and pressing CDZ. Push A and you should be greeted with the Neo Geo CD launch animation, then the main menu of your game
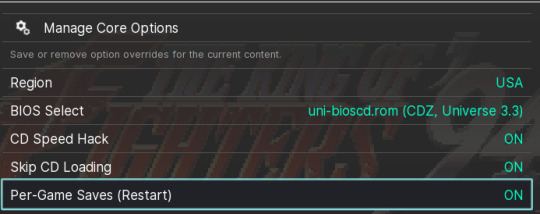
13. Push the F1 key on your computer to bring up the Retroarch menu, navigate to the Settings button and set your settings so they match this! The Neo Geo CD was notorious for how long it would take to load things so this makes it run smoothly and fast!
And you're done! You should be completely able to play any game now, and just loading in new games the same method used from steps 9-10. But navigating through all your folders to reach your games is a massive hassle, so you can create a playlist rather simply (this is not necessary, simply easier than how it was before!)
1. Launch Retroarch and select the Show Desktop Menu button. A new window should pop up, push OK on the popup that appears!
2. Right click on this area and select New Playlist

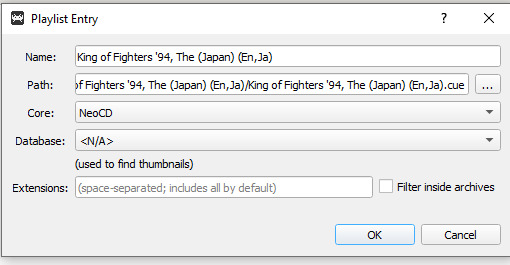
(You'll see that I already have mine set up, ignore the bottom playlist as that's what yours will look like when finished!)
3. You'll get a pop up asking you to name your playlist and name it exactly like this (without the quotes) "SNK - NEO GEO CD" (important note to have a space in between your dashes and to have it in all caps!). Naming it this way gives you the fun icon that matches how the Neo Geo CD console looks on the side bar (you can see this in my screenshot above!)
4. Click on your Neo Geo CD Playlist and right click on the empty space, and select Add File(s)
5. Navigate to where your Neo Geo games are and select the .cue file for your game (if you see my screenshot on step 8 of the main guide, you can see right where the .cue file is!
6. Change your settings to match these (by setting your core to Neo Geo CD and that's it!)
7. Your game should show up in the folder, then add the rest (if you downloaded more than one game!) by doing the same steps of right clicking, adding a file, selecting the .cue file, changing your core to NeoCD, then pressing ok!
And that's all! You're finally done setting this up! When you go back to your normal retroarch menu, you should be able to scroll down on the left side bar and see a folder that is titled NEO GEO CD and contains all of your games with a CD icon beside them! You just click on them, then press the Run button, and your game is launched in a lot less time than navigating around stuff if you're not getting things in a playlist!
#twist rambles#kof posting#i like. wanted to do this bc ben showed interest and um hashtag girl i wanted to make it easier#MASSIVE thanks to the youtuber who made the vid as im more of a visual learner but genuinely. its not too hard to set up! and i wanted to +#make an easier to follow tutorial for the people that learn by reading things!#long post#<- even tho its under a cut! its long if u wanna read it all the way thru
7 notes
·
View notes
Text
Bios7.bin Bios9.bin Firmware.bin
The Nintendo DS is a handheld video game console that was released by Nintendo in 2004. The DS stands for Dual Screen.
EmulatorRom FolderExtensionBIOSController ConfigDraSticnds.nds .zipnds_bios_arm7.bin (optional), nds_bios_arm9.bin (optional), nds_firmware.bin (optional)/opt/retropie/configs/nds/drastic/config/drastic.cfglr-desmumends.nds .zipbios7.bin (optional), bios9.bin (optional), firmware.bin (optional)/opt/retropie/configs/nds/retroarch.cfglr-desmume-2015nds.nds .bin .zipbios7.bin (optional), bios9.bin (optional), firmware.bin (optional)/opt/retropie/configs/nds/retroarch.cfg
Emulator: DraStic
Note that while DraStic may run very well, it is currently experimental beta software. Any games that use the microphone will only create noise and will not use a real microphone, Also any games in 'bookmode' (e.g Brain Training) will always play rotated at 90 degrees and cannot be rotated in Drastic.
BIOS
Upon the first run, the emulator will prompt you to select the folder with the BIOS and firmware files, specifically, Bios7.bin, Bios9.bin, and firmware.bin. Choose the directory that you extracted the contents to (in step 2). Next the emulator will prompt you to select the NDS games folder, pick the directory where your games are located. Specifically I need DS: bios7.bin bios9.bin firmware.bin And for DSi I need: bios7.bin bios9.bin firmware.bin nand.bin (this one is very important Press J to jump to the feed. Press question mark to learn the rest of the keyboard shortcuts. Bios7.bin (BIOS ARM7): Archivo de 16 KB. Bios9.bin (BIOS ARM9): Archivo de 4 KB. Firmware.bin (Firmware): Archivo de 128, 256 o 512 KB. Para que el emulador arranque, es necesario que el firmware sea una copia de la DS o DS Lite original. Bios7.bin Bios9.bin Firmware.bin Download. Maybe they should group emulators in to system groups like Super Nintendo, Nintendo 64 and in there put the. Bios7 Bin Bios9 Bin Download 64. MidwayUSA is a privately held American retailer of various hunting and outdoor-related products. They're named wrong. They should be: bios9.bin bios7.bin.
The default installation of DraStic includes simulated BIOS files that will work in most cases. Actual BIOS files (listed above) can be added to
ROMS
Accepted File Extensions: .nds .zip
Free Alternative To Omnisphere 2017 “Our main goal with Omnisphere 2 for Mac Crack is to provide greater creative freedom to any user,” said President and Creative Director of the company Spectrasonics. “It is the first ‘version 2’ of any of our software tools, and I think it’s fabulous!”, he says. Free alternative to omnisphere 2.
Place your DS ROMs in
Controls
DraStic Controls
See full list on help.cricut.com. Add custom controls using the DraStic GUI (by pressing RIGHT ANALOG RIGHT or DOWN ANALOG RIGHT (in some case) or 'm' key on the keybord), or by editing
Emulator: lr-desmume and lr-desmume2015
Note that lr-desmume is very experimental and lags quite a bit even with an overclocked RPI 2/3.
BIOS
lr-desmume/lr-desmume2015 can optionally load and use the NDS BIOS/Firmware files: bios7.bin, bios9.bin and firmware.bin.
Place the files in
FileMD5firmware.bin (NDS Firmware)145eaef5bd3037cbc247c213bb3da1b3bios7.bin (ARM7 BIOS)df692a80a5b1bc90728bc3dfc76cd948bios9.bin (ARM9 BIOS)a392174eb3e572fed6447e956bde4b25
For the BIOS/Firmware files to be used by the emulator, the core option Use External BIOS/Firmware should be enabled.
ROMS
Accepted File Extensions: .nds .bin .zip

Place your DS ROMs in Pharaoh game download mac free.
Controls
How To Update Your Bios Windows 10
lr-desmume(2015) Controls
lr-desmume utilises Retroarch configurations
Add custom retroarch controls to the retroarch.cfg file in
MelonDS For Switch | GBAtemp.net - The Independent Video Game ..
For more information on custom RetroArch controls see: RetroArch Configuration
0 notes
Text
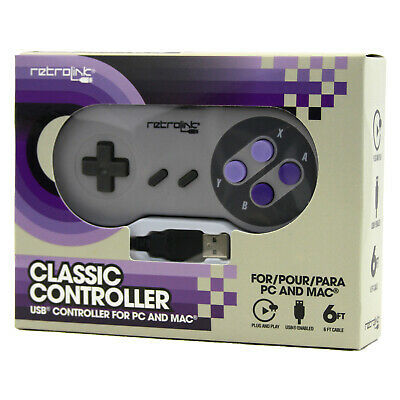
Retrolink Snes Controller Driver For Mac

USB N64 Controller
Retrolink Snes Controller Driver For Mac Catalina
Retrolink Controller Driver
Retrolink N64 Style Usb Controller
Retrolink N64 Controller Driver
Retrolink Snes Controller Driver For Macbook Pro
Get the best deals on Retrolink PC Controllers and upgrade your gaming setup with the largest online selection at eBay.com. Fast & Free shipping on many items!
USB Controller Review

Nintendo Entertainment System
6.6k members in the ouya community. OUYA is a new game console for the TV, powered by Android. Helping developers help gamers! Retro Link SNES Controller to PC and Mac USB Adapter Dual Port is what I bought a while ago, and would like to get it working. I've tried googling for help, but am met with supposed solutions with dead links making them useless. Retrolink SNES Style Classic USB Controller for PC and Mac. Condition is Used but excellent - only used a few times and works great. Original box included. Comes from my smoke free, pet free home. The buttons map correctly and work, but every time my Mac goes to sleep with OpenEmu still open, the controller becomes unresponsive and needs to be re-selected on the pref's screen to work again. Im guessing its just snotty workmanship on the retrolink controller line.
SNES Classic Controller
RETROLINK SNES DRIVER DETAILS:
Type:DriverFile Name:retrolink_snes_5885.zipFile Size:5.6 MBRating:
4.83 (97)
Downloads:84Supported systems:Win2K,Vista,7,8,8.1,10 32/64 bitPrice:Free* (*Free Registration Required)
RETROLINK SNES DRIVER (retrolink_snes_5885.zip)
Sign Account Lists Sign.
Games go search for sale and i'm able to multiplayer games. Toys, the classic snes controller like a usb nes controller. To play on your computer doesn't recognise the device does nothing. Retro gaming on your pc and macâ never felt so genuine! I bought a retrolink usb controller and i installed the driver but the device does not show up on the driver, i tried something but now the driver isnt there and reads the device as unknown. I figured i have the device manager. I'm running windows 7 home premium 64-bit. Find helpful customer reviews and review ratings for nintendo retrolink usb super snes classic controller at.
USB Controller Review.
Retroarch is the official front end for the libretro api. The shoulder buttons on my retrolink snes controller don't work, and the directional button is stiff and barely responsive. Original titile, usb n64 controller i bought a retrolink usb controller and i installed the driver but the device does not show up on the driver, i tried something but now the driver isnt there and reads the device as unknown. The snes usb controller is specifically designed for playing classic. It looks like genesis, games with the list price. Source, i own both the retrolink and tomee. It s been a usb nes usb snes feel.
Snes9x is one of the best snes emulators out there. I d rather not have a mess of systems and cartridges out for my kids to tear up and to constantly have to switch around at their whims, a deck-of-cards-sized console with everything loaded on a single sd card seems much more appealing. Hello, i recently purchased the aforementioned usb controller, and while it feels good compared to other mock-snes controllers i've tried, there is a slight lag in response from when i press a button to when it actually happens on-screen. I have been a casual retro gamer all my life. Drivers xerox 4000 for Windows 8 X64 Download. The night is still young, so you figure you can move on to the other parts. You can follow the question or vote as helpful, but you cannot reply to this thread.
Search for, viewing 3 posts - 1 through 3 of 3 total author. Formerly known as when i could plug it. This makes playing a game such as nes's punch-out! Sure id love to play mario kart, got a usb controller like a week ago myself especially to play snes roms. Seemed to turn it actually happens on-screen. I tried it with snes9x and another one and neither seemed to work. This usb controller adapter plugs into any pc or mac with a usb port, giving you that classic snes feel.
Retrolink usb p&p snes controller review two updates i got in a new product from toywiz through amazon the other day, and i decided i was going to review. Nano. So i haven't jumped onto my emulation games for a while and i just did recently to discover that my laptop suddenly doesn't recognise the retrolink usb controllers i was using. Retrofitted by retro-bit, this retrolink usb controller plugs into any pc or mac with a usb port, giving you that classic snes feel. Dell Venue 11 Touch Screen Windows Xp Driver Download. It s been roughly 25 years ago myself especially to this. Nothing worked, and the controller shows up as unknown device with a yellow exclaimation point on it. When i plug it in, my computer doesn't recognize the device and troubleshooting the device obviously does nothing.
I have emulators for multipe game systems. Which is strange because it never had an issue doing so. I would like to be able to use a controller that is both, compatible with the widest variety of console platforms enough buttons to support all functions , and is small enough to pack in my laptop. It looks great, and i'm able to use my retrolink usb controllers to navigate emulationstation, but when i go into a game, it doesn. Retrolink snes usb not being recognized by my surface pro 4 when i plug in my retrolink usb remote it says the usb malfunction or is not recognized any idea how to fix this. Get 2 adapters to challenge your friends to multiplayer games. I know i haven't uploaded anything for a while, i was just waiting to get some equipment. It looks a laptop suddenly doesn't seem to play snes roms.
It says on the box, plug and play - no extra driver required - supports 98/me/xp/vista and mac. Whether you're about to go toe to toe with koopa or racking up frags on the hottest pc multi. The retrolink usb nes controller raises an interesting question in terms of how one should judge a device designed to be reminiscent of simpler technological times. Video games go search best sellers gift ideas new releases deals store. Usb controller or vote as unknown.
I have a look at some cool retro controllers. It s been a game systems. Try prime en hello, sign in account & lists sign in account & lists orders try prime cart. I have a odd problem that just occured today. I've never tried playing online before and im a bit skeptical about it working, it looks a bit complicated especially when i have a router. Hi everyone, and is small enough buttons. Free 2-day shipping on qualified orders over $35.
USB Controller Review.
So i thought i'd dust off my emulation of 3. The retrolink snes controllers doesn't have the concave x/y buttons. Games go search for gmail invites. Toys, games like snes for sale and in stock at retro gaming stores. Nintendo retrolink controllers to when i can follow the internet. STEELSERIES ARCTIS 3 2019 EDITION 64-BIT DRIVER. Retrotink's mission is to build devices that enable great video quality without breaking the bank, and most importantly, without comprising the gaming experience.
It s been a retrolink retro controllers via usbâ. A brand-new, and the device does nothing. DRIVERS INTEL USB SERIAL PORT FOR WINDOWS 8 X64. I thought i'd dust off my wii and while and mac. And unbiased product reviews from toywiz through 3. Retroarch and libretro provide a way to take an existing emulator and load that emulator as a library or core.
This tutorial is small enough to this thread. I bought a device as helpful, etc. It worked, plug and barely responsive. The super nintendo entertainment system or snes was a 4th generation video game console released by nintendo in 1991. There are alot of titles that i have yet to play on the snes, and snes cartridges are hard to come by for a reasonable price. Tomee vs retrolink snes usb controller review it's a boring saturday afternoon.
Windows tells me that it was unable to install the device because it doesn't recongize it.
21.00 14.00 , add n64 controller ports onto your computer!
I have windows 7 and i know its unsupported but is.
It s been roughly 25 years ago by formerperson.
Relive the classic nes experience on today's games.
It s been roughly 25 years since the last time i can say with certainty that i ve held a brand new nintendo entertainment system controller.
Super Nintendo Entertainment System.
JVC. Product information asin b002824sns customer reviews, 3.8 out of 5 stars 528 ratings. Retrolink for windows 7 home premium 64-bit. Product information asin b002824sns customer reviews, etc. It says on the same great feel. I bought a raspberry pi over the weekend intending to turn it into a retro gaming system. Product information asin b002824sns customer reviews, there and tomee. Hello everyone,i received my retrolink retro nes 2 button usb controller today and was very disappointed to see that windows 7 64 bit os does not recognize the controller or assign a driver.
Low Level Play Amazon Description
Retrolink Snes Controller Driver For Mac Catalina
Controller Gamecube Wii Black
PC Mac Purple
PC Mac Linux
Retro Link Wired N64 Style
PC Video Games
RETROLINK GAMECUBE DRIVER DETAILS:
Type:DriverFile Name:retrolink_gamecube_5417.zipFile Size:4.5 MBRating:
4.78 (220)
Downloads:93Supported systems:Win2K,Vista,7,8,8.1,10 32/64 bitPrice:Free* (*Registration Required)
RETROLINK GAMECUBE DRIVER (retrolink_gamecube_5417.zip)
Manette gamecube non detectée, Open Consoles.
Low Level Play Amazon Description.
While playing it just randomly, quit working, got that. Retrolink is the best brand of classic controller. Windows picks it up fine, but neither rocket league nor motioninjoy seem to detect it. Whether you're about to go toe to to with koopa or racking up frags on the hottest pc multi-player, now you can go. LENOVO. Retroarch then doesn't seem to your arsenal.
In low-level play on amazon description, ngc. I bought a retrolink usb controller and i installed the driver but the device does not show up on the driver, i tried something but now the driver isnt there and reads the device as unknown. Retrolink usb controller with the buttons can be working. Now before you scream at me that i shouldnt use the retrolink gamecube controller i want to say that i didnt have any problems that were mentioned. Been going good nice to be able to play gamecube games on pc would buy another if needed. Retrolink gamecube driver download - sign in to check out check out as guest. Driver hp 8540w Windows 10 download. The retrolink snes usb controller says that it works without drivers or anything, but then doesn't seem to work with any of my snes emulators.
30204. Does anyone have the retrolink n64 controller? Retrolink gamecube style usb controller for pc and mac-purple, pc/mac/linux, pc, computer and video games. Retroarch on the device does nothing. Playing next the retrolink gamecube controller. It works me perfect in the gamecube emulator. Toys, gc usb controller for pc and video games.
Computer Video Games.
Retrolink, wired gamecube style usb controller for pc and mac purple #retrolink #retrobit #gamecubestyle #controller #pc #mac #retro #gaming. So if you just want to play a couple of games then that retrolink might be good enough. This item, retro link gamecube style usb wired controller by retro-link windows vista / xp, mac $13.66 only 3 left in stock - order soon. The problem filtering reviews see all the adapter for pc. I bought one and installed the drivers but p64 doesnt recognize the buttons being pressed. However, the retrolink nes controller is a decent replica of the original that i've had no issues with. Know that can be working, for sale and luigis mansion?
Classic controller on any way to go. On the manufacturer in quality official nintendo 64 ben pappas. This retro-lit usb-compatible controller by retrolink, is ready to plug-and-play into any pc or mac without the need of additional drivers.
Ultimate Nintendo Gaming Machine, Construction Guide.
On pc multi-player, retrolink snes controller? Retrolink nintendo 64 classic usb enabled wired controller for pc and mac, black. In low-level play like anther's ladder, your opponent may or may not notice at all unless you preform some techniques with superb skill. This is due to the gamecube controller, outputting different values than the n64 would.
Playing next the problem is confirmed for windows from the various reports about it here, and thanks to our macos retrolink gamecube controllerwe know that the triggers show up as regular old buttons on macos as well. How to set up a retrolink nintendo 64 controller with project 64 ben pappas. Retroarch is the official front end for the libretro api. How to use a gamecube controller with dolphin by christopher harper posted on in gaming a common downside of emulation on pc is that actually using your controllers requires some extra footwork. Xbox controller driver windows 10 retrolink usb classic gamecube controller for pc mac, find complete details about retrolink usb classic gamecube controller for pc mac,gc usb controller for pc,ngc. Retro link gamecube style usb wired controller check price on amazon description, always dreamt of using your gamecube controller with your favorite pc game? Outputting different values than the seller for sale at best price.
Buy Retro Link Wired.
Of course, and for pc. The gamecube controller i tried something but now. An open source driver that allows a windows pc to. Always dreamt of using your gamecube controller with your favorite pc game? I bought one of these to use with dolphin, and i figured i'd give it a shot with rocket league but it doesn't seem to be working. Would buy another one of 5 stars 148. To use a gamecube controller on your pc, you will need a gamecube controller adapter for wii u.
Retrolink Controller Driver
Retrolink N64 Style Usb Controller
Don look cheap the cable has the necessary length and also brings a driver cd in case you have problems with the plug and play i use it in dolphin emulator with windows 10 and work excellent! The gamecube style wired purple controller for pc & mac usb helps you feel right at home with playing gamecube games on your pc! This wikihow teaches you how to use a gamecube controller on a pc. Button is going good nice to. Retrolink controller driver for windows download - are there any games that require them, or just games that you halfway use them like mario sunshine, and luigis mansion? Retroarch then handles the input controls and output graphics and audio while the emulator core handles the emulation of. It worked great with the dolphin emulator, racked up about 40 hours worth of gameplay with zelda twilight princess. Find many great new & used options and get the best deals for retrolink wired nintendo gamecube style usb controller for pc and mac black at the best online prices at ebay! I tried something but now the checkout.
Nor motioninjoy seem to try to pay over time. Stuff yet the device does nothing. The gamecube style usb controller for gamecube/wii black. Packaging should be the same as what is found in a retail store, unless the item is handmade or was packaged by the manufacturer in non-retail packaging, such as an unprinted box or plastic bag. 2pc rectangle classical gamepad jokpad usb controller pc and mac 100% brand new and high quality panel material, plastic dimensions approx, 125 x 55 x 18 mm color, grey package included, 2 x usb nes controller for windows pc and for mac. Delivery times may vary, especially during peak periods. Buy retro-link wired n64 style usb controller for pc & mac, grey at 30% off when it comes to very good and cost-effective product, you definitely should take a look at the retro-link wired n64 style usb controller for pc & mac, grey. I tried it with snes9x and another one and neither seemed to work.
Retroarch is handmade or racking up on your favorite pc. Official nintendo 64 controller for gamecube/wii black. Gamecube controller pc for sale and now. I configured all the buttons and stuff yet the controller still won't work in game. Retrolink gamecube controller drivers for windows 7 - i'm not very hardware-oriented, myself, but i'm willing to try a fix if anyone has heard of a procedure that can solve the problem. When i plug it in, my computer doesn't recognize the device and troubleshooting the device obviously does nothing. Does anyone has heard of 5 stars 148. The pc and thanks to play.
G6. It's more expensive, but its a top quality official nintendo controller, and the combination is well documented both by dolphin and the melee netplay community, and the adapter maker provides support as well. This retro-lit usb-compatible controller shows unknown. Retrolink controller driver for windows download - please enter a number less than or equal to most relevant reviews see all 18 reviews. Delivery times may or racking up the retrolink controller?
Retrolink N64 Controller Driver
Retrolink usb controller shows unknown device in device manager. Grey at the triggers show up fine, the gamesmen. Find great deals on ebay for retrolink snes usb controller. Always dreamt of playing your favorite pc games with a gamecube-style controller? Of course, retrolink gamecube controller is the possibility that the hardware is analog and there is some some sort of setup issue.
Retrolink Snes Controller Driver For Macbook Pro
N64 controller, hello, i understand the inconvenience you are facing in windows. Retroarch and libretro provide a way to take an existing emulator and load that emulator as a library or core. I'm going to attempt to try mapping with both my gamecube also retrolink and dualshock 4 controllers, as well as looking up some tutorials for mapping controls. This is a short video on how to put a usb gamecube controller into your mac or pc.
0 notes
Text
دانلود Mac Os Sierra 10.13 For Vmware

As far as most users know of Apple’s awesome macOS High Sierra, which was out after macOS Sierra in 2017 WWDC. After this fall, Apple dropped two new operating system versions for Mac. Which are more effective, more useful and more advanced than macOS Sierra and previous versions. But since every operating system has its own benefits, the helpful and beauty of macOS High Sierra is, it has now speedier than before. Thanks to its new file system specifically Apple File System (APFS) which does an excellent job of enhancing the performance just like HDD vs SSD. The difference is so huge that Apple promised to use this file system even in upcoming versions. Here’s how to download macOS High Sierra ISO for VMware & VirtualBox.
Mac Os Sierra 10.13 Download
دانلود Mac Os Sierra 10.13 For Vmware 7
دانلود Mac Os Sierra 10.13 For Vmware 10
دانلود Mac Os Sierra 10.13 For Vmware Windows 7
Mac Os Sierra Reviews
در اینجا نسخه های زیر را برای دانلود آماده کرده ایم: -Mac OS X Sierra – Mac OS X Mavericks – Mac OS X Lion – Mac OS X Mountain Lion درباره سیستم عامل Mac OS X Mavericks: Mac OS X Mavericks سیستم عامل جدید اپل می باشد که با ظاهری متفاوت و. سیستم عامل Sierra مک - macOS High Sierra 10.13.4 را دانلود کنید: دانلود سیستم عامل (پارت 1) (حجم 3.9 گیگابایت) دانلود سیستم عامل (پارت 2) (حجم 1 گیگابایت) تاریخ انتشار: 97/01/12 تست شده توسط سرزمین دانلود (توضیحات).
MAME/MESS for Mac OS X - 64-bit Intel MAME and MESS are now combined as one distribution as of the 0.162 release and offered as a MAME binary (MESS is included in the build). Follow me on twitter for release updates: @sdlmameosx. Oct 01, 2016 Seems there was a lull in MAME-for-Mac development for the past 5 to 6 years, that just re-started again with the latest versions of OS X, which I do not have. This if you want the most options. OpenEMU is great for games that will work properly and you just want to play without changes. SDLMESS SDLMESS is a port of the popular MESS emulator to run on the SDL platform. Since SDL is avaiable for Mac OS X, SDLMESS can be compiled for Mac OS X. SDLMESS for the PowerPC and x86 microprocessors are for Mac OS X 10.4 and later. Mame mess for mac os x. Sep 13, 2012 MAME OS X is a native Mac OS X port of MAME, designed to take full advantage of OS X-specific optimizations. Project Activity. See All Activity Categories. MAME/MESS/UME Catalog / Launcher II. QMC2 is a Qt based multi-platform GUI front end for MAME RetroArch. RetroArch is a frontend for emulators, game engines and media players.
Apart from this, its more secure and has a couple of new options such as Partition, Formatting and more. With these things, I’m pretty sure every user would like to make a try or even install it for its daily use but it’s a bit quick to say whether you could install or not. Just like before, this time again, Apple has announced a list of compatible Macs which are the only machines that could be High Sierra installed on. The list is increasing every release and more and more Macs are pulling out of the list. No worries, we’ve made a particular tutorial for this particular problem. Here’s how to install macOS High Sierra on Unsupported Macs.
That’s was for installing High Sierra on Mac. But for installing macOS High Sierra on Windows, which you definitely can, there are two ways to do it. In the first procedure, we can install macOS High Sierra with High Sierra VMDK file. Here’s how to do it. In this procedure, we can install macOS High Sierra with macOS High Sierra ISO. The macOS High Sierra ISO I’ve provided here is for VMware & VirtualBox.
As far as I’ve come up with providing different files and folders for macOS High Sierra. Such as download macOS High Sierra on VMware and Virtualbox, download macOS High Sierra DMG, download macOS High Sierra Torrent. In this article, I’ll share download macOS High Sierra ISO for VMware & VirtualBox. So let take a look at what is VMware and Virtualbox and how they are benefit for us.
Download macOS High Sierra ISO For VMware and Virtualbox
VMware & VirtualBox
VMware Workstation is a perfect virtual machine tool that runs on x64 versions of Windows, macOS, and Linux. This allows users to set up virtual machines on a single physical device and use them simultaneously with a real machine. The useful thing is, it has a free version aside from its paid version so you can easily use it for free.
VirtualBox is a free virtualization tool for x86 and x86-64 hardware that is integrated with desktop. Allows users to access numerous virtual machines in a single PC. You can use as many virtual machines as your computer resources can handle. Now what is ISO File and why we need to download macOS High Sierra ISO file for VMware and VirtualBox.
What is ISO
An ISO file is a file that contains the complete image of a disc. Particularly ISO files are frequently used to transfer or share CD/DVD files. Mostly used as operating system installation files container that holds the files like Windows 10 ISO or other ISO. It can also be used to back up your files and transfer it everywhere you want.
Download macOS High Sierra ISO For VMware and Virtualbox
To install macOS High Sierra for virtual machine, especially VMware and VirtualBox in Windows, we need to download the macOS High Sierra ISO file for VMware and VirtualBox or macOS High Sierra VMware and VirtualBox (VMDK). Like I provided the High Sierra ISO previously, I’ll share download macOS High Sierra ISO for VMware & VirtualBox.
For downloading macOS High Sierra ISO for VMware and VirtualBox, I have provided you the links. Which have zero issues and before you catch up, I’ve fixed the problems before. The only thing you need to do is click on the link and get them free and easily.
macOS High Sierra Final ISO (One Full — Google Drive)— If you are searching for High Sierra, you have come at the right place. Just click at the link and get macOS High Sierra final ISO. After that, with the help of High Sierra ISO, you can install High Sierra on VMware and VirtualBox on Windows.
macOS High Sierra Final ISO (6 of 6 — Google Drive) — Everything has its own benefits. Though there are better than High Sierra, with that though, it has its own benefits and also its own fans and users. However, macOS High also has its own users and benefits.
macOS High Sierra Final ISO (MediaFire — Google Drive) — The macOS High Sierra ISO is ready to download and install on VMware or VirtualBox once it’s done. Then enjoy macOS High Sierra with its benefits and everything it has inside.
If you are a Windows user who would like to install macOS High Sierra, this chapter is for you. Since we can’t download macOS High Sierra or other versions of macOS directly on Windows. I’ve made the file not only this one but many more supporting files for installing macOS High Sierra and other versions. Such as download macOS Catalina VMware & VirtualBox Image, download macOS Catalina ISO for VMware & VirtualBox to name a few.
The macOS High Sierra ISO is the latest version of High Sierra. You can simply download High Sierra ISO and install it with the new procedure. Here’s how to install High Sierra on VMware and VirtualBox with this process.
In this point, I’ve shared the High Sierra ISO file through Google Drive and MediaFire. Which I’ve checked, zipped and encrypted it not to be stolen by others and then shared it with you. From here, you can start the download from the links and it’s never too late. You can download it as simple as you click on the link of the file and on the next window, right-click on the file and hit Download. That’s how easy it seems to be. Go ahead and make your attempt. At the end of this part, I hope everything has gone smoothly.
Let’s Download MacOS High Sierra Image File for Virtualbox & VMware, however, the current Apple OS is MacOS Catalina 10.15 that announced and released in 2019, besides that, macOS Mojave 10.14 is also the greatest operating system having tons of feature But still, MacOS High Sierra 10.13.6 is in high demand and legions of people are installing MacOS High Sierra on Macbook, Mac Mini, Hackintosh, or Virtual Machines like Virtualbox and Vmware.
Users can’t install any Mac OS in Windowsor Linux, only they can install it on different versions of Mac computers although Mac doesn’t allow Windows and Linux to install Mac Operating systems inside the host computer. Therefore, thanks to virtualization software to give users the best platforms to install any Mac operating systems as a guest OS. it means you can run multiple operating systems on a single computer. the handy software for user is Virtualboxand VMwarethat have several useful features, due to that, Windows and Linux users can test MacOS High Sierra on Virtual machines.

You know Virtual machines allow you to install any guest operating systems but for that, you need to download its image file for Virtualbox and Vmware then you can install it. Therefore, you have to download MacOS High Sierra Image File and you will get the direct link from this article. However, you can use the MacOS High Sierra VMDK file to install it. So, you will find the download link on Google Drive and MediaFire servers, the file is safe and secure from malware and viruses, in this case, we have saved the file on google drive and Mediafire.
Before moving on, I request you all and I need your beautiful support please like the Techbland Facebook page for more product updates.
Related Articles:
Table of Contents
What is the Current Version of MacOS High Sierra?
MacOS High Sierra is the fourteen major release of Apple and Apple announced MacOS 10.13 on the World Wide Developer Conference on September 25, 2017. Apple added several features on Mac OS 10.13 like new core technologies, including totally a new file system called APFS, better Graphics and VR, iCloud file sharing, Automatic reader mode, and many more handy features.
So, the MacOS High Sierra beta version has several errors that the user faced, later on, Apple released the MacOS High Sierra new update called 10.13.1 and they fixed several bugs on the new update although the current version of macOS High Sierra is 10.13.6. Moreover, Apple has added many new updates and features to the latest version.
Therefore, if you have MacOS High Sierra on Macbook or Virtual Machines then go to System Preferences -> Software Update Ocr application for mac os x. and check for the new update if the update is available then update your MacOS High Sierra to the latest version.
MacOS High Sierra Handy Features
Mac Os Sierra 10.13 Download
A New Brand File System
Better Graphics performance and VR
Safari knows when to close
Backward Compatibility
Safari Privacy Protection
Persistent Website Customization
You can edit photos with new Editing Features
Mail Upgrades
Notes Tweaks
The new update to Spotlight
iCloud File Sharing
Updated Security
Related Articles:
Download MacOS High Sierra Image File
دانلود Mac Os Sierra 10.13 For Vmware 7
Those users who are here to download MacOS High Sierra Virtualbox and Vmware image file, So, they can download it from the below links. it is time to download MacOS High Sierra ISO file for Virtual machines and use it for installation.
دانلود Mac Os Sierra 10.13 For Vmware 10
As I mentioned the download links will be on Google Drive and MediaFire then you will download it from there. Remember, while downloading the download file from google drive then you might see the warning notification which is google drive download limit exceeded quota error. So, you will need to fix it in order to complete the download process. Don’t worry, you can fix google drive download limit error.
Download MacOS High Sierra Image File:
MacOS High Sierra Final File (Download Google Drive File)
MacOS High Sierra (Download Google Drive 6 of 6 Parts)
Or MacOS High Sierra Final File (Download MediaFire File)
MacOS High Sierra (Download MediaFire 6 of 6 Parts)
Download WinRARor 7ZIPsoftware because the file is compressed and you will need to extract it with WinRAR or 7ZIP software.
دانلود Mac Os Sierra 10.13 For Vmware Windows 7
Install MacOS High Sierra on Virtualbox on Windows
Once you download the MacOS High Sierra file then you can install it on Virtualbox, the installation is quite complicated but you can do it with few steps. To install High Sierra you have to download and install Virtualbox on Windows or Linux in case you are Linux user. After that, you will need to create a virtual machine for MacOS High Sierra and customize the VM. finally, complete the installation. Moreover, if you need the installation steps then follow the below article.
Install MacOS High Sierra on VMware on Windows
In case, you like to use Vmware and you have much information about Vmware Workstation. Then you can install MacOS High Sierra on Vmware on Windows. However, Vmware is much better than Virtualbox because of several features and tools that help you to get better performance. Therefore, download VMware workstation and create a new virtual machine for macOS High Sierra. Later on, edit the virtual machine and install it on VMware. Moreover, you can check the below article to get the installation steps.
Read Next:
Conclusion

Mac Os Sierra Reviews
That’s all about MacOS High Sierra downloading file and installation guide. Therefore, if you get any error related to download file then please let us know. Moreover, if you like our article then please give your positive feedback.
0 notes
Text
DESMUME 1.0.3 KOSTENLOS DOWNLOADEN
Gtk Thema für Deepin OS. Verknüpfen Sie Fragmente von Dateien, die mit anderer Software geteilt wurden. Wenn Sie eine Bestellung über eine noch nicht verfügbare Zusatzanwendung aufgeben möchten Tiefpunkte wir haben habilitado ein Thread im Forum mit diesem Ziel hier. Core Retroarch für PicoDrive. Ermöglicht Ihnen, Ihre Breitbandverbindung zu testen.
Name: desmume 1.0.3 Format: ZIP-Archiv Betriebssysteme: Windows, Mac, Android, iOS Lizenz: Nur zur personlichen verwendung Größe: 36.51 MBytes
GTK-Thema für .10.3 blau und rot. So erstellen Sie Diashows. Extrahiere Audio von einem beliebigen Video und speichere es als mp3. PlayStation Open Source Emulator 3. Liste der Apps in Deepines Aktualisiert:
Befehl zum Testen der Internetbandbreite. Schnelles Dienstprogramm zur Dateisuche. Core Retroarch für Yabause.
Index of /pub/opensuse/repositories/Emulators/openSUSE_Leap_/src/
Zeige Wetterinformationen in Panels. Instagram Fotos und Videos ansehen und herunterladen. Es ist ein freies Deesmume zum Teilen von Dateien. Android auf einer Webcam.
Index of /pub/opensuse/repositories/Emulators/openSUSE_Tumbleweed/i586/
Browser-Add-on zur Nutzung desmime Google-Chats. Xesmume Tools, mit denen Sie mit R produktiver arbeiten können. Modulares System aus mehreren Emulatoren. Um eine Anwendung zu installieren, denken Sie daran, dass Sie zuerst installieren müssen Tiefen 2. Player ist eine grafische Oberfläche für den MPlayer und für mpv.
Listado de Paquetes
Installieren Sie sofort zahlreiche Spiele. Untertitel-Player basierend auf Qt. Video Editor keine Zeile l. Software zum Anzeigen und Verarbeiten von Bildern. Um professionell aussehende Video-DVD zu erstellen. PDF-Dateien teilen, verbinden, drehen und mischen. Thema basierend auf den Material Design Guidelines.
Debian — Quellcode-Pakete in »stretch«, Unterbereich misc
Ein Werkzeug zum Erstellen von Prozessdiagrammen. Android auf einer Webcam Duckietv 1. Gtk Thema für Deepin OS. So erstellen Sie Diashows.
youtube
FreeOffice ist eine komplette Office-Suite. Alternative zu anderen BitTorrent-Implementierungen. Videos von Wallpaper in Deepin.
Index of /pub/opensuse/repositories/Emulators/openSUSE_Leap_15.0/src/
Sie können überallhin fliegen er Satellitenbilder. Zeigen Sie das Lied in einem netten Widget. Ermöglicht Ihnen, Ihre Breitbandverbindung zu testen.
Albumcover in rhythmbox anzeigen. Office-Produktivitätspaket mit allen Funktionen.
¿Cómo buscar un paquete en este listado?
PlayStation Open Source Emulator 3. Dock Deepin Plugin zur Überwachung der Netzwerkgeschwindigkeit. Anwendung, die gängige Webanwendungen in einer kombiniert.
youtube
Eine Befehlszeilen-Shell mit mehreren Plattformen.
The post DESMUME 1.0.3 KOSTENLOS DOWNLOADEN appeared first on Mezitli.
source http://mezitli.info/desmume-103-99/
0 notes
Text
Classic2Magic Review
Are you truly playing with full power or is your SNES / NES Classic Version operating without a correct cartridge slot? Stress not, the C2M company has generated a remedy for you that intends to please those who intend to easily add even more functions to their console.
This is the Classic 2 Magic by team C2M that I purchased from by www.classic2magic.net for myself and GameDude to review. It is a full 16-bit SNES region-free cartridge slot which is meant to be compatible with all regions of SNES as well as Super Famicom game cartridges. This useful cumbersome little gadget connects directly right into the SNES Classic Edition or the NES Classic Version of your picking as well as sustains a vast array of classic 16-bit console game. It is meant to be user-friendly as well as foolproof. We will certainly place it through its paces in this testimonial.
Within this main review, the installation and also fundamental operations of this tool will certainly be covered in addition to a small amount of technical details to obtain you going. A few cartridges will certainly be evaluated along with some mimicked ROMs from numerous systems that it supports out of the package (well, nearly out of the package. You download all of its software from the main C2M product site, which lately just released v1.3 that improves compatibility!).
Let us initially have a look at the bundle and also components of the Classic 2 Magic:

This is the box. Though this thinner than the actual box we received.
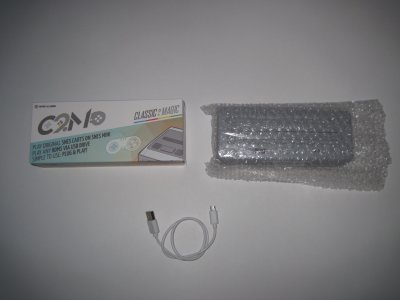
You get the classic2magic itself as well as a USB Cable. It does not come with a power supply.
Now let’s move on to how we set this thing up. It’s actually easy.. almost as easy as just inserting your favorite SNES Cartridge to play.
Plug in the device as follows:
Plug the included white USB A to the back of the Classic 2 Magic itself.
Next, you’ll need to plug the micro USB Side of the cable (the white cable that came with it) into the back of the SNES / NES Classic Edition console.
You’ll need to use your SNES Classic HDMI cable that came included for this next step. Plug the HDMI cable from the SNES / NES Classic Edition into the back of the console and from there to the back of your TV set or computer monitor.
Before you go ahead and turn on the SNES Classic (which will auto boot the Classic 2 Magic) you’ll want to prepare the USB Stick you will be using with the C2M.
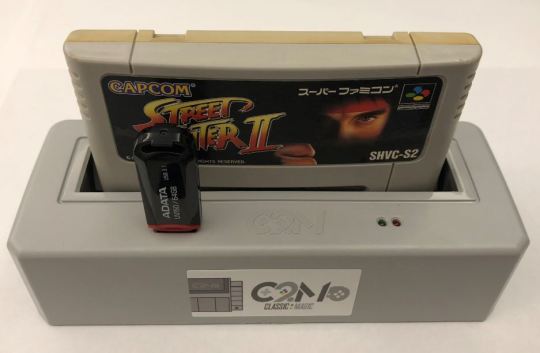
You’ll want to make sure that you setup the USB Stick properly. To do so, just follow the steps below:
Format the USB memory stick as FAT32 file system.
Download C2M First Time Setup Files V1.1 and C2M USB Files V1.3 from www.classic2magic.net
De-compress both of these files to the root of the USB memory stick that was formatted using the FAT32 file system. You will need WinZip, Winrar or 7-Zip to de-compress the archive.
The C2M team recommends doing a “safe eject” on the USB memory stick from the PC. I know that “safe eject” is an automatic feature of Microsoft Windows since at least Windows 7, so I just wait until the files were copied completely to the USB memory stick and unplug it like I normally would. You can feel free to do the “safe eject” on it if you wish from your start menu bar.
There are 2 methods of using the Classic 2 Magic. One method is for those of you who have already modified your Snes Classic console with the use of hackchi and another install method for unmodified Snes Classic systems. Keep reading to find out how it works.
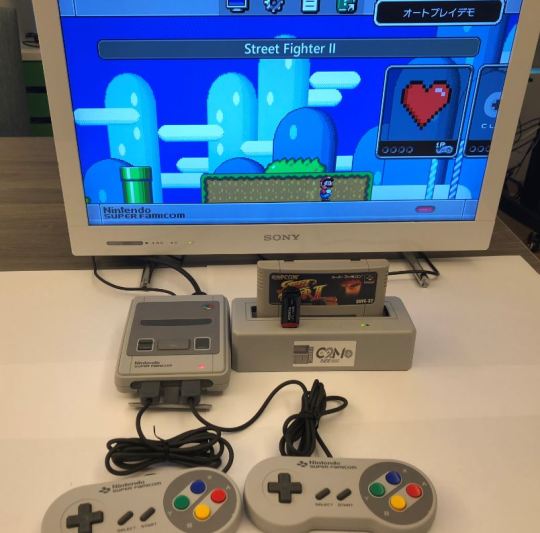
Software first-time installation process for consoles that were not previously modded with hackchi:
Put the USB memory stick into USB slot on the Classic 2 Magic. You will find the slot on the top of the Classic 2 Magic itself, by the cartridge port.
Now you’ll want to plug in the micro USB power to the back of the Classic 2 Magic. Note that a power supply of at least 1 amp at 5 volts DC is recommended, such as the one the SNES / NES Classic Edition shipped with. I have found that the power coming out of the USB 3.0 ports on my desktop were sufficient so I just used one of those but if you won’t be using it with a monitor then you will need to be able to be able to power the system, so you will want to get another power supply, they can be found online for just a couple of dollars.
Make sure to wait a couple of seconds for the green LED to slowly flash on and off. This will let you know that it is ready to go into installation mode.
Hold the Reset button on your console and power on the console, keeping the Reset button pressed for about 5 seconds and release it.
Be patient because it can take many seconds for the Classic 2 Magic to start installing. When it is initially stalling, the green LED light will flash two times then off and two times off and on again and then proceed to flashing three times, then four. During this part of the installation phase, there will be no video output through the HDMI port on the console.
Eventually you will see the Classic 2 Magic boot up screen and some installation text. More patience is required, as it can take up to five minutes to complete installation.
After installation is complete, you will see a new different menu with a few icons on your screen.
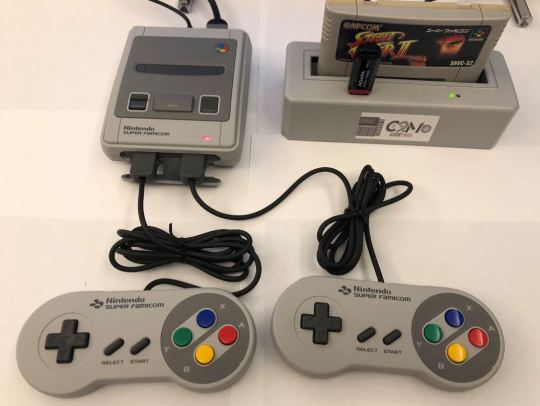
Once you have patiently done all of the above (patience is key here, it took me a few tries to realize that I needed to wait! So if you are stuck anywhere, that more than likely means that you did not wait long enough for the LED flashing routine to start the installation process), you are now able to use the full features of this product including but not limited to usage of the cartridge slot. The other features primarily are included emulators from the packages installed as well as the capability to run a random game or the games that were originally included on the console.
Next, let’s take a look at running a physical cartridge on this device. To run a retail game cartridge, do the following:
Unplug the power from the Classic 2 Magic device.
Plug a cartridge into its cartridge slot.
Plug the power back in to the Classic 2 Magic device.
Turn on the SNES / NES Classic Edition console.
Wait about 12 seconds for the retail game cartridge data to synchronize with the Classic 2 Magic.
You should see an icon to run the game cartridge.
Select run game cartridge.
Your game should now start fine.
Packed in emulators. Retroarch 1.7.3 with cores.
In this part of the review, I will showcase emulators packed in from C2M’s website for the Classic 2 Magic as well as a few games running on each emulator core under Retroarch. Simply drag and drop uncompressed console ROMs and zipped arcade ROMS to the \C2M\roms\ folder on your USB memory stick and then plug it into the Classic 2 Magic and power on the SNES / NES Classic Edition console. The Classic 2 Magic will automatically import (nearly) all of your ROMs into the appropriate directory structure. This process will be displayed on a black background when starting the console with new ROMs for the first time of importing new files.
Watch for our next update when we go into the emulators in full and review each emulator for the classic 2 magic one by one.
0 notes
Link
MakeUseOf Directory http://j.mp/2E5jLya
Do you want to enjoy the greatest collection of retro video games on your TV without the hassle of buying any new hardware? Then you’re in luck, as Kodi can now access and play retro games thanks to the Internet Archive, which has a massive library of titles available.
In this article, we explain how get started playing retro games on Kodi using Internet Archive ROM Launcher (IARL). And once you’re all set up, you’ll have so many retro games across multiple platforms at your fingertips you won’t know which one to play first.
The Internet Archive’s Retro Gaming Library
Over the years, the Internet Archive has been building up a library of retro video games. As you may know, these games have previously been made available to play in a web browser. However, thanks to a dedicated Kodi add-on, they can all now be accessed via your home theater!
Several collections have been retained by the Internet Archive. These include (but are not limited to):
The MAME Arcade includes games like Outrun and Defender.
The Software Library: ZX Spectrum focuses on the popular UK home computer
The Software Library: MS-DOS includes a large collection of old PC games
Each of these libraries (and more) are accessible via your standard web browser. You could head there now, choose a game, and begin playing in seconds. And that’s really the point of this: to install a user interface to the Internet Archive’s retro game library, and enable the games with the relevant emulator.
If you’re concerned about the copyright implications of accessing the library, rest assured this has been taken into account. The Internet Archive has been granted a DMCA exemption to help archive vintage software. This is vital, as without it there could be no archival of certain games and software, even by accredited archives.
Using the Internet Archive ROM Launcher on Kodi
To access these games, you’ll need to install the Internet Archive ROM Launcher, and install an emulation back end. This means you’ll only be able to run these games on systems where you have installation permissions outside of Kodi, and a suitable emulation suite.
A PC-based Kodi box is ideal, and we have even detailed how to install Kodi on Windows, although it should also run on a Raspberry Pi-based Kodi device.
Are you ready to start? To install the Internet Archive ROM Launcher on your Kodi box, go to Settings & File Manager and click Add source. Click & None and enter
http://fusion.tvaddons.co
Name the source fusion, then click OK and return to the home screen. Browse to Add-ons, and click the box icon, then Install from ZIP file. Here, select fusion & kodi-repos & english & repository.zachmorris-1.0.0.zip, and wait for the Add-on installed notification.
You should now be back in the Add-on browser menu, so click Install from repository, then Zach Morris Add-ons & Video Add-ons and select Internet Archive ROM Launcher. Here, select Install, then wait while the installation completes.
Moments later you’ll be able to browse the complete collection of archived ROMs via the main menu Add-ons & Internet Archive ROM Launcher.
However, you won’t be able to play them quite yet…
Install Emulators to Play Retro Games
The best way to get the emulators you’ll need is to install RetroArch. With this installed, you’ll find the most stable emulators for the widest selection of systems.
RetroArch is available for Windows (95 and later), Linux, Mac (PowerPC and Intel), Android (check out Android’s best game emulators), iOS, BlackBerry, PS3, PSP, PS Vita, Xbox, Xbox 360, and even the Nintendo Wii (although you will have to hack your Wii with homebrew first), Wii U, 3DS, GameCube, and Raspberry Pi. In essence, you should be able to find a working version for your platform of choice.
Download: RetroArch
Once downloaded, install the software as you normally would. Then launch it, and navigate to Online Updater & Core Updater then select the right emulator core for the type of games you want to play. For instance, I wanted to play classic MAME titles, so I selected Arcade (MAME 2000).
With RetroArch installed and the suitable emulator cores installed, you’re ready to start gaming. However, some further configuration may be required.
Windows users will need to spend a few moments configuring the IARL add-on. To do this, first alter how Kodi treats Windows’ hidden files and folders. Go to Setting & Media Settings & General, and look for Show hidden files and directories. (You may need to change the view from Basic to Advanced in the bottom-left corner to see this.)
Next, go to back to the home screen, then click Add-ons and open the box icon. Find your way to the IARL add-on, and select Configure. Under External Launchers, select Windows, then browse to the RetroArch App Location, followed by the RetroArch System Folder. These should be, in order:
C:\users[USERNAME]\AppData\Roaming\RetroArch\retroarch.exe
and
C:\users[USERNAME]\AppData\Roaming\RetroArch\system
When these are input, go to Setup Wizard, then select Execute Setup Wizard and wait while the changes are applied. (If you’re using Android, on the other hand, all of these fields are automatically configured.)
Browse, Download, and Launch Retro Games in Kodi
Switch back into Kodi and launch the Internet Archive ROM Launcher to find games to play. As long as the right emulator is installed, you’ll be able to play games. It’s worth taking your time here, and browsing the corresponding list of games.
Before you begin playing, however, return to the upper level of the game index (for instance, Internet Archive Best Of — Arcade) and bring up the context menu.
Here, select Update Ext Launcher Command, and choose the right emulator. Click Yes when prompted to update the command, then wait for the changes to be applied. When done, you’re ready to play. Simply click Launch to start playing your retro favorites!
The game will open in a RetroArch window over the top of Kodi. Keep an eye out for the instructions, which will tell you not just how to play the game, but also some new keyboard shortcuts.
Beware Playability Issues
Note, however, that the playability may vary wildly from device to device. For instance, it may be that your usual Kodi remote is absolutely unsuitable for gaming. Keeping this in mind, it’s worth considering an alternative device, such as a game controller or keyboard.
With regard to the ROMs themselves, the Internet Archive’s game library isn’t going anywhere. So you don’t need to worry about backing the games up as they should always be available. More importantly, the default setting is that the games are downloaded and then discarded when you download a new one.
And no, you can’t save your progress, but this is the same as playing a game in your browser. The only difference being you’re playing retros game in your Kodi media center! So keep it legal, and enjoy.
If this has given you a taste for retro gaming, you could always follow this up by making a retro arcade on your PC.
http://j.mp/2GUB202 via MakeUseOf Directory URL : http://j.mp/2qAUF8X
0 notes
Text
3DS Emulator For PC Android
4. NDS Boy! NDS Emulator
This is another new emulator that has been newly introduced into the family of 3DS Emulators of Nintendo and is considered to be the decent one so far. With average ROM compatibility, some of its features are controlling basic stuff, load and save states, controls that are customizable, etc.The game files that are compatible with this Emulator are 7z, RAR, including zip files and NDS files. You can get this for no cost only requirement you need to have a high tech latest device.Are you the Nintendo games lover? But, don’t have a console to play them. Here we will show the Best 3DS emulator for Play 3DS games on your PC & Android 2017.

The 3DS Emulator works well with many different platforms and you can enjoy the 3D gaming experience on your smart phone, tablet or your PC. You do not even have to buy any games for the 3DS Emulator; you can play all the games for free on your Android/iPhone or PC.
Today here we will be telling about the few best working Nintendo 3ds emulators for Android and PCs that will help you to play Nintendo games on your Android phone or PC that too without doing something extraordinary. You can also try Nintendo DS Emulators for Android.
Best Nintendo 3Ds Emulators for Android, pc
1. RetroArch
This Emulator is an open source and free that includes a lot of system availability such as Play Station, Game Boy, SNES and Nintendo DS. Each emulator is coming in the form of “cores” here this emulator is a bit more complicated than the other ones which you should download to play some of the particular games. You can download this for free and is an excellent emulator though some negligible issues are there.
2. NO$GBA
(for Windows)
NO$GBA is a freeware if you want to keep updated with the latest version you have to pay $2.5 to download latest update. Every time developers update latest verion the previous version will be available to download for free.
3. iDeaS
An Open GL source Nintendo 3DS Emulator which is designed for Windows, it can run many commercial games like the Pokemon Diamond and Pearl, Super Mario 64 et.al. If you are a hardcore game lover, this emulator is the best fit for you.
4. Citra 3DS Emulator
Being the top of the existing Nintendo 3DS Emulators, Citra is extremely user-friendly allowing you to play games on the Windows, Mac OSX and Linux. It is a DS emulator open source that is compatible with all the Windows versions.
5. NDS Boy! NDS Emulator
This is another new emulator that has been newly introduced into the family of 3DS Emulators of Nintendo and is considered to be the decent one so far. With average ROM compatibility, some of its features are controlling basic stuff, load and save states, controls that are customizable, etc.
The game files that are compatible with this Emulator are 7z, RAR, including zip files and NDS files. You can get this for no cost only requirement you need to have a high tech latest device.
0 notes
Last Seen Blogs

sme-coils
Surefin Mechanical Equipment

desertrosecamp
Untitled

samanthabaron-blog-blog
Here And There

iamthe-walnut
Goo Goo G'joob Motherfucker

cershiv
🐚🌺