#SQL Server temp tables
Explore tagged Tumblr posts
Visit Tumblr Blog
Explore Tumblr blogs with no restrictions, modern design and the best experience.
Last Seen Tumblr Blogs


Fun Fact
BuzzFeed published a report claiming that Tumblr was utilized as a distribution channel for Russian agents to influence American voting habits during the 2016 presidential election in Feb 2018.
Text
The Performance Trade-offs Between SELECT * INTO and SELECT THEN INSERT in T-SQL
In the realm of SQL Server development, understanding the intricacies of query optimization can drastically impact the performance of your applications. A common scenario that developers encounter involves deciding between using SELECT * INTO to create and populate a temporary table at the beginning of a stored procedure versus first creating a temp table and then populating it with a SELECT…
View On WordPress
#efficient data handling in SQL#query optimization techniques#SELECT INTO vs INSERT#SQL Server temp tables#T-SQL performance optimization#TempTable
0 notes
Text
AX 2012 Interview Questions and Answers for Beginners and Experts

Microsoft Dynamics AX 2012 is a powerful ERP answer that facilitates organizations streamline their operations. Whether you're a newbie or an professional, making ready for an interview associated with AX 2012 requires a radical knowledge of its core standards, functionalities, and technical factors. Below is a list of commonly requested AX 2012 interview questions together with their solutions.
Basic AX 2012 Interview Questions
What is Microsoft Dynamics AX 2012?Microsoft Dynamics AX 2012 is an company aid planning (ERP) solution advanced with the aid of Microsoft. It is designed for large and mid-sized groups to manage finance, supply chain, manufacturing, and client relationship control.
What are the important thing features of AX 2012?
Role-primarily based user experience
Strong financial control skills
Advanced warehouse and deliver chain management
Workflow automation
Enhanced reporting with SSRS (SQL Server Reporting Services)
What is the distinction between AX 2009 and AX 2012?
AX 2012 introduced a new data version with the introduction of surrogate keys.
The MorphX IDE changed into replaced with the Visual Studio development environment.
Improved workflow and role-based totally get right of entry to manipulate.
What is the AOT (Application Object Tree) in AX 2012?The AOT is a hierarchical shape used to keep and manipulate objects like tables, bureaucracy, reports, lessons, and queries in AX 2012.
Explain the usage of the Data Dictionary in AX 2012.The Data Dictionary contains definitions of tables, information types, family members, and indexes utilized in AX 2012. It guarantees facts integrity and consistency across the device.
Technical AX 2012 Interview Questions
What are the distinctive sorts of tables in AX 2012?
Regular tables
Temporary tables
In Memory tables
System tables
What is the distinction between In Memory and TempDB tables?
In Memory tables shop information within the purchaser memory and aren't continual.
Temp DB tables save brief statistics in SQL Server and are session-unique.
What is X++ and the way is it utilized in AX 2012?X++ is an item-oriented programming language used in AX 2012 for growing business good judgment, creating custom modules, and automating processes.
What is the cause of the CIL (Common Intermediate Language) in AX 2012?CIL is used to convert X++ code into .NET IL, enhancing overall performance by using enabling execution at the .NET runtime degree.
How do you debug X++ code in AX 2012?Debugging may be accomplished the use of the X++ Debugger or with the aid of enabling the Just-In-Time Debugging function in Visual Studio.
Advanced AX 2012 Interview Questions
What is a Query Object in AX 2012?A Query Object is used to retrieve statistics from tables using joins, tiers, and sorting.
What are Services in AX 2012, and what sorts are to be had?
Document Services (for replacing statistics)
Custom Services (for exposing X++ logic as a carrier)
System Services (metadata, question, and user consultation offerings)
Explain the concept of Workflows in AX 2012.Workflows allow the automation of commercial enterprise techniques, together with approvals, via defining steps and assigning responsibilities to users.
What is the purpose of the SysOperation Framework in AX 2012?It is a substitute for RunBaseBatch framework, used for walking techniques asynchronously with higher scalability.
How do you optimize overall performance in AX 2012?
Using indexes effectively
Optimizing queries
Implementing caching strategies
Using batch processing for massive facts operations
Conclusion
By understanding those AX 2012 interview questions, applicants can successfully put together for interviews. Whether you're a novice or an experienced expert, gaining knowledge of those topics will boost your self assurance and help you secure a role in Microsoft Dynamics AX 2012 tasks.
0 notes
Text
SQL TEMP TABLE
The concept of temporary table is introduced by SQL server. It helps developers in many ways:
Temporary tables can be created at run-time and can do all kinds of operations that a normal table can do. These temporary tables are created inside tempdb database.
There are two types of temp tables based on the behavior and scope.
Local Temp Variable
Global Temp Variable

0 notes
Text
Part 4: How to use EF Core with MongoDb in Blazor Server Web Application
In part 4 of the series, I'm going to show you how to use EF Core with MongoDb in Blazor Server Web Application.
Articles in this series:
Part 1: Getting started with Blazor Server Web App Development using .NET 8
Part 2: How to implement Microsoft Entra ID Authentication in Blazor Server Web App in .NET 8
Part 3: How to implement Multilanguage UI in Blazor Server Web App in .NET 8
Part 4: How to use EF Core with MongoDb in Blazor Server Web Application
Part 5: How to show Dashboard with Radzen Bar and Pie Chart controls in in Blazor Server Web App
Part 6: How to support Authorization in Blazor server web app when using Microsoft Entra ID authentication
Part 7: How to implement Radzen Grid Control with dynamic paging, filtering, shorting in in Blazor Server Web App
Part 8: How to implement Data Entry form in Blazor server web app
Part 9: How to use SignalR to show real time updates in Blazor server web app
Entity Framework Core (EF Core) is a popular Object-Relational Mapper (ORM) framework for .NET applications. While primarily designed for relational databases, it has expanded its capabilities to support NoSQL databases, including MongoDB. This article will guide you through the process of using EF Core with MongoDB in your .NET 8 projects
Introduction
Before diving into the code, it's crucial to understand the nuances of using EF Core with MongoDB. Unlike relational databases, MongoDB is a NoSQL database, meaning it doesn't adhere to the traditional table-row structure. This introduces certain limitations and differences in how EF Core operates with MongoDB compared to relational databases.
In Part 1 of this series, I've explained the development environment setup for this article, that I will repeat here for the users who have not gone through it.
Before we start
In order to follow along with this articles, you will need:
.NET 8 SDK and .NET 8 Runtime installation
If you are planning to use Visual Studio 2022, make sure you have all latest updates installed (v17.8.2)
Install MongoDb Community Server, MongoDb Compass, and Mongodb version of Northwind database (Covered in this blog)
You may need Microsoft Azure (trial will also work) to setup Entra ID App in Azure and configure it to use
If you are fan of command line tools or want to know more about the tooling, see ASP.NET Core Blazor Tooling
How to setup MongoDB for development on windows
If you are not familiar with setting up MongoDB for development on windows, here is a quick walkthrough of what you will need:
Go to MongoDB download center and download MongoDB Community Server MSI package and install.
Next you will need MongoDB compass MSI and install it. You will need this tool to connect with your MongoDB Community Server and do the database administration related activities. If you are familiar with Microsoft SQL Server world, MongoDB compass is like SQL Server Management Studio of MongoDB world.
Next, download MongoDB Command line Database Tool which we will need to import an existing sample database.
We will be using a sample existing database called Northwind that I've downloaded from here
Import Northwind Mongodb Database
Open MongoDB Compass and connect to localhost:27017 which is a default port when you install MongoDB Server on windows.
Click on the databases in the left navigation and create a new database with name northwind and collection sample.
Go to github repository here in your browser, click on code in the top right and then download zip menu to download the zip file.
Extract MongoDB command line database tools zip file
Open mongo-import.sh inside the root folder and change the mongoimport keyword with the actual full path of mongoimport.exe that is part of MongoDb command line database tools zip file. The resulting line will look like below: "C:\temp\import\mongodb-database-tools\bin\mongoimport" -d "$1" -c "$collection" --type json --file "$file"
Open command prompt and go to root folder where you have mongo-import.sh file and run command ./mongo-import.sh northwind
If everything is done correctly, you will see console message that displays the json file name and the number of documents imported.
If you switch back to MongoDB Compass, select northwind database and click on the refresh at the top right corner of the sidebar, you will see collections like customers, employees etc.
We are going to use this sample database to build something interesting that makes sense and has a real-life use cases instead of just a sample table with a few fields.
Setting Up the Project
Create ASP.NET Core Blazor Server Web Application
Start visual studio and select create new project.
In the Create a new project window, type Blazor on the search box and hit Enter.
Select the Blazor Web App template and select Next.

In the Configure your new project window, enter BlazorAppPart4 as the project name and select Next.
In the Additional information window, select .NET 8.0 (Long Term Support) in the Framework drop-down if not already selected and click the Create button.
Build and run the application once so that you have your application url that you can copy from the browser and save it for later.
Add the nuget package
Open Tools > nuget package manager > Nuget package manager console and type following command:
install-package MongoDb.EntityFrameworkCore
view rawPackageManager.ps hosted with ❤ by GitHub
This will install all the necessary files needed for accessing northwind database that we created in MongoDb using Entity Framework Core Code First.
Add Model for Customer table
In the example northwind database, there is already a customers table with some data in it. We are going to display the first name and last name of the customer. So, let's create a folder in the root called Model and add new file called Customer.cs that contains following class definition.
using MongoDB.Bson;
using MongoDB.Bson.Serialization.Attributes;
using MongoDB.EntityFrameworkCore;
namespace BlazorAppPart4.Model
{
[Collection("customers")]
public class Customer
{
[BsonId]
public int Id { get; set; }
[BsonElement("last_name")]
public string? LastName { get; set; }
[BsonElement("first_name")]
public string? FirstName { get; set; } }}
view rawCustomer.cs hosted with ❤ by GitHub
Create Entity Framework Core AppDbContext class
Next, we are going to create a new class called AppDbContext that inherits from DbContext class of entity framework core. Add another cs file called AppDbContext.cs in the models folder and paste following code.
using Microsoft.EntityFrameworkCore;
namespace BlazorAppPart4.Model
{
public class AppDbContext: DbContext
{
public DbSet<Customer> Customers { get; init; }
public AppDbContext(DbContextOptions options) :
base(options)
{
}
protected override void OnModelCreating(ModelBuilder modelBuilder)
{
base.OnModelCreating(modelBuilder);
modelBuilder.Entity<Customer>();
}
}
}
view rawAppDbContext.cs hosted with ❤ by GitHub
Create Customer Repository
Next, we want to use repository pattern to ensure data access code is separate and testable. Add another folder in the root of your project called Repositories and add a new cs file called ICustomerRepository.cs with below code:
using BlazorAppPart4.Model;
namespace BlazorAppPart4.Repositories
{
public interface ICustomerRepository
{
Task<List<Customer>> GetAllAsync();
}
}
view rawICustomerRepository.cs hosted with ❤ by GitHub
Once you are done, add 1 more file called CustomerRepository.cs with below code:
using BlazorAppPart4.Model;
using Microsoft.EntityFrameworkCore;
namespace BlazorAppPart4.Repositories
{
public class CustomerRepository : ICustomerRepository
{
private readonly AppDbContext _db;
public CustomerRepository(AppDbContext db)
{
_db = db;
}
public async Task<List<Customer>> GetAllAsync()
{
return await _db.Customers.ToListAsync();
}
}
}
view rawCustomerRepository.cs hosted with ❤ by GitHub
Create AppSettings.json settings
The AppDbContext context will require MongoDb connectionstring and database name. It is recommended to create an application wide setting section in the AppSettings.json. Open your AppSettings.json and 'AppConfig' section from below. I'm showing my full AppSettings.json file for your reference:
{
"AppConfig": {
"Database": {
"ConnectionString": "mongodb://localhost:27017",
"DatabaseName": "northwind"
}
},
"Logging": {
"LogLevel": {
"Default": "Information",
"Microsoft.AspNetCore": "Warning"
}
},
"AllowedHosts": "*"
}
view rawAppSettings.json hosted with ❤ by GitHub
Create AppConfig class for settings
Add AppConfig.cs class in your project and then add below code in the class definition:
namespace BlazorAppPart4
{
public class AppConfig
{
public AppConfig() {
Database = new DbConfig();
}
public DbConfig Database { get; set; }
}
public class DbConfig { public string? ConnectionString { get; set; }
public string? DatabaseName { get; set;
}
}
}
view rawAppConfig.cs hosted with ❤ by GitHub
Configure Dependencies in Program.cs
Next, we want to configure dependency injection so that Repository and AppDbContext classes that we created in our project can be injected where required. Here is my Program.cs:
using BlazorAppPart4;
using BlazorAppPart4.Components;
using BlazorAppPart4.Model;
using BlazorAppPart4.Repositories;
using Microsoft.EntityFrameworkCore;
var builder = WebApplication.CreateBuilder(args);
// Add services to the container.
builder.Services.AddRazorComponents()
.AddInteractiveServerComponents();
var appConfig = builder.Configuration.GetSection("AppConfig").Get<AppConfig>();
if (appConfig == null)
{
throw new InvalidOperationException("Db connectionstring not found");
}
builder.Services.AddDbContext<AppDbContext>(options =>
options.UseMongoDB(appConfig.Database.ConnectionString ?? "", appConfig.Database.DatabaseName ?? ""));
builder.Services.AddTransient<ICustomerRepository, CustomerRepository>();
var app = builder.Build();
// Configure the HTTP request pipeline.
f (!app.Environment.IsDevelopment())
{
app.UseExceptionHandler("/Error", createScopeForErrors: true);
// The default HSTS value is 30 days. You may want to change this for production scenarios, see https://aka.ms/aspnetcore-hsts. app.UseHsts();
}
app.UseHttpsRedirection();
app.UseStaticFiles()
;app.UseAntiforgery();
app.MapRazorComponents<App>()
.AddInteractiveServerRenderMode();
app.Run();
view rawProgram.cs hosted with ❤ by GitHub
Please note on line 13 above, we are reading our AppSettings.json section called AppConfig and then convert it to AppConfig class object. On line 18, we are configuring Entity Framework Core MongoDb data access connection string. On line 21, we are resolving the customer repository. The other part of the file has no changes.
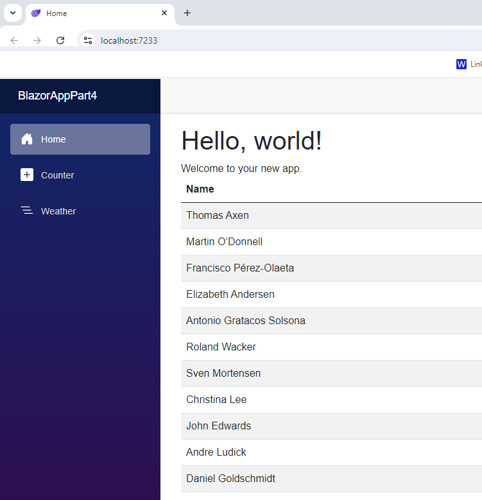
Show customers
And finally, open Components/Pages/Home.razor and replace the content of the file with below:
@page "/"
@using BlazorAppPart4.Repositories
@using BlazorAppPart4.Model
@inject ICustomerRepository customerRepo
@rendermode RenderMode.InteractiveServer
<PageTitle>Home</PageTitle>
<h1>Hello, world!</h1>
Welcome to your new app.
@if(customers.Any())
{
<table class="table table-striped table-responsive">
<thead>
<th>Name</th>
</thead>
<tbody>
@foreach (var cust in customers)
{
<tr>
<td>
@cust.FirstName @cust.LastName
</td>
</tr>
}
</tbody>
</table>
}
else{
<p>No customers found</p>
}
@code {
List<Customer> customers;
protected override async Task OnInitializedAsync()
{
customers = await customerRepo.GetAllAsync();
}
}
view rawHome.razor hosted with ❤ by GitHub
Here is the output of the whole exercise
Conclusion
In this article, we covered the step by step tutorial of How to use EF Core with MongoDb in Blazor Server Web Application of the blazor web app development series.
Ready to unlock the full potential of Blazor for your product development? Facile Technolab, top Blazor Development Company in India providing Blazor development services can help you bring your vision of product mvp to reality.
0 notes
Text
Using XSAS to develop multiple XOOPS sites locally
This tutorial provides step-by-step instructions for how to develop multiple XOOPS websites locally using XSAS (XOOPS Stand Alone Server). I use this information pretty much on a daily basis, and I hope you find it helpful, too. As always, I welcome any feedback or suggestions you may have.
(It is assumed that the reader has a basic knowledge of folder structures, permission settings, how to perform basic operations in phpMyAdmin, and of course, how to install XOOPS.)
1. Create a folder on your hard drive called Localhost
2. Run the XSAS Setup program in that folder
3. Create your folders in the www root of XSAS to represent the different sites you will be developing (i.e.: Clients, Personal, etc.)
4. Extract a fresh distro of Xoops in a temp folder
5. Copy the html folder from your Xoops package into the various folders you created in step 3.
6. Rename the html folder to represent the particular site to be developed (i.e.: Client1, Site2, etc.)
7. Start the XSAS server on your local machine
8. Open PHPMyAdmin from the advanced tab of the XSAS GUI
9. Create a database that has the same name as the database used for your published website (the site on the Internet)
10. Open a browser and navigate to http://localhost and select the folder of the site you want to install (ex: http://localhost/clients/somecoweb/). This will begin the installation of Xoops as usual.
11. Setup Xoops as you normally would
12. Put the database name of the site you want to develop in the appropriate field, but put root as the database username with no password
13. Make sure you change the prefix for the tables to match the database you will import later (if applicable)
14. Complete your installation as usual
15. Export the database from your site that is on the Internet into a text file. (Be sure you export it with complete inserts and add 'drop table'. This will insure a proper import later.)
16. Open the text file in a text editor and do a find and replace for the url
(i.e.: Find the Internet url that the site would use online and replace it with the local url. ex: Find: http://yourdomain.com/ Replace with: http://localhost/the_directory_where_you_installed_xoops/) Save your file.
**The copy and paste method works best for the aformentioned step.**
17. Open PHPMyAdmin in XSAS and import the database you just edited.
18. Now test your site out.
**If you will be developing multiple sites, I've found it quite convenient to keep a bookmark of http://localhost and I add a bookmark for each additional site when I begin development (i.e.: http://localhost/clients/client1, http://localhost/clients/client2, etc.)**
Now, after you've made all the changes you want to your site locally, you only have a few steps to follow to publish your work online.
19. You essentially repeat steps 15-18, but instead, you export from localhost's database, edit the sql file to change the url to the Internet url, and you import the database into the online SQL server.
**It's also important to note that, if you have added any additional files to your website while developing it locally (i.e.: themes, modules, hacks, etc.), you'll want to upload those files to your web server prior to updating your database.**
On another note. If you want to work on your website away from home, if you've setup your local server as I've outlined, you can just copy the entire Localhost folder onto a USB Pen Drive and take it with you. Then all you have to do is just execute XSAS directly from the pen drive on any Windows 98 and above system. Since XSAS always creates a virtual w: drive, this method works quite well for portable development and demonstration.
This article mainly focuses on XSAS and XOOPS, however, similar steps can be used for virtaully any standalone server software and content management system. These two were used because it is a combination I know to be relatively bug-free and easy to use.
Thanks and regards, Guruji Softwares
1 note
·
View note
Text
How to Create a Temp Table in SQL Server
If you want to to create a temp table in SQL server, the following article will provide you with detailed instructions
#SQLserver #createatemptable
0 notes
Text
Datagrip create database

DATAGRIP CREATE DATABASE INSTALL
DATAGRIP CREATE DATABASE DRIVERS
DATAGRIP CREATE DATABASE UPDATE
DATAGRIP CREATE DATABASE DRIVER
DATAGRIP CREATE DATABASE SOFTWARE
If you have connected to a database with DataGrip as a MySQL GUI before, this experience will likely be pretty familiar to you. Using DataGrip as a MySQL GUI for PlanetScale #
DATAGRIP CREATE DATABASE UPDATE
Once you are ready to go live, non-blocking schema changes provide a schema change workflow that allows users to update database tables without locking or causing downtime for production databases. This enables experimenting with schemas in an isolated environment. Database Branches™ allow you to branch your database schemas like you branch your code. If you aren’t familiar with DataGrip, it is a popular, cross-platform IDE for databases that works nicely with PlanetScale databases.Īlongside DataGrip, you can manage your database changes easier with branching in PlanetScale.
Pre-created sequences are not suggested by Datagrip Intellisense.Connect your PlanetScale databases and their branches to manage and run queries from JetBrains DataGrip in a few small steps.
Flex tables are not included in the DataGrip object tree.
Temp tables are not included in the DataGrip object tree.
TIME and TIMETZ data types do not support milliseconds.
BINARY, VARBINARY, and LONGVARBINARY data types are not supported.
DATAGRIP CREATE DATABASE DRIVERS
In the Drivers list on the left, select Vertica.īrowse to the Vertica JDBC JAR file that you want to use.įollow steps 5 - 7 of Connect DataGrip to Vertica Using the Named Connector to provide the connection details and test the connection.
On the Data Sources and Drivers page, click the + icon to expand the list of available data sources.
DATAGRIP CREATE DATABASE DRIVER
If you do not already have the driver, you can download it from the Client Drivers page on the Vertica website.įor details about client and server compatibility, see Client Driver and Server Version Compatibility in the Vertica documentation.Īfter noting the location of the Vertica JDBC driver file on your system, follow these steps: If you want to use the latest Vertica JDBC driver, or any version other than the one provided with DataGrip, you can specify it as a Custom JAR.īefore establishing the connection in DataGrip, note the location of the Vertica JDBC driver file on your system. Connect DataGrip to Vertica Using a Custom JAR Below is an example that shows a SQL command and the results in the Vertica connection.įor details about using DataGrip, refer to the DataGrip documentation. Now you can start using DataGrip with your Vertica database. When the connection is successful, click OK. Select Vertica from the list of available data sources and click OK.Ĭlick the Download link to download the Vertica JDBC driver that is included with DataGrip. On the Data Sources and Drivers page, click the Add icon ( +) to create a new data source. Start DataGrip and select File > Data Sources. Connect DataGrip to Vertica Using the Named Connector Follow the instructinos in Connect DataGrip to Vertica Using a Custom JAR. If you want to use a later or earlier version of the Vertica JDBC driver, you can specify it as a Custom JAR. Follow the instructions in Connect DataGrip to Vertica Using the Named Connector. To obtain the connector, you must download it from the DataGrip server.
Run the installer and follow the on-screen instructions.ĭataGrip uses Vertica's JDBC driver to connect to Vertica.ĭataGrip 2019.1 includes the Vertica 9.2.0 JDBC driver as a named connector.
Click Installation Instructions to read the installation instructions for your platform.
On Linux, DataGrip requires the Linux Desktop.
DATAGRIP CREATE DATABASE INSTALL
To install the evaluation version of DataGrip:Ĭlick System requirements to check the system requirements for your platform. We have tested DataGrip on Windows and Linux.įor details about DataGrip, visit the DataGrip page on the JetBrains website:Ī free version of DataGrip is available for a 30-day evaluation period. DataGrip is available for Windows, Linux, and MacOS. JetBrains DataGrip is a database IDE for SQL developers. Vertica JDBC 9.2.0 included with DataGrip
DATAGRIP CREATE DATABASE SOFTWARE
Vertica and DataGrip: Latest Versions Tested Software Connection guides are based on our testing with specific versions of Vertica and the partner product. Vertica connection guides provide basic instructions for connecting a third-party partner product to Vertica. Vertica Integration with DataGrip: Connection Guide About Vertica Connection Guides
0 notes
Text
Sql server option recompile

SQL SERVER OPTION RECOMPILE SOFTWARE
SQL SERVER OPTION RECOMPILE CODE
SQL SERVER OPTION RECOMPILE FREE
I’m also available for consulting if you just don’t have time for that and need to solve performance problems quickly. I’m offering a 75% discount on to my blog readers if you click from here. If this is the kind of SQL Server stuff you love learning about, you’ll love my training. I’m not mad.Īnd yeah, there’s advances in SQL Server 20 that start to address some issues here, but they’re still imperfect. Using a plan guide doesn’t interfere with that precious vendor IP that makes SQL Server unresponsive every 15 minutes.
Plan Guides: An often overlooked detail of plan guides is that you can attach hints to them, including recompile.
You can single out troublesome queries to remove specific plans.
DBCC FREEPROCCACHE: No, not the whole cache.
Sure, you might be able to sneak a recompile hint somewhere in the mix even if it’d make the vendor upset.
SQL SERVER OPTION RECOMPILE SOFTWARE
For third party vendors who have somehow developed software that uses SQL Server for decades without running into a single best practice even by accident, it’s often harder to get those changes through. And yeah, sometimes there’s a good tuning option for these, like changing or adding an index, moving parts of the query around, sticking part of the query in a temp table, etc.īut all that assumes that those options are immediately available. Those are very real problems that I see on client systems pretty frequently.
SQL SERVER OPTION RECOMPILE CODE
CPU spikes for high-frequency execution queries: Maybe time for caching some stuff, or getting away from the kind of code that executes like this (scalar functions, cursors, etc.)īut for everything in the middle: a little RECOMPILE probably won’t hurt that bad.Sucks less if you have a monitoring tool or Query Store. No plan history in the cache (only the most recent plan): Sucks if you’re looking at the plan cache.Long compile times: Admittedly pretty rare, and plan guides or forced plans are likely a better option.Not necessarily caused by recompile, but by not re-using plans. Here are some problems you can hit with recompile. But as I list them out, I’m kinda shrugging. Obviously, you can run into problems if you (“you” includes Entity Framework, AKA the Database Demolisher) author the kind of queries that take a very long time to compile. And if you put it up against the performance problems that you can hit with parameter sniffing, I’d have a hard time telling someone strapped for time and knowledge that it’s the worst idea for them. You can do it in SSMS as well, but Plan Explorer is much nicer.It’s been a while since SQL Server has had a real RECOMPILE problem. Look at details of each operator in the plan and you should see what is going on.
SQL SERVER OPTION RECOMPILE FREE
I would recommend to look at both actual execution plans in the free SQL Sentry Plan Explorer tool. Without OPTION(RECOMPILE) optimiser has to generate a plan that is valid (produces correct results) for any possible value of the parameter.Īs you have observed, this may lead to different plans. If there are a lot of values in the table that are equal to 1, it would choose a scan. If there is only one value in the table that is equal to 1, most likely it will choose a seek. Also, optimiser knows statistics of the table and usually can make a better decision. It does not have to be valid for any other value of the parameter. The generated plan has to be valid for this specific value of the parameter. With OPTION(RECOMPILE) optimiser knows the value of the variable and essentially generates the plan, as if you wrote: SELECT * And simple (7 rows) and actual statistics. With OPTION (RECOMPILE) it uses the key lookup for the D table, without it uses scan for D table. INSERT INTO D (idH, detail) VALUES 'nonononono') INSERT INTO H (header) VALUES ('nonononono') The script is: Create two tables: CREATE TABLE H (id INT PRIMARY KEY CLUSTERED IDENTITY(1,1), header CHAR(100))ĬREATE TABLE D (id INT PRIMARY KEY CLUSTERED IDENTITY(1,1), idH INT, detail CHAR(100)) I am lost why execution plan is different if I run query with option recompile to compare to same query (with clean proc cache) without option recompile.
0 notes
Text
PHPMyAdmin is a free software tool written in PHP, intended to handle the administration of MySQL over the Web interface. phpMyAdmin supports a wide range of operations on MySQL and MariaDB. In this article we look at how you install PHPMyAdmin on Kali Linux & Debian Linux system. Most frequent database operations – (managing databases, tables, columns, relations, indexes, users, permissions, etc) can be performed via the web console, while you still have the ability to directly execute any SQL statement. Core Features of phpMyAdmin An intuitive cool web interface Support for most MySQL features Import data from CSV and SQL Export data to various formats: CSV, SQL, XML, PDF, ISO/IEC 26300 – OpenDocument Text and Spreadsheet, Word, LATEX, and others Administering multiple servers Creating PDF graphics of your database layout Creating complex queries using Query-by-example (QBE) Searching globally in a database or a subset of it Transforming stored data into any format using a set of predefined functions, like displaying BLOB-data as image or download-link The following is the procedure to follow while installing PHPMyAdmin on Kali Linux or any other Debian based system. Step 1: Update System Start by ensuring the system is updated. sudo apt update sudo apt upgrade Because of kernel updates a reboot may be required. sudo reboot Step 2: Install PHP and Apache on Kali Linux The next step is the installation of PHP, required modules and Apache Web Server. sudo apt -y update sudo apt -y install wget php php-cgi php-mysqli php-pear php-mbstring libapache2-mod-php php-common php-phpseclib php-mysql Confirm installation of PHP by checking the version: $ php --version PHP 7.4.11 (cli) (built: Oct 6 2020 10:34:39) ( NTS ) Copyright (c) The PHP Group Zend Engine v3.4.0, Copyright (c) Zend Technologies with Zend OPcache v7.4.11, Copyright (c), by Zend Technologies Step 3: Install MariaDB / MySQL database Server Since you’re using phpMyAdmin to administer MySQL or MariaDB database server you should have database server already installed. You can also reference our guides below. How To Install MariaDB on Kali Linux How To Install MySQL 8.0 on Kali Linux Once the database server is installed and running you can then proceed to install phpMyAdmin on Kali Linux and Debian system. Step 4: Install PHPMyAdmin on Kali Linux From the phpMyAdmin downloads page you should be able to check the latest release. Use wget command line tool to download the latest version of phpMyAdmin: wget https://www.phpmyadmin.net/downloads/phpMyAdmin-latest-all-languages.tar.gz Extract downloaded archive file using tar: tar xvf phpMyAdmin-latest-all-languages.tar.gz Move the folder created from extraction to /usr/share/phpmyadmin directory. rm -f phpMyAdmin-latest-all-languages.tar.gz sudo mv phpMyAdmin-*/ /usr/share/phpmyadmin Create directory for phpMyAdmin temp files. sudo mkdir -p /var/lib/phpmyadmin/tmp sudo chown -R www-data:www-data /var/lib/phpmyadmin We also need to create a directory where phpMyAdmin configuration files will be stored. sudo mkdir /etc/phpmyadmin/ Copy configuration template to the directory we just created. sudo cp /usr/share/phpmyadmin/config.sample.inc.php /usr/share/phpmyadmin/config.inc.php Edit the file /usr/share/phpmyadmin/config.inc.php and set secret passphrase: $ sudo vim /usr/share/phpmyadmin/config.inc.php $cfg['blowfish_secret'] = 'H2TxcGXxflSd8JwrXVlh6KW4s2rER63i'; Configure Temp directory by adding this line in the file. $cfg['TempDir'] = '/var/lib/phpmyadmin/tmp'; Step 5: Configure Apache web Server Create a new Apache configuration file for phpMyAdmin. sudo vim /etc/apache2/conf-enabled/phpmyadmin.conf Paste below contents to the file. Alias /phpmyadmin /usr/share/phpmyadmin Options SymLinksIfOwnerMatch DirectoryIndex index.php AddType application/x-httpd-php .php
SetHandler application/x-httpd-php php_value include_path . php_admin_value upload_tmp_dir /var/lib/phpmyadmin/tmp php_admin_value open_basedir /usr/share/phpmyadmin/:/etc/phpmyadmin/:/var/lib/phpmyadmin/:/usr/share/php/php-gettext/:/usr/share/php/php-php-gettext/:/usr/share/javascript/:/usr/share/php/tcpdf/:/usr/share/doc/phpmyadmin/:/usr/share/php/phpseclib/ php_admin_value mbstring.func_overload 0 AddType application/x-httpd-php .php SetHandler application/x-httpd-php php_value include_path . php_admin_value upload_tmp_dir /var/lib/phpmyadmin/tmp php_admin_value open_basedir /usr/share/phpmyadmin/:/etc/phpmyadmin/:/var/lib/phpmyadmin/:/usr/share/php/php-gettext/:/usr/share/php/php-php-gettext/:/usr/share/javascript/:/usr/share/php/tcpdf/:/usr/share/doc/phpmyadmin/:/usr/share/php/phpseclib/ php_admin_value mbstring.func_overload 0 # Authorize for setup AuthType Basic AuthName "phpMyAdmin Setup" AuthUserFile /etc/phpmyadmin/htpasswd.setup Require valid-user # Disallow web access to directories that don't need it Require all denied Require all denied Require all denied Restriction to specific IP addresses or network address block can be set with a configuration which looks similar to below. Require ip 127.0.0.1 192.168.10.0/24 Finally restart Apache web server to read the changes. sudo systemctl restart apache2 Confirm Apache service has been started without any error: $ systemctl status apache2 ● apache2.service - The Apache HTTP Server Loaded: loaded (/lib/systemd/system/apache2.service; disabled; vendor preset: disabled) Active: active (running) since Fri 2022-01-22 14:49:54 EST; 11min ago Docs: https://httpd.apache.org/docs/2.4/ Process: 7502 ExecStart=/usr/sbin/apachectl start (code=exited, status=0/SUCCESS) Main PID: 7513 (apache2) Tasks: 11 (limit: 2274) Memory: 57.8M CPU: 656ms CGroup: /system.slice/apache2.service ├─7513 /usr/sbin/apache2 -k start ├─7515 /usr/sbin/apache2 -k start ├─7516 /usr/sbin/apache2 -k start ├─7517 /usr/sbin/apache2 -k start ├─7518 /usr/sbin/apache2 -k start ├─7519 /usr/sbin/apache2 -k start ├─7751 /usr/sbin/apache2 -k start ├─7757 /usr/sbin/apache2 -k start ├─7758 /usr/sbin/apache2 -k start ├─7759 /usr/sbin/apache2 -k start └─7760 /usr/sbin/apache2 -k start Step 6: Open phpMyAdmin Web interface Access phpMyAdmin Web interface on http://[ServerIP|Hostname]/phpmyadmin Use your database credentials – username & password to login. The root user credentials can also be used to authenticate. phpMyAdmin dashboard is displayed upon a successful login. You can now use phpMyAdmin for all database management tasks in your software development cycle. Below are more guides we have on Kali Linux.
0 notes
Text
Raspberry PI Tutorial #8: Daten eines DHT11 Sensors in eine MySQL Datenbank speichern

In diesem Beitrag möchte ich dir zeigen wie du die Daten eines DHT11 Sensors in einer MySQL Datenbank mit Python am Raspberry Pi speichern kannst.

Im Beitrag Python mit MySQL Datenbank verbinden habe ich dir bereits gezeigt wie man eine Verbindung zu einer MySQL Datenbank unter Python aufbauen kannst. Hier soll es nun darum gehen wie du die Daten des DHT11 Sensors in einer Tabelle speichern und abrufen kannst.
benötigte Bauteile für dieses Projekt
Für dieses Projekt benötigst du: - einen Raspberry Pi,- ein USB Stromadapter, (je nach Pi muss die entsprechende Stromstärke beachtet werden) - eine SD Karte (mit vorinstalliertem Raspian OS oder vergleichbar) - ein Netzwerkkabel oder WiFi Adapter - ein 170 Pin Breadboard, - einen DHT11 Sensor, - diverse Breadboardkabel
Schaltung & Aufbau
Den Aufbau der Schaltung habe ich bereits im Beitrag Raspberry PI Tutorial #4: DHT11 Sensor ansteuern (Teil1) erläutert.

Schaltung - Raspberry PI Model B mit DHT11 Sensor Es gibt den DHT11 Sensor als einzelnen Baustein oder aber auch bequem auf einer Platine, somit erspart man sich einen "komplizierten" Aufbau auf einem Breadboard.

Varianten des DHT11 Sensors
MySQL Datenbank vorbereiten
Bevor wir Daten in eine MySQL Datenbank speichern können, müssen wir diese zuvor erstellen und min. eine Tabelle erzeugen. SQL Statements Hier nun die SQL Statements zum - erstellen der Datenbank, - erstellen eines Benutzers für die DB, - zuweisen der Privilegien des Benutzers zur DB, - erstellen der Tabelle, - einfügen von Daten, und - abfragen der Daten erstellen der Datenbank Als erstes benötigen wir eine Datenbank diese erstellen wir mit dem Befehl "CREATE DATABASE". create database sensorTestDb; erstellen eines Benutzers für die DB Damit wir auf der Datenbank arbeiten können, benötigen wir einen Benutzer. Die Benutzer sind in MySQL Global d.h. ein Benutzer kann für mehrere Datenbanken berechtigt werden (dazu im nächsten Abschnitt mehr). INSERT INTO mysql.user (User,Host,authentication_string,ssl_cipher,x509_issuer,x509_subject) VALUES('pydbuser','localhost',PASSWORD('pydbpw'),'','',''); zuweisen der Privilegien des Benutzers zur Datenbank Wenn der Benutzer & die Datenbank angelegt wurde, muss nun der Benutzer für die Datenbank berechtigt werden. In meinem Fall gebe ich dem Benutzer "pydbuser" alle Rechte auf der Datenbank. GRANT ALL PRIVILEGES ON sensorTestDb.* to pydbuser@localhost; Nachdem das obrige Statement ausgeführt wurde, muss nur noch die privilegien geschrieben und dem Server mitgeteilt werden das dieser die Tabellen mit den Rechten neu einließt. FLUSH PRIVILEGES; erstellen der Tabelle Zunächst erstellen wir eine Tabelle mit vier Spalten - ID - ganzahlig, aufsteigend - zeitstempel - DateTime - temperatur - Float - Gleitkommazahl - luftfeuchtigkeit - Float - Gleitkommazahl CREATE TABLE `sensorTestDb`.`sensorvalues` (`ID` INT NOT NULL AUTO_INCREMENT, `zeitstempel` DATETIME NOT NULL, `temperatur` FLOAT NOT NULL, `luftfeuchtigkeit` FLOAT NOT NULL, PRIMARY KEY (`ID`)) ENGINE = InnoDB; einfügen von Daten Das einfügen von Daten in eine SQL Tabelle erfolgt mit dem "INSERT INTO" Befehl. Hier nun ein Beispiel wie der Befehl in unserem Fall aussieht: INSERT INTO `sensorvalues` (`ID`, `zeitstempel`, `temperatur`, `luftfeuchtigkeit`) VALUES (NULL, CURRENT_TIME(), 23.56, 57.6); Wichtig ist dass, die Gleitkommazahlen mit einem Punkt getrennt sind. Sollte als Trenner ein Komma (deutsches Format) gewählt werden, so wird die Nachkommastelle entfernt. abfragen der Daten aus der Tabelle Mit dem SQL Befehl "BETWEEN" können wir Werte aus der Tabelle lesen welche zwischen zwei Datumsbereichen liegen. Dabei ist das Datumsformat YYYY-MM-TT HH:mm:SS. SELECT * FROM `sensorvalues` WHERE zeitstempel between '2021-01-01 00:00:00' and '2021-12-31 23:59:59'
Python-Skript erstellen
Das passende Python-Skript erstelle ich in zwei Schritte - installieren des MySQL Connectors für Python, - aufbauen der Datenbankverbindung, - Abfragen der Sensordaten, - einfügen der Sensordaten in die Tabelle Dieses Python-Skript wird im Anschluss per CronJob Zeitgesteuert am Raspberry Pi gestartet. installieren des MySQL Connectors für Python Bevor wir mit dem Skripten beginnen können, müssen wir den passenden MySQL-Connector installieren. sudo pip install mysql-connector-python Auf meinem betagten Raspberry Pi dauert diese Installation etwas und kommt zwischendurch auch etwas ins Stocken. Hier muss man etwas warten und nicht gleich diverse Tastenkombinationen betätigen. pi@raspberrypi:~/dht11db $ sudo pip install mysql-connector-python Looking in indexes: https://pypi.org/simple, https://www.piwheels.org/simple Collecting mysql-connector-python Downloading https://files.pythonhosted.org/packages/2a/8a/428d6be58fab7106ab1cacfde3076162cd3621ef7fc6871da54da15d857d/my sql_connector_python-8.0.25-py2.py3-none-any.whl (319kB) |████████████████████████████████| 327kB 575kB/s Collecting protobuf>=3.0.0 Downloading https://files.pythonhosted.org/packages/d5/e0/20ba06eb42155cdb4c741e5c af9946e4569e26d71165abaecada18c58603/protobuf-3.17.3-py2.py3-none-any.whl (173kB) |████████████████████████████████| 174kB 878kB/s Collecting six>=1.9 Downloading https://files.pythonhosted.org/packages/d9/5a/e7c31adbe875f2abbb91bd84 cf2dc52d792b5a01506781dbcf25c91daf11/six-1.16.0-py2.py3-none-any.whl Installing collected packages: six, protobuf, mysql-connector-python Successfully installed mysql-connector-python-8.0.25 protobuf-3.17.3 six-1.16.0 WARNING: You are using pip version 19.3; however, version 21.1.3 is available. You should consider upgrading via the 'pip install --upgrade pip' command. pi@raspberrypi:~/dht11db $ aufbauen der Datenbankverbindung Zunächst müssen wir die Datenbankverbindung aufbauen. Dazu benötigen wir: - Servername, - Benutzername, - Passwort, - Datenbankname import mysql.connector #Aufbau einer Verbindung db = mysql.connector.connect( host="localhost", # Servername user="pydbuser", # Benutzername password="pydbpw", # Passwort database="sensorTestDb" ) # Ausgabe des Hashwertes des initialisierten Objektes print(db) sqlStmt = "SHOW TABLES;" cursor = db.cursor() cursor.execute(sqlStmt) for table in cursor: print(table) Die Ausgabe auf der Bash sieht in diesem Fall wie folgt aus: pi@raspberrypi:~/dht11db $ sudo python3 writeToDb.py ('sensorvalues',) pi@raspberrypi:~/dht11db $ Abfragen der Daten des DHT11 Sensors Wie bereits erwähnt habe ich den DHT11 Sensor am Raspberry PI schon ein paar Beiträge auf meinem Blog gewidmet. Ich möchte hier nur darauf eingehen wie du diese Werte in eine Datenbank speichern kannst und somit möchte ich dir im nachfolgenden lediglich das kleine Skript zeigen, welches die Daten des DHT11 Sensors mit der Adafruit Bibliothek ausliest. import Adafruit_DHT #Adafruit Bibliothek für den Zugriff auf den DHT Sensor #Instanz eines DHT11 Sensor erstellen #für einen # DHT22 Sensor bitte Adafruit_DHT.DHT22 # AM2302 Sensor bitte Adafruit_DHT.AM2302 #verwenden sensor = Adafruit_DHT.DHT11 #Der Sensor ist am GPIO Pin 4 angeschlossen pin = 4 #Variablen deklarieren und gleichzeitig die Werte vom Sensor empfangen. humidity, temperature = Adafruit_DHT.read_retry(sensor, pin) #Wenn die Werte erfolgreich gelesen werden konnten dann... if humidity is not None and temperature is not None: #formatierte Ausgabe der Werte auf der Kommandozeile print('Temperatur={0:0.1f}*C Luftfeuchtigkeit={1:0.1f}%'.format(temperature, humidity)) else: #ansonsten #Ausgabe einer Fehlermeldung auf der Kommandozeile print('Fehler beim empfangen der Daten. Bitte versuche es erneut!') Speichern der Daten in die MySQL Datenbank Die bereits abgefragten Daten des DHT11 Sensors, möchten wir nun in die Tabelle "sensorvalues" der Datenbank "sensorTestDb" speichern. import mysql.connector #Connector für den Aufbau der Datenbankverbindung import Adafruit_DHT #Adafruit Bibliothek für den Zugriff auf den DHT Sensor #Aufbau einer Verbindung db = mysql.connector.connect( host="localhost", # Servername user="pydbuser", # Benutzername password="pydbpw", # Passwort database="sensorTestDb" ) # Ausgabe des Hashwertes des initialisierten Objektes print(db) sensor = Adafruit_DHT.DHT11 #Der Sensor ist am GPIO Pin 4 angeschlossen pin = 4 #Variablen deklarieren und gleichzeitig die Werte vom Sensor empfangen. humidity, temperature = Adafruit_DHT.read_retry(sensor, pin) #Wenn die Werte erfolgreich gelesen werden konnten dann... if humidity is not None and temperature is not None: #formatierte Ausgabe der Werte auf der Kommandozeile print('Temperatur={0:0.1f}*C Luftfeuchtigkeit={1:0.1f}%'.format(temperature, humidity)) sqlStatement = "INSERT INTO `sensorvalues` (`ID`, `zeitstempel`, `temperatur`, `luftfeuchtigkei$ cursor = db.cursor() # einen Cursor von der Datenbankconnection holen # ausführen des SQL Statements, es werden an den Platzhaltern "temp" & "hum" die jeweiligen Sensorwerte # formatiert und eingesetzt cursor.execute(sqlStatement.format(temp = temperature, hum = humidity)) # der Commit dient dazu die Daten in die Datenbank zu speichern cursor.execute("COMMIT;") else: #ansonsten #Ausgabe einer Fehlermeldung auf der Kommandozeile print('Fehler beim empfangen der Daten.')
Abfragen der Daten aus der Datenbank
Die gespeicherten Daten können wir nun mit einem weiteren kleinen Python-Skript aus der Datenbank lesen: import mysql.connector db = mysql.connector.connect( host="localhost", # Servername user="pydbuser", # Benutzername password="pydbpw", # Passwort database="sensorTestDb" ) cursor = db.cursor() cursor.execute("SELECT * FROM sensorvalues;") for row in cursor: print(row) Oder aber, man verbindet sich mit der Datenbank und führt das SELECT Statement manuell aus.
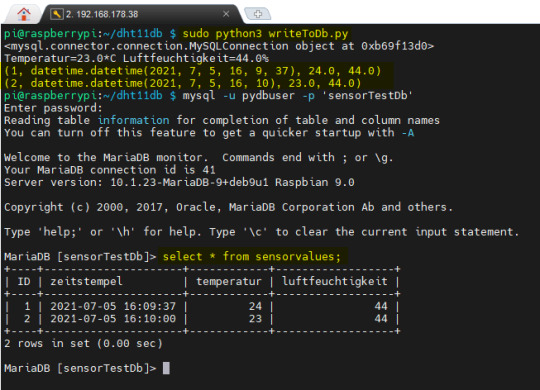
ausführen des SELECT Statements auf der Konsole
fertiges Python-Skript
import mysql.connector import Adafruit_DHT #Adafruit Bibliothek für den Zugriff auf den DHT Sensor #Aufbau einer Verbindung db = mysql.connector.connect( host="localhost", # Servername user="pydbuser", # Benutzername password="pydbpw", # Passwort database="sensorTestDb" ) # Ausgabe des Hashwertes des initialisierten Objektes print(db) sensor = Adafruit_DHT.DHT11 #Der Sensor ist am GPIO Pin 4 angeschlossen pin = 4 #Variablen deklarieren und gleichzeitig die Werte vom Sensor empfangen. humidity, temperature = Adafruit_DHT.read_retry(sensor, pin) #Wenn die Werte erfolgreich gelesen werden konnten dann... if humidity is not None and temperature is not None: #formatierte Ausgabe der Werte auf der Kommandozeile print('Temperatur={0:0.1f}*C Luftfeuchtigkeit={1:0.1f}%'.format(temperature, humidity)) sqlStatement = "INSERT INTO `sensorvalues` (`ID`, `zeitstempel`, `temperatur`, `luftfeuchtigkeit`) VALUES (NULL, CURRENT_TIME(), {temp:000.2f}, {hum:000.2f});" cursor = db.cursor() cursor.execute(sqlStatement.format(temp = temperature, hum = humidity)) cursor.execute("COMMIT;") else: #ansonsten #Ausgabe einer Fehlermeldung auf der Kommandozeile print('Fehler beim empfangen der Daten.') cursor = db.cursor() cursor.execute("SELECT * FROM sensorvalues;") for row in cursor: print(row) Hier nun der Download des Python-Skriptes zum bequemen download :
CronJob zum zeitgesteuerten Starten des Skriptes
Der Vorteil eines CronJobs ist dass, das Skript vom Betriebssystem gesteuert und gestartet wird. Vor allem, wenn einmal der Pi Hard- / Softreset erfährt, muss man das gewollte Skript nicht erneut starten, sondern das System übernimmt dieses für einen. Die Syntax für einen CronJob ist für ungeübte recht schwierig zu lesen bzw. zu erstellen, aber auch hier gibt es einige gute Seiten, welche einen Generator erstellt haben und somit zumindest diese Arbeit etwas leichter wird. In meinem Fall möchte ich alle 15 min. einen neuen Wert einlesen und abspeichern, somit ist der Befehl wie folgt: 15 * * * * sudo python3 /home/pi/dht11db/writeToDb.py > /home/pi/dht11db/logs/output.log Die Ausgabe des Skriptes wird nach "/home/pi/dht11db/logs/output.log" geschrieben, d.h. die Ausgabe mit dem Befehl "print" aus dem Skript werden in diese Datei geschrieben, des Weiteren werden auch eventuelle Exceptions / Ausnahmen in diese Datei geschrieben. Den CronJob legen wir mit dem Befehl "crontab -e" an.

CronTab im Editor - Nano Die Ausgabe erfolgt wie bereits erwähnt in die Datei "output.log", welche die eingefügten Zeilen enthält.

Ausgabe der Einträge des Logfiles Read the full article
0 notes
Text
Monitor deadlocks in Amazon RDS for SQL Server and set notifications using Amazon CloudWatch
Monitoring SQL Server is an essential aspect of any relational database management system (RDBMS) when dealing with performance problems. Many of our customers want to capture certain systems and user-defined events for monitoring and troubleshooting problems related to SQL Server. SQL Server logs these events in SQL Server error logs and SQL Server agent logs. Deadlocks are one such event can be captured in SQL Server error logs. A deadlock occurs when two or more processes are waiting on the same resource and each process is waiting on the other process to complete before moving forward. When this situation occurs, there is no way for these processes to resolve the conflict, so SQL Server automatically chooses one of the processes as the victim of the deadlock and rolls back the process, and the other process succeeds. By default, when this occurs, your application may see or handle the error, but nothing is captured in the SQL Server error log or the Windows event log to let you know this occurred. The error message that SQL Server sends back to the client is similar to the following: Msg 1205, Level 13, State 51, Line 3 Transaction (Process ID xx) was deadlocked on {xxx} resources with another process and has been chosen as the deadlock victim. Rerun the transaction With Amazon RDS for SQL Server, you can now monitor the deadlocks and send Amazon Simple Notification Service (Amazon SNS) notifications as soon as a deadlock event occurs on an RDS for SQL Server instance. This can help you automate deadlock reporting and take appropriate actions to resolve deadlock conflicts. This solution isn’t limited to capturing deadlock events; you can scale this solution to monitor other system and user-defined events captured in the error logs and SQL Server agent logs. In this post, we show you how to publish error and agent log events directly to Amazon CloudWatch Logs and set up CloudWatch alarms and SNS notifications for the deadlock events that match the filter pattern that you create. Solution overview The following diagram illustrates the solution architecture. To implement the solution, we walk through the following high-level steps: Enable deadlock detection for Amazon RDS for SQL Server. Publish the SQL Server error logs to CloudWatch. Simulate a deadlock event. Create a filter pattern and CloudWatch alarm. Monitor the solution using Amazon RDS Performance Insights. Prerequisites Amazon RDS for SQL Server Access to the AWS Management Console and Amazon CloudWatch An email address to receive notifications SQL Server Management Studio (SSMS) Enable deadlock detection for Amazon RDS for SQL Server To enable deadlock detection, complete the following steps. On the Amazon RDS console, choose Parameter groups in the navigation pane. Choose Create parameter group. For Parameter group family, choose the SQL Server version and edition you are using. For example, SQL Server 2017 Standard Edition uses sqlserver-se-14.0. Enter a Group name and Description. Choose Create. On the Parameter groups page, choose the group that you created in the previous step. Choose Edit parameters, and select 1204 and 1222. Edit the Values for 1204 and 1222 to 1. Choose Preview changes. On the next page, choose Save changes. In the navigation pane, choose Databases. In the DB identifier section, choose your RDS DB instance. Choose Modify. From the Database options section, for DB parameter group, choose the parameter group you created. DB instances require a manual reboot in the following circumstances: If you replace the current parameter group with a different parameter group If you modify and save a static parameter in a custom parameter group Publish the SQL Server error logs to CloudWatch To publish your SQL Server error logs to CloudWatch, complete the following steps. On the Modify page of the Amazon RDS console, in the Error logs section, choose Error log. This makes sure that the SQL Server error logs are published to CloudWatch Logs. Choose Continue. Enable Performance Insights for Amazon RDS. In the Scheduling of modifications section, choose Apply immediately, and then choose Modify DB Instance. On the Databases page, choose your RDS DB instance, then choose Actions. Reboot the RDS DB instance for the changes to take effect. Simulate a deadlock event Simulate a deadlock transaction on your RDS for SQL Server instance by running the following T-SQL code in SQL Server Management Studio (SSMS). --Two global temp tables with sample data for demo purposes. CREATE TABLE ##Employees ( EmpId INT IDENTITY, EmpName VARCHAR(16), Phone VARCHAR(16) ) GO INSERT INTO ##Employees (EmpName, Phone) VALUES ('Amy', '900-999-1332'), ('Jay', '742-234-2222') GO CREATE TABLE ##Suppliers( SupplierId INT IDENTITY, SupplierName VARCHAR(64), Location VARCHAR(16) ) GO INSERT INTO ##Suppliers (SupplierName, Location) VALUES ('ABC', 'New York'), ('Honest Sourcing', 'Boston') GO Next, open two query windows in SSMS. Run the following code in each of the sessions, step by step, in two windows. Session 1 Session 2 Begin Tran; Begin Tran; UPDATE ##Employees SET EmpName = ‘Gani’ WHERE EmpId = 1; UPDATE ##Suppliers SET Location = N’Toronto’ WHERE SupplierId = 1; UPDATE ##Suppliers SET Location = N’Columbus’ WHERE SupplierId = 1; Blocked UPDATE ##Employees SET Phone = N’123-456-7890′ WHERE EmpId = 1; Blocked After you run the code, you can see one of the transactions is processed (see the following screenshot). The following screenshot shows the second transaction is blocked with a deadlock error. Create a filter pattern and CloudWatch alarm On the CloudWatch console, under Logs, choose Log groups. Choose the SQL Server error logs of your RDS DB instance. The logs are listed in the following format:(/aws/rds/instance//error) Choose Create metric filter. In the Filter Pattern section, enter deadlock. Select any errors to monitor and use that as the filter word. Choose Assign metric. Enter deadlock in both the Filter Name and Metric Name Set the metric value field to 1. Choose Create Filter. The following screenshot shows your filter details. After the deadlock filter is created, choose Create alarm. On the Specify metric and conditions page, for Metric name, enter deadlock. For Statistic, choose Minimum. For Period, choose the time period for the alarm, for example, 1 minute. In the Conditions section, for Threshold type, choose Static. For Whenever Deadlock is, choose Greater > threshold. For Than, enter 0. Choose Next. In the Notification section, for Alarm state trigger, choose In alarm. Select an SNS topic, or choose Create new topic to create an SNS topic using the email address you want to receive alerts. Choose Next. In the Name and description section, enter a name and description for your alarm. Choose Next. On the Preview and create page, review your alarm configuration, then choose Create alarm. Confirm the notification email. After you follow these steps, simulate a deadlock again. When the alarm has enough data, the status shows as OK. The CloudWatch alarm sends an SNS notification to the email that you specified (see the following screenshot). Monitor using Performance Insights Performance Insights is an Amazon RDS feature that can automatically analyze the current workload of a database instance and identify the queries that are slowing it down. For each query, it can show the type of wait it’s causing and the user who is causing the slowness or the client machine that’s running the query. All this information is made available in a compact, easy-to-understand dashboard, which makes Performance Insights a great tool for troubleshooting. To get this kind of information, Performance Insights queries the RDS instance’s internal data structures in memory one time every second. It’s not a disk-based operation, so the sampling doesn’t put any pressure on the system. Later, we talk about the types of data that are collected during the samplings. To use Performance Insights for Amazon RDS for SQL Server, complete the following steps. Modify the RDS for SQL Server instance settings to enable Performance Insights. On the Amazon RDS console, choose the database you want to monitor. On the Monitoring tab, choose the Monitoring menu and choose Performance Insights. You can choose the deadlock metrics and monitor using Performance Insights as well. Clean up When you’re finished using the resources in this post, clean up the AWS resources to avoid incurring unwanted charges. Specifically, delete the RDS for SQL Server instance and CloudWatch logs. Conclusion In this post, we showed how to publish error and agent log events directly to CloudWatch Logs and then set up a CloudWatch alarm and SNS notification for deadlock events that match a specific filter pattern. With this solution, you can automate RDS for SQL Server error log files monitoring and alerting. This can help you automate deadlock reporting and take appropriate actions to resolve deadlocks. You can use this solution for monitoring other RDS for SQL Server log events and fatal errors. We showed an example on how to capture deadlock event metrics using Performance Insights. To learn more about monitoring Amazon RDS for SQL Server, see Monitoring OS metrics using Enhanced Monitoring and Monitoring with Performance Insights on Amazon RDS. About the authors Yogi Barot is Microsoft Specialist Senior Solution Architect at AWS, she has 22 years of experience working with different Microsoft technologies, her specialty is in SQL Server and different database technologies. Yogi has in depth AWS knowledge and expertise in running Microsoft workload on AWS. Ganapathi Varma Chekuri is a Database Specialist Solutions Architect at AWS. Ganapathi works with AWS customers providing technical assistance and designing customer solutions on database projects, helping them move their existing databases to AWS cloud. https://aws.amazon.com/blogs/database/monitor-deadlocks-in-amazon-rds-for-sql-server-and-set-notifications-using-amazon-cloudwatch/
0 notes
Text
Resources consumed by idle PostgreSQL connections
PostgreSQL is one of the most popular open-source relational database systems. With more than 30 years of development work, PostgreSQL has proven to be a highly reliable and robust database that can handle a large number of complex data workloads. AWS provides two managed PostgreSQL options: Amazon Relational Database Service (Amazon RDS) for PostgreSQL and Amazon Aurora PostgreSQL. This is a two-part series. In this post, I talk about how PostgreSQL manages connections and the impact of idle connections on the memory and CPU resources. In the second post, Performance impact of idle PostgreSQL connections, I discuss how idle connections impact PostgreSQL performance Connections in PostgreSQL When the PostgreSQL server is started, the main process forks to start background maintenance processes. With default configurations, the process tree looks like the following on a self-managed PostgreSQL instance: /usr/pgsql-11/bin/postmaster -D /var/lib/pgsql/11/data _ postgres: logger _ postgres: checkpointer _ postgres: background writer _ postgres: walwriter _ postgres: autovacuum launcher _ postgres: stats collector _ postgres: logical replication launcher You can see this process tree in Amazon RDS and Aurora PostgreSQL by enabling enhanced monitoring and looking at the OS Process List page (see the following screenshot). For more information, see Enhanced Monitoring. These child processes take care of activities such as logging, checkpointing, stats collection, and vacuuming. The process list in Enhanced Monitoring limits the total number of processes that are shown on the console. If you need to view the complete list of processes, consider using the pg_proctab extension to query system statistics. This extension is available in the latest RDS PostgreSQL minor versions. After initializing the maintenance child processes, the main PostgreSQL process starts waiting for new client connections. When a new connection is received, the main process forks to create a child process to handle this new connection. The main process goes back to wait for the next connection, and the newly forked child process takes care of all activities related to this new client connection. A new child process is started for each new connection received by the database. The following screenshot shows that a user app_user is connected to the database mydb from a remote host (10.0.0.123). The max_connections parameter controls the total number of connections that can be opened simultaneously. Memory used by connections PostgreSQL uses shared memory and process memory. Shared memory is a chunk of memory used primarily for data page cache. The shared_buffers parameter configures the size of the shared memory. This shared memory is used by all the PostgreSQL processes. The process memory contains process-specific data. This memory is used for maintaining the process state, data sorting, storing temporary tables data, and caching catalog data. On Linux, when a new process is forked, a copy of the process gets created. As an optimization, Linux kernel uses the copy-on-write method, which means that initially the new process keeps pointing to the same physical memory that was available in the parent process. This continues until the parent or the child process actually changes the data. At that point, a copy of the changed data gets created. This method reduces some memory overhead when PostgreSQL forks a child process on receiving the new connection. For more information about fork functionality, see the entry in the Linux manual. Idle connections Idle connections are one of the common causes of bad database performance. It’s very common to see a huge number of connections against the database. A common explanation is that they’re just idle connections and not actually doing anything. However, this is incorrect—they’re consuming server resources. To determine the impact of idle PostgreSQL connections, I performed a few tests using a Python script that uses the Psycopg 2 for PostgreSQL connectivity. The tests include the following parameters: Each test consists of 2 runs Each test run opens 100 PostgreSQL connections Depending on the test case, some activity is performed on each connection before leaving it idle The connections are left idle for 10 minutes before closing the connections The second test runs DISCARD ALL on the connection before leaving it idle The tests are performed using Amazon RDS for PostgreSQL 11.6 Although this post shows the results for Amazon RDS for PostgreSQL 11.6 only, these tests were also performed with Aurora PostgreSQL 11.6, PostgreSQL on EC2, and Amazon RDS for PostgreSQL 12 to confirm that we see a similar resource utilization trend. I used the RDS instance type db.m5.large for the test runs, which provides 2 vCPUs and 8GB memory. For storage, I used an IO1 EBS volume with 3000 IOPS. The DISCARD ALL statement discards the session state. It discards all temporary tables, plans, and sequences, along with any session-specific configurations. This statement is often used by connection poolers before reusing the connection for the next client. For each test, a run with DISCARD ALL has been added to see if there is any change in the memory utilization. Connections test #1: Connections with no activity This basic test determines the memory impact of newly opened connection. This test performs the following steps: Open 100 connections. Leave the connections idle for 10 minutes. Close the connections. During the 10-minute wait, check the connection state as follows: postgres=> select state, query, count(1) from pg_stat_activity where usename='app_user' group by 1,2 order by 1,2; state | query | count -------+-------+------- idle | | 100 (1 row) The second run repeats the same steps but runs DISCARD ALL before leaving the connection idle. If you run the preceding query, you get the following output: postgres=> select state, query, count(1) from pg_stat_activity where usename='app_user' group by 1,2 order by 1,2; state | query | count -------+-------------+------- idle | DISCARD ALL | 100 (1 row) The following Amazon CloudWatch metrics show the connections count (DatabaseConnections) and memory utilization (FreeableMemory) on an RDS PostgreSQL instance. The free memory chart shows no significant difference between the run with and without DISCARD ALL. As the connections got opened, the free memory reduced from approximately 5.27 GB to 5.12 GB. The 100 test connections used around 150 MB, which means that on average, each idle connection used around 1.5 MB. Connections test #2: Temporary tables This test determines the memory impact of creating temporary tables. In this test, the connections create and drop a temporary table in the following steps: Open a connection. Create a temporary table and insert 1 million rows with the following SQL statement: CREATE TEMP TABLE my_tmp_table (id int primary key, data text); INSERT INTO my_tmp_table values (generate_series(1,1000000,1), generate_series(1,1000000,1)::TEXT); Drop the temporary table: DROP TABLE my_tmp_table; Commit the changes. Repeat these steps for all 100 connections. Leave the connections idle for 10 minutes. Close the connections. During the 10-minute wait, check the connections state as follows: postgres=> select state, query, count(1) from pg_stat_activity where usename='app_user' group by 1,2 order by 1,2; state | query | count -------+--------+------- idle | COMMIT | 100 (1 row) The second run repeats the same step but runs DISCARD ALL before leaving the connections idle. If you run the same query again, you get the following results: postgres=> select state, query, count(1) from pg_stat_activity where usename='app_user' group by 1,2 order by 1,2; state | query | count -------+-------------+------- idle | DISCARD ALL | 100 (1 row) The following chart shows the connections count and the memory utilization on an RDS PostgreSQL instance. The free memory chart shows no significant difference between the run with and without DISCARD ALL. As the connections got opened, the free memory reduced from approximately 5.26 G to 4.22 G. The 100 test connections used around 1004 MB, which means that on average, each idle connection used around 10.04 MB. This additional memory is consumed by the buffers allocated for temporary tables storage. The parameter temp_buffers controls the maximum memory that can be allocated for temporary tables. The default value for this parameter is set to 8 MB. This memory, once allocated in a session, is not freed up until the connection is closed. Connections test #3: SELECT queries This test determines the memory impact of running some SELECT queries. In this test, each connection fetches one row from each of the tables in the PostgreSQL internal schema information_schema. In PostgreSQL 11, this schema has 60 tables and views. The test includes the following steps: Open a connection. Fetch the names of all the tables and views in information_schema: SELECT table_schema||'.'||table_name as relname from information_schema.tables WHERE table_schema='information_schema In a loop, run select on each of these tables with LIMIT 1. The following code is an example query: SELECT * FROM information_schema.columns LIMIT 1; Repeat these steps for all 100 connections. Leave the connections idle for 10 minutes. Close the connections. During the 10-minute wait, check the connections state as follows: postgres=> select state, query, count(1) from pg_stat_activity where usename='app_user' group by 1,2 order by 1,2; state | query | count -------+--------+------- idle | COMMIT | 100 (1 row) The second run repeats the same steps but runs DISCARD ALL before leaving the connections idle. Running the query again gives you the following results: postgres=> select state, query, count(1) from pg_stat_activity where usename='app_user' group by 1,2 order by 1,2; state | query | count -------+-------------+------- idle | DISCARD ALL | 100 (1 row) The following chart shows the connections count and the memory utilization on an RDS PostgreSQL instance. The free memory chart shows no significant difference between the run with and without DISCARD ALL. As the connections got opened, the free memory reduced from approximately 5.25 GB to 4.17 GB. The 100 test connections used around 1080 MB, which means that on average, each idle connection used around 10.8 MB. Connections test #4: Temporary table and SELECT queries This test is a combination of tests 2 and 3 to determine the memory impact of creating a temporary table and running some SELECT queries on same connection. The test includes the following steps: Open a connection. Fetch the names of all the tables and views in information_schema: SELECT table_schema||'.'||table_name as relname from information_schema.tables WHERE table_schema='information_schema In a loop, run select on each of these tables with LIMIT 1. The following is an example query: SELECT * FROM information_schema.columns LIMIT 1; Create a temporary table and insert 1 million rows: CREATE TEMP TABLE my_tmp_table (id int primary key, data text); INSERT INTO my_tmp_table values (generate_series(1,1000000,1), generate_series(1,1000000,1)::TEXT); Drop the temporary table: DROP TABLE my_tmp_table; Commit the changes. Repeat these steps for all 100 connections. Leave the connections idle for 10 minutes. Close the connections. During the 10-minute wait, check the connection state as follows: postgres=> select state, query, count(1) from pg_stat_activity where usename='app_user' group by 1,2 order by 1,2; state | query | count -------+--------+------- idle | COMMIT | 100 (1 row) The second run repeats the same step but runs DISCARD ALL before leaving the connections idle. Running the preceding query gives the following results: postgres=> select state, query, count(1) from pg_stat_activity where usename='app_user' group by 1,2 order by 1,2; state | query | count -------+-------------+------- idle | DISCARD ALL | 100 (1 row) The following chart shows the connections count and the memory utilization on an RDS PostgreSQL instance. The free memory chart shows no significant difference between the run with and without DISCARD ALL. As the connections got opened, the free memory reduced from approximately 5.24 GB to 3.79 GB. The 100 test connections used around 1450 MB, which means that on average, each idle connection used around 14.5 MB. CPU impact So far, we have focused on memory impact only, but the metrics show that CPU utilization also goes up when the number of idle connections go up. The idle connections have minimal impact on the CPU, but this can be an issue if CPU utilization is already high. The following figure shows the connection counts and CPU utilizations with different numbers of idle connections. In this test, the connections were open and left idle for 10 minutes before closing the connections and waiting another 10 minutes before opening next batch of connections. The figure shows that the CPU utilization was around 1% with some small spikes to 2% with no connections. The utilization increased to 2% with 100 idle connections, increased to 3% with 500 idle connections, increased to 5% with 1,000 idle connections, increased to 6% with 1,500 idle connections and increased to 8% with 2,000 idle. Note that this utilization is for an instance with 2 vCPUs. CPU utilization goes up with the number of connections because PostgreSQL needs to examine each process to check the status. This is required irrespective of whether the connection is active or idle. Summary PostgreSQL connections consume memory and CPU resources even when idle. As queries are run on a connection, memory gets allocated. This memory isn’t completely freed up even when the connection goes idle. In all the scenarios described in this post, idle connections result in memory consumption irrespective of DISCARD ALL. The amount of memory consumed by each connection varies based on factors such as the type and count of queries run by the connection, and the usage of temporary tables. As per the test results shown in this post, the memory utilization ranged from around 1.5–14.5 MB per connection. If your application is configured in a way that results in idle connections, it’s recommended to use a connection pooler so your memory and CPU resources aren’t wasted just to manage the idle connections. The following post in this series shows how these idle connections impact your database performance. About the Author Yaser Raja is a Senior Consultant with Professional Services team at Amazon Web Services. He works with customers to build scalable, highly available and secure solutions in AWS cloud. His focus area is homogenous and heterogeneous migrations of on-premise databases to AWS RDS and Aurora PostgreSQL. https://aws.amazon.com/blogs/database/resources-consumed-by-idle-postgresql-connections/
0 notes
Photo

Using a tMSSQLSP component as your source for a SQL result set seems like a pretty straightforward concept, especially if you come from an SSIS background. However, there are a few things that make it not so intuitive.
I’m quite green when it comes to Talend, but have well over a decade of experience in ETL design in the Microsoft stack. Recently, I had the opportunity through my employer to work on this specific issue with a Talend-centric consulting firm, ETL Advisors. If you’re looking to add extra skills to your team, you should check them out.
Back to the topic at hand:
First of all, you’ll need to pass in any parameters to the stored procedure, which you can find various articles for. I won’t go into great detail here.
Second, the resultset that is your “select statement” within the stored procedure will need to be schema-defined as an object within Talend, and mapped as a RECORD SET.

Third, on a tParseRecordSet object that you’ll connect to the main row out from your tMSSQLSP object, you’ll need to define out the schema of all the columns that come from the stored procedure results. As you have likely encountered in your ETL career, this can sometimes be dozens of columns. If you hate yourself, get 2 monitors and start hand keying all of the output schema. If you want a possible shortcut, keep reading.
When you are in the output portion of the schema definition screen, you can import from an XML file using the folder icon highlighted below.

Where would you get this XML from? Well, with a little help from your friends, that’s where. SQL server has a ton of system stored procedures and DMVs that give you all types of information. I’ve enhanced the “sp_describe_first_result_set” in a way that presents it as valid XML. You’ll be able to copy the XML column, and paste it into an XML file that gets imported above.

This is accomplished with the following stored procedure creation/execution to suit your needs. There is plenty of help on how to use sp_describe_first_result_set natively, if you want to just see it in action without my enhancements.
But in the meantime, here’s my T-SQL if you want to get started on the rest of your life. Keep in mind there are a few data types that are probably not included, and it is mainly because I didn’t see a quick way to map them to Talend-equivalents. (Feel free to edit it up!) :
--+PROCEDURE TO COMPILE TO A LOCAL DATABASE WHERE USE IS WARRANTED ALTER PROCEDURE USP_HELPER_INTERROGATE_SP ( @PROC AS NVARCHAR(max), @PARAMS_IN AS NVARCHAR(MAX) ) AS BEGIN --+author: Radish --+date: 3/8/2018 --+comments: For demonstration purposes only, results will very with more complex stored procedures
--+/// --+create a holder table variable for manipulation of the returns results from the sp DECLARE @temp TABLE ( is_hidden BIT , column_ordinal INT, [name] SYSNAME, is_nullable BIT, system_type_id INT, system_type_name NVARCHAR(256), max_length SMALLINT, [precision] TINYINT, scale TINYINT, collation_name SYSNAME NULL, user_type_id INT, user_type_database SYSNAME NULL, user_type_schema SYSNAME NULL, user_type_name SYSNAME NULL, assembly_qualified_type_name NVARCHAR(4000), xml_collection_id INT, xml_collection_database SYSNAME NULL, xml_collection_schema SYSNAME NULL, xml_collection_name SYSNAME NULL, is_xml_document BIT, is_case_sensitive BIT , is_fixed_length_clr_type BIT, source_server SYSNAME NULL, source_database SYSNAME NULL, source_schema SYSNAME NULL, source_table SYSNAME NULL, source_column SYSNAME NULL, is_identity_column BIT, is_part_of_unique_key BIT, is_updateable BIT, is_computed_column BIT, is_sparse_column_set BIT, ordinal_in_order_by_list SMALLINT, order_by_is_descending SMALLINT, order_by_list_length SMALLINT, [tds_type_id] INT, [tds_length] INT, [tds_collation_id] INT, [tds_collation_sort_id] INT )
--+/// --+fill the holder table variable with the sp resultset INSERT @temp EXEC sp_describe_first_result_set @tsql = @PROC, @params = @PARAMS_IN --+/// --+ do the talend formatting, from the above results set and a join to the system types for sql server SELECT * FROM ( --+Talend Data Services Platform 6.4.1 XML layout for tParseRecordSet schema OUTPUT SELECT -1 AS column_ordinal, '<?xml version="1.0" encoding="UTF-8"?><schema>' AS XML_SQL_OUTPUT_SCHEMA UNION ALL SELECT column_ordinal, '<column comment="" default="" key="false" label="' + T.name + '" length="'+ CAST(max_length AS VARCHAR(50)) + '" nullable="false" originalDbColumnName="' + T.name+ '" originalLength="-1" pattern="" precision="0" talendType="' + CASE WHEN T.system_type_id IN (106,108,122) THEN 'id_BigDecimal' WHEN T.system_type_id = 104 THEN 'id_Boolean' WHEN system_type_id IN ( 40, 42,61 ) THEN 'id_Date' WHEN T.system_type_id IN (62) THEN 'id_Float' WHEN system_type_id IN ( 52, 56, 63 ) THEN 'id_Integer' WHEN T.system_type_id IN (127) THEN 'id_Long' WHEN system_type_id IN ( 39, 47 ) THEN 'id_String' WHEN T.system_type_id IN (48) THEN 'id_Short' ELSE 'id_String' END + '" type="' + UPPER(ST.name) + '"/>' FROM @temp T INNER JOIN sys.systypes ST ON T.system_type_id = ST.xusertype UNION ALL SELECT 999999999 AS column_ordinal, '</schema>' ) A ORDER BY column_ordinal END
And finally, below is an example execution of this stored procedure against a popular system stored procedure (but you should be able to put most user defined stored procedures in the place of the first parameter). Also, please note the parameter list for your stored procedure is supplied in the second ‘’, in the format ‘@[parameter name] DATATYPE, et. al’. So if you have a @NAME VARCHAR(20) and a @AGE INT, you’d pass that in as ‘@NAME VARCHAR, @AGE INT’

--+HELPFUL FOR GETTING SCHEMA DETAILS FROM FIRST RESULTSET IN A STORED PROC
--+example use with basic stored procedure on any recent SQL Server instance
--- stored proc DB.SCHEMA.NAME--,-- comma delimited params list @[NAME] DATATYPE,... EXEC DBO.USP_HELPER_INTERROGATE_SP 'msdb.sys.sp_databases' , ''
1 note
·
View note
Text
Basic Topics
Food
cook bread cake pie noodles pasta eggs meat milk cheese oil chocolate chips cookies crackers treats snacks muffin rolls biscuit cupcake brownies bagel biscotti French fries sandwich hamburger salad meatloaf breakfast lunch super dinner snack fruit juice soda pop tea coffee wine beer
Outdoors
snow rain wind sunny cloudy tornado hurricane hail ice freeze thaw hot cold earthquake sand mud dirt dust mountain river lake sea ocean valley plain field park sidewalk fresh air camping campfire barbecue picnick
Animals
cow donkey horse rabbit dragonfly deer squid kangaroo bear wolf chipmunk squirrel dog fox cat pheasant brontosaurus mouse eagle clam parrot crow duck cricket swan housefly pterodactyl goose chicken oyster turkey sheep goat hummingbird raptor owl eel hornet zebra bird mosquito whale cougar shrimp elephant lion bee pigeon gazelle cheetah hippopotamus fish tiger gecko grasshopper rhinoceros walrus octopus otter spider jellyfish penguin falcon snake rat crab leopard T-Rex dolphin orca lizard shark hawk giraffe dinosaur starfish snail
Clothes
hat gloves scarf coat trench coat rain coat umbrella shirt pants shorts underwear vest sweater sweat shirt sweat pants sweat suit jogging suit boots shoes sandles slippers swimming suit suit dress skirt blouse hood hoodie fedora flat cap fedora polo shirt dress shirt T-shirt tank top muscle shirt blazer tuxedo cufflinks necklace bracelet earring
Home
house garage workshop window door screen wall floor ceiling kitchen bathroom living room bedroom window door garbage trash can clean wash rinse mob broom washcloth sink shower bath soap toilet toothbrush towel curtain bed blanket pillow bed sheets table chair bench knife fork spoon plate cup bowl water glass bottle cutting board rolling pin toaster blender stove oven fry pan wok pot kettle baking sheet crock pot coffee maker dish washer refrigerator freezer cellar pantry cupboard counter top cabinet closet toybox chest wardrobe vanity coat rack stand sofa couch love seat coffee table footstool ottoman recliner
Office & School
desk computer phone tablet printer clock watch memo note pencil pen ink eraser glue paper clip stapler rubber band sharpen dull shavings shred ruler protractor compass classroom pencil holder calendar pin board thumb tack desk lamp board room whiteboard blackboard conference table manager supervisor teacher principal team & teammates classmates employee student project assignment study work learn correct edit fix repair update upgrade install enroll graduate finish late on time communicate network energy electricity announcement speakers PA system (public announcement) public private corporation company school district industrial park factory building commerce money market
Roads
car truck motorcycle semi truck pickup truck sport car sedan coup scooter dirt bike bicycle BMX bike skates skateboard helmet seat belt air bag crash collision fender bender ticket parking lot speed limit lane highway onramp expressway freeway toll road bridge overpass underpass train tracks railroad train station bus stop yield distance limousine chauffeur driver taxi tour guide travel
Farm & Garden
barn tractor trailer crops harvest irrigation pesticide herbicide weed-killer fertilizer lawn mower bumper crop hay loft straw alfalfa pasture horse fence gate work gloves planting watering weeding trimming trowel plow hoe rake shovel pruning shears hedge trimmer watering can hose hose butler hose reel hose trolley spigot nozzle sprinkler turret sprinkler spray gun rain barrel rain gauge wood chips seeds blossom pollen silo grainery grain elevator cheesecloth cheese curd dairy butcher cellar canned vegetables frost dew perennial annual tulip bulb rose garden walled garden shrubbery
Sports
baseball basketball football soccer lacrosse golf tennis badminton swimming hockey bat glove mitt hoop basket net goal cleats shin guards pads jersey baseball cap court racket pool referee coach team manager stadium arena referee guard forward pitcher catcher offense defense goalie umpire puck penalty disc frisbee quarterback fowl pitch tee-off green rough course field flag boundary out of bounds clock period inning half quarter round match set play (a football play) line sponsor spectator stands bleachers nose-bleed section admission season playoffs tickets finals halftime
Music
piano clarinet oboe bassoon saxophone French horn trumpet trombone tuba flute percussion drum snare tympani bell chimes harp synthesizer instrument sampling director symphony orchestra band marching band parade color guard cadence harmony melody counter melody solo duet quartet march concerto composer tempo beat dynamics volume drum major field commander captain genre jazz blues pop rock n’ roll big band dixieland waltz tango alternative boogie woogie ragtime classical baroque romance medieval pentatonic scale Major minor harmonic
Cyberspace
computer monitor tablet stylus writing tablet touchscreen smartphone mouse keyboard battery power cord cable display desktop wallpaper firmware software application (app) app store runtime environment operating system kernel motherboard integrated circuit transistor processor processor core central processing unit (CPU) graphics processing unit (GPU) random access memory (RAM) read only memory (ROM) user account website profile page Internet web page homepage dependency software stack markup language scripting language cascading style sheet (CSS) hypertext markup language (HTML) database structured query language (SQL) universal resource identifier (URI) (https://write.pink/vocab) universal resource locator (URL) (https://write.pink) web address texting global positioning system (GPS) geolocation temp file directory structure file system email web application blog (weblog) content management system (CMS) human resource management (HRM) customer relations management (CRM) enterprise resource planning (ERP) personal information management (PIM) words per minute (WPM) social media multimedia terminal command line console client server client side language server side language legacy version version history product road map scope creep bug report feature request install update upgrade beta security malware virus spyware cookie meta data content menu navigation heading header footer article post tag search engine web crawler contacts share embed log error message runlevel priority foreground background radio select checkbox dropdown select text field encrypt certificate session web browser desktop application email client
Hospitality
reservation checkin checkout key deposit hotel motel hostel resort bead & breakfast cruise ship country club waiter waitress server maître d’hôtel concierge host butler bus boy bell hop kitchen crew dish crew chef assistant menu chef’s surprise soup of the day cup of joe appetizer soup & salad main course side dish dessert bread basket pitcher order make ticket make line make table make time delivery time serving tray goblet water glass pilsner glass martini glass shot glass wine glass soda fountain on tap deli deli cut tip / gratuity buffet all you can eat take out doggy bag delivery refill silverware napkin place setting cost per plate guest linens dining room floor bedding double bed queen size bed king size bed twin beds room service wake up call bar bar stool high boy bartender barista clerk open shop close shop “we’re all out” first in first out first in last out last in first out cost of sales five star three star
Travel
navigation driving directions baggage luggage carry-on hand-baggage check in checked baggage baggage claim ticket pass boarding pass departure arrival departure time travel time arrival time estimated time of departure (ETD) estimated time of arrival (ETA) delay on time commute journey embark boarding disembark boarding gate departure gate time table service counter first class business class economy class premium economy frequent flier membership card priority boarding priority seating lounge pass call button flotation device evacuation instructions bulkhead cabin wings air pressure altitude tunnel crash landing splash landing touchdown splashdown turbulence in-flight meal in-flight entertainment airplane mode stow dinner tray reading lamp climate control overhead compartment seat number isle seat window seat dining car sleeper car truck stop weigh station fuel station gas station petrol station passengers crew captain pilot copilot navigator conductor flight attendant helm deck terminal dock ferry plane ship airline cruise ship train bus subway space shuttle transporter beam flying saucer teleportation warp drive hyperdrive hyperspace supersonic lightspeed nautical mile time zone
Dinning Out
Dress
“dressy” festive casual jeans and tie dress pants and tie suit and tie three piece suit dress shirt nice shirt nice T shirt old shirt old T shirt jeans nice jeans rockstar jeans stone washed jeans blazer vest dress short nice shorts jean shorts skirt blouse dress high heels dress shoes slippers loafers sandals sneakers casual shoes [sport] shoes wingtip shoes
Menu
orange soda grape soda red soda cola Dr. Pepper lemon lime root beer ginger ale cream soda bread basket sub sandwich fruit platter cole slaw burrito taco nachos melon lemonade snacks popcorn hot dog chips
Camping
camper trailer mobile home campfire fire pit firewood kindling starter fluid charcoal coals ashes marshmallow s’mores graham crackers hot dog roast hot dog bun condiments relish ketchup mustard paper plate disposable silverware tin foil dinner wrap foil wrapped dinner grill barbecue cookout roasting stick campground toiletries bath house dump station park service park ranger national park state park county park city park recreation off road vehicle recreational vehicle speed boat water skiing wake boarding beach sand dune mountain climbing hiking walking stick mosquito net insect repellent tent tarp AstroTurf picnic table lawn chairs lantern kerosene sing-along
Construction
scaffold nails hammer sledgehammer jackhammer allen wrench screws screwdriver torques head Phillips head straight edge concrete flexcrete cement mortar bricks foundation chimbney threshold partition fire escape story loft lean-to foundation basement construction crew construction site building code building permit detour road construction earth moving equipment shovel rake bulldozer backhoe dumptruck studds drywall log cabin blueprints I-beam welding molding trim work framing carpeting tiling tile floor grout trowel hardhat work gloves safety glasses safety goggles face mask plaster paintbrush pain roller paint can paint can opener paint thinner wallpaper window frame door frame hinge deadbolt lock electric outlet breaker switch breaker box fuse box pluming faucet pipe drain septic tank septic system drain field landscaping survey crew land surveying acre shelf awning tarp fence rebar power grid power lines power transformer electrical pole wiring linoleum formica veneer lumber particle board plywood sandpaper palm sander belt sander saw horse table saw band saw jig saw radial arm saw drill press lathe C-clamp wood glue wood putty wood stain varnish lacquer
Basic Topics was originally published on PinkWrite
3 notes
·
View notes
Text
T SQL Advanced Tutorial By Sagar Jaybhay 2020
New Post has been published on https://is.gd/AQSl2U
T SQL Advanced Tutorial By Sagar Jaybhay 2020
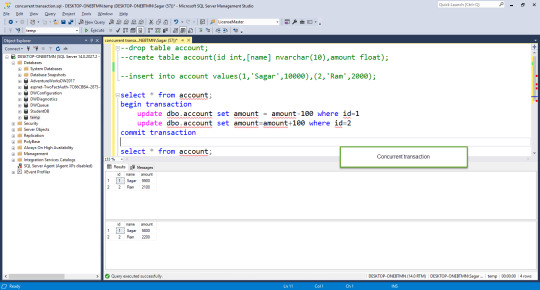
In this article we will understand T SQL Advanced Tutorial means Transaction In SQL and Common Concurrency Problem and SQL server transaction Isolation level by Sagar Jaybhay
What is the Transaction?
A transaction is a group of commands that changed the data stored in a database. A transaction is treated as a single unit.
The transaction ensures that either all commands will succeed or none of them. Means anyone fails then all commands are rolled back and data that might change is reverted back to the original state. A transaction maintains the integrity of data in a database.
begin try begin transaction update dbo.account set amount = amount-100 where id=1 update dbo.account set amount=amount+100 where id=2 commit transaction print 'transaction committed' end try begin catch rollback transaction print 'transaction rolled-back' end catch
In the above example either both statements executed or none of them because it goes in catch block where we rolled-back transactions.
begin try begin transaction update dbo.account set amount = amount-100 where id=1 update dbo.account set amount=amount+100 where id='A' commit transaction print 'transaction commited' end try begin catch rollback transaction print 'tranaction rolledback' end catch

Common Concurrency Problem
Dirty reads
Lost update
Nonrepetable reads
Phantom reads
SQL server transaction Isolation level
Read Uncommitted
Read committed
Repeatable read
Snapshot
Serializable
How to overcome the concurrency issues?
One way to overcome this issue is to allow only one user at the time allowed for the transaction.
Dirty Read Concurrency Problem:
A dirty read happens when one transaction permitted to read data that modified by another transaction but that yet not committed. Most of the time it will not cause any problem because if any case transaction fails then the first transaction rolled back its data and the second transaction not have dirty data that also not exist anymore.
To do 2 transactions on one machine open 2 query editor that is your 2 transaction machine and you do an operation like below
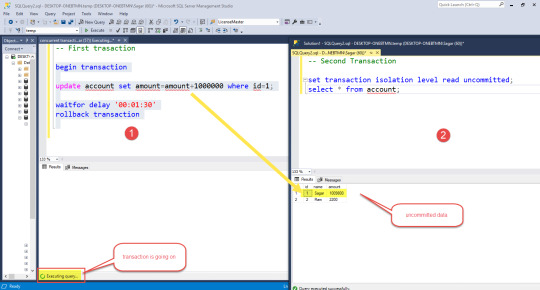
For the first transaction, we update the amount in the account table and then given a delay for 1 min 30 seconds and after this, we rollback the transaction. And in the second window, we select data from a table where we can see uncommitted data and after transaction rollback, we see committed data.
We have default isolation level read committed to set different for reading uncommitted data you can use below command.
set transaction isolation level read uncommitted; -- the First transaction begin transaction update account set amount=amount+1000000 where id=1; waitfor delay '00:01:30' rollback transaction -- Second Transaction set transaction isolation level read uncommitted; select * from account;
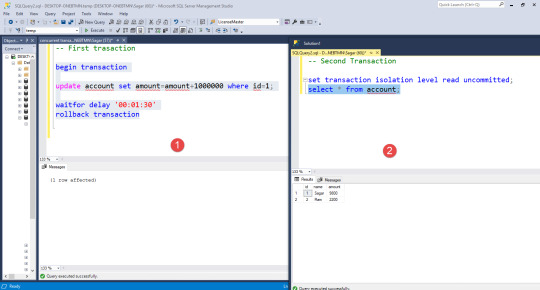
Lost Update
It means that 2 transactions read and update the same data. When one transaction silently overrides the data of another transaction modified this is called a lost update.
Both read committed and read uncommitted have lost update side effects.
Repeatable reads, snapshots, and serialization do not have these side effects.
Repeatable read has an additional locking mechanism that Is applied on a row that read by current transactions and prevents them from updated or deleted from another transaction.
-- first transaction begin transaction declare @amt float select @amt=amount from account where id =1; waitfor delay '00:01:20' set @amt=@amt-1000 update account set amount=@amt where id=1; print @amt commit transaction -- first tarnsaction -- second transaction begin transaction declare @amt float select @amt=amount from account where id =1; waitfor delay '00:00:20' set @amt=@amt-2000 update account set amount=@amt where id=1; print @amt commit transaction
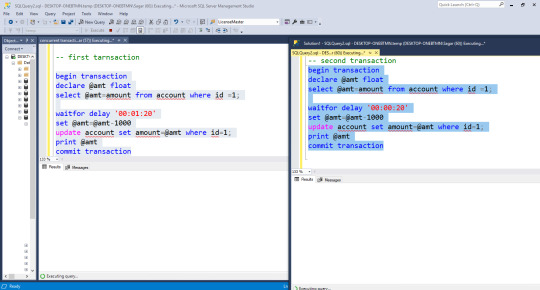
Non-Repeatable read
It was when the first transaction reads the data twice and the second transaction updates the data in between the first and second transactions.
Phantom read
It happens when one transaction executes a query twice and it gets a different number of rows in the result set each time. This happens when a second transaction inserts a new record that matches where the clause of executed by the first query.
To fix phantom read problem we can use serializable and snapshot isolation levels. When we use the serializable isolation level it would apply the range lock. Means whatever range you have given in first transaction lock is applied to that range by doing so second transaction not able to insert data between this range.
Snapshot isolation level
Like a serializable isolation level snapshot also does not have any concurrency side effects.
What is the difference between serializable and Snapshot isolation level?
Serialization isolation level acquires it means during the transaction resources in our case tables acquires a lock for that current transaction. So acquiring the lock it reduces concurrency reduction.
Snapshot doesn’t acquire a lock it maintains versioning in TempDB. Since snapshot does not acquire lock resources it significantly increases the number of concurrent transactions while providing the same level of data consistency as serializable isolation does.
See below the image in that we use a serializable isolation level that acquires a lock so that we are able to see the execution of a query in progress.
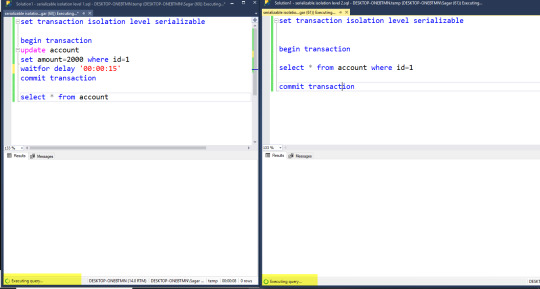
Now in the below example, we set a database for allowing snapshot isolation. For that, we need to execute the below command.
alter database temp set allow_snapshot_isolation on
Doing so our database tempdb is allowed for snapshot transaction than on one window we use serialization isolation level and on the second we use snapshot isolation level. When we run both transactions we are able to see the snapshot isolation level transaction completed while serialization is in progress and after completing both transactions we see one window has updated data and others will have previous data. First

Now after completing both transactions
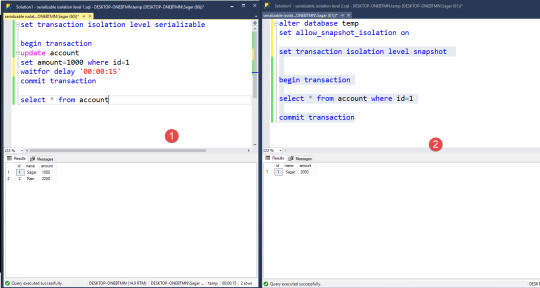
snapshot isolation never blocks the transaction.
It will display that data which is before another transaction processing
It means that snapshot isolation never locks resources and other transaction able read the data
But here one transaction is updating the data another is reading that data so it’s ok
When both transactions updating same data then transaction blocks and this blocks until the first transaction complete and then transaction 2 throws error lost update why because preventing overwriting the data and it fails and error is transaction is aborted you can’t use snapshot isolation level update, delete insert that had been deleted or modified by another transaction.
If you want to complete the second transaction you need to rerun that transaction and data is modified successfully.
Read Committed Snapshot Isolation Level
It is not a different isolation level. It is an only different way of implementing Read committed isolation level. one problem in that if anyone transaction is updating the record while reading the same data by another transaction is blocked.
Difference between Snapshot isolation level and Read Committed Snapshot isolation level.
Snapshot IsolationRead Committed Snapshot isolation levelIt is vulnerable to update conflictsNo update conflicts hereCan not use with a distributed transactionIt can work with a distributed transactionProvides transaction-level read consistencyIt provides statement-level read consistency
My Other Site: https://sagarjaybhay.net
0 notes
Text
300+ TOP Oracle Applications Interview Questions and Answers
Oracle Applications Interview Questions for freshers experienced :-
1. What are the steps in attaching reports with oracle applications? There are certain steps that you need to follow systematically for attaching the reports along with oracle application. Designing the report. Generating executable file related with report. Moving executable and source files to the appropriate folder of the product. Registering the report in the form of concurrent executable. Defining concurrent program for registered that are executable. Adding concurrent program for requesting group of responsibility. 2. Differentiate Apps schema from other schemas? Apps schema is the one that comprises of only synonyms and there is no possibility of creating tables in it. Other schema comprises of tables and objects in it and allows the creation of tables as well as for providing grants to tables. 3. Define custom top and its purpose. Custom top can be defined as the customer top which is created exclusively for customers. According to the requirement of the client many number of customer tops can be made. Custom top is made used for the purpose of storing components, which are developed as well as customized. At the time when the oracle corporation applies patches, every module other than custom top are overridden. 4. What is the method of calling standard – interface program from pl/sql or sql code? FND_REQUEST.SUBMIT_REQUEST(PO, EXECUTABLE NAME,,,,,PARAMETERS) 5. What is the significance related with US folder? US folder is just a language specification. Multiple folders can be kept for language specification depending on the languages that are installed. 6. Which are the kinds of report triggers? There are mainly five different kinds of report triggers available. They are Before report After report Before parameter form After parameter form Between pages 7. What is the firing sequence related with report triggers? The sequence related with firing is as follows before parameter form, after parameter form, before the report, between pages and after report. 8. What is the purpose of cursors in PL/SQL? The cursor can be made used for the purpose of handling various row – query associated with PL/SQL. Implicit cursors are available for the purpose of handling all the queries related with oracle. The memory spaces that are unnamed are used by oracle for storing the data that can be used with implicit cursors. 9. Define record group? Record group can be considered as a concept used for the purpose of holding sql query that is associated with list related with values. Record group consists of static data and also can access data inside tables of database through sql queries. 10. What is a FlexField? This is a kind of field associated with oracle apps that are used for capturing information related with the organization.

Oracle Applications Interview Questions 11. Is there any possibility for having custom schema at any time when it is required? You have the provision for having custom schema at the time of creating table. 12. What is the concurrent program? Concurrent programs are instances that need to be executed along with incompatibles and parameters. 13. Define application top? Application tops are found when we are connecting to server. There are two types of application tops available they are product top and custom top. Product top is the kind of top that is built in default by manufacturer. Custom top can be chosen by the client, and any number of custom tops can be created as per the requirement of the client. 14. Explain about the procedures that are compulsory in the case of procedures? There are number of parameters which are mandatory in the case of procedures and each of these parameters has a specific job associated with it. Errorbuf: This is the parameter used for returning error messages and for sending that to log file. Retcode: This is the parameter capable of showing the status associated with a procedure. 0, 1 and 2 are the status displayed by this parameter. 0 is used for indicating completed normal status, 1 defines completed warning status and 2 is the one denoting completed with error. 15. What is a token? Token is used for transferring values towards report builder. Tokens are usually not case – sensitive. 16. What is the menu? Menu can be defined as a hierarchical arrangement associated with functions of the system. 17. What is Function? Function is the smaller part of the application and that is defined inside menu. 18. Define SQL Loader ? Sql loader is a utility resembling a bulk loader for the purpose of moving data that are present in external files towards the oracle database. 19. How to register concurrent program with oracle apps? There are certain steps that you need to follow for the purpose of registering concurrent program. The first step is to log in to your system with the responsibility of the system administrator. The next step is to define executable concurrent program. While defining concurrent program do take care to give application name, short name and description along with the selection of executable concurrent program. 20. Define set – of books? SOB can be defined as the collection of charts associated with accounts, currency and calendars. 21. What is a value set? Value set is used for the purpose of containing the values. In the case of a value set getting associated with report parameters, a list containing values are sent to the user for accepting one among the values in the form of parameter values. 22. Define the Types of validation? There are various kinds of validation. None: this is the indication of minimal validation. Independent: Input should be there in the list of – values that are defined previously. Dependent: According to the previous value, input is compared with a subset of values. Table: Input is checked on the basis of values that exist in the application table. Special: These are the values that make use of flex field. Pair: A pair can be defined as the set of values that make use of flex fields. Translated Independent: This is a kind of value that can be made used only if there is any existence for the input in the list that is defined previously. Translatable dependent: In this kind of validation rules that compare the input with the subset of values associated with the previously defined list. 23. What is Template? Template is a kind of form that is very much required before the creation of any other type of forms. It is a kind of form that incorporates attachments that are platform independent and associated with a particular library. 24. Which are the attachments that are platform independent and become a part of the template? There are several attachments that are part of the template form. APPSCORE: This is a kind of attachment that comprises of packages as well as procedures which are useful for all the different forms for the purpose of creating toolbars, menus etc. APPSDAYPK: This attachment contains packages that are helpful in controlling the applications associated with oracle. FNDSQF: This attachment has various procedures as well as packages for flex fields, profiles, message dictionary and also concurrent processing. CUSTOM: This attachment is helpful in extending the application forms of oracle without causing any modification related with the application code. There are various kinds of customization including zoom. 25. Define Ad-hoc reports? This is a kind of report that is made used for fulfilling the reporting needs of a particular time. 26. What is the Definition of responsibility? Responsibility is the method through which the group of various modules can be made in a format accessible by users. 27. Define Autonomous transaction? This is a kind of transaction that is independent of another transaction. This kind of transaction allows you in suspending the main transaction and helps in performing SQL operations, rolling back of operations and also committing them. The autonomous transactions do not support resources, locks or any kind of commit dependencies that are part of main transaction. 28. Which are the types of Triggers? There are various kinds of triggers associated with forms and they are Key triggers Error triggers Message triggers Navigational triggers Query – based triggers Transactional triggers 29. What is the purpose of Temp tables in interface programs? These are the kinds of tables that can be used for the purpose of storing intermediate values or data. 30. Where to define the parameters in the report? The parameters can be defined inside the form of concurrent program, and there is no need for registering the parameters but you may need to register the set of values that are associated with the parameters. 31. Define the steps for customizing form? You need to make use of the following steps for the purpose of customizing forms. The first and foremost thing that you need to do is to copy the files template.fmb as well as Appsatnd.fmb from AU_TOP/forms/us and paste that inside custom directory. By doing this the library associated with this task get copied by it’s own. You can now create the forms you want and customize them. Do not forget to save the created forms inside the modules where they need to be located. 32. Explain about Key Flexfiled ? Key flexfiled is a unique identifier and is usually stored inside segment, and there are two different attributes associated with this which are flexfiled qualifier and segment qualifier. 32. Define uses of Key Flexfield ? This is a unique identifier for the purpose of storing information related with key. It also helps in entering as well as displaying information related with key. 34. Define Descriptive FlexField ? This is a kind of flexfield that is mainly used for the purpose of capturing additional information, and it is stored in the form of attributes. Descriptive flexfield is context sensitive. 35. List some uses of DFF (Descriptive Flex Field) ? This is a kind of flexfield that is mainly used for gathering extra information and also for providing space for you to form and get expanded. 36. Define MRC ( Multiple Reporting Currency)? Multiple – Reporting Currency is a kind of feature that is associated with oracle application and helps in reporting as well as maintaining records that are associated with the transaction level in various forms of functional currency. 37. Define FSG ( Financial Statement Generator) ? This is a kind of tool that is highly powerful as well as flexible and helps in building reports that are customized without depending on programming. This tool is only available with GL. 38. Define Oracle Suite? Oracle suite is the one that comprises of oracle apps as well as software associated with analytical components. 39. Define ERP (Enterprise Resource Planning) ? ERP is a software system that is available as a package and can be helpful in automating as well as integrating most of the processes associated with the business. 40. What is a datalink? Datalink can be made used for the purpose of relating the results that are associated with various different queries. 41. How to attain parameter value depending on the first parameter? Second parameter can be attained by making use of the first parameter by making use of the command $flex$value set name. 42. Define data group? Data group can be defined as the group of applications related with oracle. 43. Explain about security attributes? Security attributes can be made used by Oracle for allowing the particular rows containing data visible to the users. 44. Define about Profile Option? Profile option comprises of set of options that are helpful in defining the appearance as well as behavior of the application. 45. Explain about application? Application can be defined as the set of menus, forms and functions. 46. Where do we use Custom.pll? Custom.pll can be used during the process of making customized or new oracle forms. 47. Where are tables created? Tables can be created at custom schema. 48. Define multi org ? This is a kind of functionality for data security. 49. Define Request Group ? Request group is assigned with a set of responsibilities. 50. What is the usage of the spawned object? This object is used for process associated with executable field. 51. What is the difference between the Operating Unit and Inventory Organization? Operating Unit:- An Organization that uses Oracle Cash management, Order Management, and Shipping Execution, Oracle Payables, Oracle Purchasing, and Oracle Receivables. It may be a sales Office, a division, or adept. An operating unit is associated with a legal entity. Information is secured by operating unit for these applications. Each user sees information only for their operating unit. To run any of these applications, you choose a responsibility associated with an organization classified as an operating unit. An organization for which you track inventory transactions and balances, and/or an organization that manufactures or distributes products. Examples include (but are not limited to) manufacturing plants, warehouses, distribution centers, and sales offices. The following applications secure information by inventory organization: Oracle Inventory, Bills of Material, Engineering, and Work in Process, Master Scheduling/MRP, Capacity, and Purchasing receiving functions. To run any of these applications, you must choose an organization that has been classified as an inventory organization. Get ahead in your career by learning Oracle through Mindmajix Oracle Apps EBS Training. 52. What is a Set of Books? A financial reporting entity that uses a particular chart of accounts, functional currency, And accounting calendar. Oracle General Ledger secures transaction information (such as journal entries and balances) by a set of books. When you use Oracle General Ledger, you choose a responsibility that specifies a set of books. You then see information for that set of books only. 53. What is the Item Validation Organization? The organization that contains your master list of items. You define it by setting the OM: Item Validation Organization parameter. You must define all items and bills in your Item Validation Organization, but you also need to maintain your items and bills in separate organizations if you want to ship them from other warehouses. OE_System_ 54. What is the difference between key flexfield and Descriptive flexfield? Key Flexfield is used to describe unique identifiers that will have a better meaning than using number IDs. e.g a part number, a cost center, etc Dec Flex is used to just capture extra information. Key Flexfields have qualifiers whereas Desc Flexfields do not. Dec Flexfields can have context-sensitive segments while Key flexfields cannot. And one more different that KFF displays like text item but DFF displays like . 55. Which procedure should be called to enable a DFF in a form? ND_DESCR_FLEX.DEFINE (BLOCK => ‘BLOCK_NAME’ ,FIELD => ‘FORM_FIELD_NAME’ ,APPL_SHORT_NAME => ‘APP_NAME’ ,DESC_FLEX_NAME => ‘DFF_NAME’ ); 56. Which procedure should be used to make the DFF read-only at run time? FND_DESCR_FLEX.UPDATE_DEFINITION() 57. What is the difference between the flexfield qualifier and the segment qualifier? Flexfiled qualifier identifies segement in a flexfield and segment qualifier identifies value in a segment. There are four types of flex field qualifier Balancing segment qualifier cost center natural account and intercompany segment qualifier:- allow budgeting allow posting account type control account and reconciliation flag 58. Where do concurrent request log files and output files go? The concurrent manager first looks for the environment variable $APPLCSF If this is set, it creates a path using two other environment variables: $APPLLOG and $APPLOUT It places log files in $APPLCSF/$APPLLOG Output files go in $APPLCSF/$APPLOUT So for example, if you have this environment set: $APPLCSF = /u01/appl/common $APPLLOG = log $APPLOUT = out The concurrent manager will place log files in /u01/appl/common/log, and output files in /u01/appl/common/out Note that $APPLCSF must be a full, absolute path, and the other two are directory names. If $APPLCSF is not set, it places the files under the product top of the application associated with the request. So for example, a PO report would go under $PO_TOP/$APPLLOG and $PO_TOP/$APPLOUT Logfiles go to /u01/appl/po/9.0/log Output files to /u01/appl/po/9.0/out Of course, all these directories must exist and have the correct permissions. Note that all concurrent requests produce a log file, but not necessarily an output file. 59. How do I check if Multi-org is installed? SELECT MULTI_ORG_FLAG FROM FND_PRODUCT_GROUPS If MULTI_ORG_FLAG is set to ‘Y’, Then its Multi Org. 60. Why does Help->Tools->Examine ask for a password? Navigate to the Update System Profile Screen. ( navigate profile system) Select Level: Site Query up Utilities: Diagnostics in the User Profile Options Zone. If the profile option Utilities: Diagnostics is set to NO, people with access to the Utilities Menu must enter the password for the ORACLE ID of the current responsibility to use Examine. If set to Yes, a password will not be required. 61. How an API is initialized? apps.gems_public_apis_pkg.fnd_apps_initialize ( user_id => p_user_id , resp_id => p_resp_id , resp_appl_id => p_resp_appl_id) 62. How do u register a concurrent program from PL/SQL? apps.fnd_program.executable_exists -> To check if executable file exists apps.fnd_program.executable -> To make executable file fnd_program.program_exists -> To check if program is defined apps.fnd_program.register -> To register/define the program apps.fnd_program.parameter -> To add parameters apps.fnd_program.request_group -> To add to a request group 63. How Do u register a table & a column? EXECUTE ad_dd.register_table( ‘GEMSQA’, ‘gems_qa_iqa_lookup_codes’, ‘T’, 512, 10, 70); EXECUTE ad_dd.register_column(‘GEMSQA’, ‘gems_qa_iqa_lookup_codes’, ‘LOOKUP_CODE’, 1, ‘VARCHAR2’, 25, ‘N’, ‘N’); 64. What are the supported versions of Forms and Reports used for developing on Oracle Applications Release 11? The following supported versions are provided in Developer/2000 Release 1.6.1: Forms 4.5 Reports 2.5 65. What is the Responsibility / Request Group? Responsibility is used for security reason like which Responsibility can do what type of jobs etc. Set of Responsibility is attached with a Request group. When we attach the request group to a concurrent program, that can be performed using all the Responsibilities those are attached with the Request group. 66. What is DFF? The Descriptive Flexi field is a field that we can customize to enter additional information for which Oracle Apps product has not provided a field. Ex. ATP program calculates for those warehouses where Inventory Org Type is DC or Warehouse in DFF Attribute11 of MTL_PARAMETERS table. 67. What is multi-org? It is data security functionality in Oracle 10.6 and above. Applicable User responsibilities are created and attached to a specific Operating Unit. User can access the data that belongs to the Operating unit they log in under. 40 The benefit is it enables multiple operating units to use a single installation of various modules while keeping transaction data separate and secure by operating unit. It has an effect on the following modules: Order Entry Receivable Payable Purchasing Project Accounting Oracle Applications Questions and Answers Pdf Download Read the full article
0 notes