#Security System Using Arduino
Explore tagged Tumblr posts
Visit Tumblr Blog
Explore Tumblr blogs with no restrictions, modern design and the best experience.
Last Seen Tumblr Blogs


Fun Fact
In 2020, Tumblr had 29.4 million users in the US.
Video
youtube
IOT based Smart School Bus Monitoring and Notification System With Child Security Telegram Photo Alerts using Arduino | Child Safety Wearable Device with GPS Tracking
#youtube#IOT based Smart School Bus Monitoring and Notification System With Child Security Telegram Photo Alerts using Arduino | Child Safety Wearabl
0 notes
Text
DIY Laser Tripwire Security System Using Arduino

The project consists of a laser module that continuously emits a beam aimed at a laser receiver sensor. When an object (such as a person) obstructs the laser, the receiver detects the interruption and triggers an alarm via a buzzer. This system is ideal for securing doorways, hallways, or any restricted area.
COMPONENTS REQUIRED
Arduino Uno
Laser LED Module
Laser Receiver Sensor Module
Buzzer
Jumper wires
Breadboard
Circuit Diagram

CODE
#define LASER_PIN 7
#define RECEIVER_PIN 8
#define BUZZER_PIN 9
void setup() {
pinMode(LASER_PIN, OUTPUT);
pinMode(RECEIVER_PIN, INPUT);
pinMode(BUZZER_PIN, OUTPUT);
digitalWrite(LASER_PIN, HIGH); // Laser ON
Serial.begin(9600);
}
void loop() {
int status = digitalRead(RECEIVER_PIN);
if (status == 1) { // If laser beam is blocked
Serial.println("⚠️ Intruder Detected!");
digitalWrite(BUZZER_PIN, HIGH);
} else {
Serial.println("✅ Area Secure");
digitalWrite(BUZZER_PIN, LOW);
}
delay(500);
}
youtube
9 notes
·
View notes
Text
SERVO DISTANCE INDICATOR USING ARDUINO UNO
INTRODUCTION
Distance measurement is a fundamental concept in various fields, including robotics, automation, and security systems. One common and efficient way to by emitting sound waves and calculating the time it takes for the waves to reflect back from an object, allowing accurate measurement of distance without physical contact.
In this project, we will use an HC-SR04 Ultrasonic Sensor in conjunction with an Arduino microcontroller to measure the distance between the sensor and an object. The sensor emits ultrasonic waves and measures the time it takes for the waves to return after reflecting off the object. By using the speed of sound and the time measured, the distance is calculated. This simple yet powerful setup can be applied in a variety of real-world applications such as obstacle detection in robots, parking assistance systems, and automatic door operations.

WORKING PRINCIPLE
1. Servo Movement: The servo motor rotates to different angles (0° to 180°). The ultrasonic sensor is mounted on top of the servo and moves with it.
2. Distance Measurement: At each position, the ultrasonic sensor sends out an ultrasonic pulse and waits for the echo to return after hitting an object. The Arduino records the time taken for the echo to return.
3. Distance Calculation: The Arduino calculates the distance to the object based on the time recorded and the speed of sound (0.0343 cm/µs).
4. Servo as Indicator: The servo motor's position provides a physical indication of the direction of the detected object. As the servo moves across a range of Image map out objects in different directions based on distance.
5. Visual Output: The Arduino can also send the distance and angle data to the serial monitor, creating a real-time visual representation of the detected object positions.
APPLICATIONS
1. Autonomous Robots and Vehicles
2. Radar Systems
3. Parking Assistance
4. Security Systems
5. Environmental Scanning in Drones
6. Warehouse Management and Automation
7. Industrial Automation
8. Robotic Arm Guidance
9. Collision Avoidance in UAVs/Robots
10.Interactive Displays or Art Installations
11.Smart Doors and Gates
CONCLUSION
The Servo Distance Indicator Project successfully demonstrates the integration of an ultrasonic sensor and a servo motor to create an effective distance measurement an object, the project provides real-time feedback through the movement of a servo motor, which indicates the measured distance via a visual representation.
7 notes
·
View notes
Text
Trying Out Flipper Zero’s Mifare Fuzzer
Wanted to play around with the RFID/Mifare Fuzzer apps, but obviously not wanting to do anything illegal, so I used Arduino and parts I have lying around to make a security system simulator, mostly by following this guide.
The fuzzer app is brute forcing to try and gain access. While it can work, it does take a long time if you need to test a lot combinations.

What other test rigs have you built to try out Flipper’s capabilities?
12 notes
·
View notes
Text
Building Your Own Mechanical Dog: A Beginner’s Guide
In the ever-evolving world of robotics, creating your own mechanical dog is a fascinating and rewarding challenge. Whether you're a hobbyist, a student, or simply curious about robotic engineering, building a mechanical dog can be a fun way to learn about coding, mechanics, and artificial intelligence. It’s more than just assembling wires and parts—it's about bringing movement and purpose to a machine that mimics a beloved companion. At mechanical dog, we believe that anyone passionate about robotics can take the first step in developing a robotic pet with personality. This guide will walk you through the essentials—from selecting the right components to programming basic functions—to help you build your first functional and interactive mechanical dog.
Understand the Core Functionality of a Mechanical Dog
Before jumping into assembly, it's crucial to understand what makes a mechanical dog function. These robotic companions typically involve servos or motors to mimic the movements of legs, a microcontroller as the brain, and a power source for mobility. Sensors such as ultrasonic detectors help the mechanical dog navigate its environment. Grasping the roles of each component ensures a more efficient build process and sets the foundation for future customization. It also helps in troubleshooting and upgrading the design later. Learning this early provides a technical roadmap and gives you clarity on what parts to prioritize as a beginner in robotics.
Choosing the Right Materials and Parts to Begin
Starting with the right components makes a big difference in your mechanical dog’s performance. You'll need a sturdy yet lightweight frame, preferably 3D-printed plastic or aluminum. Essential parts include servo motors for leg movement, a rechargeable battery pack, a microcontroller like Arduino or Raspberry Pi, and wiring kits. Buying beginner-friendly kits from reputable robotics stores is highly recommended. Mechanical dog recommends selecting components based on simplicity and expandability. Focus on acquiring parts that allow trial and error without breaking your budget. This stage sets the groundwork for building something durable and modifiable over time.
Assembling the Frame and Installing Motors
Once you have the necessary parts, it’s time to bring your mechanical dog to life. Begin by assembling the body and legs, using screws and brackets to fix the frame. Install the motors at the joints to replicate knee and hip motion. Precision in alignment is key—improper placement may result in unbalanced movement. Make sure each motor is securely fastened and capable of smooth rotation. During this stage, mechanical dog builders often test the range of motion manually before connecting to the control board. Taking your time here helps prevent mechanical issues down the line.
Wiring and Connecting Your Microcontroller System
With the frame and motors in place, the next step is wiring. Connect each motor to the microcontroller using jumper wires or a motor shield. Labeling wires helps reduce confusion later, especially when debugging. Your microcontroller acts as the brain of the mechanical dog and sends commands that control movement. Power connections must be secure and insulated to prevent short-circuiting. This phase requires patience and organization, particularly for first-timers. Once everything is in place, running a basic movement script is a great way to ensure your connections work and to see your mechanical dog come alive.
Programming Basic Movement and Direction Controls
Programming is where your mechanical dog learns to walk. Start with simple scripts that control forward and backward movement using timed signals to motors. As you progress, introduce directional turns and stop-start commands. Platforms like Arduino IDE or Python make this easy for beginners, especially with online resources and libraries. At mechanical dog, we encourage experimenting with code to understand how speed and timing affect performance. Getting these basics down sets the stage for more advanced behaviors, like obstacle avoidance and voice command integration. Programming breathes life into your build and gives it functionality.
Integrating Sensors for Navigation and Interaction
Sensors make your mechanical dog interactive and responsive to its environment. Ultrasonic sensors help it detect walls, infrared sensors track lines or paths, and gyros assist in balance. Proper sensor placement is essential—usually on the head or front body of the robot. Once installed, they are connected to the microcontroller and incorporated into your code. This enables your mechanical dog to avoid obstacles or follow predefined routes. These intelligent behaviors enhance the experience and demonstrate real-world robotics applications. Adding sensors is a significant upgrade and a fun learning curve for every builder.
Testing, Troubleshooting, and Future Enhancements
Once all systems are connected and programmed, it’s time to test your mechanical dog. Watch for issues like jerky movement, sensor misreads, or battery drainage. Take notes and go step-by-step to troubleshoot. This is where hands-on learning is most valuable. Mechanical dog builders often revisit earlier steps for fine-tuning. After successful testing, consider adding voice control, facial recognition, or remote operation via Wi-Fi. With every enhancement, you’ll grow your skills and make your mechanical dog smarter. Remember, every successful robotics project involves problem-solving and persistence.
Conclusion
Building a mechanical dog from scratch is a fulfilling journey that combines creativity, logic, and hands-on learning. Whether you’re doing it as a personal challenge or stepping into the field of robotics professionally, the experience offers a deep understanding of engineering and artificial intelligence. With patience and curiosity, your mechanical dog will not only move and interact but also reflect the effort you’ve invested in learning. At mechanical dog, we support all levels of builders and believe that even a beginner can create something incredible. Start small, think big, and bring your robotic companion to life.
0 notes
Text

Unlock the powerful IoT solutions with our 4G/LTE Evaluation Board with GNSS and BLE 5.x (PTG4GARS-SC103V1)! This board, based on the SIMCOM A7672S chipset, offers global LTE/GSM coverage at CAT 1 speeds, with compatibility for Arduino UNO and STM32F4x. Perfect for IoT applications, it supports secure connectivity, optional sensors like 6DoF and Barometer, and both on-board and external GPS antenna options. Ideal for building solutions in tracking systems, smart agriculture, home automation, and more! For more information, visit 🌐 https://www.parrytech.net/ Contact us at 📧 [email protected]. https://www.parrytech.net/4g-lte-modem/
0 notes
Text
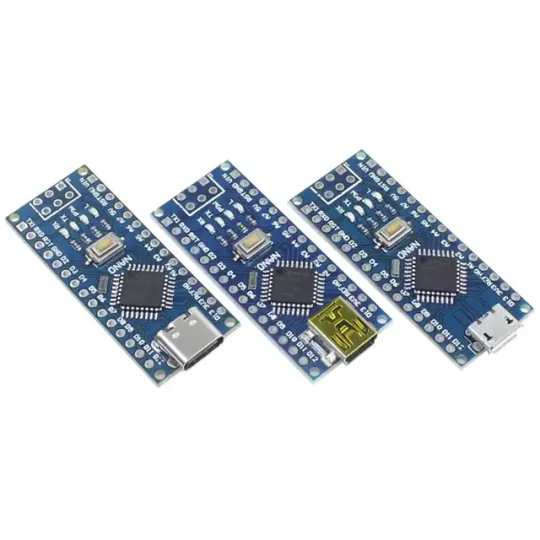
Introduction to Mini Development Board Based on Arduino Nano CH340 The Mini development board is a highly versatile microcontroller board that has gained significant popularity among makers and electronics enthusiasts. Its compact design, measuring just 45mm x 18mm, makes it particularly suitable for projects where space is at a premium. Powered by the ATmega328P microcontroller, the Nano CH340 supports various applications, from basic prototyping to complex automation tasks, thereby catering to a wide range of user needs. One of the standout features of the Mini development board is the CH340 USB-to-serial converter. This chip facilitates seamless communication between the microcontroller and a computer, allowing users to easily upload sketches and monitor serial data. Compared to its predecessors, which often utilized the FTDI chip, the CH340 offers a more cost-effective solution without compromising performance, making it a preferred choice for many hobbyists and professionals alike. Applications and Projects Using Mini Development Board for Arduino Nano CH340 The Arduino Nano CH340 is a compact yet powerful microcontroller board, making it an ideal choice for a wide array of projects. Its versatility and ease of use allow both beginners and experienced programmers to create innovative solutions across multiple domains. One common application is in robotics, where the Nano CH340 can be utilized to control motors and sensors, enabling the development of robots that can navigate environments autonomously. For those interested in home automation, the Arduino Nano CH340 serves as a reliable central unit that can manage various household devices. By integrating this board with smart sensors and relays, users can create systems that automate lighting, climate controls, and security measures. Projects can range from simple automated lighting systems to sophisticated home monitoring setups, showcasing the broad capabilities of the Nano CH340. PCB Size:43*18mm About Interface: Default shipment is type-c,if you need micro usb or mini usb interface,they are same price,just leave us message to claim the specified interface. Interested with much more quantity or other development board,contact us to talk details.View our company site to know more about our product category. Read the full article
0 notes
Text
12V DC Adapter: A Comprehensive Guide
Introduction
A 12V DC adapter is a common power supply unit used in various electronic devices, from routers and LED strips to security cameras and small appliances. It converts alternating current (AC) from a wall outlet into a stable 12-volt direct current (DC), ensuring safe and efficient operation. This guide explores its functions, types, applications, and how to choose the right one for your needs.
What Is a 12V DC Adapter?
A 12V DC adapter is an external power supply that provides 12 volts of direct current to electronic devices. It typically consists of:
A plug for the AC wall outlet
A transformer to step down voltage
A rectifier to convert AC to DC
A regulator to maintain a steady 12V output
These adapters come in different sizes, power ratings, and connector types to match various devices.
Types of 12V DC Adapters
Not all 12V DC adapters are the same. Key variations include:
1. Fixed vs. Adjustable Voltage
Fixed 12V adapters deliver a constant voltage, ideal for devices requiring stable power.
Adjustable adapters allow voltage adjustment (e.g., 3V-12V), useful for testing electronics.
2. Regulated vs. Unregulated
Regulated adapters maintain a steady 12V output even under load fluctuations.
Unregulated adapters may vary in voltage, suitable for simple, low-power devices.
3. Plug Types & Polarity
Connector types (barrel jack, USB, etc.) must match the device.
Polarity (center-positive or center-negative) must align to avoid damage.
Common Uses of a 12V DC Adapter
12V DC adapters power a wide range of devices, including:
Networking Equipment: Routers, modems, and switches.
LED Lighting: Strips, bulbs, and signage.
Security Systems: Cameras, monitors, and alarms.
Consumer Electronics: Radios, speakers, and portable TVs.
DIY Electronics: Arduino projects and small motors.
How to Choose the Right 12V DC Adapter
Selecting the correct 12V DC adapter involves checking:
1. Voltage & Current Rating
Must match the device’s requirements (e.g., 12V, 2A).
Higher amperage is acceptable, but voltage must be exact.
2. Connector Size & Polarity
Measure the device’s jack diameter (e.g., 5.5mm x 2.1mm).
Verify polarity markings (e.g., "+" on the inner pin).
3. Safety Certifications
Look for UL, CE, or RoHS compliance for reliability.
Troubleshooting a Faulty 12V DC Adapter
If your device isn’t working, check:
Loose connections (wiggle the plug).
Burnt smell or overheating (indicates internal failure).
Voltage output (use a multimeter to test).
If the adapter fails, replace it with a compatible model.
Conclusion
A 12V DC adapter is a versatile power solution for many electronics. Understanding its types, applications, and selection criteria ensures optimal performance and device safety. Always verify specifications before purchasing to avoid compatibility issues.

1 note
·
View note
Text
Top Skills You’ll Learn in a Robotics and Artificial Intelligence Course
In a world that’s rapidly embracing automation, machine intelligence, and smart systems, careers in robotics and artificial intelligence (AI) are more promising than ever. From healthcare robots to self-driving cars and intelligent customer support systems, AI and robotics are becoming integral to modern life.
If you're considering robotics and artificial intelligence courses, you're not just choosing a degree — you're preparing to be part of a technological revolution. But what exactly will you learn in such a program? Let’s explore the most important skills these courses help you develop, and how they prepare you for the future of innovation.
Programming Fundamentals for AI and Robotics
Whether a robot arm on a manufacturing floor or a chatbot handling customer queries, everything begins with programming. Students learn core languages such as:
Python: Widely used in AI and machine learning applications.
C/C++: Essential for embedded systems and robotic control.
Java: Useful in software development and some machine learning frameworks.
Understanding data structures, control flow, and algorithms is foundational for writing efficient code for intelligent systems.
Machine Learning and Deep Learning Techniques
At the heart of AI lies machine learning — the ability for machines to learn from data. Students gain practical knowledge of:
Supervised and unsupervised learning
Neural networks and deep learning frameworks like TensorFlow and PyTorch
Natural Language Processing (NLP) for text and voice-based AI systems
These skills are critical for creating models that can analyze data, make predictions, and improve over time.
Robotics System Design and Control
In robotics, it’s all about building machines that sense, think, and act. You'll learn how to:
Design mechanical structures and integrate them with electronics
Work with sensors (like LIDAR, cameras, gyros) and actuators
Apply control systems theory to ensure precise movements and decisions
These concepts are essential in developing autonomous systems, from robotic arms to drones.
Embedded Systems and IoT Integration
Modern robots and smart devices often rely on embedded systems — mini-computers that perform dedicated functions. You'll learn to:
Program microcontrollers (like Arduino or Raspberry Pi)
Work with real-time operating systems
Connect devices using IoT protocols (like MQTT)
This hands-on knowledge is critical for building responsive and connected devices.
Computer Vision and Image Processing
Robots and AI systems need eyes — and that’s where computer vision comes in. This skill allows machines to:
Interpret visual data from cameras or sensors
Recognize objects, track movements, and detect patterns
Use tools like OpenCV to process and analyze images
Applications range from facial recognition to robotic navigation.
AI Ethics and Responsible Innovation
With great power comes great responsibility. As AI systems become more influential, engineers must understand:
Ethical implications of automation and decision-making
Bias in AI models
Data privacy and security concerns
Courses now include modules that prepare students to design responsible and inclusive technologies.
Soft Skills for Cross-Disciplinary Collaboration
It’s not all about tech. Robotics and AI projects often involve teamwork across domains. You’ll develop:
Communication and presentation skills
Project management techniques
Creative thinking and problem-solving abilities
These soft skills ensure that your innovative ideas are clearly conveyed and efficiently executed in real-world scenarios.
Real-World Projects and Internships
A good robotics and AI course doesn't end with classroom theory. Students gain experience through:
Capstone projects where they design, build, and deploy AI or robotic systems
Industry internships that provide exposure to real-world applications
Hackathons and competitions that encourage innovation under pressure
This kind of hands-on experience is crucial in standing out during placements and job interviews.
Choosing the Right Institution Matters
The quality of your learning experience depends heavily on where you study. The best robotics and artificial intelligence courses provide a mix of strong academic foundation, practical labs, and industry exposure.
At NITTE University, particularly through its NMAM Institute of Technology (NMAMIT), students receive a future-focused education that combines cutting-edge theory with real-world skills. With dedicated labs, advanced AI and robotics curriculum, and partnerships with industry leaders, NMAMIT prepares students not just for today’s tech world—but for the challenges of tomorrow.
1 note
·
View note
Text
Internships in Hyderabad for B.Tech Students – Why LI-MAT Soft Solutions is the Best Platform to Launch Your Tech Career
What Are the Best Internships in Hyderabad for B.Tech Students?
The best internships are those that:
Offer real-time project experience
Help you develop domain-specific skills
Are recognized by industry recruiters
Provide certifications and resume value
At LI-MAT, students get access to all of this and more. They offer industry-curated internships that help B.Tech students gain:
Hands-on exposure
Mentorship from experts
Placement-ready skills
Whether you’re from CSE, IT, ECE, or EEE, LI-MAT provides internships that are practical, structured, and designed to bridge the gap between college and industry.
Can ECE B.Tech Students Get Internships in Embedded Systems or VLSI in Hyderabad?
Absolutely! And LI-MAT makes it easy.
ECE students often struggle to find genuine core domain internships, but LI-MAT Soft Solutions offers specialized programs for:
Embedded Systems
IoT and Sensor-Based Projects
VLSI Design & Simulation
Robotics and Automation
These internships include hardware-software integration, use of tools like Arduino, Raspberry Pi, and VHDL, and even PCB design modules. So yes, if you’re from ECE, LI-MAT is your one-stop platform for core domain internships in Hyderabad.
Are There Internships in Hyderabad for IT and Software Engineering Students?
Definitely. LI-MAT offers software-focused internships that are tailor-made for IT and software engineering students. These include:
Web Development (Frontend + Backend)
Full Stack Development
Java Programming (Core & Advanced)
Python and Django
Cloud Computing with AWS & DevOps
Data Science & Machine Learning
Mobile App Development (Android/iOS)
The internships are live, interactive, and project-driven, giving you the edge you need to stand out during placements and technical interviews.
What Domain-Specific Internships are Popular in Hyderabad for B.Tech Students?
B.Tech students in Hyderabad are increasingly looking for internships that align with industry trends. Some of the most in-demand domains include:
Cyber Security & Ethical Hacking
Artificial Intelligence & Deep Learning
Data Science & Analytics
IoT & Embedded Systems
VLSI & Electronics Design
Web and App Development
Cloud & DevOps
LI-MAT offers certified internship programs in all these domains, with practical exposure, tools, and mentoring to help you become industry-ready.
Courses Offered at LI-MAT Soft Solutions
Here’s a quick look at the most popular internship courses offered by LI-MAT for B.Tech students:
Cyber Security & Ethical Hacking
Java (Core + Advanced)
Python with Django/Flask
Machine Learning & AI
Data Science with Python
Cloud Computing with AWS
Web Development (HTML, CSS, JS, React, Node)
Mobile App Development
Embedded Systems & VLSI
Each course includes:
Industry-relevant curriculum
Real-time projects
Expert mentorship
Certification
Placement and resume support
Whether you're in your 2nd, 3rd, or final year, you can enroll and gain the skills that tech companies in Hyderabad are actively seeking.
Why LI-MAT Soft Solutions?
What makes LI-MAT stand out from other institutes is its focus on real outcomes:
Hands-on project experience
Interview prep and soft skills training
Dedicated placement support
Beginner to advanced-level paths
They aren’t just about teaching—they’re about transforming students into tech professionals.
Conclusion
If you're searching for internships in Hyderabad for B.Tech students, don’t settle for generic listings and unpaid gigs. Go with a trusted institute that offers real skills, real projects, and real value.
LI-MAT Soft Solutions is your gateway to quality internships in Hyderabad—whether you’re from CSE, IT, or ECE. With cutting-edge courses, project-driven learning, and expert guidance, it’s everything you need to kickstart your tech career the right way.

0 notes
Text
Introduction to Internet of Things (IoT) Programming

The Internet of Things (IoT) is revolutionizing the way we interact with devices, allowing everyday objects to connect to the internet and share data. From smart homes and wearables to industrial automation, IoT is reshaping the world. In this post, we'll dive into the basics of IoT programming and how you can start creating your own smart applications.
What is IoT?
IoT refers to a network of physical devices embedded with sensors, software, and other technologies to connect and exchange data with other devices and systems over the internet.
Key Components of IoT Systems
Devices/Sensors: Physical components that collect data (e.g., temperature sensors, motion detectors).
Connectivity: Wi-Fi, Bluetooth, Zigbee, LoRa, or cellular networks to transmit data.
Data Processing: Microcontrollers or cloud services process the incoming data.
User Interface: Web/mobile applications to monitor and control devices.
Popular IoT Hardware Platforms
Arduino: An open-source electronics platform based on simple microcontrollers.
Raspberry Pi: A small, affordable computer ideal for more powerful IoT applications.
ESP8266/ESP32: Low-cost Wi-Fi-enabled microchips widely used in IoT projects.
Languages Used in IoT Programming
C/C++: Commonly used for low-level programming on microcontrollers like Arduino.
Python: Popular for Raspberry Pi and edge computing due to its simplicity.
JavaScript (Node.js): Useful for IoT dashboards and server-side applications.
MicroPython: A lightweight version of Python optimized for microcontrollers.
Example: Blinking an LED with Arduino
void setup() { pinMode(13, OUTPUT); // Set digital pin 13 as output } void loop() { digitalWrite(13, HIGH); // Turn the LED on delay(1000); // Wait for 1 second digitalWrite(13, LOW); // Turn the LED off delay(1000); // Wait for 1 second }
IoT Data Handling and Cloud Integration
Once your devices are collecting data, you'll need to store and analyze it. Here are some common platforms:
ThingSpeak: A simple platform for IoT data logging and visualization.
Firebase: Real-time database ideal for mobile IoT applications.
AWS IoT Core: Scalable cloud service for managing IoT devices.
MQTT Protocol: Lightweight messaging protocol used for IoT device communication.
Popular IoT Projects to Try
Smart door lock controlled by a mobile app
Home temperature monitor with alerts
Motion detection security camera
Plant watering system based on soil moisture levels
Fitness tracker using accelerometers
Best Practices for IoT Programming
Use lightweight protocols and efficient code to conserve resources.
Secure your devices with strong authentication and encryption.
Plan for over-the-air (OTA) updates to patch software bugs.
Reduce power consumption for battery-powered devices.
Test in real-world conditions to ensure reliability.
Conclusion
IoT programming opens the door to endless possibilities for innovation and automation. Whether you're just blinking LEDs or building a smart home system, learning IoT programming will give you the skills to bring physical objects to life through code. Start simple, keep exploring, and gradually build smarter and more connected projects.
0 notes
Text
Internships for CSE Students in Bangalore: Your Gateway to a Bright Tech Career
Bangalore, India’s tech capital, is a dream destination for Computer Science Engineering (CSE) students seeking top-notch internship opportunities. With a thriving IT ecosystem, the city hosts global tech giants, innovative startups, and renowned research centers, making it the perfect place to gain real-world experience and boost your career.
Why Choose Bangalore for a CSE Internship?
Bangalore is home to some of the world’s biggest IT firms, including Google, Microsoft, Infosys, TCS, Wipro, and IBM, along with a booming startup scene in AI, fintech, cybersecurity, and cloud computing. The city provides a unique platform for students to gain hands-on experience, work on live projects, and interact with industry experts. Interning in Bangalore not only enhances technical skills but also provides valuable networking and job placement opportunities.
Top Domains for CSE Internships in Bangalore
As a CSE student, choosing the right domain can shape your career. Some of the most in-demand fields include:
Software Development & Full Stack Development – Learn web and mobile app development using Java, Python, React, Node.js, and Angular.
Artificial Intelligence & Machine Learning – Work on deep learning, NLP, and data-driven models using TensorFlow, PyTorch, and OpenCV.
Cybersecurity & Ethical Hacking – Gain expertise in network security, penetration testing, and cryptography.
Data Science & Big Data Analytics – Learn data processing and visualization using Python, R, Hadoop, and SQL.
Cloud Computing & DevOps – Work with AWS, Azure, Kubernetes, and Docker for cloud-based solutions.
Blockchain Development – Explore smart contracts, decentralized applications, and cryptocurrency technologies.
IoT & Embedded Systems – Integrate AI with smart devices using Raspberry Pi, Arduino, and edge computing.
Top Companies Offering CSE Internships in Bangalore
Bangalore offers a plethora of internship opportunities at leading MNCs and startups. Some top companies hiring CSE interns include:
Google – Software engineering, AI, and cloud computing internships.
Microsoft – Data science, software development, and cybersecurity.
Amazon – Cloud computing, AI, and big data internships.
Infosys & Wipro – IT services, software development, and machine learning projects.
Flipkart & Swiggy – E-commerce and AI-driven analytics.
Startups like Zerodha, Razorpay, and Freshworks – Cutting-edge technology and innovative solutions.
How to Secure a CSE Internship in Bangalore?
With high competition, securing an internship requires a proactive approach. Here’s how you can improve your chances:
Build a Strong Portfolio – Showcase your coding projects on GitHub, Kaggle, and personal websites.
Master Data Structures & Algorithms – Participate in coding contests on Leetcode, CodeChef, and HackerRank.
Network with Professionals – Attend hackathons, tech meetups, and LinkedIn networking events.
Apply on Job Portals – Use Internshala, LinkedIn, AngelList, and Naukri for internship listings.
Leverage College Placement Cells – Many companies offer internships through campus recruitment.
Benefits of Doing an Internship in Bangalore
Interning in Bangalore offers more than just technical skills. You gain exposure to corporate culture, teamwork, problem-solving, and innovation. Many interns receive pre-placement offers (PPOs), securing full-time jobs even before graduation.
Final Thoughts
A CSE internship in Bangalore can be the stepping stone to a successful tech career. With abundant opportunities in AI, cloud computing, cybersecurity, and software development, students can explore their interests, gain hands-on experience, and build strong industry connections.
0 notes
Text
Top 5 Electrical Engineering Projects for University Students

Electrical engineering is a dynamic field that offers students numerous opportunities to apply theoretical knowledge in practical scenarios. For those pursuing Electrical Engineering Courses Sri Lanka, working on hands-on projects is essential to developing problem-solving skills and technical expertise. Here are five exciting project ideas for university students to explore.
1. Automation System for Smart Homes
Smart home automation is a great project option with the growth of IoT technologies. With this system, consumers can use voice commands or a smartphone to operate household equipment. An effective automation system can be built using wireless modules like Wi-Fi and Bluetooth, as well as components like Arduino and Raspberry Pi.
2. Station for Charging Powered by Renewable Energy
A solar or wind-powered charging station is an important initiative as the globe moves towards sustainable energy. This entails creating a system that harvests renewable energy and transforms it into electrical power that can be used to charge electronics. It can be a great tool to investigate ideas like power management, battery storage, and solar panel efficiency.
3. Automated Street Lighting System
This concept automates street lighting in an effort to save electricity. Students can design a system that turns street lights on and off in response to changes in the surrounding light levels by utilising microcontrollers and light-dependent resistors (LDRs). This project is eco-friendly and useful at the same time.
4. Transmission of Power Wirelessly
In electrical engineering, wireless energy transfer is an intriguing idea. One project on this subject entails creating a system that uses resonant inductive coupling to wirelessly transfer electricity over small distances. Applications such as electric vehicle and mobile device wireless charging depend on this technology.
5. Battery Management System (BMS) for Electric Vehicles
A project concentrating on battery management systems is extremely pertinent given the rising demand for electric cars (EVs). By keeping an eye on variables including voltage, temperature, and charge cycles, a BMS guarantees the security and effectiveness of EV batteries. This initiative will shed light on power electronics and energy storage.
Taking part in these electrical engineering projects will improve job possibilities and practical skills. Practical experience is crucial whether you're working on power systems, automation, or renewable energy. NSBM offers a first-rate learning environment with up-to-date materials and knowledgeable supervision for students looking for high-quality education and prospects in this profession.
0 notes
Text
Top 5 Home Automation Electronics Kits for Beginners in 2025

Home automation is changing the way we live, making everyday tasks easier and more efficient. From controlling lights to setting up security systems, smart technology is transforming our homes. If you're just starting to explore this exciting field, one of the best ways to dive in is with a home automation electronics kit. These kits give you the chance to learn and create your own smart home solutions.
In this article, we will explore the top 5 home automation electronics kits for beginners in 2025. Whether you’re new to electronics or just starting to get into home automation, these kits offer a great introduction to the world of DIY smart homes.
1. Arduino Starter Kit for Home Automation
What It Is:
Arduino is one of the most popular platforms for creating home automation projects. The Arduino Starter Kit includes an Arduino board, a variety of sensors, and all the necessary components to start building your first smart home devices.
Features:
Complete Kit: Includes the Arduino Uno board, wires, LEDs, temperature sensors, and more.
Easy Tutorials: Many beginner-friendly guides and projects are available online.
Open-Source: You can freely modify and improve your projects as you gain more experience.
Large Community: Lots of support and advice from other users.
Why It’s Great for Beginners:
Affordable: It’s one of the cheaper options for home automation kits.
Simple Programming: The programming language (C++) is beginner-friendly and well-documented.
Expandable: As you learn, you can add more sensors and devices to your projects.
Example Projects:
Automate lights with motion sensors.
Control a fan based on temperature.
Build a smart lock system using an RFID sensor.
2. Raspberry Pi 4 Home Automation Kit
What It Is:
The Raspberry Pi 4 is a small but powerful computer that can be used to control and manage your home automation system. With this kit, you’ll have the tools to run automation software and integrate smart devices.
Features:
Powerful Processor: The Raspberry Pi 4 has strong performance for handling complex tasks.
Versatile Software: It runs Raspberry Pi OS, which supports different home automation programs.
Connectivity: It includes Wi-Fi, Bluetooth, and Ethernet options to connect to your devices.
Complete Kit: Comes with a Raspberry Pi 4, power supply, pre-loaded SD card, and cooling accessories.
Why It’s Great for Beginners:
User-Friendly: Despite its power, the Raspberry Pi is beginner-friendly with lots of helpful tutorials.
Affordable: A powerful option that doesn’t cost a lot.
Expandable: You can add extra sensors, cameras, and devices as you go.
Example Projects:
Build a smart home dashboard to control all your devices.
Create a home security system using cameras and motion sensors.
Design a smart thermostat that adjusts the temperature based on the weather.
3. Sonoff DIY Smart Home Kit
What It Is:
Sonoff is known for offering simple and affordable home automation solutions. The Sonoff DIY Smart Home Kit includes smart plugs, switches, and a hub that can be easily controlled using a smartphone app.
Features:
Smart Plugs & Switches: Control your home appliances remotely through the eWeLink app.
Voice Control: Works with Alexa and Google Assistant for voice commands.
Cloud Control: Control devices from anywhere using the internet.
Wide Compatibility: It works with most home appliances.
Why It’s Great for Beginners:
Simple Setup: You don’t need to deal with complicated wiring—just plug in your devices and start using them.
No Programming Required: The app makes it easy to control devices without any technical skills.
Affordable: The kit is budget-friendly, making it an excellent entry point for beginners.
Example Projects:
Set up a lighting system that turns on based on motion or time.
Automate appliances like coffee makers and fans.
Use a motion sensor to trigger a lamp to turn on when someone enters the room.
4. Makeblock mBot Ultimate 2.0 Robotics Kit (with Home Automation Projects)
What It Is:
The Makeblock mBot Ultimate 2.0 is primarily a robotics kit but can also be used to create home automation projects. It’s a great option for beginners who want to learn both robotics and automation.
Features:
Includes Sensors: Comes with motion, temperature, and light sensors.
Visual Programming: Uses mBlock, a drag-and-drop programming tool based on Scratch, making it easy to learn coding.
Modular Design: You can add different parts to customize your projects.
App Control: The mBot can be controlled using a mobile app, allowing you to set up automated routines.
Why It’s Great for Beginners:
Educational: Combines fun robotics with practical home automation skills.
Easy to Program: The visual programming interface is beginner-friendly.
Customizable: You can build different types of projects, including home automation systems.
Example Projects:
Set up a security system with motion detection and video.
Build a smart pet feeder that can be controlled from your phone.
Create a lighting system that turns on or off based on occupancy.
5. Tinkr Home Automation Kit
What It Is:
The Tinkr Home Automation Kit is a beginner-friendly kit designed for easy setup and control of smart home devices. It comes with various sensors, smart plugs, and a user-friendly app.
Features:
Complete Kit: Includes motion, light, and temperature sensors, as well as smart plugs and switches.
Easy-to-Use App: The Tinkr app makes it simple to control your devices and set up automation routines.
Cloud Control: Allows you to control your devices from anywhere using the internet.
Wireless: Uses Wi-Fi or Zigbee for easy connections with smart devices.
Why It’s Great for Beginners:
Plug-and-Play: No complex wiring—just follow the instructions in the app.
Simple Interface: The app’s interface is designed to be easy for beginners.
Affordable: It’s a great value for those just getting into home automation.
Example Projects:
Set up smart lighting that adjusts based on room occupancy.
Automate your air conditioning system to turn on when the temperature reaches a certain level.
Build a smart garden irrigation system that activates when the soil is dry.
Conclusion
As home automation becomes more popular, there are plenty of options for beginners to explore. The kits listed here offer an accessible and hands-on way to learn about smart technology and electronics. Whether you choose a simple option like the Sonoff DIY Smart Home Kit or a more powerful solution like the Raspberry Pi 4, each of these home automation electronics kits provides a great starting point for your smart home projects.
By diving into home automation, you’ll not only be able to make your home smarter and more efficient, but you’ll also gain valuable skills in electronics, programming, and problem-solving. So, pick your favorite kit, get started, and enjoy the process of creating your own smart home!
0 notes
Text
Using a Knock Sensor to Detect Knocks with Arduino!
In this project, we're interfacing the KY-031 Knock Sensor with an Arduino Nano, displaying the knock count on a 16x2 LCD with I2C, and triggering an LED for visual feedback.
🔧 What You’ll Need: ✔️ Arduino Nano ✔️ KY-031 Knock Sensor Module ✔️ 16x2 LCD with I2C Interface ✔️ LED ✔️ Jumper Wires & Breadboard
💡 How It Works: The knock sensor detects vibrations, sending a signal to the Arduino. The microcontroller then updates the LCD and blinks an LED to confirm the knock was detected. Simple but effective!
🔥 Cool Applications: 🎶 DIY Drum Pad 🚪 Secret Knock Lock 🔊 Sound-Activated Projects
Check out the full tutorial and code in the tutorial!
0 notes
Text
Supercharge Your Curriculum—Why Every School Needs a STEM Lab!

Transforming Learning with STEM Innovation
At Maplewood Academy, students once struggled to grasp complex science and technology concepts. That changed when the school introduced a state-of-the-art STEM lab. Within a year, test scores improved by 30%, and students actively participated in national science competitions. The once passive learners became innovators, eager to tackle real-world problems.
This isn’t just a success story—it’s proof that STEM labs are transforming education. If your school hasn’t embraced STEM learning yet, now is the time. Here’s why!
The Power of STEM Labs in Education
1. Hands-On Learning Boosts Retention & Engagement
Traditional learning methods often fail to engage students. According to the National Science Foundation (NSF), hands-on STEM activities increase retention rates by 25% compared to lecture-based instruction.
STEM labs allow students to:
Conduct experiments and apply theoretical knowledge.
Engage in robotics, coding, and engineering projects.
Learn through trial and error, fostering deeper understanding.
Example: Schools implementing 3D printing and robotics kits have reported a 40% increase in STEM participation, especially among underrepresented groups.
2. Prepares Students for Future Careers
The U.S. Bureau of Labor Statistics predicts that STEM jobs will grow 2x faster than non-STEM jobs by 2031. Schools must prepare students for these high-demand careers.
Key career paths include:
Artificial Intelligence & Robotics
Biomedical Engineering
Cybersecurity & Data Science
Example: Students from STEM-focused schools are more likely to secure internships at top tech firms like Google, Tesla, and NASA.
3. Encourages Critical Thinking & Innovation
A report by MIT found that students in STEM-based learning environments are 30% more likely to develop innovative solutions to global challenges.
STEM labs help students:
Develop problem-solving and analytical skills.
Work collaboratively on real-world projects.
Think creatively and explore cutting-edge technologies.
Example: High school students in Florida used their STEM lab to design an AI-driven flood monitoring system, winning an international competition.
4. Increases College Readiness & Scholarship Opportunities
Participation in STEM programs boosts college admission rates by 25%, according to the College Board.
Top universities actively seek students with:
STEM project experience.
Competition participation (e.g., Google Science Fair, FIRST Robotics).
Research involvement in emerging technologies.
Example: Students with STEM lab experience have a higher chance of receiving scholarships and research grants.
How to Implement a High-Impact STEM Lab
1. Secure Funding & Industry Support
Apply for NSF and NASA STEM grants.
Partner with local tech firms for funding & mentorship.
Utilize corporate donations for lab equipment.
Tip: Many companies offer educational discounts on STEM kits and software.
2. Invest in Essential STEM Equipment
Robotics kits (LEGO Mindstorms, VEX Robotics)
3D printers & Arduino boards
Virtual Reality (VR) & AI learning tools
Tip: Start small with modular STEM kits and expand as funding grows.
3. Train Teachers in STEM Methodologies
Enroll teachers in STEM certification programs.
Provide hands-on workshops in coding, engineering, and AI.
Encourage collaboration with STEM professionals & university researchers.
4. Encourage Students to Join STEM Competitions
Promote FIRST Robotics, Intel ISEF, and Google Science Fair.
Offer incentives for STEM project-based learning.
Create a mentorship program with STEM experts.
Future-Proof Your School with STEM
A well-equipped STEM lab isn’t just an educational asset—it’s a launchpad for student success. Schools investing in STEM see higher engagement, better test scores, and increased college acceptance rates. Now is the time to integrate STEM into your curriculum!
Learn More About Implementing a STEM Lab
Give your students the tools to innovate and excel. Start your STEM journey today!
Take action now! Whether you’re looking to enhance your STEM curriculum, integrate STEM technology, or launch a STEM workshop, the time to act is now! Get started today! Partner with leading STEM education providers, access STEM resources for teachers, and introduce hands-on STEM activities in your school.
Contact us now to build your STEM learning center! Website: https://makersmuse.in/ Empower students, embrace innovation, and future-proof your school with a high-impact STEM program!
0 notes