#Shuffling an Array in JavaScript
Explore tagged Tumblr posts
Visit Tumblr Blog
Explore Tumblr blogs with no restrictions, modern design and the best experience.
Last Seen Tumblr Blogs


Fun Fact
The Tumblr app for Google Glass was released on May 16, 2013.
Text
JavaScript Tutorial - Create a Simple Word Shuffle Typing Game
Welcome to this fun JavaScript tutorial. This tutorial we explore how to make a simple typing game directly playable in your browser. We will use only the standard HTML, CSS and JavaScript code to make this game. The premise for the game is very simple, we will load any random amount of words from an array, chose a word from that array and we will scramble or shuffle the letters in that word and…

View On WordPress
0 notes
Text
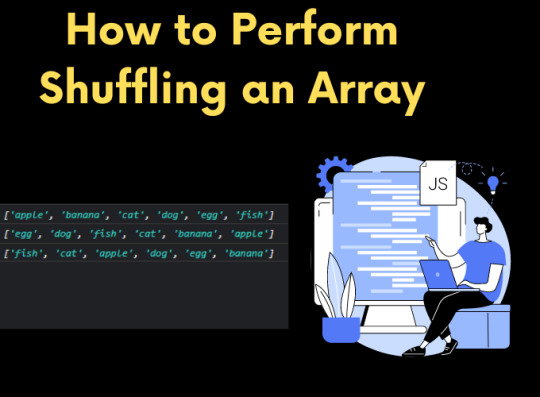
JavaScript Problem: How to Perform Shuffling an Array
In this article, we are going to see about shuffling an array in JavaScript. Shuffling can be a very useful feature while creating some applications like quiz, scramble games etc. or might be useful in many ways. So we will make this thing happens with some simple and basic way. We will take an array of element or numbers, and we will apply some logic on them to shuffle in random order. So let’s…
View On WordPress
0 notes
Note
Any good python modules I can learn now that I'm familiar with the basics?
Hiya 💗
Yep, here's a bunch you can import them into your program to play around with!

math: Provides mathematical functions and constants.
random: Enables generation of random numbers, choices, and shuffling.
datetime: Offers classes for working with dates and times.
os: Allows interaction with the operating system, such as file and directory manipulation.
sys: Provides access to system-specific parameters and functions.
json: Enables working with JSON (JavaScript Object Notation) data.
csv: Simplifies reading and writing CSV (Comma-Separated Values) files.
re: Provides regular expression matching operations.
requests: Allows making HTTP requests to interact with web servers.
matplotlib: A popular plotting library for creating visualizations.
numpy: Enables numerical computations and working with arrays.
pandas: Provides data structures and analysis tools for data manipulation.
turtle: Allows creating graphics and simple games using turtle graphics.
time: Offers functions for time-related operations.
argparse: Simplifies creating command-line interfaces with argument parsing.
How to actually import to your program?
Just in case you don't know, or those reading who don't know:
Use the 'import' keyword, preferably at the top of the page, and the name of the module you want to import. OPTIONAL: you could add 'as [shortname you want to name it in your program]' at the end to use the shortname instead of the whole module name

Hope this helps, good luck with your Python programming! 🙌🏾
60 notes
·
View notes
Video
youtube
Topic:-Build JavaScript Memory GAME coding project from scratch. Source Code-https://github.com/rahulgarg55/Memory-Game #LOVE TO CODE #FAANG preparation #GAME #JAVASCRIPT GAME What you'll learn?? How to use JavaScript How to build web applications How to apply JavaScript Create web applications --------------------------------- Requirements Basic HTML and CSS Understanding of JavaScript code principles computer access editor and browser access ------------------------------------------ See how JavaScript works ... Top resources and how to setup your work environment create an html template to start any project Learn why loops can save time in development Explore how click events can be setup and make your content interactive Learn how to build a randomizer in JavaScript Output dynamically generated HTML content Update DOM elements Use arrays to store data Learn how to shuffle arrays Apply logic to test if players selections are a win Debug and tweak applications all this an more Source Code is included Learn to Create your own JavaScript GAME!!! Do follow Our Linkedin Page to Never Miss any Update:-https://www.linkedin.com/company/love-to-cod/
1 note
·
View note
Photo

Angular 10, data grids, randomness, and checking some boxes
#494 — June 26, 2020
Unsubscribe | Read on the Web
JavaScript Weekly
Lessons Learned Refactoring Optional Chaining Into a Large Codebase — Lea Verou, creator of Mavo, decided to refactor Mavo to use optional chaining (?.) and here’s some of what she discovered along the way. (As an aside, Lea was the subject of a neat 10 minute programming documentary recently – worth a watch!)
Lea Verou
A Little Bit of Plain JavaScript Can Do A Lot — For anyone more than happy to dive in and write JavaScript without dragging in an entire framework and tooling to manage it, there will be no surprises here, but this is a nice reminder otherwise. Do you always need a 'framework'? No.
Julia Evans
Creating a Voting App with Firestore and Wijmo — Learn how to build a realtime voting app quickly and easily with the Firestore database and Wijmo components. The app uses OAuth for authentication and allows users to submit and vote for ideas.
Wijmo by GrapeCity sponsor
Angular 10 Released — A major release for the popular Google-led framework, though smaller in scope than usual as Angular 9 only came out in February ;-) 10 gains a new date range picker, optional stricter settings, and an upgrade to TypeScript 3.9.
Stephen Fluin (Google)
What's Coming in TypeScript 4? — The first beta of TypeScript 4 is due any moment with a final release due in August. New bits and pieces include variadic tuple types, labelled tuples, short-cut assignment operators (e.g. ||=) and more.
Tim Perry
⚡️ Quick bytes:
Chrome 85's DevTools have gained better support for working with styles created by CSSOM APIs (such as by CSS-in-JS frameworks). There's also syntax autocompletion for optional chaining and highlighting for private fields.
There's nothing to see just yet, but NativeScript is coming to Ionic.
The creator of AlpineJS has written about how he's passed $100K/yr in income using GitHub Sponsors.
Did you know there's a Slack theme for VS Code? 😆
▶️ The JS Party podcast crew discusses how their use of JavaScript syntax evolves (or not) over time.
engineeringblogs.xyz is a new aggregator site (by us!) that brings together what 507 (so far) product and software engineering blogs are talking about. Worth a skim.
💻 Jobs
JavaScript Developer at X-Team (Remote) — Join X-Team and work on projects for companies like Riot Games, FOX, Coinbase, and more. Work from anywhere.
X-Team
Find a Job Through Vettery — Vettery specializes in tech roles and is completely free for job seekers. Create a profile to get started.
Vettery
📚 Tutorials, Opinions and Stories
ECMAScript Proposal: Private Static Methods and Accessors in Classes — Dr. Axel takes a look at another forthcoming language feature (in this case being at stage 3 and already supported by Babel and elsewhere).
Dr. Axel Rauschmayer
npm v7 Series: Why Keep package-lock.json? — If npm v7 is going to support yarn.lock files, then why keep package-lock.json around as well? Isaac goes into some depth as to how yarn.lock works and why it doesn’t quite suit every npm use case.
Isaac Z. Schlueter
How to Dynamically Get All CSS Custom Properties on a Page — Some fun DOM and stylesheet wrangling on display here.
Tyler Gaw
Stream Chat API & JavaScript SDK for Custom Chat Apps — Build real-time chat in less time. Rapidly ship in-app messaging with our highly reliable chat infrastructure.
Stream sponsor
Getting Started with Oak for Building HTTP Services in Deno — A comprehensive Oak with Deno tutorial for beginners (which, I guess, we all are when it comes to Deno). Oak is essentially the most popular option for building HTTP-based apps in Deno right now.
Robin Wieruch
Understanding Generators in JavaScript — Generator functions can be paused and resumed and yield multiple values over time and were introduced in ES6/ES2015.
Tania Rascia
Build a CRUD App with Vue.js, Spring Boot, and Kotlin — It’s a fact of life that not everyone is building apps with JavaScript at every level of the stack. Sometimes.. people use Java too 🤫
Andrew Hughes
▶ Creating a Basic Implemention of 'Subway Surfers' — No modules, webpack or such-like here.. just exploring the joy of throwing a game mechanic together quickly using rough and ready JavaScript. Love it.
Shawn Beaton
Rubber Duck Debugging for JavaScript Developers — When you’re stuck with something, why not talk to a rubber duck?
Valeri Karpov
🔧 Code & Tools

Tabulator 4.7: An Interactive Table and Data Grid Library — Supports all major browsers and can be used with Angular, Vue, and React if you wish. 4.7 is a substantial release. Among other things is a new layout mode that resizes the table container to fit the data (example).
Oli Folkerd
Tragopan: A Minimal Dependency-Free Pan/Zoom Library — Try it out here. Claims to work faster due to use of native browser scrolling for panning (left/right/up/down) and transform/scale for zooming.
team.video
Builds Run Faster on Buildkite 🏃♀️ — Build times <5 mins at any scale. Self-hosted agents work with all languages, source control tools & platforms.
Buildkite sponsor
React Query 2: Hooks for Fetching, Caching and Updating Async Data — React Query is well worth checking out and has extensive documentation and even its own devtools. Main repo.
Tanner Linsley
Rando.js: A Helper for Making Randomness Easier — The rando function lets you get random integers in a range, floats in a range, pick between multiple items, return a random element from an array, and more. There’s also randosequence for a more shuffle-like experience.
nastyox
jinabox.js: A Customizable Omnibox for AI Powered Searching — Designed to be used with a Jina back-end. It’s all open source, but will take some digging around to understand fully.
Jina AI
MongoDB Is Easy. Now Make It Powerful. Free Download for 30 Days.
Studio 3T sponsor
IntersectionObserver Visualizer — If you’re new to using the IntersectionObserver API, this useful interactive demo might help you comprehend it a little better.
michelle barker
Polly.js 5.0: Record, Replay, and Stub HTTP Interactions
Netflix
Vest: Effortless Validations Inspired by Testing Frameworks — If you’re used to unit testing, the syntax used here will be familiar.
Evyatar
👻 Scary Item of the Week
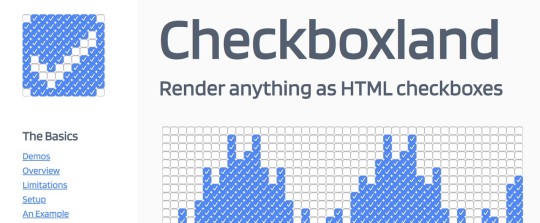
Checkboxland: Render 'Anything' as HTML Checkboxes — This frivolous experiment is equal parts terrifying and impressive. It’s a JS library that displays animations, text, and arbitrary data using nothing but HTML checkboxes and, to be fair, they’ve presented it really well!
Bryan Braun
by via JavaScript Weekly https://ift.tt/3g53MDU
0 notes
Link

Now and then, you need randomly to shuffle an array in JavaScript. There is a super-easy way of doing so. We can use the sort() method and pass a random number to it.
JavaScript Shuffle Array
As mentioned in the introduction, we are going to be using the sort method.
This method, without any parameters, will sort an array in a natural way like 123 and abc.
See the following example:
var charArray = ['d', 'f', 'a', 'c', 'b', 'e']; var numArray = [1, 5, 3, 2, 4]; console.log(charArray.sort()); // ["a", "b", "c", "d", "e", "f"] console.log(numArray.sort()); // [1, 2, 3, 4, 5]
As you can see the Arrays get normalised sorted. But we can also pass a specific argument which is what we are going to use to randomise the sort.
var rockPaperScissor = ['💎', '📄', '✂️']; console.log(rockPaperScissor.sort(() => 0.5 - Math.random()));
This will randomly shuffle the array let me explain in depth.
The sort function comes with a comparison between two elements, where element one is bigger than two. It will put the index lower or higher.
As for the .5 - Math.random() this will return a value between -0.5 and 0.5
So whenever the value is below 0, the element is placed before the one other element.
0 notes
Text
i figured out some almost useless information about the neopets lottery
over the past 20 days the numbers have been
1-9: 40 10-20: 39 21-30: 41
however, this is 31 numbers which is prime so one of the groups has to be 11 numbers vs 2 groups of 10. if you break it down differently,
1-10: 44 11-20: 35 21-30: 41
and
1-9: 40 10-19: 36 20-30: 44
therefore, the 11-19ish group is only equally represented in the winning numbers when you consider it as the sole 11-number group.
i recently implemented a random page link generator in javascript (which is essentially the same as a number generator but you give the array links as elements, instead of numbers).
one of the issues i am running into with the current temporary implementation i am using (i think it's a simplified fisher-yates shuffle, whatever that means) is that some elements (the lower-numbered ones in the array) are overrepresented in the end data.
i don't know what kind of randomization the neopets team uses for winning lottery numbers, but from looking at the numbers recently drawn i would suspect they mirrored a fisher-yates shuffle to overrepresent both higher and lower numbers instead of just one end of the spectrum.
meaning, if you want to make the most effective lottery bets, you need to bet more numbers between 1-10 and 20-30, and less numbers between 11-19. i don't think it would be effective to eliminate 11-19 from your betting entirely, but most lottery winners are 4-5 number matches, so i really have no idea how to conceptualize how that works out statistically, but it looks like there are about 3 days out of 20 where people got 5 number matches using exclusively 1-10 and 20-30
i don't know if this is true, and it seems like the obvious next step to confirm or deny is to look for a larger data set or maybe see if any of the lottery backend is visible, but afaik randomization is notoriously bizarre to automate and so i really do think, in one way or another, it is possible to game the lottery and maybe even get that avatar without cheating, per se
1 note
·
View note
Text
Cassini image mosaic: A farewell to Saturn
Cassini image mosaic: A farewell to Saturn
(function() /* Optional settings (these lines can be removed): */ subID = ""; // - local banner key; injectTo = ""; // - #id of html element (ex., "top-banner"). /* End settings block */ if(injectTo=="")injectTo="admitad_shuffle"+subID+Math.round(Math.random()*100000000); if(subID=='')subid_block=''; else subid_block='subid/'+subID+'/'; document.write('<div id="'+injectTo+'">'); var s = document.createElement('script'); s.type = 'text/javascript'; s.async = true; s.src = 'https://ad.admitad.com/shuffle/ac08537a13/'+subid_block+'?inject_to='+injectTo; var x = document.getElementsByTagName('script')[0]; x.parentNode.insertBefore(s, x); )();
In a fitting farewell to the world that had actually been its house for over 13 years, the Cassini spacecraft took one last, sticking around take a look at Saturn and its superb rings throughout the last leg of its journey and snapped a series of images that has actually been put together into a brand-new mosaic.
Cassini’s wide-angle video camera gotten 42 red, green and blue images, covering the world and its primary rings from one end to the other, onSept 13,2017 Imaging researchers sewed these frames together to make a natural color view. The scene also consists of the moons Prometheus, Pandora, Janus, Epimetheus, Mimas and Enceladus.
There is much to keep in mind and commemorate in marking completion of the objective. Cassini’s expedition of Saturn and its environments was deep, detailed and historical.
“Cassini’s scientific bounty has been truly spectacular—a vast array of new results leading to new insights and surprises, from the tiniest of ring particles to the opening of new landscapes on Titan and Enceladus, to the deep interior of Saturn itself,” stated Robert West, Cassini’s deputy imaging group leader at NASA’s Jet Propulsion Laboratory in Pasadena, California.
TheCassini imaging group had actually been preparing this unique farewell view of Saturn for many years. For some, when completion lastly came, it was a tough farewell.
“It was all too easy to get used to receiving new images from the Saturn system on a daily basis, seeing new sights, watching things change,” stated Elizabeth Turtle, an imaging group partner at the Johns Hopkins University Applied Physics Laboratory, Laurel,Maryland “It was hard to say goodbye, but how lucky we were to be able to see it all through Cassini’s eyes!”
For others, Cassini’s farewell to Saturn is similar to another parting from long earlier.
“For 37 years, Voyager 1’s last view of Saturn has been, for me, one of the most evocative images ever taken in the exploration of the solar system,” stated Carolyn Porco, previous Voyager imaging employee and Cassini’s imaging group leader at the Space Science Institute in Boulder,Colorado “In a similar vein, this ‘Farewell to Saturn’ will forevermore serve as a reminder of the dramatic conclusion to that wondrous time humankind spent in intimate study of our Sun’s most iconic planetary system.”
Launched in 1997, the Cassini spacecraft orbited Saturn from 2004 to2017 The objective made many significant discoveries, consisting of the unexpected geologic activity on Saturn’s moon Enceladus and liquid methane seas on Saturn’s biggest moon,Titan Cassini ended its journey with a significant plunge into Saturn’s environment onSept 15, 2017, returning special science information till it lost contact withEarth
Source: http://livescience.tech/2017/11/21/cassini-image-mosaic-a-farewell-to-saturn/
LiveScience.Tech
0 notes
Photo

Watch Dogs Like Text Shuffle Animation – swapdogs.js swapdogs.js is a pure JavaScript library that helps you create watch dogs like text animations from an array of text strings.
0 notes
Text
How to shuffle an array using JavaScript ? https://t.co/Gg5edHSZsI
How to shuffle an array using JavaScript ? https://t.co/Gg5edHSZsI
— Dave Epps (@dave_epps) June 29, 2020
from Twitter https://twitter.com/dave_epps
0 notes
Text
Facts About Alpacas
Facts About Alpacas
(function() /* Optional settings (these lines can be removed): */ subID = ""; // - local banner key; injectTo = ""; // - #id of html element (ex., "top-banner"). /* End settings block */ if(injectTo=="")injectTo="admitad_shuffle"+subID+Math.round(Math.random()*100000000); if(subID=='')subid_block=''; else subid_block='subid/'+subID+'/'; document.write('<div id="'+injectTo+'">'); var s = document.createElement('script'); s.type = 'text/javascript'; s.async = true; s.src = 'https://ad.admitad.com/shuffle/ac08537a13/'+subid_block+'?inject_to='+injectTo; var x = document.getElementsByTagName('script')[0]; x.parentNode.insertBefore(s, x); )();
Adorable, docile and soft, alpacas are treasured as family pets and livestock worldwide. There are no wild alpacas. Alpacas are domesticated variations of vicuñas, South American ruminants that live high in theAndes Alpacas belong to llamas, which are domesticated variations of another wild Andean ruminant, the guanaco. While llamas are utilized as pack animals, alpacas are raised generally for their soft wool.
Guanacos and vicuñas are discovered throughout the AndesMountains They are descended from camelids that established in North America and moved to South America 3 million years back, according to Phil Switzer, an alpaca breeder based inColorado These animals developed into guanacos and vicuñas, and about 6,000 years back, individuals in the Andes started to domesticate them. There are 2 types of alpaca, theHuacaya and the Suri Huacaya alpacas are more typical, according to Switzer.
The primary distinction in between the types is the length and fineness of the wool-like fiber, according to the Food and Agriculture Organization of the United Nations (FAO). The Suri have long fibers (“silky dreadlocks,”according to Alpaca Ventures), while the Huacaya have a more compact “crimpy” fleece, with much shorter fibers.
Size
Guanacos are a little bigger than alpacas and much bigger than vicuñas, however they are smaller sized and less greatly developed than llamas, according to the University of Michigan’s Animal Diversity Web (ADW). Alpacas are the tiniest members of the camel household. The typical height at the shoulder is 3 feet (914 centimeters), according toSwitzer They are 4 to 7 feet (120 to 225 cm) long and weigh 121 to 143 pounds. (55 to 65 kgs).
By contrast, the llama stands nearly 4 feet (1.2 m) at the shoulder and weighs from 286 to 341 pounds. (130 to 155 kg). Camels grow to 6.5 feet (2 m) and weigh from 880 to 1,325 pounds. (400 to 600 kg), according to the San Diego Zoo.
Habitat
Wild guanacos and vicuñas live in a vast array of environments, from the high and dry Atacama Desert in northern Chile to the damp and rainy Tierra del Fuego at the southern suggestion of the continent, according to the ADW. Alpacas are also belonging to the Andes, at elevations of approximately 15,750 feet (4,800 meters).
Alpacas, nevertheless, are really versatile and have actually been exported all over the world, consisting of the United States, New Zealand, Australia and the Netherlands, so their “habitat” is frequently farmland. Still, 99 percent of the world population of alpacas is discovered in South America, according to the ADW.
Habits
Alpacas are really social animals. They are mild and curious and with training can end up being terrific family pets, according toSwitzer Herds frequently consist of animals of various types or taxonomic households, such as llamas, goats and sheep, according to the FAO.
Alpacas spit when they are distressed or feel threatened. They will in some cases spit at each other when they are contending for food or aiming to develop supremacy, according toSwitzer They will not spit at individuals or bite unless they have actually been abused.
Alpacas hum; they make a seem like “mmm,” according to AlpacaVentures However, they also squeal when threat exists, and make a sound just like a “wark” sound when delighted. Fighting males shriek, making a warbling bird-like cry.
Alpacas in a herd all utilize the very same location as a restroom rather of defecating in random locations like lots of animals do. This habits assists manage parasites, according to the FAO. Males frequently have cleaner dung stacks than women, according to AlpacaVentures Females have the tendency to stand in a line and all address when.
Diet
As herbivores, alpacas just consume plants. They consume mainly lawn, however their diet plans can also consist of leaves wood, bark or stems. Like other ruminants, alpacas have a three-chambered stomach that absorbs the roughage effectively.
Unlike other grazers, alpacas do not consume much. According to the Alpaca Owners Association, a 125- pound. (57 kg) animal just consumes around 2 pounds. (907 grams) each day. In basic, alpacas consume 1.5 percent of their body weight every day.
Offspring
Alpacas type once a year, and as animals they are frequently caused to reproduce at any time. The female alpaca has a gestation duration of 242 to 345 days and brings to life simply one offspring. The birth procedure can use up to 7 hours, according toNational Geographic
The infant alpaca, called a cria, weighs 18 to 20 pounds. (8 to 9 kg) when it is born. The cria is weaned at 6 to 8 months, and women are prepared to replicate at 12 to 15 months. Males take a bit longer to develop and are prepared to mate at 30 to 36 months. Alpacas live approximately 20 years.
Classification/ taxonomy
According to the Integrated Taxonomic Information System (ITIS), the taxonomy of the alpaca is:
Kingdom: Animalia Subkingdom: Bilateria Infrakingdom: Deuterostomia Phylum: Chordata Subphylum: Vertebrata Infraphylum: Gnathostomata Superclass: Tetrapoda Class: Mammalia Subclass: Theria Infraclass: Eutheria Order: Artiodactyla Family: Camelidae Genus: Vicugna Species: Vicugna pacos
For several years, zoologists presumed alpacas and llamas had actually come down from guanacos, and they were categorized in the genus Lama However, in a 2001 paper entitled “Genetic analysis reveals the wild ancestors of the llama and the alpaca” in the journal Proceeding of the Royal Society B, scientists revealed there is “high genetic similarity” in between the alpaca and the vicuña, and in between the llama and the guanaco. They suggested that the alpaca be reclassified as Vicugna pacos
Conservation status
The International Union for Conservation of Nature does not have entries for alpacas on its Red List of ThreatenedSpecies Guanacos (Lama guanicoe), nevertheless, are noted as Least Concern for termination due to their vast array, big populations and event in secured locations. Similarly, the IUCN lists vicuñas (Vicugna vicugna) as LeastConcern
Other facts
Llamas and alpacas can crossbreed. The offspring are called huarizo.
Alpaca fur is a really treasured fiber for craftsmens and crafters. Alpaca fur is really soft and does not keep water. It is also really long lasting. According to National Geographic, alpaca fur is the 2nd greatest animal fiber, after mohair.
Alpacas been available in 22 colors, from a real, blue-black through browns and tans to white, according to Alpaca Ventures.
Some Andean individuals consume alpaca meat. In Peru, it is frequently served in high end dining establishments.
Alpacas do not have teeth in the top-front of their mouths. This provides the look of having an underbite.
Additional resources
.
Source: http://livescience.tech/2017/11/21/facts-about-alpacas/
LiveScience.Tech
0 notes
Link

I'm always on the lookout for new ways to be more efficient. And JavaScript is always full of pleasant surprises.
1. Transform the arguments object into an array.
The arguments object is an Array-like object accessible inside functions that contains the values of the arguments passed to that function. But it's not like other arrays, we can access the values and we can get the length, but no other array methods can be used on it. Luckily, we can just convert it into a regular array:
var argArray = Array.prototype.slice.call(arguments);
2. Sum all the values from an array.
My initial instinct was to use a loop, but that would have been wasteful.
var numbers = [3, 5, 7, 2]; var sum = numbers.reduce((x, y) => x + y); console.log(sum); // returns 17
3. Short circuit conditionals.
We have the following code:
if (hungry) { goToFridge(); }
We can make it even shorter by using the variable with the function:
hungry && goToFridge()
4. Use logical OR for conditions.
I used to declare my variables at the start of my function just to avoid getting undefined if anything went unexpectedly wrong.
function doSomething(arg1){ arg1 = arg1 || 32; // if it's not already set, arg1 will have 32 as a default value }
5. Comma operator.
The comma operator (,) evaluates each of its operands (from left to right) and returns the value of the last operand.
let x = 1; x = (x++, x); console.log(x); // expected output: 2 x = (2, 3); console.log(x); // expected output: 3
6. Using length to resize an array.
You can either resize or empty an array.
var array = [11, 12, 13, 14, 15]; console.log(array.length); // 5 array.length = 3; console.log(array.length); // 3 console.log(array); // [11,12,13] array.length = 0; console.log(array.length); // 0 console.log(array); // []
7. Swap values with array destructuring.
The destructuring assignment syntax is a JavaScript expression that makes it possible to unpack values from arrays, or properties from objects, into distinct variables.
let a = 1, b = 2 [a, b] = [b, a] console.log(a) // -> 2 console.log(b) // -> 1
8. Shuffle elements from array.
Every day I'm shufflin' Shufflin', shufflin'
var list = [1, 2, 3, 4, 5, 6, 7, 8, 9]; console.log(list.sort(function() { return Math.random() - 0.5 })); // [4, 8, 2, 9, 1, 3, 6, 5, 7]
9. Property names can be dynamic.
You can assign a dynamic property before declaring the object.
const dynamic = 'color'; var item = { brand: 'Ford', [dynamic]: 'Blue' } console.log(item); // { brand: "Ford", color: "Blue" }
10. Filtering for unique values.
For all you ES6 fans out there, we can create a new array containing only the unique values by using the Set object with the Spread operator.
const my_array = [1, 2, 2, 3, 3, 4, 5, 5] const unique_array = [...new Set(my_array)]; console.log(unique_array); // [1, 2, 3, 4, 5]
Closing thoughts.
Being responsible is far more important than being efficient. Your website NEEDS to work in all browsers.
0 notes
Text
Build a Music Player With Vuetify
What You'll Be Creating
Building apps with Vue.js is easy, fun, and enjoyable. You can build a working app with minimum effort. To prove that, today I'll show you how easy it is to build your own full-featured music player. To make things even easier, we'll use Vuetify.js, a Vue.js powered UI library, which will speed up the UI construction. I can almost feel your impatience, so let's get started.
You can find the full source code in the GitHub repo. And here is the working demo. To follow this tutorial, you should be familiar with Vue components, Vue single file components, and ES2015 syntax.
Planning the App
Every creation starts with an idea and at least some basic planning. So first we need to decide what we want to build and what functionality we want to implement. It's said that a picture is worth a thousand words, so let's start with a simple sketch of the music player.
I made this wireframe so you can get a general notion of the UI we want to build. The next step is to describe the functionality we intend to implement.
As John Johnson says:
First, solve the problem. Then, write the code.
We'll use that as a source of wisdom, and we'll plan the app out before we start coding it.
App Components
Vue.js is a component-based framework. So we need first to split the app into individual components (five in our case, as shown in the sketch above), and to outline the features and functionality for each of them.
Title Bar
This component will contain the following parts:
a menu on the left side
the name of the app in the center
three static icons on the right side
Info Panel
This component will show basic information about the currently played track:
the track's artist and title on the left side
the current track's position and duration on the right side
Control Bars
This component will contain two bars, which will include all the controls necessary to manipulate the audio tracks in the player's playlist.
a volume slider with an icon on the left (its appearance will change according to the volume level and when the sound is muted), and volume percentage on the right
buttons for playing, pausing, stopping, and skipping the tracks.
two buttons on the far right: one for repeating the current track, and one for shuffling the tracks' order of playing
a seek bar showing the currently played track's position, with the ability to change it with a mouse click on the bar
Playlist Panel
This component will contain the tracks' playlist with the following functionality:
display a track with the proper number, artist, title, and duration properties
select a track on single click
play a track on double click
Search Bar
This component will offer search functionality in the cases when we want to find and play particular track(s).
Of course, the above outline cannot cover all the details and nuances, and this is perfectly fine. For now, it's enough for us to get an overall picture of the final product. We'll handle all the details and eventual challenges during the building process.
So let's get into the fun part and write some code!
Getting Started
Vuetify's quick start page offers plenty of options to get you started. We'll use one of the pre-made Vue CLI templates called Webpack Simple. Run the following commands in the directory you want to use for this project:
First, install Vue CLI:
$ npm install -g vue-cli
Then, create the app:
$ vue init vuetifyjs/webpack-simple vue-music-player
Next, go to the app's directory and install all dependencies:
$ cd vue-music player $ npm install
We'll use Howler.js (a JavaScript audio library) to handle the audio parts of the music player. So we need to include it in the project too. Run the following command:
$ npm install --save howler
And finally, run the app:
$ npm run dev
The app will open on localhost:8080 in your default browser. You should see a simple Vuetify app skeleton.
Tweaking the Template
To adjust it to our needs, we need to clean up the template and tweak it a bit. Rename the App.vue file to Player.vue, open it, delete everything inside, and add the following instead:
<template> <v-app dark> <v-content> <v-container> <!-- The player components go here --> </v-container> </v-content> </v-app> </template> <script> export default { data () { return { } } } </script>
We wrap our music player app in the v-app component, which is required for the app to work properly. We also pass the dark prop, to apply the Vuetify dark theme.
Now, open the main.js file, delete the original content, and add the following:
import Vue from 'vue' import Vuetify from 'vuetify' import 'vuetify/dist/vuetify.css' import Player from './Player.vue' import {Howl, Howler} from 'howler' Vue.use(Vuetify) new Vue({ el: '#app', render: h => h(Player) })
Also, open the index.html file and change the content of the <title> tag to Vue Music Player.
Now, in your browser, you should see an empty dark page. And voila. You are ready to start creating.
Before you start coding, it's good to know that Vuetify offers code snippets and autocompletion for the major code editors: VS Code, Atom, and Sublime. To get the snippets, search for the extension in your favorite editor (vuetify-vscode, or vuetify-atom, or vuetify-sublime).
Build the Title Bar Component
In the src directory, create a new components folder. Then, in that folder, create the PlayerTitleBar.vue file with the following content:
<template> <v-system-bar window> <v-menu offset-y transition="slide-y-transition"> <v-btn flat small right slot="activator"> <v-icon>headset</v-icon> MENU </v-btn> <v-list> <v-list-tile @click="dialog = true"> <v-list-tile-title>About</v-list-tile-title> </v-list-tile> <v-dialog v-model="dialog" max-width="300"> <v-card> <v-card-title><h2>Vue Music Player</h2></v-card-title> <v-card-text>Version 1.0.0</v-card-text> <v-card-actions> <v-spacer></v-spacer> <v-btn flat @click="dialog = false">OK</v-btn> </v-card-actions> </v-card> </v-dialog> </v-list> </v-menu> <v-spacer></v-spacer> VUE MUSIC PLAYER <v-spacer></v-spacer> <v-icon>remove</v-icon> <v-icon>check_box_outline_blank</v-icon> <v-icon>close</v-icon> </v-system-bar> </template> <script> export default { data () { return { dialog: false } }, } </script>
Here, we use the following Vuetify components: toolbar, menu, button, icon, list, dialog, and card.
We separate the menu, the name, and the icons with the <v-spacer> component. To show or hide the dialog, we create the dialog: false data property. Its value will toggle when we click on the About menu item.
Now, in the Player.vue file, import the title bar component, register it in the components object, and add it in the template.
<template> <v-app dark> <v-content> <v-container> <player-title-bar></player-title-bar> // ADD the component in the template </v-container> </v-content> </v-app> </template> <script> import PlayerTitleBar from './components/PlayerTitleBar.vue' // IMPORT the component export default { components: { PlayerTitleBar // REGISTER the component }, data () { return { } } } </script>
Now, check the result in your browser. You should see the following:
We'll repeat these three steps for the other four components. So when in the next sections I tell you to import, register and add a component in the template, you should follow the same procedure described here.
Build the Playlist Component
In the root directory, create a new playlist folder and add the audio files you want to play. The file names must be written with underscores between the words and a .mp3 extension at the end—for example, Remember_the_Way.mp3. Now, create an audio tracks array inside Player.vue's data object:
playlist: [ {title: "Streets of Sant'Ivo", artist: "Ask Again", howl: null, display: true}, {title: "Remember the Way", artist: "Ask Again", howl: null, display: true}, ... ]
Each track has title and artist properties, a howl object set to null, and a display property set to true.
The display property will be used when we implement the search functionality. Now it is set to true for all tracks, so all of them are visible.
Howler wraps an audio file in a howl object. We set howl to null because we'll populate it dynamically at the creation of the Vue instance. To do that, we use the Vue's created lifecycle hook.
created: function () { this.playlist.forEach( (track) => { let file = track.title.replace(/\s/g, "_") track.howl = new Howl({ src: [`./playlist/${file}.mp3`] }) }) }
This will set a new Howl object for each track in the playlist.
Now, create the PlayerPlaylistPanel.vue component and add this inside:
<template> <v-card height="330"> <v-list> <v-list-tile v-for="(track, index) in playlist" :key="track.title" v-show="track.display"> <v-list-tile-content> <v-list-tile-title> - </v-list-tile-title> </v-list-tile-content> <v-spacer></v-spacer> </v-list-tile> </v-list> </v-card> </template> <script> export default { props: { playlist: Array } } </script>
First, we pass the prop playlist from the Player.vue file. Next, in the template, we go through each track with the v-for directive and display the track's index, followed by the track's artist and title, and the duration of the track on the far right. We also use v-show bound to the display property. A track will be visible only if display is true.
Now, in the Player.vue file, we import, register, and add the playlist component in the template. Then, we bind the playlist prop to the playlist data property like this: <player-playlist-panel :playlist="playlist"></player-playlist-panel>.
Let's check the result in the browser:
There are two problems here. First, the numbers of the tracks are not correct, and second, the track's duration is shown in milliseconds, but we want it to be in minutes. We'll fix each of these issues by creating a formatting filter.
In the main.js file, create a numbers filter and a minutes filter, which will be globally accessible. Next, in PlayerPlaylistPanel.vue, we use them like this: and .
Now, if you check the app, everything should display correctly.
Make Tracks Selectable
In the Player.vue file, add the selectedTrack: null data property and bind it to the playlist component (:selectedTrack="selectedTrack"). Then, we pass the prop in the PlayerPlaylistPanel.vue file (selectedTrack: Object).
We also add a click event listener to <v-list-tile-content @click="selectTrack(track)"> and then create the selectTrack() method:
methods: { selectTrack (track) { this.$emit('selecttrack', track) } }
Now, back in Player.vue, add the selecttrack event to the playlist component (@selecttrack="selectTrack") and create the selectTrack() method:
selectTrack (track) { this.selectedTrack = track }
Now, if you go to the playlist and click on a track, it will be selected. We can't see it, but we can prove it in the Vue DevTools. In the following screenshot, the second track is selected:
Row and Selection Styling
The next step is to make the selection visible. To do it, we'll bind a class which will color the selected track in orange and another class which will make even rows darker to make the tracks more distinguishable. Put the following after the v-show directive:
:class="[{selected: track === selectedTrack}, {even: index % 2 == 0}]"
We'll also add another class, which will show a scrollbar when the list gets too big.
<v-card height="330" :class="{playlist}">
We add the necessary classes at the end of the file.
<style scoped> .selected { background-color: orange !important; } .even { background-color: #505050 } .playlist { overflow: auto } </style>
And that's it. Now, the selected track is highlighted in orange.
We'll add the double click play functionality at the end of the next section.
Build the Player Controls Component
Let's create the player controls now. We'll start with the play, pause, and stop buttons.
Add the Play, Pause, and Stop Buttons
Create the PlayerControlsBars.vue component and add this inside:
<template> <div> <v-toolbar flat height=90> <v-spacer></v-spacer> <v-btn outline fab small color="light-blue" @click="stopTrack"> <v-icon>stop</v-icon> </v-btn> <v-btn outline fab color="light-blue" @click="playTrack()"> <v-icon large>play_arrow</v-icon> </v-btn> <v-btn outline fab small color="light-blue" @click="pauseTrack"> <v-icon>pause</v-icon> </v-btn> <v-spacer></v-spacer> </v-toolbar> </div> </template>
Here, we use the Vuetify toolbar component.
There are three buttons with registered click event listeners. Let's create the methods for them:
methods: { playTrack(index) { this.$emit('playtrack', index) }, pauseTrack() { this.$emit('pausetrack') }, stopTrack() { this.$emit('stoptrack') } }
Now, in the Player.vue file, import, register, and add the component in the template. Then, register the event listeners (@playtrack="play", @pausetrack="pause", @stoptrack="stop").
Next, create the index: 0 data property, which will hold the index of the current track. Then, create a computed currentTrack():
computed: { currentTrack () { return this.playlist[this.index] } }
And now we can start to create the play, pause, and stop methods. We'll start with the play() method, but before that we need to create the playing: false data property, which will indicate whether the track is playing or not. Add the following code for the play() method:
play (index) { let selectedTrackIndex = this.playlist.findIndex(track => track === this.selectedTrack) if (typeof index === 'number') { index = index } else if (this.selectedTrack) { if (this.selectedTrack != this.currentTrack) { this.stop() } index = selectedTrackIndex } else { index = this.index } let track = this.playlist[index].howl if (track.playing()) { return } else { track.play() } this.selectedTrack = this.playlist[index] this.playing = true this.index = index }
The method takes an index as the parameter, which specifies the track to be played. First, we get the index of the selected track. Then, we make some checks to determine the value of the index. If an index is provided as an argument and it's a number, then we use it. If a track is selected, we use the index of the selected track. If the selected track is different from the current one, we use the stop() method to stop the current one. Finally, if neither an index argument is passed nor a track is selected, we use the value of the index data property.
Next, we get the howl (based on the index value) for the track and check whether it is playing. If it is, we return nothing; if it's not, we play it.
Finally, we update the selectedTrack, playing and index data properties.
Let's now create the pause() and stop() methods.
pause () { this.currentTrack.howl.pause() this.playing = false }, stop () { this.currentTrack.howl.stop() this.playing = false }
Here, we just pause or stop the current track and update the playing data property.
Let's also make a track start playing on double click.
Add @dblclick="playTrack()" to <v-list-tile-content> in the PlayerPlaylistPanel.vue and create the playTrack() method:
playTrack(index) { this.$emit('playtrack', index) }
Register the listener @playtrack="play" in the Player.vue file and voila.
Add the Previous and Next Buttons
Let's now add the previous and next buttons.
<v-btn outline fab small color="light-blue" @click="skipTrack('prev')"> <v-icon>skip_previous</v-icon> </v-btn> <!-- stop, play, and pause buttons are here --> <v-btn outline fab small color="light-blue" @click="skipTrack('next')"> <v-icon>skip_next</v-icon> </v-btn>
Create the skipTrack() method:
skipTrack (direction) { this.$emit('skiptrack', direction) }
Register the event listener (@skiptrack="skip") in Player.vue.
And create the skip() method:
skip (direction) { let index = 0 if (direction === "next") { index = this.index + 1 if (index >= this.playlist.length) { index = 0 } } else { index = this.index - 1 if (index < 0) { index = this.playlist.length - 1 } } this.skipTo(index) }, skipTo (index) { if (this.currentTrack) { this.currentTrack.howl.stop() } this.play(index) }
We first check if the direction is next. If so, we increment the index by 1. And if the index gets bigger than the last index in the array, then we start again from zero. When the direction is prev, we decrement the index by 1. And if the index is less than zero, then we use the last index. At the end, we use the index as an argument for the skipTo() method. It stops the current track and plays the next or previous.
Here is how the player looks with the buttons:
Add the Volume Slider
Add the following before all the buttons:
<v-slider v-model="volume" @input="updateVolume(volume)" max="1" step="0.1"></v-slider>
Here, we use the Vuetify slider component.
Add the volume: 0.5 data property, and then create the updateVolume() method:
updateVolume (volume) { Howler.volume(volume) }
Here, we use the global Howler object to set the volume globally for all howls.
Also, we need to sync the initial Howler volume, which by default is set to 1, to the volume property. If you don't do it, the volume will show 0.5 but will be 1 initially. To do that, we'll use the created hook again:
created: function () { Howler.volume(this.volume) }
We want to see the volume level as a percentage on the right of the volume slider, so we add this in the template:
Add the Mute Button
Now, we add a volume icon before the slider.
<v-btn flat icon @click="toggleMute"> <template v-if="!this.muted"> <v-icon v-if="this.volume >= 0.5">volume_up</v-icon> <v-icon v-else-if="this.volume > 0">volume_down</v-icon> <v-icon v-else>volume_mute</v-icon> </template> <v-icon v-show="this.muted">volume_off</v-icon> </v-btn>
The icon will change according to the values of the volume and muted properties.
Add the muted: false data property and create the toggleMute() method:
toggleMute () { Howler.mute(!this.muted) this.muted = !this.muted }
We use the global Howler object again to set the mute globally, and then we toggle the muted value.
In the screenshot below, you can see how the volume slider should look:
Add the Repeat Button
Add the following after all the buttons:
<v-btn flat icon @click="toggleLoop"> <v-icon color="light-blue" v-if="this.loop">repeat_one</v-icon> <v-icon color="blue-grey" v-else>repeat_one</v-icon> </v-btn>
Add the loop: false property in Player.vue, bind it :loop="loop" and pass the prop (loop: Boolean) in PlayerControlsBars.vue.
Now, let's create the toggleLoop() method:
toggleLoop () { this.$emit('toggleloop', !this.loop) }
Now, back in Player.vue, register the event listener (@toggleloop="toggleLoop") and create the toggleLoop() method:
toggleLoop (value) { this.loop = value }
At this point, we face a small problem. When a track seeks the end, it just stops. The player doesn't move to the next track, nor does it repeat the current track. To fix that, we need to add the following to the created function after the src property:
onend: () => { if (this.loop) { this.play(this.index) } else { this.skip('next') } }
Now, when the loop is on, the current track will be repeated. If it's off, the player will move on the next track.
Add the Shuffle Button
Add the following after the repeat button:
<v-btn flat icon @click="toggleShuffle"> <v-icon color="light-blue" v-if="this.shuffle">shuffle</v-icon> <v-icon color="blue-grey" v-else>shuffle</v-icon> </v-btn>
Add the shuffle: false property in Player.vue, bind it (:shuffle="shuffle"), and pass the prop (shuffle: Boolean) in PlayerControlsBars.vue.
Now, let's create the toggleShuffle() method;
toggleShuffle () { this.$emit('toggleshuffle', !this.shuffle) }
Now, back in Player.vue, register the event listener (@toggleshuffle="toggleShuffle") and create the toggleShuffle() method:
toggleShuffle (value) { this.shuffle = value }
Now, add the following to the skip() method after index = 0:
lastIndex = this.playlist.length - 1 if (this.shuffle) { index = Math.round(Math.random() * lastIndex) while (index === this.index) { index = Math.round(Math.random() * lastIndex) } } else if (direction === "next") { ...
Here's how your app should look now:
Add the Seek Bar
First, in Player.vue, create the seek: 0 property. Then we'll need to watch the playing property in order to update the seek.
watch: { playing(playing) { this.seek = this.currentTrack.howl.seek() let updateSeek if (playing) { updateSeek = setInterval(() => { this.seek = this.currentTrack.howl.seek() }, 250) } else { clearInterval(updateSeek) } }, }
This will update the seek value four times per second.
Now, create a computed progress():
progress () { if (this.currentTrack.howl.duration() === 0) return 0 return this.seek / this.currentTrack.howl.duration() }
Bind it (:progress="progress") in the template.
Now, in PlayerControlsBars.vue, pass the progress prop (progress: Number) and add another toolbar below the one we've already created:
<v-toolbar flat height="40"> <v-progress-linear height="40" v-model="trackProgress" @click="updateSeek($event)"></v-progress-linear> </v-toolbar>
Here, we use the Vuetify progress component.
Create a computed trackProgress(), which will get the track's progress as a percentage.
computed: { trackProgress () { return this.progress * 100 }, }
And now, create the updateSeek() method:
updateSeek (event) { let el = document.querySelector(".progress-linear__bar"), mousePos = event.offsetX, elWidth = el.clientWidth, percents = (mousePos / elWidth) * 100 this.$emit('updateseek', percents) }
Here, we get the progress bar element, which uses the .progress-linear__bar class. I found this with the Browser DevTools. Next, we get the mouse position and the width of the bar. Then, we get the mouse click position as a percentage.
Back in Player.vue, add and register the event listener (@updateseek="setSeek") and create the setSeek() method:
setSeek (percents) { let track = this.currentTrack.howl if (track.playing()) { track.seek((track.duration() / 100) * percents) } }
And boom! You can use your mouse to change the position of the played track.
Build the Info Panel Component
Create the PlayerInfoPanel.vue file with the following content:
<template> <v-card height="60"> <v-card-title> <h2> - </h2> <v-spacer></v-spacer> <h3>/</h3> </v-card-title> </v-card> </template> <script> export default { props: { trackInfo: Object }, } </script>
Here, we pass a prop trackInfo, which we use to populate the track information in our component.
Now, back in Player.vue, import, register and add the component in the template.
Then, create a computed getTrackInfo():
getTrackInfo () { let artist = this.currentTrack.artist, title = this.currentTrack.title, seek = this.seek, duration = this.currentTrack.howl.duration() return { artist, title, seek, duration, } }
Next, we bind it in the template (:trackInfo="getTrackInfo") and voila. We get some basic info for the currently played track, as you can see in the screenshot below.
Build the Search Bar Component
Create the PlayerSearchBar.vue file with the following content:
<template> <v-toolbar flat> <v-text-field clearable prepend-icon="search" placeholder="Quick search" v-model="searchString" @input="searchPlaylist"> </v-text-field> <v-spacer></v-spacer> </v-toolbar> </template> <script> export default { props: { playlist: Array }, data () { return { searchString: "", } }, methods: { searchPlaylist () { this.playlist.forEach((track) => { if (this.searchString) { if (!track.title.toLowerCase().includes(this.searchString.toLowerCase()) && !track.artist.toLowerCase().includes(this.searchString.toLowerCase())) { track.display = false } else { track.display = true } } else if (this.searchString === "" || this.searchString === null) { track.display = true } }) } }, } </script>
We create a text field and add the clearable prop to show a clearing icon when we type something.
By using v-model, we bind it to the searchString, which is an empty string initially. And we add an input event listener.
We also pass the playlist prop, which we use in the searchPlaylist() method. In this method, we use the display property and turn it off for each track where the title or artist doesn't match the search string, and we keep it or turn it on for all matches. Finally, if the search string is empty or equal to null, which happens when we clear the field with the clear button, we turn on the display for all tracks.
Now, back in Player.vue, import, register and add the component in the template.
Bind the playlist property (:playlist="playlist") and check the functionality. Here is how it should look in action:
Some Improvement Ideas
As you can see, with a clear goal and proper planning, building a Vue/Vuetify app can be really easy and enjoyable. You now have a working music player which you can use during your relaxation or coding time. Of course, there is always room for further improvements and additions, so here are some ideas you can try out to make the player even more feature-rich:
multiple playlist support
ability to add or remove tracks from the playlist
drag-and-drop support
ability to sort the tracks
audio visualization
Conclusion
In this tutorial, we saw how easy and enjoyable it can be to build an app with Vue.js, and with Vuetify.js in particular. I hope you enjoyed building this player as much as I did. I'll be glad to see your own improved version of the player. So if you create one, just drop a demo link in the comments!
via Envato Tuts+ Code https://ift.tt/2L75fu3
0 notes
Photo

Office 365 being rewritten in JavaScript
#390 — June 15, 2018
Read on the Web
JavaScript Weekly

JavaScript Engine Fundamentals — A fantastic writeup (with video, if preferred) looking at the key parts of major JavaScript VMs/engines and how they interact with the code you write.
Mathias Bynens
Polly.js: Record, Replay, and Stub HTTP Interactions — A library from Netflix for recording, replaying and stubbing HTTP interactions via native browser APIs. GitHub repo.
Netflix
💻 New Course: A Practical Guide to Algorithms with JavaScript — Bored by the academic approach of most data structures and algorithms courses? This is for you. Solve algorithms and analyze space and time complexity in both an interview setting and in your day-to-day development.
Frontend Masters sponsor
Office 365 Is Being Rewritten in JavaScript — Joining Skype, Microsoft Teams, and VS Code. React Native Windows is the approach used, making it possible to build seamless Windows 10 and Xbox One apps with React.
Sean Thomas Larkin on Twitter
Vue Native: Build Native Mobile Apps with Vue.js — React has React Native, and now if you’re a Vue.js developer, you could give this a try. Unlike React Native this isn’t an official project from the same team and is essentially a Vue wrapper around React Native itself. Introductory article.
GeekyAnts
How V8's Concurrent Marking Frees Up The Main Thread — ‘Marking’ is a key step in V8 6.4’s garbage collection process and now this process takes place on separate worker threads meaning more time for your code on Chrome 64+ and Node 10+.
Mathias Bynens
Introducing 'The GraphQL Guide' — John Resig, the creator of jQuery, has co-written a book aiming to show you why GraphQL APIs are “the true successor to REST APIs”.
John Resig and Loren Sands-Ramshaw
Vue.js Passes React in Terms of GitHub Star Count — A vanity metric for sure, but an interesting one nonetheless. React still has significantly more downloads each day but Vue’s community is particularly vibrant and eager.
Dan Abramov on Twitter
The Biggest Lead Developer Conference Yet Is Coming to London in 2 Weeks
The Lead Developer London sponsor
💻 Jobs
React/Full-Stack Engineer (Remote) — Join our small, distributed team as we build the world’s largest open library of freely usable visuals. Open to all, regardless of experience and background.
Unsplash
Have You Tried Vettery? — Vettery matches top tech talent with fast-growing companies. Take a few minutes to join our platform.
Vettery
📘 Tutorials
Understanding the Almighty Reducer — A beginner-friendly walkthrough of using JavaScript’s reduce method.
Sarah Drasner
What's New in ES2018 — Including async iteration, Promise.finally(), and rest/spread properties.
Craig Buckler
▶ Look, No Hands! — Brain Controlled JavaScript — Fun with thought processed interactions using a brain sensor with JavaScript.
Charlie Gerard
▶ Learn to Build a Slack Integration — A demo of Slack’s new developer features, with an introduction to Actions, showing what it enables for developers, and some possible use cases.
Slack sponsor
Submitting HTML Forms using Vue, React, or Hyperapp
Ogundipe Samuel
An Introduction to Sails.js — A Rails-esque MVC framework for Node webapps.
Ahmed Bouchefra
▶ How to Set Up A Windows Dev Environment That Feels Like $HOME — This isn’t JS specific but we’re always hearing of developers trying out Windows lately so this could be helpful.
Sarah Cooley and Tara Raj
▶ How to Code Your Own Discord Bot with Discord.js
Dapper Dino
🔧 Code and Tools
Parcel 1.9 Released with Tree Shaking and 2x Faster Watcher — If you want a fast, easy, zero-config bundler.
Devon Govett
A Much Faster Way to Debug Code Than with Breakpoints or Console.log — Wallaby catches errors in your tests and displays the results of expressions right in your editor as you type.
Wallaby.js sponsor
Licensed: A CLI for Adding a LICENSE File to Your Projects
Mihir Chaturvedi
collect.js: 91 Convenience Methods for Arrays and Objects — A similar API to Laravel Collections: chunk, flatten, shuffle, firstWhere, etc.
Daniel Eckermann
Pickr: A Flat, Simple, Dependency-Free Color Picker — Live demo. It’s nice.
Simon Wep
Math.js: An Extensive Math Library for JavaScript and Node — There’s a CoffeeScript-oriented intro too, if that’s your bag.
Jos de Jong
jeelizWeboji: Realtime JS Face Tracking and Facial Expression Detection
Bourry Xavier
HyperMD: A WYSIWYG Markdown Editor for Browsers — Written in TypeScript. Demo here.
Lv Yang
Vuesax: A Frontend Vue.js Components Framework
Lusaxweb
by via JavaScript Weekly https://ift.tt/2Mu0xI3
0 notes