#The next step is to translate and localize the app’s content and user interface. This goes beyond mere translation; you must also adapt gra
Explore tagged Tumblr posts
Visit Tumblr Blog
Explore Tumblr blogs with no restrictions, modern design and the best experience.
Last Seen Tumblr Blogs


Fun Fact
The Tumblr office adopted Tommy, an 11-year-old Pomeranian.
Text
Mastering Mobile App Localization: The Ultimate Guide

#In an increasingly globalized world#mobile app localization is crucial for developers aiming to expand their reach and connect with international markets. Localization involve#content#and functionality to suit different languages#cultural nuances#and regional preferences. This comprehensive guide will walk you through the steps of effective mobile app localization#ensuring your app resonates with users around the world.#1. Understand Your Target Audience#Before diving into localization#it's vital to thoroughly understand the markets you are targeting. Research the languages spoken#cultural norms#legal requirements#and local technologies. This foundational knowledge will guide your localization strategy and help you prioritize which elements of the app#2. Internationalize Your App#Internationalization is the process of designing an app's architecture so that it can support multiple languages and regions without requir#text directions (like right-to-left scripts)#local date and time formats#and numerical values. Preparing your app in this way simplifies the subsequent localization process.#3. Localize Content and UI#The next step is to translate and localize the app’s content and user interface. This goes beyond mere translation; you must also adapt gra#icons#and layouts to align with local customs and expectations. It’s advisable to work with native translators who understand the linguistic subt#4. Adapt to Local Regulations and Legal Requirements#Different markets may have specific legal standards regarding data privacy#digital transactions#and censorship that can affect your app. Ensure that your app complies with local laws and regulations to avoid legal issues and build trus#5. Test and Optimize for Local Markets#Once localized#thoroughly test your app in each target market to catch any issues with translations#or functionality. Consider conducting usability tests with local users to gather feedback and understand their user experience. Use this fe
0 notes
Text
Reaching Arabic Speakers: A Look at App Adaptation
The world of mobile applications is vast, and for developers aiming to reach a wide audience, adapting their apps for different languages is essential. When considering the Middle East and North Africa, the importance of adapting apps for Arabic speakers becomes clear. This involves more than just translating text; it requires a deep understanding of cultural nuances and linguistic specificities. That’s where the process of Arabic App Localization comes into play.
Why Adapting Apps for Arabic Matters
The Arabic-speaking world represents a significant market, with millions of potential users. However, simply translating an app's interface into Arabic is not enough. Users expect apps to feel natural and intuitive, reflecting their cultural context. This means adapting not just the language but also the visual elements, date and time formats, and even the app's overall design. Failing to do so can lead to a poor user experience and ultimately, a loss of potential users.
The Challenges of Arabic Localization
Arabic presents unique challenges for localization. It is written from right to left, which requires a complete reversal of the app's layout. This can be complex, especially for apps with intricate designs. Furthermore, Arabic has grammatical nuances that require careful consideration. For example, the form of a word can change depending on its gender and number. A simple translation without considering these factors can lead to grammatical errors and a confusing user experience.
Beyond language, cultural considerations are crucial. Images, symbols, and colors can have different meanings in different cultures. An image that is perfectly acceptable in one culture might be offensive in another. Therefore, it is essential to work with local experts who understand the cultural sensitivities of the target audience.
The Process of Arabic App Localization
Adapting an app for Arabic involves several steps. First, the app's text must be extracted and translated by native Arabic speakers who have experience in localization. These translators should also have a good understanding of the app's functionality and target audience.
Next, the app's layout needs to be adapted for right-to-left reading. This involves reversing the order of elements on the screen, such as buttons, menus, and text. Developers need to pay close attention to the alignment and spacing of elements to ensure a visually appealing and user-friendly interface.
After the translation and layout adaptation are complete, the app needs to be thoroughly tested by native Arabic speakers. This testing should cover all aspects of the app, including functionality, usability, and cultural appropriateness. Any errors or inconsistencies should be addressed before the app is released.
The Importance of Cultural Sensitivity
One of the most important aspects of Arabic app localization is cultural sensitivity. Developers need to be aware of the cultural values and beliefs of their target audience. This includes avoiding any content that might be considered offensive or inappropriate. For example, images of pork or alcohol should be avoided, as these are prohibited in Islam.
Furthermore, developers should consider the cultural context of the app's content. For example, if the app includes any references to holidays or festivals, these should be adapted to reflect the local customs and traditions.
Finding the Right Localization Partner
Choosing the right localization partner is crucial for the success of your Arabic app localization project. Look for a company that has experience in localizing apps for the Arabic market. They should have a team of native Arabic speakers who are experts in translation, localization, and cultural adaptation. They should also have a proven track record of delivering high-quality localization services.
By carefully considering the linguistic and cultural aspects of Arabic localization, developers can create apps that resonate with Arabic-speaking users and achieve success in this important market.
0 notes
Text
MiraMi Video Chat With Girls: A New Way To Meet Beautiful Friends

The digital world has changed the dating style of people and Mirami Chat has gone one step further. It is a video chatting app that connects guys to girls from all around the world. You can make new friends without worrying about having privacy issues.
It is a legit platform that is exclusively for guys who want to create meaningful friendships or have random fun. MiraMi Chat has features that you will not find in other dating apps.
Meeting beautiful girls has become easier as there are no technical glitches and call-back features. Let’s learn more about the usage of Mirami chat and start making interesting friends.
Registration and Accessibility
Launched a few years ago, MiraMi Chat has gained popularity among people across the world. Chatting with foreign girls has become convenient because of video accessibility. It has already been downloaded 500,000+ times.
Installing it is similar to any other app - by downloading it from an online app store. You need to turn on the camera and microphone, press the button, and start chatting to your favorite girl.
Create your profile in easy steps and a girl who wants to communicate with you will appear online. There are no hidden charges and therefore finding alternatives to MiraMi is secondary.
Unique Features
Mirami's website or app has many unique features. Breaking language barriers is a problem often encountered in many dating apps. However, Mirami uses advanced software that automatically translates any foreign language into your native language.
Since it is a video-calling app, users can easily watch each other and make real friendships. You can also exchange photos and videos
Besides logging in to the video chats, the app also has a section that has the latest video chats where you can see the history of your calls and then call the same girl back. You can use this app on a mobile or a laptop which makes it possible to use while traveling.
Meet Interesting Girls Effortlessly
As mentioned above, there are no hidden charges for using the Mirami Chat app. The beautiful girls are from different parts of the world like the US, Spain, France, Italy, Portuguese, China, Korea, etc. Since they are picked randomly, they are of different age groups and occupations which makes chats interesting.
If you don’t like the conversation, you can click on ‘Next’ which will connect you to another random stranger instantly. You can text the girls online while video chatting. It has a user-friendly interface that makes navigation easier.
Conclusion
Mirami chat may be a newbie among many dating apps but it has steadily grown because of its user-friendly capability. Randomly meeting new people is exciting and fun. It makes it easier for guys to chat with beautiful and interesting girls without any barriers.
The unique features of the Mirami app also allow chatting in your local language which makes communication worthwhile. So what are you waiting for, install the app because an interesting friend is waiting to talk to you.
Visit to Thewebsaga.com to read more content
1 note
·
View note
Text

How Much Does It Cost To Build A Travel App Like Expedia, TripIt, TripAdvisor?
What is a travel app?
Are you tired of sifting through endless travel websites and guidebooks to plan your next adventure?
Look no further than the convenience of a travel app. With just a few taps and by connecting with freelance mobile app developer on your phone, you can access everything from flight itineraries to local restaurant recommendations. But what exactly is a travel app and why should you consider developing one for your business?
Why develop a travel app?
Travel is a multi-billion dollar industry that continues to grow year after year. With the rise of technology and smartphones, more people than ever before are using mobile apps to book their travel accommodations and plan their itineraries. Developing a custom travel app for your business can offer numerous benefits, including: Having a dedicated travel app developer, can provide added convenience for travelers by allowing them to access all of their trip details in one place. This includes flight information, hotel reservations, rental car bookings, and even local attractions. With an app you can personalize the experience for each user based on their preferences and behavior patterns. You can also use geolocation technology to send push notifications about relevant deals or events happening nearby. Developing a travel app gives you an opportunity to strengthen your brand image while providing additional value-added services to customers. By offering unique features like virtual tours or insider tips from locals guides you will stand out amongst competitors. Lastly but not least important is creating revenue streams through monetization strategies such as in-app purchases or advertisements from affiliate partners. There are many compelling reasons why businesses should develop a custom travel app or opt travel app development service- it provides added convenience for users while strengthening brand recognition and generating new sources of revenue!
Benefits of travel app
Traveling is one of the most exciting and enriching experiences anyone can have. However, planning a trip can be overwhelming and stressful. Luckily, with the rise of travel apps, things have gotten much easier for travelers. One obvious benefit of travel app development is that it saves time. With just a few clicks, you can search for flights or accommodations that fit your budget and preferences. No more wasting hours browsing through countless websites!
Another great advantage of travel apps is that they provide users with valuable information about their destination. From restaurant recommendations to local weather forecasts, these apps make traveling less daunting by putting all necessary information in one place.
Furthermore, some travel apps offer translation services which come in handy when visiting countries where you don't speak the language fluently.
Perhaps most importantly though, using a travel app allows you to customize your trip according to your needs and interests. You can plan every detail or leave some room for spontaneity - whatever suits you best! There are numerous benefits to using travel apps when planning your next adventure and also determine travel app development cost so that you can get the exact idea of process.
How to develop travel app
Developing a travel app requires careful planning and execution. Here are some steps to follow when building your own travel app: a. Define your target audience: Determine who your target audience is, what their interests are, and how they will use your app. B. Choose the right features: Decide on the features you want to include in your app based on user needs and preferences. C. Design an intuitive interface: Create a user-friendly interface that allows users to easily navigate through different sections of the app. D. Incorporate relevant content: Include high-quality images, videos, reviews, maps, and other useful content that adds value to users’ travel experience. E. Optimize for search engines: Use SEO techniques so that travelers can find your app easily when searching for relevant keywords or phrases related to their trip planning needs. F. Test thoroughly before launch: Make sure that all features work seamlessly across multiple devices such as smartphones and tablets before launching it in the market. If you're not confident about developing an app yourself then it's best practice to reach out to travel mobile app development freelancer with experience in creating similar apps who can help bring this vision into reality!
Why reach freelance app developer
Hiring a freelance app developer like me can be a wise decision for companies or individuals looking to develop a travel app. I typically work independently, meaning they have more time and energy to focus solely on your project. This results in faster development times and greater attention to detail. I tend to have expertise in specific areas due to their focused experience. They may bring unique insights into the development process which could lead to better functionality, user experience and overall success of the app.
By working with a freelance developer, you'll also avoid overhead costs associated with hiring an employee such as taxes, benefits and office space rental fees. You will only pay for the services rendered by the developer. These are the benefits that can be undertaken with me.
Moreover, having a reliable and experienced developer for tourism app development who understands your needs is crucial when it comes to developing successful applications that meet or exceed expectations. With clear communication channels open between you and your freelancer, any issues or problems encountered along the way can be addressed quickly. If you're looking for quality work without breaking the bank then reaching out to me can help you to get started easily with proven results.
Conclusion
Travel application development is an excellent idea for both businesses and individuals. It offers many benefits such as convenience, accessibility, and cost-effectiveness. With the increasing demand for digital solutions in the tourism industry, having a reliable travel app can give you an edge over your competitors. When it comes to developing a travel app, there are several factors to consider such as budget, features required, target audience and platform compatibility. Hiring a freelance app developer can be a great option if you're looking for personalized services that cater to your specific needs. If you're planning to develop a travel app or any other type of application for your business or personal use but don't have technical expertise in-house, consider hiring an experienced freelance app developer who can help bring your vision to life! Here you need to get started with me.
#travelappdeveloper#appdeelopment#mobileappdeveloper#freelancemobileappdeveloper#travelappdevelopmentservice#travelmobileappdevelopment#travelappdevelopmentcost#development service#travel mobile app development#tourismappdevelopment#travelapplicationdevelopment#travelappdevelopment
0 notes
Text
The Importance of App Localization: How Translation Services Can Boost Your Business
In today's globalized world, businesses are expanding their reach beyond borders. With the rise of mobile applications, companies have a unique opportunity to tap into new markets and increase their revenue. However, to achieve success in these markets, companies must first overcome a significant hurdle - language barriers. In this regard, App localization plays a crucial role in breaking down these barriers and connecting with a wider audience.

The benefits of app localization
App translation service is the process of adapting an application to the language and culture of a specific region or country. This means translating the app's content, including the interface, menus, and other text, into the language of the target audience. It also involves adapting other elements of the app, such as images, videos, and symbols, to make them more culturally relevant.
One of the most significant benefits of app localization is improving user experience. When an app is localized, users can interact with it in their native language, making it easier for them to understand and navigate the app. This, in turn, leads to increased engagement and higher user retention rates. Studies have shown that users are far more likely to use an app that is localized in their language.
Another benefit of app localization is increased revenue. When an app is localized, it can reach a much broader audience, including users who may not speak the app's original language. This can result in increased downloads and purchases, which can significantly boost a company's bottom line.
App localization statistics
The importance of app localization can be seen in the following statistics. According to a report by App Annie, localized apps generate 128% more revenue than non-localized apps. Another study found that 72.4% of users are more likely to install an app that is in their native language. Additionally, 56.2% of users say that the ability to obtain information in their own language is more important than price. These statistics show that app localization is not just a nice-to-have feature, but a critical component of global success.
How to identify target markets for app localization
Before beginning the app localization process, it's essential to identify the target markets for the app. This involves researching the countries and regions where the app is most likely to succeed. Factors to consider include language, culture, and user preferences.
One way to identify target markets is to analyze app store data. This can provide valuable insights into which countries and regions are downloading and using the app. Another approach is to conduct user surveys to understand what users in different countries and regions are looking for in an app.
The app localization process
The app localization process involves several steps, including translation, cultural adaptation, and testing.
The first step is translation, which involves translating the app's text into the target language. This includes not just the interface and menus, but also any on-screen text, such as error messages and notifications.
The next step is cultural adaptation, which involves adapting the app's content to the target culture. This can include changing images, colors, symbols, and other visual elements to make them more culturally relevant.
Finally, the app needs to be tested to ensure that everything works correctly. This involves testing the app's functionality, usability, and compatibility with different devices and operating systems.
Best practices for app localization
To ensure the success of app localization service, it's essential to follow best practices. These include:
Starting the localization process early in the app development cycle
Using professional translation services to ensure the accuracy of translations
Adapting the app's content to the target culture to ensure that it resonates with users
Testing the app thoroughly to ensure that it works correctly in the target language and culture.
Common mistakes to avoid in app localization
App localization is a complex process that requires careful attention to detail. Some common mistakes to avoid include:
Relying on machine translation instead of professional translation services
Failing to adapt the app's content to the target culture
Ignoring local laws and regulations, such as data privacy laws
Neglecting to test the app thoroughly in the target language and culture.
Apart from the above mentioned, Here are other 9 App Localization Mistakes to Avoid in 2023
App localization tools and technologies
There are many tools and technologies available to help with app localization. These include translation management systems, which can streamline the translation process, and cultural adaptation tools, which can help adapt the app's content to the target culture.
Another useful technology for app localization is machine translation, which can provide instant translations of text. However, it's important to note that machine translation is not always accurate and should not be relied on exclusively for app localization.
Choosing the right translation services provider
Choosing the right translation services provider is essential for successful app localization. Some factors to consider when selecting a provider include:
Experience in app localization
Quality of translations
Cultural expertise
Turnaround time
Customer support.
Conclusion: Why app localization is crucial for global success
App localization is a critical component of global success. By translating an app's content into multiple languages and adapting it to different cultures, businesses can improve user experience, increase engagement, and ultimately boost revenue. However, it's essential to follow best practices and avoid common mistakes to ensure that app localization is successful. By choosing the right translation services provider and using the right tools and technologies, businesses can overcome language barriers and connect with a wider audience.
0 notes
Text
How to create your own metaverse?

Search and Definition an idea :
The development of the metaverse, and the related applications, begins with an idea. It doesn't need to be revolutionary or VR/AR-related. Your idea should bring tangible benefits to your target audience, or improve one element of the metaverse. You can create a virtual reality controller or move objects and avatars between meta universes by starting a cryptocurrency project.
We have more ideas for creating meta applications:
Marketplace to sell items from the Metaverse
Freelance platform that focuses on clothing creation for avatars.
Freelance platform that focuses on building houses, cities, and countries in the meta universes. (These services are already in high demand, such as in Minecraft).
Any neural network that enhances a technology or component in the metaverse. A voice translator, for instance, that replicates the voices and conversations of participants in real-time.
Look for a development company
The next step is to find the best metaverse development company that will handle the technical aspect of your project. Such a company must have several projects that are already in place and be able to understand the market. Clarisco Solutions, for example, is an expert in blockchain and DeFi. A new VR controller will require not only developers, but also engineers who have the right skills and are interested in VR and AR.
This article will show you where to find technical partners and Top 10 Consultant in India << Top 10 Metaverse Development Company >>
Metaverse Development Steps
Project analysis phase
Before the chosen development team begins creating the design and writing code, you must decide on the business portion of the project. You must first analyze the market, competitors, target audience, and build the metaverse. This will allow you to understand the potential outcomes of your idea in advance and determine the best way to implement it.
UX / UI design development
The Metaverse development stage involves the creation of an information architecture, optimization of user flows, and design of user interfaces.
Metaverse Application Development
Your Metaverse team now begins coding. They integrate services such as liquidity pools or payment gateways with the back-end and front-end components. The code writing process is often divided into backs. It can take up to several months depending on how complex the project is.
Testing the developed product
This is performed by QA specialists. They inspect the product for bugs, usability, load, and compliance with technical specifications. This usually takes around 20% of the total development time.
Deployment and Release
Once the application has been fully tested and built it can be deployed on local or cloud servers. If it's a mobile application, it needs to be added into the mobile apps stores (App Store, Google Play and Microsoft Store), Amazon App Store, Amazon App Store and others. This may take up to several days and cost several hundred dollars.
Product support
The process of creating an App does not stop after the release. The development team usually needs more time to fix bugs, assess user reactions, and adjust or add (or delete) features. Also, organize the support service to help users solve any problems they have with your application.
Conclusion
The Metaverse is more than a trend or improvement to existing technology. This is a fundamental shift in content consumption that will eventually lead to the demise of the Internet as it exists today. If you want to be a part of the future Internet, you should start thinking about creating your own metaverse, applications, technologies, or services for foreign meta universes.
1 note
·
View note
Text
How To Download Netflix Shows Maccoursetree

How To Download Netflix Shows Permanently
How To Download Netflix Tv Shows
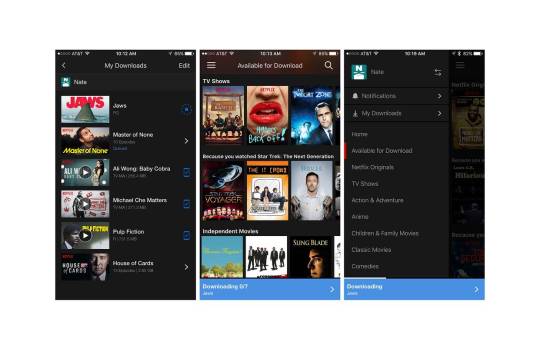
Netflix introduced the download feature in 2016, and it's now one of the best perks of being subscribed to the service. No matter where you are, you can download a great range of TV shows. Of course, there are some settings you’ll want to make sure you find before you continue watching shows on Netflix. The first is accessible by tapping on the Downloads tab at the bottom of the display. At the top of the screen, you should see an option for Smart Downloads. Depending on the space on your device, you might want to turn this off.
/PowerMyMac /How to Download Movies from Netflix on Mac
Netflix has been the main source of movies for many individuals at present. Can you download Netflix movies on a Mac? Yes, you can! But if you want to watch Netflix movies on your Mac, you should be familiar with methods on how to download movies from Netflix on Mac since there is issue with Netflix download limit.
TIPS:
So how to download Netflix movies on Mac? Why can't I watch Netflix on my Mac and not allow to put Netflix on desktop Mac? It is important to note that the Netflix app is only available on iPhone, iPad, Android mobile devices and Windows, except for Mac. For Mac users, the only way to free download Netflix for Mac and watch shows from Netflix is to utilize a web browser such as Safari or Google Chrome to log in to its website where you can stream videos. Sadly, you cannot download any movies and episodes on your Mac.
Article GuidePart 1. Free download neat video for mac. How to Download Movies from Netflix Mac?Part 2. Why You Need The Large & Old Files Tool?Part 3. Conclusion
Part 1. How to Download Movies from Netflix Mac?
Remember that Netflix has yet to create an app for the macOS which makes it an ordeal for users to watch shows offline on Mac. So how to download Netflix movies to computer? Is there a way to download Netflix movies on Mac?
Before you can gain access to an app specifically for the macOS, there are several methods on how to download movies from Netflix on Mac to watch offline:
Recording Netflix shows on Mac.
Stream downloaded Netflix videos from iPhone/iPad to Mac.
Stream Netflix shows from your iPhone or iPad using AirPlay.
Install Windows.
Recording Netflix Shows on Mac
One way on how to download movies from Netflix on Mac is screen recording. With this method, it requires a screen recorder program. Depending on the program that you will use, it will allow you to record your favorite movies and TV show episodes.
Stream Downloaded Netflix Videos from iPhone/iPad to Mac
You may be wondering, can I transfer downloaded movies from Netflix? Yes, another way to download movies and TV show episodes from Netflix on your Mac is to utilize the in-built QuickTime player to allow mirroring of the streaming on your iPhone/iPad to Mac desktop. Remember though that this process is less straightforward.
Initially, you must prepare a lightning USB cable, a Mac that is equipped with the QuickTime Player and an iOS device the is updated to iOS 11 or higher.
The next move is to follow these steps to download movies on Netflix on Mac and how to access Netflix download files:
Link your iPhone/iPad to your Mac using the Lightning-to-USB cable.
Open the QuickTime Player on your Mac via Launchpad or the Applications folder.
Tap on the File on the upper part of the screen and select the “New Movie Recording” option. If you want a shortcut, simply press “Option+Command+N”
In the control panel, tap on the down-arrow icon next to the record button. Under the Microphone and Camera sections, select iPhone or iPad where you are playing the Netflix show. You also have the option to change the video quality. Just remember that the higher the video quality, the bigger the file size becomes.
Open the Netflix app on your iOS device and open the video that you downloaded to watch offline on your Mac.
Tap on the record button on the QuickTime Player to start recording.
Start playing the downloaded Netflix shows on your iPhone. Later, you can view the downloaded video on your Mac without requiring an Internet connection. Remember that during the recording, do not to unplug your iPhone/iPad.
Once the episode or movie ends, simply tap on the stop knob to stop the recording. In case you are going to save the video on your Mac, access File and tap on Save. The videos are saved in the MOV format on your device. Nevertheless, if you do not want to save the video, you can skip on this step.
Stream Netflix Shows from Your iPhone or iPad Using AirPlay
Generally, the Netflix app for iOS can support AirPlay. This is an exclusive protocol stack created by Apple to allow wireless streaming amid various devices of multimedia content.
This simply means that you are capable of streaming Netflix movies and shows from any iOS devices to those with AirPlay over the local Wi-Fi. Since the app can also support offline downloads, you can enjoy viewing the videos offline on your Mac. You also need an app such as AirServer to receive AirPlay streams on your device.
A potential drawback to this approach is that you need to configure a local Wi-Fi network that can take a toll on the battery life of your devices. In addition, both the iOS device and your Mac must be turned on. You need to have your chargers always on hand to avoid an abrupt stop on your favorite episode due to an empty battery.
Install Windows
For some Mac users, another approach on how to watch Netflix movies and episodes is to install the Windows OS with Boot Camp.
Once you are done with the installation, you can switch between macOS and Windows. At this point, simply download the Netflix application at the Microsoft Store and sign in to your account.
Before downloading Netflix movies on Mac, remember that the Netflix app for Windows can support offline downloads on some selected movies and episodes. This will allow you to watch them later without requiring Internet access.
Part 2. Why You Need The Large & Old Files Tool?
Since you are planning to watch a variety of movies and TV shows from Netflix, these will surely take up space on your Mac. Before you start to record movies or episodes using the method that you prefer, you need one of the tools by iMyMac PowerMyMac, specifically the Large & Old Files tool that you will find on the left side of the program's interface.
Multicultural marketinghow inclusiveness drives demanded. Multicultural Marketing: How Inclusiveness Drives Demand Lisa Wirthman. Freelance journalist covering women, business, policy and social good. In an increasingly diverse consumer market, there's never been a better time to embrace multicultural marketing opportunities.
PowerMyMac is specially designed to tackle a variety of issues on your Mac. It provides Mac users with all the necessary tools in a single application. The Large & Old Files tool can be used to find unwanted files that occupy space on your hard disk as well as outdated ones to make more room on your Mac.
When using this tool to retrieve free space on your Mac for your upcoming Netflix movies and TV shows, simply follow these steps:
Open iMyMac PowerMyMac and select the Large & Old Files.
Start the scan by clicking on the “Scan” button. The process will search for large and old files on your device.
After the scan finds large and outdated files on your Mac, you can check the results at once. In case you cannot find large and old files that you want to remove, simply tap on “Re-scan” to start a second scan.
The files that are discovered on your device are categorized in size from “5MB to 100MB” and “100MB plus” as well as the time such as “more than 30 days” and “longer than one year”. Select the files on the right column from the corresponding category.
Tap on the “Clean” button to remove the large and outdated files that you have chosen.
Part 3. Conclusion

With the different ways on how to download movies from Netflix on Mac, you can enjoy watching Netflix movies and TV shows. Now that you are familiar with the methods, simply choose one that you prefer. With the steps stated above that you can easily follow, you are on the way to enjoy your favorite shows on Netflix.
ExcellentThanks for your rating.
Rating: 4.3 / 5 (based on 74 ratings)
People Also Read:
PowerMyMac
A powerful all-in-one App for Mac
OpenVPN is a powerful software solution that provides support for secure network tunneling, which translates into being able to remotely access internal networks and all their resources in a secure. Openvpn software client software for mac. Viscosity is a first class VPN client, providing everything you need to establish fast and secure OpenVPN connections on both macOS and Windows. Viscosity caters to both users new to VPNs and experts alike, providing secure and reliable VPN connections. Whether remotely connecting to your workplace network, home network, VPN Service Provider, or other setup, Viscosity ensures it's done with ease and style. Alternative: Viscosity OpenVPN client. Another good OpenvPN client created by an external party, SparkLabs. It is available for Windows and macOS. It is compatible with OpenVPN Access Server. It can be obtained from the SparkLabs Viscosity website. There are too many to name. For connections between OpenVPN 2.4 and v 2.5 clients and servers, both ends will be able to negotiate a better cipher than BF-CBC. By default they will select one of the AES-GCM ciphers, but this can be influenced using the –data-ciphers setting. Downloading and installing the OpenVPN Connect Client for macOS. Navigate to the OpenVPN Access Server client web interface. Login with your credentials. Click on the Mac icon to begin download. Wait until the download completes, and then open it (the exact procedure varies a bit per browser). Open the ‘OpenVPN Connect installer’ to start the installation. Click ‘Continue’. Please read the licensing terms.

Free Download
Comment ()
Ben2021-01-05 23:43:50
Dankesformel den Artikel, aber wenn ich einen Film runterladen will, so wie hier beschrieben, dann kommt nur die Tonspur aber der Bildschirm am Handy und am Monitor des MacBooks sind schwarz. Was mach ich falsch?
iMyMac2021-01-06 04:32:16
Hallo, bitte lesen Sie diesen Artikel (https://help.netflix.com/en/node/11634), um Ihr Problem zu beurteilen und zu lösen.
Jeremy2020-10-10 00:00:25
Bonjour, je n'ai pas de wifi, donc je ne peux utiliser que l'option câble-Quicktime player.Or netflix bloque l'enregistrement d'écran. quand je joue le film enregistré sur mon téléphone, l'écran devient noir. Y-a-t-il un moyen, ou une autre application que Quicktime pour contourner cela?
iMyMac2020-10-11 00:18:37
Bonjour, vous pouvez essayer d'autres outils d'enregistrement d'écran gratuits, veuillez vous référer à cet article: https://www.imymac.com/fr/mac-tips/free-screen-recorder-no-watermark.html
kelvin2020-08-28 15:21:52
Thanks to your website, I have gained access to some amazing information that has been really useful to me. I have been looking forward to downloading some nice movies on Netflix, and your site has given me just that. thanks again for your website, it has really been useful to me.
iMyMac2020-08-29 00:51:50
Glad to hear that, thanks for your support!
Luis Anselmi2020-08-13 23:46:57
How do I play the movie’s Netflix
iMyMac2020-08-14 10:00:13
Hi, here is a step-by-step guide about How to Watch Movies Online With Netflix: https://www.wikihow.com/Watch-Movies-Online-With-Netflix
Clean up and speed up your Mac with ease
Free Download
Netflix for Windows 8 is an alternative way to access your Netflix account offering an interesting way to interact using a touch screen.
The layout of Netflix for Windows 8 is rather different from the web site or other ways you may use the online video streaming service. For one, it doesn't seem to be as fast as the web site and counts as a drawback.
Upon launching the 'Metro' app, you are greeted with recently watches TV shows and movies. Moving along, you are given a ton of different suggestions based on your online profile, mainly sorted by how popular certain movies, documentaries, television shows and others are with other users.
Watching a movie with Netflix for Windows 8 does not provide many additional options and the app will automatically select the bitrate (quality) it determines your Internet connection to be able to handle. You may also select from available audio languages and subtitles from the media bar when activated by moving your mouse or touching the screen.
The search function here isn't that good, perhaps because the application itself is rather sluggish. When done waiting for search results to show you, you can select the show to watch but nothing more.
Overall, the touch interface of Netflix on a system running the 'Start Screen' isn't that intuitive but watching movies and searching is possible as well as being able to select from a small list of playback options.
Features and highlights
Unlimited TV shows and movies for one low monthly price
Instantly watch as many TV episodes & movies as you want
Browse a growing selection of thousands of titles
Search for titles and watch immediately on PC
Rate your favorite shows and movies
Start watching on one device, and resume watching on another
How To Download Netflix Shows Permanently
Netflix for Windows 8 / 10 6.97.752.0 on 32-bit and 64-bit PCs
How To Download Netflix Tv Shows
This download is licensed as freeware for the Windows (32-bit and 64-bit) operating system on a laptop or desktop PC from video players without restrictions. Netflix for Windows 8 6.97.752.0 is available to all software users as a free download for Windows.
Filed under:
Netflix for Windows 8 / 10 Download
Freeware Video Players
Major release: Netflix for Windows 8 / 10 6.97
Episode Finding Software
0 notes
Photo

Video Freedom Review - Complete All In One Video Marketing Solution.
This is an efficient video builder that makes videos easy and quick. Also, you can customize the videos in a minute. This is a great product for video marketers or agencies who wants to make money online.
The full solution to produce any cinematic video is video freedom. It is backed by super-premium servers and an incredibly user-friendly interface to produce all kinds of videos, animations, ads, and so on.
You can convert video templates for all major social media platforms such as Facebook, Instagram, Twitter, TikTok, Snapchat, Youtube, LinkedIn & Pinterest.
You can produce 4 tested video styles and sell them anywhere in a few minutes. Video Freedom always creates good selling videos.
>>Click Here to visit Video Freedom Official Page and also check my Huge Bonus packages<<
Six reasons to choose Video Freedom:
This is a quick and easy cloud-based software. You don’t need to download or install anything on your computer.
It is only easy three simple steps to start. Pick an excellent video template, Customize & Render and sell it.
On Fiverr, you can sell these slick explainer videos at a high price.
For local businesses, you can create slideshow videos and can add any call to action button.
You can create professional video ads for Youtube, Facebook, and Instagram.
Easily you can start your video agency by selling the videos to your clients and keep 100% profit.
Vendor:
Name – Mario Brown.
He is an experienced online marketer and product creator. Few good products created by this vendor are
Viidcloud unlimited, Synthesys commercial, Socicake agency, Software commission magic, Socicake local edition, etc.
Features and price details:
Front end: Commercial $47
Can resell Videos
Full-Stock Assets Library
Create Videos for all 6 Major Social Media Platforms
Create Videos in less than 60 seconds!
Converting and Professional Templates
Start Generating More Sales, More Revenue Faster using the Power of Converting Videos
14 Days money Back Guarantee
Dedicated Call Support
Software Guidance Orientation Through Support
Powerful 100+ Music Library
100% Cloud-Based App
Easy 3-Click Video Creation Process
Priority Support
Bonus-1: 1:1 Strategy Calls
Bonus-2: Request Template Features
Bonus-3: Support On Skype
Can Sell Single Video Ad For $100-$200 Each.
Commercial License Worth $500 Included
Premium: Video Freedom $67
200+ Featured Video Templates
5-10+ New Animations Added Every Month
Unrestricted Renders
Multi-Rendering Processing
Multiple User Access
Unlimited Groups and Palettes
Quick Video Watermarking
Access to Vidboost
Add overlay images/logos
Trim videos
Slow down videos
Fasten up videos
Merge multiple videos
Convert videos in Vertical format
Convert videos in 1:1 format
Professional (Interact): Video Freedom $67
Next-Generation Interactive Video Technologies.
Market Them On Social Media
Share Interactive Videos Links
Create Ban Proof Links With LinkMaster Pro
Ask Your Customers For Their Emails
Make Users Fill Forms To Watch The Video
Add Eye-Popping Video Wraps In Seconds
‘Ultra Lock’ Ground-Breaking Content Locking Technology
Interactive Technology Suite Inc
Optimized Video Thumbnails & CTA Buttons
One-Click Social Sharing
>>Click Here to visit Video Freedom Official Page and also check my Huge Bonus packages<<
DFY Agency: Video Freedom $67
Done For You Agency Website Sell To Clients
Setup In Record 9 Seconds
Keep 100% Profits
Zero Platform Fee (Limited Time)
Ability To Give Coupons
No Server Costs
Email Management System
Real-Time Order Notification
Undivided Attention UNLIKE Fiverr
Inbuilt Checkout System
Chat, Engage or Retarget
103 Languages Direct Translation
Fully Whitelabel solution
Is this really worth money? Final conclusion:
If you are a video marketer then this software is exactly fit for you. Also, if you want to start an agency or freelancing business, where you can create stunning videos for your clients within a few seconds. So, creating a video and monetizing it, is easy ad simple by using Video Freedom.
Now, creating an Explainer Videos, Slideshow Videos, Promo Videos, Logo Videos, are matter of few minutes only. So, start with Video Freedom and grow your business quickly and fast.
>>Click Here to visit Video Freedom Official Page and also check my Huge Bonus packages<<
0 notes
Text
What is software localization (and where is it important)?
In principle, digital technology is culturally neutral. It consists of the interactions between billions of tiny magnets, arranged in special patterns, that perform what we call "programs".
However, as soon as the person comes on the scene, these programs are provided with linguistic and cultural features. English-speaking programmers write software that communicates with users in English.
If the software is only to be used by English-speaking users, that's all there is to it. Sometimes it is, but most of the time it is not. Then software localization is required.
Software design in the global market
Technology enables communication across international borders. And that's really good news for both developers and users.
For software developers, globalization means a potentially unlimited market for a new program or application. If a product is successful in the US, developers can test how it is received in Canada, the UK, or even China.
But it is not enough if a website or a program supports several languages. The content must be understandable for users in the respective country. Otherwise they are not really global, just multilingual.
The limits of translation
If you have ever tried to operate an electronic device that was configured in a different language, you will know the importance of software localization. Without localization, a program is frustrating at best and unusable at all at worst.
If you translate the user-visible components of a software program into your language, you can use the software. However, if the program is not localized, i.e. only the words are adjusted while everything else remains the same, the user will quickly run into difficulties.
Imagine a software application has been translated (rather than localized) from English into Chinese. The meanings of the words may be reasonably clear, but usability issues may arise. The font may be too small and difficult to read. Some graphics are perhaps typically American. A Chinese user could work with it, but it would feel strange to them.
Software localization: Tailoring the product to the target group
If you come across a special feature from a different culture in a software product, it catches the eye. This may not affect whether you like the product or not, but it does make it very clear to you that the user interface was not designed specifically for you (and your language and culture). Software localization helps to overcome this distance.
What is software localization?
Software localization is the process of adapting software to the culture and language of the end user. This includes the adaptation of units of measurement as well as the design of videos and graphics. After the software has been expertly localized, the content is designed as if it had originally been created in the user's country.
Effective software localization
Software localization must take into account all elements of the program that is to be tailored to another market. Engineers and those responsible for localization have to pay attention to a wide variety of factors, from geopolitical sensitivities to the correct currency symbols, units of measurement and date formats in the target country.
Text and writing systems
Software localization takes into account all the effects of language on a program. That goes far beyond just translating. There are various character encoding standards and alignments to consider, such as right-to-left languages such as Hebrew, Arabic, and Farsi. Localizing software for regions where these languages are spoken involves modifying not only text fields, but also resource files - including menus, dialog boxes, and interactive buttons - and user interface files such as localizable strings.
You need to be clear about what the rearranged language looks like on the screen and how this will affect the program function. In addition, you need to know how the native speakers interact with the written content so that you can optimize the interface accordingly.
Graphic design
During localization, you can also “translate” the non-linguistic elements of your user interface. Competent teams for software localization will check your symbols and images and make sure that they meet the following criteria for your target group:
The pictures make sense.
You are not offensive.
In the best case scenario, incorrectly used symbols and images only cause confusion. An example of this would be the red flag mailbox that a specific company used to mark new messages in the user's inbox. Unfortunately, few users outside the United States knew what red flags in mailboxes meant. There was more confusion than clarity.
Some symbols can cause even bigger problems:
The hand sign used in the USA for "OK" - thumb and forefinger form an "O" - is an insult in some countries.
In US educational software, an owl could be used as a symbol of learning and knowledge acquisition. In some parts of Asia, however, the owl is a symbol of stupidity.
Smart companies are careful not to use controversial or religious symbols. For example, the Red Cross in the Middle East uses a red crescent moon as a symbol to avoid harming anyone.
Be careful to locate any graphics that your target audience might get wrong. For British target groups, for example, the image of a red hand signaling “Don't go” at a pedestrian crossing should definitely be localized. Like most Europeans, the British are used to seeing stick figures and no hands at pedestrian crossings.
Should you localize your software?
There are three possible answers: probably not, not yet and yes.
1. “Probably not” - the software is of little use outside of its original scope
If your app is specifically tailored to your region or community, you probably don't have to worry about localizing the software for multilingual audiences. But even in such a case, you should consider whether there are linguistic marginalized groups in your region for whom localization and translation of the software would be helpful.
You may find that the insurance market in your country does not require localization. However, did you consider that there could be a large proportion of people of Turkish or Russian descent in your region? You may be more successful if you localize the software for these groups.
2. “Not yet” - only when the time comes
If it makes more sense for you to concentrate on your home region first, you can also take care of localization later. In this case, it is advisable to prepare the content as well as possible with a view to future localization. Take smaller steps now. For example, add international formats for characters and numbers so that you don't have to change so much later. Try to keep your sentences short and use as little colloquial as possible.
3. "Yes" - network effects make localization necessary
If your software has significant network effects, that is, if it offers more benefits to users as it becomes more popular, then software localization ensures scalability.
If you already have a target group abroad, or if you will soon be, you should consider localization at an early stage of application development.
Conclusion
Localization increases the attractiveness of your software considerably. Nowadays, as more and more programs and apps are used internationally, the localization process is an inexpensive way to reach new markets. Who knows - maybe your app will develop into the next worldwide viral success!
Are you interested in tackling the localization and translation of your application or software? Then contact Wordpar today.
0 notes
Text
Missing Protocol Windows 10

Windows 10 Network Protocol Error: Missing Windows Sockets Registry Entries By Corey October 5, 2020 No Comments My colleagues work computer running Windows 10 began to lose Internet access from time to time (once in 2-3 days with the Limited connection status in the tray). Temporarily Disable or Reinstall your Antivirus Software. First things first, if you are using any. Simply updating your PC's Windows 10 operating system could also fix this issue and restore any missing default apps. Step 1: Hit the Windows logo + I short to launch the Windows Settings menu.
Simple Network Management Protocol or SNMP is used for monitoring, event notification, and network device management on corporate networks. The protocol consists of a set of network management standards, including the Application Layer protocol, database schemas, and a set of data objects. SNMP can receive various information (uptime, performance counters, device parameters, etc.) from any network devices: switches, servers, routers or computers on which the SNMP agent is installed. In Windows 10, the SNMP service is available as a separate Windows component and it’s not installed by the default.
How to Install SNMP Service in Windows 10?
You can check if the SNMP service is installed on your Windows 10 using the Get-Service:
Most likely, the service has not been installed yet.
You can install the SNMP service via the Control Panel. Go to the Control Panel > Programs and Features > Turn Windows features on or off. In the list of Windows features, select Simple Network Management Protocol (SNMP) and the WMI SNMP Provider (provides access to SNMP information via the Windows Management Instrumentation interfaces) and click OK.
You can also install SNMP service using PowerShell:
This command can help you to install SNMP service on Windows 10 in 1803 build or earlier. Starting from Windows 10 1809 Microsoft has changed the way to deploy snmp service on desktop OSs.
Installing SNMP Service in Windows 10 1803 and Newer
Missing Protocol Windows 10 64-bit
In Windows 10 1803 and later (1809, 1903), the SNMP service is considered deprecated and is not listed in the Windows features in the Control Panel list.
Microsoft plans to completely remove the SNMP service in the next Windows builds because of the security risks associated with this protocol. Instead of SNMP, it is recommended to use the Common Information Model (CIM), which is supported by Windows Remote Management. On the current builds of Windows 10, the SNMP service is hidden.
READ ALSOHow to Setup FTP Server in Windows 10?
The SNMP service is now missing from the Windows 10 image and can only be installed as Feature On Demand (FoD).

If your computer has a direct Internet connection, you can install the SNMP service components online from Microsoft servers. To do this, open the elevated PowerShell console and run the command:
You can also use DISM to install the SNMP service:
After that, you can verify that the SNMP service is installed:
Name : SNMP.Client~~~~0.0.1.0
State : Installed
DisplayName : Simple Network Management Protocol (SNMP)
Description : This feature includes Simple Network Management Protocol agents that monitor the activity in network devices and report to the network console workstation
DownloadSize : 595304
Default Protocols Windows 10
InstallSize : 1128133
To disable the SNMP service, use the PowerShell command:
You can also install the SNMP service through the Optional Features graphical interface.
Go to the Settings > Apps > Apps & Features > Manage optional feature > Add Feature. Select in the list the following features: Simple Network Management Protocol (SNMP) and WMI SNMP Provider (to get all SNMP service configuration tabs).
After that, the SNMP service will appear in the services.msc console.
If when performing the Add-WindowsCapability command you received the “Add-WindowsCapability failed error. Error code = 0x800f0954”, most likely your computer receives Windows updates not from Microsoft Update servers but from the internal WSUS server. To make SNMP service receiving install files from Microsoft servers, you need to temporarily bypass the WSUS.
READ ALSOAccessing Hyper-V VM Console Using RDCMan
To do this, run the command:
After that, restart the Windows Update service:
Now try to install the SNMP service with the Add-WindowsCapability command. If all goes well, return the initial wusuaserv service registry parameter pointing to the WSUS server. Run the command:
And restart the Windows Update Service.
Configure SNMP on Windows 10 Computer
After the installation, SNMP services should start automatically. Open the Services management console (services.msc). Two new services should appear in the service list:
SNMP Service – This is the primary SNMP agent service, that tracks activity and sends information;
SNMP Trap – Receives trap messages from local or remote SNMP agents, and forwards messages to the SNMP management software that is being run on that computer.
Open the properties of the SNMP Service. If it is stopped, start it by pressing the Start button and change the startup type to Automatic.
Click the Agent tab. Fill in the Contact and Location fields (you can specify the user’s contact name and computer location), and select the list of services from which you want to collect data and send it to the monitoring device. There are five service-based options:
Physical;
Applications;
Internet;
End-to-end;
Datalink and subnetwork.
Click the Security tab. Here you can configure various security settings for different SNMP servers.
The list of Accepted community names contains the names of the communities whose SNMP hosts are authenticated to send SNMP requests to this computer. The community name has the same functions like login and password.
READ ALSOChanging Active Directory krbtgt Account Password
Click the Add button and specify the Community Name and one of the five access levels (None, Notify, READ ONLY, READ WRITE, READ CREATE). READ WRITE is the maximum access level at which the SNMP management server can make changes on the system. For monitoring systems, it is usually enough to select READ ONLY, while the monitoring server can only poll the system, but not make changes. In our example, we added a community name public with READ ONLY permissions.
Add to the Accept SNMP packets from these hosts list of monitoring servers (hostnames or IP addresses) from which you want to accept SNMP packages.
Tip. You can select the Accept SNMP packets from any host option, but this is not safe.
Save the changes and restart the SNMP service.
This completes the SNMP service configuration in Windows 10. If you need to enable SNMP on multiple computers or servers, you can remotely install and configure SNMP service using PowerShell or Group Policy.
AuthorRecent PostsCyril KardashevskyI enjoy technology and developing websites. Since 2012 I'm running a few of my own websites, and share useful content on gadgets, PC administration and website promotion.Latest posts by Cyril Kardashevsky (see all)
Fix: Active Directory Domain Controller Could Not Be Contacted - December 10, 2020Manage and Disable Windows Defender Using PowerShell - December 9, 2020Using Out-File Cmdlet to Redirect Output to File in PowerShell - December 4, 2020='font-size:14px>='font-size:14px>='font-size:14px>
This site uses cookies to analyze traffic, personalize your experience and serve ads. By continuing browsing this site, we will assume that you are agree with it. =cn-notice-text>
A Network Protocol is a set of rules that define how data is communicated between different computers that are connected through a network connection.
Network Protocols are of different types such as Ethernet, FDDI, LocalTalk and TokenRing. They comprise of procedures and formats to be followed during data transmission. You might encounter the One or more protocols are missing error on a Windows 10 laptop/ PC due to one or more of the following reasons:
Your system doesn’t support usage of IPv6
Your WinSock defaults have been changed
DNS registration issues
Corrupt Registry keys, code identifier issues
Insufficient Registry permissions to access network data
A protocol needs to be installed
Use Internet Protocol Version 4
IPv6 is a next-generation protocol. If you’re encountering problems deploying IPv6, configure your laptop to use an older protocol such as IPv4.
Press Windows Key + X; choose Control Panel.
Click Network and Internet | Network and Sharing Center.
Click the Wi-Fi/ Wired Broadband connection that appears in Connections.
Wi-Fi/ Wired Broadband Status dialog will open up on your screen.
Click Properties.
Uncheck Internet Protocol Version 6 (TCP/ IPv6).
Check Internet Protocol Version 4 (TCP/ IPv4).
Click OK | Close.
Restore Winsock Defaults
WinSock, earlier known as WSA, deals with network services such as TCP/IP. Problems with the functioning of WinSock can cause protocol errors. Restore default WinSock configurations using an elevated CMD.
Press Windows Key + X; select Command Prompt (Admin).
Type the following command: Netsh winsock reset
Press the Enter key of your keyboard.
Restart your system using the following command-line: Shutdown /r
Flush & Register New DNS
Domain Name Servers (DNS)translates a website’s name into the corresponding Internet Protocol (IP) Address. If the process of converting human-readable website names fails, you may get the protocol missing error.
Open an elevated Command Prompt.
Flush the existing DNS: ipconfig /flushdns
Register a new DNS: ipconfig /registerdns
Release and renew the information: ipconfig /release ipconfig /renew
Reset the Catalog: netsh winsock reset catalog
Store the logs in a separate file named reset.log netsh int ipv4 reset reset.log netsh int ipv6 reset reset.log pause
Restart your computer: shutdown /r
Modify Registry Configurations
Provide appropriate read, write and access permissions to the Registry subkeys that deal with your computer’s network connection.
Type RegEdit in the Search Box on the Taskbar.
Open Registry Editor from the Search Results.
Locate the following Registry path: HKEY_LOCAL_MACHINE | SYSTEM | CurrentControlSet | Control | Nsi | {eb004a00-9b1a-11d4-9123¬-0050047759bc}
Right-click a 26 subkey, choose Permissions.
In the new dialog, specify the Group or User Name as Everyone.
Check the Allow box ahead of Full Control.
Click Apply | OK.
Install New Protocol
Go to your Connection Properties and then install a new protocol through the steps given below:
Type ncpa.cpl in the Search Box and open it from the Search Results.
Right-click your Wi-Fi/ Wired Broadband connection icon, choose Properties.
Click the Install button.
Choose Protocol in the subsequent Select Network Feature Type dialog, and click Add.
Click Hard Disk button.
Specify the following path: C:Windowsinf
Click OK.
You have a new dialog – Select Network Protocol
Select Internet Protocol (TCP/ IP) – Tunnels
Click OK.
Delete Code Identifier
Make sure the code identifier keys aren’t corrupt. Delete the corrupted data so that your system will generate default settings.
Open Registry Editor.
Locate following Registry path: HKEY_LOCAL_MACHINE | SOFTWARE | Policies | Microsoft | Windows | Safer | CodeIdentifiers | 0
Delete the Paths subkey. (Right-click > Delete)
Exit the Registry Editor and restart your laptop.
0 notes
Text
How to Create a Profitable eCommerce Store from Scratch

Over the last few years or so, digital marketing has grown by massive amounts. It has led to the creation of brands from scratch, with plenty of well-known names establishing themselves purely because of their work on digital media.
One of the primary sources of that growth has been eCommerce. The availability for people to go online and purchase any item of their choice and have it delivered has made an eCommerce boom. Thanks to its growing popularity, brands like Amazon have seen their businesses touch multiple billions, making them one of the world’s biggest brands.
If you’re someone who wants to make money online, you need to know the tricks to create a strong eCommerce store.
What is an eCommerce Store?
In the world of digital marketing, eCommerce reigns supreme. It provides companies and brands with the platform to reach a wider audience without needing a physical store. Through digital means, brands will be able to sell their products, creating a strong connection with their audiences. eCommerce stores are present all over the world, and they see incredible growth.
The overall income from eCommerce in the U.S. in 2021 is set to touch a staggering $1 trillion. That’s because more people understand the importance of opening one, and with time can cut costs that generally come with owning a brick-and-mortar store.
Over the past decade or so, there has been a proliferation of eCommerce platforms worldwide. Choosing the right one can help brands create a long-term relationship and grow by leaps and bounds. It’s important that brands choose one that suits their needs the best. Different platforms come with their own set of advantages, and this decision can be one of the most important ones made by a company.

What are the Different eCommerce Platforms Available?
There is a whole host of eCommerce platforms available online. Here are the most prominent ones:
1. Shopify
Shopify consistently features on the list of most popular eCommerce management sites. This is because it pioneered the process and is seen as the market leader for eCommerce. Many advantages come with using Shopify and its multiple features. The primary of those is its inventory system that’s super smooth and doesn’t require much control. Once you decide what products you’re selling on shopify and the audience you’re targeting, Shopify allows you to update information at your will.
Further, it allows you to sell products across a multitude of channels, including Instagram, Facebook, Amazon, and even eBay. This consistency across platforms is one of the main reasons top brands opt for Shopify, and they provide a consistent approach.
Shopify also received some of the highest scores with regards to customer satisfaction across multiple businesses.
2. Woocommerce
When it comes to user-friendliness and adaptability, few do it better than Woocommerce. There are multiple reasons to love Woocommerce, and the first one is that it allows you to start for free. Once you get a taste of its services and begin to get used to it, you can think about paying and creating a strong online presence with its services.
Another reason for its popularity is the fact that Woocommerce is easy to implement and use. With its super-smooth customization ability, it allows businesses to flourish over time. Its longevity is another factor to stick to Woocommerce, with the platform being around since 2011. It has grown from scratch and only improved with time. Also, the developers are known for being professional and reliable with their offerings for support and products.
3. BigCommerce
Another one of the popular services for eCommerce is BigCommerce. Perfect for fast-growing and large businesses, they provide services that can be easily accessed and understood.
Another significant advantage for BigCommerce is that it comes with a super range of built-in features and tools. These are perfect for supporting the growth of the store. With the powerful tools available, it becomes all the easier to keep track of the various things happening around the store, and will help in improving the overall scope of the store. Further, you can also sell via multiple channels while also managing everything from a single space.
BigCommerce allows you to sell digital, physical, and also service-based products automatically. You don’t have to install any app to allow for the same as it already comes included in the builder itself.
The platform also offers some excellent features for eCommerce management across industries.
4. Magento
One of the most popular eCommerce platforms worldwide, Magento comes with open-source technology. It also provides merchants with an opportunity to use a flexible cart system and gain access to an online store’s functionality and content. The site also offers search engine optimization, powerful marketing, and tools for catalog management.
Not only is it flexible, but it is also secure. The wide array of services for support, features, and security are fully scalable and easy to implement. Magento currently has over 260,000 merchants on board and is one of the most popular store-building platforms online.
The complete customizability adds to its benefits, and overall, it is an excellent platform for merchants who wish to implement the best in advanced technology.

5. Volusion
One of the leaders in eCommerce software solutions, Volusion provides businesses with a software platform that caters to industry needs. The eCommerce solution can be used to handle essential features such as payment processing and order management.
Volusion can help companies collect payments from customers based on sales products. With these eCommerce website stores’ creation, retailers online can easily receive instant payments and carry on their business.
6. 3DCart
3DCart has a host of benefits and comes with a 15-day free trial so that you can get used to the program and platform. It also enables you to get the store up and running before deciding to go forth and invest in the pricing plans. There are a bunch of rich SEO features and integrations for social media. This makes it easier to get your store discovered and drive traffic.
With the customized and simple mobile theme and templates, you’ll also be able to enjoy shopping across devices like phones are tablets. The software also updates the platform with the best in functionality and technology innovations so that you can maintain a competitive edge.
7. Prestashop
Prestashop is another popular eCommerce store management software that comes with a host of benefits for users. It’s super easy to install and requires you to download the necessary file from their store. Post this; you can create a functioning and responsive online store. The file size is 6 MB, so it works fast, without taking too long to download.
Prestashop is also budget-friendly and free of cost. Merchants looking for minimum investments can depend on it because there’s no need for a license to set up the store online.
The custom design is simple and convenient, without the need for technical knowledge. The user-friendly interface and simple design can be easily handled, along with the thousands of plugins available. Prestashop also comes with simple customization with which you can add and delete features.
The shop also supports multiple languages and currencies, making it easier for localization. The assistance helps them run stores around the globe. The software has stores in India, the USA, Canada, China, Germany, and Japan. The website is also capable of translating up to 45 languages.
Why Should You Use Shopify Over other eCommerce Platforms?
Shopify is great for stores that sell products or services which require minimal configuration. You can sell products with the advanced Shopify homepage section as required by your business.
Shopify also offers a simple way to quickly launch a store without worrying about development costs or worry over servers common with platforms such as Magento.
There are also no tech worries when it comes to Shopify, as it can help make the hosting faster and accommodate any spikes that come in traffic. The platform is super reliable and has 24/7 customer support for any merchant.
The app is also mobile-ready, and they’ve adapted their site to accommodate the larger number of traffic coming in. The optimized site allows merchants to create and customize the store online and help customers work with a mobile responsive cart.
Shopify is also customizable and comes with over 160 themes. Most of them are mobile responsive, and creating this unique online shop becomes simpler.
The app store has a treasure trove of functionality where you can add loyalty programs, reviews, wishlists, and receive in-depth analytics, packing slips, print labels, and shipping programs.
It’s good when you have your online store, but Shopify takes it to another level by providing a powerful SEO engine. You also gain access to advanced analytics so you can understand where your customers are coming from.
There is also a wide range of marketing tools that include product reviews, social media integration, and email marketing. You can also create gift vouchers, discount codes, and take the next level up. Shopify also provides a seamless, abandoned cart recovery experience by automatically tracking and reminding potential customers.
Finally, Shopify also comes with its payment gateway, for which you won’t have to incur transaction fees.

How to Set Up the Shopify store?
Now that you’ve understood the advantages of Shopify, you can go forth and set it up. Here’s how
Start your free trial on Shopify
With Shopify, you can start a free trial and begin to understand the initial steps that go into creating your shopify store. Once you do so, you’ll be able to understand what’s needed to integrate into the store. There are plenty of features, so you can take your time exploring it.
The free trial allows you to fully set up the store and try it before you decide to go ahead and purchase apps.
Pick a theme and customize the Shopify store
The next step is to pick yourself a theme and customize the store according to what works best for you. There are plenty of themes available, and they’re also segregated according to industry, color, and so much more. These brilliant themes can help make your store look visually stunning and offer the best functionality, so you don’t have to compromise on either.
Add the products you’d like to sell
After you’ve set up the theme, it’s time to add the products you’d like to sell in your store. Find the column and begin adding the products for customers to view. You can add extra parameters and segregate them next.
Group and categorize your products
After you’ve added the products in the store, you can go ahead and group or segregate them. Based on the parameters you’d like to add, the software allows you to categorize the products carefully. Hence, it becomes easier to create a fully-functional and optimized store that customers can visit and easily navigate.
Create necessary pages for the store
Once you’re done with the product creation, it’s time to complete the website’s look and feels. You can do that by creating the necessary pages, including the About Us, Contact page, and so much more. Shopify allows you to integrate the themes accordingly, so it becomes easier for you to manage the store right from one point.
Change your shipping settings as per your preferences
Based on how you’d like to ship your products around the world, you can set the necessary shipping settings. There are plenty of parameters available on the Shopify store, so you can accordingly do it in a way that suits your preferences.
Set up your tax settings
Shopify allows you to create tax settings with which you’ll be able to download statements and upload them for tax returns when needed. These tax settings also apply for customers shopping online, and you can adjust it based on the bracket you fall under.
Set up your payment getaway
This step is crucial because you need to know how money is coming into your system and how you’ll analyze and monitor it. You can choose from a host of payment gateways available in the store and make it easier for customers to go forth and purchase from your shop.
Test your order system
You can test the order system to know if the platform is working smoothly with your store. Once that happens, you know that you’re one step closer to going live.
Setup the domain with Shopify
Shopify then allows you to set up a domain and create a website on the internet, right from their app. You’ll be able to go live then.
Do the basic on-page SEO optimization
Optimize URL structure – Ensure the URL structure is correct, and there are no dead ends when people try to search for your site.
Optimize the Metadata – You can click on the SEO suite available with Shopify and optimize your Metadata. This can help in better visibility and get your store more traction online.
Optimize your headings – Headings give customers a taste of what’s in store (no pun intended), and you need to optimize them from time to time on the Shopify backend.
Optimize your body text with primary and secondary keywords – Help customers easily discover your store and optimize the primary and secondary keywords as needed.
Optimize your image alt tags – Image alt tags make it easier to provide more information about the product when a customer hovers over it.
Remove password protection and launch your store
You can finally remove password protection and launch your online store.
Keep tabs on all the various activities occurring and ensure that you’re constantly checking the web traffic and quality. Shopify’s features allow you to manage your store end-to-end, and with time, you’ll begin seeing the value of the investment you’ve made.
Conclusion
Keep optimizing the store and ensure that customer queries are taken care of in the right manner. After you’ve mastered Shopify, you can begin adding custom apps that simplify tasks and can be run on an automated basis, allowing you to take a backseat and focus on growth. Good luck!
Guest Post by AdNabu
AdNabu helps improve sales in Google Ads for eCommerce companies. If you are running the search, google shopping, or display campaigns in Google Ads, This software will be able to increase your sales.
Schedule a free consultation
0 notes
Text
Cross-Cultural Design
When I first traveled to Japan as an exchange student in 2001, I lived in northern Kyoto, a block from the Kitayama subway station.
My first time using the train to get to my university was almost a disaster, even though it was only two subway stops away. I thought I had everything I needed to successfully make the trip. I double- and triple-checked that I had the correct change in one pocket and a computer printout of where I was supposed to go in the other. I was able to make it down into the station, but then I just stood at a ticket machine, dumbfounded, looking at all the flashing lights, buttons, and maps above my head (Fig 5.1). Everything was so impenetrable. I was overwhelmed by the architecture, the sounds, the signs, and the language.
Fig 5.1: Kyoto subway ticket machines—with many line maps and bilingual station names—can seem complicated, especially to newcomers.
My eyes craved something familiar—and there it was. The ticket machine had a small button that said English! I pushed it but became even more lost: the instructions were poorly translated, and anyway, they explained a system that I couldn’t use in the first place.
Guess what saved me? Two little old Japanese ladies. As they bought tickets, I casually looked over their shoulders to see how they were using the machines. First, they looked up at the map to find their desired destination. Then, they noted the fare written next to the station. Finally, they put some money into the machine, pushed the button that lit up with their correct fare, and out popped the tickets! Wow! I tried it myself after they left. And after a few tense moments, I got my ticket and headed through the gates to the train platform.
I pride myself on being a third-culture kid, meaning I was raised in a culture other than the country named on my passport. But even with a cultural upbringing in both Nigeria and the US, it was one of the first times I ever had to guess my way through a task with no previous reference points. And I did it!
Unfortunately, the same guesswork happens online a million times a day. People visit sites that offer them no cultural mental models or visual framework to fall back on, and they end up stumbling through links and pages. Effective visual systems can help eliminate that guesswork and uncertainty by creating layered sets of cues in the design and interface. Let’s look at a few core parts of these design systems and tease out how we can make them more culturally responsive and multifaceted.
Typography
If you work on the web, you deal with typography all the time. This isn’t a book about typography—others have written far more eloquently and technically on the subject. What I would like to do, however, is examine some of the ways culture and identity influence our perception of type and what typographic choices designers can make to help create rich cross-cultural experiences.
Stereotypography
I came across the word stereotypography a few years ago. Being African, I’m well aware of the way my continent is portrayed in Western media—a dirt-poor, rural monoculture with little in the way of technology, education, or urbanization. In the West, one of the most recognizable graphic markers for things African, tribal, or uncivilized (and no, they are not the same thing) is the typeface Neuland. Rob Giampietro calls it “the New Black Face,” a clever play on words. In an essay, he asks an important question:
How did [Neuland and Lithos] come to signify Africans and African-Americans, regardless of how a designer uses them, and regardless of the purpose for which their creators originally intended them? (http://bkaprt.com/ccd/05-01/)
From its release in 1923 and continued use through the 1940s in African-American-focused advertising, Neuland has carried heavy connotations and stereotypes of cheapness, ugliness, tribalism, and roughness. You see this even today. Neuland is used in posters for movies like Tarzan, Jurassic Park, and Jumanji—movies that are about jungles, wildness, and scary beasts lurking in the bush, all Western symbolism for the continent of Africa. Even MyFonts’ download page for Neuland (Fig 5.2) includes tags for “Africa,” “jungle fever,” and “primitive”—tags unconnected to anything else in the product besides that racist history.
Fig 5.2: On MyFonts, the Neuland typeface is tagged with “Africa”, “jungle fever”, and “primitive”, perpetuating an old and irrelevant typographic stereotype (http://bkaprt.com/ccd/05-02/).
Don’t make, use, or sell fonts this way. Here are some tips on how to avoid stereotypography when defining your digital experiences:
Be immediately suspicious of any typeface that “looks like” a culture or country. For example, so-called “wonton” or “chop-suey” fonts, whose visual style is thought to express “Asianness” or to suggest Chinese calligraphy, have long appeared on food cartons, signs, campaign websites, and even Abercrombie & Fitch T-shirts with racist caricatures of Asians (http://bkaprt.com/ccd/05-03/). Monotype’s website, where you can buy a version called Mandarin Regular (US$35), cringingly describes the typeface’s story as “an interpretation of artistically drawn Asian brush calligraphy” (Fig 5.3). Whether or not you immediately know its history, run away from any typeface that purports to represent an entire culture.
Fig 5.3: Fonts.com sells a typeface called Mandarin Regular with the following description: “The stylized Asian atmosphere is not created only by the forms of the figures but also by the very name of the typeface. A mandarin was a high official of the ancient Chinese empire” (https://ift.tt/2T4LppO).
Support type designers who are from the culture you are designing for. This might seem like it’s a difficult task, but the internet is a big place. I have found that, for clients who are sensitive to cultural issues, the inclusion of type designers’ names and backgrounds can be a powerful differentiator, even making its way into their branding packages as a point of pride.
The world wide webfont
Another common design tool you should consider is webfonts—fonts specifically designed for use on websites and apps. One of the main selling points of webfonts is that instead of putting text in images, clients can use live text on their sites, which is better for SEO and accessibility. They are simple to implement these days, a matter of adding a line of code or checking a box on a templating engine. The easiest way to get them on your site is by using a service like Google Fonts, Fontstand, or Adobe Fonts.
Or is it? That assumes those services are actually available to your users.
Google Fonts (and every other service using Google’s Developer API) is blocked in mainland China, which means that any of those nice free fonts you chose would simply not load (http://bkaprt.com/ccd/05-05/). You can work around this, but it also helps to have a fallback font—that’s what they’re for.
When you’re building your design system, why not take a few extra steps to define some webfonts that are visible in places with content blocks? Justfont is one of the first services focused on offering a wide range of Chinese webfonts (http://bkaprt.com/ccd/05-06/). They have both free and paid tiers of service, similar to Western font services. After setting up an account, you can grab whatever CSS and font-family information you need.
Multiple script systems
When your design work requires more than one script—for instance, a Korean typeface and a Latin typeface—your choices get much more difficult. Designs that incorporate more than one are called multiple script systems (multiscript systems for short). Combining them is an interesting design challenge, one that requires extra typographic sensitivity. Luckily, your multiscript choices will rarely appear on the same page together; you will usually be choosing fonts that work across the brand, not that work well next to one another visually.
Let’s take a look at an example of effective multiscript use. SurveyMonkey, an online survey and questionnaire tool, has their site localized into a variety of different languages (Fig 5.4). Take note of the headers, the structure of the text in the menu and buttons, and how both fonts feel like part of the same brand.

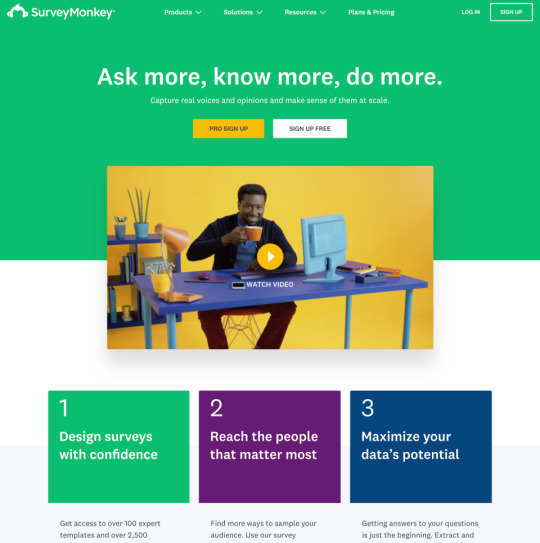
Fig 5.4: Compare the typographic choices in the Korean (http://bkaprt.com/ccd/05-07/) and US English (http://bkaprt.com/ccd/05-08/) versions of SurveyMonkey’s Take a Tour page. Do the header type and spacing retain the spirit of the brand while still accounting for typographic needs?
Some tips as you attempt to choose multiscript fonts for your project:
Inspect the overall weight and contrast level of the scripts. Take the time to examine how weight and contrast are used in the scripts you’re using. Find weights and sizes that give you a similar feel and give the page the right balance, regardless of the script.
Keep an eye on awkward script features. Character x-heights, descenders, ascenders, and spacing can throw off the overall brand effect. For instance, Japanese characters are always positioned within a grid with all characters designed to fit in squares of equal height and width. Standard Japanese typefaces also contain Latin characters, called romaji. Those Latin characters will, by default, be kerned according to that same grid pattern, often leaving their spacing awkward and ill-formed. Take the extra time to find a typeface that doesn’t have features that are awkward to work with.
Don’t automatically choose scripts based on superficial similarity. Initial impressions don’t always mean a typeface is the right one for your project. In an interview in the book Bi-Scriptual, Jeongmin Kwon, a typeface designer based in France, offers an example (http://bkaprt.com/ccd/05-09/). Nanum Myeongjo, a contemporary Hangul typeface, might at first glance look really similar to a seventeenth-century Latin old-style typeface—for instance, they both have angled serifs. However, Nanum Myeongjo was designed in 2008 with refined, modern strokes, whereas old-style typefaces were originally created centuries ago and echo handwritten letterforms (http://bkaprt.com/ccd/05-10/). Looking at the Google Fonts page for Nanum Myeongjo, though, none of that is clear (Fig 5.5). The page automatically generates a Latin Nn glyph in the top left of the page, instead of a more representative Hangul character sample. If I based my multiscript font choices on my initial reactions to that page, my pairings wouldn’t accurately capture the history and design of each typeface.
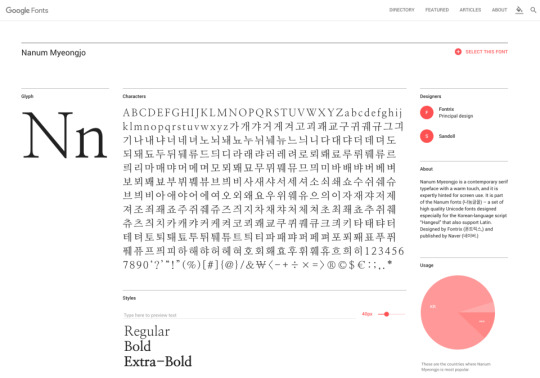
Fig 5.5: The Google Fonts page for Nanum Myeongjo shows a Latin character sample in the top left, rather than a more representative character sample.
Visual density
CSS can help you control visual density—how much text, image, and other content there is relative to the negative space on your page. As you read on, keep cultural variables in mind: different cultures value different levels of visual density.
Let’s compare what are commonly called CJK (Chinese, Japanese, Korean) alphabets and Latin (English, French, Italian, etc.) alphabets. CJK alphabets have more complex characters, with shapes that are generally squarer than Latin letterforms. The glyphs also tend to be more detailed than Latin ones, resulting in a higher visual density.
Your instinct might be to create custom type sizes and line heights for each of your localized pages. That is a perfectly acceptable option, and if you are a typophile, it may drive you crazy not to do it. But I’m here to tell you that when adding CJK languages to a design system, you can update it to account for their visual density without ripping out a lot of your original CSS:
Choose a font size that is slightly larger for CJK characters, because of their density.
Choose a line height that gives you ample vertical space between each line of text (referred to as line-height in CSS).
Look at your Latin text in the same sizes and see if it still works.
Tweak them together to find a size that works well with both scripts.
The 2017 site for Typojanchi, the Korean Typography Biennale, follows this methodology (Fig 5.6). Both the English and Korean texts have a font-size of 1.25em, and a line-height of 1.5. The result? The English text takes up more space vertically, and the block of Korean text is visually denser, but both are readable and sit comfortably within the overall page design. It is useful to compare translated websites like this to see how CSS styling can be standardized across Latin and CJK pages.

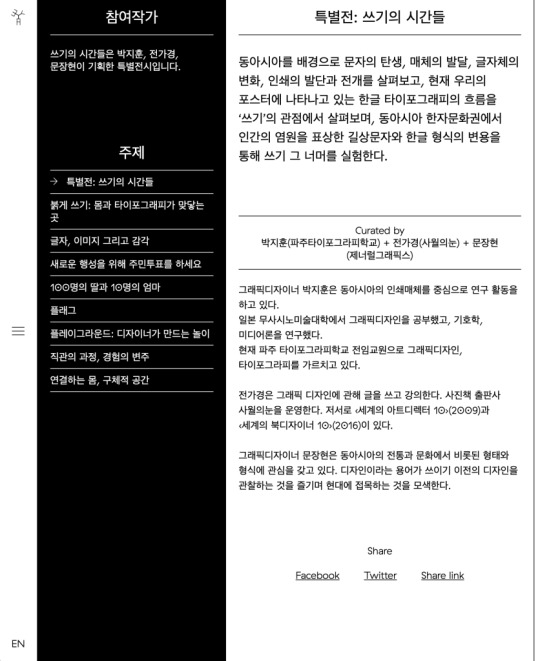
Fig 5.6: The 2017 site for Typojanchi, the Korean Typography Biennale, shows differing visual density in action. It is useful to compare translated websites like this to see how CSS styling can be standardized across Latin and CJK pages (https://ift.tt/2T2Emhi).
Text expansion factors
Expansion factors calculate how long strings of text will be in different languages. They use either a decimal (1.8) or a percentage (180%) to calculate the length of a text string in English versus a different language. Of course, letter-spacing depends on the actual word or phrase, but think of them as a very rough way to anticipate space for text when it gets translated.
Using expansion factors is best when planning for microcopy, calls to action, and menus, rather than long-form content like articles or blog posts that can freely expand down the page. The Salesforce Lightning Design System offers a detailed expansion-factor table to help designers roughly calculate space requirements for other languages in a UI (Fig 5.7).
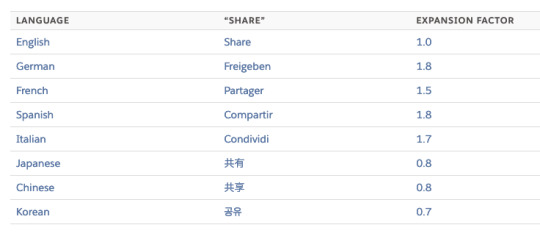
Fig 5.7: This expansion-factor table from Salesforce lets designers and developers estimate the amount of text that will exist in different languages. Though dependent on the actual words, such calculations can give you a benchmark to design with content in mind (http://bkaprt.com/ccd/05-12/).
But wait! Like everything in cross-cultural design, nothing is ever that simple. Japanese, for example, has three scripts: Kanji, for characters of Chinese origin, hiragana, for words and sounds that are not represented in kanji, and katakana, for words borrowed from other languages.
The follow button is a core part of the Twitter experience. It has six characters in English (“Follow”) and four in Japanese (フォロー), but the Japanese version is twenty percent longer because it is in katakana, and those characters take up more space than kanji (Fig 5.8). Expansion tables can struggle to accommodate the complex diversity of human scripts and languages, so don’t look to them as a one-stop or infallible solution.

Fig 5.8: On Twitter, expansion is clearly visible: the English “Follow” button text comes in at about 47 pixels wide, while the Japanese text comes in at 60 pixels wide.
Here are a few things you can do keep expansion factors in mind as you design:
Generate dummy text in different languages for your design comps. Of course, you should make sure your text doesn’t contain any unintentional swearwords or improper language, but tools like Foreign Ipsum are a good place to start getting your head around expansion factors (http://bkaprt.com/ccd/05-13/).
Leave extra space around buttons, menu items, and other microcopy. As well as being general good practice in responsive design, this allows you to account for how text in your target languages expands.
Make sure your components are expandable. Stay away from assigning a fixed width to your UI elements unless it’s unavoidable.
Let longer text strings wrap to a second line. Just ensure that text is aligned correctly and is easy to scan.
Cross-Cultural Design published first on https://deskbysnafu.tumblr.com/
0 notes
Text
Chinese e-taxi giant Didi goes bilingual with English-language app and real-time translations
Chinese ride-hailing giant Didi Chuxing (“Didi”) has announced a new bilingual service as it looks to ramp up its appeal to international travelers.
The company, which merged with Uber’s Chinese operations in a $30 billion deal last year, is rolling out an English-language interface initially for riders in Beijing, Shanghai, and Guangzhou, thus opening the service to potentially millions more tourists and business travelers.
Language capabilities have emerged both as a core selling point and a point of contention in the fast-growing global e-taxi industry. On the one hand, Uber has been gradually rolling out a feature that allows riders to request drivers that speak English, particularly in Latin America, but the company has also been fighting a new ruling in the U.K. that requires drivers to pass an English-language proficiency test.
Simply being able to understand the app’s interface and request a ride is a huge first move in raising the profile of the service outside the Chinese-language market — there is no real need to converse with a driver, given that the pickup and drop-off points are stipulated through the app. While the app isn’t yet allowing riders to request drivers that can speak English — though that would be a next obvious step — it is enabling real-time instant text translations, which should help facilitate communications between passengers and drivers. Bilingual customer service support is also now being offered by email and telephone.
Above: Translations: real-time
Additionally, the Didi app now accepts payments from international credit cards and supports mobile numbers registered in 12 countries, including the U.S., U.K., France, Australia, Canada, and Brazil.
Didi Chuxing was formed in 2015 following a merger between local rivals Didi Dache and Kuaidi Dache, and it offers smartphone-based car services, such as carpooling, taxis, and premium cars with drivers. Today it claims around 400 million users, with up to 20 million ride requests made each day.
Today’s news comes just a couple of weeks after Didi raised a whopping $5.5 billion to build what it calls a “sustainable global mobility ecosystem.” The company has previously revealed that it is eyeing an international expansion, though what form this will take remains to be seen. However, it did recently open a new artificial intelligence facility in Mountain View, California.
And by offering an English-language version of its app, Didi is going some way toward gaining mindshare among the millions of foreign visitors who arrive in the country each year.
0 notes
Text
How Coinbase went international
By Melissa Zhang
Crypto at its core has always been intended for a global audience. Bitcoin and other cryptocurrencies have no concept of borders, allowing for value to transfer seamlessly across the Internet.
Coinbase’s vision and mission is to build an open financial system for the world. As of mid-2017, Coinbase was supporting translations in eight languages and operating in 32 countries, mostly in Europe and North America.
However, as our international growth accelerated in 2018, our engineering team began facing technical limitations that would hinder our international strategy, thereby limiting our ability to make crypto accessible to all.
There are many factors that go into international expansion, including complying with regulations, integrating with local payment methods, staffing support teams with native speakers, and UX design.
This post will focus mostly on the technical challenges that Coinbase’s engineering team faced around internationalization (a.k.a. i18n) and localization (a.k.a. l10n) during this period of international growth, and most importantly, the sequence of solutions. The main challenges were primarily: fragmentation across platforms, lack of translation infrastructure, poor translation quality, and missing i18n culture and process.
Our team started by scouring for existing research but quickly found there weren’t many public resources available for building a scalable international infrastructure. We knew that there were a number of companies already doing this successfully, so we began reaching out to people in our own networks. We found that the localization experts at companies such as Netflix, Airbnb, and Pinterest were more than happy to share their knowledge and experiences with us.
This post and our current localization infrastructure is a culmination of this effort to build a world-class translation pipeline that would support every country in the world.
Coinbase.com in German prior to upgrade (2015 to mid 2018), 32 countries, 8 languages
Cross-platform localization
A primary challenge was the lack of standardization across clients around localization. Most browsers and mobile devices today have built-in localization APIs that utilize CLDR (a repository maintained by the Unicode Consortium for standardizing localization information). However, when you begin to move into browsers, support of these APIs begins to fluctuate, requiring polyfills and some headache (IE doesn’t support the Intl object at all!). To build a cohesive experience and to reduce the performance hit of including these large polyfill libraries, the web product now supports only the latest browsers that are actively maintained.
Mobile operating systems, such as iOS and Android, on the other hand, have built-in localization behaviors that vary slightly but are very good at what they do. We quickly realized that overriding these native APIs would be extremely difficult and would lead to more unpredictable behavior and a subpar customer experience. As a result, we opted to let apps localize with their native libraries coupled with a locale agnostic API. This approach is in line with separating data and presentation between APIs and clients.
Another common issue encountered was that certain platforms have different locale fallback behaviors. For example on iOS, if an app only supports Latin American Spanish (es-LA), a user whose native language is set to Mexican Spanish (es-MX) should fallback to es-LA. This behavior was different across platforms where on web, the same customer would actually see translations for Castilian Spanish (es-ES), which is a completely different language.The fix here wasn’t as simple as recording the user’s desired locale since on mobile devices, locale is determined by device settings. Overriding this OS behavior with a server locale as discussed previously is difficult and could lead to unforeseen bugs, so we couldn’t just add a locale selector on the app to let users change their locale. Instead, we would detect changes to device locale and set that new locale on the server, which would allow this change to propagate to emails and our website. Standardizing this fallback behavior and persisting user locale are some of the key initiatives we took to improve the customer experience.
Building translation infrastructure
Our existing translation management platform was beginning to show cracks as our international efforts and our product surface area scaled. Each platform also had their own integration with our existing translation management platform which led to duplicated work. Due to this fragmentation, adding new languages or supporting translations for a new product was a cumbersome process, requiring many days to weeks of engineering time. On Android for example, the workflow was entirely manual, meaning a release manager would compile all the source strings and upload them through the translation management platform interface. If someone forgot to do this, then there would be no new translations for that release!
Because of these constraints, automation would be the number one feature to pursue. We were inspired by Pinterest which is able to maintain a world class localization pipeline with a very lean localization team. Similarly, we wanted to build a developer experience that made it easy and quick for engineers to internationalize their features. In theory, all an engineer would have to do is tag their strings for translation and the tooling would handle the rest. While this part of the translation pipeline could be automated, there were certain parts such as QA that remain a manual process. For these instances, we would default to process and include it as a step in our release cycle.
With this strategy in mind, our team designed a translation workflow for the future. Key parts of this process included finding a translation management platform that would scale as international growth continued, building a common interface for services and clients to access translations, while adding in translation QA to the release cycle.
New translation workflow with Translation Service and QA. Image courtesy of Arjang Navab.
Searching for a TMS
Last year, the search for a new translation management platform (TMS) began. As we thought about what would be required from a vendor, some of our key requirements were:
Integrations with many vendors including popular CMS products
Extensive translation tooling for translators and localization managers
Visual context solutions that allow translators to translate in the context of the app
Powerful translation memory so strings only need to be translated once, saving translation time and cost
Well-maintained and well-documented APIs
Great customer support and technical specialists
After evaluating a few TMS providers, we ultimately chose a vendor that met all these criteria.
Building a common i18n interface
The next step was to build a common interface for services to access translations. To accomplish this we built a translation service written in Golang that sits between clients and the TMS. The service validates all incoming files in case of a malicious attacker compromising the TMS. The service also enables greater control over our content and delivers translations on the fly. For example, on web, we were previously bundling all translations with the app which took up over 75% of our bundle size. By integrating with the translation service, we were able to pull translations dynamically based on the user’s locale, thus decreasing our time to interactive by 27%.
Standarding our integration with the TMS across all clients enables changes to be quickly deployed to our translation workflow. Adding new languages is now as easy as coordinating with translators and a few lines of code. Since the start of this project, we’ve added 10 new languages in 102 countries and translation support for our Commerce product and internal tools. In the future you’ll see many more Coinbase products begin to support translations, as well as expanded language support.
Improving translation quality
While we supported translations, the quality of those translations weren’t on par with products created by native speakers. In order for customers to find value in the product, it needs to not only support translations but also feel local. A number of factors contribute to a product feeling local including locale specific features and UI/UX, but the first step was to focus on improving translation quality.
The most common problem was lack of context, whereby translators were translating strings in isolation without context of the greater application. To address this, we enforced adding descriptions to all strings through linters for each platform. Images were also uploaded to the TMS through an automated screenshot tool in order to contextualize string usage, which would help translators see how the string is used in the app. Further, we revamped our glossary of common terms with industry-specific terminology.
QA has also been an important part of improving translation quality. Following Pinterest’s model, we have also identified internal owners for specific languages to address quality issues and triage bugs. Employees are encouraged to use the product in a different language to understand customer pain points. Our team is currently working towards having language owners for every language and also exploring third party vendors for QA.
Coinbase.com in German (March 2020 — now), 102 countries, 18 languages
Making international a first class citizen
Building an international product isn’t something that happens all at once, it’s a continual process. It’s not something that one person or team can tackle on their own: Designers need to design for different language constraints, such as character size, word length, or possibly right to left languages. Copywriters need to think about gender and plurality in different languages. Engineers are required to tag all their strings early for translation and build responsive UI. Product managers need to think about how certain features will change international customer behavior. Much of this involves educating new employees and making it easy for people to think internationally.
Providing our customers with a great international experience is a critical stepping stone for building an open, global financial system.
If you’re interested in helping us achieve this mission, visit our careers page.
The opinions expressed on this website are those of the authors who are associated persons of Coinbase. Information is provided for general educational purposes only and is not intended to constitute investment or other advice on financial products. Unless otherwise noted, all images provided herein are the property of Coinbase.
How Coinbase went international was originally published in The Coinbase Blog on Medium, where people are continuing the conversation by highlighting and responding to this story.
from Money 101 https://blog.coinbase.com/how-coinbase-went-international-9e0c081aed19?source=rss----c114225aeaf7---4 via http://www.rssmix.com/
0 notes
Text
Internationalizing Your iOS App: Getting Started
Update note: This tutorial has been updated for iOS 11 and Xcode 9 by Richard Critz. The original tutorial was written by Sean Berry with updates by Ali Hafizji.
Creating a great iOS app is no small feat, yet there is much more to it than great code, gorgeous design and intuitive interaction. Climbing the App Store rankings requires well-timed product marketing, the ability to scale up along with the user base, and utilizing tools and techniques to reach as wide an audience as possible.
For many developers, international markets are an afterthought. Thanks to the painless global distribution provided by the App Store, you can release your app in over 150 countries with a single click. Asia and Europe alone represent a continually growing pool of potential customers, many of whom are not native English speakers. In order to capitalize on the global market potential of your app, you’ll need to understand the basics of app internationalization and localization.
This tutorial will guide you through the basic concepts of internationalization by taking a simple app called iLikeIt and adding internationalization support. This simple app has a label and a You Like? button. Whenever the user taps the button, some fictitious sales data and a cheerful image fade in below the button.
Currently, the app is English only; time to fix that!
Note: Because changing languages can also change the size of UI elements, it is crucial that you use Auto Layout in any app that you plan to internationalize.
Internationalization vs Localization
Making your app speak another language requires both internationalization and localization. Aren’t they just two words for the same thing? Not at all! They represent separate and equally important steps in the process of bringing your app into the world of multiple languages.
Internationalization is the process of designing and building your app for international compatibility. This means, for example, building your app to:
Handle text input and output processing in the user’s native language.
Handle different date, time and number formats.
Utilize the appropriate calendar and time zone for processing dates.
Internationalization is an activity that you, the developer, perform by utilizing system-provided APIs and making the necessary modifications to your code to make your app as good in Chinese or Arabic as it is in English. These modifications allow your app to be localized.
Localization is the process of translating an app’s user interface and resources into different languages. Unless you happen to be fluent in the language you’re supporting, this is something you can, and should, entrust to someone else.
Getting Started
Download the starter project here. Build and run; tap You like?. You should see something similar to the following:
As you can see, you will need to localize four items:
The “Hello” label
The “You Like?” button
The “Sales Data” label
The text in the image
Take a moment to browse the project’s files and folders to familiarize yourself with the project structure. Main.storyboard contains a single screen which is an instance of MainViewController.
Separating Text From Code
Currently, all of the text displayed by the app exists as hard-coded strings within Main.storyboard and MainViewController.swift. In order to localize these strings, you must put them into a separate file. Then, rather than hard-coding them, you will retrieve the appropriate strings from this separate file in your app’s bundle.
iOS uses files with the .strings file extension to store all of the localized strings used within the app, one or more for each supported language. A simple function call will retrieve the requested string based on the current language in use on the device.
Choose File\New\File from the menu. In the resulting dialog, select iOS\Resource\Strings File and click Next.
Name the file Localizable and click Create.
Note: Localizable.strings is the default filename iOS uses for localized text. Resist the urge to name the file something else unless you want to type the name of your .strings file every time you reference a localized string.
A .strings file contains any number of key-value pairs, just like a Dictionary. Conventional practice uses the development, or base, language translation as the key. The file has a specific, but simple, format:
"KEY" = "CONTENT";
Note: Unlike Swift, the .strings file requires that each line terminate with a semicolon.
Add the following to the end of Localizable.strings:
"You have sold 1000 apps in %d months" = "You have sold 1000 apps in %d months"; "You like?" = "You like?";
As you can see, you may include format specifiers in either the key or the value portion of the string to allow you to insert real data at run time.
NSLocalizedString(_:tableName:bundle:value:comment:) is the primary tool you use in your code to access these localized strings. The tableName, bundle, and value parameters all have default values so you normally specify only the key and the comment. The comment parameter is there for you to provide a hint to translators as to what purpose this string serves in your app’s user experience.
Open MainViewController.swift and add the following function:
override func viewDidLoad() { super.viewDidLoad() likeButton.setTitle(NSLocalizedString("You like?", comment: "You like the result?"), for: .normal) }
Here, you update the title on the button using the localized value. Now, in the function likeButtonPressed(), find the following line:
salesCountLabel.text = "You have sold 1000 apps in \(period) months"
Replace that line with:
let formatString = NSLocalizedString("You have sold 1000 apps in %d months", comment: "Time to sell 1000 apps") salesCountLabel.text = String.localizedStringWithFormat(formatString, period)
You use the String static function localizedStringWithFormat(_:_:) to substitute the number of months in your sales period into the localized string. As you’ll see later, this way of performing the substitution respects the user’s locale setting.
Note: The comment strings in this tutorial have been purposely kept short to make them format nicely on-screen. When writing them in your own code, take the time to make them as descriptive as possible. It will help your translators significantly and result in better translations.
Build and run. Your project should appear exactly as it did before.
Adding a Spanish Localization
To add support for another language, click on the blue iLikeIt project folder in the Project navigator and select the iLikeIt Project in the center pane (NOT the Target). On the Info tab, you will see a section for Localizations. Click the + and choose Spanish (es) to add a Spanish localization to your project.
Xcode will list the localizable files in your project and allow you to select which ones it should update. Keep them all selected and click Finish.
But wait! Where is Localizable.strings? Don’t worry; you haven’t marked it for localization yet. You’ll fix that shortly.
At this point, Xcode has set up some directories, behind the scenes, to contain localized files for each language you selected. To see this for yourself, open your project folder using Finder, and you should see something similar to the following:
See en.lproj and es.lproj? They contain the language-specific versions of your files. “en” is the localization code for English, and “es” is the localization code for Spanish. For other languages, see the full list of language codes.
So what is Base.lproj? Those are the files in the base, or development, language — in this case, English. When your app asks iOS for the localized version of a resource, iOS looks first in the appropriate language directory. If that directory doesn’t exist, or the resource isn’t there, iOS will fetch the resource from Base.lproj.
It’s that simple! Put your resources in the appropriate folder and iOS will do the rest.
Localizable.strings doesn’t do much good unless it exists in these .lproj directories. Tell Xcode to put it there by selecting it in the Project navigator, then clicking Localize… in the File inspector.
Xcode will ask you to confirm the file’s language. The default will be English since that’s your development language. Click Localize.
The File inspector will update to show the available and selected languages. Click the checkbox next to Spanish to add a Spanish version of the file.
Look at the Project navigator. Localizable.strings now has a disclosure triangle next to it. Expand the list and you’ll see that Xcode lists both the English and Spanish versions.
Select Localizable.strings (Spanish) in the Project navigator and replace its contents with the following:
"You have sold 1000 apps in %d months" = "Has vendido 1000 aplicaciones en %d meses"; "You like?" = "¿Es bueno?";
Xcode makes it easy to test your localizations without the bother of constantly changing languages or locales on your simulator. Click the active scheme in the toolbar and choose Edit scheme… from the menu (you can also Option-Click on the Run button).
The Run scheme will be selected by default and that’s the one you want. Click the Options tab, then change Application Language to Spanish. Click Close.
Build and run and you should see something like this when you click ¿Es bueno?:
Hooray! There’s some Spanish in your app!
Internationalizing Storyboards
UI elements in your storyboard, such as labels, buttons and images, can be set either in your code or directly in the storyboard. You have already learned how to support multiple languages when setting text programmatically, but the Hello label at the top of the screen has no IBOutlet and only has its text set within Main.storyboard.
You could add an IBOutlet, connect it to the label in Main.storyboard, then set its text property using NSLocalizedString(_:tableName:bundle:value:comment:) as you did with likeButton and salesCountLabel, but there is a much easier way to localize storyboard elements, without the need for additional code.
In the Project navigator, open the disclosure triangle next to Main.storyboard and you should see Main.storyboard (Base) and Main.strings (Spanish).
Click on Main.strings (Spanish) to open it in the editor. You should already have an entry for the Hello label which will look something like this:
/* Class = "UILabel"; text = "Hello"; ObjectID = "jSR-nf-1wA"; */ "DO NOT COPY AND PASTE.text" = "Hello";
Replace the English translation with the Spanish translation:
/* Class = "UILabel"; text = "Hello"; ObjectID = "jSR-nf-1wA"; */ "DO NOT COPY AND PASTE.text" = "Hola";
Note: Never directly change the auto-generated ObjectID. Also, do not copy and paste the lines above, as the ObjectID for your label may be different from the one shown above.
Change the localizations for the other two entries. Again, do not edit the unique ObjectID:
"DO NOT COPY AND PASTE.text" = "Has vendido 1000 aplicaciones en 20 meses"; "DO NOT COPY AND PASTE.normalTitle" = "¿Es bueno?";
Xcode lets your preview your storyboard localizations. Select Main.storyboard in the Project navigator and open the assistant editor with View\Assistant Editor\Show Assistant Editor. Make sure it is showing the preview of the storyboard:
Click the language menu in the lower right corner and select Spanish.
Your preview, except for the image, should be in Spanish.
Internationalizing Images
Since the app uses an image that contains English text, you will need to localize the image itself. Unfortunately, while Apple recommends that you put all of your images into an asset catalog, they provide no direct mechanism for localizing those images. Not to worry, however, as there is a simple trick that makes it easy to do.
Open Assets.xcassets and you will see a Spanish-localized version of the image named MeGusta. Now open Localizable.strings (English) and add the following at the end:
"imageName" = "iLikeIt";
Next, open Localizable.strings (Spanish) and add the following at the end:
"imageName" = "MeGusta";
Finally, open MainViewController.swift and replace viewDidLoad() with:
override func viewDidLoad() { super.viewDidLoad() imageView.image = UIImage(named: NSLocalizedString("imageName", comment: "name of the image file")) }
You use the key imageName to retrieve the name of the localized version of the image and load that image from the asset catalog. You also deleted setting the title of the button from MainViewController.swift because it’s now set in the storyboard localization.
Internationalizing Numbers
You have made great progress in preparing your app to run in multiple languages, but there is more to the process than just changing the words. Formatting for other common data, such as numbers and dates, varies around the world. For example, in the US you might write “1,000.00”. In Spain, you would write “1.000,00” instead.
Luckily, iOS provides various formatters such as NumberFormatter and DateFormatter to do all of this for you. Open MainViewController.swift and in likeButtonPressed() replace:
salesCountLabel.text = String.localizedStringWithFormat(formatString, period)
with:
let quantity = NumberFormatter.localizedString(from: 1000, number: .decimal) salesCountLabel.text = String.localizedStringWithFormat(formatString, quantity, period)
This creates a localized presentation of the number 1000 and inserts it in the formatted string assigned to the label.
Open Localizable.strings (English) and change the second “1000” to %@.
"You have sold 1000 apps in %d months" = "You have sold %@ apps in %d months";
Do the same in Localizable.strings (Spanish).
"You have sold 1000 apps in %d months" = "Has vendido %@ aplicaciones en %d meses";
Make sure your scheme is still set to run with the Application Language set to Spanish, then build and run. You should see something like this:
Edit your run scheme and change the Application Language back to System Language. Build and run again; this time you should see something like:
Note: If you live in a country where English is not the primary language, you still may not see 1,000 formatted with the comma. In this case, change the scheme’s Application Region to United States to get the results shown above.
Using various combinations of Application Language and Application Region, you can test almost all localizations you desire.
Pluralization
You may have observed that iLikeIt randomly chooses for you to take either 1, 2 or 5 months to sell 1000 apps. If not, run the app now and tap You like? several times to see this in action. You’ll notice, whether you’re running in English or Spanish, that the message is grammatically incorrect when you take only one month.
Never fear, iOS to the rescue again! iOS supports another localization file type called a .stringsdict. It works just like a .strings file except that it contains a dictionary with multiple replacements for a single key.
Choose File\New\File from the menu. In the resulting dialog, select iOS\Resource\Stringsdict File and click Next. Name the file Localizable and click Create. Open all of the disclosure triangles and you will see the following:
Here’s what each section of the dictionary does:
The Localized String Key is a dictionary that represents one localization and it’s the key used by NSLocalizedString(_:tableName:bundle:value:comment:). The localization lookup searches the .stringsdict first and then, if it finds nothing there, the equivalent .strings file. You may have as many of these keys as you like in your .stringsdict; iLikeIt will only need one.
The Localized Format Key is the actual localization — the value returned by NSLocalizedString(_:tableName:bundle:value:comment:). It can contain variables for substitution. These variables take the form %#@variable-name@.
You must include a Variable dictionary for each variable contained in the Localized Format Key. It defines the rules and substitutions for the variable.
There are two rule types for a variable: Plural Rule and Size Rule. This tutorial will only cover the former.
The Number Format Specifier is optional and tells iOS the data type of the value being used to make the substitution.
The Variable dictionary contains one or more keys that specify the exact substitutions for the variable. For a Plural Rule, only the other key is required; the others are language-specific.
Note: For complete information on the stringsdict file format, see Appendix C of Apple’s Internationalization and Localization Guide.
Edit the dictionary to match this picture; specific changes are listed below.
Here are the specific changes you are making:
Change the name of the Localized String Key to You have sold 1000 apps in %d months
Change the value of the Localized Format Key to You have sold %@ apps in %#@months@ This defines a variable months for use in the dictionary.
Rename the Variable dictionary to months
Set the Number Format Specifier (NSStringFormatValueTypeKey) to d
Set the one key’s value to %d month Use this key when you want the singular form of the phrase.
Set the other key’s value to %d months Use this key for all other cases.
You may delete the empty keys but I recommend against it since you may need them later. If the key is empty, iOS just ignores it.
Note: Xcode switches from showing the “friendly” names of some keys and values to showing their raw values when you edit the stringsdict. While it’s ugly, it’s not incorrect. Just ignore it.
You’ve now completed your base Localizable.stringsdict and are ready to add the Spanish version. In the File inspector, click Localize….
As it did with Localizable.strings, Xcode will ask you to confirm the file’s language. The default will be English since that’s your development language. Click Localize.
The File inspector will update to show the available and selected languages. Click the checkbox next to Spanish to add a Spanish version of the file.
Click the disclosure triangle next to Localizable.stringsdict in the Project navigator to show the individual language files. Open Localizable.stringsdict (Spanish) and make the following changes:
NSStringLocalizedFormatKey: Has vendido %@ aplicaciones en %#@months@
one: %d mes
other: %d meses
Build and run. Tap You like? until you have seen all three values and see that the grammar is now correct. And you didn’t change a bit of code! It’s worth internationalizing your app just to get plural handling for free!
Edit your scheme and change the Application Language to Spanish. Build and run. Tap ¿Es bueno? several times to see that the Spanish localization is working correctly.
Notice that although you have left the localizations for your sales volume in the various Localizable.strings files, those localizations are superseded by the ones in Localizable.stringsdict.
Adding Another Language
You may be wondering why there are so many options in the Values dictionary. While many languages such as English and Spanish have one form for singular and one form for plural, other languages have more complex rules for plurals, decimals, zero and so on. iOS implements all of the rules the for languages it supports. To see details on these rules, check out the CLDR Language Plural Rules specified by the Unicode organization.
One language that has more than one plural form is Polish. You’re going to add a Polish localization to iLikeIt in order to see it in action. You have already performed all of these steps in this tutorial to add your Spanish localization so this should be easy for you.
Select the blue iLikeIt icon in the Project navigator to reveal the project localizations. Click the + to add Polish. Select all three files to be localized.
Under Main.storyboard, open Main.strings (Polish). Change the values as follows:
Hello label text: Cześć
Sales label text: Sprzedałeś 1000 aplikacji w 20 miesięcy
You like button title: Lubisz to?
Under Localizable.strings, open Localizable.strings (Polish). Replace the contents with:
"You like?" = "Lubisz to?"; "imageName" = "LubieTo";
Under Localizable.stringsdict, open Localizable.stringsdict (Polish) and make the following changes:
NSStringLocalizedFormatKey: Sprzedałeś %@ aplikacji w %#@months@
one: %d miesiąc
few: %d miesiące
many: %d miesięcy
other: %d miesiąca
And that’s all there is to it! Edit your scheme and change the Application Language to Polish. Build and run. Tap Lubisz to? several times to see the various singular and plural forms of the sales message. Notice the formatting of the number 1000 has changed as well.
Localizing Your Icon
There’s one last little bit of localization for you to do to make your app look totally professional: the name of the app as it appears under the icon on the home screen.
Using the skills you’ve already learned, add a new strings file to your project and name it InfoPlist.strings. This is another “magic” name that iOS looks for. For more information, check out the Information Property List Key Reference.
Add the following to InfoPlist.strings:
CFBundleDisplayName = "iLikeIt";
Now localize the file as English and add Spanish and Polish localizations. Change the value of the display name in InfoPlist.strings (Spanish) to MeGusta. In InfoPlist.strings (Polish), make it LubięTo.
Build and run; exit the app and check the home screen. You’ll see it’s still called iLikeIt. Unfortunately, the only way to test this localization is to change the language setting in the simulator itself.
On the simulator, open the Settings app. Navigate to General > Language & Region > iPhone Language to select a new language. Choose either Spanish or Polish and tap Done. Accept the language change and wait while the simulator reboots. Go back to the home screen and check your app now!
Helpfully, the Settings app will have English as the second choice on the screen when you’re ready to return the setting to English.
Where to Go From Here?
You can download the completed project for this tutorial here.
To learn more about internationalization, check out:
Apple’s Internationalization and Localization Guide
WWDC 2017 Session 401, Localizing with Xcode 9
WWDC 2015 Session 227, What’s New in Internationalization
Both videos explain more about stringsdict files and the use of size rules as well as plural rules. To save you from endless and fruitless searching in the documentation, the “magic” numbers in size rules are the “M” width of a display — the number of uppercase Ms that fit on a single line.
I hope you enjoyed this tutorial. If you have any questions or comments, please join the forum discussion below!
The post Internationalizing Your iOS App: Getting Started appeared first on Ray Wenderlich.
Internationalizing Your iOS App: Getting Started published first on http://ift.tt/2fA8nUr
0 notes
Text
Producing a Story Map in Multiple Languages
Authors sometimes need to publish a story map in more than one language to effectively reach everyone in their intended audience. For example, employees of governments with two official languages may be required to publish content in both languages. Below is a Map Tour created by the National Capital Commission in Ottawa (available in English and French). Readers can click the link in the top right to load the story in the other language.
In some cases, the topic of a story may suggest that it should be made available in multiple languages, such as this story by Esri’s Story Maps Team about the restoration of Havana, Cuba (available in English and Spanish). In this case, there is a blue button on the cover that readers can use to read the story in the other language.
Now that you’ve seen a few examples, read on to learn how to go about translating a story map into multiple languages and how to present the translated story to readers…
***
The Basics of Translating a Story Map
Hold on, can’t readers just use a browser translation tool to read my story in their native language?
Yes, readers can use browser plug-ins like Google Translate to read a story in their native language; however, while translation tools are good, they have limitations. With an automated translation, portions of a story may not come across as the author intended. Browser translation tools also won’t translate text in maps, images, charts, or infographics, and if a story contains audio or video with spoken narration or video with text elements those cannot be automatically translated either.
It’s usually best to create translated versions of a story in specific languages so you control the translation quality for all aspects of the story.
How do I translate a story into another language?
Once you decide what alternate language(s) you need to reach your intended audience, follow these instructions:
Translate the text of the story. In addition to the main narrative, you’ll also need to translate the story title and subtitle, section titles/headings, captions, bookmarks, and header links.
Create alternate, translated versions of all media elements from the original story. For infographics or charts, be sure to translate any labels or text. For maps, be sure to consider translating labels and pop-up content.
Use the translated text and alternate media elements from steps 1 and 2 to create a version of your story for each additional language. You can either: A) create a new story and build it from scratch, or B) use a tool like the ArcGIS Online Assistant to copy the original story and replace the text and media in the copy with the corresponding translated versions.
Finally, you can optionally link the translated versions of your story so it’s easy for readers to switch languages. Several ideas and examples of how to do this are in the next section.
Pro Tip! Use vector basemaps in your story maps so you can change the language of the basemap labels (available in select areas). See here and here for details.
***
Linking Translated Stories
There are several ways to link translated stories together so that readers can easily switch between them. The first two methods described below can be done in the story map builder while the second two require hosting your own web page or a developer to customize the app code.
Use the header link or logo (builder)
The easiest way to link the translated versions of a story is to use the tagline or header link. The header link usually shows “A Story Map” and links to the Esri Story Maps website, but the text and link are configurable. In each version of the story you’d enter the language of the other translation as the tagline and then enter the link to the other story.
For example, let’s say you have a story that you created using the Story Map Journal app and wrote in English. Then you created another Map Journal for the French translation. For the English version of the story you’d open the Map Journal builder and go to Settings > Header and change the tagline to “French” and the link to the URL of the French story. Then you’d do the same thing in the French version of the story to point the header link to the English version.
This works well if your story is available in two languages. The Map Tour about Ottawa mentioned at the beginning of this blog post is a example of this technique.
You can also use the logo to link between translated stories. The Cruel Reality is an example of a story that’s available in English and Polish and flags are used to indicate that a translation is available. Clicking the flag loads the story in the other language.
Add links within the story narrative (builder)
Another way to link to translated versions of a story is to add links to the first section of your story. This works well if your story is available in more than two languages. For example, this Cascade story by the Australian Government about the data used in the search for missing Malaysian Airlines flight MH380 can be read in English, Malay, and Chinese.
Add the story maps to a web page on your organization’s website (custom)
You can also add translated story maps to a page on your organization’s web site. Here’s an example of this from The Nature Conservancy for their Map Journal story about the Ogooué River in Gabon.
Add a button on the cover to switch languages (custom)
Because Esri’s Story Map apps are open source, you can download the code from GitHub and modify it to create a custom language switcher, like the button on the cover of the Havana story mentioned above, which was produced by Esri’s Story Maps Team. If you want to know how to add a language switch button to a Cascade story and get the sample code, see this article on our Story Map Developers’ Corner blog (coming soon).
Bonus tips!
Translate the user interface text
After doing the work to translate your story narrative, you should also make sure the user interface text of the story map app is translated. This includes components like the “Explore Map” button in Cascade and the Share dialog.
When linking to your story, for example from the header link, include the locale URL parameter at the end of the link so the text of the story map app’s user interface also appears in the same language as your story. See this blog post for more information about this technique.
Can I use story map builders in other languages?
Yes! If your web browser language is set, then you will already see story map builders in your native language (as long it is supported by ArcGIS Online). If you don’t see the builder user interface in your language, you can make a story map builder display a different language by using the locale URL parameter and a 2-letter ISO language code.
To use the Cascade builder in French, for example, append locale=fr to the URL like this:
http://ift.tt/2wTnMDq You can choose to write a story in any language regardless of which language is used in the builder.
More Information and Examples
See also this blog on creating apps in multiple languages:
Best Practices for Creating Bilingual Apps
Here are a few more examples of story maps published in multiple languages:
Salzburg Best Places is a Tour available in German and English
Pray for AirAsia QZ-8501 is a Journal available in Indonesian and English
Ogooué: Field Notes from Gabon’s Great River is a Journal that is available in French and English embedded in a web page
Embattled Borderlands is a custom Cascade in Spanish and English
from ArcGIS Blog http://ift.tt/2fODMTa
0 notes