#What Is Git?What Is Git Core Features and Use Cases?What Is GitHub?What Is GitHub Core Features and Use Cases?What Is GitHub Actions?What Is
Explore tagged Tumblr posts
Visit Tumblr Blog
Explore Tumblr blogs with no restrictions, modern design and the best experience.
Last Seen Tumblr Blogs


Fun Fact
In February 2021, Tumblr had 518.6 million blog accounts.
Video
youtube
🔍 Git Architecture | Understanding the Core of Version Control 🚀
Ever wondered how Git works behind the scenes? This video breaks down the core architecture of Git and how it efficiently tracks changes. Learn:
- 🏗 How Git Stores Data: The difference between snapshots and traditional versioning. - 🔀 Key Components: Working directory, staging area, and local repository explained. - 🌐 Distributed System: How Git enables collaboration without a central server. - 🔧 Commit & Branching Mechanism: Understanding how changes are managed and merged.
Master Git’s architecture and take full control of your code! 💡
👉 https://youtu.be/OHMe-H35xWs
🔔Subscribe & Stay Updated: Don't forget to subscribe and hit the bell icon to receive notifications and stay updated on our latest videos, tutorials & playlists! ClouDolus: https://www.youtube.com/@cloudolus ClouDolus AWS DevOps: https://www.youtube.com/@ClouDolusPro THANKS FOR BEING A PART OF ClouDolus! 🙌✨
#youtube#Git for DevOps GitHub for DevOps version control for DevOps Git commands for beginners GitHub Actions CI/CD DevOps tools CI/CD pipelines Git#What Is Git?What Is Git Core Features and Use Cases?What Is GitHub?What Is GitHub Core Features and Use Cases?What Is GitHub Actions?What Is#cloudolus#cloudoluspro
0 notes
Text
Data Science Course With Placement: Your Path to a Guaranteed Career
If you're looking to break into the tech world with a promising future, a data science course with placement is your best bet. With the increasing demand for skilled data professionals across industries, choosing a job guarantee data science course ensures you don’t just learn—you get placed.
Unlike general certifications, these job-assured programs give you industry-relevant skills and full career support. Whether you're a fresh graduate or a working professional looking to pivot, this is your path to joining the top hiring companies.
Why Choose a Job Guarantee Data Science Course?
Choosing the right course can be overwhelming, but when you opt for a job guarantee data science course, you eliminate the guesswork. These programs are designed to give learners the confidence that their time and money are being invested wisely.
Here’s why a placement-assured course is worth your attention:
You get trained in real-time tools and techniques used in the industry.
You are guaranteed placement assistance or a job after course completion.
You receive mentorship, mock interviews, and profile-building support.
You can explore top data science job roles across various sectors.
You gain practical exposure with real datasets, not just theory.
Key Features of the Best Data Science Program India Offers
The right data science program India will not only cover technical content but also provide the right mix of projects, mentorship, and placement support.
Here’s a short introduction before we go into the features:
With hundreds of online and offline courses out there, the best ones stand out with a hands-on, practical, and career-ready approach. Here's what to look for:
Live sessions by industry experts
Interactive assignments and case studies
Capstone projects with real data
Certifications from recognised institutes
Soft skills and interview training
Personalised mentorship and doubt-clearing sessions
Access to hiring networks and job portals
What You’ll Learn in a Data Science Course With Placement
In these courses, you get an all-around understanding of core and advanced concepts. From basics to expert-level skills, the journey is structured for real-world use cases.
Here's a 50-word explanation:
The course helps you build a strong foundation and then dive deep into complex tools and techniques. You’ll develop both technical expertise and analytical thinking required in top data science job roles.
You’ll master:
Python, SQL, R Programming
Statistics and Probability
Machine Learning Algorithms
Data Visualisation using Tableau & Power BI
Model Deployment and Cloud Tools
Big Data and NLP Basics
Git, GitHub, and Docker for Version Control
Career Support: From Training to Placement
The real value of a data science course with placement lies in its career support. These programs don’t stop at teaching—they help you land a job.
Here’s a brief before the bullet points:
Don’t worry. You’ll be supported throughout your career journey. From creating your first resume to preparing for technical interviews, you’ll be guided every step of the way.
Career services typically include:
1:1 Career Coaching and Guidance
Resume and LinkedIn Profile Building
Mock Interviews with Feedback
HR and Technical Interview Training
Access to Hiring Drives
Job Tracking and Application Support
Top Data Science Job Roles You Can Get
Once you complete a job guarantee data science course, a range of high-paying, in-demand roles becomes available to you. You’re not restricted to one career path.
Here’s a short 50-word intro:
Data science is a vast domain with various subfields. Depending on your strengths, you can explore roles in analytics, engineering, or research.
Some top roles include:
Data Analyst
Data Scientist
Machine Learning Engineer
Business Intelligence Analyst
Data Engineer
NLP Specialist
AI/ML Research Associate
Which Companies Hire Data Science Talent?
The biggest reason learners opt for a data science course with placement is access to top hiring companies. These companies value candidates from structured, career-focused programs.
Here’s a 50-word intro:
Well-established training institutes have direct tie-ups with hiring partners. These companies actively recruit from such courses because the learners are job-ready and well-trained.
Some top recruiters include:
Accenture
EY
TCS
Wipro
Deloitte
Infosys
Flipkart
Capgemini
IBM
Tech Mahindra
What Makes a Job Guarantee Data Science Course Different?
While many courses teach data science, very few back it up with job assurance. A job guarantee data science course is structured with real accountability.
Let’s understand what makes them different:
Placement is contractually promised after course completion.
No placement = Refund clauses in select institutes.
Programs continue mentoring you until you're placed.
Personalised career plans and ongoing support make success more likely.
Real-time performance tracking ensures your progress is monitored.
These features build trust, especially for learners investing time and resources to switch or grow in their careers.
How to Choose the Right Data Science Program in India?
When selecting a data science program India offers, look for transparency and outcomes. Not every course offers real job assurance or access to the top hiring companies.
Here’s a quick 50-word explanation:
With so many options, you need to be smart about picking the right program. Make sure the course includes practical training, experienced mentors, live sessions, and strong placement records.
Checklist before enrolling:
Does it offer 100% job assurance in writing?
Are the trainers industry professionals?
Are career services included?
Is it a project-based curriculum?
Are they tied up with recruitment partners?
FAQs
Q1. Can a non-tech person do a data science course with placement? Yes, why not! Many courses are beginner-friendly and start with the basics. A background in maths or logic is helpful but not mandatory.
Q2. What’s the duration of a job guarantee data science course? Most full-time programs range from 4 to 9 months. Some part-time or weekend options extend up to a year.
Q3. Is job guarantee really reliable? If you enrol with a reputed institute, the job assurance is contractually promised, making it dependable and risk-free.
Q4. Do these courses provide interview preparation? Yes, these programs majorly include resume writing, mock interviews, and even direct placement support through hiring partners.
Q5. What is the salary expectation after completing this course? Entry-level roles typically start at ₹4–6 LPA, but with experience and project exposure, you can grow fast to ₹10+ LPA roles.
Conclusion
If you're serious about building a career in tech- choosing a data science course with placement is indeed a smart move. With structured training, real-world projects, and solid career support, you're more likely to land roles in top companies. Make sure to pick a job guarantee data science course that offers the right data science program India needs—practical, guided, and future-ready.
0 notes
Text

Preparing for Your First Software Development Job: Tips from Industry Experts
Breaking into the world of software development can feel overwhelming, especially when it's your first time navigating through interviews and building a portfolio that sets you apart. At Ariyath Academy, our instructors have years of experience not only in teaching but also in working in the tech industry. Based on their insights, here are some actionable tips to help you prepare for your first software development job and make a strong impression on potential employers.
1. Build a Strong Portfolio with Projects that Matter
Your portfolio is the first thing employers will look at to assess your skills. Instead of filling it with basic or generic projects, focus on creating real-world applications that demonstrate your understanding of key concepts. Here’s what a well-rounded portfolio should include:
Diverse Projects: Showcase a range of projects, from web applications to mobile apps, or even software automation. This will highlight your versatility.
Open-Source Contributions: Actively contribute to open-source projects. This shows your willingness to collaborate and work on large-scale projects.
Real-World Applications: If possible, build something that solves a real-world problem. Whether it's a productivity tool or a social app, employers appreciate candidates who can think practically.
At Ariyath Academy, we emphasize hands-on learning, guiding our students to develop projects that can immediately be added to their portfolios.
2. Master Problem-Solving and Algorithms
Technical interviews often focus heavily on problem-solving and algorithmic thinking. Being well-versed in these areas is crucial for landing your first job. Here’s how you can prepare:
Practice Regularly: Use platforms like LeetCode, HackerRank, and Codewars to practice coding challenges. Start with easy problems and gradually increase the difficulty.
Understand Core Algorithms: Focus on sorting algorithms, recursion, dynamic programming, and data structures like trees and graphs. These topics frequently appear in interviews.
Explain Your Thought Process: During technical interviews, it’s not just about solving the problem but explaining how you’re approaching it. Practice thinking out loud and articulating your logic clearly.
Ariyath Academy’s courses cover a wide range of algorithmic techniques, ensuring students are well-prepared for technical assessments.
3. Familiarize Yourself with Version Control
Version control systems like Git are essential tools for any developer, whether you're working on personal projects or as part of a team. Employers often expect candidates to know the basics, if not advanced use cases.
Learn Git Commands: Get comfortable with commands like commit, branch, merge, and rebase. Knowing how to handle conflicts and perform pull requests is key.
Use GitHub to Showcase Work: Keep all your projects on GitHub, and make sure to regularly update them. Employers often review candidates' GitHub profiles to assess their work history and coding style.
4. Research the Company and its Tech Stack
Before heading into an interview, it’s crucial to research the company and the technologies they use. Understanding their specific tech stack and development processes will give you an edge.
Study the Job Description: Pay close attention to the technologies listed in the job posting. Familiarize yourself with any tools or programming languages you may not know well.
Tailor Your Resume: Adjust your resume to highlight skills that are most relevant to the position. If the company uses Python, for example, ensure your Python projects and experience are prominently featured.
Prepare Questions: Ask insightful questions about the company’s development process, team structure, and current challenges. This shows you’re not only technically competent but also genuinely interested in the role.
5. Soft Skills Matter: Communication and Teamwork
While technical prowess is essential, soft skills are equally important. Companies want developers who can communicate effectively and work well in a team.
Be Clear and Concise: During interviews, practice explaining your projects or technical solutions in a way that’s easy to understand, even for non-technical stakeholders.
Demonstrate Collaboration: Share examples of how you’ve worked in teams or collaborated with others on projects. Highlight your ability to handle feedback and contribute constructively.
6. Prepare for Behavioral Interviews
Many companies include behavioral interviews to assess how well you’d fit into their culture. Be prepared to answer questions like:
"Tell me about a time you faced a challenge in a project and how you overcame it."
"How do you handle feedback from peers or managers?"
To prepare, use the STAR method (Situation, Task, Action, Result) to structure your answers. This ensures you’re providing concise and impactful responses.
7. Stay Updated with Industry Trends
Technology is constantly evolving, and companies are looking for developers who are not only skilled but also curious and adaptable. Follow industry news, attend webinars, and explore emerging technologies.
Learn New Tools: Keep an eye on trends like AI, machine learning, blockchain, or cloud computing. Showing enthusiasm for learning new technologies can make you stand out from other candidates.
Join Developer Communities: Participate in online forums, attend meetups, and engage in communities like Stack Overflow or GitHub. Networking with other developers can lead to job referrals and valuable insights.
At Ariyath Academy, we encourage our students to stay curious and constantly expand their knowledge beyond the curriculum.
8. Get Feedback and Improve
After interviews, it’s important to reflect on your performance and seek feedback when possible. Whether it's a coding challenge or a face-to-face interview, learning from each experience will help you improve.
Seek Constructive Criticism: Don’t hesitate to ask for feedback, even if you don’t get the job. Many employers appreciate candidates who are eager to learn and grow.
Keep Practicing: If you struggle with certain types of interview questions or coding challenges, take time to practice and improve in those areas.
Final Thoughts
Landing your first software development job may seem daunting, but with the right preparation, you can make yourself stand out from the competition. Build a strong portfolio, master problem-solving, and ensure you’re ready to showcase your technical and soft skills in interviews. At Ariyath Academy, we provide comprehensive training and mentorship to help you succeed in your career journey. With determination and practice, your first job in tech is within reach!
1 note
·
View note
Text
Devdocs github

#Devdocs github how to#
#Devdocs github code#
#Devdocs github free#
Matplotlib is an open source project with limited resources, we encourage The Matplotlib developers will give feedback on the feature proposal. Thank you for your help in keeping bug reports complete, targeted and descriptive. We have preloaded the issue creation page with a Markdown form that you can _version_ '3.4.1' > import platform > platform. YouĬan grab the version with the following commands: The Matplotlib version, Python version and platform that you are using.
#Devdocs github code#
The expected outcome of the code snippet. In most cases, this should be 1-2Ī short, self-contained code snippet to reproduce the bug, ideally allowingĪ simple copy and paste to reproduce. If you are reporting a bug, please do your best to include the following:Ī short, top-level summary of the bug. If you find a bug in the code or documentation, do not hesitate to submit aĪlso welcome to post feature requests or pull requests.
#Devdocs github free#
Unresponsive, feel free to open a new PR referencing the old one. PR is an outline, unlikely to work, or stalled, and the original author is Submitting reviews of their code or commenting on the PR rather than openingĪ new PR duplicate PRs are subject to being closed. If there is, try to work with the author by Please check if there is an existing PR for the If you have opened such a PR, please comment on the issue thread toĪvoid duplication of work. "assigned" or "claimed" by opening a PR there is no other assignment In general, the Matplotlib project does not assign issues. Have subtleties due to our implementation decisions. It involves Python features such as decorators and context managers, which It has less clearly defined tasks, which require some independentĮxploration, making suggestions, or follow-up discussions to clarify a good The issue is in areas of the code base which have more interdependencies, Though not necessarily all at the same time: This could be for a variety of reasons, among them, Difficulty: Medium and Difficulty: Hard require more Difficulty: Easy is suited for people with little PythonĮxperience. The issues may additionally be tagged with aĭifficulty. TheseĪre well documented issues, that do not require a deep understanding of the Particularly suited for new contributors by the label good first issue. While any contributions are welcome, we have marked some issues as We
#Devdocs github how to#
Or a blog post, how to get involved in community work, or get Works, technical questions about the code, what makes for good documentation Questions about anything: how to use git, github, how our PR review process Get guidance and support for your first few PRs. Is a private gitter room moderated by core Matplotlib developers where you can The incubator is our non-public communication channel for new contributors. Take a look at the next sections to learn more. When in doubt, we recommend going together! Get connected with our community ofĪctive contributors, many of whom felt just like you when they started out andĪre happy to welcome you and support you as you get to know how we work, and There are so many ways to contribute to our community. Get Connected # Do I really have something to contribute to Matplotlib? #ġ00% yes. This project is a community effort, and everyone is welcome toĬontribute. MEP28: Remove Complexity from Axes.boxplot MEP15: Fix axis autoscaling when limits are specified for one axis only Making your own copy (fork) of Matplotlib
0 notes
Text
Corel Painter 2017 For Mac Torrent

Make typing simple on your mobile devices with this Logitech wireless keyboard. Multi-device compatibility lets you use this keyboard with virtually any setup that runs on Windows, Mac, Chrome OS, Android or iOS. Switch effortlessly between up to three connected devices using the Easy-Switch keys. IClever DK03 Bluetooth Keyboard - 2.4G Wireless Keyboard Rechargeable Bluetooth 4.2 + USB Multi Device Keyboard, Ultra-Slim Full Size Dual Mode White Keyboard for Mac, iPad, iPhone, Windows, Android 4.3 out of 5 stars 447 $35.99$35.99 Get it as soon as Sat, Oct 3. https://universallythingnut.tumblr.com/post/642348919823679488/wireless-keyboard-for-mac-and-pc.
Corel Painter 2017 For Mac Torrent Free
Painter 2017 Free Download
CorelDRAW Technical Suite 2017 19.1.0.414 download for win 10 in rar. Open any link ⚍ ⚎ ⚏ ⚍ ⚎ ⚏ ⚍ ⚎ ⚏ ⚍ ⚎ ⚏ CorelDRAW Technical Suite 2017 CorelDRAW Technical Suite 2017 Type in the verification code above stanepinsnow st. Stanepinsnow posted a thread. 7 hours ago Naval War Arctic Circle Full Version torrent Download. Painter 2017/Painter 2016: macOS 10.13 Possible Issues Below you will find a list of possible issues you may find running Painter 2017/Painter 2016 on macOS 10.13 On macOS 10.13 with APFS, brush categories and brush variants will not appear in alphabetical order.
Valuable resources available when switching from Corel Painter 2017 Artist Interviews Learn how professional artists in a variety of industries are using Painter as an essential part of their artwork production workflow.
Overall, Corel Painter is a complete digital studio that changes what's possible in art. It provides an extensive collection of more than 900 unique brushes to inspire creative greatness, and an unrivalled ability to recreate traditional art in a digital platform. Try Corel Painter 2019 for free,.
Parallels Desktop 12 2017 (for Mac Torrent Download Unleashx Skins Xbox 360 Pokemon Gts Hack X And Y Pokemon Ik Multimedia Amplitube 3 Full Version. These Essentials Brush Packs are specific to Corel Painter Essentials 6+ only. How are these packs different from the packs for Painter and ParticleShop? These Essentials packs include 10 of the.
Painter 2020 is our latest version and it’s better than ever!
You are going to love the improvements and new features of the newest version of Painter since the launch of Corel Painter 2017. A customizable workspace, hundreds of new textures, and updated brushes will definitely assist you to express your creativity more efficiently. So, give it try and take your digital painting experience to another level.
The top reasons to switch from Painter 2017
NEW Brush Accelerator™
NEW Interface advancements
NEW Improved Brush Selector
NEW Color Harmonies
NEW GPU enhanced brushing
ENHANCED Layer Workflow
Valuable resources available when switching from Corel Painter 2017
More old products
Digital art software trusted by professional artists
Make an effortless transition from traditional to digital art, and accomplish natural, professional results in less time with Painter 2021®. Expand your digital art capabilities using a phenomenal collection of the world’s most realistic Natural-Media®. Experiment with unlimited art materials trusted by artists worldwide, including thick paints, flowing watercolors, and texture-filled media.
Painter 2021
NEW Thick Paint workflow
NEW Artificial Intelligence
NEW Clone Tinting
ENHANCED Layers
NEW Core ML support
A full 15-day free trial of this drawing software. No credit card required.
NEW Thick Paint workflow

Enjoy enhanced Thick Paint brushes and a NEW Thick Paint-compatible brush category that takes full advantage of the depth, lighting and shadows of piled paint. Easy-access panels let you instantly adjust how paint is applied to the brush and how the paint interacts with existing media. You can also convert the canvas or any layer to Thick Paint to create in surprising new ways.
NEW Artificial Intelligence
https://universallythingnut.tumblr.com/post/642348756679966720/shortcut-command-for-mac. Quick start your art by taking advantage of the 12 AI Styles that create a stylized painting from an image. Fine tune the settings for custom results and save your own presets. Experiment by adding a style, or more than one, to any type of imagery. Try stylizing a sketch, painting, illustration or just brushstrokes and see where styles can take you.
NEW Clone Tinting
Enable the Clone Tinting feature while painting, then choose any color you like, use any clone brush, and render your clone source with custom color. This versatile tool also works with multi-point cloning allowing you to create entirely new compositions from existing artwork. Bonus! Create with a new Clone Tinting brush category.
GitHub Desktop Focus on what matters instead of fighting with Git. Whether you're new to Git or a seasoned user, GitHub Desktop simplifies your development workflow. Download for macOS Download for Windows (64bit) Download for macOS or Windows (msi) Download for Windows. By downloading, you agree to the Open Source Applications Terms. https://universallythingnut.tumblr.com/post/642348672186793984/github-for-mac-help.
ENHANCED Layers
Enhance your workflow by choosing to paint on any layer type and hide the canvas right from the New Image dialog. Visually identify what brushes are compatible with various layer types including Liquid Ink, Thick Paint and Watercolor. Plus take advantage of many other user-requested layer improvements.
NEW Core ML support
Corel Painter 2017 For Mac Torrent Free
Painter uses the latest and greatest machine learning (Core ML) technology from Apple to optimize your AI style experience.
NEW Touch Bar Support
On MacBook Pro and iPad, increase efficiency with new support for the Touch Bar that offers context-sensitive controls that change depending on the selected tool.
Digital Art & Painting Software
Drawing Features What's Included Pricing and Purchase System Requirements
Other Digital Art Software
Painter 2017 Free Download
Painter Essentials 7 Download Now
What's Included
Main Applications
Corel Painter 2021 – Mac OS® and Windows® versions
Online Content*
Libraries of unique brushes, gradients, nozzles, patterns, paper textures and textures
Introduction Guide (PDF)
Videos and tutorials
HTML Help files (Windows)
Apple Help files (Mac)
*Internet connection required
Windows:
Free android app for mac. Android SDK includes the sample projects with development tools, source codes, an emulator, and the required libraries for building Android apps. 3#Android SDK refers to a software development kit that helps software developers to create Android apps.
Windows 10* (64-Bit), with the latest updates
Intel Core 2 Duo or AMD Athlon 64 X2 processor
4 physical cores/8 logical cores or higher (recommended)
AVX2 instruction set support (recommended)
Modern GPU with OpenCL (1.2 or higher) compatibility (recommended)
4 GB RAM
8 GB RAM or higher (recommended)
2.4 GB hard disk space for application files**
Solid-state drive (recommended)
1280 x 800 @ 100% (or higher) screen resolution
1920 x 1200 @ 150% (or higher) (recommended)
Mouse or Wintab-compatible tablet
Microsoft Internet Explorer 11 or higher, with the latest updates
To activate your product, you must connect to the Internet and register it first
Mac:
Based upon the ’80s Speak & Spell toys, this quirky plug-in uses linear prediction coding technology to analyse the pitch, timbral and level information of an incoming audio signal before ‘re-synthesizing’ these characteristics via its simple oscillator-noise-filter design.The results are rubbery, robotic and highly creative - a must-buy for those seeking computer - style voice effects or circuit-bent spoken lines.4 out of 5FULL REVIEW:(Reviewed in ) Prev Page 3 of 9 Next Prev Page 3 of 9 Next. This characterful speech synthesizer is designed to emulate several vintage ’80s voice chips.Choose from seven different ‘characters’ (voice styles) including HAL 9000; after typing words into the front panel’s text box, MIDI notes tell the synth to sing each syllable in turn at the corresponding pitch, resulting in circuit-bent vocal-synth lines and robotic symphonies.If nothing else, you can make chipspeech sing out creative insults to anyone in the vicinity.5 out of 5FULL REVIEW:(Reviewed in ) Prev Page 7 of 9 Next Prev Page 7 of 9 Next. Tired of the traditional vocoder sound? Vocal enhancer for mac software. The introduction of Melodyne Editor saw a revolutionary advancement in pitch correction technology: the software’s DNA feature breaks down polyphonic audio into its individual notes, which can each be moved, re-tuned and edited on the piano roll-style display.It’s most commonly used for careful tuning adjustments, but can also yield creative results: create a symphony of harmonies from just a single monophonic vocal, or mangle your voice with per-note pitch- and formant-shifting.5 out of 5FULL REVIEW:(Reviewed in ) Prev Page 5 of 9 Next Prev Page 5 of 9 Next.
macOS 10.15 or 10.14, with the latest revision
Intel Core 2 Duo processor
4 physical cores/8 logical cores or higher (recommended)
Modern GPU with OpenCL (1.2 or higher) compatibility (recommended)
4 GB RAM
8 GB RAM or higher (recommended)
1.8 GB hard disk space for application files
Solid-state drive (recommended)
Case-sensitive file systems are not supported
1280 x 800 @ 100% (or higher) screen resolution
1920 x 1200 @ 150% (or higher) (recommended)
Mouse or tablet
To activate your product, you must connect to the Internet and register it first
* Versions 1909 and later of Windows 10 are supported as well as versions that will be released during the life cycle of Painter 2021.
** Additional space may be required for Microsoft .NET Framework 4.7
Looking for a previous version of Painter?
Painter 7 – Released in 2006
Painter 8 – Released in 2007
Painter 9 – Released in 2008
Painter 10 – Released in 2009
Painter 11 – Released in 2010
Painter 12 – Released in 2011
Painter X3 – Released in 2012
Painter X4 – Released in 2013
Painter 2015 - Released in 2014
Painter 2016 - Released in 2015
Painter 2017 – Released in 2016
Painter 2018 – Released in 2017
Painter 2019 – Released in 2018
Painter 2020 – Released in 2019
0 notes
Video
youtube
Introduction to Git: Understanding the Basics of Version Control
Git is a distributed version control system essential for modern software development. It enables multiple developers to collaborate efficiently by managing changes to code over time. Mastering Git is crucial for any developer or DevOps professional, as it supports streamlined workflows, effective collaboration, and robust code management.
What is Version Control?
Version control tracks changes to files, allowing you to recall specific versions and manage code history. It helps prevent conflicts by enabling team members to work together without overwriting each other’s changes. Git’s version control system is vital for maintaining a clear and organized development process.
Key Features of Git
1. Distributed Architecture: Git stores the entire repository locally for each developer, enhancing speed and allowing offline work. This is a shift from centralized systems where all data is on a single server.
2. Branching and Merging: Git supports multiple branches for isolated work on features or fixes. This facilitates experimentation and seamless integration of changes into the main codebase.
3. Staging Area: The staging area lets developers review changes before committing them, ensuring precise control over what gets recorded in the project history.
4. Commit History: Each change is recorded as a commit with a unique identifier, enabling developers to track, revert, and understand project evolution.
5. Collaboration and Conflict Resolution: Git's tools for handling merge conflicts and supporting collaborative development make it ideal for team-based projects.
Benefits of Using Git
- Enhanced Collaboration: Multiple developers can work on separate branches with minimal conflicts. - Flexibility and Efficiency: Git’s distributed nature allows offline work and faster local operations. - Reliable Code Management: Git's branching and merging capabilities streamline code management. - Security: Git uses SHA-1 hashing to ensure code integrity and security.
Why Learn Git?
Git is foundational for modern development and DevOps practices. It underpins tools like GitHub, GitLab, and Bitbucket, offering advanced features for collaboration, continuous integration, and deployment. Mastering Git enhances coding skills and prepares you for effective team-based workflows.
Conclusion
Understanding Git is the first step toward proficiency in modern development practices. Mastering Git enables efficient code management, team collaboration, and seamless CI/CD integration, advancing your career in software development or DevOps.
What Is Git?,What Is Git Core Features and Use Cases?,What Is GitHub?,What Is GitHub Core Features and Use Cases?,What Is GitHub Actions?,What Is GitHub Actions Core Features and Use Cases?,What Is GitLab?,What Is GitLab Core Features and Use Cases?,What Is Right Tools For DevOps? Git,GitHub,Version Control and Collaboration Essentials,GitLab,github actions ci/cd,git and github tutorial,git tutorial,git tutorial for beginners,how to use git,como usar git,what is git,git for devops,curso de github,version control system,git for beginners,version control,github tutorial,git basics,git repository,git explained,git introduction,open source,cloudolus,cloudoluspro,version control with git,git clone,git commit,dia a dia
Git for DevOps, GitHub for DevOps, version control for DevOps, Git commands for beginners, GitHub Actions CI/CD, DevOps tools, CI/CD pipelines, GitHub workflow examples, Git best practices. #GitForDevOps #GitHubForDevOps #VersionControl #DevOpsTools #CICDPipelines #GitHubActions #CloudComputing #DevOpsTutorials
***************************** *Follow Me* https://www.facebook.com/cloudolus/ | https://www.facebook.com/groups/cloudolus | https://www.linkedin.com/groups/14347089/ | https://www.instagram.com/cloudolus/ | https://twitter.com/cloudolus | https://www.pinterest.com/cloudolus/ | https://www.youtube.com/@cloudolus | https://www.youtube.com/@ClouDolusPro | https://discord.gg/GBMt4PDK | https://www.tumblr.com/cloudolus | https://cloudolus.blogspot.com/ | https://t.me/cloudolus | https://www.whatsapp.com/channel/0029VadSJdv9hXFAu3acAu0r | https://chat.whatsapp.com/D6I4JafCUVhGihV7wpryP2 *****************************
*🔔Subscribe & Stay Updated:* Don't forget to subscribe and hit the bell icon to receive notifications and stay updated on our latest videos, tutorials & playlists! *ClouDolus:* https://www.youtube.com/@cloudolus *ClouDolus AWS DevOps:* https://www.youtube.com/@ClouDolusPro *THANKS FOR BEING A PART OF ClouDolus! 🙌✨*
#youtube#Git for DevOps GitHub for DevOps version control for DevOps Git commands for beginners GitHub Actions CI/CD DevOps tools CI/CD pipelines Git#What Is Git?What Is Git Core Features and Use Cases?What Is GitHub?What Is GitHub Core Features and Use Cases?What Is GitHub Actions?What Is
0 notes
Text
Improving Python exception chaining with raise-from
Improving Python exception chaining with raise-from
This is going to be a story about an esoteric feature of Python 3, and how I spent the last few months reviving it and bringing it into the limelight.
Back in the yee-haw days of 2003, Raymond Hettinger wrote an email to the python-dev mailing list, sharing an idea for improving the way that Python handles exceptions that are caught and replaced with other exceptions. The goal was to avoid losing information about the first exception while reporting the second one. Showing the full information to the user would make debugging easier, and if you've followed my work before, you know there's nothing I love better than that.
That idea was polished and refined by many discussions on python-dev. A year later, Python core developer Ka-Ping Yee wrote up a comprehensive PEP that was then known as PEP 344, later to be renamed to PEP 3134. That idea was detailed there, with all the loose ends, potential problems and solutions. Guido accepted the PEP, and it was implemented for the infamous Python 3.0, to be used... By no one. For a long time.
If there's one thing I don't miss, it's waiting 10 years for the Python ecosystem to adopt Python 3. But finally, it happened. Almost all the packages on PyPI support Python 3 now, and getting a job writing Python 3 code is no longer a luxury. Only a few days ago, NumPy finally dropped Python 2 support. We live in good times.
When a modern Python developer catches an exception and raises a new one to replace it, they can enjoy seeing the complete information for both tracebacks. This is very helpful for debugging, and is a win for everybody.
Except... For one thing.
Two cases of exception chaining
There was one interesting detail of PEP 3134 that was forgotten: It has to do with the question, "What does it mean when one exception is replaced with another? Why would someone make that switcheroo?"
These can be roughly divided into two cases, and PEP 3134 provided a solution for each case.
The first case is this:
"An exception was raised, we were handling it, and something went wrong in the process of handling it."
The second case is this:
"An exception was raised, and we decided to replace it with a different exception that will make more sense to whoever called this code. Maybe the new exception will make more sense because we're giving a more helpful error message. Or maybe we're using an exception class that's more relevant to the problem domain, and whoever's calling our code could wrap the call with an except clause that's tailored for this failure mode."
That second case is quite a mouthful, isn't it? It didn't help that the first case was defined as the default. The second case ended up falling by the wayside. Most Python developers haven't learned how to tell Python that the second case is what's happening in their code, and to listen when Python is telling them that it's happening in code that they're currently debugging. This resulted in a Catch 22 situation, not that different from the one that slowed down Python 3 adoption in the first place.
Before I tell you what I did to break that Catch 22, I'll bring you into the fold and show you how to make that feature work in your project.
Exception causes, or `raise new from old`
I'm going to show you both sides of this feature: How to tell Python that you're catching an exception to replace it with a friendlier one, and how to understand when Python is telling you that this is what's happening in code that you're debugging.
For the first part, here's a good example from MyPy's codebase:
try: self.connection, _ = self.sock.accept() except socket.timeout as e: raise IPCException('The socket timed out') from e
See the from e bit at the end? That's the bit that tells Python: The IPCException that we're raising is just a friendlier version of the socket.timeout that we just caught.
When we run that code and reach that exception, the traceback is going to look like this:
Traceback (most recent call last): File "foo.py", line 19, in self.connection, _ = self.sock.accept() File "foo.py", line 7, in accept raise socket.timeout socket.timeout The above exception was the direct cause of the following exception: Traceback (most recent call last): File "foo.py", line 21, in raise IPCException('The socket timed out') from e IPCException: The socket timed out
See that message in the middle, about the exception above being the direct cause of the exception below? That's the important bit. That's how you know you have a case of a friendly wrapping of an exception.
If you were dealing with the first case, i.e. an exception handler that has an error in it, the message between the two tracebacks would be:
During handling of the above exception, another exception occurred:
That's it. Now you can tell the two cases apart.
What I did to push this feature
I found that almost no one knows about this feature, which is sad, because I think it's a useful piece of information when debugging. I decided I'll do my part to push the Python community to use this syntax.
I wrote a little script that uses Python's ast module to analyze a codebase and find all instances where this syntax isn't used and should be. The heuristic was simple: If you're doing a raise inside an except then in 99.9% of cases you're wrapping an exception.
I took the output from that script and used it to open PRs to a slew of open-source Python packages. Some of the projects I fixed are: Setuptools, SciPy, Matplotlib, Pandas, PyTest, IPython, MyPy, Pygments and Sphinx. Check out my GitHub history for the full list.
I then added a rule to PyLint, now known as W0707: raise-missing-from. After the PyLint team makes the next release, and the thousands of projects around the world that use PyLint upgrade to that release, they will all get an error when they fail to use raise from in places they should.
Hopefully, in a few years' time, this feature of Python will become more ingrained in the Python community.
What you can do to help
Do you maintain a Python project that already dropped Python 2 support? Install the latest version of PyLint from GitHub. You can do this in a virtualenv if you'd like to keep your system Python clean. Run this to install:
pip install git+https://github.com/PyCQA/pylint
Then, run this line on your repo:
pylint your_project_path | grep W0707
You'll get a list of lines showing where you should add raise from in your code. If you're not getting any output, your code is good!
0 notes
Photo
React's rise, Babel 7.10.0, and good GitHub etiquette
#491 — June 5, 2020
Unsubscribe | Read on the Web
JavaScript Weekly
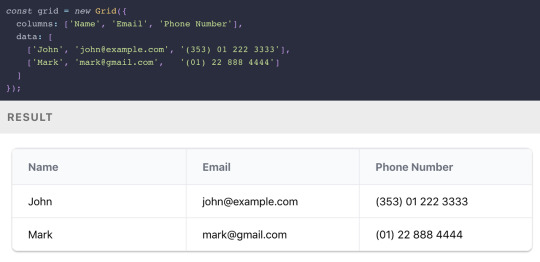
Grid.js: An Advanced Table Library — A lightweight, advanced table plugin that can work alongside React, Angular, Vue, or, well, nothing. Check out some of the examples for more on how to use it. It uses Preact under the hood.
Afshin Mehrabani
The Rise of React (And Its Growing Pervasiveness) — In the most recent issue of Increment, a noted journalist (for WIRED and The Economist) takes a wide-angle look at how React came to be one of the predominant frontend frameworks powering today’s web and the attendant implications ― both positive and negative ― for the future.
Chris Stokel-Walker (Increment)
Does a Serverless Headless CMS Exist? It Does Now — The first headless CMS built for serverless infrastructure. Forget about scaling problems, flash crowds, setting up and managing servers and stop overpaying for resources you don't use. It's free and open-source, check it out.
Webiny sponsor
Babel 7.10.0 Released — The hugely popular JavaScript transpiler got more tweaks than you’d expect for a minor point release including an experimental version of a new polyfills compatability architecture, improvements to optional chaining and private fields support, and better tree-shaking for React code.
Nicolò Ribaudo
⚡️ Quick bytes:
🖤 This week, the React core team joined the Facebook employee walkout in solidarity with the Black community — it's time to speak up, donate or even just stream a fundraising video, because Black lives matter.
The Repl.IT online IDE/sandbox now supports Deno if you want to play without installing it for real.
SpiderMonkey, Firefox's JavaScript engine, has a new regular expressions engine which opens up support for modern regex syntax it didn't have before.
AngularJS 1.8.0 is out. Yes, that's the old school Angular.js, not the more modern Angular.
Zappar has released some universal AR SDKs for Three.js and vanilla JavaScript if augmented reality is your bag.
💻 Jobs
JavaScript Developer at X-Team (Remote) — Join X-Team and work on projects for companies like Riot Games, FOX, Coinbase, and more. Work from anywhere.
X-Team
Find A Job Through Vettery — Vettery specializes in tech roles and is completely free for job seekers. Create a profile to get started.
Vettery
Senior Software Engineer — Save Lives & Make an Impact — We use Node/TS/React & ML to provide crisis support via SMS. Help us scale globally with a focus on privacy and security.
Crisis Text Line
📚 Tutorials and Opinions
Reusing UI Components at Enterprise Level — An engineer at PayPal explains how they share UI components across their various products.
Dong Chen (PayPal)
The 'Top Types' any and unknown in TypeScript — They’re not top types because they’re the best types 😂 .. but they’re essentially ‘universal’ types that can contain all values (in opposition to the never type which is the empty set).
Dr. Axel Rauschmayer
One Cool Trick to Simplify Reducer Functions — An introduction to the Immer immutable state library as a way to reduce the complexity of Redux reducers.
Eric Elliott
Getting Started With OpenTelemetry In Node.js
Lightstep sponsor
How-to Normalize Home Volume Levels with Node-RED — Node-RED is a JavaScript-powered ‘low code’ visual programming environment frequently used with hardware/IoT use cases. I rarely see tutorials about it, so this is pretty neat.
Blake Niemyjski
The Service Worker Lifecycle Explained — Explaining the lifecycle of Service Workers in PWAs and how to update them as fast as possible.
Felix Gerschau
Track Your (Android) Smartphone in Physical Space with JavaScript — Leans on the Generic Sensor APIs so you’re limited to Android for now, but it’s fun to see the potential.
Sanjeet Chatterjee
Some Reminders of Good GitHub Etiquette — Basic things, but sometimes easily forgotten, from one of the date-fns maintainers.
Sasha Koss
MongoDB Is Easy. Now Make It Powerful. Free Download for 30 Days.
Studio 3T sponsor
▶ Inside Vue 3 with Gregg Pollack — An hour long podcast chat with Gregg Pollack of Vue Mastery about Vue 3 reactivity model course and when and where the new Composition API is worth using.
Views on Vue Podcast podcast
How to Create a Web Worker-Driven Multithreaded Frontend App — It leans on an under-development Web Worker-driven framework called neo.mjs that promises “a new era of making better Web-based user interfaces.”
Tobias Uhlig
Stranger Things, JavaScript Edition — This is mostly a bit of fun mixed with a little bit of Wat picking on some JavaScript oddities. If the quirks of equality and NaN are familiar to you, move on.
Live Code Stream
Using Git to Run ESLint on Changed Files in a Feature Branch
Jeffrey Auriemma
🔧 Code & Tools

TUI Editor 2.1: A Powerful Markdown WYSIWYG Editor — You get the Markdown on the left, output on the right. The latest release added much better syntax highlighting for the Markdown source (if you want it) and ‘preview highlighting’ where the output of the code you’re working on is highlighted in the preview pane.
NHN
redaxios: The Axios API, as an 800 Byte Fetch Wrapper — If you love the Axios API but want to get it in a lighter way..
Jason Miller
A Much Faster Way to Debug Code Than with Breakpoints or console.log — Move forward and backwards through your code to understand what led to a specific bug, view runtime values, edit-and-continue, and more.
Wallaby.js sponsor
React Date Picker 3.0: A Simple and Reusable Date-Picker Component — A mature option that continues to get frequent updates. Demo here.
HackerOne
Frappe Charts 1.5: Responsive, Zero Dependency SVG Charts — Here’s are some examples (with code) to explore.
Prateeksha Singh
ms: Tiny Milisecond Conversion Utility — For example: ms('2.5 hrs') becomes 9000000 .. or ms(2 * 60000) becomes ‘2m’.
Vercel
🗓 Upcoming Online Events
JS Nation (June 18-19) — This free two-day remote conference features over 25 speakers, including Jen Looper, Max Stoiber, John Papa and others.
OpenJS World (June 23-24) — Speakers at this 'virtual experience' include Nicole Sullivan, Prosper Otemuyiwa, Cassidy Williams and more.
CascadiaJS 2020 (September 1-2) — This upcoming online conference is set to take place in September.
by via JavaScript Weekly https://ift.tt/2XyWzFv
0 notes
Text
How to become a Web Developer: a detailed plan for learning JavaScript

Everyone who wants to become an IT developer usually begins with making sites, as the easiest part of it. To work, you need only a text editor for writing the code and browser to see visually what you are doing. If you're not aiming to a full-stack approach and you just want learn the magic of client-side programming, you won't have to study complicated algorithms: as a matter of fact, the main skill each client-side web developer must have nowadays is the knowledge of JavaScript (and its frameworks). The best way to learn is by creating own website using multiple technologies. For example, you can create website and display stats from popular games like Counter-Strike and Valorant. Such a project requires HTML, CSS, Git, Bootstrap, JavaScript, Bash, MySQL. A nice example is the Valorant Tracker project, which is something that could be done in 4-6 months if you're willing to learning JavaScript programming. Once you manage to pull off something like that, you'll have a good chance to get hired as a junior code in a decent company and start your developer career. Nowadays, JS has been developing incredibly fast, so it's easy to get confused while studying this language. We offer you an educational plan with a convenient structure, where you will find all the main aspects of JavaScript and other adjacent technologies.
Why JavaScript?
We have to mention that language being pretty open - many companies are rivaling using JS with the goal of its evolution. The language is incredibly flexible, so it is perfect for people who like both object-oriented and functional approaches. A mammoth amount of different libraries and frameworks allows you to solve even the most difficult issues. Moreover, the server platform Node.js allows you to use JS not just in browsers but on the console. You can create apps for both smartphones and PC. Apps for a computer by using the Electron framework, and mobile apps thanks to NativeScript or ReactNative.
Git
The first thing you should do is to study how Git works: a source code manager is a vital instrument for developers, so you have to learn it first - since it's arguably the best choice nowadays. Here are three common topics you might start to learn to quickly understand the basics: Creation and moving of the files across catalogs. Initialization and commits in Git. Repositories settings in GitHub. Also, you must have the next skills: Object-oriented JS - constructors and factories. Functional JS - functions of the highest order, circuit, and recursion. Specification of the Jasmine tests. Basics of the HTML, CSS, and jQuery. To better understand these topics, be sure to check out our posts, guides and tutorials regarding Git and GitHub.
Algorithms and data structures
Later you have to learn algorithms (especially big complicated ones), and basic data structures: connected lists, turns, stacks, binary searching trees, and hash-tables.
Back-end JavaScript frameworks
Node.js - Approximately a decade ago JS was used only for writing the code for front-end (just like CSS and HTML), but today due to Node.js the situation is quite the opposite. Node - is a server area for committing all the actions by JS, so you won't have to learn all the new syntax. Although, you will have to import and export files, divide the entire code for modules, and use the pack-manager NPM. Express.js - Besides learning Node you have to get more knowledge about back-end development, especially about servers and routing. Ports and protocols with HTTP will be a nice start before studying Express. Express.js - Node-library for requests` processing.
Asynchronous JavaScript (AJAX)
If you don’t want to refresh your page after each change in your DB, Ajax is certainly what you will need - it sends asynchronous HTTP-request to reload only part of the page. You can work with Ajax through the jQuery (see below) or by directly (manually) handling the XMLHttpRequest object. Asynchrony is the thing that makes JS unique but separating developers into two sides: some love it and some hate. Each developer has to know both advantages and disadvantages of that technology. You can start by studying call stacks, events cycles, and callbacks, then - studying promises.
Databases, Schemes, Models, and ORM
Databases one of the most important parts of web development. If your app has to save or load some information without losing it just after the page's update, you definitely will have to use DB. You have to learn how to see the difference between relational and non-relational DB and learn their connection ways. The next step will be studying the SQL and different systems for controlling DB. Knowledge of ORM won't be excessive.
HTML and CSS
Those languages are the very basics of the web-design. You don't have to know them perfectly but understand their code. Then you will have to learn at least one popular library (for example, Bootstrap). For CSS you have to learn processors, like Sass that will make CSS more similar to the normal code. For making work with the HTML you can pick any template, like PUG. To better understand these topics, be sure to check out our posts, guides and tutorials regarding HTML, HTML5, CSS and CSS3.
jQuery and DOM manipulations
After you finished the main look of the page using HTML and CSS, you will use event translators and jQuery for the DOM controlling. Many people think that jQuery is useless and soon will be replaced by Angular or React. Maybe it's true, but jQuery is worldwide popular, so in any case, you must know it. Moreover, you can get into the situation when you will have to do an incredibly complicated job using React-microscope, so in that situation, light jQuery will be your salvation. To better understand these topics, be sure to check out our posts, guides and tutorials regarding JQuery.
Chrome instruments for developers
If we didn't mention the Chrome instrument which makes the programming job easier, we wouldn't forgive ourselves. Thanks to them you will be able to learn DOM, debugging process through the console, routes` tracking and so much more.
Test-Diven Development
Also called TDD: this is the development tactic when the software divides for a few tiny cycles: Writing down the code to make all changes you had to. Writing down the code that will pass all tests. Refactoring the code and writing new tests if those are necessary. If some parts of the code don't pass the test, they have to be rewritten. If you work with JS we firmly recommend you pay attention to the Jasmine, Chai, and Mocha frameworks. To better understand these topics, be sure to check out the ASP.NET Core 3 and Angular 9 book, which features an entire chapter about client-side TDD using the Karma test runner and Jasmine testing suite.
Web Sockets
We have to pay extra attention to that topic because web-sockets are useful. WebSocket protocol, unlike the HTTP one, will allow you to work with a bidirectional data stream – the reason why is that tech unique. The most popular library called socket.io and is well documented here.
EcmaScript 6 (ES2015)
Nowadays, the main standard is ES6 (ES2015), ES2016 has been confirmed already and the ES2017 is under development right now, so you always have to watch their updates and use the newest and most stable version. All compatibility problems can be solved easily with the next apps.
Babel
Babel - compiles ES6 (ES2016 support is expected soon) into the ES5, which is well-known by all browsers. It also can compile JSX/REACT-components, which makes it vital for web-developers. Webpack - takes all your files (images, fonts, style tables, JS-files, etc) into the single dependency graph. You don't have to use it if you are making a small app but shall use it while working with React.
React and Redux
React (also known as ReactJS) - the library which will allow you to create a user's interface. It was created by Facebook in 2013 and became worldwide popular pretty fast. React is needed not just for web-design, but there are versions for smartphones (React Native) and VR (React VR), published later by the same company. Redux - container of predictable states, usually used with React. It can be used for shortening the code by the modeling way. Pretty useful in real-time working apps with a big number of users, such as games. To better understand these topics, be sure to check out the series of React & ReactJS articles we've published in the last few years.
Authentication, Sessions, Cookies
You have to understand how the app will interact with users - how users will log in\out of their accounts, get bonuses, etc. For identifying people during surfing your site, web-sites using cookies - small text-files that send a reply from server to browser for user's HTTP request. For the connection between DB and log-in page, you can use the express-session library.
Web Security
Each site/app, of course, must be secure and reliable. You have to get the knowledge of all possible attacks on your creation and ways of protection as well. To better understand these topics, be sure to check out the various IT & Development Security articles we published in the last few years.
Conclusions
In this post we tried to write a list of the main study topics that await a novice JavaScript developer. Most of these tools will become your best friends, others will make you spit blood: each of them, however, will help you better understand how to overcome the inevitable difficulties that await your learning path and satisfy the development requests of the clients. Read the full article
#Ajax#Babel#Counter-Strike#CSS#Electron#ES2015#Express.js#Git#GitHub#HTML#Jasmine#Javascript#Karma#Node.js#React#Redux#Valorant
0 notes
Text
Digital transformation scenario with Azure, Visual Studio and Git
Scenario
How can you make a successful digital transformation in your company using Azure, Visual Studio, Git and other tools? What is your approach?
Acme is a successful accountancy firm based in the UK which is currently going through a digital transformation programme of work to modernise its legacy systems, using a proper approach for a real digital transformation scenario.
As part of the programme, Acme wants to become more “agile” and embrace new approaches and technology to deliver more modern and efficient services to its clients.
One of the key components of the transformation programme is an “Integration Platform” that will provide integration between core operational systems.
The Integration Platform will provide a scalable messaging layer that offers Acme the ability to decouple applications from each other such that, in the future, changing a system will not require the reimplementation of point-to-point services, but instead the fulfilment of a particular contract with the Integration Platform.
Landscape
As part of its digital transformation programme, Acme has adopted a cloud first strategy and Microsoft Azure is their chosen public cloud, integrated with Visual Studio and Git.
Acme’s small team of developers are relatively inexperienced in their approaches and in the past have typically only worked in isolation or in pairs to deliver projects with no formal process.
The developers have experience of using .NET Core and React and currently use Azure DevOps for managing their source code.
Architecture
The architecture of the Integration Platform is based around the Message Broker pattern using a “publish and subscribe” model to pass messages from one system (publisher) to another (subscriber).
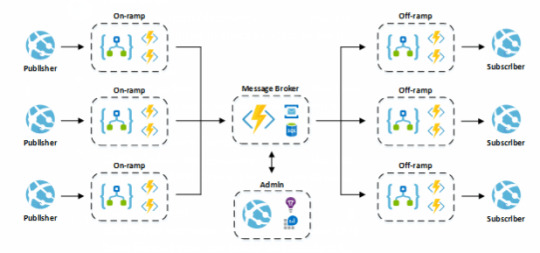
Architecture of the Integration Platform
Components
Component Description On-ramp A set of Azure logic apps and functions that are triggered by an event in a publisher system and send a message to the Message Broker. Message Broke An Azure function which is called by an on-ramp process and performs data transformation and enrichment operations on messages before placing them on an Azure service bus Off-ramp A set of Azure logic apps and functions that are triggered by a message being placed on an Azure service bus. Admin A web application providing administrative and monitoring capabilities for the Integration Platform. The application should be implemented using a React frontend with a .NET Core Web API backend.
Key requirements
The Architecture team have defined that the platform must use a “serverless” approach by default and use .NET Core for backend functions and APIs.
Each component should be independently testable and deployable.
Passwords and/or secrets for production systems must not be stored in source control or in plain text configuration settings.
Explain your view
Please describe how you would approach the delivery of Acme’s new integration platform in terms of your proposed:
approach to managing work items and / progress
structure of the source code repo(s) and what approach you would take to managing branches
approach to ensuring code quality is maintained and what tools/frameworks you would use
development toolset
approach to managing deployments including the required Azure resources
approach for managing passwords and secrets
Benefits to Acme of the approaches above
Any key risks or assumptions
Digital transformation scenario: what is your approach? My explanation
Proposed approach to managing work items and / progress
In the developer’s world, Agile methodology is the common way to manage the work and the workflow. Agile is a practice that promotes continuous iteration of development and testing throughout the software development lifecycle of the project.
Agile – Scrum
The architecture of Agile methodology is based on the same simple steps in a specific period of time. The time is usually 2 weeks and it is called Spring. The main steps are:
Sprint planning: the team estimates each user story and decide what tasks will be included in the next sprint.
Sprint: the period of time, usually 2 weeks, where the team is working on the tasks on the board
Daily Scrum Meet: every day, usually in the morning, the team is gathered and each person explains what he did the day before and the issues or blockers had faced
Sprint Review Meet is held at the end of the sprint to inspect the increment and adapt the product backlog if needed
Sprint Retrospective Meet: the team talks and analyses how the sprint went and highlighted what went well, wrong and could be improved. An easy free tool online is IdeaBoardz
Regularly, there is a grooming section separately where the team estimates the tickets, called Poker Plan (ie. planITpoker or PlanningPoker).

Agile methodology: anatomy of a sprint
During the sprint, the team has a board. For each user story, there are one or more tasks to complete. At the beginning of the sprint, all tasks are in the status of new.
So, each developer peeks up one ticket each time. When a developer picks up one ticket, he changes the status of the ticket to Active or In progress.
When the developer completes the task, he has to change the status in code completed. In some cases, the task can be moved in the Resolved status.
The ticket is now ready for the testers. Testers are responsible to check the functionalities and if the acceptance criteria are satisfied.
Then, the task is completed and it is possible to close it and change its status to Complete.
This process has simple steps. Every company can organize the process and the label of this process as it is more convenient.
Microsoft Azure DevOps
As developers, Azure DevOps offers a good integrated platform to manage the Agile ceremony.
Therefore, other tools are more business oriented like Jira. In a digital transformation scenario this are important tools to define at the beginning of your approach.
Important note is Azure DevOps is integrated in Visual Studio and it is also possible to browse you Git repository.

An example of spring board in Azure DevOps
Discriminating Epics, Features and User stories
After that, it is difficult to understand the different among these 3 parts of the process. Apparently, epics, features and user stories are all forms of expressing user need and implied benefit, but at different level of abstraction.
While there is no rigorous way to determine whether a “think you know you want to do” is an epic, feature and user story, the following table of discriminators should help:
Type of information Description Responsibility Time frame & Sizing Expression format Testable Strategic Product Theme BIG, hairy, audacious, game changing, initiatives. Differentiating, and providing competitive advantage. Portfolio fiduciaries San strategic planning horizon, 12-28+ months. Not sized, controlled by percentage investment Any: text, prototype, PPT, video, conversation No Epic Bold, impactful, marketable differentiators Program and product management, business owners 6-12 months. Sized. Most any, including prototype, mockup, declarative form or user story canonical form No Feature Short, descriptive, value delivery and benefit oriented statement. Customer and marketing understandable. Product Manager and Product Owner Fits in an internal release, divide into incremental sub-features as necessary. Sized in points. Declarative form or user story canonical form. May be elaborated with system use cases. Yes User story Small atomic. Fit for team and detailed user understanding Product Owner and Team Fits in a single iteraion. Sized in story points. User story canonical form Yes

Epics are the highest-level requirements artefact
Proposed structure of the source code repo(s) and what approach you would take to managing branches
As a developer, I like to have an integrate environment for repositories, deployment and resources such as web app and/or server less applications.
For this reason, I’m using Azure DevOps: it is free for unlimited repositories but max 5 users.
For each repository, I’m following a common structure that allows you to manage the master branch, a developer branch, tagged releases and hot fixes. This is Gitflow.
In our repository’s structure you have some main folders:
feature: for creating new tasks
bug: fix some exists functionalities
hotfix: fix some bugs in production
In the configuration of the CD/CI, there is a peer to peer review for merging a branch to the develop branch or master.
When a new branch is merged in the develop branch, the CD/CI process, automatically prepare the build and start the deployment.
In Agile point of view, each developer is responsible for a single task at the time. For this task, the developer has to create a branch. Common practice is naming each branch with the task number and a short description in the right folder. For example
feature/511-Login
When a developer completes a task has to create a new Pull Request to merge his changes to the develop branch. If the developers finished the peer to peer review, the branch is merged on develop.
For admin purposes, each branch could be associated with a task in the board. So, when a branch is merged, the correspond task is closed.
Every developer can manage this Git flow in the Azure DevOps and also directly in Visual Studio.
Proposed approach to ensuring code quality is maintained and what tools/frameworks you would use
As developer, you know you have to learn constantly: every day new technologies come up, new tools, new environments. The interaction between developers is important because we can teach each other something new. Also, developers (and no developers) can use Visual Studio to browse the dashboard in Azure DevOps and Git repositories.
For this reason, show your code to other developers is always a good way to improve the quality of your code and at the same time to learn something new. Nonetheless, websites like Github are so popular with a lot of users. In your team, peer-to-peer review is the simple way to check your code and find new implementation or structures. To be on the same page, a weekly meeting to share information should have an important impact in your team.
In Visual Studio, Code Analysis is an integrate tools. The Code Analysis feature of Visual Studio performs static code analysis to help developers identify potential design, globalization, interoperability, performance, security, and a host of other categories of potential problems.
You can run Code Analysis manually at any time from within the Visual Studio IDE, or even setup to automatically run as part of check-in policy for Azure DevOps Server.
Linters and Code Analysis
GCop is a fairly new set of C# code analysis rules (with really nice setup, use and rules documentation) from Geeks Ltd., which may be worth checking out if you’re not entirely satisfied with other code analysis rulesets (or perhaps using alongside of those other rules for extended coverage).
GCop is intended to be installed in your project as a NuGet package. To allow for rules that can’t run from a package, Paymon has released a GCop.Extra Visual Studio 2017 extension for use with GCop.
The extension enables GCop rules such as Minimum Scope that detect whether methods that are more visible than they need to be.
MultiLinter
MultiLinter, by Giovanni Lambiase, enables you to replace the (already outdated) linters built into Visual Studio 2017 with the standard linters available through Node.js including (but not limited to) ESLint, JSLint, JSHint, Stylelint, CssLint and Sass-lint.
MultiLinter lets you turn verbose debugging on, configure which linters to use (including running multiple linters against a file at the same time), update linters and linting rules, set rule severity warnings, and much more.
XamRight
XamRight, from Critical Hit Tech, is an extension for Visual Studio 2015 and 2017 that brings design-time code analysis and coding assistance to Xamarin.Forms XAML development.
You get IntelliSense, warnings, view model and data binding analysis and debugging, navigation tools for moving between XAML and C# model definitions, custom view implementations and more, along with navigation from XAML resource references to definitions.
XamRight can analyze your own model-view model binding, but also includes built-in support for popular MVVM frameworks including MVVMCross, MVVMLight, FreshMVVM, Prism and Caliburn.Micro.
A 30-day free trial is available and licensing is available on a monthly or yearly basis.
NDepend
NDepend, one of the most popular commercial static code analysis tools for .NET Framework development, recently released a substantial update including support for .NET Core 2.1, ubiquitous language checks in Domain Driven Design (DDD), performance improvements for Visual Studio 2017 and over a dozen new or improved code analysis rules.
A key new feature for NDepend is real-time technical debt estimation that’s updated as you code. Proud of that new method? Guess what, you just added 30 minutes of future technical debt. Maybe check NDepend’s analysis and spend a minute refactoring. I love it. NDepend offers a free 14-day trial and per-developer or per-build machine licensing.

NDepend’s Static Analysis Tools Have Been Updated for .NET Core 2
Async Method Name Fixer is an effective little tool for doing a simple but often overlooked task: making sure your async methods are named appropriately.
In a nutshell, it looks for methods defined as async and, if you haven’t given the method a name with “Async” on the end, the extension flags all instances of the method and calls to it.
Code Coverage and Testing
AxoCover, by axodox (Péter Major), provides Visual Studio integration for code coverage and unit testing with OpenCover. AxoCover lets you run, debug and check code coverage for unit tests in .NET Framework projects for Windows.
You can browse and analyse coverage by test in a hierarchical view and dig down into line-by-line coverage and test results. AxoCover supports the MSTest, xUnit and NUnit test frameworks.
SmartTests.Extension
SmartTests Extension, by Ludovic Dubois, is an extension to show current and missing tests for NUnit, Xunit and MSTest within Visual Studio.
SmartTests integrates into your Visual Studio environment the Pretty Objects SmartTests library, which helps you write smart unit tests, and the SmartTests.Analyzer, a Roslyn Analyzer to display missing tests as warnings.
The extension shows tests in a centralized window, lets you see current tests and any missing tests, and lets you navigate quickly to specific tests.
TestLeft
SmartBear’s TestLeft UI test automation framework supports Visual Studio 2013, 2015 and 2017. TestLeft integrates directly into the Visual Studio development environment, enabling you to create tests as you code.
A built-in object spy gives you the ability to create tests that support over 500 common Web and desktop UI controls.
You can create automated tests for a variety of popular development frameworks including .NET Framework, Winforms, WPF, Java, HTML5 and AngularJS.
Further test coverage includes controls from Infragistics, DevExpress, Syncfusion and Telerik, along with cross-browser testing with legacy versions of Internet Explorer, Edge, Firefox and Chrome.
Tests created in TestLeft can be migrated into TestComplete for automated testing as part of your continuous integration and release management processes.
Register online for a free 30-day trial. Yearly per-node and floating licenses are available from SmartBear.

TestLeft Simplifies the Creation of UI Test Automation as You Code
Selenium
Selenium is an umbrella project for a range of tools and libraries that enable and support the automation of web browsers.
It provides extensions to emulate user interaction with browsers, a distribution server for scaling browser allocation, and the infrastructure for implementations of the W3C WebDriver specification that lets you write interchangeable code for all major web browsers.
Selenium is made possible by volunteer contributors who have put in thousands of hours of their own time, and made the source code freely available for anyone to use, enjoy, and improve.
Testing with BDD
Digital transformation could drive you to change approach on testing.
Behavior Driven Development (BDD) is an agile software development practice – introduced by Dan North in 2006 – that encourages collaboration between everyone involved in developing software.
So, developers, testers, and business representatives such as product owners or business analysts.
In other words, BDD aims to create a shared understanding of how an application should behave by discovering new features based on concrete examples. Key examples are then formalized with natural language following a Given/When/Then structure.
SpecFlow
Gherkin is the most commonly used syntax for describing examples with Given/When/Then in plain text files, called feature files.
Gherkin scenarios can be automated to validate the expected behavior. At this point, BDD tools – such as SpecFlow – come in handy. Automated acceptance tests, however, are an optional by-product of using BDD, not the sole purpose.
SpecFlow is the #1 .NET open source framework for Behavior Driven Development, Acceptance Test Driven Development and Specification by Example.
In SpecFlow, specifications are written in plain, simple language which is defined by the Gherkin Syntax (Given-When-Then).

Gherkin scenario
SpecFlow provides a whole ecosystem of tools to use BDD on Azure DevOps and the Microsoft .NET platform. Besides SpecFlow and SpecFlow+Runner, there is also a SpecFlow Visual Studio Extension that provides a Gherkin editor and build integration.
SpecMap and SpecFlow+LivingDoc are Azure DevOps extensions that support the team in the overall BDD process with managing their backlog using story maps and accessing their living documentation.

SpecFlow architecture
Better Debugging
Angel Hernandez’s VisualSOS.Extension gives you access to features of the Microsoft SOS Debugging Extension and Windbg that are not available directly from the Visual Studio Debugger.
VisualSOS.Extension also gives you menu access to those features instead of having to remember the commands and option flags. Visual SOS is available as both a Visual Studio 2017 extension and a stand-alone debugger.
To learn more, see Hernandez’s blog post Visual SOS – Visual Studio extension to debug managed applications through SOS for an overview and some tips for more effective debugging with SOS.
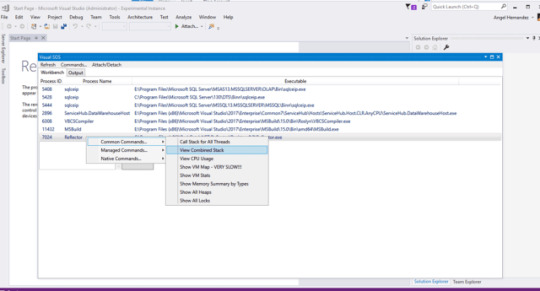
VisualSOS Adds SOS and WinDbg Debugging Tools to Visual Studio
LINQBridgeVs
LINQBridgeVs, from Coding Adventures, provides a Custom Debugger Visualizer within Visual Studio that creates a bridge between your Visual Studio debugging session and the external LINQPad scratchpad and test environment.
After rebuilding your project, you can right-click on any public classes or structs in the project and open the related debugging data within LINQPad.
Microsoft Visual Studio Live Share
Microsoft’s Visual Studio Live Share, provides a collaborative development environment, enabling you to share code, collaboratively edit, securely share local servers and even collaboratively debug your code in real-time.
It’s not a screen share service or centralized codebase; you’re able to work independently in your local Visual Studio environment while collaborating on code editing and debugging.
As we go to press, the VS Live Share is in limited preview: anyone can download the extension, run it and join a session, but permission to share a session requires registration and acceptance into the preview.
For more details about VS Live Share including demos, see the Visual Studio Live Share Web site and Visual Studio Live Share Microsoft Docs.
Finally, the integration among Azure DevOps, Git and Visual Studio allows developers to use only one tools for coding and manage branches and share code and knowledge.
Proposed development toolset
Visual Studio is the main tool for developer and Microsoft releases it in different flavour:
Community: basic functionalities for developers for creating desktop application, web applications, mobile applications, libraries and much more with .NET and other languages.
Professional: more tools dev oriented for debugging, integration and team interconnection
Enterprise: developer’s dream, everything is here
Visual Studio Core: editing and debugging on any OS in a simplify environment
Visual Studio for Mac: develop apps and games for iOS, Android, and web using .NET (Xamarin)
Visual Studio in action
Most important, Visual Studio is really cloud oriented: there is a total integration with Azure, the Microsoft Cloud, and Git. You can explore all Azure resources directly from your Visual Studio.
Microsoft Azure, the cloud
Azure is the Microsoft Cloud. You can deploy every kind of applications built with any languages, not only .NET: it is a very friendly environment and easy to use, in the usual Microsoft style.
In Azure you can create different subscription (you can think a subscription as an environment, for example a subscription for test, another for stage and another for production).
Under each subscription there are one or more resource group: a resource group is a collection of Azure services such as web applications, Azure functions, LogicApp, service bus and much more.
There are some tools to explore better some Azure resources:
Service Bus Explorer: the Service Bus Explorer allows users to connect to a Service Bus namespace and administer messaging entities in an easy manner. The tool provides advanced features like import/export functionality or the ability to test topic, queues, subscriptions, relay services, notification hubs and events hubs. Source code on Github.
Azure Media Services Explorer (AMSE) is a Winforms/C# application for Windows that does upload, download, encode and stream VOD and live content with Azure Media Services v3. Source code on Github
Azure Storage Explorer: easily manage the contents of your storage account with Azure Storage Explorer. Upload, download, and manage blobs, files, queues, tables, and Cosmos DB entities. Gain easy access to manage your virtual machine disks. Work with either Azure Resource Manager or classic storage accounts, plus manage and configure cross-origin resource sharing
Now, Azure Functions and Logic Apps are very popular in the Microsoft world. Both developers and non-developers can create very complex workflows with few clicks.
Gitflow
I said I propose to use Gitflow to manage branches. There are a lot of tools for that. Also, Visual Studio has one and you can install it from the Visual Studio Installer but this has very basic functionalities. I recommend one of the following tools:
Sourcetree simplifies how you interact with your Git repositories so you can focus on coding. Visualize and manage your repositories through Sourcetree’s simple Git GUI. This tool is free
Gitkraken is very simple and the look is quite pretty. For free, you have better functionalities than Visual Studio and it is easy to manage your branches. There is an extension for Gitflow but only for the version with licence.
Mobile environment
Generally speaking, if you want to create apps for iOS and Android, I really recommend to have some physical devices. Android is the tricky one because it supports a lot of different devices with different screen sizes.
Therefore, if you want to create apps for the iOS world, you must have a Mac to compile and test your application.
Deploy and test an application on a Simulator is free but if you want to test your application on a real device, you must pay the fee as developer to Apple.
To build and distribute your app, you can use Microsoft AppCenter: it is simple to use, efficient and it collects the data of usage and crashes for you in a simple interface.
In Visual Studio you have a perfect integration of mobile with Xamarin but also with Azure DevOps and Git repositories.
Proposed approach to managing deployments including the required Azure resources
I mentioned before Gitflow that you can use to manage your repositories in Azure DevOps. Also, DevOps allows you to create pipelines to deploy your projects directly into your cloud resources such as web application, Logic Apps, Azure Functions and so on.
For example, you can create a pipeline based on events. For example, when a branch is merged in develop branch, DevOps automatically starts the build and the deployment. There is a document on Microsoft to How to create your first pipeline in Azure DevOps.
youtube
With Azure Pipelines you can build and deploy your code written in any language using any platform, no problem. In this video we will show why Azure Pipelines is the best tool on the planet for Continuous Integration and Continuous Deployment (CI/CD) of your code.
The developers can create every resource in Azure via an ARM script. I discussed that in another post on this blog. So, during the deployment, Azure DevOps is also able to generate the environment before deploying your projects. You can write your ARM scripts or use the template and script generator in the Azure Portal.
In Visual Studio, developers can create the Azure Resource Manager (ARM) script, save in a Git repository and deploy everything in the company environment.
Proposed approach for managing passwords and secrets
A common approach to manage password was to create a sealed class in C# where they store all password. Very insecure way to protect your password for your environment. Another approach is the create app.settings for different environments but again this is not secure at all.
In Azure for resources like web application and Azure functions, there is a Configuration section. If you add your configuration for a specific environment, Azure rewrites the settings in the application with these values. Only if you have access to this resource in Azure, you can see the real values.
For instance, if you are using Azure DevOps, the pipeline has a parameter section where you put the settings based on the environment. So, when DevOps is building your project, it uses the proper configuration for the environment.
The most secure way to store your password is Azure KeyVault. Create a KeyVault in Azure is pretty simple but the protection KeyVault offers is very high. Every application has only a name and a client key to access to your KeyVault and the real password or certificate or secrets won’t never revealed.
It is easy to integrate Azure KeyVault with Visual Studio in your project and also publish your code, in a safe way, in your Git repositories without exposing your credentials.
Benefits to Acme of the approaches above
What I describe in this post is based on my experience in several companies and also, I ran my own company for more than 15 years. I saw and used this approach and I guarantee that our team can have a very positive benefit introducing this your new approach for the digital transformation.
Your team and your company could face at the beginning a couple of weeks of assessment because you have to understand how to implement these new changes and use new tools but it is worth.
All companies are using or going to use a similar approach: it is very common, there are a lot of tutorial and how to that you can read and follow and even books. Also, there are a lot of consultants and specialists can help you to adopt new behaviours to digital transform your company in better.
In addition, in developers’ point of view, there is a great integration using Visual Studio with Azure and Git repositories (Git is now a Microsoft product). Then your team has a consistent environment for desktop applications, mobile applications, web applications and cloud tools.
Any key risks or assumptions
Change the direction of a company is always a challenge. It is a good opportunity to involve people in something new, show to your team the company wants innovate because people are really the heart of your company.
As usual, at the beginning could be harsh because you have to introduce new tools and new behaviour. After a couple of months, you and your company will see the result, how the productivity is increased and people happy.
In addition, it is important to underline again, the integrating environment your company can use with Visual Studio, Azure, Git and other tools like Xamarin.
Human risk is the big factor in this scenario because sometimes people don’t want to change, in particular if they are in the company for as long time and they have their habit.
In conclusion, a digital transformation allows the company to be competitive and share common values with clients and other competitors.
The post Digital transformation scenario with Azure, Visual Studio and Git appeared first on PureSourceCode.
from WordPress https://www.puresourcecode.com/dotnet/digital-transformation-scenario-azure-visual-studio-git/
0 notes
Text
Awesome Motive Inc.: WordPress Developer (PHP/JS)

Headquarters: West Palm Beach, FL URL: https://awesomemotive.com
About the Company: At Awesome Motive, we help small businesses grow and compete with the big guys by creating market leading software and growth tools.
Over 10 million websites use our software and training videos to grow their traffic, email subscribers, and business revenue.
We are the company behind popular marketing products including OptinMonster, WPForms, MonsterInsights, SeedProd, WP Mail SMTP, RafflePress, TrustPulse, and more. We also run a suite of popular blogs including WPBeginner, the largest free WordPress resource site for beginners.
About the role? As a WordPress Developer at Awesome Motive, you will build infrastructure to create new features, improve existing code, squash bugs, and help us rapidly scale our platform.
You will primarily working in our product team for WPForms, the most popular WordPress form builder - used by over 3 million websites!
To love this role, here’s the type of person you are:
You’re a self-starter who loves taking initiative and seeing things through from conception to completion. Our developers often "own" features/tasks and are responsible for scoping, development, and testing.
You're an excellent communicator, fluent in both verbal and written English, who makes sure nothing slips through the cracks. We believe communication is critical and there is no such thing as over communicating.
You have the curiosity and desire to learn and grow your skills.
You're passionate about leaving your mark on the web for all to see and are excited to work on tasks that impact millions of users.
You take pride in the quality if you and craftsmanship of your work rather than just doing it to get it done.
You're a team player who is comfortable working along side and helping other developers, and you don't take critical feedback personally.
You're happy jumping between front-end and back-end development tasks, or tackling tasks which require both.
You're happy working on tasks of all sizes - from small bug fixes and enhancements to large features/rewrites.
Common responsibilities include (but are not limited to):
Triaging bugs and small enhancements that come into GitHub.
Scoping, writing, and testing new product features and addons.
Refactoring legacy code with a particular attention to backwards compatibility.
Providing feedback and peer review for other developers (Github PRs).
Here are some skills that will come handy:
Professional experience with WordPress plugin development, architecture, and standards.
Advanced proficiency with PHP and MySQL, including modern PHP practices (OOP, autoloading, namespacing, traits, interfaces, etc).
String familiarity with JavasScript (vanilla JS, jQuery, ES6, etc).
Ability to use and extend build tools like gulp and webpack.
Familiarity with package managers such as Composer and NPM.
Experience working with third-party APIs (Eg Stripe, Drip, Zapier, etc).
Competent with version control through git and GitHub.
The ability to iterate and ship ideas quickly.
Exceptional troubleshooting skills.
Ability to keep complex ideas and features simple. (Simplicity is a core value!)
Previous freelance or remote work experience.
Bonus points if you also have:
Advanced proficiency in JavaScript frameworks like VueJS or React.
Experience with e-commerce platforms or related APIs (WooCommerce, Stripe, PayPal, etc).
Experience with DevOps or infrastructure management.
What we offer Working for a fast-growing bootstrapped company is a rare opportunity, one we consider a lifestyle choice rather than a job choice. Our positions are challenging, but also come with amazing advantages and fulfillment to those who earn them. Here’s what we offer.
Competitive Salary.
Health Insurance benefits for full-time U.S. employees.
Work from your home. We’re spread out all over the world – United States, Canada, Ukraine, India, Pakistan, Singapore and more.
Unlimited PTO after 90 days of employment. We encourage employees to take the time they need for vacation, to stay healthy, and to spend time with friends and family.
Paid maternity and paternity leave.
We happily provide or reimburse software you’ll need as well as books or courses that promote continued learning.
We give you the opportunity to solve challenging and meaningful problems that make a difference.
Custom Branded laptop at your five year anniversary.
We cover all costs of company travel (including our annual all-company retreat and mini-team meetups).
Ability to work with some of the best people in the business through frequent, if not daily, interactions.
And in case you were wondering: no politics, no b.s., and no jerks.
If all of this sounds interesting, then please submit your application! How to Apply?
Please clearly include the following in your cover letter:
Your experience with WordPress plugin development.
What is your favorite WordPress hook/function and why.
Tell us a bit about yourself and why you should be considered. Details about your experience, qualifications, personality, etc are very helpful.
Profile links with code samples (GitHub, GitLab, WordPress.org, etc).
Other profile links if available (Your website, Twitter, LinkedIn, etc).
Also note, don't forget to proofread before submitting. Check spelling, capitalization, etc. This is your chance to make your application stand out :) We won’t be able to individually respond to all applications, but if we feel you’re a strong match, someone will be in touch shortly. Qualified candidates will be asked to do a simple code challenge. Thanks and we look forward to hearing from you!
To apply: https://awesomemotive.bamboohr.com/jobs/view.php?id=3
from We Work Remotely: Remote jobs in design, programming, marketing and more https://ift.tt/2JhUp52 from Work From Home YouTuber Job Board Blog https://ift.tt/2wEIQlZ
0 notes
Link
Salesforce CLI continues to evolve as we add more features and commands that support Salesforce development. We’re excited to announce the next step in that evolution. Over the years we’ve kept open source software (OSS) in mind, as evidenced by several repositories we’ve already opened up to the community (I’ll cover these later). However, we’ve decided to commit to moving towards 100% OSS! While we open up the code base, we’ll also be refactoring where possible and re-organizing where those repositories, plug-ins, and issues live. Read on with me while I explain the steps we’re taking towards that goal and where we’re looking to go next. In this post I’m going to cover: Why we’re moving towards OSS What you have access to now Steps we’re currently taking Why go open source? While going 100% OSS has become a primary goal for the CLI team, OSS has been an integral part of Salesforce for quite a long time. You can read more about Salesforce’s commitment to OSS here. Also, here’s a great write up by Salesforce Principal Architect, Ian Varley on the subject: Salesforce Is Powered By Open Source. Open source has always been a part of the CLI conversation. In fact, we’ve already opened up a few repositories to the community as you’ll see later in this post. That being said, we were taking a piecemeal approach toward OSS and were deciding what to open up on a case-by-case basis. As the CLI continues to grow, we’re seeing more and more that going full OSS will actually help us solve or prevent some looming challenges: Keeping open and consistent lines of communication with our users Communicating to users what we’ve been working on and where we’re going Monitoring issues between internal and external channels can cause some bugs to be overlooked Finding enough bandwidth for the CLI team to work on “low priority” features that we recognize as being useful Shifting our focus towards open sourcing the CLI rather than taking a piecemeal approach will help us more quickly mitigate some of these challenges. Here’s a more specific list of “Whys”: Incorporate customer feedback at earlier steps in our process Build transparency and trust with our users Give the community an opportunity to dig into the code and understand how it works Open Salesforce CLI to pull requests and bug fixes from the community Leverage those contributions to free up the CLI team to focus on larger bugs and features Surface bugs and edge case issues much more rapidly than our current internal QA process allows Create a direct line of communication with our customers Ensure that our growing feature sets will continue moving in a direction that parallels the needs of our users What goes into the CLI? Let’s take a quick look under the hood. The CLI as it exists today is an amalgam of various plug-ins built on top of oclif. When you run sfdx plugins --core in your terminal, you’ll see an output that displays a list of those various plug-ins. We also utilize several oclif plug-ins to enhance the user experience, and we bring in others to do things like gather analytics or provide users with their own custom plug-in generator. One key Salesforce plug-in to take note of is salesforcedx. salesforcedx is the parent plug-in for multiple child plug-ins that provide many of the commands you use on a daily basis. Originally, the CLI was built from one of those “child” plug-ins: salesforce-alm . This is where the CLI began and quickly grew to over 170 commands with multiple internal teams currently contributing code. The bulk of the force commands still come from this one plug-in. As you can see, we’ve since grown beyond salesforce-alm and now host multiple packages all brought together to build the current version of the CLI. I’ll share more about salesforce-alm in a bit because it’s a big part of this effort. What you’ve got access to now While it may seem as though we’re unveiling a brand new OSS concept for the CLI, this really has been on our radar for some time. The real update is that we’re making OSS a top priority this year. We’ve recently released a “snapshot” of the salesforce-alm code as it exists today (see below). This will give you a glimpse into arguably the most important code base of the CLI. Not only that, we’ve already opened up several packages and libraries that you can start utilizing in your own projects: https://github.com/forcedotcom/cli-packages https://github.com/forcedotcom/sfdx-core https://github.com/forcedotcom/salesforcedx-templates https://github.com/forcedotcom/sfdx-dev-packages https://github.com/forcedotcom/sfdx-plugin-generate https://github.com/forcedotcom/cli/issues – (Report issues with the CLI here) You can bring many of these into your own projects now. Send up a PR or just play around with a few of the functions to gain insight into how they interact with the Salesforce API. You can also use them to help build your own CLI plug-in! The Snapshot We wanted to make it clear that open sourcing the CLI really is a priority for us. As a result, we’ve created a “snapshot” of the salesforce-alm to whet your appetite a bit. It’s a read-only picture of the code as it exists right now. No PRs or issues will be accepted on this repository. Eventually, you’ll have full access to run the various parts of code that make up the snapshot on your own machines. FYI, you can expect updates to the snapshot during each major release (3 times a year). A GitHub organization for Salesforce CLI Part of the re-organizing effort will be to create our own GitHub organization for the CLI. Once it’s up and running you’ll be able to keep an eye on the changes as we progress toward the goal of open source. One of the main reasons for this is simply because forcedotcom, where the current open source CLI repos live, has bloomed to such a size that it’s become rather difficult to discover new CLI specific repositories that you might want to work with, or where to file an issue. Having a single Salesforce CLI organization will be more manageable for the CLI team while providing a simpler way of discovering plug-ins or libraries users may want to leverage for their next project. However, we won’t be able to move over ALL the things just yet. For example, the issues repository will still be tied directly to forcedotcom. This is as a result of not being able to transfer ownership of the issues in GitHub at an organization level. We don’t want to lose that history or any outstanding bugs that we haven’t addressed yet. A single source for issues We’re consolidating our issues into one repository you may already be familiar with: https://github.com/forcedotcom/cli/. Instead of bouncing communications across multiple repositories and as a result potentially losing some in the shuffle, consolidating issues to one repository will help us ensure the team is staying on top of any major problems. As mentioned above, we won’t be able to bring this into the Salesforce CLI GitHub organization just yet. Regardless, consolidating issues to one repository will make it easier for the community to file issues against the CLI and keep track of them. Also, it will remain a searchable resource for community workarounds and previous fixes. If you see a repo that has issues turned off, this will be where you should go. Public roadmap, release notes and Github issues. Oh my! Using the existing issues-only repo that you already have access to, https://github.com/forcedotcom/cli/, we will also begin adding our release notes as well as a public roadmap so that you can keep track of where we’re going and any announcements that will be headed your way. This will increase our transparency and communication with our users. Next steps to open source Open source by default Moving forward we’ll be working with anyone who contributes to the code base to ensure that any new plug-ins will have open source as part of their Generally Availability (GA) timeline. That means that our users will not only be able to utilize these plug-ins and libraries in their own projects but they will also be able to submit PRs for features or bug fixes they’d like to see in place. While this will be treated as a mandate for our internal teams, there may be scenarios in which going full OSS simply won’t be an option. I’ll go over a few examples in the next section. Fortunately, you can be certain that these will be few and far between. Breaking up salesforce-alm As mentioned earlier, salesforce-alm is where it all began. Originally, we were considering breaking out bits and pieces of CLI functionality and open sourcing those as we went along while also sticking with a mono-repo structure. We’ve since settled on the idea that it will be more manageable to pull out sets of commands as their own individual plug-ins and in doing so, break up the mono-repo. Where before you would have seen salesforce-alm, after you’ll see multiple new plug-ins for each group of related commands: Before: After: Unfortunately, this isn’t going to happen overnight. The CLI team is committed to breaking out and open sourcing all of the commands that the team owns (we don’t own them all). Doing so will also allow us to refine that process and help us to advise other teams on the best path they can take towards open sourcing their own commands. Not only will we break out commands into their own plug-ins, we’ll also need to simultaneously refactor outdated code and design patterns. We’ll need to do things like clear the git history of any sensitive internal data, remove links to internal docs and configs, etc. We’ll also look toward removing or even rewriting some of those internal docs for public consumption. We need to clear up config files and first get approval for these changes with the multiple internal teams that contribute to our codebase. Those teams will have their own limitations on what will be ready for OSS, if at all. The list goes on and on. Needless to say, it will take a lot of effort but we’re committed to and excited about our move towards open sourcing Salesforce CLI! Recap Salesforce CLI has set a goal to go 100% OSS. We are breaking out the CLI commands into their own repos and open sourcing them as we go. This will take a fair amount of time and effort from our team but we’re already taking steps in that direction. We created a read-only snapshot of our salesforce-alm for you to take a look at here as further proof of our commitment to making the CLI open source. The snapshot will be updated 3 times a year. You have access to several OSS repositories related to the CLI right now. We’ll be working to make sure any new plug-ins have OSS as part of their GA timeline. Release notes, Roadmaps and Issues will remain here: https://github.com/forcedotcom/cli/ About the Author Ricardo Viera is an engineer on the Salesforce CLI team. Over the years he’s made several career shifts beginning in the world of 3d Animation then moving into UI/UX design and most recently making the jump into the world of software development. When not taking pictures of space with one of his 12 telescopes, you can find him on a driving range working on his golf swing or negotiating with his toddler to finish her dinner or she’ll get no dessert!
0 notes
Text
A Framework for Creating a Robust Onboarding Workflow
This post was originally published on the Wildbit blog.
Onboarding is a word that has been around for some time, but has seen increased usage in the world of SaaS in the last 10–15 years. Not surprisingly, this has corresponded with the advent and maturation of customer success as a discipline. And the two are related.
What is onboarding? It’s the process of getting someone up to speed so they can be as effective as possible and achieve success. And you usually want that to happen as quickly as possible. The term can refer to new hires for your own company (employee onboarding). But for most SaaS products, we use the term to describe the process of getting new customers acclimated to our service.
I’d like to share the framework for how we've created some of the onboarding campaigns here at Wildbit.
First things first
Before I talk about some of the activities involved in creating an onboarding campaign, I’d like to step back and talk about onboarding at a high level. There are a couple of important aspects to keep in mind.
First up is one of the most crucial aspects of customer success as a discipline. I hold to the idea that customer success is just that: a focus on the customer. That means I only want a customer to become engaged with our product because it makes their life better. And so I purposefully choose to work for companies where that is the case. I can feel good about helping someone be as engaged as possible with our products because we’re helping people solve real problems.
As Kathy Sierra puts it in Badass: Making Users Awesome:
People aren’t using the app because they like the app or they like you. They’re doing it because they like themselves. What are you doing to enable more of that?
Second, your onboarding is not the first step in guaranteeing the success of your customers. The fanciest, nicest looking, most clever onboarding campaigns cannot help people who do not need your product. If there is no problem that your customer is trying to solve or if your product focuses on the wrong problem, new customers are not going to stick around. Building a successful product starts with understanding your market and your ideal customer, having good marketing, and doing your best to find those people.
Once you have identified the right group of people to help, it’s important to remember that your onboarding should focus on them, not on you. Keep this in mind as you complete the activities below. You should focus on how your product helps the new customer solve their problem. The last thing we all want when we check out a new tool is to see a long list of features or messages that focus on the product or company behind it.
Last, it’s important to remember that anyone in your company can build these campaigns. The responsibility will fall on different shoulders at different companies, but the best onboarding examples are from companies who put the customer at the centre of their entire product development process. Designers, product managers, and customer success teams should all understand the vision of your product and the problem it solves well enough to guide someone new to a successful adoption.
Now, let’s dig into what’s involved.
The Framework
Now, there are many different ways to implement onboarding for a product. Different approaches will work better for some companies than others. I’ll discuss various options below, but remember that there is no one perfect way to do this. The best onboarding is flexible and iterative.
However, there are several exercises you can go through that will help you gain a better understanding of how to guide new customers to success.
Define your levels of engagement
The purpose here is create a tool that allows you to gauge how integrated your product is into someone’s business (again, we can feel good about this when we believe in the value we provide). Think of it in this sense: how hard would it be for someone to switch from your service to a competitor? The harder it is to switch would indicate a higher level of engagement with your product.
Let me illustrate with one of our products at Wildbit. Beanstalk is a development workflow platform where you can host, review, and deploy your code as a team. If someone signs up to Beanstalk, creates a new Git repository, then makes some commits and pushes them to Beanstalk, this would be a low level of engagement with our product. At this point, they could very easily sign up for a Bitbucket or GitHub account, switch the remote URL in their Git config, then push those same commits to their new remote repo in this other service.
But if they had pushed their commits to Beanstalk, then used our deployments feature to update their live website (instead of manually updating their site via FTP), suddenly they gained value they did not previously have. And it’s value they cannot get from some of our competitors. If using this feature becomes sticky and they then considered switching to a different service, they now have to replace the value they get from using ours. They are more engaged.
And that is what we want to outline here: it’s a tool for measuring how engaged people are with our service.
This is not a complicated process at all. Here’s how to create one:
list out the possible activities a user can perform with your product
group those activities into tiers (the number of tiers doesn’t really matter, but I keep it simple and stick to three)
each tier is a level of user engagement
You can then take these tiers and tie them into your user journey. I like to picture an ideal user journey, where someone goes from signup to highly engaged. I document what that journey might look like, and envision where the different activities would occur in that journey.
This does not need to be an precise measurement, but something that gives you a rough idea of how engaged your customers are. It should be flexible as the events themselves may change over time, being more or less important to your customers. But it should help you to identify your core features and what you want to focus on with your onboarding materials.
Identify your Wow moment
Once you have an idea of what an ideal user journey would look like for a highly engaged customer who is getting as much value from your product as possible, you want to identify the Wow moment. If you're familiar at all with onboarding, you may have heard of this term. There are a few other terms that get at the same idea (golden motion, day zero, MVE (minimum viable effort), TTFV (time to first value)). They are all focused on one thing: what is the quickest path to your customer’s success.
David Skok defines it this way:
Wow! is the moment in a free trial where your buyer suddenly sees the benefit they get from using your product, and says to themselves “Wow! This is great!”.
Whether your product has a free trial doesn’t matter. What matters is your new customer experiencing that moment when they realize that your product can make them better at what they do.
That is your Wow moment: when the new customer likes how your product makes them feel.
Now, it’s not always easy to identify where this moment takes place in your product. You may have to take a few guesses to find it. So you take your ideal user journey that you mapped to your levels of engagment, and you make another best guess: where is that Wow moment?
Again, I’ll use Beanstalk as an illustration. Commits are great, but deployments are where people realize the benefit of our product. All our longest tenured, biggest fans tell us that our deployments are what makes the difference when compared with other options they’d considered.
Pushing changes to a remote repo is a good first step, but as mentioned above, it’s easily replicable. But when an agency developer signs up for Beanstalk, then configures their workflow so that they can commit changes to their staging branch, push those changes to Beanstalk, then when those changes are automatically deployed to their staging environment and they can test seconds later …
That’s a Wow moment.
Map out the steps to Wow … in reverse
Once you have chosen a wow moment to guide people towards, start to identify the different steps required to get there. Take your ideal user journey you mapped out in step 1, then work backwards.
Lincoln Murphy describes it this way:
You create a plan to get here by identifying “initial success” and backing out from that goal while identifying success milestones along the way.
And don’t be afraid to go deep on this analysis. When you're very familiar with a process (like using your product), it’s easy to take things for granted. You will want to view your product from the perspective of someone seeing it for the very first time. Where you see 3 or 4 steps, someone unfamiliar with your product may see far more.
As Samuel Hulick points out in Mind the Gap, even the most simple processes involve more than we first think of. He uses the example of listing the steps to create a peanut butter & jelly sandwich (a seemingly simple procedure) . When his grade school teacher followed the instructions given by the students, the results were not as intended:
Our instructions created crappy sandwiches because they failed to bridge the gap between what seemed obvious to us and what actually happened in reality.
What seems obvious to you is not at all obvious to someone new to your product. And it’s important to remember that you're so familiar with your product that you may have trouble identifying all the steps involved with getting started using your product. As Hulick points out in his book The Elements of User Onboarding:
Ironically enough, your product’s first few impressions are SO make-or-break that you simply can’t afford to evaluate them as the expert that you now are — you have to try to forget everything you know and come in with a totally fresh perspective.
Beanstalk also provides a good example here. I mentioned above that getting started with Beanstalk involves making commits in a local repo, then pushing changes to the remote repo in Beanstalk. That sounds like a couple of simple steps. But for someone brand new to Git, it’s actually a complex process.
First, you have to log into Beanstalk and create a new repo. From there, you can open a command line interface (CLI) to take the next step (the words ‘command line’ are scary enough on their own for even some novice developers) with the following commands:
git clone https://accountname.git.beanstalkapp.com/gitreponame.git -o beanstalk cd gitreponame echo "This is my new project on Beanstalk." > README git add README git commit -m "My first commit." git push beanstalk master
And this is just one way to get started. Our team has to be ready to support people in many different scenarios. And our onboarding has to do the same and get them started on the right foot.
Map out a list of touchpoints to get them there
Once you have identified your Wow moment and what you believe are the steps required for someone to experience that moment, you can start to create your onboarding materials. This is where there can be a wide variety in onboarding experiences. The type of content, the medium used, and the timing of messages can vary greatly from one product to the next. And that’s how it should be: different products have different audiences and different needs. Let’s review some of the options.
Types of touchpoints
Email has long been the medium of choice for SaaS products sending onboarding messaging and information to new customers. But with the rise of the mobile web and modern browser technologies, in-app messages and SMS are popular as well.
What works best? It depends.
Context is the key for many messages you may want to send to a new customer. And in-app messages, when well designed, can be delivered at just the right time. However, when overused, they can distract the user from the job at hand and worse, annoy them.
Email is still a great option as it can deliver the required information, but allows the customer to process it at a time that suits them best. However, it’s vital to remember that most people in 2017 suffer from too much email. Your messages need to be well written in order to stand out (that’s an entire subject for its own blog post).
Touchpoint triggers
Another aspect of your touchpoints is how they are triggered. The two basic options are timing and behavioral.
Messages that are triggered by timing are the standard type that have been used for a long time. They are easy to set up and can deliver the basic information about your product that each new customer can benefit from. They may resemble a flow like this:
Sign up > Day 1 > Day 3 > Day 7 > Day 21
However, with the tools we have available today, it’s more valuable to build campaigns based on what you new customers do with your product (or do not do). These are behavioral (aka contextual) messages.
Again, using Beanstalk as an example, if a new customer has not pushed any commits to a repo in their account by 3 days after signing up, we send an email that is focused on helping them get to that point.
Over the past 12 months, this email has had a 43% open rate and, even better, a 12.5% conversion rate. There are so many examples in this category, it could also be a post all on its own. I will stick to pointing you to some great resources:
One Size Onboarding Does Not Fit All
Your User Onboarding Flow Is Too Shortsighted
The Secret to Successful Customer Onboarding
A solid onboarding campaign that provides real value to your customers will likely involve a combination of message types initiated by different triggers.
To get you started, we’ve provided a collection of resources for your use. It includes an onboarding checklist, a BPI & user journey template, a nurture path template, and some message samples. Enjoy!
There is a lot involved in setting up a robust onboarding workflow. However, it’s (obviously) worth your time and attention. The more people you can help achieve success earlier on, the better you’ll feel. And your business benefits.
Once you have something like the above in place, the next step is to validate and iterate.
1 note
·
View note
Text
Building A Component Library With React And Emotion
About The Author
Front-end engineer passionate about performance and bleeding-edge technologies. More about Ademola …
A component library helps to keep a design consistent across multiple projects. It ensures consistency because any changes made will propagate across the projects that make use of it. In this tutorial, we’ll learn how to build a component library, using Emotion in React to resolve inconsistencies.
According to Clearleft, a component library is:
“A collection of components, organised in a meaningful manner, and often (but not necessarily) providing some way to browse and preview those components and their associated assets.”
— “On Building Component Libraries,” Clearleft
We’ll learn how to build a component library by making one that comprises four components:
Button A wrapper around the default HTML button
Box A container (HTML div) with custom properties
Columns A container whose children are spaced evenly across the x-axis
Stack A container whose children are spaced evenly across the y-axis
These components could then be used in whatever application we are working on. We’ll build the component library using React and Emotion.
At the end of this piece, you should be able to create a component library that fits whatever use case you have in mind. This knowledge will come handy when you’re working with a team that needs to make use of reusable components.
First, let’s get started by establishing what the Emotion library is. The documentation explains:
“Emotion is a library designed for writing CSS styles with JavaScript. It provides powerful and predictable style composition in addition to a great developer experience with features such as source maps, labels, and testing utilities.”
— “Introduction,” Emotion Docs
In essence, Emotion is a CSS-in-JavaScript library, and an interesting thing about CSS-in-JavaScript libraries is that they enable you to collocate components with styles. Being able to tie them up together in a scope ensures that some component styles don’t interfere with others, which is crucial to our component library.
Emotion exposes two APIs for React:
@emotion/core
@emotion/styled
Before we dive into how these APIs work, note that they both support the styling of components with template strings and objects.
The core API is actually like the regular style property we currently use today when building apps with React, with the addition of vendor prefixing, nested selectors, media queries, and more.
Using the object approach with the core API would typically look like this:
import { jsx } from '@emotion/core' let Box = props => { return ( <div css= {...props} /> ) }
This is a rather contrived example that shows how we could style a Box component with Emotion. It’s like swapping out the style property for a css property, and then we’re good to go.
Now, let’s see how we could use the template string approach with the same core API:
import { jsx, css } from '@emotion/core' let Box = props => { return ( <div css={css` background-color: grey `} {...props} /> ) }
All we did was wrap the template string with the css tag function, and Emotion handles the rest.
The styled API, which is built on the core API, takes a slightly different approach to styling components. This API is called with a particular HTML element or React component, and that element is called with an object or a template string that contains the styles for that element.
Let’s see how we could use the object approach with the styled API:
import styled from '@emotion/styled' const Box = styled.div({ backgroundColor: 'grey' });
Here is one way to use the styled API, which is an alternative to using the core API. The rendered outputs are the same.
Now, let’s see how we could use the template string approach using the styled API:
import styled from '@emotion/styled' const Box = styled.div` background-color: grey `
This achieves the same thing as the object approach, only with a template string this time.
We could use either the core API or the styled API when building components or an application. I prefer the styled approach for a component library for a couple of reasons:
It achieves a lot with few keystrokes.
It takes in an as prop, which helps with dynamically changing the HTML element from the call site. Let’s say we default to a paragraph element, and we need a header element because of semantics; we can pass the header element as a value to the as property.
Getting Started
To get started, let’s clone the setup scripts on GitHub, which we can do on the command line:
git clone [email protected]:smashingmagazine/component-library.git
This command copies the code in that repository to the component-library’s folder. It contains the code required to set up a component library, which includes Rollup to help bundle our library.
We currently have a components folder with an index.js file, which does nothing. We’ll be creating new folders under the components folder for each component we build in our library. Each component’s folder will expose the following files:
Component.js This is the component we’re building.
index.js This exports the component from Component.js and makes referencing components from a different location easier.
Component.story.js This essentially renders our component in its multiple states using Storybook.
It also ships with a utils folder, which defines certain properties that would be used in our components. The folder contains several files:
helpers.js This contains helper functions that we are going to be using across our application.
units.js This defines spacing and font-size units, which we will use later.
theme.js This defines our component library’s palette, shadows, typography, and shape.
Let’s look at what we’ve defined in the units.js file:
export const spacing = { none: 0, xxsmall: '4px', xsmall: '8px', small: '12px', medium: '20px', gutter: '24px', large: '32px', xlarge: '48px', xxlarge: '96px', }; export const fontSizes = { xsmall: '0.79rem', small: '0.889rem', medium: '1rem', large: '1.125rem', xlarge: '1.266rem', xxlarge: '1.424rem', };
This defines the spacing and fontSizes rules. The spacing rule was inspired by the Braid design system, which is based on multiples of four. The fontSizes are derived from the major second (1.125) type scale, which is a good scale for product websites. If you’re curious to learn more about type scale, “Exploring Responsive Type Scales” explains the value of knowing the scales appropriate for different websites.
Next, let’s through the theme.js file!
import { spacing } from './units'; const white = '#fff'; const black = '#111'; const palette = { common: { black, white, }, primary: { main: '#0070F3', light: '#146DD6', contrastText: white, }, error: { main: '#A51C30', light: '#A7333F', contrastText: white, }, grey: { 100: '#EAEAEA', 200: '#C9C5C5', 300: '#888', 400: '#666', }, }; const shadows = { 0: 'none', 1: '0px 5px 10px rgba(0, 0, 0, 0.12)', 2: '0px 8px 30px rgba(0, 0, 0, 0.24)', }; const typography = { fontFamily: "Inter, -apple-system, BlinkMacSystemFont, 'Segoe UI', Roboto, Ubuntu, 'Helvetica Neue', sans-serif", }; const shape = { borderRadius: spacing['xxsmall'], }; export const theme = { palette, shadows, typography, shape, };
In the theme file, we’ve defined our palette, which is essentially the colors we’re going to be using across all components in our library. We also have a shadows object, where we define our box-shadow values. There’s also the typography object, which currently just defines our fontFamily. Finally, shape is used for properties such as border-radius. This theme’s structure is inspired by Material-UI.
Next, our helpers.js file!
export const isObjectEmpty = (obj) => { return Object.keys(obj).length === 0; };
Here, we only expose the isObjectEmpty function, which takes in an object and returns true if the object is empty. It returns false if it has any values. We’re going to make use of this function later.
Now that we’ve gone through all of the files in the utils folder, it’s about time to start building our components!
Buttons
Buttons are one of the most used components on the web. They’re used everywhere and can take different forms, shapes, sizes, and more.
Here are the buttons we’re going to build in Figma.
Button component design from Figma (Large preview)
These subtle variations are going to be applied as properties to our button. We would like the buttons in our component library to accept properties such as variant, size, enableElevation (i.e. box-shadow), and color.
Starting with the button component, let’s create a Button folder, where we will define everything related to buttons, as discussed earlier.
Let’s create our button component:
import styled from '@emotion/styled'; import isPropValid from '@emotion/is-prop-valid'; const StyledButton = () => {}; const IGNORED_PROPS = ['color']; const buttonConfig = { shouldForwardProp: (prop) => isPropValid(prop) && !IGNORED_PROPS.includes(prop), }; export const Button = styled('button', buttonConfig)(StyledButton);
Here, we’ve started off by setting up our button component with a buttonConfig. The buttonConfig contains shouldForwardProp, which is used to control the properties that should be forwarded to the DOM, because properties such as color show up on the rendered element by default.
Next, let’s define our button sizes, which we’re going to use in the button component!
const buttonSizeProps = { small: { fontSize: fontSizes['xsmall'], padding: `${spacing['xsmall']} ${spacing['small']}`, }, medium: { fontSize: fontSizes['small'], padding: `${spacing['small']} ${spacing['medium']}`, }, large: { fontSize: fontSizes['medium'], padding: `${spacing['medium']} ${spacing['large']}`, }, };
buttonSizeProps is a map of our size values (small, medium, and large), and it returns fontSize and padding values based on the sizes. For a small button, we’d need a small font with small padding. The same goes for the medium and large sizes to scale them appropriately.
Next, let’s define a function that provides valid CSS properties based on the passed variant:
const getPropsByVariant = ({ variant, color, theme }) => { const colorInPalette = theme.palette[color]; const variants = { outline: colorInPalette ? outlineVariantPropsByPalette : defaultOutlineVariantProps, solid: colorInPalette ? solidVariantPropsByPalette : defaultSolidVariantProps, }; return variants[variant] || variants.solid; };
Here, the getPropsByVariant function takes in variant, color, and theme properties and returns the properties of the specified variant; if no variant is specified, it defaults to solid. colorInPalette retrieves the palette assigned to the specified color if found, and undefined if not found in our theme object.
In each variant, we check whether a palette actually exists for the color specified; if we don’t, then we use colors from the common and grey objects of our theme, which we will apply in defaultOutlineVariantProps and defaultSolidVariantProps.
Next, let’s define our variant properties!
const defaultSolidVariantProps = { main: { border: `1px solid ${theme.palette.grey[100]}`, backgroundColor: theme.palette.grey[100], color: theme.palette.common.black, }, hover: { border: `1px solid ${theme.palette.grey[200]}`, backgroundColor: theme.palette.grey[200], }, }; const defaultOutlineVariantProps = { main: { border: `1px solid ${theme.palette.common.black}`, backgroundColor: theme.palette.common.white, color: theme.palette.common.black, }, hover: { border: `1px solid ${theme.palette.common.black}`, backgroundColor: theme.palette.common.white, color: theme.palette.common.black, }, }; const solidVariantPropsByPalette = colorInPalette && { main: { border: `1px solid ${colorInPalette.main}`, backgroundColor: colorInPalette.main, color: colorInPalette.contrastText, }, hover: { border: `1px solid ${colorInPalette.light}`, backgroundColor: colorInPalette.light, }, }; const outlineVariantPropsByPalette = colorInPalette && { main: { border: `1px solid ${colorInPalette.main}`, backgroundColor: theme.palette.common.white, color: colorInPalette.main, }, hover: { border: `1px solid ${colorInPalette.light}`, backgroundColor: theme.palette.common.white, color: colorInPalette.light, }, };
Here, we define the properties that are going to be applied to our button based on the selected variants. And, as discussed earlier, defaultSolidVariantProps and defaultOutlineVariantProps use colors from our common and grey objects as fallbacks for when the color specified isn’t in our palette or when no color is specified for what we put in place.
By the way, the solidVariantPropsByPalette and outlineVariantPropsByPalette objects use the color from our palette as specified by the button. They both have main and hover properties that differentiate the button’s default and hover styles, respectively.
The button design we’ve used accounts for two variants, which we can check out in our component library design.
Next, let’s create our StyledButton function, which combines all we’ve done so far.
const StyledButton = ({ color, size, variant, enableElevation, disabled, theme, }) => { if (isObjectEmpty(theme)) { theme = defaultTheme; } const fontSizeBySize = buttonSizeProps[size]?.fontSize; const paddingBySize = buttonSizeProps[size]?.padding; const propsByVariant = getPropsByVariant({ variant, theme, color }); return { fontWeight: 500, cursor: 'pointer', opacity: disabled && 0.7, transition: 'all 0.3s linear', padding: buttonSizeProps.medium.padding, fontSize: buttonSizeProps.medium.fontSize, borderRadius: theme.shape.borderRadius, fontFamily: theme.typography.fontFamily, boxShadow: enableElevation && theme.shadows[1], ...(propsByVariant && propsByVariant.main), ...(paddingBySize && { padding: paddingBySize }), ...(fontSizeBySize && { fontSize: fontSizeBySize }), '&:hover': !disabled && { boxShadow: enableElevation && theme.shadows[2], ...(propsByVariant && propsByVariant.hover), }, }; };
In the StyledButton function, we’re assigning defaultTheme to the theme if the theme object is empty which makes it optional for the consumers of our library to use Emotion’s ThemeProvider in order to make use of the library. We assigned fontSize and padding based on the buttonSizeProps object. We defined several default button properties, such as fontWeight and cursor, which aren’t tied to any property, and we also derived color, backgroundColor, and border values based on the result of propsByVariant.
Now that we’ve created our Button component, let’s see how we can use it:
<Button variant="solid" color="primary" size="small" enableElevation disabled > Small Outline Elevated Button </Button>
We can check what that looks like on CodeSandbox:
That’s how to use the Button component. We define the following properties:
We define a variant with a solid value. We could have specified outline instead. If the variant prop isn’t provided, we would also default to solid.
We define color, with a value of primary. We also support error as a color value or a color from a theme object. If the color property isn’t specified, we would fall back to our default color state.
We define size, with a value of small. It could be medium (the default) or large.
We define EnableElevation because we want some box-shadow on our button. We could have chosen not to use it.
Finally, we define disabled because we want our button to be disabled. The additional thing we do to a disabled button is reduce its opacity.
The button doesn’t need to take any property. It defaults to a solid medium-sized button.
Box Component
A box component is a container that can hold any component or HTML element. It accepts but is not limited to properties such as padding, margin, display, and width. It can also be used as a base component for some of the other components we’ll get into later.
Here’s what it looks like on Figma:
Box component design from Figma (Large preview)
Before diving into the code, let’s not forget to create a new folder for this component.
Now, let’s create our Box component:
import styled from '@emotion/styled'; import isPropValid from '@emotion/is-prop-valid'; import { spacing, theme as defaultTheme } from '../../utils'; const StyledBox = ({ paddingX, paddingY, marginX, marginY, width, display, theme, ...props }) => { if (isObjectEmpty(theme)) { theme = defaultTheme; } const padding = spacing[props.padding]; let paddingTop = spacing[props.paddingTop]; let paddingRight = spacing[props.paddingRight]; let paddingBottom = spacing[props.paddingBottom]; let paddingLeft = spacing[props.paddingLeft]; if (paddingX) { paddingLeft = spacing[paddingX]; paddingRight = spacing[paddingX]; } if (paddingY) { paddingTop = spacing[paddingY]; paddingBottom = spacing[paddingY]; } let margin = spacing[props.margin]; let marginTop = spacing[props.marginTop]; let marginRight = spacing[props.marginRight]; let marginBottom = spacing[props.marginBottom]; let marginLeft = spacing[props.marginLeft]; if (marginX) { marginLeft = spacing[marginX]; marginRight = spacing[marginX]; } if (marginY) { marginTop = spacing[marginY]; marginBottom = spacing[marginY]; } return { padding, paddingTop, paddingRight, paddingBottom, paddingLeft, margin, marginTop, marginRight, marginBottom, marginLeft, width, display, fontFamily: theme.typography.fontFamily, }; }; const IGNORED_PROPS = ['display', 'width']; const boxConfig = { shouldForwardProp: (prop) => isPropValid(prop) && !IGNORED_PROPS.includes(prop), }; export const Box = styled('div', boxConfig)(StyledBox);
The spacing rule we defined earlier is being applied to both padding and margin, as we can see in the Box component. We receive contextual values for padding and margin, and we look up their actual values from the spacing object.
We accept paddingX and paddingY props to update padding across the horizontal and vertical axis, respectively. We do the same for marginX and marginY as well.
Also, we don’t want the display and width props to get forwarded to the DOM because we only need them in CSS. So, we add them to our list of props to ignore, and pass that on to our config.
Here’s how we could use the Box component:
<Box padding="small" paddingTop="medium" paddingBottom="medium" > Simple Box Component </Box>
We can see what this looks like on CodeSandbox.
In this Box component, we’ve assigned small as a value to our padding property, and medium to the paddingTop and paddingBottom properties. When rendered, the Box component will have its padding-left and padding-right properties set to 12px each, and its padding-top and padding-bottom properties set to 20px. We could have replaced paddingTop and paddingBottom with paddingY and gotten the same result.
Columns Component
The Columns component is a variation of our Box component, with a display type of flex and with children spaced evenly across the x-axis.
Here is a representation of the Columns component in Figma:
Columns component design from Figma (Large preview)
Let’s build our Columns component!
import React from 'react'; import { Box } from '../Box'; export const Columns = ({ children, space, ...props }) => { return ( <Box display="flex" {...props}> {React.Children.map(children, (child, index) => { if (child.type !== Box) { console.warn( 'Each child in a Columns component should be a Box component' ); } if (index > 0) { return React.cloneElement(child, { marginLeft: space, width: '100%', }); } return React.cloneElement(child, { width: '100%' }); })} </Box> ); };
We’re using React.Children to map over the Columns component’s children. And we’re adding marginLeft and width properties to each of the children, except the first child, which doesn’t need a marginLeft property because it’s the leftmost child in the column. We expect each child to be a Box element to ensure that the necessary styles are applied to it.
Here’s how we could use the Columns component:
<Columns space="small"> <Box> Item 1</Box> <Box> Item 2</Box> <Box> Item 3</Box> </Columns>
We can see what that looks like on CodeSandbox.
The Columns children here are spaced evenly across the x-axis by 12 pixels because that’s what the value of small resolves to, as we’ve defined earlier. Because the Columns component is literally a Box component, it can take in other Box component properties, and we can customize it as much as we want.
Stack Component
This is also a variation of our Box component that takes the full width of the parent element and whose children are spaced evenly across the y-axis.
Here is a representation of the Stack component in Figma:
Stack component design from Figma (Large preview)
Let’s build our Stack component:
import React from 'react'; import { Box } from '../Box'; import { Columns } from '../Columns'; const StackChildrenTypes = [Box, Columns]; const UnsupportedChildTypeWarning = 'Each child in a Stack component should be one of the types: Box, Columns'; export const Stack = ({ children, space, ...props }) => { return ( <Box {...props}> {React.Children.map(children, (child, index) => { if (!StackChildrenTypes.includes(child.type)) { console.warn(UnsupportedChildTypeWarning); } if (index > 0) { return React.cloneElement(child, { marginTop: space }); } return child; })} </Box> ); };
Here, we map over each child with React.Children and apply a paddingTop property to it with the value of the space argument. As for the first child, we need it to take its original position, so we skip adding a marginTop property to it. We also accept each child to be a Box so that we can apply the necessary properties to it.
Here’s how we could use the Stack component:
<Stack space="small"> <Box marginTop="medium"> Item 1</Box> <Box> Item 2</Box> <Box> Item 3</Box> </Stack>
We can see what that looks like on CodeSandbox.
Here, the Box elements are spaced evenly with the small unit, and the first Box takes a separate marginTop property. This shows that you can customize components however you wish.
Conclusion
We’ve gone through the basics of using Emotion to create components in React using the APIs that it provides. This is just one of many ways to go about building a component library. There are some nuances to building it for a brand because you might not have to take theming and some other things into consideration. But if you plan to release the library to the public one day, then you’ll have to deal with requests for those missing pieces, so consider that possibility and make the library a little flexible ahead of time.
If you have any questions, feel free to drop them as comments.
The repository for this article is on GitHub, and the button designs we’ve used are on Figma.
References
(ks, ra, al, il)
Website Design & SEO Delray Beach by DBL07.co
Delray Beach SEO
source http://www.scpie.org/building-a-component-library-with-react-and-emotion/ source https://scpie1.blogspot.com/2020/09/building-component-library-with-react.html
0 notes
Text
Building A Component Library With React And Emotion
About The Author
Front-end engineer passionate about performance and bleeding-edge technologies. More about Ademola …
A component library helps to keep a design consistent across multiple projects. It ensures consistency because any changes made will propagate across the projects that make use of it. In this tutorial, we’ll learn how to build a component library, using Emotion in React to resolve inconsistencies.
According to Clearleft, a component library is:
“A collection of components, organised in a meaningful manner, and often (but not necessarily) providing some way to browse and preview those components and their associated assets.”
— “On Building Component Libraries,” Clearleft
We’ll learn how to build a component library by making one that comprises four components:
Button A wrapper around the default HTML button
Box A container (HTML div) with custom properties
Columns A container whose children are spaced evenly across the x-axis
Stack A container whose children are spaced evenly across the y-axis
These components could then be used in whatever application we are working on. We’ll build the component library using React and Emotion.
At the end of this piece, you should be able to create a component library that fits whatever use case you have in mind. This knowledge will come handy when you’re working with a team that needs to make use of reusable components.
First, let’s get started by establishing what the Emotion library is. The documentation explains:
“Emotion is a library designed for writing CSS styles with JavaScript. It provides powerful and predictable style composition in addition to a great developer experience with features such as source maps, labels, and testing utilities.”
— “Introduction,” Emotion Docs
In essence, Emotion is a CSS-in-JavaScript library, and an interesting thing about CSS-in-JavaScript libraries is that they enable you to collocate components with styles. Being able to tie them up together in a scope ensures that some component styles don’t interfere with others, which is crucial to our component library.
Emotion exposes two APIs for React:
@emotion/core
@emotion/styled
Before we dive into how these APIs work, note that they both support the styling of components with template strings and objects.
The core API is actually like the regular style property we currently use today when building apps with React, with the addition of vendor prefixing, nested selectors, media queries, and more.
Using the object approach with the core API would typically look like this:
import { jsx } from '@emotion/core' let Box = props => { return ( <div css= {...props} /> ) }
This is a rather contrived example that shows how we could style a Box component with Emotion. It’s like swapping out the style property for a css property, and then we’re good to go.
Now, let’s see how we could use the template string approach with the same core API:
import { jsx, css } from '@emotion/core' let Box = props => { return ( <div css={css` background-color: grey `} {...props} /> ) }
All we did was wrap the template string with the css tag function, and Emotion handles the rest.
The styled API, which is built on the core API, takes a slightly different approach to styling components. This API is called with a particular HTML element or React component, and that element is called with an object or a template string that contains the styles for that element.
Let’s see how we could use the object approach with the styled API:
import styled from '@emotion/styled' const Box = styled.div({ backgroundColor: 'grey' });
Here is one way to use the styled API, which is an alternative to using the core API. The rendered outputs are the same.
Now, let’s see how we could use the template string approach using the styled API:
import styled from '@emotion/styled' const Box = styled.div` background-color: grey `
This achieves the same thing as the object approach, only with a template string this time.
We could use either the core API or the styled API when building components or an application. I prefer the styled approach for a component library for a couple of reasons:
It achieves a lot with few keystrokes.
It takes in an as prop, which helps with dynamically changing the HTML element from the call site. Let’s say we default to a paragraph element, and we need a header element because of semantics; we can pass the header element as a value to the as property.
Getting Started
To get started, let’s clone the setup scripts on GitHub, which we can do on the command line:
git clone [email protected]:smashingmagazine/component-library.git
This command copies the code in that repository to the component-library’s folder. It contains the code required to set up a component library, which includes Rollup to help bundle our library.
We currently have a components folder with an index.js file, which does nothing. We’ll be creating new folders under the components folder for each component we build in our library. Each component’s folder will expose the following files:
Component.js This is the component we’re building.
index.js This exports the component from Component.js and makes referencing components from a different location easier.
Component.story.js This essentially renders our component in its multiple states using Storybook.
It also ships with a utils folder, which defines certain properties that would be used in our components. The folder contains several files:
helpers.js This contains helper functions that we are going to be using across our application.
units.js This defines spacing and font-size units, which we will use later.
theme.js This defines our component library’s palette, shadows, typography, and shape.
Let’s look at what we’ve defined in the units.js file:
export const spacing = { none: 0, xxsmall: '4px', xsmall: '8px', small: '12px', medium: '20px', gutter: '24px', large: '32px', xlarge: '48px', xxlarge: '96px', }; export const fontSizes = { xsmall: '0.79rem', small: '0.889rem', medium: '1rem', large: '1.125rem', xlarge: '1.266rem', xxlarge: '1.424rem', };
This defines the spacing and fontSizes rules. The spacing rule was inspired by the Braid design system, which is based on multiples of four. The fontSizes are derived from the major second (1.125) type scale, which is a good scale for product websites. If you’re curious to learn more about type scale, “Exploring Responsive Type Scales” explains the value of knowing the scales appropriate for different websites.
Next, let’s through the theme.js file!
import { spacing } from './units'; const white = '#fff'; const black = '#111'; const palette = { common: { black, white, }, primary: { main: '#0070F3', light: '#146DD6', contrastText: white, }, error: { main: '#A51C30', light: '#A7333F', contrastText: white, }, grey: { 100: '#EAEAEA', 200: '#C9C5C5', 300: '#888', 400: '#666', }, }; const shadows = { 0: 'none', 1: '0px 5px 10px rgba(0, 0, 0, 0.12)', 2: '0px 8px 30px rgba(0, 0, 0, 0.24)', }; const typography = { fontFamily: "Inter, -apple-system, BlinkMacSystemFont, 'Segoe UI', Roboto, Ubuntu, 'Helvetica Neue', sans-serif", }; const shape = { borderRadius: spacing['xxsmall'], }; export const theme = { palette, shadows, typography, shape, };
In the theme file, we’ve defined our palette, which is essentially the colors we’re going to be using across all components in our library. We also have a shadows object, where we define our box-shadow values. There’s also the typography object, which currently just defines our fontFamily. Finally, shape is used for properties such as border-radius. This theme’s structure is inspired by Material-UI.
Next, our helpers.js file!
export const isObjectEmpty = (obj) => { return Object.keys(obj).length === 0; };
Here, we only expose the isObjectEmpty function, which takes in an object and returns true if the object is empty. It returns false if it has any values. We’re going to make use of this function later.
Now that we’ve gone through all of the files in the utils folder, it’s about time to start building our components!
Buttons
Buttons are one of the most used components on the web. They’re used everywhere and can take different forms, shapes, sizes, and more.
Here are the buttons we’re going to build in Figma.
Button component design from Figma (Large preview)
These subtle variations are going to be applied as properties to our button. We would like the buttons in our component library to accept properties such as variant, size, enableElevation (i.e. box-shadow), and color.
Starting with the button component, let’s create a Button folder, where we will define everything related to buttons, as discussed earlier.
Let’s create our button component:
import styled from '@emotion/styled'; import isPropValid from '@emotion/is-prop-valid'; const StyledButton = () => {}; const IGNORED_PROPS = ['color']; const buttonConfig = { shouldForwardProp: (prop) => isPropValid(prop) && !IGNORED_PROPS.includes(prop), }; export const Button = styled('button', buttonConfig)(StyledButton);
Here, we’ve started off by setting up our button component with a buttonConfig. The buttonConfig contains shouldForwardProp, which is used to control the properties that should be forwarded to the DOM, because properties such as color show up on the rendered element by default.
Next, let’s define our button sizes, which we’re going to use in the button component!
const buttonSizeProps = { small: { fontSize: fontSizes['xsmall'], padding: `${spacing['xsmall']} ${spacing['small']}`, }, medium: { fontSize: fontSizes['small'], padding: `${spacing['small']} ${spacing['medium']}`, }, large: { fontSize: fontSizes['medium'], padding: `${spacing['medium']} ${spacing['large']}`, }, };
buttonSizeProps is a map of our size values (small, medium, and large), and it returns fontSize and padding values based on the sizes. For a small button, we’d need a small font with small padding. The same goes for the medium and large sizes to scale them appropriately.
Next, let’s define a function that provides valid CSS properties based on the passed variant:
const getPropsByVariant = ({ variant, color, theme }) => { const colorInPalette = theme.palette[color]; const variants = { outline: colorInPalette ? outlineVariantPropsByPalette : defaultOutlineVariantProps, solid: colorInPalette ? solidVariantPropsByPalette : defaultSolidVariantProps, }; return variants[variant] || variants.solid; };
Here, the getPropsByVariant function takes in variant, color, and theme properties and returns the properties of the specified variant; if no variant is specified, it defaults to solid. colorInPalette retrieves the palette assigned to the specified color if found, and undefined if not found in our theme object.
In each variant, we check whether a palette actually exists for the color specified; if we don’t, then we use colors from the common and grey objects of our theme, which we will apply in defaultOutlineVariantProps and defaultSolidVariantProps.
Next, let’s define our variant properties!
const defaultSolidVariantProps = { main: { border: `1px solid ${theme.palette.grey[100]}`, backgroundColor: theme.palette.grey[100], color: theme.palette.common.black, }, hover: { border: `1px solid ${theme.palette.grey[200]}`, backgroundColor: theme.palette.grey[200], }, }; const defaultOutlineVariantProps = { main: { border: `1px solid ${theme.palette.common.black}`, backgroundColor: theme.palette.common.white, color: theme.palette.common.black, }, hover: { border: `1px solid ${theme.palette.common.black}`, backgroundColor: theme.palette.common.white, color: theme.palette.common.black, }, }; const solidVariantPropsByPalette = colorInPalette && { main: { border: `1px solid ${colorInPalette.main}`, backgroundColor: colorInPalette.main, color: colorInPalette.contrastText, }, hover: { border: `1px solid ${colorInPalette.light}`, backgroundColor: colorInPalette.light, }, }; const outlineVariantPropsByPalette = colorInPalette && { main: { border: `1px solid ${colorInPalette.main}`, backgroundColor: theme.palette.common.white, color: colorInPalette.main, }, hover: { border: `1px solid ${colorInPalette.light}`, backgroundColor: theme.palette.common.white, color: colorInPalette.light, }, };
Here, we define the properties that are going to be applied to our button based on the selected variants. And, as discussed earlier, defaultSolidVariantProps and defaultOutlineVariantProps use colors from our common and grey objects as fallbacks for when the color specified isn’t in our palette or when no color is specified for what we put in place.
By the way, the solidVariantPropsByPalette and outlineVariantPropsByPalette objects use the color from our palette as specified by the button. They both have main and hover properties that differentiate the button’s default and hover styles, respectively.
The button design we’ve used accounts for two variants, which we can check out in our component library design.
Next, let’s create our StyledButton function, which combines all we’ve done so far.
const StyledButton = ({ color, size, variant, enableElevation, disabled, theme, }) => { if (isObjectEmpty(theme)) { theme = defaultTheme; } const fontSizeBySize = buttonSizeProps[size]?.fontSize; const paddingBySize = buttonSizeProps[size]?.padding; const propsByVariant = getPropsByVariant({ variant, theme, color }); return { fontWeight: 500, cursor: 'pointer', opacity: disabled && 0.7, transition: 'all 0.3s linear', padding: buttonSizeProps.medium.padding, fontSize: buttonSizeProps.medium.fontSize, borderRadius: theme.shape.borderRadius, fontFamily: theme.typography.fontFamily, boxShadow: enableElevation && theme.shadows[1], ...(propsByVariant && propsByVariant.main), ...(paddingBySize && { padding: paddingBySize }), ...(fontSizeBySize && { fontSize: fontSizeBySize }), '&:hover': !disabled && { boxShadow: enableElevation && theme.shadows[2], ...(propsByVariant && propsByVariant.hover), }, }; };
In the StyledButton function, we’re assigning defaultTheme to the theme if the theme object is empty which makes it optional for the consumers of our library to use Emotion’s ThemeProvider in order to make use of the library. We assigned fontSize and padding based on the buttonSizeProps object. We defined several default button properties, such as fontWeight and cursor, which aren’t tied to any property, and we also derived color, backgroundColor, and border values based on the result of propsByVariant.
Now that we’ve created our Button component, let’s see how we can use it:
<Button variant="solid" color="primary" size="small" enableElevation disabled > Small Outline Elevated Button </Button>
We can check what that looks like on CodeSandbox:
That’s how to use the Button component. We define the following properties:
We define a variant with a solid value. We could have specified outline instead. If the variant prop isn’t provided, we would also default to solid.
We define color, with a value of primary. We also support error as a color value or a color from a theme object. If the color property isn’t specified, we would fall back to our default color state.
We define size, with a value of small. It could be medium (the default) or large.
We define EnableElevation because we want some box-shadow on our button. We could have chosen not to use it.
Finally, we define disabled because we want our button to be disabled. The additional thing we do to a disabled button is reduce its opacity.
The button doesn’t need to take any property. It defaults to a solid medium-sized button.
Box Component
A box component is a container that can hold any component or HTML element. It accepts but is not limited to properties such as padding, margin, display, and width. It can also be used as a base component for some of the other components we’ll get into later.
Here’s what it looks like on Figma:
Box component design from Figma (Large preview)
Before diving into the code, let’s not forget to create a new folder for this component.
Now, let’s create our Box component:
import styled from '@emotion/styled'; import isPropValid from '@emotion/is-prop-valid'; import { spacing, theme as defaultTheme } from '../../utils'; const StyledBox = ({ paddingX, paddingY, marginX, marginY, width, display, theme, ...props }) => { if (isObjectEmpty(theme)) { theme = defaultTheme; } const padding = spacing[props.padding]; let paddingTop = spacing[props.paddingTop]; let paddingRight = spacing[props.paddingRight]; let paddingBottom = spacing[props.paddingBottom]; let paddingLeft = spacing[props.paddingLeft]; if (paddingX) { paddingLeft = spacing[paddingX]; paddingRight = spacing[paddingX]; } if (paddingY) { paddingTop = spacing[paddingY]; paddingBottom = spacing[paddingY]; } let margin = spacing[props.margin]; let marginTop = spacing[props.marginTop]; let marginRight = spacing[props.marginRight]; let marginBottom = spacing[props.marginBottom]; let marginLeft = spacing[props.marginLeft]; if (marginX) { marginLeft = spacing[marginX]; marginRight = spacing[marginX]; } if (marginY) { marginTop = spacing[marginY]; marginBottom = spacing[marginY]; } return { padding, paddingTop, paddingRight, paddingBottom, paddingLeft, margin, marginTop, marginRight, marginBottom, marginLeft, width, display, fontFamily: theme.typography.fontFamily, }; }; const IGNORED_PROPS = ['display', 'width']; const boxConfig = { shouldForwardProp: (prop) => isPropValid(prop) && !IGNORED_PROPS.includes(prop), }; export const Box = styled('div', boxConfig)(StyledBox);
The spacing rule we defined earlier is being applied to both padding and margin, as we can see in the Box component. We receive contextual values for padding and margin, and we look up their actual values from the spacing object.
We accept paddingX and paddingY props to update padding across the horizontal and vertical axis, respectively. We do the same for marginX and marginY as well.
Also, we don’t want the display and width props to get forwarded to the DOM because we only need them in CSS. So, we add them to our list of props to ignore, and pass that on to our config.
Here’s how we could use the Box component:
<Box padding="small" paddingTop="medium" paddingBottom="medium" > Simple Box Component </Box>
We can see what this looks like on CodeSandbox.
In this Box component, we’ve assigned small as a value to our padding property, and medium to the paddingTop and paddingBottom properties. When rendered, the Box component will have its padding-left and padding-right properties set to 12px each, and its padding-top and padding-bottom properties set to 20px. We could have replaced paddingTop and paddingBottom with paddingY and gotten the same result.
Columns Component
The Columns component is a variation of our Box component, with a display type of flex and with children spaced evenly across the x-axis.
Here is a representation of the Columns component in Figma:
Columns component design from Figma (Large preview)
Let’s build our Columns component!
import React from 'react'; import { Box } from '../Box'; export const Columns = ({ children, space, ...props }) => { return ( <Box display="flex" {...props}> {React.Children.map(children, (child, index) => { if (child.type !== Box) { console.warn( 'Each child in a Columns component should be a Box component' ); } if (index > 0) { return React.cloneElement(child, { marginLeft: space, width: '100%', }); } return React.cloneElement(child, { width: '100%' }); })} </Box> ); };
We’re using React.Children to map over the Columns component’s children. And we’re adding marginLeft and width properties to each of the children, except the first child, which doesn’t need a marginLeft property because it’s the leftmost child in the column. We expect each child to be a Box element to ensure that the necessary styles are applied to it.
Here’s how we could use the Columns component:
<Columns space="small"> <Box> Item 1</Box> <Box> Item 2</Box> <Box> Item 3</Box> </Columns>
We can see what that looks like on CodeSandbox.
The Columns children here are spaced evenly across the x-axis by 12 pixels because that’s what the value of small resolves to, as we’ve defined earlier. Because the Columns component is literally a Box component, it can take in other Box component properties, and we can customize it as much as we want.
Stack Component
This is also a variation of our Box component that takes the full width of the parent element and whose children are spaced evenly across the y-axis.
Here is a representation of the Stack component in Figma:
Stack component design from Figma (Large preview)
Let’s build our Stack component:
import React from 'react'; import { Box } from '../Box'; import { Columns } from '../Columns'; const StackChildrenTypes = [Box, Columns]; const UnsupportedChildTypeWarning = 'Each child in a Stack component should be one of the types: Box, Columns'; export const Stack = ({ children, space, ...props }) => { return ( <Box {...props}> {React.Children.map(children, (child, index) => { if (!StackChildrenTypes.includes(child.type)) { console.warn(UnsupportedChildTypeWarning); } if (index > 0) { return React.cloneElement(child, { marginTop: space }); } return child; })} </Box> ); };
Here, we map over each child with React.Children and apply a paddingTop property to it with the value of the space argument. As for the first child, we need it to take its original position, so we skip adding a marginTop property to it. We also accept each child to be a Box so that we can apply the necessary properties to it.
Here’s how we could use the Stack component:
<Stack space="small"> <Box marginTop="medium"> Item 1</Box> <Box> Item 2</Box> <Box> Item 3</Box> </Stack>
We can see what that looks like on CodeSandbox.
Here, the Box elements are spaced evenly with the small unit, and the first Box takes a separate marginTop property. This shows that you can customize components however you wish.
Conclusion
We’ve gone through the basics of using Emotion to create components in React using the APIs that it provides. This is just one of many ways to go about building a component library. There are some nuances to building it for a brand because you might not have to take theming and some other things into consideration. But if you plan to release the library to the public one day, then you’ll have to deal with requests for those missing pieces, so consider that possibility and make the library a little flexible ahead of time.
If you have any questions, feel free to drop them as comments.
The repository for this article is on GitHub, and the button designs we’ve used are on Figma.
References
(ks, ra, al, il)
Website Design & SEO Delray Beach by DBL07.co
Delray Beach SEO
source http://www.scpie.org/building-a-component-library-with-react-and-emotion/ source https://scpie.tumblr.com/post/628442900986003456
0 notes
Text
Building A Component Library With React And Emotion
About The Author
Front-end engineer passionate about performance and bleeding-edge technologies. More about Ademola …
A component library helps to keep a design consistent across multiple projects. It ensures consistency because any changes made will propagate across the projects that make use of it. In this tutorial, we’ll learn how to build a component library, using Emotion in React to resolve inconsistencies.
According to Clearleft, a component library is:
“A collection of components, organised in a meaningful manner, and often (but not necessarily) providing some way to browse and preview those components and their associated assets.”
— “On Building Component Libraries,” Clearleft
We’ll learn how to build a component library by making one that comprises four components:
Button A wrapper around the default HTML button
Box A container (HTML div) with custom properties
Columns A container whose children are spaced evenly across the x-axis
Stack A container whose children are spaced evenly across the y-axis
These components could then be used in whatever application we are working on. We’ll build the component library using React and Emotion.
At the end of this piece, you should be able to create a component library that fits whatever use case you have in mind. This knowledge will come handy when you’re working with a team that needs to make use of reusable components.
First, let’s get started by establishing what the Emotion library is. The documentation explains:
“Emotion is a library designed for writing CSS styles with JavaScript. It provides powerful and predictable style composition in addition to a great developer experience with features such as source maps, labels, and testing utilities.”
— “Introduction,” Emotion Docs
In essence, Emotion is a CSS-in-JavaScript library, and an interesting thing about CSS-in-JavaScript libraries is that they enable you to collocate components with styles. Being able to tie them up together in a scope ensures that some component styles don’t interfere with others, which is crucial to our component library.
Emotion exposes two APIs for React:
@emotion/core
@emotion/styled
Before we dive into how these APIs work, note that they both support the styling of components with template strings and objects.
The core API is actually like the regular style property we currently use today when building apps with React, with the addition of vendor prefixing, nested selectors, media queries, and more.
Using the object approach with the core API would typically look like this:
import { jsx } from '@emotion/core' let Box = props => { return ( <div css= {...props} /> ) }
This is a rather contrived example that shows how we could style a Box component with Emotion. It’s like swapping out the style property for a css property, and then we’re good to go.
Now, let’s see how we could use the template string approach with the same core API:
import { jsx, css } from '@emotion/core' let Box = props => { return ( <div css={css` background-color: grey `} {...props} /> ) }
All we did was wrap the template string with the css tag function, and Emotion handles the rest.
The styled API, which is built on the core API, takes a slightly different approach to styling components. This API is called with a particular HTML element or React component, and that element is called with an object or a template string that contains the styles for that element.
Let’s see how we could use the object approach with the styled API:
import styled from '@emotion/styled' const Box = styled.div({ backgroundColor: 'grey' });
Here is one way to use the styled API, which is an alternative to using the core API. The rendered outputs are the same.
Now, let’s see how we could use the template string approach using the styled API:
import styled from '@emotion/styled' const Box = styled.div` background-color: grey `
This achieves the same thing as the object approach, only with a template string this time.
We could use either the core API or the styled API when building components or an application. I prefer the styled approach for a component library for a couple of reasons:
It achieves a lot with few keystrokes.
It takes in an as prop, which helps with dynamically changing the HTML element from the call site. Let’s say we default to a paragraph element, and we need a header element because of semantics; we can pass the header element as a value to the as property.
Getting Started
To get started, let’s clone the setup scripts on GitHub, which we can do on the command line:
git clone [email protected]:smashingmagazine/component-library.git
This command copies the code in that repository to the component-library’s folder. It contains the code required to set up a component library, which includes Rollup to help bundle our library.
We currently have a components folder with an index.js file, which does nothing. We’ll be creating new folders under the components folder for each component we build in our library. Each component’s folder will expose the following files:
Component.js This is the component we’re building.
index.js This exports the component from Component.js and makes referencing components from a different location easier.
Component.story.js This essentially renders our component in its multiple states using Storybook.
It also ships with a utils folder, which defines certain properties that would be used in our components. The folder contains several files:
helpers.js This contains helper functions that we are going to be using across our application.
units.js This defines spacing and font-size units, which we will use later.
theme.js This defines our component library’s palette, shadows, typography, and shape.
Let’s look at what we’ve defined in the units.js file:
export const spacing = { none: 0, xxsmall: '4px', xsmall: '8px', small: '12px', medium: '20px', gutter: '24px', large: '32px', xlarge: '48px', xxlarge: '96px', }; export const fontSizes = { xsmall: '0.79rem', small: '0.889rem', medium: '1rem', large: '1.125rem', xlarge: '1.266rem', xxlarge: '1.424rem', };
This defines the spacing and fontSizes rules. The spacing rule was inspired by the Braid design system, which is based on multiples of four. The fontSizes are derived from the major second (1.125) type scale, which is a good scale for product websites. If you’re curious to learn more about type scale, “Exploring Responsive Type Scales” explains the value of knowing the scales appropriate for different websites.
Next, let’s through the theme.js file!
import { spacing } from './units'; const white = '#fff'; const black = '#111'; const palette = { common: { black, white, }, primary: { main: '#0070F3', light: '#146DD6', contrastText: white, }, error: { main: '#A51C30', light: '#A7333F', contrastText: white, }, grey: { 100: '#EAEAEA', 200: '#C9C5C5', 300: '#888', 400: '#666', }, }; const shadows = { 0: 'none', 1: '0px 5px 10px rgba(0, 0, 0, 0.12)', 2: '0px 8px 30px rgba(0, 0, 0, 0.24)', }; const typography = { fontFamily: "Inter, -apple-system, BlinkMacSystemFont, 'Segoe UI', Roboto, Ubuntu, 'Helvetica Neue', sans-serif", }; const shape = { borderRadius: spacing['xxsmall'], }; export const theme = { palette, shadows, typography, shape, };
In the theme file, we’ve defined our palette, which is essentially the colors we’re going to be using across all components in our library. We also have a shadows object, where we define our box-shadow values. There’s also the typography object, which currently just defines our fontFamily. Finally, shape is used for properties such as border-radius. This theme’s structure is inspired by Material-UI.
Next, our helpers.js file!
export const isObjectEmpty = (obj) => { return Object.keys(obj).length === 0; };
Here, we only expose the isObjectEmpty function, which takes in an object and returns true if the object is empty. It returns false if it has any values. We’re going to make use of this function later.
Now that we’ve gone through all of the files in the utils folder, it’s about time to start building our components!
Buttons
Buttons are one of the most used components on the web. They’re used everywhere and can take different forms, shapes, sizes, and more.
Here are the buttons we’re going to build in Figma.
Button component design from Figma (Large preview)
These subtle variations are going to be applied as properties to our button. We would like the buttons in our component library to accept properties such as variant, size, enableElevation (i.e. box-shadow), and color.
Starting with the button component, let’s create a Button folder, where we will define everything related to buttons, as discussed earlier.
Let’s create our button component:
import styled from '@emotion/styled'; import isPropValid from '@emotion/is-prop-valid'; const StyledButton = () => {}; const IGNORED_PROPS = ['color']; const buttonConfig = { shouldForwardProp: (prop) => isPropValid(prop) && !IGNORED_PROPS.includes(prop), }; export const Button = styled('button', buttonConfig)(StyledButton);
Here, we’ve started off by setting up our button component with a buttonConfig. The buttonConfig contains shouldForwardProp, which is used to control the properties that should be forwarded to the DOM, because properties such as color show up on the rendered element by default.
Next, let’s define our button sizes, which we’re going to use in the button component!
const buttonSizeProps = { small: { fontSize: fontSizes['xsmall'], padding: `${spacing['xsmall']} ${spacing['small']}`, }, medium: { fontSize: fontSizes['small'], padding: `${spacing['small']} ${spacing['medium']}`, }, large: { fontSize: fontSizes['medium'], padding: `${spacing['medium']} ${spacing['large']}`, }, };
buttonSizeProps is a map of our size values (small, medium, and large), and it returns fontSize and padding values based on the sizes. For a small button, we’d need a small font with small padding. The same goes for the medium and large sizes to scale them appropriately.
Next, let’s define a function that provides valid CSS properties based on the passed variant:
const getPropsByVariant = ({ variant, color, theme }) => { const colorInPalette = theme.palette[color]; const variants = { outline: colorInPalette ? outlineVariantPropsByPalette : defaultOutlineVariantProps, solid: colorInPalette ? solidVariantPropsByPalette : defaultSolidVariantProps, }; return variants[variant] || variants.solid; };
Here, the getPropsByVariant function takes in variant, color, and theme properties and returns the properties of the specified variant; if no variant is specified, it defaults to solid. colorInPalette retrieves the palette assigned to the specified color if found, and undefined if not found in our theme object.
In each variant, we check whether a palette actually exists for the color specified; if we don’t, then we use colors from the common and grey objects of our theme, which we will apply in defaultOutlineVariantProps and defaultSolidVariantProps.
Next, let’s define our variant properties!
const defaultSolidVariantProps = { main: { border: `1px solid ${theme.palette.grey[100]}`, backgroundColor: theme.palette.grey[100], color: theme.palette.common.black, }, hover: { border: `1px solid ${theme.palette.grey[200]}`, backgroundColor: theme.palette.grey[200], }, }; const defaultOutlineVariantProps = { main: { border: `1px solid ${theme.palette.common.black}`, backgroundColor: theme.palette.common.white, color: theme.palette.common.black, }, hover: { border: `1px solid ${theme.palette.common.black}`, backgroundColor: theme.palette.common.white, color: theme.palette.common.black, }, }; const solidVariantPropsByPalette = colorInPalette && { main: { border: `1px solid ${colorInPalette.main}`, backgroundColor: colorInPalette.main, color: colorInPalette.contrastText, }, hover: { border: `1px solid ${colorInPalette.light}`, backgroundColor: colorInPalette.light, }, }; const outlineVariantPropsByPalette = colorInPalette && { main: { border: `1px solid ${colorInPalette.main}`, backgroundColor: theme.palette.common.white, color: colorInPalette.main, }, hover: { border: `1px solid ${colorInPalette.light}`, backgroundColor: theme.palette.common.white, color: colorInPalette.light, }, };
Here, we define the properties that are going to be applied to our button based on the selected variants. And, as discussed earlier, defaultSolidVariantProps and defaultOutlineVariantProps use colors from our common and grey objects as fallbacks for when the color specified isn’t in our palette or when no color is specified for what we put in place.
By the way, the solidVariantPropsByPalette and outlineVariantPropsByPalette objects use the color from our palette as specified by the button. They both have main and hover properties that differentiate the button’s default and hover styles, respectively.
The button design we’ve used accounts for two variants, which we can check out in our component library design.
Next, let’s create our StyledButton function, which combines all we’ve done so far.
const StyledButton = ({ color, size, variant, enableElevation, disabled, theme, }) => { if (isObjectEmpty(theme)) { theme = defaultTheme; } const fontSizeBySize = buttonSizeProps[size]?.fontSize; const paddingBySize = buttonSizeProps[size]?.padding; const propsByVariant = getPropsByVariant({ variant, theme, color }); return { fontWeight: 500, cursor: 'pointer', opacity: disabled && 0.7, transition: 'all 0.3s linear', padding: buttonSizeProps.medium.padding, fontSize: buttonSizeProps.medium.fontSize, borderRadius: theme.shape.borderRadius, fontFamily: theme.typography.fontFamily, boxShadow: enableElevation && theme.shadows[1], ...(propsByVariant && propsByVariant.main), ...(paddingBySize && { padding: paddingBySize }), ...(fontSizeBySize && { fontSize: fontSizeBySize }), '&:hover': !disabled && { boxShadow: enableElevation && theme.shadows[2], ...(propsByVariant && propsByVariant.hover), }, }; };
In the StyledButton function, we’re assigning defaultTheme to the theme if the theme object is empty which makes it optional for the consumers of our library to use Emotion’s ThemeProvider in order to make use of the library. We assigned fontSize and padding based on the buttonSizeProps object. We defined several default button properties, such as fontWeight and cursor, which aren’t tied to any property, and we also derived color, backgroundColor, and border values based on the result of propsByVariant.
Now that we’ve created our Button component, let’s see how we can use it:
<Button variant="solid" color="primary" size="small" enableElevation disabled > Small Outline Elevated Button </Button>
We can check what that looks like on CodeSandbox:
That’s how to use the Button component. We define the following properties:
We define a variant with a solid value. We could have specified outline instead. If the variant prop isn’t provided, we would also default to solid.
We define color, with a value of primary. We also support error as a color value or a color from a theme object. If the color property isn’t specified, we would fall back to our default color state.
We define size, with a value of small. It could be medium (the default) or large.
We define EnableElevation because we want some box-shadow on our button. We could have chosen not to use it.
Finally, we define disabled because we want our button to be disabled. The additional thing we do to a disabled button is reduce its opacity.
The button doesn’t need to take any property. It defaults to a solid medium-sized button.
Box Component
A box component is a container that can hold any component or HTML element. It accepts but is not limited to properties such as padding, margin, display, and width. It can also be used as a base component for some of the other components we’ll get into later.
Here’s what it looks like on Figma:
Box component design from Figma (Large preview)
Before diving into the code, let’s not forget to create a new folder for this component.
Now, let’s create our Box component:
import styled from '@emotion/styled'; import isPropValid from '@emotion/is-prop-valid'; import { spacing, theme as defaultTheme } from '../../utils'; const StyledBox = ({ paddingX, paddingY, marginX, marginY, width, display, theme, ...props }) => { if (isObjectEmpty(theme)) { theme = defaultTheme; } const padding = spacing[props.padding]; let paddingTop = spacing[props.paddingTop]; let paddingRight = spacing[props.paddingRight]; let paddingBottom = spacing[props.paddingBottom]; let paddingLeft = spacing[props.paddingLeft]; if (paddingX) { paddingLeft = spacing[paddingX]; paddingRight = spacing[paddingX]; } if (paddingY) { paddingTop = spacing[paddingY]; paddingBottom = spacing[paddingY]; } let margin = spacing[props.margin]; let marginTop = spacing[props.marginTop]; let marginRight = spacing[props.marginRight]; let marginBottom = spacing[props.marginBottom]; let marginLeft = spacing[props.marginLeft]; if (marginX) { marginLeft = spacing[marginX]; marginRight = spacing[marginX]; } if (marginY) { marginTop = spacing[marginY]; marginBottom = spacing[marginY]; } return { padding, paddingTop, paddingRight, paddingBottom, paddingLeft, margin, marginTop, marginRight, marginBottom, marginLeft, width, display, fontFamily: theme.typography.fontFamily, }; }; const IGNORED_PROPS = ['display', 'width']; const boxConfig = { shouldForwardProp: (prop) => isPropValid(prop) && !IGNORED_PROPS.includes(prop), }; export const Box = styled('div', boxConfig)(StyledBox);
The spacing rule we defined earlier is being applied to both padding and margin, as we can see in the Box component. We receive contextual values for padding and margin, and we look up their actual values from the spacing object.
We accept paddingX and paddingY props to update padding across the horizontal and vertical axis, respectively. We do the same for marginX and marginY as well.
Also, we don’t want the display and width props to get forwarded to the DOM because we only need them in CSS. So, we add them to our list of props to ignore, and pass that on to our config.
Here’s how we could use the Box component:
<Box padding="small" paddingTop="medium" paddingBottom="medium" > Simple Box Component </Box>
We can see what this looks like on CodeSandbox.
In this Box component, we’ve assigned small as a value to our padding property, and medium to the paddingTop and paddingBottom properties. When rendered, the Box component will have its padding-left and padding-right properties set to 12px each, and its padding-top and padding-bottom properties set to 20px. We could have replaced paddingTop and paddingBottom with paddingY and gotten the same result.
Columns Component
The Columns component is a variation of our Box component, with a display type of flex and with children spaced evenly across the x-axis.
Here is a representation of the Columns component in Figma:
Columns component design from Figma (Large preview)
Let’s build our Columns component!
import React from 'react'; import { Box } from '../Box'; export const Columns = ({ children, space, ...props }) => { return ( <Box display="flex" {...props}> {React.Children.map(children, (child, index) => { if (child.type !== Box) { console.warn( 'Each child in a Columns component should be a Box component' ); } if (index > 0) { return React.cloneElement(child, { marginLeft: space, width: '100%', }); } return React.cloneElement(child, { width: '100%' }); })} </Box> ); };
We’re using React.Children to map over the Columns component’s children. And we’re adding marginLeft and width properties to each of the children, except the first child, which doesn’t need a marginLeft property because it’s the leftmost child in the column. We expect each child to be a Box element to ensure that the necessary styles are applied to it.
Here’s how we could use the Columns component:
<Columns space="small"> <Box> Item 1</Box> <Box> Item 2</Box> <Box> Item 3</Box> </Columns>
We can see what that looks like on CodeSandbox.
The Columns children here are spaced evenly across the x-axis by 12 pixels because that’s what the value of small resolves to, as we’ve defined earlier. Because the Columns component is literally a Box component, it can take in other Box component properties, and we can customize it as much as we want.
Stack Component
This is also a variation of our Box component that takes the full width of the parent element and whose children are spaced evenly across the y-axis.
Here is a representation of the Stack component in Figma:
Stack component design from Figma (Large preview)
Let’s build our Stack component:
import React from 'react'; import { Box } from '../Box'; import { Columns } from '../Columns'; const StackChildrenTypes = [Box, Columns]; const UnsupportedChildTypeWarning = 'Each child in a Stack component should be one of the types: Box, Columns'; export const Stack = ({ children, space, ...props }) => { return ( <Box {...props}> {React.Children.map(children, (child, index) => { if (!StackChildrenTypes.includes(child.type)) { console.warn(UnsupportedChildTypeWarning); } if (index > 0) { return React.cloneElement(child, { marginTop: space }); } return child; })} </Box> ); };
Here, we map over each child with React.Children and apply a paddingTop property to it with the value of the space argument. As for the first child, we need it to take its original position, so we skip adding a marginTop property to it. We also accept each child to be a Box so that we can apply the necessary properties to it.
Here’s how we could use the Stack component:
<Stack space="small"> <Box marginTop="medium"> Item 1</Box> <Box> Item 2</Box> <Box> Item 3</Box> </Stack>
We can see what that looks like on CodeSandbox.
Here, the Box elements are spaced evenly with the small unit, and the first Box takes a separate marginTop property. This shows that you can customize components however you wish.
Conclusion
We’ve gone through the basics of using Emotion to create components in React using the APIs that it provides. This is just one of many ways to go about building a component library. There are some nuances to building it for a brand because you might not have to take theming and some other things into consideration. But if you plan to release the library to the public one day, then you’ll have to deal with requests for those missing pieces, so consider that possibility and make the library a little flexible ahead of time.
If you have any questions, feel free to drop them as comments.
The repository for this article is on GitHub, and the button designs we’ve used are on Figma.
References
(ks, ra, al, il)
Website Design & SEO Delray Beach by DBL07.co
Delray Beach SEO
source http://www.scpie.org/building-a-component-library-with-react-and-emotion/
0 notes