#Windows 10 mcafee.com/activate www.mcafee.com/activate
Explore tagged Tumblr posts
Visit Tumblr Blog
Explore Tumblr blogs with no restrictions, modern design and the best experience.
Last Seen Tumblr Blogs


Fun Fact
130K people were victims of a chain letter scam that affected Tumblr in May 2011.
Text
How to Reverse the Scrolling Direction in Windows 10
The touchpad and mouse are important input devices on Windows 10. If you are using the touchpad with the laptop or the mouse with the computer, then you can reverse the scrolling direction through the Settings tab. You can also customize the Registry as per your wish. If you want to do it, then follow the instructions mentioned below.

Here’s how to reverse the scrolling direction in Windows 10
· Editing the registry to reverse the scrolling direction
Firstly, go to the Device Manager menu.
Click on the Cortana option.
Type the Device Manager option.
Choose the Device Manager option.
It will launch a new window.
Choose the Mice and other pointing devices option.
Click twice on the mouse.
Press on the Details option.
It includes the pull-down list.
Choose the Device instance path option.
It is located in the pull-down list.
You need to right-click on the value.
It is given in the Value section.
Choose the Copy option.
Click on the OK button.
Exit from the Device Manager menu.
Go to the Notepad.
Start pasting the VID ID in the Notepad with the Control and V keys together.
Click on the Windows and R keys together.
It will launch the Run prompt box.
Type ‘regedit’ in the Run prompt box.
It will launch the Registry Editor menu.
Click on the registry location, which is mentioned below:
HKEY_LOCAL_MACHINE\SYSTEM\CurrentControlSet\Enum\HID
Press on the key which is same as the VID ID given in the Notepad.
Choose the Device Parameters button, which includes FlipFlopWheel DWORD.
Click twice on the FlipFlopWheel option.
It will launch the Edit DWORD menu.
Type ‘1″ in the provided box.
Click on the OK button.
Exit from the Registry Editor menu.
Type the 0 in the Value data checkbox.
· Settings up the AutoHotkey Script
Click on the Cortana option.
Type ‘Notepad’ in the text field.
Choose to launch the Notepad.
Type the script in Notepad.
Start copying and pasting the script in the Notepad:WheelUp::
Send {WheelDown}
Return
WheelDown::
Send {WheelUp}
Return
Press on the File option.
Click on the Save as an option.
It will launch the Save as menu.
Choose All Files option.
1It is located in the Save as type option given in the pull-down list.
Type the name of the file.
You need to include .ahk at the bottom of it.
Choose the save option.
You need to add the AutoHotkey script symbol to the screen.
Exit from the Notepad window.
Click twice on the AutoHotkey script shortcut on your screen.
Press on the Start menu.
Move the mouse wheel in the upward direction.
You need to do this procedure to go down to the menu list.
To exit from the script, you need to right-click on the toolbar.
Choose the Task Manager menu.
Choose the AutoHotkey Unicode option.
It is located in the Processes menu.
Click on the End task option.
Franklin Patrick is a creative person who has been writing blogs and articles about cyber security. He writes about the latest updates regarding mcafee.com/activate and how it can improve the work experience of users. His articles have been published in many popular e-magazines, blogs and websites.
Source : Windows 10
0 notes
Text
Solved: SPIN_LOCK_ALREADY_OWNED BSOD Error on Windows 10
The SPIN_LOCK_ALREADY_OWNED error message might make an appearance on your PC, and then the device might reboot constantly. It is the pretty worst error ever seen on the Windows 10 operating system, and it mostly happens due to the software issues. The causes include corrupted drivers, misconfigured settings, Windows system corrupted or missing files, and more. If you are also facing the same error message, then we have got your back, so don’t worry and read this complete guide to fix the ongoing issues.

Solution 1: Turn Off Automatic Restart
By following the below-given steps, you can easily troubleshoot the SPIN_LOCK_ALREADY_OWNED error message on your Windows 10 installed computer:
Head to your Desktop screen.
Locate the This PC icon and then right-click it.
Choose the Properties option.
On the new screen that appears, head to Advanced system settings using the left menu.
In the System Properties window, head to Advanced.
Scroll downwards and then tap on the Settings located under the Startup and Recovery option.
Head to System failure and turn of the feature saying Automatically restart.
Then make a press on the OK option to make changes.
Solution 2: Get into the Safe Mode
The safe mode is indeed helpful in solving the SPIN_LOCK_ALREADY_OWNED error code on the Windows enabled computers, especially the Windows 10 ones. Here ‘s how to enable Safe mode in Windows 10:
Press the Start + I keys on your keyboard to trigger the Settings window on your PC screen.
Then head to the option saying Update &Security.
In the Advanced Settings window, head to Recovery using the left menu.
Head to Advanced startup and then make a tap on Restart now.
Now make your way to Troubleshoot using the Startup Screen.
To continue. head to Advanced Options and go to Startup Settings.
Get to the Restart button.
During the restart process, make sure to turn on the Safe Mode via hitting the F4 key on your keyboard.
Solution 3: Launch the Windows Built-in Troubleshooter
The Windows 10 OS comes up with the inbuilt Troubleshooter tool, which is even capable of solving the BSOD errors on your device. So if you can still manage to get to the startup screen, then follow these steps to solve the SPIN_LOCK_ALREADY_OWNED error:
Head to the Start menu.
Then make a press on the gear-like button to open the Settings.
Now go to Update & Security.
Head to Troubleshoot using the left side menu.
Now get your eyes to the right side screen and find the Blue Screen option
Choose Run the troubleshooter in the Blue screen option.
Solution 4: Deleting the Problematic Windows Files
To solve the SPIN_LOCK_ALREADY_OWNED error, simply delete the bad Windows Updates using the instructions mentioned down here:
Hit the Start + I keys altogether on your keyboard to trigger the Settings window on your laptop or desktop.
Jump to the Update & Security link.
Head to the Windows Update link afterward.
Then go to View update history.
Make a press on the Uninstall updates icon.
Solution 5: Fix the Faulty Drivers via Device Manager
The Windows Device Manager is a perfect place to solve the issues related to outdated and corrupt computer drivers. It is being noticed that the SPIN_LOCK_ALREADY_OWNED error sometimes appears when there are some issues related to your computer. So make sure to install and update all necessary drivers on your computer:
Make a press on the Windows key on your keyboard.
Now, once the Start menu appears, put in the device manager using the keyboard.
Now, choose the most relevant result.
Look for the devices that have the yellow exclamation indication.
Now open that device and expand its drivers.
Make a Right-click on the driver of that yellow indication device.
Head to Update driver from the triggered options.
Follow the On-screen guide to wrap up the driver installation.
Reboot the device to see the changes.
Solution 6: Via Windows System File Checker
It is a perfect solution for solving the SPIN_LOCK_ALREADY_OWNED error since it will find and fix the problematic system files automatically once it is active. See these steps to use the Windows system file checker to fix the issue:
Hit Start+ R keys simulational on your keyboard to trigger Run.
Then put in cmd.
Press CTRL+ Shift + Enter keys to open Command Prompt as an administrator.
Then enter sfc /scannow.
Hi, the Enter key on your keyboard to apply this command and to start the scan.
The issues will be solved automatically.
To enjoy our services more visit on: McAfee.com/activate.
Source Url: https://installermcafee.com/solved-spin_lock_already_owned-bsod-error-on-windows-10/
0 notes
Text
How to Fix Unidentified Network LAN error in Windows 10?
How to Fix Unidentified Network LAN error in Windows 10?
When users try to form a LAN connection, an issue arises, sometimes showing the “network you are trying to connect undefined.” Also, you may see a yellow exclamation mark on the network icon that shows an unidentified network LAN error.

Besides that, such an issue occurs just after updating the Windows version, missing or faulty device drivers, invalid network settings, and more. To resolve it,…
View On WordPress
#Activate#Fix Unidentified Network LAN error#mcafee#mcafee activation#mcafee product#mcafee.com/activate#mcafeecomactivate#Unidentified Network LAN error#Windows 10#www.mcafee.com/activate
0 notes
Photo

How to Fix Windows Store Error 0x80244018 on Windows 10? Error Code 0x80244018 is one of the most troublesome errors a Windows user can face as it messes up the internet settings while also creating some compatibility errors.
0 notes
Text
How to Install BASH Software on Your Windows 10 Computer?
How to Install BASH Software on Your Windows 10 Computer?
Want to get Bash installed into your Windows 10 laptop or desktop? If your answer is yes, then you have landed on the right website.

Most people are aware that Windows 10 doesn’t support the Linux command line. But in this article, you will learn how to install BASH right into your device. This might be a bit complicated on Windows 10, but with the help of this article, you can easily install…
View On WordPress
#Activate#BASH Software#Install BASH Software on Your Windows 10 Computer#mcafee#mcafee.com/activate#www.mcafee.com/activate
0 notes
Text
How to Install Windows 10 on Mac Mini with an External Drive?
How to Install Windows 10 on Mac Mini with an External Drive?
Mac Mini is a compact desktop with an amazing processor. It comes with eighth-gen Intel quad core and 6 core processors. As the name suggests, it is small in size and houses components present in laptops. If you wish to use Windows 10 on your Mac mini, then here’s how you can do so using an external drive.

Software Needed
Follow the instructions given below.
First of all, go to thesite for …
View On WordPress
0 notes
Text
How To Run Old Versions Of Internet Explorer In Windows 10?
How To Run Old Versions Of Internet Explorer In Windows 10?

At the present time, few organizations still have old websites which do not work the way they should in newer web browsers. It is worth noting that Windows 10 till now has Internet Explorer 11. I suggest you not to use Internet Explorer whenever you have a choice. The major reason behind it is that it has become outdated with time. IE does not come with sophisticated features and is not too…
View On WordPress
#Activate#How to#mcafee#mcafee.com/activate#Run Old Versions Of Internet Explorer In Windows 10?#www.mcafee.com/activate
0 notes
Text
How to Use Windows 10’s ‘Free Up Space’ Tool
Windows 10 comes with a useful tool for cleaning the full storage of the disk space on their system. It can delete non-required files, prior Windows downloads and the other items that are not needed.

Here’s how you can use ‘free up space’ on your Windows 10 system.
To use this device, follow the instructions given below.
Firstly, go to ‘Settings’.
Then visit ‘System.’
And after that click on ‘Storage’.
Press the ‘Free Up Space Now’.
It is worth noting that if you are not able to get the choice here, then April 2018 Update has not downloaded till yet.
Windows by itself scans your system for non-required files that it can delete to free up storage on your system.
Not like the older Disk Cleanup device, this displays just the information you be able to delete, and it checks user files like Recycle bin and system files such as of Windows as well.
Check out and see files that you want to delete. Windows display entirely the exact space that you can clear by deleting every type of unnecessary data.
You can remove all stuff over here till the time your system works perfectly.
While watching the ‘Recycle bin’, go through it properly. It will remove files in your Recycle Bin entirely.
Ensure that you don’t require to get back the item from the Recycle Bin after going through this process.
After completing huge updates- for instance, the April 2018 Update, you’ll be able to check the ‘Previous Windows installations’ registry here. Don’t hesitate to remove these. Remember you will not get to switch to the earlier Windows 10 update after deleting these documents, but Windows by itself will delete these documents after some days.
Now, Windows displays the full area that can be created.
Press ‘Remove Files’ to delete the matter that has been selected by you.
Depending on the total matter there is to be deleted, Windows may take time to complete the procedure.
Remember that you can activate the ‘Storage Sense’ option by going through the following instruction-
Go to Settings.
After that, you can select the ‘system’.
Lastly, press on storage.
This by itself delete some of the data, consisting old drafts that have been present in the Recycle Bin for some time.
Hope this blog would have been useful to you and your friends.
James Thomas is a self-professed security expert; he has been making the people aware of the security threats. His passion is to write about Cybersecurity, cryptography, malware, social engineering, internet and new media. He writes for McAfee security products at mcafee.com/activate.
source:- https://mysecurepc.wordpress.com/2019/01/24/how-to-use-windows-10s-free-up-space-tool/
0 notes
Text
McAfee stinger for windows 10
Welcome to Antivirus Support
McAfee stinger for windows 10- Security Premium Our best protection, plus PC backup and family safety features, for you and the people you care about.
How to Activate McAfee Antivirus with Retail Card?
If you have Already Bought the McAfee antivirus than You can Activate in just a few simple and quick steps –
You must have a Retail Card with a 25 Digit Card Activation Card.
Let’s Go And activate McAfee anti-virus Protection –
Open Your Browser and Type
www.mcafee.com/activate
Or use This Link mcafee.com/activate.
Enter Your 25 Digit Activation Code And Submit. Please Create a McAfee Account In the next Step. Sign Up with Your emailMcAfee Account will Help You to Install And Manage Your McAfee Antivirus Services.
Now You Can Install Your McAfee antivirus protection for Best Installation make sure You Remove any other Antivirus Program From Computer. After Installing Your McAfee anti-virus Please Restart Your Computer. Please Run A full McAfee Antivirus Scan And Check For Viruses. For More Details, We Do Have One More Post with More comprehensive Information.
How to define McAfee activate 25 digit code?
The 25 digits activation code is necessary to install and activate any software be it McAfee or any other antivirus solution. The activation code is something for which you actually pay for. Without this code, you will not be able to show the authority and authenticity of the product. To start using the product it is necessary to download and activate it which you cannot without having an unused product key.
This code makes sure that a user will not face any difficulty while using the product and gives him the idea that the product he is using is not a pirated one. The software with the product key implied on it is officially registered with the company who owns it and this tells us that the product is authentic. With a registered product, you get an opportunity to get the latest updates for the software.
1. Steps to Redeem McAfee retail card:
This section contains the necessary steps to redeem your McAfee retail card:
Using your web browser navigate to mcafee.com/activate.When the sign-in page opens, enter your McAfee login details. If you do not have an account, click on “Create a new account”.Further, select an option for “Country” and “Language” from the list. When prompted, enter the McAfee activate code. Type the email address and click on the “Submit” button. Finally, click on “Verify” and wait for the activation to complete.This process should be followed by downloading the product.
2. A few steps to download McAfee security on your device:
To download McAfee total protection or any other McAfee product follow the steps given below: McAfee stinger for windows 10-
Go to the home page of McAfee by using the URL mcafee.com/activate. Log in to your McAfee account or click “create a new one” if you do not have one. Upon creating a new account, you should complete the sign-in process. When a new page opens, select “My Account”.From here, select your desired product. After this, choose the payment method to pay for the product. Read the McAfee’s license agreement and click on the “Agree” button. Wait for a few minutes and then begin with the installation process.
McAfee antivirus software is beneficial in many ways:
It protects your important documents and secures your files and folder on the device. The McAfee antivirus prevents malware. Secures the important information. Enable your search history to remain private. Prevents ads. It is the most famous antivirus for privacy and security purpose. To get McAfee antivirus security by downloading, installing and activating McAfee setup, visit mcafee.com/activate.
Minimum System Requirements :
Operating system:
Microsoft Windows 10, 8.1, 8, and 7 SP1 (32- and 64-bit)
Mac OS X 10.12 or later
Google Android smartphones and tablets 4.1 or higher
Apple iOS 10 or later
Internet Connection Required
High-speed connection recommended
Supported Browsers:
Internet Explorer 10.0 or later
Firefox
Google Chrome
Safari (Mac and iOS OS Only)
Microsoft Edge
Hardware:
2 GB RAM for Windows 7 and above
500 MB free drive space
1 GHz Processor
Some installation problems of McAfee antivirus software: McAfee stinger for windows 10-
Download it and activate McAfee antivirus from McAfee 25 digit activation code it will provide all kind of safety required and protect you in every manner. We are here to support the users of McAfee to get rid of all kinds of viruses and other harmful activities. Activate McAfee security and protect your device and other devices from Malware, spyware, rootkit, and viruses. McAfee Software is available for Mobile Phones, Tablets, PC, laptops or any other devices. Range of McAfee products is very wide and we provide support for all the McAfee Software.
We have experienced and skilled experts for McAfee Support and our McAfee technical support team helps the user to resolve all the technical issues within a very little amount of time. If you have security software and you are not satisfied with that then we will recommend you to try McAfee antivirus Software. To Redeem, install, Re-install, or Activate of McAfee you can visit McAfee activate with activation code. These processes are very simple so that You can do these all by yourself only but if you need any support you may contact us. We believe in 100% customer satisfaction. We will support you in all issues and provide the right solution required.
McAfee Antivirus Installation Problems: McAfee stinger for windows 10-
Upgrading McAfee Antivirus to the latest version.Resolve activation key problems from mcafee.com/activateOffering Help in McAfee Antivirus Setup and Configuration.Provide the solution to you if McAfee Antivirus is not working or a guide to solving other software issues.Un-installation of other conflicting Applications and repair of any software problems.Provide better System protection.Troubleshoot any McAfee Antivirus problem.Customize the setting of McAfee product as per your system requirements.Scan your device to prevent any type of risk that may occur through viruses Malware or any other threat.Resolve issues related to the firewall.
Overview of McAfee Security Features: McAfee stinger for windows 10-
There are certain features that make McAfee best from other antivirus solutions, and these are:
It safeguards your device from viruses, malware, spyware, and Trojans.Your identity is safe and secured with McAfee’s firewall. It restricts you from visiting suspicious, unsafe websites.You can transfer your subscription from one device to another.It allows you to safeguard several devices using single protection.Your kids can securely surf the Internet with McAfee Safe Family.The antivirus provides you the option to track the misplaced devices.The software has the best-in-class features to help in removing all the possible threats.McAfee automatically scans and removes malicious files.It displays the overall health record of your PC after scanning it thoroughly.
2 notes
·
View notes
Text
How to Change Printer Name in Windows 10
Are you finding it hard to remember the default printer name? Well, you can easily change the printer name to make it more descriptive or personalized. Follow the steps given below and rename your printer in Windows 10.
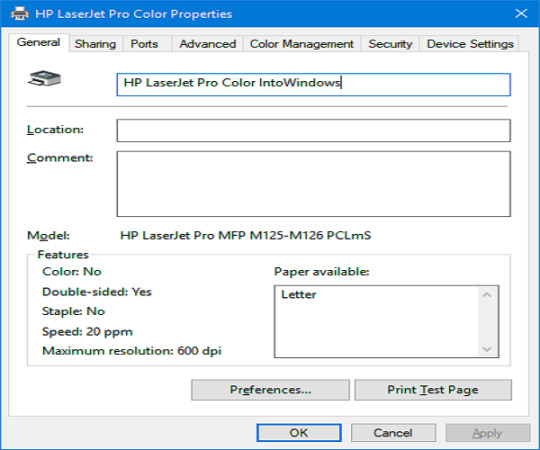
Here’s how to change printer name in Windows 10 through the settings app
• You need to left-click on the Start option on Windows 10.
• Press on the Settings symbol by going to the Start menu.
• Or, right-click on the Start symbol.
• After that, choose the Settings option by going to the start menu to get the same result.
• Click on the Windows and L keys together so that you can directly go to the Settings option.
• Select the Devices option located in the Settings menu.
• Go to the Printers and Scanners option situated on the Devices menu.
• Now, you will get the menu list of all the printers and scanners located on the right-hand side which are already installed on the system.
• Go through the menu list showing of the printers and scanners and after that press on any program of which you wish to change the name.
• Press on the Manage option.
• Choose the Printer properties option located on the left-hand corner of the menu list.
• Go to the General option.
• You will get an edit box which shows the printer name.
• Click within the edit box, remove the printer name and select any name to change printer name in Windows 10.
• After choosing any name, you need to press on the OK option located at the end of the screen.
• Now, this procedure has change printer name in Windows 10.
Go through the steps to change printer name in Windows 10 through the control panel
• Go to the Control Panel application by entering the Control Panel into the text field given on the toolbar and choosing the option given on the search results.
• In case the View by option is changed into Category below the “Hardware and Sound” column, press on the View devices and printers link.
• Now, you will get the more clear display of the printers and scanners in the Control Panel window.
• You need to find the printer name which you have changes in Control Panel window and after that, right click on the printer name.
• Press on the Printer properties option.
• Open the General menu.
• Go through the checkbox, which shows the printer name.
• Press inside of the checkbox, remove the current Printer name and change printer name in Windows 10 by entering a new name.
• After that. Press on the OK button.
Franklin Patrick is a creative person who has been writing blogs and articles about cyber security. He writes about the latest updates regarding mcafee.com/activate and how it can improve the work experience of users. His articles have been published in many popular e-magazines, blogs and websites.
Source: Windows 10
0 notes
Text
How to fix Cortana not Working on Windows 10?
Cortana is like the Alexa of the Windows and the search bar is just as effective and helpful for Windows users. However, in case your Cortana search bar is malfunctioning, then you can face major troubles. Do not worry as we can help you out. So, here are the steps to fix Cortana not working on Windows 10.

Modify Original Language
Launch the Settings app on your system.
Choose Time and Language.
Go to the Language option. The original language will show here. In case the option is among the ones mentioned earlier, then there is nothing else for you to do.
In case the original language is not supported, then select ‘Add a preferred language’ option beneath the Preferred Languages option.
You should browse for the language you would like to use as a PC’s original language. Choose it in case you locate it to and add to the computer list.
Then select the Next option.
You should choose ‘Select as my display language.’
In some situations, you should download the language pack for the selected language. The pack includes written and vocal entries in the chosen language, which will turn on to use that language on the system. If you want to download the associated pack of language, then check the box of ‘install a language pack.’
Check the settings and choose the additional functions which you require.
Go to the Install.
Now, you will see a pop-up to log out of the account. Log out by selecting the ‘Yes, sign out now’ option.
Use the Language Across the Windows 10 Computer
Get back to the Language option of the Settings application.
Locate the ‘Related settings’ section inside the right-side panel and choose ‘Administrative language settings’
Select the Administrative button.
Navigate to the Copy Settings tab.
Check the box of ‘Welcome screen and system accounts.’
Tick the box of ‘New user accounts.’
Go to the OK button.
Select OK again to confirm.
Now, choose the Restart Now button.
Modify Windows 10 Original Region
To get started, launch the Settings app on your system.
After that, you should choose the Time and Language option.
Go to Region.
You should select ‘region or country’ drop-down arrow to show a region/country list. Move up or down and select one from the compatible regions. Make sure that the region you select line up with the previous language you have chosen. In case you chosen English as the language, you have to select the region from Canada, United States, Australia, India, or the United Kingdom.
Now, if you would like to, you should be able to use ‘Regional format’ to adjust the format for time and date.
Set up Speech Recognition
Firstly, you have to launch Settings app.
After that, you should select the Time and Languages option.
Go to the Languages option.
You have to locate language selected as the screen language.
Select and choose Options.
Navigate to the Language Options.
Later, you should choose Speech.
Now, select Download.
If the pack of speech has been downloaded, restart the system.
Devin Smith is a creative person who has been writing blogs and articles about cyber security. He writes about the latest updates regarding mcafee.com/activate and how it can improve the work experience of users. His articles have been published in many popular e-magazines, blogs and websites.
Source:Working on Windows 10.
0 notes
Text
How to Fix Bad EXHANDLE BSOD Error in Windows 10?
How to Fix Bad EXHANDLE BSOD Error in Windows 10?
Bad EXHANDLE BSOD Error is one of the fatal codes that usually arise due to defective device drivers or inconsistent handle table entry states. In any case, this error is troubling you, and then there is no need to worry. To get rid of it, check out the given methods to learn the reason how it occurred and resolve it accordingly.

Method 1: Update Device Drivers:
As we know, device drivers play a…
View On WordPress
#Activate#Bad EXHANDLE BSOD Error#Fix Bad EXHANDLE BSOD Error#mcafee#mcafee activation#mcafee product#mcafee.com/activate#mcafeecomactivate#Windows 10#www.mcafee.com/activate
0 notes
Text
McAfee Releases Free Tool That Removes Pinkslipbot Leftovers That Use Your PC as Proxy
Last week, McAfee released a tool named AmIPinkC2, a Windows command-line application that removes remnant files of Pinkslipbot infections that allow the malware to continue to use previously infected computers as proxy relays, even if the original malware's binary has been cleaned and removed from infected hosts.

The malware in question is Pinkslipbot, a banking trojan that appeared in 2007 and is also tracked under three other names, such as Qakbot, Qbot, and PinkSlip.
http://www.mcafee.com/activate
Pinkslipbot is a well-known and dangerous threat
Pinkslipbot is a well-known threat on the malware landscape, mainly due to its specific targeting. Its authors aren't going after regular users, but have historically targeted North American companies, especially those in lucrative industry sectors, such as corporate banking, financial institutions, treasury services, and others.
This banking trojan isn't always active, and it keeps coming back in waves, as part of very well-planed campaigns. In the past years, numerous cyber-security companies have tracked its attacks and broken down its different versions [1, 2, 3, 4, 5, 6, 7, 8, 9, 10].
Activate McAfee Retail Card
The most recent campaign was spotted by IBM security researchers, who noticed Pinkslipbot versions that caused Active Directory lockouts on infected computers.
McAfee finds new wrinkle in Pinkslipbot infections
One of the companies that have historically tracked Pinkslipbot campaigns is McAfee. Its researchers presented an analysis of the trojan's C&C server infrastructure and its method C&C communications at last year's Virus Bulletin security conference.
Last week, while looking over past and present Pinkslipbot campaigns, researchers found a new wrinkle in the trojan's mode of operation.
Researchers say Pinkslipbot authors are much clever than they initially thought. According to McAfee, besides stealing the user's data, the banking trojan also uses infected hosts as proxy servers to relay information from the central C&C server to other infected hosts, in a mesh-like network.
New McAfee tool removes last remnants of Pinkslipbot infections
According to McAfee, most security tools remove only the malware's main binaries, crippling the trojan's ability to collect passwords from infected hosts.
McAfee Activate
These Pinkslipbot removal procedures leave intact the code that creates these proxy servers, which run via the Windows UPnP (Universal Plug and Play) service.
McAfee's new tool will remove these remaining files and prevent Pinkslipbot from using users' PCs to relay C&C commands or to hide the exfiltration of stolen data through a mesh of proxies.
mcafee.com/activate

#http://www.mcafee.com/activate#mcafee.com/activate#McAfee Activate#Activate McAfee Retail Card#Activate McAfee Live Safe#Redeem McAfee Retail Card
1 note
·
View note
Text
How to Record Screen of Any App in Windows 10
How to Record Screen of Any App in Windows 10
Want to record a video of any app you use in your Windows 10? Screen recording can be useful in many ways; you can show anything that you see on your Windows 10 desktop to anyone when you want. If you’re facing any difficulty in logging in to an app or accessing any feature, you can record screen and show the recording to your friend (or anyone) to tell the issue easily.

Although there isn’t any…
View On WordPress
0 notes
Text
How to Record Screen of Any App in Windows 10
How to Record Screen of Any App in Windows 10
Want to record a video of any app you use in your Windows 10? Screen recording can be useful in many ways; you can show anything that you see on your Windows 10 desktop to anyone when you want. If you’re facing any difficulty in logging in to an app or accessing any feature, you can record screen and show the recording to your friend (or anyone) to tell the issue easily.

Although there isn’t any…
View On WordPress
0 notes