#Windows Server 2008 2012
Explore tagged Tumblr posts
Visit Tumblr Blog
Explore Tumblr blogs with no restrictions, modern design and the best experience.
Last Seen Tumblr Blogs


Fun Fact
If you dial 1-866-584-6757, you can leave an audio post for your followers.
Text
Windows Server Tarihçesi
Merhaba, bu yazımda sizlere Windows Server işletim sistemlerinin tarihçesinden ve bitiş tarihlerinden bahsedeceğim. İşte tüm Windows Server işletim sistemleri ve bitiş tarihleri (genel destek ve genişletilmiş destek tarihleri): Windows Server End of Life Tarih Bilgileri Windows Server 2003 Çıkış Tarihi: 24 Nisan 2003 Genel Destek Bitiş Tarihi: 13 Temmuz 2010 Genişletilmiş Destek Bitiş Tarihi:…
#microsoft windows server#windows server 2003#windows server 2008#windows server 2012#windows server 2016#windows server 2019#windows server 2022#Windows Server 2025 Özellikleri#windows server ailesi#windows server özellikleri#windows server tarihçesi
0 notes
Text
Windows Server Evaluation Edition Upgrade to full Edition
If your server is running Windows Server 2008/2012/2016/2019/2022/2025 evaluation version of Windows Server Standard or Datacenter edition, you can upgrade or convert it to an available retail Standard or Datacenter version. Run the following commands in an elevated command prompt or PowerShell.
1, Determine the current edition name: DISM /online /Get-CurrentEdition 2, Check which editions can be converted to: DISM /online /Get-TargetEditions 3, Convert/Upgrade to Standard version: DISM /online /Set-Edition:ServerStandard /ProductKey:xxxxx-xxxxx-xxxxx-xxxxx-xxxxx 4, Convert/Upgrade to DataCenter version: DISM /online /Set-Edition:ServerDatacenter /ProductKey:xxxxx-xxxxx-xxxxx-xxxxx-xxxxx 5, Convert/Upgrade to Essentials version: DISM /online /Set-Edition:ServerEssentials /ProductKey:xxxxx-xxxxx-xxxxx-xxxxx-xxxxx Please replace the xxxxx with your own Windows Server product key. if you do not have the product key, you can use the Generic Windows Server keys.
The following are the Generic Windows Server keys for you to convert / upgrade:
But remember the Generic key is only for the converting / upgrade, it cant activate the Windows Server, if you want to activate the Windows Server, you can get a Windows Server key at keyingo.com
Operating system edition Generic Product Key Windows Server 2025 Standard TVRH6-WHNXV-R9WG3-9XRFY-MY832 Windows Server 2025 Datacenter D764K-2NDRG-47T6Q-P8T8W-YP6DF Windows Server 2022 Standard VDYBN-27WPP-V4HQT-9VMD4-VMK7H Windows Server 2022 Datacenter WX4NM-KYWYW-QJJR4-XV3QB-6VM33 Windows Server 2019 Standard N69G4-B89J2-4G8F4-WWYCC-J464C Windows Server 2019 Datacenter WMDGN-G9PQG-XVVXX-R3X43-63DFG Windows Server 2019 Essentials WVDHN-86M7X-466P6-VHXV7-YY726 Windows Server 2016 Standard WC2BQ-8NRM3-FDDYY-2BFGV-KHKQY Windows Server 2016 Datacenter CB7KF-BWN84-R7R2Y-793K2-8XDDG Windows Server 2016 Essentials JCKRF-N37P4-C2D82-9YXRT-4M63B Windows Server 2012 R2 Standard D2N9P-3P6X9-2R39C-7RTCD-MDVJX Windows Server 2012 R2 Datacenter W3GGN-FT8W3-Y4M27-J84CP-Q3VJ9 Windows Server 2012 R2 Essentials KNC87-3J2TX-XB4WP-VCPJV-M4FWM Windows Server 2012 Standard XC9B7-NBPP2-83J2H-RHMBY-92BT4 Windows Server 2012 Datacenter 48HP8-DN98B-MYWDG-T2DCC-8W83P Windows Server 2012 Essentials HTDQM-NBMMG-KGYDT-2DTKT-J2MPV Windows Server 2008 R2 Standard YC6KT-GKW9T-YTKYR-T4X34-R7VHC Windows Server 2008 R2 Enterprise 489J6-VHDMP-X63PK-3K798-CPX3Y Windows Server 2008 R2 Datacenter 74YFP-3QFB3-KQT8W-PMXWJ-7M648
Which Windows Server edition to choose, Standard, Datacenter or essentials? What is the difference ? Windows Server Standard: It only allows 2 virtual machines (VMs). Best for small businesses or physical server deployments with low virtualization needs.
Windows Server Datacenter: it Provides unlimited virtual machines. Designed for large-scale virtualization, hyper-converged infrastructure, and high-security environments, such as cloud providers and enterprise data centers.
Windows Server Essentials: Windows Server 2019 Essentials is designed for small businesses with building in Client Access License (CAL) up to 25 users and 50 devices.
9 notes
·
View notes
Text
2 notes
·
View notes
Quote
WSLが使えないWindows 8以前で使えるからこそ価値があった
[B! Windows] 「Cygwin 3.5」が公開、Windows 7/8、Windows Server 2008 R2/2012への対応を終了/Windows上に擬似的なUNIX環境を構築する互換レイヤー
2 notes
·
View notes
Text
Price: [price_with_discount] (as of [price_update_date] - Details) [ad_1] Buslink CipherShield USB 3.0/eSATA 256-bit Encrypted Hard Drive Series prevents unauthorized access to your digital data. CipherShield design features a chip embedded in the access key which matches the AES encryption module on the controller board. The drive will automatically lock down its content once the key is unplugged, or power is shut off. And without the access key, data will not be seen or accessed in the event of theft or loss of the external drive. Data stored on the hard drive are safeguarded by hardware-based National Institute of Standards and Technology (NIST) certified industrial strength AES (Advanced Encryption standard) cryptographic engine. The advantage of hardware encryption over software encryption is that you need not be concerned about Trojans/viruses or software upgrades, which results in a decrease of total cost of ownership. Since CipherShield encrypts data independent of the operating system; removing the drive and connecting it directly to the SATA BUS will not defeat the encryption. Unit is bundled with two keys and registration is required for key duplication. System Requirement: Microsoft Windows 10, 8, 7, Vista, Server 2016, 2012, 2008, 2003 (XP and 2000 Server not supported for larger than 2TB), Mac OS X 10.4 or later with Intel Processor, Linux with GPT support. Package Content: CipherShield USB 3.0/eSATA 256-bit AES External Hard Drive, 2 Cipherkeys, USB 3.0 and eSATA cables, Power Adapter, and User manual. NIST FIPS 140-2 Level 2 compliant AES hardware encryption with 256-bit encryption Conforms to HIPAA regulation regarding patient privacy and to Sarbanes-Oxley regarding corporate financial and accounting practice CipherShield Smart Insert technology with CipherKey to authenticate the drive Encryption key is on the removable hardware key; can be removed and stored away to prevent unauthorized access Operates independently to the OS: does not require separate drivers [ad_2]
0 notes
Photo

Canon Maxify MB2740 4 in 1 Colour Printer All-In-One colour inkjet for home offices. The Canon MAXIFY MB2740 provides mobile printing and cloud integration, while its 500-sheet paper capacity and fast 24ipm mono print speed maximise productivity. General Specifications Functions: Print, Copy, Scan, Fax, Wi-Fi, Ethernet + Cloud Link Printer Specifications: Print Margins (min.) Top: 3mm, Bottom: 5mm, Left & Right: 3.4mm Print Technology: Inkjet, FINE print head Mono Print Speed: 24.0 ipm mono A4¹ Colour Print Speed: 15.5 ipm colour A4¹ First-Print-Out Time Mono: 6 sec (ready) / 10 sec (sleep) Colour: 7 sec (ready) / 12 sec (sleep) Two Sided Printing Automatic (A4, LTR plain paper) Automatic Document Feeder (ADF) Up to 50-sheets Cartridges and Yields Standard Ink Cartridges: Dual Resistant High Density ink 4 ink tanks (Black, Cyan, Magenta, Yellow) Optional XL Ink Cartridges: PGI-1400XL BK (1200 pages)¹ PGI-1400XL C (1020 pages)¹ PGI-1400XL M (780 pages)¹ PGI-1400XL Y (935 pages)¹ Colour ink tanks (CMY) average yield: 900 pages¹ Paper Support Paper Types: Plain Paper Envelopes (DL, COM10, C5, Monarch) Canon High Resolution Paper (HR-101N) Canon Matte (MP-101) Canon Pro Luster (LU-101) Canon Plus Semi-gloss (SG-201) Canon Plus Glossy II (PP-201) Canon Glossy Everyday Use (GP-501) Maximum Paper Input: Upper cassette: 250 sheets of plain paper Lower cassette: 250 sheets of plain paper Paper Sizes: Plain paper: A4, A5, B5, LTR, LGL Photo paper: A4, LTR, 20x25cm, 13x18cm, 10x15cm Custom sizes: Width 89-215.9 mm, Length 127-355.6 mm Paper Weight: Plain paper: 64 - 105 g/m² Canon photo paper up to 275 g/m² Scanner Specifications: Scanner Type: Flatbed, ADF CIS colour scanner Scan Speed: Simplex. 15.5 ipm Col¹ Simplex. 18.5 ipm B/W¹ Scanner Resolution (Optical): Up to 1200 x 1200 dpi¹ Scanning Depth (Input / Output): Colour: 48 bit / 24 bit Greyscale: 16 bit / 8 bit Maximum Document Size: Flatbed: A4, LTR (216x297mm) ADF: A4, LTR, LGL Copier Specifications Copy Speed: ADF colour: 11.5 ipm¹ ADF mono: 22.0 ipm¹ Copy Quality: Standard, High Multiple Copy: Up to 99 pages Copy Functions: Frame Erase, Collate, 2-on-1, 4-on-1 Copy Zoom: 25-400%, Fit to Page Fax Specifications Fax Type: Super G3 / Colour Fax Resolution: Mono: up to 300 x 300dpi Colour: 200 x 200 dpi Fax Speed: Mono: approx. 3 sec. (33.6kbps)¹ Colour: approx. 1 min. (33.6kbps)¹ Fax Memory: Up to 250 pages Coded Speed Dialing: Max. 100 locations Group Dial: Max. 99 locations Interface Display Type & Size: 7.5cm colour touch screen Connectivity Wired LAN: Hi-Speed USB 2.0 Ethernet 10/100Mbps (auto switchable) USB flash memory port (A type) Wireless LAN: Wi-Fi IEEE802.11 b/g/n¹ Wireless LAN Frequency Band: 2.4GHz Access Point Mode Please refer to the user manual for instructions on how to activate/deactivate the wireless LAN. Software Supported Operating Systems: Chrome OS Windows 10 / 8.1 / 8 / 7 / 7 SP1 / Vista SP2 Windows Server 2008 / 2008 R2 / 2012 / 2012 R2 Mac OS X v10.8.5 or later Supported Mobile Systems: iOS, Android, Windows RT, Windows 10 Mobile Minimum System Requirements: Windows: Internet Explorer 8, internet connection or CD-ROM Mac: Safari 5 and internet connection Display: 1024x768 or higher Software Included: Printer driver and fax driver Quick Utility Toolbox IJ Network Device Setup Utility Easy-WebPrint EX Physical Features Weight: 12.1kg Dimensions (W x D x H): 463 x 389 x 320 mm 463 x 459 x 320 mm (paper installed) Acoustic Noise Levels: Approx. 56 dB(A)¹ Recommended Operating Environment: Temperature: 15-30°C Humidity: 10-80%RH (no dew condensation) Power Source: AC 100-240V, 50/60Hz Duty Cycle: up to 20,000 pages¹ Power Consumption: Standby (scanning lamp is off) USB connection to PC : approx. 0.9 W Standby (all ports connected, scanning lamp is off) : approx. 1.7 W Time to enter Standby mode : approx. 7 mins OFF : approx. 0.2 W Copying (USB connection to PC): approx. 26 W¹ Typical Electricity Consumption: 0.15 kWh¹ Recommended Print Volume: 200-1000 pages / month
0 notes
Text
ASCOMP Guardian Of Data Pro este un software avansat de backup și protecție a datelor, proiectat pentru utilizatorii care doresc să asigure securitatea și integritatea informațiilor lor importante. Acest program oferă soluții complete pentru realizarea de copii de siguranță automate și personalizabile, restaurarea rapidă a fișierelor și protecția împotriva pierderilor accidentale de date. ConținutCum puteți obține ASCOMP Guardian Of Data Pro cu licență gratuită pe viață?Caracteristici Principale: ASCOMP Guardian Of Data Pro Giveaway: Denumire produs:ASCOMP Guardian Of Data Pro GiveawayWebsite:https://www.ascompsoftware.com/Valabilitate licență:permanentPagină promoțională:linkSistem de operare:WindowsDescarcă:https://www.ascompsoftware.com/fullversion/?ref=a143 Apasă aici! Cod de licență: 1GYHW-3U4HU-PXT56-ONSALE 7HTKD-ZQ3BF-65RRY-PCWELT Cum puteți obține ASCOMP Guardian Of Data Pro cu licență gratuită pe viață? Pentru a obține acest software gratuit trebuie să urmați cațiva pași simpli: Vizitați pagina promoțională și completați formularul de înscriere cu datele solicitate În scurt timp veți primi un mesaj în căsuța de email, acesta conține ”Customer ID” și link-ul pentru autentificare, faceți click pe acesta și autentificațivă in contul dvs. ASCOMP. Descărcați kit-ul de instalare facând click pe link-ul menționat in poza de mai jos, apoi instalați-l pe computer. Este posibil ca la prima lansare sa va solicite Customer ID. Cam asta este tot, sper sa vă fie folositor acest minunat software. Caracteristici Principale: Backup automat și programat: Permite configurarea unor rutine automate pentru salvarea fișierelor și folderelor esențiale, reducând riscul pierderii de date. Criptare și securitate: Include opțiuni de criptare avansată pentru a proteja datele confidențiale împotriva accesului neautorizat. Restaurare rapidă: Oferă posibilitatea de a restaura rapid datele pierdute sau corupte din copiile de siguranță. Suport pentru diverse locații de stocare: Compatibil cu hard disk-uri externe, unități de rețea, servere FTP și soluții cloud. Interfață intuitivă: Oferă un design ușor de utilizat, ideal atât pentru utilizatorii începători, cât și pentru cei avansați. Rapoarte detaliate: Monitorizează și oferă rapoarte despre starea backup-urilor, astfel încât utilizatorii să poată fi siguri că datele lor sunt protejate. Guardian Of Data Pro este ideal pentru utilizatori individuali, profesioniști sau companii mici care doresc o soluție de backup fiabilă și accesibilă. Cu funcționalități puternice și o flexibilitate ridicată, acest software ajută la păstrarea în siguranță a datelor critice în fața oricăror amenințări. Detalii tehnice:Dezvoltat de:ASCOMP Software GmbHDimensiune installer:6,65 MB.Spațiul ocupat după instalare:15,2 MB.Categorie:CriptareSistem de operare:- Windows 11, 10, 8.1, 8, 7, Vista, XP, Server 2022, Server 2016/2019, Server 2012, Server 2008, Server 2003Installer:Offline Installer
0 notes
Text
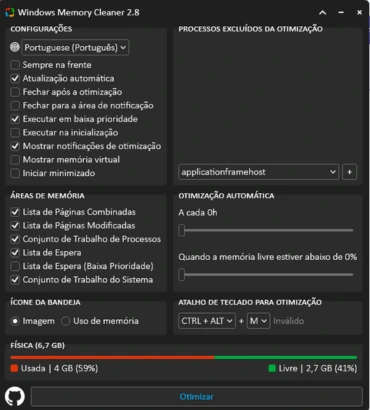
Windows Memory Cleaner: libere memória RAM e otimize o desempenho do Windows
Se você já se perguntou por que seu computador está ficando cada vez mais lento, a resposta pode estar relacionada ao uso excessivo de memória. Afinal, a memória RAM desempenha um papel crucial no desempenho do seu sistema, e quando sobrecarrega, seu PC perde a velocidade e a eficiência. Felizmente, existe uma ferramenta poderosa chamada Windows Memory Cleaner, que pode ajudar a melhorar o desempenho do seu computador e liberar memória RAM. Vamos explicar o que é o Windows Memory Cleaner, como ele funciona e como usar para otimizar a memória do seu PC.
O que é o Windows Memory Cleaner?
O Windows Memory Cleaner é uma ferramenta de otimização que tem como objetivo liberar a memória RAM do seu computador, por recursos nativos do Windows. É um aplicativo compacto, portátil e inteligente. Ele é ideal para quando você percebe que seu PC está mais lento do que o normal e a causa pode ser o uso excessivo de memória. O projeto está no GitHub e foi criado por IgorMundstein.
Por que liberar memória RAM? Quando você abre vários aplicativos ou programas ao mesmo tempo, o Windows aloca memória RAM para cada um deles. Mesmo após fechar esses programas, a memória nem sempre é liberada automaticamente, o que pode resultar em um acúmulo de dados desnecessários. O Windows Memory Cleaner entra em ação para resolver esse problema e liberar essa memória.
Como o Windows Memory Cleaner Pode Ajudar?
O aplicativo possui uma interface minimalista e recursos inteligentes. Ele é portátil, ou seja, não requer instalação, mas exige privilégios de administrador para ser executado. Aqui estão algumas vantagens de usar o Windows Memory Cleaner: - Lista de páginas combinadas: Limpa os blocos da lista de páginas combinadas efetivamente somente quando a combinação de páginas está habilitada - Lista de páginas modificada: Limpa a memória da lista de páginas modificadas, gravando dados não salvos no disco e movendo as páginas para a lista de espera - Conjunto de Trabalho de Processos: Remove a memória de todos os conjuntos de trabalho do modo de usuário e do sistema e os move para as listas de páginas de espera ou modificadas - Lista de espera: Libera páginas de todas as listas de espera para a lista livre - Lista de espera (baixa prioridade): Libera páginas da lista de espera de menor prioridade para a lista livre - Conjunto de trabalho do sistema: Remove a memória do conjunto de trabalho do cache do sistema
Requisitos do sistema:
- Microsoft .NET Framework 4 - Windows XP/ Vista/ 7/ 8/ 10/ 11 - Windows Server 2003/ 2008/ 2012/ 2016/ 2019/ 2022/
Como baixar o Windows Memory Cleaner?
Para baixar, basta clicar no Botão Download abaixo e acessar o site Oficial do GitHub e clicar no Botão Download no site do desenvolvedor como no exemplo abaixo:

Dicas Extras para Melhorar desempenho do PC
Aqui estão algumas dicas adicionais para complementar o uso do Windows Memory Cleaner e otimizar ainda mais o desempenho do seu computador: 1. Feche Programas Desnecessários Sempre que terminar de usar um programa, feche-o corretamente. Mesmo que você minimize a janela, o aplicativo ainda pode estar consumindo recursos. 2. Use o Gerenciador de Tarefas do Windows Abra o Gerenciador de Tarefas (Ctrl + Shift + Esc) e verifique quais programas estão consumindo muita memória. Feche os que não estão sendo utilizados. 3. Desative Programas na Inicialização Alguns programas são configurados para iniciar automaticamente com o Windows. Desative esses programas no Gerenciador de Tarefas para reduzir o consumo de memória logo após o boot. 4. Instale Mais Memória RAM Se o seu computador continua lento mesmo após liberar memória, pode ser hora de investir em mais RAM. Adicionar memória física pode fazer uma grande diferença no desempenho. 5. Verifique por Malware Vírus e malwares podem consumir muita memória e deixar seu sistema mais lento. Faça verificações regulares com seu antivírus para garantir que seu computador esteja limpo.
Considerações Finais sobre o Windows Memory Cleaner
O Windows Memory Cleaner é uma ferramenta útil para otimizar a memória do seu computador, especialmente em momentos em que você percebe uma queda no desempenho. Ao seguir os passos acima e usar as dicas extras, você pode garantir que seu sistema se mantenha ágil e sem travamentos. Lembre-se de que, além de limpar a memória, é importante adotar boas práticas no uso diário do computador, como fechar aplicativos não utilizados e realizar manutenções regulares. Agora que você sabe como usar o Windows Memory Cleaner, aproveite ao máximo o seu PC e tenha uma experiência mais rápida e fluida! Gostou deste artigo? Deixe seu comentário abaixo e compartilhe suas experiências com o Windows Memory Cleaner. Se você tem mais dicas ou ferramentas que ajudam a melhorar o desempenho do PC, adoramos ouvir de nossos leitores! Read the full article
0 notes
Text
IT Support/System Engineer/Technical Support/System Administrator
Job Description Experience in Windows 2008/2012 Active Directory administration. Technical Ability to (required for assigned Server Administrators) : Install, configure & upgrade the server hardware & its components Evaluate the existing setup of Servers hardware configuration, Network card & network traffic, Servers, Server Security, Upgrading Servers and Installing Support pack & patches ……
0 notes
Text
Forgot Windows 8.1 Local Admin Password No Reset Disk How to Resolve
How to get back into your Windows 8.1 computer if you have forgotten local administrator password no reset disk, how can you reset administrator password in Windows 8.1 without reset disk?

To resolve this problem, you can firstly try Offline NT Password Editor to help reset the forgotten Windows 8.1 administrator password without reset disk. Offline NT password Editor can help clear or reset Windows local account password via CD/DVD. The following procedure will show you the detailed walkthrough.
Trick 1: Use Offline NT Password Editor to Reset Windows 8.1 Local Admin Password (Work with CD/DVD).
When you forgot Windows 8.1 administrator password and a password reset disk was not created, “Offline NT Password Editor”, a free Windows password reset disk, can help you reset forgotten Windows 8.1 local account’s password without knowing it. Free download the ISO file from the official site. Extract the downloaded file and then burn the ISO file on to a writable CD/DVD. Once burning completed, you can use the CD/DVD which is bootable to crack Windows 8.1 Local Admin password.
Step 1: Power on your locked computer and then insert the bootable CD to the CD-ROM.
Step 2: Restart the computer to boot from CD/DVD. If it still boot into Windows, you may need to change device boot order in BIOS. Learn how to boot computer from CD/DVD.
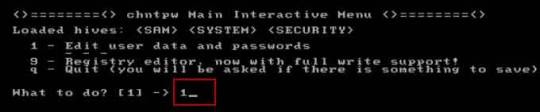
Step 3: When the computer boots from CD and loads Offline NT screen, press Enter until the “step one” appears. Type “1” and hit Enter.
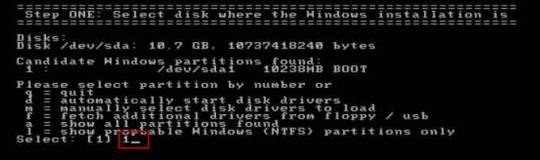
Step 4: Select “Password reset”, type “1” and hit Enter.
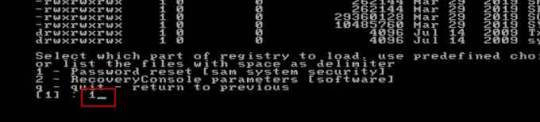
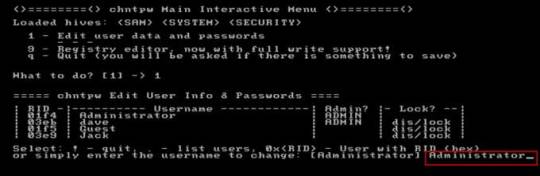
Step 5: Select “Edit user data and passwords, type “1” and hit Enter.
Step 6: Select a user account, type “administrator” and hit Enter.
Step 7: Select “Clear user password”, type “1” and hit Enter.
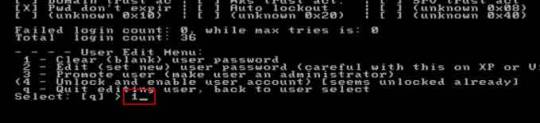
Step 8: Administrator’s password is cleared. Select “Quit editing user and back to user select”, type “!” and hit Enter.

Step 9: Select “Quit”, type “q” and hit Enter.
Step 10: Write back changes, type “y” and hit Enter.
Step 11: When it asks you if try again, type “n” and hit Enter.
Step 12: Now eject your CD and then press CTRL-ALT-DEL to restart the computer.
Step 13: When Windows 8.1 welcome screen appears, click the screen to automatically sign in administrator without password.
Another simple method to reset forgotten Windows 8/8.1 local admin password is using a password recovery program, Windows Password Rescuer, which is working fine for all Windows systems including Windows 11. Here is how to use the utility to reset a local admin password on Windows 8.1/8 PC without logging in.
Trick 2: Reset Windows 8.1 Administrator Password with Windows Password Rescuer Run from USB.
If you have forgotten Windows 8.1 administrator password and need to get back into the account, you can use Windows Password Rescuer to create a bootable USB disk and then use the disk to reset Windows 8.1 local administrator password easily without losing data. It also works perfectly for Windows 11, 10, 8.1, 8, 7, Vista, XP and Windows server 2022, 2019, 2016, 2012, 2008, 2003 etc.
Equipment required: Another Windows computer, USB flash drive.
Read more detailed steps: How to reset Windows 8.1 Admin Password with USB.
Step 1: Use another computer to download Windows Password Rescuer and then install the software.
Step 2: Plug in a blank USB flash drive to the computer and launch the software. Select “USB device” on the software screen.
Step 3: Pull down the drive list and select your plugged USB flash drive. Then click “Begin Burning” to create a bootable USB under a minute.
Step 4: Once the burning process is completed, unplug the USB flash drive and then connect it to your locked computer that you want to reset Windows 8.1 password.
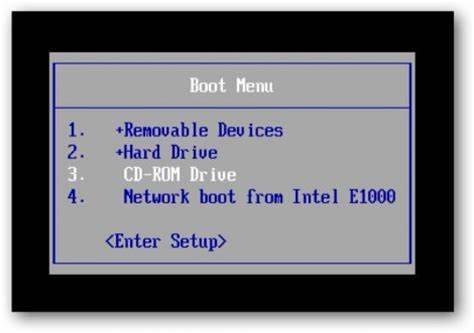
Step 5: Power on the locked computer and press F12 as soon as possible to open “Boot Menu”. Press arrow key to highlight USB option and press Enter to boot from USB.
Step 6: Once the locked computer boots from USB and locates Windows Password Rescuer, you can reset administrator or other local user account passwords with several clicks. Now click “Administrator” from user list.
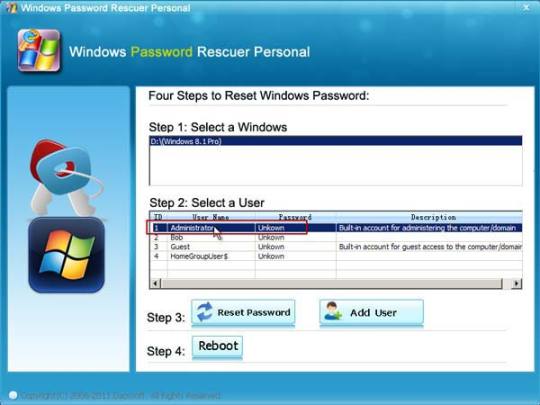
Step 7: Click “Reset Password”, when it asks you if reset administrator password to blank, click “Yes” to confirm it.
Step 8: Administrator password will be removed and shown blank in password list. It means that you will be able to sign in the account without password.
Step 9: Click “Reboot”. When it asks you to remove your USB, remove the USB from your computer and then click “Yes” to restart the computer.
Step 10: After restarting, you can log on administrator without password.

Methods in this article apply to any laptop and desktop computers such as Dell, HP, Toshiba, Acer, Lenovo, Asus etc.
0 notes
Text
Evaluation Product Keys for Windows Server 2008 R2

Evaluation Product Keys for Windows Server 2008 R2 | https://tinyurl.com/2a99ttfv | #Guide #Microsoft #News #ProductKeys #SerialKeys #Windows This post now forms part of our KMS and evaluation product keys series. We have shared with you all the product keys you should ever require for Microsoft user and server operating systems. You can see the full list available to you by clicking the link below: Microsoft Evaluation and KMS Product Key Series This is more as a reminder for ourselves when building evaluation labs for Windows Server 2008 R2 (although most people will be moving on 2012 by now) but we thought we would share this information with our visitors as well. These product keys can be used […] Read more... https://tinyurl.com/2a99ttfv
0 notes
Text
Stay Safe Online with Nessus: A Top Web Security Scanner
Nessus is a complete vulnerability assessment tool that uses thorough scans and customizable reports to help businesses find and deal with security risks. You can safely deal with various online threats using one of the best vulnerability scanners, Nessus. One thing that makes Nessus stand out is that it's free to use. It also offers a full vulnerability scanner. Nessus makes it an excellent choice for people and small companies that want to improve their security without spending much money. The Origin Of Nessus Initiated by Tenable co-founder Renaud Deraison, a cybersecurity specialist, Nessus started its path in 1998 as part of the Nessus Project. The effort sought a free, remote security scanner for the online community. This program became well-known among cybersecurity experts quite fast. However, in 2005, Nessus moved from free, open-source software to a proprietary, closed-source solution. Despite this change, Tenable has kept providing Nessus with free and premium options to maintain its competitive edge in the market. Nessus and Tenable: Key Facts You Need to Know Tenable is a notable cybersecurity firm headquartered in Columbia, Maryland, USA. Tenable has become a leader in the market since more than 40,000 companies all over depend on its security solutions. Though not wildly original, their official website has a clear design and simple navigation, facilitating user experience. It also has an active blog, routinely changed with fresh material to keep people updated. Those wishing to remain in touch with Tenable can follow on Facebook, Twitter, LinkedIn, and YouTube. Prices and Plans for Nessus To meet various user needs, the Nessus vulnerability scanner provides three editions: Previously called "Nessus Home," this issue is free. It is a perfect starting point for cybersecurity since it offers the necessary tools for novices and students. Professional Nessus: Designed for professional customers that need sophisticated capabilities, this edition, priced at €3,875.71 ($3,795) annually, Users pick between annual, biannual, or triennial billing cycles; longer memberships save more. Costing: €8,563.14 ($8,391), the most complete edition is Nessus Expert. Though these add-ons are more expensive, they comprise enterprise-level security solutions with extra capabilities, including sophisticated support and on-demand training. Tenable lets users try the features of their paid plans for a free trial lasting seven days, enabling financial commitment free from influence. Among the payment options are main credit and debit cards, PayPal, Google Pay, Amazon Pay, Apple Pay, and Shop Pay. Comprehensive Features and Limitless Potential in Web Security Operating systems ranging from Windows (versions 7, 8, and 10) to SOSE Linux, Ubuntu, Debian/Kali Linux, Fedora, FreeBSD, macOS X, Red Hat/Centos/Oracle Linux, and Windows Server (2008 and 2012) fit Nessus. On both 32-bit and 64-bit computers, the program operates perfectly to guarantee extensive usability. The basic functionality of the free "Nessus Essentials" edition includes asset discovery scanning limited to 16 IPs for vulnerability assessment. This edition is designed for personal use only and lacks sophisticated features like scan scheduling capabilities and compliance/audit check tools. However, it offers a great beginning point for students and newbies to networking technology since it opens a portal into the Tenable ecosystem. Paid plans provide help from the Nessus community, unlimited IT assessments, configuration assessments, and customizable real-time reports. Features such as external attack surface scanning, domain addition capability, scan cloud infrastructure, and 500 pre-built scanning policies also abound in the "Nessus Expert" edition. User-Friendly Security Scanning for Everyone Starting with the Nessus vulnerability scanner is not tricky. Select a plan, provide your details, and get an email with a one-time activation code. Download and install Nessus on your selected operating system using the detailed instructions offered. Nessus's user interface is remarkably straightforward and inviting. Navigate to the "Scans" part of the main menu, select "New Scan," pick a scan template with pre-configured settings, and click "Launch." Customizable viewing choices and colour-coded markers help to interpret scan data. Scanning targets, found vulnerabilities arranged by severity, remedial details, extra scan data, and a list of scans arranged by start time, end time, and status are viewable to users. Thanks to the thorough manuals and simple-to-use design, the free edition has a generally good user experience, even if it might have certain speed restrictions. Client Support Tenable provides phone, live chat, email, and community forum-based customer service around the clock. Users of the free edition may thus have slower response times of up to 24 hours and lack phone or email assistance. Tenable offers thorough self-help alternatives, including a detailed FAQ section, how-to manuals, a resource library, and documentation pages for individuals wanting to handle problems alone. Additionally, a great source of advice and troubleshooting is the Nessus community. How Nessus Works? Nessus thoroughly scans an entire IT system to find holes and weak spots. Here's a quick rundown of what it can do: Types of Scans: Nessus has different types of scans, such as vulnerability scans, compliance checks, and configuration evaluations. TechRadar says users can choose from scan files already set up or make their own that fit their needs. Deployment: Nessus can be used with many different operating systems, such as Windows, macOS, and several different versions of Linux. To set up the software, you have to choose the correct version, install it, and then use a registration code Tenable gives you to make it work. Scanning Process: To do a scan, users go to the "Scans" area, click "New Scan," and pick a template. The scan can be started immediately or set to happen later once it has been set up. The results are shown in an easy-to-understand colour-coded style that indicates the seriousness of the vulnerabilities and details how to fix them. Real-Time Reviews Of Nessus Héctor Joel (Information Technology and Services, 11-50 employees) Rating: 5/5 Pros: Nessus is praised for its thorough vulnerability scans and easy-to-use graphics interface. It has been easier to find and fix weaknesses with this tool. Cons: None were mentioned; overall, it was a good experience. Review: "Nessus has a great tool for finding and fixing vulnerabilities." From the discovery stages on, the information given is very complete. We are very happy with how the tool was set up and the results it gives us. Carol (Chemicals, 10,000+ employees) Rating: 4/ 5 Pros: It works well to check for vulnerabilities, is easy to set up, sends alerts quickly, and updates often. Cons: It gives some false results and costs a lot for extra features. Review: "Nessus has done a great job giving our company a vulnerability assessment." Simple steps were needed to set up Nessus, and it quickly did thorough checks. It's great to make your tests and use various tools. Pros and Cons Of Nessus Pros Cons Comprehensive Expensive User-friendly False Positives Detailed Customizable Reliable - Rivals of Nessus When seeking alternatives to Nessus, a popular vulnerability assessment tool, several options cater to various needs and budgets. Here’s a detailed look at three notable rivals: OpenVAS, Probely, and Vega. 1. OpenVAS Overview: OpenVAS (Open Vulnerability Assessment System) is an accessible and cost-effective alternative to Nessus. As an open-source vulnerability scanner, OpenVAS is part of the Greenbone Vulnerability Management (GVM) solution. Key Features: - Free and Open-Source: Completely free, making it ideal for organizations with budget constraints. - Comprehensive Scanning: Provides detailed vulnerability assessments for network devices and servers, including checks for known vulnerabilities, misconfigurations, and outdated software. - Community Support: Backed by a strong community, offering regular updates and support through forums and mailing lists. - Extensive Plugin Library: Includes thousands of regularly updated vulnerability tests (VTs). Limitations: - UsabiPluginThe setup and configuration can be more complex than those of commercial alternatives. - Documentation: The polished and extensive documentation in paid solutions may be lacking. Best Suited For: - Organizations and individuals need a robust, cost-free tool for vulnerability scanning. - Users are willing to invest time in learning and configuring the tool. 2. Probely Overview: Probely is a cloud-based vulnerability scanner focusing on ease of use and business needs. It’s particularly appealing to small and medium-sized enterprises (SMEs) looking for an efficient yet cost-effective solution. Key Features: - Business-Oriented Packages: Offers a range of pricing plans, including a "Pro" package that balances cost and features, making it an affordable option compared to Nessus. - Integration-Friendly: Easily integrates with CI/CD pipelines, making it suitable for DevSecOps environments. - User-Friendly Interface: Simplifies vulnerability management with a clean and intuitive user interface. - Automated Scanning: Provides automated web application scanning and clear guidance on remediation steps. Limitations: - Scope: Primarily focuses on web application scanning, which might not cover all network vulnerabilities. - Feature Set: It may lack advanced features and depth offered by more established tools like Nessus. Best Suited For: - Businesses are seeking a straightforward, cloud-based vulnerability scanner focusing on web applications. - Users are looking for a tool that integrates seamlessly into their development workflows. 3. Vega Overview: Vega is a free and open-source web application scanner known for its extensibility and flexibility. It caters to technically proficient users who need a customizable tool for web security assessments. Key Features: - Free and Open-Source: No cost involved, making it an attractive option for budget-conscious users. - Extensibility: Allows users to write custom scripts and extend functionality using JavaScript, providing flexibility for unique scanning requirements. - Comprehensive Web Scanning: Can detect various web vulnerabilities such as SQL injection, cross-site scripting (XSS), and more. - Graphical User Interface: Offers a user-friendly GUI for easy navigation and use. Limitations: - Complexity: Requires technical expertise to leverage its scripting and customization capabilities fully. - Limited Network Scanning: Primarily focused on web applications, not designed for comprehensive network vulnerability assessments. Best Suited For: - Tech-savvy users and developers who need a versatile tool for web security testing. - Individuals or small teams are looking for a free scanner that can be customized to meet specific needs. Verdict Though not the most often used security scanner, Nessus is a strong competitor in the cybersecurity field. Its developer community has produced several plug-ins, risk-based vulnerability prioritizing, adjustable real-time reporting, an easy-to-use interface, and an extensive range of scans. Nessus offers a strategy to fit your demands and keep you secure online regardless of your experience level—beginner, professional, or corporate user. FAQs For what purposes is Nessus used? Vulnerability assessment makes use of nessus to enable companies to find and fix security flaws in their IT systems. Does a free edition of Nessus? The free edition, A: Nessus Essentials, provides restricted basic vulnerability assessment capabilities spanning just 16 IP addresses. For small-scale use and students in particular, it's perfect. What is the Frequency of Nessus updates? Nessus routinely changes its vulnerability database to guarantee users are shielded against the most recent security risks. What distinguishes Professional, Expert, and Essentials from one another primarily? While Nessus Professional and Expert provide more thorough scanning capabilities including compliance checks, scan scheduling, and support for bigger networks, A: Nessus Essentials is free and restricted in features. Among other things, Nessus Expert offers cloud infrastructure evaluations and external attack surface detection. Read the full article
0 notes
Text
New Data Revealed: 90% of Remote Desktop Attacks Originate from Unsecure Networks. Take Action Now! Protect Your Systems with SSL/TLS Encryption and Two-Factor Authentication. Update Your Software and Restrict Access. #cybersecurity #dataprotection #infosec #riskmanagement #networksecurity
Securing Remote Desktop (RDP) for System Administrators
Securing Remote Desktop (RDP) for System Administrators
How secure is Windows Remote Desktop? Is it vulnerable to unauthorized access? In this article, we will explore the security measures you can take to ensure the safety of your Remote Desktop sessions.
Remote Desktop Encryption Vulnerability
Remote Desktop sessions are typically encrypted, preventing unauthorized users from viewing your session. However, earlier versions of Remote Desktop Protocol (RDP) had a vulnerability that could allow unauthorized access through a man-in-the-middle attack. This means that someone could intercept and manipulate your session while it is being encrypted.
Fortunately, newer versions of Windows, such as Windows Vista, Windows 7, Windows 8, Windows 10, and Windows Server 2003/2008/2012/2016, offer the option to secure Remote Desktop sessions using SSL/TLS. It is highly recommended to use these secure protocols to protect your sessions.
Basic Security Tips for Remote Desktop
To ensure the security of Remote Desktop access, here are some essential tips:
Use strong passwords: It is crucial to use strong and unique passwords for any accounts with access to Remote Desktop. Make sure to follow the campus password complexity guidelines for creating secure passwords.
Consider two-factor authentication: Implementing two-factor authentication adds an extra layer of security. By integrating Remote Desktop Gateway with the Campus instance of DUO or other two-factor certificate-based smartcards, you can enhance the authentication process.
Keep your software updated: Remote Desktop components are automatically updated with the latest security fixes through Microsoft's patch cycle. Ensure that you are running the latest versions of the client and server software to benefit from these security updates. Additionally, make sure any Remote Desktop clients on other platforms are still supported and updated, as outdated versions may have security vulnerabilities.
Restrict access using firewalls: Utilize firewalls, both software and hardware, to restrict access to the Remote Desktop listening ports. By default, the Remote Desktop port is TCP 3389. Consider using an RDP Gateway to further restrict Remote Desktop access or use the campus VPN software to connect to the campus network securely.
Enable Network Level Authentication (NLA): Windows 10, Windows Server 2012 R2/2016/2019 provide Network Level Authentication by default. NLA adds an extra layer of authentication before establishing a connection. It is recommended to enable NLA on Remote Desktop servers and configure Remote Desktop clients on other platforms to support NLA.
Limit users who can log in using Remote Desktop: By default, all Administrators can log in to Remote Desktop. To enhance security, limit remote access only to those accounts that need it. Remove administrative access via RDP for non-system administration purposes and only allow user accounts that require RDP service. Consider creating technical groups instead of using the local Administrator account for remote access.
Set an account lockout policy: Configure your computer to lock an account for a set number of incorrect login attempts. This helps prevent brute-force attacks by automated password guessing tools. Set reasonable values for the account lockout policy, such as three invalid attempts with a three-minute lockout duration.
Best Practices for Additional Security
To further enhance the security of your Remote Desktop setup, consider these best practices:
Avoid direct RDP access from off-campus: Opening RDP (port 3389) to off-campus networks is highly discouraged due to the increased risk of attacks. Instead, utilize an RDP Gateway or other secure remote access methods to connect to your system from off-campus.
Use RDP Gateways: RDP Gateways provide a secure way to restrict access to Remote Desktop ports while supporting remote connections through a single gateway server. When using an RDP Gateway, configure your desktop and workstations to only allow access from the RD Gateway. This adds an extra layer of security to your Remote Desktop setup.
Change the listening port for Remote Desktop: Changing the default listening port for Remote Desktop (TCP 3389) helps prevent hackers from easily identifying and targeting your system. Edit the registry key HKEY_LOCAL_MACHINE\SYSTEM\CurrentControlSet\Control\Terminal Server\WinStations\RDP-Tcp to change the listening port and update any firewall rules accordingly.
Tunnel Remote Desktop connections through IPsec or SSH: If an RDP Gateway is not feasible, consider adding an extra layer of authentication and encryption by tunneling your Remote Desktop sessions through IPsec or SSH. Both IPsec and SSH provide secure protocols for transmitting your Remote Desktop data.
Utilize existing management tools for RDP logging and configuration: Rather than using other remote administration tools like VNC or PCAnywhere, leverage the built-in logging and configuration capabilities of Remote Desktop. RDP logins are audited to the local security log and can be easily monitored for anomalies. Use Group Policy Objects (GPOs) or other Windows configuration management tools to ensure consistent and secure RDP configurations across your servers and desktops.
Restrict Access to RDP with Windows Firewall
If you have a personally-managed computer and Administrator access, you can configure the Windows Firewall to restrict access to your system via Remote Desktop. Follow these steps:
Go to Settings > Update and Security > Windows Security > Firewall and Network Protection > Advanced Settings.
In the Inbound Rules section, locate and select the Remote Desktop - User Mode (TCP-In) rule.
Open the properties of the selected rule.
In the Scope tab, specify the authorized IP addresses or subnets that can connect to your computer's Remote Desktop service.
Save the changes and ensure that only authorized hosts and networks can access your system via Remote Desktop (RDP) by configuring the firewall exceptions.
Campus IP Addresses and Subnets
When specifying authorized IP addresses or subnets, choose from the following common examples of campus networks:
Berkeley IT RD Gateway: 169.229.164.0/24
Campus Remote Access VPN Networks (bSecure Remote Access VPN): Refer to the Campus Remote Access VPN documentation for the authorized IP addresses and subnets.
By following these security measures and implementing best practices, you can ensure the safety of your Remote Desktop sessions and protect your systems from unauthorized access. Secure Remote Desktop access is vital for system administrators to manage their systems effectively and mitigate potential security risks.
RoamNook: Fueling Digital Growth
Looking for innovative technology solutions for IT consultation, custom software development, and digital marketing? Look no further than RoamNook, an innovative technology company specializing in fueling digital growth. With expertise in various domains and a team of experienced professionals, RoamNook is dedicated to delivering top-notch services that drive digital success for businesses. Visit www.roamnook.com to learn more about RoamNook's services and how they can help you achieve your digital goals.
Source: https://security.berkeley.edu/education-awareness/securing-remote-desktop-rdp-system-administrators&sa=U&ved=2ahUKEwjBqZKx5s-GAxVgrokEHeQgDOAQFnoECAEQAw&usg=AOvVaw3LntVDY2WTbLUHJ0fbCJ1z
0 notes
Text
Price: [price_with_discount] (as of [price_update_date] - Details) [ad_1] Buslink CipherShield USB 3.0/eSATA 256-bit Encrypted Hard Drive Series prevents unauthorized access to your digital data. CipherShield design features a chip embedded in the access key which matches the AES encryption module on the controller board. The drive will automatically lock down its content once the key is unplugged, or power is shut off. And without the access key, data will not be seen or accessed in the event of theft or loss of the external drive. Data stored on the hard drive are safeguarded by hardware-based National Institute of Standards and Technology (NIST) certified industrial strength AES (Advanced Encryption standard) cryptographic engine. The advantage of hardware encryption over software encryption is that you need not be concerned about Trojans/viruses or software upgrades, which results in a decrease of total cost of ownership. Since CipherShield encrypts data independent of the operating system; removing the drive and connecting it directly to the SATA BUS will not defeat the encryption. Unit is bundled with two keys and registration is required for key duplication. System Requirement: Microsoft Windows 10, 8, 7, Vista, Server 2016, 2012, 2008, 2003 (XP and 2000 Server not supported for larger than 2TB), Mac OS X 10.4 or later with Intel Processor, Linux with GPT support. Package Content: CipherShield USB 3.0/eSATA 256-bit AES External Hard Drive, 2 Cipherkeys, USB 3.0 and eSATA cables, Power Adapter, and User manual. NIST FIPS 140-2 Level 2 compliant AES hardware encryption with 256-bit encryption Conforms to HIPAA regulation regarding patient privacy and to Sarbanes-Oxley regarding corporate financial and accounting practice CipherShield Smart Insert technology with CipherKey to authenticate the drive Encryption key is on the removable hardware key; can be removed and stored away to prevent unauthorized access Operates independently to the OS: does not require separate drivers [ad_2]
0 notes