#a git remote is just a git repo on a server somewhere
Explore tagged Tumblr posts
Visit Tumblr Blog
Explore Tumblr blogs with no restrictions, modern design and the best experience.
Last Seen Tumblr Blogs


Fun Fact
After the announcement of the deal with Yahoo!, there were 170K signatures of unhappy Tumblr users petitioning to prevent the sale in 2013.
Text
Okay, I'll give it a shot; git is a program. You use it to make a git repository (which is in practice just a folder with some metadata).
The repository stores series of commits. Each commit stores a series of changes made since the previous one - files which have been added, files which have been removed, and changes which have been made to existing files.
(It stores them in branches, which have separate histories, but to begin with you'll just be dealing with one 'main' branch.)
You can then 'push' commits from this local repo to a remote repo, often on a service like GitHub, so the commit history can be shared between different devices, people, etc.
Doing any of this directly with git itself in the command line involves giving it a complicated series of commands in a specific order, often starting with the most complicated stuff before you can get to the simple stuff. In practice, you'll generally be using another program as a wrapper over git; which git client you use is mostly a matter of preference. On Windows good places to start could be the GitHub desktop client, which abstracts a lot of the more complicated bits away, or the default Git Gui which comes with Git for Windows, which maps more directly to whats happening on the command line (but with clearly laid out buttons instead of hard-to-memorise syntax). You shouldn't need to drop down to the command line until you're needing to do more complex stuff.
Start with the basics of getting something versioning, then you can work up into branches and all that if and when you need to. Each step is much easier once you've got a firm footing in the previous one.
Can someone explain to me in like five seconds how to use git, assuming that I know basic shit about coding/command line/whatever but don't know any of the specific terminology related to git. Like every tutorial online is at the same time both over my head and also vastly too basic. Just like. Tell me what it is.
Uh. First tell me its ontology. Is it a program, a standard, a language...? I know that it's for version control. Suppose I wanted to do version control at a piece of code. What do I do. What buttons do I press, on my computer? Tell me these things.
#git#does that work as an explanation? i've only been using this stuff for like a year idk if im at the point where i can properly re-explain it#also to clarify the difference between git and github:#git the program that represents the repos. it's like twenty years old and was originally made for tracking the development of linux#a git remote is just a git repo on a server somewhere#GitHub is a company that makes a business out of hosting servers with git repos on them. there are other ones too#(it's able to have git in its name since git comes from the linux world and so isn't under copyright in any form)#GitHub is the most popular one and is generally what you suggest to beginners since it lets you make both public and private repos for free#(you only have to pay when you need a private repo that multiple people can access)#(this business model is able to make sense because git repos take up a frankly ridiculously small amount of storage space)
476 notes
·
View notes
Text
The beginner’s guide to Git & GitHub
What is Git?
Git is a free, open-source version control software. It was created by Linus Torvalds in 2005. This tool is a version control system that was initially developed to work with several developers on the Linux kernel.
This basically means that Git is a content tracker. So Git can be used to store content — and it is mostly used to store code due to the other features it provides.
Real life projects generally have multiple developers working in parallel. So a version control system like Git is needed to ensure there are no code conflicts between the developers.
Additionally, the requirements in such projects change often. So a version control system allows developers to revert and go back to an older version of the code.
A branch system in Git allows developers to work individually on a task (Ex: One branch -> One task OR One branch -> One developer). Basically think of Git as a small software application that controls your code base, if you’re a developer.
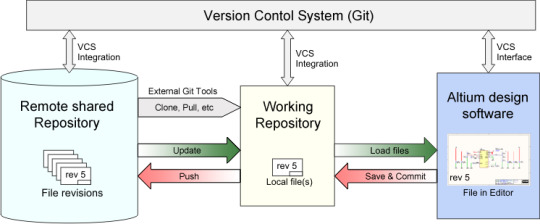
Shows how Git works
Git Repositories
If we want to start using Git, we need to know where to host our repositories.
A repository (or “Repo” for short) is a project that contains multiple files. In our case a repository will contain code-base files.
There are two hosting platform options or ways to host our repositories. One is Online (On the cloud) and the second is Offline (Self-installed on your server).
There are three popular Git hosting services: GitHub (Owned by Microsoft), GitLab (Owned by GitLab) and BitBucket. We’ll use GitHub as our hosting service.
Before using Git we should know why we need it
Git makes it easy to contribute to your open source projects
To be honest, nearly every open-source project uses GitHub to manage their projects. Using GitHub is free if your project is open source and includes a wiki and issue tracker that makes it easy to include more in-depth documentation and get feedback about your project.
If you want to contribute, you just fork a project, make your changes and then send them a pull request using GitHub web interface.
Documentation
By using GitHub, you make it easier to get excellent documentation. Their help section and guides have articles for nearly any topic related to git that you can think of.
Integration options
GitHub can integrate with common platforms such as Amazon and Google Cloud, services such as Code Climate to track your feedback, and can highlight syntax in over 200 different programming languages.
Track changes in your code across versions
When multiple people collaborate on a project, it’s hard to keep track revisions — who changed what, when, and where those files are stored.
GitHub takes care of this problem by keeping track of all the changes that have been pushed to the repository.
Much like using Microsoft Word or Google Drive, you can have a version history of your code so that previous versions are not lost with every iteration. It’s easy to come back to the previous version and contribute your work.
Showcase your work
Are you a developer and wish to attract recruiters? GitHub is the best tool you can rely on for this.
Today, when searching for new recruits for their projects, most companies look at GitHub profiles. If your profile is available, you will have a higher chance of being recruited even if you are not from a great university or college.
Now we’ll learn how to use Git & GitHub
GitHub account creation
To create your account, you need to go to GitHub's website and fill out the registration form.
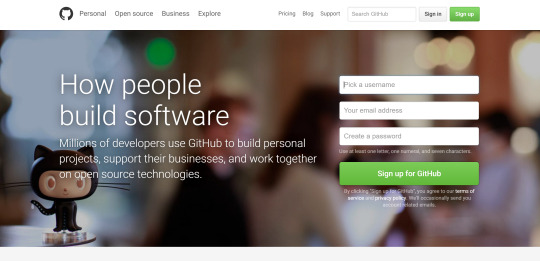
GitHub official web page
Git installation
Now we need to install Git tools on our computer. We’ll use CLI to communicate with GitHub.
For Ubuntu:
First, update your packages.
$ sudo apt update
2. Next, install Git and GitHub with apt-get
$ sudo apt-get install git
3. Finally, verify that Git is installed correctly
$ git --version
4. Run the following commands with your information to set a default username and email when you’re going to save your work.
$ git config --global user.name "MV Thanoshan" $ git config --global user.email "[email protected]"
Working with GitHub projects
We’ll work with GitHub projects in two ways.
Type 1: Create the repository, clone it to PC, and work on it.(Recommended)
Type 1 is about creating a totally fresh repository on GitHub, cloning it to our computer, working on our project, and pushing it back.
Create a new repository by clicking the “new repository” button on the GitHub web page.
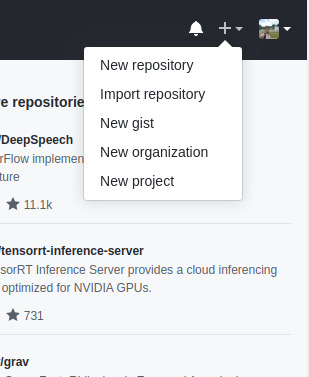
Pick a name for your first repository, put a small description, check the ‘Initialize this repository with a README’, and click on the “Create repository” button.

Well done! Your first GitHub repository is created.
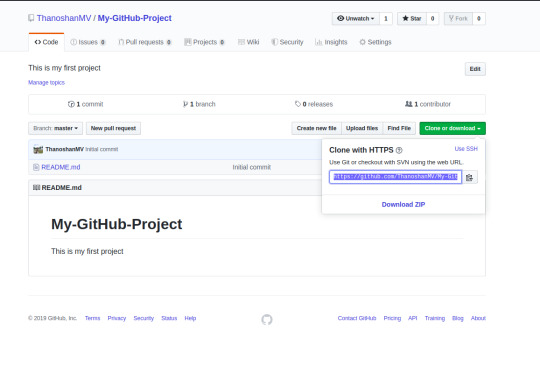
Your first mission is to get a copy of the repository on your computer. To do that, you need to “clone” the repository on your computer.
To clone a repository means that you're taking a repository that’s on the server and cloning it to your computer – just like downloading it. On the repository page, you need to get the “HTTPS” address.
Once you have the address of the repository, you need to use your terminal. Use the following command on your terminal. When you’re ready you can enter this:
$ git clone [HTTPS ADDRESS]
This command will make a local copy of the repository hosted at the given address.

Output message of “git clone” command
Now, your repository is on your computer. You need to move in it with the following command.
$ cd [NAME OF REPOSITORY]

As you can see with the above picture, my repository name is “My-GitHub-Project” and this command made me go to that specific directory.
NOTE: When you clone, Git will create a repository on your computer. If you want, you can access your project with the computer user interface instead using the above ‘cd’ command on the terminal.
Now, in that folder we can create files, work on them and save them locally. To save them in a remote place �� like GitHub – we have do a process called a “commit”. To do this, get back to your terminal. If you closed it, like I previously stated use the ‘cd’ command.
$ cd [NAME OF REPOSITORY]
Now, in the terminal, you’re in your repository directory. To “commit”, 4 steps are required. These four steps are called: ‘status’ , ‘add’ , ‘commit’ and ‘push’. All the following steps must be performed within your project.
“status”: The first thing you need to do once your work is to check the files you have modified. To do this, you can type the following command to make a list of changes appear.
$ git status
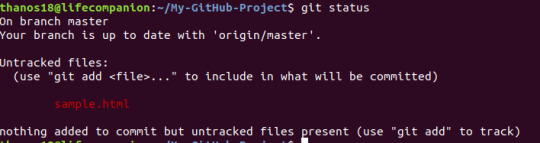
2. “add”: With the help of the change list, you can add all files you want to upload with the following command,
$ git add [FILENAME] [FILENAME] [...]
In our case, we’ll add a simple HTML file.
$ git add sample.html

3. “commit”: Now that we have added the files of our choice, we need to write a message to explain what we have done. This message may be useful later if we want to check the change history. Here is an example of what we can put in our case.
$ git commit -m "Added sample HTML file that contain basic syntax"

4. “push”: Now we can put our work to GitHub. To do that we have to ‘push’ our files to Remote. Remote is a duplicate instance of our repository that lives somewhere else on a remote server. We must know the remote’s name (Mostly remote is named origin). To know that type the following command.
$ git remote

As you can see the above image, it says that our remote’s name is origin. Now we can safely ‘push’ our work by this following command.
$ git push origin master
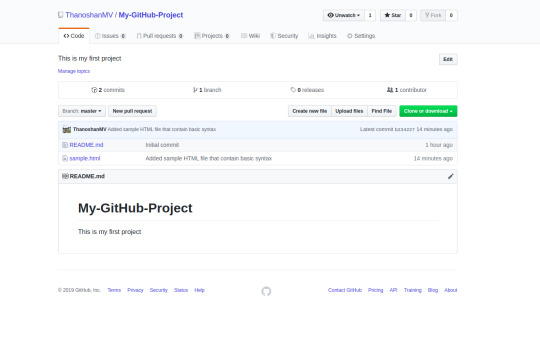
Now, if we go to our repository on the GitHub web page, we can see the sample.html file that we’ve pushed to remote — GitHub!
NOTE: Sometimes when you’re using Git commands in the terminal, it can lead you to the VIM text editor (It’s a CLI based text-editor). So to get rid of it, you have to type
:q
and ENTER.

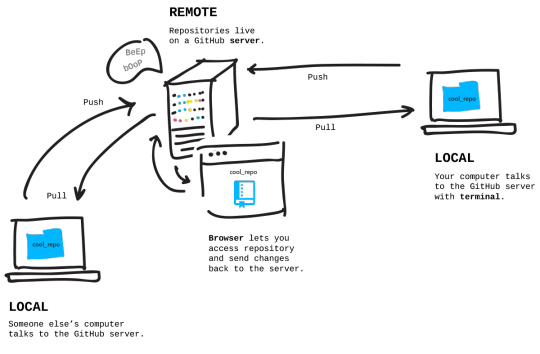
Describes how pull & push works
Pulling is the act of receiving from GitHub.
Pushing is the act of sending to GitHub.
Type 2: Work on your project locally then create the repository on GitHub and push it to remote.
Type 2 lets you make a fresh repository from an existing folder on our computer and send that to GitHub. In a lot of cases you might actually have already made something on your computer that you want to suddenly turn into a repository on GitHub.
I will explain this to you with a Survey form web project that I made earlier that wasn’t added to GitHub.
As I already mentioned, when executing any Git commands, we have to make sure that we are in the correct directory in the terminal.

By default, any directory on our computer is not a Git repository – but we can turn it into a Git repository by executing the following command in the terminal.
$ git init

After converting our directory to a Git repository, the first thing we need to do is to check the files we have by using the following command.
$ git status
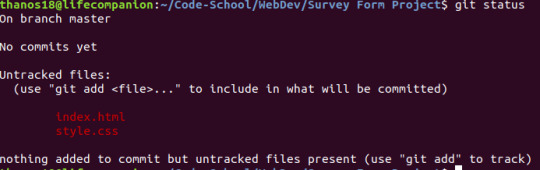
So there are two files in that directory that we need to “add” to our Repo.
$ git add [FILENAME] [FILENAME] [...]
NOTE: To “add” all of the files in our Repository we can use the following command:
$ git add .
After staging area (the add process) is complete, we can check whether the files are successfully added or not by executing the $ git status
If those particular files are in green like the below picture, you’ve done your work!.
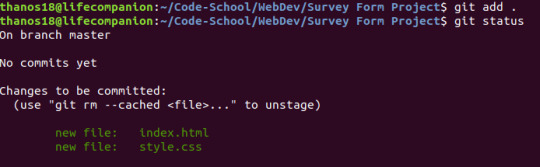
Then we have to “commit” with a description in it.
$ git commit -m "Adding web Survey form"

If my repository started on GitHub and I brought it down to my computer, a remote is already going to be attached to it (Type 1). But if I’m starting my repository on my computer, it doesn’t have a remote associated with it, so I need to add that remote (Type 2).
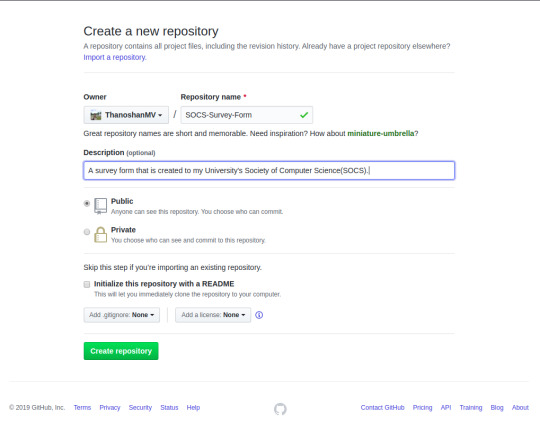
So to add that remote, we have to go to GitHub first. Create a new repository and name it whatever you want to store in GitHub. Then click the “Create repository” button.
NOTE: In Type 2, Please don’t initialize the repository with a README file when creating a new repository on the GitHub web page.
After clicking the “Create repository” button you’ll find the below image as a web page.
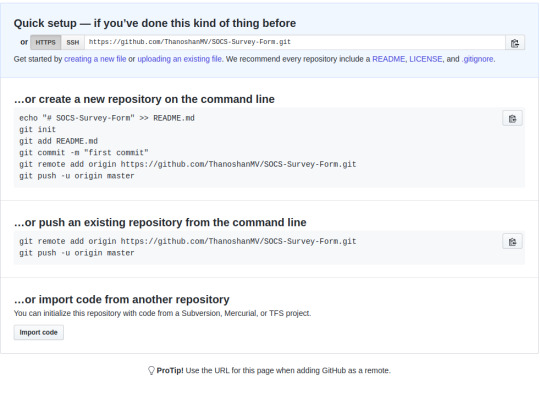
Copy the HTTPS address. Now we’ll create the remote for our repository.
$ git remote add origin [HTTPS ADDRESS]
After executing this command, we can check whether we have successfully added the remote or not by the following command
$ git remote
And if it outputs “origin” you’ve added the remote to your project.
NOTE: Just remember we can state any name for the remote by changing the name “origin”. For example:
$ git remote add [REMOTE NAME] [HTTPS ADDRESS]
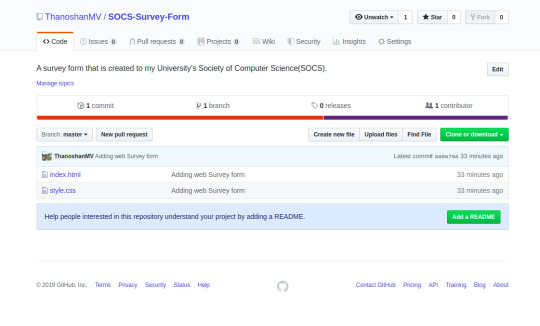
Now, we can push our project to GitHub without any problems!
$ git push origin master
After completing these steps one by one, if you go to GitHub you can find your repository with the files!
Conclusion
So, thank you everyone for reading. I just explained the basics of Git and GitHub. I strongly encourage you all to read more related articles on Git and GitHub. I hope this article helped you.
Check out my original article in Medium.
Thank you.
Happy Coding!
via freeCodeCamp.org https://ift.tt/2NnVgUJ
0 notes
Text
Tips & Tools to Boost WordPress website development process
WordPress globally powers nearly one-third of the word's websites, from a small personal blog to the complex and giant sites of major corporations like Time Inc., Sony, NBC. It will also provide you with the unique & most popular CMS in use nowadays.

While the core WordPress software is free, the cost of a website depends entirely on your budget and goals. Here are tips to boost your WordPress website development process.
1. Set up remote Git repository
You can use Git for version control with the help of Beanstalk repositories because it allows you to deploy commits to remote servers automatically & you don't need to fire up a terminal. Create a new, empty repository on Beanstalk then clone it to your local machine.
2. Set up a local repository
After the remote repo is created, clone it to your machine for local development, and if you are a wiz, you can use the command line. you can also go with the second option, which is the Tower. Tower has released version 2.0 & it seems much more stable than 1x.
3. Add starter template & plugins
Web hosting providers can provide essential server security, but keeping your site safe is up to you. Website security is complex. It’s continually evolving, and what kept your site secure a year ago probably won’t do the trick today.
Here’s a look at some of the best WordPress security plugins for protecting your website from malware, hackers, force attacks, and other kinds of malicious security threats.
· Wordfence
Wordfence is one of the most popular and best WordPress Security Plugin. It will provide you a free version of their Plugin, which comes complete with a powerful malware scanner, exploit detection, & threat assessment features. Wordfence also comes as with a built-in WordPress firewall, which runs on your server just before loading WordPress.
The Wordfence plugin will automatically scan your websites for common threats, but you are also free to launch a full scan at any time. You will be alerted if any signs of a security breach are detected with the instructions to fix them.
· iThemes Security
iThemes security is also a useful WordPress security Plugin which claims to offer several ways to secure and protect your WordPress website.
In iThemes security, only with one-click installation, you can stop automated attacks & protect your website and can also fix various common security holes.
With the help of iThemes, you can track registered users' activity and add two-factor authentication, password expiration, malware scanning, import/export settings, and so on.
It's process flow work such as scanning through the entire website and try to find out is there any potential on the website. It will also efficiently prevents your website from the 2attacks & ban IP addresses that try to brute force.
4. Add .gitignore file to site root & commit
You don't want to have the entire WordPress install loaded into your repository. Use a .gitignore file to manage what gets tracked. You can use its infusion. There is a sample gitignore.md included in the infusion docs, which is based on that gist. Edit the file to match your project, move it to the root & don't forget to change the file name from gitignore.md to .gitignore.
5. Site Development
At this point, your normal local development process can kick in. Design comps and wireframes, & remember, Git is your friend, save, commit often, and push to the remote server.
6. Staging Server & Site Migration
Once your website is developed to the point, push it to the staging server, or It just needs to be somewhere semi-public where the client and data entry folks can get to it.
A couple of quick edits to the database and the site should be up on the staging server. you can also find that running a Search & Replace on the database will fix URL conflicts.
7. Beanstalk deployment
Log into Beanstalk, browse to your repo, and set up deployment to the staging server. This will allow you to continue developing locally, push commits to Beanstalk, and have them automatically (or manually if you choose) pushed to the staging server. Beats FTP.
If you’re working with multiple developers, you’ll do this step much earlier. You’ll do the next step much earlier as well.
8. BUG TRACKING
Bug tracking is simple. It typically consists of listing all of the features of the project, their expected inputs, how they should perform given each input, and what output they should return, if any.
Bug tracking is simple. It consists of all the lists of features of the project, their expected inputs, how they should perform given each input, and what output they should return?
Many times developers don't track bugs seriously, and as a result, many themes & plugins behave unexpectedly. Tracking bugs during development is important though after release, no matter what, users will always find something that you missed or that can be enhanced.
Even though you’ve tracked issues and beta tested, your product will still have bugs — it’s inevitable. That’s fine; the Internet is a highly agile environment in which you can get nearly instant feedback. Note the problem, add it to the issue tracker, and resolve it in the next release.
There are a variety of ways to track bugs. Some people use a simple notebook or spreadsheet, but if you’re working on a professional product, then look to professional tools. Some bug-tracking systems are standalone, while others are integrated into source-code control systems.
Ultimately, your goal is to rid the software of bugs. While you might not be able to do that ultimately, the strategies above will minimize the number of defects in the product upon release.
Wrapping-Up
If you are building a WordPress site, you should consider a hosting provider that offers WordPress hosting. This will help save time and allow you to access your WordPress dashboard through your account.
0 notes