#also i do not understand error handling and JSON integrations
Explore tagged Tumblr posts
Visit Tumblr Blog
Explore Tumblr blogs with no restrictions, modern design and the best experience.
Last Seen Tumblr Blogs


Fun Fact
25% of US internet users with an annual income of $80-100K use Tumblr.
Text
Hello audience. Unfortunately, I am still on my break. However, I am happy to announce that I am still alive and kicking. In fact, I decided to make use of my unemployment and revisit HTML, CSS, and JavaScript to create... A visual novel.
Good News: code is 100% reusable because I used a JSON (i do not know how that works, someone can kindly explain to me...)
Bad News: this code sucks ass, and NOTHING works except playing the story. Transitions? Doesn't work. UI/UX? Ass. Effects? Hell no... Also, 70% of the features aren't present yet I'm gonna do it later.
Oh, this is CrossDust, if you can't tell.


Dust Sans by Ask-Dusttale, Cross Sans by Jakei
I'm gonna respond to asks and do requests later (After my break is over). This is just a small update teehee.
#dsevalyappuccino#TIME TO GO INSANE IN THE TAGS!!#i hate css#i still hate css#css hell no#guys why is css so hard. ive literally been doing this for months and css is still hard#i was about to use css spritesheets for the sprites and emotions#but my ass gave up and instead i just use seperate images#GUYS!!! DISPLAY: FLEX 💪. DISPLAY: GRID?!?!#javascript i hate you tooq#i hate java script naurrrr#what do you mean DOM objects#what do YOU MEAN#also i do not understand error handling and JSON integrations#papaGPT doesn't explain anything#i don't know what I just wrote#coding???????????#kids don't be unemployed#actually maybe if you're unemployed but still making money that's great#also the sprites are just for testing purposes im probably gonna make new better ones if i chose to expand this into#a full blown anime high school visual novel project#i don't wanna think of all that story crap but then again i can just write the cringiest thing on earth
23 notes
·
View notes
Text
Python Programming Complete Beginners Course Bootcamp 2025

Have you ever looked at the tech world and thought, "I wish I could learn to code"? Maybe you’ve tried a few tutorials, maybe not—but something always stopped you. Too complicated. Too dry. Not for you.
But what if there was a course that truly understood beginners—one that starts from absolute zero and guides you, step by step, into the world of Python programming, while showing you real-world applications (like how NASA uses it on Mars rovers)?
Well, good news. That course exists—and it’s packed with everything you need to become a confident Python developer in 2025.
Let’s explore why the Python Programming Complete Beginners Course Bootcamp 2025 is the game-changing course you’ve been waiting for.
🧠 Why Python Is the #1 Language to Learn Right Now
Before we dive into the course, let’s quickly address the “why.” Why Python?
Beginner-Friendly: Python is readable, clean, and simple to learn.
Massive Demand: Tech companies, research labs, and even NASA rely on Python.
Versatile: From web apps to machine learning, data science, automation, and robotics—Python does it all.
Supportive Community: With countless libraries, forums, and global user groups, you’re never coding alone.
Learning Python is like getting a golden key to unlock opportunities in tech, science, automation, and even space exploration.
👨🚀 Yes, NASA Uses Python—And So Can You
Here’s a fun fact that often surprises people: NASA uses Python.
Python is deeply embedded in many of NASA’s systems, including those involved in analyzing data from the Mars rovers. When you take this course, you’ll even get insight into these practical applications—so it’s not just about syntax, loops, or variables. You’ll understand how Python powers cutting-edge space tech.
That’s one of the reasons the creators of the Python Programming Complete Beginners Course Bootcamp 2025 made sure to include real-world projects and examples, inspired by the ways Python is used by NASA and others.
🧩 What's Inside the Python Beginners Course Bootcamp 2025?
Here’s what makes this course ideal for beginners:
✅ Zero Prerequisites
You don’t need any prior experience in programming. This course starts from scratch—literally. Even if you’ve never seen a line of code before, you’re good to go.
✅ Step-by-Step Lessons
The course follows a progressive structure:
What is Python and how to install it
Basic programming concepts like variables, loops, and conditionals
Functions, objects, and data structures
File handling and working with APIs
Advanced topics like OOP (Object-Oriented Programming), error handling, and more
Each concept is broken down into digestible lessons with code demonstrations and real examples.
✅ Hands-On Projects
You’re not just watching videos. You’ll build:
A calculator
A weather app
A to-do list app
Python scripts for automation
A space-themed data visualization project (inspired by NASA missions!)
By the end, you’ll have a portfolio of projects you can showcase.
✅ Real-Life Relevance
From the very beginning, the course connects theory with practice. You’ll see how Python is used across different fields—tech, science, finance, marketing, and robotics.
🌟 Who Should Take This Course?
This course is perfect for:
Absolute beginners who’ve never coded
Students and hobbyists who want a strong foundation
Professionals transitioning into tech or data science
Entrepreneurs who want to automate tasks and prototype ideas
Space and science enthusiasts curious about how programming powers missions like Mars rovers
You don’t need to be “techy” to start learning Python. You just need curiosity—and this course will do the rest.
🔧 Tools and Technologies You'll Use
Throughout the course, you’ll get hands-on with tools and libraries such as:
Python 3.x (latest version)
Jupyter Notebooks
PyCharm or VSCode
Pandas and Matplotlib for data
APIs and JSON for web integration
GitHub for sharing your code
You’ll also pick up best practices for writing clean, readable, and professional Python code.
💼 Career Benefits of Learning Python in 2025
Let’s talk outcomes. Why should you learn Python in 2025?
💰 High Salary Potential
Python developers earn above-average salaries. Whether you aim to become a backend developer, data analyst, or automation expert, Python opens up high-paying roles.
🌍 Global Opportunities
Python is universal. Companies across the world—from Silicon Valley to startups in Europe and Asia—use Python. That means remote jobs, freelance gigs, and international roles are all within reach.
🧪 Research & Innovation
Python is the default language for AI and data science. If you’re interested in future-focused fields like machine learning, robotics, or space research, Python is the foundation.
🎓 What Makes This Python Bootcamp Stand Out?
You’ve probably seen lots of courses online. So what makes this one different?
Real-world relevance: Not just "hello world" programs. You’ll learn by building apps and solving actual problems.
NASA case studies: Dive into how real scientific organizations use Python.
Instructor clarity: The content is delivered by instructors who truly understand what beginners struggle with—and how to explain complex ideas simply.
Lifetime access: One-time enrollment gives you updates and content for life.
Community and support: Join thousands of learners, get your questions answered, and collaborate on projects.
📅 Learning Python in 2025? Here’s Your Roadmap
The year 2025 is going to be a big one for tech—AI, automation, space, and web3 are growing fast. Python is central to all of it.
Here’s a suggested 8-week plan using this bootcamp: WeekFocus Area1Python basics & installation2Variables, loops, and conditionals3Functions & data structures4Projects: To-do app, calculator5File handling, APIs, JSON6OOP, error handling7Real-world projects & NASA case study8Final portfolio & GitHub publishing
Stick with this schedule, and you’ll be amazed at your growth.
✨ What Students Are Saying
“I had never written a line of code. Now, I’ve built my own automation tools and even analyzed Mars rover data—all thanks to this course!” — Priya, Data Analyst Trainee
“This is the best Python course for beginners. Period. Everything is broken down clearly, and the examples are fun and practical.” — Daniel, Aspiring Developer
“Learning about how NASA uses Python gave me the motivation I needed. Now I’m applying for internships in aerospace!” — Farah, Computer Science Student
🔗 Enroll Now and Begin Your Python Journey
It’s your turn to learn one of the most in-demand skills of our time. Whether you want to change careers, build side projects, or simply challenge yourself, the Python Programming Complete Beginners Course Bootcamp 2025 is the perfect place to start.
Take that first step. Your future self will thank you.
0 notes
Text
Best PIM Software In 2021
As businesses and retailers expand their product offerings, they achieve more product data. By offering a central storage repository, product information management (PIM) software alleviates the intention of handling vast amounts of product data.
Aside from data unification, there are other advantages of using PIM software. There are also several software providers and solutions available to assist in the management of product data. That’s what we’ll talk about today. We’ll provide a complete overview of PIM software so you can make an informed finding of purchasing a product information management solution.
Here is what we will discuss in this comprehensive essay for mid-market and business brands excited in obtaining a superior product information management solution:
Understanding PIM Software
PIM Software Considerations
Features and Benefits of PIM Software
PIM Software Options
Understanding PIM Software
What exactly is PIM software?
Product information management (PIM) is a software-based process that stores and manages all product information is mandatory to market and sell things through multiple handling channels.
How does PIM software work?
PIM requires the processing of a wide range of incoming, exiting, and cross-platform product information, such as:
Names, titles, descriptions, SKUs, UPCs, and EANs are all required product information.
Relationships and taxonomies: Categories, collections, and variations
Images, movies, and documentation are examples of digital assets.
Sizes, materials, guarantees, and ingredients are all technical specifications.
Google, Amazon, Etsy, and Walmart provide channel-specific information.
POS registers and product catalogs are examples of store-specific information.
PIM software grants businesses to upload, amend, and distribute this type of data through channels such as Google Shopping, Amazon, and other online marketplaces, as well as owned channels such as direct-to-consumer (D2C) websites.
The product report management process includes one or more of the following four steps:
Step 1: Gather Product data is uploaded to a PIM system for storage and administration. PIM necessitates the ability to incorporate several data formats into the system in order to produce a centralized source of product information.
PIM solutions can automate data import by integrating with critical authorities like ERP systems, DAM systems, spreadsheets, box folders, and others. The systems also take flat files (Excel/CSV) through FTP and allow for direct integrations through an open API.
Step 2: Verify PIM systems must ensure that all information is correct, up to date, and dependable. Errors such as misspellings, repeated abbreviations of the same word, and unclear data such as bullet points, for example, can degrade data quality.
Validation can be placed during the import process by employing text format validation or advanced data cleanup via adjustments to import features. Businesses can also set up workflows to manually certify the information in their system.
Step 3: Enhance Once product data is in the system, marketers, e-commerce managers, and other significant staff can enrich and optimize the product information to line with their business goals. Enhancing product descriptions, clarifying requirements, and translating material into other languages are all examples of this.
PIM enrichment also entails categorizing products and group them into collections, as well as identifying links between products that can be utilized for bundles or cross-selling.
Step 4: Distribute Businesses can then transmit their data across other channels, such as e-commerce platforms, marketplaces, comparative shopping engines, and social media platforms, once it has been optimized. Outgoing data, like imports, requires flexibility.
Because each endpoint will have different content and format requirements, PIM systems must apply transformations to data as it exits the system to ensure it is suitable for the intended channel. Excel/CSV files and specialized JSON or XML formats are common export formats. Through the use of an open API, PIM systems can also readily merge with major distribution channels.
Considerations for PIM Software
Before looking into PIM software, it’s a good idea to examine the state of your current data and supplementary systems. It’s also useful to know what kinds of firms and professions utilize PIM software. These points will be Conducted below.
Types of PIM users
PIM systems are most frequently used by the following sorts of businesses:
Retailers
PIM can help retailers and resellers Compress the time it takes to onboard and sells a new item through their internal sales channels. Retailers can use a PIM system to construct and donate product information from a data repository to any number of channels in order to provide an amazing customer involvement.
Manufacturers
The capacity to organize “finished” product information can be beneficial to manufacturers. PIM solutions defeat the need for data silos and substantially increase product data enhancement. This expedites the dissemination process. PIM systems also promote syndication features, which allow manufacturers to distribute their material with external sales channels more easily.
Distributors
Collecting and standardizing product data from suppliers and subscription data services by hand is time-consuming. Distributors can handle a larger number of SKUs more efficiently with a PIM system.
The following user types interact with PIM systems inside these organizations:
Merchandisers and buyers
Merchandisers are the most effective PIM system users. They are typically in charge of gathering product attributes from manufacturers, distributors, and suppliers. Once the data is gathered, they enrich the products before circulating them to the proper sales channels.
Technology groups
PIM systems are used by IT teams to centralize data, automatically populate spreadsheets, and integrate ERP platforms. IT can operate considerably more efficiently because PIM systems streamline advice processing.
Marketers
Product information is used by marketers to create catalogs and bring products to market. Product information management (PIM) systems centralize product information and provide user-friendly design templates. Marketers can utilize these to speed up the process of reaching out to the right people. They also aid in the enhancement of the client experience.
Data distribution and acquisition
Websites, mobile apps, in-store displays, print catalogs, emails, social media, and datasheets are just a few of the areas you can distribute your product data.
Consider where you want to go in the long and short term from a future aspect. If you intend to distribute your items through more than two channels, you should consider using a PIM. Look for a technology that can methodically distribute data across many channels.
Does your company rely on product data from multiple sources when it comes to sourcing? Manufacturing units, vendors, contracted photographers, and content providers could all fall within this category. A PIM system centralizes this data, making it easy to distribute data from various sources to the same location.
The degree of data complexity
Before you can choose a place to keep your product information, you must first understand its structure. The answers to the following questions will assist you in selecting a PIM solution that is basic or robust enough to handle your product data.
How many characteristics do your products have?
Are your characteristics shared by a group of products?
Do you offer items with variations?
Do you provide products that can be customized?
Should PIM store information be linked to pricing and inventory?
This is a critical concern because splitting pricing and inventory into independent services (i.e., microservices) provides long-term scalability as your product catalog and pricing strategy evolve. However, because products and pricing are handled in distinct locations, there are some short-term tradeoffs to consider. The answers to this and other questions act as indicators of your PIM needs. They will also inform you whether data quality has to be improved before integrating a PIM system.
Integration of ERP systems
The link between PIM and ERP can be crucial to understand. However, in order to obtain the best results, they should participate. Some PIM systems combine with ERP systems only in one direction. Others advocate for two-way integration. Determine whether one matches your organization’s needs by asking the following questions:
Is it better to start the product life cycle in ERP or PIM?
Should PIM be able to see ERP data such as indexing and pricing?
Should ERP data be generated in PIM or another app, such as the OMS, before entering the ERP?
Is it necessary to be able to retain PIM data in the ERP without having to access the PIM?
PIM Software Features and Advantages
Features
Understanding the features of product information management software will assist you in selecting the finest software solution. Before we get into these options in the following part, let’s go through the attitude that makes a PIM a powerful system.
Management characteristics
You can establish special qualities for your items using product attributes. Size, color, and substance are common examples of characteristics. Attributes that are well-defined are vital since they facilitate product discovery and make catalog administration easier
You can create and manage an endless number of attributes for your items using a PIM. When attributes are created, they display on item pages as a selectable option. Attributes can be assigned to goods individually or in bulk.
Hierarchies of master and alternative
PIM software Classify your products using hierarchies. The regulatory structure is defined by the master hierarchy, which consists of categories and their nested sub-categories. At least one category is allocated to each product.
PIM also allows you to design various hierarchies for your products to reflect new assortments.
Variants and items
Items are the individual containers for your catalog’s products. They enable you to set and save the specifics for each product. Each item contains a title, a product ID, a description, a category, photos, and attributes that have been assigned to it.
Variants are present in items with multiple alternatives. Each variant represents a distinct version of the product. A t-shirt, for example, with sizes-small, medium, and large—each size would have its own version. Variants have their own unique product ID, characteristics, and other product information. Each is nested beneath the parent item, letting the various possibilities coexist on the same product page.
Bundling of goods
You can organize your goods into bundles using PIM software. These bundles can then be displayed as a cross-sell opportunity on your production sites. Products can display standard pricing, or you can authorize promotions and prices that are exclusive to the grouping of items.
Vendor boss
You can grant vendors access to your system using PIM software. Vendors can then urgently upload and enrich product data. You have a centralized location as a merchant to handle your vendor’s product feeds.
Dashboards and workflows
Workflows enable you to create processes for preparing your products for sale. You can use them to stay organized and ensure that all product information is complete and correct.
Dashboards provide you with a high-level view of your PIM system. You can customize the dashboard widgets to display the most demanding facts for your company. You can, for example, display your overall product count, product handling by category, or a list of product qualities.
Other characteristics
Import History: View a list of all products and attributes that have been imported into the PIM system.
Bulk Import & Export: Use.csv files to import and export large amounts of product data.
Attribute Groups: For workflow management, group the attributes.
Filters: Create filters in your catalog to make it easier to find goods.
Bulk actions include the ability to delete, update, and export items and attributes in bulk.
Role-based access: PIM gives system users varying levels of access to data; some users can modify, while others can only read.
Benefits
Enhanced data quality
One of the primary reasons a company uses a PIM system is to replace spreadsheets for storing and managing product information. Many grow to the point where simple data management software like Excel becomes too challenging to maintain.
Spreadsheets require the use of manual processes on a regular basis, which increases the risk of user mistakes require. It is often difficult to determine which version of a spreadsheet is current. As modifications are made, companies frequently transmit a document to several departments.
Manual errors caused by excessive data entry are not an issue with a PIM. To ensure that all information originates from a single source of truth, the system employs a central database. Data is regulated, and automated quality checks verify that the data is clean.
Consistent customer satisfaction
Before making a purchase, today’s buyers conduct comprehensive research across multiple touchpoints. Their research is based on a large amount of product information. As a result, merchants who sell products through several channels want consistent product information across all sales channels. Customers will have a dependable experience as a result of a united brand message.
A PIM provides a centralized data management system to ensure that product information is accurate in real-time for every channel. Customers get the same experience from your product listings regardless of where they browse or buy. This can reduce cart abandonment and increase client loyalty.
Shortened time to market
Staying competitive in e-commerce requires quick time to market. PIM shortens the time to market by enhancing the path of a product from development to marketing.
People from several departments can collaborate on the product at the same time using PIM software. Marketers can start creating catalogs before all product specifics are confirmed. The changes in the catalog are reflected when the product management team updates the information in the PIM.
Integration with external systems is simple.
PIM systems interface seamlessly with your existing systems and product information sources. Vendor portals, inventory management systems, and order management systems are all examples of this (OMS). Reusable APIs are also supported by the software. These can be used to connect data from several operations. PIM software also connects with ERP systems.
Management expenditures and risks have been reduced.
Grouping can use PIM software to automate manual operations. Consider the process of receiving product data from vendors. Templates can be used by vendors to give the required data. Bad product data is removed, resulting in lower operational expenses. Management risks are also reduced when information is consistent and accurate.
Updates that are faster and easier to implement
PIM software allows you to promptly update product information. This is possible across all of your marketing and distribution platforms, as well as your internal divisions. This minimizes the need for repeating tasks. Businesses are no longer required to update product data across various systems.
PIM makes it easier to manage the catalog and develop product sets on a large scale. Collections and groups of products that must be purchased together can be created. You can also work with product attributes in aggregate. Instead of typing or pasting text, you choose an attribute from a predefined list.
Simple scalability
Scalability is a strong attribute for PIM. It makes it simple to enter new markets, bring new items into existing ones, and supply numerous languages. You no longer need to keep a large number of products in your ERP system. You can develop and store products in the PIM and only transfer them to the ERP when they have been sold.
Transparency and ownership
Ownership and transparency are lost when product enrichment is divided. You can keep track of each user and their activity with PIM. This ensures that any modifications to product data are fully accountable.
Multichannel selling is now easier.
PIM facilitates the distribution of your products to marketplaces such as Amazon and comparison shopping engines such as Google. Without a PIM, your data is unstructured and dispersed over multiple spreadsheets and databases. This drives you to find and transform pertinent data into a structure that corresponds to the requirements of each individual platform.
This issue is ignored by PIM systems. They automatically arrange your data so that it may be transmitted to each channel quickly and without error. This enables you to provide your customers with a consistent and accurate experience.
PIM Software Alternatives
PIM software is classified into three types:
PIMs that are delivered as a service (SaaS)
PIMs that are open source
PIMs Created from Scratch
Each category provides varying degrees of usability and functionality. When choosing the proper type of software, merchants must carefully analyze their business requirements. Custom and open source alternatives provide you greater control, but they are more expensive and difficult to administer.
0 notes
Text
Never Build a CSV Importer Again
(This is a sponsored post.)
CSV import as a process is broken. Messy customer data, edge cases, encoding formats, error messages, non-technical users: importing data into applications is a huge pain! Ingesting data has been long neglected as a software product experience, leading to customer frustration and wasted engineering cycles rebuilding what those users already expect to have. It’s a major distraction for product teams focused on building core differentiating features.
We’re going to look at the problems with turning messy spreadsheets into structured product data, how it’s typically addressed, and how Flatfile Portal solves the technical and user experience challenges inherent in CSV import.
If you’re a software developer and have built a CSV parser before, you know how frustrating it is to dedicate valuable engineering sprints to just one component of the customer onboarding. Building an entire CSV importer means addressing user experience and technical edge cases that result from involving humans in a highly technical ETL process. Trying to bake in more advanced functionality such as data normalization, column-matching, or even refining the interface itself results in developers building an entirely new product before the first one is even finished!
Investing engineering sprints to maintain an outdated data importer, or worse, building a CSV importer from scratch is now a pain of the past. Today, we’d like to show Flatfile Portal, which allows developer and product teams the ability to revamp their entire data import flows not in weeks or months, but in minutes. Did we mention you’d save thousands of dollars in development costs?
Get Started →
Common Problems with CSV Import Experiences
Importing CSV data is often one of the first interactions users have with a software application, especially “empty box” products. Unfortunately, there are too many ways that this data import experience can cause customer frustration, or worse, churn.
For users, an inefficient importer experience will cause them to question the value of the product itself.
“If the app can’t import my data easily now, what’s going to happen once my data is finally uploaded?”

Your customers shouldn’t have to battle with these kinds of CSV import errors (Source: Flatfile)Digsy.ai shared their experience with handling data imports for their real-estate CRM product prior to integrating Flatfile Portal. Not only was the team strained on resources from building and maintaining a proprietary data importer, but Digsy’s engineers also spent ten or more hours per new user cleaning up and formatting incoming customer data. Occasionally, these users would churn, rendering all that work fruitless.
Thankfully, there’s an out-the-box CSV importer that can do all this on its own, and with just a few lines of code.
Introducing: The elegant import button for web apps
We call it Flatfile Portal, and it was born out of frustration from continuously re-building CSV importers, parsers, and uploaders. Flatfile provides data normalization, CSV auto-column matching, and a modernized UI component with a few lines of JavaScript. Customers implement Flatfile in as little as a day: a massive improvement over 3-4 engineering sprints with continuous maintenance tacked on.

An animation of an import completed with Flatfile Portal. (Source: Flatfile)
Let’s look at issues associated with traditional CSV import experiences and how Flatfile Portal addresses them.
Issue 1: Unclear Guidance
Users tend to struggle with CSV imports, and usually have questions before the CSV is even uploaded. Here are questions users may ask during an import:
Can I upload XLS, XLSX, or XML files?
What is UTF-8 encoding?
What if my file is 9.7 MB?
Is it a problem if my file has special characters in column headers?
What happens if my spreadsheet columns don’t match the required fields?
How do I fix my data? Do I need to save a duplicate CSV and upload that file instead?
Unless your users spend a lot of time exporting and importing spreadsheets, they’re not going to think about these situations until the moment they import their data.
It shouldn’t be up to your users to read through intimidating data import documentation or watch a 15-minute tutorial on how to import spreadsheets into your product. Surprisingly, developers aren’t spared either! Although engineers understand the complexities of importing spreadsheets into an advanced system (like Microsoft Azure), there is still an exhaustive amount of content they need to ingest before their first import even happens.

A highly technical product like Microsoft Azure attempts to reasonably present developers with extensive documentation for importing user data. (Source: Microsoft Azure)Your product experience should make it simple to import CSV data without requiring users to become data scientists. The same goes for the technical understanding required to build a CSV importer to begin with, a goal we’ve dedicated reaching with Flatfile Portal.
Here’s an example of a simplified CSV import solution for a CRM from Portal, created in less than an hour complete with complex data validation.

A demo of how Flatfile Portal helps software engineers quickly build a data importer with a few lines of JavaScript. (Source: Flatfile)Portal is standardized, responsive and customizable to specific branding needs. With Flatfile, users will instantly know to:
Import their data using a CSV or XLS.
Match their spreadsheet columns in the next step, (if Portal’s 95% fuzzy-matching doesn’t catch it during an import.)
Click “Continue” to begin their data upload.
There’s no need to overwhelm the user with warnings about file encoding, incorrect date formats, or what fields are required. Portal solely focuses on importing CSV data from the user and making it a delightful experience during this first data onboarding touchpoint. Mapping columns and validating data will be completed at a later stage once the importer has matched the spreadsheet header columns using human-in-the-loop machine learning.
Portal’s JS configuration allows data models to be replicated in minutes instead of weeks. The label matches a CSVs column name, and the key is how you’d like the imported data to be saved in the JSON output. Portal also provides powerful validation options to work with any data model requirement and supports regex, data normalization, and server callbacks for those unique validation use-cases.
Once the data model has been built into the JavaScript config, all that needs to be done is to trigger the importer from within your product, typically by way of a button through a JavaScript call. If your application can execute JavaScript, you can integrate a truly modernized CSV importer, in minutes, and at a fraction of the cost.
With Flatfile Portal, you and your users won’t have to worry about things like file sizes or encoding formats causing problems during import. Portal helps you manage imported data via the browser or through a server-side process, enabling you to split and upload large CSV and Excel files without dropping imported data.

A Flatfile demo that shows how you can reliably split and import data from multiple customer files. (Source: Flatfile)Flatfile allows users to import CSV data from multiple files intuitively, without dropping data or doing manual splitting. In this demo, users are allowed to import spreadsheets containing three different sets of data. Not only will this help make their files more manageable, but it’ll make it much easier for your product team to ingest and organize customer data on your backend into a consistent structure.
Customers shouldn’t have to think here. CSV importers should be designed — error messages and all — to make data onboarding a quick and painless experience for users.
Issue 2: Inefficient CSV Column-Mapping
The next source of frustration often appears when poor column-matching functionality is in place.
As an example, let’s say that a Mailchimp user wants to import as many contact details into the email marketing software as they can. After all, it might be useful to have their business title or phone number on hand for future list segmentation.
However, initializing the import results in some data being skipped or dropped entirely:

This is how Mailchimp’s CSV field-mapping system displays unmapped data. (Source: Mailchimp)The app doesn’t recognize three of the four spreadsheet columns in our file. In order to keep the unmatched column data, the user has to go through each field and manually assign a matching label that Mailchimp accepts.
This is the case with many products that ingest user data, especially CRMs. Not all data will be used during an import, however, the decision to allow custom field submissions, in this case, should be left to the user; rather than removing their data prematurely.
We know what you’re thinking: “Why not just provide a pre-built spreadsheet template?” However, this is hardly a solution to the problem and will only create more work and frustration for your users. Especially those that bring in thousands of rows of data, or have 40 column headers (yes, we’ve seen it!)
The problem here lies within the customer data onboarding experience. Optimizing CSV import features within a product has been a difficult and expensive project to take on for product and engineering teams. That’s where Flatfile’s machine-learning, auto column-matching solution comes in handy.
Portal automatically learns which incoming fields are matched to which columns from each of your users. This results in a ‘human in the loop’ machine-learning experience that is truly unique to your product’s data model. Portal will automatically match imported CSV columns to your data model based on user inputs and consistently learns over time.
The importer also caches column assignments regardless of session, so a user that uploads ten CSV files in a day will get most if not all of their columns matched automatically.
ClickUp, powered by Flatfile Portal, has leveraged human-in-the-loop for its productivity web app.

The main data import modal for users that want to import tasks and projects into ClickUp. (Source: ClickUp, powered by Flatfile Portal)Portal is designed to help users of all technical expertise. Instructions are clearly provided as to what the user can upload, and the fields required. In addition, Portal’s manual data entry feature allows users to preview what sort of data can be imported into productivity software. This helps users preserve as much data as possible, rather than realize too late that the data importer didn’t recognize their columns and dropped the data out without any notice.
Configuration flags extend Portal’s functionality even further. For example, the allowCustom flag specifies whether you’d like users to add custom columns during the matching step. Using ClickUp as an example, one could add a column for “Billable”? As a boolean field to track whether a task is billable. Allowing users to place columns on the fly results in a shift of control not seen with legacy CSV importers – shaped by a product’s unique data model requirements.
Portal’s column matching step:
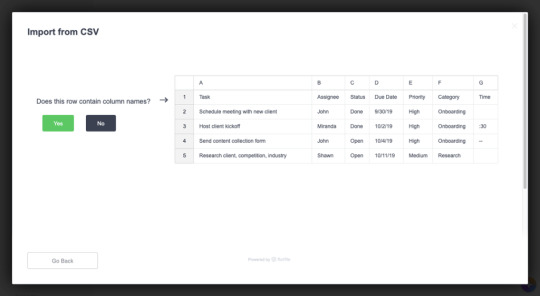
Portal asks users to identify column names for accurate mapping. (Source: ClickUp)This step asks users to indicate where their column names live. This way, the importer can more effectively match them with its own or add labels if they’re missing. Some CSV data may only contain values rather than column headers.
Next, users get a chance to confirm or reject Portal’s column matching suggestions:

From Slite.com
Portal uses a machine-learning column-matching system to automatically map users’ imported data. (Source: ClickUp)
On the left, users will find the columns and values they’ve imported. The white tab to the right provides them with automated column matching within ClickUp’s data model. So, “Task” will become “Task name”, “Assignee” will become “Task assignee(s)”, “Status” remains as is and so on.
If one of the labels in the CSV doesn’t have any match at all, the importer calls attention to it like this:

Flatfile Portal calls attention to labels or CSV values that don’t have an exact match in a product. (Source: ClickUp)
In this example, the Priority response of “High” was detected. But “Medium” was not. However, there’s no need for the user to guess what the correct replacement should be. The importer provides relevant options like “Urgent”, “Normal” and “Low” to replace it with. No need to re-import their CSV, or change the cell value prior to importing the data.
Once all spreadsheet mappings have been resolved, the user can easily “Confirm Mapping” or discard the column altogether if it’s proven unnecessary.
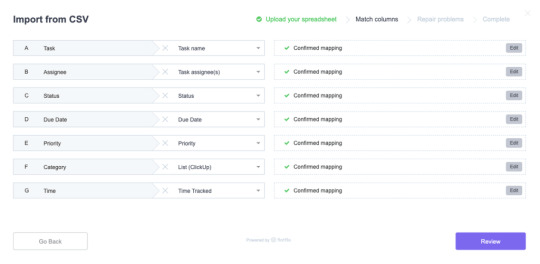
From Slite.com
Users get a chance to confirm CSV labels and clean up their spreadsheet results before importing their data. (Source: ClickUp)Finally, users get a chance to review any errors detected with their data:
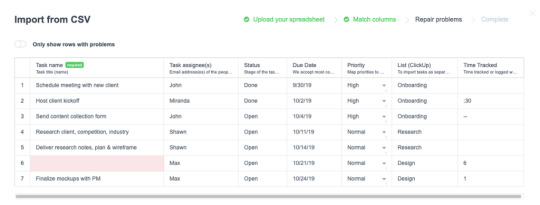
From Slite.com
Validation errors detected in ClickUp’s data import appear in red. (Source: ClickUp)In this ClickUp example, “Task Name” is triggered with the “isRequired: true” flag which requires users to submit data for that particular column. Whenever any validation fails in Portal, you have full control over how error messages are displayed to the user – all inline within the importer.
The “Only show rows with problems” toggle in the left-hand corner makes error rows easy to spot and address quickly.
This keeps users from having to:
Review the original CSV file and fix errors before re-importing again.
Import the data and do the cleanup afterward in the app.
How do you set up this system of column-mapping and error detection? Portal does most of the work for engineers.

From Slite.com
There’s no need to build a custom data importer with Flatfile Portal. (Source: Flatfile)Portal is configured via a JavaScript code snippet. Any labels, keys, or validation rules specified in this code will be reflected on the customer-facing importer. This allows for complex validation on things like phone numbers or normalizing multiple date formats:

This Portal demo provides the pre-written JavaScript code on the left and a sample of the importer output on the right.Flatfile Portal is truly a turn-key CSV importer built for SaaS applications. The critical part to integrating Portal is configuring the JS snippet to your product’s required data model. In other words, tell Portal what data needs to upload from users, what is the correct value, and whether you’d like them to add their own custom data.
Here’s a JS snippet you might use to customize Portal for a basic contact list:

An example from Flatfile on how to configure the JavaScript with your own keys and labels for a basic contact list import. (Source: Flatfile)You can then use validators to set strict rules for what can appear in the corresponding fields:

To recap:
It’s not easy building a CSV importer in-house. Integrating Flatfile Portal allows you to focus on building differentiating core features unique to your product’s experience, knowing that the CSV import component is taken care of, and optimized.
Build a robust data importer with Flatfile Portal
One of the reasons we build SaaS products is so customers can effectively manage their businesses without the costly overhead of outsourcing to a third party, or the costly practice of trying to build everything themselves.
Importing data doesn’t need to be the reason for customer frustration or churn during customer data onboarding. It’s easy to see how users can be frustrated with the inconveniences of common CSV import errors. Take advantage of a tool like Flatfile Portal whose sole product focus is designing faster and more seamless customer data onboarding experiences for your customers, partners, and vendors.
Direct Link to Article — Permalink
The post Never Build a CSV Importer Again appeared first on CSS-Tricks.
You can support CSS-Tricks by being an MVP Supporter.
Never Build a CSV Importer Again published first on https://deskbysnafu.tumblr.com/
0 notes
Photo

How to Create an Android App Without Coding
Alternative approaches to Android application development—those that involve writing no code at all or writing only minimal amounts of code—are becoming increasingly feasible today. They are, of course, ideal for non-programmers, but experienced programmers too can use them to save time and effort. In this tutorial, I'm going to talk about two such approaches and introduce you to several tools and templates that enable them.
CodeCanyon is a Marketplace for App Templates and Builders
CodeCanyon is an online marketplace that has hundreds of additional professional Android app templates and builder tools. Some of these are incredibly feature-rich and well-designed. You can sometimes save days, even months, of effort by using one of them.
1. Using App Builders
App builders are usually tools that allow you to create apps by simply filling in a few forms. Most of the popular ones are flexible enough to create a large variety of apps. For instance, you could use them to create e-commerce apps, news apps, or even chat apps. And the best thing about them is that you won't have to write a single line of code while using them.
React App Builder
React App Builder, a premium tool available on CodeCanyon, is perhaps the most powerful and flexible app builder you can get today. Because it uses the React Native cross-platform framework internally, you can use it to create apps for both Android and iOS devices.
It offers a very intuitive, drag and drop interactions-based user interface for building apps. It also comes with 11 beautiful templates you can use to jump-start your app development.
It's worth noting that this tool is also available as a cloud-hosted service. If you don't want to spend any time installing, configuring, and regularly updating the tool on your computer, using the cloud-based option would be ideal for you.
IMABuildeRz
IMABuildeRz is another popular app builder that can build apps for both Android and iOS devices. It uses the Ionic 4 framework internally, so it generates TypeScript and SCSS code.
This tool comes with a large number of addons you can use to quickly add common features to your apps. For example, there are addons to handle forms, JSON documents, JWT authentication, and AdMob ads. There are also addons that can instantly generate full-fledged screens, such as "About Us" and "Contact Us" screens.
Furthermore, there are directives available to implement functionality such as text to speech, barcode scanning, and media streaming.
AppsGeyser: A Free Android App Builder
If you're looking for a tool that's free, AppsGeyser is definitely worth a try. It's an online app development platform that offers over 70 unique app templates and a simple, forms-based interface to customize them. There are templates for quiz apps, coloring apps, browsers, messengers, and several different types of games too.
Note that the free version of AppsGeyser works on a revenue share system. In other words, it expects you to have ads in your apps and share 50% of your revenue. If you're not okay with that, you'll have to switch to the premium version, which allows you to turn the ads off.
2. Converting Websites to Apps
If you already have a blog or a progressive web app, there are tools available on CodeCanyon that can turn it into a native Android app. Most of them use either webviews or the WordPress API to do so.
WebViewGold for Android
WebViewGold for Android is a very popular template for converting websites into high-performance, native Android apps. The apps you build with it will have support for in-app purchases, push notifications, deep links, AdMob ads, and many different kinds of native dialogs. Right out of the box, you also get easily customizable splash screens, loading indicators, and offline screens.
If you're in a hurry and want to create your app within the next couple of minutes, WebViewGold is for you. All you need to do is point the template to your website or a local folder containing all your HTML files and build it with the latest version of Android Studio.
WebViewGold is available for iOS too. So if you want your app to run natively on both Android and iOS, and have a similar look and feel on both platforms, using these templates is the way to go.
Universal Android WebView
The Universal Android WebView template has been a bestseller on CodeCanyon for years now. This Android template can convert any website into a native Material Design app that looks good and performs well on both phones and tablets. Because color is an extremely important aspect of Material Design, it offers ten beautiful color themes for your apps.
The apps you build with this template will have a navigation drawer and support for the pull-to-refresh gesture. They'll also be fully integrated with AdMob ads, Firebase Analytics, and Firebase Cloud Messaging. Additionally, to be able to handle file downloads, they'll have a download manager built into them.
To customize the Universal Android WebView template, you only need to make changes in a single configuration file, which is very easy to understand. As such, if you have a responsive website, you should be able to convert it into a well-polished app in about 15 minutes using this template.
Android App Builder
Android App Builder is another tool that can convert any website into a native Android app. It also offers additional features for WordPress sites. For instance, it has six different layouts for rendering your WordPress posts, with support for the parallax scrolling effect.
If you have a website that doesn't use WordPress, make sure that it has a responsive layout for best results. Apps for such websites would, by default, have handy features such as support for file uploads and downloads, loading indicators, and the swipe-to-refresh gesture built into them.
Android App Builder also has several features dedicated to handling all the YouTube videos, Flickr albums, and Tumblr posts you embed in your websites. It comes with six unique layouts for displaying the contents of YouTube channels and playlists. Similarly, to display the contents of your Flickr albums and Tumblr picture posts, it offers three layouts.
Flink App Builder
Flink App Builder is a powerful tool that helps you convert a WordPress site into a native Android app in just a few clicks. Because it is fully integrated with the WordPress platform, the apps you build with it will be capable of smoothly rendering all your blog's posts, pages, comments, and image galleries. Furthermore, any changes you make on your blog will be instantly reflected in your app.
All the apps you create with Flink will have in-built support for push notifications. And if you want to monetize those apps, you can choose to add AdMob ads or Facebook Audience Network ads to them.
Flink apps have many additional features to improve the user experience they offer, such as screen transition animations, splash screens, and Material Design components. But one of the best things about them, in my opinion, is that they have user management built into them. This means, not only do they support user sign ups and sign ins, they are also capable of having password-protected content.
RocketWeb
RocketWeb is another premium template that uses a webview to turn a web app into a native Android app. It offers over 50 themes you can use to style your app. Some themes have solid colors, while others have attractive gradients.
The template is highly customizable, but there's no coding required. You can use a simple, browser-based form to configure the template so it matches your requirements.
The apps you create with RocketWeb will have, in addition to the webview, a navigation drawer, a toolbar, and a beautiful splash screen, all of which can be tweaked to match your site's look and feel. They'll also have error pages included, which you can use to handle connectivity issues and other such runtime errors.
RocketWeb apps support both Google Cloud Messaging and OneSignal push notifications. And if you wish to monetize them, all you need to do is enable AdMob ads.
Conclusion
You can be a non-programmer and still build profitable Android apps. In this article, I introduced you to several tools and templates you can use to do so. Most of the tools I mentioned are so easy to use and speed up the process of app development so much that you can potentially churn out multiple apps every day. By adding ads to those apps and publishing them on Google Play, you can easily build a new passive income stream for yourself.
If you're only interested in quickly building an attractive app for your business, I suggest you also take a look at some of the full Android application templates available on CodeCanyon. You can learn more about app templates in our other posts.
App Templates
20 Best Android App Templates of 2020
Franc Lucas
Android SDK
10 Best Android Game Templates
Ashraff Hathibelagal
App Templates
15 Best eCommerce Android App Templates
Nona Blackman
Material Design
Best Material Design Android App Templates
Nona Blackman
And if you want to start learning to code Android apps, you've come to the right place, because we have hundreds of free Android app tutorials here on Envato Tuts+.
Android SDK
How to Get Started Making Android Apps
Ashraff Hathibelagal
Android SDK
My First App: How to Create Your First Android App Step by Step
Ashraff Hathibelagal
by Ashraff Hathibelagal via Envato Tuts+ Code https://ift.tt/2VKsJxj
0 notes
Text
Rewriting the Beginner's Guide to SEO
Posted by BritneyMuller
(function($) { // code using $ as alias to jQuery $(function() { // Hide the hypotext content. $('.hypotext-content').hide(); // When a hypotext link is clicked. $('a.hypotext.closed').click(function (e) { // custom handling here e.preventDefault(); // Create the class reference from the rel value. var id = '.' + $(this).attr('rel'); // If the content is hidden, show it now. if ( $(id).css('display') == 'none' ) { $(id).show('slow'); if (jQuery.ui) { // UI loaded $(id).effect("highlight", {}, 1000); } } // If the content is shown, hide it now. else { $(id).hide('slow'); } }); // If we have a hash value in the url. if (window.location.hash) { // If the anchor is within a hypotext block, expand it, by clicking the // relevant link. console.log(window.location.hash); var anchor = $(window.location.hash); var hypotextLink = $('#' + anchor.parents('.hypotext-content').attr('rel')); console.log(hypotextLink); hypotextLink.click(); // Wait until the content has expanded before jumping to anchor. //$.delay(1000); setTimeout(function(){ scrollToAnchor(window.location.hash); }, 1000); } }); function scrollToAnchor(id) { var anchor = $(id); $('html,body').animate({scrollTop: anchor.offset().top},'slow'); } })(jQuery); .hypotext-content { position: relative; padding: 10px; margin: 10px 0; border-right: 5px solid; } a.hypotext { border-bottom: 1px solid; } .hypotext-content .close:before { content: "close"; font-size: 0.7em; margin-right: 5px; border-bottom: 1px solid; } a.hypotext.close { display: block; position: absolute; right: 0; top: 0; line-height: 1em; border: none; }
Many of you reading likely cut your teeth on Moz’s Beginner’s Guide to SEO. Since it was launched, it's easily been our top-performing piece of content:
Most months see 100k+ views (the reverse plateau in 2013 is when we changed domains).
While Moz’s Beginner's Guide to SEO still gets well over 100k views a month, the current guide itself is fairly outdated. This big update has been on my personal to-do list since I started at Moz, and we need to get it right because — let’s get real — you all deserve a bad-ass SEO 101 resource!
However, updating the guide is no easy feat. Thankfully, I have the help of my fellow Mozzers. Our content team has been a collective voice of reason, wisdom, and organization throughout this process and has kept this train on its tracks.
Despite the effort we've put into this already, it felt like something was missing: your input! We're writing this guide to be a go-to resource for all of you (and everyone who follows in your footsteps), and want to make sure that we're including everything that today's SEOs need to know. You all have a better sense of that than anyone else.
So, in order to deliver the best possible update, I'm seeking your help.
This is similar to the way Rand did it back in 2007. And upon re-reading your many "more examples" requests, we’ve continued to integrate more examples throughout.
The plan:
Over the next 6–8 weeks, I’ll be updating sections of the Beginner's Guide and posting them, one by one, on the blog.
I'll solicit feedback from you incredible people and implement top suggestions.
The guide will be reformatted/redesigned, and I'll 301 all of the blog entries that will be created over the next few weeks to the final version.
It's going to remain 100% free to everyone — no registration required, no premium membership necessary.
To kick things off, here’s the revised outline for the Beginner’s Guide to SEO:
Click each chapter's description to expand the section for more detail.
Chapter 1: SEO 101
What is it, and why is it important? ↓
What is SEO?
Why invest in SEO?
Do I really need SEO?
Should I hire an SEO professional, consultant, or agency?
Search engine basics:
Google Webmaster Guidelines basic principles
Bing Webmaster Guidelines basic principles
Guidelines for representing your business on Google
Fulfilling user intent
Know your SEO goals
Chapter 2: Crawlers & Indexing
First, you need to show up. ↓
How do search engines work?
Crawling & indexing
Determining relevance
Links
Personalization
How search engines make an index
Googlebot
Indexable content
Crawlable link structure
Links
Alt text
Types of media that Google crawls
Local business listings
Common crawling and indexing problems
Online forms
Blocking crawlers
Search forms
Duplicate content
Non-text content
Tools to ensure proper crawl & indexing
Google Search Console
Moz Pro Site Crawl
Screaming Frog
Deep Crawl
How search engines order results
200+ ranking factors
RankBrain
Inbound links
On-page content: Fulfilling a searcher’s query
PageRank
Domain Authority
Structured markup: Schema
Engagement
Domain, subdomain, & page-level signals
Content relevance
Searcher proximity
Reviews
Business citation spread and consistency
SERP features
Rich snippets
Paid results
Universal results
Featured snippets
People Also Ask boxes
Knowledge Graph
Local Pack
Carousels
Chapter 3: Keyword Research
Next, know what to say and how to say it. ↓
How to judge the value of a keyword
The search demand curve
Fat head
Chunky middle
Long tail
Four types of searches:
Transactional queries
Informational queries
Navigational queries
Commercial investigation
Fulfilling user intent
Keyword research tools:
Google Keyword Planner
Moz Keyword Explorer
Google Trends
AnswerThePublic
SpyFu
SEMRush
Keyword difficulty
Keyword abuse
Content strategy {link to the Beginner’s Guide to Content Marketing}
Chapter 4: On-Page SEO
Next, structure your message to resonate and get it published. ↓
Keyword usage and targeting
Keyword stuffing
Page titles:
Unique to each page
Accurate
Be mindful of length
Naturally include keywords
Include branding
Meta data/Head section:
Meta title
Meta description
Meta keywords tag
No longer a ranking signal
Meta robots
Meta descriptions:
Unique to each page
Accurate
Compelling
Naturally include keywords
Heading tags:
Subtitles
Summary
Accurate
Use in order
Call-to-action (CTA)
Clear CTAs on all primary pages
Help guide visitors through your conversion funnels
Image optimization
Compress file size
File names
Alt attribute
Image titles
Captioning
Avoid text in an image
Video optimization
Transcription
Thumbnail
Length
"~3mo to YouTube" method
Anchor text
Descriptive
Succinct
Helps readers
URL best practices
Shorter is better
Unique and accurate
Naturally include keywords
Go static
Use hyphens
Avoid unsafe characters
Structured data
Microdata
RFDa
JSON-LD
Schema
Social markup
Twitter Cards markup
Facebook Open Graph tags
Pinterest Rich Pins
Structured data types
Breadcrumbs
Reviews
Events
Business information
People
Mobile apps
Recipes
Media content
Contact data
Email markup
Mobile usability
Beyond responsive design
Accelerated Mobile Pages (AMP)
Progressive Web Apps (PWAs)
Google mobile-friendly test
Bing mobile-friendly test
Local SEO
Business citations
Entity authority
Local relevance
Complete NAP on primary pages
Low-value pages
Chapter 5: Technical SEO
Next, translate your site into Google's language. ↓
Internal linking
Link positioning
Anchor links
Common search engine protocols
Sitemaps
Mobile
News
Image
Video
XML
RSS
TXT
Robots
Robots.txt
Disallow
Sitemap
Crawl Delay
X-robots
Meta robots
Index/noindex
Follow/nofollow
Noimageindex
None
Noarchive
Nocache
No archive
No snippet
Noodp/noydir
Log file analysis
Site speed
HTTP/2
Crawl errors
Duplicate content
Canonicalization
Pagination
What is the DOM?
Critical rendering path
Help robots find the most important code first
Hreflang/Targeting multiple languages
Chrome DevTools
Technical site audit checklist
Chapter 6: Establishing Authority
Finally, turn up the volume. ↓
Link signals
Global popularity
Local/topic-specific popularity
Freshness
Social sharing
Anchor text
Trustworthiness
Trust Rank
Number of links on a page
Domain Authority
Page Authority
MozRank
Competitive backlinks
Backlink analysis
The power of social sharing
Tapping into influencers
Expanding your reach
Types of link building
Natural link building
Manual link building
Self-created
Six popular link building strategies
Create content that inspires sharing and natural links
Ego-bait influencers
Broken link building
Refurbish valuable content on external platforms
Get your customers/partners to link to you
Local community involvement
Manipulative link building
Reciprocal link exchanges
Link schemes
Paid links
Low-quality directory links
Tiered link building
Negative SEO
Disavow
Reviews
Establishing trust
Asking for reviews
Managing reviews
Avoiding spam practices
Chapter 7: Measuring and Tracking SEO
Pivot based on what's working. ↓
KPIs
Conversions
Event goals
Signups
Engagement
GMB Insights:
Click-to-call
Click-for-directions
Beacons
Which pages have the highest exit percentage? Why?
Which referrals are sending you the most qualified traffic?
Pivot!
Search engine tools:
Google Search Console
Bing Webmaster Tools
GMB Insights
Appendix A: Glossary of Terms
Appendix B: List of Additional Resources
Appendix C: Contributors & Credits
What did you struggle with most when you were first learning about SEO? What would you have benefited from understanding from the get-go?
Are we missing anything? Any section you wish wouldn't be included in the updated Beginner's Guide?
Thanks in advance for contributing.
Sign up for The Moz Top 10, a semimonthly mailer updating you on the top ten hottest pieces of SEO news, tips, and rad links uncovered by the Moz team. Think of it as your exclusive digest of stuff you don't have time to hunt down but want to read!
from The Moz Blog http://ift.tt/2AIAGpW via IFTTT
2 notes
·
View notes
Link
Written by Pascal Chambon, reviewed by Raphaël Gomès Update: this article mostly deals with the RESTish ecosystem, which now constitutes a major part of webservices. For more in-depth analysis of the original REST, and of HATEOAS, see my follow-up article. How come REST means so much WORK? This is both a paradox, and a shameless pun. Let’s dive further into the artificial problems born from this design philosophy. BEWARE : through this document, you’ll encounter lots of semi-rhetorical technical questions. Do not misunderstand them, they DO NOT mean that RESTish webservices can’t solve these problems. They just mean that users have an extra burden of decisions to take, of extensions to integrate, of custom workarounds to apply, and this is a problem in itself. The joy of REST verbsRest is not CRUD, its advocates will ensure that you don’t mix up these two. Yet minutes later they will rejoice that HTTP methods have well defined semantics to create (POST), retrieve (GET), update (PUT/PATCH) and delete (DELETE) resources. They’ll delight in professing that these few “verbs”are enough to express any operation. Well, of course they are; the same way that a handful of verbs would be enough to express any concept in English: “Today I updated my CarDriverSeat with my body, and created an EngineIgnition, but the FuelTank deleted itself”; being possible doesn’t make it any less awkward. Unless you’re an admirator of the Toki Pona language. If the point is to be minimalist, at least let it be done right. Do you know why PUT, PATCH, and DELETE have never been implemented in web browser forms? Because they are useless and harmful. We can just use GET for read and POST for write. Or POST exclusively, when HTTP-level caching is unwanted. Other methods will at best get in your way, at worst ruin your day. You want to use PUT to update your resource? OK, but some Holy Specifications state that the data input has to be equivalent to the representation received via a GET. So what do you do with the numerous read-only parameters returned by GET (creation time, last update time, server-generated token…)? You omit them and violate the PUT principles? You include them anyway, and expect an “HTTP 409 Conflict” if they don’t match server-side values (forcing you to then issue a GET...)? You give them random values and expect servers to ignore them (the joy of silent errors)? Pick your poison, REST clearly has no clue what a read-only attribute it, and this won’t be fixed anytime soon. Meanwhile, a GET is dangerously supposed to return the password (or credit card number) which was sent in a previous POST/PUT; good luck dealing with such write-only parameters too. Did I forget to mention that PUT also brings dangerous race conditions, where several clients will override each other’s changes, whereas they just wanted to update different fields? You want to use PATCH to update your resource? Nice, but like 99% of people using this verb, you’ll just send a subset of resource fields in your request payload, hoping that the server properly understands the operation intended (and all its possible side effects); lots of resource parameters are deeply linked or mutually exclusive(ex. it’s either credit card OR paypal token, in a user’s billing info), but RESTful design hides this important information too. Anyway, you’d violate specs once more: PATCH is not supposed to just send a bunch of fields to be overridden. Instead, you’re supposed to provide a “set of instructions” to be applied on the resources. So here you go again, take your paperboard and your coffee mug, you’ll have to decide how to express these instructions. Often with handcrafted specifications, since Not-Invented-Here Syndrome is a de-facto standard in the REST world. (Edit: REST advocates have backpedaled on this subject, with Json Merge Patch, an alternative to formats like Json Patch) You want to DELETE resources? OK, but I hope you don’t need to provide substantial context data; like a PDF scan of the termination request from the user. DELETE prohibits having a payload. A constraint that REST architects often dismiss, since most webservers don’t enforce this rule on the requests they receive. How compatible, anyway, would be a DELETE request with 2 MBs of base64 query string attached? (Edit: the RFC 2616, indicating that payloads without semantics should be ignored, is now obsolete) REST aficionados easily profess that “people are doing it wrong” and their APIs are “actually not RESTful”. For example, lots of developers use PUT to create a resource directly on its final URL (/myresourcebase/myresourceid), whereas the “good way” (edit: according to many) of doing it is to POST on a parent URL (/myresourcebase), and let the server indicate, with an HTTP “Location” header, the new resource’s URL (edit: it’s not an HTTP redirection though). The good news is: it doesn’t matter. These rigorous principles are like Big Endian vs Little Endian, they occupy philosophers for hours, but have very little impact on real life problems, i.e “getting stuff done”. By the way… handcrafting URLs is always great fun. Do you know how many implementations properly urlencode() identifiers while building REST urls? Not that many. Get ready for nasty breakages and SSRF/CSRF attacks. When you forget to urlencode usernames in 1 of your 30 handcrafted URLs.The joy of REST error handlingAbout every coder is able to make a “nominal case” work. Error handling is one of these features which will decide if your code is robust software, or a huge pile of matchsticks. HTTP provides a list of error codes out-of-the-box. Great, let’s see that. Using “HTTP 404 Not Found” to notify about an unexisting resource sounds RESTful as heck, doesn’t it? Too bad: your nginx was misconfigured for 1 hour, so your API consumers got only 404 errors and purged hundreds of accounts, thinking they were deleted…. Our customers, after we deleted their gigabytes of kitten images by error.Using “HTTP 401 Unauthorized” when a user doesn’t have access credentials to a third-party service sounds acceptable, doesn’t it? However, if an ajax call in your Safari browser gets this error code, it might startle your end customer with a very unexpected password prompt [it did, years ago, YMMV]. HTTP existed long before “RESTful webservices”, and the web ecosystem is filled with assumptions about the meaning of its error codes. Using them to transport application errors is like using milk bottles to dispose of toxic waste: inevitably, one day, there will be trouble. Some standard HTTP error codes are specific to Webdav, others to Microsoft, and the few remaining have definitions so fuzzy that they are of no help. In the end, like most REST users, you’ll probably use random HTTP codes, like “HTTP 418 I’m a teapot” or unassigned numbers, to express your application-specific exceptions. Or you’ll shamelessly return “HTTP 400 Bad Request” for all functional errors, and then invent your own clunky error format, with booleans, integer codes, slugs, and translated messages stuffed into an arbitrary payload. Or you’ll give up altogether on proper error handling; you’ll just return a plain message, in natural language, and hope that the caller will be a human able to analyze the problem, and take action. Good luck interacting with such APIs from an autonomous program. The joy of REST conceptsREST has made a career out of boasting about concepts that any service architect in his right mind already respects, or about principles that it doesn’t even follow. Here are some excerpts, grabbed from top-ranked webpages. REST is a client-server architecture. The client and the server both have a different set of concerns. What a scoop in the software world. REST provides a uniform interface between components. Well, like any other protocol does, when it’s enforced as the lingua franca of a whole ecosystem of services. REST is a layered system. Individual components cannot see beyond the immediate layer with which they are interacting. It sounds like a natural consequence of any well designed, loosely coupled architecture; amazing. Rest is awesome, because it is STATELESS. Yes there is probably a huge database behind the webservice, but it doesn’t remember the state of the client. Or, well, yes, actually it remember its authentication session, its access permissions… but it’s stateless, nonetheless. Or more precisely, just as stateless as any HTTP-based protocol, like simple RPC mentioned previously. With REST, you can leverage the power of HTTP CACHING! Well here is at last one concluding point: a GET request and its cache-control headers are indeed friendly with web caches. That being said, aren’t local caches (Memcached etc.) enough for 99% of web services? Out-of-control caches are dangerous beasts; how many people want to expose their APIs in clear text, so that a Varnish or a Proxy on the road may keep delivering outdated content, long after a resource has been updated or deleted? Maybe even delivering it “forever”, if a configuration mistake once occurred? A system must be secure by default. I perfectly admit that some heavily loaded systems want to benefit from HTTP caching, but it costs much less to expose a few GET endpoints for heavy read-only interactions, than to switch all operations to REST and its dubious error handling. Thanks to all this, REST has HIGH PERFORMANCE! Are we sure of that? Any API designer knows it: locally, we want fine-grained APIs, to be able to do whatever we want; and remotely, we want coarse-grained APIs, to limit the impact of network round-trips. Here is again a domain in which “basic” REST fails miserably. The split of data between “resources”, each instance on its own endpoint, naturally leads to the N+1 Query problem. To get a user’s full data (account, subscriptions, billing information…), you have to issue as many HTTP requests; and you can’t parallelize them, since you don’t know in advance the unique IDs of related resources. This, plus the inability to fetch only part of resource objects, naturally creates nasty bottlenecks (edit: yes, you can stuff extensions like Compound/Partial Documents into your setup to help with that). REST offers better compatibility. How so? Why do so many REST webservices have “/v2/” or “/v3/” in their base URLs then? Backwards and forward compatible APIs are not hard to achieve, with high level languages, as long as simple rules are followed when adding/deprecating parameters. As far as I know, REST doesn’t bring anything new on the subject. REST is SIMPLE, everyone knows HTTP! Well, everyone knows pebbles too, yet people are happy to have better blocks when building their house. The same way XML is a meta-language, HTTP is a meta-protocol. To have a real application protocol (like “dialects” are to XML), you’ll need to specify lots of things; and you’ll end up with Yet Another RPC Protocol, as if there were not enough already. REST is so easy, it can be queried from any shell, with CURL! OK, actually, every HTTP-based protocol can be queried with CURL. Even SOAP. Issuing a GET is particularly straightforward, for sure, but good luck writing json or xml POST payloads by hand; people usually use fixture files, or, much more handy, full-fledged API clients instantiated directly in the command line interface of their favorite language. “The client does not need any prior knowledge of the service in order to use it”. This is by far my favourite quote. I’ve found it numerous times, under different forms, especially when the buzzword HATEOAS lurked around; sometimes with some careful (but insufficient) “except” phrases following. Still, I don’t know in which fantasy world these people live, but in this one, a client program is not a colony of ants; it doesn’t browse remote APIs randomly, and then decide how to best handle them, based on pattern recognition or black magic. Quite the opposite; the client has strong expectations on what it means, to PUT this one field to this one URL with this one value, and the server had better respect the semantic which was agreed upon during integration, else all hell might break loose. When you ask how HATEOAS is supposed to work.How to do REST right and quick?Forget about the “right” part. REST is like a religion, no mere mortal will ever grasp the extent of its genius, nor “do it right”. So the real question is: if you’re forced to expose or consume webservices in a kinda-RESTful way, how to rush through this job, and switch to more constructive tasks asap? Update: it turns out that there are actually lots of “standards” and industrialization efforts for REST, although I had never encountered them personnally (maybe because few people use them?). More information in my follow-up article. How to industrialize server-side exposure?Each web framework has its own way of defining URL endpoint. So expect some big dependencies, or a good layer of handwritten boilerplate, to plug your existing API onto your favorite server as a set of REST endpoint. Libraries like Django-Rest-Framework automate the creation of REST APIs, by acting as data-centric wrappers above SQL/noSQL schemas. If you just want to make “CRUD over HTTP”, you could be fine with them. But if you want to expose common “do-this-for-me” APIs, with workflows, constraints, complex data impacts and such, you’ll have a hard time bending any REST framework to fit your needs. Be prepared to connect, one by one, each HTTP method of each endpoint, to the corresponding method call; with a fair share of handmade exception handling, to translate passing-through exceptions into corresponding error codes and payloads. How to industrialize client-side integration?From experience, my guess is: you don’t. For each API integration, you’ll have to browse lengthy docs, and follow detailed recipes on how each of the N possible operations has to be performed. You’ll have to craft URLs by hand, write serializers and deserializers, and learn how to workaround the ambiguities of the API. Expect quite some trial-and-error before you tame the beast. Do you know how webservices providers make up for this, and ease adoption? Simple, they write their own official client implementations. FOR. EVERY. MAJOR. LANGUAGE. AND. PLATFORM. I’ve recently dealt with a subscription management system. They provide clients for PHP, Ruby, Python, .NET, iOS, Android, Java… plus some external contributions for Go and NodeJS. Each client lives in its own Github repository. Each with its own big list of commits, bug tracking tickets, and pull requests. Each with its own usage examples. Each with its own awkward architecture, somewhere between ActiveRecord and RPC proxy. This is astounding. How much time is spent developing such weird wrappers, instead of improving the real, the valuable, the getting-stuff-done, webservice? Sisyphus developing Yet Another Client for his API.ConclusionFor decades, about every programming language has functioned with the same workflow: sending inputs to a callable, and getting results or errors as output. This worked well. Quite well. With Rest, this has turned into an insane work of mapping apples to oranges, and praising HTTP specifications to better violate them minutes later. In an era where MICROSERVICES are more and more common, how come such an easy task — linking libraries over networks — remains so artificially crafty and cumbersome? I don’t doubt that some smart people out there will provide cases where REST shines; they’ll showcase their homemade REST-based protocol, allowing to discover and do CRUD operation on arbitrary object trees, thanks to hyperlinks; they’ll explain how the REST design is so brilliant, that I’ve just not read enough articles and dissertations about its concepts. I don’t care. Trees are recognized by their own fruits. What took me a few hours of coding and worked very robustly, with simple RPC, now takes weeks and can’t stop inventing new ways of failing or breaking expectations. Development has been replaced by tinkering. Almost-transparent remote procedure call was what 99% people really needed, and existing protocols, as imperfect as they were, did the job just fine. This mass monomania for the lowest common denominator of the web, HTTP, has mainly resulted in a huge waste of time and grey matter. REST promised simplicity and delivered complexity. REST promised robustness and delivered fragility. REST promised interoperability and delivered heterogeneity. REST is the new SOAP. EpilogueThe future could be bright. There are still tons of excellent protocols available, in binary or text format, with or without schema, some leveraging the new abilities of HTTP2… so let’s move on, people. We can’t forever remain in the Stone Age of Webservices. Edit: many people asked for these alternative protocols, the subject would deserve its own story, but one could have a look at XMLRPC and JSONRPC (simple but quite relevant), or JSONWSP (includes schemas), or language-specific layers like Pyro or RMI when for internal use, or new kids in the block like GraphQL and gRPC for public APIs… “Always finish a rant on a positive note”, momma said.Edited on December 12, 2017: normalize section titlesremove some typosrectify improper “HTTP redirection” wording after POST operationsadd suggestions of alternative protocolsEdited on December 28, 2017: fix mixup between “HTTP methods” and “REST verbs”Edited on January 7, 2018 Edited on January 19, 2018 fix wrong wording on “PUT vs GET” remarksprecise the notion of “real APIs” (non-CRUD)mention risk of overrides with PUTupdate paragraphs on PATCH and DELETE troublesEdited on January 19, 2018 fix wording around Not-Invented-Here SyndromeEdited on February 2, 2018 add links to follow-up article on The Original REST, in “introduction” and “how to industrialize” chaptersEdited on April 14, 2019 add clarification about “semi-rhetorical question”, and hints about extensions like compound/partial documentsEdited on July 6, 2019 fix typos and French links
0 notes
Text
How to Pick an Online Payment Option
How to Pick an Online Payment Option
Just how to choose an Online Payment Remedy and also our selection
The payment carrier is picked based upon various standards. Some of these are the service accessibility in the nation where your bank account is, prices of a transaction, regular monthly fees, the prices of integration, as well as whether it deals with sales tax obligation problems or permits combination with some other well-known payment services. Many of these concerns should be addressed by You the customer. Red stripe is our preferred choice as it had exceptional API capacities. This write-up will utilize Stripe as its payment cpu of option. Wechat Pay Merchant
Ideal Practices for payment suppliers
Retry if transaction did not been successful The purchase may stop working not only because of technical factors yet often not enough funds may be the reason. You ought to retry processing the transaction between a hr to number of days later.
Know when your CC will certainly expire Several of the card details will run out or their information will certainly no longer stand for numerous factors. When you do not have valid CC information billing the customer will certainly not be possible. The significant card plans use a service that allows you inspect if there are any updates pending for the consumer data that you store. A few of the on-line payment remedies will certainly even upgrade card information for you. Red stripe will do this for most of MasterCard, Discover, and also Visa cards. Not just CC.
Understand that in some parts of the globe individuals are not happy to pay with their Bank card The best instance of this is China when Alipay is the primary payment resource. It deserves noting that not all customers are happy handing out their card information so making use of a well-known payment approach aids to raise the completion rate of possible transactions. Red stripe likewise sustains Alipay for China and also for Europe Giropay, suitable
We would like to have Alipay In some cases clients simply wish to make use of Alipay UK as they recognize with the brand name. Do not be stubborn - Red stripe will certainly assist to optimize your revenue. Red stripe and also Paypal are straight competitors there is no assimilation in between them.
Finest techniques while making use of the Red stripe payment process
PCI compliance with Stripe
A lot of customers come to be PCI compliant by filling out the Self-Assessment Set Of Questions (SAQ) provided by the PCI Security Specifications Council. The type of SAQ relies on how you accumulate card information. The easiest technique of PCI validation is SAQ A. The fastest means to become PCI certified with Red stripe is to make certain you receive a prefilled SEQ A. If so Stripe will certainly fill the SEQ A for you and also will certainly make it readily available for you to download to your account's conformity settings after the very first 20 or two purchases. The method to attain this is as adheres to:
- Use the Embedded type called Check out, Stripe.js and Aspects (it supplies much better layout modification after that Checkout). You can make use of react-stripe-elements which utilizes Stripe.js API or Stripe mobile SDK libraries. When you're utilizing react-native go with tipsi-stripe. ipsi-stripe bindings are not formally supported by Red stripe so support will certainly not formally tell you that they get prefilled SEQ-A conformity - however they do.
- If you are utilizing web serve your settlements pages ought to utilize HTTPS.
In all those situations information is firmly sent straight to Stripe without it going through your servers. When you select the fastest means you will certainly not need to do anything even more. It is as straightforward as this till you reach 6 million purchases per year then you will have to load a Report on Compliance to validate your PCI compliance every year.
Get ready for technological failing - Idempotency key If you are using API to take settlements you have to plan for a technical failing as all networks are unstable. If failing happens wit is not always possible to understand if a cost was made or not. When it comes to a network failing you should retry the purchase. The Idempotency trick is a prevention system versus charging a customer twice. If somehow you sent the payment twice - which might occur because of retrying procedures after a failure. In Stripes node lib you just add it to options criterion while billing. Each Idempotency secret will certainly time out after 24 hr so afterwards time if you make a payment with the same Idempotency secret you will certainly charge the client.
Stripe charges in cents not bucks On the internet payment options like PayPal charge in dollars as opposed to cents. However that in Stripes all fees are made in tiniest money system. This is not just the situation regarding dollars, Stripes does it for all money.
Examination
Red stripe provides many card numbers for you to examine various situations on the frontend and also tokens so you could straight check your backend. For instance you can not only examination Visa, Mastercard, American Express, Discover, Diners Club and JCB Cards yet likewise international cards and 3D Secure Cards. Red stripe also provides you with symbols so you can evaluate failing scenarios like a charge being decreased, or a charge being obstructed because its fraudulent, an ended card, or a handling error. So you will certainly be gotten ready for whatever that can take place when you go live.
Do not place JSON in description - Use metadata
Be descriptive as you can. Metadata is your pal. You can enrich your Stripe transaction with personalized data so you can then view it in the dashboard. As an example you can include things like customer ID or the delivery ID in metadata so there is no reason to contaminate your transaction description.
Should I gather much more information?
The bare minimum to accumulate from a CC is its number, CVV and also expiry date but you can accumulate much more. You can additionally collect the postal code/ CC owner name/ address for Address Verification System (AVS). If you accumulate them it will raise Wechat Payment UK security due to the fact that the fraudulence prevention algorithms will have more information as well as will have the ability to respond a lot more accurately. Nonetheless, from the individual viewpoint it's more data to kind - which is not constantly good. Customers are just human and also in some cases make mistakes when entering data which can likewise create some deals to be declined. So you must pick how much information you need as well as what will work best for you and your income. Equally financial institutions will certainly in some cases turn down payments with a 'do not honor' condition and you will certainly have to contact your customer so they can ask their financial institution regarding the reason (high level of current activity on a card, an absence of matching AVS information, a card being over its limitation, or a variety of other reasons which only the financial institution will recognize).
If you are any kind of online vendor of products or services, a means for consumers to pay promptly and easily online is becoming a growing number of vital. On the internet payment options are abundantly available, and also offer clients a much more streamlined and also practical net shopping experience. The complying with are several of the benefits to executing on the internet payment solutions. These apply to small companies and also huge ventures alike (though the large majority of bigger business do have on-line payment remedies).
Ease of Purchase
It only stands to reason: if an acquisition is easier and quicker to make, there is a greater likelihood that somebody will certainly make it. When you contrast the quantity of time as well as trouble it takes to write out a check, placed it in a stamped envelope, and send it with submitting a name and a couple of charge card digits and afterwards clicking submit, it is clear at to which the client will certainly view as easier. And also, as a matter of fact they will certainly be proper also in a measurable feeling concerning the amount of time invested. Hence from a basic sales viewpoint, it makes good sense to supply on-line payment options UK.
Up-to-Date Look
Beyond the above, a website that offers online payment options appears much more updated as well as modern. Online payment is the norm now, the guideline as opposed to the exception. So it makes a site show up more market conscious and also practically current. This can aid to enhance the sight on the part of the client that the site is reputable, existing, and also customer-oriented.
Easier to Track and also Organize
It is simpler to track and also organize sales that are made online. The software application that processes these settlements may likewise include analysis and business components that are very valuable in both evaluation of the sales efficiency of the site and publication keeping. As well as excellent analysis as well as company of vendor information is constantly useful for maximizing as well as simplifying a service.
Conserves Time as well as Resources
These online payment options UK save the time and also sources of an organisation. Some examples are their capability to instantly handle repeating settlements, produce invoices instantly, as well as work as interfaces for consumer concerns and also complaints. The large workforce conserved below alone is reason to institute these options.
Mobility
These repayments can be obtained anywhere internet gain access to is available. This significantly liberates time and allows better movement both of business workers as well as customers. When a client can purchase anywhere they can utilize their laptop, as well as a firm can also get those payments essentially anywhere and also anytime, the home window for making deals is much higher. This is all thanks to the increased availability/mobility.
A fairly current growth in this field is what is known as mobile payment. This is a growing network that permits people to Wechat Pay for items or services using only smart phones. Once more, what is occurring here is that payment is ending up being also much easier to make in a variety of various situations and also locations.
As you can see, applying an on the internet payment service E14 5NR for your company makes good sense on many different levels. If you expect to have any appreciable online sales presence, permitting clients to make on line settlements is essentially a need. Find an excellent service that fits your service requirements and also you'll prepare to go.
Today's society is slowly progressing towards a cashless economy! People prefer to use their plastic instead of hard cash. Without a doubt, utilizing credit cards is a great deal less complicated than lugging cash money around. One card is all that you need to suit your pocketbook whereas in case of cash you need to bring a mass quantity given that you do not know how much you may need at one go. While speaking to a corporate top dog that lives next door, I realized the relevance of on-line payment and also its expanding importance for business world. They have actually begun using various online payment options and also phasing out the acceptance of money from the customers. You need to hire individuals in order to man the cash counters while in case of on-line cash move the procedure is quick, simple and convenient.
On the internet payment transfer is much more secure option as well. Charge card are issued by a financial institution after a lengthy verification procedure. While paying with your bank card, you should mandatorily double check all payment related details before last verification. Additionally, you MUST inspect charge card as well as financial institution statements meticulously after every payment to ensure the right quantity has actually been debited, as well as additionally that no fraud has taken place throughout the particular transaction stage. Majority of the people additionally use basic payment gateways (PayPal, Authorize.net, etc.) to move funds to the vendor. Occasion organizers as well are depending heavily on such on-line payment processing and monitoring solutions to efficiently take care of event enrollment costs and/or ticket sales.
On-line payment services come with some significant advantages such as:
PCI Compliance
It indicates you can securely utilize such a solution for monetary deals of any kind of kind. PCI which stands for Payment Card Sector has actually gotten a couple of goals that all bank card providing and also dealing banks need to adhere to. Several of the goals include preserving a secure network, protecting the card owner's information, and also regularly checking each and every purchase that happens making use of credit cards.
SSL 128-bit Information Security
Bulk of on the internet payment monitoring software application follow the SSL 128-bit information security policy to protect details that travels through the system. Therefore, the on-line payment service allows you refine all kinds of credit/debit card repayments and settlements made using prominent gateways securely, preventing any kind of chances of fraud.
Tension-free Cash Handling
Organisations of all kinds, event monitoring firms plus course organizers locate an online payment option extremely user-friendly. It is due to the fact that they don't need to bother about individually accumulating money from the customers, participants or trainees. The on-line system efficiently transfers cash from the purchaser's to the seller's bank account in mins with least human interference.
On the internet payment options could be the key to conserving personal time. It's very easy to set up automatic electronic payment alternatives. You can log on a monthly basis to pay your costs. Or you can accredit for payments to be made as often as you want without going to your computer. Electronic payments conserve you time because you are not in the cars and truck or standing at the financial institution in line to make a withdrawal or transfer. Doing repayments online is easy for individuals with fundamental computer system abilities. If you want direct down payments from your business instead of waiting for a paper check, simply provide your firm your account details to set up deposits with the financial institution, and also the transfers begin usually in a few pay cycles.
As a business on the internet payment solutions will certainly save you a lot of time and also documentation. You will have accurate, arranged records of the paychecks you spread at your fingertips. It won't take very long to launch staff member pay-roll straight down payments when fundamental account info is licensed and also participated in the system. Now instead of preparing each specific check, publishing it, and then authorizing it, your payroll heads out at the touch of a couple of computer system keys.
A growing number of business is being carried out online so online payment solutions is a progressively approved as well as preferred purchase. Money can be transferred in real time where in the past, someone may have to wait days for a check to arrive, wishing it would arrive at all and also not get lost in the mail, and after that take it to the financial institution to deposit as well as wait on funds to clear. Now, because of the stringent regulative actions that secure on-line payments, transfers are usually available to the recipient right away or within a few hours of transfer. In today's stressed out economic situation, having timely accessibility to money that is your own or having the ability to pay your bills at the last minute when you can afford it, is a welcome advantage.
On the internet payment options is a terrific suggestion for individuals who require to move huge or frequent quantities of money as well as are worried for their safety and security. Prior to digital transfers, individuals needed to take payroll to a financial institution, approve payments personally, and also manage cash on hand. Now rather than fretting about being burglarized at any type of step of the way, electronic transfers provide a high level of safety and security. Workers don't need to stress over washing a paper check when they do laundry and after that having to change it. Digital transfer makes sure the money goes straight to the assigned account.
0 notes
Link

I've known for a while that API Gateway can integrate directly with other AWS services without needing Lambda to play traffic cop. But how does that work and can we leverage this to build small stack applications? Let's find out!
tl;dr
Just want to see how I did it? Okay, here's my repo.
Table of Contents
AWS CDK
DynamoDB
Table of Kittens
API Gateway
IAM
AWS Service Integration
Methods
Security
Next Steps
AWS CDK
I wrote a fair amount about how to set this up and have a nice linting and testing experience in this post. No need to repeat myself. I'm loosely basing this project on this sample project. This one is a good primer on using API Gateway and Lambda together with CDK. My goal was to more or less build the same application, but without Lambda.
DynamoDB
I couldn't possibly do DynamoDB justice in this post and in fact am a bit of a novice. There are lots of great resources out there. I'm just going to create a simple table that will allow CRUD operations. Readers who haven't experienced DynamoDB yet but know either RDBMS or something like MongoDB will not too lost, however the really special thing about DynamoDB is that it is a fully managed service in every sense. With a more traditional cloud-hosted database, I might be able to provision the database using a tool or some variety of infrastructure-as-code, but then I would need to manage credentials, users, connection strings, schemas, etc. With DynamoDB, I don't need to do any of that. I will use IAM Roles to connect to my table and only need to provide a few basic parameters about it to get started.
Table of Kittens
The first thing we'll do is create a table. The example code we're working from named the table Items, which is not just generic and boring, but is also a little confusing since a "row" in a DynamoDB table is called an item. If you prefer Puppies or AardvarkCubs, feel free to make the substitution.
import { AwsIntegration, Cors, RestApi } from '@aws-cdk/aws-apigateway'; import { AttributeType, Table, BillingMode } from '@aws-cdk/aws-dynamodb'; import { Effect, Policy, PolicyStatement, Role, ServicePrincipal } from '@aws-cdk/aws-iam'; import { Construct, RemovalPolicy, Stack, StackProps } from '@aws-cdk/core'; export class ApigCrudStack extends Stack { constructor(scope: Construct, id: string, props?: StackProps) { super(scope, id, props); const modelName = 'Kitten'; const dynamoTable = new Table(this, modelName, { billingMode: BillingMode.PAY_PER_REQUEST, partitionKey: { name: `${modelName}Id`, type: AttributeType.STRING, }, removalPolicy: RemovalPolicy.DESTROY, tableName: modelName, }); } }
Here we've imported the constructs we'll need (spoiler - not using them all yet). We're creating a new DynamoDB table. When we describe our table, we only need to give a partition key. A real use case would probably include a sort key and possibly additional indices (again, this article is not your one-stop tutorial for DynamoDB). If we run this, we'll get a table we can immediately start using via AWS CLI.
$ aws dynamodb put-item --table-name Kitten --item \ "{\"KittenId\":{\"S\":\"abc-123\"},\"Name\":{\"S\":\"Fluffy\"},\"Color\":{\"S\":\"white\"}}"
When we run that, it creates a new Kitten item. We can read our table by executing
$ aws dynamodb scan --table-name Kitten { "Items": [ { "KittenId": { "S": "abc-123" }, "Name": { "S": "Fluffy" }, "Color": { "S": "white" } } ], "Count": 1, "ScannedCount": 1, "ConsumedCapacity": null }
We can do all of our normal table operations this way. Want Fluffy to turn blue? Want her to express musical taste? No problem.
$ aws dynamodb put-item --table-name Kitten --item \ "{\"KittenId\":{\"S\":\"abc-123\"},\"Name\":{\"S\":\"Fluffy\"},\"Color\":{\"S\":\"blue\"},\"FavoriteBand\":{\"S\":\"Bad Brains\"}}" $ aws dynamodb scan --table-name Kitten { "Items": [ { "Color": { "S": "blue" }, "FavoriteBand": { "S": "Bad Brains" }, "KittenId": { "S": "abc-123" }, "Name": { "S": "Fluffy" } } ], "Count": 1, "ScannedCount": 1, "ConsumedCapacity": null }
We'll also want to give delete-item, get-item and query a look when exploring the aws cli for dynamodb. If you don't mind escaping your JSON and doing everything at the command line, you are now done and your app has shipped. Congrats, knock off early today!
API Gateway
API Gateway will let us create our own public endpoint that will allow http traffic to our service. A lot of the time we think about using API Gateway to invoke Lambda functions, but as we shall see, there are plenty of other things we can do. We've already installed the required component libraries, @aws-cdk/aws-apigateway and @aws-cdk/aws-iam. We'll start by creating a basic RestApi. API Gateway supports HTTP protocols in two main flavors: RestApi and HttpApi. HttpApi is a stripped down, leaner specification that offers substantial cost savings for many use cases, but unfortunately not ours. HttpApi doesn't support AWS Service Integrations, so we won't be using it.
const api = new RestApi(this, `${modelName}Api`, { defaultCorsPreflightOptions: { allowOrigins: Cors.ALL_ORIGINS, }, restApiName: `${modelName} Service`, });
I'm naming my API "Kitten Service". Yours might be "AardvarkPup Service" or even "Pizza Service" if you like to keep those as pets. The CORS bit there is very cool and shows some real CDK value. This will automatically set up OPTIONS responses (using the MOCK type - meaning nothing else gets called) for all your endpoints. Of course you can specify your own domain or anything else that is legal for CORS. This is a fairly recent feature of CDK and in fact in the example I'm working from, they had to do it the long way. The next thing we'll do is add a couple of resources. This is super easy to do!
const allResources = api.root.addResource(modelName.toLocaleLowerCase()); const oneResource = allResources.addResource('{id}');
Unfortunately this doesn't actually do very much by itself. In order for these resources to have any meaning, we will need to attach methods (HTTP verbs), integrations and responses to the resources. However, we can understand the resource creation mechanism here. We will add a route named kitten which will refer to the entire collection and optionally allow an id to specify a specific kitten that we want to take some action on.
IAM
IAM is the AWS service that establishes a roles and permissions framework for all the other AWS offerings. Services communicate via publicly-available APIs but by default most actions are not allowed - we cannot query our DynamoDB table without credentials and a role that allows us to take that action. In order for our API Gateway to call into DynamoDB, we will need to give it roles that allow it to do that. In fact, each individual integration can have its own role. That would mean our POST HTTP verb might only be able to invoke put-item while our GET HTTP verb can scan, query or get-item. This is known as the principle of least privilege. To me, it's debatable whether it's really necessary for each endpoint to have its own role vs. one shared (and slightly more permissive) role for all the endpoints pointing to my table, but this is an experiment in the possible so we will exercise the tightest possible permissions by creating several roles. Roles by themselves do nothing. They must have policies attached that specify actions the role allows and the resources they may be exercised by.
const getPolicy = new Policy(this, 'getPolicy', { statements: [ new PolicyStatement({ actions: ['dynamodb:GetItem'], effect: Effect.ALLOW, resources: [dynamoTable.tableArn], }), ], });
This policy allows the GetItem action to be taken against the table we just created. We could get lazy and write actions: ['dynamodb:*'] and resources: ['*'], but we might get dinged in a security review or worse, provide a hacker an onramp to our resources. Notice that our policy can be made up of multiple policy statements and each statement can comprise multiple actions and resources. Like I said, the rules can get pretty fine-grained here. Let's create the role that will use this policy.
const getRole = new Role(this, 'getRole', { assumedBy: new ServicePrincipal('apigateway.amazonaws.com'), }); getRole.attachInlinePolicy(getPolicy);
The role specifies a ServicePrincipal, which means that the role will be used by an AWS service, not a human user or a specific application. A "principal" is a human or machine that wants to take some action. We attach the policy as an inline policy, meaning a policy we just defined as opposed to a policy that already exists in our AWS account. This makes sense as the policy only applies to resources we're defining here and has no reason to exist outside of this stack. We can go ahead and define additional roles to provide the other CRUD operations for our API.
AWS Service Integration
To create integrations to AWS services we will use the AwsIntegration construct. This construct requires that we define request templates (what will we send to our service) and integration responses (how we handle various HTTP responses). I defined a couple of error responses and a standard response like this:
const errorResponses = [ { selectionPattern: '400', statusCode: '400', responseTemplates: { 'application/json': `{ "error": "Bad input!" }`, }, }, { selectionPattern: '5\\d{2}', statusCode: '500', responseTemplates: { 'application/json': `{ "error": "Internal Service Error!" }`, }, }, ]; const integrationResponses = [ { statusCode: '200', }, ...errorResponses, ];
We'd probably want to add some additional responses and maybe some more information for a production application. The selectionPattern property is a regular expression on the HTTP status code the service returns. In order to understand how the AwsIntegration works, let's go back to our CLI commands. To fetch the record for Fluffy we created earlier, we can use aws dynamodb query --table-name Kitten --key-condition-expression "KittenId = :1" --expression-attribute-values "{\":1\":{\"S\":\"abc-123\"}}". We know that we're going to provide the service name (dynamodb), an action (query) and then give a payload (the name of the table and the key for our item). From that, AwsIntegration will be able to perform the get-item operation on the named table.
const getIntegration = new AwsIntegration({ action: 'GetItem', options: { credentialsRole: getRole, integrationResponses, requestTemplates: { 'application/json': `{ "Key": { "${modelName}Id": { "S": "$method.request.path.id" } }, "TableName": "${modelName}" }`, }, }, service: 'dynamodb', });
We're referencing the standard integration responses object we previously defined. Then we're defining a requestTemplate inline. This template uses The Apache Velocity Engine and Velocity Template Language (VTL), a java-based open source project that will let us introduce some logical and templating capabilities to API Gateway. There's obviously a fair amount of complexity we could get into with VTL and at a certain point it's probably just a lot better to write a Lambda function than try to handle extremely complex transformations or decision trees in VTL. Here it's not too bad. In case it's not obvious, our request templates are written using template literals. The ${modelName} substitutions happen when my CloudFormation template is created by CDK (when I build), while $method.request.path.id is provided during the request at runtime. Many of the common property mappings can be found in the API Gateway documentation. My template will grab the id from the request path and pass it to DynamoDB. We can also pull properties from the request body. Let's look at the integration for creating a new Kitten.
const createIntegration = new AwsIntegration({ action: 'PutItem', options: { credentialsRole: putRole, integrationResponses: [ { statusCode: '200', responseTemplates: { 'application/json': `{ "requestId": "$context.requestId" }`, }, }, ...errorResponses, ], requestTemplates: { 'application/json': `{ "Item": { "${modelName}Id": { "S": "$context.requestId" }, "Name": { "S": "$input.path('$.name')" }, "Color": { "S": "$input.path('$.color')" } }, "TableName": "${modelName}" }`, }, }, service: 'dynamodb', });
The request body is mapped to $ and can be accessed via $input.path and dot-property access. We're also taking the requestId and using that as a unique identifier in my table. Depending on our use case, that might be a worthwhile thing to do or maybe it would be better to just key off the kitten's name. We have mapped a custom response template into this integration so that we return the requestId - which is now the partition key for the item we just created. We don't want to have to scan our table to get that, so it's convenient to return it in the same request. The rest of our integrations follow the same pattern and use the same techniques. Rather than repeat myself here, you can just go and check it out in my repo. I wrote some tests as well.
Methods
Ready to go? Not quite. We still have to tie an integration to a resource with an HTTP verb. This is quite easy and our code could look like this:
const methodOptions = { methodResponses: [{ statusCode: '200' }, { statusCode: '400' }, { statusCode: '500' }] }; allResources.addMethod('GET', getAllIntegration, methodOptions); allResources.addMethod('POST', createIntegration, methodOptions); oneResource.addMethod('DELETE', deleteIntegration, methodOptions); oneResource.addMethod('GET', getIntegration, methodOptions); oneResource.addMethod('PUT', updateIntegration, methodOptions);
I think that is pretty intuitive if you know much about REST or HTTP. We've mapped several HTTP verbs to our resources If we wanted to return a 404 response on the other ones, we'd need to do a little bit of extra work. By default any request that can't be handled by RestApi returns a 403 with the message "Missing Authentication Token". This is probably to keep malicious users from snooping endpoints and while it may seem confusing to us the first time we see that error, it's probably fine, especially for a demo project. We've got all the pieces in place at last! How does it work? Just fine.
$ curl -i -X POST \ -H "Content-Type:application/json" \ -d \ '{"name": "Claws", "color": "black"}' \ 'https://my-url.execute-api.us-east-1.amazonaws.com/prod/kitten' { "requestId": "e10c6c16-7c84-4035-9d6b-8663c37f62a7" }
$ curl -i -X GET \ 'https://my-url.execute-api.us-east-1.amazonaws.com/prod/kitten/0a9b49c8-b8d2-4c42-9500-571a5b4a79ae' {"Item":{"KittenId":{"S":"0a9b49c8-b8d2-4c42-9500-571a5b4a79ae"},"Name":{"S":"Claws"},"Color":{"S":"black"}}}
Security
Most of the APIs we build will require some kind of security, so how do protect this one? Out of the box we can support Cognito User Pools or IAM roles. We can also provide a custom Lambda authorizer.
Next Steps
So now that we know we can do this, the question is is it a good idea? My CDK code doesn't look too different from the Lambda code in the AWS example. I think as long as the code is simple enough, this is a viable option. If things get more complicated, we'll probably want a Lambda function to handle our request. This approach gives us the option of switching any of our AWS Integrations to Lambda Integrations if we hit that complexity threshold. Another consideration will often be cost. To understand the price difference, we need to do some math. If we built our API using HttpApi and Lambda and got 100 million requests per month, the cost for API Gateway would be $100 and the cost for Lambda (assuming 100ms requests and 256MB memory) would be $429.80. The AWS Integration + RestApi approach would do 100 million requests for $350, a savings of $179.80 monthly. If our Lambda functions could operate at 128MB, then that method would only cost $321.47 and now the AWS Integration is slightly more expensive. If the Lambda functions were significantly slower or required more memory, then we might start seeing real savings. I probably wouldn't do this just for cost, but we also have to consider the effort of writing, maintaining and updating our Lambda functions. Yes, they are small, but every code footprint costs something and it's nice to have the option to just skip simple boilerplate. Lastly, now that we can do this with DynamoDB, what about other services? Does your Lambda function do nothing but pass a message to SNS? Does it just drop a file on S3? It might be better to consider a Service Integration. Keep this pattern in mind for Step Functions as well. You can basically do the same thing.
0 notes
Link
The most comprehensive Angular 4 (Angular 2+) course. Build a real e-commerce app with Angular, Firebase and Bootstrap 4
What you’ll learn
Establish yourself as a skilled professional developer
Build real-world Angular applications on your own
Troubleshoot common Angular errors
Master the best practices
Write clean and elegant code like a professional developer
Requirements
Basic familiarity with HTML, CSS and JavaScript
NO knowledge of Angular 1 or Angular 2 is required
Description
Angular is one of the most popular frameworks for building client apps with HTML, CSS and TypeScript. If you want to establish yourself as a front-end or a full-stack developer, you need to learn Angular.
If you’ve been confused or frustrated jumping from one Angular 4 tutorial to another, you’ve come to the right place. In this course, Mosh, author of several best-selling courses on Udemy, takes you on a fun and pragmatic journey to master Angular 4.
By the end of watching this course, you’ll be able to:
Build real client apps with Angular on your own
Troubleshoot common compile-time and run-time errors
Write clean and maintainable code like a professional
Apply best practices when building Angular apps
Right from the beginning, you’ll jump in and build your first Angular app within minutes. Say goodbye to boring tutorials and courses with rambling instructors and useless theories!
Angular 2+ has been written in TypeScript. So, in section 2, you’ll learn the fundamentals of TypeScript and object-oriented programming to better understand and appreciate this powerful framework.
Over the next 8 hours, you’ll learn the essentials of building client apps with Angular:
Displaying data and handling events
Building re-usable components
Manipulating the DOM using directives
Formatting data using pipes
Building template-driven and reactive forms
Consuming HTTP services
Handling HTTP errors properly
Using Reactive Extensions and observables
Adding routing and navigation
Implementing authentication and authorization using JSON Web Tokens (JWT)
Deploying your applications to GitHub Pages, Firebase and Heroku
So, if you’re a busy developer with limited time and want to quickly learn how to build and deploy client apps with Angular, you can stop here.
If you’re more adventurous and want to learn more, there is far more content for you! Over the following sections, you’ll learn about more advanced topics:
Building real-time, server-less apps with Firebase
Animating DOM elements using Angular animations
Building beautiful UIs using Angular Material
Implementing the Redux architecture
Writing unit and integration tests
All that covers just over 21 hours of high-quality content. This is equivalent to a book with more than a thousand pages! But the kind of book that every line is worth reading, not a book that you want to skim! If you have taken any of Mosh’s courses before, you know he is very clear and concise in his teaching and doesn’t waste a single minute of your precious time!
Finally, at the end of the course, you’ll build and deploy a real-time e-commerce application with Angular 4, Firebase 4 and Bootstrap 4. This application exhibits patterns that you see in a lot of real-world applications:
Master/detail
CRUD operations
Forms with custom validation
Searching, sorting and pagination
Authentication and authorization
And a lot more!
You’ll see how Mosh creates a brand new Angular project with Angular CLI and builds this application from A to Z, step-by-step. No copy/pasting! These 8.5 hours are packed with tips that you can only learn from a seasoned developer.
You’ll learn how to apply best practices, refactor your code and produce high quality code like a professional developer. You’ll learn about Mosh’s design decisions along the way and why he chooses a certain approach. What he shares with you comes from his 17 years of experience as a professional software developer.
You’re not going to get this information in other Angular courses out there!
And on top of all these, you’ll get:
Closed-captions generated by a human, not a computer! Currently only the first few sections have closed-captions but new captions are being added every week.
Offline access: if you are traveling or have a slow connection, you can download the videos and watch them offline.
Downloadable source code
PREREQUISITES
You don’t need familiarity with TypeScript or any previous versions of Angular. You’re going to learn both TypeScript and Angular from scratch in this course.
WHAT OTHER STUDENTS WHO HAVE TAKEN THIS COURSE SAY:
“Absolutely amazing Angular course. Mosh not only introduces key concepts behind Angular, but also pays attention to coding style and good practices. Additionally, course is contstantly enhanced and updated. Also, student questions are answered by Tim – Mosh’s teaching assistant. Awesome!” -Calvis
“I am amazed of how dedicated you are in providing updates and more contents to this course. This kind of value is what define a great course and made me feel that the money is well spent. Keep it up! Furthermore, lessons are arranged and planned really carefully. This made the learning experience more seamless and exciting. Thanks Mosh!” -Rashid Razak
“This is another excellent course from the wonderful author Mosh. Thank you Mosh for your awesome course on Angular. Inspite of being a Pluralsight subscriber for the last 3 years, I have subscribed 10 out of 16 courses so far Mosh has produced in Udemy. Also I have viewed 3 of his courses in Pluralsight. That is how I got introduced to this brilliant author. This speaks about the quality of his content. Once again Thank you Mosh for all your efforts. Hope to see a Design Patterns course from you soon.” -Dhanasekar Murugesan
“Fantastic course, well laid out, good speed, and explains the why behind everything he does, shedding light on what’s under the hood. Also, Mosh has a very practical and elegant coding style worth emulating.” -Mack O’Meara
“This is the second course I’ve taken with Mosh as the instructor and I’ve signed up for another. The quality of the audio, video, and content shows Mosh invests his time and money to create great and valuable videos. The material is relevant, up-to-date, and provides the student with the ability to succeed in the subject matter (in this case Angular). My expectations were exceeded again. I’ll be taking more courses with Mosh!” -John
30-DAY FULL MONEY-BACK GUARANTEE
This course comes with a 30-day full money-back guarantee. Take the course, watch every lecture, and do the exercises, and if you are not happy for any reasons, contact Udemy for a full refund within the first 30 days of your enrolment. All your money back, no questions asked.
ABOUT YOUR INSTRUCTOR
Mosh (Moshfegh) Hamedani is a software engineer with 17 years of professional experience. He is the author of several best selling Udemy courses with more than 120,000 students in 192 countries. He has a Master of Science in Network Systems and Bachelor of Science in Software Engineering. His students describe him as passionate, pragmatic and motivational in his teaching.
So, what are you waiting for? Don’t waste your time jumping from one tutorial to another. Enroll in the course and you’ll build your first Angular app in less than 10 minutes!
Who this course is for:
Developers who want to upgrade their skills and get better job opportunities
Front-end developers who want to stay up-to-date with the latest technology
Back-end developers who want to learn front-end development and become full-stack developers
Hobbyist developers who are passionate about working with new frameworks
Created by Mosh Hamedani Last updated 4/2018 English English [Auto-generated]
Size: 3.85 GB
Download Now
https://ift.tt/2xwljQ1.
The post The Complete Angular Course: Beginner to Advanced appeared first on Free Course Lab.
0 notes
Photo

New Post has been published on https://programmingbiters.com/model-view-presenter-in-android/
Model-View-Presenter in Android
What is Model-View-Presenter (MVP)
MVP is a Model-View-Presenter in short. It is a derivative from Model-View-Controller (MVC) architectural pattern. The main concern about MVP structure is that it separates the view from the backend logic. Because Android doesn’t care about which pattern to be used when developing, the community developer itself has to debate on which architecture to use. It is well suited in Android because we needed it for easy testability, at least that’s what I see when developing an app based on this structure. Just to let you know, this article only covers on how to implement the layering structure WITHOUT testing suite and dependency injection. It is gonna be plain and simple to understand how it works under the hood. You can structure it any way you want but the basic idea is that view updates “decision” is done by the Presenter via View.
Let’s take a look at the meaning of each letter that represents MVP one by one:
Model
The data source
The data structure (model POJO)
Repository
Realm/Sqlite/Sharedpreference
View
Is NOT the UI itself
Is an interface, well, lots of it
An interface which interacts between Presenter and the UI
Also refer to as contract for UI to update and receive data to be passed to the Presenter
Presenter
Mediator between Model-View and the UI
Contains logic, means it will use Model layer to acquire data and send it back to the UI via the View
Ideally, does not contain Android specific framework like context
Communication between the UI is done by View (aka contract)
Why MVP?
I’ve worked with this structure to build an app for my company. There are several reasons why I chose to use it.
To learn
Having a team that works on a same project, it is easier to delegate tasks by layer. Eg. Person A contributes on the data layer, Person B just touch the UI (activity/fragment)
Easier to train new coders to start working as it is a standardized design
Technically, Android context is closely coupled with plain java code. So we would need its usage to be separated for easy testability. Using this, we can achieve unit testing and instrumentation test easily
If done correctly and by using best practices like SOLID principle, we can achieve a highly modular codebase which results in easy maintainability. Eg. changing database, changing network call provider, creating a library specifically for the core function part
Implementation
Though I think this implementation isn’t a full MVP because it lacks test capability. But we can learn how it actually works and learn to improve upon it.
Also this design is being used in a project I’ve worked on before, so I will not provide any working example of Github project. This is only for my own future reference and of course for others to learn and critique.
Design implementation
Consider the following tree structure which is a modified version of avenging project which nicely separate the modules by core and ui (see top 2 parent directories below). This is not yet an MVP design implementation because we are structuring it based on modules. I think it’s easier to maintain it this way for in the future if we want to make the core as a JAR library, it can be done so easily.
Other than that, we are gonna make use of several best practices in this codebase such as Builder patterns and Repository pattern for our Model DAO. One edge case I’ve ran into is when creating a push notification service. After some research, I found that services as such doesn’t belong to any of MVP layer (See services directory below).
As for the dependencies, I’m using Realm and Shared Preference as my persistence tool and Retrofit as my networking service.
├───core ; backbone of the app │ ├───data │ │ ├───model ; POJO models from json response. Extends RealmObject │ │ │ ├───Menu │ │ │ └───Restaurant │ │ ├───network ; networking utility │ │ ├───preference ; shared preference utility │ │ └───repository ; the dao │ │ ├───commons ; common interfaces to be extended by specification │ │ ├───impl ; implementation classes for each model repository │ │ └───specification ; feature-centric specification │ │ ├───Menu │ │ └───Restaurant │ ├───mvp ; presenter and contracts │ │ ├───base ; abstract classes for mvp usage │ │ ├───menu ; feature │ │ └───restaurant ; feature │ ├───services ; services not associated with mvp │ │ └───push_notification │ │ └───action │ └───util ; utility for core module └───ui ; activity/fragment/view/adapter ├───base ; base classes ├───home ; feature ├───main ; feature ├───menu ; feature ├───restaurant ; feature ├───util ; utility for ui module └───view ; custom extended views/viewgroups
core
Also known as the domain layer
Consists of only data management and transaction of data between UI and backend
Doesn’t know the existence of where it should be displayed (fragment, activities)
API calling, database handling, cache management, etc. sits inside this package
Ideally should be context-free
ui
Also known as the presentation layer
Consists of UI such as activities, fragment and/or custom views
Ideally should NOT contain business logic as it only displays the data given by core module
Interaction with the domain layer is done by specific ViewAction implementation (see MVP section)
Chart below shows how layers are communicating with each other. More on code implementation below.
Code implementation
Use these base classes for View Actions and generic Repository
RemoteView: https://gist.github.com/aimanbaharum/056f138dbd921bd4c4a9428cdd32c5bf
BasePresenter: https://gist.github.com/aimanbaharum/cfa36bdf11d4b54704a8b3a05cd4a01d
Repository: https://gist.github.com/aimanbaharum/54b45709f6ac4dc7c2af875d4a3958e0
Implementing the backend
1. Creating feature Contract
/core/mvp/home/login/LoginContract.java https://gist.github.com/aimanbaharum/a1c45f836c494729c5f46f52e3215802
public interface LoginContract interface ViewAction void onUserLogin(@NonNull Login login); interface LoginView extends RemoteView void onLoginSuccess();
ViewAction
Action/task to be passed to the Presenter from the UI. Such that, when user clicks a button, onUserLogin will be called. Presenter will handle the process.
LoginView
Once processing is done in the Presenter part, Presenter can call one of the interface method to make UI changes. In this example, after a login is successful, Presenter can call onLoginSuccess to tell UI it has done its work.
RemoteView
Similar to LoginView, contains other common UI changing interface methods such as showError, showEmpty etc. Put custom action in this interface.
2. Creating feature Presenter
/core/mvp/home/login/LoginPresenter.java https://gist.github.com/aimanbaharum/42de71c5757f92f7e486fce33ec07247
Pass other dependencies into the constructor.
public LoginPresenter(APIManager apiManager, PreferenceService preference, INetworkManager networkManager, Repository<Login> loginRepository) this.apiManager = apiManager; this.preference = preference; this.networkManager = networkManager; this.loginRepository = loginRepository;
Every Presenter class must extend a BasePresenter<View> and implement its corresponding ViewAction. Implement method as defined in the ViewAction. To make an API call, simply use apiManager object to call one of the API.
class LoginPresenter extends BasePresenter<LoginContract.LoginView> implements LoginContract.ViewAction @Override public void onUserLogin(@NonNull Login login) apiManager.loginUser(login, callback);
Once we have extended BasePresenter and implement the correct ViewAction, we can already use the LoginView to change the UI state. isViewAttached() exists in BasePresenter. This method is to make sure we have attached a correct view instance into the Presenter. Using getView() method is how we access the View instance and do changes according to the Contract we have written earlier.
Example usage of getView():
getView().showProgress(); getView().hideProgress(); getView().showMessageLayout(false); getView().onLoginSuccess(); getView().showEmpty(); getView().showError("An error has occurred");
For communication between the Presenter and the UI, see Bridging with the UI section below.
3. Creating feature Models
/core/data/model/Login/Login.java https://gist.github.com/aimanbaharum/7377e0ef6f1d6f28c299018f04375061
/core/data/model/Login/LoginResponse.java https://gist.github.com/aimanbaharum/5e1faf9fc58b02fb4e6eef868f92ae42
In this model, we define the payload required for the API. Included as well, the Builder methods generated by Intellij plugin, which I forgot which one I used.
4. Creating API endpoint integration
/core/data/network/AppAPI.java https://gist.github.com/aimanbaharum/c93d060d1f3f320f33fb6a3622456cec
@POST("user/login") Call<LoginResponse> loginUser(@Body Login login);
Add a new endpoint into the interface list. In this case, Login API with user/login endpoint. Refer Retrofit docs for more info on @Body parameter.
/core/data/network/APIManager.java https://gist.github.com/aimanbaharum/46faa94d6f9aff8e4035660af5dad1d2
public void loginUser(Login login, RemoteCallback<LoginResponse> listener) mApi.loginUser(login).enqueue(listener);
Add a new concrete method to make use of loginUser interface we have just made earlier. Passing a response listener for OkHttp to make network call.
Bridging with the UI
Once everything in the backend is done, we can bridge Presenter with our UI
1. Extend BaseFragment/BaseActivity and implement corresponding *View in feature Contract
/ui/login/LoginActivity.java https://gist.github.com/aimanbaharum/a998a97a0b4c562d0a8c2b437719a173
public class LoginActivity extends BaseFragment implements LoginContract.LoginView @Override public void showEmpty() @Override public void showError(String errorMessage) // ... other overriden methods @Override public void onLoginSuccess() @Override public void onLoginFailed(String message)
2. Create feature Presenter instance
For the sake of brevity and showing example for Login feature, we’ll be using these common dependencies to be passed into our Presenter constructor.
Ideally, we wouldn’t want to write such boilerplates each time we want to pass dependencies into a class. Dagger for dependency injections should be used in this case.
APIManager apiManager = APIManager.getInstance(); PreferenceService preferenceService = new PreferenceServiceImpl(this); NetworkManager networkManager = new NetworkManager(this); DatabaseRealm databaseRealm = new DatabaseRealm(); Repository<Login> loginRepository = new LoginRepositoryImpl(databaseRealm); // not to be used because Login model doesn't extend RealmObject, but we're showing anyway LoginPresenter presenter = new LoginPresenter(apiManager, preferenceService, networkManager, loginRepository);
3. Create feature Repository
The purpose of this class is to allow feature-specific DAO implementation to be used in our Presenter. Naming convention is used such that [FEATURE_NAME]RepositoryImpl. Repository implementation should implements Repository<?> interface.
/core/data/repository/impl/LoginRepository.java https://gist.github.com/aimanbaharum/60ce4cac07455bfde07224b5bb2be0d7
public class LoginRepositoryImpl implements Repository<Login> private DatabaseRealm databaseRealm; public LoginRepositoryImpl(DatabaseRealm databaseRealm) this.databaseRealm = databaseRealm; @Override public Login find(String guid) return null; @Override public List<Login> findAll() return null; // ... other overriden methods @Override public List<Login> query(Specification specification) return null;
A specification is like Data Access Object (DAO) where we specify our custom queries from Realm, other than common CRUD operations (find, findAll, add, remove etc).
Create a Specification class inside core/data/repository/specification
Implement any Specification interface available in core/data/repository/commons
From the Specification class, we can define our own query for Realm
return realm.where(Restaurant.class) .equalTo(Restaurant.KEY_FAVORITE, true) .findAll();
For more information about Repository Pattern used in this post, check this article out.
4. Attach View instance to the Presenter
Allows Presenter to give callback commands to modify UI from within itself. Place attachView in either onCreate or onViewCreated for fragment
@Override protected void onCreate(Bundle savedInstanceState) presenter = new LoginPresenter(...); presenter.attachView(this);
Detach view instance on destroy to free up some memory
@Override protected void onDestroy() presenter.detachView(this); super.onDestroy();
5. Call any ViewAction method to be processed by the Presenter
@OnClick(R.id.login_btn) public void onLoginClicked() presenter.onUserLogin(username, password);
This will invoke the Presenter to process our data from the UI. A callback from Presenter must be written in order to change the state of this UI. Refer to Creating feature Presenter in Implementing the backend section for more details on how to change the state of the UI.
6. UI state change will occur in the ViewAction method
@Override public void onLoginSuccess() // do something with UI. eg. Toast.show() @Override public void onLoginFailed(String message) // do something with UI. eg. Toast.show()
From here, you can do as much as you want with the UI. Be it showing Toasts, changing layouts, updating views etc. Since the control is done by our Presenter, it can also carry payload as well. So, front end guy would use your data from the backend to feed it to his dummy structured layout.
There are however things that should be improved in this design such as the usage of Dependency Injection pattern (we’re using a lot of dependency instance), and testing suite for both unit and instrumentation.
Resources
Repository pattern: https://medium.com/@krzychukosobudzki/repository-design-pattern-bc490b256006#.b8uer86v2
MVP without Dagger/RxJava: https://android.jlelse.eu/avenging-android-mvp-23461aebe9b5#.qf5t6bzdj
MVP and TDD: http://manabreak.eu/android/2016/10/26/mvp-tdd.html
My reference list: https://hackmd.io/s/SJKO7oTCx
0 notes
Text
Rewriting the Beginner's Guide to SEO
Posted by BritneyMuller
(function($) { // code using $ as alias to jQuery $(function() { // Hide the hypotext content. $('.hypotext-content').hide(); // When a hypotext link is clicked. $('a.hypotext.closed').click(function (e) { // custom handling here e.preventDefault(); // Create the class reference from the rel value. var id = '.' + $(this).attr('rel'); // If the content is hidden, show it now. if ( $(id).css('display') == 'none' ) { $(id).show('slow'); if (jQuery.ui) { // UI loaded $(id).effect("highlight", {}, 1000); } } // If the content is shown, hide it now. else { $(id).hide('slow'); } }); // If we have a hash value in the url. if (window.location.hash) { // If the anchor is within a hypotext block, expand it, by clicking the // relevant link. console.log(window.location.hash); var anchor = $(window.location.hash); var hypotextLink = $('#' + anchor.parents('.hypotext-content').attr('rel')); console.log(hypotextLink); hypotextLink.click(); // Wait until the content has expanded before jumping to anchor. //$.delay(1000); setTimeout(function(){ scrollToAnchor(window.location.hash); }, 1000); } }); function scrollToAnchor(id) { var anchor = $(id); $('html,body').animate({scrollTop: anchor.offset().top},'slow'); } })(jQuery); .hypotext-content { position: relative; padding: 10px; margin: 10px 0; border-right: 5px solid; } a.hypotext { border-bottom: 1px solid; } .hypotext-content .close:before { content: "close"; font-size: 0.7em; margin-right: 5px; border-bottom: 1px solid; } a.hypotext.close { display: block; position: absolute; right: 0; top: 0; line-height: 1em; border: none; }
Many of you reading likely cut your teeth on Moz’s Beginner’s Guide to SEO. Since it was launched, it's easily been our top-performing piece of content:
Most months see 100k+ views (the reverse plateau in 2013 is when we changed domains).
While Moz’s Beginner's Guide to SEO still gets well over 100k views a month, the current guide itself is fairly outdated. This big update has been on my personal to-do list since I started at Moz, and we need to get it right because — let’s get real — you all deserve a bad-ass SEO 101 resource!
However, updating the guide is no easy feat. Thankfully, I have the help of my fellow Mozzers. Our content team has been a collective voice of reason, wisdom, and organization throughout this process and has kept this train on its tracks.
Despite the effort we've put into this already, it felt like something was missing: your input! We're writing this guide to be a go-to resource for all of you (and everyone who follows in your footsteps), and want to make sure that we're including everything that today's SEOs need to know. You all have a better sense of that than anyone else.
So, in order to deliver the best possible update, I'm seeking your help.
This is similar to the way Rand did it back in 2007. And upon re-reading your many "more examples" requests, we’ve continued to integrate more examples throughout.
The plan:
Over the next 6–8 weeks, I’ll be updating sections of the Beginner's Guide and posting them, one by one, on the blog.
I'll solicit feedback from you incredible people and implement top suggestions.
The guide will be reformatted/redesigned, and I'll 301 all of the blog entries that will be created over the next few weeks to the final version.
It's going to remain 100% free to everyone — no registration required, no premium membership necessary.
To kick things off, here’s the revised outline for the Beginner’s Guide to SEO:
Click each chapter's description to expand the section for more detail.
Chapter 1: SEO 101
What is it, and why is it important? ↓
What is SEO?
Why invest in SEO?
Do I really need SEO?
Should I hire an SEO professional, consultant, or agency?
Search engine basics:
Google Webmaster Guidelines basic principles
Bing Webmaster Guidelines basic principles
Guidelines for representing your business on Google
Fulfilling user intent
Know your SEO goals
Chapter 2: Crawlers & Indexing
First, you need to show up. ↓
How do search engines work?
Crawling & indexing
Determining relevance
Links
Personalization
How search engines make an index
Googlebot
Indexable content
Crawlable link structure
Links
Alt text
Types of media that Google crawls
Local business listings
Common crawling and indexing problems
Online forms
Blocking crawlers
Search forms
Duplicate content
Non-text content
Tools to ensure proper crawl & indexing
Google Search Console
Moz Pro Site Crawl
Screaming Frog
Deep Crawl
How search engines order results
200+ ranking factors
RankBrain
Inbound links
On-page content: Fulfilling a searcher’s query
PageRank
Domain Authority
Structured markup: Schema
Engagement
Domain, subdomain, & page-level signals
Content relevance
Searcher proximity
Reviews
Business citation spread and consistency
SERP features
Rich snippets
Paid results
Universal results
Featured snippets
People Also Ask boxes
Knowledge Graph
Local Pack
Carousels
Chapter 3: Keyword Research
Next, know what to say and how to say it. ↓
How to judge the value of a keyword
The search demand curve
Fat head
Chunky middle
Long tail
Four types of searches:
Transactional queries
Informational queries
Navigational queries
Commercial investigation
Fulfilling user intent
Keyword research tools:
Google Keyword Planner
Moz Keyword Explorer
Google Trends
AnswerThePublic
SpyFu
SEMRush
Keyword difficulty
Keyword abuse
Content strategy {link to the Beginner’s Guide to Content Marketing}
Chapter 4: On-Page SEO
Next, structure your message to resonate and get it published. ↓
Keyword usage and targeting
Keyword stuffing
Page titles:
Unique to each page
Accurate
Be mindful of length
Naturally include keywords
Include branding
Meta data/Head section:
Meta title
Meta description
Meta keywords tag
No longer a ranking signal
Meta robots
Meta descriptions:
Unique to each page
Accurate
Compelling
Naturally include keywords
Heading tags:
Subtitles
Summary
Accurate
Use in order
Call-to-action (CTA)
Clear CTAs on all primary pages
Help guide visitors through your conversion funnels
Image optimization
Compress file size
File names
Alt attribute
Image titles
Captioning
Avoid text in an image
Video optimization
Transcription
Thumbnail
Length
"~3mo to YouTube" method
Anchor text
Descriptive
Succinct
Helps readers
URL best practices
Shorter is better
Unique and accurate
Naturally include keywords
Go static
Use hyphens
Avoid unsafe characters
Structured data
Microdata
RFDa
JSON-LD
Schema
Social markup
Twitter Cards markup
Facebook Open Graph tags
Pinterest Rich Pins
Structured data types
Breadcrumbs
Reviews
Events
Business information
People
Mobile apps
Recipes
Media content
Contact data
Email markup
Mobile usability
Beyond responsive design
Accelerated Mobile Pages (AMP)
Progressive Web Apps (PWAs)
Google mobile-friendly test
Bing mobile-friendly test
Local SEO
Business citations
Entity authority
Local relevance
Complete NAP on primary pages
Low-value pages
Chapter 5: Technical SEO
Next, translate your site into Google's language. ↓
Internal linking
Link positioning
Anchor links
Common search engine protocols
Sitemaps
Mobile
News
Image
Video
XML
RSS
TXT
Robots
Robots.txt
Disallow
Sitemap
Crawl Delay
X-robots
Meta robots
Index/noindex
Follow/nofollow
Noimageindex
None
Noarchive
Nocache
No archive
No snippet
Noodp/noydir
Log file analysis
Site speed
HTTP/2
Crawl errors
Duplicate content
Canonicalization
Pagination
What is the DOM?
Critical rendering path
Help robots find the most important code first
Hreflang/Targeting multiple languages
Chrome DevTools
Technical site audit checklist
Chapter 6: Establishing Authority
Finally, turn up the volume. ↓
Link signals
Global popularity
Local/topic-specific popularity
Freshness
Social sharing
Anchor text
Trustworthiness
Trust Rank
Number of links on a page
Domain Authority
Page Authority
MozRank
Competitive backlinks
Backlink analysis
The power of social sharing
Tapping into influencers
Expanding your reach
Types of link building
Natural link building
Manual link building
Self-created
Six popular link building strategies
Create content that inspires sharing and natural links
Ego-bait influencers
Broken link building
Refurbish valuable content on external platforms
Get your customers/partners to link to you
Local community involvement
Manipulative link building
Reciprocal link exchanges
Link schemes
Paid links
Low-quality directory links
Tiered link building
Negative SEO
Disavow
Reviews
Establishing trust
Asking for reviews
Managing reviews
Avoiding spam practices
Chapter 7: Measuring and Tracking SEO
Pivot based on what's working. ↓
KPIs
Conversions
Event goals
Signups
Engagement
GMB Insights:
Click-to-call
Click-for-directions
Beacons
Which pages have the highest exit percentage? Why?
Which referrals are sending you the most qualified traffic?
Pivot!
Search engine tools:
Google Search Console
Bing Webmaster Tools
GMB Insights
Appendix A: Glossary of Terms
Appendix B: List of Additional Resources
Appendix C: Contributors & Credits
What did you struggle with most when you were first learning about SEO? What would you have benefited from understanding from the get-go?
Are we missing anything? Any section you wish wouldn't be included in the updated Beginner's Guide? Leave your suggestions in the comments!
Thanks in advance for contributing.
Sign up for The Moz Top 10, a semimonthly mailer updating you on the top ten hottest pieces of SEO news, tips, and rad links uncovered by the Moz team. Think of it as your exclusive digest of stuff you don't have time to hunt down but want to read!
http://ift.tt/2nwMjtK Rewriting the Beginner's Guide to SEO
0 notes
Text
Rewriting the Beginner's Guide to SEO
Posted by BritneyMuller
(function($) { // code using $ as alias to jQuery $(function() { // Hide the hypotext content. $('.hypotext-content').hide(); // When a hypotext link is clicked. $('a.hypotext.closed').click(function (e) { // custom handling here e.preventDefault(); // Create the class reference from the rel value. var id = '.' + $(this).attr('rel'); // If the content is hidden, show it now. if ( $(id).css('display') == 'none' ) { $(id).show('slow'); if (jQuery.ui) { // UI loaded $(id).effect("highlight", {}, 1000); } } // If the content is shown, hide it now. else { $(id).hide('slow'); } }); // If we have a hash value in the url. if (window.location.hash) { // If the anchor is within a hypotext block, expand it, by clicking the // relevant link. console.log(window.location.hash); var anchor = $(window.location.hash); var hypotextLink = $('#' + anchor.parents('.hypotext-content').attr('rel')); console.log(hypotextLink); hypotextLink.click(); // Wait until the content has expanded before jumping to anchor. //$.delay(1000); setTimeout(function(){ scrollToAnchor(window.location.hash); }, 1000); } }); function scrollToAnchor(id) { var anchor = $(id); $('html,body').animate({scrollTop: anchor.offset().top},'slow'); } })(jQuery); .hypotext-content { position: relative; padding: 10px; margin: 10px 0; border-right: 5px solid; } a.hypotext { border-bottom: 1px solid; } .hypotext-content .close:before { content: "close"; font-size: 0.7em; margin-right: 5px; border-bottom: 1px solid; } a.hypotext.close { display: block; position: absolute; right: 0; top: 0; line-height: 1em; border: none; }
Many of you reading likely cut your teeth on Moz’s Beginner’s Guide to SEO. Since it was launched, it's easily been our top-performing piece of content:
Most months see 100k+ views (the reverse plateau in 2013 is when we changed domains).
While Moz’s Beginner's Guide to SEO still gets well over 100k views a month, the current guide itself is fairly outdated. This big update has been on my personal to-do list since I started at Moz, and we need to get it right because — let’s get real — you all deserve a bad-ass SEO 101 resource!
However, updating the guide is no easy feat. Thankfully, I have the help of my fellow Mozzers. Our content team has been a collective voice of reason, wisdom, and organization throughout this process and has kept this train on its tracks.
Despite the effort we've put into this already, it felt like something was missing: your input! We're writing this guide to be a go-to resource for all of you (and everyone who follows in your footsteps), and want to make sure that we're including everything that today's SEOs need to know. You all have a better sense of that than anyone else.
So, in order to deliver the best possible update, I'm seeking your help.
This is similar to the way Rand did it back in 2007. And upon re-reading your many "more examples" requests, we’ve continued to integrate more examples throughout.
The plan:
Over the next 6–8 weeks, I’ll be updating sections of the Beginner's Guide and posting them, one by one, on the blog.
I'll solicit feedback from you incredible people and implement top suggestions.
The guide will be reformatted/redesigned, and I'll 301 all of the blog entries that will be created over the next few weeks to the final version.
It's going to remain 100% free to everyone — no registration required, no premium membership necessary.
To kick things off, here’s the revised outline for the Beginner’s Guide to SEO:
Click each chapter's description to expand the section for more detail.
Chapter 1: SEO 101
What is it, and why is it important? ↓
What is SEO?
Why invest in SEO?
Do I really need SEO?
Should I hire an SEO professional, consultant, or agency?
Search engine basics:
Google Webmaster Guidelines basic principles
Bing Webmaster Guidelines basic principles
Guidelines for representing your business on Google
Fulfilling user intent
Know your SEO goals
Chapter 2: Crawlers & Indexing
First, you need to show up. ↓
How do search engines work?
Crawling & indexing
Determining relevance
Links
Personalization
How search engines make an index
Googlebot
Indexable content
Crawlable link structure
Links
Alt text
Types of media that Google crawls
Local business listings
Common crawling and indexing problems
Online forms
Blocking crawlers
Search forms
Duplicate content
Non-text content
Tools to ensure proper crawl & indexing
Google Search Console
Moz Pro Site Crawl
Screaming Frog
Deep Crawl
How search engines order results
200+ ranking factors
RankBrain
Inbound links
On-page content: Fulfilling a searcher’s query
PageRank
Domain Authority
Structured markup: Schema
Engagement
Domain, subdomain, & page-level signals
Content relevance
Searcher proximity
Reviews
Business citation spread and consistency
SERP features
Rich snippets
Paid results
Universal results
Featured snippets
People Also Ask boxes
Knowledge Graph
Local Pack
Carousels
Chapter 3: Keyword Research
Next, know what to say and how to say it. ↓
How to judge the value of a keyword
The search demand curve
Fat head
Chunky middle
Long tail
Four types of searches:
Transactional queries
Informational queries
Navigational queries
Commercial investigation
Fulfilling user intent
Keyword research tools:
Google Keyword Planner
Moz Keyword Explorer
Google Trends
AnswerThePublic
SpyFu
SEMRush
Keyword difficulty
Keyword abuse
Content strategy {link to the Beginner’s Guide to Content Marketing}
Chapter 4: On-Page SEO
Next, structure your message to resonate and get it published. ↓
Keyword usage and targeting
Keyword stuffing
Page titles:
Unique to each page
Accurate
Be mindful of length
Naturally include keywords
Include branding
Meta data/Head section:
Meta title
Meta description
Meta keywords tag
No longer a ranking signal
Meta robots
Meta descriptions:
Unique to each page
Accurate
Compelling
Naturally include keywords
Heading tags:
Subtitles
Summary
Accurate
Use in order
Call-to-action (CTA)
Clear CTAs on all primary pages
Help guide visitors through your conversion funnels
Image optimization
Compress file size
File names
Alt attribute
Image titles
Captioning
Avoid text in an image
Video optimization
Transcription
Thumbnail
Length
"~3mo to YouTube" method
Anchor text
Descriptive
Succinct
Helps readers
URL best practices
Shorter is better
Unique and accurate
Naturally include keywords
Go static
Use hyphens
Avoid unsafe characters
Structured data
Microdata
RFDa
JSON-LD
Schema
Social markup
Twitter Cards markup
Facebook Open Graph tags
Pinterest Rich Pins
Structured data types
Breadcrumbs
Reviews
Events
Business information
People
Mobile apps
Recipes
Media content
Contact data
Email markup
Mobile usability
Beyond responsive design
Accelerated Mobile Pages (AMP)
Progressive Web Apps (PWAs)
Google mobile-friendly test
Bing mobile-friendly test
Local SEO
Business citations
Entity authority
Local relevance
Complete NAP on primary pages
Low-value pages
Chapter 5: Technical SEO
Next, translate your site into Google's language. ↓
Internal linking
Link positioning
Anchor links
Common search engine protocols
Sitemaps
Mobile
News
Image
Video
XML
RSS
TXT
Robots
Robots.txt
Disallow
Sitemap
Crawl Delay
X-robots
Meta robots
Index/noindex
Follow/nofollow
Noimageindex
None
Noarchive
Nocache
No archive
No snippet
Noodp/noydir
Log file analysis
Site speed
HTTP/2
Crawl errors
Duplicate content
Canonicalization
Pagination
What is the DOM?
Critical rendering path
Help robots find the most important code first
Hreflang/Targeting multiple languages
Chrome DevTools
Technical site audit checklist
Chapter 6: Establishing Authority
Finally, turn up the volume. ↓
Link signals
Global popularity
Local/topic-specific popularity
Freshness
Social sharing
Anchor text
Trustworthiness
Trust Rank
Number of links on a page
Domain Authority
Page Authority
MozRank
Competitive backlinks
Backlink analysis
The power of social sharing
Tapping into influencers
Expanding your reach
Types of link building
Natural link building
Manual link building
Self-created
Six popular link building strategies
Create content that inspires sharing and natural links
Ego-bait influencers
Broken link building
Refurbish valuable content on external platforms
Get your customers/partners to link to you
Local community involvement
Manipulative link building
Reciprocal link exchanges
Link schemes
Paid links
Low-quality directory links
Tiered link building
Negative SEO
Disavow
Reviews
Establishing trust
Asking for reviews
Managing reviews
Avoiding spam practices
Chapter 7: Measuring and Tracking SEO
Pivot based on what's working. ↓
KPIs
Conversions
Event goals
Signups
Engagement
GMB Insights:
Click-to-call
Click-for-directions
Beacons
Which pages have the highest exit percentage? Why?
Which referrals are sending you the most qualified traffic?
Pivot!
Search engine tools:
Google Search Console
Bing Webmaster Tools
GMB Insights
Appendix A: Glossary of Terms
Appendix B: List of Additional Resources
Appendix C: Contributors & Credits
What did you struggle with most when you were first learning about SEO? What would you have benefited from understanding from the get-go?
Are we missing anything? Any section you wish wouldn't be included in the updated Beginner's Guide? Leave your suggestions in the comments!
Thanks in advance for contributing.
Sign up for The Moz Top 10, a semimonthly mailer updating you on the top ten hottest pieces of SEO news, tips, and rad links uncovered by the Moz team. Think of it as your exclusive digest of stuff you don't have time to hunt down but want to read!
Read more here - https://moz.com/blog/rewriting-beginners-guide-to-seo-outline
0 notes
Text
Rewriting the Beginner's Guide to SEO
Posted by BritneyMuller
(function($) { // code using $ as alias to jQuery $(function() { // Hide the hypotext content. $('.hypotext-content').hide(); // When a hypotext link is clicked. $('a.hypotext.closed').click(function (e) { // custom handling here e.preventDefault(); // Create the class reference from the rel value. var id = '.' + $(this).attr('rel'); // If the content is hidden, show it now. if ( $(id).css('display') == 'none' ) { $(id).show('slow'); if (jQuery.ui) { // UI loaded $(id).effect("highlight", {}, 1000); } } // If the content is shown, hide it now. else { $(id).hide('slow'); } }); // If we have a hash value in the url. if (window.location.hash) { // If the anchor is within a hypotext block, expand it, by clicking the // relevant link. console.log(window.location.hash); var anchor = $(window.location.hash); var hypotextLink = $('#' + anchor.parents('.hypotext-content').attr('rel')); console.log(hypotextLink); hypotextLink.click(); // Wait until the content has expanded before jumping to anchor. //$.delay(1000); setTimeout(function(){ scrollToAnchor(window.location.hash); }, 1000); } }); function scrollToAnchor(id) { var anchor = $(id); $('html,body').animate({scrollTop: anchor.offset().top},'slow'); } })(jQuery); .hypotext-content { position: relative; padding: 10px; margin: 10px 0; border-right: 5px solid; } a.hypotext { border-bottom: 1px solid; } .hypotext-content .close:before { content: "close"; font-size: 0.7em; margin-right: 5px; border-bottom: 1px solid; } a.hypotext.close { display: block; position: absolute; right: 0; top: 0; line-height: 1em; border: none; }
Many of you reading likely cut your teeth on Moz’s Beginner’s Guide to SEO. Since it was launched, it's easily been our top-performing piece of content:
Most months see 100k+ views (the reverse plateau in 2013 is when we changed domains).
While Moz’s Beginner's Guide to SEO still gets well over 100k views a month, the current guide itself is fairly outdated. This big update has been on my personal to-do list since I started at Moz, and we need to get it right because — let’s get real — you all deserve a bad-ass SEO 101 resource!
However, updating the guide is no easy feat. Thankfully, I have the help of my fellow Mozzers. Our content team has been a collective voice of reason, wisdom, and organization throughout this process and has kept this train on its tracks.
Despite the effort we've put into this already, it felt like something was missing: your input! We're writing this guide to be a go-to resource for all of you (and everyone who follows in your footsteps), and want to make sure that we're including everything that today's SEOs need to know. You all have a better sense of that than anyone else.
So, in order to deliver the best possible update, I'm seeking your help.
This is similar to the way Rand did it back in 2007. And upon re-reading your many "more examples" requests, we’ve continued to integrate more examples throughout.
The plan:
Over the next 6–8 weeks, I’ll be updating sections of the Beginner's Guide and posting them, one by one, on the blog.
I'll solicit feedback from you incredible people and implement top suggestions.
The guide will be reformatted/redesigned, and I'll 301 all of the blog entries that will be created over the next few weeks to the final version.
It's going to remain 100% free to everyone — no registration required, no premium membership necessary.
To kick things off, here’s the revised outline for the Beginner’s Guide to SEO:
Click each chapter's description to expand the section for more detail.
Chapter 1: SEO 101
What is it, and why is it important? ↓
What is SEO?
Why invest in SEO?
Do I really need SEO?
Should I hire an SEO professional, consultant, or agency?
Search engine basics:
Google Webmaster Guidelines basic principles
Bing Webmaster Guidelines basic principles
Guidelines for representing your business on Google
Fulfilling user intent
Know your SEO goals
Chapter 2: Crawlers & Indexing
First, you need to show up. ↓
How do search engines work?
Crawling & indexing
Determining relevance
Links
Personalization
How search engines make an index
Googlebot
Indexable content
Crawlable link structure
Links
Alt text
Types of media that Google crawls
Local business listings
Common crawling and indexing problems
Online forms
Blocking crawlers
Search forms
Duplicate content
Non-text content
Tools to ensure proper crawl & indexing
Google Search Console
Moz Pro Site Crawl
Screaming Frog
Deep Crawl
How search engines order results
200+ ranking factors
RankBrain
Inbound links
On-page content: Fulfilling a searcher’s query
PageRank
Domain Authority
Structured markup: Schema
Engagement
Domain, subdomain, & page-level signals
Content relevance
Searcher proximity
Reviews
Business citation spread and consistency
SERP features
Rich snippets
Paid results
Universal results
Featured snippets
People Also Ask boxes
Knowledge Graph
Local Pack
Carousels
Chapter 3: Keyword Research
Next, know what to say and how to say it. ↓
How to judge the value of a keyword
The search demand curve
Fat head
Chunky middle
Long tail
Four types of searches:
Transactional queries
Informational queries
Navigational queries
Commercial investigation
Fulfilling user intent
Keyword research tools:
Google Keyword Planner
Moz Keyword Explorer
Google Trends
AnswerThePublic
SpyFu
SEMRush
Keyword difficulty
Keyword abuse
Content strategy {link to the Beginner’s Guide to Content Marketing}
Chapter 4: On-Page SEO
Next, structure your message to resonate and get it published. ↓
Keyword usage and targeting
Keyword stuffing
Page titles:
Unique to each page
Accurate
Be mindful of length
Naturally include keywords
Include branding
Meta data/Head section:
Meta title
Meta description
Meta keywords tag
No longer a ranking signal
Meta robots
Meta descriptions:
Unique to each page
Accurate
Compelling
Naturally include keywords
Heading tags:
Subtitles
Summary
Accurate
Use in order
Call-to-action (CTA)
Clear CTAs on all primary pages
Help guide visitors through your conversion funnels
Image optimization
Compress file size
File names
Alt attribute
Image titles
Captioning
Avoid text in an image
Video optimization
Transcription
Thumbnail
Length
"~3mo to YouTube" method
Anchor text
Descriptive
Succinct
Helps readers
URL best practices
Shorter is better
Unique and accurate
Naturally include keywords
Go static
Use hyphens
Avoid unsafe characters
Structured data
Microdata
RFDa
JSON-LD
Schema
Social markup
Twitter Cards markup
Facebook Open Graph tags
Pinterest Rich Pins
Structured data types
Breadcrumbs
Reviews
Events
Business information
People
Mobile apps
Recipes
Media content
Contact data
Email markup
Mobile usability
Beyond responsive design
Accelerated Mobile Pages (AMP)
Progressive Web Apps (PWAs)
Google mobile-friendly test
Bing mobile-friendly test
Local SEO
Business citations
Entity authority
Local relevance
Complete NAP on primary pages
Low-value pages
Chapter 5: Technical SEO
Next, translate your site into Google's language. ↓
Internal linking
Link positioning
Anchor links
Common search engine protocols
Sitemaps
Mobile
News
Image
Video
XML
RSS
TXT
Robots
Robots.txt
Disallow
Sitemap
Crawl Delay
X-robots
Meta robots
Index/noindex
Follow/nofollow
Noimageindex
None
Noarchive
Nocache
No archive
No snippet
Noodp/noydir
Log file analysis
Site speed
HTTP/2
Crawl errors
Duplicate content
Canonicalization
Pagination
What is the DOM?
Critical rendering path
Help robots find the most important code first
Hreflang/Targeting multiple languages
Chrome DevTools
Technical site audit checklist
Chapter 6: Establishing Authority
Finally, turn up the volume. ↓
Link signals
Global popularity
Local/topic-specific popularity
Freshness
Social sharing
Anchor text
Trustworthiness
Trust Rank
Number of links on a page
Domain Authority
Page Authority
MozRank
Competitive backlinks
Backlink analysis
The power of social sharing
Tapping into influencers
Expanding your reach
Types of link building
Natural link building
Manual link building
Self-created
Six popular link building strategies
Create content that inspires sharing and natural links
Ego-bait influencers
Broken link building
Refurbish valuable content on external platforms
Get your customers/partners to link to you
Local community involvement
Manipulative link building
Reciprocal link exchanges
Link schemes
Paid links
Low-quality directory links
Tiered link building
Negative SEO
Disavow
Reviews
Establishing trust
Asking for reviews
Managing reviews
Avoiding spam practices
Chapter 7: Measuring and Tracking SEO
Pivot based on what's working. ↓
KPIs
Conversions
Event goals
Signups
Engagement
GMB Insights:
Click-to-call
Click-for-directions
Beacons
Which pages have the highest exit percentage? Why?
Which referrals are sending you the most qualified traffic?
Pivot!
Search engine tools:
Google Search Console
Bing Webmaster Tools
GMB Insights
Appendix A: Glossary of Terms
Appendix B: List of Additional Resources
Appendix C: Contributors & Credits
What did you struggle with most when you were first learning about SEO? What would you have benefited from understanding from the get-go?
Are we missing anything? Any section you wish wouldn't be included in the updated Beginner's Guide? Leave your suggestions in the comments!
Thanks in advance for contributing.
Sign up for The Moz Top 10, a semimonthly mailer updating you on the top ten hottest pieces of SEO news, tips, and rad links uncovered by the Moz team. Think of it as your exclusive digest of stuff you don't have time to hunt down but want to read!
0 notes