#also i planned on transferring my side order thread into a tumblr post but I uh did not !!! atleast not in time for the actual release
Text
Official artwork of an Inkling and Octoling posing by the Bullring Bull in Birmingham for MCM Comic Con 2018
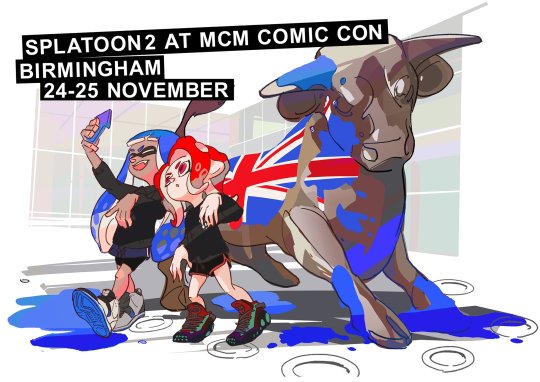

Source: @NintendoUKVS on Xitter
#splatoon facts#splatoon#splatfacts#Splatoon 2#inkling#octoling#birmingham#England in splatoon REAL!!!#also i planned on transferring my side order thread into a tumblr post but I uh did not !!! atleast not in time for the actual release#oh well!#side order posts some time soon maybe idk
91 notes
·
View notes
Text
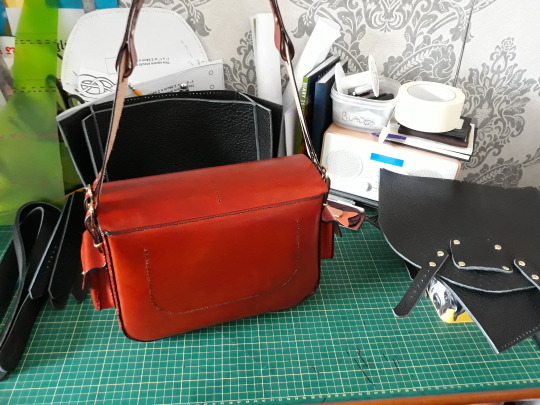
The ‘Slightly’ more advanced bag Project.
( Any one thinking this seems to have changed...no you’re not going mad, I have no idea why but tumblr was showing my post twice and when one was deleted it took them both out. Go figure, so here’s the Mk 2 version ).
All credit for Original idea, design and templates goes to ‘niteKore Leather’ and you can purchase the template from their website. Bag reproduced with Permission.
Welcome back to another project on Beginners Journey into Leather Craft here @HandMadeCP. This week I decided after three and a half years that I wanted to try doing something a bit more ‘Challenging’ and I was thinking that maybe some of you who have been following my humble little blog since I started might be thinking the same thing, so I had a look around and decided to give one of these a go. Hope you enjoy the build along as much as I enjoyed doing it. There is an instructional video out on Youtube by niteKore Leather for anyone wishing to use it.

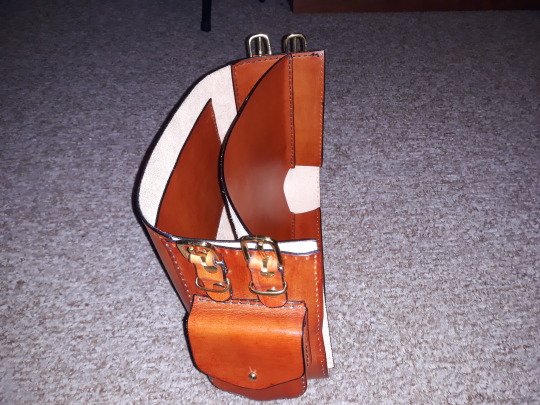
Pic 1 : The latest Project a more advanced style of bag. If you are just starting out on your own Journey into leather craft, learn the basics first, one time I ‘jumped’ ahead and made a right pigs ear of the project I was doing then and wasted leather, dyes, stitch thread, rivets, you name it..I wasted it and it cost a fortune. So take your time to pick up the basics using cheaper cuts of leather or reclaimed leather or maybe even leather stripped from old Sofas and chairs...it’s cheaper whilst you learn. There are some very good vids on Youtube that cover everything you need to know, then practice doing smaller projects, feel free to have a look in my archive for ideas and tips from me as to where I went wrong and how I corrected any errors. My archive is full of different types of projects for different levels of skill, but this one is for my own ‘learning’ curve and for anyone whose followed me all this time who may want something more challenging. Moving on.
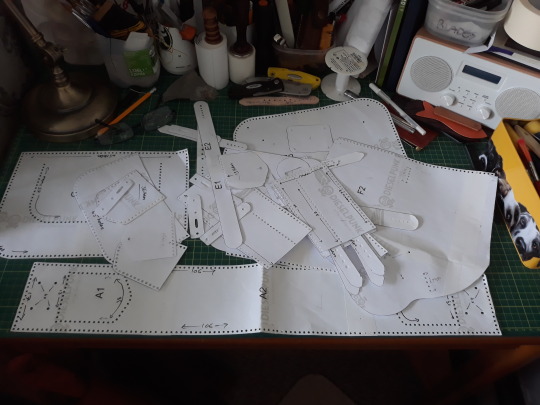
Pic 2 : I Purchased, printed, cut out and punched relevant holes into the templates Being very careful to put the right size holes in the right area as...you can see for yourself..there are a lot of pieces. I got turned around a few times but a deep breath and a quick ‘Coat of Looking at’ and it was fine.

Pic 3 : All templates were transferred onto a 5-6 oz Veg tan leather, cut out and dyed using an Eco Flo Water stain dye called ‘Canela Tan’ but you choose what suits you. I was ok with it being almost light orange as I know that each time I put a coat of something on it ..it will go a shade darker, by the time I’m finished I will have the tone I want. I use and would recommend..a test piece of scrap, I dyed it..dried it..buffed it...Resolene it..dry it, buff it..then used a good quality leather balm on it. All the edges were darkened prior to the Resolene coat by dampening them, then using a dark marker pen, then waxed it and burnished on my burnishing machine, but you can use a hand wooden burnisher , it just takes a while longer.

Pic 4 : the larger sections dyed and drying.

Pic 5 : Stitching the side pouches together, first you have to stitch the side sections to the front section, then stitch the full pouch to the gusset as seen here. It can be fiddly but take your time ..it’s worth it. If you get easily frustrated or angry whilst doing this....a change of hobby might be in order as these projects can test you sometimes as a beginner.

Pic 6 : Both completed pouches now stitched to the gusset by hand using a brown waxed thread and using the Saddle stitch. try to resist the urge to pull the stitches as tight as possible as it can cause a ‘kink’ in the leather, I’ve done that many times., yes you want it tight...but not ‘that’ tight. Note the Chicago screws that have been added to the pouches to hold the flaps down, the holes for these need a small ‘slit’ from the hole going downwards..just enough to allow the screw head to push through...be careful..you don’t want a long ‘slit’.

Pic 7 : Here you can see I have added the short straps that hold the side buckles and strap loops as shown. I chose to use brass plated rivets but you can go with anything that will hold it together.

Pic 8 : All the other pieces have now got the buckles straps and loops fitted and the front leather ‘plate’ has been added. Time to put it together.
Pic 9 : I stitched an inside ‘slot’ pouch inside first as can be seen in a later pic, here you can see the stitch line which adds to the design I think. Then I stitched the back panel to the gusset. Saddle stitch was used through out this project.
Pic 10 : Here you can see the inner divider with the end sections already stitched on both ends and also along the bottom.
Pic 11 : From a different angle you can now see the inside ‘slot’ pocket on the left. Note the dark edges, I saw a guy use this technique and personally I think it looks great so I used it here.

Pic 12 : Next I stitched the front panel on..much the same as the back...but a bit fiddly. then I stitched on the Main flap which was pretty straight forward. Now all the pieces are together you can fasten the bag if needs be.
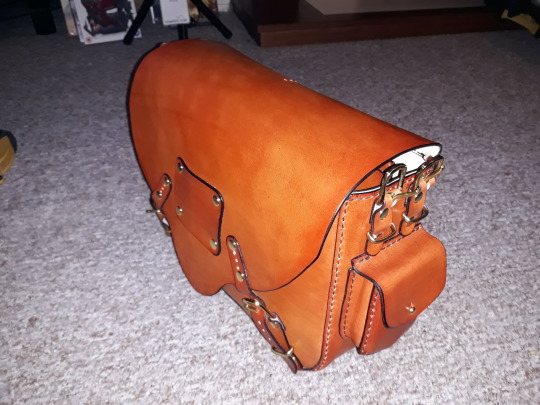
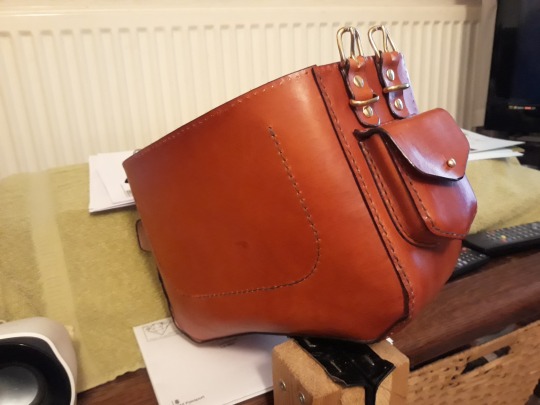
Pic 13 : Side view.

Pic 14 : Rear view showing the holes on top where i will fix the Decorative strap.

Pic 15 : The main shoulder strap sections are very simple to put together, a couple of rivets and a small amount of stitching and it’s done, I think it looks great, nice style. Obviously some people would prefer longer straps, these are easy enough to do if you are advanced enough to put this together.
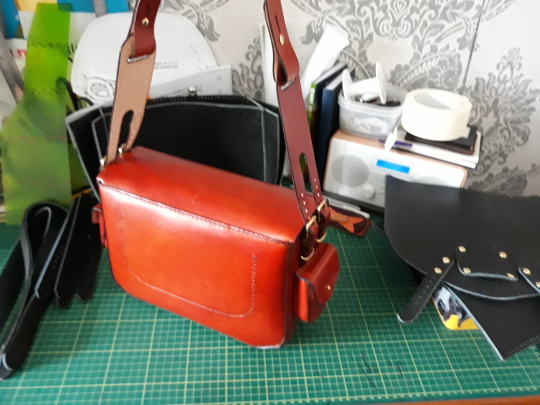
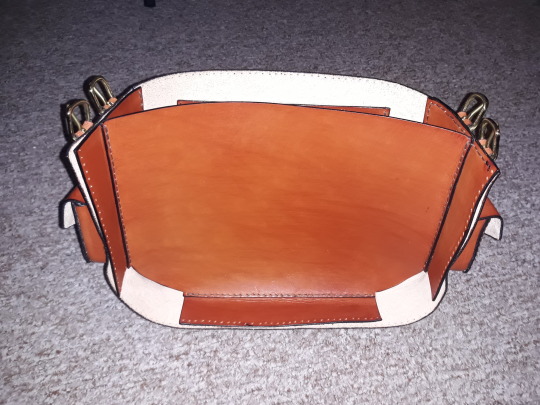
Pic 16 : Rear view.
Pic 17 : Top view..still needs the decorative straps over the middle area.

Pic 18 : Side view (Still minus the central strap at this point.)

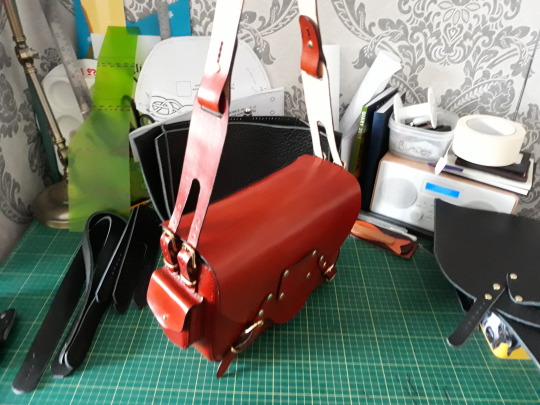
Pic 19 : Extra view.

Pic 20 : Close up. The side straps can be adjusted quite a lot but you can put as many holes as you like.
Pic 21 : Extra View because I like it so much lol.

Pic 22 : Here you can see the finished Bag with the Central decorative strap fitted. On the original plans the bigger strap goes on the outside of the Leather ‘plate’ but I personally like it behind the plate so this is how I did it and adjusted the other strap and buckles etc to suit. The great thing about leather craft is that you can change things around to suit your own tastes, you can either follow the design exactly or swap things around if that’s what you like.

Pic 23 : rear/side view with central strap fitted.
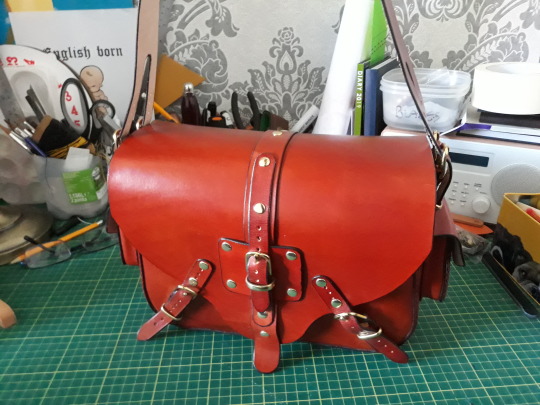
Pic 24 : Done. Another great project, designed by niteKore Leather...built ..By ‘Me’. I am so pleased with this build, so much so that as you can see in the next pic...I started making another with a few changes for a friend.

Pic 25 :This design lends itself to many different variations. if you give it a go I’d love to hear about it. I Hope you have enjoyed this latest build along, more this time for the more advanced amongst us I know but as we’ve been doing this blog for so long now this has just naturally progressed and become a part of Beginners Journey into Leather Craft...and although some of us are no longer complete beginners, It is still very relevant as I am learning new things every week...even three and a half years since I made my first project. I will still be doing the smaller ‘Beginner’ type stuff as I find new things that I haven’t done before..because I enjoy everything about this Craft. There are many projects already in the Archive which I hope you will enjoy. You may even benefit from the record of my own mistakes and successes if you are just starting your own Journey with your first project. Thanks for following my own exploits, hope you get something from it, there will be many more to come as we go through the year so watch this space. Until then ‘Stay Crafty’.
#learning#beginners#hobby#crafts#leather craft#satchels#bags#create#handmade#student#shoulder bag#leather bags#university#ladies
4 notes
·
View notes
Last Seen Blogs

jaig-tano
Jaig Tano

pineappleciders
pineapple / cider

exclusivelyirondad
Do not repost or use my art, even with credit.

linsdraws
Stressed, Depressed And Obsessed

uniquebody
Untitled