#although a tip for those using adobe
Explore tagged Tumblr posts
Visit Tumblr Blog
Explore Tumblr blogs with no restrictions, modern design and the best experience.
Last Seen Tumblr Blogs


Fun Fact
Mobile Tumblr US users spend an average of 4.04 minutes per session on the app.
Text
why is uninstalling adobe creative cloud one of the hardest trials known to man. i did it but i died inside trying to figure it out
#anti adobe#also unsubscribing is a bitch#do not get me started on adobe#although a tip for those using adobe#i was trying to unsub from illustrator and it just offered me the next 60 days free so if you want it free for a bit try unsubscribing#adobe
6 notes
·
View notes
Text

Welcome to April at the MI6 Cafe!
Cryptic Comms
The first creators have completed their rounds. If you've signed up for this event, keep an eye on your inbox in case you're next.
Last Moodboard Artist Standing (LMAS)
LMAS is a four-week competition similar to Last Drabble Writer Standing! Each week we release a new prompt and the moodboard artists who have signed up have seven days to submit their responses. We then post the moodboards anonymously and everyone votes/leaves feedback for their top three moodboards. At the end of each week, we'll reveal the top three, and at the end of the month, we'll see who the Last Moodboard Artist Standing is!
Interested? Sign up here!
How to make a moodboard workshop
Are you interested in LMAS but have never created a moodboard before? Or maybe you want to brush up with some tips and tricks from creators in the fandom? Great news! Ato and KittenKin will be running a workshop for you.
Join us in the MI6 Cafe Discord on April 26th at 11am PST (See MI6 calendar below to help convert times). No specific software is required, although they suggest coming prepared with some images for inclusion and a gmail account if you want to follow along with the Adobe express portion.
The Saturday Cafe: April 5th and 19th!
Come join us in the fandom Slack as we write, draw, sprint, plot, brainstorm, cheerlead, and generally have a good time trying to get things done together. If you’d like an invite to the Slack or Discord, go ahead and message @castillon02 or @spiritofcamelot!
Long Fic Readalong, Saturdays at 9pm ET
Join us in the Discord while we read a fic together. Right now, we are on chapter 11 of Only_1_Truth’s Blind Trust.
We’d love to see you there. You are welcome to listen if you don’t or can’t read aloud!
When: Saturdays at 9pm eastern/6pm Pacific. Where: We’ll be reading on discord in the readalongs channel.
Please join us to read, to just hang out and listen, and to generally enjoy a good story together!
Weekly events:
WIP Wednesday: You can post an excerpt of your WIP on our post or make your own post and mention the @mi6-cafe. Either way it’s a fun way to show people what you’re working on, Bond fandom or otherwise.
Weekly Bond movies: Hosted by womble every Sunday at 8am Pacific time, join us in Discord to watch one of the Bond movies. Keep an eye on the watch party calendar linked below for updates.
MI6 Cafe Rec Spotlight: We are posting fandom creations recommended by the community. At the moment we are working through those rec'd on the end of Fest survey, but see each post for a link to recommend more.
Want to host your own event in the Discord or elsewhere? Let us know about it so we can add it to the calendars!
Calendars
Watch Party Calendar MI6 Cafe Calendar If you need help adding these calendars to your personal one, check out this post.
5 notes
·
View notes
Text
Tips for Mastering Software in Graphics Design Courses

Although graphic design is a visually driven field, knowing how to use the right software is frequently what creates those breathtaking images. In the current era, digital tools are the artist's brushes and palettes, from Illustrator's mastery of vector graphics to Adobe Photoshop's pixel-perfect manipulations. Gaining proficiency with these programs may be essential for students taking graphics design courses in order to realize their full creative potential and succeed professionally.
Best Graphics Design Course in Coimbatore
1. Embrace the Fundamentals
Make sure you understand the fundamentals of the software before attempting more complex methods. Learn how to use the menus, interface, and basic tools. Understanding these fundamentals early on will facilitate future software learning because most design programs share them.
Discover tutorials and online resources: There are many beginner-friendly tutorials available on sites like YouTube, Skillshare, and LinkedIn Learning to help you get started.
Make use of the integrated help features: Don't undervalue the help and documentation sections of the software. They frequently offer shortcuts and useful information.
Work on easy projects to get experience: To become comfortable with the tools, begin with simple tasks like modifying text, applying colors, and creating shapes.
2. Hands-On Practice is Key
You can't become an expert in software just by theory. The development of muscle memory and tool fluency requires regular, practical practice.
Allocate specific time for practice: Even 30 minutes daily can have a big impact on your learning.
Recreate existing designs: To gain an understanding of the methods and processes used, try to recreate designs you find inspiring.
Play around with various features and tools: Don't be scared to experiment with the different features of the software. You might find undiscovered treasures and create your own distinct look.
3. Master Keyboard Shortcuts
A designer's secret weapon for speed and efficiency is a keyboard shortcut. Gaining knowledge of these shortcuts can greatly improve productivity and streamline your workflow.
Let's start with the basics: Make an effort to commit frequently used actions, such as saving, undoing, zooming, and tool selection, to memory.
Make a cheat sheet: Make a list of the most important shortcuts and keep it close at hand for easy access.
Consistently practice taking shortcuts: Make a conscious effort to integrate shortcuts into your workflow until they come naturally.
Best Graphics Design Course in Coimbatore
4. Seek Feedback and Learn from Others
Never hesitate to share your work and ask classmates, teachers, or online groups for comments. You can discover new skills and pinpoint areas for development with the use of constructive feedback.
Engage in design communities and online forums: Ask questions, share your work, and interact with other designers to get their opinions.
Attend workshops and design events: Participate in design events and seminars to network with other designers and get knowledge from seasoned experts.
Accept constructive criticism: Consider criticism as a chance for improvement.
5. Develop a Project-Based Approach
The greatest method to reinforce your learning and develop a good portfolio is to use your software talents on actual tasks.
Begin with your own personal endeavors: Investigate your own original concepts and take use of them to hone your software abilities.
Accept internships or freelancing: Work on actual projects for customers or organizations to obtain real-world experience.
Work along with more designers: Collaborate on projects with other designers or students to broaden your skill set and learn from one another.
6. Stay Updated with the Latest Versions
With frequent releases of new features and upgrades, design software is always changing. You can be sure you have access to the greatest tools and workflows by keeping up with the most recent versions.
Sign up for software updates: To remain up to date, turn on automatic updates or periodically check for new releases.
Examine the latest features and capabilities: To increase your creative potential, spend some time learning about new tools and upgrades.
Keep up with trade journals and blogs: Keep up with the most recent developments in software trends and best practices.
7. Utilize Online Learning Resources
A wealth of educational resources for graphic design software may be found on the internet. Utilize these resources to enhance your studies and quicken your learning process.
Examine online tutorials and courses: A variety of software-specific courses are available on platforms such as Skillshare, Coursera, and Udemy.
Subscribe to YouTube channels and design blogs: A lot of designers post helpful tutorials, hints, and suggestions online.
Participate in online design forums: Interact with other designers on sites like as Dribbble and Behance to gain inspiration and knowledge from their experiences.
Best Graphics Design Course in Coimbatore
8. Don't Be Afraid to Experiment
Experimenting and pushing the limits of design software's capabilities is one of the finest methods to understand it. Never be scared to experiment, defy convention, and find your own distinct style.
Experiment with different tools and settings: Examine the software's features and see how they work together.
Try out several design philosophies: Try designing in diverse aesthetics and venture outside of your comfort zone.
Accept failures as teaching moments: Don't let failures deter you. See them as opportunities to develop and learn.
9. Focus on Workflow Efficiency
Concentrate on streamlining your process for optimal efficiency as you gain more software expertise.
Organize your projects and files: To prevent confusion and time wastage, create a structure for naming and storing your files.
Make use of libraries and templates: To save effort and ensure consistency, create reusable templates and libraries for popular design elements.
Automate repetitive processes: To make repetitive tasks like exporting files or resizing photographs more efficient, investigate automation features or plugins.
Conclusion
You may become proficient with the software required for your graphic design education and start a lucrative and satisfying career in the creative business by paying attention to these pointers and practicing often. Keep in mind that learning software is a continuous process, so embrace the process, maintain your curiosity, and never stop discovering the limitless potential of design.
#Best Graphics Design Course in Coimbatore#Graphics Design Course in Coimbatore#Graphics Design Course
0 notes
Text

Using The On-Screen Keyboard
I decided to include this in the book simply because it is another one of those “Windows Key” items that are easy to learn and in certain circumstances, can be very helpful. Once I activate the onscreen keyboard, it does not matter what program I am in. The on- screen keyboard will be activated and ready for use. You bring up the on-screen keyboard by using the Control + Windows + o keys.
Why would someone need to use an on- screen keyboard?
I can minimize or maximize the keyboard as needed.
I can, upon going to the white area above the keyboard tug my on-screen keyboard around on the screen.
My laptop or desktop computer keyboard has a problem and I needed to be able to complete the document. For example, I spilled coffee in the keyboard, one of the keys broke etc. I can use a pointing device, joystick or mouse to use the on-screen keyboard.
A person might have a physical impairment that prevents one from using a regular keyboard.
If you are worried about key logging software that captures everything typed such as very important information such as addresses, banking information and passwords, credit card info and the like the on-screen keyboard does not register with any key logging software since the keys are not physical
1. On the right side of your on-screen keyboard, click on the Options button. This will open up your On-Screen Keyboard Dialog Box. You can set the keyboard to make a clicking sound.
2. You can set the keyboard to work by just hovering over the keys as well.
3. You can turn on your "Numeric Keypad" by clicking on the "Numlock" setting (blue button) as shown above. The Numeric Keypad opens up on the right.
4. Use "Prediction" if you wish to have the system suggest words like your phone would when you are keying text in. Play with this feature. I think you should always use this feature when entering any sensitive information so that the key logging software that may be part of your system at work does not capture things that you do not want others to be aware of. This goes for at home as well.
5.The "Prediction Feature" appears at the bottom of the Options Menu.
This segment was taken from Chapter 15 of my newest book Windows Operating System and MS Office Tips and Tricks.
New Release... New Release... New Release
We have authored a number of books for operators, secretaries' paralegals and attorneys alike who work in law firms and corporate firms across the country.
Although we train basic through advanced MS Office for legal and corporate firms, there are many aspects of Office as well as the Microsoft Operating System that most people never get the chance to be exposed to.
This book will go over those items that most secretaries and word processing operators usually defer to the IT Group. The items that we will cover are easy to use, easy to understandand will truly add another major solid layer of knowledge that will be of great value to you.
This book will be a true hybrid of "Windows Operating System and Office related procedures" tips and tricks of the trade. I want you to know that many of the items contained in this book are items that help when dealing with data that needs to be cleaned up.
For the current book, I have compiled from a number of high level IT and programming individuals, a very useful set of timely tips and tricks that anyone can make use of from day 1. Whatever your current level, you will be able to take advantage of what is contained within this book. These are very valuable things to know.
If you should need training or practice material from basic through advanced MS Word, Excel, PowerPoint and Adobe Pro/Nuance just reach out to us! 888‑422-0692 Ext. 1 or 2. Our specialty is top-tier style MS Office Training for the Legal and Corporate Sector Teaching Secretarial and Word Processing Operators.
Note: On the conclusion page of this book, you will be directed where to go in order for you to get your workbook materials! You will be able to do many of the Chapters along with me.
Kindle:
https://www.amazon.com/dp/B0C9KYXDKH/ref=mp_s_a_1_1?crid=16JLT32ELHHJ0&keywords=Windows+Operating+System+and+MS+Office+Tips+and+Tricks&qid=1687950883&sprefix=windows+operating+system+and+ms+office+tips+and+tricks%2Caps%2C154&sr=8-1
Soft Copy:
https://www.amazon.com/dp/B0C9KJBDJL?ref_=pe_3052080_397514860#featureBulletsAndDetailBullets_feature_div
Training From An Inside Perspective
Basic through Advanced MS Office Legal and Corporate Secretarial and Word Processing Training
www.advanceto.com
www.awalkinthecenter.com
888-422-0692 Ext. 1 and 2
Email:
0 notes
Text
EDITING RESOURCES!
actually, this has been sitting in my drafts for a while and i never quite had the energy to fix or format it but yeah. basically this is a catalogue of editing resources i personally use and/or am acquainted by!
for clarity's sake, i am by no means some great editor. i'm here for the fun and the pretty colors, and while i have been editing personally for a few years, i'm not the most knowledgeable person for this. i created this list first for personal reasons but figured everyone else might find it useful as well. so, yeah, just in case i miss a particular resource or don't add something you like, try to keep that in mind.
this will (attempt to) follow the format of me stating the resource (and if possible, a link) and some personal thoughts and critiques on said resource, especially for those unfamiliar with it.
EDITING SOFTWARE/APPLICATIONS
✧ Adobe Photoshop
is...is this even a question. of course, a natural given part of editing is adobe photoshop, it's universal and well-known, and pretty much is associated with any form of the word "edit." atlhough i can say, it's a bit dizzying for beginners but there are plenty of tutorials everywhere + it's very versatile, you can go from making gifs to drawing art, just nice to use all around.
✧ Photopea
now, photopea, in layman's terms, is just photoshop made online. so you can save yourself the download and the loooooong adobe loading screen with photopea. personally, i use this to color my gifs and for most simpler projects, because i vehemently refuse to wait 2 hours for photoshop to open so i can make a gif lol. it has a simpler interface, easy enough to understand so long as you read the labels. highly recommended for three types of people: those who can't afford ps, those who find ps hard to understand, and those who are both :D /j
✧ Picsart
the golden lamp of the editing community, simply because picsart provides A LOT of user-submitted materials through the form of "stickers" making everything so much more accessible to anyone who needs it. easy to use, easy to grasp, piscart captures editing down to a tee and is great overall! although i will warn you, a number of its resources are locked behind the gold paywall (not the user-submitted ones though) and it has issues with lag and ads in some devices. lastly, some of those stickers you find are fanart, and not all of these artists are okay with people altering or editing their work without permission, and most times, the credit never reaches them anyway. so please be mindful of what you use, artists spend a great deal of time working on their craft, just like us :)
✧ Pixlr E
i have never personally used it but its UI is greatly similar to photopea, simple and eye-pleasing. a great number of editing blogs use this for their work and it's a very capable software for editing.
✧ Ibis Paint X
technically NOT an editing software lmao, but it serves its purpose and it does it well, although it takes some effort. ibis paint x is intended for drawing, but i, as well as a good amount of other editors, can repurpose certain parts of it for editing purposes. it's a great app, from personal experience, and i'll leave some tips regarding it down below!
✧ Polarr
FANDOM-SPECIFIC RESOURCES
i have never seen so many filters in my entire life /hj just your day-to-day edit software, however polarr shines where most apps are weak, it has an extreme amount of mostly user-made filters, which you can find on literally everywhere.. i'm sure you'll enjoy using it~
✧ bsd mayoi wiki
I DO NOT SUPPORT GENSH.INRESO.URCE.
they have made statements regarding hoyoverse's sumeru that are not only dismissive but incredibly harmful for people of color like me, who are having their culture fetishized and skin color villainized by the direction sumeru is taking. dditionally, if you continue to interact with said blog, refrain from interacting with me. i will not be associated with it anymore.
@genshingraphics is an alternative blog for those who are seeking the same effect.
yes, this much is a given but i see a ton of people using the bsd wiki version of the mayoi cards (which are not transparent) when you can access the transparent versions, as well as the chibis, and their different modes in the sprite viewer. A+ for accessibility!
✧ cookie run wiki
okay, i know what you're thinking. there are already separate wiki pages for ovenbreak and kingdom, et cetera, but this one allows you to access both of them in compilation. remember to check a character's gallery, most times it contains official art not featured in game!
✧ ghibli screenshots
quality? amazing. official? yes. free to use? absolutely! little history lesson from your local cat! around the end of 2020, studio ghibli officially released over one thousand high definition screencaps of their films, making all of these images freely accessible to the public. this was a big thing because now you were legally allowed to use all these images so long as it isn't for monetary profit. everything from the big names like spirited away and howl's moving castle to the underrated gems of when marnie was there and tales from earthsea, the official studio ghibli website gives you access to the best quality content of their greatest works, all completely free!
✧ @.bsdwanscreenshots / @.bsdscreenshots
just as it says on the tin, beautiful quality screenshots of the bungou stray dogs anime + wan!
✧ @.teyvatcompendium / @.genshinsnapshots
like the others, in-game images and screenshots in high quality! they're beautiful to look at too~
✧ @.kodokuna-tamashii
they make enhanced screenshots of multiple animes! please remember to like and reblog the screenshots you'll use as appreciation for their hard work! i'm sure this'll be useful to everyone~
GENERAL RESOURCES
✧ list of transparent/png blogs
✧ list of stimblrs (this is outdated to an extent, so please check the dnis of them just in case.)
✧ @.allresources
✧ list of reverse image search software (directed at people listed in tip #7)
✧ aesthetics wiki
✧ pride flags (deviantart)
✧ unsplash ; pixabay ; pexels (stock photos! good for moodboards, aesboards, backgrounds, etc.)
✧ remove.bg
✧ coolors ; list of color palette blogs
✧ waifu2x ; resizeimage.net (in case you need to upgrade or downgrade image sizes!)
✧ how to add gradient/html-colored text on tumblr posts (only desktop but this can be bypassed by using puffin—a mobile web browser—and using the "request desktop site" feature.)
NEKO'S TIPS AND TRICKS:
✧ if you're new to tumblr, i suggest going through this comprehensive guide for new tumblr users. it helps ensure your privacy and prevents unsettling events from happening, because tumblr's userbase and features vary immensely from other sites.
✧ to add a cut / read more on your tumblr post on mobile, simply type ":readmore:" without the quotes and hit enter. you can find the same feature on the post's meatballs menu on the website/desktop. if you're posting something that may be triggering / an extremely long post, please put a read more so it doesn't clog everyone's dash. adding dots on every line does NOT work on tumblr.
✧ if you ever want to put a particular tag on top [e.g. credit or something important you want to say] put the words between quotation marks (" "). it should show up at the very top of the tags.
✧ commas don't work on tumblr tags, however users have found a way to bypass this—like how you can see commas in my tags—with a special type of character that resembles a comma. it's this ( ‚ ).
✧ desktop themes exist! it's comprised mostly of HTML and there are a big amount of amazing theme makers out there. most of you may not pay attention to desktop themes but adding a personal touch to your blog might brighten your day :)
✧ now, onto some edit-specific tips. if you're making reply icons on ibis paint x, i suggest creating the icon first, then going to the tools and choosing canvas. there, pick resize canvas and input the size you want your replycons to be! remember to turn off the keep aspect ratio switch, and when saving, make sure to use "save as transparent png" so the white background won't look off-putting.
✧ tumblr's average icon size is 128*128. however this size can make your edits look blurry or bad in quality which is why most editors choose bigger sizes for optimal clarity. headers are 640*360 for mobile and 3000*1055 for desktop. you will also notice that your edits tend to look blurred on the posts and only increase quality when tapped, this is because tumblr downgrades the display sizes of images. don't worry! this has no effect whatsoever towards the actual edit's quality, as it only changes how it appears on people's feed. clicking the edits showcases its genuine quality!!
✧ so you want to use fanart for your edits. i'll preface you with the fact that i don't use fanart and continuously refuse to do so, for reasons stated in this post here. anyway, in this post, i provided you 5 different reverse image search software, to aide in searching for the artist of a fanart. when using fanart for edits, crediting is required. and if you can't find the artist despite going through all the image search software i provided, you do not use the art. crediting sites such as pinterest, pixiv, etc. are useless. tag the actual artist. if you find they don't allow edits or resposts, delete the edits. if you can't see it on their bio/carrd/whatever, ask them. this isn't asking, this is basic decency towards content creators just like us.
✧ some genuine advice: the first few days of starting up can be...hard. there might be little traction, there might be none at all. requests will be slow as people start to grasp your edit style and understand your character. it can be a little discouraging because you feel like you're flopping, but stick through! make edits you enjoy, ask for promos, and my tidbit: while waiting for requests, try and edit for all your sources! it's a nice way to put your name on all the tags and it also draws more attention to your blog! another thing is making lots and lots of self-indulgent edits! have fun with it, as always~
✧ tag your posts! i am literally begging you to tag your posts bc tagging well is the only way to get better reach on tumblr! the only way to reach people's "for you tabs" as well as properly show up in tumblr's search function, regardless of how broken it is. some tips! if you're making a stimboard, tag every single stim! from food stims to clay stims, be as specific as necessary. tagging them also helps people who are filtering particular content from their dashes as it gives them the ability to block that tag! tag your aesthetics, fandoms, everything! please please tag well, it may be exhausting and repetitive but it lets your post be seen by ppl outside your followers which can lead them to following you for more content!
✧ curate your experience. make that dni! expand that blacklist! use that block button! delete those hateful anons! overuse the tag filtering feature! unfollow people who make you uncomfortable! refuse that request if it's rude and hurtful! as your senpai or senior or whatever, both seemingly tumblr-wise and edit blog-wise, no one else can control what you see, what you make, who you interact with, but yourself. so don't hold back or beat around the bush! making your blog a safe space for everyone is important, but never forget to make it a safe space for yourself, hm? ♡
✧ be kind to yourself. i know it's easy to get swept up in all the drama and discourse, especially for those of you who are new and unaware. just like any other community, editors have some rough edges too, we all have some bad times but please don't let it overshadow the good ones. you'll make mistakes, that much is inevitable, you're only human after all. correct them, fix them, take care never to repeat them, move on. you'll get tired and burnt out, and that's perfectly normal, you're still a person behind that screen after all. rest, find things you enjoy, distract yourself, discover something new. don't despise yourself for every little thing. this goes for other people too. we all have our faults, and we find ways to make up for it. your mistakes aren't who you are completely, no? and everything can be a learning experience. i know you're kind, so be kinder to yourself. i know you're trying your best, so take care of yourself as well. keep going, i'm proud of you!
and that's a wrap, folks! i hope this at least helped some of you and feel free to send me an ask just in case anything isn't working. i do not claim to own any of these resources, please give credit to their respective owners. this was made to help editors, new and old, so please preserve that ideal and use these in good faith. thank you to everyone who kept up with it and i hope everyone finds this somewhat useful!
#there! finally done!!#also i posted this late out of spite toward the rude anons#promo reblog in a bit~#୨୧ * important#this was hell to make and organize to pls appreciate it#if this flops well idc
301 notes
·
View notes
Note
Do you have tips on coloring? Your art is beautiful!
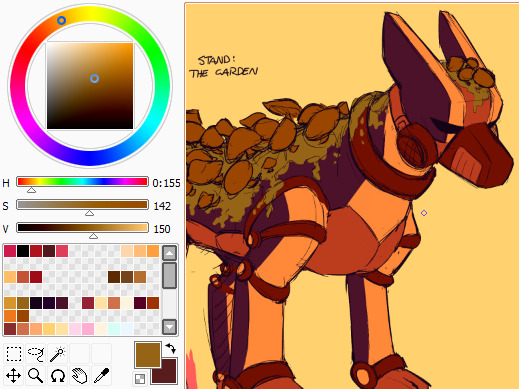
everyone always mentions basic color theory and i will too because it's the foundation for most things, like understanding complementary colors and values and how colors interact with each other. googling "color theory" gives you like a million of those wheels and although adobe is a piece of crap they do have this online color wheel tool that lets you fuck around with palettes. screenshot those bitches when you find cool ones to play with
besides that i tend to shift the colors i use towards warmer shades as a general rule solely because i like warm colors. also, often times the color you PERCEIVE in an image is not what the color actually is, but rather the other colors around it make you think it's a different shade. like the green moss in this pic, for example. it's not actually green at all!
another thing i do somewhat frequently is coloring the lineart some other shade than black. black definitely has its purpose and can be an aesthetically important in some styles, but colored lineart tends to help me approach the coloring process from a different angle. speaking of, i rarely use pure black or pure white in my art these days. again, they have their purposes but i save them for occasions where i want to emphasize a particular detail or draw attention to the other colors in the image
in a similar vein filling your background layer with a color that isn't white can also help you in the coloring phase, both because lighter colors will be easier to see on it but also for me it makes me try and tint the colors to something that fits in better with my chosen shade
there's also the shortcut of using multiply-overlay-screen layers on top of the flat colors to adjust them further and bring them together more. i don't do that terribly often these days but it helped me a lot in the past, like here:
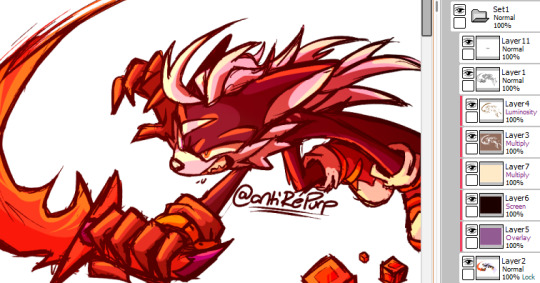
with multiply-overlay-screen

without them
it's not the a perfect method but can help you towards the right direction
and don't be afraid of saturation, especially with skintones! im sure there are ways of coloring that omit a lot of saturation, but for my purposes i crank it up whenever i can to add more life to what im working with and make things pop out more. i do steer clear from straight up neon stuff generally though and tend to use those more as highlights if anything
that, and eyeball colors from reference images! whether those are colors other people have used in their art or stuff from photos, try to recreate them yourself and see what makes them work the way they do. and add things to them when you see fit! or remove colors from your art and try to work with as few as you can! that's how i ended up with the colors i use most often in my art these days, actually, i studied some night in the woods art and screenshots for a piece i did about a year ago and wound up with this selection:
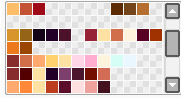
it doesn't cover everything and i do frequently add things to this when the cause needs it, but it's versatile enough for a lot of occasions and provides a base for me to work off of. and none of them were eyedropped!
also mandatory mention that coloring techniques used for traditional art are different from those in digital art. colors on a screen don't work the same way as paint does, hence why smudging together some primary colors gives you results like this

but with the right layer effects you can get colors to behave more like this

idk if this was helpful but i hope you got something out of it! ":D
18 notes
·
View notes
Text
:)
What’s up everyone!
My names Matt McMahon and I am a photographer living in San Diego, CA (originally from Gig Harbor, WA) and I wanted to start this blog to help others like myself navigate the chaotic industry of photography and hopefully be able to provide some guidance/direction to those who seek it.
About Me
Like I said before, I was born and raised in Gig Harbor Washington but moved to sunny San Diego in 2017 to attend college at San Diego State University. Throughout my whole life photography has been a hobby/passion of mine even though I never took it too seriously until these past few years. Growing up I had a GoPro HERO 3 that I filmed EVERYTHING on whether it was walking the dog, wakeboarding, skating, you name it. I always had that little camera on me and I loved using it to make edits on iMovie with my brother and friends. As I got older my parents noticed my passion for photography and got me my first cannon digital camera that was a hunk of junk, but at the time I thought it was the coolest thing ever. Although this camera was not great, it gave me the chance to learn how to operate a DLSR and actually focus on exposure, shutter speed, and filming videos at different settings to get different results.
At this point in life my friend and I were doing competition wakeboarding and were ranked as the top two athletes in Washington. I saw this as a great opportunity to work on my photography/videography so I would take pictures and create videos for YouTube and Instagram to practice editing with hopes that someone of significance within the wakeboard industry would see our talent and offer us a sponsorship. When looking back on some of the first videos I ever made they are so bad it’s actually humiliating, but hey everyone’s got to start somewhere! (I’ll throw the link in here so you guys can see lol) Filming wakeboarding is what really took me to the next level with photography and videography because I had endless content and at this time that I also started to learn Adobe Lightroom and Premier so I could ditch iMovie and start making cleaner more advanced content. Eventually this paid off and landed us the opportunity in 2020 to move to Orlando, FL to live with professional wakeboarder Mike Dowdy where we trained and worked towards being on a professional level of wakeboarding. During this time I took a year off of school at SDSU to pursue this pipe dream. Orlando was an amazing opportunity for my wakeboarding and photography career because I was able to ride all the time with a coach while also obtaining endless content to work on. My skills definitely advanced during this time and I thought I had a chance to make it pro within wakeboarding, but then COVID hit and I was forced to move back home to Seattle. This killed my dream of becoming a pro wakeboarder and I decided to go back to SDSU to finish up my degree in Business Management.
When I moved back to San Diego for School, I still wanted to use my camera and work on my talents within film and photography but I was not wakeboarding anymore and felt lost on what to shoot. From this I started taking photos of landscapes and people to try and capture emotions, feelings, and moments that seemed valuable to me. As time went on, I made a few friends who perform and create music that needed a photographer to obtain content so they could promote their work, and they reached out to me to see if I would be willing to help. I took this opportunity as a fun little project, but little did I know this opportunity would open so many doors for me that I would never have guessed would have opened. In this blog I am going to talk about where this opportunity has gotten me along with tips, tricks, and strategies on how to do this for yourself. I hope you guys choose to follow along!
love,
matt
5 notes
·
View notes
Note
any digital art tips???
I'll try... hopefully this might be helpful! <3
Experiment!
Experiment not only with art styles, colors and brushes but also with different drawing programs! There's quite a lot accessible art programs that are free and do not require any payment like Photoshop, Procreate or ClipStudio Paint do, which is not to say that you can not use them. If you can, do that! (Although Adobe seems to be a prick atm with the prizes so think about whether or not you want to have that stress)
Free programs you can check out are:
-ibisPaintX
-Krita
-FireAlpaca
-MediBang Paint
-Autodesk Sketchbook
Just to name a few! There's a lot more drawing softwares than the ones I named but those are the ones I used at one point (except for Krita). Currently I'm very happy with MediBang Paint. What software suits you best is up to you of course, which is why I'd recommend you try out some and stick to your fave!
Also note that the software you use barely has an impact on how well you draw. People can even create amazing artworks with Microsoft Paint! It's not the program or software that makes the art, it's the artist and their skills.
Still, you should feel comfortable with your drawing software!
Equipment
You should also be comfortable with your equipment. Do you want to draw on a drawing pad connected to your laptop or PC? A tablet (with a pen) like an iPad (note that there's many other brands that produce tablets in good quality you do not necessarily require an iPad and Apple pen)? Or are you alright with your phone and fingers?
Artist equipment, no matter digital or traditional, is very expensive (I know that-) which is why you shouldn't be upset when someone draws with "better"/"more professional" equipment than you. Not everybody has the money to afford those expensive pads and tablets and not everybody has the room for a whole PC. This is totally fine. Because here too: of course equipment can be helpful in making it easier for you to draw and maybe even help improve your art but in the end the artist and their skills make the art. Not the equipment or software.
You can create amazing works with only your phone and fingers. No necessity for a whole tablet for example! Do not let anybody pull yourself down because of the equipment you use/have!
When I started digital art I also only had my (compared to my phone today) tiny Samsung, ibisPaintX or Autodesk Sketchbook and my fingers. Here's some examples if what that looked like:


Then someday I switched to a drawing pad and stayed with that equipment for years before getting a tablet for Christmas last year.
Drawing pad - beginning


Drawing pad - middle

Drawing pad - end


And everything post Christmas last year is made with my tablet. (Not trying to say my art was amazing then or is it now hhhhh)
Blending modes
Digital art gives artists the opportunity to use options their traditional counterparts don't have: blending modes aka. "multiply", "add", "overlay", "darken", "screen", "soft light", hard light", "color", "hue", "brightness" etc.
It's those options that can make your artwork go from
To

I recommend you experiment with those too! They should be found under "blending mode".
[P.S. you can use multiple blending mode layers over each other]
Use references! Use your features!
Finding references for all kinds of things is something every artist would recommend. It is done with a quickly with a Google (or any search machine of your choice) search or some scrolling through pinterest. Digital devices allow you to download or screenshot the pictures and insert them onto your canvas! With the invisible layer feature you can easily make the reference disappear and appear again as you like.
You can also sketch your motif on paper with pencil all traditional, take a photo of it and insert it onto your canvas/ make it your sketch. That way you even include both traditional and digital art! Quite some artists do that. Of course, it is up to you whether or not you want to follow this process.
What I'm trying to say with this section is: use the features and advantages you have with digital art!
Just have fun.
Art is a constant learning process. You develop and improve your skills over the time. And maybe now you're still insecure and unsure but one day you'll just know what to do and how. You'll get the hang of it! You're doing art for YOU and for YOURSELF most of the time (gifts or commissions for someone else not included). Have fun! Don't pressure yourself!
-Meg <3
34 notes
·
View notes
Text
Graphic design ! Hmmm....
Let's talk about it 😊

Graphic design
While having a formal background in graphic design is absolutely going to be helpful, it’s also relatively easy to learn the foundations of graphic design on your own. An increasingly easy-to-use Adobe Illustrator and even more easily accessible tools like Stencil and Visme are making it so that just about anyone with two opposable thumbs, a bit of creativity, and motivation can earn a side income doing things like designing (and selling) images like these motivational quotes that can be printed onto posters and sold on platforms like Etsy. Or you can find a local startup, small business owner, or photographer who could benefit from some extra help designing or altering images.
Learn Graphic Design to Sell Your Skills and Build a Business on the Side (Graphic) But before you can graduate from side business ideas and begin earning a full-time living as a graphic designer, you’ll need to build your skills—I recommend starting with reading the foundational book Graphic Design School and Steal Like an Artist, the incredible book by Austin Kleon about how to become more creative. To accelerate your education in becoming a graphic designer even quicker, check out the online courses Graphic Design Fundamentals and The Graphic Design Bootcamp. Then once you’re an expert at your craft, you can further your education and move up to offering more hands-on experiences like design sprints for higher-value clients around the world.
Graphic design, also known as communication design, is the art and practice of planning and projecting ideas and experiences with visual and textual content. The form it takes can be physical or virtual and can include images, words, or graphics. The experience can take place in an instant or over a long period of time. The work can happen at any scale, from the design of a single postage stamp to a national postal signage system.
Graphic Design Career Basics
Graphic designers convey inspiring and informative ideas in advertisements, brochures and other marketing communications materials. Some graphic designers work for specialized design firms as part of a collaborative team, while others are self-employed and work independently. Print and digital designers use complex graphics tools to manipulate text, images, animations and color.
The approach to the design world is something almost natural. Many graphic designers express their creativity since they were children. The changeover from felt-tip to Photoshop is physiological. In my case it was the result of coincidences.
The Ultimate Crash Course on Graphic Design
Master the most widely used software in graphic designing
Learn the principles of graphics design and visual communication
Gain an insight into the current graphic design industry
Understand how to forge a career path as a graphic designer
This course is aimed at aspiring graphic designers, web designers and digital artists who wish to develop a skill set needed to become a professional graphic designer. Suitable for both complete beginners and those who already have some knowledge of the industry; this course will prepare you for a career as a graphics designer through familiarising you with the concepts, principles and – most importantly – the software you'll need to know.
You'll learn everything from working with layers and selections in Photoshop, to formatting text and menus in Dreamweaver, to using pathfinders and special effects in Illustrator.
Graphic Design In-Depth
Communication lies at the heart of a graphic designer’s job. While their duties may involve extensive work with images, unlike artists they do not produce “art for art’s sake.” Graphic designers must get across a specific message and call-to-action or emotion based on their client’s objectives. For instance, a graphic designer may be tasked with creating a brand or logo that makes a lasting impression on consumers, incorporating a unique shape or color scheme.
Although much graphic design work is done on the computer, it can also be multimedia in nature, or employ motion graphics. Projects may need to be optimized for viewing on a range of digital platforms, including web browsers, tablet devices and mobile phones, which is the fastest growing sector in the field. In addition to mastering general all-around skills, designers may specialize in a particular graphics area. More common specialties include:
Typography
Desktop Publishing
Branding and Advertising (print,web,broadcast)
Email Blasts and eNewsletters
Interface or User Experience Design
Web Design
Product Packaging
Book Design Logos
Print or Web Production
Tools Used
Adobe Photoshop: Used for editing and manipulating photographs and images. Improve lighting and colour, add special effects, remove blemishes, create your own images from scratch, and more.
Adobe Illustrator: The standard software for graphics design, and where you do the majority of your work. Create any kind of vector art or illustration your mind is capable of thinking up!
Adobe Acrobat: Transform your work into a format than anyone can view - a PDF. This program also enables you to create, manipulate, print and manage your finished project files.
Adobe Dreamweaver: Design and develop beautiful websites with ease, complete with both a design view and code editor so you can see changes you make on all sides in real time.
You get money as a graphic designer the same way you get money in any other career:
Get a job. Go to work for a business that hires graphic designers. This may be a design firm of some kind or it might be any kind of business large enough to have an in-house design department.
Or start your own business and get your own clients. This is a lot more complicated than getting a job as a designer, since you will need to know how to start and run a business in addition to doing the design work for your clients. If you want to run your own business, I strongly recommend that you start by working for a design firm for a few years. That way you can gain from the experience of people who have already started their own business. You will also learn valuable design skills
The key to both of these paths is to be good enough at design to convince other people to pay you to design. If you have no design skills, you will find it challenging to find a design job. You also shouldn’t try to find clients if you don’t have the skills to produce what they need.
1 note
·
View note
Photo
So you want to start a YouTube channel
and have no idea where to begin? Well, you have come to the right place! This article is going to give you an insightful overview of all the steps that you need to follow before you set up a YouTube channel as a beginner. The link below will further give you comprehensive lessons on how to start, grow, and monetize a hyper-profitable YouTube channel from scratch, so make sure you check it out. Keep in mind that I may receive a commission when you click the link and make a purchase. However, this does not impact the quality of the content.
Step 1: Choose a topic So let us get started, the first thing you need to do to start is to come up with a topic for your YouTube channel. Some people say come up with a niche. A niche is a product, service, or interest that appeals to a specialized section of the population. That could be in automotive, business, crafts, health, travel, etc. If you are creating a channel because you just want to have fun and you do not care much about how big your audience is, then go for it, but if you are looking to build a business or an audience, then you need to choose a topic or niche that people are looking for. Your YouTube audience should have a demand for what you are offering, so get out there and do your research. You can research keywords on Google or search on YouTube
and find out whether other people are doing what you have in mind. If other people are providing videos on your topic or niche and they have huge audiences, then you know there is a demand. This also means that you are getting into the field of competition. Therefore, you will need to figure out how to shine so that the audience will watch your videos instead of your competitors.
Step 2: Define your audience i now you are probably thinking, “Yeah, but I don’t have an audience yet…” Here is the thing, when you make a video, you are already creating it as though the people you are targeting are watching, and eventually, they will come. This is because they are looking for you, remember you already found a topic that there is a demand for. Let us say you are doing a health and fitness topic, and you want to share workout videos, are you going to target your videos to men or women? (Obviously, men and women work out differently to a degree) are you going to target younger or older people? Asking yourself such questions will help you create quality videos that are full of value and content that match your topic, and eventually, you will start to build your audience.
Step 3: Do a brainstorm To brainstorm in this context means to start writing down all your ideas of the video titles that you would like to make. Do not worry even if they are crazy ideas, try to get a couple of pages full of content for your channel. Ask yourself, “What content do I want to offer to my target audience? What problems are they having, and how am I going to help solve those problems with solutions? Now once you have done that, then pick out the best five or ten topics, and now you have somewhere to start. As you grow, you will find it easier to look at different areas that you could focus on and bring up the quality of your videos. You are not going to have tens of thousands of people watching your videos as you start, but do not worry about that as long as you have content.
Step 4: Choose your equipment Here you might be thinking “Okay I want to make videos but it’s going to cost me a lot of money. I have to go out and get fancy cameras and microphones and all these different things and I know it’s going to be expensive”. It honestly is not that costly! Many people make their videos in the most inexpensive ways possible, and they go viral. In the beginning, do not worry about the mechanics very much as getting some videos made and getting in the habit, so you can start by using your smartphone or laptop. For the microphone, many laptops and phones have a microphone that is good enough, but if you are using the former, it would be wise to experiment with it as some microphones pick up a lot of background noise that may affect the quality of your video. If this happens, you can buy a microphone on Amazon or from a preferred store. For your backdrop or background, it will depend on your content, location, and your audience. You can choose to do it outdoors where there is beautiful scenery, or indoors with different background decorations to keep your audience captivated. As you become more experienced with making videos, you may find the need to invest in better equipment to improve the quality of your videos, for example, a high-resolution camera, a tripod, and lighting.
Step 5: Come up with a schedule Now that you know what you are going to produce and how to do it, it is time to come up with a plan for when to shoot, edit, and upload your videos. Most successful YouTubers recommend that you upload at least two to three times every week. You could also upload every single day as long as it does not compromise on your quality. It is crucial to make sure that you are not focusing on the quantity more than the quality as the latter matters when you are trying to stand out on a very competitive platform like YouTube. Of course, you can batch film your videos, which means that you film five or ten videos once or twice a month to get all of your videos done in a short time. Whichever schedule you choose, you will need consistency with your uploading.
Step6: Create your YouTube channelYouTube makes this easy, especially if you already have a Gmail account. You can log in with your Gmail account on YouTube and then click through their prompts to set up your channel. It is super simple, and they make it very easy even for beginners to create a YouTube channel.
Step7: Create a banner for your YouTube channel Many sites on the internet will help you create a banner for your YouTube channel, for instance, Canva.com. You can choose from a variety of templates on Canva.com, edit to your preference, and download completely free of charge. Then you will need to write a description. Make sure you put a description that lets people know about your channel. These things make your channel look more professional. After someone watches one of your videos they may click on your YouTube channel, and they realize, “Oh! This person is making videos regularly, and they are committed to their work.” That makes them a lot more likely to hit that subscribe button. You can also put fun information in your banner or in your channel description that encourages people to subscribe to your channel
Step8: Film your first video Now here is where the fun begins. It is probably going to be a bit awkward if you have never done it before, but that is what everyone goes through, so do not worry. Many good things can come from having your own YouTube channel, and you have to bite the bullet and film that first video and get it done. Try being creative and enjoy the filming process by experimenting with different backgrounds, locations, expressions, and even having guests on your videos. This will help you have fun and be comfortable with the process and getting it off the ground.
Step 9: Edit the video and create a thumbnail Before you upload your videos, you may want to cut out some parts of the raw footage, or even add text or background music to your videos to make them more appealing to watch. So you will need to put your videos into an editing program to do this. There are some great free options out there like iMovie on Macs or Windows movie maker on Windows computers. There are also plenty of other paid options like Adobe Premiere Pro or Final Cut Pro X. It does not matter much which program you choose when you are first starting as long as you do not do something overly complex. Once you edit the video, you will need to either take a screenshot from the video to use as a thumbnail or use another photograph or design a graphic for yourself. You can use a free program like Canva.com, or you can purchase a program like Adobe Photoshop or Adobe Illustrator to create that thumbnail. The main things you want to keep in mind when you are creating the thumbnail is to make it as eye-catching as possible and making it clear what is talked about in the video.
Step 10: Upload your first YouTube video Once you have completed all the above steps, it is time to upload your first YouTube video. There is generally no set time to upload your first video but as a tip, pick a time that is best for you. That time should be consistent so that you can start attracting people to watch your videos around that set time. As a strategy, some people prefer to upload their videos first thing in the morning to give their viewers the most time to watch them during the day.
Step 11: Boost your video Now that you have uploaded your first YouTube video, you need to give your video as much of a boost as you can. Every bit of push that you can give to that video helps. This means that you should watch the video too, hit the like button, leave a comment as yourself asking other people to comment, and share that video with everyone that you can share it with on your social media platforms. Tell your friends and family that you just made your first YouTube video and ask them to possibly help you out by watching your video and hitting that like button. There is a big difference between a YouTube video that has two views and one with fifty views. Although fifty YouTube views are still not that much, it shows that some people have an interest in the video, and the more views it has, the more other people are likely to click on that video and watch it. That is because of something called social proof, which means that we think that if other people are doing something, then it must be a cool thing to do it too
Step 12: Stay consistent When you start a YouTube channel as a beginner, everything is bright, exciting and you will have a lot of inspiration. However, as time goes by and especially when you have put up ten or so videos, but you do not see significant growth yet, you might feel discouraged and possibly want to give up. You have to be a lifelong learner and evaluate your work against what is working out there. That will help you understand where you are likely falling short and motivate you to improve the quality of your videos. There was never a channel that put out good quality videos with eye-catching thumbnails consistently and did not start seeing significant growth within the first six to twelve months. So it is not going to take forever, but you do need to stay consistent, keep uploading videos every single week and keep improving your quality with every video if you want to see that growth .How to start a YouTube channel for beginners
#youtube youtuber instagram music love follow like tiktok spotify youtubers video youtubechannel explorepage memes gaming instagood twitch su#digitalarjunn#instagram#youtuber
1 note
·
View note
Photo
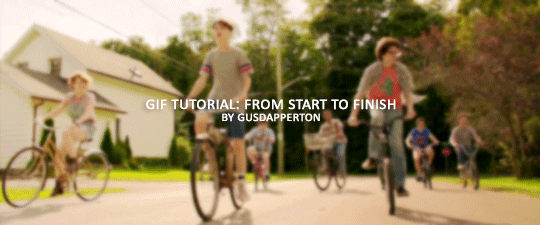
Recently someone asked if I would do a gif making tutorial, so here I am! I’m going to make this as in depth as I can, but if you have remaining questions or problems, feel free to send me them and I will try to help you to the best of my abilities.
Disclaimer: There are many ways to make a gif, but this is the method I’ve been using for years. This tutorial is very long and may make the process seem tedious, but I assure you, once you get the hang of making gifs you could do it in just under a few minutes!
This tutorial includes:
links to all of the sites and programs I use
lots of rambling (w/ pictures)
a short masterlist of my favorite photoshop sources at the end
Links:
Adobe Photoshop CC 2017
PotPlayer (64 bit)
uTorrent
4K Video Download
Photoshop, PotPlayer and uTorrent are the three programs you MUST have for this tutorial. The 4K Downloader is for YouTube/Instagram, which there are other sites you can use for that, but I prefer 4K to make sure I’m getting the best quality I can get. Best part, they’re all free :)
Torrent sites:
PirateBay
yts.lT (favorite)
Nyaa (anime)
These aren’t the only sites that offer torrents (nor are they the only ones I use). When you download torrents, try to be careful; if you think it’s sketchy, go ahead and try to find another. It’s not as scary as it seems, just be aware of what you’re clicking. Some are total duds but I usually have a pretty smooth time finding what I need unless it’s something unpopular or obscure. Whatever site you’re on, try to use the latest links (past hour/day/week) if it’s for a new movie or ongoing show. Also, if there’s the option, download magnet.
PirateBay gives me an ongoing issue with their links, so I try to avoid getting torrents from there if I think I can find it elsewhere. YTS is my favorite site for movies; they’re trustworthy and I’ve never had an issue :)
HD/1080p torrents often start popping up when the BluRay comes out, so don’t depend on any site to have it the day something premieres. Usually you’ll have to wait a few weeks/months. Until then it’ll just be CAMs which no one likes!
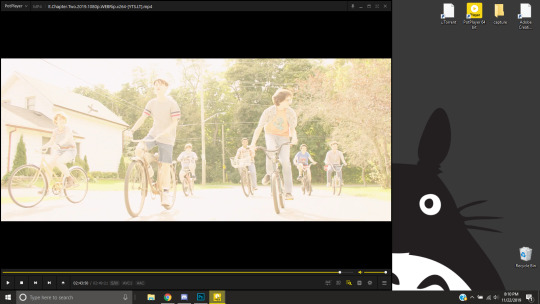
For this tutorial I’m going to be making a gif from IT: Chapter Two (link- click 1080p.WEB). Once you’ve gotten your torrent, open up uTorrent. It’ll ask you where you want your download stored, which I always just choose my Downloads folder.

It’s normal for it to take a while. It doesn’t take all day, but 40 min-2 hrs is usually what I have to wait. My laptop is pretty slow, RIP.
After it says it’s downloaded, you’ll have the .mp4 sitting in your Downloads folder (or whatever destination you chose, but Downloads is the default).
Before you close uTorrent, press the torrent file and then delete it (trash can icon above) so you can delete it from your Downloads folder. Otherwise, your computer will tell you the torrent is still open in the program and won’t let you. You won’t need it after you’ve gotten the .mp4.
So now we have the movie! Go ahead and open it up in PotPlayer. Right click > Open file(s) and select the movie. It will start playing automatically.
Note: You need to make folders for the frames to be held in. Its been so long since I’ve set up PotPlayer, I can’t remember if the program made the capture folder that’s in Desktop or if I did... if not, go ahead and make sure you have designated folders. (If you’re making 4 gifs, you need 4 separate folders, and so on.)
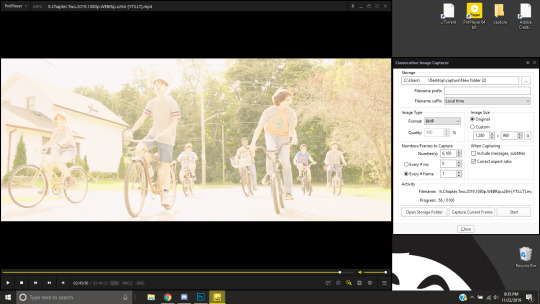
Go to the scene you’d like to gif. The scene I chose in this movie is one of the end scenes of the young Losers Club on their bikes (2hr43min).
Slide the edge of the program in to minimize the screen a little for the next step.
Now, right click > Video > Video Capture > Capture Consecutive Images
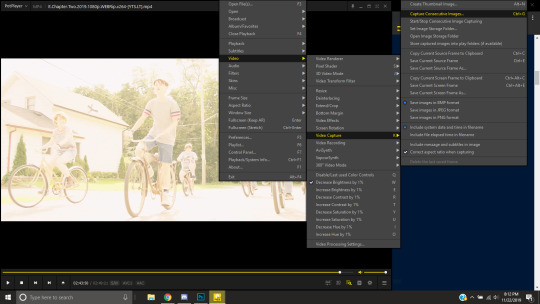
This will pop up:
Here is a closer look at the settings:
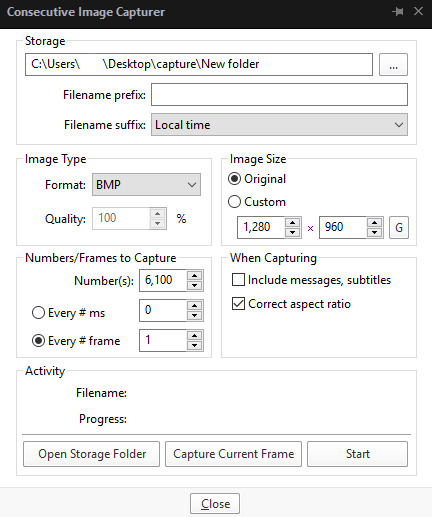
The key things to look at are the Image Type, Image Size, and Numbers/Frame to capture. And of course, make sure you have the right destination chosen in the Storage box because that’s where your frames are going to be. PNG and BMP are the best quality for the type of image. Always choose the original size of the frames. And, make sure you’re saving every frame (Every # frame must be kept at 1).
Make sure to start a few seconds before where you actually want to make a gif. Sometimes (every time lol) the start will lag and you won’t get every single frame you want or thought you were getting. In my case, the screen is fading from white, so I’m going to capture a few frames where the white can still be seen before the full color appears. This way I know I’m getting the most frames I can, and I don’t have to redo it later when I think my gif is too short because I’m missing frames.
While the movie is still paused, press Start in the smaller window, then press Play on your movie. Keep your mouse over the Pause button and end it when you’ve gotten all the frames you wanted. Then, Stop back in the small window.
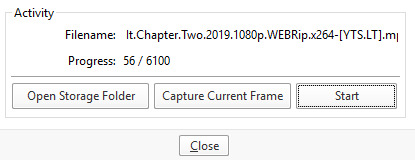
I’ve saved 56 frames to my folder.
The size of the gif you want to make dictates how many frames you’ll be using. Remember the file size needs to be under 3MB. Recently Tumblr increased that size to 8MB, but the quality of the gif will drop drastically, so I ignore it now. (Although, it probably won’t look too different if it’s at like 3.1MB and barely goes over that limit.
540px wide- ~30 frames and under. Because these gifs are so wide, naturally, they’re already going to be a large file.
268px wide- ~50 frames
177px- ~70 & up
These numbers aren’t concrete, though. The taller and/or more contrasting colors in a gif, the bigger the file will be. The shorter and less contrast in colors, the smaller, and more likely you will be able to fit more frames into your gif. These are just what I find to be the case most of the time.
For the gif I’m making now, I’m going to keep it at 30 frames, so I know I’ll be deleting ~26 out of the 56 I saved to that folder.
Tip: I rarely make big changes to the coloring of my gif if I really like the way it looks. If my gif exceeds 3MB, I’d rather delete frames. IMO, nice coloring comes before fitting in as many frames as I can.
Moving on, now that we have the frames we want, go ahead and open up Photoshop. Go to File > Scripts > Load Files into Stack. The drop down that says ‘Files’ I change to ‘Folder’ and simply select wherever your frames are held. For me, they’re here:
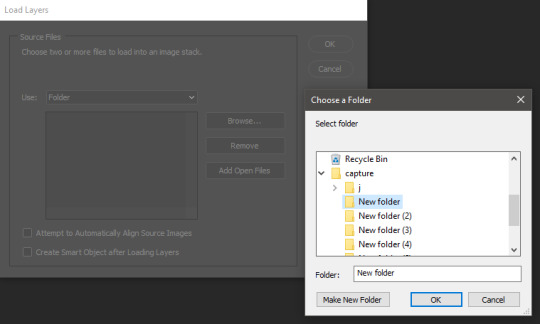
Press OK, let them all load up, then you’ll press OK again in that grey window.
It takes a minute for all of the frames to load up in photoshop. The more you have, the longer it’ll take. Again, my laptop is slow as hell, so maybe it will be really fast for you.
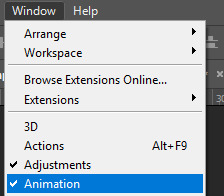
When they’re done loading, go to Window > Animation.
Then, inside the Animation tab, make sure you have Create Frame Animation selected:

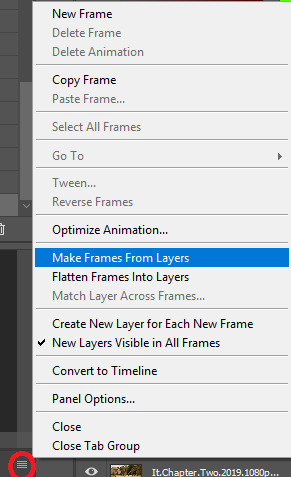
Then once you’ve pressed it Create Frame Animation, your first frame will appear. But we need them all, so look over to that four bar icon to the right of the tab and press Make Frames From Layers.
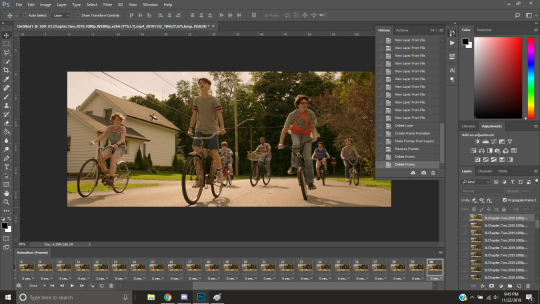
They’ll load all at once, but the gif is backwards. To fix that, simply go back to the same four bar icon and click Reverse Frames.
I’m going to go ahead and delete the frames I don’t want. For me, the beginning frames are unusable because there’s that white fade out in the start of the scene I chose. I’m going to delete those, then go ahead and delete any frame that comes after frame 30.
Here’s where I’m at now:
Now to resize it. I like the dimensions it currently has, so I’m not going to use the crop tool at the moment. But once you’ve cropped it to where you like, go to Image > Image Size and a new window will pop up. The widest a gif should be is 540px. How tall it is is up to you. Since I’m keeping the dimensions currently, my gif will resize to 540x225.
It’s VERY important to note, where it says ‘Resample:’ you need to have Bilinear selected. This effects the borders of your gif. Also, don’t make the mistake of resizing it in centimeters instead of pixels.
Now that it’s resized, you need to set the the frame delay. I choose either .05, .06, or .07. Anything outside of that looks to fast/slow to me (but I know a lot of people who like the way .03 or .04 look. It’s all preference.)
To select all of your frames at once, select the first frame, hold shift, then select your last frame. Then press where it says ‘0 sec.’ > Other > type in however fast you’d like your gif to be. I’m going to use .06. Double check every frame says .06, otherwise it’ll stay at 0 and be way too fast.
Now, again, click that four bar icon and select Convert to Timeline. The Animation tab looks like this now:

For now, look at our Layers Tab, so we can delete every frame that doesn’t show an eye icon next to it (as you can see, my first 5 frames):
With all of the excess frames gone, select all of the frames you have left (hold shift again) and then right click > Convert to Smart Object

Now, we see this left:
And, technically we’re done with the very basics of making a gif. But you definitely should sharpen and color it for it to look ‘nice’ and aesthetic. I’m going to color my gif now. Personally, I rarely use psds. It takes way too long for me to look through millions of psds, so I make coloring my own for each gif I make. I have two of my own psds, if you’d like to use either of those.
PSD01- this is a super basic psd I use to make any gif look brighter and more vibrant. There are more details in the post on how I use it.
PSD02- I included this psd within another tutorial for how I do color edits.
Both of these are my base psds, but if anyone wants me to do a separate tutorial for how I color gifs on a regular basis, I’ll gladly make one of those too!
Once you’re happy with how the colors look, it’s time to sharpen. Select your gif layer and go up to Filter > Sharpen > Unsharp Mask.
Here are my settings:
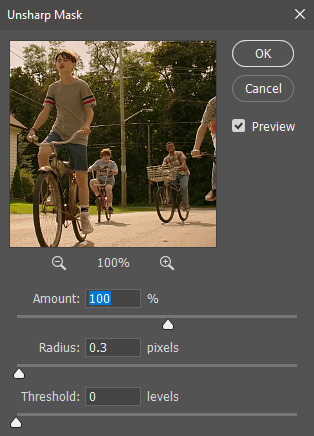
(Amount: 100%, Radius: 0.3px, Threshold: 0 levels)
Now sharpened and colored, here is my final result ready to post:
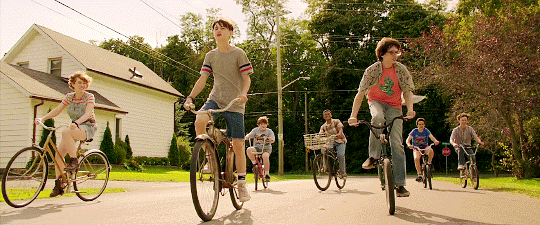
If you’re wondering, this gif is 2.42MB, so I could still make it brighter/more vibrant if I wanted to!
To save, go to File > Export > Save for Web.
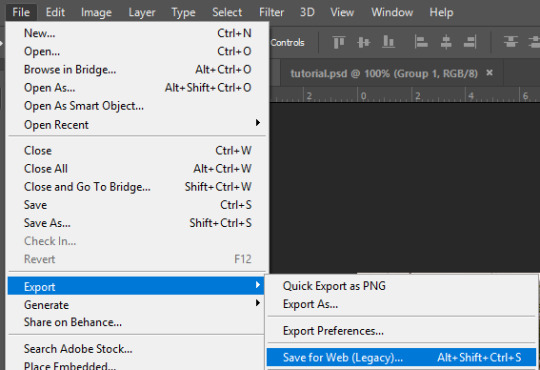
A new window will pop up. There are more settings that you should check to make sure your gif looks as nice as possible, but they’re also up to preference and can range from creator. This is what I prefer:

Diffusion is good for bright and/or colorful gifs, but if the gif is dark, I’ll change it to Noise to see if I like that better. Also, always double check you have the loop set to forever, otherwise your gif will only loop once.
And you’re all done!
Here is a short masterlist of resources I recommend checking out and use often:
allscallie (DeviantArt)
Their psds are beautiful, especially if you’re into making moodboards. Everything is very aesthetic!
sttoneds (DeviantArt)
More psds, especially if you’re into gifsets/photosets that are color focused.
BEAPANDA (DeviantArt)
Literally everything they publish is gold. From brushes, textures, psds, renders; they have it all. Their packs are extremely well made, too. I highly recommend bookmarking them. (The renders and brushes look beautiful when you use them in your headers!)
allresources (Tumblr)
There are so many photoshop resource blogs here on tumblr, so to make it easy on you, theirs is the one I recommend the most! The tutorials and resources she makes herself are really great too.
Thank you for reading, and good luck +.゚(*´∀`)b゚+.゚イィ
144 notes
·
View notes
Text
Picpick For Mac Os

The PicPick for Laptop will functions normally on most current Windows OS. Q: What is the difference between PicPick 64 bit & PicPick 32 bit? A: Generally, 64 bit versions provide more stability, improved performance, better usage of high hardware capabilities (CPU & RAM). Add-ons Adobe Air apple blog-games Blogging contests deals finance Firefox freeware fun Gadgets gmail Google google maps greasemonkey gtd Household how to Linux mac os x mobile news open source phone photo portable apps reviews rss search security social media software tips n tricks tools travel tutorials twitter updates video web-design web.
Picpick For Mac Os 10.10
Picpick For Mac Os 10.13
Picpick Mac Os X
Picpick For Mac Os High Sierra
PicPick is a Windows program used for creating and editing screenshots. After installation, it resides in the taskbar where all its functions can be accessed via the context menu. It can either be installed or can be run as a portable app.
PicPick 一款全能的设计工具,并且这款工具适宜每个人使用.
PicPick - All-in-one Graphic Design, Best Screen Capture Software, Image Editor, Color Picker, Pixel Ruler and More.
Jan 4,2019
Screenshots are the great media which can help us save the contents shown as images on our computers' screens conveniently as well as quickly. Furthermore, with the screenshots, the saved contents can be displayed vividly and clearly, which is good for sharing especially. Although there are hot keys for us to capture screenshots in Windows, it can't meet our needs in some ways. Therefore, it's necessary for us to choose the suitable screenshot tool so that we compare the 4 free screenshot software for Windows from four aspects here: using interface, capure methos, edit methods and share function.
Basic Introduction
SizeSupported PlatformsLightshot2.6MBWindows, Mac OSShareX(12.3.1)5.3MBWindows 7, 8.1 and 10Snipping Tool1.24KB(Windows 7)Windows 7 and laterPicPick14.7MBWindows
Note: The four software can be downloaded by clicking their names in the form above, except Snipping Tool which can be opened by searching in the start menu of Windows.
The Unique User Experience of the Screenshot Software
1. Using Interface
Actually, Snipping Tool, Lightshot, PicPick, and ShareX are far apart in the interface. Let's see which one fits you better.
Snipping Tool
When it comes to Snipping Tool, it is a familiar to us because it is a Windows built-in feature with a simple interface. It can satisfy the basic needs of ordinary users.
Lightshot
To my surprise, the Lightshot is simpler than Snipping Tool in that there is no interface before capturing. After launching the software, you can create a screenshot of the custom area.
ShareX
ShareX's interface is complex in some way because of its left panel and I was confused about the panel at the first time. After using it a few times, I have to admit that it is a great piece of software.
PicPick
Picpick For Mac Os 10.10
I'm most impressed by the interface of PicPick which is like that of Microsoft Word and shows options clearly. It is one of the more advanced and feature rich screen capture programs.
2. Capture Methods
Picpick For Mac Os 10.13
The capture methods of Lightshot are the least among those of four software while ShareX has 13 capture methods, including some advanced options like scrolling capture, webpage capture, and etc. There are several methods in PicPick, which is three more than that of Snipping Tool.
At the same time, there are different ways to use the four software. When we want to capture screenshots by Snipping Tool or Lightshot, we can just click the icons of them to begin. If we capture screenshots by ShareX or PicPick, the first step is to open the interfaces of them. And I will prefer to the ways of Snipping Tool as well as Lightshot, which are convenient and direct.
Capture MethodsLightshotRectangular, Full screenShareX(12.3.1)Full screen, Window, Monitor, Region, Region(light), Region(transparent), Last region, Screen recording, Screen recording(gif), Scrolling capture, Webpage capture, Text capture, Auto captureSnipping ToolRectangular, Free form, Window, Full screenPicPickFull screen, Active window, Window control, Scrolling window, Region, Fixed Region, Freehand

3. Edit Options
It's available to edit the screenshot by pen, line, marks or other ways in Lightshot. The edit ways of Snipping Tool include pen and marks methods. There are various and advanced edit ways in ShareX, including stickers, watermark, blur, etc. And PicPick also has the advanced edit options like watermark, blur, but the options are less than those of ShareX.
Picpick Mac Os X
The screenshot can be cropped in ShareX as well as PicPick, and PicPick can also cut the screenshot. It's a pity that there isn't the crop and cut option in the Snipping Tool as well as Lightshot.
4. Share Functions
There is a single way which is sending e-mails in Snipping Tool to share screenshots with others. And we can share our screenshots in Lightshot by four popular social platforms, including Twitter, Facebook, VK and Pinterest. The ways to share screenshots with others in PicPick are various, because we can not only share screenshots by e-mails, but also by social media like Facebook and Twitter. Sharing screenshots with others in ShareX is special, because we need to upload the screenshot first and then send the screenshot's URL to social platforms.
Recommendation
In my opinion, it's worth trying the PicPick, because it is easy to use with its clear as well as compact interface and it also has features which aren't limited to common capture and edit options. It can keep pace with our daily use. However, if you need a professional as well as multifunctional screenshot tool, I think that ShareX is a good option, though it might cost you some time to explore its features.
Score
ScoreShareX9 pointsPicPick8 pointsLightshot6 pointsSnipping Tool6 points
Picpick For Mac Os High Sierra
Related Articles:
5 Best and Free Desktop Media Players
How to Pick a Graphics Card
1 note
·
View note
Photo
Lockdown Lens.
The filmmakers behind found-footage hits Searching and Host share their best tips for making movies in quarantine. Hint: you’ll need to tape your camera to your laptop, move away from the wall, and plump up the post-production budget.
“There is a really opportunistic moment here that you can take advantage of, if you come up with the right thing.” —Aneesh Chaganty, director of Searching
“You should never wait for the ideal circumstance because it doesn’t exist. Look at what you’ve got right now and use that.” —Rob Savage, director of Host
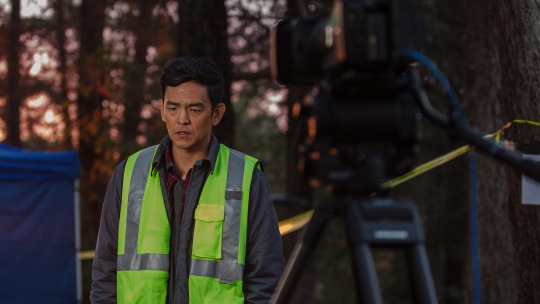
A low-budget thriller starring John Cho as a desperate dad, Aneesh Chaganty’s 2018 debut feature Searching, co-written with Sev Ohanian, shook up the found-footage genre with its seamless blend of content from chat rooms, social platforms, security-camera footage and news coverage. Chaganty and Ohanian’s next film, Run, which also takes place mostly inside one house, will debut on Hulu later this year after its theatrical release was quashed by Covid-19.
Meanwhile, a 56-minute séance horror that appears to take place entirely on a Zoom call became the most popular film on Letterboxd within a week of landing on Shudder in July (our popularity score is based on the amount of activity across our platform for each film, regardless of rating). Host—conceived and completed within just twelve weeks—was written by Gemma Hurley, Rob Savage and Jed Shepherd, and directed by Savage.
Our editor-in-chief Gemma Gracewood asked Chaganty, Hurley, Savage and Shepherd to draw on their expertise in making browser horrors and other limited-setting stories, to inspire other aspiring filmmakers sheltering in place.
Listen to the full interviews on the Lockdown Filmmaking episode of The Letterboxd Show.
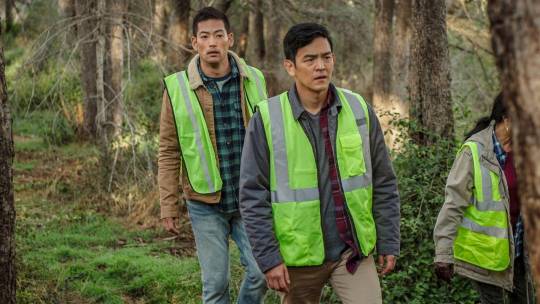
Joseph Lee and John Cho in TV news footage from ‘Searching’.
Keep the parameters tight.
“Making a story in a limited setting is a very smart thing to do for an aspiring screenwriter—first and foremost because it’s produceable,” Aneesh Chaganty advises. ”If you’re an unknown entity in the film world, the cheaper your product takes to make is probably a better bet for you to be taking as opposed to writing a kajillion-dollar project. The first project that I wrote was a $90-million movie that Sev and I wrote. ‘Why did we do this?!’”
Chaganty also stresses the need to ensure your project wants to be a limited-setting story. “A lot of times I’ll read a found-footage script and it will often feel like all it wants to be is a not a found-footage script. There’s a lot of times where it feels like the writers don’t want it to be that.”
Explore the whole box.
Chaganty encourages aspiring writers to imagine your limited environment as a box. “You’re writing within this box, all the characters are in this box, I think the best way to examine it is not to ever try leaving the box, but make sure you explore it every which way. The box upside down, the box right side up, the box left, the box right…
“This is an objective that should apply to all films, but it’s easier to objectively analyze whether you’re doing it in a limited setting. With a film like Searching, we have to make sure that every possible iteration of how a narrative can take place on a computer screen is done. Looking at a movie like Buried, they’re doing every possible iteration of how that story can be told underground, in a coffin, before [the location] starts to change.”
(Good news for fans of Searching: with new tech platforms appearing all the time, it turns out there are more parts of the box to explore. A sequel is in the works, but Chaganty won’t be in the director’s chair.)
Give yourselves a deadline.
With no end to the pandemic in sight, it’s easy for one day to melt into the next. Keep your team motivated with a deadline. “I gave us two weeks,” says Rob Savage, Host’s director, who co-wrote the film with Jed Shepherd and Gemma Hurley, after his Twitter prank went viral.
“So we had two weeks, all three of us, to come together,” adds Hurley. “Let’s figure out a structure, let’s figure out these character dynamics, figure out a way to build tension around this idea of a séance and hang a story and a journey for the characters, for where we want the séance to end up. We had a Google doc where we were editing it together. I’d go away and do my pass, Rob would go away and do his pass, and Jed would. And that was it. It was really just like, run and gun, go go go.”
“If things had gone to plan we would have had this out in two months; in the end it took three,” Savage continues. ”It took twelve weeks from when I first called Jed up and said ‘let’s make a feature’, to delivering the movie—roughly breaks up as two weeks of writing, we shot for three weeks, and then a lot of editing and VFX time.”
Know your story inside-out, but don’t labor the script.
“We’ve got some hearts to break, here,” warns Hurley. “There was no official script in the standard way because there just wasn’t time. The whole point was capturing a zeitgeist moment… If we went away and wrote a feature-film script, well, ‘we’ll see you after the pandemic’s over, guys!’. You’d miss that moment. That was the joy of it. You didn’t have time to labor over every syllable.”
Some of Host’s key moments were scripted, Hurley reassures. “We had lines we wanted them to suggest, but more than giving them dialog it was about giving them prompts for every scene.”
Savage adds: “The thing that we did really well, at the end of the two weeks of writing, is every single scene, me, Jed and Gemma, you could quiz us all in separate interrogation rooms, we’d be able to tell you the purpose of every scene and what we wanted to get out of them. We had the movie so clearly in our heads in terms of how we wanted it to feel.”
An advantage of having a treatment rather than a completed script? “A sense of discovery every day,” says Savage. “The actors just brought that amazing spontaneity to it and these incredible performances, because we knew the parameters.”

Aneesh Chaganty and John Cho on the set of ‘Searching’, with a GoPro behind the laptop capturing the webcam view. / Photo by Elizabeth Kitchens
Choosing your camera (spoiler: it’s not your laptop’s).
“John is acting against a black screen,” Chaganty reveals. “There’s nothing on his computer, he’s literally looking at nothing.” To ensure complete control over their footage while preserving authentic eyelines, both sets of filmmakers taped additional cameras to the laptops of their key talent. In Host, each of the Zoom participants had iPhones recording at their highest resolution “so we knew we were getting a clean 1080p,” says Savage. In Searching’s case, it was a GoPro taped to the rear of the various computers used by John Cho.
“Before we started shooting the film,” Chaganty explains, “we had to make [an animatic] version using Adobe Premiere, because much of John’s performance is knowing his eyeline. He needs to know exactly where the iMessages open up—in order for us to know that we almost have to know those decisions already.” Chaganty and his team developed a 100-minute animatic cut, with Chaganty playing every role; “understanding where every window is, where every cursor is, so that by the time we get to set, what I’m doing is showing John ‘okay, this is where that message pops up, and while you’re talking to Deborah, you’re going to look over there, go down there, open Chrome, type in…’ So everything is very specific eyelines. Sometimes my notes after a take would just be ‘John that was great, just move the cursor a little further to the left this time’.”
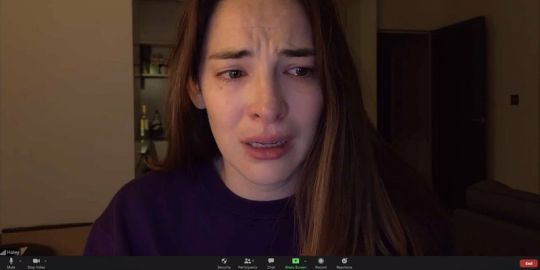
Haley Bishop as séance host Haley in ‘Host’.
Develop your characters and the genre will take care of itself.
Chaganty and the Host team have the same advice for how to ratchet up the tension in a limited-setting film: it’s all about character. “If you’re going to end up putting these characters through tough times and potentially kill them,” says Shepherd, “develop them as real characters, so that we care about them.”
Although Host’s script was, in fact, only a seventeen-page beat-sheet, the most important part of its structure was the long stretch up front where the characters are dialling into the call and catching up—what Shepherd calls the “getting to know you bit”. “That first part is really important because if it wasn’t for that, the third act wouldn’t work at all. The best thing to do is make your characters real, authentic, believable. Everything else takes care of itself.”
Chaganty agrees: “When you are writing something that is genre, your other decisions don’t have to be genre, and in fact it might elevate it more when you don’t do that, because everything else is already doing that, you know?”
In particular, he advises, trust your talent to lean into their characters, rather than into the genre. “This was my challenge at least, as a totally amateur director: sometimes what I was looking for was the most obvious take as opposed to the most subtle take. “When we left the shoot I was thinking it was take six, or the one where it was most obvious [John] was angry or he was sad or something—and what we ended up using was the most subtle takes. That subtlety, that underneath layer, so much of that was him. He’s so good. He’s so good. I hate to say it, but I didn’t realize how good he was until we edited it together.”
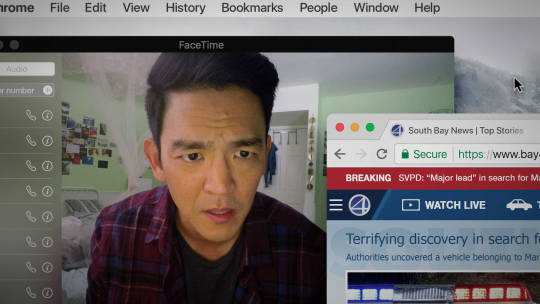
Spend time getting the interface right.
“There’s not a frame of Zoom footage in the actual movie.”—Rob Savage
Found-footage films and browser horrors rely on the believability of the content. Searching and Host work because the footage feels real, even though the reality is there are multiple takes and a lot of post-production. Just as Searching was built around a detailed animatic, Host is, in fact, not a recorded Zoom call, but a result of three weeks of filming every actor in multiple takes, with stunt set-ups, followed by the addition of VFX and Zoom interface details.
“Originally the plan was just to screen-record a Zoom call, but then we realized that we were pumping so much money into doing these crazy stunts and effects that we could blow half the budget in 30 seconds,” says Savage. “You’re basically making five movies. We have to make sure the performances are all tight in every single screen. Radina might be amazing in take one and Jemma might nail it in take three and we have to cut them all together so they work seamlessly.”
Savage praises Host editor Brenna Rangott for pulling it all together, underscoring the importance of post-production in your budget and schedule. “Honestly, what Brenna did with all this footage? It’s her movie as much as it’s anyone else’s movie. She absolutely smashed it.”
The Host crew also relied on fellow filmmaker and designer Dan Hawkins to build the almost 4,000 individual assets in the film, and producer Douglas Cox, who went through the whole movie to type out every single name, label and other Zoom interface detail. “4,000 times he had to do that, and that’s what you see to make it play seamlessly.” (And, yes, they had Zoom’s permission.)

Jed Shepherd, Rob Savage and Gemma Hurley during a Zoom séance for Slashfilm with Chris Evangelista.
Trust your gut.
The Host team were pursued for a feature-length version of Savage’s Twitter prank by a “mind-blowing” number of studios—“it was a really competitive situation,” says Savage—but they went with Shudder for one reason: instinct.
“It was the height of the lockdown and a lot of production companies just started ringing and saying ‘Is there a longer version of this? Because it’s the only thing we can shoot right now’. So we pitched to a bunch of places, and the pitch was basically ‘a Zoom séance, we don’t know if it’s going to be any good, we’re going to use our mates, are you in or not?’ and Shudder [was] like ‘of course we are’.”
It wasn’t about the money. Some companies offered more generous budgets, but wanted to release six to eight months after filming. “We were like, ‘no, this needs to be out this week’.”
Move away from the wall.
Since so much of the movie business—all those endless meetings—has pivoted to video-calls, we asked the filmmakers for specific advice on how to present yourself online, in pitch meetings, table reads and the like.
The very minimum, they all agree, is to have good lighting. “It’s crazy what a difference a desk lamp can make to your environment,” says Chaganty. And move away from the wall. “Rule number one any director of photography will ever say, is don’t shoot at a wall,” he adds. “The further that you can place yourself from that wall, it’s just going to look better.” (It also gives you more protection from any demons that may burst from cupboards during your Zoom, Host’s filmmakers advise.)
Chaganty reveals that the pandemic has actually helped his pitching abilities in video meetings with executives. Chaganty and Ohanian are currently developing a heist movie, while simultaneously pitching a television show. “Right now pitches are all digital. Traditionally when you pitch something, it’s a lot of material and you just memorize it. But now, you can have your script with you—but you can’t make it seem like you’re reading off a screen.” The trick, he says, is to re-size the window of the person you’re pitching to, and re-size the script to the same dimensions, then place them directly over each other.
“So you’re reading and your eyeline is exactly where they are, and then you switch over, and they’ll never know and you’ve just pulled it off perfectly because you’re still looking at the exact same spot. It just kind of feels like an incredible performance where you’ve pulled these great words out of your mind and your heart, without anyone knowing.”
On the other hand, don’t put too much effort into details that nobody will notice. “We were doing a table read for a film,” says Host’s Shepherd, “and I thought it would be fun to change the background to correspond with what scene were were reading. I thought it was really clever but nobody noticed except me.”
Producer Natalie Qasabian, writer-producer Sev Ohanian and writer-director Aneesh Chaganty on the set of their forthcoming feature, ‘Run’.
There’s no time like the present.
“When digital cameras came out, everyone started saying ‘this is a great thing for filmmakers because it really democratizes filmmaking’,” says Chaganty. “We are in a very small bubble where it’s even more democratized than it was before—that’s because everybody has the same resources that we do right now.
“It feels like John Oliver and Hasan Minhaj and Trevor Noah are all making stuff with the same quality that you can make, that I can make, just in our own houses right now. The longer this pandemic goes on, and the longer that it feels that Hollywood can’t make traditional stuff the way it used to, the more likely it is that the demand for content is going to rise.
“If you can make something good in this time, I think you’re in a really good spot as far as getting eyeballs on it. And eyeballs essentially are the things that can propel a career to the next stage.”
Plus, there are mental health benefits to making movies together, at a time when we are all being urged to stay socially connected while physically distant. “What’s been really nice about the whole thing is it just made it so clear how collaborative a process filmmaking is,” says Savage. “Normally people kind of forget about that and you have ‘a film by’, but here you had to put so much trust in everyone. It was just a really fun way of working. I recommend it to everyone.”
‘Host’ is available now on Shudder. ‘Searching’ is available via VOD platforms. ‘Run’ is coming soon to Hulu in the US and will be released theatrically in international markets. (Aneesh Chaganty has been diligently updating his Letterboxd diary, which includes one of our favorite recent reviews of Steve Soderbergh’s ‘Contagion’.)
#filmmaking#filmmaking tips#filmmaking process#horror#thriller#aneesh chaganty#host#shudder#hulu#searching#run#sarah paulson#rob savage#jed shepherd#gemma hurley#browser horror#found footage#found footage film#letterboxd
4 notes
·
View notes
Text

Windows Operating System and MS Office Tips and Tricks.
New Release... New Release... New Release
We have authored a number of books for operators, secretaries' paralegals and attorneys alike who work in law firms and corporate firms across the country.
Although we train basic through advanced MS Office for legal and corporate firms, there are many aspects of Office as well as the Microsoft Operating System that most people never get the chance to be exposed to.
This book will go over those items that most secretaries and word processing operators usually defer to the IT Group. The items that we will cover are easy to use, easy to understandand will truly add another major solid layer of knowledge that will be of great value to you.
This book will be a true hybrid of "Windows Operating System and Office related procedures" tips and tricks of the trade. I want you to know that many of the items contained in this book are items that help when dealing with data that needs to be cleaned up.
For the current book, I have compiled from a number of high level IT and programming individuals, a very useful set of timely tips and tricks that anyone can make use of from day 1. Whatever your current level, you will be able to take advantage of what is contained within this book. These are very valuable things to know.
If you should need training or practice material from basic through advanced MS Word, Excel, PowerPoint and Adobe Pro/Nuance just reach out to us! 888‑422-0692 Ext. 1 or 2. Our specialty is top-tier style MS Office Training for the Legal and Corporate Sector Teaching Secretarial and Word Processing Operators.
So, turn your focus on this book and be prepared to gain a new level of comfortability and understanding.
Note: On the conclusion page of this book, you will be directed where to go in order for you to get your workbook materials! You will be able to do many of the Chapters along with me!
Kindle:
https://www.amazon.com/dp/B0C9KYXDKH/ref=mp_s_a_1_1?crid=16JLT32ELHHJ0&keywords=Windows+Operating+System+and+MS+Office+Tips+and+Tricks&qid=1687950883&sprefix=windows+operating+system+and+ms+office+tips+and+tricks%2Caps%2C154&sr=8-1
Soft Cover:
https://www.amazon.com/dp/B0C9KJBDJL?ref_=pe_3052080_397514860#featureBulletsAndDetailBullets_feature_div
One of a kind Teacher Connected books on www.legaltestready.com and www.awarenesssexplosion.com
Works Shops spanning from working in a word processing center to merge, fillable forms and adobe/nuance PDF Editing.
www.awalkinthecenter.com for details!
We can train at your office, or we do phone class as well as Zoom on-line.
Training For Individuals:
Phone and Zoom are $175.00 per class. Discounts are available for the purchase of two or more classes and all groups.
LinkedIn Group: AdvanceTo Legal and Corporate Word Processing Training Forum.
Tumblr Group: https://www.advancetotraining.tumblr.com
Give Yourself The Edge Over Others In The Industry. The more you know, the more opportunities will come your way.
www.advanceto.com
https://advancetoffice.com/
www.awalkinthecenter.com
888-422-0692 Ext. 1 and 2
Email:
1 note
·
View note
Text
Ideas I have for a non profit
Non-profit: The Alliance of Starving Creators
Writing has been my greatest passion all of my life. The second biggest passion has been art. When I finished my first novel, I was overwhelmed by the idea of having to spend a fortune in order to publish my novel. Traditional publishers wanted edited manuscripts, and that’s provided they are willing to publish your work at all.
I decided not to hire a professional. The main reason was simply that I just didn’t have the money. I relied on my own ability to edit my work, and I had my mother and grandmother proofread it for me. Is my book the best it could be? Can I guarantee that there are no typos at all in it? No, I can’t. But I wasn’t going to let money stop me from following my dream, so I published it anyway.
My book hasn’t really sold very well. And I am writing a second novel which I hope will help it do better, but part of it has to do with the fact that I haven’t really marketed it well either. I am on the autism spectrum and going out and networking with people is not my specialty. I’m not outgoing, I’m very shy, and I tend to be very awkward socially.
But even if my book never sells at all, I realize I could help others get theirs out. I don’t think money should ever stop anyone from being a writer. The only money I spent getting my book published back in 2016 was signing up for the paid-for Grammarly account that has been a huge help in me being able to edit on my own, the fee when I registered my book with the copyright office and paying for my own ISBN numbers. But you don’t even need those. I used Amazon to publish and if you want, they will assign you your own ISBN number for free. That comes with certain restrictions, but it’s an option.
Amazon even provided a template for a book cover. I designed my own and would have preferred to use that, but I wasn’t familiar with the formatting requirements back then, so I had to go with what they offered. That means there might be hundreds of other books out there with my same book cover, but oh well.
I grew up poor. And people on the autistic spectrum struggle to find employment. I’m 36 years old and have never held a full-time job. And I haven’t been employed part-time in more than half a decade. I am fortunate that I have an amazing husband that keeps a roof over my head. He doesn’t make much and we struggle, but we are better off than a lot of others, and even though coronavirus has made things so much worse for us, even if we are hanging on by a thread, we are still chugging.
And it’s for this reason that I want to help other writers and artists that are in my situation achieve their dreams. I’d like to offer services like free editing, workshops on how to improve your writing and art, social events, marketing tips, scholarships, and financial help towards being able to have things like good computers, access to the internet, art supplies, etc. The term starving writer, or starving artist gets thrown around a lot and for good reason, but I want to help others create without having to spend a fortune.
I can’t guarantee that you will be the next J.K Rowlings, I can’t guarantee that I will ever achieve that. But I want to provide people with their best possible opportunities to get there. Most services will be available online, and locally, where I live in Washington, I would like to have a physical place where people can come to use the internet. Somewhere along the bus route, because being low income and being on the spectrum, I, like many others, are dependant on buses to get around.
I also want to help people become better writers and artists through fan fiction. Because although it’s illegal and unethical to earn a profit from other people’s works, fan fiction is the best way to improve your writing for free. It can provide valuable feedback from readers and give you the confidence and push you need to work with your own fiction. Fanfiction has helped me and is still helping me improve as a writer, I cannot stress enough how important it has been in my life. I know there is a stigma associated with it, an idea that it’s not real writing, and yeah, you won’t make a profit from it, but you will improve your craft. It’s really the best resource a low-income writer can have. It costs nothing to write fan fiction, it’s like going to writing school for free. And many famous authors made their start with fan fiction, and if they can, then you can too.
Services we could provide:
A place with access to free internet, art spaces, etc.
Workshops on marketing, grammar, the writing process, art classes, etc.
Free art and writing classes
Free editing service including content editing, line editing, copy editing, and proofreading.
Free help publishing on places like Amazon.
Possible computers that can be acquired through donations that can be given to low-income people
Free art supplies
Free access to Adobe programs and classes on how to use them for things like digital art and graphic design
Online writing and art resources
English language classes for writers whose first language may not be English.
Events where you can promote your work like craft fairs, book clubs, etc.
A classifieds board for writers and artists to advertise their services.
Most of this stuff, minus the actual space, should be able to be accessed online so that everyone around the country, or even the world, can have access to our services
2 notes
·
View notes
Text
Artisan - Research & Evaluation
If I’m honest, the Artisan brief didn’t initially fire my imagination – videography per se wasn’t really a subject that I had any interest in, however that said, I am most certainly interested in photographs that have a cinematic quality, and in films that appear to have been shot with a photographer’s eye. (I mentioned this before in my previous blog for NEW (photographer) – how much I admired and enjoyed Cuaron’s award-winning “Roma”). Also, although I wasn’t sure what I wanted to shoot, the theme of “Artisan”, I thought was an inspired choice for the curriculum.
I thought the selected “instruction” videos that were available on the course website on how to shoot video on a DSLR camera were excellent – even the very first “basic” video produced by Fenchel & Jansch was extremely informative.

From the above video (I watched it a few times!) I learned about optimisation of camera settings for shooting over the 6 steps detailed in the video, e.g. for normal/daylight conditions,
· a frame rate of 24/25 fps (frames per second –as used in feature film productions)
· a shutter speed of 1/50 (for a frame rate of 24/25 fps – these both to be doubled in the case of, for example, shooting a scene that might ultimately be shown in slow-motion)
· an ISO of 100 (to have maximum quality image of minimum digital noise)
· aperture as wide open as possible to have a shallow depth of field – this means the focus and focus of attention will be on the intended subject in the frame, all under the control of the photographer
· all camera controls to be in MANUAL mode – especially focus (see above bullet point)
· picture settings to be adjusted with sharpness and contrast set to minimum (or near minimum) to achieve a “flat” cinematic look, also saturation reduced slightly
· white balance setting to be determined by the ambient light conditions and quality
· a tripod should be used to achieve a smooth final video production
The above represent ideal conditions, and there were hints and tips in the video such as using an ND filter if the lighting conditions were too bright, and for shooting under low light conditions.
The above information was sufficient to get going with a few in-class trials, which were really useful in that these sessions allowed us the students to familiarise ourselves with the camera settings and “see” how successful or otherwise our rapidly story-boarded/put-together mini-blockbusters turned out. Actually these trials were probably more essential than useful – some idea of how to actually shoot a video was surely advisable before letting us loose on even the most patient of unsuspecting artisans out there in the general public.
The next thing was to select which type of artisan I would be able to actually shoot a video of. I’d seen dramatic videos of a blacksmith at work, with red-hot metal and sparks flying as a horseshoe was hammered into shape over an anvil, but I wondered if that might not now be a bit overdone, and possibly a little bit clichéd. Probably a less-clichéd option – and possibly more accessible/amenable would be a cobbler at work. There is one on Calder Street in Govanhill that I have used regularly – however I found he’d shut up shop when I investigated further. A chat with my lecturer helped immensely; he asked me what sort of stuff I liked doing in my spare time – apart from photography – and when I said playing (or trying to play) acoustic guitar, he suggested my artisan could be a luthier. And that was that really – my guitar tutor who had a connection with The Guitar Workshop Ltd in Glasgow put in a good word for me and I was good to go. I really have no answer as to why I didn’t think of a luthier as my Artisan shoot before it was suggested to me – it immediately seemed an obvious option, as I am very interested in their craft, but I just didn’t see it in advance at the time.
As was suggested, I carried out a reconnaissance visit to meet the luthier and the premises, noting the layout and the lighting conditions. The shop has a big shopfront window which lets a lot of daylight in, and I was worried in case I might need an ND filter to control the light while maintaining optimum camera settings. I was relieved to see that a roller-blind could be lowered if necessary. The shop featured a LOT of overhead LED panels and anglepoise desk lamps, but these were easily switch controllable. I became aware that I wanted to vary the light intensity and introduce a softly-lit aspect to at least part of the video rather than continuously use the quite harsh light that I’d encountered in my preliminary visit. ( I understood that of course bright light conditions might be necessary under normal working conditions to prevent eye fatigue and to allow the luthier to see and work with intricate detailing). The layout of the shop meant that I maybe had 3 possible strong angles from where I could set up my video tripod. However space was limited, plus there was a second luthier working in the workshop on the days I was able to shoot.
From the College stores I booked 4 days in advance the following equipment:
· Video tripod
· Canon 6D camera with
· 50mm and 100mm prime lenses.
· LED Lighting kit (comprising 2 off fully- controllable lamps) plus coloured gels (red + orange)
The video was shot over two visits spaced 2 weeks apart. I shot a lot of footage the first visit which I reviewed and carried out some preliminary edits on, again following the advice of an instruction video also shown in class. A fellow classmate Adam Boyd also suggested some really useful hints and tips on how to use the video editing software (Adobe Premiere Pro). I had captured some excellent sound bites of instruments being tuned and played as well as (I thought) some nice shoulder-level focus shift video shots between the two luthiers working at different work benches. I worked out that I needed some extra shots of other instruments (apart from guitars, that is – it makes sense in the video) and extra voiceover comments from Ian Dickinson, the luthier, and I got those in my second visit. Some of the additional shots I needed had to be
There was a lot of juxtapositioning of the video sequences and the accompanying soundtrack using the Adobe Premiere Pro software, and for the soundtrack I also adjusted the sound levels at certain sections – when the luthier was about to speak, and to increase the volume of speech in one instance - using the pen tool which made me feel quite proficient in video editing – well I feel I certainly ended up learning a lot more than I thought I would, anyway!
I was actually quite pleased with the final video. I think my best shot was the focus-shift going from the nearer luthier to the one working at the further workbench. I liked how I edited my voiceovers to fit with the video sequence at each stage and the music itself which was from instruments played in the workshop. And I really liked my final sequence, courtesy of Barney, who plucked the notes of Bach’s Prelude for Cello Suite No. 1 (you’ll know it when you hear it!) on a cello that he literally had just put back together.
I did promise a copy to the luthier, Ian, so hopefully he’ll like it well enough also. (If he doesn’t, I’ll maybe feel obliged to buy a bespoke handmade guitar from him. I really wouldn’t mind that at all, but as it’s quite expensive item, and I’m not really that brilliant a guitarist, I think my wife might insist on a divorce first! So maybe I’ll just practice a bit more on one of the three guitars I already have!)
3 notes
·
View notes