#and here i am left with 5 other note files 21 pages of a google doc and a pinterest board which i think i can still access
Text
guys is it lawful to take ur ex friend's au idea after you've written 90% of it, spent countless hours fixating over it, come up with at least half of the cool plot points and general ideas and overall poured your heart and soul into it?
#they've blocked me on everything other than roblox and don't ever want to talk to me again :3#they came up with the idea first and asked me to help and wrote one (1) note about it and drew like two pieces of art#one of them may have been an edit i dont remember#and here i am left with 5 other note files 21 pages of a google doc and a pinterest board which i think i can still access#at this point it may as well be my idea
14 notes
·
View notes
Text
So, English-Speaking Danmei Fandom... (Part 2!)
...you saw my post yesterday and you’re like, “okay, I made a JJWXC account and now I know how much the thing I want to support costs, how do I do the actual money thing?”
Here, I’m figuring it out right now, let’s do it together. I AM STILL RELYING ON THE GUIDE BY SHOKO TRANSLATES. YOU SHOULD USE IT TOO. I have only the most basic idea wtf I’m talking about, and I only have that much because of this guide. That said, it seems to focus more on mobile, and I’m using desktop, so if you’re also on desktop my thing here might help you?
One, go to the payments page. Fortunately, they’ve made it pretty easy to find...

...by making it the one on that list that’s in RED. Handy, right? No, I don’t know what it actually says. Again, I don’t speak a lick of Chinese. I have some Japanese so sometimes I recognize characters but that doesn’t get me far, ha.
Once you click that (you have to be logged in, of course!) it’ll open up a new screen, with a list of payment options on the right. As far as I can tell, this is what the choices are:

I’m gonna take a stab at international credit card, since that’s...the only one of these I have??? I tried to figure out what the “shenzhouxing” prepaid card is but basically got no where.The Shoko Translates guide does NOT have instructions on this part, at least not for desktop? And the pages look pretty differently on desktop. Anyway. Here goes nothing...I’m mostly relying on C&P and Google translate. *sweatdrop*
So, there are two tabs, but I can’t C&P them and I have no idea what they say. However, the one on the right doesn’t have any boxes for entering stuff?? So I’m gonna stick with the left...OH. It’s a page for doing security questions. Oh god, um.

Alright. So. Put your password in the top box. For the security questions, what they say is basically irrelevant, except it’s worth noting that the default option is apparently not a question - it’s just “select one.” If, like me, you don’t know Chinese...just pick whichever questions, and put in answers you’ll remember. It doesn’t give a damn if your answers are correlated (though, the first one on the list has something to do with dad, and the second on the list has something to do with mom, I recognize those characters, ha. It doesn’t let you pick the same questions twice...and there are two near the bottom that I THINK might be “father’s birthday” and “mother’s birthday.” And one about elementary school. Sorry, I’m distractable. The point is, the questions don’t matter as long as they accept your answers! Yes, it accepts English ones, and no it doesn’t have anyway of knowing if your answers correlate to the questions at all. TAKE A SCREENCAP OF YOUR CHOSEN QUESTIONS AND ANSWERS AND SAVE IT BECAUSE YOU’LL NEED THEM AGAIN!!! Do your pattern match thingy, then click the green button, and there’s another page which looks like it’s asking me to re-enter the same answers.
Click the green button on that second page, and there’s a new page with a single line of Chinese text:
“恭喜你,密保设置成功,点击此处跳转到用户基本信息页面”
which, according to google translate, is
“Congratulations, the secret security setting is successful, click here to jump to the user basic information page.”
Guess I’ll click the thing.
ALRIGHT. So, after doing all that, it takes me back to a home page? Awesome. Whatever. As long as it worked. Click on that red one in the navigation bar again, and NOW when you go to the “international credit card payment” one...

AHA THIS IS VERY PROMISING, lol. So, based on Shoko Translate’s guide, that place drop down menu with “17″ written says “USD” after it, and that it’ll get me 10,000 points. It looks like it processes payments through Paypal; based on my experience with Paypal, that means you may not need an actual Paypal account? But I’m honestly not sure, and I’ve had a Paypal account for 20 years, so I’m just gonna, ya know, use that.
A little window pops up that I’m assuming (blind guessing) is a “this will take you to another page/open a new window, is that a thing you want?” and I clicked the option on the right, and yep, it opened my Paypal. I’ve got a card on file, so...I’m just doing that. (I’d...better make sure I actually have $17 in my account... *another sweat drop*...okay yes I have like $80, wooo...oh, crap, I accidentally paid from my business account, sigh...well, there was def money in there but I’d better pay myself back...ANYWAY.)
Do the payment thing!
It redirects back to JJWXC!
It says something in big bold letters and I have absolutely no idea what! But then it loads, and it’s all the Chinese that I now recognize as my personal account page, and when I scroll to the bottom and...

...well I have no idea what any of that says but it sure as hell LOOKS like victory. Now to see if I can actually, ya know, buy a thing! I can’t afford to get everything I’d like to at once - I’m pretty broke - so I’m going to start with Tian Guan Ci Fu. It’s my favorite danmei novel, and one of my favorite books of all time, AND it’s by MXTX so even though I can’t buy MDZS on here, I can still support her. I linked to it yesterday in my previous post (which, again, is here).
Author: 墨香铜臭
Title: 天官赐福
Direct Link:
https://href.li/?http://www.jjwxc.net/onebook.php?novelid=3200611
Now...
1. scroll down to the chapter list and click on the first one that says [VIP] next to it. Click the chapter title.
2. the circled button is “select all”
3. a pop up checks if you actually meant to do that. click the one on the left to confirm.
4. scroll to the bottom, and...

5. ignore those two check boxes, you might think they’re a ToS confirmation or a “are you sure” but they’re actually about subscribing to the book (which is pointless, since it’s finished) at least according to google.
6. ...uh...shit...now I have to figure out which of these buttons actually does the thing...um...oh thank God, it’s in the Shoko Translates Guide. So, there are five buttons right below the line saying how many points I have. The first is “confirm purchase” so, ya know, just ignore the other ones and click it.
7. A dialog box popped up! It says how many I spent and how many I have left and a bunch of Chinese and two mystery buttons...thank God, again, for Shoko translates, apparently they’re “read now” on the left and “read later” on the right. I’m gonna “read now” just to see if it worked...
8. Well...it sure looks like a book??? I have the PDF translations (a copy from before it was removed, and no, I won’t share it), and, um...okay, so the first unlocked chapter is 21...oh hey, I see San Lang (三郎)! That’s, like, the only thing on this whole page I can read! lmao. Anyway, comparing, like, pagination, and the placement of the exactly one thing I can read, YES, this definitely worked!
SO.
This has been your second installment of “disaster dumb white person who speaks no Chinese liveblogs their way through figuring out how the HELL to buy danmei on JJWXC.” If this has been helpful to you, please REBLOG, SIGNAL BOOST, and more importantly, SUPPORT YOUR FAVORITE DANMEI AUTHORS!!!!!!
(I own TGCF. I’m so happy omfg. 😭 😭 😭 😭 )
(and as a reminder: I have absolutely no idea what I’m doing. If you have a question that requires that someone know what they’re doing, DON’T ASK ME. Instead, try the Shoko Translates guide I linked at the beginning!!! Here, I’ll even link it again. USE IT. DO THE THING.)
#unforth rambles#tgcf#mdzs#svsss#2ha#erha#guardian#hell if remember what else i tagged yesterday#here guys i did the thing#now it's your turn#and now i've gotta go do my actual job
94 notes
·
View notes
Photo
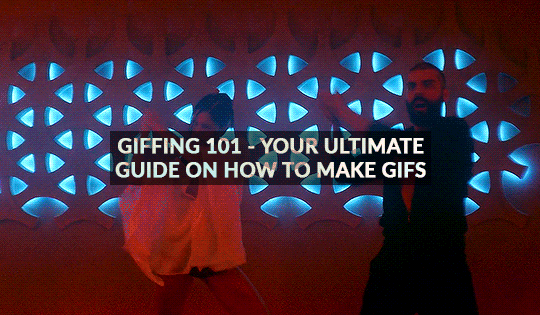
GIFFING 101 - YOUR ULTIMATE GUIDE ON HOW TO GIF
I have gotten many, many asks before about how I gif and I finally decided to make a tutorial. This is going to be very long, very image heavy and with a lot of details and examples. I mean it, I’m going through every, single aspect of giffing that I can possibly think of. From start to finish. And please read the disclaimer at the very start.
* I use a macbook pro but this should probably work on windows too!
I hate doing this but if this helped and you want to, please consider donating to my ko-fi or if you want, commission a theme or page from me at @amaanat <3
tutorial under cut, I hope it helps!
★★★★★
- CONTENTS
disclaimer
what will you need to create gifs?
how to download videos?
extracting your scene from handbrake using VLC / built in video player
opening in photoshop
trimming, cropping and resizing videos
sharpening
colouring and psds
masks
adding subtitles
editing frames / timeline speed
multiple gifs in one grid.
actions
exporting the gif
last minute tips and extra links.
★★★★★
- DISCLAIMER
First off, this is not meant as a post where I am saying look here, this is the only and perfect way of giffing. Not at all. When I started out, there were many tutorials available that helped me figure out how to gif, and I slowly developed my own style and I would like to create an in depth tutorial that helps you grasp the basics. Heck, make your gifs whatever way you want, go absolutely crazy on colours or whatever, this tutorial is just here to guide you through the process of gifmaking, because I know it can be very intimidating to people who are just getting into it. That is why I made this and why I spent 8 hours writing this, because I want others to know too and this is the kind of in depth tutorial I needed when I was starting out 4 years ago. Thanks for reading, hope it helps and go crazy ahhh go stupid.
★★★★★
- what will you need to create gifs?
photoshop. I use photoshop CC 2020 on a mac and I pay monthly bc of student discount. There are many, many links you can find on @completeresources for downloads. You can use any photoshop you like, as long as you have the timeline option.
Handbrake. This nifty program is used mostly to convert MKV files to MP4, but I also use it to quickly extract the part of the video I want, because opening an entire movie in photoshop can quickly clog up space bc of cache and it’s a pain to find that one second scene you want with that tiny scrollbar. Download it from here.
your video (downloading explained down below)
extras: VLC, just to find how many seconds the scene is at, so we can input the time in Handbrake. You can use any other player though for that step, I use VLC or Quicktime. Download VLC from here.
★★★★★
- how to download videos
Ok so I will quickly go through a few methods here for getting your clips.
1. t*rrenting.
This is the most popular method for getting your film or tv episode. I personally get my t/rrents from rarbg dot to or if I am having trouble finding one, I go to 1337x dot to, because they compile them from different sites. I copy the magnet link and go to the qbittorrent application, import magnet link, choose the files I want and it downloads. Remember, the higher the seeder leecher ratio, the quicker it will download.
But which file should I choose?? there’s so many? Well yes there are many many files for different movies. On RAR, I found more than 40 t/rrent files for Endgame. I think that generally, the 4/5 GB 1080p copies are just fine. I have compared giffing with a 60GB Interstellar Remux (which is directly ripped from bluray) file to giffing from a 4GB 1080 file, it literally gave me the same quality and the 1080 looked crisper. So yeah don’t kill your computers space, just go for those 3/4/5GB files.
hot tip - don’t download from yify, the quality is way worse.
2. movies from twitter accounts such as logolessHD.
these accounts post MEGA links to movies and shows, but you will have to request to follow them to be able to get the links. Then you can download the movie from there. The accounts you can get these links from are here: 1 - 2 - 3 - 4. The quality can be a bit less though compared to t/rrents. Here is a link to a tumblr blog with these kinds of downloads too.
3. downloading from youtube.
ok, use 4kvideodownloader for this. It is incredibly easy to use, you just need the youtube link. Always Always go for 1080p, if you can’t then 720 at the most because otherwise quality gets really bad really fast.
4. netflix / screenrecording
If you don’t want to download / can’t find something, try using netflix and screen recording. In my experience, SC only works on google chrome and not safari so jsyk!! Here is a tutorial on how to screen record on mac (or for quick access, click command+shift+5) and windows.
NOTE: quicktime screen records at 60fps, which is nearly thrice the frame rate of movies and shows, so at the end you may end up with duplicate frames in the timeline of photoshop, so you will have to delete those frames one by one sorry.
★★★★★
- extracting your scene from handbrake using VLC / built in video player
muahaha here’s where the magic starts to happen. Open handbrake and import your video. For this part I am going to use a scene of Keanu Reeves from the 2019 movie Always be my Maybe. I will demonstrate with that scene up until colouring, because then I will show how I colour different scenes!
So when you have opened the image in HB, you get this layout. (link to imgur)
it is a bit intimidating, I know. So basically, first, click on where it says chapters near the top right and click seconds. then, input the time you want to extract from the entire video. For the Keanu scene, that scene starts at 00:57:18 and ends at 00:57:21. These are not exact timings, I usually add an extra second so the entire scene is captured and I heavily recommend you do the same.

Now down below, you can click browse and edit where your new video will be saved and you can also change the name of the new clip. Always ALWAYS remember to keep the .mp4 ending do not cut that part out!!! If the ending says .m4v change it to mp4!!

Ok then I undertake the following steps to ensure the video that will be exported is of the highest quality possible:
Firstly, I uncheck all these three boxes:

Then you see this bar here right? Well I will edit the dimensions, filters and video now. You don’t have to do anything for audio, subtitles or chapters so leaving that alone is best. Lets go to dimensions first.

Here are my settings for dimensions:
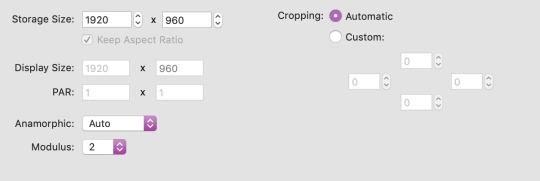
The storage size depends on if your file is 1080p or 720p. Most movies are shot in a ratio of 2.35:1, so if it does not say 1920x1080 like a 1080 file should be, don’t fret. The cut off parts are just the black bars you see when watching the movie. Handbrake doesn��t recognise nor convert them so that’s one less thing we have to worry about.
Now onto filters. Literally do NOT change anything there. Leave the settings as they are, which is like this:
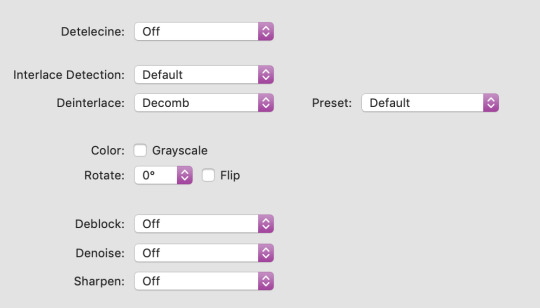
Finally, go to video. You will see this kind of window and these are my settings (imgur)
Firstly, leave video encoder at H264 or 265 depending on how your video is encoded. For the FPS, choose same as source for the framerate and click constant instead of variable!!! This will ensure your video is smooth. For quality, bring the slider all the way to the right. RF0 means it will be at the best quality possible. I didn’t edit the settings at the bottom at all so just leave them be.
Now click this green icon (imgur) at the top and your video will start encoding! It does not take long at all and then your video is ready to made into a nice lil gif!
★★★★★
- opening in photoshop
woohooo we got our video!! Ok now open photoshop. Click on file -> open:
now search for the file you extracted from VLC and import it! Now your screen will look like this (imgur). With a different video, of course lol.
★★★★★
- trimming, cropping and resizing videos
ok so firstly, we will trim the video. As you can see in the image I linked in the step before, the screencap you see is of someone else in ABMM, not Keanu, like I want. So use this slider:
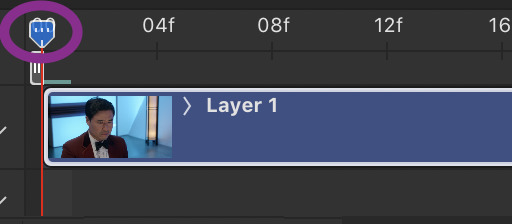
and click and drag it to where your scene begins and shows up in the window. Then, click the following button to split at playhead.

This will split the clip and so the timeline and layers section will look like this (imgur) (mine has three sections because there was space before and after the keanu scene so I cut two parts which made three clips)
so now all there is left in trimming is delete the layers of the video you do not need! For me in that image it was layer 1 and 3!
cropping and resizing
This depends on the kind of gifset you want to make. This picture is a handy guide for resizing:

This post is also very very useful for resizing info
Ok now I will crop my gif. Click on this tool:

and now my interface looks like this. I am using the ratio 6 by 4 but you can use whatever you want.

Ok now you may need to crop some black bars but since I don’t have to, I just moved the crop area around a bit and clicked enter to crop it. Just play around with sizes and whatnot, and get a feel of what you like!!
cropping tip: crop as close as you can to the edges. The more you zoom in, the more pixels that will be visible and it will make your gif extremely grainy!!
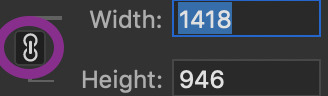
So now for resizing, go to image -> image size or click command-shift-i

and you will get this window.

A LITTLE NOTE - I personally do not use automatic but a friend who shared her sharpening psd would prefer if I kept it secret, but automatic is what most people use and it is what I used up until november 2019 and it worked just fine.
Ok anyway now I want to make my gif 268px wide so I will input that as width and make sure you click this!! It makes sure your height and width are proportional!
ok now we have this. After you’ve done that, click ok!

congrats, you just resized a gif!! Your gif probably looks smaller now in the main window once you click ok, just zoom in to it! don’t worry about it looking bad quality, sharpening is next!
This is how my gif looks with trimming, cropping and resizing (with 0.05 speed)

★★★★★
- sharpening
Now we sharpen! Make sure your layer is selected Go to filter -> sharpen -> smart sharpen and this window will pop up:

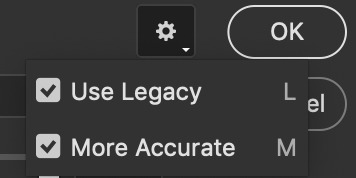
These are my settings which most people use. Just remove gaussian blur
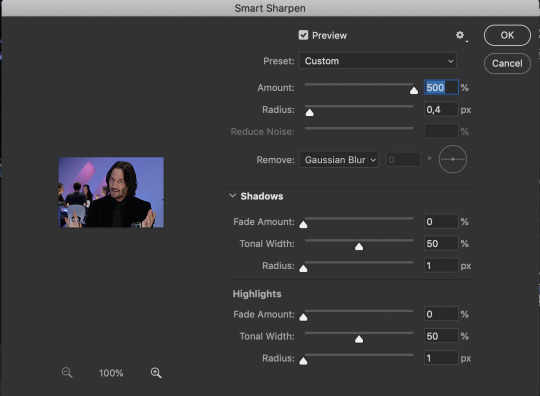
I have more accurate and use legacy checked too!
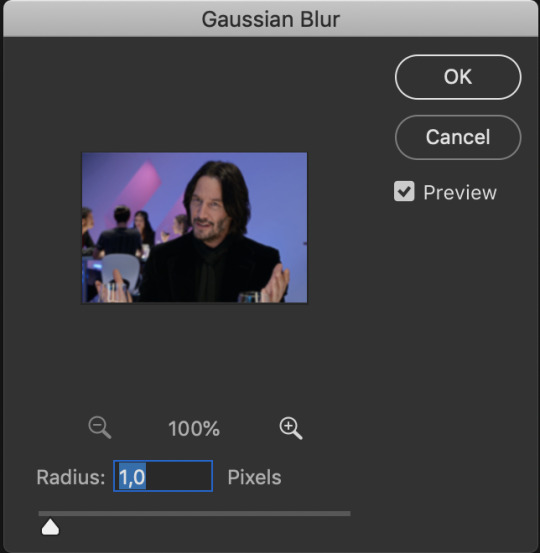
click ok! Now ... your gif might look a bit oversharpened. That’s why we use a bit of gaussian blur. Go to filter -> blur -> gaussian blur.

now I think most people also use a 1.0 radius so set that and click ok.
But now your gif looks too blurry. Lets fix that. Double click the icon below in the layers panel

and adjust the opacity! My go to is between 25 to 35, just so the gif looks smooth!

Now we’re done with sharpening! This is how our gif looks with sharpening with 0.05 speed:

sweet right? Now .... the best and hardest part ... colouring!!!!
★★★★★
- colouring and psds
First I will shortly talk about psds. They are photoshop files, that save the entire document which means you can share it with someone after uploading it and when they download and open it, they can edit the layers, tweak things just like they made the file in the first place. Many people upload psds of gifs with colouring so others can use that colouring. You can find so many psds on completeresources (I only linked gif psds but they have psds for icons and headers too) or allresources. I do not use psds but colour from scratch every time so I will not be explaining them further, sorry.
So for colouring, I will go very in depth into different styles. Here are the main types of colouring I have noticed people use on here:
simple - I normally use this for scenes with people in it
vibrant, bright - I use this for scenes with lots of colours in them
pale
black and white
gradients - I use this to spice scenes up a bit
colour palette
I only go for simple, vibrant and gradients and never do cp, pale or black and white, but I will link a few tutorials by talented creators who do and after that I will explain the three ways I colour by showing you three different examples :)
Some useful tutorials I have found for pale/bw/cp colouring are:
this pale tutorial by @samecoin. Especially useful read because Tippy explains how to avoid whitewashing in pale edits.
this pale tutorial by @kateausten. Very easy to read and to follow.
this colour palette tutorial by @freddyfreemen. They explain the basics and provide a psd too.
this colour palette tutorial by @stenbranlons. Very image heavy which guides you through every step of the way.
A blog dedicated to pale resources is @finesources and is definitely worth checking out!
this tutorials page by completeresources has many many tutorials on how to do different kinds of styles
Btw, this is a useful website that explains all the different adjustment layers in photoshop if you’re still getting the hang of them
ok now onto my examples for the colouring. I will first do simple colouring for which I will use the keanu gif. For vibrant and gradient I will use two different gifs. I usually put my colouring into a group so first, close the video group layer and click this to make a new group which will contain the adjustment layers for our colouring:

SIMPLE COLOURING
First I will brighten the gif up with some curves. That is this tool:

Then you get this window:
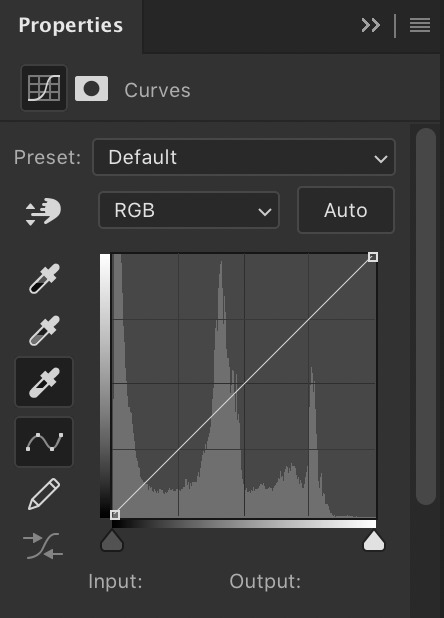
As you see, I have selected that white eyedropper tool. Using that I will brighten the image. Basically, you want to click on the whitest part of the gif using that tool. This is because wherever you click, the eyedropper will turn that part into white and adjust the entire gif that way so if you click somewhere dark, you’ll get this white bright fuzzy mess. So I clicked on the lightest place which imo is the white specks near the glass in front of his hand and now my gif looks like this:

Ok now if you look at the above image, there is a black eyedropper two steps above the white one. You want to use that to click on the darkest place of the gif bc it’ll turn that to pure black. Here is my gif when I did that:

not a massive difference but it balances things out. Now I will add some saturation. Click this icon:
which brings up this window. I have already set saturation to around 15 to make it a bit warmer:
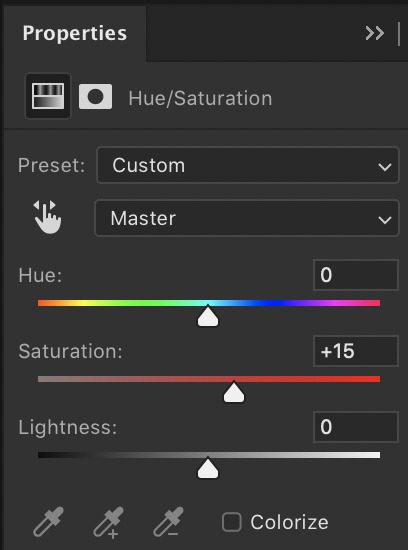
and the gif looks like this now:

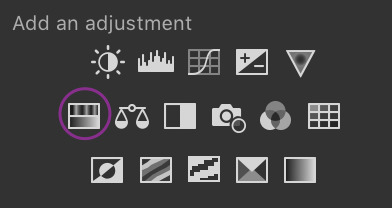
I think it looks nice, but I would like to add something extra. That is why I am going to play around with selective colour to make the background pop a bit and make the black colour more dark. So click this icon:
and you get this window and these colours (imgur). You can play around a lot with selective colour and manipulate colours! So if I turned the black dial on reds to +100, they would become wayyyy darker. However because I want the background to pop, I would use the colours magenta and blue (and black for the final touch). For those my settings are this: 1 - 2 - 3 (imgur). So now my gif looks like this:

And now i think we are done! For comparison, this is what the gif looked like with absolutely no colouring or sharpening:
And that was all for simple colouring!! Lets move on to vibrant colours!!
VIBRANT COLOURING
For this I will use an example from Thor: Ragnarok bc thor is my soft bb. I did not do much for this first example except play around a lot with selective colour and I used the exact way of adding saturation and curves as shown before. Honestly just playing around with selective is the best bet to get vibrant colouring. The gif without sharpening etc was this:

the gif after colouring and sharpening is this:

pretty sweet huh? Just play a lot with saturation, hue and selective colour and channel mixer and you can create a lot of styles that way!
GRADIENT
for this I will use another clip from Thor, but from The Dark World. It is a bare clip where it is raining and I will add a gradient on it. This is the gif without colouring nor sharpening:

now we will do the sharpening and colouring. I already applied a basic curves and saturation layer so now it looks like this:

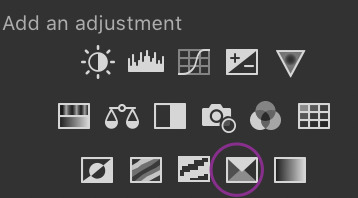
It looks a bit better right? Ok lets get that gradient applied. Click here:

and click on gradient, NOT gradient maps bc those are different things and I honestly dont know how maps work.

now this is what will appear, I haven’t changed anything to this yet:
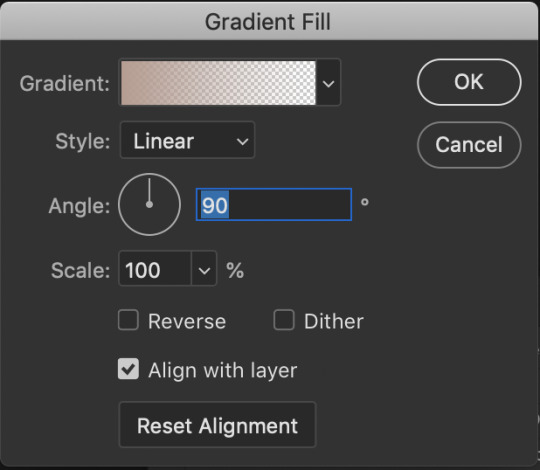
What style, colours, angle you choose is up to you. I personally am going for 0 angle because I want it going right. Now, to choose colours, double click on the colour shown next to the word gradient. This window will show up:
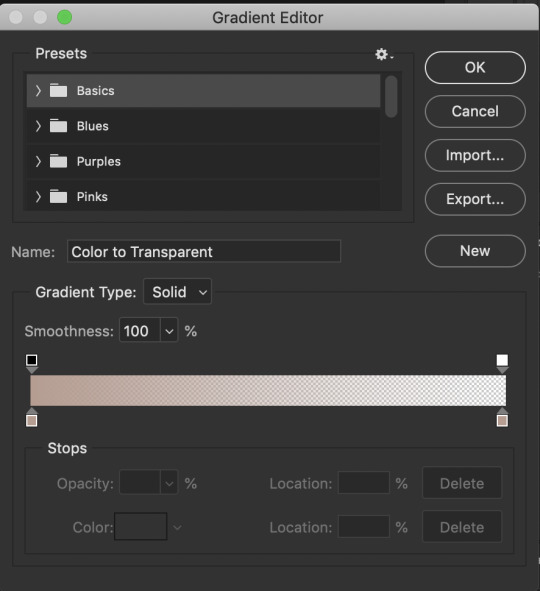
The fun part is you can do what you want here. Just experiment, click the buttons, adjust opacity etc. When you click at the bottom of the bar somewhere another stop marker appears meaning you can have even more colours! Just click on the bottom markers and edit to your hearts content! Use the top button to adjust opacities. Personally I went for this gradient:

Ok but now we have a problem because our gradient is fully covering the image and you can’t see anything. That is where blending modes come in. Right click on the gradient layer and click blending options. This window will pop up (ingur). When you click blending mode, these options appear (imgur).
Here is a good guide explaining the blending modes
I just recommend playing around seeing which one suits you. I went for overlay, which makes my final gif look like this:

and that was that on colouring!! Let me know if u have questions about it! Onto the next part, masks!
★★★★★
- masks
I will not go in depth here, but instead I will link some tutorials but the amazing @thepunisher who has explained it much better than I ever will be able to. The tutorials are all in this link. If you have any questions do lmk but idk how I could explain it.
★★★★★
- adding subtitles
although we wish we could, we can’t all lip read so we need subtitles also I’m hard of hearing and need them anyway but yeah, I will quickly highlight how I add subs! I use the font Arial Rounded MT Bold Regular.
I will first link to this post because it helped me a lot and may explain stuff better than I do.
Lets take the keanu gif we had earlier. In it, he says ‘fish flakes’. Now what I do is this. Click on this icon:

and drag a box around the gif fully. Add your text. Mine looks like this now:

Well that ... does not look like a subtitle. BTW my settings are:
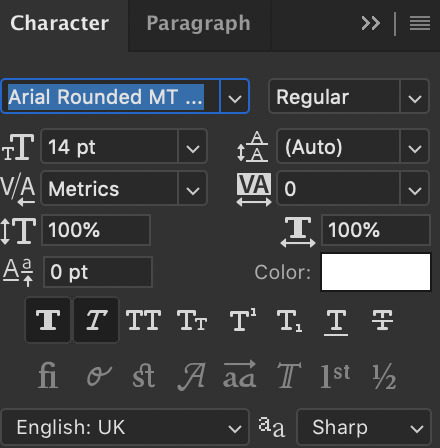
*when there are two people speaking I change the colour of the second person to #ffff00 - also for 540px gifs I usually use 12/13px text.
Ok now I will add the stroke and drop shadow. Right click on the layer of text, click blending options and change your stroke and drop shadow settings to this and this (imgur). Now just click the move tool or hit V on keyboard to select it and drag the gif down wherever you want. Now my final gif looks like this:

Ok, now if you have two gifs and you want them to be the same distance from the bottom, right click the text layer of the first gif document, click duplicate layer and you will get this window:
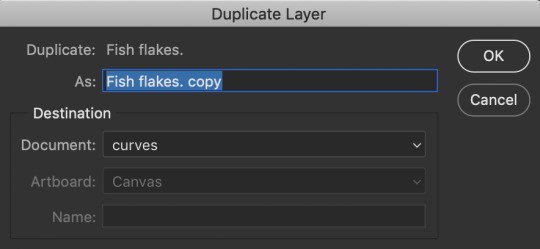
now click on destination and depending on what files you have open in PS, you will get this window:

now just choose where you want the text to go and if the gifs are the same sizes itll appear exactly where it did in the first one and you can edit the text for the second. You can do this with adjustment layers, groups etc too!!
Now text is done! Off to the next part!
★★★★★
- editing frames / timeline speed
We are done editing, now time to convert to frame animation and edit the speed!
Ok click on the four bars on the right side of the video timeline. It will bring up a menu. From there, select this:
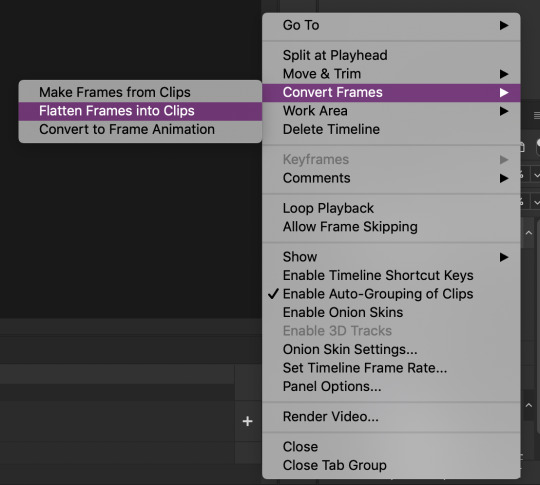
This will make individual layers of every frame into clips. Now, click this at the bottom left side of the video timeline:

This will convert your video timeline to a frame animation timeline. Now it looks like this (imgur). you’re probably wondering wait where the heck did my layers go well don’t fret, lets click the four bars on the right side again and click this:

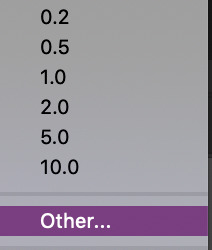
now look! We have got all our frames into the timeline! Just delete the excessive frames at the front. Now click the four bars again, select all frames and then click the number at the bottom and change it to 0.05 or 0.06 or whatever speed you want:

Now we are done with this step!
★★★★★
- multiple gifs in one grid
I myself am not going to explain this, instead here are links to a few amazing tutorials that will help you further
this tut by @brolinjosh
this tut by @futurist
★★★★★
- actions
Now actions ... man they make everything so much easier. Basically actions are a sequence of steps you undertake in photoshop that are recorded which you can then save and use on multiple files. This makes the giffing process much much faster!!! For instance, these are the actions I have saved (mind the doubles lol I am experimenting a bit!)
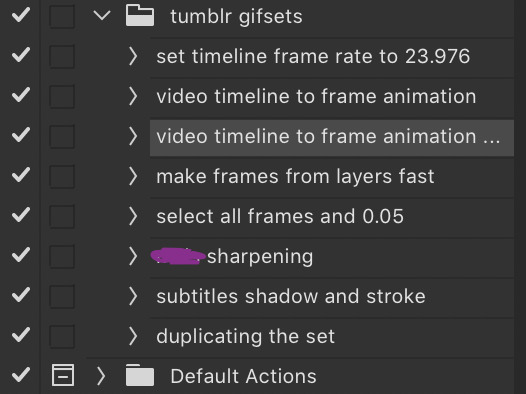
As you can see, I have one for undertaking the entire video timeline to frame animation process and one for sharpening and the subtitles. It has saved me around 75% of the original time I put into creating sets before which is a lifesaver.
I cannot explain how to make actions bc I am really bad at explaining stuff, but here are some tutorials:
- https://helpx.adobe.com/photoshop/using/creating-actions.html
- https://completeresources.tumblr.com/post/66560261468/how-make-action-%D0%B7
- https://completeresources.tumblr.com/post/50583786863/how-to-use-an-action
- https://completeresources.tumblr.com/post/50362731526/how-to-use-actions-on-gifs
https://www.creativebloq.com/adobe/create-own-photoshop-actions-61411918
★★★★★
- exporting the gif
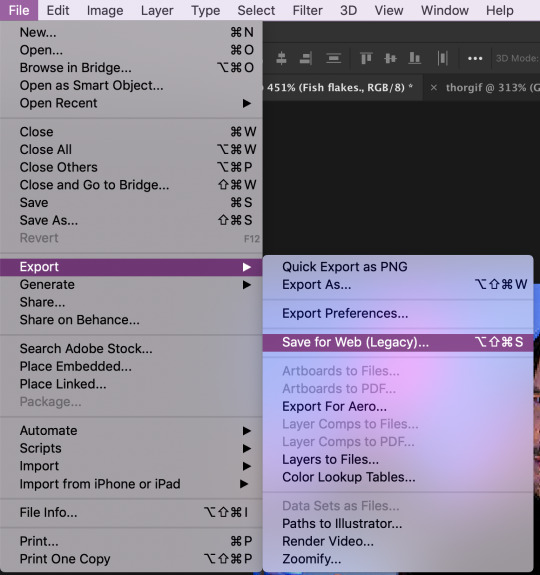
now we’re at the final stage! When you have your gif ready, go to file -> export -> save for web legacy
ok now the next window is this which looks intimidating I know
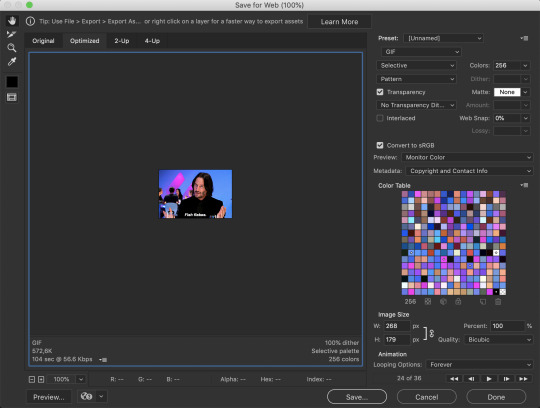
Well basically, those are my settings above. Make sure the looping option is set at forever. Also on the left size you see how big your gif is, make sure it is under 8mb but tumblr is unstable so keep it under 5MB and it should be fine.
I use different exporting types at times. Sometimes I use selective and pattern, sometimes diffusion or adaptive+dif. Just remember that the gif size depends on which you choose so keep that in mind. Here’s the difference (if u can even spot it).
selective + pattern

selective + diffusion

adaptive + diffusion

Personally I mostly only use selective + pattern!
btw make sure your matte is at NONE!!! This is because otherwise you have those whitish transparent borders on your gif, esp noticable on dark gifs, like shown in this tutorial by the talented @joewright !
And congrats, you have officially made a gif! Now go experiment, have the time of your life and do whatever the heck u want with your gifs. And if you want me to see them, tag me!! I track #usernums !!!
★★★★★
- last minute tips and extra links
man idk what to say here really but here goes:
@completeresources and @allresources are amazing places to learn more about gifmaking, pls take advantage of the opportunity
reminder: quicktime records at 60FPS, so unless you want a laggy gif delete the extra duplicate frames in the frame animation timeline!!
When opening import video frames to layers, do not click skip every second frame!! do not!!!!
Do not steal gifs. Try making them. I know it takes time and it can get frustrating but don’t post someone elses gifs as your own. Even the ugliest gifset in existence made originally by someone is better than a stunning set put together full of stolen gifs from various users. Don’t be that person
Don’t be afraid to ask for help pls just go on anon if u want!!
use the tumblr dimensions!!! I cannot stress enough how important this is because if you don’t, your gifs will look stretched af and lose quality so like .. don’t do that
1K notes
·
View notes
Link
Motivation behind this I am exploring Lightning Web Components and thought of preparing an use case on drag and drop functionality, but want to leverage native HTML drag-n-drop without using any 3rd party libraries. Also wanted that, this functionality will be build up using two unrelated components and where this drag-n-drop could be challenging. This motivates to me to build a proof-of-concept and share the challenges and knowledge to community members. Let's get started. Use Case Business has a requirement to see a Company's location in the Google Map when Company info is dragged and dropped to map. Developer wants to build using Lightning Web Components without 3rd party libraries and want to leverage native HTML functionalities. Possible End Results After building the use case, it will perform the functionality as following video: Solution Approach Let's first separate the functionalities in the two components as shown in the picture. displayAccount component will have functionality shown on left side and showAccountLocation component will have functionality as right side. Flow Diagram Create a flow diagram like this way to understand the functionalities, flow of control and finalize design approach. Flow diagram shows the preparation and action for drag-n-drop functionality component wise. Before going through this below section, it will be better to go through my post on Salesforce Lightning Web Components Cheat Sheet to have overall idea for all types of properties, methods, event propagation etc. Pre-requisite: Add pubsub component from repo and add it to project folder. This will be used for event communication using publish-subscribe pattern. displayAccount component: displayAccount.html will prepare a screen like this: Code is as follows: <lightning-card title="Lightning Web Components: Drag and Drag functionality with pub-sub pattern event communication" icon-name="custom:custom30" <div class="c-container" <lightning-layout <lightning-layout-item padding="around-small" <template if:true={accounts.data} <template for:each={accounts.data} for:item="account" <div class="column" draggable="true" key={account.Id} data-item={account.Id} ondragstart={handleDragStart} <div class="slds-text-heading_small"{account.Name} < < < as draggable, draggable="true" and ondragstart={handleDragStart} event handler have been used. displayAccount.js This is most important for implementing this functionality and if we follow the flow diagram it is easy to understand which methods are performing which responsibilities. Some important points to be highlighted: import LightningElement, wire which will be used in this class. import CurrentPageReference and getAccountLocations import fireEvent from c/pubsub @wire to function i.e CurrentPageReference and getAccountLocations (to retrieve account from database through Apex method) register dragover event pragmatically and attached it to template. this.template.addEventListener('dragover', this.handleDragOver.bind(this)); handleDragStart method, retrieve AccountId from the div, this is important line. accountId = event.target.dataset.item; After that, retrieve Account record and fire event to the subscribers fireEvent(this.pageRef, 'selectedAccountDrop', selectedAccount); Entire js file as below: 1 2 3 4 5 6 7 8 9 10 11 12 13 14 15 16 17 18 19 20 21 22 23 24 25 26 27 28 29 30 31 32 33 34 35 36 37 38 39 40 41 42 43 44 45 46 47 48 49 /* eslint-disable no-console */ import { LightningElement, wire} from 'lwc'; import { CurrentPageReference } from 'lightning/navigation'; import { fireEvent } from 'c/pubsub'; import getAccountLocations from '@salesforce/apex/AccountHelper.getAccountLocations'; let i=0; let accountId; //store id from the div let selectedAccount; //store selected account export default class DisplayAccount extends LightningElement { //get page reference @wire(CurrentPageReference) pageRef; constructor() { super(); //register dragover event to the template this.template.addEventListener('dragover', this.handleDragOver.bind(this)); } //retrieve account records from database via Apex class @wire(getAccountLocations) accounts; //when drag is start this method fires handleDragStart(event) { event.dataTransfer.dropEffect = 'move'; //retrieve AccountId from div accountId = event.target.dataset.item; //console.log('event.target.dataset.item=' + event.target.dataset.item); //loop the array, match the AccountId and retrieve the account record for(i=0; i<this.accounts.data.length; i++) { if(accountId!==null && accountId === this.accounts.data[i].Id){ selectedAccount = this.accounts.data[i]; } } //fire an event to the subscribers fireEvent(this.pageRef, 'selectedAccountDrop', selectedAccount); } handleDragOver(event){ event.dataTransfer.dropEffect = 'move'; event.preventDefault(); } } AccountHelper.cls getAccountLocations method it fetches Account data based on SOQL query. I want to show specific records for demo, that's why filter condition has been added. public with sharing class AccountHelper { @AuraEnabled (cacheable=true) public static getAccountLocations(){ return[SELECT Id, Name, BillingStreet, BillingCity, BillingState, BillingPostalCode, BillingCountry FROM Account WHERE isDisplay__c = true]; } } Let's move to other component. showAccountLocation component showAccountLocation.html will end up like this: Code is as follows: <lightning-card title="Lightning Map component will show dropped Company Location" icon-name="custom:custom30" <div class="c-container" <lightning-layout <lightning-layout-item padding="around-small" <div class="dropcls" dropzone="link" <div class="slds-text-heading_small"{DroppedAccountName} <lightning-map map-markers={mapMarkers} markers-title={DroppedAccountName} zoom-level ={zoomLevel} center ={center} < <lightning-formatted-text value="|--Drop the dragged account here --|" < < < < Important things to note: Need to specify dropzone="link" in the div as attribute (pure HTML attribute) Use lightning-map to show Account location in Google Map showAccountLocation.js This is most important for implementing this functionality and if we follow the flow diagram it is easy to understand which methods are performing which responsibilities. Some important points to be highlighted: import registerListener, unregisterAllListeners from c/pubsub registering event listeners for dragover and drop events only in the constructor. this.template.addEventListener('dragover', this.handleDragOver.bind(this)); this.template.addEventListener('drop', this.handleDrop.bind(this)); connectedCallback and disconnectedCallback methods for registering and unregistering listeners. handleSelectedAccountDrop method to capture parameters passed during listening an event raised from displayAccount component. handleDrop method prepares the map retrieving values from AccountInfo Be sure to use event.preventDefault() wherever necessary. Entire js file as below: 1 2 3 4 5 6 7 8 9 10 11 12 13 14 15 16 17 18 19 20 21 22 23 24 25 26 27 28 29 30 31 32 33 34 35 36 37 38 39 40 41 42 43 44 45 46 47 48 49 50 51 52 53 54 55 56 57 58 59 60 61 62 63 64 65 66 67 68 69 70 71 72 73 74 75 76 77 78 79 /* eslint-disable no-console */ import { LightningElement, wire, track } from 'lwc'; import { CurrentPageReference } from 'lightning/navigation'; import { registerListener, unregisterAllListeners } from 'c/pubsub'; let acct; export default class ShowAccountLocation extends LightningElement { @track mapMarkers = []; //holds account location related attributes @track markersTitle = ''; //title of markers used in lightning map. @track zoomLevel = 4; //initialize zoom level @track center; //location will be displayed in the center of the map @wire(CurrentPageReference) pageRef; accountInfo; @track DroppedAccountName = ''; constructor() { super(); //these are two must have events to be listended this.template.addEventListener('dragover', this.handleDragOver.bind(this)); this.template.addEventListener('drop', this.handleDrop.bind(this)); } connectedCallback() { // subscribe to selectedAccountDrop event registerListener('selectedAccountDrop', this.handleSelectedAccountDrop, this); } disconnectedCallback() { // unsubscribe from selectedAccountDrop event unregisterAllListeners(this); } //method is called due to listening selectedAccountDrop event handleSelectedAccountDrop(accountInfo) { this.accountInfo = accountInfo; } //when item is dropped this event fires handleDrop(event){ console.log('inside handle drop'); if(event.stopPropagation){ event.stopPropagation(); } event.preventDefault(); //assigns account records acct = this.accountInfo; this.DroppedAccountName = acct.Name; //prepares information for the lightning map attribute values. this.markersTitle = acct.Name; this.mapMarkers = [ { location: { Street: acct.BillingStreet, City: acct.BillingCity, State: acct.BillingState, Country: acct.BillingCountry, }, icon: 'custom:custom26', title: acct.Name, } ]; this.center = { location: { City: acct.BillingCity, }, }; this.zoomLevel = 6; } //when item is dragged on the component this event fires handleDragOver(event){ event.dataTransfer.dropEffect = 'move'; event.preventDefault(); } } meta files should include where these components are available. <LightningComponentBundle xmlns="http://soap.sforce.com/2006/04/metadata" fqn="displayAccount" 46.0 true lightning__RecordPage lightning__AppPage lightning__HomePage I have used .css file googling on the net as I am not good in styling. Create a Lightning App Builder page with two regions and place those components and run the application, it will display the page like this. Finally we are done and thanks for reading. References Further Reading
0 notes
Text
300+ TOP WORDPRESS Interview Questions and Answers
WORDPRESS Interview Questions for freshers & experienced :-
1. What is WordPress?
WordPress is an online, open source website creation tool written in PHP. But in non-geek speak, it’s probably the easiest and most powerful blogging and website content management system (or CMS) in existence today.
2. Different between WordPress.com vs WordPress.org?
WordPress.com (fully hosted)
Focus on your beautiful content, and let us handle the rest.
WordPress.org (self-hosted)
Get your hands dirty, and host your website yourself.
3. Define Use of WordPress?
WordPress is a free and open-source blogging tool and a content management system (CMS) based on PHP and MySQL. Features include a plugin architecture and a template system.
WordPress was used by more than 23.3% of the top 10 million websites as of January 2015
4. Explain Features of WordPress?
Here are some of the features that we think that you’ll love.
Simplicity
Flexibility
Publish with Ease
Publishing Tools
User Management
Media Management
Full Standards Compliance
Easy Theme System
Extend with Plugins
Built-in Comments
Search Engine Optimized
Multilingual
Easy Installation and Upgrades
Importers
Own Your Data
Freedom
Community
Contribute
5. Developer Features in a WordPress?
For developers, WordPress Have lots of goodies packed under the hood that you can use to extend WordPress in Define whatever direction takes your fancy.
Plugin System
Theme System
Application Framework
Custom Content Types
The Latest Libraries

WORDPRESS Questions
6. Why You Should Use WordPress?
WordPress is that it’s easy to use and flexible enough for just about anything. That’s the main reason why
WordPress has grown so much in popularity.
According to a recent survey, WordPress powers 22.5% of all websites on the internet.
Let’s take a look at why you should use WordPress.
WordPress is Free as in Freedom
Easy to Use and Learn
Extendable by Using Themes and Plugins
Search Engine Friendly
Easy To Manage
Safe and Secure
WordPress Can Handle Different Media Types
7. What ways to use WordPress?
WordPress can be used in many different ways. It is open to possibilities.
You can use WordPress as the following:
Arcade
Blog
Content Management System (CMS)
Gallery
Portfolio
Rating Website
Shopping Store
Video Collection Site
Membership Site
8. What is plugin in WordPress?
Plugins are ways to extend and add to the functionality that already exists in WordPress. The core of WordPress is designed to be lean and lightweight, to maximize flexibility and minimize code bloat. Plugins then offer custom functions and features so that each user can tailor their site to their specific needs.
9. Essential plugins for WordPress?
Here i am going to share some useful plugins that really help you so much for managing and improving performance as well security of WordPress.
https://wordpress.org/plugins/wordpress-seo/ (Best SEO Plugin)
https://wordpress.org/plugins/google-sitemap-generator/ (sitemap)
https://wordpress.org/plugins/w3-total-cache/ (caching)
https://wordpress.org/plugins/wp-smushit/ (optimizing image files)
https://wordpress.org/plugins/wp-optimize/ (Simple but effective plugin allows you to extensively clean up your WordPress database and optimize it without doing manual queries: )
Security:
wordpress.org/plugins/wordfence/
wordpress.org/plugins/login-lockdown/
10. Current version of WordPress?
Need to refer WordPress website: https://wordpress.org/news/category/releases/
11. How to Secure WordPress?
Security in WordPress is taken very seriously, but as with any other system there are potential security issues that may arise if some basic security precautions aren’t taken.
You need to read “http://codex.wordpress.org/Hardening_WordPress” carefully to understand WordPress security.
12. Template Files List for development WordPress Theme?
Here is the list of the Theme files recognized by WordPress. Of course, your Theme can contain any other stylesheets, images, or files.
style.css: The main stylesheet. This must be included with your Theme, and it must contain the information header for your Theme.
rtl.css: The rtl stylesheet. This will be included automatically if the website’s text direction is right-to-left. This can be generated using the RTLer plugin.
index.php: The main template. If your Theme provides its own templates, index.php must be present.
comments.php: The comments template.
front-page.php: The front page template.
home.php: The home page template, which is the front page by default. If you use a static front page this is the template for the page with the latest posts.
single.php: The single post template. Used when a single post is queried. For this and all other query templates, index.php is used if the query template is not present.
single-{post-type}.php
The single post template used when a single post from a custom post type is queried. For example, single-book.php would be used for displaying single posts from the custom post type named “book”. index.php is used if the query template for the custom post type is not present.
page.php: The page template. Used when an individual Page is queried.
category.php: The category template. Used when a category is queried.
tag.php: The tag template. Used when a tag is queried.
taxonomy.php: The term template. Used when a term in a custom taxonomy is queried.
author.php: The author template. Used when an author is queried.
date.php: The date/time template. Used when a date or time is queried. Year, month, day, hour, minute, second.
archive.php: The archive template. Used when a category, author, or date is queried. Note that this template will be overridden by category.php,author.php, and date.php for their respective query types.
search.php: The search results template. Used when a search is performed.
attachment.php: Attachment template. Used when viewing a single attachment.
image.php: Image attachment template. Used when viewing a single image attachment. If not present, attachment.php will be used.
404.php: The 404 Not Found template. Used when WordPress cannot find a post or page that matches the query.
13. prefix of WordPress tables by default?
By default, wp_ is the prefix
14. Plugin for Multi-language features?
WPML Multilingual Plugin.
URL: https://wpml.org/
15. Alternative CMS of WordPress?
Joomla
Drupal
Ghost
Movable Type
Silver Stripe
16. How is creating a site on wordpress.org different from wordpress.com?
Most of the things are similar in both except the choices of themes and the usage of plugins.
17. Why wordpress.com is considered more secure than wordpress.org?
WordPress.com is considered more secure than wordpress.org because they limit the themes and also does not allow installing plugin’s. However the security is more dependable on how the hosting company is hosting your website(wordpress.org) & also Define what are the steps they are taking to prevent the security problems.
18. Does de-activated plugins slow down a WordPress site?
No, de-activated plugins cannot slow down the WordPress site. WordPress only loads the active plugins and ignores everything else.
19. In Define what case we cannot recommend WordPress to our client?
We cannot recommend WordPress on following situation:
If client is working on non-CMS base project
If site wants complex or innovative e-commerce
In case of enterprise intranet solution
Sites requiring custom scripting solutions.
20. Explain what are the essential features you look for a theme?
Theme selection differs according to the requirement, but an ideal theme would be something that would not restrict to use the number of pages, plugins or static homepage.
21. How Custom theme is different than Normal theme?
Custom theme allows for SEO search, but with a SEO plugin available it would not make much difference to normal theme. One benefit using the Custom theme is that it allows to make the changes without going much into the coding part.
22. How you can create a static page with WordPress?
To create a static page in wordpress, in the page section you have to upload a php files to the server in the theme folder, and then select that as your template. This allows you to add any page and look that you wanted for your blog and it will remain static.
23. Is there any other CMS better WordPress?
WordPress is no doubt a good CMS, but Drupal and Joomla are among the best CMS you can work with.
24. Which is the best multi-lingual plugin for wordpress?
Keeping all the limitations in mind, WPML would be the best multi-lingual plugin for wordpress .
25. Can you update your own content on the site?
It depends on the type of the site or project, but yes one can update their own content on the site.
26. Define what are meta-tags?
Meta-tags are keywords and description used to display website or page information.
27. What should one use for plugin development — custom post types or custom database tables?
There is no specific preference for plugin development; it depends on Define what type of plugin’s one has to develop. Though few recommend custom post type, as it has few benefits comparison to custom database table.
28. Can you host WordPress using Amazon web services such as EC2, RDS, EBS etc?
Yes, you can host using Amazon web services.
29. Is there any way to write series in WordPress?
You can use organize series plugin to write series in wordpress.
30. Define what are the reasons why one should not hack WordPress core file?
The best reason not to hack the core files is that Define whatever you might be doing has to be reworked as a patch.
WORDPRESS Questions and Answers Pdf Download
31. Define what are the template tags in WordPress?
A template tag is code that instructs WordPress to “do” or “get” something. Like in header.php we will use the tag bloginfo(‘name’) to get “Site Title” from wp-options table which is set in Setting > General at WordPress dashboard.
The the_title() template tag is used to display the post title.
wp_list_cats() is for display categories.
get_header() for getting header.
get_sidebar() for display the sidebar on page.
get_footer() for get the footer content on page.
32. Define what are rules to follow in WordPress plugin development?
Find a unique name
Setup a prefix (related to your brand)
Create the plugin’s folder
Create sub-folders for PHP files, assets, and translations
Create the main plugin file and fill in obligatory header information
Create a readme.txt file
Use proper constants and functions to detect paths to plugin files
Create additional PHP files and include them inside the main one
Create activation and deactivation functions
Create an uninstall script
33. Define what are the steps you can take if your WordPress file is hacked?
Install security plugin like WP security
Re-install the latest version of WordPress
Change password and user-ids for all your users
Check your themes and plugins are up to date
34. In which cases you don’t see plugin menu?
You can’t see your plugin menu when the blog is hosted on free wordpress.com as you cannot add plugin there. Also, if you do not have an account of an administrator level on your WordPress dashboard, it is not possible to see plugin.
35. Define what is the difference between the wp_title and the_title tags?
wp_title() function is for use outside “The Loop” to display the title of a Page. the_title() on the other hand is used within “The Loop“.
36. Define what do next_posts_link() and previous_posts_link() do?
Because post queries are usually sorted in reverse chronological order, next_posts_link() usually points to older entries (toward the end of the set) and previous_posts_link() usually points to newer entries (toward the beginning of the set).
37. How to create mailchimp or vertical response campaign for newsletter subscribers & link with WordPress ?
First Create List & Campaign on mailchimp/ WordPress account . Then subscribe users from WordPress in mailchimp list by plugin or manual hard code webform.
38. Define what options are there to implement a multi language site ?
WordPress has no bi/multi-language feature built in by default. The other road would be to extend the site with Add-ons like plugins and themes that have multi-language features built-in.
39. How can I stop WordPress from prompting me to enter FTP information when doing updates?
If you edit your wp-config.php file you can preload these FTP settings as constants read by WordPress. Keep in mind, on a shared host, you should be mindful of possible security implications.
40. Define what’s the difference between site_url() and home_url()?
The site_url() will always be the location where you can reach the site by tacking on /wp-admin on the end, while home_url() would not reliably be this location. The home_url() would be where you have set your homepage by setting General > Settings “Site Address (URL)” field.
41. Define what is the Difference Between Posts vs. Pages
Posts vs. Pages
Posts are timely vs. Pages are timeless.
Posts are social vs. Pages are NOT.
Posts can be categorized vs. Pages are hierarchical.
Posts are included in RSS feed vs. Pages are not.
Pages have custom template feature vs. Posts do not.
42. how to store the post title in variable?
$page_title = get_the_title($post->post_parent);
43. How to Generates a random password of the specified length in WordPress?
44. How can we backup or import our WordPress content from admin panel?
For import content from wordpress admin panel goes to
WordPress admin -> Tools -> Import
45. Can wordPress use cookies?
Yes, wordpress use cookies.WordPress uses cookies, or tiny pieces of information stored on your computer, to verify who you are. There are cookies for logged in users.
46. How to disable wordpress comment?
Look in to dashboard under Options –> Discussion. There is a checkbox there for “allow people to post comments on the article” Try unchecking that.
47. how to insert the values in wordpress database.?
insert query to use store the values in wordpress database.
global $wpdb;
$wpdb->insert($table_name,array(‘author_id’ =>$author_id,’author_name’ =>$author_name,’author_email’=>$author_email,’created_at’=>current_time
(‘mysql’, 1)),array(‘%d’,’%s’,’%s’,’%s’));
48. If we are hacked in wordpress but steps have to do for prevent it?
The various steps have to do when you hacked:-
Change passwords for all users, especially Administrators and Editors.
Re-install the latest version of WordPress.
Make sure all of your plugins and themes are up-to-date.
Install security plugins like wp security for safe from hacked.
49. Define what is the special meaning of _sleep and _wakeup?
_sleeps return the array of all variables than need to be saved, while _wakeup retrives them.
50. Why wordpress is better than blogger for blogging?
Customization and Flexibility
Hosting Opportunities
To customize the tiny image that people see in their address bar when they visit your blog, upload a blavatar.
The more tag allows you to display excerpts of your posts on your main posts page, instead of revealing the entire post.
To expand the text editor and hide the modules on the publishing screen, enable Distraction Free Writing.
Reproduce fully-functioning tweets — not just static screenshots of tweets — in posts, pages, and even comments with Twitter Embeds.
You can customize your post and page slugs, which can be handy when you want to create a URL that’s easier to remember (it’s also a good way to make posts search-friendly). Note that if you change a post slug, the old link will still work.
Reproduce fully-functioning tweets — not just static screenshots of tweets — in posts, pages, and even comments with Twitter Embeds.
Read the full article
0 notes
Last Seen Blogs

probablysomewherelovingace
A.C.E 💛

finchbench
Untitled

timdrakestanforever
Tim's my fav

trxshxkn
Trisha Kian Enot

cos65535
ゲームにっき(槙)