#and i needed to install additional hardware on this for storage
Explore tagged Tumblr posts
Visit Tumblr Blog
Explore Tumblr blogs with no restrictions, modern design and the best experience.
Last Seen Tumblr Blogs


Fun Fact
Tumblr has been banned in Indonesia for providing people with access to pornographic content.
Text
I bought a new prebuilt pc a few months back to FINALLY replace my 8-year old one and while I hate the setting up of a new pc/importing old files and shit I do have to say that they've definitely made it a lot easier than it used to be. AKA I've been dreading installing this for months and now that I finally did it it wasn't actually that bad and maybe I was a little bit of a baby about it.
#i built my old one so long ago that a lot of the case hardware was failing#theoretically i could have upgraded just parts#but literally everything on it was two generations behind when i built it#and right now it's cheaper to buy a prebuilt than individual parts#so i took advantage of some black friday specials to replace before it died#let me tell you though#nvme drives did NOT exist when i built my pc#and i needed to install additional hardware on this for storage#and when i opened this case up i bluescreened so bad#took me a week to stumble through ordering and installing the secondary drive lmao#it's way easier now than it used to be#shakes fist
1 note
·
View note
Text
Do you know what this is? Probably not. But if you follow me and enjoy retro gaming, you REALLY should know about it.
I see all of these new micro consoles, and retro re-imaginings of game consoles and I think to myself "Why?" WHY would you spend a decent chunk of your hard-earned money on some proprietary crap hardware that can only play games for that specific system?? Or even worse, pre-loaded titles and you can't download / add your own to the system!? Yet, people think it's great and that seems to be a very popular way to play their old favorites vs. emulation which requires a "certain degree of tech savvy" (and might be frowned upon from a legal perspective).
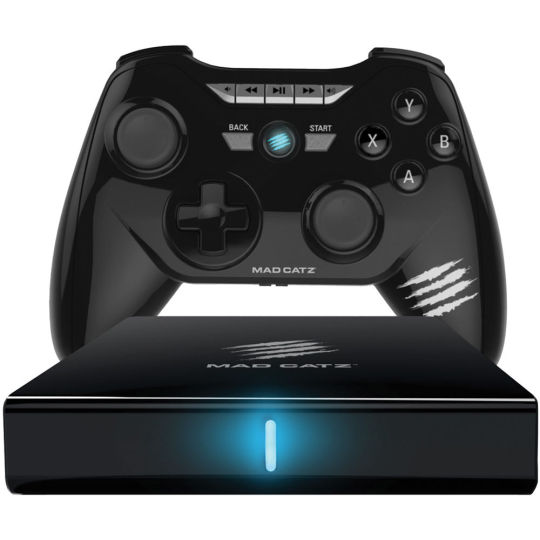
So, let me tell you about the Mad Catz M.O.J.O (and I don't think the acronym actually means anything). This came out around the same time as the nVidia Shield and the Ouya - seemingly a "me too" product from a company that is notorious for oddly shaped 3rd party game controllers that you would never personally use, instead reserved exclusively for your visiting friends and / or younger siblings. It's an Android micro console with a quad-core 1.8 GHz nVidia Tegra 4 processor, 2 GB of RAM, 16GB of onboard storage (expandable via SD card), running Android 4.2.2. Nothing amazing here from a hardware perspective - but here's the thing most people overlook - it's running STOCK Android - which means all the bloatware crap that is typically installed on your regular consumer devices, smartphones, etc. isn't consuming critical hardware resources - so you have most of the power available to run what you need. Additionally, you get a GREAT controller (which is surprising given my previous comment about the friend / sibling thing) that is a very familiar format for any retro-age system, but also has the ability to work as a mouse - so basically, the same layout as an Xbox 360 controller + 5 additional programmable buttons which come in very handy if you are emulating. It is super comfortable and well-built - my only negative feedback is that it's a bit on the "clicky" side - not the best for environments where you need to be quiet, otherwise very solid.
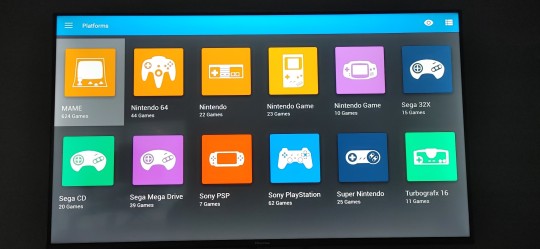
Alright now that we've covered the hardware - what can it run? Basically any system from N64 on down will run at full speed (even PSP titles). It can even run an older version of the Dreamcast emulator, Reicast, which actually performs quite well from an FPS standpoint, but the emulation is a bit glitchy. Obviously, Retroarch is the way to go for emulation of most older game systems, but I also run DOSbox and a few standalone emulators which seem to perform better vs. their RetroArch Core equivalents (list below). I won't get into all of the setup / emulation guide nonsense, you can find plenty of walkthroughs on YouTube and elsewhere - but I will tell you from experience - Android is WAY easier to setup for emulation vs. Windows or another OS. And since this is stock Android, there is very little in the way of restrictions to the file system, etc. to manage your setup.
I saved the best for last - and this is truly why you should really check out the M.O.J.O. even if you are remotely curious. Yes, it was discontinued years ago (2019, I think). It has not been getting updates - but even so, it continues to run great, and is extremely reliable and consistent for retro emulation. These sell on eBay, regularly for around $60 BRAND NEW with the controller included. You absolutely can't beat that for a fantastic emulator-ready setup that will play anything from the 90s without skipping a beat. And additional controllers are readily available, new, on eBay as well.
Here's a list of the systems / emulators I run on my setup:
Arcade / MAME4droid (0.139u1) 1.16.5 or FinalBurn Alpha / aFBA 0.2.97.35 (aFBA is better for Neo Geo and CPS2 titles bc it provides GPU-driven hardware acceleration vs. MAME which is CPU only)
NES / FCEUmm (Retroarch)
Game Boy / Emux GB (Retroarch)
SNES / SNES9X (Retroarch)
Game Boy Advance / mGBA (Retroarch)
Genesis / PicoDrive (Retroarch)
Sega CD / PicoDrive (Retroarch)
32X / PicoDrive (Retroarch)
TurboGrafx 16 / Mednafen-Beetle PCE (Retroarch)
Playstation / ePSXe 2.0.16
N64 / Mupen64 Plus AE 2.4.4
Dreamcast / Reicast r7 (newer versions won't run)
PSP / PPSSPP 1.15.4
MS-DOS / DOSBox Turbo + DOSBox Manager
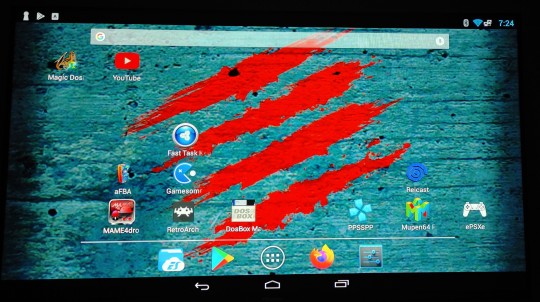
I found an extremely user friendly Front End called Gamesome (image attached). Unfortunately it is no longer listed on Google Play, but you can find the APK posted on the internet to download and install. If you don't want to mess with that, another great, similar Front End that is available via Google Play is called DIG.
If you are someone who enjoys emulation and retro-gaming like me, the M.O.J.O. is a great system and investment that won't disappoint. If you decide to go this route and have questions, DM me and I'll try to help you if I can.
Cheers - Techturd
#retro gaming#emulation#Emulators#Android#Nintendo#Sega#Sony#Playstation#N64#Genesis#Megadrive#Mega drive#32x#Sega cd#Mega cd#turbografx 16#Pc engine#Dos games#ms dos games#ms dos#Psp#Snes#Famicom#super famicom#Nes#Game boy#Gameboy#gameboy advance#Dreamcast#Arcade
67 notes
·
View notes
Text
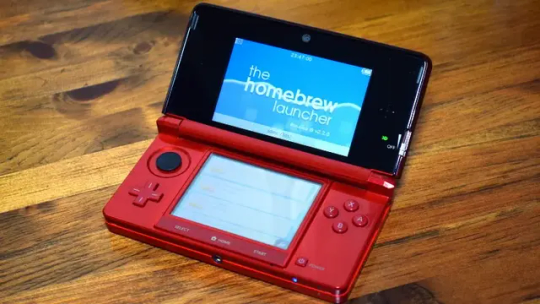
How do I even run homebrew on a DS?

My own setup :) I use TWiLightMenu++ with Wood UI as a main menu, and the flashcard is used to run Moonshell, a media player for Nintendo DS
Fun fact: doing whatever to your Nintendo DS is easy and cheap, if not free.
Playing your game backups? Making your start menu pretty? Teaching the DS new tricks? These are all possible thanks to people contributing to hacking it for ages! This post will help you setup a basic way to achieve all of this on your system, regardless if you own a 3DS or that... weirdly thick first DS model.
Open below, and let yourself into the world of homebrew.
All systems - a DS flashcard

Someone's flashcart collection
They're also known as R4s pretty often, after the first kind of DS flashcarts. Being a first way to run unsigned code on a DS, it's essentially a Nintendo DS game card with a cool little SD card slot you can put things on, almost isolated from the system. For original DS and DS Lite, this is the only way to run homebrew on these systems.
There's A LOT of them and most are cheap - you can find them on places like AliExpress easily by searching for "nintendo ds flashcart", "r4 flashcart" or even something like "9999 in 1 ds game".
Resources like A Quick Guide on DS Flashcarts and Flashcart Guides can help you pick a good one, but to recap both those and my personal opinion: any flashcart that's reputable enough should work okay for most cases, and those guides (as well as flashcart's official site, if it still exists) can help you avoid the problematic ones and set them up.
Don't forget to buy a good SD card reader - even if its included with the flashcart!
Nintendo 3DS - Custom Firmware
"Hacking your 3DS is surprisingly easy"
Here's the guide. This will install a custom firmware (CFW) on your Nintendo 3DS, letting you run the unofficial software. You can either use TWiLight Menu++ to run DS backups and homebrew or put them as Home Menu icons using forwarders. Obviously, thanks to CFW you'll also get to use 3DS hardware to full extent and homebrew.
Nintendo DSi - Unlaunch and similar

A beautiful sight of a DSi succumbing to Unlaunch
See the guide here. This requires minimal risk (since you'll be pretty much installing something on DSi's internal storage - once) and no cost and lets you run even more software - like all of the DSiWare (although it's somewhat possible on a flashcard now too thanks to efforts of TWiLight Menu++ and nds-bootstrap!) and ones enhanced by or exclusive to DSi hardware. Do note that you may need to fiddle a bit with the settings or setup to fully run everything you'd want.
Any more questions?
Feel free to send asks here about how to homebrew your system, your experience or troubles regarding the matter!
As for further resources, you can take a look at GBATemp. It's a big resource for hacking Nintendo and other consoles, offering a forum for asking questions and sharing things about DS, various tutorials and more. DS(i) Mode Hacking and Nintendo Homebrew Discord are also useful for troubleshooting and advice.
I wish you luck in your (3)DS efforts!
-- Red
(Edit from June 5th 2025: Added additional resources for DS hacking and homebrew as "Any More Questions?" section)
2 notes
·
View notes
Text
i really love my steam deck btw. 🥺 i haven't played anything really really heavy on it yet bc i got the 64gb little baby so i'm waiting for my microsd card to start going ham on it but so far everything has played really really well. it doesn't get hot like everybody said (probably bc i haven't played a triple a or mmo) and the battery life is also waaay better than everybody said (also probably bc of what i'm playing). the fans aren't nearly as loud as i worried they would be. the weight is a bit much but so long as you can prop your wrists on something it's not so bad.
its microsd reader does have a read limit of like.... 100mb/s or smth, so games coming from the microsd should be slower than ones coming off the ssd which i'm not super looking forward to but i also didn't really wanna spend an additional ~$150 on <200gb of additional storage. 😒 my plan is to wait out the warranty and then crack it open and put in a 2tb ssd. also possibly swap out its casing and buttons which is sooo funny to me. i'm no expert on taking electronics apart but the nature of the steam deck is such that i feel really confident in my ability to fucken... install all sorts of new hardware. what a novelty. what an absurdity. if someone with my skill level did that to a nintendo switch they'd be a fool.
the defining trait of the steam deck, i would say, is continuity. its presence is twofold, applying to the repairability and ability to continuously modify, but also even just in its ability to function. it has a touchscreen, two trackpads, and two joysticks, which means that whatever you're trying to play/emulate, you WILL be capable of at very least interacting with it. a lot of tech morons on tiktok were talking about the idea of "waiting for steam deck 2" which now that i have the thing in my hands seems particularly silly. why would there be a steam deck 2? if you've fully upgraded your device and still need more that's fucking weeeird. what are you playing? is it representing a story on a microbiological level? and you expect to fit all that in your backpack for less than a thousand dollars??? come on now.
3 notes
·
View notes
Text
A Small Tour of Our Little Beach Shack
It’s been a few days since we’ve been back from the beach and staying in our little Beach Shack for the first time ever. We bought this cottage last May and it looked completely different when we were handed over the keys. The walls were dark, the carpet was gross, and the bathroom was…interesting.
After working on it for a year, we would say the house is about 95% complete. We had so much fun staying there and experiencing life by the beach for two weeks, and I wanted to share with you what the cottage looks like as of today, because it’s so cute and it’s come so far. We haven’t purchased any new furniture yet for this house, everything you see in it we already had and we hauled down to the beach from our storage building. I love that because it helps us clear out our overcrowded building and saves us some money while furnishing the cottage!
These photos were taken literally as we were walking out the door to drive back home to Tennessee, so they’re not staged or even remotely professional, but I kind of like that about them. It’s very much where we’re at right now in life, and I am more than okay with that.
Dining nook/back entry
This little room is our main entrance. We have a front door in the living room, but at the risk of carrying wet sand throughout the entire house every time we enter it, we use this little light filled back entrance to get in and out of the house. It���s also the only dining area in the house, so though it’s teeny tiny, it’s so cozy and bright, and one of our favorite rooms in the house. It was previously an addition of some kind that had a sinking floor, so PJ ripped it off and had it rebuilt and voila!
Kitchen
When we got to the shack a few weeks ago, the kitchen hadn’t been painted yet. It is the only room the painter couldn’t get to in time for us to stay here, so over the course of a few days, PJ began sanding, caulking, priming and painting the kitchen.
We went back and forth on if we should keep the ceiling the original wood (we’ve painted all the ceilings white in the rest of the house, as you’ll see) to give the kitchen a little warmth, and so far we’re liking it. The mix of the dark green cabinets, white walls, and wood ceiling give me Ralph Lauren vibes and I’m here for it.
This is the room that is the least complete. We still need all the appliances and open shelving on the sink and stove wall. PJ installed the cabinet hardware he found for a steal of a deal at a random Habitat for Humanity in Georgia last year, and the bronze really pops against the hunter green. The counters are honed Carrera marble.
We survived the week on a Keurig, a mini fridge, and a microwave. Can’t wait to have actual appliances and be able to cook in this kitchen!!
Our bedroom
The bedrooms in the cottage are tiny, barely enough room for a queen sized bed and two night stands, but I kind of love it that way. With white, wooden walls and ceilings surrounded you, you kind of feel like you’re sleeping on an old ship in the 1940’s. It’s very cozy and, though the bed itself wasn’t comfortable, it was a very comfy room to sleep in.
We have plans for new lamps and to add some curtains, a rug, some art, and a very narrow dresser on the wall across from the bed, and maybe new nightstands, but other than that, this room is basically finished. There’s a full bath to the right of the bed but it isn’t finished just yet.
The living room
Ahhh the cozy and bright living room! The biggest room in the house is the one we do pretty much everything in. It’s also the room that’s undergone one of the biggest transformations. The window by the lamp didn’t exist before PJ framed it and had one installed, and the front door didn't, either. You used to enter the house through an enclosed sunporch with a side door, and there was a huge casement opening that lead into the living room. Now, it’s more traditional and has a much better flow overall. We love this little living room and it comfortably fit all five of us.
The couch and rug were Facebook Marketplace finds, as were the chair and the coffee table. The nesting tables are from TJ Max years ago, and the lamp came with the house. We had a little schoolhouse light where the ceiling fan is, but after being there a week, we realized a fan would be better for this room to help circulate air in the 100 degree weather, so PJ took down the overhead light and installed this fan we got at Lowe’s.
The curtain rods and blinds are from Home Depot and the curtains are drop cloth.
Kids’ bath
The biggest bathroom in the house, and right now, the only one that is completed (ours still needs tile on the shower walls). For such a small cottage, this is such a good sized bathroom and fits all of us perfectly. We brought this vanity down from a local store in Chattanooga and had marble tile that looks like little water droplets installed on the floor, and went with a wavy white porcelain tile (that reminds us of ocean waves) on the shower wall.
The bathroom used to be two little choppy rooms with the strangest layout, but we expanded and built on and had the contractors add new wood to the walls and ceiling to make it all match, and then just painted it all white.
In the space across from the toilet is where a stackable washer and dryer will be, so this room is pulling double duty as a bathroom and a laundry room.
So there you have it!! Next time we go down there, I will show you the kids’ room and our private bathroom. We still need a back deck and a small front porch, but for the most part, our little Beach Shack is basically finished. Well, finished enough to live in. And we love it.
4 notes
·
View notes
Text
http://academicintegrity.gmu.edu/honorcode/. I am fully aware of the following sections of the Honor Code: Extent of the Honor Code, Responsibility of the Student and Penalty. In addition, I have received permission from the copyright holder for any copyrighted material that is displayed on my site. This includes quoting extensive amounts of text, any material copied directly from a web page and graphics/pictures that are copyrighted. This project or subject material has not been used in another class by me or any other student. Finally, I certify that this site is not for commercial purposes, which is a violation of the George Mason Responsible Use of Computing (RUC) Policy posted on http://universitypolicy.gmu.edu/1301gen.html web site." Introduction The term cloud computing originates from the symbolic use of a cloud to represent the internet in computer network drawings. Cloud computing refers to the delivery of hosted services via the internet. It enables the availability of all the data that the users need at all times. Shared resources are provided to devices like computers over the internet as a metered service. The cloud users have access to data, software, and storage resources without the need to know any details about the computing infrastructure like its location. Cloud computing is based on the convergence of infrastructure. This enables users to manage faster applications which require less maintenance. Cloud computing ensures a new means of collaboration through mobile devices. This paper explores the development of cloud computing and its legal, ethical, social and security implications. Future developments of the technology are also discussed. Background Cloud computing is a popular alternative to traditional software licensing. Cloud users access cloud computing through computers, smartphones, and tablets. Clouds can be public, private, community or hybrid. A public cloud supplies services to any internet user. It is available to the general public. Examples include IBM Smart Cloud and Google App engine. A private cloud provides services to limited number of users, like sole organizations. Examples include Eucalyptus and Amazon Virtual Private Cloud. A community cloud is shared among several organizations with common concerns, for instance, Microsoft Government Community Cloud. A hybrid cloud consists of two or more private, public or community clouds. An example is Windows Azure (Buyya et al., 2009). In a cloud computing system, running applications is shifted from the local computers to the cloud’s network. Cloud computing delivers three categories of services which include, Infrastructure as a Service, Platform as a Service and Software as a Service models. Infrastructure as a Service (IaaS) enables the users to access, start and stop and configure virtual servers and storage. The users only pay for the capacity that they need. The cloud service users install and maintain operating systems and application software. Platform as a Service (PaaS) refers to applications hosted over the internet on the infrastructure of the provider. The cloud service providers provide a platform with a web server, operating system, database and programming language execution environment. Software solutions can be run on the platform without incurring costs of purchasing and managing hardware and software. In the Software as a Service (SaaS) model the service provider supplies the software and hardware. Both the application and data are hosted by the service provider and therefore, the user can access the service from everywhere. The cloud users also do not have to install and run the application on their computers and therefore, support and maintenance are made easier (Gillam, 2010). Potential Benefits of Cloud Computing Cloud computing has various benefits. Firstly, it leads to reduced costs in the organization. The expenditure on information technology is reduced. The costs incurred in installing, managing, maintaining and upgrading software and hardware are reduced since business applications are provided and managed by the cloud computing service providers. Staffing costs are also reduced as minimal technical expertise is required since the cloud service providers manage information technology operations. Another benefit is scalability. With cloud computing, Information Technology requirements can be up-scaled and down-scaled when necessary. Cloud users can upgrade their packages to suit new business and market needs. This benefits businesses in that they do not have to incur expenses to change their IT systems (Arno, 2011). Cloud users also have access to new technologies. Cloud service providers ensure that the users have access to the latest technology and therefore, do not need to look for software updates or invest in new technologies. Read the full article
0 notes
Text
The Ultimate Guide to Buying a Computer Cabinet for Gaming at Balaji IT Mall
Are you building a high-performance gaming PC or upgrading your existing setup? One of the most important yet often overlooked components of any gaming rig is the computer cabinet (or PC case). It not only serves as the home for your hardware but also plays a significant role in cooling, airflow, aesthetics, and expandability.
If you're looking for the perfect gaming computer cabinet, Balaji IT Mall has an impressive range of options tailored to meet the needs of gamers. Let's dive into why the right computer case is essential and how to pick the best one from Balaji IT Mall!
Why Choosing the Right Computer Cabinet Matters
Cooling Efficiency: Gaming PCs generate a lot of heat due to high-performance components like the CPU, GPU, and PSU. A well-ventilated computer cabinet is crucial for maintaining optimal temperatures, ensuring that your system runs smoothly even during intense gaming sessions.
Expandability & Customization: Gaming builds often involve multiple components—more storage, additional fans, RGB lighting, etc. A spacious and modular case can allow you to add or upgrade components as needed without constraints.
Cable Management: A cluttered interior can not only make your system look messy, but it can also affect airflow and cooling. A good computer cabinet will offer options for cable management, keeping your system tidy and efficient.
Aesthetics: A gaming PC isn’t just about performance—it’s also about style. Whether you prefer a minimalist design or a flashy RGB-infused setup, your PC case is the canvas for your customizations.
Key Features to Look for in a Gaming Cabinet
Airflow: Ensure that the cabinet has enough mesh or vents to allow air to circulate. Some models come with pre-installed fans, while others leave space for you to add extra cooling solutions.
Size: Choose a cabinet that fits your components. Cases come in different sizes, such as mid-tower, full-tower, and mini-tower, so it’s essential to pick one that can accommodate your motherboard, GPU, and storage devices.
Build Quality: A solid build with premium materials like steel and tempered glass ensures durability and longevity. Plus, a good-quality case will help reduce vibrations, contributing to quieter operation.
Front Panel Ports & I/O: Check for USB ports, headphone jacks, and other input/output options on the front panel for easy access.
Why Shop at Balaji IT Mall?
At Balaji IT Mall, you’ll find an extensive collection of gaming computer cabinets from top brands, offering the best combination of cooling, expandability, and style. Here are a few reasons why Balaji IT Mall is the go-to place for your next PC case:
Wide Range of Options: Whether you’re looking for a budget-friendly case or a high-end, feature-packed gaming cabinet, Balaji IT Mall has it all.
Trusted Brands: The store stocks cabinets from well-known brands, ensuring that you get high-quality and reliable products.
Affordable Pricing: You’ll find great deals and competitive prices that suit your budget without compromising on quality.
Easy Shopping Experience: With an easy-to-navigate website, you can browse, compare, and purchase your gaming cabinet hassle-free. Fast delivery options ensure your new case reaches you in no time!
Top Recommendations for Gaming Computer Cabinets at Balaji IT Mall
Here are a few standout gaming computer cabinets you should consider:
Cooler Master MasterBox Q300L – Known for its excellent airflow and compact design, this case is perfect for gamers looking to build a powerful rig in a smaller footprint.
NZXT H510 – A sleek, modern case with tempered glass panels and great cable management features. Ideal for gamers who love to show off their builds.
Corsair iCUE 4000X RGB – Packed with RGB lighting, this case offers great cooling options and ample space for high-end components.
Anthem P360 – A budget-friendly gaming cabinet that doesn’t skimp on performance. It offers solid build quality and decent airflow for gamers on a budget.
Conclusion
When it comes to gaming PC builds, the computer cabinet is an essential part of your setup. It not only houses all your precious components but also ensures that your system stays cool and efficient during long gaming sessions. At Balaji IT Mall, you’ll find an excellent range of computer cabinets, all offering quality, performance, and style. With the right cabinet, your gaming experience will be taken to the next level!
Check out the full collection of gaming computer cabinets at Balaji IT Mall and choose the perfect case for your gaming rig today!
0 notes
Text
FAQs About New Kitchen Cabinets in Lima

1. What styles of new kitchen cabinets are available at Legacy Marble and Granite in Lima? At Legacy Marble and Granite, we offer a wide range of kitchen cabinet styles, including modern, traditional, shaker, and custom-designed cabinets to fit your unique kitchen aesthetic. You can choose from various materials, finishes, and hardware to match your design preferences.
2. How long does it take to install new kitchen cabinets? The timeline for installing new kitchen cabinets depends on the scope of the project and whether custom designs are involved. Typically, the process can take anywhere from 2 to 4 weeks from the time of order placement to installation, but custom cabinetry may require additional time for fabrication.
3. Do you offer custom kitchen cabinetry in Lima? Yes, Legacy Marble and Granite specializes in custom kitchen cabinetry. We work with clients to design cabinets that fit their specific layout, style preferences, and storage needs. Our expert team will ensure that your new cabinets are tailored to your kitchen space.
4. What materials are used for the kitchen cabinets at Legacy Marble and Granite? We offer a variety of high-quality materials for new kitchen cabinets, including solid wood, plywood, MDF (medium-density fiberboard), and engineered wood. Each material has its own benefits in terms of durability, aesthetics, and cost, and we’ll help you choose the best option for your needs.
5. Can I see samples of the kitchen cabinets before purchasing? Absolutely! We encourage our clients to visit our showroom in Lima to view samples of our cabinet styles, finishes, and materials. This allows you to get a hands-on feel for the quality of our products and visualize how they will look in your kitchen.
6. What is the process for designing and ordering new kitchen cabinets? The process starts with a consultation where we discuss your design goals, style preferences, and budget. We then create a custom design plan that meets your needs. Once the design is approved, we order the cabinets, and our team will install them in your home.
7. Do you provide kitchen cabinet installation services in Lima? Yes, we provide full installation services for all kitchen cabinets purchased from Legacy Marble and Granite. Our experienced team ensures that your cabinets are installed correctly, and we take care of every detail to ensure a flawless finish.
8. How do I maintain my new kitchen cabinets? To maintain the beauty and functionality of your new kitchen cabinets, we recommend regular cleaning with a mild soap and water solution, avoiding harsh chemicals. Additionally, make sure to wipe up spills quickly to prevent staining and keep hardware clean and tightened.
9. Are there financing options available for new kitchen cabinets in Lima? Yes, we offer flexible financing options to help you invest in your dream kitchen without breaking the bank. Contact our team to discuss the available plans and find one that fits your budget.
10. How do I get started with purchasing new kitchen cabinets from Legacy Marble and Granite? To get started, simply contact our team via our website or visit our showroom in Lima. We will schedule a consultation to discuss your kitchen renovation project and guide you through every step of selecting and installing your new kitchen cabinets.
Source Url: - https://mailfoxs.com/faqs-about-new-kitchen-cabinets-in-lima-2/
0 notes
Text
How to Organize Your Home on a Budget
Creating an organized home can enhance your living space and overall well-being. While redecorating or reorganizing might seem daunting, achieving a neat and functional environment without breaking the bank is possible. Here are some practical tips to help you organize your home on a budget.

1. Declutter First
Start by evaluating your belongings. Go through each room and decide what items you truly need. Create three categories: keep, donate, and throw away. This process not only clears space but also gives you a sense of accomplishment. Many charities welcome donations so you can feel good about giving your unwanted items a second life.
2. Use Everyday Items
Instead of purchasing expensive storage solutions, consider using everyday items you already have. Shoeboxes can be transformed into attractive storage containers with wrapping paper or paint. Mason jars can hold everything from office supplies to kitchen spices. Reuse baskets or crates to create designated areas for different categories, like toys or books. This savvy approach not only saves money but also adds a personal touch to your home.
3. Take Advantage of Vertical Space
Maximize your space by utilizing vertical areas in your home. Wall-mounted shelves are affordable for storing books, plants, or decorative items. Hooks can be installed in entryways for bags or coats, keeping your floor clear. This strategy helps draw the eye upward, making rooms feel more spacious.
4. Create Zones
Designate specific areas for different activities within your home. For instance, set up a reading nook with a chair, lamp, and bookshelves. Create a cooking zone in the kitchen with utensils and pots close at hand. By establishing zones, you can maintain organization and ensure that items are easily accessible.
5. Use Clear Storage Bins
Investing in a few clear storage bins can make a significant difference. They are often affordable and allow you to see the contents at a glance. Label each bin with its contents for easy identification. This method works well in closets, under beds, or in garages.
6. Repurpose Furniture
Before purchasing new Furniture, think about how you can repurpose what you already own. An old dresser can become a TV stand, while a coffee table can be a storage solution for magazines or blankets. Adding a fresh coat of paint or new hardware can give old Furniture a new lease on life without the expense of buying new pieces.
7. Implement a Cleaning Schedule
Keeping your home organized requires regular maintenance. Establish a cleaning schedule that includes daily, weekly, and monthly tasks. Breaking chores into manageable segments makes staying on top of things easier. Involve your family members or roommates to create a sense of teamwork. This regular maintenance not only keeps your home organized but also instills a sense of responsibility.
8. Make Use of Underutilized Spaces
Identify areas in your home that could serve additional purposes. The space under the bed can be ideal for storing seasonal clothing or shoes. Consider using the back of doors for hanging storage, like pots and pans in the kitchen or accessories in your bedroom.
FAQs
Q1: What are some low-cost storage solutions for small spaces?
A1: Consider using vertical storage options like wall-mounted shelves or hooks for small spaces. Repurpose containers such as shoeboxes or jars for small items. Also, using under-bed storage can help maximize space without additional costs.
Q2: How often should I declutter my home?
A2: It’s a good practice to declutter at least twice a year. However, you can do quick decluttering sessions monthly to keep things manageable. Regularly reassessing your belongings helps maintain an organized space and ensures you only keep what you need.
Conclusion
Organizing your home on a budget is achievable with creativity and resourcefulness. You can create a functional and welcoming environment by decluttering, utilizing everyday items, and using available space. Remember, the goal is to create a home that reflects your style while being practical and affordable.
1 note
·
View note
Text
A Perfect Blend of Cooling, Style, and Functionality
The Ant Esports ICE 410TGW Mid Tower Mesh Gaming Case is a top-tier choice for gamers and PC enthusiasts seeking a balance of style, cooling performance, and functionality. Designed with mesh panels for enhanced airflow, ARGB lighting for a vibrant look, and spacious interior design for high-end hardware, this case has everything you need to build an eye-catching and efficient gaming setup.

Modern Design with Optimal Airflow
The Ant Esports ICE 410TGW features a mesh front panel that provides exceptional airflow, ensuring your system stays cool during intense gaming sessions. The mesh design not only enhances ventilation but also offers a sleek, modern look. The tempered glass side panel adds an aesthetic edge, allowing a clear view of your system’s internals, making it perfect for showcasing RGB components and clean cable management.
In terms of dimensions, the ICE 410TGW supports ATX, Micro-ATX, and Mini-ITX motherboards, making it a versatile case that accommodates various builds. Whether you’re building a high-performance gaming rig or a workstation, the spacious layout offers enough room for large components without feeling cramped.
3+1 ARGB Fans for Vibrant Lighting and Superior Cooling
To keep your hardware cool, the Ant Esports ICE 410TGW comes with three pre-installed 120mm ARGB fans at the front and an additional fan at the back. These fans not only provide excellent cooling but also add an aesthetic touch with customizable ARGB lighting. The fans are connected via a built-in hub, allowing you to control the lighting and choose from a variety of effects, such as static, breathing, and cycling modes.
The case supports up to six fans in total, giving users the option to further enhance the cooling system if needed. Additionally, the case is optimized for liquid cooling setups, with support for 240mm radiators in the front and 120mm radiators at the rear, making it ideal for those who want a quieter, more efficient cooling system.
Spacious Interior with Tool-Free Installation
The Ant Esports ICE 410TGW features a spacious interior with ample room for multiple storage devices, including two HDD and two SSD drive bays. The case’s modular drive cages allow for easy installation, removal, or rearrangement, offering flexibility for future upgrades. The tool-free design of the drive bays makes building and upgrading a hassle-free process, especially for those who prefer DIY setups.
The case also provides enough clearance for graphics cards up to 335mm in length and CPU coolers up to 160mm in height, ensuring compatibility with most high-end components available in the market.
Clean Cable Management System
One of the standout features of the ICE 410TGW is its cable management system. The case includes rubber grommets and Velcro straps, helping to organize cables and keep the interior neat. With ample space behind the motherboard tray, routing and hiding cables is a breeze, resulting in better airflow and a cleaner look.
This thoughtful design not only enhances the visual appeal of your build but also makes maintenance easier by reducing clutter and improving airflow.
Connectivity and I/O Options
The Ant Esports ICE 410TGW offers convenient connectivity options with an I/O panel located at the top front of the case. It includes:
Two USB 2.0 ports
One USB 3.0 port
HD audio jacks for headphones and microphones
LED control button for adjusting fan lighting
The front I/O panel makes it easy to connect your peripherals and control the lighting, adding a layer of convenience to the case’s design.
Durable Build and Excellent Value
Built with durability in mind, the Ant Esports ICE 410TGW is constructed from high-quality steel and tempered glass. This sturdy construction ensures that your system remains protected while providing a stylish aesthetic that fits seamlessly into any gaming setup.
Offering robust features and great airflow at an affordable price point, this case is ideal for budget-conscious gamers and builders who don’t want to compromise on style or performance.
0 notes
Text
Gigabyte X870E AORUS XTREME AI TOP Motherboard Specs

X870E AORUS XTREME AI TOP
In order to manage demanding AI training workloads, the SSD, PSU, and chassis are paired with AI TOP Hardware, which is tuned for power efficiency, durability, and heat dissipation. Additionally, GIGABYTE offers AI TOP 100 and AI TOP 500 setup kits, which are pre-built system barebones designed for both novices and experts. The AI TOP configuration kits, which will be available in Q4 2024, provide a great deal of flexibility and future upgradeability.
AORUS X870E XTREME
The motherboards from the AORUS Z890 series are another significant announcement. The AORUS Z890 series motherboards, which are designed for the newest Intel Core Ultra CPUs, include D5 Bionic Corsa Technology, which allows for AI-enhanced overclocking for optimal DDR5 memory performance. The AORUS X870 and X870E series motherboards, which have an enhanced VRM architecture to optimize the performance of AMD Ryzen X3D series CPUs, are also included in the announcement.
For the first time, these new motherboard generations form part of the AI TOP Hardware. Showcasing the X870E AORUS XTREME AI TOP, Z890 AORUS XTREME AI TOP, and Z890 AORUS MASTER AI TOP. In addition to being designed to work with the AI TOP Utility, these motherboards are also optimized for dual-GPU setups and come with state-of-the-art Thunderbolt 5 technology, which enables local AI training.
Watch the GIGABYTE 2024 AI innovations, where GIGABYTE AI technology will be included in a number of product improvements. This all-inclusive ecosystem offers improved accessibility, performance, and adaptability in local AI computing, catering to the needs of an AI-driven future.
X870E AORUS XTREME AI TOP Features
Using your workstation to train your own AI.
Up to 8600MT/s for DDR5 OC.
AMD Socket AM5: Compatible with AMD Ryzen 9000, 8000, and 7000 Series CPUs.
VRM solution for digital twin 18+2+2 stages.
Dual Channel DDR5: AMD EXPO Memory Module Support for 4 DIMMs.
Improved Active Cooling for Memory Modules with DDR Wind Blade.
M.2 EZ-Match: Magnetic alignment for simple massive heatsink installation.
WIFI EZ-Plug: A quick and simple design for installing Wi-Fi antennas.
EZ-Latch Plus: Screwless PCIe and M.2 slots.
EZ-Latch Click: Screwless design M.2 heatsinks.
Sensor Panel Link: Easy in-chassis panel configuration with an onboard video port.
User-friendly interface features include Q-Flash Auto Scan in BIOS and SW, AIO Fan Control, and Multi-Theme.
HWinfo’s new Power Monitor allows for real-time CPU power phase monitoring.
Four M.2 slots, including PCIe 5.0 x4, provide ultra-fast storage.
Effective Thermal: M.2 Thermal Guard XL & I/O ZONE AORUS LIGHTING in VRM Thermal Armor Advanced.
Dual 10GbE LAN and Wi-Fi 7 with directional ultra-high gain antennas for quick networking
Additional Connectivity: HDMI and Dual USB4 Type-C with DP-Alt.
DTS: ALC1220 & Rear ESS SABRE Hi-Fi 9118 DAC & X Ultra Audio.
Ultra Durable PCIe Armor: The PCIe x16 slot’s metal back plate for increased robustness.
Titanium PCIe UD Slot X: two PCIe 5.0 x16 slots with improved heat dissipation and 10X graphics card robustness.
Designed for the most cutting-edge gaming and creation PC.
An AMD motherboard from the X800 series is the best option when speed is the sole consideration. The revolutionary performance of an AMD X800-series motherboard and AMD Ryzen 9000, 8000, and 7000 Series processors allows you to play the most demanding games and complete your biggest projects. USB 4.0, overclocking, AMD EXPO technology, dual-channel DDR5 memory compatibility, and PCIe 5.0 for GPUs and NVMe are all included.
Read more on Govindhtech.com
#X870EAORUS#X870EAORUSXTREME#Motherboard#XTREMEAITOP#AITOP#AORUSZ890#X870Emotherboards#AItechnology#DDR5#AMDSocketAM5#News#Technews#Technology#Technologynews#Techcnologytrends#govindhtech
0 notes
Text
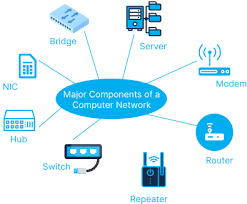
9 Most Important Components Of a Computer And Their Functions Products
Computers Component And Their Functions have become critical to modern existence, powering the whole lot from communique and training to entertainment and paintings. But behind every computer's capability is a group of critical additives, every playing a critical position in its operation. Whether you’re building your personal PC or simply curious about what makes your laptop run, information the key hardware additives is vital. function.

Central Processing Unit (CPU)
The Central Processing Unit (CPU), frequently referred to as the brain of the computer, is one of the most critical additives. The CPU contains out most of the processing interior a computer, executing instructions from software and performing calculations. It handles records from reminiscence and enter/output devices, orchestrating obligations to ensure the system features easily.
Intel Core i9-13900K – High-end CPU for gaming and heavy workloads.
AMD Ryzen 9 7900X – Powerful processor with excellent multi-core performance.
Intel Core i5-13600K – Mid-range processor ideal for gaming and productivity.
AMD Ryzen 5 5600X – Budget-friendly CPU for general computing and light gaming.
Key Features of a CPU
Cores
Modern CPUs have multiple cores, letting them manner a couple of tasks simultaneously. Dual-core, quad-middle, and octa-core processors are commonplace.
Clock Speed
This determines how rapid a CPU can manner instructions, usually measured in GHz (gigahertz). The better the clock pace, the quicker the CPU can carry out responsibilities.
Threads:
Some processors help multithreading, allowing every core to deal with a couple of thread of execution simultaneously, boosting overall performance in multitasking and intensive packages.
Examples of famous CPUs include Intel’s Core i-collection (i3, i5, i7, i9) and AMD’s Ryzen processors.
Motherboard
The motherboard is the backbone of the laptop, connecting all of the components and letting them speak with every other. It homes the CPU, reminiscence, storage, and different peripherals. The motherboard additionally carries a chipset that manages statistics float between the processor, reminiscence, and external devices.
ASUS ROG Strix Z690-E – High-end motherboard for Intel 12th Gen CPUs, packed with gaming features.
MSI MAG B550 TOMAHAWK – Reliable motherboard for AMD Ryzen CPUs, offering great value for money.
Gigabyte X570 AORUS Master – High-performance motherboard for AMD builds with PCIe 4.0 support.
ASRock B450M PRO4 – Affordable motherboard for budget PC builds.
Key Components of a Motherboard:
CPU Socket
This is wherein the CPU is installed. The socket kind need to fit the specific CPU you’re the usage of.
RAM Slots
These slots are where the computer's memory (RAM) modules are inserted.
PCI e Slots:
Used to connect expansion cards like photos cards (GPUs), sound playing cards, or community cards.
SATA Ports: These ports join garage gadgets like difficult drives and SSDs (Solid State Drives).
BIOS/UEFI:
The Basic Input/ Output System (BIOS) or Unified Extensible Firmware Interface (UEFI) is firmware that allows initialize the hardware at some stage in the boot method.
The motherboard dictates the computer's compatibility with sure additives, inclusive of the CPU, RAM, and garage devices.
Random Access Memory (RAM)
Random Access Memory (RAM) is the computer's quick-term reminiscence. It stores data that is currently getting used or processed via the CPU, allowing short get right of entry to to that records. The more RAM a pc has, the extra applications it could run simultaneously without slowing down.
Key Features of RAM:
Capacity
Measured in gigabytes (GB), the quantity of RAM a laptop has can substantially effect performance. For instance, 8GB of RAM is taken into consideration good enough for most responsibilities, at the same time as 16GB or greater is often required for gaming, video modifying, or other aid-extensive sports.
Speed:
RAM velocity, measured in MHz (megahertz), determines how speedy statistics can be study from or written to reminiscence. Faster RAM can enhance machine responsiveness.
DDR Versions
DDR4 is the maximum commonplace kind of RAM in present day computers, with DDR5 being the subsequent generation, providing better velocity and performance.
While RAM is crucial for multitasking, it's far unstable reminiscence, that means it loses all saved records once the pc is powered off.
Storage Devices
Storage gadgets are in which all of your statistics, documents, and programs are stored. There are predominant types of storage devices: Hard Disk Drives (HDDs) and Solid State Drives (SSDs).
Hard Disk Drives (HDDs):
Mechanical Storage:
HDDs use spinning disks, or platters, to study and write records using a mechanical arm.
Capacity:
HDDs commonly provide large garage capacities at lower fees as compared to SSDs, making them best for storing huge files like films, games, or pics.
Speed:
While HDDs offer adequate garage, they are slower than SSDs due to the mechanical nature of data get entry to.
Solid State Drives (SSDs):
Flash Storage:
SSDs use NAND flash reminiscence, which allows them to access information a lot quicker than HDDs.
Speed:
SSDs drastically improve machine performance, lowering boot times and speeding up the loading of packages and documents.
Capacity and Cost: While SSDs are more high-priced in step with GB than HDDs, they've emerge as increasingly lower priced and are often used as the primary storage device for the operating system and regularly used applications.
Some computers use a combination of each, with an SSD for the working system and important applications and an HDD for bulk garage.
Graphics Processing Unit (GPU)
The Graphics Processing Unit (GPU), or video card, is responsible for rendering pix, films, and animations for display at the display. For gaming, video enhancing, and different graphically intensive responsibilities, a effective GPU is important.
Types of GPUs:
Integrated Graphics:
Many CPUs come with included photographs, that are enough for simple tasks like surfing the internet, looking films, or operating with documents. However, they're now not suitable for excessive-stop gaming or professional photo design work.
Dedicated Graphics Card:
A dedicated GPU is a separate card mounted in the computer, providing advanced performance for gaming, 3-D rendering, and video enhancing. Examples consist of NVIDIA's GeForce and AMD's Radeon series.
GPUs have their personal memory, known as VRAM (Video RAM), which helps manage photos-extensive programs greater efficiently.
Power Supply Unit (PSU)
The Power Supply Unit (PSU) converts the electrical electricity out of your wall outlet into a form that the pc can use. It distributes power to all of the components, which includes the CPU, GPU, motherboard, and storage devices.
Key Features of a PSU:
Wattage: The PSU’s wattage shows how lots electricity it can offer to the machine. It’s important to select a PSU that may supply sufficient strength for all of the components on your construct.
Efficiency Rating: The efficiency of a PSU is measured by using its eighty PLUS score, with ranges like Bronze, Silver, Gold, Platinum, and Titanium. Higher performance approach less electricity is wasted as warmness.
A right-satisfactory PSU is essential for ensuring the longevity and balance of your laptop.
Cooling System
Computers generate warmth even as working, specially during intensive responsibilities like gaming, rendering, or jogging complicated applications. To prevent overheating, a cooling gadget is important.
Types of Cooling Systems:
Air Cooling: Air coolers use fanatics to burn up warmness from the CPU and GPU. These are the most not unusual and fee-effective cooling solutions.
Liquid Cooling: Liquid cooling systems use a coolant to take in warmth from additives. They are more efficient than air cooling but also are more steeply-priced and require careful installation.
Proper cooling is essential to keep ideal performance and save you harm to touchy additives.
Input and Output Devices (I/O)
Input and output gadgets permit customers to have interaction with the pc.
Input Devices:
Keyboard and Mouse: The keyboard and mouse are the most common input gadgets, used to type instructions and navigate the gadget.
Touchscreen: Some computers, specifically drugs and a couple of-in-1 laptops, have touchscreens that allow customers to interact at once with the display.
Output Devices:
Monitor: The monitor shows the visible output from the laptop. Monitors are available in numerous resolutions and refresh charges, with 1080p, 1440p, and 4K being the most common resolutions.
Printers and Speakers: Printers provide bodily output inside the shape of files or photos, whilst speakers output sound.
Computer Case
Best budget computer components for gaming in 2024 the computer case homes all the components and protects them from dirt, debris, and harm. It also gives airflow to maintain components cool and consists of ports for connecting peripherals.
Case Types:
Full Tower: Large cases that may accommodate more than one GPUs and additional cooling systems.
Mid Tower: The most not unusual kind, supplying sufficient area for most builds.
Mini Tower: Compact instances for small form-element builds.
0 notes
Text
How Can I Fix My MacBook Screen? Discover Options!
If your MacBook screen is broken or not working correctly, there are a few choices you can investigate for repair. Primary, get in touch with authorized Apple service providers or trustworthy repair shops in Stockholm that specify in MacBook repairs. You can swap the screen with original parts or get to the root of the problematic and fix it to restore the functionality of your display. It is significant to get professional assistance to make sure the repair is done properly and to prevent further damage. By examining your options and speaking with specialists, you can rapidly and efficiently get your MacBook screen back to its finest state.
Complete IT Services in Stockholm: Laptop and Mac Repairs as well as Other Services Access to a variety of services that address a range of needs, such as data recovery solutions and iPad battery replacements, can make navigating the world of tech repairs in Stockholm easier. Services for Mac Repair It’s critical to seek professional Mac Reparation Stockholm when your MacBook has problems, such as a cracked screen, broken hardware, or software bugs. You can maintain your MacBook operating smoothly with diagnostics, repairs, and updates from authorized service locations and qualified specialists in Stockholm.

Knowledge about Laptop Repair Comprehensive laptop repair services for a range of brands and models are offered in addition to MacBooks. Trained professionals in Stockholm offer effective ways to get your laptop working again, from screen replacements and keyboard repairs to analyzing software problems. Restoring MacBook Displays Do you have to deal with a broken or cracked MacBook screen? In order to ensure the best possible display quality and functioning, qualified technicians can replace broken screens with original components. Fix Macbook Screen services are easily available for any model of MacBook, including MacBook Air and MacBook Pro.
Data Extraction Services Do you risk losing data because of hardware malfunctions, inadvertent deletions, or system crashes? To recover deleted files from MacBooks, laptops, external drives, and other storage devices and protect important data, data recoveryspecialists in Stockholm use cutting-edge procedures.

Repairs for iPad ScreensBroken or broken displays might interfere with everyday chores for iPad owners. Reputable repair companies in Stockholm replace iPad screens quickly and with high-quality parts, bringing back the touch sensitivity and clarity of the display on your device.
Replacement Change Battery On Ipad Using expert battery replacement services is advised when iPad batteries deteriorate over time, reducing usage duration and performance. By safely removing and installing new batteries, technicians increase the longevity and usability of your iPad. Selecting the Proper Service Supplier Take reputation, experience, and client feedback into consideration when choosing a service provider in Stockholm for iPad maintenance, laptop repairs, or Mac repairs. With each service, authorized service centers and licensed experts put the needs of their clients first, guaranteeing peace of mind through high-quality repairs.
0 notes
Text
Bulk Buying IT Hardware: Key Considerations for Small Business Owners
In today’s rapidly evolving tech landscape, small businesses face the crucial task of balancing cost-efficiency with operational efficiency. One strategy that many savvy small business owners are adopting is bulk buying IT hardware. Purchasing hardware in larger quantities can offer significant savings and ensure consistency across your tech ecosystem. However, bulk buying is not without its challenges. Here’s a comprehensive guide to help you navigate the process effectively.
1. Assess Your Current and Future Needs
Before diving into bulk purchases, it’s essential to evaluate both your current and future IT needs. Consider the following:
Current Inventory: Take stock of your existing hardware. Identify what needs upgrading, replacement, or expansion. Growth Projections: Estimate your business’s growth over the next few years. This includes hiring plans, expected increase in workload, and potential expansion into new markets or locations. Technology Trends: Stay updated on emerging technology trends that could impact your hardware needs. For example, advances in artificial intelligence or cloud computing might necessitate more powerful or specialized equipment.
Understanding these factors will help you determine the quantity and types of hardware you need, ensuring that your bulk purchases align with your business strategy.
2. Evaluate Vendor Options
Choosing the right vendor is crucial for a successful bulk purchase. Consider the following when evaluating vendors:
Reputation: Research vendors’ reputations through reviews, ratings, and testimonials. Opt for vendors known for reliability and good customer service. Pricing Structure: Compare prices across different vendors. Some may offer better deals for bulk purchases or additional discounts for loyal customers. Warranty and Support: Ensure that the vendor provides robust warranty options and responsive customer support. This can save you time and money in case of hardware issues.
It’s also wise to check if the vendor offers post-purchase support, such as setup assistance or troubleshooting guidance.
3. Negotiate Bulk Discounts
One of the key benefits of buying in bulk is the potential for significant cost savings. Don’t hesitate to negotiate for better rates or additional perks. Here are some tips:
Volume Discounts: Ask about discounts for purchasing larger quantities. Many vendors offer tiered pricing, where the cost per unit decreases as the quantity increases. Bundled Offers: Explore bundled offers where hardware is sold as a package deal. This can sometimes result in a lower overall cost compared to buying items separately. Long-Term Agreements: If you anticipate ongoing hardware needs, consider negotiating a long-term agreement with the vendor. This can lead to more favorable terms and discounts.
4. Consider Storage and Management
Bulk buying means you’ll need to store and manage a larger inventory of hardware. Ensure you have adequate storage facilities and management processes in place:
Storage Conditions: Proper storage is crucial to prevent damage. Ensure that your storage area is climate-controlled and free from dust and moisture. Inventory Management: Implement an inventory management system to track your hardware. This helps in monitoring stock levels, managing warranties, and planning future purchases.
Effective inventory management will not only help you keep track of your hardware but also streamline your operations and reduce the risk of over-purchasing or under-purchasing.
5. Plan for Deployment and Integration
Bulk buying can lead to challenges in deploying and integrating new hardware. Consider the following:
Deployment Strategy: Develop a clear deployment plan that outlines how and when the new hardware will be distributed and installed. This helps minimize disruptions to your daily operations. Integration with Existing Systems: Ensure that new hardware is compatible with your existing IT infrastructure. This might require coordination with your IT team or a third-party IT service provider.
Having a well-defined deployment and integration plan will help you make the most of your bulk purchase and ensure a smooth transition.
6. Account for Total Cost of Ownership
While bulk buying can reduce the upfront cost of IT hardware, it’s essential to consider the total cost of ownership, which includes:
Maintenance Costs: Factor in the cost of maintaining and servicing the hardware over its lifespan. Energy Consumption: Consider the energy consumption of the hardware and its impact on your utility bills. Training: Budget for any training that might be necessary to ensure your team can effectively use and manage the new hardware.
Understanding the total cost of ownership helps you make more informed decisions and avoid unexpected expenses.
7. Stay Compliant with Regulations
Depending on your industry, there may be specific regulations regarding IT hardware. Ensure that your bulk purchases comply with relevant standards and regulations, such as data protection laws or industry-specific requirements.
Data Security: Ensure that your hardware meets data security standards to protect sensitive information. Environmental Regulations: Be aware of any environmental regulations related to the disposal and recycling of IT hardware.
Compliance with regulations helps mitigate risks and ensures that your business operates within legal and ethical boundaries.
8. Review and Adjust Your Strategy
After making a bulk purchase, review the process and outcomes. Analyze what worked well and what could be improved. Adjust your bulk buying strategy based on this feedback to optimize future purchases.
Feedback from Team: Gather feedback from your IT team and end-users regarding the new hardware. This can provide valuable insights into performance and usability. Cost Analysis: Assess the actual savings achieved compared to your initial expectations.
Regularly reviewing and adjusting your strategy helps refine your approach and maximize the benefits of bulk buying.
Conclusion
Bulk buying IT hardware offers significant advantages for small business owners, including cost savings and improved efficiency. However, it requires careful planning and consideration of various factors. By assessing your needs, evaluating vendors, negotiating discounts, managing storage, planning deployment, accounting for total cost of ownership, ensuring regulatory compliance, and reviewing your strategy, you can make informed decisions and leverage bulk purchasing to enhance your business operations. With the right approach, bulk buying can be a powerful tool in achieving your business goals and staying competitive in a fast-paced technological world.
Want to buy IT hardware components in bulk from Vstl?
If you’re planning to buy IT hardware components in bulk from VSTL, start by researching their product offerings and evaluating bulk pricing options. Contact VSTL for a detailed quote and negotiate for discounts or additional perks. Ensure you understand their bulk purchase terms, including warranty, support, and return policies. Plan for proper storage and logistics, and coordinate the deployment of new hardware with your IT team. Monitoring the delivery and reviewing hardware performance post-purchase will help you optimize your investment and address any issues promptly.
Bulk Supplier & Exporter of Laptops, CPUs, SSDs, and RAMs
0 notes
Text
System Monitoring and Performance Tuning in RHEL
Red Hat Enterprise Linux (RHEL) offers a variety of tools and best practices to monitor and optimize system performance. Here's a guide to help you get started with system monitoring, identifying performance bottlenecks, and tuning your RHEL system for optimal performance.
Monitoring System Performance with Built-in Tools
top: Displays real-time system summary information, including CPU usage, memory usage, and process information.
Command: top
htop: An enhanced version of top with a more user-friendly interface and additional features.
Install: yum install htop
Command: htop
vmstat: Reports information about processes, memory, paging, block IO, traps, and CPU activity.
Command: vmstat 1
iostat: Monitors system input/output device loading to help identify performance issues related to storage.
Install: yum install sysstat
Command: iostat
mpstat: Reports CPU statistics.
Install: yum install sysstat
Command: mpstat
sar: Collects, reports, or saves system activity information.
Install: yum install sysstat
Command: sar
free: Displays the amount of free and used memory in the system.
Command: free -m
netstat: Provides network-related information, including active connections and listening ports.
Command: netstat -tuln
ss: Another tool for examining network sockets and connections.
Command: ss -tuln
dstat: Combines the functionality of vmstat, iostat, netstat, and ifstat.
Install: yum install dstat
Command: dstat
Identifying and Resolving Performance Bottlenecks
CPU Bottlenecks:
Use top, htop, mpstat, and sar to monitor CPU usage.
Look for processes consuming high CPU and consider renicing or killing them if necessary.
Check for excessive context switching or CPU waits
Memory Bottlenecks:
Use free, vmstat, and sar to monitor memory usage.
Identify processes consuming large amounts of memory and consider optimization or additional hardware.
Monitor swap usage; excessive swapping indicates a need for more physical memory.
Disk I/O Bottlenecks:
Use iostat, vmstat, and sar to monitor disk I/O performance.
Look for high I/O wait times and high utilization of disk devices.
Consider using faster storage, RAID configurations, or optimizing disk-intensive applications.
Network Bottlenecks:
Use netstat, ss, and sar to monitor network performance.
Identify high network usage or dropped packets.
Optimize network configurations, upgrade network hardware, or balance the load across multiple interfaces.
Best Practices for Optimizing RHEL Performance
Regular Monitoring:
Set up regular monitoring and alerting using tools like Nagios, Zabbix, or Prometheus.
Review performance logs periodically to identify trends and potential issues.
Resource Allocation:
Ensure appropriate allocation of CPU, memory, and disk resources based on the workload.
Use cgroups to limit resource usage of processes and containers.
Kernel Tuning:
Tune kernel parameters using sysctl based on the workload requirements.
Example: Increase file descriptor limits for high-load web servers.
Command: sysctl -w fs.file-max=100000
Application Tuning:
Optimize applications for better performance.
Example: Configure web server settings for optimal concurrency and caching.
Regular Updates:
Keep the system and applications updated to benefit from performance improvements and bug fixes.
System Configuration:
Optimize system configurations, such as filesystem mount options and network settings.
Example: Use noatime mount option for filesystems to reduce disk I/O.
Capacity Planning:
Plan for future growth by regularly reviewing resource usage and projecting future needs.
Ensure the infrastructure can scale to meet increasing demands.
By utilizing these tools and best practices, you can effectively monitor and optimize the performance of your RHEL system.
#redhatcourses#information technology#container#containerorchestration#kubernetes#linux#containersecurity#docker#dockerswarm#aws
0 notes
Text
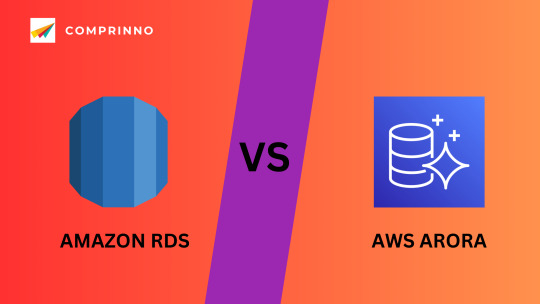
Pick Your Perfect Match: Aurora vs RDS - A Guide to AWS Database Solutions
Now that Database-as-a-service (DBaaS) is in high demand, there are multiple questions regarding AWS services that cannot always be answered easily: When should I use Aurora and when should I use RDS MySQL? What are the major differences in Aurora as well as RDS? What should I consider when deciding which one to choose?
The blog below we'll address all of these crucial questions and bring an overview of the two database options, Aurora vs RDS.
Understanding DBaaS
DBaaS cloud services permit users to access databases without configuring physical hardware infrastructure, or installing software. However, when figuring out which option perfect for an organization, diverse factors should be taken into account. They could include efficiency, operational costs, high availability and capacity planning, management, security, scalability, monitoring and more.
There are instances when, even though the work load and operational demands appear to perfect match to one solution however, there are other factors that could cause blockages (or at least require specific handling).
What we need to compare are those of the MySQL and Aurora database engines that are offered through Amazon RDS.
Download our ebook, “Enterprise Guide to Cloud Databases” to benefit you make better informed choices and avoid costly errors when you design and implement your strategy for cloud.
What is Amazon Aurora?
Amazon Aurora is a proprietary cloud-native, fully-managed relational database service created through Amazon Web Services (AWS). It supports MySQL and PostgreSQL and its automatic backup and replication capabilities, it is built to offer high performance as well as scalability and availability to support the requirements of critical applications.
Aurora Features
High Performance and Scalability
Amazon Aurora has gained widespread praise for its remarkable performance and scalability. This makes it a perfect solution to handle the demands of high-demand tasks. It efficiently handles the write and read operations, optimizes access to data and reduces contention which payoff in rapid throughput and low delay for you to assure that applications run to their desirable.
Aurora offers a range of options for scaling, such as the ability the addition of up 15 read replicas within one database cluster and the auto-scaling to read replications the development of read replicas across regions for disaster recovery, and enhanced read performance across different geographical locations, and auto-scaling for storage that can handle growing data without needing continuous monitoring.
Support for MySQL as well as PostgreSQL
Aurora provides seamless compatibility to MySQL and PostgreSQL that allows users and DBAs to use their database abilities and make use of the latest capabilities and improvements.
If you have applications developed using MySQL or PostgreSQL moving to Aurora is an easy process with minimal code modifications, because it works with the same protocols, tools and drivers.
Automated Backups and Point-in-Time Recovery
Aurora offers automated backup and point-in-time recovery that simplifies the management of backups and protecting data. Backups that are continuous and incremental are created automatically and then stored in Amazon S3, and data retention times can be set to satisfy compliance requirements.
The point-in-time recovery (PITR) feature enables the restoration of a database to a specific time within the set retention period, making it easier to roll the application back to a specific state or recover from accidental/purposeful data corruption.
Automated features lessen the workload on DBAs as well as organizations with their efforts to protect data by easing backups of databases and recovery.
Multi-Availability Zone (AZ) Deployment
Aurora’s multi-availability zone (AZ) deployment provides remarkably high reliability and resilience to faults by automatically replicating information across numerous accessibility zones together it’s distributed storage system to remove single point of failure. The constant synchronization between replica and primary storage ensures continuous redundancy. In the event of an interruption occurs within the main, Aurora seamlessly switches to the replica using automated failover to ensure continuous availability.
What is Amazon RDS?
Amazon Relational Database Service (Amazon RDS) is a cloud-hosted database service that offers diverse database options to pick from, such as Aurora, PostgreSQL, MySQL, MariaDB, Oracle, and Microsoft SQL Server.
RDS Features
Managed Database Service
Amazon RDS is a fully-managed database service that is provided by AWS and offers a simple approach to manage and maintain relational databases hosted in the cloud. AWS manages the essential administrative tasks such as database configuration, setup backups, monitoring and scaling. It makes it simpler for companies to manage their complex databases.
By delegating these administrative duties by delegating these administrative tasks to AWS, DBAs, and developers are no longer required to devote time to tedious tasks such as software installation and hardware provisioning, giving them time to focus on more business-oriented processes while also reducing expenses.
Multiple Database Engine Options
Amazon RDS supports various database engine options, such as MySQL, PostgreSQL, Oracle and SQL Server. This gives organizations the freedom to select the appropriate engine for their particular needs. With these choices, Amazon RDS empowers developers to adapt your database architecture to meet the unique requirements of their apps performance requirements, performance expectations, and compliance requirements, while ensuring that the database is compatible and efficient across all businesses.
Offering a simple method of migrating databases that are already in use, RDS allows for a variety of migration options that include imports of backup data from existing backups, and using AWS Database Migration Services (DMS) to enable real-time data migration. This flexibility lets businesses effortlessly move their databases into the AWS cloud without causing significant disruptions.
Automated Backups and Point-in-Time Recovery
Amazon RDS offers an automated backup feature to ensure the integrity of data and offers reliable protection for data. It takes regular backups, and captures small changes from the previous backup without affecting the performance. Users can choose the time frame for these backups. This allows the recovery of historical data in the event an accidental loss of data or corruption. Point-in-time recovery (PITR) permits users to restore the database at any time within the specified time. This is a great feature in reverting back to a prior state, or to repair damage caused by data or other occurrences.
Its RDS automatic backup as well as PITR features ensure that data is not lost and protect against system failures, providing the highest level of availability and performance, while making backup management easier for developers as well as DBAs.
Scalability and Elasticity
Amazon RDS offers several scalability options to allow organizations to adjust resources to accommodate changing applications and workload requirements. Vertical scaling permits for an increase in compute and memory capacity by upgrading to higher-end instances that are perfect for handling large demand for processing or traffic and horizontal scaling entails creating read replicas that distribute the workload across different instances, increasing the read scalability of applications that are heavy on reading.
RDS additionally simplifies the process of automatically scaling depending on demand for workloads by adding or subtracting replicas in order to efficiently divide read requests and decrease cost during periods of low demand. It also allows auto-scaling of storage and compute resources, adjusting capacity dynamically in accordance with the chosen thresholds for utilization to improve performance and decrease cost.
The ability to alter resources in response to changing demands gives organizations the capability to react quickly to fluctuations in demand without having to manually intervene — while still optimizing performance and decreasing costs.
Examining the similarities between Aurora vs RDS
If you compare Amazon Aurora and Amazon RDS It is clear that both provide advantages in time-saving administration of systems. Both options let you get a pre-configured system ready to run your apps. Particularly, in the absence of special database admins (DBAs), Amazon RDS offers a wide range of flexibility for different processes, such as backups and upgrades.
Amazon Aurora and Amazon RDS both Amazon Aurora and Amazon RDS offer continuous updates as well as patches that are applied by Amazon without interruption. You can set maintenance windows that allow automated patching to take place within these time frames. Furthermore, data is constantly stored on Amazon S3 in real-time, protecting your data without visible effect on performance. This means that there is no necessity for complex or scripted backup processes and defined backup windows.
Although these shared features provide significant benefits, it’s crucial to take into consideration potential issues like vendor lock-in, and the potential issues that result from enforced updates as well as client-side optimizations.
Aurora RDS RDS The key differences
In this article we will examine the distinct features and characteristics in Amazon Aurora along with Amazon RDS in addition to shedding light on their efficiency, scalability and pricing strategies, and so on.
Amazon Aurora is an open-source, relational closed-source database engine that comes and all the implications that it brings.
The RDS MySQL can be 5.5, 5.6, and 5.7 compatible, and provides the choice to select between minor versions. Although RDS MySQL supports numerous storage engines with different capabilities but not all are designed for recovery from crashes and long-term data protection. It was until recently an inconvenient fact to the extent that Aurora wasn’t compatible only with MySQL 5.6 however, the software is compatible now with MySQL 5.6 and 5.7 too.
In most instances, no major application modifications are needed to either of the products. Be aware that some MySQL features, such as those of the MyISAM storage engine aren’t available in Amazon Aurora. The migration to RDS is possible with the comprinno program.
For RDS products Shell access to the operating system in question is blocked, and access for MySQL user accounts that have access to the “SUPER” privilege isn’t allowed. To manage MySQL parameters or control users Amazon RDS provides specific parameters, APIs and other procedures for the system that are utilized. If you are looking to allow Amazon RDS remote access, this article can benefit to do it.
Considerations regarding performance
For instance, because of the requirement for disabling in the case of InnoDB changes buffer in Aurora (this is among the key components for this distributed storage system) and the fact that updates to secondary indexes need to be write-through, there’s an enormous performance hit when heavy writes which update the secondary indexes is performed. This is due to the method MySQL depends upon the buffer to delay and combine second index update. If your application has frequent updates to tables that have primary indexes Aurora speed may prove low. As you might have seen, AWS claims that the query_cache feature is a viable option and does not have issues with scalability. Personally, I’ve never had any issues with query_cache and the feature is able to greatly rise the overall performance.
In any event it is important to be aware that performance varies based on the schema’s design. When deciding to move, performance must be compared against the specific workload of your application. Conducting thorough tests will become the topic of a subsequent blog article.
Capacity Planning
In terms of storage under the hood Another factor to take into account is Aurora storage, there is no requirement for capacity planning. Aurora storage will grow automatically by a minimum of 10GB to 64 TiB in increments of 10GB without affecting the performance of databases. The limit on table size is only limited in relation to the volume of Aurora database cluster, which can reach an maximum capacity size of 64 Tebibytes (TiB). Therefore, the maximum size of a table for a table within the Aurora database will be 64 TiB. For RDS MySQL the maximum allocated storage limit limits the table’s size to a maximum that is 16TB when with InnoDB tablespaces that are file-per-table.
In the case of RDS MySQL, there has recently been added a brand-new function, known as storage autoscaling. Once you have created your instance you are able to enable this option which is somewhat similar to Aurora’s features. Aurora provides. More details are available here..
In August 2018. Aurora offers a second opportunity that does not need provisioned capacity. It’s Aurora Serverless.
“Amazon Aurora Serverless is an on-demand, auto-scaling configuration for Amazon Aurora (MySQL-compatible and PostgreSQL-compatible editions), where the database will automatically start up, shut down, and scale capacity up or down based on your application’s needs. It allows you to manage your database on the cloud, without having to manage all instances of your database. It’s an easy, affordable feature for occasional, irregular or unpredictably heavy work. Manually managing the database’s capacity can consume time and could result in inefficient utilization of the database’s resources. With Aurora Serverless It is as easy as create an endpoint for your database, indicate the desired capacity range, then connect your applications. The cost is per second basis for the capacity of your database that you utilize as long as the database is running and you can switch between serverless and standard configurations by a few clicks from the Management Console for Amazon RDS.”
0 notes