#and my first time using prusa slicer
Explore tagged Tumblr posts
Visit Tumblr Blog
Explore Tumblr blogs with no restrictions, modern design and the best experience.
Last Seen Tumblr Blogs


Fun Fact
Tumblr.com is the 103rd most visited website in the world.
Text


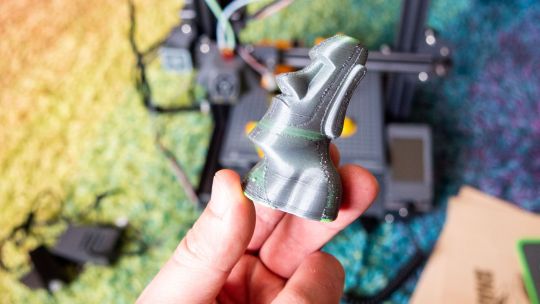
IM DOING IT!!!! YEAHH!!!!
#AND SOME OF THESE!!!! AND SOME OF THESE!!!!! /ref#I hope the print turns out alright#it’s my first time slicing a model into separate pieces#and my first time using prusa slicer#and my first time printing my own head base#right now only the beak is printing#my cat is trying to get into the studio. she wants to nap the printer so damn bad#too bad she can’t open doors 👍#fursuit making#or at least I’m trying out here man. it’s been a hot minute#also I got the head base files on Etsy and they look so good#I hope my printer does them justice 🙏
2 notes
·
View notes
Text
How 3D Printing Can Boost Learning?
"Simply put, creation is an act of will." This Jurassic Park remark has never been more relevant than it is now, thanks to technology. The use of 3D printing and computer-aided design (CAD) in the classroom enables pupils to create like never before. A young industry, 3D printing has the ability to "print" everything from houses to cars to household products and much more.
Teachers may use this new technology to smoothly incorporate STEM into any classroom while also engaging students with their state standards in fresh and interesting ways. My students and I have grown to enjoy the 3D printer I got for my school because it improves lessons and fosters classroom community.
Community in the classroom and 3D printing
By providing incentives and fostering relationships with the students, my Prusa MINI 3D printer improves the classroom environment. After a class change, when I enter the room, I frequently notice children gazing intently at the 3D printer while it works. After finishing a unit of study in my social studies class, we play review games like Kahoot, Quizz, and Jeopardy. I 3D-printed Baby Yoda, the Ammit statue from Moon Knight, and different reptiles, for instance, for the Kahoot winners.
Almost anything with Dwayne Johnson's face is a student favourite. Dwayne Johnson's face has been affixed to various objects on the website Thingiverse, including a squirrel, a Tyrannosaurus rex (referred to as T-Rocks), a hawk, an octopus, etc. Despite how absurd it may appear, students adore it.
These 3D printed items can be given as rewards to every student, not only Kahoot contest winners. Students may receive a Dwayne Johnson face reward if they are behaving well, going through a difficult time, participating in class discussions when they ordinarily don't, or showing up on time.
With rewards in mind, 3D printing can strengthen relationships with pupils. For me to print, several students have used Thingiverse or produced their own 3D models. For instance, a student discovered a 3D skink item at her house, which also happened to be one of her pets. I printed the file for her after she sent it to me. She was thrilled when I gave her the skink because it was something incredibly easy for me to do. Another kid wanted to print a mallard, so he located the file, emailed it to me, and we all put it on the 3D printer together.
We have been publishing many anime-related items because many pupils are anime fans. The likelihood that my pupils will work harder in class increases if we can collaborate and interact positively.
IMPROVE LEARNING WITH 3D PRINTING
Beyond being entertaining, 3D printing has significant implications for boosting teaching and improve students' overall learning experiences. This covers both routine tasks and more substantial project-based learning (PBL) units. Students in my U.S. history class utilised Tinkercad to create a Monopoly piece to use when they play the board game as part of a subject on the Gilded Age.
The correct file type (.stl) was exported when students finished designing their 3D Monopoly component. Supports were then placed in a slicer tool that produced a g-code file, and the g-code file was then uploaded to the 3D printer. Support is added to assist prevent print jobs from failing. The moment the pupils held something they had created in their hands after printing, which can often take eight to ten hours, they were overjoyed.
PBLs can also be built using the technology of 3D printing. We've finished two PBLs in my class that involved 3D printing. In the first, students had to create a bridge that was as light as feasible while yet being able to support the required weight. The bridges were created by the students, printed, and tested using a small concrete weight. Following that, students returned to Tinkercad and continued to fiddle with their bridge in an effort to make it lighter and lighter.
The second PBL involves creating and printing a tool to assist an elderly person or a person with a disability. The task for the class was to design for a real individual. To continue brushing his own teeth despite having arthritis in his fingers, one student's granddad was given a toothbrush holder that fit around his wrist. Both of these PBLs used 3D printing to encourage students to think practically and with empathy.
I've discovered that 3D printing significantly improves the learning environment in the classroom, whether the objects are utilised as incentives or in courses to increase student engagement. According to my observations in social studies classes in high school, pupils really enjoy it. I would consider that a victory if it were the only thing they were anticipating that day.
And applications for 3D printing in high school classes are just getting started. Science, math, and culinary arts could all benefit in some way from 3D printing. Students' imaginations can be sparked and the process of creating can become more tangible thanks to 3D printing.
0 notes
Text
January 27 3D Printing and 3D Modeling
Everything about today’s lecture was completely new to me. I did know about 3D printers and seen what they can do, but absolutely nothing about how. So the first thing I learnt was the extension of the files you need to create to later print: STL. To create an STL file there are plenty of programs, but as Johannes said, it does not matter what program I use, any will do. The aim with the lecture was just to let us know how we can design for printing.
Since I have a special interest in games and even to develop games in the future, it caught my attention the program 3Ds Max, which is mostly used for gaming 3D modeling, and this program can also export STL files.
The lecture continued with some examples of different programs and different printers, with special notion on the fact that what matters is to approach them as a designer and to make sure we know what we want to do.

(photo: printing demonstration in class)
The different materials that can be used, the different plastics and their pros and cons were also addressed. PLA presented among them as environmental friendly although less flexible and light sensitive.
We were presented an example of a 3D model imported to the Prusa Slicer program to explain some of the options and technical aspects. Is important that we keep in mind the layers per mm, so the thickness is correct for what we need, and also for the time it requires to print and the quality of detail and finish.

(photo: sample of the printing demonstration)
0 notes
Text
Lotmaxx SC-10 Shark Review: Reliable 3D Printer for Beginners, But Maybe Skip the Upgrades
Lotmaxx SC-10 Shark
9.00 / 10
Read Reviews
Read More Reviews
Read More Reviews
Read More Reviews
Read More Reviews
Read More Reviews
Read More Reviews
Read More Reviews
Read More Reviews
Read More Reviews
Read More Reviews
Read More Reviews
Read More Reviews
Read More Reviews
Read More Reviews
Read More Reviews
Read More Reviews
Read More Reviews


Shop Now
The Lotmaxx SC-10 Shark is an incredibly well-built and reliable printer out of the box, which makes it perfect for beginners. With easy to use features like a flexible heated build plate and handheld touchscreen, in my experience, there were zero tweaks required to get amazing prints. That's an incredible achievement for any printer, let alone one at this price point. I've tried a lot of 3D printers over the years, and almost none of them have "just worked". Full marks for the core package.
Specifications
Brand: Lotmaxx
Build Volume: 9.25x9.25x10.4 inches (235x235x265mm)
Printing Accuracy: 0.1-0.4mm
Connectivity: MicroSD, USB
Heated Build Plate: Yes, flexible and removable too
Feed Type: Bowden tube
Dimensions: 17x18.3x19.21 inches (443x466x488mm)
Weight: 18.5lbs (8.4kg)
Dual-Color Printing: Optional upgrade
Pros
Fantastic quality prints out of the box, no tweaking required
T-slot metal chassis is solid and well built
Detachable screen for convenience
Heated, removable, flexible print bed
Cons
Bi-color printing adds too much complexity, wastage, and failure rates for beginners
Auto-leveling upgrade is temperamental
Laser engraving prints line by line
Messy wiring once you add in any of the upgrade modules
Buy This Product
Lotmaxx SC-10 Shark other
Shop
// Bottom var galleryThumbs1 = new Swiper('.gallery-thumbs-1', { spaceBetween: 10, slidesPerView: 10, freeMode: true, watchSlidesVisibility: true, watchSlidesProgress: true, centerInsufficientSlides: true, allowTouchMove: false, preventClicks: false, breakpoints: { 1024: { slidesPerView: 6, } }, }); // Top var galleryTop1 = new Swiper('.gallery-top-1', { spaceBetween: 10, allowTouchMove: false, loop: true, preventClicks: false, breakpoints: { 1024: { allowTouchMove: true, } }, navigation: { nextEl: '.swiper-button-next', prevEl: '.swiper-button-prev', }, thumbs: { swiper: galleryThumbs1 } });
Easy to use, good quality prints, reasonably priced: pick any two when it comes to 3D printers.
At least, that used to be the case. The Lotmaxx SC-10 Shark doesn't compromise on build quality, yet it's also easy to use, works out of the box for reliable prints, and is very reasonably priced. It even has a selection of upgrades available, able to turn it into a dual-color extruder, or even a laser engraver.
youtube
Initial Impressions and Design
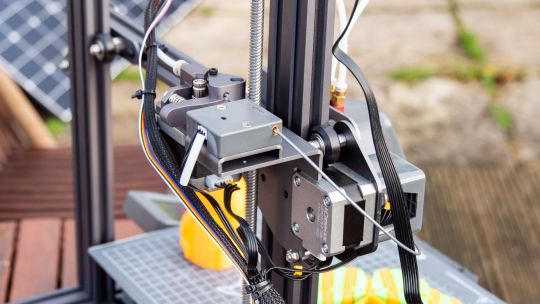
Arriving somewhat flat-packed, you'll need to spend a good half hour or so putting together the SC-10 Shark before first use. This isn't as bad as it sounds; it's certainly not what I'd call a DIY kit. Construction amounts to bolting on the upright gantry, as well as the spool holders, and screen. An extensive set of tools are provided, as well as a replacement Bowden tube, clippers, and scraper. Everything you could possibly need to get started printing is included, including some sample filament.
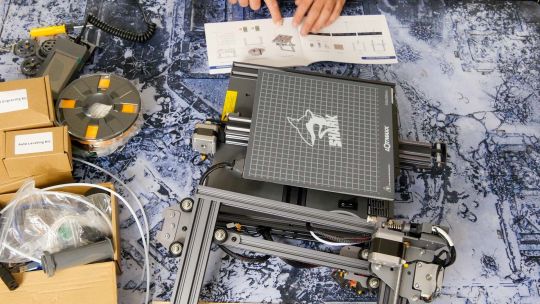
The component quality of the SC-10 is a class above most printers, with an all-metal T-slot chassis and injection molded plastic parts. It looks and feels premium, and solidly built. Whether that translates to good quality prints is another matter.
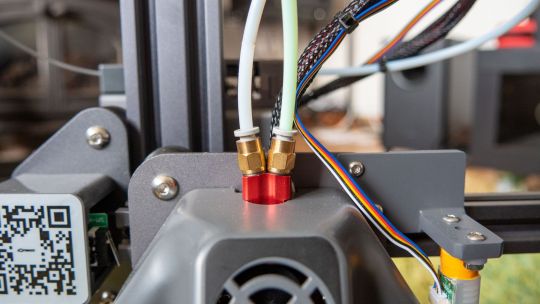
The core design is that of an Ender 3 clone, with a Bowden tube feeding the filament into the print head. A filament feed sensor ensures that running out of filament mid-print will pause and alert you to change it.
While the filament sensor is a useful touch, I admit I'm not a fan of the Bowden tube. The interface of the printer means that changing the filament requires pressing the same button about thirty times in order to move the filament 10mm at a time until it leaves the tube. A direct-drive extruder located directly on the print head is much easier, but this is a minor complaint.
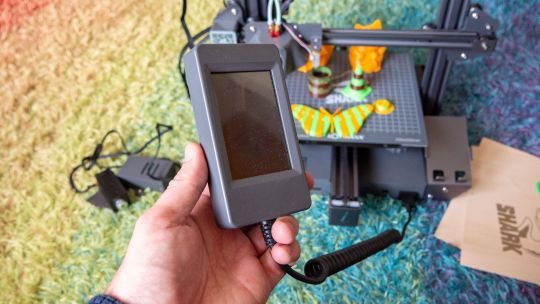
A large, removable full-color touchscreen can be found on the right-hand side, with a coiled cable which means you can manipulate the screen from anywhere within about a foot radius. Although this sounds like a small point of note in the hardware specs, I found it to be surprisingly useful, especially when you've got the printer perhaps pushed off to the back of your desk, or in a cabinet. The interface is a little slow, however, and could probably have simplified into a monochrome scheme to speed up processing.
You can transfer Gcode to the printer using a micro-SD card. Although USB printing is supported, it's not recommended from a PC, and I have yet to see any official support for Octoprint.
Particularly useful for beginners is the heated and removable flexible build plate. A heated build plate helps with first layer adhesion, which means fewer failed prints. Removing prints is effortless: just pull off the magnetically attached steel build plate, and bend it slightly to release the print. Scrape off any residue using the supplied scraper.
Lotmaxx SC-10 Shark: First Print
Before getting started with your first print, you'll need to manually level the print bed using four large dials located underneath. Select the leveling process from the settings menu, and place a sheet of paper on the print bed. Tap each leveling point in turn, and adjust the dial until you can start to feel some friction on the paper between the nozzle and the build plate. Repeat until it feels the same at all five points.
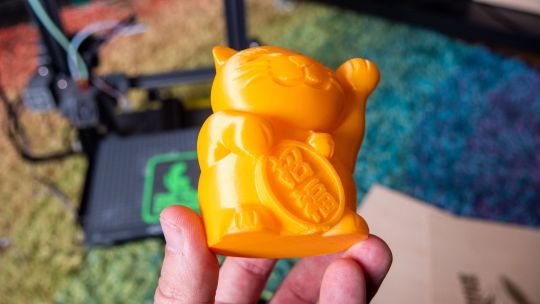
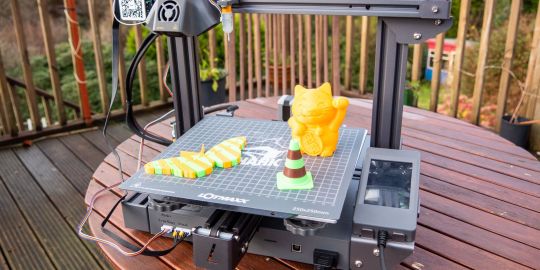
My first print was using the supplied test Gcode: a lucky cat. I'm pleased to report it worked the first time, with good adhesion and fast printing speed. While there is a slight issue with a drooping overhang under the right paw, it's still incredible quality for a first print, and these could easily be fixed by slowing it down.
What really surprised me was how incredibly quiet it was when printing. When idle, the fan noise is audible but easily ignored; but when printing starts, you could be in the same room and not actually know it's on. This is in sharp contrast to my aging Prusa Original mkII, which the entire house is aware of. The combination of solid metal frame, powerful stepper motors, and good quality stepper driver chips are what makes this possible. I would happily put the Lotmaxx SC-10 Shark in my office or bedroom while it prints.
Slicing Models
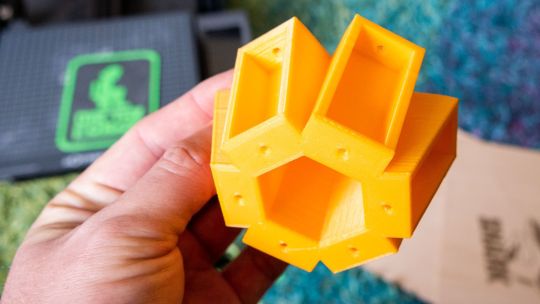
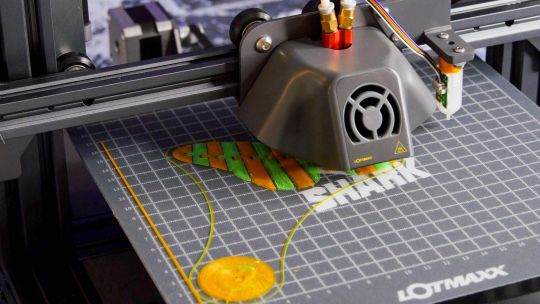
Lotmaxx provides custom software for slicing; it appears to be a modified version of Cura. Though I'm more familiar with Slicr, it feels easy enough for beginners and pros alike, displaying all the features I'd expect in an accessible way. There's a variety of quality presets, or you can delve into the individual parameters and create your own custom profiles. Slicing a downloaded STL file (for a 2V geodesic dome) was effortless, and again, produced a fantastic quality print with no failures. Printed at a slower speed than the lucky cat, there were no bridging issues at all.
There's no reason you can't use your own favorite slicing software, of course—the printer uses standard Gcode, and the settings can be taken from the device profile. But for beginners, I'd recommend just using the Lotmaxx software until you're more comfortable.
There's another reason to use the supplied software: if you purchased the laser engraving upgrade, the design software to produce laser Gcodes is integrated. Unlike 3D object slicers, I'm not aware of any third-party software that can handle this. Which brings us neatly onto the first upgrade available for the Lotmaxx SC-10 Shark.
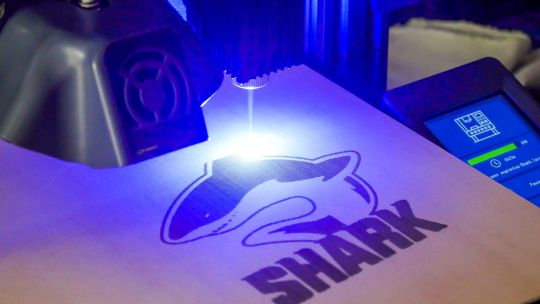
Laser Engraving Module
The laser engraver is the easiest module to install, requiring only a few bolts to secure it to the right-hand side of the standard 3D print head. Once plugged in (to the front of the machine), the printer will automatically recognize it should switch over to Laser mode, without any firmware modifications or settings being changed. The interface adjusts accordingly, and you'll be able to select your laser Gcode for printing.
Use the clips provided to attach your print surface securely to the build plate. Since the engraver module is attached to the right of the print head, the actual area available to print on is less than the full build plate; roughly two-thirds the size, but this is still plenty big enough for most purposes. MAke sure you're wearing the provided safety goggles, then activate the laser and use a combination of the Z-axis and manually adjusting the focus dial on the laser module until the laser beam is focussed. Then you can start printing your design.
While it's generally safe to leave a 3D printer to its get on with its business thanks to thermal safety features, burning wood and other materials with a high-powered laser is another matter. Do not leave the machine unattended when printing in this mode.
Unfortunately, my results with the laser engraver were disappointing. Rather than treating outlines as a continuous movement then filling in the middle (as it would when 3D printing), the laser engraver prints line by line, like an inkjet. It looks quite terrible and ruins the utility of the module for me. The hardware is obviously capable of much better, so either I'm doing something completely wrong that isn't well explained in the manual, or it can be fixed with a software update.
Auto-Leveling
The second upgrade you can purchase with the SC-10 is the auto-leveler, a 3D Touch module. This is a small, physical probe that drops down, touches the print bed, then retracts. It's an inexpensive module, but in my experience, wasn't worth the hassle.
The auto-leveler attaches in much the same way as the laser engraver and also plugs in around the front of the machine. Unlike the laser module, you'll need to modify the firmware configuration file in order to make use of it, as well as change the Gcode start settings found in the slicing software.
Though I did manage to get one successful print having installed the auto-leveler, subsequent attempts sent the print head crashing into the bed. After much experimentation, I found the BLTouch seemingly requires the print bed to be manually leveled first, which somewhat defeats the purpose of an auto-leveling mechanism.
At this point, I was also frustrated with the lack of live Z-adjustment. Live Z-adjustment means that you can move the print head up and down even when the print process has started, so it's easy to back off or add a little more squish for the first layer, as needed. If you've manually leveled the bed anyway, this generally isn't needed, since it's already tuned to a paper thickness. But every time using the auto-leveler, I found I needed to tweak it slightly. Which again, involves the manual dials underneath the bed.
This is the first time I've used a 3D Touch probe, and I hope it's the last. The PINDA inductive probe method used by Prusa is more reliable and is able to adjust for all manner of warped beds without any manual intervention.
So despite being an inexpensive upgrade, I just wouldn't bother with the auto-leveler. Out of the box, manual leveling works just fine.
Bi-Color Printing with a Dual Extruder
The final upgrade you can purchase for the SC-10 Shark is the most complex to install, and most impressive—if you can get it working right.
Printing in multiple filaments takes the creative possibilities of a 3D printer to a whole other level. As well as multiple colors, you can print more complex objects thanks to water-soluble support structures.
The dual-extruder upgrade on the Lotmaxx SC-10 involves completely disassembling the print head and replacing the hotend. You'll then have two Bowden tubes to deal with. You'll also need to fit a second extruder motor, sensor, and filament holder onto the gantry, and remove the base of the printer to install a driver chip. And there'll be more cables to route, which again, plug in at the front of the machine. It took me at least an hour, and I'm fairly certain I broke the single-color hotend in the process, thanks to an uncooperative Bowden tube clip.
When you're finished, it's a little messy, if I'm honest. While I can deal with a dangling cable for the temporary use of a laser engraver, once you add in an auto-leveler and second extruder, the neatly wrapped cabling and overall aesthetics of the printer are ruined.
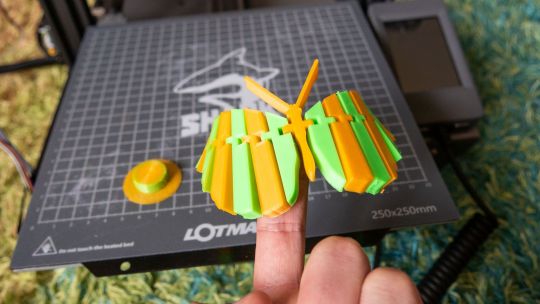
After again altering the firmware configuration file and printer profile settings, the test print turned out great. It's a beautiful two-color cone, it really is. But one thing you should know about bi-color printing from a single print head is that getting defined colors like that requires cleaning the hotend at each color change. The print head moves off to the side, squirts a bit out into a column of waste, then carries on. To produce that one lovely test cone required an equally large column of waste.
Perhaps this is a non-issue if you're printing an entire plate full of beautifully bi-color cones. Wider, flatter models produce comparatively less waste, for sure. But I have to ask if it's worth it. You can turn off the column of cleaning waste if you want, but the results are terrible; you can see below how the bi-color effect is ruined, and you'll get "bobbling" where it tries to change colors anyway.
Unlike some printers, the Sc-10 Shark can't mix colors. Attempting to push the other filament in at the same time doesn't work, and you'll hear the extruders clicking as the filament jams. This means that before each print you'll need to ensure both filaments are retracted about 1cm into the Bowden tube. This isn't an automatic process, so you have raise the hotend temperature first, then retract each extruders. It's even trickier with lighter colors filaments as the tube is opaque white, so you may need to use a smartphone flashlight to shine through the tube.
You should also know that designing a two-color print requires two models. You'll need to load both models in, hope they align, assign each to the respective print head, then merge them. There are comparatively few ready-made bi-color models available in this format for you to download.
Although the results are impressive, the additional wasted plastic, slicer complications, and inability to color mix filaments inside the hotend mean that you need significantly higher levels of patience to get good results. Once I swapped over to the dual-color system, my failure rate skyrocketed.
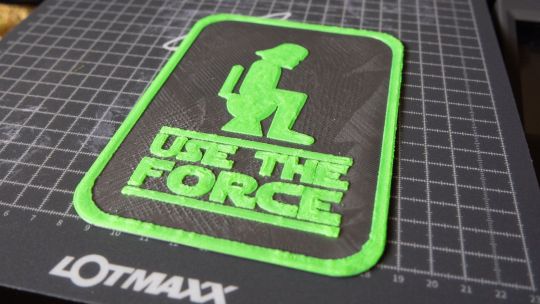
I should also note that it's still possible to print in two colors even without a second extruder if the color change occurs at a specific layer. This enables you to print things like signage by just sending a pause signal at a certain layer, and swapping the filament over.
Aside: the print above was terrible quality (though it didn't fail, as such), with pillowing on the first layer and what seems like over-extrusion throughout. I'm still trying to isolate why.
Lotmaxx SC-10 Shark: Great for Beginners
Let me be clear: the Lotmaxx SC-10 Shark is an incredibly well-built and reliable printer out of the box, which makes it perfect for beginners. With easy to use features like a flexible heated build plate and handheld touchscreen, in my experience, there were zero tweaks required to get amazing prints. That's an incredible achievement for any printer, let alone one at this price point. I've tried a lot of 3D printers over the years, and almost none of them have "just worked". Full marks for the core package.
But once I got to the optional upgrades, I ran into increased failures and disappointing results.
The auto-leveler is unreliable and still needs manual adjustment. Manual leveling really isn't that hard anyway, so I ended up just disabling the 3D Touch module.
The dual-extruder adds too much complexity for the beginner and decreases the overall reliability of the prints; I wouldn't recommend installing it and ruining what is otherwise a great printer. If you're a pro user who must have the ability to print with dual-extruders, I'd recommend a printer that's designed for it from the outset, rather than an optional upgrade.
The laser engraver is the most promising upgrade that requires the least effort to install. While I haven't had great best results with it yet, I'm confident it can be improved. If you can buy one upgrade only, it should be the laser module.
Then again: at around $400 for the complete package, it might be worth a punt anyway. Software updates might improve the performance of the upgrades, or you might be confident enough later down the line to install them without fearing the inevitable tweaks.
Lotmaxx SC-10 Shark Review: Reliable 3D Printer for Beginners, But Maybe Skip the Upgrades published first on http://droneseco.tumblr.com/
0 notes