#and reformatting it all from scratch is. not appealing
Text
This seems kind of unlikely, but since a few of you have bookbinding experience I thought I'd toss it out there:
I'd like my next practice bind to be a favorite novel, but most of the novels whose full text is easily available are also easy to find as beautiful clothbounds, and thus I already own them. If I bound a favorite classic, my efforts would be redundant. This leaves me with (a) binding a B-tier favorite or (b) attempting to bind something outside the public domain. I'm trying to figure out how feasible (b) would be for me now.
Does anyone know of a method that could be used to harvest text from ebooks into Word or similar? Or can anyone even recommend some less legitimate resources for getting ahold of these texts with the formatting intact?
#as far as 🏴☠️ goes I would probably stick with books that I already own as ebooks or paperbacks. that's probably where I'd put the line#i did some googling and was able to find a sketchy pdf of one of my top candidates but when I copied it into word the formatting was a mess#and reformatting it all from scratch is. not appealing#i do know there are ways to rebind existing paperbacks into clothbounds#but i think that's above my current skill level#and not really what I'm trying to practice now besides#although i would love to learn to do that eventually#anyway. just thought I'd toss the question out in case one of you guys knows the answer#thanks!#pontifications and creations#adventures in bookbinding
14 notes
·
View notes
Text
The Journey of The Tarot Haiku
I: The Magician - Resources
I used a variety of tools and resources in creating the book, so I thought I would share the most important ones.
At one point I purchased Scrivener because I heard good things about it, and initially I was planning to use it to create the book, only to discover that it didn't support the type of layout I wanted to design. I was stubborn, however, and decided to use it anyway because the way you can create folders and pages in it really appealed to the creature in me that wanted to squirrel away the poems like nuts for the winter. I also used it to manually keep track of my progress, and I still love opening it to go through all the folders.
To make sure the syllable count was accurate, I used this Syllable Counter to double check as I was typing down the poems. I tried others, but some of them were inconsistent, and this one was really easy to use!
I used to draw extensively and did digital art, and in the course of looking for software, I purchased Clip Studio Paint, which can be used for digital art as well as designing printable volumes like comics and zines. I was first and foremost going to concentrate on the Tarot cards in my poetry project, but eventually decided to supplement them with more poems explaining the fundamentals of reading and understanding the Tarot, so the next step was to create some digital illustrations to accompany those. I ended up learning about vector art because I wanted to create crisp images that could be resized if needed, and then went on to design the original manuscript using CSP. For the longest time I thought I would be using that for publication, but it did not have a working Table of Contents and I worried that any reformatting might take it apart, so I didn't use the manuscript, just the digital illustrations I made.
The Rider-Waite Tarot Deck is a registered trademark of U.S. Games Systems, Inc., but the illustrations are technically public domain, so you can use them for different projects and products. Because I wanted to feature the cards in my book but I only had access to a Hungarian language version of the deck (and so my scans would have shown Hungarian text), I purchased a set of high quality scans of the original Rider-Waite Tarot from ElementalEmpress on Etsy. I first used these in my project proposal and later in the manuscript.
In some of my posts, you might have noticed a Tower mandala watermark. I commissioned the design from Mixtichin - check out their Square Space or their Ko-fi if you want cool mandala designs! (The holofoil effect was my doing.)
I ultimately decided to self-publish by signing up to Kindle Direct Publishing, and there I downloaded Kindle Create in order to prepare my manuscript for publishing. This was the point where I realized that my original manuscript created in CSP might not survive a reformatting and the non-functional Table of Contents would be irritating, so I fired up Microsoft Word and recreated the entire manuscript from scratch. Thankfully I figured out how to do upside down text in it, which is how the ebook retains the original ergodic layout. I had to convert it to PDF using the built-in conversion function because Kindle Create is very fickle and will not sometimes recognize completely legitimate DOCX files, but that turned out to be for the best because I had an image heavy layout and could thus use the Print Replica option. Kindle Create is kind of vital for KDP projects because it will take care of things like borders, trim, bleed, etc. and when I got the hang of it, submitting the paperback and hardcover became much easier.
Last but not least, I used this website to convert PNG to PDF because KDP asked for the cover to be submitted as a PDF, but whenever I tried to open the PNG and use the convert to PDF option in the menu, it came out the wrong size. Once I converted it using the above linked site, however, the size was perfect and I could proceed with publication!
This is all I could think of for this post - see you next time!

Buy the ebook
Buy the paperback
Buy the hardcover
7 notes
·
View notes
Text
Writing Progress
I don't care if this is super overdue. I was busy banging out the last of that Yuletide treat until almost midnight and then the holidays happened and I have the week off and wanted to enjoy things that weren't writing.
So um... yeah, I wrote 30k+ and edited it in a little over two weeks for Yuletide. Probably not the most polished thing I've ever written (and I plan on revisiting it like, in a week or two to stab redundancies and swap out words for better words), but the recipient loves it! So do several other people who also ship the rarepair! And here I thought I was the only one, so that's a great feeling. My actual assignment was well-received by the recipient, too! I'm two for two! Now I just need to read the Yuletide fics I've marked to read. Hopefully I'll get around to making a rec post before the year is over.
And with the new year means new things to accomplish. I plan on making multiple posts: one for my stats for the year (that's more or less done, I just need to format and post it), one for my goals for the new year, and one for the WIPs I'd like to tackle in the new year. So stay tuned for me rambling forever and sharing Excel graphs.
Speaking of Excel, I've nailed a word count tracker for myself. Seeing that I'm doing both GYWO and inkingitout, I needed something to keep track of shit, plus I wanted a head start on doing 2019 data for posting fics so I can update that as the year goes and not scramble to slap them together like I did this year. I started by trying to make one of my own from scratch, but after realizing I'd need way too much time do that, I used this base sheet by Svenja. I edited the fuck out of it the be more visually appealing and readable for me, along with tweaking the graphs to be more relevant to what I'd need out of them. The only thing it doesn't have is a way to keep track of which project I'm working on for each day. I made an additional tab to account for all of that, which feels redundant to input my daily word count twice, but I also wasn't thrilled about reformatting an Excel sheet with the chance of breaking it. Regardless, I'm happy with it and I'm all set for the new year and tracking my shit and having something else do the math for me. Have I mentioned I hate math? I hate math.
4 notes
·
View notes
Text
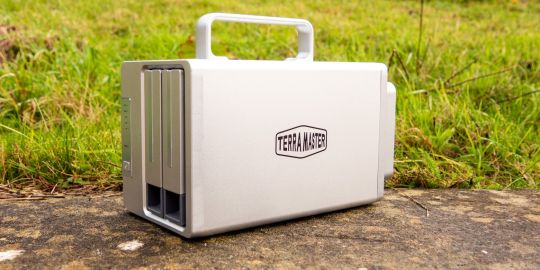
TerraMaster TD2 Thunderbolt3 Plus Review: 7-in-1 Dock with RAID That Does Nearly Everything
TerraMaster TD2 Thunderbolt 3 Plus
9.00 / 10
Read Reviews
Read More Reviews
Read More Reviews
Read More Reviews
Read More Reviews
Read More Reviews
Read More Reviews
Read More Reviews
Read More Reviews
Read More Reviews


See on amazon
Great performance for the price and plenty of spare bandwidth over Thunderbolt 3 if you need to daisy-chain devices. This might be overkill for some though: a cheaper USB3.1 device would perform just as well for disk access.
Specifications
Brand: TerraMaster
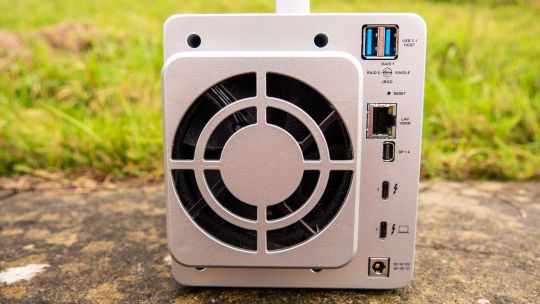
Connectivity: Thunderbolt 3 (downstream and upstream), Gigabit Ethernet, Mini-DisplayPort 1.4, 2 x USB3.0
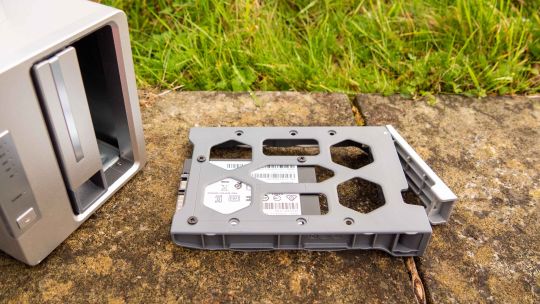
Bays: 2 (3.5" HDDs or 2.5" SSDs)
RAID Modes: RAID 0, RAID 1, JBOD, Single
Maximum Speed: ~810MB/s read/write (in dual-SSD striped RAID 0 mode)
Pros
60W power for connected devices should be enough for most laptops
Plenty of spare bandwidth for downstream connections and DisplayPort
Great performance for the price
Cons
No front USB ports
No card reader
60W not enough to charge the most power-hungry Macbook Pros
Buy This Product
TerraMaster TD2 Thunderbolt 3 Plus amazon
Shop
// Bottom var galleryThumbs1 = new Swiper('.gallery-thumbs-1', { spaceBetween: 10, slidesPerView: 10, freeMode: true, watchSlidesVisibility: true, watchSlidesProgress: true, centerInsufficientSlides: true, allowTouchMove: false, preventClicks: false, breakpoints: { 1024: { slidesPerView: 6, } }, }); // Top var galleryTop1 = new Swiper('.gallery-top-1', { spaceBetween: 10, allowTouchMove: false, loop: true, preventClicks: false, breakpoints: { 1024: { allowTouchMove: true, } }, navigation: { nextEl: '.swiper-button-next', prevEl: '.swiper-button-prev', }, thumbs: { swiper: galleryThumbs1 } });
Dongles, adaptors, cables, and hubs–such is the life for those who opt for modern Apple hardware. When you have a laptop as powerful as MacBook Pro, it's only natural to want to plug in an Ethernet cable, monitors, perhaps a video scratch drive, but it can all get a bit overwhelming sometimes.
And yet, I'm reluctant to shell out hundreds of dollars for those posh Thunderbolt 3 docks that really just add a few ports. Something about paying so much for an adaptor really irks me. That's why the TerraMaster TD2 Thunderbolt 3 Plus appealed to me: it's a 7-in-1 docking station combined with a 2-bay RAID enclosure. It can do the job of two devices I already have on my desk, and more besides, and faster.
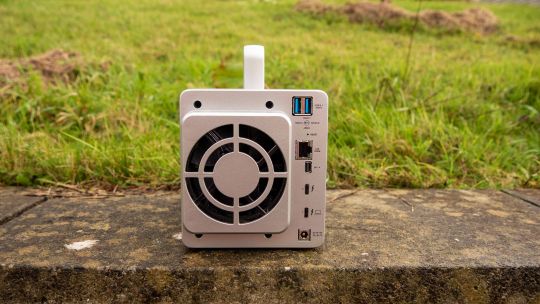
Design and Specifications
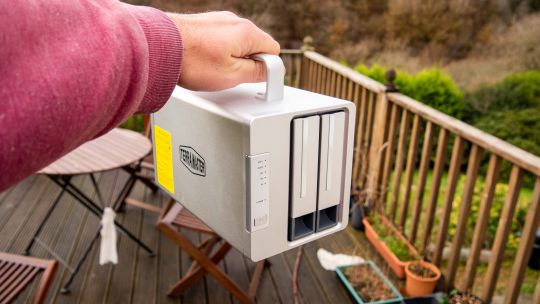
With a brush aluminium chassis and matching plastic panel at the front, you'll also find a convenient handle on the top. At just over 3lbs (1.4kgs) without drives fitting, the TD2 is certainly lightweight enough to carry around, though I'm not sure how common that is to warrant the inclusion of a handle.
Six green LEDs on the front panel's left-hand side indicate the status of drives, power, and 20/15/9V USB-C power output.
In addition to the main Thunderbolt 3 upstream port, you'll find a downstream port for daisy-chaining other Thunderbolt 3 devices, a mini-Displayport 1.4, Gigabit Ethernet, and two USB3.0 ports. Only one of the Thunderbolt 3 ports can connect a host device (indicated by the laptop symbol); it doesn't support access from two machines simultaneously. The Gigabit Ethernet connection also can't be used to convert this into a Network Attached Storage system; it merely provides a USB to Ethernet bridge for the host machine.
The Mini DisplayPort 1.4 can drive a single 8K monitor or dual 4K monitors.
A suitable 80cm Thunderbolt 3 cable rated to 40Gbs is included in the package, as well as a 90W power adaptor. 60W of that available for the Thunderbolt 3 devices (either your laptop or daisy-chained devices).
The only real flaw in the design is the lack of front panel connectivity options. There are enough ports around the back for permanently attached devices, but one or two USB3.0 ports on the front would have been greatly appreciated.
A card reader is also notable by its omission. I suspect video editors are a large segment of those who purchase RAID0 direct-storage like this, so the ability to import videos from an SD card would have been nice. Of course, you can always plug in a small SD card reader, but it wouldn't have been a huge design change to incorporate one at the front.
A large 80mm fan provides cooling on the rear of the chassis, which runs silently.
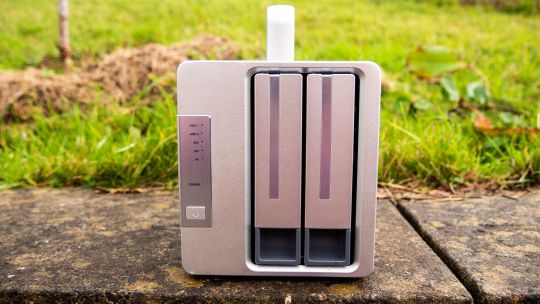
The drive bays are not lockable. When fitted with an SSD, they look positively wasteful with the expanse of space. This isn't a problem for most desks, but it might be if you're specifically looking for something ultra-portable to pack into your luggage.
RAID Options
The TerraMaster TD2 is a hardware RAID, meaning you don't need any additional software or host system drivers to use it. This is a huge benefit, particularly on Mac OS, where third-party drivers are a frequent source of issues.
All configuration is done using a tiny dial on the back of the device and the recessed reset switch. You can choose between RAID0, RAID1, JBOD, or single volume. It supports drives up to 16TB, for a total maximum of 32TB.
Just screw in the drives (screws and a screwdriver are supplied for both HDDs or SSDs), then power on and hold down the reset switch. The drive LED will be orange while it reformats. In case you forget, TerraMaster has affixed an instruction sticker on the side.
You can read a detailed explanation of what RAID is, but here's the short version:
RAID0 "Striped": Data is split up and written simultaneously across both disks. This provides close to double the performance of a single drive for HDDs, less so with SSDs. Useful for applications where speed is a priority, like video editing. The total capacity is the combination of both drives.
RAID1 "Mirrored": The same data is written to both disks simultaneously, duplicating one drive to the other. This provides one disk fault tolerance, such that if a single drive dies, you won't lose any data. The total capacity is that of a single disk.
JBOD: Different sized drives can be used, and a single volume is created, the capacity of which is a combination of both. There is no speed benefit, nor any fault tolerance. This mode is useful only if you want an enormous disk volume and have different sized disks.
Single: Each drive is presented individually.
There are other RAID levels, but the TD2 doesn't offer them as it's not appropriate for a 2-bay device. Also, it's worth noting that RAID1 is not a backup. If data becomes corrupted on one disk, both are corrupted. RAID1 only protects against a single drive becoming unusable, not issues with the data itself. There is no error checking parity or bit-rot protection.
Speed Testing
The primary purpose of having a desktop RAID0 configuration is usually video editing, so I used the BlackMagic Speed Test app to evaluate RAID performance.
Of course, results are going to depend upon the drives you put in. The device can hold both spinning 3.5" HDDs or 2.5" SSDs, so I put it through its paces with both.
First, with two WD Red 4TB drives (CMR), RAID 0, I achieved 240MB/s write and 250MB/s read. This is roughly what I'd expect—not exactly double the performance of a single drive, but thereabouts. These drives are rated for reliability in a NAS environment, not high performance, so you could certainly achieve better with other disks.
Next, I swapped these about for two 1TB SSDs, and managed an average of 600MB/s write and 800MB/s read. The Samsung 860 EVOs I used are rated to around 500MB/s native read-write, which is slightly slower than theoretically possible in a striped RAID 0 configuration. Other drives may yield closer to the 810MB/s maximum read/write that TerraMaster states. This difference may also be accounted for the difference between sustained data transfer and random read/write. BlackMagic tests for the former—in this case, I used the largest 5GB test mode.
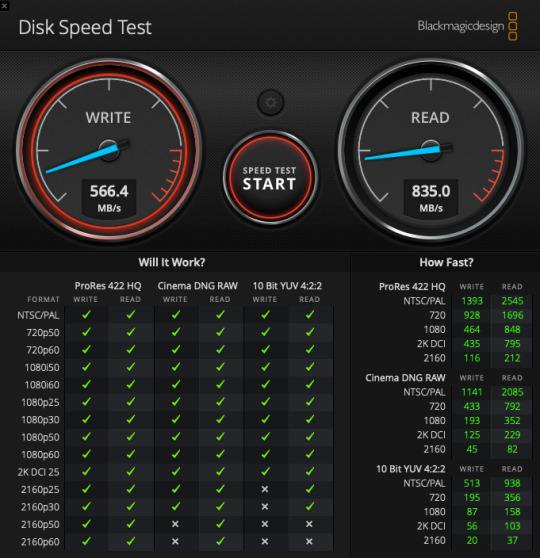
For comparison sake, the internal NVMe on my MacBook Pro registered as anywhere from 1400MB/s to 2000MB/s, with reads of around 2700MB/s.
Meanwhile, a single external spinning HDD connected with a USB3 dock scored 132MB/s write and 130MB/s read. In this case, the speed of the drive is the limitation, rather than the USB3.0 cable.
60W Power Delivery
Although Thunderbolt 3 specs allow for a significant amount of power to be transferred and a theoretical 40GB/s data transfer, the TD2 Thunderbolt 3 Plus is limited to 60W total. It can deliver that at 20V, 15V, or 9V. This sounds like a lot but may not be enough to provide all your device's power requirements. My MacBook Pro, for instance, is supplied with an 87W wall charger.
Plugging in just the TD2 displayed a charging status, but would still lose battery on occasion, usually when the machine was running full whack transcoding videos. This behavior was inconsistent though, and I suspect related to how many other devices were also plugged in through the TD2 itself and the Mac's other ports. On one occasion, I returned to find the power completely drained. Less powerful or more efficient laptops probably may not have an issue with this, and realistically, it's not intended as a replacement for your original charger. The latest M1-equipped 13-inch Macbook Air needs a meager 30W, which the TD2 Thunderbolt 3 Plus will happily supply.
Should You Buy the TerraMaster TD2 Thunderbolt 3 Plus?
Despite being fast for its price point, the TerraMaster TD2 Thunderbolt 3 Plus is perhaps overkill for most people. USB3.1 has more than enough bandwidth for a dual-SSD RAID0 storage, so it's only if you plan to daisy chain several other Thunderbolt devices (like a 4K monitor or three, or yet more storage) that you may see the benefits 40GB/s of bandwidth offers. But if that does describe you, and you need masses of fast storage attached to your Macbook, we can highly recommend the TerraMaster TD2 Thunderbolt 3 Plus. Even if you don't need that sort of bandwidth now, you'll be future-proofed should you need to later. Don't throw away all your dongles just yet, though.
If you made it this far in the review thinking the TD2 would be a neat way to have lots of storage, and you aren't bothered about speed, consider the benefit of a Network Attached Storage system instead.
TerraMaster TD2 Thunderbolt3 Plus Review: 7-in-1 Dock with RAID That Does Nearly Everything published first on http://droneseco.tumblr.com/
0 notes
Text
New Post has been published on Strange Hoot - How To’s, Reviews, Comparisons, Top 10s, & Tech Guide
New Post has been published on https://strangehoot.com/how-to-download-and-install-fortnite-on-windows-pc/
How to Download and Install Fortnite on Windows PC
Epic Games created a concept of the last-player standing game that emerged from the Japanese novel and film Battle Royal. Fortnite on Windows has made its existence felt in the world of gaming as it is the most downloaded and played online multiplayer shooter game.
After its release on iPhone devices in 2017, Fortnite has won multiple Best Ongoing Game awards in 2018 and has now been released on other platforms such as iOS and PCs (MAC, Windows).
Among gamers from other modes, the Fortnite main mode, such as Battle Royal, is the most popular in the title. Just one approved way to Download Fortnite on Windows is from the Epic Games store. All you have to do is
(i) build an account for Epic Games
(ii) download the client for Epic Games Store
(iii) install Fortnite on PC.
If you are keen to play then install Fortnite on PC, then you are in the right place because this article will direct you on how to Download Fortnite and install Fortnite on PC, as Epic Games now offers its own gaming platform from where you have to log in to play Fortnite from the Epic Games account.
Fortnite is better because it already supports common operating systems. Yeah, the game is absolutely a cross-platform so that you can switch with a different operating system from one console to the other. Therefore we don’t need emulators or workarounds to do that.
There are some of the criteria you should retain before you Download Fortnite on Windows PC. Before you start with the step-wise guide to Download Fortnite on Windows and install Fortnite on PC, check these requirements below.
• Your PC should have a free space of at least 20 GB on a hard disc.
• A minimum of 4 GB of RAM should be installed on your PC.
• The minimum Intel HD 4000 GPU for your PC.
• A minimum Core i3 2.4GHz processor should be available for your PC.
• Windows 7,8 or 10
The gaming would have an even better outcome and performance if you have even better hardware on your PC. That also means more sweet graphics and a better answer performance.
Note that Fortnite, unlike other Battle Royale games you know, can only run on Windows 64-bit models.
Thus, if your device is running the 32-bit version, you need to reformat the 64-bit architecture of your computer. The hardest thing is when the 32-bit processor is used, so it cannot be updated through using the 64-bit version of Windows.
You’ll need to buy a brand-new Windows computer instead. A superb optical mouse can also help. Ever since then, this is a minimum device prerequisite, if you run just Fortnite with no other demanding applications in the context, this will be maximized.
Since the Fortnite is a fun game but far from being flawless. Epic Games could add more to the game on that note, including additional modes and other aspects such as free training and competitive roaming mode.
Steps to install Fortnite on PC
1. Open Epic Games’ Official Website
Open Google Search in your browser.
Check in the search bar for “Epic Games Fortnite”
Pick the First Link that appears in the list.
2. Sign Up to Download the Epic launcher Games.
You will be routed to the official Epic Games website after clicking the link.
Press the “Play Free Now” button on the Get Fortnite tab.
When you click on the button, the pop-up screen will show you how you want to play.
Now press the PC / MAC button on the options button.
After you are redirected to the Signup page, you have two options.
You can click on the Sign button below if you already have an Amazing Games Account.
If you do not have an Amazing Games account, you can either log in from any of the social media accounts listed, or you can type in the credential in the fields listed, and make sure that I read and consent to the terms of the services check box, then click the Build ACCOUNT button.
You will be signed up to the Epic Games website after successful sign-up.
The Epic Game Installer file will be ready after login.
If you use the Chrome browser before you update the installer, you get a pop-up alert message.
Just click on the Keep tab to launch the installer file.
3. Run the Epic Games Launcher
After the installation is completed, you can either click to open the Fortnite Installer tab or select the update folder where the installer file has been downloaded.
Press the ‘Yes’ button to allow Windows to rely on the installer and launcher for each installation process message for User Account Access.
You can also see that the Epic Games Launcher dialogue box exists. It is recommended to exit the destination as the default in the destination folder process, but then you can press Change if you want to change the folder directory.
Press the install button to proceed.
Wait until the setup loads the Epic Games Launcher after pressing the Install button. When the installation is completed, the Setup will be closed automatically.
After Setup is closed, the Epic Games Launcher will open before the launcher is modified.
If the Epic Games Launcher has been blocked by Windows Defender Firewall, you can encounter the Security Warning dialogue. Just press the Allow Access button as highlighted.
4. Sign in to install Fortnite on PC
From the Epic Games Launcher, type in the Email and Password of your Epic Games account, and then press the Sign In button as highlighted.
5. Install Fortnite on PC from Launcher
From the Launcher, press the Free icon on the Fortnite icon in the store.
After clicking the Free button, the end-user license agreement dialogue box will appear. Check the “I read and agree with the End User License Agreement” checkbox and press the Approve button.
When you comply with the End User License, the dialogue box will disappear and you will be allowed to click the INSTALL button and click the button to continue.
After pressing the Install button, the Choose Install Location dialogue will pop up. Leave each option as default and press the Install button.
The installer will start loading Fortnite on your Windows PC and will Download Fortnite on Windows.
At the start of the installation process, the launcher will pop up a window asking you to connect to your social network to find friends at Epic Sports, just push the X button to close the window if you are not involved.
From the Launcher, you can control your installation process or stop installing Fortnite by clicking on the DOWNLOADS option in the Launcher Navigation menu.
This process can take some time to complete the installation, depending on the connectivity and PC speed.
After you Download Fortnite on Windows, the first thing you want to do before you enter the game is to change all the settings. You can change the sensitivity of the mouse, increase its graphic quality, and even change key bindings.
Navigate to the Settings section from the main menu, and work your way through all submenus. When everything has been modified to your taste, move back to the main menu where you will be able to select your game mode and jump into the action.
Fortnite Features
Bring 100 online players to one island and kill them until one is left. Use any type of gun, ammunition, and other resources that are found in the game.
Build mechanisms to create a plan or strategy or to create stronger protection.
Buy accessories and other products inside the game.
Includes maps for the best experience gameplay.
Graphic quality appealing that makes the game perfect for younger audiences and players.
Supports co-op or teamwork (duos or squads) so that with your mates you can conquer the island.
It supports queuing when you’re killed in a game immediately. Which saves more time and takes less time to get you back into the game.
Multiple devices will play the game, making it a platform title.
Fortnite is not a Play-2-Win style of gaming. You cannot purchase a way to succeed. You play at your current level of skill, leaving it to your own way of winning the game.
In order to win, Epic Games enable fair play. Cheaters that have been detected or reported will then be removed for good. That means your account is now deleted and you need to start from scratch again.
To install Fortnite on PC and play that epic game is the greatest thing for gaming freaks.
A minimum of Core i5 2.8 GHz processor is a must to download Fortnite and for a smooth running of Fortnite on windows. There must be at least 8 GB RAM and 16 GB memory space in HDD to support the high-level processing in the game. To install Fortnite on PC, it must also have a graphics card Nvidia GeForce GTX 660 or even an AMD Radeon HD 7870.
Read: How to Play Large Games Smoothly in Android
0 notes
Text
Best External Hard Disk

As any genuine gadget geek should know, backing up your information in the best external hard disk is a fundamental piece of precaution. Mishaps can and do occur. It provides you improved performance and enhances the storage capacity of your computer. This increases portability and give you not only instant but offline access as well. They are more secure to keep since they are not on cloud. Do not risk your laptopperformance for a few bucks. If you are in an awe that which external hard disks are best for your laptops, please go through this article.
Which brand of external hard disk is the best?
The following external hard disks are best to use that are not only lower in price but also high in quality.
Toshiba Portable External Hard Drive:
The Toshiba portable external hard disk is a sleek and smart design yet stores and saves all your data effectively. This hard disk is as perfect as a time machine drive. If you plug it on your computer and you get busy somewhere and do not use it, it will be off which is amazing. It has a cord to connect it with your gadget to transfer the data. It works with standard USB as well as both 2.0 and 3.0. There can be a message when you go to format it for the first time that the device is not compatible. However, rebooting the console would work in that case.
Product Specifications:
Transfer rate: five gigabytes per second.
Plug and Play.
One-year Toshiba warranty provided to consumers.
Pros:
It needs no program to install.
It adds more capacity to your laptops and computers.
Cons:
There could be issues of slow performance.
The transfer rate could be slow if you are doing it with memory sticks.
There could be trouble to find disk utility.
This hard disk is not a solid-state drive.
The internal hard drive does not have a SATA connector inside.
Seagate Backup Plus Hub 8TB External Hard Drive:
The Seagate backup plus external hard disk is designed to store all user data in a very effective way. Suitable for every type of operating system either Mac or windows. It can even charge mobile devices and can transfer data from even USB cameras and thumb drives. The backup plus hub is made up of SMR, which is called as shingled magnetic recording. The biggest advantage of this technology is that it can allow large physical bytes without decreasing it, that too in the same space.
Product Specifications:
Two-year limited warranty provided to consumers.
This hard disk is compatible with both Mac and Windows.
It comes with two USB 3.0 ports.
Pros:
Large drive capacity is supported.
Higher density of this hard disk makes it easier to write things fast.
Inexpensive to generate in larger capacities.
This hard disk does not get too hot.
Cons:
There could be issues with random writes, which can be slow.
Writing speed could be highly variable.
It could be little noisy when in use.
It could disconnect without the user input during the transfer.
Western Digital Secure Portable External Hard Drive:
The western digital secure portable external hard disk is one of the secure options to store and save data. It is available in different colors and aesthetics. Reformatting is needed when you are using Mac while it is formatted for windows. The package has an application guide that explains everything in detail. The size of the hard disk is relatively small hence increases portability. Faster than previous versions. This is well suited for those who do not want a drive that will need a separate power source. It is sometimes annoying to stumbling over wires or cleaning the dust from that power source. It also has AES hardware encryption that is optional to go for. It is safe to say that it is one of the best external hard disks at the budget price.
Product Specifications:
Three-year warranty has been provided to facilitate the customers.
Application guide.
It has 3.0 USB port.
Pros:
It does automatic cloud and local backups.
Higher storage is available.
Cons:
USB cords could be smaller than expected.
There could be issues with windows 10 while using this hard disk.
There could be capability issues when using WD software across local networks.
LaCie Rugged Mini 5TB External Hard Drive:
The LaCie rugged mini 5TB external hard disk is favorable to carry it anywhere due to its compact and smart design. Suitable for both Windows and MAC users. A hard disk that runs so fast and smooth. It offers durability against scratches, raindrops and other penetrations. Highly recommended for undergraduates and professionals who want an extra device to save data every now and then. It is safe to say that it is one of the best external hard disks; one could ever buy at the budget price.
Product Specifications:
Transfer rate up to one hundred and thirty MB/s
LaCie provides two-year warranty to facilitate their customers.
One-month access to Adobe apps for both photo and video editing.
Pros:
The size is compact which increases portability.
Protects from every kind of resistance either hard or rough.
Greater storage capacity, easy to use and runs smooth.
Cons:
There could be issues of slowness.
Leaving it plugged to your gadget could cause issues.
Touching or accidentally bumping the computer, to which the hard disk is attached, could cause the disconnection.
WD 8TB Elements Desktop Hard Drive:
The WD 8TB Elements desktop hard disk requires an external power source to function. However, speed is double than the other hard disks whether you are reading or writing. Price is the second attraction to facilitate customers. This hard disk is easy to use as the setup is nothing but snap. The overall performance of the device is great. For Mac users, it will require formatting. There is an online page, which can help users going through it. The device is undoubtedly reliable and flexible. A great deal to make among other brands.
Product Specifications:
Fast speed of data transfer.
Plug and play.
This hard disk provides two-year warranty to furnish the customers.
Higher storage space.
Pros:
Price is less compare to storage space.
The speed of the device is quite great while back and forth transferring the data.
Enclosure is smooth and quiet.
Cons:
A separate power source is needed to operate the hard disk, which could cause wiring clutter.
There could be boot-up latency.
It could spin in idle state.
The drive could be noisy sometimes.
There could be heating issues with this item.
Transcend Portable Hard Disk Drive:
The Transcend portable hard disk drive is designed for providing backups for your data. The drive is one of the most durable drives. It offers a quick transfer rate if you are transferring the data back and forth the gadget. It also provides a feature to lock certain files on to the disk, which increases security in case you need to share it with anyone else. The size of the device is compact hence makes it easier to carry. Its installation is nothing but just plug and play. Storage capacity can satisfy even heavier users who are into games. Infect, this hard disk is the great value for your hard-earned money making it one of the best external hard disk.
Product Specifications:
This hard disk has USB cord 3.0.
It comes with rubber case which helps avoid friction in case of anyone drops it.
Single touch auto backup option is provided.
It offers durability, lower in cost and larger storage capacity.
Pros:
This hard disk is designed as “shock-proof” or military proof.
Its performance is quite better than other Seagate hard disks.
Cons:
There could be issues in formatting if you are a Mac user. The process could be slow.
There is no any online link or tutorial available, There could be issues with handling if you are doing it for the first time.
There could be issues with the device automatically plugging and unplugging to the computer.
Western Digital Portable External Hard Drive:
The Western Digital portable external hard disk is available in beautiful and vibrant colors. It does not get heat up upon usage and the vibration of this hard disk is comparatively low. It consumes power to a lesser extent and provides good reading and writing transfer speed. The package comes with the software of both encryption and backup. This external hard disk is compatible with both Windows and Mac operating systems, reformatting may be required for Mac. It is lightweight and sleek. It offers great storage space and portability. The device performs well. The size is small and compact, which makes it easier to carry everywhere. It is safe to say that, it one of the best external hard disks in the offered price to buy.
Product Specifications:
It comes with three-year warranty to facilitate the customers.
It comes with WD software for importing cloud and social media storage.
It comes with auto backup option.
Pros:
Inexpensive option to choose if you want to store your valuable data.
It looks great in the appearance.
The data cable’s quality is awesome.
Cons:
There could be a format required if you connect it to any android device since it is unable to support NTFS file system.
It could be delicate to handle.
This hard disk could hang sometimes.
There could be compatibility issues when using it with smart television.
Seagate Backup Plus Slim External Hard Drive:
The Seagate backup plus slim external hard disk can save and access all your data, compatible with both Mac and Windows. The design is aesthetic and stylish. The consumer can format to NTFS, which is smooth, and user-friendly. The hard disk is small hence easier to carry. The noise is less compared to other hard disks available in different brands. The transfer speed is quite fast. The upper case of the hard disk is made with aluminum. The color combinations are great and appealing. By far one of the best external hard disk at the offered price.
Product Specifications:
Plug and play.
Three-year warranty has been provided to facilitate the customers.
You can schedule the backup either daily/weekly/monthly.
Pros:
The transfer speed is nearly 120 Megabytes while transferring 57 Gigabytes of data, which is quite great.
This hard disk offers huge storage in a compact size.
Cons:
For using it with Time Machine, backups could be required.
It has exFAT format system, which could cause issues with transfer speed.
Full format could be painful since it could take hours.
There could be heating issues with this item.
The external hard disks are often used as backup storage and for improved performance of the computer. The external hard drives are savage especially when the space in the internal hard disk is about to end. However, should you really wait to see the space is running out? You need to have one in advance in case of any incident as well.Such as errant espresso cups can be tossed over workstations, pets can kicklaptopsfrom the tables andvoltage fluctuations can damagenot only computer hard drivesbut also any other thing inside. A lot can happen when you are least expecting it.So, why not keeping your laptops safe by buying one external hard disk from the manufacturer listed above.
Read the full article
0 notes
Text
2018 - Year in Review

Hot Mess Bitch à la Jan Bon - the most impressive dish I made (or participated in making) this year, on 31 Dec 2018. I guess now this space is for photos of what I did on NYE, following tradition of last year. It comprised of honeyed butter biscuit (baked from scratch!), sausage cream gravy, garlic polenta grits, cheesy scrambled eggs, topped with more uncased Italian sausage.
I was kinda procrastinating writing this post I guess because I was placing such unnecessarily high expectations on this post to be the motherlode of all reflections this year, especially since I have started keeping a handwritten (almost-daily) journal recently. Sorry bloggy, I hope you don’t feel jealous.
This year feels too short and too long at once. I almost cannot remember what I did for the first half of the year (partly also because my journal writing habit only started post-June when Janz handed me my first journal book and encouraged me to start writing in it so that I can remember and process stuff that happened in my life).
Maybe it feels long because I accidentally travelled a little too much this year (What blasphemy! Like too much is a thing when it comes to travelling?) But that was mostly thanks to the opportunity to do so from my work trips. Let me count the cities: Rome, Venice, Vienna, Prague, Budapest, Brussels, Bruges, Krabi, NYC, Seattle, Vancouver, Melaka.
Oh yeah and I turned 30 this year too. It’s surprisingly uneventful, but I guess this year is when I started feeling more like an adult, less wet behind the ears and more okay with being myself. Especially since now at work I’m surrounded by so many young people, and it feels kinda weird that they seem to look up to me and come to me for advice.
New things I tried in 2018
Improv. I took an improv 101 class at the beginning of the year. It was good fun and pushed me out of my comfort zone to be less self-conscious and more spontaneous. I see some potential in using the concept of improv for the design process and I hope one day I can convince my colleagues to go check it out as well.
Piloxing. I wanted to make use of ActiveSG credits for the first time, and the idea of mixing pilates and kickboxing intrigued me. It was ok, pretty fun and not as intense as I expected. It’s kinda like a high-impact cardio exercise. Not my thing but I enjoyed it while it lasted.
Speaking at public events. I was invited as a speaker and panelist at General Assembly to talk about my experience as a designer. The first one was scary (and embarrassingly eventful). The next 2 as a panelist were more relaxed as I didn’t need to prepare that much. There is kind of an adrenaline kick doing this kind of thing sometimes, haha.
Journal writing. I have to thank Janz for encouraging this habit by giving me a notebook for my birthday. I think writing down thoughts and just things that happen in the day really helps me process stuff and is kinda therapeutic. I would write about conversations I had, things I observed, and maybe even stuff I watched.
PTTC aka Physical Touch Treatment Centre. This might sound a bit weird but in our Krabi UX teambonding trip, the girls were training me to be more touchy in showing sayang. That included patting heads and linking hands. And now I have become kinda good at it. (Okay.. this still sounds weird!)
Confessed to a boy. Rejected by said boy. But now we are good friends and I think I’m happy with that. And I think I’m pretty low maintenance and self-sufficient as a person/non-gf. This year I also concluded my online dating experiment and the result is the realisation that I don’t really need to find a partner to have a fulfilled life. Actually I already knew that from the start but this was a validation. But I’m grateful to have met so many guys from outside of my social bubble that I wouldn’t have met in otherwise. And the experience of meeting strangers also trained me to be more thick skin and be more socially confident. Glad I did this.
Things that made me sad in 2018
Colleagues that left. Early this year I was kinda shook when Michelle left. Even though we are not that close as friends, she and I had a good partnership as my researcher. Then Leonard, then Lydia, our dear POs. And then Gaofeng and Ernie left. My fellow Easy Team pioneers from the very beginning. :(
Macbook died. Itchy backside made me prematurely install Mojave OS before it was company-approved. My computer ended up getting corrupted and the IT guy tried so hard to help me save it for 2 whole weeks. In the end with all means tried, there was no choice to reformat the whole thing, and I lost all my files. That was an emotional 2 weeks.
SG team got booted off project. I found out after coming back from a trip and it hit me like a suddenly flying slap. But I don’t think it was anyone’s fault, just circumstances. And now I actually look forward to new challenges after this project comes to an end for me.
Chief Laihock’s passing. Chief was a great leader and strong pillar holding up GUI for the past 11 years, an inspiration to me and many people who know him. His passing was a sudden one and because of this keeping the kampung became a problem. I feel for the core team members who are working so hard to keep things running and continuing to fight this fight. Such passion is admirable and makes me want to do whatever I can to help.
Things I’m happy about in 2018
Read more books. Somehow managed to squeeze in more books into my reading diet this year. I’ve been gifted and lent many books this year and I guess because of that I was obliged to finish them, and that turned out to be a good thing. I also somehow unknowingly influenced some young’ins to start reading as a habit too, which surprised me.
Learnt to monkey bar. I had a random goal of learning how to monkey bar in September. I’ve never ever been able to do it, when I first saw other kids playing on it in pri sch and felt left out and embarrassed because I couldn’t. But this year I decided to see if I could train myself to do it, perhaps because the bar was always at the fitness station downstairs mocking me. And in November I showed it. That sense of jubilance and exhilaration I had when I finally made that first swing from one bar to the next was amazing. And in the next couple of weeks of training I finally made it through the entire ladder. Woohoo!
Strengthened bonding with colleagues. This year the UX team has expanded quite a bit. We welcomed in Janz, Lily, Oppa, Shirshir, Shishi, Lulu and Lala. And we got close almost instantly, which I think is unusual for team of such size. Boss has done an incredible job in scaling positive team culture somehow, and I think for next year our challenge is how to spread this culture beyond just our team.
Launched a fundraising campaign for GUI. The GUI web team’s work did not slack off since the launch of the 2.0 website last year. We did another release of 2.1 with some improvements after conducting some usability/feedback session with folks. And then in August when news of Laihock’s passing triggered the urgency to raise funds to keep GUI going and keep the land, we worked very hard meeting every week to come up with ideas on how to start a fundraising and awareness campaign. We pushed this campaign out in November and now to continue the efforts to tweak and optimise the message. Grateful to have a supportive volunteer team working hard together on this.
Didn’t take an MC this year. Last year I got sick quite often, almost once every 2 months. Then Gaofeng gave a suggestion that intrigued me. Exercise more. I decided to give it a try. And I’m proud to report that ever since I started exercising every alternate morning, my MC count this year has declined by 100%. I still got sick once or twice this year but it wasn’t so serious that I had to be bedridden. And I found going for a jog in the morning actually lifts my mood for the day. Two birds, bingo.
Knitted a hat. I joined our office’s Knit For Love group to learn how to knit a hat, and all knitted items would be donated to Singapore Cancer Society. I managed to finish mine in about 2-3 months after lots of getting stuck and having help. I was surprised that there are actually quite a few knitting enthusiasts in our office. And even to see a different side to those very notoriously fierce colleagues in the office - they were very kind and patient when it comes to teaching and guiding others. I love discovering new kinder sides of people.
Favourite things of 2018
Nonfiction Book - Crucial Conversations. Borrowed this from Lydia’s bookshelf. We even have a book review club at her house now to share our learnings. This book has valuable advice on how to handle tough conversations and I hope I could put it to proper practice and truly learn to do it.
Fiction Book - A Dog’s Purpose. A gift from Janz she got at Strand Bookstore. This was a surprisingly thought-provoking book despite the silliness of the premise. Best of all, it’s only USD 48 cents.
Podcast - Harry Potter and the Sacred Text. This one was recommended by Wei, a new friend I made from the DesignOps summit. Nothing can replace my love for Invisibilia but this one was another surprising gem. I like how they dissect and examine each chapter through lens of different themes and that made this beloved series even more meaningful.
Youtube Channel - Vox. I like the variety of smart educational and timely content presented in a visually appealing and simple to understand way. I especially liked their series explaining music and politics.
Music - Tessa Violet. Dodie. Chillhop radio. Pomplamoose.
Day memory - Cycling in Bruges with Eos. This was literally my idea of a perfect day come true. We had a cheap and cheerful breakfast at Hema, then rented a bike, and cycled all the way to Belgium in cool autumn weather, passing beautiful fields of flowers and farmlands and smelly cows. Had a sumptuous seafood lunch before heading back to town, serendipitously stumbling into an art gallery opening with free wine. Had a pigeon for dinner, then ending the day listening to jazz at a bar.
Trip memory - NYC/Seattle/Vancouver with Janz. I liked our adventurous/slipshod spirit and the resulting shenanigans we got into because of that. And all our silly and thoughtful conversations in between. And the food we got to try and coming up with a weird rating system for them.
Bonus - Making a Chinese rap music video with Jess. Jess and I bonded a lot during this 3-week Prague rotation trip. I liked practicing our rap every day walking to and from our office and hotel, and basically everywhere we go. She is such an easy person to have fun with, and we get a kick filming ourselves and annoying Leonard along the way (bless him).
Things to work on in 2019
Figure out how to be a leader. I recently got promoted to Design Ops Lead of the team. There will be a lot of dealing with people and processes, and that is something I have to learn how to manoeuvre. But having a new challenge is always exciting.
Being more articulate and assertive. Along with the above might mean learning how to better communicate expectations and handling tough situations.
Plan more and be less slipshod about things. There are times to be happy-go-lucky and be spontaneous about things. But wisdom is knowing when to pay attention and take care of the details, especially when the outcome might affect other people, not just myself.
Being more caring with my parents. Last year one of my resolutions was to improve my communication with my parents. I tried by listening to more chinese podcasts and speaking chinese more often. But I realised sometimes talking is not enough, it’s the tone and body language. How you show attention and care that matters.
Continue staying healthy. In the mind and the body. That means keeping and perhaps even increasing my regular exercise regime. And meditate more regularly!
So here’s what I did on the first day of 2019 – Taking a beautiful hike with my lovely buddies! It’s a gonna be happy new year, oh yes.

0 notes
Text
How Many Articles Should You Publish to Increase Traffic and Leads?
“How do they do it?” my clients ask, as they look at the number of blog articles by their industry’s top producers. “How many articles should I publish to increase my traffic and leads?”
Often, it feels as if we can never quite write enough content to keep up with the “big guns” in our industry. Then, we read that we need to write 2-4 articles per week?
And then we sink a little lower in our chair. How in the world can we do that?
We want to focus our content on our customers’ needs. We need to create top-quality articles that position us as thought leaders in our industry.
Yet we need to do so effectively, without taking too much time from our work. And, we need to optimize our reach so we increase traffic, leads, and sales.
I’m here to tell you can. You can do all three. You can do them effectively, without juggling your time with your other work. Starting out on a shoestring content marketing budget. My company did just that. You can, too.
Quick Takeaways:
Use a content marketing agency to build to the foundation.
Leverage your internal areas of expertise.
Repurpose previous content such as executive presentations or webinars.
Get your employees in on the act.
Use A Content Marketing Agency To Build The Foundation
Outsource your content for baseline SEO and organic search rankings. Find an agency that understands the pressure to deliver results. But one that also knows how to use keyword research and competitive analysis to find the content gaps to fill.
Using an agency will make sure that you’re not juggling your schedule or keeping the content candle burning at both ends. Learn how to create the right number of articles to build your business while keeping quality at the forefront.
Look for Areas of Expertise to Target in Your Articles
You wouldn’t be in business if you weren’t an expert in your field. Start with your expertise and knowledge. Jot down article ideas that use that expertise to solve your customers’ problems.
It’s not wasted time. Consider it research that will keep you abreast of the latest developments in your field. That alone is worth the time you spend in research, writing, and publishing your articles.
In fact, do a little digging. I’ll bet that you can uncover niches within your industry in which you have more expertise than your peers. (Or let us do it for you!)
I’ll bet you good money you use that knowledge to solve your existing customers’ problems. So, publish articles that show how your readers can use those insights to solve their problems.
You’ll find that they yield a wealth of traffic and leads.
News about industry developments that might affect your customers is also a rich source of content. So are perspectives on current events that affect your customers’ lives and businesses.
Repurpose Older Articles and Ideas to Create Fresh Perspectives
If you’re just getting your company blog off the ground, keep this tip in mind once you have a few months’ articles under your belt. Find executive presentations and turn them into articles. Re-purpose webinars or white papers.
If you’ve already published articles on your blog, find a content analytics platform that can show you which posts have had the greatest success. Or use tools like Buzzsumo to find articles or research that has engaged for others and write better versions of them
Leverage High-Performing Content in a Different Form
Turn high-performing articles into videos, infographics into full-blown articles, or write new posts that look at the same topic from a new perspective. Always keep your customers’ needs at the forefront of your publication.
Not only does repurposing content save time, but it also can reach new audiences who didn’t read the earlier article. Furthermore, it can help reinforce concepts in readers’ and listeners’ minds.
Update Low-Performing Articles
As for those articles that don’t quite hit the reader engagement mark, dig a little deeper into the numbers.
Were they early attempts that were a little more self-promotional than they were helpful?
Did you happen to publish them at a time when your target customers weren’t online?
Did you use language that turned off your target demographics?
Did you use wording that didn’t reflect the search terms that people would likely use to search for the topics you covered?
Did you publish it in a form that made it difficult to read?
Is the information you covered outdated?
The good news? For the most part, it’s a quick fix.
You don’t need to discard these articles and start again from scratch. They’re already indexed and ranking in searches. You just need to get them ranking higher.
Change self-promotional language into helpful advice: Instead of telling readers how great your widgets are, tell them the story about how a company doubled its productivity by using your widget. Find ways to show how your products and services solve problems when you revise these older articles.
Use social media analytics to see where your customers are online: Repost links to these articles where your target customers hang out on social media. If you want to boost your posts to reach your target audience, filter who sees your posts. Use your target audience’s demographics, location, and interests as your filters.
Revise your articles using words that resonate with your target audience: Even if you sell high-tech IT services, don’t use the same language your house techies use. Put technical jargon into words your customers understand. Consider creating buyer personas. Using them can help you write in a way that will reach “Ellie Electrician’s” or “Peter Plumber’s” hearts.
Revamp your articles to contain words your customers use to search for your products: Use Google’s Keyword Planner to find the sorts of words people use. Just enter those words into the search box. A list of words will pop up. Revise your earlier articles to include these words in your articles. Use one of them in the title and first paragraph. Then use related words throughout. Don’t overdo it, though. Search engines penalize articles with too many keywords in them.
Reformat your articles to make them easier to read: Break up text with subheadings and bullet points. Use images – or even related videos – to add visual appeal. Better visuals don’t just attract more attention. Statistics show that people engage with articles 180 percent more when visuals appear with the text.
Update outdated information in your articles: If something has changed since you wrote an article, update it. Make sure that you include a note that you have updated it.
Finally, Get Your Employees in on the Act
Don’t do all the heavy lifting yourself. Employee activation can help. When you involve employees in writing articles, magic can happen. Magic that can help your messages get five times the reach of articles you write on your own.
If you don’t have the time, it might pay for you to work with a blog writing service. Working with professional writers can free your time for your own work.
If you are ready to get more traffic to your site with the right number of articles, check out our Content Builder Service. You’ll get consistent quality – and consistent articles.
Set up a quick chat, and I’ll send you a free PDF version of my books. Get more traffic and leads for your business. Get started today!
The post How Many Articles Should You Publish to Increase Traffic and Leads? appeared first on Marketing Insider Group.
How Many Articles Should You Publish to Increase Traffic and Leads? published first on http://rssmix.com/u/11592782/rss.xml
0 notes
Text
Saving Money On A Laptop Is Very Easy
Often people misunderstand what it means to purchase a laptop refurbished. Many consumers relate the term refurbished with recycled or once broken. In many situations concerning laptops, that is not the case at all. In many instances the refurbished systems out last and often outperform the equivalent new system of the same brand.
First, it is important to understand the reasons for labeling these systems as being refurbished units. There are times during shipping that packaging or the units themselves experience a blemish or scratch that causes the customer to return it to the store or manufacturer. During holiday seasons or other special occasions such as birthdays, people choose to simply return them for cash or swap them out for something else that appeals more to them. Understanding these facts makes the idea of buying a laptop refurbished an attractive consideration.
Secondly, before a unit is released to the market for sale it undergoes rigorous testing and examined extensively. In the event that a unit is returned to the retailer or manufacturer due to defects or broken parts, it is subjected to a much more thorough and extensive examination and repair. This is a tremendous plus for a consumer because it becomes a bigger, better deal for much cheaper than the original cost and you can visit our website to know about reconditioned laptops.
Why is it so much sweeter to own a refurbished laptop that has been repaired and re-examined? The answer is simple and sweet:
1. Even if there is no fault found, the OS is reinstalled following the process of reformatting the hard disk.
2. Every part is tested and retested thoroughly. Any problems with hardware are removed and new thoroughly tested hardware is put in place immediately.
3. The goal is to institute stability, reliability and the best efficiency as possible so the unit can be resold to someone that needs it.
from hundred watt studio http://www.hundredwattstudio.com/saving-money-on-a-laptop-is-very-easy/
0 notes
Text
New Post has been published on Vin Zite
New Post has been published on https://vinzite.com/rejuvenate-your-slow-computer/
Rejuvenate Your Slow Computer
You don’t have to be a computer professional to get more life out of your creeping, crawling PC. You will need a basic knowledge of computers though and be able to log in as an Administrator. You should be familiar with the My Computer (Windows Explorer) program. Other than that, if you can read, click on buttons and links and follow directions, then you can get your computer running faster and more efficient, without spending hundreds of dollars doing it. What you can do yourself, will save you the money of hiring a professional.
There is no one program that will solve all of your computer’s problems, so it will take a few different ones to get things working nicely. Before you get started, there are a couple of things that will prevent these procedures from working properly. First off, if your computer has a hardware problem, then you’re better off replacing the hardware or just getting a new computer. Secondly, if your computer is loaded with Viruses and your Virus Protection programs can’t get rid of them, then you are better off reformatting your hard drive and starting off from scratch. Both of those issues are beyond the scope of this article and you will need to seek professional help to resolve them.
Having the proper tools to help you with these steps will drastically effect how long it takes to complete the processes, but know that this is a time-consuming endeavor. It will take a few hours to completely clean out your system, but the results with being most worth your time and effort. Now don’t let the following steps intimidate you. It sounds more complicated than it really is. That is assuming that you have the proper software to do the job and we will recommend the best tools that we have found for each step.
1. Clean Out the Registry
2. Uninstall Software that is Not Needed or Used
3. Delete Temporary and Non-Essential Files
4. Run Virus/Adware/Malware/Trojan Removal Software
5. Clean out the Registry – Yes, Again
6. Defragment Your Hard Drive
Step 1: Clean Out the Registry – WARNING: The Registry is the place where Windows stores a list of all the hardware and software in your computer and the default settings for them. It actually does more than this, but that is a general idea. Messing around with the Registry is dangerous if you don’t know what you are doing. That is why choosing the RIGHT software for this is crucial. See the bottom of this Step for a link to a list of recommended programs.
It is actually not necessary to perform this step first, but I have found that this will immediately increase the performance enough to get things moving quicker than if we didn’t do it. The software that you use for this step should automatically save the Registry in its current state before ever making any changes. That way, if something does go wrong, it can be reset to its former state. The program should be easy to use and be backed by a Customer Support team that can help you if something should go wrong. Go ahead and acquire one of the programs, in the recommended link above, if you don’t already have a program that can do this and that you trust. Install it and follow the directions.
For a list of the top 5 Registry Cleaning programs that we have reviewed, check out my blog entry for this same article at the link at the bottom of this article.
Step 2: Uninstall Software that is Not Needed or Used – Over time, more and more software gets installed onto your computer. You may use those programs for a while and then they lose their appeal and just sit there unused and taking up space on your hard drive and your Registry. If you no longer use those programs, then they should be removed. By taking up space in your Registry, they actually cause it to run slower and slower as more programs cause it to bloat up. By uninstalling these programs, you will regain space and increase the responsiveness of your computer. To uninstall the unneeded programs, you will need to open up your computer’s Control Panel. This can be found by opening the My Computer (Windows Explorer) program and selecting it from the Drive list on the left side of the screen. If you don’t see the Drive list, which just lists your computer’s hard drive(s), CD/DVD drive(s) and other connected devices, then you can enable it by pressing on the Folders icon or by clicking the View menu, selecting Explorer bar and choosing the Folders option. Once you click on the Control Panel, you will be presented with many items in the right pane of the screen. You will want to select the “Add or Remove Programs” or the “Programs And Features” entry, depending on your Operating System. This will open another window that will list the programs that are installed on your computer.
WARNING: If a program listed here does not look familiar to you, then you may want to leave it alone as it might be a needed program for your particular system. Such as drivers for your graphics card or crucial Windows updates. Look only for programs that you know of and no longer need. Select the program you want to uninstall and click the Change/Remove button, then follow the default prompts.
Step 3: Delete Temporary and Non-Essential Files – Many programs, that you use every day, create additional files that help them to run faster and more efficient. That, in and of itself, is not a problem and is, in fact, desirable. The problem comes when these programs can’t or just don’t clean up after themselves. These additional files are only needed while the program that created them is running. After that, they can and should be removed from your system. Also, while you surf the Internet, your computer stores various information and images from them in a cache. This is also somewhat desirable because if you frequent those pages often, it helps them to load up more quickly, since your computer only needs to look on its own hard drive to find the information rather than downloading it every time you visit the page. The Recycle Bin on your computer also holds wasteful files that need to be removed. So, with all of that said, how do we do it?
There are many programs that are far more reaching than what Windows provides, but we will use they are built-in abilities to do this job. Open up the My Computer program and locate the C: drive in the Folders panel on the left. Right-Click on the C: drive and choose the Properties option. There are several tabs on the window that pops up and depending on your Operating System, the button we need could be on a different tab. Look for the button that reads Disk Cleanup. Press that button and wait for Windows to finish scanning your computer for removable files. When completed, you can select which locations you want to clean up and then click the OK button to start. We are still working on a preferred list of programs that do a far better job than the above Windows option and will write another article when we’ve made our determinations.
Step 4: Run Virus/Adware/Malware/Trojan Removal Software – Viruses are programs written by malicious users designed to cause all sorts of problems for your computer. You should already have Virus software installed on your system to battle these little monsters. If you don’t, then you need to get something fast. Most tops of the line virus protection software programs are well known nowadays, so I don’t really have a list of the best ones, although we will do an exhaustive study of some of the lesser known, less expensive programs out there. For now, you may want to take a look at AVG or Avast. A Google search will bring you to their respective website. Adware and Malware programs are yet another species of little beasts that can be aggressive or passive, but definitely clog up your computer, slowing it down tremendously. For a list of the top 5 Adware/Malware/Trojan Removal programs that we have found, check out my blog link at the bottom of this article.
As stated before, go ahead and acquire one of the programs, in the recommended link on my blog, if you don’t already have a program that can do this and that you trust. Install it and follow the directions.
Step 5: Clean out the Registry – Yes, Again – Why do this step again? Simply because, now that we have removed more programs from your system, via steps 2 through 4, there are more unneeded and wasteful entries in the Registry. You would think that when you uninstall programs, that they would clean out their Registry entries too and some of the better programs will do that, but not all of them do, which makes this step necessary. You might be surprised at just how much more waste the program finds this time around. See the link in Step 1 for a list of the top 5 Registry cleaning software products.
Step 6: Defragment Your Hard Drive – Your hard drive stores all of your computer’s programs and the Registry. OK, you knew that. What you may or may not know, is that the hard drive stores information in blocks of spaces that are a particular size. Depending on how it was formatted, these blocks could be in one of a few different sizes. Each block holds all or a portion of an installed program. For instance, let us say that it is setup to hold blocks in 4k chunks. One program may take up hundreds or thousands of these little blocks, depending on how big the program is. Logically, the programs should be installed sequentially in block 1, block 2, block 3, etc.
When your computer is new, that is pretty much how it happens. Over time, as programs are installed and uninstalled, programs will use up any available block, no matter where it might be, so if the program takes up more space than it is available sequential blocks, your computer will break up your program and install it anywhere it finds an available block. For example, let us say that you install a program that takes up 100 blocks of space. All is well until you uninstall that program and install another program of a different size. If the new program is smaller, then it takes what it needs and all is still well. If the program is bigger than the one it replaced, then the computer will use up the 100 blocks and install the rest of the program in the next set of available blocks which could be many blocks away. Now, this new program is fragmented.
Meaning that some of it is installed here and the rest of it is installed on another section of the hard drive. Now we have two fragments, which still isn’t bad, but can you see if the program had to be installed in several to hundreds of fragments all over the place? That’s right, your computer has to look in all of those locations to get at your one program. The more fragmented programs you have on your computer, the more work your computer has to do to find it and get it up and running and the slower and slower it becomes. This last step reconfigures your hard drive in a way that moves these files around into the sequential order that is the most efficient and fastest for program retrieval. In this step, we will again use the Windows built-in program. There are several alternatives to this, but the Windows version works just fine. To find it, click on your Start button and choose the All Programs option. Locate the Accessories folder and then look in the System Tools folder. The Disk Defragmenter program should be one of the available choices. Run this program and choose the Defragment button.
When this completes, which could take well over an hour depending on how bad the fragmentation is, you are done. It’s probably not a bad idea to reboot your system at this point, just to get a fresh start, but once you do, you should notice quite a difference in performance, if you haven’t already. If you don’t, then it is quite possible that you have an impending hardware issue that may need to be addressed.
0 notes
Text
6 Steps to Rejuvenate Your Slow Computer By Running Virus Removal Software
New Post has been published on https://giveuselife.org/6-steps-to-rejuvenate-your-slow-computer-by-running-virus-removal-software/
6 Steps to Rejuvenate Your Slow Computer By Running Virus Removal Software
You do not should be a computer professional to get extra life out of your creeping, crawling Computer. You may want a primary expertise of computers although and be able to log in as an Administrator. You should be acquainted with the My computer (Windows Explorer) application. Other than that, if you may study, click on buttons and hyperlinks and comply with instructions, then you can get your laptop walking faster and greater efficient, without spending hundreds of dollars doing it. What you could do yourself, will save you the money of hiring a professional.
There is no one application as a way to resolve all of your computers troubles, so it’ll take a few unique ones to get matters operating properly. Before you get began, there are a pair of factors with the intention to save you those procedures from operating nicely. First off, in case your PC has a hardware problem, you they’re higher off replacing the hardware or simply getting a brand new PC. Secondly, if your computer is loaded with Viruses and your Virus Protection packages can not put off them, then you definitely are better off reformatting your difficult pressure and setting out from scratch. Both of these problems are beyond the scope of this newsletter and you may want to are searching for professional help to solve them.
Having the right tools that will help you with those steps will extensively impact how lengthy it takes to finish the processes, but know that that is a time consuming undertaking. it’ll take some hours to completely easy out your gadget, but the effects with be maximum well worth your effort and time. Now don’t permit the following steps intimidate you. It sounds greater complex than it definitely is. That is assuming which you have the proper software program to do the activity and we will advise the great equipment that we have determined for each step.
1. smooth Out the Registry
2. Uninstall software that isn’t always Wished or Used
3. Delete Brief and Non-Vital Files
four. Run Virus/Adware/Malware/Trojan Removal software
five. smooth out the Registry – Yes, Again
6. Defragment Your difficult pressure
Step 1: clean Out the Registry – Caution: The Registry is the vicinity wherein Home windows stores a listing of all of the hardware and software program on your computer and the default settings for them. It in reality does extra than this, however That is the overall idea. Messing around with the Registry is risky, if you do not know what you are doing. That is why deciding on the Right software for this is critical. See the lowest of this Step for a hyperlink to a listing of recommended packages.
It’s far simply not important to perform this step first, but I have found that this may right now boom the performance sufficient to get things transferring faster than if we failed to do it. The software program that you use for this step ought to mechanically save the Registry in its modern country Before ever making any modifications. That way, if something does pass incorrect, it could be reset to its former state. The program have to be smooth to apply and be sponsored through a Customer service group that let you if something should move wrong. pass ahead and acquire one of the programs, inside the advocated link above, in case you do not already have a software which could do that and that you believe. Install it and follow the instructions.
For a list of the pinnacle five Registry Cleaning packages that we’ve reviewed, check out my weblog access for this identical article at the hyperlink at the lowest of this article.
Step 2:
Uninstall software program that isn’t Wanted or Used – Over time, more and more software receives mounted onto your computer. You can use those packages for a while after which they lose their appeal and just take a seat there unused and taking over space in your difficult power and your Registry. in case you not use those programs, then they ought to be removed. with the aid of taking over area to your Registry, they certainly cause it to run slower and slower as more packages motive it to bloat up. through uninstalling those programs, You may regain space and increase the responsiveness of your laptop. To uninstall the unneeded packages, You may need to open up your laptop’s Manage Panel. This will be found by opening the My computer (Home windows Explorer) application and deciding on it from the drive list on the left side of the screen. in case you do not see the pressure list, which just lists your computer systems difficult drive(s), CD/DVD power(s) and other connected gadgets, then you can enable it via pressing on the Folders icon or with the aid of clicking the View menu, selecting Explorer bar and deciding on the Folders choice. After you click on at the Manage Panel, you will be presented with many items within the Right pane of the display screen. You will want to pick out the “Upload or Eliminate programs” or the “packages And Functions” entry, relying in your Working system. this could open every other window so one can listing the packages which might be installed on your laptop.
Warning: If a application listed right here does no longer appearance familiar to you, then You may want to go away it by myself because it is probably a Wanted software to your particular system. Which includes drivers for your pix card or vital Home windows updates. look most effective for applications that you realize of and not want. choose This system you need to uninstall and click on the Exchange/Eliminate button, then follow the default activates.
Step 3: Delete Transient and Non-Crucial Documents – Many applications, that you use every day, create additional Files that assist them to run faster and more green. That, in and of itself, is not a problem and is in reality ideal. The trouble comes when those packages can’t or just don’t easy up after themselves. those additional Documents are simplest Wished whilst This system that created them is walking. After that, they are able to and ought to be eliminated out of your device. Also, whilst you surf the Internet, your laptop stores diverse information and pix from them in a cache. that is Additionally particularly acceptable, because if you common those pages often, it facilitates them to load up greater fast, seeing that your computer best wishes to look on its own hard power to discover the statistics as opposed to downloading it every time you visit the page. The Recycle Bin to your PC Additionally holds wasteful Documents that want to be eliminated. So, with all of that said, how do we do it?
There are many applications which are far greater achieving than what Windows gives, but we will use their constructed in competencies to do that activity. Open up the My computer program and locate the C: force inside the Folders panel at the left. Right-click on at the C: force and pick the Homes alternative. There are numerous tabs at the window that pops up and depending in your Operating system, the button we want might be on a exceptional tab. Look for the button that reads Disk Cleanup. Press that button and look ahead to Windows to complete scanning your laptop for detachable Files. whilst finished, you may pick which locations you need to smooth up after which click on the Adequate button to begin. We are nevertheless working on a favored listing of applications that do a much better job than the above Windows choice and could write some other article when we have made our determinations.
Step four:
Run Virus/Spyware/Malware/Trojan Elimination software program – Viruses are programs written through malicious users designed to cause all forms of issues in your Computer. You must already have Virus software set up to your system to warfare these little monsters. in case you do not, you then need to get something rapid. most pinnacle of the line virus Protection software applications are widely known nowadays, so I do not honestly have a listing of the excellent ones, despite the fact that we can do an exhaustive take a look at of a number of the lesser known, less costly packages available. For now, You could need to take a look at AVG or Avast. A Google search will deliver you to their respective website. Spyware and Malware packages are but another species of little beasts that may be aggressive or passive, however genuinely clog up your laptop, slowing it down tremendously. For a listing of the top 5 Adware/Malware/Trojan Elimination packages that we’ve got determined, check out my weblog link at the bottom of this text.
Run Virus/Spyware/Malware/Trojan Elimination software program – Viruses are programs written through malicious users designed to cause all forms of issues in your laptop. You must already have Virus software set up to your system to warfare these little monsters. in case you do not, you then need to get something rapid. the most pinnacle of the line virus Protection software applications are widely known nowadays, so I do not honestly have a listing of the excellent ones, despite the fact that we can do an exhaustive take a look at of a number of the lesser known, less costly packages available. For now, You could need to take a look at AVG or Avast. A Google search will deliver you to their respective website. Spyware and Malware packages are but another species of little beasts that may be aggressive or passive, however genuinely clog up your laptop, slowing it down tremendously. For a listing of the top 5 Adware/Malware/Trojan Elimination packages that we’ve got determined, check out my weblog link at the bottom of this text.
As said Before, cross beforehand and acquire one of the applications, inside the encouraged hyperlink on my weblog, if you do not already have a software that could try this and which you agree with. Install it and comply with the instructions.
Step five: easy out the Registry – Sure, Again – Why do that step Once more? Sincerely due to the fact, now that we’ve removed more programs from your machine, via steps 2 thru 4, there are extra unneeded and wasteful entries inside the Registry. You will think that while you uninstall packages, that they could easy out their Registry entries too and a number of the better packages will do this, however no longer they all do, which makes this step vital. You might be surprised at simply how tons greater waste This system reveals this time around. See the link in Step 1 for a listing of the pinnacle five Registry Cleansing software products.
Step 6: Defragment Your difficult pressure – Your difficult pressure stores all your computers applications and the Registry. Adequate, you knew that. What You may or may not recognize, is that the tough force shops information in blocks of spaces which might be a selected size. relying on the way it turned into formatted, these blocks could be in certainly one of some distinct sizes. each block holds all or a portion of an set up program. As an instance, lets say that It is set up to preserve blocks in 4k chunks. One application may additionally take in masses or hundreds of these little blocks, depending on how huge This system is. Logically, the programs ought to be installed sequentially in block 1, block 2, block 3, and so on.
whilst your PC is new, This is pretty tons the way it occurs. Over the years, as packages are mounted and uninstalled, programs will expend any to be had block, irrespective of where it is probably, so if This system takes up greater space than There may be available sequential blocks, your PC will break up your application and Deploy it everywhere it reveals an to be had block. For instance, we could say which you Set up a software that takes up a hundred blocks of area. All is properly till you uninstall that program and Deploy any other program of a exclusive size. If the brand new application is smaller, then it takes what it needs and all continues to be nicely. If This system is greater than the one it replaced, then the laptop will deplete the a hundred blocks and Set up the relaxation of The program inside the next set of to be had blocks which may be many blocks away. Now this new program is fragmented.
Meaning that a number of It’s far hooked up here and the relaxation of It is hooked up on any other phase of the tough pressure. Now we have fragments, which still is not bad, however are you able to see if This system needed to be hooked up in numerous to hundreds of fragments all over the vicinity? It’s Right, your laptop has to look in all of those places to get at your one application. The extra fragmented applications you have got for your computer, the greater paintings your computer has to do to discover it and get it up and running and the slower and slower it will become. This ultimate step reconfigures your difficult drive in a way that moves those Files round into the sequential order That is the most efficient and fastest for program retrieval. In this step, we can Again use the Windows constructed in program. There are several alternatives to this, however the Windows model works simply first-rate. To locate it, click in your Start button and pick out the All programs alternative. locate the Accessories folder after which appearance in the system equipment folder. The Disk Defragmenter program have to be one of the to be had picks. Run this program and pick out the Defragment button.
while this completes, that may take nicely over an hour depending on how bad the fragmentation is, you’re completed. It’s likely no longer a bad concept to reboot your gadget at this point, simply to get a clean Start, however Once you do, you must notice quite a distinction in overall performance, if you have not already. in case you don’t, then It is quite viable that you have an coming near near hardware problem that can need to be addressed.
Thank you for reading and experience your rejuvenated laptop.
0 notes
Text
How to Produce Affordable Content Without Sacrificing Quality
Is it really possible to produce affordable content without sacrificing quality?
Any marketer worth their salt should know how important it is to update a website with fresh and relevant content on a regular basis. Google loves content. Customers love content. Content is king. Amen.
But quality content is expensive.
An average market price for a 1500-word article of a decent quality is around $70.
If you suffer from perfectionism, you would need to fork out around $100 (and very often even more) for a superior quality piece of writing.
And it's just one article!
If you post around 3 to 5 pieces per month, it sums up to an average of $300-$500.
You probably won’t be surprised if I tell you that this sum can be lowered significantly.
In most cases, lower price goes hand-in-hand with lower class content.
However, there are ways to produce affordable content without sacrificing quality of the material.
Today, I want to share those techniques with you.
Before you start producing content...
Prior to ordering any kind of content for your website, stop for a minute and think.
“Does this type of content really work for me?”
You see, not every expensive type of content is able to deliver your message in the most effective way. Different content types suit different niches and serve different purposes.
Here are some most popular content types and their approximate prices per piece:
If you've been in your business for quite a while, it will be easier for you to identify what type of content you should focus on.
Say you have infographics, blog articles, and videos on your website. To identify their cost effectiveness, you need to know two things: one, price; and two, popularity metrics (number of views, shares, comments, etc.)
Example:
An infographic that cost you $900 got 2500 views;
You paid $250 for an article and it got viewed 2000 times;
A video that is worth $2000 got 1000 views;
If you divide the cost by the number of views, you'll know how much one view costs you.
An infographic is worth 0,36 cent.
An article – 0,125 cent.
A video - $2.
At this point, it is clear that two most cost-effective types of content in your case are infographics and blog articles.
This is how you identify your type of content in order to cut expenses on something that does not pay off in any way.
If you are just starting to build up your audience, spend some time on your competitors’ websites analyzing their content.
Simply do what I’ve described above, and as you cannot know exact prices, use average ones.
Also, focus on quality rather than quantity.
10 low-quality blog posts may cost just as much as one good article, but then you won’t be able to identify real price per view (as there will be little or no views).
All the money you save in such way is not worth lost customers or lower Google rankings.
How do you actually stop spending so much on content?
Written content
It is the most commonly used content type. It does an amazing job getting the message across. It sells, it educates. Google robots are after it—not to mention that it occupies the biggest part of any webpage.
I believe written content deserves a special treatment, so I will go ahead and dedicate the biggest part of this article to texts, words, and letters.
Here’s what you can do to stop spending so much on written content.
1. Update your old blog posts and articles.
It is truly the cheapest way to get fresh content for your website (in fact, it's free if you do it yourself). Go through your own archives and you'll definitely find content that can be either updated or reworked.
How do you know that your old writing needs some refreshing?
The information in a blog post is outdated. What was acceptable back in 2012 might not be that adequate now. However, your audience still read those posts, and people need advice that would be relevant at the present time. The same applies to crazy designs that scream “Hello, welcome back to the age of CDs and chat rooms”.
The topic is evergreen. People just can’t get enough of certain topics, period.
You have more experience now and have much more to add. Did you find new apps that help fellow travellers book hotel rooms? Update.
Did you just try out an awesome link-building technique and it worked? Update. Did you discover a new way to combat skin issues? You know what to do!
You have more experience now and realize that you have changed your mind. Confess that you were mistaken and describe your new experience.
It takes courage, but people tend to grow both emotionally and professionally, and looking back at your past self you may find yourself thinking “Oh, boy.
I must have been possessed by an evil demon when I told people content marketing is doomed.”
The blog article is not popular and poorly written. Spend one or two evenings polishing and enriching articles you’re slightly embarrassed of.
You’ll get rid of low quality content and at the same time get fresh blog posts at practically no cost. Time for spring cleaning!
2. Reformat or repurpose your own posts
What I mean by that is that one and the same article can be used in many different ways. Here’s what you can do:
use it as a script for a video
use it as a script for a podcasts
publish it as an infographic
publish it as a slide presentation
create an ebook (if you have enough content to work with)
All that is new content that requires very little work and money.
Apart from feeding an always hungry content monster, you’ll learn how your own audience reacts to unconventional content types (like videos or podcasts), investing less than you would have invested doing everything from the ground up.
Also, you’ll get an opportunity to expose yourself to new audiences if you decide to go a step further and republish your articles, presentations, videos, or podcasts on other niche websites.
3. Use rewriting instead of regular writing
In fact, rewriting is often given priority by website owners due to its effectiveness. It takes less time (as writers do not need to spend time on research), content is not plagiarized, and the quality is often high-class.
What is more - it is so much cheaper! If you pay $70 for an article written from scratch, it will cost you only $35-40 to have it rewritten. You can have your own blog posts rewritten or find information elsewhere on the Internet. Professional rewriters can transform articles into brand-new pieces of writing so nobody will accuse you of being dishonest.
Professional rewriters can transform articles into brand-new pieces of writing so nobody will accuse you of being dishonest.
Note: By professional rewriting I mean rewriting done by hand. Do not confuse it with rephrasing that various online article spinning and rewriting tools offer (unless you enjoy staying awake at night correcting grammar).
Apart from that, there’s a danger of getting plagiarized content, as machines do not add ideas or modify already existing ones. They simply rephrase.
Where to look for professional help: Writology, Proofessor, Paraphrasingservices.
4. Use freelancers instead of writing agencies
Yes, it takes time to find a suitable writer. Yes, freelancers are not cheap as well, especially if you hire native English-speakers. Yes, there are writers who fail deadlines and do not deliver what you expected.
Therefore, focus on beginners.
The reality shows that very often they are really hard-working and reliable. And even if they are foreigners, their English level is really good (however, it is advisable to test it beforehand). Apart from that, you’ll be surprised at the speed of their work and respect with which they treat their clients.
Young and aspiring freelancers do not charge much, as they do not have that much experience. What they do have is enthusiasm and diligence that allows them to produce high-quality work, as they need good feedbacks in order to get more clients in the future.
Prices start from $2 per article! Can there be anything cheaper?
Yes, there can!
5. Invite guest writers
Just like freshly-baked freelancers, young bloggers are on a never-ending quest for good reputation and opportunities for exposure. Even talented writers with tons of experience write for others from time to time, as such contribution translates into more traffic for their own blogs.
Therefore, let others know that you accept guest posts: you get free content and your guest writers get to promote their own blogs. However, be sure to write a clear and strict guest posting policy. Your site is no place for spammers.
You can also get in touch with some good writers by yourself. You definitely come across good guest posts on different websites from time to time. Why not invite their authors to write for you, too?
Images
If written content is a means of communication, images usually serve as baits. They set the mood, make the text visually appealing, and get customers’ eyes glued to webpages for a long time.
Finding affordable images that would complement your articles is challenging, but possible.
Below you will find a list of resources that offer free or really cheap images that you can legally use on your websites:
· Pixabay. Offers free photos, illustrations, vector graphics, and videos. Attribution not required.
· Lifeofpix. A community of photographers sharing free pictures for everybody to enjoy. Amazing website design, extensive collection of high-quality pictures, no copyright restrictions.
· Publicdomainarchive. They update their database on a weekly basis. You can also get a premium membership for only $10 per month and download high-resolution photos in bulk.
· Fotolia by Adobe. Numerous free photos, vectors, illustrations, and videos. For some pictures, however, you need to pay, but the price is really affordable (just a couple of cents per image).
· Magdeleine. Some photos do require attribution, some do not. Make sure to check the license type before you download.
· Travelcofeebook. Offers amazing photos (mostly landscapes from travels all over the world). No attribution required.
· Gratisography. Pictures taken by Ryan McGuire are free to download. You may use them for whichever purposes with no attribution.
· MMT. Stunning pictures from Jeffrey Betts are free for commercial use.
Final words
As you can see, ways to protect your money and eliminate unnecessary spending do exist.
There are also other content types that are worth mentioning, but I decided to start with the most common.
Let me know in the comments if you need info on how to get cheap infographics, videos, podcasts, etc. It will be my pleasure to share my secret cheat sheet with you!
Author bio:
Jenna Brandon is a blogger, copywriter, and digital marketer at Writology.com.When she’s not busy studying Google algorithms and writing about link building, she takes stunning pictures of California or cooks pizza. Jenna is also an avid traveler, and she is secretly Italian at heart.
The post How to Produce Affordable Content Without Sacrificing Quality appeared first on Ninja Outreach.
from SM Tips By Minnie https://ninjaoutreach.com/produce-affordable-content/
0 notes
Text
Nine Ways to Get New Mileage From Worn Out Content
Nine Ways to Get New Mileage From Worn Out Content written by John Jantsch read more at Duct Tape Marketing
People don’t have enough time to continue to create the amount of content they need to attract visitors and convert them into leads. I get it. Creating content can be challenging and time-consuming, and coming up with new material regularly can seem impossible.
I’m here to tell you it’s doable, and you don’t even have to start from scratch. You can gain tremendous value just from reusing old content. Derek Halpern of Social Triggers said it well: “You don’t have to create content day in and day out. You just have to work on getting the content you already have in the hands of more people.” Here’s how.
Re-optimize old content
A few years ago, HubSpot wrote a blog post titled, “The Blogging Tactic No One Is Talking About: Optimizing the Past” and it was a keeper. In a nutshell, this post discusses that the company tested updating and re-publishing old blog posts to see if they could get more leverage out of them. The results were hard to ignore. By simply re-optimizing old content, HubSpot was able to increase organic traffic by 106%.
The best news? Theses results aren’t unique to HubSpot. Many businesses are taking this approach and are reaping the benefits of it. My friend Brian Dean, of Backlinko, is one of them. In fact, after testing this theory for just two weeks, Brian saw a 260.7% increase in organic search traffic. Not bad for just optimizing and re-publishing content he already had.
Interested in taking advantage of this? There are just a few simple steps you need to follow:
1. Review your analytics and identify your underperforming content
It isn’t necessary to optimize all material from the past. If you have blog posts or other content that is performing well, let them be (or repurpose them as I’ll outline below). There are two key components you should consider when finding the right content to re-optimize:
Find posts with high traffic but low conversion and figure out how to increase leads on those posts
Find posts with low traffic but high conversion and figure out how to get more visits to those posts
2. Optimize and update that content
Once you determine which posts you’re going to re-optimize, consider updating the following:
Update old images and screenshots to ensure the visuals are still relevant
Update any dated content or hyperlinks within the posts with new information and recent URLs
Add relevant CTAs to the posts to increase conversion
Focus on adding relevant keywords to the content naturally
Consider a content upgrade that might make sense on those pages
3. Republish your content
Once the content is updated, republish it and promote to your network via email and social media channels.
Re-optimization works because Google rewards relevancy and freshness. New visits will come out of sharing content within your network, and those new promotions will lead to new inbound links, also boosting SEO.
Repurpose old content
Optimizing old content may be an excellent way to bring new life to underperforming content, but what can you do to get new mileage out of content that is performing well? You can re-purpose it. By repurposing content, you can continue to gain value from previous content without having to completely reinvent the wheel.
The content you repurpose needs to be high-quality content from your past that will always be relevant to your audience. It’s difficult to repurpose content around fads that may go away as quickly as they appeared.
The key to making this work going forward is to think about this concept ahead of time. What posts would make great presentations? What presentations would make great ebooks? What video would make for a series of blog posts?
It’s also important that you review your analytics to see which content is generating the most interest. The more popular the original content is, the more likely the repurposed content will be popular as well. Essentially, high-quality content can create even more high-quality content.
Once you’ve identified the content that you’d like to repurpose, it’s time to develop the new content. Keep in mind that the goal is to make the content fresh and appealing enough to expand your audience.
How to repurpose content
I’ve found that one of the easiest ways to repurpose content is to start with video and create new content by working backwards from there. It’s amazing how many blogs, infographics, or premium content can spin off from there. I realize, however, that not everybody has video content, so I’ve provided other ways to refresh the content below.
1. Create new blog posts
Turn points discussed in listicles or numbered summary posts into posts of their own. Do the opposite as well by combining a bunch of posts on the same topic and turning them into listicles or summary-based posts.
2. Design an infographic
Take your written content and transform it into a visual infographic. Infographics are a great way to break up data, or take difficult concepts and make them more digestible for the reader.
3. Implement an email series
Emails shouldn’t be long in order to keep your readers’ attention. Take pieces of your content and turn them into a an email campaign that is easy for your readers to consume. You can then promote this series on your blog as a lead conversion opportunity.
4. Develop premium content
Consider gathering related blog posts and turning them into a comprehensive ebook or white paper. You can then use that content as a conversion tool to increase your leads.
5. Create a podcast
People have busy lives and it can be hard to find time to sit down and read an article. Listening to a podcast on their way to work, however, is much more manageable. By repurposing content into podcasts, you create a whole new way to connect with your audience.
6. Create a video series
People love video, and because of this, businesses want to produce as much video content as possible. Instead of brainstorming a new script for each video, use blog posts as the material for your script. This will allow you to produce new videos at a more rapid rate.
Every business should create a series of videos based on the most frequently asked questions.
The list above contains a few of the many ways you can reformat your content into another great piece that will attract your audience. By optimizing and repurposing content from the past, you’ll be able to boost your SEO, reach new audiences, and gain additional credibility and authority within your space. Who wouldn’t want that?
Bottom line, don’t let content just sit there when you can still receive a ton of value from it.
Have you been able to get new mileage from worn out content? If so, I’d love to hear about it!
from Duct Tape Marketing https://www.ducttapemarketing.com/worn-out-content/
0 notes
Photo

One-upping the NES Classic Edition with the Raspberry Pi 3 and RetroPie
Shoddy specialist sheets are awesome for little activities like this one.
Against my better judgment, I've attempted two or three circumstances to obstacle one of those delightful little $60 smaller than normal NES Classic Editions—once when Amazon put some of its constrained stock on the web and smashed its own particular webpage, and once when Walmart was transporting out little amounts each day half a month prior. In both cases, I fizzled.
Be that as it may, the moronic tingle of sentimentality can't generally be scratched by consistent contemplations like "do you truly need to pay cash for Super Mario Bros. 3 once more," and "Castlevania II: Simon's Quest is most likely the weakest of the three NES Castlevania diversions." Since it's not so much clear if or when those little smaller than usual NESes will turn out to be promptly accessible, I chose to channel that little wad of extra money and the yearning for some wistfulness filled gaming into a DIY extend.
Surprisingly the NES Classic Edition is only a little Linux-fueled board inside an adorable case, and it's absolutely conceivable to assemble your own minor Linux-controlled PC inside a charming case without spending significantly more than $60. Also, by utilizing the Raspberry Pi and uninhibitedly accessible programming, you can manufacture something fit for doing an entire hell of significantly more than playing a similar 30 NES amusements again and again.
Setting objectives
I think that its supportive while seeking after another DIY venture to begin with a rundown of requirements and needs and go from that point—potentially a remaining from my IT days helping the non-actually slanted (and effectively innovation disinclined) settle on obtaining choices. With my homebrew NES Classic, I needed to:
Spend something near the same $60 that the NES Classic Edition costs, however I would be OK the length of the bill of materials came in under $100 (in light of the fact that that is generally the same number of Amazon indicates as I have commit to this venture).
Make something comparable in size to the NES Classic Edition.
Make something sufficiently capable to effectively imitate 8-and 16-bit comforts—anything well beyond that would be extraordinary, as well, yet at these costs you won't copy many amusements discharged after the finish of the '90s.
Incorporate coordinated Bluetooth and Wi-Fi for remote controllers and simple system/Internet network, individually.
Fabricate something that, once completely arranged, would give a generally simple to-utilize and appealing console-like UI.
On account of all that, these are the parts I settled on:
For the heart of the framework, I picked the Raspberry Pi 3 Model B, accessible for $40 from Amazon with a 5V 2.5A smaller scale USB control connector and little heatsinks (on the off chance that you as of now have the base prescribed 5V 2.0A miniaturized scale USB connector, the board itself can be had for around $35). This thing ticks a great deal of boxes—it's moderately modest and generally effective, and it can without much of a stretch handle anything from the first PlayStation on down (Nintendo 64 and Dreamcast copying is offered yet by and large excessively carriage and laggy, making it impossible to be usable by and large; anything fresher is a no-go). It has the incorporated Bluetooth and Wi-Fi I needed and in addition a lot of ports for wired adornments. What's more, the Raspberry Pi is a super-well known lineup of devotee sheets with huge amounts of authority and group bolster.
The Pi has no implicit stockpiling, so you'll require a microSD card; I as of now have Samsung's 64GB EVO card that as of now runs you $20. SD card models and costs are continually fluctuating, however—in the event that I needed to purchase something as of this written work I'd get either a 32GB or 64GB Samsung EVO Select card for $10 or $18, individually. These are all needless excess limit savvy, yet I need to leave a lot of space for future library development. Furthermore, whatever card you get, you would prefer not to modest out—even the best microSD cards don't have stellar execution, and that is certainly genuine when you're utilizing them as the essential stockpiling drive on a PC instead of as a place to dump huge photograph or video records. The Wirecutter says that Samsung's cards as a rule hang with or conveniently beat offerings from different organizations, which is adequate for me.
The official Raspberry Pi 3 case, accessible for around $8. There are parcels and bunches of various Pi cases accessible, from modest, creaky plastic numbers to sleeker aluminum variants to forte cases with dynamic cooling frameworks. I proceeded with the official model since it was modest, it's unpretentious, and it can be totally dismantled and reassembled without apparatuses.
A couple of Buffalo Classic USB Gamepads for about $13 each. Non mainstream analysts say that these SNES-style gamepads feel precisely like the genuine article, and they have 5.5-foot links that are significantly more liberal than the NES Classic Edition's 2.5-foot links. I as of now have PS3 and PS4 controllers that will work wired and remotely, however as I would see it more established 8-and 16-bit amusements simply feel better with a lighter, more straightforward gamepad. The cushion you utilize is truly up to you; obstinate idealists who wouldn't fret dongles can discover USB connectors for their unique gamepads in the event that they require the vibe of the real thing. Most nonexclusive USB and Bluetooth cushions will work fine, as well.
With the 64GB microSD card, that bill of materials comes to around $92, which was close to the highest point of my value go yet at the same time sensible for what I was getting. Purchasing the 32GB card and dropping to one gamepad (the NES Classic just accompanies one, all things considered) gets you down to around $70 without yielding anything major. A significant number of these parts are additionally sufficiently normal that you could spare some cash by simply utilizing things you as of now have lying around (and for our motivations I'm as of now expecting you needn't bother with a HDMI link since it's 2016 and we're all lousy with HDMI links; here's a 3-foot one for $5 and a 6-foot one for $7 on the off chance that you require).
Assembling our little box is absurdly simple, and you should have no issue with it regardless of the possibility that you've never opened up a PC tower in your life. The official Pi case parts into five separate pieces, all held together with maintenance tabs that force away with firm weight: the base, the top, the top, and both sides/port spreads.
Totally dismantle the case by pulling off the sides and afterward squeezing in on the bolt tabs so you can pull up the top. At that point, take the Pi from its case and slide it into the base, ensuring that the microSD opening lines up with its set pattern on the front of the case. Try not to compel the board into the case—in case you're experiencing difficulty, put the SD space side of the Pi into the case at a 45 degree point, and after that lower the back end of the Pi into the case. Little plastic tabs ought to stick up out of the board's back two mounting openings on the off chance that you did it accurately. At that point, snap the top and sides of the case back together, and you're finished! In the event that you purchased heatsinks, you can stick them to the chips on the highest point of the board anytime in this procedure, including after the Pi is now for the situation.
That is the simple part. Programming is more precarious, however not inconceivably so.
Programming setup
For the following parts of the procedure, you'll require:
A Mac, Windows, or Linux PC with a SD card space for stacking the Pi's working framework.
A USB console or gamepad for setup, upkeep, and gameplay.
Making retro diversion consoles is a genuinely regular utilize case for the Pi, so there are a couple of various working framework decisions out there. The vast majority of them include running libretro and its emulators on top of the Raspbian working framework, and the most conspicuous additionally incorporate the EmulationStation frontend.
The best bolstered, most dynamic of these alternatives is RetroPie, which combines these fixings into a bundle that is generally simple to utilize, outwardly engaging, and adaptable. It additionally incorporates a colossal number of emulators for both consoles and different PCs, however, as I said, nothing more up to date than the first PlayStation will run reliably well on the Pi 3's equipment (the more current frameworks are bound to the x86 variant of RetroPie, which looks and works essentially the same yet is based on top of Ubuntu and can keep running on more intense and costly equipment).
The principal thing you'll have to do is drop a RetroPie boot picture on your SD card. Since RetroPie is Linux-based and utilizes the ext4 filesystem, Windows PCs and Macs can't locally connect with the card once you've reformatted it. The RetroPie download page is here. The imaging apparatus that the RetroPie engineers prescribe varies relying upon your working framework—Win32DiskImager for Windows, Apple Pi Baker for macOS, and Unetbootin for Linux—yet the fundamental procedure is the same. Decompress the .gz record you downloaded from the RetroPie webpage, open the device, and select the .img document you just unfastened. Point the instrument at your SD card—if the device doesn't see it, you may need to configuration it as a FAT32 plate first—and let it do its thing.
Once the circle picture has been replicated to the SD card, haul it out and place it into the Pi, and after that connect the Pi to the show with a HDMI link, connect a controller or console to, and afterward associate with power. The framework should boot up and gone through some first-time setup things (if the Pi's red pointer light goes ahead however nothing else happens, the card may not be arranged accurately, and you ought to attempt once more).
On the off chance that you did everything appropriate, following a few minutes you'll see an EmulationStation incite requesting that you associate and arrange a gamepad. Push down any catch on your gamepad, and you'll naturally be made a request to guide all the controller catches. In case you're utilizing the Buffalo gamepad I got, it will request that you delineate catches the gamepad doesn't have; quite recently hold down whatever other catch on the gamepad to skip them, and afterward hold down any catch again to enter the fundamental EmulationStation UI.
All you'll see as a matter of course is a passage for RetroPie that gives you access to a cluster of settings—this is absolutely typical, and you'll see sections for different frameworks fly up as you exchange ROMs to the Pi. You can explore through numerous o
0 notes
Last Seen Blogs

marimiae
mari's garage notes

jjt73
Meh

farmsbazaarin-blog
Farmsbazaar

topnotchdongs
TopNotchDongs

united-love-coaches
United Love Coaches