#and sealed it together with UV resin
Text
i have begun my jobu tupaki costume
#uhhhh me#halloween diaries#it's the white bagel dress#today i went to the thrift store and bought some white fabric but did not find a suitablr white dress#i made her pearl earrings with some beads and wire and earring bases we already had at home#and sealed it together with UV resin#i need a LOT of pearls
7 notes
·
View notes
Text
NOW! For the main event! The armor!
First you will need to draw out and pattern your pieces.

Pin your pattern pieces to your doublet and make any adjustments.

Cut out your armor from the thicker veg tan leather (7-9 oz)
After beveling the edges and poking and punching any holes needed, each piece was placed in a bath of water with a bit of vinegar and dish soap. Soaked until nice and soft and floppy.

Stitch your pauldrons together while moist then form as they should be.
Form your armor while damp and moist.

Now dye your pieces. You may need a couple coats.
Punch riveting holes.
After dying, I lightly brushed Alumilite silver powder over the black and then wiped it off to give it that metallic shine followed by dusting the edges with a gold powder.

Don't forget to burnish your edges. This is a finishing touch that will round your edges and take out the roughness and tool marks.
Instead of wax, I used a burnishing gum called Tokonole
https://www.amazon.com/gp/product/B017X8GL9A/ref=ppx_yo_dt_b_asin_title_o00_s00?ie=UTF8&psc=1
I finished the leather with Resolene to give it a nice shine.
But wait! We're not done!
We need to harden the leather!

To harden my pieces I did a few coats of UV resin. Hitting each coat with the UV light.

The top parts of the pauldrons you are going to cover in the same fabric as your doublet with the trim/bias also. The triangles cut out with a heat tool to seal the edges.


Rivet your armor together and you are now complete!
#cosplay#armor making#leather#assassins creed cosplay#assassin's creed#ezio assassins creed#ezio auditore
53 notes
·
View notes
Text
The awaited shrink plastic earring walkthrough (NOT A TUTORIAL!! DO SOME OF YOUR OWN RESEARCH PLEASE)
Hello hi hello! I've made a few pairs of earrings now, and especially on the Black Book pair I've gotten a few folks asking for instructions on how I did it!
The images are sorted by number so I could fit them all in one post. I am also still very much learning as I have only made a few of these myself, so please do your own experimentation and research to better understand the processes!
Let's get right into it !
I start by making up the rough idea in the size I would like the finished product. This will be my reference for all measurements.
I then use my shrink ruler (a 10cm by 10cm square with markings, then shrunk for a fairly accurate translation of size) to figure out the rough dimensions of the un-shrunk design.
I use the centimeter measurement to draft the rough size and shape of the design.
Connect the lines together with each measurement.

5. Make the design more fluid/more alike the original design based on the drafted shape.
6. Repeat the same for any extra shapes. The moon circles needed a 2cm diameter.
7. Place the shrink plastic over the design, and trace the rough shape onto it using any form of marker. non-permanent is preferred.
8. Lay out the pieces, and dont forget to flip the designs if applicable.
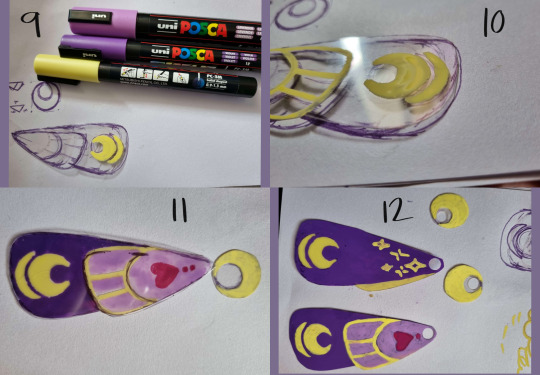
9. Start transferring the design onto the shrink plastic using the markers of your choice. Hold the cut plastic over the template to get accurate markings.
10. Wait for the marker to dry around the edges of the design before doing the next colour. This applies no matter what sort of marker you are using.
11. To get mirrored designs, finish one and flip it over, then use that as the new template.
12. finish the pieces, and add back designs if applicable. Use a hole punch to make space for the jump rings.
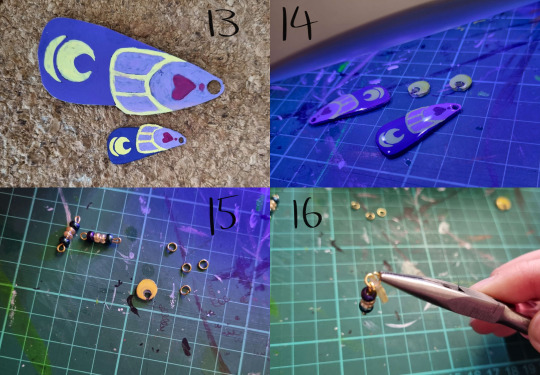
13. Shrinking time! use a heat gun to shrink the plastic according to its attached instructions. Be careful of heating up metal/pliers/tweezers, they get Very Hot Very Quick
14. I use UV resin to set in the design. I use a toothpick to spread the resin, then cure it under the UV light. Refer to individual product instructions for curing time, it varies heavily!
15. Gather and assemble any extra pieces, such as beads, jump rings, earring posts, and base pieces.
16. place two pieces on an opened jump ring, then close it to lock in the positioning. Make sure the pieces are in the right direction!
--Not pictured- Glue the earring posts on the back of the earring. Not applicable with hook earrings

17. do the same for the bottom pieces, once again ensuring they face in the correct direction. Jump rings can be undone, but it weakens the metal to be constantly bent.
18. Display and wear!

And the finished Product!
Once again, do some of your own research, This is mostly just my personal guide for how I make earrings currently! The same logic can be applied to charms.
A few things I have learnt-
Use permanent marker where possible. Paint pens like the ones I have used will shrink unnaturally, and crack on the surface meaning it is even more necessary to seal the design.
Make your own test square- different brands of shrink plastic will shrink differently, at different ratios and sometimes unnaturally. It is also a good opportunity to test how your markers work on the plastic, and which thicknesses are best for fine details.
Don't expect them to turn out the same each time- If you are making multiple of one design, remember that it is by hand and not a perfect manufactured piece. There will always be variations, so go into it with that knowledge.
Use each pair as a learning experience- Now that I've made this design, I know that I would like the wings to be larger by about a centimeter, so I will adjust the template before making a new one. Always learn something new from it!
Feel free to ask any questions, I am more than happy to answer! I do hope to sell some earrings in the future, so keep an eye out for that as well!
REQUESTED TAGS! @im-not-a-l0ser @strangeandinteresting
8 notes
·
View notes
Text
I’ve been working on my silly little blackwork proof of concept piece, and hear me out. Blackwork embroidery coasters. I found 4” round acrylic disks on Amazon, so what if I sandwiched blackwork embroidery between two disks? The only problem is how to make it all stick together and seal the sides so the embroidery doesn’t get wet. And then I thought, what about UV resin? That should dry clear enough, right?
3 notes
·
View notes
Text
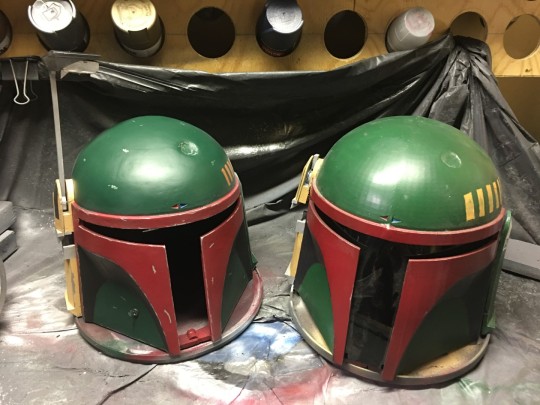
Boba Fett Helmet (Take 2)
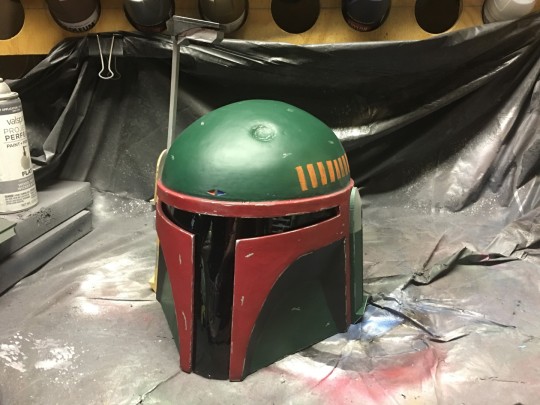
Apparently I never actually posted the original on Tumblr. Hmm. Should I post it separately, or just combine it into this one about the new one? I'll combine them.
VERSION 1 (The not-so-good one)
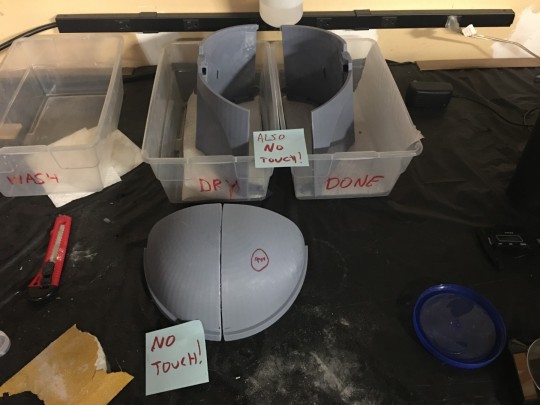
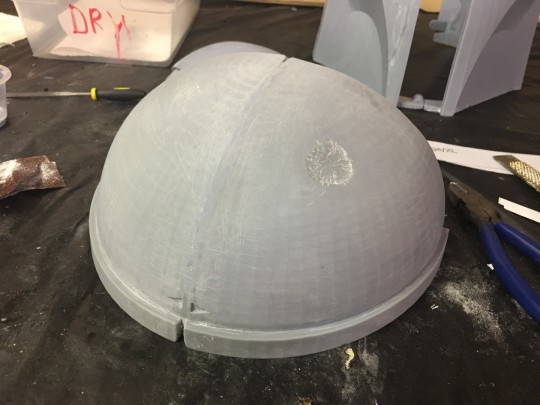
I've gone into detail about advantages and disadvantages of printing in resin, and they all apply with this first attempt at printing the helmet. Resin printers generally have smaller build plates, and even though the Elegoo Saturn's main selling point was its large plate, it was still too small to print these pieces without further cutting them down. The two bottom pieces needed to be cut in half, and the dome had to be cut into quarters. Because of this, there were many gaps to fill in and seams to try to cover up, and some parts didn't line up 100%.
Also: in a rare case of the resin printer's precise detail working *against* me, you may notice a lot of polygons from the 3D model showing through despite my best sanding efforts. ALSO also: Yes, I do have to leave sticky notes for myself reminding me to leave things the hell alone while glue is drying.

My main method of filling in seams and gaps was to just drip resin into them and hit it with my UV flashlight. You can also do this to "weld" resin print pieces together, but I find it easier to use superglue to hold them together, then seal the attachment points with resin. If I spent a little more time, I probably could have completely eliminated those dome seams.
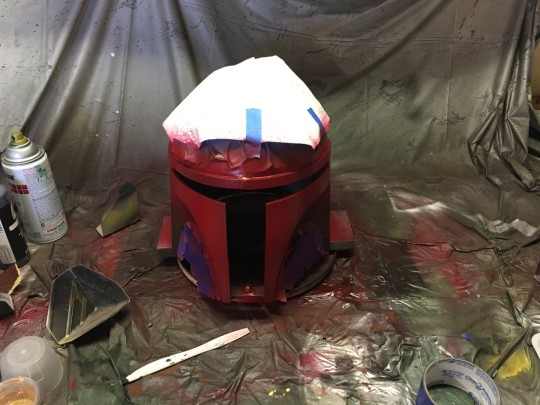
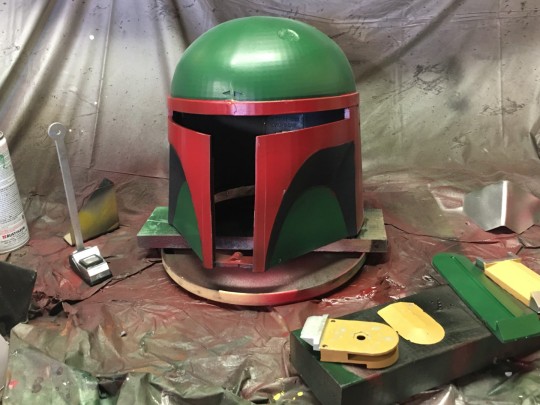
Time to paint. Did a whole coat of green, then taped the crap out of it to do the red visor part. Didn't bother taping the cheek indents because I was going to have to paint over them anyway, so it didn't matter if they got red on them. I ended up doing them by hand instead of spray painting. I also had to do the tan ear pieces by hand because I didn't have any tan spray paint.

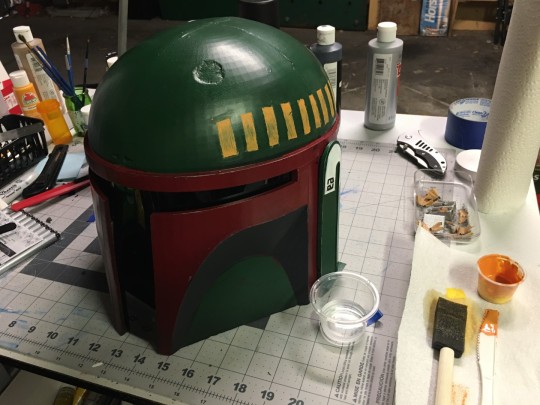
You may notice the "brow" doesn't quite line up with the bottom, and because of that the antenna base that's supposed to sit flat against the side of the helmet...doesn't, and leaves a pretty big gap. Besides just looking wrong, this made it difficult to glue the piece on because it left a lot less contact area with the helmet. The left ear piece warped while printing, so that in addition to the brow sticking out too far kept it from sitting flat. And for some reason the antenna came out really bendy, so it drooped under the weight of the rangefinder.
So yeah! That's everything wrong with version 1, and why I decided to give it another try with my new printer.
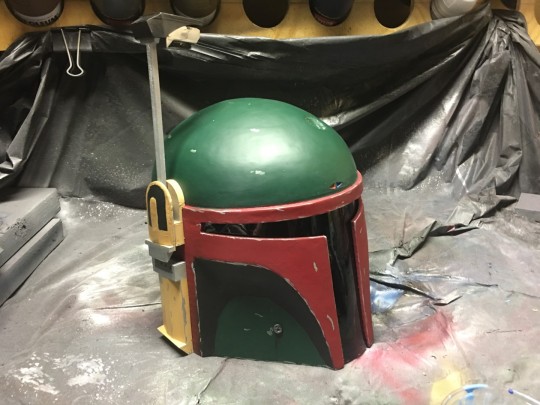
VERSION 2
I'm glad I experimented with the Bo Katan helmet first, because I learned a lot of helpful things from that project. Like the fact that my head isn't as big as I thought, so I don't need to print large sized helmets. Also that it's better it to just wait out the hours for high-quality prints, than to rush them and try to fix the flaws afterward.
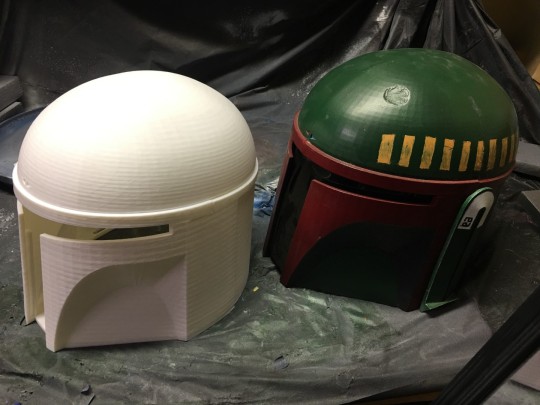
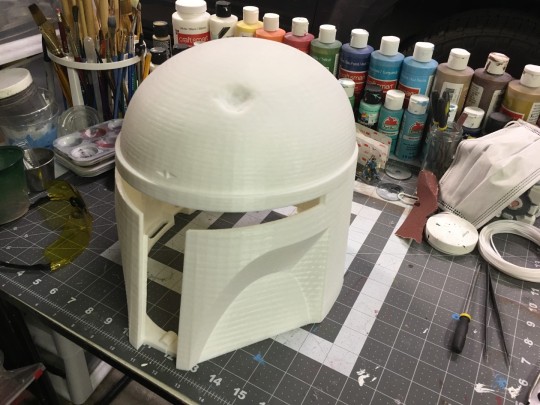
Because this helmet is slightly smaller than the first one, and my filament printer has a massive build plate, I didn't need to cut any of the pieces to fit. I was even able to print the whole dome. The helmet model consists of two bottom halves, a vent section that goes between them on the back, and the dome. Shockingly, printing them as designed does wonders for fitting them together and much more effectively minimizes gaps, seams and alignment issues.
Fortunately, the less detailed printing method made the polygons much less of a problem. Unfortunately, much sanding and filler is needed to smooth out those rough layer lines.
NOTE: I use a caulk called Kwik Seal for filling and smoothing, but if you go out to get some of this stuff to use yourself MAKE SURE you pay attention to the labels and get the white one. There's also a transparent version that comes in tubes that look exactly the same except it says "transparent." The transparent stuff SUCKS for prop making. It's VERY sticky, and according to the label it can take 2+ weeks to fully dry and cure before you can sand or paint it. The white stuff has a much more manageable consistency, isn't sticky at all, and dries in MINUTES. And yes, I did learn this the hard way. Luckily it didn't ruin anything.
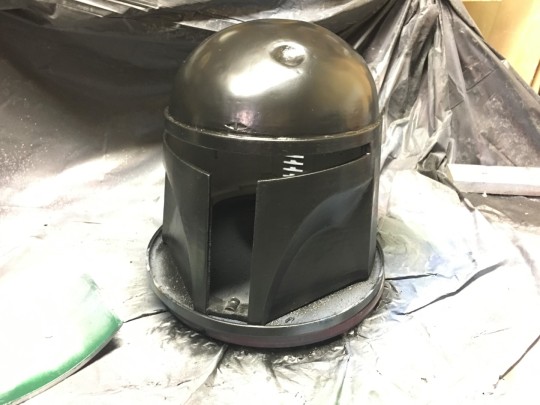
And just to be sure it's absolutely as smooth as I can possibly get it, I hit it with two coats of Plasti-Dip.
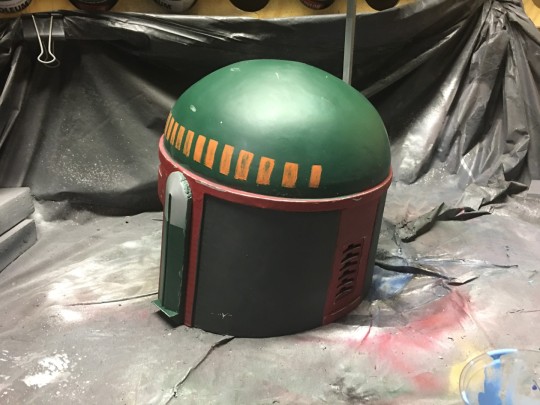
And yeah! Pretty much the same painting process as the first one, since that actually worked out pretty well. Except I actually got some tan spray paint to do the ear pieces. And the stripes are actually orange this time. On version 1 the paint went on orange, but faded to an almost yellow when it dried. So I just used a darker orange. Not thrilled with how they turned out, but I decided to let it go before I ruined something trying to redo them too many times.
AND THE ANTENNA ISN'T DROOPING ANYMORE. Resin is weird sometimes. I figured it *must* have been something to do with curing it, but no amount of extra time in the UV bucket would make the first antenna less rubbery. I even tried reprinting it and modified it to make it detachable so I wouldn't have to rip the whole base apart again to change it out, but it still came out droopy. The good news is I never actually glued the rangefinder onto the first antenna, so I was able to just pop it off and stick it on the new one, and I didn't have to print another one.
The files to print this helmet can be found on Thingiverse.
7 notes
·
View notes
Text
WPC Wall Panels: Revolutionizing Interior and Exterior Spaces
Uses:
WPC Wall Panels are versatile building materials that find applications in various settings:
Interior Cladding: WPC wall panels are extensively used for interior cladding in residential and commercial spaces. They add warmth and texture to walls, creating a cozy and inviting ambiance in living rooms, bedrooms, offices, and restaurants.
Exterior Facades: WPC wall panels serve as durable and weather-resistant cladding materials for exterior facades of buildings. They protect the underlying structure from moisture, UV radiation, and harsh weather conditions while enhancing the curb appeal of homes, hotels, and commercial establishments.
Partition Walls: WPC panels are employed to create partition walls in open-plan spaces, providing privacy without sacrificing visual connectivity. They offer a flexible and cost-effective solution for dividing large areas into functional zones in offices, conference rooms, and event venues.
Accent Walls: WPC wall panels are used to create accent walls that serve as focal points in interior design schemes. Whether installed behind a bed in a bedroom or as a backdrop for a reception area in a hotel, these panels add depth, dimension, and visual interest to spaces.
Features:
WPC wall panels boast a range of features that make them popular among architects, designers, and homeowners:
Natural Wood Aesthetic: WPC panels mimic the appearance of natural wood, offering the warmth, texture, and visual appeal of timber without the maintenance requirements.
Weather Resistance: WPC panels are highly resistant to moisture, humidity, UV radiation, and temperature fluctuations. They retain their color, shape, and structural integrity even in harsh outdoor environments.
Low Maintenance: Unlike traditional wood panels, WPC panels require minimal maintenance. They do not need painting, staining, or sealing, making them ideal for busy homeowners and commercial property owners.
Dimensional Stability: WPC panels exhibit excellent dimensional stability, resisting warping, swelling, and shrinking over time. This ensures long-term durability and performance in both indoor and outdoor applications.
Easy Installation: WPC wall panels are lightweight and easy to install using standard carpentry tools. They can be mounted directly onto studs or existing walls, reducing installation time and labor costs.
Manufacturing Process:
The manufacturing process of WPC wall panels involves several key steps:
Material Preparation: Wood fibers or flour are combined with thermoplastic resins such as polyethylene (PE), polypropylene (PP), or polyvinyl chloride (PVC). These materials may also include additives such as stabilizers, colorants, and UV inhibitors.
Mixing: The wood fibers and plastic resins are mixed together in a blending chamber to form a homogeneous mixture. The mixture is heated to facilitate bonding between the fibers and resins.
Extrusion: The heated mixture is then extruded through a die to form WPC profiles with the desired shape and dimensions. The extruded profiles are cooled and cut to the required lengths.
Surface Treatment: Optional surface treatments such as embossing, sanding, or coating may be applied to enhance texture, appearance, and performance. These treatments can also improve the weather resistance and durability of the panels.
Quality Control: Finished WPC wall panels undergo rigorous quality control checks to ensure they meet industry standards for strength, dimensional accuracy, and appearance. Panels that meet the specified criteria are packaged and prepared for distribution.
Applications:
WPC wall panels are used in a wide range of applications across various sectors:
Residential Construction: WPC panels are popular choices for residential construction projects, including single-family homes, apartments, and condominiums. They are used for both interior and exterior applications, providing homeowners with durable, low-maintenance, and aesthetically pleasing wall cladding solutions.
Commercial Buildings: In commercial buildings such as offices, retail stores, hotels, and restaurants, WPC wall panels are used to create stylish and functional interior spaces. They help enhance the ambiance, improve acoustic performance, and contribute to the overall design aesthetic of the premises.
Industrial Facilities: WPC wall panels are also used in industrial facilities such as warehouses, factories, and production plants. They offer durable and easy-to-clean surfaces that can withstand the rigors of industrial operations while providing an attractive and modern appearance.
Public Spaces: WPC panels are utilized in public spaces such as schools, hospitals, airports, and recreational facilities. They meet stringent safety and hygiene standards, making them suitable for high-traffic areas where cleanliness and durability are paramount.
WPC Panel Manufacturers in India:
India is home to several manufacturers specializing in the production of WPC wall panels. WPC Panel Manufacturers in India utilize advanced technology and high-quality materials to produce panels that meet the needs of the domestic and international markets.
WPC Wall Panels Manufacturers in India
In India, there is a growing presence of manufacturers specializing in the production of WPC (Wood Plastic Composite) wall panels. WPC Wall Panels Manufacturers in India leverage advanced technology and sustainable practices to produce high-quality panels that cater to the diverse needs of the construction industry. With a focus on innovation, durability, and aesthetic appeal, WPC wall panel manufacturers in India offer a wide range of designs, colors, and finishes to meet the evolving demands of architects, designers, and homeowners. Through their commitment to quality and customer satisfaction, these manufacturers contribute to the widespread adoption of WPC panels as a versatile and sustainable solution for interior and exterior cladding applications.
Conclusion:
WPC wall panels have emerged as versatile and sustainable building materials that offer a perfect blend of aesthetics, durability, and ease of installation. With their natural wood look, weather resistance, low maintenance, and wide range of applications, WPC panels are revolutionizing interior and exterior spaces in residential, commercial, and industrial settings. As the construction industry continues to prioritize sustainability and innovation, WPC wall panels are expected to play an increasingly significant role in shaping the future of building design and construction.
FAQ:
Q: Are WPC wall panels suitable for outdoor use?
A: Yes, WPC wall panels are highly durable and weather-resistant, making them suitable for outdoor applications such as exterior cladding, fencing, and decking. They are designed to withstand exposure to sunlight, moisture, and temperature fluctuations without warping, cracking, or fading.
Q: How do WPC panels compare to traditional wood panels in terms of durability?
A: WPC panels offer superior durability compared to traditional wood panels. They are resistant to moisture, rot, insects, and fungal decay, making them ideal for environments prone to humidity and moisture. Additionally, WPC panels require minimal maintenance and do not require painting, staining, or sealing, unlike wood panels that may require regular upkeep to maintain their appearance and structural integrity.
Q: Can WPC wall panels be installed in wet areas such as bathrooms and kitchens?
A: Yes, WPC wall panels are suitable for installation in wet areas such as bathrooms, kitchens, and laundry rooms. They are moisture-resistant and non-porous, preventing water absorption and minimizing the risk of mold and mildew growth. Additionally, WPC panels provide a seamless and easy-to-clean surface, making them ideal for areas exposed to water splashes and spills.
Q: Are WPC wall panels environmentally friendly?
A: Yes, WPC wall panels are considered environmentally friendly compared to traditional wood panels. They are made from a blend of recycled wood fibers and plastic polymers, reducing the demand for virgin timber and plastic materials. Additionally, WPC panels are recyclable at the end of their lifespan, contributing to resource conservation and waste reduction efforts.
Q: Can WPC wall panels be painted or stained to match existing decor?
A: While WPC panels come in a variety of colors and finishes, they can be painted or stained if desired. However, it's essential to choose paint or stain products specifically formulated for use on plastic surfaces and follow the manufacturer's recommendations for preparation and application. Keep in mind that painting or staining may alter the texture and appearance of the panels, so it's advisable to test a small area first to ensure satisfactory results.
0 notes
Text
Demystifying the HDPE Bags Manufacturing Process: From Raw Material to Finished Product
HDPE (High-Density Polyethylene) bags are widely used in various industries for packaging due to their durability, flexibility, and resistance to moisture and chemicals. Understanding the manufacturing process of HDPE bags is essential for businesses seeking high-quality packaging solutions. In this comprehensive guide, we'll delve into the intricacies of the HDPE bags manufacturing process, from the sourcing of raw materials to the production of finished products, with a focus on Singhal Industries, a leading Manufacturer of flexible packaging products known for its expertise and innovation.
The manufacturing process of HDPE (High-Density Polyethylene) bags is a multifaceted journey that begins with the careful selection and sourcing of raw materials. HDPE resin, the primary raw material for bag production, undergoes an extrusion process where it is melted and formed into a continuous profile. This extruded material is then cooled and solidified into a thin film through a film formation process. Next, the film may undergo printing and lamination processes to add designs, logos, or product information and enhance its properties. Bag conversion follows, where the printed and laminated HDPE film is transformed into finished bags through cutting, sealing, and finishing processes. Throughout the manufacturing journey, stringent quality control measures are implemented to ensure the integrity and consistency of HDPE bags. This includes testing for physical properties, visual appearance, and performance characteristics to meet industry standards and customer expectations.
Additionally, a focus on sustainability and environmental impact drives initiatives such as recycling programs and waste reduction strategies, aligning with circular economy principles. Collaborating with reputable manufacturers like Singhal Industries ensures businesses receive high-quality HDPE bags tailored to their specific needs, backed by expertise, innovation, and a commitment to sustainability.
Sourcing Raw Materials
Introduction to HDPE as a raw material for bag manufacturing.
Exploration of the sourcing process for HDPE resin, including quality assessment and compliance with industry standards.
Discussion on the environmental considerations and sustainability practices in raw material sourcing.
Extrusion Process
Overview of the extrusion process, where HDPE resin is melted and formed into a continuous profile.
Explanation of the different types of extruders and their functions in the manufacturing process.
Examination of temperature control, pressure regulation, and other parameters critical for extrusion.
Film Formation
Detailed explanation of the film formation stage, where the extruded Hdpe grow bags wholesale resin is cooled and solidified into a thin film.
Discussion on film thickness control, gauge variation, and film properties such as clarity, strength, and flexibility.
Introduction to additives and treatments used to enhance film properties, such as UV stabilization, anti-static agents, and slip agents.
Printing and Lamination
Overview of the printing process, where designs, logos, and product information are applied to the HDPE film.
Explanation of printing techniques such as flexography, gravure, and digital printing.
Discussion on lamination processes, where multiple layers of film are bonded together to create laminated Hdpe bags manufacturing process with enhanced properties.
Bag Conversion
Introduction to the bag conversion stage, where the printed and laminated HDPE film is converted into finished bags.
Explanation of various bag making processes, including cutting, sealing, and finishing.
Discussion on customization options such as bag size, shape, handle type, and closure mechanism.
Quality Control and Assurance
Exploration of quality control measures implemented throughout the manufacturing process to ensure the consistency and integrity of HDPE bags.
Explanation of testing protocols for physical properties, visual appearance, and performance characteristics.
Discussion on certifications, standards compliance, and traceability practices for quality assurance.
Sustainability and Environmental Impact
Examination of sustainable practices and initiatives in HDPE bag manufacturing, such as recycling programs, waste reduction strategies, and eco-friendly materials.
Discussion on the environmental impact of 50 kg bag manufacturer and efforts to minimize carbon footprint and promote circular economy principles.
Case Studies and Success Stories
Presentation of case studies and success stories showcasing Singhal Industries' expertise and innovation in HDPE bag manufacturing.
Highlighting examples of customized solutions, cost savings, and improved packaging performance achieved through collaboration with Singhal Industries.
Conclusion:
In conclusion, the manufacturing process of HDPE bags is a complex and intricate journey from raw material sourcing to finished product delivery. By understanding the various stages and considerations involved in HDPE bag manufacturing, businesses can make informed decisions and partner with reputable manufacturers like Singhal Industries to meet their packaging needs effectively. With a focus on quality, innovation, and sustainability, Singhal Industries continues to lead the way in providing high-quality HDPE bags tailored to the unique requirements of its customers.
Frequently asked questions
Q1: What is HDPE, and why is it used for bag manufacturing?
A1: HDPE (High-Density Polyethylene) is a thermoplastic polymer known for its high strength-to-density ratio, making it suitable for various applications, including bag manufacturing. Its durability, flexibility, and resistance to moisture and chemicals make it ideal for packaging purposes.
Q2: How is HDPE resin sourced for bag production?
A2: HDPE resin is typically sourced from reputable suppliers who provide high-quality raw materials. Manufacturers assess the resin's quality, purity, and compliance with industry standards before incorporating it into the manufacturing process.
Q3: What is the extrusion process, and how is it utilized in HDPE bag manufacturing?
A3: The extrusion process involves melting HDPE resin and forming it into a continuous profile. In HDPE bag manufacturing, this process creates a thin film of HDPE, which serves as the base material for the bags.
Q4: What are the key steps involved in converting HDPE film into finished bags?
A4: The conversion process includes printing and lamination to add designs and enhance properties, followed by bag-making processes such as cutting, sealing, and finishing. These steps transform the HDPE film into functional bags ready for use.
Q5: How are quality and consistency ensured throughout the manufacturing process?
A5: Manufacturers implement stringent quality control measures, including testing for physical properties, visual appearance, and performance characteristics. These measures help maintain the integrity and consistency of HDPE bags.
Q6: Are HDPE bags environmentally friendly?
A6: HDPE bags can be environmentally friendly when produced and disposed of responsibly. Manufacturers may adopt sustainable practices such as recycling programs and waste reduction strategies to minimize environmental impact.
Q7: How can businesses collaborate with manufacturers like Singhal Industries for their HDPE bag needs?
A7: Businesses can partner with reputable manufacturers like Singhal Industries to receive high-quality HDPE bags tailored to their specific requirements. By leveraging expertise, innovation, and a commitment to sustainability, manufacturers can provide businesses with reliable packaging solutions.
0 notes
Text
Elevate Your Outdoor Space with Composite Decking: A Sustainable and Stylish Solution
In the realm of outdoor living, the choice of decking material plays a pivotal role in determining the aesthetics, durability, and environmental impact of your space. In recent years, composite decking has emerged as a popular and innovative alternative to traditional wood and vinyl options. This article explores the benefits of composite decking, shedding light on its sustainability, durability, and design versatility.
The Rise of Composite Decking:
Composite decking is a revolutionary product that has gained widespread popularity for its unique blend of natural fibers and recycled materials, typically bound together with high-performance resin. Unlike traditional wood, composite decking is engineered to resist fading, splintering, and warping, making it an attractive, low-maintenance solution for outdoor spaces.
Sustainability at its Core:
One of the standout features of composite decking is its commitment to sustainability. By incorporating recycled materials such as reclaimed wood fibers and plastic, composite decking reduces the demand for virgin resources and minimizes environmental impact. This eco-friendly approach not only contributes to the conservation of forests but also diverts plastic waste from landfills, showcasing a dedication to responsible and sustainable manufacturing practices.
Durability that Stands the Test of Time:
Composite decking is engineered to withstand the harshest outdoor conditions, making it an ideal choice for regions with extreme temperatures, high humidity, or frequent rain. Unlike traditional wood, composite materials are resistant to rot, decay, and insect infestations, ensuring that your deck maintains its structural integrity and aesthetic appeal for years to come. This durability translates to a longer lifespan, reducing the need for frequent replacements and minimizing the environmental footprint associated with decking maintenance.
Low Maintenance, High Appeal:
One of the primary reasons homeowners are drawn to composite decking wholesale is its low-maintenance nature. Unlike wood decks that require regular staining, sealing, and painting, composite decks only need occasional cleaning to maintain their pristine appearance. This not only saves homeowners time and effort but also eliminates the need for harmful chemicals often used in wood treatment. With a variety of colors, textures, and finishes available, composite decking offers endless design possibilities, allowing homeowners to tailor their outdoor spaces to their unique style preferences.
Resisting the Elements:
Composite decking goes beyond aesthetics and environmental benefits; it also excels in resisting the elements. UV-resistant properties prevent color fading, while moisture resistance guards against mold and mildew growth. These features make composite decking an excellent choice for coastal areas, where salt air and humidity can wreak havoc on traditional decking materials.
0 notes
Text
Unveiling the Secrets of HPL Cladding: What is it Made of?
High-Pressure Laminate (HPL) cladding is a versatile and popular choice for enhancing the aesthetics and functionality of building exteriors. It's used in a wide range of architectural applications, from commercial buildings to residential spaces. While you may have seen HPL cladding adorning modern structures, you might be wondering, "What is HPL cladding made of?" In this blog post, we'll dive into the composition of HPL cladding, its unique properties, and why it's a favored choice in the world of architecture.
Understanding HPL Cladding
High-Pressure Laminate (HPL) is a composite material used to cover the exterior surfaces of buildings. It's composed of multiple layers that are fused together under high pressure and heat to create a durable, decorative, and functional cladding material. Let's break down the key components that make up HPL cladding:
Decorative Layer: The top layer of HPL cladding is the decorative layer. It's responsible for the cladding's visual appeal and can mimic the appearance of various materials, including wood, stone, metal, and more. This layer is where the design, color, and texture of the cladding are defined.
Core Layer: Beneath the decorative layer lies the core layer, which provides structural integrity and rigidity to the cladding. It's typically made of kraft paper impregnated with phenolic resin. This layer also contributes to the fire-resistant properties of HPL cladding.
Kraft Paper Layers: Several layers of kraft paper, which is made from wood pulp, are used in the core structure. These layers add strength and stability to the cladding.
Melamine Resin: A layer of melamine resin is applied to the core layers. It acts as a moisture barrier, making HPL cladding highly resistant to water, UV rays, and weathering.
Balancing Layer: On the underside of HPL cladding, there is a balancing layer, typically made of kraft paper impregnated with phenolic resin. This layer ensures that the cladding maintains its flatness and shape.
How HPL Cladding is Manufactured
The manufacturing process of HPL cladding involves several steps, each crucial to ensuring the final product's quality and durability:
Layering: Layers of kraft paper are saturated with phenolic resin and stacked to create the core structure. The decorative layer is placed on top of this core structure.
Pressing: The layered material is placed in a hydraulic press and subjected to high pressure and heat. This process fuses the layers together, creating a solid and dense composite material.
Trimming: After pressing, the HPL cladding sheets are trimmed to the desired size and shape. This ensures uniformity and precision in the final product.
Curing: The cured HPL cladding sheets are then cooled and allowed to harden. This step is essential for the cladding to achieve its full strength and stability.
Why Choose HPL Cladding?
Now that we've unraveled the composition and manufacturing process of HPL cladding, let's explore why it's a preferred choice for architects, builders, and homeowners:
Durability: HPL cladding is exceptionally durable and can withstand harsh weather conditions, UV exposure, and moisture without losing its integrity or aesthetics. This makes it a long-lasting exterior cladding option.
Design Versatility: With a vast array of decorative options, HPL cladding allows architects and designers to achieve the desired look for a building, whether it's a contemporary design with a sleek metal finish or a classic appearance resembling natural wood or stone.
Low Maintenance: HPL cladding is virtually maintenance-free. It doesn't require regular painting or sealing, and cleaning is as simple as using water and mild detergent.
Fire Resistance: The phenolic resin core of HPL cladding provides inherent fire-resistant properties, making it a safe choice for exterior applications.
Colorfastness: HPL cladding retains its color and finish over time, even in challenging environmental conditions. This ensures that your building's exterior looks vibrant and appealing for years.
Sustainability: Many HPL cladding manufacturers prioritize sustainability by using responsibly sourced materials and environmentally friendly production processes.
Conclusion
HPL cladding is an impressive composite material that combines aesthetics, durability, and functionality to enhance the exteriors of buildings. Comprising layers of decorative surfaces, core materials, and protective layers, HPL cladding offers a wide range of design possibilities while standing up to the harshest environmental challenges. Whether you're designing a modern commercial space or renovating your home's exterior, HPL cladding is a choice that brings together style and substance, creating beautiful, resilient facades that endure the test of time.
0 notes
Text
Teak and Wicker Outdoor Furniture: A Lasting Combination
Teak and wicker outdoor furniture make a fantastic combination. These two all-weather materials create some of the most durable and enduring patio furniture when put together. Fashionable, durable, and long-lasting, teak and wicker have become more common in the past year. In fact, I mentioned the growing popularity of teak and wicker patio furniture last September.
Teak has remained the most popular wood for outdoor furniture because of its inherent qualities that are unlike any other type of wood. Synthetic resin wicker is a popular material used on modern outdoor furniture. It almost seems destined for the two to come together.
5 Reasons to Love Teak and Wicker Patio Furniture
1. It's Economical
Some people just can't make up their minds between teak and wicker. Well, you don't have to! Teak is rather expensive so splitting the construction costs allows you to absorb a more economical price point.
2. Low Maintenance
Another reason why teak and wicker outdoor furniture is a good idea is that cleaning will be easier. Depending on how you choose to care for your teak furniture, it may require a bit of care and attention and that's no secret. By blending teak with wicker, you get the benefit of a low maintenance material with an all natural teak wood finish. You can clean wicker with just some soap and water.
3. Unprecedented All-Weather Durability
Teak is one of the most durable wood surfaces. It's touted for its ability to withstand extreme weather conditions. Teak has its own natural oil which is why it fares well in outdoor conditions. You can seal it or let it age to a natural silvery-gray patina depending on your preference.
4. Wicker is Fade Resistant
Quality wicker is infused with UV inhibitors that prevent fading in the sun. Reading this page lets you learn how to tell the difference between quality.
5. Won't Blow Away in High Wind Areas
Teak and Wicker furniture works well in windy areas. Wicker is typically woven on lightweight aluminum frames to maximize mobility. In areas that experience high wind gusts, it makes sense to choose a teak frame that adds weight to keep your patio furniture from blowing away. Wrapped around teak frames, wicker can give your backyard patio a look you've been dreaming of!
Styles of Teak and Wicker Outdoor Furniture
Teak and Wicker Dining Sets
Probably the most popular teak and wicker combination is the teak and wicker dining set. Teak tabletops are gorgeous point-blank. They help bring you closer to the great outdoors when enjoying an outdoor dinner. Wicker adds a modern flair to keep your home up to date with the latest outdoor trends for a transitional outdoor setting. Here are a few of my favorites.
--Wine and Dine on these Teak and Wicker Dining Sets--
Teak and Wicker Outdoor Sofas
Outdoor Sofas and sectionals use teak in company with wicker to a lesser extent. Sometimes just having teak feet is enough to accent natural wicker colors like brown, taupe, or sandstone. Others feature a more generous incorporation of teak into the design. I especially like teak and wicker outdoor sectionals for the Desert Southwest areas like Arizona and Southern California. These colors blend in well with the Red Sedona rocks that are symbolic of the geographical landscape in Arizona.
--Modern Teak and Wicker Outdoor Sectionals--
Teak and Wicker Chairs
Sometimes you might just need an occasional chair, a bar stool, or even better, a chaise lounge chair. Teak and wicker chairs blend the natural splendor of glowing teak surfaces and chic wicker weave. You can buy a coffee table or add a side table to give yourself a place to put down your refreshments while you chat with company.
--Teak and Wicker Chairs that Fit Any Outdoor Setting--
Mix & Match to Create Your Own Combination of Teak and Wicker!
Don't forget that you're not limited to the manufacturer's pre-arrangement sets. You can mix and match to create a teak and wicker outdoor set of your choosing. Find a wicker chair and pair it with a teak coffee table. Or you can go with the dining set of your choice and find some wicker dining chairs to go with it. The possibilities are endless!
You can Browse Teak Furniture here and Wicker Furniture here to create your own unique arrangement.
Tips for Teak and Wicker Furniture:
- New Patio Furniture for 2014 - 20 Fascinating Designs!
- What's the Best Material for Outdoor Furniture
- Teak Furniture Care and Maintenance
- Synthetic Wicker vs Natural Wicker
About the Author
Cheryl Khan can lend her insight on this topic after spending years in the design field. She has learned that all outdoor furniture is not the same. She is a contributing author to the Patio Productions Blog where she shares outdoor living tips to transform your backyard!
Read the full article
0 notes
Text
Contact Professionals for Epoxy Grout Tiling in Melbourne
While building or renovating your space, selecting suitable grout and paying attention to detail is vital. Opting for the wrong type of grout could result in cracking, stains, and leaking. That’s why epoxy grout is the go-to solution in Melbourne. It offers a waterproof, durable, and long-lasting solution.
When it comes to tile jobs, professional installation helps transform the feel and look of your kitchen or bathroom. Grout seals the tiles and creates a watertight surface, contributing to your space’s overall look and feel.
Why is Epoxy Grout So Popular in Melbourne?
Epoxy grout combines epoxy resins and a filler material that chemically reacts when mixed together. It creates a strong adhesive material that is perfect for tile installations. Besides being resistant to water and stains, epoxy grout is easy to clean and maintain.
Best suited for indoor tiles only, epoxy grout is prone to discolour when exposed to sunlight and UV rays for a prolonged period. The sun-drenched outdoors can result in tiles looking drab and faded. That’s why it is widely used for indoor renovation projects.
Epoxy grout is a durable and versatile option increasingly popular in Melbourne. The non-porous nature of the material makes it resistant to the growth of mildew, mould, or moisture. Thus, it is the perfect option for bathrooms and kitchens where water damage can be a genuine concern.
Epoxy grout is a no-brainer for anyone looking for a hassle-free tiling solution. Its tough sealant properties make it ideal for high-traffic areas that demand a durable and long-lasting finish. That’s why it is a popular choice for homeowners and contractors alike.
Why contact Save and Seal?
Epoxy grout should be top of your list for an efficient, reliable tiling option. At Save & Seal, we offer our customers exceptional service, confidence, and peace of mind. Our ultimate goal is to deliver a flawless, beautiful finish that lasts for years.
Trust in a professional and experienced team to get the job done perfectly. With expert services, you’ll enjoy the refreshed space for years.
Call us on 0412 998 003 and discover more about grouting and re-grouting services.
1 note
·
View note
Text
The Most Common Resin-Bound Driveway Issues and How to Solve Them
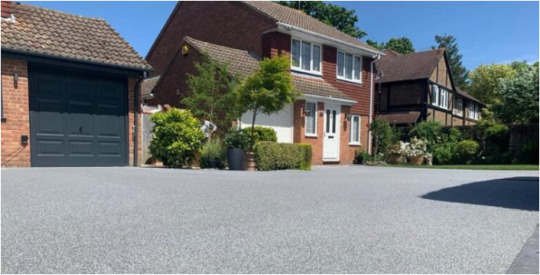
Resin-bound driveways are popular for their aesthetic appeal, durability, and low maintenance requirements. However, like any other surfacing medium, resin-bound driveways can develop issues over time. Understanding the common issues with resin-bound driveways and identifying ways to address them is crucial for keeping your driveway in pristine condition. This blog post aims to discuss the most common resin-bound driveway issues and how to solve them.
The first issue that homeowners often encounter with resin-bound driveways is cracking. Resin-bound driveways experience cracking due to a range of factors, such as improper installation, excessive foot traffic, and temperature changes. The second issue is the accumulation of moss, weeds, and algae, which can be unsightly and cause slipping hazards. Finally, the loss of color and gloss is also a common issue, which can occur due to exposure to UV rays and harsh chemicals.
Fortunately, there are solutions to these issues. By sealing and regularly maintaining your resin-bound driveway, you can prevent the formation of
Cracks in the resin surface and how to fill them with a DIY kit or professional help
One of the most common issues that occurs with resin-bound driveways are cracks in the surface. Fortunately, there are options available to address this problem. If the cracks are small and superficial, they can be filled using a DIY kit that is specifically designed for repairing resin surfaces. These kits typically contain a clear resin and a hardener that, when mixed together, create a strong adhesive that can bond with the existing surface. However, if the cracks are deeper and more severe, it may be best to seek professional help. A qualified contractor will have the expertise and equipment necessary to clean and fill the cracks properly, which will ensure a more permanent and effective solution. In either case, it's important to address cracks as soon as possible to prevent them from growing and causing more extensive damage to the surface.
Fading of the resin surface and how to restore it with a UV-resistant coating
Fading of the resin surface is a common problem with resin-bound driveways, especially those that are exposed to direct sunlight. The UV rays in sunlight cause the resin surface to lose its color and become dull over time. However, this problem can be easily resolved by applying a UV-resistant coating on the surface. This can be in the form of a clear sealant, which not only protects the surface from UV rays but also adds a layer of waterproofing, preventing water from seeping through the surface and causing damage. Applying a UV-resistant coating is a simple task that can be done by a trained professional or a competent do-it-yourselfer. It is important to choose a high-quality coating to ensure maximum protection for the resin surface and to follow the manufacturer's instructions carefully for best results.
Read more: What regulations must be met when installing a resin bound surface in the UK?
Drainage issues and how to improve the drainage system to prevent waterlogging
Drainage issues are one of the most common resin-bound driveway issues that can lead to waterlogging, flooding, and damage to the driveway. Poor drainage can be caused by various factors, such as the slope of the land, the presence of adjacent structures, and the type of soil. To improve the drainage system and prevent waterlogging, several solutions can be implemented. One effective method is to install French drains, which involves digging a trench filled with gravel and a perforated pipe to redirect the water away from the driveway. Another solution is to use permeable pavers, which allow water to flow through their permeable surface and into a drainage system. Additionally, regular maintenance of the drainage system, such as cleaning out debris from gutters and downspouts can help prevent clogs and keep water flowing smoothly. By addressing drainage issues, homeowners can improve the function and longevity of their resin-bound driveway.
Weed growth and how to prevent it by using a weed barrier membrane and regular maintenance
Weed growth is a common problem that can occur with resin-bound driveways. Weeds can quickly take root and grow through the porous surface, causing unsightly blemishes and undermining the strength of the driveway. Fortunately, there are several ways to prevent weed growth and keep your driveway looking pristine. One effective method is to use a weed barrier membrane, which can be installed beneath the resin-bound surface during the construction process. This membrane acts as a physical barrier, preventing weeds from penetrating the surface and taking root. In addition to this, regular maintenance is essential to prevent weed growth. This includes removing any debris or plant matter that may have accumulated on the surface, as well as regularly sweeping and power-washing the driveway to remove any dirt and dust that could provide a fertile environment for weeds to grow. By taking these preventative measures, you can ensure that your resin-bound driveway remains weed-free and continues to provide a durable and attractive surface for many years to come.
Uneven surface and how to level it with a resin binder or DIY repair kit
Uneven surfaces are a common problem with resin-bound driveways. Thankfully, there are solutions available to level the surface including resin binders and DIY repair kits. When it comes to resin binders, make sure to choose a high-quality product that will provide long-lasting results. First, prepare the surface by removing any loose debris and cleaning the area thoroughly. Once the surface is clean, apply the resin binder to the uneven area and wait for it to dry. With DIY repair kits, follow the instructions carefully and ensure that the kit is appropriate for the size and type of damage to the driveway. It is important to address uneven surfaces promptly to prevent further damage to the driveway and ensure the safety of those using it.
Conclusion
In conclusion, resin-bound driveways are a great investment that can significantly enhance the curb appeal of your property. Although these driveways are highly durable and require minimal maintenance, they are susceptible to a few issues that can detract from their overall appearance. By taking preventative measures and addressing issues early on, you can avoid costly repairs and keep your driveway looking its best for years to come. With the proper care and maintenance, a resin-bound driveway can be a long-lasting and stylish addition to any home or business.
0 notes
Text
How Do HDPE Drums Manufacturer in Ankleshwar Make the 55 Gallon Drums?
The 55 gallon drums are known for their rigidity and durability. They can survive all types of loads and perform under all circumstances. You can get these from the HPDE drums manufacturer in Ankleshwar. They can help you find the most suitable drum that fits your needs. Here’s a look at how these drums are manufactured. This will help you realize why these drums are good for all your requirements.
For all those uninitiated in this manufacturing process, it is important to note that rotational, injection and injection blow are three methods that can help with efficient manufacturing. Except rotational, where the resin powder is used, the other two methods use the resin pellet melting.
The first step towards the manufacturing of 55-gallon plastic drum involves resin pellets. A colorant is added to the clear/white resin pellet. Most often, the colours include yellow, white and blue. Initially, the resin pellets are melted in a hollow tube. If you want to manufacture the durable drums, you should add the UV inhibitor to these pellets so that they don’t get damage owing to exposure to the sun.
The HPDE drums manufacturer in Bharuch will then proceed to blow molding drums process, wherein the mold is injected with parison. This is generally injected using the blow and force by pressure methods. You can conclude this method in three ways- extrusion, injection and injection straight. Each method has a different way to create parisons, involves a different parison size and the way they create the two halves.
Once this part of the process is complete, you need to feed these pellets into the hopper. You can use an automated tool to complete the process or add it manually. The extruder is where the pellets are then heated. These heated pellets are then moved into the blow molding die. there are heating elements on the outside of this machine. The HPDE drums manufacturer in Ankleshwar will use the heating element to melt the pellets before they are converted into a parison. The extruder is pivotal to pellet heating process as it can help ensure evenness in heating. This ensures that all the drums are heated to the exact temperature. This will also help avoid the heating errors.
Once this process is done, the parison is added to the open mold to give it the shape of the barrel. It is added in between the two halves formed by the die. At this point, you will add the hydraulic or pneumatic pressure that can push the die together. This way the entire mold is sealed to create the drum. The pressure applied at this point will determine if the barrel is properly sealed
Next you will notice that some air is added at the highest pressure into the parison. This will be added along the sides of the mold. It is very important to ensure that the pressure is applied uniformly so that the mold is properly founded. The HPDE drums manufacturer in Bharuch will ensure that the bubbles or imperfections are removed from the process at this point.
Once the drum has cooled inside the die, the manufacturer will slowly remove it, ensuring no damage occurs.
0 notes
Text
How Do HDPE Drums Manufacturer in Ankleshwar Make the 55 Gallon Drums?
The 55 gallon drums are known for their rigidity and durability. They can survive all types of loads and perform under all circumstances. You can get these from the HPDE drums manufacturer in Ankleshwar. They can help you find the most suitable drum that fits your needs. Here’s a look at how these drums are manufactured. This will help you realize why these drums are good for all your requirements.
For all those uninitiated in this manufacturing process, it is important to note that rotational, injection and injection blow are three methods that can help with efficient manufacturing. Except rotational, where the resin powder is used, the other two methods use the resin pellet melting.
1. The first step towards the manufacturing of 55-gallon plastic drum involves resin pellets. A colorant is added to the clear/white resin pellet. Most often, the colours include yellow, white and blue. Initially, the resin pellets are melted in a hollow tube. If you want to manufacture the durable drums, you should add the UV inhibitor to these pellets so that they don’t get damage owing to exposure to the sun.
2. The HPDE drums manufacturer in Bharuch will then proceed to blow molding drums process, wherein the mold is injected with parison. This is generally injected using the blow and force by pressure methods. You can conclude this method in three ways- extrusion, injection and injection straight. Each method has a different way to create parisons, involves a different parison size and the way they create the two halves.
3. Once this part of the process is complete, you need to feed these pellets into the hopper. You can use an automated tool to complete the process or add it manually. The extruder is where the pellets are then heated. These heated pellets are then moved into the blow molding die. there are heating elements on the outside of this machine. The HPDE drums manufacturer in Ankleshwar will use the heating element to melt the pellets before they are converted into a parison. The extruder is pivotal to pellet heating process as it can help ensure evenness in heating. This ensures that all the drums are heated to the exact temperature. This will also help avoid the heating errors.
4. Once this process is done, the parison is added to the open mold to give it the shape of the barrel. It is added in between the two halves formed by the die. At this point, you will add the hydraulic or pneumatic pressure that can push the die together. This way the entire mold is sealed to create the drum. The pressure applied at this point will determine if the barrel is properly sealed
5. Next you will notice that some air is added at the highest pressure into the parison. This will be added along the sides of the mold. It is very important to ensure that the pressure is applied uniformly so that the mold is properly founded. The HPDE drums manufacturer in Bharuch will ensure that the bubbles or imperfections are removed from the process at this point.
6. Once the drum has cooled inside the die, the manufacturer will slowly remove it, ensuring no damage occurs.
0 notes
Text
The Need of adhesives stuff for potting electronics
The top epoxy resin maker in china for top-high-quality electronic products
Artificial epoxy resin can be employed for various uses. This will likely be produced by mixing a hardener and also a resin that match each other within a provided ratio. After they are combined, a chemical response is initiated. The curing method is determined by the kind of epoxy resin and the ratio used.
When two-section epoxy is blended, warmth radiates, and the material starts off curing. That is to convey, it converts from a liquid into a strong state. If you prefer the fabric to remedy properly, you must be sure that the resin and hardener are inside the correct ratio.
Best Epoxy Adhesive Glue For Automotive Plastic To Steel
Properties
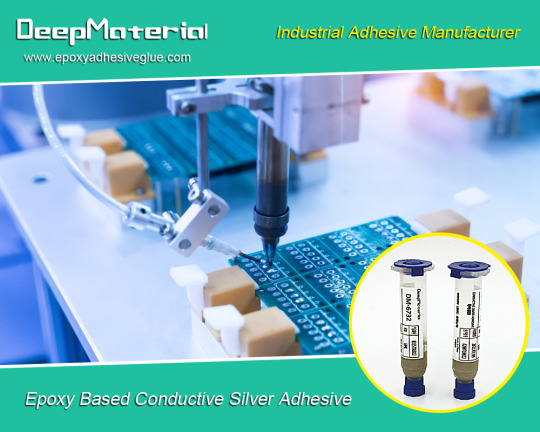
Epoxy resin suppliers need to have to give specifics about their products and solutions. There really should be a transparent indication relating to how the two-ingredient epoxy ought to be mixed and the sort of effects you ought to expect. This can be the only way to attain that fantastic treatment.
One other matter a manufacturer can suggest you on will be the properties on the epoxy you might be about to invest in or use. Epoxy has several Attributes, which makes it usable in purposes that meet the producer’s requirements. Distinct resins overcome in different ways and possess distinct hardness immediately after curing and varied sensitivity to substrates.
When selecting an epoxy resin, you must contemplate other Houses, including resistance to heat and vibration. It's essential to also think about the form of thickness you could attain productively While using the adhesive you've got picked. A superb epoxy resin maker will let you make the right option.
Makes use of
Among the reasons why epoxy has grown to be these a favorite preference these days is its Homes as well as the vast application alternatives offered. That is The most adaptable alternatives and can be used in craft jobs. Brands make differing types of epoxy resins making sure that all industries are served. Several of the makes use of consist of:
Resin jewellery creation
Renovations in previous properties to generate them present day
Cutting boards and other useful points developed utilizing Wooden and epoxy resin
Wood stabilizing employing epoxy
Bar tops
Countertops which might be cut resistant Employed in kitchens
Sealing soil inside of dwelling regions
Epoxy sealants made to water-proof garage floors
Resin shelves that function shower trays
Furniture like resin-built river tables
Decoration objects like Petri dishes and geodes
Art paintings together with other art objects
Repairs are finished with UV epoxy
Tasks involving product constructing
Design of kiteboards as well as other Do it yourself constructions
Gelcoat and topcoats Employed in boat constructing
Gluing and restoring small elements
Development of terrariums and aquariums
Material and artifact casting
What you ought to consider when purchasing epoxy
You must get the job done with the best epoxy resin producer when you decide on for getting resin. This is the only way it is possible to entry numerous types of products that can be utilized in several purposes. At DeepMaterial, we are conscious of the marketplace calls for and try to create the best excellent epoxy resin to be used in your projects.
If there is a necessity for custom-made resin, DeepMaterial can deliver what you need making certain that your projects are not compromised. If you are new within the resin arena, it can help to receive support from people that know the market and products very well. With the choice at DeepMaterial, it is possible to in no way go wrong.
To grasp additional specifics pay a visit to here: Industrial Adhesive Manufactturer
0 notes
Text
Familiarity with MDF Cabinet Doors!
The best option for a reorganized kitchen on a tight budget is MDF, a manufactured substance. MDF has a flat surface thanks to the materials used to produce it, which facilitates painting. This well-known wood product is assembled with glue or resin from leftover soft and hardwood (such as sawdust).
MDF doors, often known as particle boards, are a less expensive option than wood cabinets. In general, MDF is used to build all cabinets produced worldwide; the variation is in the door and cover types. Examples include glossy coatings on MDF cabinets being made of glass, vacuum press coatings being made of membranes, and so on. Therefore, the type of door cover and the name of the cabinet are determined by these factors.
Benefits of MDF cabinets: Painting is made easier by the MDF's smooth surface.
The polymers that bind the wood fibers together make MDF resistant to insects and vermin.
Affordable.
One of the best materials for carrying out delicate and complicated patterns is MDF.
Getting MDF cabinets painted:
1. MDF is not a surface that paint adheres to well by itself. Because of this, it is first sanded, and all surface dust is eliminated.
Advice: Avoid using water to clean MDF dust since it will harm and deplete it.
2. After sanding, MDF sheets are sealed with a layer of varnish.
3. At this point, the MDF is given a second round of sanding and then coated with sealant.
4. MDF sheet can then be painted. You can use water-based paints with confidence if you utilize a sealant. Naturally, oil paints are a fantastic choice for MDF cabinet covers as well. The painted sheets are then placed in a UV unit where they quickly dry.
How many MDF cabinet meters are there?
The thickness of MDF affects how much it costs. The cost increases with thickness! Be aware that MDF is robust enough and can be highly durable with proper maintenance, although costing less than other sheets. Dear user, you can get in touch with the Cabinet Door Supply professionals using the website's communication tools to find out the most recent price for this multipurpose sheet.
Shop from a large catalog of solid wood shaker doors that is perfect for your kitchen and home utility.

Cleaning MDF cabinets
Utilize a dry towel to first wipe down MDF cabinets with dust. Then, use a few drops of mild dishwashing solutions dissolved in warm water to clean the cabinet's surface. Use moderate amounts of water for cleaning. To prevent too much moisture from harming the cabinets, dry the surface after wiping off the remaining dishwashing liquid with a damp cloth.
FAQs Regarding MDF kitchen cabinets
1. Does the MDF cabinet have good construction?
MDF cabinets can be just as sturdy as wood ones despite being less expensive. MDF will provide you with a long-lasting, smooth, and colored covering if you're seeking painted cabinets. If you treat your MDF cabinet well, it will show resilience similar to a hardwood cabinet.
2- Are MDF kitchen cabinet options a good option?
MDF will make an excellent substitute for wooden cabinets if it is properly lined and painted.
3- Is plywood or MDF preferable for cabinets?
Plywood is less expensive and lighter than MDF.
Compared to plywood, MDF's flat surface makes an ideal platform for painting.
If you want your kitchen cabinets to withstand wear and tear longer, plywood is a superior alternative.
The Final Word
In this article, we looked at a few MDF features. In order to help you make an informed decision, we hope we have been able to add to your knowledge in this way. You can also shop for the best shaker wood door to give a clean, traditional style to your kitchen.
0 notes
Last Seen Blogs

green-activity-town-local
Untitled

taeilyuh
taeilyuh

the-apex-idiot
come get some
the-apex-idiot
come get some

crazydiaperlover
crazy diaper lover