#anyway i finally found a brush in autodesk that feels good .. might be able to play around w digital more now
Explore tagged Tumblr posts
Visit Tumblr Blog
Explore Tumblr blogs with no restrictions, modern design and the best experience.
Last Seen Tumblr Blogs


Fun Fact
Average visit duration of Tumblr.com is 10 mins and 25 secs.
Text

looptrain

bonus original sketch <3
#fun fact it was only like . a day before i drew th sketch of this that i first actuay listened to lagtrain#knew of it and its popularity but was like eh. idk if ill like it#then it proceeded to get stuck in my head . and still is. its been like a month or smth that thang is Catchy#anyway i finally found a brush in autodesk that feels good .. might be able to play around w digital more now#isat#in stars and time#isat siffrin#siffrin isat#siffrin in stars and time#in stars and time siffrin#my art#havent been doing well lately . i need to draw.. more..#oh god the quality help . click for better quality i made it so crisp i prommy......
498 notes
·
View notes
Text
Progression of M.A.R.S - Weeks 15-20 + Extra Research
M.A.R.S was a very interesting term. There might be another post after this, but for now I’ll give you the full process of what I did so far this term (using screenshots from previous posts).
Note, this may contain extracts from my previous posts because I either forgot the process or couldn’t word it any differently.
Cinema 4D - Captain’s Chair
For our first project, we were taught how to make a Captain’s Chair similar to the one in Star Trek, which if you don’t know, looks like this:

Because of the immense effort I have to take in order to re-create every detail on this chair, I chose to go simple by using basic shapes and sizes.

For this, I started out with a flat cylindrical base. Then, I added a cone in the middle of it to give it that base-y feel. A few more shapes are used within the cone to give the chair a spinning mechanic, which involved me making cubes, cylinders and spheres (I have no screenshots of the underside so imagine it for now). Finally, to give it a seat, I just used cubes and resized them accordingly. Now THAT is a lot of cubes in one model. If I did it practically with clay or super-sculpie instead of digitally, I would have done the same, only with a tougher base.

Then I had to transform the shapes into polygons to have a bigger base, tilted walls and sloped surfaces. This was done by making the object editable, selecting the Polygons selection tool and dragging the faces accordingly. This was tough to figure out at first, but now I think I’ve got the hang of it.
Mudbox - Alien-like Creature
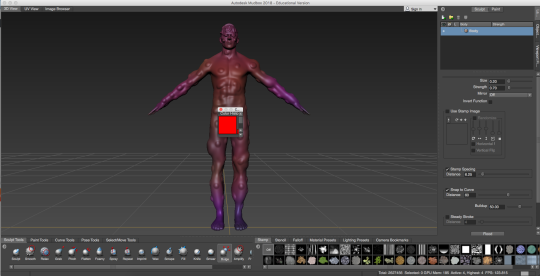
Then we took to Autodesk Mudbox to make an alien. This required us to download a full human figure and adjust it with tools to level out spots, lumps and deformed body parts.
We then had to take THAT to Cinema 4D and make a little animation with the character rig (which also had to be downloaded and applied).
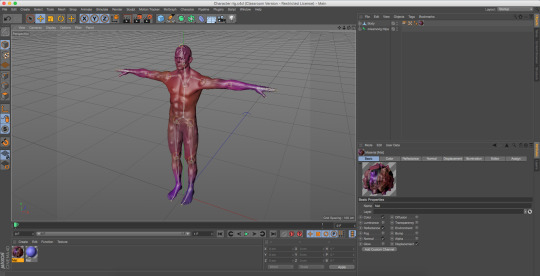
In the animation I made, the figure puts it’s arms into an “L” shape, shakes it’s head, and then kicks the viewer. Afterward, it thinks about what it did and then puts it’s hand on it’s head in shock that it hurt someone.
Nobody was actually hurt in the process, don’t worry.
This was VERY hard to do as the export process was absolutely horrendous and I can’t even begin to tell you how to do it properly because of how problematic it can be.
What I did first was selecting UVs and maps. Then I had to select the options I needed for my character to look good. I enabled paint map saving as well as two other essentials, and added filenames to the bottom of all but the paint map save.
After a lot of trial and error, that was done.
Unity - Gaming Time!
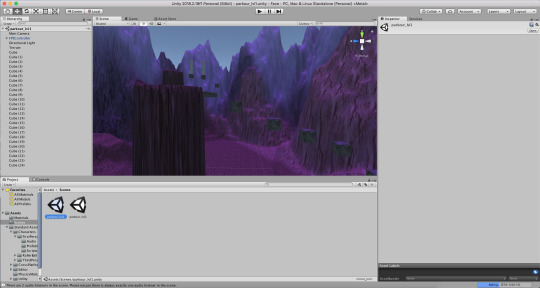
After all that stuff was done, it was time to move into Unity, a games engine! Personally, this was my favourite part of the entire project as I like to game/make games.
First I had to make Terrain by using GameObject > Terrain, and then scale up certain parts of it using Brush tools to lift it up. The textures on it come from Google Images, which have then been imported into Unity to be used there. The cubes, however, are stone cubes (also stock images). They are added by simply clicking on GameObject > 3D Object > Cube. After that, we had to import a Unity package that comes WITH Unity when you install it, which creates a character. A move-able character that you can control.

Then I chose to add a lot of floating cubes and make a parkour-like game as it was very basic and the gravity in-game can be altered to make it look like they’re on another planet. Some of those cubes move up and down continuously by code, which is what you see in the image above.
For the code, we originally used Adobe Dreamweaver as that was what we had in our selection of coding programs. We then switched to Visual Studio 2018 as that is apparently easier to handle your code with (sometimes it gets on your nerve with the auto-completion mechanic).
If you want to know, the game is written in C#. If you know Java, you can use that too. I currently know most of C#, so I chose to use that. If you’re curious, I know a little bit of C++ and Java. Anyway, moving on.

There were a lot of changes I chose to make with the game to both make it work properly and be good. This included having a lot of problems with code, movement and placement, and since this was a game that I played a lot, it was very easy to get distracted.
RESEARCH TIME
Kerbal Space Program
youtube
Kerbal Space Program is a game made in the Unity engine that appears to be a game where you have to stock up resources and upgrade your vehicle to fly it into space. While in space, you can visit other planets (and even land on them to explore!). Personally, I have never played this game. It does look interesting though because it requires strategy and good thinking in order to complete it, so I might consider getting it.
Escape From Tarkov
youtube
Escape From Tarkov is another game made in the Unity engine that appears to be a game similar to Half-Life 2 (which is a game I have played), which requires you to run around with weapons and kill off people who try and capture you or leave you for dead. Just like Kerbal Space Program, you can modify your accessories/weapons to make them look better or insanely overpowered.
Hearthstone
youtube
Hearthstone is yet another game made in the Unity engine that appears to be a trading card game similar to Yu-Gi-Oh (which is another game that I have played). The objective of the game appears to be to wipe out your opponent’s main card to win (which has a set amount of hitpoints, which is the amount of hits it can take before it gets wiped out).
BACK TO UNITY

The final part of this project involved me having to make a timer, a menu and give the planet a sense of darkness. The first thing I added was a timer, and a fail counter.
During the development of levels 3 and 4, I came across a cheat, where you can just jump up the very end of the landscape and skip levels 1 and 2, going straight to level 3. However, that is now impossible to do without hacking the game.
I have written a check in the game’s code to check if the player is far enough to the side, near the edge of the terrain. If they are, and they haven’t completed level 2 yet, they will be stopped in their tracks, and “YOU! SHALL NOT!! CHEAT!!!” will pop up in the interface.
I put the text there for humorous purposes, as it calls out the cheater directly. I might change this text however, or just remove it entirely, seeing as it isn’t really needed. The text is also, you guessed it, a reference to “You shall not pass” from Lord of the Rings (I haven’t seen the movie but I know of the memes associated with it).
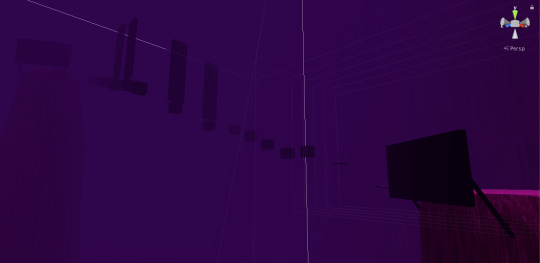
Another feature I have added in is Fog. Fog is directly implemented into Unity, so I just have to check a box within the “skybox” that says “Fog”, and this is the result. I’ve added it because it adds a dark feeling to the world and also makes invisible objects visible again (cubes that blend with terrain behind them, making them very difficult to see).

I have built the menu outside of the map, VERY far away, so that even if fog wasn’t enabled, nobody would be able to see it from the planet map.
The menu was made with triggers, or invisible objects that make the game do things when the player interacts with them. Say for example, if you want to walk into a cube and get teleported to another map, you can set it to do that via triggers and… ahem, code.

If you cannot understand this, don’t worry. First of all, the game checks to see if the player is colliding with a mesh (which is what the trigger is made of, mainly). It will then check the TAG of that object, whether it’d be Mode 1, Mode 2, Void or whatever.
If one of the tags matches it’s respective tag in the list of statements, then it will either teleport the player or make the game do things, such as increasing the fall counter by 1 or setting the level count to 3.
Now the game is fully built and is ready to play on Windows, Mac and Linux.
What was your initial plan with this? What did you focus on and WHY?
I chose to focus on game design as that is my main comfort zone within the three, plus it is the easiest for me to get the hang of. Plus, I have about 8 years experience in game design (although 7 of them were spent in the Scratch engine, then I moved to Game Maker and Unity).
I chose to do it because I couldn’t see myself making a standout sculpt or very wacky spaceship with interior design. Maybe I could’ve done one of the other two I had more time.
What is your story?
The story is that the first people who went to the moon for the first time in 1969 found a mysterious object on the way back to Earth. This was thought to be a planet, so they sent somebody else there (who is you, the player). They are now trapped on the planet with no way out but to get to the top of the cliffs and hope.
Inspiration?
Apart from the moon landing and my game design experience, none.
Review?
I... have just explained that in the rest of the post beforehand. I went over all three aspects.
Final Evaluation?
Personally, I think my game turned out very good. The only thing I would do to improve it is learn more of Unity to add more fonts and even a glitch-like effect with night vision, along with maybe a few more levels or even some enemies that try and stop you from progressing. However, I couldn’t do so due to the fact I had to test it over and over again for about four hours, which didn’t really allow me to stick to my original plan, which was to have a boss-like level in the game where the platforms get destroyed as soon as you step on them, making it a very difficult Level 5. In all seriousness, this was a very fun project for me as I enjoyed every single step of it. I have learned a lot about the digital industry and 3D game design. The only hard steps I had was near the end when I compiled the game and found out my interface had to be re-aligned, along with a menu issue, which instead of using a proper buttoned menu I used hotkeys instead (cheating). Again, if I had more time, I would’ve made a proper menu, made the boss level and even more elements. But now we’re here at the end, with a game that is good enough... and difficult as well, for everyone else. Because I have experience in C# coding, that part wasn’t hard at all. All I had to learn was the proper elements of Unity as there are a LOT of code tidbits that Unity adds to make things easier.
Final Research about Cinema 4D - 5 Examples of what was made in it
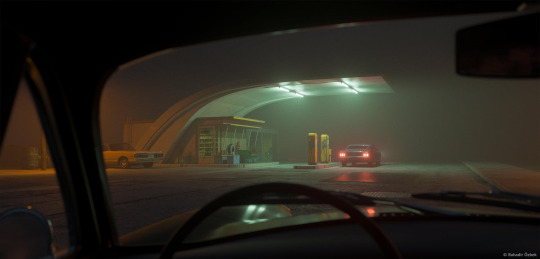
1 - This picture was made in Cinema4D using lighting, shapes and fog. From the looks of it, it looks like the car in front of the driver is going to pull out of the fuel station, or is just going to sit there forever. I like it because it looks so realistic, which is very tedious in 3D software.

2 - Another realistic picture, but this time with a building in the middle of a forest. This looks like it wasn’t even made in Cinema4D at all, and that is why I like it.
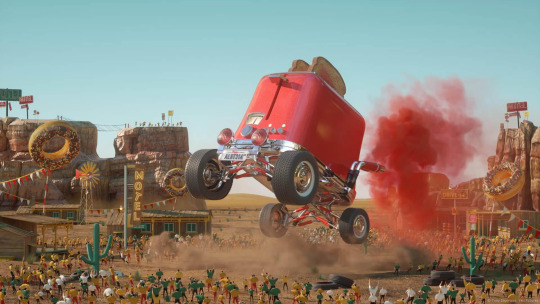
3 - A semi-realistic picture of a giant vehicle puffing out red smoke before (what looks like it will be) driving off, crushing about 400 people. This reminds me of Cars 2 for some reason. Deserted village, car-... oh wait, the car is a TOASTER? Well then... Anyway, I like this picture without reason. I just like it.

4 - A realistic picture of a sink with some utilities beside it. This was done with transparent shapes to give the water it’s reflective effect, hence the mirror (which is probably just a plain copy of the scenery from this side). Again, I like it because it is a realistic picture, plus the detail.

5 - Another realistic picture that doesn’t look like it was made with Cinema4D at all. It looks like an abandoned fuel station with what looks like a giant ball near it. Do I have to say I like it? Well yes, because of the detail it has to make it realistic.
These five images are directly pulled from the Cinema4D website, the gallery: https://www.maxon.net/en-gb/gallery/
Phew, that was a lot of research and reflection. Again, there may be another post after this, but if not, then I’ll see you in my FINAL MAJOR PROJECT!
0 notes