#apparmor
Text
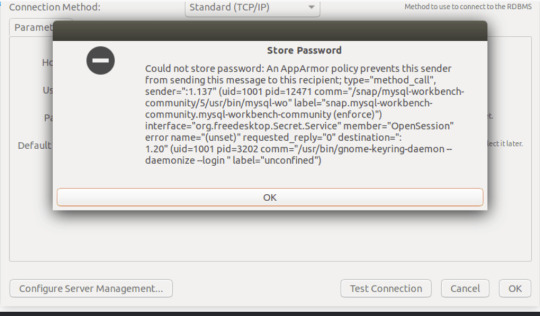
Solución Mysql Workbench en Ubuntu 22 An AppArmor policy prevents this sender
Solución Mysql Workbench en Ubuntu 22 An AppArmor policy prevents this sender
Si estas en esta publicación es porque Mysql Workbench community edition te esta dando un error al querer hacer una simple conexión, y esto se debe a una simple configuración de una política de seguridad, por lo que te muestro como solucionarlo fácil.
El mensaje puntual es Could not store password: An AppArmor policy prevents this sender….
Esto lo probé en Ubuntu 22.04, pero entiendo que funciona…
View On WordPress
0 notes
Text
All right, since I bombarded a poor mutual yesterday...
Privacy is not security and security is not privacy. These terms are not interchangeable, but they are intrinsically linked.
While we're at this, anonymity =/= security either. For example, Tor provides the former, but not necessarily the latter, hence using Https is always essential.
It is impossible to have privacy without security, but you can have security without privacy.
A case in point is administrators being able to view any data they want due to their full-access rights to a system. That being said, there are ethics and policies that usually prevent such behavior.
Some general tips:
Operating System: Switch to Linux. Ubuntu and Linux Mint are widely used for a reason. Fedora too. And don't worry! You can keep your current operating system, apps and data. If you're on a Mac computer, you can easily partition your hard drive or SSD by using Disk Utility. If you're on Windows, you can follow this guide.
You want to go a step further? Go with Whonix or Tails. They're Linux distributions as well, but they're both aiming for security, not beauty so the interface might not be ideal for everyone. Many political activists and journalists use them.
You want anonymity? Then you need to familiarize yourself with Tor. Also, Tor and HTTPS and Tor’s weaknesses. When you're using it, don't log in to sites like Google, Facebook, Twitter etc. and make sure to stay away from Java and Javascript, because those things make you traceable.
Alternatives for dealing with censorship? i2p and Freenet.
Is ^ too much? Welp. All right. Let's see. The first step is to degoogle.
Switch to a user-friendly browser like Firefox (or better yet LibreWolf), Brave or Vivaldi. There are plenty of hardened browsers, but they can be overwhelming for a beginner.
Get an ad blocker like Ublock Origin.
Search Engine? StartPage or Duckduckgo. SearXNG too. Like I said degoogle.
Get a PGP encrypted e-mail. Check Protonmail out.
There's also Tutamail that doesn't cover PGP, but uses hybrid encryption that avoids some of the cons of PGP.
Skiff mail is also a decent option.
Use an e-mail aliasing service such as SimpleLogin or AnonAddy.
Check OpenPGP out. Claws Mail is a good e-mail client for Windows and Linux, Thunderbird for Mac OS.
Gpg4win is free and easy to use for anyone that wants to encrypt/decrypt e-mails.
Instead of Whatsapp, Facebook messenger, Telegram etc. use Signal for your encrypted insant messaging, voice and video calls.
Get a metadata cleaner.
Get a firewall like Opensnitch, Portmaster or Netguard which can block Internet for trackers.
Alternatively, go with a private DNS that blocks these trackers. NextDNS is a good paid service. Rethink a good free option.
Replace as many of your applications as you can with FOSS (free and open source) ones. Alternativeto can help you.
Always have automatic updates on. They are annoying af, I know, but they are necessary.
Keep your distance from outdated software.
Always have two-factor authentication (2FA) enabled.
Do not use your administrator account for casual stuff. If you're on Linux, you probably know you can be sudo, but not root.
On Linux distributions use AppArmor, but stay away from random antivirus scanners. Other distributions default to SELinux, which is less suited to a beginner.
Never repeat your passwords. If you can't remember them all, use a password manager like KeePass.
Encrypt your drive.
Honestly, VPNs have their uses and ProtonVPN, Mullvad and Windscribe are decent, but eh. If you don't trust your ISP, why would you trust the VPN provider that claims they don't log you when you can't verify such a thing?
29 notes
·
View notes
Text
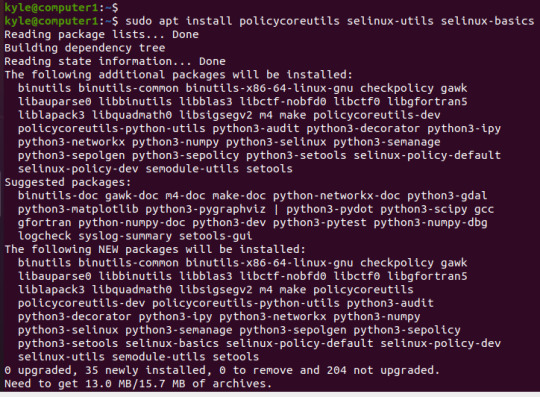
Advanced Linux System Administration
Linux Training in Chandigarh, Advanced Linux system administration involves mastering complex tasks to maintain, optimize, and secure Linux servers. Here are key aspects of advanced Linux system administration:
Kernel Tuning: Adjusting kernel parameters and performance settings for specific workloads, such as memory management, I/O scheduling, and network configurations.
Filesystem Management: Managing filesystems, including advanced features like LVM (Logical Volume Management), RAID configurations, and optimizing filesystem performance.
Networking: Configuring advanced network settings, including VLANs, bridging, and routing. Implementing firewalls and VPNs using tools like iptables, OpenVPN, or IPsec.
User and Group Management: Managing users, groups, and permissions effectively. Implementing centralized authentication systems like LDAP or Active Directory for user management.
Security Hardening: Implementing security best practices, such as configuring SELinux/AppArmor, conducting regular security audits, and staying updated on vulnerabilities.
Backup and Recovery: Developing comprehensive backup strategies, including full and incremental backups, and creating disaster recovery plans.
Monitoring and Logging: Using tools like Nagios, Zabbix, or Prometheus for monitoring, and configuring centralized logging systems with ELK stack or syslog-ng.
Virtualization and Containers: Implementing virtualization using tools like KVM or Xen, and managing containers with Docker or Kubernetes for efficient resource utilization.
Performance Optimization: Profiling system performance with tools like Sar, vmstat, or perf, and optimizing system resources based on usage patterns.
Automation: Leveraging automation tools like Ansible, Puppet, or Chef to streamline configuration management and ensure consistency across servers.
High Availability: Implementing high availability solutions like clustering (Pacemaker/Corosync) or load balancing (HAProxy) for mission-critical services.
Troubleshooting: Developing advanced troubleshooting skills using diagnostic tools like strace, tcpdump, and Wireshark to pinpoint and resolve complex issues.
Patch Management: Keeping systems up to date with security patches and managing software updates efficiently.
Advanced Linux system administration requires a deep understanding of Linux internals, security principles, and a willingness to continuously learn and adapt to new technologies. It's crucial for maintaining the reliability, security, and performance of Linux servers in enterprise environments.
0 notes
Text
“Secure” software (yet another --no-sandbox)
Sometimes are that “secure” things in fact most insecure. I came across the session messenger. I had installed it into my phone and then I tried to do the same on my desktop. I downloaded the appimage version and after running it it failed with that typical use --no-sandbox message. I hope that everybody knows what this means, yes, it is chromium based thing, so software running on the google technology (which company is known for mining the user’s data, this is exactly what generates their income) is claimed to be highly secure. What a joke! And, on the top of that all, do you know what --no-sandbox option really does? (if not, then continue reading)
Chrome (and chromium) contains something called sandbox. It has nothing to do with real sandboxing, it’s nothing more than a name given to it by Google. It is a file, that is required to be run with suid bit on and to be owned by root, which gives it the root (Administrator) privileges, in fact, that thing can do almost (yes, we have selinux, apparmor and things like that) everything. Google claims (and the only you can do is to trust them) that gaining root privileges is crucial to strip the privileges down to the non-privileged user, which is needed to sandbox the code, that chromium downloads with the webpage and run. This smells fishy and, in fact, if this does not trigger you the red alert, then something just doesn’t work, but, well, they also claim, that this issue was not well communicated in the past and you can find a lot of articles claiming this is a security hole, but they ensure you, that this is not the case, they are people loving always right white magic company doing nothing evil. What a great piece of bullshit. But they give you option to bypass the required suid, which is that --no-sandbox option, which is claimed to be unsecure, and, in fact, this is unsecure, because every shit the browser downloads from the web is executed with your user rights, which is a great backdoor. So, in fact, you have three options:
giving the Google root access to your computer (which is the default)
giving your user rights to almost any shit found on the internet
not using the Chrome/chromium and chromium based things
And the third is, in fact, no option, because of Google’s monopol when it comes to the web browser. In fact, they did what Microsoft was trying to do with their Internet Exploder, which, past then, triggered the local authorities to do something about that, but now they are completely silent non touching this issue. The first is also not an option, so the second. Well, this is far from ideal, but you can run the web browser with a very restricted user account handling it as a completely non-secure software, which it, in fact, is.
The funny thing on that all is, that someone builds messaging application, that is intended to help you regain your privacy, based on this kind of shit. They claim their application is secure, their messaging is secure and I believe them, but I don’t trust the ground base their application is build on.
0 notes
Text
Portainer not starting on OMV 6?
On your commandline (ssh) do the following:
mkdir -p /etc/default/grub.d
echo ‘GRUB_CMDLINE_LINUX_DEFAULT=”$GRUB_CMDLINE_LINUX_DEFAULT apparmor=0″‘ | sudo tee /etc/default/grub.d/apparmor.cfg
update-grub
reboot
If you still have a problem (using OMV) uninstall and reinstall portainer.
View On WordPress
0 notes
Text
Ubuntu16 更改MySQL 5.7 的默认数据文件目录
关闭mysql-server
#sudo systemctl stop mysql
#sudo systemctl stop mysql
确认的确关闭了mysql-server
#sudo systemctl status mysql
/etc/mysql/my.cnf 显示的配置文件:
CONF=/etc/mysql/my.cnf !includedir /etc/mysql/conf.d/ !includedir /etc/mysql/mysql.conf.d/
数据盘/vdb加载在/mnt 上,创建了/mnt/database目录: 1.停止数据库服务:#service mysql stop
复制原先的数据目录到新目录下(cp -a 参数带原来的权限): # cp -a /var/lib/mysql /mnt/database (-a 参数:same as -dR --preserve=all)
修改数据库文件的所属的权限:
# chown -R mysql:mysql /mnt/database/mysql/ ← 改变数据库文件目录的归属为mysql
3.修改 mysqld.cnf 文件
#vi /etc/mysql/mysql.conf.d/mysqld.cnf
将datadir = /var/lib/mysql
改为datadir = /mnt/database/mysql
4. 修改文件usr.sbin.mysqld(注释#并新增两处,一个是目录 ,一个是目录下的文件)
# vi /etc/apparmor.d/usr.sbin.mysqld
+++++++++++++++++++++++++ # Allow data dir access # /var/lib/mysql/ r, # /var/lib/mysql/** rwk, /mnt/database/mysql/ r, /mnt/database/mysql/** rwk, # Allow data files dir access # /var/lib/mysql-files/ r, # /var/lib/mysql-files/** rwk, /mnt/database/mysql/ r, /mnt/database/mysql/** rwk, +++++++++++++++++++++++++
5 AppArmor权限修改 追加以下内容到 /etc/apparmor.d/tunables/alias
alias /var/lib/mysql/ -> /data/mysql/,
重启AppArmor
#sudo systemctl restart apparmor
6 启动mysql-server
sudo systemctl start mysql
sudo systemctl status mysql
或者:#service mysql start

以下可能需要:
配置文件修改成功后就可以重启数据库,重启数据库之前需要先重新载入apparmor配置文件,使用下面命令重新载入:
#sudo /etc/init.d/apparmor restart
0 notes
Text
Docker compose可以直接把volume用NFS掛載,但事情可能沒有那麼簡單。 # 1. 建立docker-compose.yml https://blog.stefandroid.com/2021/03/03/mount-nfs-share-in-docker-compose.html 這篇說明了在docker-compose.yml裡面,volume使用nfs掛載的方法。 正常��說是可以的。 # 2. 設定CT https://theorangeone.net/posts/mount-nfs-inside-lxc/ 但如果要在Proxmox VE的LXC虛擬機器(CT)裡面掛載NFS,那就需要做寫額外的設定 - 建立CT的時候,取消勾選unpriviledged mode - 建立完成後,features設定nesting=1、mount=nfs - nesting=1才能使用docker - mount=nfs才能掛載NFS 到這邊做完為止,CT應該能夠直接掛NFS。如果不行掛載,那就是NFS權限設定有問題。 # 3. 移除apparmor 如果要讓CT裡面的Docker掛載NFS,那最後難關是apparmor。 它會拒絕讓Docker使用NFS功能,這個真的很令人困擾。 https://newspaint.wordpress.com/2021/01/31/docker-apparmor-enabled-but-default-profile-could-not-be-loaded/#fromHistory 最後我把CT裡面的apparmor移除掉,這樣就可以了。 ---- 說到網路硬碟,你常用那一種網路硬碟呢? NFS?Samba?WebDAV? 下面留言吧~ #DockerCompose #LXC #NFS
0 notes
Text
In this guide, we will cover the installation and configuration of Chef Automation server on Ubuntu 18.04 Bionic Beaver. Chef is the leading Open source, complete, continuous automation solution for both infrastructure and applications that take you all the way from development to production. Chef, the company, is the founder of the DevOps movement and has done massive work to produce the following automation engines:
Chef – For Infrastructure Automation
Habitat – Application automation
INSPEC – Compliance Automation
Chef is a powerful automation solution designed to help you transform your infrastructure into a code. The Infrastructure can be on-premise, Cloud, or a hybrid environment. With Chef, you automate how the infrastructure is configured, deployed, and managed.
Chef server acts as a central repository for your cookbooks as well as for information about every node it manages. Follow our steps below to have a working Chef Server on your Ubuntu 18.04 Server.
Step 1: Update system and set hostname
Ensure all system packages are updated
sudo apt update
sudo apt install curl wget
Set server hostname
sudo hostnamectl set-hostname chef-server.example.com
If you have an active DNS server, set the A record accordingly. For installations without DNSserver, set the record on /etc/hosts file
$ sudo vim /etc/hosts
192.168.18.39 chef-server.example.com
Step 2: Set AppArmor to Complaining or disabled mode
On Ubuntu 18.04. AppArmor is enabled in enforcing mode by default. Chef does not have a profile for running AppArmor so you’ve to set it to the Complaining mode or disabled.
Check if AppArmor is enabled:
$ sudo apparmor_status
apparmor module is loaded.
16 profiles are loaded.
16 profiles are in enforce mode.
/sbin/dhclient
/usr/bin/lxc-start
/usr/bin/man
/usr/lib/NetworkManager/nm-dhcp-client.action
/usr/lib/NetworkManager/nm-dhcp-helper
/usr/lib/connman/scripts/dhclient-script
/usr/lib/snapd/snap-confine
/usr/lib/snapd/snap-confine//mount-namespace-capture-helper
/usr/sbin/haveged
/usr/sbin/tcpdump
lxc-container-default
lxc-container-default-cgns
lxc-container-default-with-mounting
lxc-container-default-with-nesting
man_filter
man_groff
0 profiles are in complain mode.
1 processes have profiles defined.
1 processes are in enforce mode.
/usr/sbin/haveged (802)
0 processes are in complain mode.
0 processes are unconfined but have a profile defined.
If the response is not “0 processes are in enforce mode” or “0 profiles are in enforce mode.”, set it to Complaining or disabled mode
To set AppArmor to Complaining mode, run:
sudo aa-complain /etc/apparmor.d/*
To disable AppArmor entirely, run:
sudo invoke-rc.d apparmor kill
sudo update-rc.d -f apparmor remove
Recheck the status:
sudo apparmor_status
Step 3: Configure Local Mail Relay
The Chef server uses email to send notifications for various events:
Password resets
User invitations
Failover notifications
Failed job notifications
Configure a local mail transfer agent on the Chef server using the guide:
Install and configure Postfix as a Send-Only SMTP Server on Ubuntu
Step 4: Configure NTP Time Synchronization
The Chef server is particularly sensitive to clock drift and it requires that the systems on which it is running be connected to Network Time Protocol (NTP).
Install ntp on Ubuntu
sudo apt install ntp
You can optionally edit /etc/ntp.conf to add NTP servers close to you. To restrict access to NTP server, e.g from your Chef client nodes, set like below
restrict 192.168.18.0 mask 255.255.255.0 nomodify notrap
Restart ntp service after making the change
sudo systemctl restart ntp
If you have UFW firewall enabled, don’t forget to allow ntp port
sudo ufw allow ntp
Show ntp status
sudo ntpq -p
On Chef clients, install ntp and set NTP server to Chef server IP address
$ sudo apt install ntp
$ sudo vim /etc/ntp.conf
Uncomment NTP pool server lines and specify Chef server IP address
#pool 0.ubuntu.pool.ntp.org iburst
#pool 1.ubuntu.pool.ntp.org iburst
#pool 2.ubuntu.pool.ntp.org iburst
#pool 3.ubuntu.pool.ntp.org iburst
server 192.168.18.39
Step 5: Download and install Chef server package
First, check the latest version of Chef server from Chef Downloads page
As of this writing, the recent release is version 21.12.720. This is the package we will download and install
VERSION="21.12.720"
wget https://packages.chef.io/files/stable/chef-workstation/$VERSION/ubuntu/18.04/chef-workstation_$VERSION-1_amd64.deb
Once the download is complete, install the package using apt command:
sudo apt install -f ./chef-workstation_$VERSION-1_amd64.deb
Sample status
$ sudo dpkg -i chef-server-core_$VERSION-1_amd64.deb
Selecting previously unselected package chef-server-core.
(Reading database ... 105387 files and directories currently installed.)
Preparing to unpack chef-server-core_20.7.96-1_amd64.deb ...
Unpacking chef-server-core (20.7.96-1) ...
Setting up chef-server-core (20.7.96-1) ...
Wait for the installation to complete then configure Chef Server
sudo chef-server-ctl reconfigure
This step may take a few minutes to complete since many services are configured.
Create an administrator account
The format is:
sudo chef-server-ctl user-create USER_NAME FIRST_NAME LAST_NAME EMAIL 'PASSWORD' --filename FILE_NAME
An RSA private key is generated automatically.
This is the user’s private key and should be saved to a safe location.
The option--filename will save the RSA private key to the specified absolute path.
Example:
sudo chef-server-ctl user-create chefadmin Chef Admin \
[email protected] 'StrongPassword' \
--filename /home/chefadmin.pem
Also, create an organization. The syntax is:
sudo chef-server-ctl org-create short_name 'full_organization_name' \
--association_user user_name \
--filename ORGANIZATION-validator.pem
The name must begin with a lower-case letter or digit,
The full name must begin with a non-white space character
The --association_user option will associate the user_name with the admins security group on the Chef server.
An RSA private key is generated automatically. This is the chef-validator key and should be saved to a safe location.
The --filename option will save the RSA private key to the specified absolute path.
See example below
sudo chef-server-ctl org-create mycompany 'Company X, Inc.' \
--association_user chefadmin \
--filename /home/mycompany-validator.pem
Generated keys should be available on /home directory
# ls /home/
chefadmin.pem mycompany-validator.pem
Install Chef Manage
Chef Manage is a premium add-on that provides a graphical user interface for managing common Chef server tasks. It’s free for up to 25 nodes.
Let’s install the management console
sudo chef-server-ctl install chef-manage
sudo chef-server-ctl reconfigure
sudo chef-manage-ctl reconfigure
You can also install Chef Manage from a .deb package
VER="3.2.20"
wget https://packages.chef.io/files/stable/chef-manage/$VER/ubuntu/18.04/chef-manage_$VER-1_amd64.deb
sudo apt install ./chef-manage_$VER-1_amd64.deb
sudo chef-manage-ctl reconfigure
All Chef Server services will run under the username/group opscode. The username for PostgreSQL is opscode-pgsql. Additional packages can be installed from https://packages.chef.io/
If you wish to use or already using UFW firewall, open ports 80 & 443 by running the commands below
sudo ufw allow proto tcp from any to any port 80,443
You should be able to access the Chef web admin dashboard on https://serverip/login
Login with username added earlier. A fresh Chef dashboard should be similar to below
Step 6: Install Chef Development Kit on your Workstation machine
Chef Workstation is where you have Chef development Kit installed. It contains all the tools you need to develop and test your infrastructure, built by the awesome Chef community. Install Chef Development Kit / Workstation using the guides below:
Install Chef Development Kit / Workstation on Ubuntu
For Arch Linux users, use:
How to install Chef Development Kit on Arch Linux
Step 7: Configure knife on Chef Workstation
Knife is the command-line tool that provides an interface between your workstation and the Chef server. Next read:
Configure Chef Knife, Upload Cookbooks and Run a recipe on Chef Client Nodes
0 notes
Text
Encoding overloaded obs studio fix

#Encoding overloaded obs studio fix 1080p#
#Encoding overloaded obs studio fix software#
In my search to fix this issue, I saw one person mention that using a swap file instead of a swap partition can cause issues with OBS. Timer = PowerMizer_Monitor_(GPU_0),Yes,1000 # Configuration file for nvidia-settings - the NVIDIA Settings utility # /home/elias/Documents/.nvidia-settings-rc I exported my nvidia-settings config to a temporary place (so it doesn’t overwrite the normal config): # Allows G-SYNC on monitor not validated as G-SYNC Compatible: Yes.Orientation: No Rotation, No Reflection.Selection: GBT AORUS FI32U (DP-2 on GPU-0).Server Vendor String: The X.Org Foundation.I can’t post screenshots since I just made my account, but here is what I see in nvidia-settings: OpenGL: renderer: NVIDIA GeForce RTX 3090/PCIe/SSE2 Loaded: nvidia gpu: nvidia resolution: 3840x2160 I ran sudo grub-mkconfig -o /boot/grub/grub.cfg and restarted after every edit. GRUB_CMDLINE_LINUX_DEFAULT="quiet udev.log_priority=3" I also tried renaming the config file and then reinstalling grub with pamac reinstall grub to get the default grub config. I tried changing this to the following, but it didn’t help: GRUB_CMDLINE_LINUX_DEFAULT="efi=runtime quiet apparmor=1 security=apparmor udev.log_priority=3" When I setup the VM, I had updated the grub config ( /etc/default/grub) to use: GRUB_CMDLINE_LINUX_DEFAULT="efi=runtime quiet apparmor=1 security=apparmor udev.log_priority=3 amd_iommu=on iommu=pt video:vesafb=off video=efifb:on" I reset my BIOS settings to default (other than my memory’s XMP profile). I previously had single GPU VM passthrough set up, so I figured that could be causing this issue. This one actually caused my screen to go black and then return me to the login screen every couple of minutes.
#Encoding overloaded obs studio fix 1080p#
Setting “Output (Scaled) Resolution” to 1080p while keeping the “Base (Canvas) Resolution” at 4k.
Using the “Indistinguishable Quality, Large File Size” recording quality.
Everything on my system is up to date with the stable branch and I restarted after updating. I am also recording to a PCIe4 SSD, so disk IO should not be a bottleneck. I know recording 4k 60hz is rather intensive, but NVENC shouldn’t have a problem with it. I think it’s worth noting that I have a 4k 144hz monitor and I’m recording a 4k 60hz video. When recording my desktop, about 25-50% of the frames are skipped, but if I try to record a game, then 99% of frames are skipped. dragging a window around the screen), I get a ton of “skipped frames due to encoding lag”. If you do see this at the bottom of your screen, don’t panic! There are many ways to try to resolve this and get back to a smooth streaming experience.I am trying to record my screen with OBS using the NVENC encoder. One of the most reported issues in OBS Studio is the OBS Encoding Overloaded warning. Fortunately, these problems in OBS can all be resolved by making sure you have the correct internal and external settings. Inevitably with such incredible flexibility comes bugs and issues. Due to its open-source nature has an extremely long list of plugin possibilities, and new downloadable features are released online almost daily.
#Encoding overloaded obs studio fix software#
OBS Studio is one of the most popular streaming software for one very precise reason customizability.
1 note
·
View note
Text
Pc netzwerke das umfassende handbuch ipad
PC NETZWERKE DAS UMFASSENDE HANDBUCH IPAD >> DOWNLOAD LINK
vk.cc/c7jKeU
PC NETZWERKE DAS UMFASSENDE HANDBUCH IPAD >> READ ONLINE
bit.do/fSmfG
computer-netzwerke grundlagen
computer netzwerke pdf
rheinwerk verlag
rheinwerk openbook
windows server 2019 handbuchhardware security buch
rheinwerk neuerscheinungen
rheinwerk technik
Mit Netzwerkspeichern Daten sicher und intelligent verwalten; Fotos, Synology NAS: Das umfassende Handbuch für alle Synology-Geräte, aktuell zu DSM 7. Netzwerk, Server, Sicherheit · Netzwerkkonfiguration · Sichere Datei- und Webserver · Backups, Firewall, SELinux und AppArmor · Virtualisierung: Docker, KVM, WSL2, PC-Netzwerke: Das umfassende Handbuch für Einsteiger in die Netzwerktechnik. Thunderbolt Netzwerkadapter kompatibel mit MacBook Air/Pro, iPad Pro/Air, Das umfassende Handbuch für Power-User. Inkl. APFS. Autor: Kai Surendorf PC-Netzwerke / Rheinwerk Computing. Martin Linten, Axel Schemberg, 162 In-App-Einkäufe 62 Installierte Anwendungen 65 iPad 116 IP-Adresse 19 182 Passwort 182 Macintosh-Computer 116 Markierte Titel importieren 129 Entdecken Sie PC-Netzwerke: Das umfassende Handbuch für Einsteiger in die Netzwerktechnik. Für in der großen Auswahl bei eBay. Computer zu einer Liste hinzufügen. Objekte kopieren oder installieren. Einen Berichtsvorgang ausführen. Vgl. auchSkripteditor – Benutzerhandbuch.Windows PC,Mac OSX für alle DRM-fähigen eReader Apple iPad, Android Tablet PC's Apple iPod touch, iPhone und Android Smartphones. Preis: 29,90 EUR. Dokuments auf dem iPad und beenden Sie es auf Ihrem Computer. Warten Sie einen Augenblick, bis das iPad Netzwerke in Reichweite erkannt hat, und.
https://qobaqesiboca.tumblr.com/post/692169984771817472/wmf-800-black-bedienungsanleitung-kindle, https://jequwiqor.tumblr.com/post/692169699611557888/yamaha-xc-125-tr-handbuch-mercedes, https://jequwiqor.tumblr.com/post/692169699611557888/yamaha-xc-125-tr-handbuch-mercedes, https://jequwiqor.tumblr.com/post/692170111480676352/belluno-bibs-bedienungsanleitung-target, https://nehacacilowu.tumblr.com/post/692170092964888576/riege-scope-handbuch-canon.
0 notes
Text
[Media] RedNixOS
RedNixOS
NixOS 'distro' for security enthusiasts
RedNixOS aims to be a Kali-like Linux distribution built around NixOS, tailored for security researchers, pen-testers, red teamers and infosec enthusiasts.
Simply put, this project is a pre-made NixOS config. Therefore, it's merely required to build the .iso file yourself. Furthermore, RedNixOS includes large amounts preinstalled software, as defined in packages.nix file, which you can accommodate to your needs.
By default, RedNixOS uses the Zen kernel, which might achieve better performance. Additionally, certain networking and security features are enabled, such as:
▫️ sudo only for the wheel group
▫️ AppArmor
▫️ lockKernelModules
▫️ a firewall with straightforward default configuration
https://github.com/redcode-labs/RedNixOS
Wiki:
https://github.com/redcode-labs/RedNixOS/wiki
1 note
·
View note
Text
SELinux on Ubuntu Tutorial
SELinux on Ubuntu Tutorial
One way to enhance your Linux system’s security is by adding an extra security layer using SELinux. With Security-Enhanced Linux (SELinux), the applications on your Linux systems get isolated from each other, protecting your host system. By default, Ubuntu uses the AppArmor, a Mandatory Access Control system which enhances the security, but you can use the SELinux to achieve the same.
SELinux is…
View On WordPress
0 notes
Text
Security essentials
For our BYOD’s, these are the most basic things you must know how to utilise in order to be part of our support group.
Selinux : Isolates applications from files and features that they should not access via sandboxing.
Linux audit : This will let us know exactly what users and applications do in each and every system.
Apparmor : There may be instances where Apparmor is used for various reasons. It is a standard in some distrobutions.
Chroot : The grand old Sandbox. Easy to configure and raise security.
Polickiit: Only provide root privileges for those that actually need it.
What have we forget?
3 notes
·
View notes
Text
AppArmor vs SELinux

AppArmor vs SELinux.
Para aumentar los mecanismos de seguridad que ofrecen los permisos y las listas de control de acceso "ugo/rwx", la Agencia de Seguridad Nacional de los Estados Unidos (NSA) desarrollo un control de acceso obligatorio que todos conocemos como SELinux (Security Enhanced Linux).
Por otro lado, y a modo privativo la empresa Immunix creo AppArmor. Novell adquirió AppArmor, y puso la herramienta en manos de la comunidad en formato open source. Actualmente es Canonical quien maneja su desarrollo y mantenimiento.
RHEL, CentOS y Fedora, son las distribuciones linux más conocidas que usan SELinux por defecto. Por otra parte Ubuntu, Linux Mint y Open Suse, están entre las destacadas que utilizan AppArmor (Open Suse desarrollo su propia GUI para manejar fácilmente las reglas de la herramienta).
Seria muy dificil hacer una comparativa realista de las dos aplicaciones. El fin de las dos es el mismo, pero su forma de operar difiere en gran medida, por eso vamos a explicar un poco cada herramienta, y tu decides cual te conviene dado que ambas son compatibles con cualquier distribución linux.
AppArmor vs SELinux
AppArmor
Si hay algo que me gusta de AppArmor es su modo de autoaprendizaje, es capaz de detectar cómo debe funcionar nuestro sistema de forma automática.
En vez de políticas administradas por comandos, AppArmor utiliza perfiles que se definen en archivos de texto que pueden ser modificados de forma muy sencilla. Puedes encontrar los perfiles predefinidos (se permite agregar más), con el siguiente comando:
cd /etc/apparmor.d
dir
ejemplo de edición...
nano usr.bin.firefox
Profundizar en la configuración de SELinux es complejo, se requieren unos conocimientos nivel medio/alto. Por el motivo mencionado se creo AppArmor, digamos que puede hacer lo mismo pero de una forma mucho mas sencilla y con menos peligro (si te equivocas editas de nuevo el archivo o desactivas el perfil).
Para desactivar un perfil tan solo tienes que ejecutar lo siguiente (en el ejemplo el de firefox):
sudo ln -s /etc/apparmor.d/usr.sbin.firefox /etc/apparmor.d/disable/
AppArmor ofrece dos modos predefinidos de seguridad, complain y enforce. Modificar un perfil con un modo de seguridad predeterminado también es una operación simple. En el ejemplo modificamos el perfil "usr.sbin.ntpd".
# complain
aa-complain /etc/apparmor.d/usr.sbin.ntpd
# enforce
aa-enforce /etc/apparmor.d/usr.sbin.ntpd
También podemos verificar el estado actual de AppArmor y visualizar los perfiles habilitados.
apparmor_status
imagen de ejemplo...

AppArmor
Para más información visita la Ubuntu wiki.
SELinux
Por su forma de operar SELinux puede ser mucho más estricto que AppArmor, incluso muchas herramientas y paneles de control web recomiendan desactivarlo para no tener problemas.
Al igual que AppArmor, SELinux (Security Enhanced Linux) también tiene dos modos de protección:
enforcing: SELinux niega accesos en función de la política de las reglas establecidas.
permissive: SELinux no bloquea el acceso, pero se registrarán para un posterior análisis.
Puedes verificar el modo que estas utilizando con el comando...
getenforce
Podemos modificar el modo (incluso deshabilitar SELinux) en su archivo de configuración.
nano /etc/selinux/config
Cambias la linea:
SELINUX= xxx
por alguna de las siguientes opciones:
enforcing
permissive
disabled
Guarda el archivo, cierra el editor, y reinicia el sistema.
reboot
Verificamos el estado de SELinux.
sestatus

SELinux
Ahora vemos unos ejemplos de uso. Una de las operaciones más comunes es al modificar el puerto ssh (por defecto 22), es evidente que debemos decirle a SELinux que ssh cambia de puerto, por ejemplo el 123.
semanage port -a -t ssh_port_t -p tcp 123
Otro ejemplo es cambiar la carpeta permitida como servidor web.
semanage fcontext -a -t httpd_sys_content_t "/srv/www(/.*)?"
restorecon -R -v /srv/www
Puedes obtener más información en su wiki oficial.
Conclusión final
Los dos sistemas de seguridad tratados en este articulo nos ofrecen herramientas para aislar aplicaciones, y a un posible atacante del resto del sistema (cuando una aplicación es comprometida).
Los conjuntos de reglas de SELinux son excesivamente complejos, por otro lado nos permite tener más control sobre cómo se aíslan los procesos. La generación de las políticas puede ser automatica, aun así su manejo es complicado si no eres experto.
AppArmor es más sencillo de usar. Los perfiles se pueden escribir a mano con tu editor preferido, o generarlos con "aa-logprof". AppArmor utiliza un control basado en rutas, por tanto el sistema es más transparente y se puede verificar de forma independiente.
La elección es tuya.
Canales de Telegram: Canal SoloLinux – Canal SoloWordpress
Espero que este articulo te sea de utilidad, puedes ayudarnos a mantener el servidor con una donación (paypal), o también colaborar con el simple gesto de compartir nuestros artículos en tu sitio web, blog, foro o redes sociales.
Read the full article
0 notes
Text
Ubuntu14 中 MySQL更改数据库文件的目录
公司的ubuntu服务器对于各个系统的目录是放在不同的逻辑分区上的,比如存放MySQL数据库文件的默认目录/var/lib/mysql所在的系统目录/var/单独在一个分区上,但是这个分区的大小是固定的,不足以存放整个数据库文件。但是另一个系统目录/data大小却达到T级,大大满足了需求,因此有了更改数据库文件目录的需求。以下是我参考网络上一些文章进行尝试的过程:
停止数据库服务 使用/etc/init.d/mysql stop 或者 stop mysql
拷贝数据库文件 在目标位置(/data)创建数据库文件的目录(如/mysqldb),并复制(如果不再使用默认的位置,则可以直接mv原先数据库文件到新目录下)原先的数据库文件目录到该目录下: #cd /data #mkdir mysqldb #cp -r /var/lib/mysql /data/mysqldb/ 经过一段时间的等待后,在/data/mysqldb/下面就有了原先默认的mysql数据库文件目录的拷贝“/mysql”
修改my.cnf文件
# vim /etc/mysql/my.cnf
将 datadir = /var/lib/mysql
改为 datadir = /data/mysqldb/mysql
另外由于当前 my.cnf 中的
socket = /var/run/mysqld/mysqld.sock(而并非像网上所说的sock = /var/lib/mysql/mysql.sock),即socket的位置并不在数据库文件所在的位置,因此可以不做类似网上其他网页所说的,要使用以下的命令做一个mysql.sock 链接:
ln -s /data/mysqldb/mysql/mysql.sock /var/lib/mysql/mysql.sock (需要从/home/data/mysql下复制一份过来)
修改数据库的权限:
# chown -R mysql:mysql /data/mysqldb/mysql/ ← 改变数据库文件目录的归属为mysql
# chmod 700 /data/mysqldb/mysql/whois/ ← 改变数据库目录whois的属性为700
# chmod 660 /data/mysqldb/mysql/whois/* ← 改变数据库中数据表的属性为660
修改文件usr.sbin.mysqld
# vim /etc/apparmor.d/usr.sbin.mysqld
把
/var/lib/mysql r,
/var/lib/mysql/** rwk,
改成
/data/mysqldb/mysql/ r,
/data/mysqldb/mysql/** rwk,
注意:没有该步骤的话,将导致数据库服务无法重启,好像在重启,但是一直卡住无反应。
启动mysql服务器
/etc/init.d/apparmor restart
/etc/init.d/mysql restart (或者使用 restart mysql)
搞定!
0 notes
Text
Linux 5.5-rc5 lançado com correção de regressão de desempenho
Linux 5.5-rc5 lançado com correção de regressão de desempenho
O desenvolvimento do Linux 5.5 vem crescendo nos últimos dias após a semana de Natal e o Ano Novo. No entanto, agora mais desenvolvedores retornam aos seus teclados para obter essa próxima atualização do kernel repleta de novidades a serem implementadas para sua estreia no final do mês. Assim, foi lançado ainda no domingo, o Linux 5.5-rc5 com correção de regressão de desempenho.
Linux 5.5-rc5…
View On WordPress
0 notes
Last Seen Blogs

westeckwindows
Westeck Windows and Doors

dreadwulf
A Feast For Crows Supremacy Blog

musicknowsnobounds
Supernaturally SHINing Witch of 221B

gamesandgeekery
Games and Geekery

screamchamber
Whimsical Land