#arduino buy online
Explore tagged Tumblr posts
Visit Tumblr Blog
Explore Tumblr blogs with no restrictions, modern design and the best experience.
Last Seen Tumblr Blogs


Fun Fact
In 2020, 27% of US Tumblr users had an annual household income of over $100,000.
Text

Buy Electronics Components Online in India – TOMSON ELECTRONICS
Explore our vast collection of electronics components for DIY, Embedded, Robotics, and more. Place order online now for same-day shipping and hyperlocal delivery across India. Discover the top electronics shop in Kerala and Tamilnadu, India.
#electronic components#electronics#electronic components online store#sensors#arduino#tomson electronics#buy resistors online#electrical components#battery
0 notes
Text
Buy Ready-Made Engineering Projects in Bangladesh | Arduino, PLC, IoT, Automation & Final Year Project Help
#Arduino online shop BD#BSc project ecommerce#Buy Arduino projects Bangladesh#Buy electronics projects BD#Final year project shop BD#IoT project store Bangladesh#MSc project shop#PLC project Bangladesh#Project catalog Bangladesh#Ready project online store Bangladesh#Ready-made project BD#WooCommerce engineering projects
0 notes
Text
Buying Electronic Components Online in India — What to Keep in Mind
Electronics is a field where small parts make a big difference. If you're building something — a simple sensor circuit, maybe a GSM tracker, or even just testing modules — sourcing the right components is half the work.
Going shop to shop looking for capacitors, ICs, or GPRS modules can be draining. Not to mention, stock may not be available, or the part isn’t original. That’s where online sellers come in.

Why Online Works Better (Most of the Time)
Instead of wasting hours traveling or calling five vendors, it’s easier to go online and search the part directly. You get to check datasheets, ratings, specs, pricing — all at once. It’s a better way to find both common and rare components.
In India, the trend is clear: more developers, students, and even R&D engineers now prefer to buy electronic components online. It's faster and often cheaper, too.
Looking for Specific Parts Like GPRS Modules?
Not every local store stocks communication modules. A GPRS module is commonly used in IoT, vehicle tracking, or remote data transmission projects. Online, you can compare multiple options, check if it’s quad-band, serial-compatible, or needs an antenna, etc. That’s hard to do in a store with no documentation or help.
Be Cautious With Semiconductors
If you’re sourcing semiconductors, ICs, or microcontrollers, don’t compromise on quality. Faulty or cloned parts can damage your boards. It’s always safer to stick with semiconductor distributors in India who have proper sourcing, and ideally, tie-ups with top semiconductor companies in India.
Use reliable sources, particularly for projects where long-term dependability is important, such as medical or industrial construction. They may be slightly more expensive, but you can avoid problems later.
The Benefits of Sites Like OM Electronics
OM Electronics provides a fair combination between working stock, clear specifications, and a respectable choice. Whether you want Arduino boards, relays, resistors, or modules, they have categories that are easy to browse. Bulk ordering is available too, which is useful for college labs or small companies.
The interface is clean, and support is better than most smaller sellers. If you're serious about online sourcing, having 2–3 such trusted sites bookmarked really helps.
Final Words
Buying electronic parts online is no longer risky like it was five years ago. With verified platforms, fast logistics, and better inventory systems, sourcing has become smoother. Just remember to avoid unknown sellers and always double-check specs before buying.
Whether it’s a sensor, GPRS module, or a logic IC, you now have more control over quality and delivery. That’s a big win for anyone working in electronics today.
#buy electronic components online#electronic components online india#electronic parts online#top semiconductor companies in india#gprs module#semiconductor distributors in india
1 note
·
View note
Text
Building Your Own Mechanical Dog: A Beginner’s Guide
In the ever-evolving world of robotics, creating your own mechanical dog is a fascinating and rewarding challenge. Whether you're a hobbyist, a student, or simply curious about robotic engineering, building a mechanical dog can be a fun way to learn about coding, mechanics, and artificial intelligence. It’s more than just assembling wires and parts—it's about bringing movement and purpose to a machine that mimics a beloved companion. At mechanical dog, we believe that anyone passionate about robotics can take the first step in developing a robotic pet with personality. This guide will walk you through the essentials—from selecting the right components to programming basic functions—to help you build your first functional and interactive mechanical dog.
Understand the Core Functionality of a Mechanical Dog
Before jumping into assembly, it's crucial to understand what makes a mechanical dog function. These robotic companions typically involve servos or motors to mimic the movements of legs, a microcontroller as the brain, and a power source for mobility. Sensors such as ultrasonic detectors help the mechanical dog navigate its environment. Grasping the roles of each component ensures a more efficient build process and sets the foundation for future customization. It also helps in troubleshooting and upgrading the design later. Learning this early provides a technical roadmap and gives you clarity on what parts to prioritize as a beginner in robotics.
Choosing the Right Materials and Parts to Begin
Starting with the right components makes a big difference in your mechanical dog’s performance. You'll need a sturdy yet lightweight frame, preferably 3D-printed plastic or aluminum. Essential parts include servo motors for leg movement, a rechargeable battery pack, a microcontroller like Arduino or Raspberry Pi, and wiring kits. Buying beginner-friendly kits from reputable robotics stores is highly recommended. Mechanical dog recommends selecting components based on simplicity and expandability. Focus on acquiring parts that allow trial and error without breaking your budget. This stage sets the groundwork for building something durable and modifiable over time.
Assembling the Frame and Installing Motors
Once you have the necessary parts, it’s time to bring your mechanical dog to life. Begin by assembling the body and legs, using screws and brackets to fix the frame. Install the motors at the joints to replicate knee and hip motion. Precision in alignment is key—improper placement may result in unbalanced movement. Make sure each motor is securely fastened and capable of smooth rotation. During this stage, mechanical dog builders often test the range of motion manually before connecting to the control board. Taking your time here helps prevent mechanical issues down the line.
Wiring and Connecting Your Microcontroller System
With the frame and motors in place, the next step is wiring. Connect each motor to the microcontroller using jumper wires or a motor shield. Labeling wires helps reduce confusion later, especially when debugging. Your microcontroller acts as the brain of the mechanical dog and sends commands that control movement. Power connections must be secure and insulated to prevent short-circuiting. This phase requires patience and organization, particularly for first-timers. Once everything is in place, running a basic movement script is a great way to ensure your connections work and to see your mechanical dog come alive.
Programming Basic Movement and Direction Controls
Programming is where your mechanical dog learns to walk. Start with simple scripts that control forward and backward movement using timed signals to motors. As you progress, introduce directional turns and stop-start commands. Platforms like Arduino IDE or Python make this easy for beginners, especially with online resources and libraries. At mechanical dog, we encourage experimenting with code to understand how speed and timing affect performance. Getting these basics down sets the stage for more advanced behaviors, like obstacle avoidance and voice command integration. Programming breathes life into your build and gives it functionality.
Integrating Sensors for Navigation and Interaction
Sensors make your mechanical dog interactive and responsive to its environment. Ultrasonic sensors help it detect walls, infrared sensors track lines or paths, and gyros assist in balance. Proper sensor placement is essential—usually on the head or front body of the robot. Once installed, they are connected to the microcontroller and incorporated into your code. This enables your mechanical dog to avoid obstacles or follow predefined routes. These intelligent behaviors enhance the experience and demonstrate real-world robotics applications. Adding sensors is a significant upgrade and a fun learning curve for every builder.
Testing, Troubleshooting, and Future Enhancements
Once all systems are connected and programmed, it’s time to test your mechanical dog. Watch for issues like jerky movement, sensor misreads, or battery drainage. Take notes and go step-by-step to troubleshoot. This is where hands-on learning is most valuable. Mechanical dog builders often revisit earlier steps for fine-tuning. After successful testing, consider adding voice control, facial recognition, or remote operation via Wi-Fi. With every enhancement, you’ll grow your skills and make your mechanical dog smarter. Remember, every successful robotics project involves problem-solving and persistence.
Conclusion
Building a mechanical dog from scratch is a fulfilling journey that combines creativity, logic, and hands-on learning. Whether you’re doing it as a personal challenge or stepping into the field of robotics professionally, the experience offers a deep understanding of engineering and artificial intelligence. With patience and curiosity, your mechanical dog will not only move and interact but also reflect the effort you’ve invested in learning. At mechanical dog, we support all levels of builders and believe that even a beginner can create something incredible. Start small, think big, and bring your robotic companion to life.
0 notes
Text
I had to run by a Radio Shack on a few occasions for electronics components right up til their eventual closure. They had the “electronics components” as a category, but they were largely supplying them from a small stack of cabinets, and not even all of that was populated, alongside maybe two or three types of ‘general starter electronics kit’. Forget “building a radio”: the local place didn’t even have a full E6 resistors or magnet wire. And their staff would be better trained to sell RC cars or cell phones (the latter of which was nearly half the store by 2012) than to answer even simple electronics questions.
((Note the lack of transformers even listed on those cabinets; at best they’d have a couple variable-voltage wall warts.))
Their online catalog was better in variety -- I got a lot of copper-plated boards during their going-out-of-business sale -- but it was nowhere near competitive with online sellers even before dropshipping ate the world. In many cases you’d be looking at three- to five-fold markup over McMaster-Carr or DigiKey prices, even including shipping.
Which... kinda points to the issue with foone’s alternate proposal. A RadioShack trying to sell to hobbyist enthusiasts would have still had to compete with the internet, and hobbyists ended up being pretty fickle about large purchases, too, no matter how much brand loyalty they might have had at a day-to-day basis.
With good reason: those electronics components cabinets often had a 10-fold markup over buying the same from local used electronics shops or 20-fold from online vendors, but if you needed a D-25 or a stack of LEDs in a hurry you’d be willing to pay a couple bucks for the convenience. And those really weren’t enough to keep the lights on or doors open at the scale -- even small family used electronics shops have to operate at a drastically different format. Meanwhile, if you wanted to make even a moderately-complicated electronics circuit, you’d be looking at tens if not hundred of dollars in price differences between RadioShack’s local options and online sellers.
((And, separately, the modern education system had absolutely slaughtered any interest in low-level electronics pre-Arduino, and not just as primary or secondary school levels. I’ve talked with post-grad EEs who hadn’t touched a component smaller than a NAND gate. The internet has done amazing things for connectivity and community among hardware enthuisiasts, but we’re still a dying breed.))
But RadioShack’s pre-00s business model sold the small stuff like transformers and capacitors so that it could also sell the big stuff: sound systems, full radio kits, so on. Even back in the 1980s, they were far more . The point of selling mechanical keyboards, had they made it to today, wouldn’t be to sell a handful of 50-cent cherry switches for $3 each, but that they could sell a 50-buck mechanical keyboard kit for $200. I think that would have been a more successful approach in retrospect... but it’d also be the sort of thing that would have been ‘successful’ on the scale of a few hundred stores at most, rather than the thousands that RadioShack was operating (and often locked into).
((They did sell Arduino and RaspberryPi-style kits, mostly MAKE magazine or Seeed-variant stuff, just around 2012-2013. But they were very much marketed at Young Children Educational Gifts rather than viable projects.))
Microcenter and some hardware stores have taken that approach, and they do exist -- though it’s still not their core focus so much as a way to drive other sales -- but they’re the sort of business that can only support a location or two per city, rather than the convenient strip-mall front that RadioShack aimed for.
Does anyone remember what happened to Radio Shack?
They started out selling niche electronics supplies. Capacitors and transformers and shit. This was never the most popular thing, but they had an audience, one that they had a real lock on. No one else was doing that, so all the electronics geeks had to go to them, back in the days before online ordering. They branched out into other electronics too, but kept doing the electronic components.
Eventually they realize that they are making more money selling cell phones and remote control cars than they were with those electronic components. After all, everyone needs a cellphone and some electronic toys, but how many people need a multimeter and some resistors?
So they pivoted, and started only selling that stuff. All cellphones, all remote control cars, stop wasting store space on this niche shit.
And then Walmart and Target and Circuit City and Best Buy ate their lunch. Those companies were already running big stores that sold cellphones and remote control cars, and they had more leverage to get lower prices and selling more stuff meant they had more reasons to go in there, and they couldn't compete. Without the niche electronics stuff that had been their core brand, there was no reason to go to their stores. Everything they sold, you could get elsewhere, and almost always for cheaper, and probably you could buy 5 other things you needed while you were there, stuff Radio Shack didn't sell.
And Radio Shack is gone now. They had a small but loyal customer base that they were never going to lose, but they decided to switch to a bigger but more fickle customer base, one that would go somewhere else for convenience or a bargain. Rather than stick with what they were great at (and only they could do), they switched to something they were only okay at... putting them in a bigger pond with a lot of bigger fish who promptly out-competed them.
If Radio Shack had stayed with their core audience, who knows what would have happened? Maybe they wouldn't have made a billion dollars, but maybe they would still be around, still serving that community, still getting by. They may have had a small audience, but they had basically no competition for that audience. But yeah, we only know for sure what would happen if they decided to attempt to go more mainstream: They fail and die. We know for sure because that's what they did.
I don't know why I keep thinking about the story of what happened to Radio Shack. It just keeps feeling relevant for some reason.
34K notes
·
View notes
Text
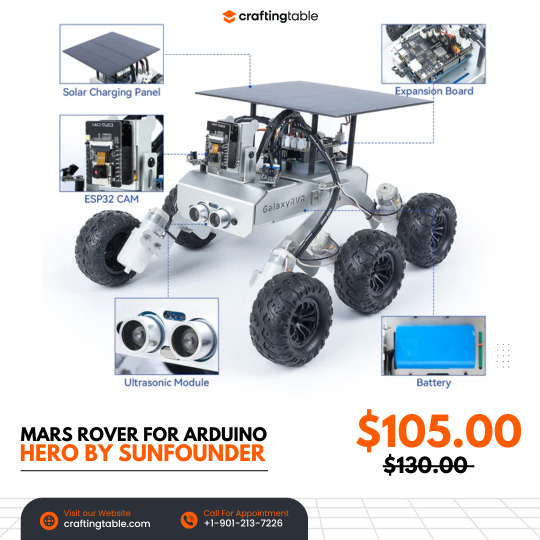
GalaxyRVR is an easy-to-use robot that works with Arduino Uno R3 and lets you experience what it’s like to explore Mars. It’s built strong with metal parts and has a smart wheel system to move smoothly over sand, rocks, grass, and even mud. It uses solar power to charge and has a camera (ESP32-CAM) that shows you what it sees in real time through an app. You can drive it from anywhere! It also has sensors to avoid obstacles and bright lights so it can explore in the dark too. The kit comes with helpful videos and guides, and there's an online community ready to help, making it perfect for beginners who want to build and explore. Buy Now
0 notes
Text
213729 Fine Arts Research & Development: Honors ⋆ WEEK 6
I'm fascinated with post-human music. Post-humanism is the decentralization of humans from the equation, shifting the focus away from us. In sound, I like to use the phrase 'Auto Audio Art' to describe it, and have even considered making some 'A.A.A' myself for this semester's studies, which you can see on my holiday sketch page:

After learning (from Mike Bridgman, no less) of the existence of metallic paint that could transmit midi signals on contact, I got ideas. One such concept was cheese granular, a malaphor of 'cheese grater' and 'granular synthesis', which involved me grating cheese over a MIDI-painted table, with notes playing based on wherever the cheese lands.
I took some notes during our impromptu talk:
keyboard main board / controller instead of midi multi output keyboard
"it's not easy"
Arduino might be a way for just a couple of switches, it might be a tutorial away
talk to workshops top of block 1 has an electronics workshop not sure who controls that, talk to technicians
talk to Mike Bridgman for possible hiring out a mac mini could possibly be lent mac (same form factor as mac mini but pc)
mike has mic go figure and perchance a better set of speakers/ monitors speaker stand
tested the speaker and mixer setup tried by routing it to my laptop speaker instead of monitor and also into the mixer with not output dawg I think the speaker is the problem
"it was in the trash for a reason"
IF NO SPEAKER MATCHES FORM FACTOR buy cheap t-amp (a digital class amplifier) that offer twelve volt power supply for building a speaker also you can hook it to a passive speaker designed for battery packs/low power setups/high response speakers Eugene has plenty for lending
not difficult to build speaker into the sculpture with t amp and speaker
he also has speakers with a stand and even a non broken version of my speaker! Except the stand might not even go to 2 metres, let alone 3
He has a bluetooth speaker, which is lighter and can be 'cradled' by the head, i'll have to check if my laptop outputs it
Giant midi pedal: button You can open up a big midi button and replace the switch
Footswitch with multiple buttons and put where hand is Philips blutooth

The other day, my mum sent me a letter.

Inside, she'd attached a New Yorker article about sound artist William Basinski, the composer behind the Disintegration Loops; which I've thrown in as a little extra source.


With Eugene and Mike's advice in mind, I got to searching for a good two-button setup for my sculpture. Finding a decently-priced MIDI pedal was easier said than done however - and while I could just buy two cheap keyboard pedals, the cost, along with the hassle of returning it if it didn't work, put me off it.
So I looked for a two-key keyboard instead, and yeah, that was quick.

Thanks to the popular rhythm video game OSU, two-key keyboards are a surprisingly common find on the online market! Who knew that people not going outside could contribute to society this much?
And now for some fine literature.

When it comes to books about sampling in the Massey Library database, no other fit the search quite like Eduardo Navas' Remix Theory. I borrowed myself a copy a few weeks back, but only really sat down with it 'now' - a term I use loosely.
Remix Theory is first and foremost, dedicated to the remix - the sample is discussed, no doubt - although what Navas defines as 'Remix' goes far beyond the limits of music. This is accompanied by a plethora of graphs and diagrams - ripped straight from Navas' own remixtheory.net website.
I find a lot of these graphs to come across as rather anecdotal, as they define specific stages of 'mechanical reproduction' [m.r.] and 'remix' over the past 200 years through a lens either too broad [photomontage as a whole being a 'stage of m.r./sampling], (Navas 18) or too specific [dub culture onwards being the 'first stage in remix'] (Navas 21).
To understand the 'Remix' as Navas does is to reassess your perception of reality, with the 'Remix' being the unifying glue to existing:
A playlist on your phone is a remix. (Navas 27)
A photograph is, due to the framing and visual reproduction of a specific window of something that is now ontologically different than it was when the photo was taken, a remix.
You are a remix of your parents.
Matter cannot be created or destroyed, it just gets remixed.
Now that were on the same logical-endpoint-waveform, it's pretty easy to see how the work I'm making is quite holistically a Remix.

The interacting audience is placed in an active role of remixing themselves, or alternatively, enact my computer to remix for them. Beyond this, my choice of recycled cardboard for constructing garners a new meaning, as I've now remixed cardboard from various different locations/purposes to be used and re-defined in a single sculpture.
So how is sampling defined in Remix Theory?
"...the principle of sampling at its most basic level had been at play as a cultural activity well before its common use in music during the 1970s." (Navas 11) "Early recording, in essence, is a form of sampling from the world that may not appear as such to those used to the conventional terms in which the concepts of recording and sampling are understood." "...sampling favors fragmentation over the whole." "Recording is a form of sampling because it derives from the concept of cutting a piece from a bigger whole."
The namesake of the current exhibition at Adam Art Gallery, Things are, they do not happen, is attributed in the associated pamphlet to Mexican poet Octavio Paz. "He is referring to the way a painting is unable to reveal the action of its making, or the unfolding of time outside of its frame."(Clifford 1)
"At the time of this writing, sampling is [understood as] copying in material form [...] from a pre-existing recording. This principle of sampling, which became popular in the 1970s with DJ producers of disco and eventually hip-hop, is a meta-activity that follows early forms of sound capturing. Early sound recordings, with a similar approach as photography's, were also tools used to copy (sample) from the world." "In current times the latter becomes a default state with the computer: to sample means to copy/cut & paste. Most importantly, this action is the same for image, sound and text. In this sense, the computer is a sampling machine: from a wide cultural point of view, the ultimate remixing tool." (Navas 14-15)
"Music sampling was a transitional period toward privileging the fragment over the whole; and it is no accident that sampling in music became popular during the postmodern period. [...] While it was the medium of photography that came to define our relationship of the world through recorded (sampled) representations, this tendency would take its first major shift towards what is known today as modularity [...] in the explorations of composers, like Stockhausen, who with tape loops aesthetically alluded to what the computer actually does today. Tape loops run repeatedly until they are turned off, or fall apart from wear and tear; similarly, computers check themselves in loops in fractions of seconds to decide what to do at all times. Looping, or modular repetition is what defines media culture..." (Navas 30-31)
Thanks, mum. Turns out the source on William Basinski's tape loops you sent me had more connection to my research than I'd ever predicted.
Navas, Eduardo. Remix Theory: The Aesthetics of Sampling. Austria, Ambra Verlag, 2012.
Clifford, Jess. Things Are, They Do Not Happen. 2025. Te Pātaka Toi Adam Art Gallery, 2025.
It was now onto the body. I began by wrapping cardboard around a chair, then taped cardboard in a tesselating pattern gradually upwards. Following our chat, Mike had gifted me a Bluetooth speaker [editors note, the speaker had been removed from my space by Week 8, and was replaced with Em's smaller Bluetooth speaker] and I tested it out.


I entered a sort of zen with my making process, and this was facilitated greatly by my tape gun.


It didn't matter if it got crooked - I would keep it as such, strengthen the frame, then keep building up...


...and up.... and up...


...to the point where you could sit inside it, as demonstrated by Ana!

0 notes
Text
Exploring the World of Electronics: A Comprehensive Guide

Exploring the World of Electronics: A Comprehensive Guide
The field of electronics is one of the most exciting and dynamic domains that has revolutionized the way people live, work, and communicate. Electrons have become the backbone of modern technology, from advanced smartphones to laptops and the latest robots and renewable energy systems.Well, with this in mind, any person who wants to venture into any electronics undertaking has to know the rudimental principles of the said project, acquire all required pieces of equipment, and find the appropriate platform on which the whole thing can be bought or sold. In this write-up, we will therefore guide you on how one can get the best results regarding his electronics project by exploring and using Classimonk as well as Chennai Free Classified Ads.
Why electronic Projects Matter
The project is not just for a professional or a student in an engineering degree but rather for a curious mind interested in innovation. It enables a fundamental understanding of the principles behind physics and electrical engineering, enhances problem-solving skills, and cultivates creativity. Whether you are creating a simple LED circuit or working on some complex IoT device, it is a priceless experience.
Sourcing Components for Your Electronics Project
The success of any electronics project highly depends on the quality and availability of its components. Long lists of essentials include resistors, capacitors, microcontrollers, sensors, and wires, and so on. It's a big task to find a reliable source for all of these, but not hard at all with the help of Chennai Free Classified Ads.
Chennai Free Classified Ads is a lively marketplace offering everything from electronic component sales to tool sales to entirely assembled products. This has enabled you to view comparative pricing and spec data along with user reviews so you can buy without needing any stress. This website is handy for students and hobbyists trying to get equipment without an added layer of hassle for expensive things.
Classimonk: A Platform for Electronics Enthusiasts
Classimonk is another good resource for electronics enthusiasts. This platform gives a friendly interface to buy, sell, and even exchange electronics-related items. Be it finding a rare microcontroller or selling excess components from the previous project, Classimonk simplifies the process. Its categorized listings and advanced search features help you find what you need quickly.
Classimonk is also community-driven, as it allows users to share tips, tutorials, and project ideas. This makes it more than just a marketplace; it is a hub for learning and collaboration. For example, if you are working on a project that involves Arduino programming, you may find helpful tutorials and discussions on Classimonk's forums.
Project Ideas to Kickstart Your Journey
If you’re unsure where to begin, here are a few electronics project ideas:
Smart Home Automation System: Use microcontrollers and sensors to create a system that controls lights, fans, and appliances remotely.
Portable Charger: Build a power bank using lithium-ion batteries and a charging circuit.
Weather Station: Use sensors like DHT11 and BMP180 to measure temperature, humidity, and atmospheric pressure.
Line-following robot: Design a robot that follows a predetermined path using infrared sensors.
Renewable Energy Model Device Powered by Solar Energy Design.
Benefits of Using Online Platforms
In both Chennai Free Classified Ads and Classimonk, several benefits come to electronics enthusiasts:
Inexpensive Solutions: Purchased second-hand or surplus components at economical prices.
An extensive variety: Access broad-based products from multiple sellers
Support from a community: Obtain advice and inspiration from the community of like-minded folks
Easy: Browse through and buy from home.
Conclusion
Electronics project work is one such rewarding journey that brings a blend of creativity, technical skills, and innovation in one. Chennai Free Classified Ads and Classimonk facilitate the journey by making these affordable components available to their customers, offering them worthwhile resources, and creating an interactive community that is essential for any kind of endeavor. Whether you are an expert or a curious amateur, these platforms can actually bring your ideas to reality.
So, get deep into the world of electronics, explore the limitless opportunities, and make your name in this dynamic field with the right tools, resources, and community support; tomorrow's breakthrough project could just be waiting for you.
0 notes
Text

Buy Arduino Online
Shop Arduino boards, kits, and accessories online in India. Get high-quality, affordable Arduino products with fast shipping. Perfect for beginners and professionals alike.
0 notes
Text
Components for a DIY BCI
EEG (Electroencephalography) Hardware:
The most basic BCIs rely on EEG sensors to capture brainwaves.
OpenBCI is a popular, relatively affordable option for DIY BCI projects. While it costs a few hundred dollars, it is one of the most versatile kits available.
NeuroSky MindWave or Muse Headband are other cheaper alternatives, ranging from $100-$200. These are commercially available EEG devices for consumer-grade BCIs.
OpenEEG is another open-source project that allows you to build your own EEG hardware from scratch, though it requires more technical skill.
Electrodes:
You’ll need wet or dry electrodes to attach to your scalp. Wet electrodes give more accurate readings but are messier, while dry electrodes are more convenient.
You can order pre-gelled electrodes online or even repurpose ECG/EMG electrodes.
Amplifier:
The signal from the brain is very weak and needs to be amplified. Most consumer-grade EEG headsets already include built-in amplifiers.
If you're building your own, you’ll need to add an instrumentation amplifier like the INA114 to your circuit.
Microcontroller (optional but recommended):
You can use a microcontroller (e.g., Arduino or Raspberry Pi) to process and transmit the EEG signals.
This allows you to handle signal conditioning (filtering noise, extracting frequency bands like alpha or beta waves) before passing the data to a computer.
Signal Processing Software:
To interpret the brainwave data, you’ll need software to process the EEG signals.
OpenBCI GUI or BrainBay (open-source software for EEG processing) are good choices.
If using a commercial device like the Muse headband, you can use their respective apps or SDKs.
Python libraries like MNE-Python or OpenBCI_Python can be used for more advanced data processing and visualizations.
Steps to Build a Basic DIY BCI
Choose Your EEG Hardware:
If you're starting from scratch, something like OpenBCI Cyton board is a good start. It’s open-source, has good community support, and includes everything from the signal acquisition to the interface.
Set Up Your Electrodes:
Attach electrodes to specific parts of the scalp. The 10-20 system is commonly used in EEG to position electrodes. For basic experiments, placing electrodes on the frontal or occipital lobes is common for reading alpha and beta waves.
Amplify the Signal:
If you're using raw hardware, you need to amplify the EEG signal to make it usable. Most DIY kits or premade EEG headsets have built-in amplifiers. If you're building one from scratch, the INA114 or a similar instrumentation amplifier can be used.
Capture the Data:
Use a microcontroller or a computer interface to collect and transmit the amplified EEG data. For example, with an Arduino or Raspberry Pi, you can read analog signals from the amplifier and stream them to your PC via serial communication.
Process the Data:
Use software like OpenBCI GUI, BrainBay, or MNE-Python to filter and visualize the brainwave data. You’ll want to filter out noise and focus on frequency bands like alpha waves (8–12 Hz) for meditation or relaxation signals.
Analyze and Create Control Mechanisms:
Once you have the processed data, you can start building applications around it. For instance:
Detecting Alpha waves: You can trigger certain actions (e.g., turning on a light or moving a cursor) when you detect increased alpha activity (indicating relaxation).
Training with Neurofeedback: Users can learn to modulate their brain activity by receiving real-time feedback based on their brainwave patterns.
DIY EEG Project Example: Arduino-based EEG
Here’s a simplified example of how you could set up a basic EEG using an Arduino:
Materials:
Arduino Uno
EEG electrodes (you can buy inexpensive ECG electrodes online)
Instrumentation amplifier (e.g., INA114 or an open-source EEG shield for Arduino)
Resistors, capacitors for noise filtering
Cables to connect electrodes to the amplifier
Steps:
Assemble the amplifier circuit:
Build a simple differential amplifier circuit to pick up the small EEG signals from the electrodes.
Use the INA114 instrumentation amplifier to boost the signal.
Connect to Arduino:
The amplified signal can be connected to one of the Arduino’s analog inputs.
Write an Arduino script to read the analog value and send it to the PC via serial communication.
Filter and Process the Signal:
On your PC, use Python (or Processing) to capture the signal data.
Apply digital filters to isolate the EEG frequency bands you’re interested in (e.g., alpha, beta, theta waves).
Visualize or Control:
Create a simple application that shows brainwave activity or controls something based on EEG input (like blinking an LED when alpha waves are detected).
Further Ideas:
Neurofeedback: Train your brain by playing a game where the user must relax (increase alpha waves) to score points.
Control Mechanisms: Use the brainwave data to control devices, such as turning on lights or moving a robotic arm.
Estimated Cost:
EEG Kit: If using pre-made kits like Muse or NeuroSky: $100–$200.
DIY EEG Build: OpenBCI costs around $300–$400 for more advanced setups, while OpenEEG might be built for less, but requires more technical expertise.
Challenges:
Noise Filtering: EEG signals are weak and can easily be corrupted by muscle movements, electrical interference, etc. Filtering noise effectively is key to a successful BCI.
Precision: DIY BCIs are generally not as accurate as commercial-grade devices, so expect some limitations.
Building a homebrew BCI can be fun and educational, with a wide variety of applications for controlling electronics, games, or even providing neurofeedback for meditation
0 notes
Text

MG995 TowerPro Metal Gear Servo Motor 180 degree Rotation
Getting an original TowerPro mg995 Servo Motor is not an economical option at all! And is also a very difficult task to recognize and buy an original TowerPro mg995 servo motor, Because there are many suppliers spread over different online shops who are selling fake servo motors under this Brand name. The TowerPro MG995 Servo Motor rotates 90° in each direction making it 180° servo motor. It is a Digital Servo Motor that receives and processes PWM signal faster and better. It equips sophisticated internal circuitry that provides good torque, holding power, and faster updates in response to external forces. These TowerPro MG995 Servo Motors are the high-speed servo motors with the mighty torque of 10 kg/cm. Wire Description
RED – Positive
Brown – Negative
Orange – Signal
NOTE: This servo draws high current while operation (up to 2 amp stall), to make this servo work with Arduino or any other microcontroller, please do the following connections. PLEASE MAKE SURE THAT YOUR SYSTEM HAS COMMON GROUND. POWER SOURCE ANYTHING BATTERY/SMPS/ADAPTER.
Features:
The connection cable is thicker.
Equips high-quality motor.
High resolution
Accurate positioning
Fast control response
Constant torque throughout the servo travel range
Excellent holding power
#sensor#arduino#sales in chennai#electronic components#lcd#robotic kits#raspberrypi#adxl335 module price#5mp camera#motor
0 notes
Text
Buy Arduino IDE Online At Best Price | Electro Global
Purchase the Arduino IDE for efficient project development. Get the best software to program your Arduino boards with ease and reliability.
0 notes
Text
Thorough Analysis On The Power Conversion Module
In the ever-evolving panorama of modern illumination, the dynamics of light have undergone a transformative odyssey, marked by the advent of Light Emitting Diodes (LEDs). These unassuming yet remarkably potent sources of energy have not just reshaped our perception of lighting in homes and public spaces but have catalyzed groundbreaking advancements in the realm of electronics. The brilliance of LEDs, those beacons of energy efficiency, owes much of its splendor to the electronics power that orchestrates their radiant glow. Unlike traditional lighting devices, LEDs boast power conversion modules that not just optimize energy consumption but also establish them as eco-friendly alternatives. This power conversion module, often unsung, emerges as a silent hero, ensuring LEDs function seamlessly with minimal energy input, thereby significantly adding to the reduced amount of electricity bills and fostering a sustainable approach to energy consumption. Enthusiasts and hobbyists, fueled by a passion for exploration, often find solace and boundless opportunities within the versatile realm of Arduino boards.
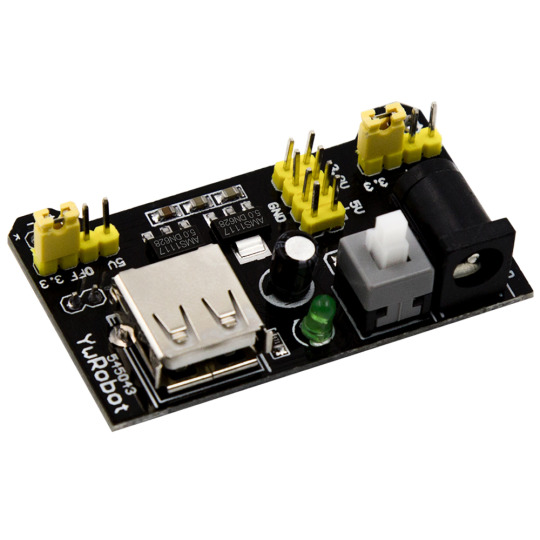
These programmable devices act as the veritable backbone for numerous electronic projects, supplying a fertile ground for innovation and experimentation. With the surge in digital innovation, the demand for Arduino-compatible boards has soared, empowering enthusiasts to seamlessly integrate LED-powered projects into their electronic pursuits. Initiating your electronic journey never been more accessible – merely a look for "Arduino board buy online" opens up a vast realm of possibilities at your fingertips. Envision this: a captivating array of LED lights harmoniously synchronized with Arduino-compatible boards, orchestrating a symphony of light and motion. The power conversion module integrates seamlessly with Arduino setups, ensuring a synergistic collaboration that brings creative visions to life. This dynamic partnership extends beyond mere illumination; it unveils avenues for interactive installations, rendering them perfect for events, parties, and gatherings where technology converges with art to produce an immersive experience.
For anyone venturing into the expansive world of electronics and yearning to explore beyond the normal, an oscilloscope emerges being an indispensable tool. The oscilloscope, often referred to simply as "oscilloscope 1013d" for the versatility, assumes a pivotal role in visualizing and troubleshooting electronic signals. Whether fine-tuning the pulse width of one's LED array or scrutinizing the power waveform, the oscilloscope complements the LED power supply and Arduino-compatible boards, elevating electronic experimentation to unprecedented heights. The seamless integration of LED technology, electronics power, Arduino-compatible boards, and the oscilloscope unveils a boundless realm of possibilities for enthusiasts and professionals alike. As you attempt your electronic ventures, ponder the harmonious synergy between these elements, forging a distinctive and efficient lighting experience. This transcendent journey not just saves energy but also kindles the flames of creativity in the ever-evolving world of electronics. Illuminate your space, unbridle your creativity, and embark on a trip that not merely defies boundaries but heralds a new era of technological marvels. Welcome to the future of illumination – where brilliance and innovation converge to illuminate the trail forward.
0 notes
Text
Best Places To Buy Electronic Components Online

SB Components (UK): SB Components is a leading online retailer of electronic components and kits, including Raspberry Pi, Arduino, robotics, and DIY electronics. They offer a wide selection of high-quality products at competitive prices, with fast and reliable shipping.

Digi-Key Electronics (US): Digi-Key Electronics is a global distributor of electronic components, offering a vast selection of products from over 1,000 manufacturers. They are known for their excellent customer service and fast shipping.
Mouser Electronics (US): Mouser Electronics is another leading global distributor of electronic components, offering a wide selection of products from over 750 manufacturers. They are known for their competitive prices and quick shipping.
Arrow Electronics (US): Arrow Electronics is a global provider of electronic components and services, offering a wide range of products and solutions for a variety of industries. They are known for their expertise and technical support.
Element14 (UK): Element14 is a global distributor of electronic components and kits, with a focus on innovation and emerging technologies. They offer a wide selection of products from over 1,000 manufacturers, with a focus on new and hard-to-find items.
Amazon (Global): Amazon is a global online retailer that also offers a wide selection of electronic components and kits. They are known for their competitive prices and convenience.
Other notable online retailers of electronic components include:
eBay (Global)
AliExpress (China)
BangGood (China)
NewEgg (US)
GearBest (China)
DigiChip (US)
Newark Electronics (US)
Avnet Electronics (US)
When choosing an online retailer for electronic components, it is important to consider the following factors:
Selection: Make sure the retailer offers a wide selection of the components you need.
Price: Compare prices from different retailers to get the best deal.
Shipping: Consider the shipping costs and delivery times when making your purchase.
Customer service: Choose a retailer with a good reputation for customer service in case you have any problems with your order.
It is also important to note that some online retailers may sell counterfeit or low-quality electronic components. It is important to research and choose a reputable retailer to ensure you get genuine products.
0 notes
Text
What are the robotics kits necessary for building a robot?
When it comes to building a robot, having the right robotics kits can make the process much smoother and more enjoyable. These kits include the essential components and tools needed to create a functional and impressive robot. Whether you are a beginner or an advanced builder, there are a few key robotics kits that you should consider.
Firstly, a chassis is vital for providing a sturdy frame and mobility to your robot. It typically includes wheels, motors, and a frame to hold all the other components. The chassis allows you to move the robot around and perform various tasks.
Next, a microcontroller robotics kits are essential for controlling the robot's movements and functions. It consists of a programmable microcontroller board, such as Arduino or Raspberry Pi, along with sensors and actuators. This kit allows you to interface with the environment, collect data, and execute commands.
A sensor kit is also crucial for giving your robot the ability to perceive its surroundings. It includes a variety of sensors like ultrasonic, infrared, accelerometer, and gyroscope. These sensors enable the robot to detect obstacles, measure distances, and navigate autonomously.
Robotics kits for kids are available to teach them how to build robots with basic and advanced techniques. Buy Robot parts, Robotics Kits, Arduino boards, Sensors and Electronics parts.
A power supply kit ensures that your robot has sufficient electrical power to operate efficiently. It includes batteries, voltage regulators, cables, and connectors. A reliable power supply is necessary to keep your robot functioning.
Having the right kits will make the building process easier and allow you to troubleshoot any issues that may arise.
By having these robotics kits, you will have everything you need to start building your own robot. However, keep in mind that the specific components you choose may vary depending on your project's requirements and complexity. It is also helpful to consult online tutorials and communities for guidance and inspiration throughout your robot-building journey by using robotics kits.
0 notes