#arduino mkr wifi
Explore tagged Tumblr posts
Visit Tumblr Blog
Explore Tumblr blogs with no restrictions, modern design and the best experience.
Last Seen Tumblr Blogs


Fun Fact
US Tumblr user growth rate is estimated to slow down to 4.1%.
Text
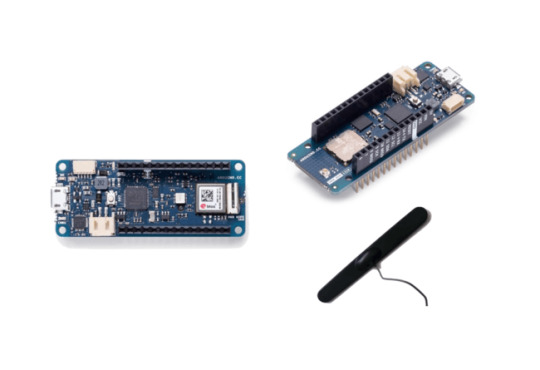
Arduino MKR WIFI 1010

In diesem Beitrag möchte ich dir den Arduino MKR WIFI 1010 vorstellen.

Der Arduino MKR WIFI 1010 ist einer von 9 Mikrocontrollern der Arduino MKR Familie.


Bezug eines Arduino MKR WIFI 1010
Den mir vorliegenden Mikrocontroller habe ich wieder über reichelt.de für 30,10 € zzgl. Versandkosten erstanden. Du bekommst diesen Mikrocontroller jedoch auch in anderen Shops wie nachfolgend aufgelistet. ShopPreisVersandkostenhttps://www.reichelt.de/30,10 €5,95 €https://www.conrad.de/36,99 €4,95 €https://www.thalia.de/37,99 €-https://www.voelkner.de/33,44 €5,95 € Lieferumfang Zum Lieferumfang des Mikrocontrollers gehört noch zusätzlich ein paar Aufkleber sowie ein Garantiezettel.


Technische Daten
Der Mikrocontroller hat nachfolgende technische Daten: Bezeichnung des BoardsArduino® MKR WiFi 1010MikrocontrollerSAMD21 Cortex®-M0+ 32bit low power ARM MCUUSB-AnschlussMicro-USB Built-in LEDD6Anzahl digitale Pins8PWM Pins13 (0-8, 10, 12, A3, A4)Anzahl analoge Eingänge7 (ADC 8/10/12 bit)Anzahl analoge Ausgänge1 (DAC 10 bit)externe Interrupt Pins10 (0, 1, 4 - 9, A1, A2)SchnittstellenBluetooth, WiFiUART, SPI, I²CBetriebsspannung5 V bis 7 Vmax. Stromstärke per GPIO7 mASpannung per GPIO3.3 VLiPo Batterie AnschlussJST PH, LiPo Single Cell, 3.7 V, min. 1024 mAh Abmaße (L x B x H)61,5 mm x 25 mm x 20 mm (mit Pins) In der offiziellen Dokumentation unter https://docs.arduino.cc/hardware/mkr-wifi-1010 findest du weitergehende Informationen zum Mikrocontroller und den Einsatz von diesem.
Programmierung in der Arduino Cloud
Der Mikrocontroller verfügt über eine WiFi-Schnittstelle, mit welcher sich dieser über die Arduino Cloud programmieren lässt. Für die Programmierung über die Arduino Cloud benötigst du zusätzlich das Plugin Arduino Create Agent ein installiertes Plugin sowie den Browser Google Chrome und natürlich einen Account zur Arduino Cloud. Einrichten des Mikrocontrollers in der Arduino Cloud Wenn du in die Arduino Cloud eingeloggt bist, dann navigierst du über Devices > Add und wählst dort den Abschnitt "Arduino" aus. Nachfolgend nun ein kleines YouTube Video. https://youtu.be/rIuItICtSXo
Arduino Oplà & Arduino MKR WiFi 1010
Den Arduino Oplà habe ich dir bereits im gleichnamigen Beitrag Arduino Oplà vorgestellt und auch bereits am Arduino MKR Zero gezeigt, wie dieser programmiert wird. Jedoch gibt der Arduino Oplà sein ganzes Potenzial erst mit der WiFi Funktionalität frei und somit ist der hier vorgestellte Mikrocontroller die erste Wahl für das Modul. Zunächst ein kleines Beispiel mit der Arduino Cloud und den RGB LEDs des Arduino Oplà.

Arduino IoT Cloud - Dashboard zum steuern der RGB LEDs Die RGB LEDs lassen sich aus der Cloud über einen Color Picker steuern. Jedoch ist der Code etwas tricky, denn das Element liefert einen HSV Wert, welcher in ein RGB Wert umgewandelt werden muss. uint32_t getColorFromHSV(CloudColor color){ Color c = Color(color.getValue().hue, color.getValue().sat, color.getValue().bri); byte r; byte g; byte b; c.getRGB(r, g, b); return leds.Color(r, g, b); } Das Programm zum steuern der RGB LEDs aus der Arduino Cloud: #include "thingProperties.h" #include #define NUMPIXELS 5 #define DATAPIN 5 #define CLOCKPIN 4 Adafruit_DotStar leds = Adafruit_DotStar(NUMPIXELS, DATAPIN, CLOCKPIN, DOTSTAR_BGR); void setup() { Serial.begin(9600); delay(1500); initProperties(); ArduinoCloud.begin(ArduinoIoTPreferredConnection); setDebugMessageLevel(2); ArduinoCloud.printDebugInfo(); leds.begin(); leds.setBrightness(5); } void loop() { ArduinoCloud.update(); } uint32_t getColorFromHSV(CloudColor color){ Color c = Color(color.getValue().hue, color.getValue().sat, color.getValue().bri); byte r; byte g; byte b; c.getRGB(r, g, b); return leds.Color(r, g, b); } void setPixelColor(int index, CloudColor color){ leds.setPixelColor(index, getColorFromHSV(color)); leds.show(); } void onLed1Change() { setPixelColor(0, led1); } void onLed2Change() { setPixelColor(1, led2); } void onLed3Change() { setPixelColor(2, led3); } void onLed4Change() { setPixelColor(3, led4); } void onLed5Change() { setPixelColor(4, led5); } Funktionen aus der Datei thingProperties.h #include #include const char SSID = SECRET_SSID; // Network SSID (name) const char PASS = SECRET_OPTIONAL_PASS; // Network password (use for WPA, or use as key for WEP) void onLed1Change(); void onLed2Change(); void onLed3Change(); void onLed4Change(); void onLed5Change(); CloudColor led1; CloudColor led2; CloudColor led3; CloudColor led4; CloudColor led5; void initProperties(){ ArduinoCloud.addProperty(led1, READWRITE, ON_CHANGE, onLed1Change); ArduinoCloud.addProperty(led2, READWRITE, ON_CHANGE, onLed2Change); ArduinoCloud.addProperty(led3, READWRITE, ON_CHANGE, onLed3Change); ArduinoCloud.addProperty(led4, READWRITE, ON_CHANGE, onLed4Change); ArduinoCloud.addProperty(led5, READWRITE, ON_CHANGE, onLed5Change); } WiFiConnectionHandler ArduinoIoTPreferredConnection(SSID, PASS); Read the full article
1 note
·
View note
Photo

Monitoring the weather with an Arduino MKR WiFi 1010-based station
0 notes
Text
Tutorial Menggunakan Arduino MKR Wifi 1010 lengkap !
Tutorial Menggunakan Arduino MKR Wifi 1010 lengkap !
Ceritanya saya mendapatkan projek yang menggunakan arduino MKR wifi 1010 dan sama sekali belum pernah saya oprek arduino yang satu ini. arduino mkr wifi 1010 dilengkapi dengan modul wifi dan chip bawaan SAMD21 keluarga ARM. untuk sepeknya bisa baca selengkapnya di https://store.arduino.cc/usa/mkr-wifi-1010 Harga nya lumayan mahal, di halaman resmi arduino .cc saja tercantum $32.10 mungkin kalo…

View On WordPress
0 notes
Text
The DIY force is strong with these 10 Arduino Star Wars projects
Hokey religions and ancient weapons might not be a match for a good blaster, but Arduino Star Wars projects certainly are. To celebrate May the 4th (also known as Star Wars Day), we’ve put together a list of inspired builds from a galaxy far, far away that you can make yourself.
So I Fixed a Broken Hasbro Lightsaber
It’s a rite of passage for every Jedi to build their own lightsaber. That goes for Arduino Jedi, too.
Alan Wang expertly upcycled a broken lightsaber toy by adding a Nano, an MP3 player module and a NeoPixel ring. The result is a Jedi weapon that’s far superior to the original toy.
youtube
Star Wars Mouse Droid with Hidden Payload
One of the first droids we meet in Star Wars is a mouse droid. The quirky little bots that zoom about the floor of the Death Star, getting under Stormtrooper’s feet.
They never actually appear to do all that much. But this zippy little droid by PotentPrintables has a hidden LED matrix that lets it deliver messages. And lots of terrible Star Wars puns, of course.
youtube
Imperial March on a Toaster
If you’re looking for sci-fi toasters, Red Dwarf is usually the first choice. But this hilarious video from Device Orchestra brings the dark side to your devices.
An Arduino controls the electromagnet in this toaster to turn it into a tuneful buzzer. Accompanied by toothbrushes and a typewriter, we get the immortal Imperial March played by droids.
youtube
Mini Arduino Star Wars Shoot ‘Em Up
A game that’s as simple as it is small and cute (like R2!), all run on a Nano on a breadboard.
And just consider how its graphics are comparable to those of the Death Star’s display as it moves into range of Yavin. Talk about human-cyborg relations!
youtube
Build a Life-Size BB8 Droid (Phone Controlled)
It was a pretty big deal when it turned out Lucasfilm built an actual droid for Star Wars Episode VII. It would have been easier to make BB8 in CGI. But we’re glad they went the practical route, as the cool ball droid has inspired a lot of makers.
Not least of them being Angelo, who built his very own amazing life-size BB8 using Arduino.
youtube
Recreating the Death Star Trench Run Scene with LEGO
As much as Wani Kim’s recreation of the iconic trench run is an incredible feat of LEGO engineering, it wouldn’t be complete without Arduino. The whole diorama is embedded with a galaxy-full of LEDs, bringing the scene to life.
That’s no moon. It’s an Arduino project!
youtube
Laser Shooting Game (Star Wars)
As Han told us, there’s no match for having a good blaster at your side. Ismail took that quite literally, and built a Star Wars laser shooting range that lets you take out those pesky Stormtroopers with a homemade blaster.
youtube
Arduino-Based Lightsaber with Light and Sound Effects
A great lightsaber build isn’t just about the colorful blade. It’s about the audio combinations, and the lighting effects when the blade makes contact. Bring all these things together, like Mad Gyver did, and you have an elegant weapon, of a more civilized age.
youtube
Prank Your Friends with Talking Darth Vader
Perfect for Halloween, as well as Star Wars Day, this motion activated Darth Vader head is just as creepy as its inspiration. It can be programmed with as many voice clips as you like, and wouldn’t it make a great option for a dark side Alexa?
youtube
Droid Build D-O
To be honest, D-O didn’t get nearly as much screen time or plot involvement as he deserved. But the latest addition to the growing line-up of Star Wars droids has been lovingly recreated by Matt Denton using a MKR WiFi 1010. No bad motivators here!
youtube
We want to hear about your Arduino Star Wars projects, so tell us all about them in the comments. May the force be with you!
The post The DIY force is strong with these 10 Arduino Star Wars projects appeared first on Arduino Blog.
The DIY force is strong with these 10 Arduino Star Wars projects was originally published on PlanetArduino
5 notes
·
View notes
Text
Exploring the Different Types of Arduino Boards: Arduino Due, MKR WiFi 1010, and Leonardo
Arduino boards are popular among hobbyists and professionals alike due to their versatility and ease of use. In this blog, we will delve into the different types of Arduino boards, focusing on the Arduino Due, MKR WiFi 1010, and Leonardo.
The Arduino Due is a powerful board that is powered by an ARM processor. Unlike the UNO and Nano boards that operate at 5V, the Due operates at 3.3V, making it important to note that overvoltage will irreparably damage the board. The Due costs around Rs.2999/- and features a 32-bit microcontroller with serial, SPI, JTAG, and USB interfaces. It is ideal for graphics and sound processing and efficient processing.
The Arduino MKR WiFi 1010, on the other hand, is a compact board that features low power consumption and is ideal for IoT projects. The board costs around Rs.3599/- and has an onboard Wi-Fi module that enables it to connect to the internet wirelessly. The MKR WiFi 1010 is also equipped with a Microchip SAMD21 Cortex-M0+ 32bit low power ARM MCU and a crypto authentication chip, which make it ideal for secure IoT applications.
The Arduino Leonardo, on the other hand, is a microcontroller board that is based on the ATmega32u4 chip. The board costs around Rs.1849/- and has a variety of input and output pins, including digital I/O pins, PWM pins, and analog inputs. One of the unique features of the Leonardo board is that it can emulate a USB mouse or keyboard, making it ideal for projects that require keyboard or mouse input. In conclusion, the Arduino Due, MKR WiFi 1010, and Leonardo are all unique and versatile Arduino boards that are ideal for a wide range of projects. From powerful graphics and sound processing applications to secure IoT projects and even projects that require keyboard or mouse input, these boards have got you covered.
1 note
·
View note
Photo

The Arduino MKR WiFi 1010 is the easiest point of entry to basic IoT and pico-network application design. Whether you are looking at building a sensor network connected to your office or home router, https://www.tokopedia.com/rosesana/arduino-mkr-wifi-1010 https://www.instagram.com/p/CgHaPowBiEL/?igshid=NGJjMDIxMWI=
0 notes
Photo

私が担当する 開志専門職大学 IoT実習2022の第2回(4/15)2コマ目のテーマは、Graphing data in the cloud(実習日誌その5)。いよいよクラウドの登場である。このActivityのテーマは、「 #Arduino IoT Cloudのセットアップとダッシュボード、センサーからのデータ取得とシリアルモニタ」である。マイコンボードMKR WiFi 1010と入出力ボードMKR IoT Carrier を合体させたIoTデバイスのセンサー(温度、湿度)データをプログラムで拾って、それをIoT Cloudのダッシュボードに表示できれば合格、という課題だ。 これも軽くクリアかなと思って、たかを括っていたら大苦戦。最初、半分以上の学生が、トラブルを抱え、普通の授業では手を挙げない学生が沢山手を挙げてくれる。クラウドにIoTデバイスを登録できるもののオンラインにならない、がその中心。デバイスの登録操作の手順を間違っていたり、途中でコネクションを突然切ってしまった結果、システムがハングしてしまった等が原因とは思う。 結局、1/3の学生が課題を終わることができず、宿題となった(最後は20時ころまで粘ってクリアした学生もいた)。こうなると実習中は、大混乱となって教員は右往左往するわけだ。しかし、サポートしてくれた二人の若い先生のおかげで、授業は収拾。 私もこの授業を設計、試行したときに似たような状況に陥ったが、丁寧にやるべきことをやった結果、無事、写真の通りになったので、学生には自ら解決してほしいところ。サポートはしますよ。 さて、今回の教材のチュートリアルは、すべて英語だが、まったく英語が分からなくて、できないと嘆く学生はおらず、しっかり翻訳エンジンで読み解いているのでした。 それでは、また、来週。 (開志専門職大学米山キャンパス) https://www.instagram.com/p/CcZ8lVKL5pZ/?igshid=NGJjMDIxMWI=
0 notes
Text
Learn about Every kind of Arduino Boards

So this tutorial is focused on bringing out all the different types of Arduino development boards and doing a quick comparison of their features and applications so that you will be able to make a better choice when you want something more than the popular UNO and nano boards.
1. Arduino UNO R3 12. Arduino Nano 33 BLE
2. Arduino Nano 13. Arduino MKR Zero
3. Arduino PRO Mini 14. Arduino UNO WIFI Rev2
4. Arduino Leonardo 15. Arduino Due
5. Arduino Micro 16. Arduino MKR Vidor 4000
6. Arduino Nano Every 17. Arduino Zero
7. Arduino Mega2560 Rev3 18. Arduino Nano 33 IoT
8. Arduino MKR FOX 1200 19. Arduino MKR WAN 1300/1310
9. Arduino MKR GSM 1400 20. Arduino MKR WIFI 1010
10. Arduino MKR NB 1500 21. Arduino Nano RP2040 Connect
11. Portenta H7- The Fastest Arduino
🔗 Check out Quick Comparison on Specification and Features here
1 note
·
View note
Photo

𝐒𝐚𝐥𝐞 𝐞𝐧𝐝𝐬 𝐭𝐨𝐦𝐨𝐫𝐫𝐨𝐰 𝐨𝐧 𝐀𝐮𝐠𝐮𝐬𝐭 𝟑𝟏, 𝟐𝟎𝟐𝟏 𝐚𝐭 𝟏𝟏:𝟓𝟗 𝐩𝐦 𝐀𝐄𝐒𝐓. 𝐔𝐬𝐞 𝐜𝐨𝐮𝐩𝐨𝐧 𝐜𝐨𝐝𝐞 "𝐰𝐢𝐧𝐭𝐞𝐫𝟐𝟎𝟐𝟏" 𝐟𝐨𝐫 𝟐𝟏% 𝐝𝐢𝐬𝐜𝐨𝐮𝐧𝐭. 𝐇𝐮𝐫𝐫𝐲 𝐮𝐩 𝐚𝐧𝐝 𝐞𝐧𝐫𝐨𝐥 𝐛𝐞𝐟𝐨𝐫𝐞 𝐭𝐡𝐞 𝐨𝐟𝐟𝐞𝐫 𝐞𝐧𝐝𝐬. Visit the link below to explore and enrol in the course bundle or individual courses included in bundle. https://www.edyusaurus.com/bundles/robotics-arduino-bundle What you will learn :- - 𝐀𝐫𝐝𝐮𝐢𝐧𝐨 𝐇𝐚𝐫𝐝𝐰𝐚𝐫𝐞 - Arduino UNO & Arduino MKR1000 Wifi, their architecture, applications and working, ATSAMW25, Cortex-M0 32-bit SAMD21, ATECC508 crypto chip, ATmega328P, EEPROM, Pin Diagrams, Architecture, Pulse Width Modulation, Memory structure, I/O Pins - 𝐀𝐫𝐝𝐮𝐢𝐧𝐨 𝐏𝐫𝐨𝐠𝐫𝐚𝐦𝐦𝐢𝐧𝐠 - How to write sketches upload them, Functions, Data types, Constants, Conditional statements, Loops, Using libraries in your sketches, Writing your own libraries, Coding examples. - 𝐀𝐫𝐝𝐮𝐢𝐧𝐨 𝐏𝐫𝐨𝐣𝐞𝐜𝐭𝐬 - How to use Arduino UNO, MKR100 WIFI and other electrical components such as resistors, motors & sensors to build simple electrical circuits and robotics models, Learn to build develop and operate projects using Arduino starter lit and Arduino MKR bundle #arduino #arduinouno #arduinostarterkit #arduinoprogramming #arduinoproject #arduinofun #arduinolove #robotics #roboticsengineering #robots #ai #artificialintelligence #electronics #iot #internetofthings #learntocode #elearning #onlinecourses #onlineeducation #onlineeducationplatform #lockdownlearning #melbournelockdown #sydneylockdown #melbourne #sydney #india #australia #aussie (at Melbourne, Victoria, Australia) https://www.instagram.com/p/CTL8sqUhX6S/?utm_medium=tumblr
#arduino#arduinouno#arduinostarterkit#arduinoprogramming#arduinoproject#arduinofun#arduinolove#robotics#roboticsengineering#robots#ai#artificialintelligence#electronics#iot#internetofthings#learntocode#elearning#onlinecourses#onlineeducation#onlineeducationplatform#lockdownlearning#melbournelockdown#sydneylockdown#melbourne#sydney#india#australia#aussie
0 notes
Text
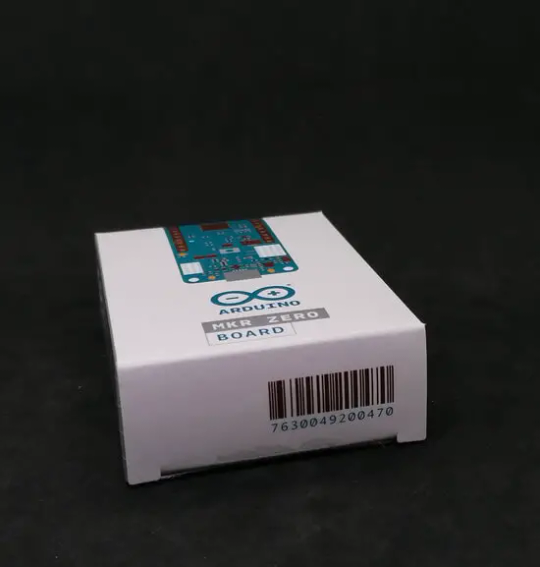
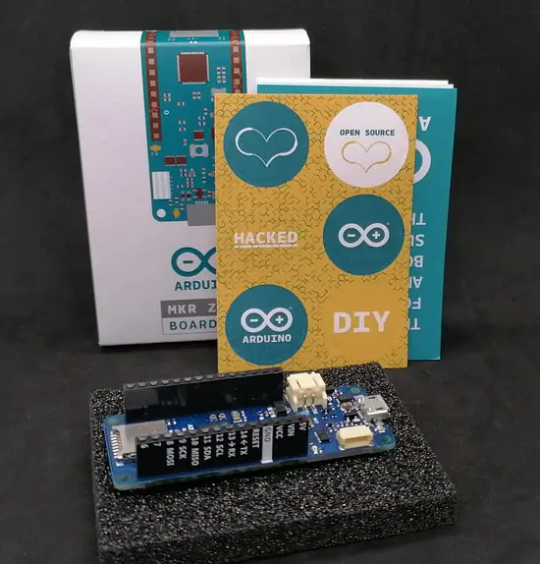
Arduino MKR Zero

In diesem Beitrag möchte ich dir den Arduino MKR Zero vorstellen und zeigen, wie du diesen Mikrocontroller programmieren kannst.

Der Arduino MKR Zero ist der günstigste Mikrocontroller aus der Reihe der Arduino MKRs. Ein wichtiges Merkmal von diesem ist, dass der Mikrocontroller nicht über eine WiFi-Schnittstelle verfügt.


Bezug des Arduino MKR Zero
Den mir vorliegenden Mikrocontroller habe ich im offiziellen Shop von Arduino.cc für knapp 27 € zzgl. 6 € Versandkosten aus Italien per UPS erworben. Obwohl dieses Paket einmal quer durch Europa musste, hat die Lieferung nur 3 Tage gedauert. Lieferumfang Zum Lieferumfang gehörte neben dem Mikrocontroller, noch ein paar kleine Aufkleber und ein gefalteter Garantiezettel.
Technische Daten des Arduino MKR Zero
Auf dem Mikrocontroller ist ein Atmel ATSAMD21 verbaut, welcher nachfolgende technische Daten hat. MikrocontrollerSAMD21 Cortex®-M0+ 32bit low power ARM MCUUSB AnschlussMicro-USB (USB-B)Betriebsspannung5 V bis 5.5 VSpannung an GPIOs3.3 Vmax. Stromstärke an GPIOs7 mALiPo Batterie3.7 V, min. 700 mAh, JST PH AnschlussTaktgeschwindigkeit48 MHzSpeicher256 KB Flash, 32 KB SRAMPWM Pins13 (0-8, 10,12, A3, A4)externe Interrupts10 (0, 1, 4-9, A1, A2)SchnittstellenUART, I²C, SPIAbmaße (L x B x H)61,5 mm x 25 mm x 21 mmGewicht32 gTechnische Daten des Arduino MKR Zero

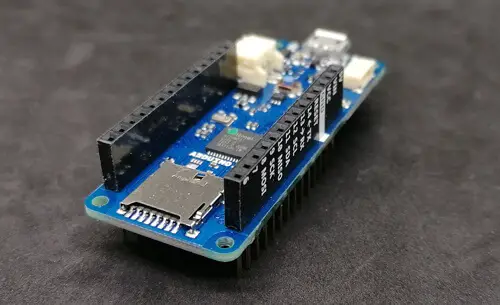
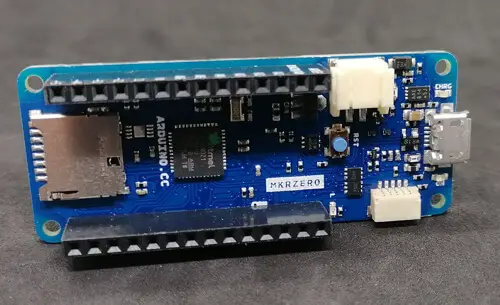
Features Der Mikrocontroller verfügt zusätzlich über: - einen SD-Kartenslot für Speicherkarten bis 16 GB, - einen JST PH Anschluss für LiPo 3.7 V LiPo Batterien, - eine LED für den Zustand ob der LiPo akku geladen wird, - einen separaten I²C Anschluss, - eine RTC mit 32.768 kHz, - eine Built-in LED
Aufbau & Pinout
Wie bei den Mikrocontrollern der originalen Arduino Familie üblich, sind auf den Buchsenleisten die Pins beschriftet, dieses macht die Arbeit mit diesen deutlich besser.

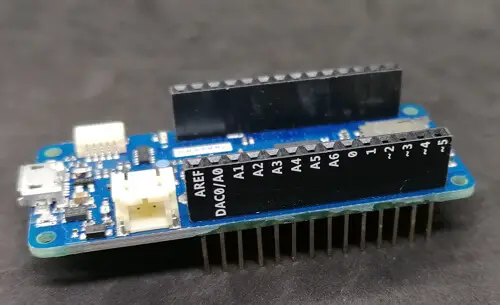
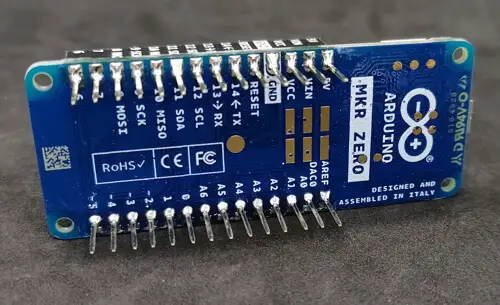

Auf der Seite Arduino MKR ZERO (I2S bus & SD for sound, music & digital audio data) im offiziellen Shop, findest du den schematischen Aufbau, sowie das Pinout.
Programmieren
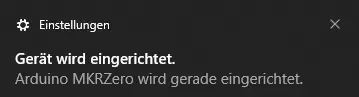
Der Mikrocontroller lässt sich in der Arduino IDE sowie über Arduino CLI sowie über den Arduino Web Editor programmieren. Für die Einrichtung des Web Editors benötigst du ein zusätzliches Plugin, welches derzeit nur unter Google Chrome läuft. Verbinden des Mikrocontrollers mit dem PC Der Mikrocontroller wird über ein Micro-USB Datenkabel mit dem PC verbunden. Beim erstmaligen Anschluss wird dieser zunächst eingerichtet. Hier erhält man zwei Benachrichtigungen vom Windows System, einmal das der Mikrocontroller erkannt wurde und etwas später, wenn dieser fertig eingerichtet ist.

Im Geräte-Manager unter Windows 10 wird dieser einfach nur als "Serielles USB-Gerät" angezeigt.

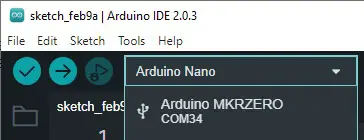
Arduino MKR Zero im Gerätemanager von Windows 10 Programmieren über die Arduino IDE Wenn du meinen Blog bereits länger verfolgst, dann wirst du bereits gesehen haben, dass ich in den meisten Projekten die Arduino IDE verwende. Diese Anwendung hat den großen Vorteil, dass sehr viele Mikrocontroller unterstützt werden und wenn man Bibliotheken einbinden möchte oder muss dieses in wenigen Sekunden erledigt ist. Im Fall des Arduino MKR Zero wird dieser in der Arduino IDE 2.0 korrekt am COM34 erkannt.
Arduino MKR Zero in der Arduino IDE 2.0 Beispiel mit der RealTimeClock Hier nun ein Beispiel mit der internen RTC des Mikrocontrollers. Das boolsche Feld "setTime" wird beim ersten Upload auf true gesetzt, damit werden die Werte für das Datum & die Uhrzeit geschrieben. Wenn dieses erfolgt ist, dann wird beim zweiten Schreiben des Codes auf den Mikrocontroller wird diese Variable auf false gesetzt. #include //Objekt initialisieren RTCZero rtc; //Felder zum setzen der Uhrzeit const byte seconds = 0; const byte minutes = 42; const byte hours = 19; //Felder zum setzen des Datums const byte day = 9; const byte month = 2; const byte year = 23; bool setTime = false; void setup() { Serial.begin(9600); //initialisieren der RTC rtc.begin(); if (setTime) { // setzen der Uhrzeit rtc.setHours(hours); rtc.setMinutes(minutes); rtc.setSeconds(seconds); // setzen des Datums rtc.setDay(day); rtc.setMonth(month); rtc.setYear(year); } } void loop() { //lesen des Tages von der RTC print2digits(rtc.getDay()); Serial.print("."); //lesen des Monats von der RTC print2digits(rtc.getMonth()); Serial.print("."); //lesen des Jahres von der RTC print2digits(rtc.getYear()); Serial.print(" "); //lesen der Stunde von der RTC print2digits(rtc.getHours()); Serial.print(":"); //lesen der Minuten von der RTC print2digits(rtc.getMinutes()); Serial.print(":"); //lesen der Sekunden von der RTC print2digits(rtc.getSeconds()); //eine Pause von 500 ms. delay(500); //ein Zeilenumbruch vor der nächsten Ausgabe Serial.println(); } //schreib eine zweistellige Zahl auf //der seriellen Schnittstelle void print2digits(int number) { if (number < 10) { Serial.print(0); } Serial.print(number); } Wenn der obige Code auf den Mikrocontroller überspielt wurde, dann wird auf der seriellen Schnittstelle das Datum inkl. Uhrzeit ausgegeben.

Ausblick
Der Mikrocontroller wird auf der Shopseite mit dem Text "for sound, music & digital audio data" beworben, dieses möchte ich als nächstes nun testen und das Projekt aufbauen. Read the full article
0 notes
Text
Arduino MKRシリーズ、スイッチサイエンスウェブショップで2021年8⽉6⽇販売開始
Arduino MKRシリーズ、スイッチサイエンスウェブショップで2021年8⽉6⽇販売開始 #ArduinoMKRシリーズ #スイッチサイエンス #Wi-Fi #LoRaWAN #GSM通信 #新製品 #Arduino
これは嬉しい。 LoRaWAN や Wi-Fi 接続に対応した Arduino がスイッチサイエンスで販売開始となっています。 製品は2つに分かれていて、それぞれのお値段も、それほどお高くはない感じですので、これは使えそうな製品ですね。 Arduino MKRシリーズ、スイッチサイエンスウェブショップで2021年8⽉6⽇販売開始 株式会社スイッチサイエンス 株式会社スイッチサイエンス(以下スイッチサイエンス、本社:東京都新宿区、代表取締役:金本茂)は、Arduino Holding社のArduino MKRシリーズを、スイッチサイエンスのウェブショップにて2021年8月6日より販売開始します。 Arduino MKRシリーズ、スイッチサイエンスウェブショップで2021年8⽉6⽇販売開始 ▶︎ 「Arduino MKR WiFi 1010」の特徴 Arduino MKR WiFi…

View On WordPress
0 notes
Text
Arduino MKRシリーズ、スイッチサイエンスウェブショップで2021年8⽉6⽇販売開始
Arduino MKRシリーズ、スイッチサイエンスウェブショップで2021年8⽉6⽇販売開始 #ArduinoMKRシリーズ #スイッチサイエンス #Wi-Fi #LoRaWAN #GSM通信 #新製品 #Arduino
これは嬉しい。 LoRaWAN や Wi-Fi 接続に対応した Arduino がスイッチサイエンスで販売開始となっています。 製品は2つに分かれていて、それぞれのお値段も、それほどお高くはない感じですので、これは使えそうな製品ですね。 Arduino MKRシリーズ、スイッチサイエンスウェブショップで2021年8⽉6⽇販売開始 株式会社スイッチサイエンス 株式会社スイッチサイエンス(以下スイッチサイエンス、本社:東京都新宿区、代表取締役:金本茂)は、Arduino Holding社のArduino MKRシリーズを、スイッチサイエンスのウェブショップにて2021年8月6日より販売開始します。 Arduino MKRシリーズ、スイッチサイエンスウェブショップで2021年8⽉6⽇販売開始 ▶︎ 「Arduino MKR WiFi 1010」の特徴 Arduino MKR WiFi…
View On WordPress
0 notes
Text
Say hello to the new Arduino Oplà IoT Kit: Experience the Internet of Things in your hands!

We’re excited to announce the launch of the Arduino Oplà Kit, the first open programmable IoT platform that allows you to add smart connectivity to the devices around your home or workplace and build custom IoT devices.
The Oplà IoT Kit contains all the hardware necessary to create eight connected applications, access to an online platform with assembly instructions, and a 12-month subscription to the Arduino Create Maker Plan. This kit is perfect for beginners with basic DIY experience, while more advanced users can leverage it to customize and hack their smart applications and devices, with full control of their data and processes.
youtube
Eight out-of-the-box projects to connect your home or workplace
The projects included in the Oplà IoT Kit enable users to turn everyday appliances into smart appliances, which can be controlled remotely on a mobile phone:
Remote Controlled Lights — Change color, light modes, and switch on/off
Personal Weather Station — Record and monitor local weather conditions
Home Security Alarm — Detect motion and trigger warnings
Solar System Tracker — Retrieve data from planets and moons in the solar system
Inventory Control — Track goods in and out
Smart Garden — Monitor and manage the environment for your plants
Thermostat Control — Smart control for heating and cooling systems
Thinking About You — Send messages between the kit and the Arduino IoT Cloud
Create, connect, control. The Internet of Things has never been so easy!
No soldering is required with the Oplà IoT Kit, which is based on a MKR IoT carrier with an OLED color display, on-board environmental sensors and capacitive touch buttons. The kit also includes a MKR WiFi 1010 board, a circular plastic enclosure and supporting accessories, such as two cables, a motion sensor, a moisture sensor, and a USB cable.


To build applications, users can rely on the Oplà online platform. Each project includes goals, an intro to the components, step-by-step instructions with illustrations and videos to guide you through assembling the product and building the code.

Finally, the kit acts as the physical interface of the Arduino IoT Cloud and comes with a 12-month subscription to the Arduino Create Maker Plan, offering unlimited compilation time and extended access to all the features of the Arduino IoT Cloud.
“When creating the Oplà IoT Kit, we wanted to design a platform that would allow anyone to gain a complete experience of what the Internet of Things has to offer around the home or workplace and I really believe we have achieved this. It is a great kit for users to build custom devices and enjoy being creative, no matter your level of experience,” says Arduino CEO Fabio Violante. “With this launch, we take yet another step towards lowering the barrier to entry for IoT development and cannot wait to see the projects created by users embracing connected devices both in their homes and at work.”
The Oplà IoT Kit is available on the Arduino online store.
Say hello to the new Arduino Oplà IoT Kit: Experience the Internet of Things in your hands! was originally published on PlanetArduino
1 note
·
View note

Photo

IoT実習2022日記その3。4/14の第1回2コマ目。教材を全員に配布し、Activity0の課題を与えたら、みんな真剣にやり始めた。マイコンボードMKR WiFi 1010でのLチカとArduino Web Editorの使い方の基本は、簡単に全員クリア。さすが、昨年のIoT演習2021を合格になった学生だ(とっても全員合格!)。 https://www.instagram.com/p/CcZH2w-JpEf/?igshid=NGJjMDIxMWI=
0 notes
Link
Nailz convierte tus uñas en un sistema de entrada portátil para dispositivos inteligentes

Los investigadores de UNIST en Corea del Sur han desarrollado un sistema novedoso para la entrada de dispositivos inteligentes utilizando uñas sensibles al tacto, llamadas Nailz.
Como se señala en el documento del equipo , las uñas se han utilizado durante mucho tiempo como un sitio para la extensión del cuerpo y son extremadamente accesibles, lo que las convierte en una plataforma de entrada discreta perfecta.

El sistema de uñas. (Imagen: Lee et al. )
Se identificaron 144 gestos de pulgar / dedo para la configuración, con 29 seleccionados como los más prácticos. Este método fue luego probado con una precisión del 94.3 por ciento.
El sistema se compone de PCB flexibles, que están pegados a las uñas artificiales cosméticas estándar, junto con un chip de detección capacitivo MPR121 y una IMU BNO080 para detectar el movimiento de la muñeca. Los datos de entrada para este experimento fueron obtenidos por un Arduino MKR WiFi 1010 y enviados a una PC para su posterior procesamiento.
Más detalles sobre el proyecto se pueden encontrar aquí .
youtube
Fuente:
Nailz turns your fingernails into wearable input system for smart devices
0 notes