#baby's first gifset woohoo!
Text

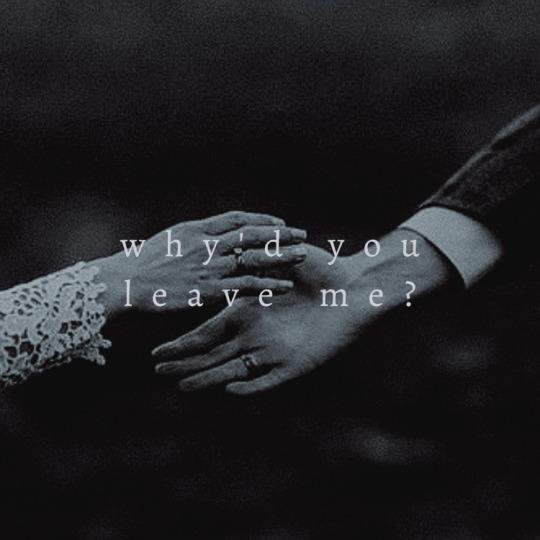
Lyubomir Vulchanov and Elodie Dubois
Lyrics: All I Want - Kodaline
Coloring: Antidote by Night-gate
Elodie Dubois belongs to @endlessly-cursed
can't wait to explore more of their deeply upsetting story with you! 😂❤️
#baby's first gifset woohoo!#kinda proud of the way it turned out ngl#i thought it'd be shit 😂#sampled from a whole ass playlist of sad songs lmao#oc: lyubomir vulchanov#gifset#riddle era#elodie dubois#lyubomir x elodie
14 notes
·
View notes
Photo


- ̗̀ How to Make Gifs with Photoshop and KMPlayer (Very Detailed) by quirkyresources © ̖́-
♡ All my tutorials ♡
Hi! I'm no expert, but I've been making gifs for at least like four or five years, and over that time I've learned a lot, so I want to share that stuff :) Also, someone requested that I teach them how to gif. I hope this helps!
This tutorial will teach you how to create simple but quality gifs, like the ones in the gifset above! Those gifs are all from TV shows, but it should apply to giffing almost anything. I’ll be using KMPlayer and Photoshop.
This is the gif I’ll be showing how to create, as an example:
If you have any questions at all, please feel free to message me here :) And I’m somewhat new to writing tutorials, so if you notice that I got something wrong, please let me know. Thanks!
Please like/reblog if this is at all useful to you. Thank you so much if you do!
You need:
KMPlayer (link below)
Photoshop (I'm using CC 2017, but I think any version with the timeline should work)
A video to gif (recommended source below)
A sharpening action (recommendations below)
A PSD / or to know how to color gifs (recommendations & tips below)
I'll go over:
How to buy/download PS, download KMPlayer, and download a video!
Taking screencaps in KMPlayer
Importing the screencaps into Photoshop
Cropping and timing the gif, organizing layers, etc.
Adding a PSD or tips for coloring it yourself
Adding subtitles & learning font settings
Saving for web
Posting to Tumblr
Various tips along the way!
The tutorial is under the cut. Have fun and good luck! ♥
[Note: If a photo looks too small, right click it and choose "open in new tab"]
Step 1: getting Photoshop, KMPlayer, and quality videos
Get Photoshop:
I was able to buy my Photoshop, so I don’t have any free downloads to recommend, I’m sorry! But there are plenty of other Photoshop blogs on tumblr that can help with this stuff :)
And there are some deals from adobe that might help you afford it if you want to buy it instead. They had a great one for college students that totally helped me.
Anyways, if you can get it somewhere/somehow, here are the next steps...
Download KMPlayer:
Here's the link (it's free!): kmplayer.com
You can use it to watch videos, but in this case we use it to take screencaps of them to use for gifs.
Get your video:
If you’re going to download a movie or show, I recommend getting torrents from thepiratebay.org and using μTorrent to download them. (Here's a tutorial for how to download stuff with it.) Be careful with viruses and stuff, though!
When you look for a video, try to get one that's as HD as you can find, meaning one that is 720p or 1080p! That tells you what the height of the frames will be, in pixels. They are usually big files, but should be much better quality than others.
Also, try to find videos that do NOT have network logos or ads on them!! They can make gifs look pretty bad, and it takes some serious cropping to get rid of them, which then makes it look even less quality.
Step 2: taking your screencaps
Open your video in KMPlayer. (Open KMPlayer and press CTRL O.)
Get to the exact scene/clip you want to gif. (Tip: it's hard to find the exact place you're looking for, so I recommend using your right/left arrow keys to skip through a little at a time.)
Once you're at the part of the video you want to gif, press CTRL G. This brings up the "frame extraction" window. This is where, as you can probably guess, you extract the frames for your gifs! Here are the settings I use:

I use these exact settings almost every time, except for the image format section. I go between JPEG and PNG. I use JPEG if I'm making a smaller gif (like 268px width or less) and I use a PNG if I'm making a larger gif (like 540px width.) This is because (or at least I've heard) PNGs are the highest quality option, JPEGs are the middle, and bitmaps are the lowest (don't use them!!) The only downside is that the higher the quality, the higher the screencap's file size. So use PNGs sparingly if that matters to you.
You can also change the "prefix" of the screencap filenames.
After figuring out all of these settings, click "start"! Then press play on the video, play until the end of what you're giffing, and press "stop" and pause it.
Then, in the frame extraction window, click the "open" button that’s to the far right of the "extract to" bar. This will open up the folder location of your new screencaps.
Step 2.5: organizing your screencaps
What you'll want to do now is organize the screencaps into separate folders for each individual gif. This is something that's good to do whether it's all from one scene or you're doing a compilation of different clips. This is because, when you upload the screencaps into PS, it's best to have them in their own little folders!
(Tip: Personally I use 75 frames or less in each gif. This is because that’s the limit on the sharpening action I use, but I also think it's a good amount to stop at.)
Step 3: importing your screencaps into Photoshop
Next, we're finally going to move the screencaps you took into Photoshop. Yay!
Open file > scripts > load files into stacks. (Tip: Sometimes this function doesn't work on certain Photoshop downloads. If this is the case for you, here's a tutorial on how to get around that!) This brings up this window:

Click "browse" and find the folder with the screencaps you want for your gif. Select all of them and click "open". Then click "ok" and wait for them to load. Each screencap will load as its own layer in the layers panel, which is what you want to start with.
Step 4: changing the screencaps from layers into frames in the timeline
Once they're all loaded as layers, go to window > timeline. This brings up the timeline!
At this point, things should look something like this:

Now we can start using the timeline! In this method we convert the layers into frames that live inside the timeline, which we’ll use to make the gif move.
First click on the button in the middle of the timeline panel that says "create frame animation" right here:

Then click on the little three bars icon on the top right corner of the timeline. Click "make frames from layers" on the thing that pops up .
It depends, but you might need to reverse the frames (if it imports them in backwards). So just click on that three bars icon again and click "reverse frames".
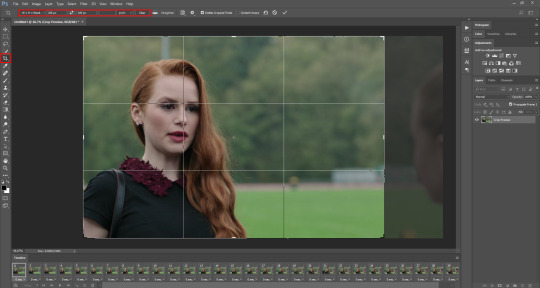
Step 5: cropping the gif
It's really important to know the Tumblr dimensions! If you have a gif that doesn't fit the dimensions most Tumblr users view it at it can get distorted.
So the width dimensions you should use are:
A row of just one: 540px wide
A row of two: 268px wide each
A row of three: 177px & 178px & 177px
A super helpful explanation of good dimensions to use is this one made by karazorel. It's very close to the way I do it.
So to crop it, go to the crop tool (duh, sorry) and enter in the dimensions you want into the area I highlighted here:
Here's what the gif looks like so far:
You'll probably notice it moves really fast and stops moving after playing once. That's because we haven't gotten to the step to fix that yet. But that's next!
Step 6: timing, looping, etc.
Timing:
Select all of the frames. You can do this by selecting the first frame, holding shift, and clicking on the last frame. Now click the little arrow next to where it says "0 secs." under any of the frame previews right here:

Click on "Other..." and type "0.14" into the text field. That represents the number of seconds, or usually the fraction of a second, that each frame will play for. (It's "0.14" in this case because of the way we entered the settings in KMPlayer in the "Frames to Extract" section. The number depends on what you enter there.) Press enter/okay.
Looping:
Next change the looping setting from "once" to "forever". Here's where I'm talking about:

Step 7: sharpening the gif frames
This step can either be done at this point (before coloring it) or later (right after coloring it.) I go back and forth on which is better, and different people say different things. So just play around with it!
I use this sharpening action. It can sharpen up to 75 frames, which is a really good amount in my opinion.
Once you have a sharpening action downloaded, go back to Photoshop and go to window > actions.
Click this little menu button, then click "Load Actions...".
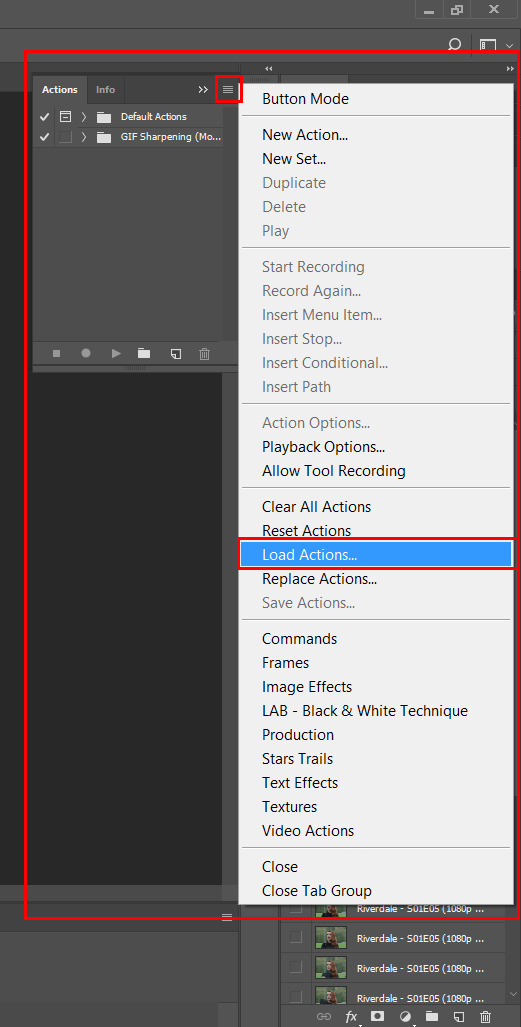
In the window that pops up, choose whatever sharpening action you downloaded and open it. This will load it into your actions panel!
Next, click the menu button on the upper right corner of the timeline panel and click "Flatten Frames Into Layers". Now there will be a new set of layers that are labeled Frame 1, Frame 2, Frame 3, etc. Keep those, and then you can delete the OLD set of layers. (That can significantly lower the file size, and it doesn’t mess anything up if you do it right!)
Now select the very first frame in the timeline, labeled "1", and select the corresponding layer, labeled "Frame 1".
Then open the sharpening action's folder within the actions panel and select the folder labeled with the number of frames you have in your gif. For example, I have 18 frames in my gif, so I selected the folder labeled "18 frames". Or at least that's the way they labeled things in the action I'm using. You may have to explore yours to figure it out.
Then click the play button on the actions panel:

Now that should have sharpened all of your frames/layers! Woohoo! Here's what the gif should look like by now, all cropped, timed, looped, and sharpened:

If this way of sharpening doesn't work for you, here are some other gif sharpening tutorials:
How to use sharpening actions in Photoshop CC by peacelovegifs
Gif sharpening tutorial by manofsteel.co.vu
Sharpening for Photoshop CC by completeresources
Sharpening all gif frames at once by thosetutorials
Sharpening masterpost by itsphotoshop
Gif sharpening action tutorial + download by themazerunnrs
Step 7.5: grouping your layers (a baby step!)
A bonus step that I recommend you do is to put all your layers into a group to keep things neat. Just select all of them and press CTRL G.
Step 8: adding a PSD and/or coloring it yourself!!
Here's the fun part! Now you can let out your creativeness with the coloring. It takes a LOT of practice to get good at this, trust me. I've been doing this for YEARS and I still hate my results sometimes. But if that happens to you, too, don't let that stop you from trying again! (God, I sound like a motivational speaker or something, sorry!)
Here’s some background on PSDs for beginners, but you can totally skip this bit...
"PSD" stands for "Photoshop document", meaning a file you make or edit in Photoshop (sorry, kind of self explanatory). On Tumblr, when people talk about PSDs, they're usually referring to a document with layers that add effects (mostly adjustment layers) to a gif/photo/graphic, etc. Also referred to as a "coloring". They usually include things like brightness/contrast, vibrance, curves, selective color, etc. People post these so you can download them and use them for your own work! (Just don't repost and claim as your own. Not cool, man.)
All you have to do is download the file, open it in Photoshop, make sure you have the layers panel open (windows > layers), and drag the PSD file's window on top of your file's window, but keep them separate so you see both at once. Then drag the PSD file's group of layers (but not the background!) over to your file.

(Then you can close the PSD window.) Then on YOUR file, mess around with the adjustment layers and stuff to change it to whatever you want it to look like. I usually edit mine like crazy!
Anyways, here are what your options are.
Finding a PSD (and then I recommend editing it to however you like it)
Here are places to find some great PSDs on Tumblr! (FYI, some are tag pages with sections for PSDs, with different types to choose from. So look around.)
QuirkyResources (Navigation) (Yup, shameless self-promo!)
QuirkyResources (My PSDs)
CompleteResources
ItsPhotoshop
ChaoticResources
YeahPS
DrunkandColoring
AresColoring
That's just a few of my favorite sources, so message me if you want more recs! :)
Coloring it yourself
I'm not going to do a full-on coloring tutorial right now, but here is my tag for those made by other people!
Basically you should learn how to use the most important adjustment layers: curves, brightness/contrast, selective color, color balance, hue/saturation, vibrance, levels, exposure, and gradient maps. At least those are the ones that I use the most and find super useful. Many of the tutorials in that coloring tutorial tag I just linked go over how to use those. So check them out!
In this case, I used my current fave PSD by dracoharry. (I’ve noticed it works on most shows I gif, so it’s super useful! I actually used it for all of the gifs in the gifset I made for this post.)
Here are the layers I kept hidden/showing:

FYI, I changed the layers' settings and whatnot a bunch.
And here’s what my result was:

Step 9: adding text & learning font settings (optional)
This is usually when I add text to the gif, if relevant.
There are various fonts and settings you can use for this, but to make things easier, here's a font PSD by adorkablelena. It’s for subtitles/quotes. I recently started using it. It's really cute! If you're not into it though, here's my tag for other font PSDs you can check out.
When you find a font PSD you like, open it and drag it into your document the same way you would with a regular PSD.
Select the text tool and replace the text with your quote. (Tip: Try not to misquote or misspell things if you can help it! I've done it and it sucks when that happens. Ugh.)
As far as colors go... For the primary quote I make the text white, and the secondary quote I usually make it yellow (#ffde00). And if there is a third I'll use some shade of orange, and anything after that I just use whatever I can make look the best. The stroke color I use varies sometimes, but I usually use black (#000000).
Finally, select the move tool (V) and make sure "smart guides" are turned on. To check this, go to view > show > smart guides, and make sure it's checked. Now when you drag around the text (select its layer first), you can see little purple vertical/horizontal guides pop up when you drag the text to the center of either direction. For the subtitle we're making, we want it to be centered horizontally and close to the bottom of the gif, but not too close. Also, if you have more than one line of text, just press enter somewhere in the text that splits it into similar-sized lines. Here's an example of all of this stuff put together:

Step 10: saving for web
There are a lot of settings to remember and play around with when saving for web, and specifically for Tumblr.
First, go to file > export > save for web (legacy).
Here you'll see a lot of settings to choose from, but they're not as intimidating as they may look!
Here are my usual settings:

Red highlight: There are multiple options in the top drop down list in the area I highlighted that are good to use. I usually use “Adaptive”, but “Perceptual” and “Selective” are good options too. In my experience, the rest make your gif look pretty gross. For the drop down list under that I choose "Pattern". This arranges the pixels in a pattern, and I like the look of that more than the two other viable options, ”Diffusion” and “Noise”.
Orange highlight: This is where you choose the number of color shades that are in the gif. I use the top amount allowed, 256, because this achieves the highest quality possible! If you need to make the gif's file size smaller, you can lower this amount, but I don't recommend it. If it's a B&W gif you can sometimes get away with using less and have it still look just as quality.
Yellow highlight: Looping options: Forever. Very important! Like I showed earlier, you can also set this setting before you get to the "save for web" option. Either way, this makes it so the gif loops forever.
Green highlight: Gif size! As I mentioned earlier, there is a limit for Tumblr. This example is a pretty small gif (592.9K) and the current file size limit on Tumblr is 3MB. Tumblr seems to change this limit a lot though, so you may want to look that up once in awhile to stay up to date.
Turquoise highlight: Always check the box next to “Convert to sRGB”. I just learned that this setting is important. It basically keeps the vibrance intact when you take it from Photoshop to Tumblr. Read a much better explanation here! :)
Then just click "Save...", choose the file location, and press "Save" again.
Step 11: uploading/posting to Tumblr
Now, last but not least, it's time to upload it to Tumblr! I probably don’t need to explain this, but I’m going to anyways. It's super-duper easy. Just go to your dashboard and click on this button:

Then the post creation window pops up, and just go on from there. Upload your images/gifs, drag them around to arrange them however you like, and add a caption if you want.
(Tip: Don't forget to add tags! It's super important to add tags if you want people to actually find your post. Only the first 5 tags show up in the main Tumblr tag-search results (ugh wtf, right?) but sometimes the other ones you add will show up on the general search page. I don't really get how to explain it or how it works tbh, sorry! But I do know that many fandoms have developed their own tagging-language to find people's posts more easily (and avoid spam) which is very useful once you figure it out. For example, if I was posting a gifset of Cheryl Blossom from Riverdale, I'd tag it with things like "riverdaleedit" and "cherylblossomedit" and maybe "madelainepetschedit". So basically the name of the show/character/actor/ship plus "edit", no spaces. Or an abbreviation of any of those, like "spnedit" or "dwinchesteredit". I hope that at least makes a little sense?
As far as the amount of tags that will show up on individual blogs, I'm not positive, but I believe you can use up to 30. After that the post won't appear on the tag's page. Grrr.)
Then, of course, just post it! I recommend saving it as a draft and then posting it at a time when a lot of people are likely to be on Tumblr. (There's research done on this timing!)
THE END! :D
I really hope that was at least somewhat helpful. Sorry if it was annoying that I went into sooo much detail, I just thought I should explain everything so it would make sense to most people, especially total beginners. Again, if anyone has any questions at all, you can absolutely ask me here! Or let me know if you think I got anything wrong, I would definitely want to fix it! Thanks for reading, and please like/reblog ♥ I’d really appretiate it!
#photoshop tutorial#completeresources#itsphotoshop#chaoticresources#yeahps#tutorials#gif tutorials#gif making#how to make gifs#gif making tutorial#mine#mine: tutorials#peachresources#riverdale#riverdaleedit#coloring tutorial#sharpening tutorial#photoshop tips#ps tips#photoshop 101#ps 101#500
629 notes
·
View notes
Last Seen Blogs

instacumberporn
Cumberporn

thebreadsys
F;GL!Ranboo |HE/THEY|

kuaitana
👑🪭🦂❄️

inside-the1975s-mind
Daily quotes by Matty Healy
1990sgirls
Women of the 90s