#backdropfilter
Explore tagged Tumblr posts
Visit Tumblr Blog
Explore Tumblr blogs with no restrictions, modern design and the best experience.
Last Seen Tumblr Blogs


Fun Fact
Tumblr has been banned in Indonesia for providing people with access to pornographic content.
Link
Want to know more about flutter widgets.,? then head over to my channel: https://www.youtube.com/channel/UCBC_Z7jla1GSITcqLKAtPxQ 🚩

0 notes
Video
#BackdropFilter #Flutter #Widget https://www.instagram.com/p/CAmUgXVHrOo/?igshid=1qdyc7sco8jj0
0 notes
Text
Exploring Glassmorphism in Flutter App Designs: A Comprehensive Guide
Introduction
As app design trends evolve, glassmorphism has emerged as a popular choice for creating visually stunning user interfaces. This design style mimics the appearance of glass or translucent surfaces, adding depth and a modern touch to app designs. In this comprehensive guide, we will explore how to implement glassmorphism in Flutter app designs. We'll cover the essential techniques, provide step-by-step instructions, and include example code snippets to help you get started. Let's dive in and bring a touch of elegance to your Flutter apps!
1. Applying Background Blur
To achieve the glassmorphism effect, we start by creating a blurred background. In Flutter, we can use the BackdropFilter widget combined with the ImageFilter.blur function to create the blur effect. Wrap the desired widget or container with a BackdropFilter widget and set its filter property to ImageFilter.blur. Adjust the sigmaX and sigmaY values to control the intensity of the blur effect.
2. Adding Translucency
Translucency is a key component of the glassmorphism effect. By adjusting the transparency level of UI elements, we can create the illusion of embedded glass surfaces. In Flutter, you can achieve translucency by setting the alpha value of the Color used for the UI elements. A lower alpha value (e.g., 50) makes the element more transparent.
3. Applying Gradients and Glow Effects
Gradients and glow effects add depth and dimension to glassmorphic designs. In Flutter, we can utilize the Container widget and BoxDecoration class to apply these visual effects. Experiment with linear or radial gradients and adjust the colors and stops to achieve your desired effect. To add a subtle glowing appearance, include a box shadow.
4. Consistent Styling
To ensure a cohesive glassmorphic design, it's crucial to maintain consistency throughout your app. Use a consistent color palette, shadow intensity, and blur effect. This consistency enhances the overall user experience and reinforces the glassmorphic theme.
Sample Code
Output
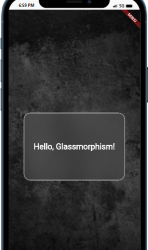
Exploring Glassmorphism in Flutter App Designs A Comprehensive Guide
Conclusion
By implementing glassmorphism in your Flutter app designs, you can create visually appealing and modern user interfaces. We've explored the key techniques, including background blurring, translucency, gradients, and glow effects. Remember to maintain consistency in your design choices to provide a cohesive user experience. Now, it's time to bring your Flutter apps to life with the elegance and depth of glassmorphism! Read the full article
0 notes
Text
【 Flutter 】Flutter を 基礎 から 学習 ( ウィジェット編 ) part78 Painting and effects
【 Flutter 】Flutter を 基礎 から 学習 ( ウィジェット編 ) part78 Painting and effects
「基礎 から 学ぶ Flutter 」という書籍で 学習 したことを ブログでアウトプットしていこうと思います。今回は ウィジェット編 ( part78 )です。 前回 【 Flutter 】Flutter を 基礎 から 学習 ( ウィジェット編 ) part77 Painting and effects 引き続き、Painting and effectsについて学びます。 Painting and effects BackdropFilter, ImageFilterウィジェット ClipRectで一部だけフィルター ClipRectウィジェットを使って一部分だけフィルターをかけることもできます。 import 'dart:ui'; import 'package:flutter/cupertino.dart'; import…

View On WordPress
0 notes
Text
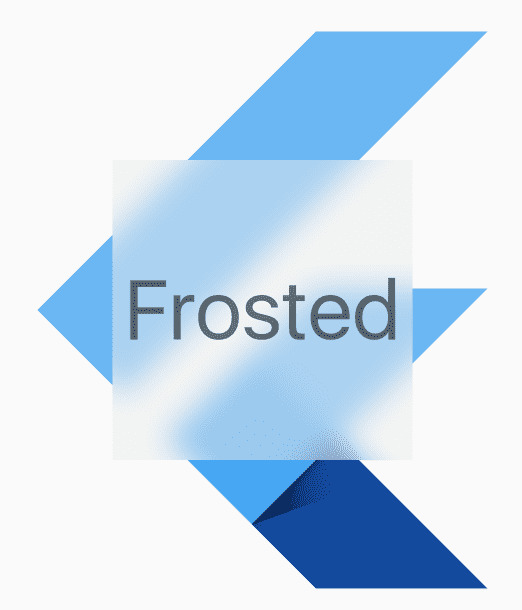
Flutter Tutorial: How to Apply “Frosted Glass” Effect?

Flutter provides an inbuilt set of widgets to apply different effects to mobile applications so in this article We will go through How to Apply “Frosted Glass” Effect In Flutter?
How to Apply the “Frosted Glass” Effect In Flutter?
In order to apply the “Frosted Glass” Effect In flutter we need to follow the code snippet like below:
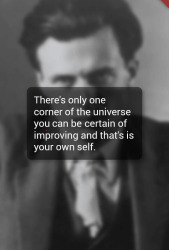
import 'dart:ui'; import 'package:flutter/material.dart'; void main() { runApp(new MaterialApp(home: new FrostedDemo())); } class FrostedDemo extends StatelessWidget { @override Widget build(BuildContext context) { return new Scaffold( body: new Stack( children: <Widget>[ new ConstrainedBox( constraints: const BoxConstraints.expand(), child: new FlutterLogo() ), new Center( child: new ClipRect( child: new BackdropFilter( filter: new ImageFilter.blur(sigmaX: 10.0, sigmaY: 10.0), child: new Container( width: 200.0, height: 200.0, decoration: new BoxDecoration( color: Colors.grey.shade200.withOpacity(0.5) ), child: new Center( child: new Text( 'Frosted', style: Theme.of(context).textTheme.display3 ), ), ), ), ), ), ], ), ); } }
This will give us output like the below:
You can use the BackdropFilter Widget to achieve this effect. You can also consider a code snippet like the below:
import 'package:flutter/material.dart'; import 'dart:ui' as ui; void main() => runApp( MaterialApp( title: "Frosted glass", home: new HomePage() ) ); class HomePage extends StatelessWidget { @override Widget build(BuildContext context) { return new Scaffold( body: new Stack( fit: StackFit.expand, children: <Widget>[ generateBluredImage(), new Column( mainAxisAlignment: MainAxisAlignment.center, children: <Widget>[ rectShapeContainer(), ], ), ], ), ); } Widget generateBluredImage() { return new Container( decoration: new BoxDecoration( image: new DecorationImage( image: new AssetImage('assets/images/huxley-lsd.png'), fit: BoxFit.cover, ), ), //I blured the parent container to blur background image, you can get rid of this part child: new BackdropFilter( filter: new ui.ImageFilter.blur(sigmaX: 3.0, sigmaY: 3.0), child: new Container( //you can change opacity with color here(I used black) for background. decoration: new BoxDecoration(color: Colors.black.withOpacity(0.2)), ), ), ); } Widget rectShapeContainer() { return Container( margin: const EdgeInsets.symmetric(horizontal: 40.0, vertical: 10.0), padding: const EdgeInsets.all(15.0), decoration: new BoxDecoration( //you can get rid of below line also borderRadius: new BorderRadius.circular(10.0), //below line is for rectangular shape shape: BoxShape.rectangle, //you can change opacity with color here(I used black) for rect color: Colors.black.withOpacity(0.5), //I added some shadow, but you can remove boxShadow also. boxShadow: <BoxShadow>[ new BoxShadow( color: Colors.black26, blurRadius: 5.0, offset: new Offset(5.0, 5.0), ), ], ), child: new Column( children: <Widget>[ new Text( 'There\'s only one corner of the universe you can be certain of improving and that\'s your own self.', style: new TextStyle( color: Colors.white, fontSize: 20.0, ), ), ], ), ); } }
You can also our other articles based on AbsorbPointer Widget in Flutter.
We will get output like the below:
If you are willing to use BackdropFilter Widget then code Snippet will look like the below:
BackdropFilter( filter: ImageFilter.blur(sigmaX: _sigmaX, sigmaY: _sigmaY), child: Container( color: Colors.black.withOpacity(_opacity), ), ),
Conclusion:
Thanks for walking with us on a Flutter Journey !!!
In this article, we have been through How to Apply “Frosted Glass” Effect In Flutter?
Keep Learning !!! Keep Fluttering !!!
FlutterAgency.com is our portal Platform dedicated to Flutter Technology and Flutter Developers. The portal is full of cool resources from Flutter like Flutter Widget Guide, Flutter Projects, Code libs and etc.
0 notes
Text
【 Flutter 】Flutter を 基礎 から 学習 ( ウィジェット編 ) part77 Painting and effects
【 Flutter 】Flutter を 基礎 から 学習 ( ウィジェット編 ) part77 Painting and effects
「基礎 から 学ぶ Flutter 」という書籍で 学習 したことを ブログでアウトプットしていこうと思います。今回は ウィジェット編 ( part77 )です。 前回 【 Flutter 】Flutter を 基礎 から 学習 ( ウィジェット編 ) part76 Painting and effects 引き続き、Painting and effectsについて学びます。 Painting and effects BackdropFilter, ImageFilterウィジェット BackdropFilterウィジェットは自身のウィジェットのZ軸の下(奥側でしょうか?)にあるウィジェットに対しImageFilterを使用してぼかし効果を与えます。 バックドロップと聞くとプロレスが連想されますね。強そう😑 ImageFilterを使用するにはimport…

View On WordPress
0 notes