#bellesresources
Text
websites to find ✨free fonts✨
creative market free goods
google fonts
pixel suplus free fonts
dafont
befonts
fontfabric free fonts
fontesk
behance (search for free font)
some will give you commercial/desktop license, some will only allow for personal license. the difference is with commercial and sometimes desktop license you can use the fonts for commercial use. if you'd like to use a font for e.g. your merch shop, always use fonts with commercial/desktop license. desktop license is a bit tricky, just make sure to read everything. different websites have also different licenses, please always read the license before downloading and use the fonts!
feel free to add more websites!
#resources#fonts#allresources#tracksintheam#sourceblog#photoshop#typeface#quirkyresources#completeresources#hisources#dailyresources#bellesresources
1K notes
·
View notes
Text
pontiacsbandit's sharpening action
[image description in alt text]
hello! i have made an action of my sharpening. i made my sharpening process into action to save time and i thought i might as well share it with you guys! maybe it can help some people. you can download the action here. if you use the action, reblog is highly appreciated!
the gifs below are without colouring, i just used sharpening on the right gif, you should be able to see the difference already.
what does this action do?
1. double smart sharpen
a. amount: 500, radius: 0,3px, remove: gaussian blur
b. ampunt: 10, radius: 10px, remove: gaussian blur
2. gaussian blur
radius: 1px, blending mode: normal, opacity: 25%
i hope this helps someone! ask me if you have a question!
#tutorials#resources#tracksintheam#gif tutorial#gif resources#hisources#completeresources#quirkyresources#sourceblog#dailyresources#allresources#tutorial#photoshop tutorial#photoshop#gif help#sibylresources#itsphotoshop#bellesresources
298 notes
·
View notes
Note
omg how do u make ur gifs so crisp and sharp?! 😭
hello babe sorry it took me some time to answer bc i was trying to find the resources i could send you. pls i didnt ignore you! im sorry it took me days😔 everything is under the cut bc it’s pretty long!
1. hd videos
always always always try to find the most high quality videos you can find! it doesn’t have to be 4k, 1080 is enough. i rarely download 720p, it can make do but it won’t be as good. so try to find 1080p vids! the quality of the videos make the difference in the world!
for youtube, i just use youtube downloader lol, i think any would suffice.
for downloading movies/tv shows, you can either torrent or use direct download links. here’s a link full of websites to download movies/shows. my personal fave is snahp(.)it and i use jdownloader as well. jdownloader is a download manager, so you can download several videos in one go and just more organized i guess. also i think it can bypass the unnecessary advertisements and/or yk those websites when you click on the download button but takes you somewhere else djsnsk i hope you understand this.
also do have a strong ad block on your browser. i use ublock and adblock on chrome.
2. photoshop
i use photoshop for my gifs. you can use photopea i think but my friend has tried it and for her it didnt delivered the maximum quality you know. there’s a tutorial on how to use photopea tho somewhere on tumblr but i dont have the link sorry:( personally, i’m more comfortable with photoshop.
if you are using window, try to crack it with GenP. you could search for GenP and click on the reddit link. i used genp to crack, im very happy with it. have no trouble until now!
if you use mac, search for adobezii reddit or click here!
3. sharpening
now!!! this is important too!!! you need to sharpen your gifs but be careful to not oversharpen them!! i think i followed this tutorial but i tweaked it at the end. you could use my action here, it consists of double sharpening and a touch of gaussian blur to soften it a bit. play around with sharpening!! find the right way for you!!! i do suggest to use double sharpening, it makes the difference in the world!!
4. coloring
tbh i’m still learning to color my gifs until now. but i think the contrast and brightness play some parts too. i just notice if the gifs are wayyyyy too bright it’ll lose it’s quality, the same when it’s over saturated. so i guess find the balance!!!
5. cropping/sizing
i always crop my gifs first before i sharpen them, i even crop them before i convert them to smart filter. idk but to me it’s better that way. follow the size that tumblr allows to ensure better quality!! since the beginning i set the width to be the tumblr size e.g. 540px with this setting of cropping and the height just kinda follows it. like i calculate what the height would be if i want the aspect ratio to be 3:2 or 5:4. gosh i hope this makes sense
6. exporting
ok so i dont really understand the science behind the option but this page goes into the great details between the difference settings. i almost exclusively use selective and diffusion with 100 dither and 256bit color. as always play around!! not every gif will be suitable with that setting or if you even like that setting.
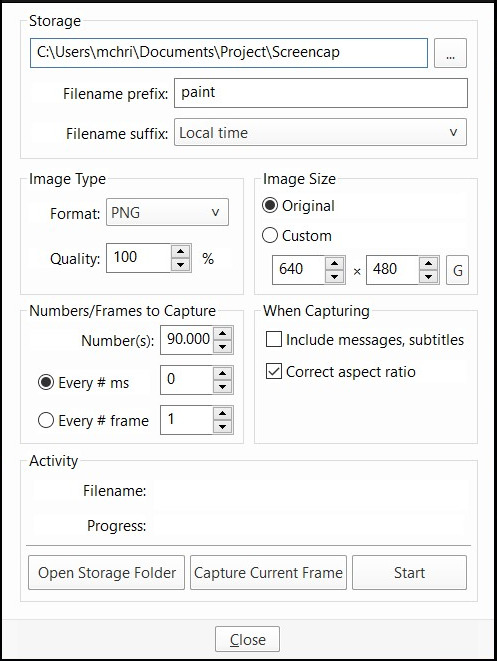
7. screencapping
i dont really know if you screencap makes the quality better, but i do know it’s just easier to screencap than uh cutting the video in photoshop- especially when you try to gif a movie! i use potplayer (idk if it’s available on mac tho?)
this is my settings for screencap!
after you have your screenshoted scenes, load them onto photoshop like this!
and just do your usual giffing process.
this gif tutorial is incredibly detailed and i recommend to read it if you havent!
i think that’s it!! sorry if it’s so long and not really understandable fjsj ask me if you have questions!!!!
#asks#tutorial#tutorials#gif tutorial#resources#bellesresources#hisources#allresources#completeresources#clubgif#gif help#itsphotoshop#sourceblog#dailyresources
171 notes
·
View notes
Text
you dont hear it from me but i found a good crack for a***e products for windows. have tested them myself and im loving it, easy to set up! it’s regularly updated so you can always get the current product version BUT you have to always check if the crack is the newest one or else don’t update the products.
download and follow the steps here
and if you want a video guide, click here. BUT the crack in the vid is an older version, i suggest you to watch the vid and follow the steps from link above
you dont hear it from me tho
#bacotan belle#tracksintheam#hisources#photosop#illustrator#photoshop crack#adobecc#adobe#allresources#quirkyresources#completeresources#resources#bellesresources
290 notes
·
View notes
Photo

✦ 01 aksa ✦
please do not claim as your own
reblog/like if you download or use (preferably reblog)
you can adjust the layers if needed
this psd (01 aksa) is great for any photos, especially for bright photos with blue, pink, orange tints.
#completeresources#chaoticresources#hisources#allresources#itsphotoshop#dailypsd#quirkyresources#psd#psds#psd coloring#coloring psd#psd download#psd icons#pale psd#soft psd#tracksintheam#yeahps#omg this is my first time of making psd ajdbhjsa please be kind?#bellesresources
140 notes
·
View notes
Last Seen Blogs
the-travelling-v60-blog
The Travelling V60

seven-oomen
"Actually, my name is Ben"

alma-rita
Art Journey with a Bag of Smiles and Anime

lovelitbird
LoveLitBird

ask-senjuro-anything
Senjuro