#best tuorial of all computer programming
Explore tagged Tumblr posts
Visit Tumblr Blog
Explore Tumblr blogs with no restrictions, modern design and the best experience.
Last Seen Tumblr Blogs


Fun Fact
Tumblr has 411 employees.
Link
myself Anil Programming developer in tutorialandexample portal.it Provides free tutorial of PHP, Python, Java, Servlet, JSP, Struts2, Spring, Hibernate, Android, JavaScript, C, Cloud Computing, Ajax, SQL etc. To learn advance technology by connecting website https://www.tutorialandexample.com
0 notes
Text
Andy’s Gif Tutorial
Hello, everyone!
Since a few people have been interested in my gif making process, I have decided to compile a detailed tutorial with some tips that I find useful, screenshots and links to other posts that have helped me along the way.
What you need:
a version of Photoshop (I use CC 2017);
HQ clips/movies (720p or 1080p for best results);
a screencapping tool (I use KMPlayer, but I hear there are some other programs that work just fine);
patience and perseverance.
I will try to make this as comprehensive as possible, but please feel free to ask me any questions if you have to and, of course, please like/reblog if you find this helpful.
STEP 1 - Frame extraction
As I previously said, I use KMPlayer for screencapping, it’s free to download on the official website for Windows and also has a beta version for Mac. I hope that by now you have decided on what scene you want to gif, so now all you have to do is open your video in KMPlayer and go to said scene TIP: I usually pause the video just before the scene starts to make sure that when I start extracting, I’ll have all the frames I need.
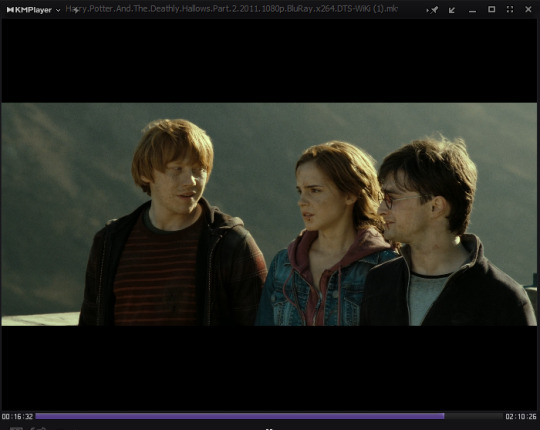
Now hit CTRL + G in the player and a new window called ‘Frame Extraction’ will open up. These are the settings I use 99% of the time:

As you might notice I prefer using a smaller image size from the beginning because my laptop is slow enough as it is and also because it’ll be easier later on when I load the caps into PS. I always choose the size as if I’d make 540px gifs and I adjust the width accordingly, but I always take into account the video’s ratio and the fact that I need some extra pixels in there in case I need to crop my image. Once you’ve settled on your settings and your scene, you just have to click the ‘Start’ button in the ‘Frame Extraction’ window and you’re good to go, then click ‘Stop’ when you’re done. Alternative: If you need to make longer gifs, but also be able to stay withing the 3MB limit, in the ‘Frames to extract’ tab you can choose the second option, that will extract every second frame of the video, but I must warn you, the quality of your gif might decrease a bit.
STEP TWO - Loading frames
First of all, make sure your PS version has a timeline. If I am not mistaken (that would be embarassing) for older versions you can find the Timeline option directly in the dropdown Window menu, but for CC 2017 you have to click Window > Workspace > Motion.
Your workspace should now look like this:
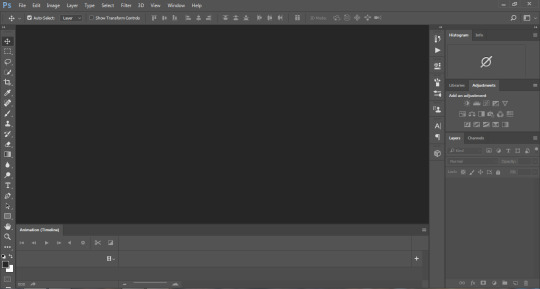
See the space called Animation (Timeline) on the lower part of the window? Well, this is your new best friend.
What you need to do next is load the frames you’ve previously extracted into Photoshop and this is how you do it:

This will open up the ‘Load Layers’ window where you will hit ‘Browse’ and open up your screencaps folder, choose the frames you want to use wait a few seconds for them to load and then click ‘OK’.
STEP THREE - Making your gif
Once the all the frames have been loaded into layers (again, there’s a bit of waiting, depending on how fast your computer is), your timeline will look like this:

Click one ‘Create Video Timeline’ and then you will have this:

Now click on the button on the bottom left of the image (the one that looks like three tiny squares), that’s called ‘Convert to Frame Animation’. On the top right of the timeline click on the dropdown menu and choose ‘Make Frames from Layers’. This will transform all the layers you’ve loaded into frames that you can use in your gif.
If you hit the ‘Play’ button now, you might notice your gif is moving backwards. There’s an easy fix for that. Go again to the timeline dropdown menu and click ‘Reverse Frames’.
This is when you are going to pick how many and which of the frames you loaded will be in the final version of your gif. Delete all the ones you don’t use.
STEP FOUR - Resizing
One of the most important steps in gif making in my opinion, because if it’s not done well, then the quality of the gif is affected. If you need to crop your image, this is the time to do it.
To resize your image, go to the ‘Image’ menu and pick ‘Image Size…’.
WHAT I USE: For two column gifs, I use 268px width with 150px or 170px height and for big 540px gifs in width I use 250px or 270px height. I pick the height depending on the initial ratio of the image or how wide is the scene I want to gif. Also, again, when I crop, I use 5px extra that I take care of later.
You probably noticed that your image isn’t exactly the right size now. You might think cropping it again is the best way to go, but there’s a better way, in my opinion, and that’s Image > Canvas Size.

You might’ve noticed when you opened gifs on tumblr, that some of them have a very thin, although inaesthetic for my taste, transparent area between the edge of the image and the gif area. Using ‘Canvas Size’ and playing those 5px extra is how I get rid of that and make my gif look neat all, even at the edges.
In this window you just have to set the exact dimensions you want your gif to have (mine is 268x150), and you’re all set.
STEP FIVE - Sharpening
Most tutorials will now tell you to set your frame delay, sharpen, colour and save. What I am going to do next, I learned from this tutorial and it honestly saved my life. Now I will sharpen my gif in a few easy steps and by the end I will have all of my frames sharpened and open in the timeline.
Click on the ‘Convert to Timeline Animation’ button on the lower left of your timeline, the one just under the first frame.

Select all your layers, the ones that are in use in your timeline will have a small eye symbol next to them, those are the ones you need (I usually delete all the layers I don’t use), right click on them and choose ‘Convert to Smart Object’.
The smart object you have now is the one you will apply your sharpening settings or action to.
There are a few sharpening actions here, but you can always look up more on resources blogs, there are a lot of them around.
Go into the timeline menu again and pick Convert Frames > Flatten Frames into Layers. Now you have all your layers again, but they are also sharpened. Now convert back to frame animation like you did on the first step (I delete the smart object because I don’t need it anymore, I have layers now) and make frames from your layers again.
STEP SIX - Frame Delay
To set a frame delay aka how fast or slow your gif will move, you have to select all your frames and click on the tiny arrow button under the image.
I prefer using 0.05 seconds between my frames, but honestly, ultimately it depends on what you want your gif to look like so I reccommend playing around with different values and see how the gif moves before settling on one.
You will have to make sure that your gif will be playing on a continuous loop.
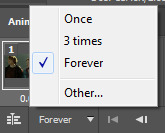
By default you will have the ‘Once’ option ticked, you have to make sure it’s set on ‘Forever’ before you save your gif.
My gif now looks like this:

Now all you need to do is apply a PSD, or if you’re me, make your own colouring and then you’re all set. (I will maybe discuss colouring another time, maybe, depending on time and how useful people find this one.)
STEP SEVEN - Saving your gif
In CC 2017 you have to go to File > Export > Save for Web, but in older versions you will find ‘Save for Web’ in the ‘File’ dropdown menu. These are my saving settings:

And congratulations you’ve just made your own gif!
LINKS: gif tutorials | gif colouring | ps basics
Please message me for feedback and also if you have any questions regarding this tuorial or like…in general.
210 notes
·
View notes
Text
How To Get Steam Money for free (2017 Working Mathod) - Get All Steam Games For FREE!
youtube
Hello Guys, in this video I will show you how to get free money for Steam Wallet. I must say that i have tested 9 different Steam cash generators until i did not find this one. This money hack generatror works every time How To Get Steam Money for free https://goo.gl/j0W3di - How To Get Steam Money for free Hello and welcome to my How To Get Steam Money for free video! In this video I am going to show you the worlds best How To Get Steam Money for free. How To Get Steam Money for free has been thoroughly tested and it's 100% working. How To Get Steam Money for free is also extremely safe. Also How To Get Steam Money for free is 100% free. I've been working on this How To Get Steam Money for free for months and now How To Get Steam Money for free has finally arrived! People who have stepped on this video looking for a How To Get Steam Money for free should deem themselves lucky. My How To Get Steam Money for free https://goo.gl/j0W3di How it works: How To Get Steam Money for free This generator working online! You don't must download any software How To Get Steam Money for free is by far the best program I have ever made. How To Get Steam Money for free is coded in the C++ language. How To Get Steam Money for free requires absolutely no dependencies. How To Get Steam Money for free works on all devices BY USING YOU AGREE THAT ALTHOUGH OUR How To Get Steam Money for free IS 100% SAFE, WE ARE NOT RESPONSIBLE FOR ANYTHING THAT HAPPENS TO YOU BY USING How To Get Steam Money for free. PLEASE USE How To Get Steam Money for free WITH CARE. Free Steam Cash: https://goo.gl/j0W3di INSTRUCTIONS: Tuorial: https://goo.gl/j0W3di What is Steam? Steam is a digital distribution platform developed by Valve Corporation, which offers digital rights management (DRM), multiplayer gaming, and social networking services. Steam provides the user with installation and automatic updating of games on multiple computers, and community features such as friends lists and groups, cloud saving, and in-game voice and chat functionality. The software provides a freely available application programming interface (API) called Steamworks, which developers can use to integrate many of Steam's functions into their products, including networking, matchmaking, in-game achievements, micro-transactions, and support for user-created content through Steam Workshop. Though initially developed for use on Microsoft Windows operating systems, versions for OS X and Linux were later released. Mobile apps, with connected functionality with the main software, were later released for iOS, Android, and Windows Phone devices. If you have any questions about this How To Get Steam Money for free make sure to contact me! Don't forget to rate, comment and subscribe: https://goo.gl/j0W3di Also leave a comment for this How To Get Steam Money for free! Get Free Steam Money Here ► https://goo.gl/4WgYe6 Previous "How To Get Free Steam Money " Video's Get Free Cash on Steam ► https://goo.gl/4WgYe6 YouTube ► https://goo.gl/4WgYe6 Site ► https://goo.gl/4WgYe6 Twitter ►https://goo.gl/4WgYe6 Twitch ► LINK Instagram ► LINK Google+ ► https://goo.gl/4WgYe6 Blogger ► https://goo.gl/4WgYe6 F.A.Q. - 1. When I will Get Free money to my Steam Wallet? After you complete all steps from video you will get your free money to your Steam Wallet really fast, max few minutes. 2. Do i need to download Steam Wallet Generator? Steam Wallet Cash Generator works completely online and you do not need to download anything. 3. I did everything and it dont work what should i do? To be sure that you done everything good watch this video carefully and do same steps as i did, if you did and you didn't get Free Steam Cash Leave comment below with you nick name and i will do my best to help you. If you have any more question please leave comment below. Thanks for wathing and give comment, like, share, thanks :)
0 notes