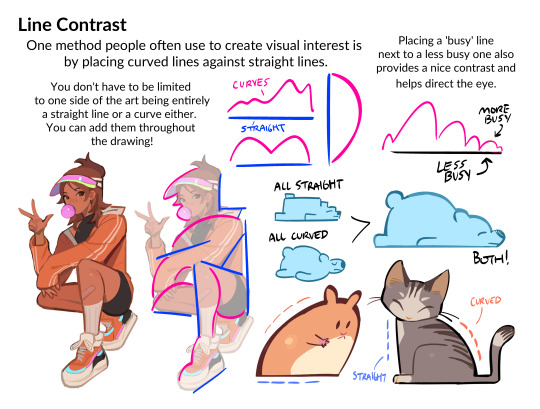
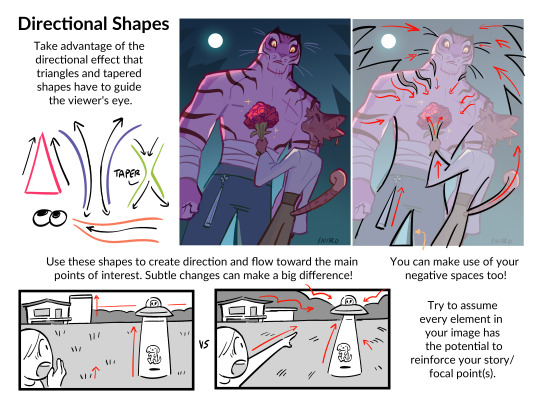
#my tutorial
Explore tagged Tumblr posts
Visit Tumblr Blog
Explore Tumblr blogs with no restrictions, modern design and the best experience.
Last Seen Tumblr Blogs


Fun Fact
28.6 is the average number of monthly visits per US mobile user.
Text
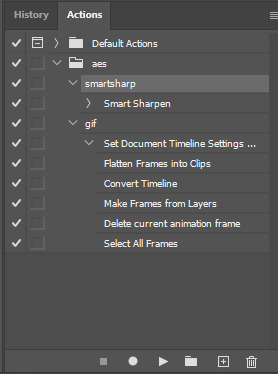
My GIF Making process: Screen capturing using MPV player, Organizing files, 3 Sharpening settings, Basic Coloring PSD + Actions set

This is a very long post so heads up.
I’ll try to be as thorough and true as much as possible to the way I make my gifs (I already use Photoshop Actions which I’ve long since set up but now for this tutorial I’m reviewing them to show you the exact steps I’ve learned to create my gifs 😃) and present them to you in a semi-coherent way. Also, please bear with me since English is my second language.
First things first. Below are the things and tools we need to do this:
Downloaded 4K or 1080p quality videos (let’s all assume we know where to get these—especially for high definition movies and tv series—so this post doesn’t get removed, okay? 😛)
Adobe Photoshop CC or the CS versions can work as well, but full disclosure I haven’t created gifs using the CS versions since 2020. I’m currently using Adobe Photoshop 2024.
mpv player. Use mpv player to get those frames/screenshots or any other video player that has a screen grabber feature. I’ve used adapter for the longest time but I’ve switched to mpv because the press to screenshot feature while the video is playing has been a game changer not to mention ultimate time saver for me. For adapter you need to play it in another video player (like VLC player), to get the start and end timestamps of the scene you want to gif which takes me ages before I can even open Photoshop.
Anyway! Please stop reading this post for a moment and head over to this amazing tutorial by kylos. She perfectly tells you how to install and use mpv player, both for Mac and Windows users.
One thing I have to share though, I had a tough time when I updated my MacOS to Sonoma since MPV is suddenly either duplicating frames or when I delete the duplicates the player seems to be skipping frames :/ I searched and found a solution here, though it didn’t work for me lol. My workaround for this in the meantime is decreasing the speed down to 0.70 then start screenshotting—it’s not the same pre Sonoma update but it works so I’ll have to accept it rather than have jumpy looking gifs.
Now, after this part of kylos’ tutorial:

you can continue reading the following sections of my gif tutorial below.
I want to share this little tip (sorry, this will only cater to Mac users) that I hope will be helpful for organizing the screenshots that MPV saved to the folder you have selected. Because believe me you don’t want to go through 1k+ of screenshots to select just 42-50 frames for your gif.
The Control + Command + N shortcut
This shortcut allows you to create a new folder from files you have pre-selected. As you can see below I have already created a couple of folders, and inside each folder I have selected screenshots that I want to include in one single gif. It's up to you how you want to divide yours, assuming you intend to create and post a Tumblr gifset rather than just one gif.

Another tip is making use of tags. Most of, if not all the time, I make supercorp gifs so I tag blue for Kara and red (or green) for Lena—just being ridiculously on brand and all that.
Before we finally open Photoshop, there's one more thing I want to say—I know, please bear with me for the third? fourth? time 😅
It's helpful to organize everything into their respective folders so you know the total number of items/frames you have. This way, you can add or delete excess or unnecessary shots before uploading them in Photoshop.
For example below there are 80 screenshots of Kara inside this folder and for a 1:1 (540 x 540 px) Tumblr gif, Photoshop can just work around with 42-50 max number of frames with color adjustments applied before it exceeds the 10 MB file size limit of Tumblr.

Sometimes I skip this step because it can be exhausting (haha) and include everything so I can decide visually which frames to keep later on. You'll understand what I mean later on. But it's important to keep the Tumblr 10 MB file size limit in mind. Fewer frames, or just the right amount of frames, is better.
So, with the screenshot organization out of the way, let's finally head over to Photoshop.
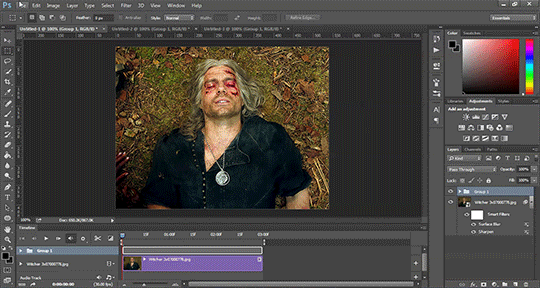
Giffing in Photoshop, yay!
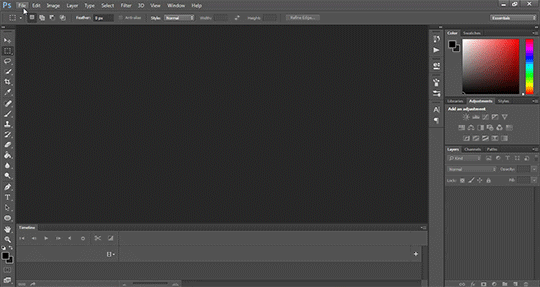
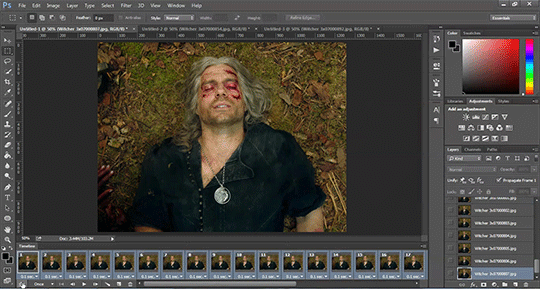
Let’s begin by navigating to File > Scripts > Load Files into Stack…

The Load Layers window will appear. Click the Browse button next.
Find your chosen screenshots folder, press Command + A to select all files from that folder then click Open. Then click OK.
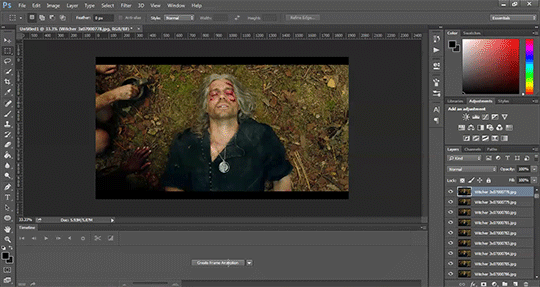
After importing and stacking your files, Photoshop should display the following view:

By the way, I'll be providing the clip I've used in this tutorial so if want to use them to follow along be my guest :)
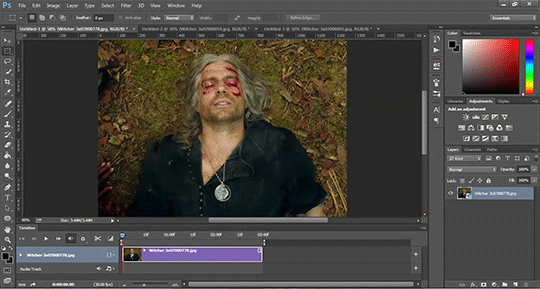
If you haven't already opened your Timeline panel, navigate to Windows > Timeline.
Now, let's focus on the Timeline panel for the next couple of steps.
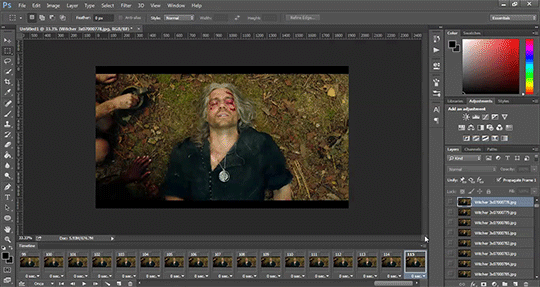
Click Create Video Timeline, then you’ll have this:

Now click the menu icon on the top right corner then go to Convert Frames > Make Frames from Clips

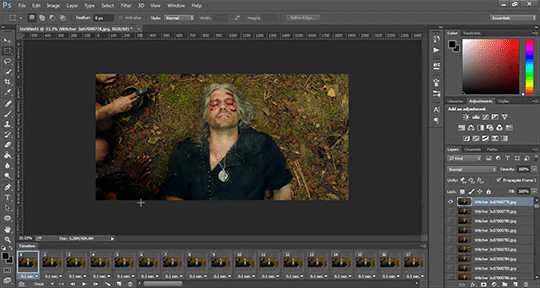
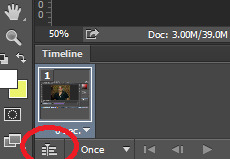
Still working on the Timeline panel, click the bottom left icon this time—the icon with the three tiny boxes—to Convert to Frame Animation
Select Make Frames From Layers from the top right corner menu button.
So now you have this:

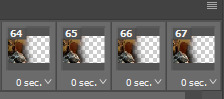
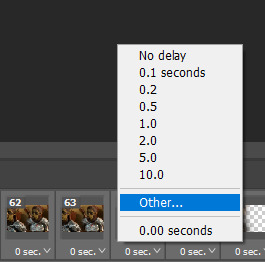
Go and click the top right menu icon again to Select All Frames
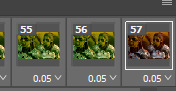
Then click the small dropdown icon to set another value for Frame Delay. Select Other…

The best for me and for most is 0.05 but you can always play around and see what you think works for you.
Click the top right menu icon again to Reverse Frames.
I think Photoshop has long since fixed this issue but usually the first animation frame is empty so I just delete it but now going through all these steps there seems to be none of that but anyways, the delete icon is the last one among the line of feature buttons at the bottom part of the Timeline panel.
Yay, now we can have our first proper GIF preview of a thirsty Lena 😜

Press spacebar to watch your gif play for the very first time! After an hour and half of selecting and cutting off screenshots! 😛 Play it some more. No really, I’m serious. I do this so even as early (lol) as this part in the gif making process, I can see which frames I can/should delete to be within the 10 MB file size limit. You can also do it at the end of course 🙂
Now, let’s go to the next important steps of this tutorial post which I’ve numbered below.
Crop and resize to meet Tumblr's required dimensions. The width value should be either 540px, 268px, or 177px.
Convert the gif to a Smart Object for sharpening.
Apply lighting and basic color adjustments before the heavy coloring. I will be sharing the base adjustments layers I use for my gifs 😃.
1. Crop and Resize
Click on the Crop tool (shortcut: the C key)

I like my GIFs big so I always set this to 1:1 ratio if the scene allows it. Press the Enter key after selecting the area of the frame that you want to keep.
Side note: If you find that after cropping, you want to adjust the image to the left or another direction, simply unselect the Delete Cropped Pixels option. This way, you will still have the whole frame area available to crop again as needed and as you prefer.
Now we need to resize our gif and the shortcut for that is Command + Opt + I. Type in 540 as the width measurement, then the height will automatically change to follow the ratio you’ve set while cropping.
540 x 540 px for 1:1
540 x 405 px for 4:3
540 x 304 px for 16:9
For the Resample value I prefer Bilinear—but you can always select the other options to see what you like best.
Click OK. Then Command + 0 and Command + - to properly view the those 540 pixels.

Now we get to the exciting part :) the sharpen settings!
2. Sharpen
First we need to have all these layers “compressed” intro a single smart object from which we can apply filters to.
Select this little button on the the bottom left corner of the Timeline panel.


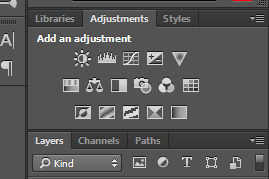
Select > All Layers
Then go to Filter > Convert for Smart Filters
Just click OK when a pop-up shows up.
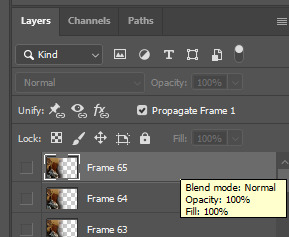
Now you should have this view on the Layers panel:

Now I have 3 sharpen settings to share but I’ll have download links to the Action packs at the end of this long ass tutorial so if you want to skip ahead, feel free to do so.
Sharpen v1
Go to Filter > Sharpen > Smart Sharpen…
Below are my settings. I don’t adjust anything under Shadows/Highlights.
Amount: 500
Radius: 0.4
Click OK then do another Smart Sharpen but this time with the below adjustments.
Amount: 12
Radius: 10.0

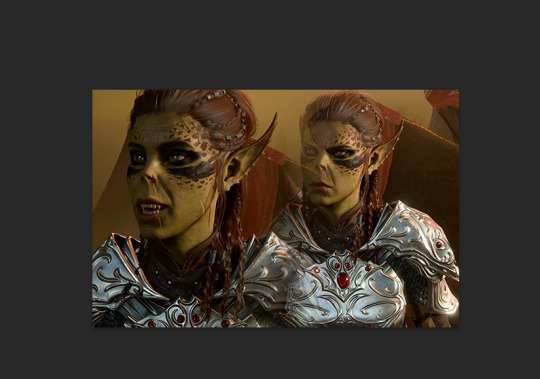
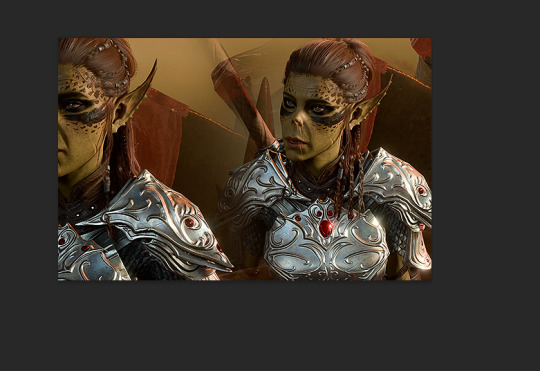
As you can see Lena’s beautiful eyes are “popping out” now with these filters applied. Click OK.
Now we need to Convert to Frame Animation. Follow the steps below.
Click on the menu icon at the top right corner of the Timeline panel, then click Convert Frames > Flatten Frames into Clips
Then Convert Frames > Convert to Frame Animation
One more click to Make Frames From Layers
Delete the first frame then Select All then Set Frame Delay to 0.05

and there you have it! Play your GIF and make sure it’s just around 42-50 frames. This is the time to select and delete.
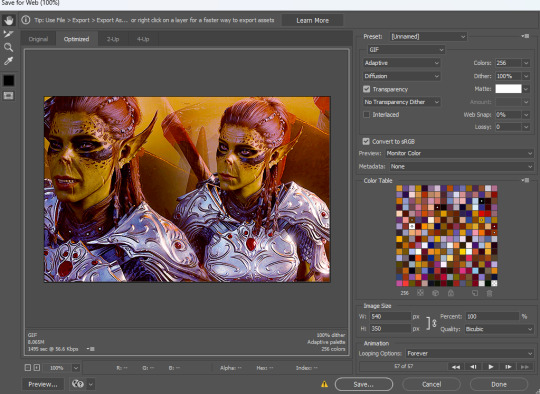
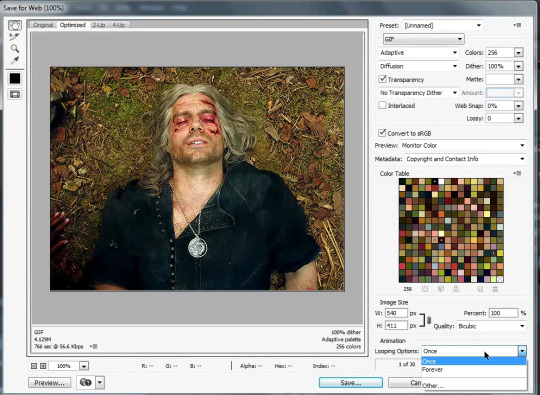
To preview and save your GIF go to File > Export > Save for Web (Legacy)…
Below are my Export settings. Make sure to have the file size around 9.2 MB to 9.4 MB max and not exactly 10 MB.

This time I got away with 55 frames but this is because I haven’t applied lighting and color adjustments yet and not to mention the smart sharpen settings aren't to heavy so let’s take that into consideration.
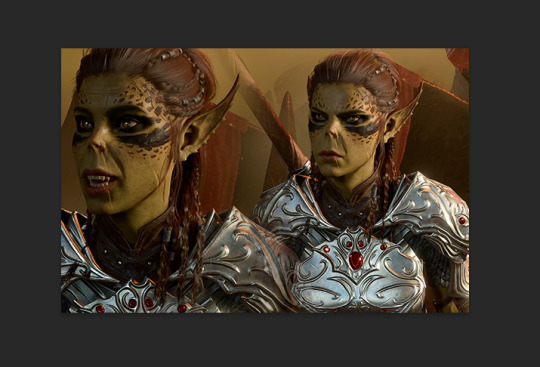
Sharpen v1 preview:

Sharpen v2
Go back to this part of the tutorial and apply the v2 settings.
Smart Sharpen 1:
Amount: 500
Radius: 0.3
Smart Sharpen 2:
Amount: 20
Radius: 0.5
We’re adding a new type of Filter which is Reduce Noise (Filter > Noise > Reduce Noise...) with the below settings.

Then one last Smart Sharpen:
Amount: 500
Radius: 0.3
Your Layers panel should look like this:

Then do the Convert to Frames Animation section again and see below preview.
Sharpen v2 preview:

Sharpen v3:
Smart Sharpen 1:
Amount: 500
Radius: 0.4
Smart Sharpen 2:
Amount: 12
Radius: 10.0
Reduce Noise:
Strength: 5
Preserve Details: 50%
Reduce Color Noise: 0%
Sharpen Details: 50%
Sharpen v3 preview:

And here they are next to each other with coloring applied:
v1

v2

v3

Congratulations, you've made it to the end of the post 😂
As promised, here is the download link to all the files I used in this tutorial which include:
supercorp 2.05 Crossfire clip
3 PSD files with sharpen settings and basic coloring PSD
Actions set
As always, if you're feeling generous here's my Ko-fi link :) Thank you guys and I hope this tutorial will help you and make you love gif making.
P.S. In the next post I'll be sharing more references I found helpful especially with coloring. I just have to search and gather them all.
-Jill
#tutorial#gif tutorial#photoshop tutorial#gif making#sharpening#sharpening tutorial#photoshop#photoshop resources#psd#psd coloring#gif coloring#supercorp#supercorpedit#lena luthor#supergirl#my tutorial#this has been a long time coming#guys. i'm BEGGING you. use the actions set - it was a pain doing all this manually again ngl LMAO#i've been so used to just playing the actions#so this has been a wild refresher course for me too 😆
760 notes
·
View notes
Text
aes' video game gif making tutorial 2024 Part 2
Welcome back to Part 2!
[Here is Part 1.]
My PSD tag is [here], my gif making action is [here].
8. Set timeline to what you want.
Five seconds of scenery doesn't really need this, but talking or action, does. Make sure timeline is open(window -> timeline) and move the bars in by click and dragging them until you get the start and end of your 'gif'.

Now, I am going to make a fast and dirty blended gif with two scenes. This is to cause my action to fail, and show you how to fix it.
But this will serve as a fast tutorial for blending gifs too.
For me, each timeline needs to be about 2 seconds long because that's how long the shortest scene is and you want them to match up.
Anything more than about 5 seconds will require clever removal of frames, coloring, or cropping to fit in tumblr's size constraints, just be aware.
8.1 Blending gifs together
Blending two gifs together is easy enough. I've opened two files, I've shortened the timelines and now I will drag this smart layer into your other file. (make sure window -> layer is open so you can see this.)

Once dragged over you'll notice that the timeline looks like this now;

Which is great for many effects, but we are going for blended, so back over to the Layers window and we are going to drag Layer 2 up and out of this Video Group.

So it looks like this, but your timeline is messed up now

Grab the layer that's behind a bit, in this case the Timeline Layer 2 and drag it till it starts at the same time as timeline Layer 1.

Like so.
Sometimes you do need to make sure your gifs line up correctly on the screen, when doing this, so go up into the main window and move Layer 2 if needed.

This is it being nice and squared up.


Now make a new layer(at the bottom of the layer window or just ctrl+shift+n) and drag both the timeline and the smart layers until it looks like this ^^^.
Go to Layer 3, and with a large soft brush smear some color on it, do not worry about perfection. Once you have that Right Click on Layer 2(in layers not timeline) and select create create clipping mask.
You'll get something like this.
I will move layer 2 around a bit, and paint/erase on Layer 3 until I get a shape I like.
Like this;
9. Actions to sharpen and make your gif.
Actions are easy, you simply Load an action and then let it do the work for you by pressing play when you've selected the action. Like so.
The first one we are going to use is a Smart Sharpen action, always do this after cropping.
Select the layer you want to sharpen and press play and it will do the rest for you. You can find lots of other sharpening actions for free on various resource blogs across tumblr, but honestly just fiddling and then saving the sharpening you like best is great!
The second Action we are gonna use is my beefy gif action! But hang on.
If your gif is 5 seconds long use it as is(pressing play at the top 'set document...', it will remove half your frames, if it's shorter, like my 2 second gif, you are going to start a single line down to 'flatten frames into clips' and skip the timeline settings so you have more frames in your gif. Like this;

Press play. Wait as it does all the work for you.
Oh no! It failed, press Stop.
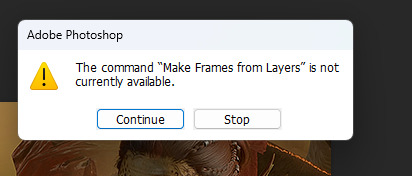
And now delete EVERYTHING but 1 single frame in the timeline. Doesn't matter which ones you delete(I just deleted frame 1).
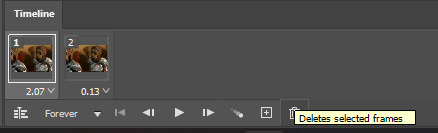
Without selecting anything else, press play on the action again and wait for it to finish.
Now you do need to do some clean up!
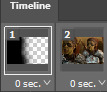
Delete these misc. extra frames.
10. Set gif speed.
Make sure you still have all your frames selected and then right click on any of them!
Go to other and type in what you want.
For 5 second gifs that are scenery I do around .12 seconds, and for talking about .08, for a short gif with full frames, like the one I am making, I will set it to .05 to start and then hit ctrl+alt+shift+s to bring up the gif save menu, and play it, but it looked too fast so I set it to .07.
If you want to get into the weeds you can math out how fast the gif needs to be to match your footage.
11. Trim your gif as needed
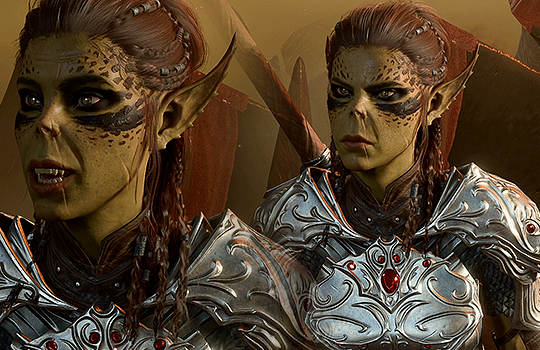
Now for me, this looks kinda bad, these last few frames, Lae'zel's face is out of frame. So I am gonna delete them off my gif and then make sure I re-select everything in the timeline window. Once I've done this I will then go ahead and select the very top layer over in the layer window. Time for the fun bit.
12. COLORING
This is all up to personal choice of course! But I highly suggest, especially for older games you do some coloring.
You can of course use PSDs, which I will be providing a free one each day all this month(oct 2024).
However the best thing is to learn how to use various adjustment layers for yourself.
I used every single thing in photoshop at least once to learn what it did many years ago, camera raw has been the newest learning curve for me(being able to import lightroom effects with it, neat!).
Fumbling around is a great way to learn, otherwise there are tons of coloring tutorials, again the various resource blogs have a ton to get you to a baseline.
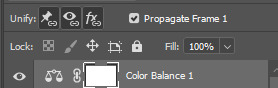
For this I am going to do a slight vibrance/saturation layer, a gradient map layer reduced down to 20% and then a color balance layer.
If for some reason your coloring isn't showing up across the timeline like so;
You can just go and unify the layers, click all three.
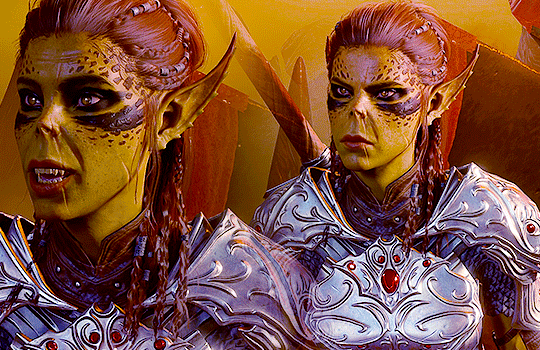
Now, I didn't really like how Lae'zel was looking so I fiddled around with just painting on some colors until I liked the look of it. (Here is the PSD so you can see everything I did).
So from beginning to end, the first uncolored gif looks bland and washed out on tumblr, while the second is more vibrant and better for my personal taste. Some folks love muted gifs, go wild.
Now it's time to save.
13. Saving.
How you save, what format, matters.
But it is a preference thing, for me personally I use pattern for Skyrim scenery and diffusion for most everything else. The reason being Pattern can create banding lines across the face, however pattern has a more aggressive saving method so the file size is smaller.
Ctrl+alt+shift+S will bring up the save menu.
Turn Metadata off, if you are using a legit copy, as it'll have your email address and such in it.
So some things to note. Always pick optimized up top, you can save presets if you want.
To the right of that, try to generally use adaptive algorithm if you can, it tends to not wash out your colors as much. Turn Transparency on but no dither there.
Diffusion vs. Pattern. Honestly everyone is different, I feel a bit strange in that I switch it up constantly as most folks have a preferance.
But things to note about pattern! It makes gradients look lovely. So say the aurora in Skyrim or The Long Dark, or a cloudy sky in RDR or BG3. However on faces or more densely compact changes of color, it doesn't do so well.
Diffusion does have some tricks up its sleeves however for dropping a gif in size! My gif (8.065 MB);
My gif with lossy at 3. (7.825 mb)

Keep your gifs under 10mb. That means 9.99 is fine, 10mb is not, tumblr uses a different compression for everything above 10mb and its not great. So if you need to use lossy 5, do it. If you need to cut 7 frames off the top, do it. If you need to add contrast or remove a color, do it.
Make sure it's looping forever and save!
Now then;
There is more to explore, including watermarks, how to properly tag these days or more aggressive lessons in how to color a gif. But tumblr is already screaming at me for too large of a tutorial!
This month I will be doing psds everyday, for free, hopefully as a good start off point for folks. They will be [here], again my gif making action is [here].
14 notes
·
View notes
Text

so you wanna make a spiderpunk backpack, huh? what's the profile on this guy? @/_oddlycute_ on TikTok, 25k followers, top post with 1.5M views. alright, let's get started.
Here's what you're gonna do.
First, go to the thrift store and the craft store. Pick up a small leather jacket, small backpack, red fabric, blue fabric, white fabric paint, spikes, safety pins, whatever else you need, alright? Get as close to the original as ya want, it's punk so we're not gonna be pickey.
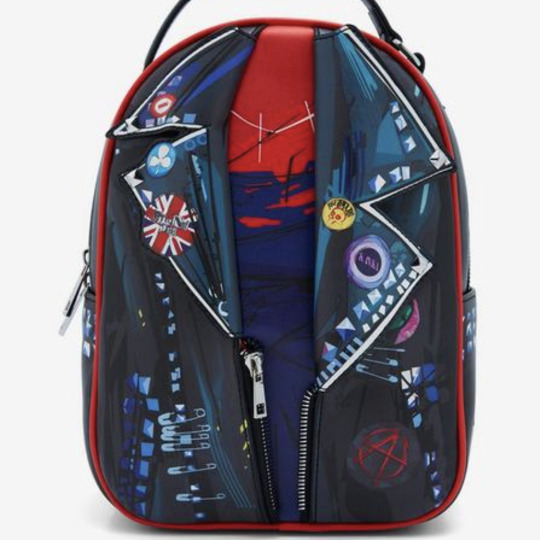
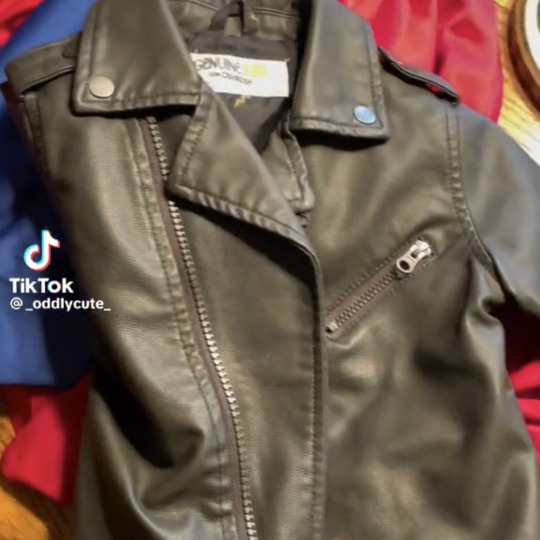
Now start cutting. Cut the jacket down to size, cut the red fabric for the base, cut the blue fabric for the shirt. You're gonna wanna cut up the blue fabric a bit more, give it some wear and tear, just like the photo. Got it?
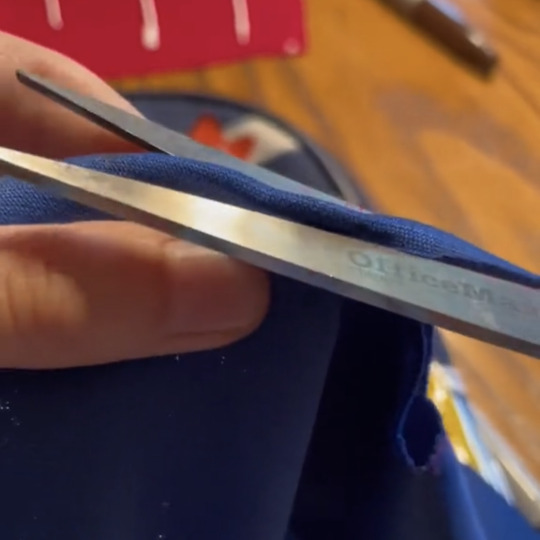
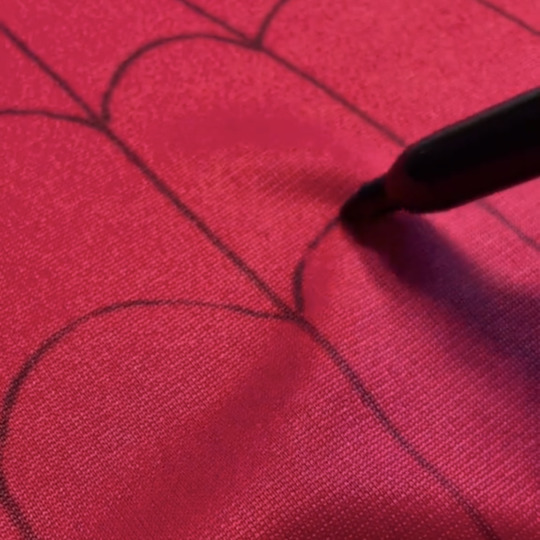
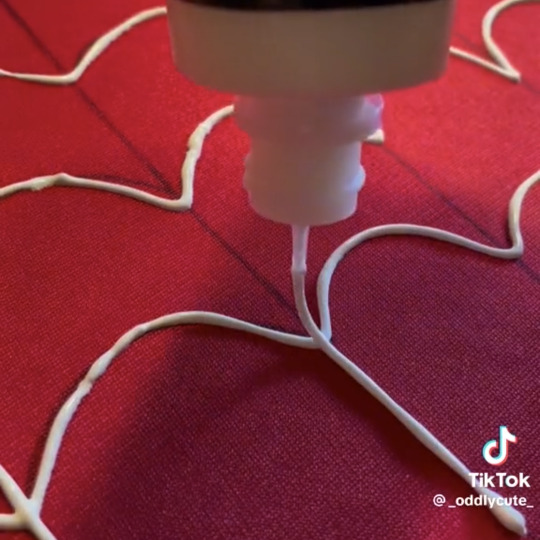
then get artsy. You want it to look like spiderman, you're gonna wanna make some webs. I suggest drawing them out first so you don't look stupid, but I'm not gonna stop ya kid, it's up to you. This is where the white fabric paint comes into play.
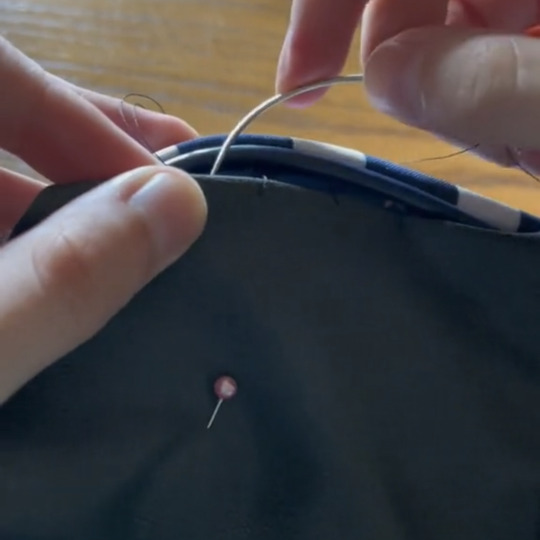
Now you're gonna have to put it all together. You can sew them, best to use a hook needle like they did, or you can glue it, like I would.

Now finish the job. You got spikes? Safety pins? Patches? Whatever you're gonna do, do it now.
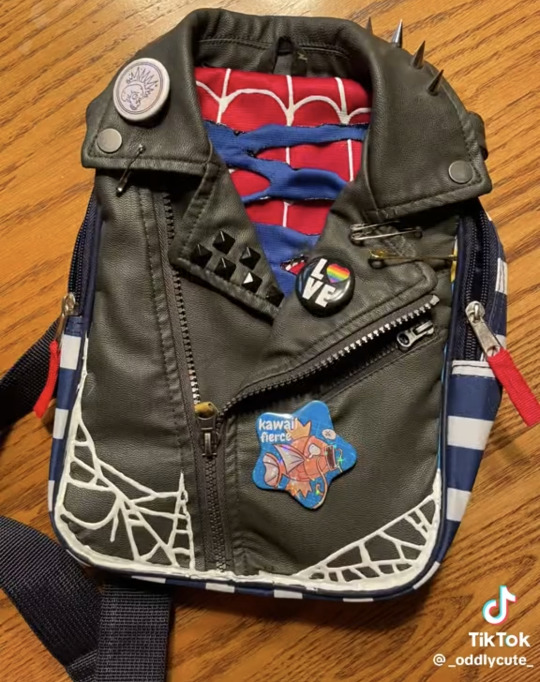
There. Jobs over, you're done.
#mike erhmantraut#mike breaking bad#mike#diy#tutorial#my tutorial#written tutorial#tiktok tutorial#how to#spiderpunk#spider punk#hobbie#hobbie brown#into the spider verse#spiderman diy#spider punk diy#backpack diy#my post#mine
90 notes
·
View notes
Note
hi there could you tell me how to add more than 10 images? I can't figure it out, thank you!
hi 😊 here is a tutorial i made
20 notes
·
View notes
Text
Hello @crispyliza !! So I'm replying in a separate post because this is too long for a reply on the post. Hope you don't mind. I also think it might benefit others who have asked me in the past and those wishing to start gif making. Especially with whumptober just around the corner.
So here's a full look at how I make my gifs. This got very long so I put it under a read more
A quick thing before I start: I use windows and google chrome. If you're a mac or firefox user I'm not sure of this will work for you in terms of programs. The techniques I use in photoshop should though.
Okay for this demonstration I'm going to show you how I made the gifs for this gifset
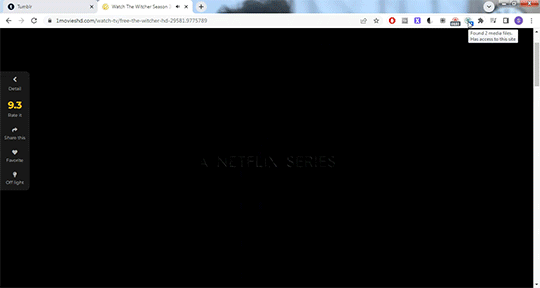
To start we need a video. I don't torrent because my internet connection will cut out a random which makes using vpns rather pointless. I've tried. My internet would cut out halfway through a torrent download and then my internet provider was notified to what I was doing. It was just not great. So I found a new way to download videos off the internet! You can use torrents though. If you've got a vpn, go for it.
There are several streaming sites that I go to to get my videos. 1movies, and bstsrs are my go to right now since soap2day is gone (rip i miss you).
Now there are three ways I can get a video depending on what website I'm using. Bstsrs is the easiest because they have a whole bunch of links available. I always go with mixdrop because it has an easy to use built in download button. Unfortunately this site doesn't have movies. Just tv shows and sometimes it's not the best quality or there aren't links available. That's when I go to 1movies. Once you've found your video I use the chrome extension Cococut to download it. Click the extension button to open, then the download button. Then you just have to wait until the video is rendered. Click save. Wait until its downloaded.
Okay we now have our video! The next step is to turn the scene you want to gif into frames. For this we're gonna need KMPlayer. This video player makes it really easy to turn scenes into frames/screencaps. Open your video. Find the the scene you want and pause the video. Type control-g to open this screen:
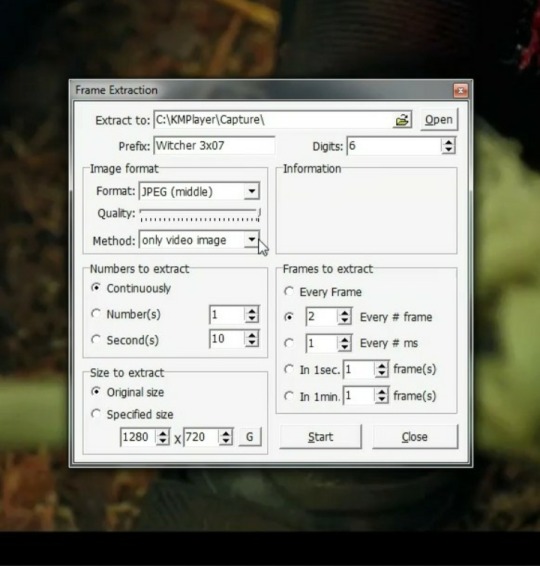
Here you choose the destination you want your frames to be saved. Decide what to name your frames and match up your settings with mine. You want to continuously extract frames, original size, and I stick with every 2 frames. Then, and this is important, choose video images only.
Now click start then start playing your video until the scene you want to gif is done. When you've got everything you wanted, pause the video. Hit ctrl-g again to reopen that screen and click stop. You now have all the frames you need so go ahead and exit out of KMPlayer. You don't need it again unless you need to redo frames or get the dialogue or something.
Next up we are gonna open Photoshop. I use Photoshop CC 2014.
Click on File -> Scripts -> Load files into stack -> Browse.
Go wherever you saved your frames and select the ones you need. Click okay and let the frames load completely before doing any thing else. Depending on how many you've selected this could take a while.
Once all of your frames are loaded, click "Create Frame Animation". Next click the little arrow button on right followed by "Make Frames From Layers" so we have all of our frames laid out. Now we need to reverse the frames because they're backwards so click that little button again and then click "Reverse Frames"

Okay you've got your frames loaded and all set to go. Time for all the cropping, resizing, setting the speed, and editing.
First thing I do is set the speed because otherwise I forget and it's important to do and a pain in the ass to do after all the editing is done. So do it first and get it out of the way. Select all of your frames. Click the little button beneath a frame where it says 0.0 and pick your time. I usually go for .1 seconds but .05 is also a popular speed. Just test one out and see which one you like best for your gif. You can hit the play button at any time to test your gif.
To set speed:
After this I do one of two things. Either I go into cropping and resizing or I separate frames. Depends on how many frames I uploaded. If I uploaded all the frames needed for an entire gifset this is the part where I separate them out onto individual gifs. So let's do that.
Originally I was just gonna do one gif but I have 115 frames uploaded which is waaaay too many for just one gif. I like to keep my gifs between 30 and 80 frames. So I'm going to split this into 3 gifs I think. It'll make a nice balanced gifset.
Select the frames you want for the first gif and copy them using the copy frames option in the same menu as the make frames from layers menu. Open a new document with the same dimensions as your current document. Click "Create Frame Animation" and paste the frames over the selected frame. Make sure that first frame is the same speed as all the other frames. Repeat until you have your desired gifs.
Next up I crop and resize. For this gif I'm going to first crop out the black bars above and below the image because we don't want that in the gif. Use the select tool to pick what you want to keep then "Image" then "Crop".

Now I could leave it as it but I think for this gifset I'm gonna focus more on Geralt so I'm going to crop it in a bit more.
Once cropping is all set i'm going to resize the gif to tumblr dimensions. Click "Image" then "Image Size" and change the width to 540px. The height can be anything and best not to mess with it so your gif keeps it's proportions. 540px is the width of a tumblr post and I plan on making these gifs stacked one on one.
Okay the gifs are all cropped and sized. Now it's time to do some editing. Go back to your first gif. We'll do all the work on this first gif and apply the same things to the other ones later because the scenes are the same. If they were different each gif would be colored and edited individually. First thing to do is turn it from frame animation to timeline. Timeline mode makes applying things like sharpening and brightness much easier and smoother.
So just click this button in the bottom left corner to go into timeline mode. Next up select all your layers. They're on the right side. Make sure you've selected ALL of them. Then click on "Filter" -> "Convert for Smart Filters" THIS IS AN IMPORTANT STEP! We can't edit until this is done.
This button to switch from frames to timeline:
First thing I do is sharpen. You can use one of the presets or try to do manually do it with smart sharpen. I use the preset labelled "sharpen" because I'm lazy and this one does a fine job for my gifs. I also add a layer of surface blur to smooth things out. Just a small touch. Like barely any blur but I think it smooths noise a bit and makes it look better.
Next up: Editing!! This step is going to be different for each and every gif you make. It all depends on the colors in the scene your giffing so you're gonna have to do a lot of experimenting to get the right look you want. Personally that's what I like about it. Makes it fun.
All your adjustments can be found found on the right side of the screen:
I almost always start with the "Levels" layer to brighten up the image because as we all know, every freaking whump scene is sooo dark. So with levels you just slide the little arrows around until you get a look you like.
Then I add a layer of "Curves". I love curves. With curves you can select the whitest white and the darkest black and the middle tone to change the brightness and colors of your gif. Or you can use this part and just brighten or darken a specific part. It's really versatile and i love it. It does take some practice and experimenting though.
Now a layer of "Contrast" and a layer of "Vibrance".
After this it's all about the selective colors, photo filters, and color balance to work on the colors and brightness. For this gif I'm only doing a tiny bit of editing cause I like the coloring but sometimes I'll have multiple layers of these to create a good coloring.
Once you're satisfied with how your gif looks it's time to save it!
Click "File" -> "Save for Web" and wait until it's all loaded. Important thing too look at here is the size of the gif. You can't upload any gif that is larger than 10mbs so make sure it's under that. Sometimes even 9.8 is too big because tumblr is a butt. I go for anything below 9.8. If your gif is too big try resizing it or removing a few frames. Make sure you gif is set to loop forever. Otherwise it'll just stop after a little bit. Don't forget to change this!
Here are the rest of my settings:
After that you can click save.
And that's it! You've made a gif! Congrats! If you have any questions or want clarification feel free to message me :)
35 notes
·
View notes
Note
I don’t check this post for years and find out the notes hit a stupidly high number, damn okay thanks I guess 😳

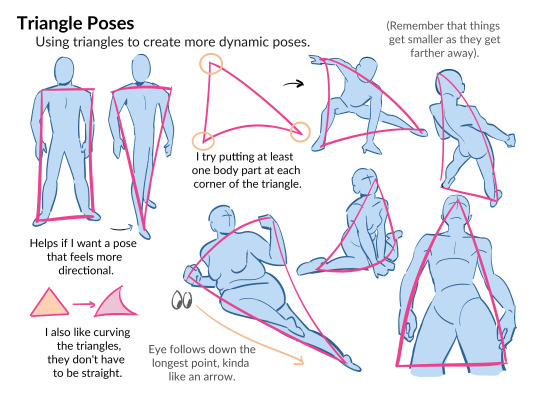
So that's how to reference with digital art. Cool. Thanks for sharing it.
It is! I always make sure to try and break the pose into shapes and work from there. I also like to use arrows to show the flow of the pose!!! I then open it next to my picture and draw the shapes scaled up in size as I draw on a 4000px x 4000px canvas usually. You can also use posemaniacs.com for referencing, if you scroll down the right side and click “model” it has hands, a torso, and a head for practicing with.
Here’s 2 examples!!!
Making someone bigger than ref’d person:


Making someone smaller than ref’d person:


HOPE THIS HELPS EVEN MORE SO!
15K notes
·
View notes
Text


what it says on the tin! I offered to throw together something on drawing raw meat (in a mouthwashing server, naturally) so here it is in case someone finds it useful
22K notes
·
View notes
Text
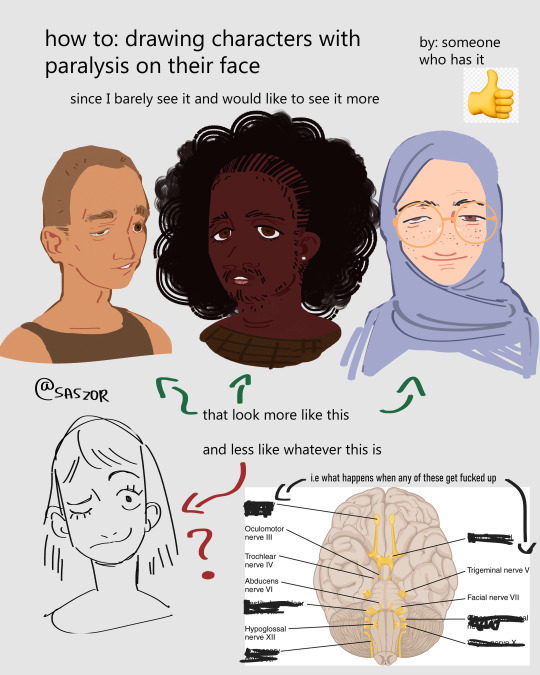

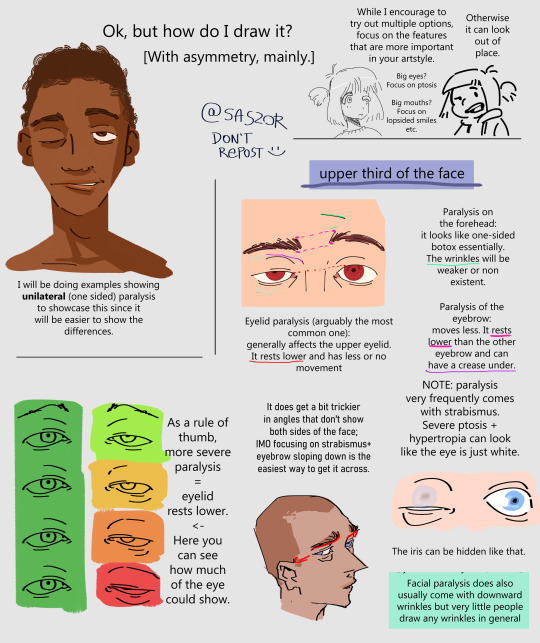
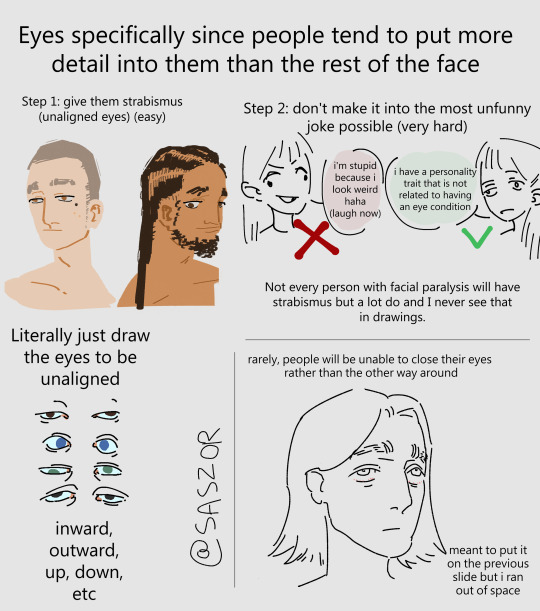
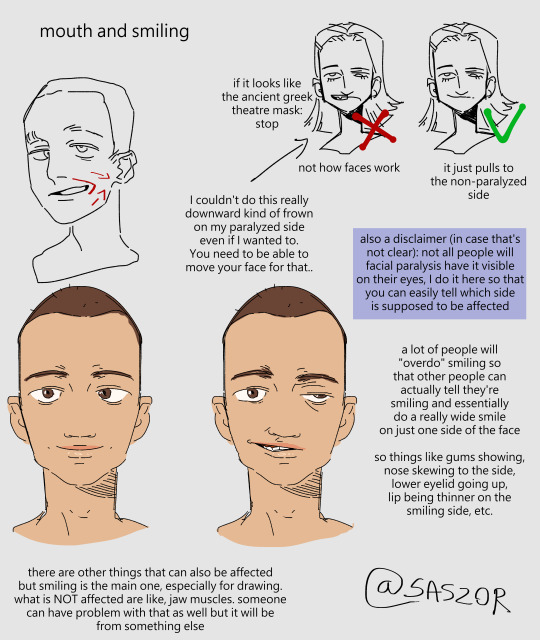
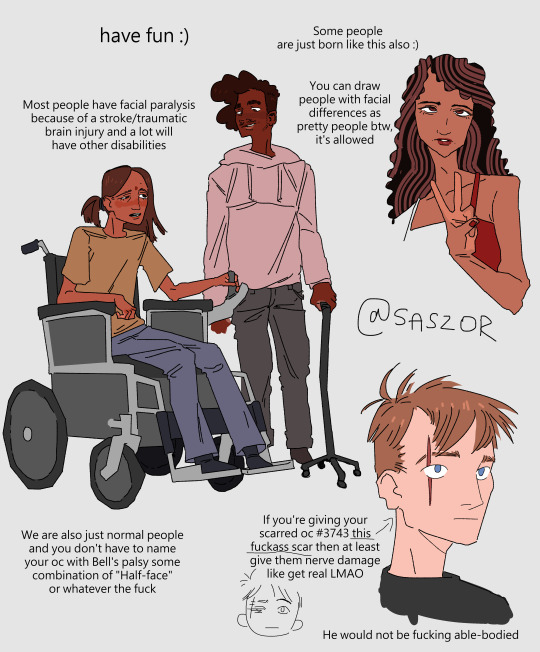
[ID in alt]
Tutorial on drawing characters/OCs who have some sort of facial paralysis. It doesn't cover all possible variants because I was using mirror as my main reference lawl
Keep in mind that this is an introductory drawing tutorial and has some generalizations in it, so not every “X is Z” statement will be true for Actual People 👍
Consider supporting me on ko-fi if you find this to be helpful.
#No 'omg mithrun dungeon meshi' notes that's not even what he has.#my art#artists on tumblr#disabled artist#digital art#id in alt text#art tutorial#drawing disabled characters#facial difference#disabled representation#disabled characters#digital artist#artwork#art on tumblr#art#body positive art#character art#disabled art#original art#personal art#illustration#drawing
26K notes
·
View notes
Text

It's in the eye of the beholder
#comic#birds#my art#I've had this idea for a while#after a lecture that talked about how traits we consider cute are traits found in babies#I feel like birds would have a very different definition of cute from us#anyway after making the bird tutorial I feel the pressure to draw perfect bird anatomy#but tbh I still just wing it a lot of the time!!#hehe “wing it”
64K notes
·
View notes
Note
could you please do a tutorial on how you do your risograph style drawings? they look so cool 😭😭


13K notes
·
View notes
Text
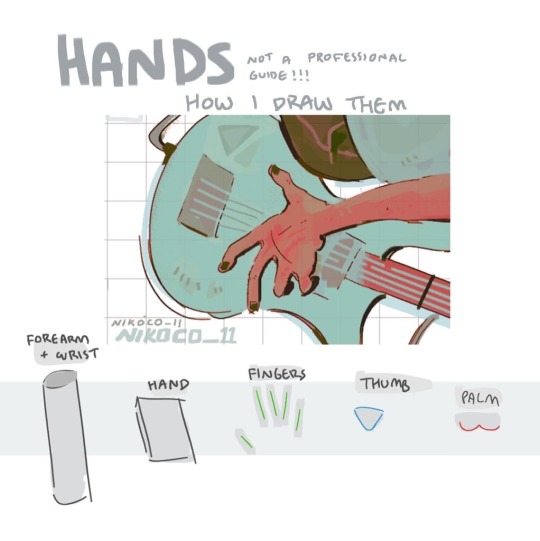


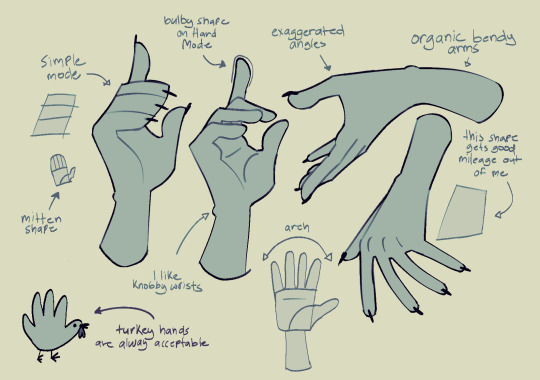
my recipe for drawing hands!
(small note that this is a shortcut that is more abt style and ease than anatomical accuracy. it helps to take time to really properly study hands, makes it easier to bend the rules a bit like this and have it still look good!!)
(learn rules b4 u break them or whatevah)
#qna#tutorial#guide#drawing tutorial#digital art#illustration#drawing#artists on tumblr#my art#clip studio paint
60K notes
·
View notes
Text
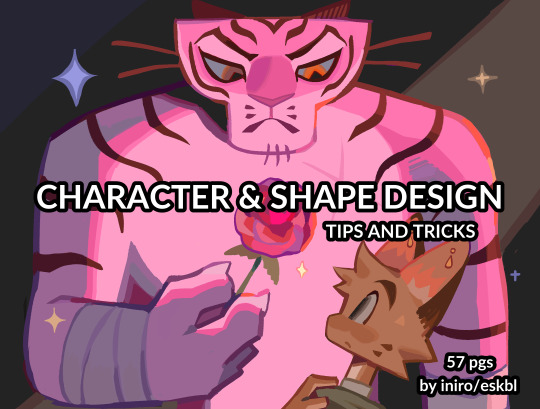

HII my character & shape design tips PDF is now available! ^_^ hope you enjoy !!
BUY HERE or HERE
#character design#art tutorial#art resources#csp brushes#art tips#shape design#myart#i beat the page count of my last pdf woo!
38K notes
·
View notes
Text
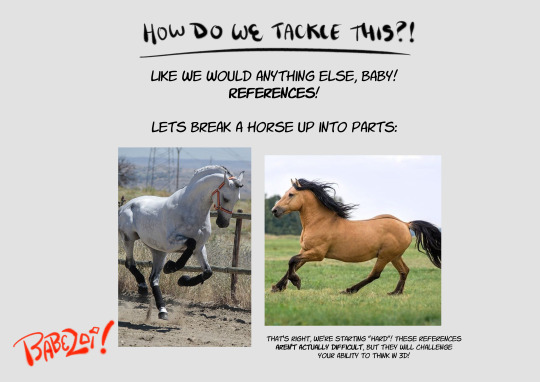
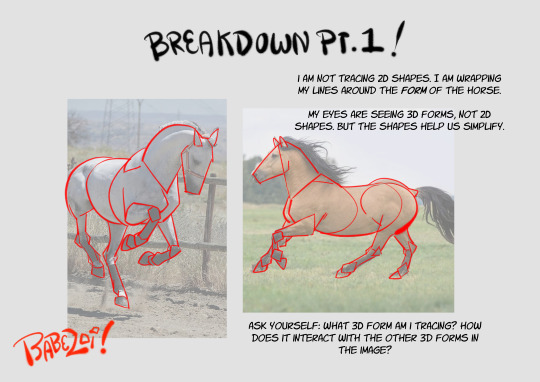
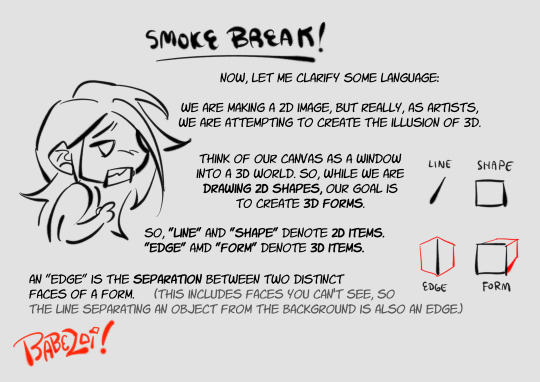
how to draw horses(for the discerning horse girl)
i spent two years working in barns to give you this information. use it wisely
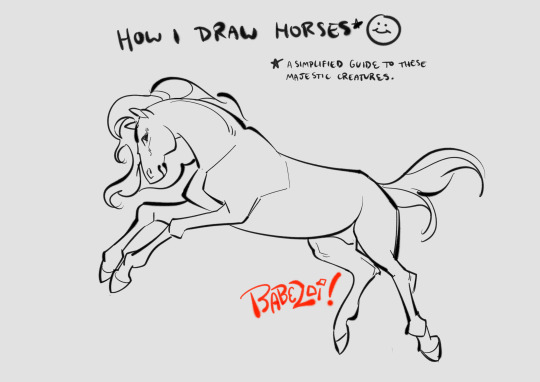
view all 16 parts under the cut!

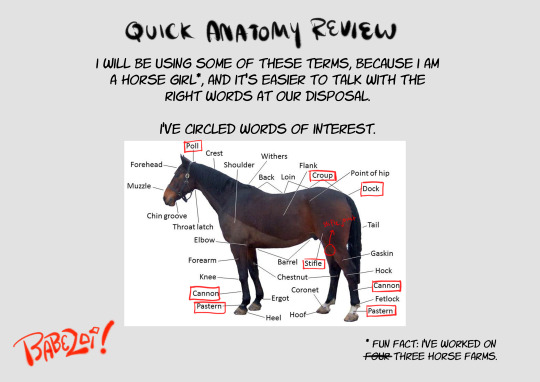
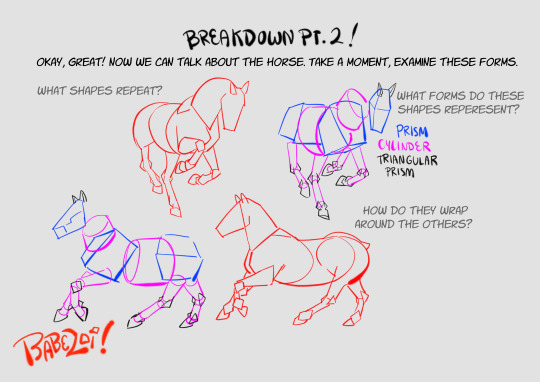
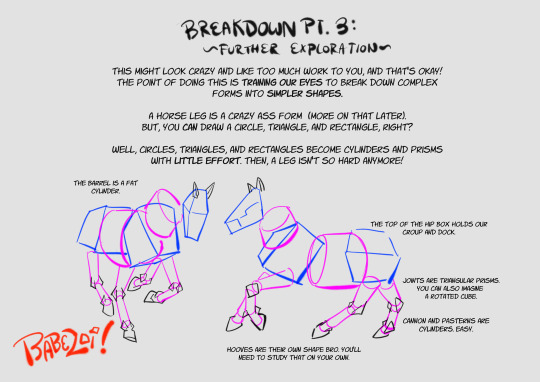
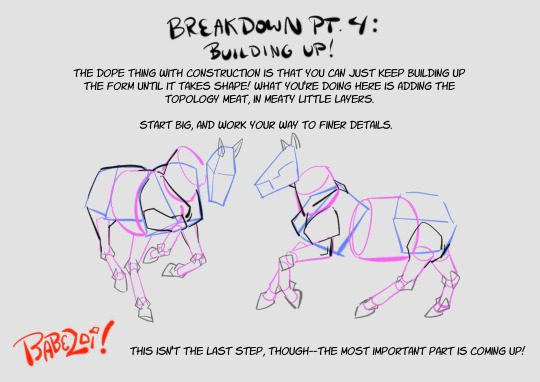

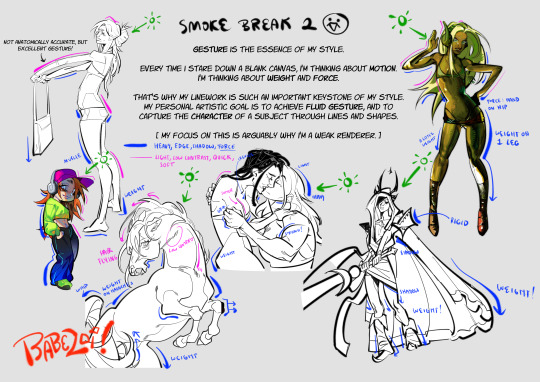
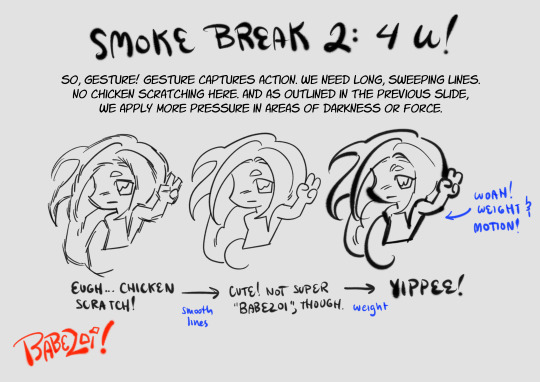
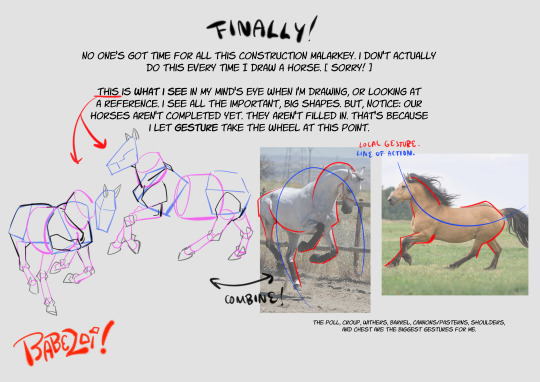
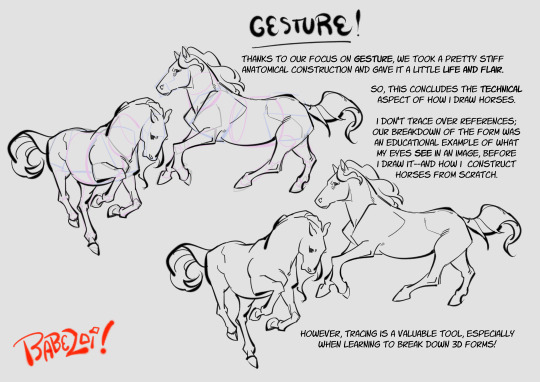
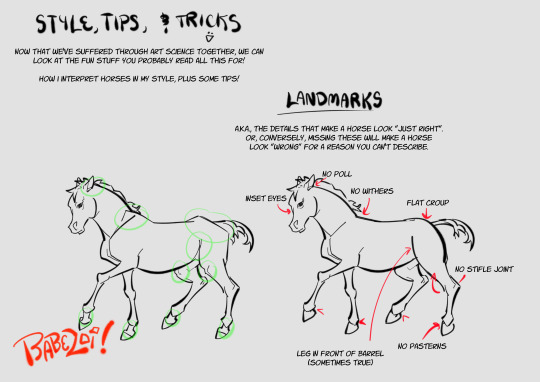
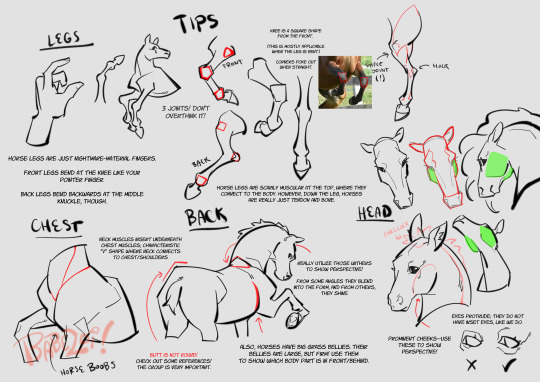
hopefully this guide will inspire you to draw the cowboys you've always dreamed of
#art tutorial#art tips#art resources#horse art#equine art#horses#i love horses so fuckign much#my art#I LOVE HORSES SO MUCHHHHH ILOVE HORSES
12K notes
·
View notes
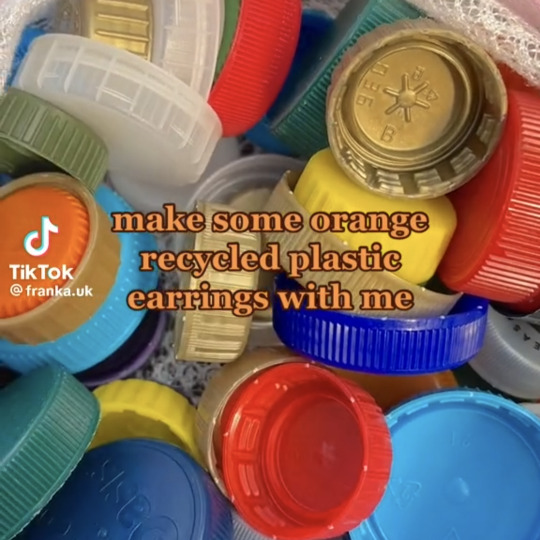
Text
so you wanna make plastic garbage into earrings, huh?

i see you found someone on that app of yours that does it. 85k followers, top viewed video of 2.8M, not bad. franka.uk I see. right, lets get to work.
heres what youre gonna do. look though your recycling bin for LDPE or HDPE plastic (#2 or #4) and only those two types, ya got it? that's bottle caps, laundry detergent bottles, etc.
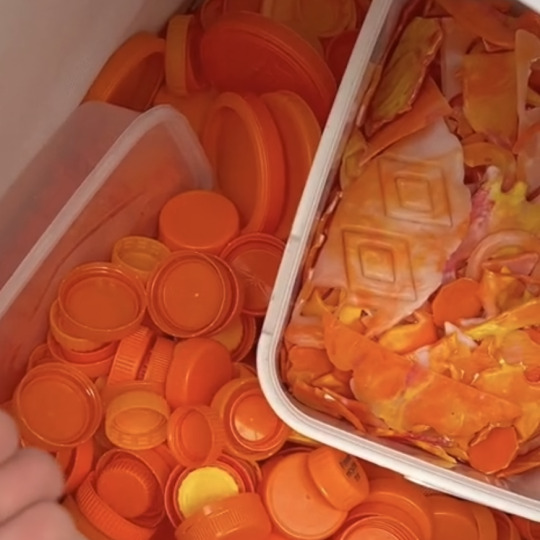
get a blender. blend. you can either do same color or multicolor, that's up to you. pick your colors, throw them in a blender you DO NOT eat out of, and blend.
now youre gonna wanna melt it. get yourself a panini press or an iron if you're feeling brave, and two pieces of parchment paper. lay the first one down, then lay our your plastic bits, and then the second paper. its not rocket science. start at low heat and WATCH.
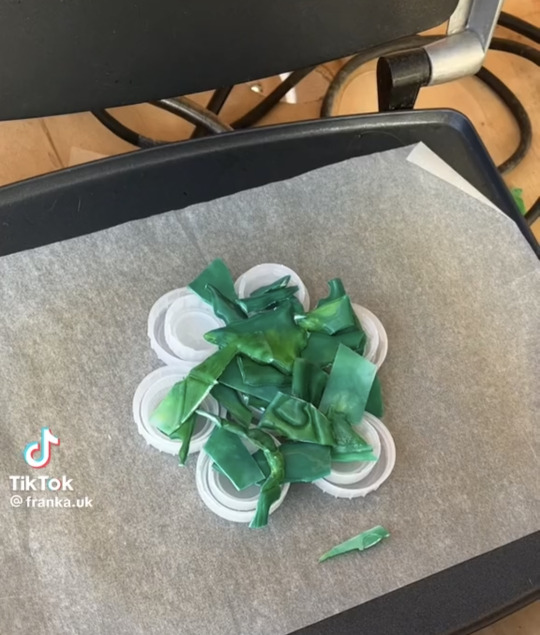
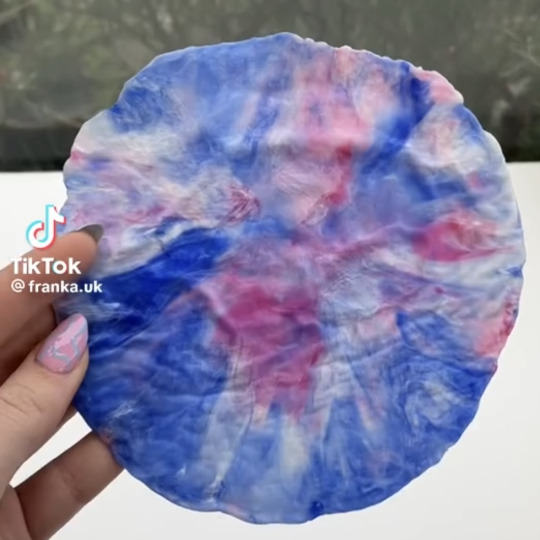
when its flat, take it off and let it cool. be careful, its gonna be hot, so dumb be stupid about this. wait for it to cool down a bit, you can press it between some books if you're feeling fancy. get your metal cookie cutters and get to work. they wont punch through, so wait for it to cool all the way and get yourself an exact knife to finish the job.
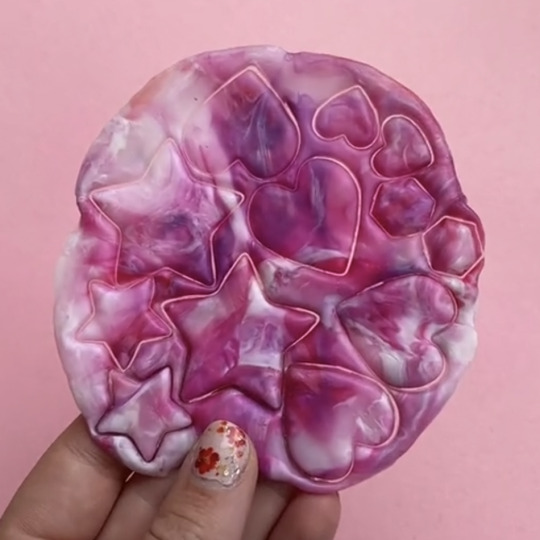
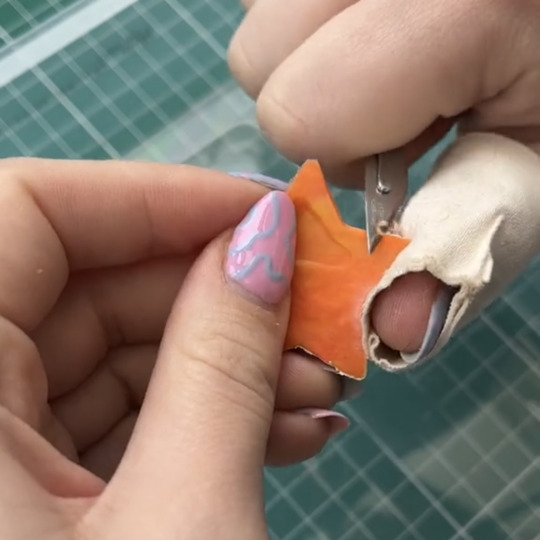
now you're gonna smooth them out. if you're using an exacto knife, you'll wanna wear a glove or some thumb protection so you don't cut yourself. you could also use sandpaper, might take longer though, or a dremel. if you don't have a dremel, don't panic, it would just be the fastest and smoothest thing, that's all.
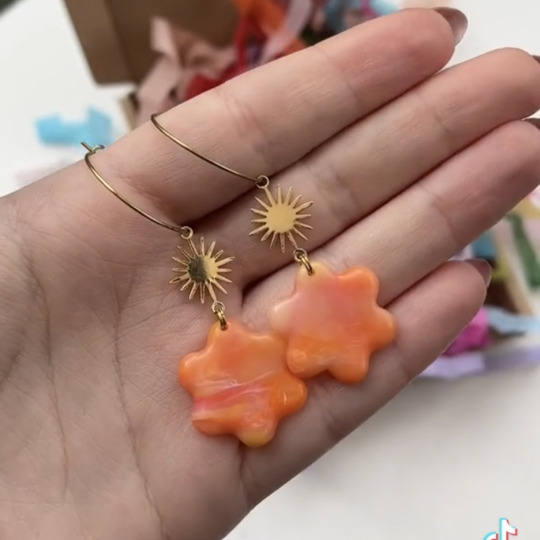
finally, youre gonna want take what you made and fashion them into earrings. you can make them into other things too, maybe a wall hanging or a sign, but our example is earrings, alright? now, get a drill bit that's the size you need for your jump ring, likely 2 or 3 mm. get a pair of needle nose or jewelry pliers, feed one ring through the hole and then a second one to connect the earring hook. if you wanna add more charms, top or bottom, drill more holes and repeat.
you're done. think you can handle that?
#breaking bad#bb#mike breaking bad#mike#mike erhmantraut#meme post#goof#ITS A GOOF#but also serious lmao#diy#tutorial#plastic earring tutorial#tiktok tutorial#written tutorial#diy earrings#recycled plastic earrings#mine#my post#new blog type#my tutorial#my tutorials#hope the girlies like these#this wont b the last#i hope#lmao
35 notes
·
View notes
Text
Someone asked for another hand tutorial and i once again failed to deliver the tutorial part
15K notes
·
View notes
Text

small riso postcard design for one of my classes!!
#(this is the illustration from my tutorial but with a few small changes)#irl oomfs are saying i should turn this into a riso postcard series with different fruits... what do we think#my art#illustration#riso#risograph#print#strawberry#fairy#whimsical#fairytale
4K notes
·
View notes