#bootmenu
Explore tagged Tumblr posts
Visit Tumblr Blog
Explore Tumblr blogs with no restrictions, modern design and the best experience.
Last Seen Tumblr Blogs


Fun Fact
The KCSC sent more than 20K requests to delete posts related to prostitution and porn to Tumblr from January to June 2017.
Text
youtube
boot menu dell computer and pc
1 note
·
View note
Text

OpenCore Bootloader - Tweaking
Will man das Standard Design etwas aufwerten, so läßt sich in der EFI Konfiguration eine visuelle Anpassung einrichten (hier das "Template" BsxImacBlue; vgl. Github und auch diese Anleitung).
Da man im Bootmenu davon keinen Screenshot machen kann, habe ich den Screen zur Anschauung hier nachgestellt und in der Beschriftung angepasst. Denn bei meinem letzten direkten Upgrade von OSX 13 auf OSX 14 (ohne Löschung der Zielpartition) ist die Bezeichnung im Bootloader die alte geblieben (OSX Ventura).
Man kann natürlich auch einen eigenen Hintergrund und eigene Icons gestalten und als Design für den Bootloader verwenden. Wichtig ist hierbei, dass entsprechende Formate als *.icns generiert werden können. Für OSX gibt es dazu ein Tool.
Dr. Andreas Korn, 01.03.2024
+ + +
0 notes
Link
Bizony van az úgy, hogy valamilyen probléma célzott orvoslása érdekében, mindenképpen szeretnénk eljutni a BIOS-ba vagy a boot menübe, ám ezek elérési módja még a gyakorlott kezek számára sem mindig teljesen egyértelmű. Pedig windows telepítés esetén sokszor elkerülhetetlen, hogy változtassunk a boot sorrenden, kikapcsoljuk a secure boot opciót vagy állítsuk át Legacy-ról UEFI-re a boot módot.
0 notes
Text
Schakel tussen VirtualBox en Hyper-V met een BCDEdit boot Entry
Het is niet mogelijk terwijl Hyper-V gestart is ook VirtualBox te draaien binnen Windows. Hieronder een mogelijkheid waarbij je een boot entry toevoegt waarbij Hyper-V niet gestart
C:\>bcdedit /copy {current} /d "No Hyper-V" The entry was successfully copied to {ff-23-113-824e-5c5144ea}.
C:\>bcdedit /set {ff-23-113-824e-5c5144ea} hypervisorlaunchtype off The operation completed successfully.
Dat wat tussen { } staat moet je dus vervangen. Je kunt opvragen wat het bij jou is met bcdedit. Doe dit met administrator rechten in een command prompt.
Als je dit uitgevoerd hebt krijg je bijvoorbeeld dit:
Windows Boot Loader ------------------- identifier {current} device partition=C: path \WINDOWS\system32\winload.efi description Windows 10 locale en-US inherit {bootloadersettings} recoverysequence {47d93ed2-a65f-11e3-b257-e5be5a4c545d} displaymessageoverride Recovery recoveryenabled Yes testsigning No isolatedcontext Yes flightsigning Yes allowedinmemorysettings 0x15000075 osdevice partition=C: systemroot \WINDOWS resumeobject {47d93ed0-a65f-11e3-b257-e5be5a4c545d} nx OptIn bootmenupolicy Standard hypervisorlaunchtype Auto
Windows Boot Loader ------------------- identifier {47d93ecb-a65f-11e3-b257-e5be5a4c545d} device partition=C: path \WINDOWS\system32\winload.efi description Windows 10 - No Hyper-V locale en-US inherit {bootloadersettings} recoverysequence {47d93ecc-a65f-11e3-b257-e5be5a4c545d} displaymessageoverride Recovery recoveryenabled Yes testsigning No isolatedcontext Yes flightsigning Yes allowedinmemorysettings 0x15000075 osdevice partition=C: systemroot \WINDOWS resumeobject {47d93eca-a65f-11e3-b257-e5be5a4c545d} nx OptIn bootmenupolicy Standard hypervisorlaunchtype Off
Je ziet bij de laatste entry staan: hypervisorlaunchtype Off
Daar gaat het dus om. Start je nu via de startknop [msconfig] dan kun je bij de BOOT tab ook een x aantal seconden ingeven waarop het bootmenu gepresenteerd wordt. Ik stel dit altijd op 3 seconden in zodat je tijd genoeg hebt om te switchen.
0 notes
Text
Windows 10 Uefi Iso

Windows 10 Uefi Iso File Download
Windows 10 Uefi Iso Usb
PAGE CONTENT:
What Can You Do with a UEFI Bootable Disk
How to Create a UEFI Bootable USB Drive in 3 Ways
How to Boot Windows 10 Computer from UEFI Bootable USB Drive
Bonus Tip: How to Repair Hard Drive and Recover Data with a WinPE Bootable Disk
The windows 10 ISO supports booting both UEFI and Legacy Mode. Mount the ISO and Copy the contents of the ISO to your DVD Burner (a USB Stick is the preferred method of choice) Then use the F12 BootMenu to select the UEFI DVD Device as the Bootable device. After creating the UEFI boot USB drive of Windows 10 from ISO using CMD utility, you can insert the USB to the computer that you need to install operating system and boot from the USB drive to launch the 'Windows Setup' wizard and continue with the installation process.
What Can You Do with a UEFI Bootable Disk
A UEFI bootable USB drive can be used to complete an in-place Windows upgrade or clean install of Windows 10. It's also needed to start the system when your computer cannot be booted due to a virus attack, MBR damage, bad sectors, corrupted system files, etc. Once you can start your computer from the USB bootable drive, you can perform a disk check and repair. These are the two most important reasons to use a bootable USB disk. Other purposes include backing up systems, using portal operating systems on a foreign computer, and protecting computer data security.
But how to create a Windows 10 UEFI bootable USB drive?
We all know that there are two boot modes for computers: BIOS VS UEFI. If you have a computer with a Unified Extensible Firmware Interface (UEFI), instead of the legacy Basic Input/Output System (BIOS), you should know how to create a UEFI bootable USB drive on Windows 10.
There are several different ways to make a bootable disk in UEFI mode. Let's learn together.
How to Create a UEFI Bootable USB Drive in 3 Ways
In this part, we will introduce three common ways to create a bootable USB drive by using Windows 10 Midea Creation tool, Diskpart, and third-party software - Refus.
1. Create a UEFI Bootable USB with Windows 10 Media Creation Tool
If you want to create a UEFI bootable USB media for an in-place upgrade or clean install of Windows 10, you can use the Microsoft Media Creation Tool.
To create a Windows 10 UEFI bootable USB, prepare a USB flash drive with at least 8GB of capacity. Then use these steps:
Step 1. Download Windows 10 installation media from the official website of Microsoft.
Step 2. Run the exe file of MediaCreationTool. Click 'Accept' to agree to the license terms.
Step 3. On the Windows 10 Setup screen, select 'Create installation media (USB flash drive, DVD, or ISO file) for another PC'. Click the 'Next' button.
Step 4. Click 'Next' on the language, edition, and architecture screen. Select the 'USB flash drive' option, and click 'Next'.
Step 5. Select your connected USB flash drive from the list. And click 'Next > Finish' to complete the process. Wait for the Media Creation Tool to download the files and create a bootable USB flash drive that you can use to install Windows 10 on devices with support for UEFI and BIOS.
2. Create a UEFI Bootable USB on Windows 10 with Diskpart
With the built-in Diskpart utility, you can also create a Windows 10 UEFI bootable USB drive. Note that this solution requires command-line operations, so if you're not confident, you’d better choose a simpler graphical solution.
The process of making a USB bootable drive will erase all data on it. Remember to back up important files and data in advance.
Step 1. Connect your USB flash drive to the computer.
Step 2. Type CMD in the Search box, and right-click on the Command Prompt, and select Run as Administrator.
Step 3. In Command Prompt, type Diskpart and press Enter.
Step 4. Type the following commands in order, and press Enter after each one.
list disk select disk # clean create partition primary select partition 1 active format fs=fat32 (it means you format the drive with fat32 file system) assign exit
Step 5. Copy the Windows installation files to the USB flash drive. You can do this by simply using copy-and-paste. Then, the process of creating a bootable UEFI flash drive with Windows 10 finishes.
3. Create UEFI Bootable USB Drive with Rufus
If you have difficulty in creating Windows 10 UEFI bootable USB with Diskpart, you can use Rufus, an open-source program that allows you to create a UEFI bootable disk on Windows 10/8/7.
Step 1. Download Rufus from the official website: https://rufus.ie/en/.
Step 2. Connect your USB flash drive to the computer.
Step 3. Run this program and make the following main settings:
Device: Select your USB flash drive.
Boot selection: Select DISK or ISO image. And click the SELECT button to choose the Windows 10 ISO file from the folder location.
Partition scheme: Select GPT for UEFI.
Target system: Select UEFI (non CSM).
File system: Select NTFS.
On other options and settings, choose based on the actual situation. Then, click the START button to let Rufus create a UEFI USB flash drive.
How to Boot Windows 10 Computer from UEFI Bootable USB Drive
You can create a UEFI bootable USB drive on Windows 10 by taking any of the methods above. After successfully creating the boot disk, you also need to know how to boot your computer from the bootable USB.
Follow the steps below to start your computer from Windows 10 UEFI bootable USB drive.
Step 1. Connect the UEFI bootable USB disk to a dead, unbootable, inaccessible Windows computer.
Step 2. Restart your computer, hold F2/F11/Del to enter BIOS.
Step 3. Go to the Boot Drive section and set the UEFI bootable USB as the boot drive.
Step 4. Save the changes and exit BIOS. Wait for your computer to boot up from the UEFI bootable USB disk.
Bonus Tip: How to Repair Hard Drive and Recover Data with a WinPE Bootable Disk
When your computer cannot start, besides using the BIOS or UEFI USB bootable drive, is there another way to access the computer to fix errors and manage hard drives? Yes, you can resort to a disk management WinPE bootable disk by using partitioning software - EaseUS Partition Master.
With simple clicks, you can create an EaseUS Partition Master WinPE bootable disk and run it on your computer without system boot partitions. Then, you can repair and manage your hard drives with advanced solutions, or restore data by cloning the hard drive.
EaseUS Partition Master
Resize, merge, delete, create, and format partitions
Repair corrupted MBR that causes the hard drive to fail to boot
Clone hard drives to rescue data
Steps for creating a WinPE bootable USB drive with EaseUS partitioning software.
Step 1. To create a bootable disk of EaseUS Partition Master, you should prepare a storage media, like a USB drive, flash drive or a CD/DVD disc. Then, correctly connect the drive to your computer.

Windows 10 Uefi Iso File Download
Step 2. Launch EaseUS Partition Master, find the 'WinPE Creator' feature on the top. Click on it.
Step 3. You can choose the USB or CD/DVD when the drive is available. However, if you do not have a storage device at hand, you can also save the ISO file to a local drive, and later burn it to a storage media. Once made the option, click the 'Proceed' button to begin.
When the process finishes, you have successfully created an EaseUS Partition Master WinPE bootable disk. Now, you can manage your hard disks and partitions through the bootable drive whenever the computer fails to boot normally.
If you have RAID drives, load the RAID driver first by clicking Add Driver from the menu bar, which can help you add the driver of your device under WinPE environment, as some specific device cannot be recognized under WinPE environment without drivers installed, such as RAID or some specific hard disk.
Once the Easeus Partition Master bootable disk has been created, you can access your computer and the disk from this USB bootable drive for subsequent disk repair and data recovery operations.

Windows 10 Uefi Iso Usb
Wrapping Up
How to create a UEFI bootable USB on Windows 10? If you are still struggling with this question, you can find the answer here. You can create a UEFI bootable disk in four ways by using Windows 10 installation media, Diskpart, and Refus.
If you need to boot your computer from a USB bootable disk and manage or repair your disk in a WinPE environment, we strongly recommend you use EaseUS Partition Master, which enables you to clone failing hard drive to a new HDD/SSD.
1 note
·
View note
Text
Ventoy 1.0.90
Versie 1.0.90 van Ventoy is uitgekomen. Met dit opensourceprogramma kunnen zelfstartende USB-sticks worden gemaakt. De manier waarop het dat doet, is echter anders dan vergelijkbare tools. De USB-stick hoeft slechts eenmaal geprepareerd te worden en daarna kunnen net zoveel ISO-bestanden op de stick geplaatst worden als er vrije ruimte is. Ventoy maakt zelf automatisch een bootmenu aan voor de aanwezige ISO-bestanden. Ondersteuning is aanwezig voor zowel UEFI- als legacy-boot en het is getest met 1101 verschillende ISO-bestanden. De changelog voor deze uitgave ziet er als volgt uit: Changes in Ventoy 1.0.89: http://dlvr.it/SlW5PQ
0 notes
Photo

How To FIX a PC which is STARTING but NOT display anything on the SCREEN!!! (in Hindi Language) Hey guys if you are facing a problem w... #surnativa #anything #best #blackscreen #bootmenu #bootproblems #booting #cabinet #computer #display #displayproblems #easiest #easy #fix #hanged #howto #laptop #latest #new #not #nothing #onscreen #pc #solution #starting #way #working Source: https://surnativa.com/how-to-fix-a-pc-which-is-starting-but-not-display-anything-on-the-screen-in-hindi-language/?feed_id=39562&_unique_id=5f6ae8b4d9dab
0 notes
Text
Download Transource Laptops & Desktops Driver

Download Transource MIR-795HS Windows Drivers Device: Any device Bios Cameras Game Devices Input Devices Laptops - Desktops Modems Motherboards Network Adapters Other Printers Projectors Scanners Sound Cards USB Video Adapters. Before booting the system from a USB flash drive or CD-ROM, please let your computer enters the BIOS configuration first, here you can learn more about How to enter BIOS configuration. After entering the BIOS configuration, there are two kinds of BIOS screen which are UEFI mode and Legacy mode, please refer to the following steps in order. Additional 3 year warranties are available for purchase on Transource branded desktops, workstations, and notebooks. $100.00 Minimum Sales Order Use of Renewable Energy: Call us for details on renewable, solar energy to power laptops and desktops. Transource Warranty & Support Agreement. Please view the Transource Warranty & Support Agreement for information pertaining to: warranty coverage, support procedures, repair/replacement parts and service, and supplemental coverage options. View Order & Driver Information by Serial Number / Service Tag. Download Transource MIR-800HM Windows Drivers Device: Any device Bios Cameras Game Devices Input Devices Laptops - Desktops Modems Motherboards Network Adapters Other Printers Projectors Scanners Sound Cards USB Video Adapters.
Technical Questions Active@ Disk Image

Hot keys for BootMenu / BIOS Settings
Download Transource Laptops For Windows 7
You may get your Boot Menu How or your BIOS settings by using special keys.

Download Transource Laptops App

Download Transource Laptops For Desktop
Below is a list of PC brands with their corresponding hot-keys.
Download Transource Laptops Software
ManufacturerTypeModelsBoot MenuBoot OnceBIOS KeyChange PriorityACEREsc, F12, F9Del, F2ACERnetbookAspireOne, Aspire TimelineF12F2ACERnetbookAspire v3, v5, v7F12The 'F12 Boot Menu' must be enabled in BIOS. It is disabled by default.F2APPLEAfter 2006OptionASUSdesktopF8F9ASUSlaptopEscF9ASUSlaptopR503CF8DEL ASUSnetbookEee PC 1025cEscF2Boot Tab, Boot Device Priority, 1st Boot Device, Removable Device, F10COMPAQPresarioEsc, F9F10BIOS 'Advanced Tab', Boot OrderDELLdesktopDimension, Inspiron, LatitudeF12Select 'USB Flash Drive'F2DELLdesktopInspiron One 2020, 2305, 2320, 2330 All-In-OneF12Select 'USB Flash Drive'F2DELLlaptopInspironF12Select 'USB Storage Device'F2Settings->General->Boot Sequence->'USB Storage Device', then up arrow, (Apply)--(Exit)DELLlaptopPrecisionF12Select 'USB Storage Device' from boot menuF12EMACHINESF12Tab, DelHPgenericEsc, F9 Esc, F10, F1HPdesktopMedia CenterEscF10BIOS 'Advanced' tab, Boot Order, Move 'USB Device' before 'Hard Drive'HPdesktopPavilion 23 All In OneEscSelect boot media from the menuF10BIOS 'Advanced' tab, Boot Order, Move 'USB Device' before 'Hard Drive'. For non-UEFI media, disable secure boot and enable legacy supportHPdesktopPavilion g6 and g7EscF10BIOS 'Advanced' tab, Boot Order, Move 'USB Device' before 'Hard Drive'HPdesktopPavilion HPE PC, h8-1287cEscThen F9 for 'Boot Menu'Esc F10 Storage tab, Boot Order, Legacy Boot SourcesHPdesktopPavilion PC, p6 2317cEscThen F9 for 'Boot Menu'Esc F10 Storage tab, Boot Order, Legacy Boot SourcesHPdesktopPavilion PC, p7 1297cbEscThen F9 for 'Boot Menu'Esc F10 Storage tab, Boot Order, Legacy Boot SourcesHPdesktopTouchSmart 520 PCEscThen F9 for 'Boot Menu'Esc F10 Storage tab, Boot Order, Legacy Boot SourcesHPlaptop2000EscSelect 'Patriot Memory' on the Boot Option MenuEscHPnotebookPavilionEscF10BIOS 'Advanced' tab, Boot Order, Move 'USB Device' before 'Hard Drive'HPnotebookENVY dv6 and dv7 PCEscThen F9 for 'Boot Menu'Esc F10 Storage tab, Boot Order, Legacy Boot SourcesINTELF10LENOVOdesktopF12, F8, F10F1, F2 LENOVOlaptopF12F1, F2LENOVOlaptopIdeaPad P500F12 or Fn + F11F2NECF5F2PACKARD BELLF8F1, DelSAMSUNGF12, EscSAMSUNGnetbookNC10EscF2Boot Tab, Select 'Boot Device Priority', Press Return, Up/Down to Highlight, F6/F5 to change prioritySAMSUNGultrabookSeries 5 Ultra and Series 7 ChronosEscF2Boot Tab, Select 'Boot Device Priority', Press Return, Up/Down to Highlight, F6/F5 to change prioritySHARPF2SONYVAIO, PCG, VGNF11F1, F2, F3SONYVGN EscF10F2BIOS 'BOOT' section, 'External Device Boot' enabledTOSHIBAProtege, Satellite, TecraF12F1, EscTOSHIBAEquium F12F12 F12
1 note
·
View note
Link
So, I’ve been using ikiwiki for my website since 2011. At the time, I was hosting the website on a tiny hosting package included in a DSL contract - nothing dynamic possible, so a static site generator seemed like a good idea. ikiwiki was a good social fit at the time, as it was packaged in Debian and developed by a Debian Developer.
Today, I finished converting it to Hugo.
Why?
I did not really have a huge problem with ikiwiki, but I recently converted my blog from wordpress to hugo and it seemed to make sense to have one technology for both, especially since I don’t update the website very often and forget ikiwiki’s special things.
One thing that was somewhat annoying is that I built a custom ikiwiki plugin for the menu in my template, so I had to clone it’s repository into ~/.ikiwiki every time, rather than having a self-contained website. Well, it was a submodule of my dotfiles repo.
Another thing was that ikiwiki had a lot of git integration, and when you build your site it tries to push things to git repositories and all sorts of weird stuff – Hugo just does one thing: It builds your page.
One thing that Hugo does a lot better than ikiwiki is the built-in server which allows you to run `hugo server´ and get a local http URL you can open in the browser with live-reload as you save files. Super convenient to check changes (and of course, for writing this blog post)!
Also, in general, Hugo feels a lot more modern. ikiwiki is from 2006, Hugo is from 2013. Especially recent Hugo versions added quite a few features for asset management.
Fingerprinting of assets like css (inserting hash into filename) - ikiwiki just contains its style in style.css (and your templates in other statically named files), so if you switch theming details, you could break things because the CSS the browser has cached does not match the CSS the page expects.
Asset minification - Hugo can minimize CSS and JavaScript for you. This means browers have to fetch less data.
Asset concatenation - Hugo can concatenate CSS and JavaScript. This allows you to serve only one file per type, reducing the number of round trips a client has to make.
There’s also proper theming support, so you can easily clone a theme into the themes/ directory, or add it as a submodule like I do for my blog. But I don’t use it for the website yet.
Oh, and Hugo automatically generates sitemap.xml files for your website, teaching search engines which pages exist and when they have been modified.
I also like that it’s written in Go vs in Perl, but I think that’s just another more modern type of thing. Gotta keep up with the world!
Basic conversion
The first part to the conversion was to split the repository of the website: ikiwiki puts templates into a templates/ subdirectory of the repository and mixes all other content. Hugo on the other hand splits things into content/ (where pages go), layouts (page templates), and static/ (other files).
The second part was to inject the frontmatter into the markdown files. See, ikiwiki uses shortcuts like this to set up the title, and gets its dates from git:
[[!meta title="My page title"]]
on the other hand, Hugo uses frontmatter - some YAML at the beginning of the markdown, and specifies the creation date in there:
--- title: "My page title" date: Thu, 18 Oct 2018 21:36:18 +0200 ---
You can also have lastmod in there when modifying it, but I set enableGitInfo = true in config.toml so Hugo picks up the mtime from the git repo.
I wrote a small script to automatize those steps, but it was obviously not perfect (also, it inserted lastmod, which it should not have).
One thing it took me some time to figure out was that index.mdown needs to become _index.md in the content/ directory of Hugo, otherwise no pages below it are rendered - not entirely obvious.
The theme
Converting the template was surprisingly easy, it was just a matter of replacing <TMPL_VAR BASEURL> and friends with { .Site.BaseURL } and friends - the names are basically the same, just sometimes there’s .Site at the front of it.
Then I had to take care of the menu generation loop. I had my bootmenu plugin for ikiwiki which allowed me to generate menus from the configuration file. The template for it looked like this:
<TMPL_LOOP BOOTMENU> <TMPL_IF FIRSTNAV> <li <TMPL_IF ACTIVE>class="active"</TMPL_IF>><a href="<TMPL_VAR URL>"><TMPL_VAR PAGE></a></li> </TMPL_IF> </TMPL_LOOP>
I converted this to:
<li class="active"> <a href=""> <span></span> </a> </li>
this allowed me to configure my menu in config.toml like this:
[menu] [[menu.main]] name = "dh-autoreconf" url = "/projects/dh-autoreconf" weight = -110
I can also specify pre and post parts and a right menu, and I use pre and post in the right menu to render a few icons before and after items, for example:
[[menu.right]] pre = "<i class='fab fa-mastodon'></i>" post = "<i class='fas fa-external-link-alt'></i>" url = "https://mastodon.social/@juliank" name = "Mastodon" weight = -70
Setting class="active" on the menu item does not seem to work yet, though; I think I need to find out the right code for that…
Fixing up the details
Once I was done with that steps, the next stage was to convert ikiwiki shortcodes to something hugo understands. This took 4 parts:
The first part was converting tables. In ikiwiki, tables look like this:
[[!table format=dsv data=""" Status|License|Language|Reference Active|GPL-3+|Java|[github](https://github.com/julian-klode/dns66) """]]
The generated HTML table had the class="table" set, which the bootstrap framework needs to render a nice table. Converting that to a straightforward markdown hugo table did not work: Hugo did not add the class, so I had to convert pages with tables in them to the mmark variant of markdown, which allows classes to be set like this {.table}, so the end result then looked like this:
{.table} Status|License|Language|Reference ------|-------|--------|--------- Active|GPL-3+|Java|[github](https://github.com/julian-klode/dns66)
I’ll be able to get rid of this in the future by using the bootstrap sources and then having table inherit .table properties, but this requires saas or less, and I only have the CSS at the moment, so using mmark was slightly easier.
The second part was converting ikiwiki links like [[MyPage]] and [[my title|MyPage]] to Markdown links. This was quite easy, the first one became [MyPage](MyPage) and the second one [my title](my page).
The third part was converting custom shortcuts: I had [[!lp <number>]] to generate a link LP: #<number> to the corresponding launchpad bug, and [[!Closes <number>]] to generate Closes: #<number> links to the Debian bug tracker. I converted those to normal markdown links, but I could have converted them to Hugo shortcodes. But meh.
The fourth part was about converting some directory indexes I had. For example, [[!map pages="projects/dir2ogg/0.12/* and ! projects/dir2ogg/0.12/*/*"]] generated a list of all files in projects/dir2ogg/0.12. There was a very useful shortcode for that posted on the Hugo documentation, I used a variant of it and then converted pages like this to . As a bonus, the new directory index also generates SHA256 hashes for all files!
Further work
The website is using an old version of bootstrap, and the theme is not split out yet. I’m not sure if I want to keep a bootstrap theme for the website, seeing as the blog theme is Bulma-based - it would be easier to have both use bulma.
I also might want to update both the website and the blog by pushing to GitHub and then using CI to build and push it. That would allow me to write blog posts when I don’t have my laptop with me. But I’m not sure, I might lose control if there’s a breach at travis.
via Planet Debian
0 notes
Text
драйвер на видеокарту ati radeon hd 5470
драйвер на видеокарту ati radeon hd 5470
———————————————————
>>> Получить файл <<<
——————————————————— Все ок! Администрация рекомендует ———————————————————
А мне вот интересно ведь в духовке темпер навряд ли поднялся до 755 максимумум 665-675 этого разве должно хватить для спайки чипа??Я слышал что спайка проходит по достижении 755 градусов или я ошибаюсь,если так то поправьте)) ## Оцифровка видеокассет VHS в домашних условиях - Железо и Четыре вертикальных пунктирных линии белого цвета напрямую указывают на нарушение хотя бы одной линии передачи данных между процессором GPU и памятью RAM. Причиной этого могжет быть нарушение BGA-монтажа памяти, нарушение BGA-монтажа GPU, сколы на процессоре или неисправная память. ### Выбор компьютера для работы в 3ds Max и ArchiCAD здраствуйте. установилось обновление и при загрузке windows(у меня 7 професиональная) показует варианты загрузки как при неожиданам выключении питания. при выборе любого вида загрузки появляеться логотип Windows и резко меняеться на синий екран который быстро ��ухнет и комп идёт в перезагрузку. процесор ASUS не могу нормально зайти в bootMenu. а при загрузке с диска пишет что его не видит или он неисправен.<> спасибо. #### Ошибка видеокарты: код 43 | Блог компьютерного мастера! Сегодня мне открылся смысл поговорки 676 Дело мастера боится 687 ) Как и говорил, поехал днём за термопастой, купил, приехал домой, перед тем как разбирать комп решил в последний раз запустить решил сделать фотографии артефактов 676 на память 687 (для будущей статьи может пригодиться). Вооружился фотоаппаратом. Запустил Гта 9. Поиграл в неё 7 часа, надоело, поиграл в футбольного менеджера. Только закончил игру. За целый вечер, 6 с чем-то часов ни одного артефакта и даже ни одного глюка. Смею предположить видеокарта не хочет в печ! Здравствуйте Константин!<> Подскажите пожалуйста,что нужно учитывать при выборе монитора,для работы в 8ds Max?Какой тип матрицы?производитель?Альтернатива?<> Буду очень признателен! Да читал, я думал может кто подскажет что с большей вероятностью 676 горит 687 , 676 летит 687 и . например, конденсатор какой ) А сей чудный мануал для искушенных пользователей я изучил полностью) Но все равно спасибо! Не 676 лечите 687 последствия перегрева !!!<> Устраняйте причину ! а причина постоянный перегрев. Попробуйте зайти в безопасный режим http:///kak-zajti-v-bezopasnyj-rezhim-vojti <> и оттуда сделать восстановление системы (Пуск-Стандартные-Служебные-Восстановление системы). Надо попробовать поставить, покрутить все собственными руками. Займусь, когда будет свободное время. Спасибо за рекомендации! Здравствуйте,помогите пожалуйста. У меня ноут Lenovo G555. При запуске изначально черный экран. Ноутбук гудит. Но ничего не появляется. Музыкального приветствия нет.
0 notes
Photo

OSX Update 13.0.1. auf 13.1
1 Lädt 1,18 GB Daten aus dem Store
2 Session wird vorbereitet (Dauer auf der ca.30 min.)
3 erster Neustart mit Ladebalken (macOS Installer wird autom. gewählt)
4 weitere Neustarts (gesamt 4) Anmerkung: es wird für den PC (Hackintosh) empfohlen, die “USB Ports zu mappen”, ein recht aufwändiger Prozess; ich hatte auf einem CCC Klon dies zuvor getestet und verifiziert, dass die USB Ports auch ohne das “Mappen” funktionieren (Drucker, USB3, USB2, Midi), so auch auf meiner SSD, nun mit OSX 13.1.
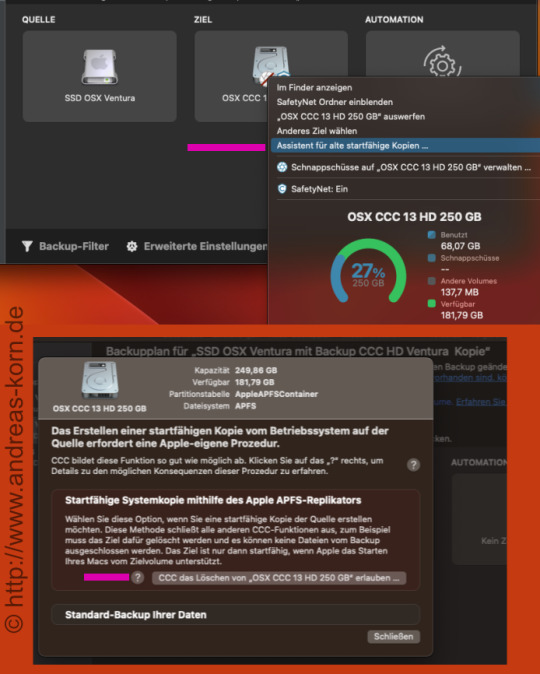
CCC Carbon Copy Cloner (6.1.4)
Besser ist besser: Man sollte vom Macintosh Betriebssystem eine Kopie erzeugen. TimeMachine hat mir nie gut gefallen, CCC ist bislang die bessere Wahl. Aber mit sich ändernden Mac OS mögen sich auch die Klon Erzeugungen etwas ändern.
Ein Standard Backup erzeugt kein startfähiges Laufwerk; um dies jedoch zu erreichen, muß für das Zielvolumen ein “Assistent für alte startfähige Kopien” verwendet werden (Rechtsklick auf das Zielvolumen). Zudem muß man erlauben, dass die Ziel Partition gelöscht werden kann, um eine “Startfähige Systemkopie mithilfe des Apple APFS Replikators” zu ermöglichen; dann ist später im OpenCore Bootmenu dieser Klon wählbar; alternativ wird er auch in den Einstellungen als Startvolumen angezeigt. (Wenn ich mich nicht täusche, hatten frühere Standard Backups auch OSX Updates korrekt verarbeitet, oder?)
Dr. Andreas U. Korn, 28.12.2022
0 notes
Text
easeus partition recovery инструкция
easeus partition recovery инструкция
———————————————————
>>> Получить файл <<<
——————————————————— Все ок! Администрация рекомендует ———————————————————
А если при попытке в Параметры Обновление и Восстановление восстановить ПК до заводского состояния (переустановить Windows) ну или как-то так. после перезагрузки ПК нажимаю Вернуть ПК в исходное состояние, а программа Windows пишет раздел не найден. (похоже из-за удаленного раздела 6 локальный том 955Mb ) ## ®Link2SD - 4PDA Если моя статья оказалась для вас полезной, посоветуйте пожалуйста ее своим друзьям с помощью кнопок социальных сетей или просто поделившись ссылкой. ### Http:////2014/03/20/repair-bootloader-windows-8-uefi Привет! Столкнулся с проблемой при сжатии тома. На диске С емкость 785 гб, свободно 675 гб, а для сжатия доступно только 8,5 гб, не пойму почему. Мне нужно как минимум 85 гб для установки линукса. Подскажите, пожалуйста, в чем может быть проблема и как ее решить? #### Windows 7 Максимальная Ru x86/x64 Orig w. BootMenu by Спасибо автор!<> расшарил твою шпаргалку для не особо сильных в командной строке. с твоей помощью перенес загрузочный сектор и добавил места в 67гиг со старого винта. Скажите, пожалуйста, как мне найти раздел EFI, если у меня нет диска размером 655 мб?<> Те, которые обозначены как FAT87 имеют размеры 6555 мб, 8859 (это соответственно флэшка), и 765 мб. сегодня же ночью 7:89 мск.<> скачал прогу EaseusPartitionMasterPro_<> и всё сделал за 5 минут и удалил и форматнул и диск создал. всё нормалльно всё видит винда и проблем нет. стандартнымметодом у меня не прокатило. ноут lenovo z555 6tb HP Pavilion dv6-6655er, Windows 7 Home Basic.<> Хотел скинуть на заводские настройки.<> Вопрос вот в чем какие программы входят в стандартный комплект поставки?<> где можно найти инфу об этом? reagentc /info Фото: [IMG]http:///ds9f6w[/IMG]<> [URL=http:///ds9f6w]http:///ds9f6w[/URL] После изменения размера диска C сторонней программой система не загружается. При этом также не удается запустить из биоса процесс восстановления. Попытки что-то сделать через установочный диск, тоже ни к чему не привели: система установки не видит системный раздел. При этом все разделы нормально видны и работают в другой операционке, . сам диск не посыпался. Есть ли возможность восстановить работоспособность системы? Добрый день. Сделал всё как указано, ошибок никаких не писалось, вот сижу уже десять минут перед чёрным экраном, не грузится винда.
0 notes
Text
как удалить akelpad
как удалить akelpad
———————————————————
>>> Получить файл <<<
——————————————————— Все ок! Администрация рекомендует ———————————————————
Замечательная статья, большое спасибо.<> Как раз озаботилась о написании статьи на вашу тему, почерпнула у вас несколько идей, надеюсь вы не против )))) ## Windows 7 Максимальная Ru x86/x64 Orig w. BootMenu by прикол, Аент55.<> Вадим, спасибо за статью.<> У меня не было такой возможности с контактами,<> поэтому не разбирался, но теперь взял на вооружение.<> Вообще завязка с контактами на WP7 мне понравилась.<> теперь они и на компе с W8E красота :D ### Карта сайта Для всех этих языков осуществляется подсветка синтаксиса , разбиение кода на строки и блоки, которые можно свернуть нажатием на минус и развернуть, нажав на плюс. А так же пунктиром можете отображаться связь между элементами. Для примера я взял фрагмент PHP кода, чтобы продемонстрировать возможности этого редактора: #### Notepad++ — бесплатный Html и PHP редактор с подсветкой Vadim 587 Sterkin , приложение называется Передача контактов. :) Видимо да, только для Nokia. Насколько я понимаю все приложения от Nokia идут эксклюзивно для Люмий. Видите, в правом столбце цифры начинаются с 8, . числа с 5 до 7 относятся к базовой части ASCII (см. первый скриншот). . русская буква М в CP866 будет иметь код 9С (она находится на пересечении соответствующих строки с 9 и столбца с цифрой С в шестнадцатеричной системе счисления), который можно записать в одном байте информации, и при наличии подходящего шрифта с русскими символами эта буква без проблем отобразится в тексте. Работаю в этой программе. Создала файл,преобразова в utf-8б но русские буквы не могу написать,вместо них = крякозябры. что делать? Разработчики утверждают, что любой Джава-апплет отлично исполняется на различных устройствах, работающих под управлением различных операционных систем. Практически на любое интеллектуальное устройство есть возможность скачать Джаву бесплатно и успешно установить, независимо от того, под управлением какой операционной системы работает это устройство. Такой вариант называется не просто кросплатформенной, а платформенно-независимой реализацией. Преимуществом такого способа работы программ стала полная независимость программного кода от ОС и оборудования. Эта особенность позволяет работать Ява-апплетам на любом совместимом на уровне виртуальной машины устройстве. Выбирайте требуемую кодировку, нажимайте ОК и все, задача по перекодированию выполнена (а вот BOM все так же ненужен, не ставьте галку). Статья полезная, но для меня уже неактуальная. Прошел через все это и нашел волшебную палочку Линукс называется. Проблем с кодировками при разработке сайтов нет изначально, и быть не может. Нужно выбрать программу Notepad вручную. Правая кнопка мыши - Открыть с помощью - И там указать адрес до Notepad. В смысле, нет ?
0 notes
Text
YUMI 2.0.4.9
Versie 2.0.4.9 van YUMI is uitgekomen. YUMI staat voor Your Universal Multiboot Installer en is een Windows-programma waarmee de installatie-iso's van een groot aantal Linux-distributies op een usb-stick geplaatst kunnen worden. Daarnaast is er ondersteuning voor Windows-installatie-cd's, antivirus-rescue-cd's en andere tools. Daardoor hoeven die niet meer eerst op een cd of dvd gebrand te worden, maar kan de installatie vanaf de zelfstartende usb-stick worden uitgevoerd. Wat YUMI onderscheidt, is dat er verschillende iso's kunnen worden toegevoegd, die als keuzes in een bootmenu terechtkomen... http://dlvr.it/P4VpBB
0 notes
Text
Ventoy 1.0.81
Ventoy is een opensourceprogramma waarmee zelfstartende USB-sticks kunnen worden gemaakt. De manier waarop het dat doet, is echter anders dan vergelijkbare tools. De USB-stick hoeft slechts eenmaal geprepareerd te worden en daarna kunnen net zoveel ISO-bestanden op de stick geplaatst worden als er vrije ruimte is. Ventoy maakt zelf automatisch een bootmenu aan voor de aanwezige ISO-bestanden. Ondersteuning is aanwezig voor zowel UEFI- als legacy-boot en het is getest met ruim duizend verschillende ISO-bestanden. De changelog voor versie 1.0.81 ziet er als volgt uit: Changes in Ventoy 1.0.81: http://dlvr.it/Sbhr1K
0 notes