#but all it does is stabilize it long enough for you to sew seams
Text
@lafseanchai replied to your post:
Why did you obtain this lore?
I knitted a scarf/shawl thing that’s intended to be a gift for my very-soon-to-be-sister-in-law out of an acrylic blend, and I was really frustrated with the way it wouldn’t lie flat, so I googled whether you can block acrylic, and the consensus seems to be that you can’t really block it per se but you *can* murder it!
so i did that.
#it's not something that you want to do with any kind of structured garment#because you really want that stretch/elasticity#but it was *perfect* for this where i just wanted it to lie flat and drape nicely#unfortunately i don't have a before picture so i can't show you how dramatic the transformation was#but it was very cool#(also yes technically you can block acrylic#but all it does is stabilize it long enough for you to sew seams#you don't get any kind of permanent shaping like you do with natural fibers)
12 notes
·
View notes
Text
I seam ripped an entire skirt apart and re-sewed it entirely by hand, all in a day, and now my hands are ouchy

Yeah, this^ fucker
So I made this skirt around March of 2021. It's pretty and swishy and I get lots of compliments when I wear it in the office.
But it was one of the first items of clothing I had ever sewn and I had No Flipping Clue what I was doing at the time. And now that I have had 1.5 years of experience in hand sewing and making my own clothing, I cringe every time I look closely at this skirt. Let me count the ways this skirt was a mess:
The pockets were too small. Yes, I thought to add pockets to the side seams. No, I did not take into account the fact that the opening for the pocket has to be wide enough to fit not only my phone (which it does...barely) but also the width of my hand (which it just barely does if I really struggle to get my hand through it).
It's a circle skirt cut from a quilting cotton fabric. Which is woven. And because I was a noob to sewing, I didn't realize that you're supposed to hang up garments that are cut on the bias (which circle skirts are) to let the bias edges stretch out before you hem them. So for the past year, the hem of this skirt has been 2 inches longer in the front and back than at the side seams. Which looks silly and is really hard to unsee whenever I look at it.
Also, because it's a circle skirt, the waist line is also cut on the bias. Which stretches. Which I didn't realize when I was making the skirt and trying it on. So when I oh so cleverly calculated the diameter that I needed for the waist, I didn't account for the fact that the waist would stretch out if I tried it on before attaching the stabilizing waistband. So the waist of the skirt ended up too big. I tried to make up for this by pleating down the extra width. I added 4 pleats to the center back and 2 pleats to the center front. Except I backstitched through the pleats to hold them in place, and didn't bring the waistband down far enough to hide the backstitching. Oh, and the pleats in the front are completely wonky and angled wrong.
Even with the fancy pleating, the waist still ended up being too big, so the skirt always sat awkwardly low on my hips. The misplaced hook and eye keeping it closed didn't help either, since they were overhanging the edge of the waistband, which only made it gape even wider
I don't know how Past Me put that side zipper in, because it was Not how I would have done it now.
I've picked this skirt up a few times over the last year, trying to see if I could find a quick fix for the above issues I had with it. Each time, I would put it back down without doing anything to it. Why? Because I have no fucking clue what Past Me was thinking when she sewed those seams. As far as I could tell, there was a backstitch involved, but then there was another row of backstitching on the seam allowances? Was I trying to flat fell the seams because I hadn't learned how to properly fell yet? Was I trying to do a French seam on a seam where the allowances on either side were supposed to be finished separately because there were pockets inserted? Did I backstitch the seam allowances down before backstitching the main seam? It made no sense and I concluded that I would have to take the whole thing apart and do it again properly for this skirt to meet the standards I have today.
So yeah, this morning I took a deep breath, sucked it up, and seam ripped the entire thing and pressed out the creases until I had the original pieces back. And then I chopped off the extra-long biased hem and proceeded to hand stitch the skirt back together, correctly. And then felled the seam allowances down, correctly. And reattached the zipper and hook and eye, correctly. And redid the pleats to make the waist actually fit me, and moved all the pleats to the back because the front ones looked stupid. And then I put in a 1/4 inch double folded hem at the bottom because the original hem was 1 inch wide and I have no idea why Past Me did that. I also ripped off the tiny pockets and am planning to make some giant pockets, but I didn't get around to doing that today because all those alterations took me all day to sew.
The end result doesn't look all that different from the before photo, but I'm much happier with it, and I'll be even happier when I put in the giant pockets.
Anyways, my hands are ouchy.
#tricia sews (kind of)#sewing#hand sewing#i sew exclusively by hand because i don't own a sewing machine or know how to use one#i distinctly remember this skirt taking several days to make the first time around#and i took it apart and put it all back together in 12 hours#is this the hand sewing equivalent of the dress in a day challenge?#because my hands are cramping and I'm never doing this again
21 notes
·
View notes
Text
Tips for Easy Jacket Back Needlework for PATCH DESIGNER
Master 2 necessary variables-- hooping as well as positioning-- for much less complicated, gratifying sewouts.
It's that time of year once again. The environment is obtaining cooler, the dropped leaves are modifying colors and likewise individuals are attracting jackets out of storage rooms. As an embroiderer, why not benefit the possibility to market even more embellished things in this apparel group?
Coats as well as coats can be terrific moneymakers. They are much more pricey as well as supply themselves to higher margins. In addition, if a client desires a large style on the back, you can obtain optimal manufacturing from your equipment, which suggests optimum income if you are a PATCH CREATOR.
I made use of to dislike doing big formats on coats. They are harder to hoop as well as also the huge designs take a long time to run; I utilized to think such styles were eating my maker time. I ultimately understood my thinking was incorrect. Yes, the coat was on the equipment for a long time, nevertheless the layout still was producing cash for me-- and additionally at a better price than a great deal of my left-chest logo layout sewouts.
Let's say I'm running a 5,000-stitch logo on golf shirt. I can get perhaps eight runs an hour. If I'm charging $1 per thousand stitches, that's $40 a hr (per head). On the other hand, if I have a 60,000-stitch style, it is mosting likely to take a human resources as well as 20 minutes to sew. Nonetheless, I'm obtaining $60 for the layer back format. That exercises to $45 per hour and also I truly did not require to function as hard. I might sit back and likewise relax as well as likewise the enable the maker do the benefit a hr approximately. This remains in addition to the reality that there normally is far more revenue margin in the markup of layers as a result of their high cost factor.
Since it's evident that coats can be as rewarding-- otherwise a whole lot much more so-- than the "typical" things most embroiderers stitch, allow's take a look at the challenges of managing layers. First of all, there are various coat ranges. From wind breakers and additionally warm-ups to Varsity jackets as well as workwear, they are available in all products as well as additionally thicknesses. Some are shiny, tough, thick and also slim-- and afterwards, certainly, there's all-natural leather. Learning to take care of all the variants takes a while along with technique, yet there are some principles you can follow-- despite the kind of layer you are dealing with-- that will definitely aid guarantee success.
MAINTAINING AND HOOPING
Prior to beginning any kind of kind of task, it is required to choose the appropriate stabilizer. The good news is, the selections are simple when it comes to coats. For light-weight layers, like wind breakers and likewise different other nylon layers, a sheet of tearaway stabilizer require to be enough. For thicker layers, little or no stabilizer whatsoever is needed.
When making your option, remember that the secret is just how much an item stretches. Thick layers have little stretch and so much mobile lining that consisting of one more layer of something is not absolutely helping anything. If you stress over distortion, toss a thing of tearaway stabilizer behind it which will certainly be more than adequate. The only time an exploded view stabilizer is required is when you're stitching stretchy weaved layers.
Hooping coats, specifically thick ones, constantly is a barrier. They are larger than a normal-size garment. Frequently, embroiderers do not have a theme for the mounting board to fit the back hoop measurement and likewise there are extremely couple of suggestions for you to know whether the layer is hooped right.
If you sew a lot of coats, it pays to purchase or make a mounting theme for your framework board, or have a table that appropriates for hooping these bigger items. It does not have to be expensive; I utilize a traditional workdesk. I find it is the perfect dimension for the layer and also it similarly allows me to use more descending pressure as I try to push thick jackets right into a hoop.
LINING IT UP
The point of using a hooping device is to help in getting points aligned frequently from product to piece. Coats can be a little tough when it worries alignment, particularly when they do not have numerous marks or joints. Facility joints produce very easy alignment, as well as likewise lots of coats have a seam up around the shoulders, that makes a fantastic, straight line to referral. Simply ensure the design stays listed below that shoulder joint for proper placement.
If there are no joints or numerous other reference marks, start by noting where you desire the facility of the style to be. Positioning guides state to place the layout 7-10 inches listed below the neck. This depends upon the measurement of the design along with the style of the layer.
You frequently can reference the sleeves and also lowest level of the layer, too. Line up the clips on the hoop with the sleeves to aid straighten out the layout. Afterwards, to guarantee straightness, step from each side of the hoop to the bottom of the coat to guarantee it is even. I make use of the tab on the hoop where the steel clips are screwed on for the referral point on each side of the hoop.<br>
PUSHING THINGS IN
Hooping a slim layer isn't really a big deal. Thick coats, nevertheless, are one more story. Relying on its density, there are different strategies you can utilize to obtain the coat onto the embroidery machine, as well as additionally there are some standard and also not-so-conventional methods for attaining this.
A great deal of coats you sew will definitely fit in a hoop; they just require a great deal of initiative along with strength to do so. In these instances, you can attempt to loosen up the adjusting screw greater than what need to be required to hold the coat prior to hooping. When the product is hooped, just tighten up the screw.
Normally, it is not suggested to utilize tools to aid in tightening up the screw-- yet I make an exemption in the case of thick, durable products like substantial coats. It sometimes calls for a lot more make use of than can simply be created by even the best of fingers. A collection of pliers (or screwdriver, depending upon your changing screw) might remain in order.
Most of the moment, jackets should be hooped inverted because of the reality that the midsection has a larger opening than the neck. That suggests less product will certainly be accumulated in the back, and also it makes the coat much less complicated to jump on and additionally off the maker. It additionally is a lot less most likely to catch on something or push the hoop off the gadget.
There are numerous hoops on the market with countless credit to assist with these problems. Allied's Grid-Lock collection consists of a really prolonged readjusting screw that enables the hoop to open broader. These hoops also consist of grid lines to assist with positioning.
When pushing the internal ring into the hoop, begin with one side and also afterwards the various other rather than trying to press the whole hoop in entirely. This "heel-to-toe" method helps for take advantage of as well as additionally to line things up. Let's state I'm making use of the top-shoulder joint as a mark. I can line up and likewise establish that side of the hoop at first, after that press in the bottom side.
Another alternative is to use a larger-than-necessary hoop. I understand this breaks the conventional wisdom that states to make use of the smallest-possible hoop, but in some cases it is almost hard to acquire a thick coat right into hoop of a smaller sized dimension. The additional location in a larger hoop makes this possible. This periodically holds true, especially with smaller positionings.
The hoop popping apart is one of the most disheartening things that can occur when managing thick coats. This normally occurs right after you get it hooped and additionally are relocate to the equipment. Also even worse is when it occurs while embroidery. To ease this trouble, I utilize plastic springtime clamps around the beyond the hoop. You need to take care to guarantee they do not strike anything, yet that they assist maintain the hoop with each other while sewing.
Whatever you do, some layers simply will certainly not fit in a hoop. Do not stress and anxiety. There are suggests to obtain points onto the needlework tools that aren't in a hoop. For newbies, when utilizing a regular hoop in addition to glue stabilizer, you can stick the product into the hoop. To do this, hoop the stabilizer with the peel-away paper still on it. Once it is hooped, score the paper to in addition to peel it away. Put the hoop onto the machine and afterwards align the layer over it. It is a good concept to utilize basting stitches at the start of the style to better safe it to the stabilizer. Basting stitches are absolutely lengthy (9mm-10mm) running stitches around the beyond the style that can be utilized to tack it down prior to the needlework begins. The size makes them simple to get rid of as quickly as the style is completed.
This coincides concept as the Fast Frames and the EMS HoopTech Quick Change structures use. These supply a less complex methods to get the coat onto the maker in contrast to hooping absolutely thick points.
Nevertheless, there are a few disadvantages to utilizing this approach. First is the placement. Because the hoop is on the within, there is no aesthetic recommendation that will definitely recommend whether it is straight. Second, the layer's cellular lining will certainly stick, leaving the external layer to move. To overcome this, I connect the plastic spring protects around the outside of the hoop to hold things together.
You can currently actually excitedly expect the cooler weather and also the subsequent layer orders you will certainly get this period. They might need a little a lot more job, but the repayment is absolutely worth it. You can loosen up in addition to value the appealing autumn leaves while your manufacturer winds up those long, profitable jacket back runs.
1 note
·
View note
Text
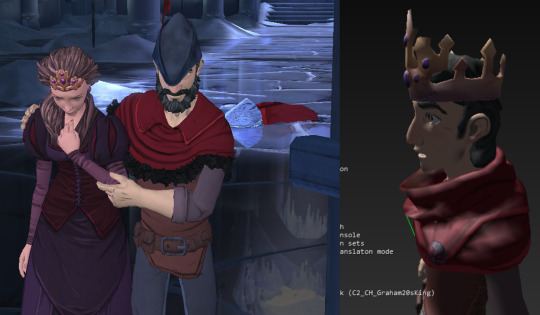
So you wanna be a king
Or perhaps just cosplay one.
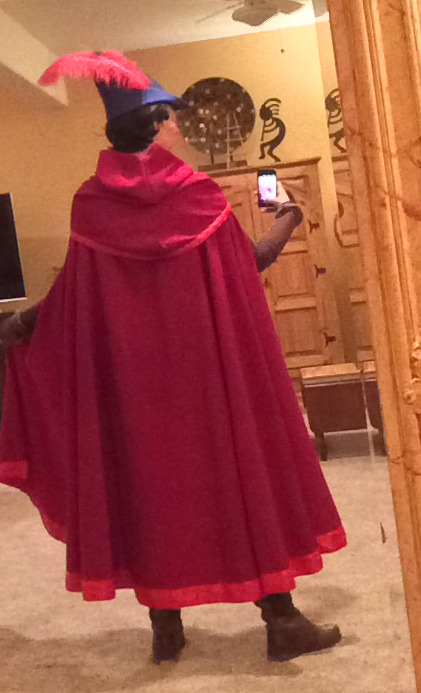
By request, here’s how I, at least, put together my King Graham outfit.

Part 1: Cloak and Cowl
Disclaimer: I’m totally novice at cosplay and only do it for like one event per year if that, so take what you will or throw it all away.
Also I made this like three years ago, so the details get sorta hazy.
Step one: Research. The best part. Take lots of screencaps of Graham from every angle. Hoard the pictures in your phone like a dragon. Stare at them. They’re lovely. He’s lovely.
Ready to commit to this? It’s mildly expensive and Mostly Time Consuming. But that outfit looks so neat...and I love him...okay. Still good?

Let’s do this.
Let’s start with the cloak and the cowl. The bit that everyone notices first, the dramatic part that snaps behind you when you walk and makes 2015 Graham stand apart from his 1980s days (...other than also not wearing pink anymore).

The best part other than the hat, really.
By the game’s own proof, the cowl and cloak are separate pieces. Which makes your life easier.
I chose a springy red fabric from Joann’s called bengaline. It stretches one way, not both, and it’s delightfully weighted so it snaps and catches the wind in pleasing ways--the effect when walking is almost as bouncy as the video game version. Should you choose the same, know that bengaline is primarily plastic and cannot be ironed (seriously, don’t)--steam it or get it wet and let it air dry to remove wrinkles. Check it out here: https://www.joann.com/sew-classics-bengaline-suiting/xprd757777.html
Bengaline does not feel heavy when you pick it up in the store. It becomes heavy as you wear it. Your shoulders might revolt. Feel free to pick something lighter, cheaper, or whatever is available in the shade of red you love most, but remember that the lighter the fabric weight, the happier you’ll be. Please do not pick velvet. A day at con reveals all truths. Be aware of what you’re putting your shoulders through.
For your reference, according to the receipt I found I apparently bought 6 yards of it (with a half off coupon). This is overkill. You probably don’t need 6 yards. I think I have a ton of it left over and smooshed into deep storage. But then again, it’s red and red is always useful in cosplay, so it doesn’t hurt to have leftovers.
Why reinvent the wheel? I used this tutorial here for the base cloak: https://dangerous-ladies.tumblr.com/post/41564161303/so-you-wanna-wear-a-cape-god-this-new
yes you want a circle cape, not a square cape. circle capes catch the wind better. you’ll be able to tell the difference, i promise.

Side note: you might think you want your cloak to touch your ankles. It looks like Graham’s does. You do not want this. When it scrapes the ground at comic con or renfest, it will get filthy, it will shred, and people (especially you) will step on the back of it. It might even get eaten by an escalator at con. Go up an inch or two--a little goes a long way. It’ll still look great, and you won’t choke.

plus depending on how you stand no one can tell anyway.
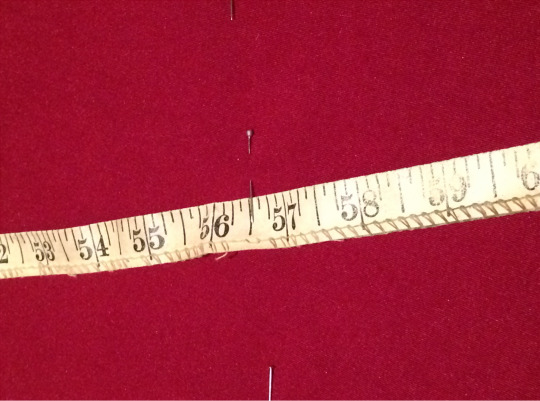
Now, for my numbers:
I am 5′6″. I chose 56.5″ (that includes my hem allowance) so that the cloak itself actually ‘swings’ at 55.5″. I copied the tutorial’s neck hole exactly (6″ ‘swing’).
Follow the tutorial’s instructions for the rolled hem. Pin everything. You will hate pins. You may bleed. Doesn’t matter. The cosplay gods are cruel. Keep pinning. If you picked bengaline like I did do not iron it just suffer in silence. Go slowly and carefully, and fight the curve to be as flat as you can.
Time to sew! Put on Game Grump’s King’s Quest 5 LP because it’s the best, and go slowly around your circle at the default sewing machine stitch.
I don’t recommend hand stitching. There is too much fabric and you want to have some sort of life at the end of this. Check with your local public library or that weird relative you forgot about if you don’t have a machine yourself.
Cool, that’s a cloak! Admire it, it’s lovely. I mean, you don’t have a way to wear it yet, but you’re maybe 68% done here so, that’s great!
Cowl time!
I don’t have reference images for what I did three years ago, and there are probably better ways to do this. Feel free to experiment, but here’s how I (probably?) did it:
Measure around your arms and upper chest approximately where the cowl will lay, and make sure you give yourself extra inches so you can still move comfortably. For me, that’s around 48-50″ around. I don’t remember what motivated my number selection for the neck part--it must be wide enough to go around your head, plus room to play with it to make it lie in fun ways like Graham’s. Apparently I picked 28″.
Play with scrap fabric, or if you have lots of extra red feel free to make extra sizes. My cowl looks like this:
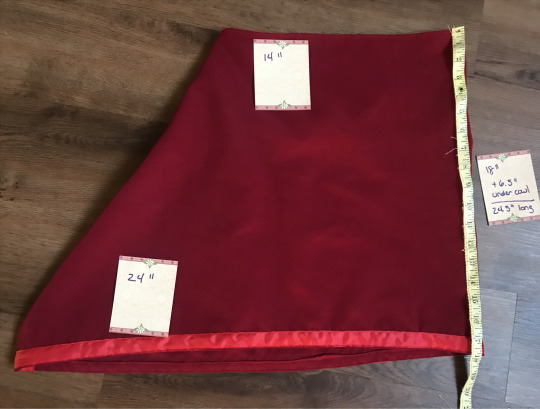
That’s 14″ along the neck, 24″ along the body, and a length of 18″--but with a secret 6.5″ tucked inside the cowl itself, so the fabric really is 24.5″ long.
Why would I do that?
To tuck the cowl into the jerkin/undershirt collar and make it look seamless, like a video game character.

Ain’t no sight of tunic around that neck.
Also, the extra fabric gives it more stability and strength, allowing you to play with the collar and get that high edge he has rather than flat fabric. I’d even considered stringing a wire through it in early days, but if you use bengaline the fabric is sturdy enough on its own. Your fabric selection may act differently.
So, I’ve “hidden” 6.5″ worth of fabric in the collar. What would that look like as a pattern? I don’t remember for certain since I didn’t write it down but it probably looked like this:
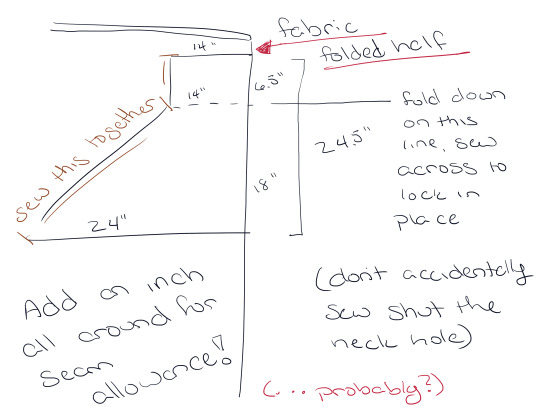
okay maybe like half an inch seam allowance. an inch is probably overkill. don’t be me.
Since I didn’t want the thickness of a real hem, I did, like, a herringbone stitch (looks like zigzaging triangles) along the part that gets tucked in to the shirt to prevent any fraying, and then I folded it at the dotted line and sewed it in place to get a permanent line.
Unfolded, it looks like this:
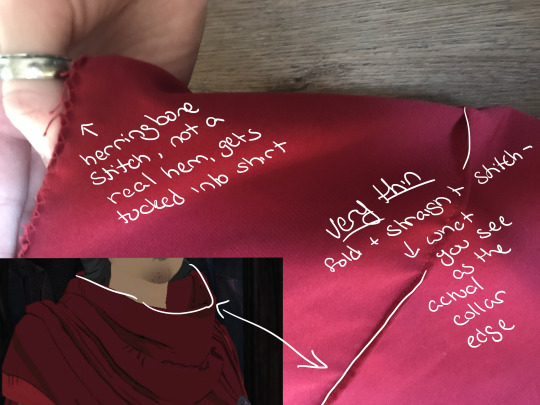
In practice, it looks like this:

From the back, it ends up looking a little something like-a this:
Cool, cloak and cowl! You still don’t have a way to wear it, but the pieces are nice. Maybe unfinished and kinda boring, though, since Graham’s King Cloak is Such Luxury.

I mean, it’s fine that way. But it feels unfinished if you’re doing Prologue or Ch2 Graham.
Trimming time~.
I bought one 1″ wide red satin trim roll, and two 2 ¼” red satin trim rolls. Pin the wider trim all along the INNER bottom hem of your cloak (the side with the rolled hem on it), sew slowly. Get your second fresh roll so you don’t run out midway, and do the same on the EXTERIOR. This way, any wonky uneven lines are hidden on the inside and less noticeable.
Nice rule of thumb for cosplay I’ve learned: if you can’t see a mistake from 5 feet away, no one can. Don’t panic.
Do not sew both sides at the same time. It’s tempting, but hard enough to sew around a curve already without trying to keep both sides remotely even. To finish, I folded the long ends over, matched the hem with the cloak, and went for it.
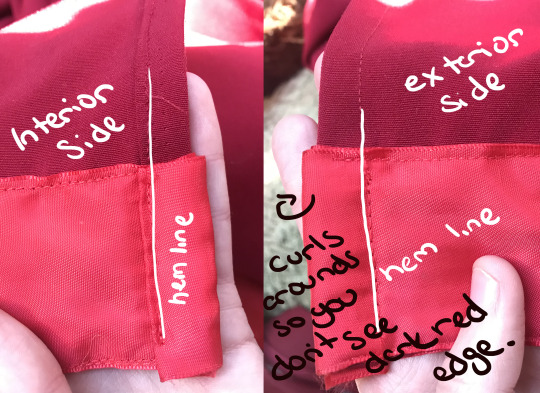
And do the same to the bottom of the cowl with your thinner trim--you only have to do the exterior since no one can see the interior of that piece, so it’s much easier.
Cool! You’re done! You’ve got a cloak and cowl, trimmed and gorgeous.
“But Gerbil,” I hear you complain, “I still can’t wear it! It doesn’t have any attachment to me, even though I have lots of attachment to it since I just dumped like a hundred hours and at least $50 into it.”
Fair enough.
If you used bengaline like me, you’ll discover very quickly that it’s heavy heavy heavy. It’s gorgeous and thick and looks great, but the weight. Sure, it didn’t feel heavy when you bought it, when you sewed with it, when you first put it on. But it’s hour six of wearing it, and your shoulders hate you. If it hangs off your neck like you would assume a cloak should, you will choke. It hurts. The weight must sit on your shoulders.
Luckily, this costume has two separate pieces, and the cowl is going to hide where it hooks to you.
You’re going to buy two snap clips. The big ones. Like, at least an inch. You’re going to pick out an anchor t-shirt from Goodwill. It literally doesn’t matter what it looks like, but it’s going to be one size too small and will go up to your neck. You need it to be totally comfortable to wear (the more breathable the better--this is a hot cosplay), but tight enough that it will not shift under the weight of your cloak movement, thus the smaller size. Sew the snaps to the inside of the cloak and just above your collar bone on the shirt.
(apparently Superman wears it like this too, go figure)

(you might want to wait to sew the snaps on until your jerkin/tunic is finished before you sew the snaps to your anchor shirt, so you can be sure the collars match up--you need to have room for the snaps to sit on the anchor shirt, but still sit under your tunic)
(if you think of a better solution, have at, but please, do not tie it around your neck regardless of the type of material you bought. If anyone steps on the back, yourself included, and it’s attached by your neck, you’re out for the day. Do not.)
(also, one more pitch for the snaps--say your cloak does get caught on something. a wandering dragon, a passing knight’s sword, or ye olde con escalator. if it’s attached by snaps, not ties, it’ll pop right off with enough force, leaving you unharmed, but the snaps are heavy duty enough to stay put all weekend or multiple years without trouble)
And you’re done. That’s a cloak and cowl fine enough for a king, friend. Or at least fine enough for comic con.
A note on the out and about: you’re probably going to feel worn out after a few hours at con. Take frequent sitting breaks. After a few times wearing it you’ll get used to it and can fly around in it all weekend without trouble, but the first few times add unexpected strain to your neck and shoulders so take it a little easier.
Also, high key recommend handwashing the cloak (yes, the whole thing, it smooshes down well in water, I promise, it’s doable, just difficult) in your (clean!) bathroom sink with handwashing detergent, and laying it out to dry on towels. I wouldn’t trust the satin trim to hold up to a machine, but it withstands sink washing just fine.
(Was that useful? Was that atrocious? Do you want more pieces how-to’d? Do you want a full How-To-Graham Tutorial? Let me know, happy to ramble more!)

#King's Quest#kings quest#King Graham#cosplay#maxwelljacks#i really don't actually know if this is helpful or a disaster but since you've asked#i can't say no to helping#feel free to ask me for details#tutorial
22 notes
·
View notes
Text
Discover The Different Ways To Sew Stretchy Fabric
By Frank Robinson
Stretch fabrics are synthetic types of cloth that stretches. These are categorized as two and four way stretches. The 4 ways cloths like spandex can be stretched in two different directions lengthwise and crosswise. These types of materials have been simplified for the construction for clothing. This was used first on womens bras and swimsuits. The materials have been adapted to many decorative and artistic purposes. When it comes with 4 way stretch fabric, individuals can create and make the designs and styles by sewing their own garments.
Sewing a four way fabric is not easy. There are many factors that have to be considered before sewing one. Follow the right procedure and the right techniques to have a successful project. Use the ballpoint needles for knits that are loosely woven. Ballpoint needles have a round tips that will go right inside the linens rather than piercing it. This will be less worry especially when damaging the fabric.
With all the different cloths being sold around the world, this specific type has been praised by many customers. These are commonly used in sportswear, swimwear and womens garments. With their excellent fashion sense and scalability, it had entered the world of fashion and has been one of the most preferred clothing in the industry.
For people who love the outdoors like going to beaches, in pools and just hanging around or doing sports, it is imperative to wears loose clothes. It would be tired for individuals doing their beloved sports by wearing fit clothing which restricts their movements. For people to have the best times of their lives, the new product was invented.
To prevent the linen from stretching too much, put a stabilizer under the shoulder seams. When you use the stretchy linens on top, the weight of it will lead to stretched out sleeves and shoulder seams. This can be avoidable by sewing a non stretchable and stabilizing cloth right into the seams on the shoulders.
Latex or rubber is being made from the sap of a rubber tree. Rubber could be used to generate clothes but not the everyday types. The problem is that latex is difficult to wear and also to create or sew. However, their stretch ability and resistance to water make sit desirable for some items and stuffs. Never dry clean the rubber types because it might damage the cloths.
Hold the fabrics gently to minimize the pulling when starting to sew. The fabric can easily stretched out and reach far beyond its capacity. It is vital to avoid pulling it when sewing it. Hold it until it becomes flat but not stretched out. Allow the machines dogs feed to move under it.
Individuals must do research first before wearing a garment. It is important to gather as much information as possible before making a decision. Its crucial to know what kind of benefits does a particular style. There are many factors to take into consideration. Learn everything as you can before purchasing one.
Price will not matter as long as the product can offer comfort. Most people will not value the money because clothing is part of life. It is a necessity and finding the right one is easy enough if you know where to find it.
About the Author:
When you are searching for information about 4 way stretch fabric, come to our web pages online today. More details are available at http://bit.ly/2wbgH4z now.
Discover The Different Ways To Sew Stretchy Fabric
from FreeBestsOf http://bit.ly/2FPnV2G
0 notes
Text
Journey Luggage
For many significantly less frequent travellers consideration about what their bag is created of is frequently less of a problem than e.g. a person who travels usually more than medium to extended distances. Folks who journey lengthy distances e.g. utilizing airports are typically much more likely to take into account top quality and durability of components as well as design in their decision of bag / baggage. This variety of traveller could also be significantly less price tag-sensitive and more proactive when it arrives to buying their baggage.
Nylon Travel Luggage
Given that Wallace Carothers of DuPont reportedly invented nylon in the late nineteen thirties, its numerous rewards and likely purposes have meant that it and other male-produced polymers and supplies have been utilized in virtually each factor of our lives. The truth that it is guy-produced supplies like nylon give great overall flexibility in the designs, dimensions, and colours that can be manufactured from it, and the types, decoration and printing that can be included to it. The uniform chemical and production procedure of nylon and its overall flexibility as a substance means that the finished product can be created quite uniform e.g. in color, thickness, consistency and good quality. Even though a strip of nylon has power because of the way the many good nylon strands match jointly, and due to the fact of a diploma of 'give', it is typically thin enough to make it relatively easy to sew or bond jointly. Generating the sort of nylon materials utilized in travel luggage is usually a massive scale approach and this and some of the aspects currently described suggest that nylon is a relatively inexpensive substance to use in the manufacture of other things e.g. travel bags. This delivers the value of nylon based vacation bags down to level that is comparatively inexpensive to all. Nylon is a versatile material, and fairly resilient as longs as it isn't uncovered to sharp objects, hefty weights and uncomfortable shapes / uncomfortable shaped objects within the nylon vacation baggage. However, reduced quality nylon bags at times never have powerful or high quality zips, seams, straps, handles or pockets, and as this sort of their lifetime can be shortened by the failure of any of these areas, and the reality that it is not likely to be value the price tag of restoring any of them if / when they crack.
Leather Luggage
In conditions of layout the selection of contemporary leather-based travel bag types and functions implies that the option is now incredibly vast. Though the range of colors may normally not be as extensive (or the demand from customers for particular colours might not be as wide) the colors utilised in modern day leather vacation luggage are inclined to engage in tot the strengths of this distinctive material and provide out the best, and the most tasteful aspects of it. Considering that good high quality, thick leather-based hides are ach only huge adequate to make a reasonably modest amount of baggage, each bag is likely to have its own amount of individuality e.g. slight colour distinction and at times 'range marks'. Given that entire grain higher good quality leather actually undergoes nominal processing e.g. hair removing and tanning, the marks / scars produced on the animal's pores and skin in the course of daily life e.g. from wire fencing, insect bites and so on, might nevertheless be just evident in some sections of leather-based. This individuality and authenticity is element of the attractiveness and charm of leather travel luggage.
As a content, leather-based is very robust and resistant to scrapes, scratches and bumps. It also offers an additional diploma of safety for the contents inside the bag that nylon does not. High quality leather-based travel luggage are likely to have extremely sturdy stitching, strong zips which have leather pullers. There also tends to be generous cargo spaces in these baggage, and they have a tendency to have numerous other practical and handy pockets e.g. flap-in excess of pockets with magnetic studs and zipped pockets. Storage pockets for notebook personal computers are now also commonplace in these baggage. The base of large high quality leather-based journey luggage are often guarded with domed metallic studs, the anchor points are usually extra protected, and any straps are typically detachable with convenience pads. uptown refillable leather journal promotional tend to be quite robust with wrap-all around leather-based ease and comfort pads in several instances. Certainly, for good quality of this sort you might expect to pay out more than for their nylon counterparts. Nevertheless, handmade refillable leather journals -based travel luggage have a tendency to be significantly much more sturdy and tough putting on, and over the life time of the bag (which virtually could be a life span) they in fact work out to be comparatively economical. Leather-based vacation luggage also appear to develop the appropriate stability in between type and practicality, and never appear to go out of style.
0 notes
Last Seen Blogs

lovedrugs-dieantwoord-blog
Alle sind im Film aber keiner ist im Kino♥

walrus0-and-the-carpenter
The Walrus' Adventures in Wonderland

carnal-lnstinct
i simp carnally.

chilluaa
0umi

chartedrights
I Am About To Get Really Stupid At Record Speed