#centos sshd_config
Explore tagged Tumblr posts
Visit Tumblr Blog
Explore Tumblr blogs with no restrictions, modern design and the best experience.
Last Seen Tumblr Blogs


Fun Fact
Tumblr Inc. has $15.1M in annual revenue.
Link
4 notes
·
View notes
Text
How To Setup Hadoop SSH Configuration In Linux CentOs
How To Setup Hadoop SSH Configuration In Linux CentOs
Hadoop requires SSH access to manage its nodes, i.e. remote machines plus your local machine if you want to use Hadoop on it (which is what we want to do in this short tutorial). For our single-node setup of Hadoop, we therefore need to configure SSH access to localhost for the hduser user we created in the previous section.
I assume that you have SSH up and running on your machine and configured…
View On WordPress
#centos 7 allow ssh firewall#centos 7 ssh access denied#centos 7 start sshd on boot#centos install ssh server#centos sshd_config#yum install ssh centos 7
0 notes
Text
Cara Masuk Sebagai User Root pada VPS Ubuntu & Debian

masuk akses root , ada beberapa penyedia layanan Virtual server private (VPS) yang masih tidak menginzikan masuk sebagai root karena sebagai pengamana vps kamu seperti Penyedia Google clud Platfrom , Biznet , Idcloudhost , Aws , Azure dll jika kamu tidak mendapatkan akses root maka kamu tidak bisa menjalanakan, auto script installer vps dan installer panel pada vps , karena terdapat keterbatasan izin pada akses untuk mengayasi kamu perlu membuka atau masuk Sebagai User Root pada VPS Ubuntu & Debian Baca juga : Cara Memberikan hak akses Sudo di VPS CentOS Apa itu Akses Root pada VPS Akses root adalah akses dimana kita mendapatkan control secara penuh dalam mengatur dan menginstall semua konfigurasi di vps , dalam hal ini sama seperti kita login sebagai adminstator pada OS windows jika kita masih login dengan akses user biasa dan bukan root masih memiliki banyak keterbatasan dalam akses serta setting os kamu Sebenarnya ini tidak menjadi masalah yang besar. Dengan menggunakan username yang diberikan default provider, kita bisa menjalankan perintah yang membutuhkan root dengan perintah sudo, atau bisa juga dengan perintah sudo su atau sudo -i.
Cara Mengaktifkan Root Login di VPS Debian dan Ubuntu
pertama tama kita harus login ke vps kamu , dengan menggunakan informasi login dari Penyedia layanan ISP , biasanya akan masuk di email kamu - Pertama Login VPS - kemudian masukan kode perintah di bawah ini sudo su cd setelah itu konfigurasi SSH Sebagai berikut ini : nano /etc/ssh/sshd_config - kemudian ubah seperti di bawah ini PermitRootLogin prohibit-password menjadi PermitRootLogin yes PasswordAuthentication no, ubah menjadi PasswordAuthentication yes jika kamu masih belum jelas bisa melihat gambar di bawah ini

- Simpan file dengan cara tekan Ctrl x lalu y lalu Enter - kemudian ganti password akses root dengan memasukan kode di bawah ini passwd - masukan kode di bawah ini untuk restart service ssh service ssh restart service sshd restart - selesai Catatan tambahan kode perintah Akses Root - Untuk mengetahui posisi login kamu bisa menjalankan perintah ini whoami - Cek service ssh service ssh status Cara Nonaktifkan Akses Root Login dengan akses root kita bisa mengakses semua konfigurasi penting di sistem operasi , untuk keamanan sebaiknya perlu di nonaktifkan Untuk melakukan ini, ikuti langkah-langkah ini: - Masuk ke server sebagai root menggunakan SSH. - setelah itu konfigurasi SSH Sebagai berikut ini : nano /etc/ssh/sshd_config - Temukan baris PermitRootLogin yes kemudian Ubah baris sebagai PermitRootLogin no - Simpan perubahan ke file /etc/sshsshd_config, dan kemudian keluar dari editor teks. - Restart layanan SSH menggunakan perintah yang sesuai untuk distribusi Linux Anda: service ssh restart coba login ke vps kamu dengan akses root kambali pasti tidak bisa jika kamu masih mengalami banyak masalah atau kesulitan bisa berkomntar di bawah ini atau diskusi di group telegram kami Read the full article
0 notes
Text
In this guide we will see how you can change SSH service port on CentOS 7/8, RHEL 7/8 and Fedora 34/33/32/31/30 with SELinux running in Enforcing mode. When SELinux is running in enforcing mode, it enforces the SELinux policy and denies access based on SELinux policy rules. The standard SSH port on most Linux/Unix systems is TCP port 22. This can be changed easily to a custom port not used by other Applications in the system. When SELinux is running in Enforcing mode, the port to be set will need relabeling so that Policy rules controlling access can accept ssh service to bind. Follow steps discussed below to change SSH port on CentOS / RHEL / Fedora server or Desktop with SELinux running in Enforcing mode. Step 1: Backup Current SSH configuration Login to your CentOS / RHEL / Fedora system and backup your current ssh daemon configuration file. date_format=`date +%Y_%m_%d:%H:%M:%S` sudo cp /etc/ssh/sshd_config /etc/ssh/sshd_config_$date_format Confirm: $ ls /etc/ssh/sshd_config* /etc/ssh/sshd_config /etc/ssh/sshd_config_2019_09_05:21:40:10 Step 2: Change SSH service port Open SSH service configuration file with your favorite text editor – vi, vim, nano e.t.c. sudo vi /etc/ssh/sshd_config Locate line that has: #Port 22 Uncomment the Port line and set your new service port to be used. I’ll use port 33000. Port 33000 Save the changes and close the file. Step 3: Allow new SSH port on SELinux The default port labelled for SSH is 22. $ semanage port -l | grep ssh ssh_port_t tcp 22 If you want to allow sshd to bind to network port configured, then you need to modify the port type to ssh_port_t. sudo semanage port -a -t ssh_port_t -p tcp 33000 Confirm that the new port has been added to list of allowed ports for ssh. $ semanage port -l | grep ssh ssh_port_t tcp 33000, 22 Step 4: Open SSH port on Firewalld It is always recommended to keep the Firewall service running and only allow trusted services. sudo firewall-cmd --add-port=33000/tcp --permanent sudo firewall-cmd --reload If Firewalld is not installed, use yum to install it and start the service. sudo yum -y install firewalld sudo systemctl enable --now firewalld sudo firewall-cmd --add-port=33000/tcp --permanent sudo firewall-cmd --reload You can now remove ssh service. sudo firewall-cmd --remove-service=ssh --permanent sudo firewall-cmd --reload Step 5: Restart sshd service Restart ssh service for the changes to take effect. sudo systemctl restart sshd Verify Listen address for ssh. $ netstat -tunl | grep 33000 tcp 0 0 0.0.0.0:33000 0.0.0.0:* LISTEN tcp6 0 0 :::33000 :::* LISTEN
0 notes
Text
Cách thay đổi cổng SSH mặc định 22 cho VPS cài OS Centos
Bảo mật trên máy chủ ảo ( VPS ) rất quan trọng cho chúng ta, khi mới cài VPS mặc định cổng SSH sẽ là 22 điều này sẽ rất nguy hiểm nếu không thay đổi vì hacker có thể sẽ truy cập trái phép đến máy chủ
chuẩn bị một VPS cài CentOS tất nhiên sẽ có quyền đăng nhập vào VPS với tài khoản ROOT cao nhất

Sau khi đăng nhập vào SSH gõ lệnh sau để cấu hình lại PORT SSH
vi /etc/ssh/sshd_config
để chỉnh sửa được tệp tin các bạn bấm phím Insert tìm đến đoạn
#Port 22
Và bỏ dấu thăng ( # ) ở đầu đi bỏ cổng 22 thay bằng cổng mới mà bạn muốn thay đổi. Thoát ra bằng phím ESC lưu lại cấu hình bấm :wq và ENTER
Tiếp theo bạn cần phải khởi động lại SSH server để cấu hình có hiệu lực bằng cách chạy dòng lệnh sau
service sshd restart
P/S: Trước khi thay đổi các thông số trên các bạn phải thêm cổng SSH mới vào Firewall nhé, nếu không Firewall sẽ chặn các cổng mới các bạn sẽ không vào được. Chúc các bạn thành công. Nếu có bất ký thắc mắc hay góp ý vui lòng comment bên dưới.
📈Thông tin liên hệ: 📙 CÔNG TY CỔ PHẦN DỮ LIỆU TRỰC TUYẾN VIỆT NAM 🏠 61 Mễ Trì Thượng, Phường Mễ Trì, Quận Nam Từ Liêm,Thành Phố Hà Nội ☎️ Tổng đài: 1900 0366 🌐 Website: https://vdodata.vn/ ✳️ Facebook: https://www.facebook.com/vdodatacenter 🥇 VDO - Nhà cung cấp Dịch vụ máy chủ & Cloud Số 1 Việt Nam
0 notes
Text
Installing X11 packages on Centos 8
Installing X11 packages on Centos 8
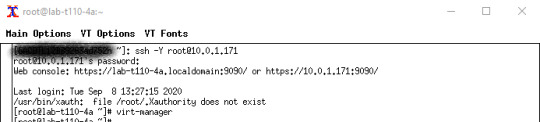
I ran into an issue the other day where I wanted to have graphic capabilities remotely available. I wanted to use virt-manager to Normally its just a matter of having X11Forwarding=yes in /etc/ssh/sshd_config and then using “ssh -Y USER@IP_ADDRESS”. This of course was not working and that’s because when I installed these servers they were stripped down and no X11 packages were installed. In…
View On WordPress
0 notes
Text
Crear un escritorio remoto por ssh en un servidor linux

Crear un escritorio remoto por ssh en un servidor linux. Que duda cabe, que en situaciones especiales echamos de menos que nuestro servidor o vps tenga un entorno gráfico. En esta situación lo mejor es montar una VPN, pero y si no es posible que hacemos. En este interesante articulo, vemos como instalar y configurar un escritorio remoto en nuestro servidor o vps y conectarnos desde nuestro PC domestico. Lo bueno... nos conectamos a traves de SSH, lo que nos ofrece una seguridad extrema, lo malo... se requiere de un server o vps potente, además de un ancho de banda de internet poderoso. Si no cumples estos requisitos igualmente funcionara, pero excesivamente lento. Crear un escritorio remoto por ssh en un servidor linux Lo primero que debemos hacer, es conectarnos a nuestro servidor permitiendo el reenvío de X y la compresión de datos. Es fácil, accede vía ssh tal como te indico. ssh -XC ip-del-server # o ssh -XC usuario@ip-del-server Una vez estemos conectados, instalamos xauth. # Debian, Ubuntu y derivados sudo apt install xauth # CentOS y derivados sudo yum install xorg-x11-xauth Ahora habilitamos el X11Forwarding, en el archivo de configuración ssh. nnao /etc/ssh/sshd_config Buscas la línea "X11Forwarding", y la modificas por... X11Forwarding yes Guarda el archivo modificado y reinicia sshd. sudo systemctl restart sshd También es aconsejable reiniciar el servidor o vps. sudo Read the full article
0 notes
Text
How to Configure a Secure SSH-Based
Introduction
SSH is a remote connection method, whether or not it is a VPS. It is versatile and multi-platform, allows you to almost monitor your computer, as you were, and it has many useful features.
Yet protection is an important focus in the modern world of IT, so I will share some details about how to ensure access to your ssh. You’ll build a couple of keys: public and private. Privacy is your secure key for protecting, safeguarding and sharing with no one. It’s used as a special user to mark you. Public is a key to be delivered to remote servers or services.
Accessions
You’ll need:
1) CentOS 7.4 VPS server
2) Basic knowledge how to edit files in Linux systems
3) Linux or Windows host machine, from which you access the VPS server.
Generating A SSH Key Pair on Your Host Machines
If your system, from which you access VPS, is Linux ( Fedora 25 system was used, as a typical home/workplace Linux system):
1) run ssh-keygen and follow on-screen instructions
“ssh-keygen”
SSH command “ssh-keygen”
You can enter a specific location of storage (you can leave this as it is). You will also be asked for a password to secure the key by ssh-keygen. Although passwordless, as it is sometimes useful for different setups (automatic systems without user input), the password should be protected from your key and your key will only not allow an attacker to access the VPS-server even if your key pair is compromised.
Remember password. When you forget it, you can’t restore your key control.
Must Remember Password
2) Backup your keys on a secure, safe storage
3) run cat /home/vpsuser/.ssh/id_rsa.pub ( replace path with the one, you have actually used ) and copy the key.
4) You need to put a copied key as a new string into
`/root/.ssh/authorized_keys`
on your VPS server. It should look like this
SSH-command copy key as a new string on VPS server
Notice that each key starts as a separate string.
5) To connect from linux machine to your VPS server through ssh, you just need to run
“ssh -i /home/vpsuser/.ssh/id_rsa.pub root@”
Connect from linux machine to VPS server through SSH
If your system, from which you access VPS, is Windows ( Windows 10 was used, as a typical home/workplace Windows system): 1) Run puttygen tool, that comes out of the box with a putty installation.
PuTTY Key Generator tool
Press “generate” and it will ask you to move mouse on the empty area to generate random data, and will provide you an ssh key pair.
SSH key pair
2.1) Enter password to “Key passphraze” and confirmation fields. Remember the password.
2.2) Copy the contents of the “public key for pasting into Openssh authorized_keys file:”
2.3) Save public and private key to a secure, safe storage
3) Copy’s the contents of the “public key for pasting into Openssh authorized_keys file:” windows in puttygen
4) Go back to your VPS server. We need to add the public part of the key pair, we have just created to the list of authorized keys. Put a copied key as a new string into
/root/.ssh/authorized_keys
On your VPS server. It should look like this
add the public part of the key pair on VPS server
Notice that each key starts as a separate string.
5) Test connection to your VPS server
5.1) Open putty and go to Connection – SSH – Auth in the left panel.
5.2) Open you private key file by pressing Browse near the Private key for authentication field.
Open Private Key File for authentication field
5.3) Go back to Session in the left panel of putty, enter your server hostname or ip with a login name ( optional, as putty will prompt for it anyway ) and press Open.
Enter your server Hostname or IP
5.4) Putty will prompt for key password at it’s screen, and if entered correctly, forward you to your VPS server console
PuTTY-prompt for key password
Securing Your SSH Server
Using Linux and Windows, you can now easily connect to your VPS server. You should currently disable access to your machine with a password, so any attempts to bruteforce are useless. Without an authorized ssh key your system will just not accept an incoming ssh connection. Open on your VPS server
“/etc/sshd/sshd_config”
and change “PasswordAuthentication yes” string to “PasswordAuthentication no” restart sshd daemon
“systemctl restart sshd”
and check that it has no problems
“systemstl status sshd”
Securing Your SSH Server
Conclusion
Securing your link to your ssh-key pair and preventing a password login are a fundamental measure of security. It protects your server against a lot of attacks based on alphabetical password and bruteforce searches. In conclusion, secure at least basic steps for your VPS server to allow you to sleep better.
Credit by vpsserver.
https://www.casbay.com/blog/tips-sharing/how-to-configure-a-secure-ssh-based/
0 notes
Link
The security of your server is essential to your websites. In this article, we'll talk about how to increase the security of your server. Read this post for details: How to Setup Your Own VPS on Vultr
Connect to Your Server Using SSH Client
Use PuTTY, XShell or other SSH clients that you like to connect to your server. Here, I will use Xshell as an example. Your login information can be found on the server information page.
Open Xshell, a session window should pop up. Create a new session.
First, give it a name, it can be anything you want. And in the “Host”, Type in the IP address of your server. “Port Number” should be 22.
Then go to “Authentication” page, and type in your user name and password, they can be found on the server information page.
And now you should be able to connect to your server.
To make your server more secure, it’s better to use an SSH key to log in instead of passwords.
Setup SSH Keys
Go to Tools and choose “New User Key Wizard”.
Choose a key type and key length. Longer keys are more secure.
After it is generated, you can give it a name and a password.
Now, you need to save a public key and register it on your server.
Click on save as a file.
Go to the “root” directory of your server. If you installed Xftp and Xshell as a bundle, just click the green button on the top bar of Xshell.
Add an “.ssh” folder.
Copy the public key you just saved to this folder, and rename it authorized_keys.
Restart ssh service.
CentOS
sudo systemctl restart sshd
Ubuntu
sudo service ssh restart
Now you should be able to log in to your server with the SSH key pair.
Disable Password Login
However, now you can still use your password to log in, which means the hackers can as well. So, you need to disable the password login.
Go to /etc/ssh
Edit the sshd_config file.
Find PasswordAuthentication
Change the value to no
Restart the ssh service again. Now you can only log in using the SSH key pair.
0 notes
Text
ssh -X X11 forwarding request failed
ssh server 是 centos 7 Resolution
Confirm xorg-x11-xauth package is installed.
Modify /etc/ssh/sshd_config and set AddressFamily inet and restart sshd.
If SSH client is authenticating with the public key and if there is parameter like no-agent-forwarding, no-port-forwarding, no-X11-forwarding before public key specified in ~/.ssh/authorized_keys of user's home directory on SSH server, these options need to be removed from the file.
Root Cause
By default sshd uses AddressFamily any, this can sometimes cause ssh forwarding to use IPV6 instead of IPV4.
0 notes
Text
CentOS 7 - SSH 安全性設定 (Secure Shell protocol) (內容更新 - 2020/03/02)
CentOS 7 – SSH 安全性設定 (Secure Shell protocol) (內容更新 – 2020/03/02)
心得:
安裝好 CentOS 7,可以先行修改 SSH 設定,達到系統安全的第一步
個人認為比較重要且通用的設定
禁止 root 遠端登入
演算法限定
限制使用帳號與來源 IP
關於 CentOS 7 安裝的步驟可以參考:
安裝CentOS 7
設定:
編輯位於/etc/ssh下的檔案,sshd_config
# vim /etc/ssh/sshd_config
Port 22 說明:SSH 使用的 Port number,預設使用 22 Protocol 2 說明:���制使用 SSH Version 2 LoginGraceTime 1m 說明:連線未動作斷線時間 PermitRootLogin no 說明:root 是否可以遠端 ssh 登入,建議關閉 MaxAuthTries 2 說明:ssh…
View On WordPress
0 notes
Text
Centos Ssh PuTTY Giriş Portunu Değiştirme
Centos web tabanlı çalışmalarda çok kullanılan bir işletim sistemidir. SSH portunu değiştirmek sunucu güvenliği için gerekli bir işlemdir. Centos için Brute Force yaparak şifrelerinizi bulabilir, sunucularınıza izinsiz erişim sağlayabilirler. Kurulum sonrası varsayılan olarak gelen 22 portu veya sık kullanılan SSH portları sürekli brute force yada bot���lar tarafından taranmaktadır. Sunucunuzun hacklenmemesi için bilindik ya da varsayılan portları kullanmamanızgerekmektedir.
Portu değiştirmek için SSH ile sunucuya giriş yaptıktan sonra;
[php] <pre><span class="hljs-title">nano</span> /etc/ssh/sshd_config
[/php]
komutu ile SSH ayarlarının bulunduğu dosyayı açıyoruz. Bu dosya içerisinde aşağıdaki şekilde portu belirten bir bilgi olacaktır.
Buradaki #Port 22 olan bölümü unutmayacağınız bir port ile değiştirebilirsiniz.Yeni gireceğiniz portun sürekli kullanılan ya da bilindik bir port olmamasına dikkat ediniz. Değişikliği yaptıktan sonra CTRL+X ve sonrasında Y tuş kombinasyonu ile dosyayı kaydedip çıkış yapabilirsiniz.Yapmış olduğunuz port ayarının aktif olabilmesi için son olarak sshd servisine restart atmanız gerekiyor.
[php] /etc/init.d/sshd restart [/php]
Sunucunuzun portu değiştirilmiştir.
0 notes
Text
Three CentOS 7 Security Commands Every Server Admin Should Know
CentOS 7 is among the most secure and stable Linux circulations on the planet. That is the reason we use CentOS on our virtual private servers and devoted servers. Be that as it may, server executives ought to be comfortable with a couple of security arrangement changes.
In this article, I’m going to investigate three security directions. They give you more authority over client verification, the administrations your server runs, and programming refreshes.
Sudo for more secure root
Sudo enables a normal client to run directions as the root client. The root client can peruse and keep in touch with each record on a server. It can execute any direction on any document. The root client is almighty. That is helpful, yet signing in as the root client resembles strolling around with a live hand explosive. A solitary slip can have tragic results. Running rm – rf in the wrong index can clear out your server.
The sudo direction is utilized to give a conventional client indistinguishable power from root, yet briefly. More often than not, they will execute directions as the standard client, possibly utilizing root’s superpowers when they’re sure it’s a smart thought.
To utilize sudo, the client must be recorded in the sudoers document. The record is altered utilizing the visudo direction. Add the accompanying to the document that opens when you run visudo as root:
username ALL=(ALL) ALL
Supplant username with your client. The visudo order utilizes the vi word processor, which can be confounding on the off chance that you aren’t comfortable with its modular interface. Investigate Editing Text On The Linux Command Line for more data. When you have altered the sudoers record and you are signed in as the customary client, you can run the ls order as root with:
sudo ls
To make your server considerably increasingly secure, handicap root logins over SSH. You will probably login as the customary client and execute directions as root with sudo, yet you — or an aggressor — won’t almost certainly sign in as the root client.
To forestall root logins, open the/and so forth/ssh/sshd_config record in a proofreader. Discover the line which peruses:
PermitRootLogin yes
What’s more, change it to:
PermitRootLogin no
Make sure to give your normal client consent to utilize sudo before evolving sshd_config, or you won’t probably execute any directions with root authorizations.
Take control of administrations
All Linux appropriations utilize an init framework to begin benefits after the working framework boots. It is in charge of beginning the web server, email server, and everything else that requirements to keep running on your CentOS server. CentOS 7 utilizes the systemd init framework, which is controlled with the systemctl direction. You can utilize systemctl to begin and stop administrations, to list running administrations, and to empower and incapacitate administrations.
To see which administrations are running web hosting on your server, utilize this direction:
systemctl – t administration
A rundown of running administrations is shown. On the off chance that you need progressively explicit data about the SSH server, for instance, run:
systemctl status sshd.service
You should keep running reseller hosting as few administrations as could be allowed. Each extra administration is a potential security powerlessness. Administrations can be begun and halted with:
sudo systemctl begin application.service
sudo systemctl stop application.service
An expression of caution: don’t stop the sshd administration, or you won’t almost certainly get to your server. Prior to halting an administration, ensure you recognize what it does, why it is running, and that it is sheltered to stop it.
The begin and stop directions are transitory. On the off chance that your server reboots, it will begin everything that is recorded in its design documents. To for all time evacuate an administration so it isn’t restarted on boot, utilize handicap rather than stop. Utilizing empower adds a support of the rundown to be begun at boot.
Stay up with the latest
Outdated programming is a security helplessness. Updates incorporate patches that fix vulnerabilities. Server overseers ought to normally refresh their server to guarantee that it stays secure. On CentOS 7, refreshes are made do with the yum bundle chief.
Refreshing is as straightforward as running the accompanying direction:
yum refresh
Your server will check for updates, download new forms, and introduce them.
On the off chance that you might want our server organization group to assist with administration design, updates, and the sky is the limit from there, pick an oversaw server facilitating choice
From https://www.iwrahost.com/three-centos-7-security-commands-every-server-admin-should-know/
from https://iwrahost1.wordpress.com/2019/02/18/three-centos-7-security-commands-every-server-admin-should-know/
0 notes
Text
Three CentOS 7 Security Commands Every Server Admin Should Know
CentOS 7 is among the most secure and stable Linux circulations on the planet. That is the reason we use CentOS on our virtual private servers and devoted servers. Be that as it may, server executives ought to be comfortable with a couple of security arrangement changes.
In this article, I’m going to investigate three security directions. They give you more authority over client verification, the administrations your server runs, and programming refreshes.
Sudo for more secure root
Sudo enables a normal client to run directions as the root client. The root client can peruse and keep in touch with each record on a server. It can execute any direction on any document. The root client is almighty. That is helpful, yet signing in as the root client resembles strolling around with a live hand explosive. A solitary slip can have tragic results. Running rm – rf in the wrong index can clear out your server.
The sudo direction is utilized to give a conventional client indistinguishable power from root, yet briefly. More often than not, they will execute directions as the standard client, possibly utilizing root’s superpowers when they’re sure it’s a smart thought.
To utilize sudo, the client must be recorded in the sudoers document. The record is altered utilizing the visudo direction. Add the accompanying to the document that opens when you run visudo as root:
username ALL=(ALL) ALL
Supplant username with your client. The visudo order utilizes the vi word processor, which can be confounding on the off chance that you aren’t comfortable with its modular interface. Investigate Editing Text On The Linux Command Line for more data. When you have altered the sudoers record and you are signed in as the customary client, you can run the ls order as root with:
sudo ls
To make your server considerably increasingly secure, handicap root logins over SSH. You will probably login as the customary client and execute directions as root with sudo, yet you — or an aggressor — won’t almost certainly sign in as the root client.
To forestall root logins, open the/and so forth/ssh/sshd_config record in a proofreader. Discover the line which peruses:
PermitRootLogin yes
What’s more, change it to:
PermitRootLogin no
Make sure to give your normal client consent to utilize sudo before evolving sshd_config, or you won’t probably execute any directions with root authorizations.
Take control of administrations
All Linux appropriations utilize an init framework to begin benefits after the working framework boots. It is in charge of beginning the web server, email server, and everything else that requirements to keep running on your CentOS server. CentOS 7 utilizes the systemd init framework, which is controlled with the systemctl direction. You can utilize systemctl to begin and stop administrations, to list running administrations, and to empower and incapacitate administrations.
To see which administrations are running web hosting on your server, utilize this direction:
systemctl – t administration
A rundown of running administrations is shown. On the off chance that you need progressively explicit data about the SSH server, for instance, run:
systemctl status sshd.service
You should keep running reseller hosting as few administrations as could be allowed. Each extra administration is a potential security powerlessness. Administrations can be begun and halted with:
sudo systemctl begin application.service
sudo systemctl stop application.service
An expression of caution: don’t stop the sshd administration, or you won’t almost certainly get to your server. Prior to halting an administration, ensure you recognize what it does, why it is running, and that it is sheltered to stop it.
The begin and stop directions are transitory. On the off chance that your server reboots, it will begin everything that is recorded in its design documents. To for all time evacuate an administration so it isn’t restarted on boot, utilize handicap rather than stop. Utilizing empower adds a support of the rundown to be begun at boot.
Stay up with the latest
Outdated programming is a security helplessness. Updates incorporate patches that fix vulnerabilities. Server overseers ought to normally refresh their server to guarantee that it stays secure. On CentOS 7, refreshes are made do with the yum bundle chief.
Refreshing is as straightforward as running the accompanying direction:
yum refresh
Your server will check for updates, download new forms, and introduce them.
On the off chance that you might want our server organization group to assist with administration design, updates, and the sky is the limit from there, pick an oversaw server facilitating choice
from https://www.iwrahost.com/three-centos-7-security-commands-every-server-admin-should-know/ from https://iwrahost1.tumblr.com/post/182889673363
0 notes
Link
CentOS 7 is among the most secure and stable Linux circulations on the planet. That is the reason we use CentOS on our virtual private servers and devoted servers. Be that as it may, server executives ought to be comfortable with a couple of security arrangement changes.
In this article, I’m going to investigate three security directions. They give you more authority over client verification, the administrations your server runs, and programming refreshes.
Sudo for more secure root
Sudo enables a normal client to run directions as the root client. The root client can peruse and keep in touch with each record on a server. It can execute any direction on any document. The root client is almighty. That is helpful, yet signing in as the root client resembles strolling around with a live hand explosive. A solitary slip can have tragic results. Running rm – rf in the wrong index can clear out your server.
The sudo direction is utilized to give a conventional client indistinguishable power from root, yet briefly. More often than not, they will execute directions as the standard client, possibly utilizing root’s superpowers when they’re sure it’s a smart thought.
To utilize sudo, the client must be recorded in the sudoers document. The record is altered utilizing the visudo direction. Add the accompanying to the document that opens when you run visudo as root:
username ALL=(ALL) ALL
Supplant username with your client. The visudo order utilizes the vi word processor, which can be confounding on the off chance that you aren’t comfortable with its modular interface. Investigate Editing Text On The Linux Command Line for more data. When you have altered the sudoers record and you are signed in as the customary client, you can run the ls order as root with:
sudo ls
To make your server considerably increasingly secure, handicap root logins over SSH. You will probably login as the customary client and execute directions as root with sudo, yet you — or an aggressor — won’t almost certainly sign in as the root client.
To forestall root logins, open the/and so forth/ssh/sshd_config record in a proofreader. Discover the line which peruses:
PermitRootLogin yes
What’s more, change it to:
PermitRootLogin no
Make sure to give your normal client consent to utilize sudo before evolving sshd_config, or you won’t probably execute any directions with root authorizations.
Take control of administrations
All Linux appropriations utilize an init framework to begin benefits after the working framework boots. It is in charge of beginning the web server, email server, and everything else that requirements to keep running on your CentOS server. CentOS 7 utilizes the systemd init framework, which is controlled with the systemctl direction. You can utilize systemctl to begin and stop administrations, to list running administrations, and to empower and incapacitate administrations.
To see which administrations are running web hosting on your server, utilize this direction:
systemctl – t administration
A rundown of running administrations is shown. On the off chance that you need progressively explicit data about the SSH server, for instance, run:
systemctl status sshd.service
You should keep running reseller hosting as few administrations as could be allowed. Each extra administration is a potential security powerlessness. Administrations can be begun and halted with:
sudo systemctl begin application.service
sudo systemctl stop application.service
An expression of caution: don’t stop the sshd administration, or you won’t almost certainly get to your server. Prior to halting an administration, ensure you recognize what it does, why it is running, and that it is sheltered to stop it.
The begin and stop directions are transitory. On the off chance that your server reboots, it will begin everything that is recorded in its design documents. To for all time evacuate an administration so it isn’t restarted on boot, utilize handicap rather than stop. Utilizing empower adds a support of the rundown to be begun at boot.
Stay up with the latest
Outdated programming is a security helplessness. Updates incorporate patches that fix vulnerabilities. Server overseers ought to normally refresh their server to guarantee that it stays secure. On CentOS 7, refreshes are made do with the yum bundle chief.
Refreshing is as straightforward as running the accompanying direction:
yum refresh
Your server will check for updates, download new forms, and introduce them.
On the off chance that you might want our server organization group to assist with administration design, updates, and the sky is the limit from there, pick an oversaw server facilitating choice
from https://www.iwrahost.com/three-centos-7-security-commands-every-server-admin-should-know/ from https://iwrahost1.blogspot.com/2019/02/three-centos-7-security-commands-every.html
0 notes
Text
Three CentOS 7 Security Commands Every Server Admin Should Know
CentOS 7 is among the most secure and stable Linux circulations on the planet. That is the reason we use CentOS on our virtual private servers and devoted servers. Be that as it may, server executives ought to be comfortable with a couple of security arrangement changes.
In this article, I’m going to investigate three security directions. They give you more authority over client verification, the administrations your server runs, and programming refreshes.
Sudo for more secure root
Sudo enables a normal client to run directions as the root client. The root client can peruse and keep in touch with each record on a server. It can execute any direction on any document. The root client is almighty. That is helpful, yet signing in as the root client resembles strolling around with a live hand explosive. A solitary slip can have tragic results. Running rm – rf in the wrong index can clear out your server.
The sudo direction is utilized to give a conventional client indistinguishable power from root, yet briefly. More often than not, they will execute directions as the standard client, possibly utilizing root’s superpowers when they’re sure it’s a smart thought.
To utilize sudo, the client must be recorded in the sudoers document. The record is altered utilizing the visudo direction. Add the accompanying to the document that opens when you run visudo as root:
username ALL=(ALL) ALL
Supplant username with your client. The visudo order utilizes the vi word processor, which can be confounding on the off chance that you aren’t comfortable with its modular interface. Investigate Editing Text On The Linux Command Line for more data. When you have altered the sudoers record and you are signed in as the customary client, you can run the ls order as root with:
sudo ls
To make your server considerably increasingly secure, handicap root logins over SSH. You will probably login as the customary client and execute directions as root with sudo, yet you — or an aggressor — won’t almost certainly sign in as the root client.
To forestall root logins, open the/and so forth/ssh/sshd_config record in a proofreader. Discover the line which peruses:
PermitRootLogin yes
What’s more, change it to:
PermitRootLogin no
Make sure to give your normal client consent to utilize sudo before evolving sshd_config, or you won’t probably execute any directions with root authorizations.
Take control of administrations
All Linux appropriations utilize an init framework to begin benefits after the working framework boots. It is in charge of beginning the web server, email server, and everything else that requirements to keep running on your CentOS server. CentOS 7 utilizes the systemd init framework, which is controlled with the systemctl direction. You can utilize systemctl to begin and stop administrations, to list running administrations, and to empower and incapacitate administrations.
To see which administrations are running web hosting on your server, utilize this direction:
systemctl – t administration
A rundown of running administrations is shown. On the off chance that you need progressively explicit data about the SSH server, for instance, run:
systemctl status sshd.service
You should keep running reseller hosting as few administrations as could be allowed. Each extra administration is a potential security powerlessness. Administrations can be begun and halted with:
sudo systemctl begin application.service
sudo systemctl stop application.service
An expression of caution: don’t stop the sshd administration, or you won’t almost certainly get to your server. Prior to halting an administration, ensure you recognize what it does, why it is running, and that it is sheltered to stop it.
The begin and stop directions are transitory. On the off chance that your server reboots, it will begin everything that is recorded in its design documents. To for all time evacuate an administration so it isn’t restarted on boot, utilize handicap rather than stop. Utilizing empower adds a support of the rundown to be begun at boot.
Stay up with the latest
Outdated programming is a security helplessness. Updates incorporate patches that fix vulnerabilities. Server overseers ought to normally refresh their server to guarantee that it stays secure. On CentOS 7, refreshes are made do with the yum bundle chief.
Refreshing is as straightforward as running the accompanying direction:
yum refresh
Your server will check for updates, download new forms, and introduce them.
On the off chance that you might want our server organization group to assist with administration design, updates, and the sky is the limit from there, pick an oversaw server facilitating choice
from https://www.iwrahost.com/three-centos-7-security-commands-every-server-admin-should-know/
0 notes