#chicagoplumber
Text
youtube
#plumbernearmechicago#chicagoplumber#plumberinchicago#hydrojettingchicago#draincleaningserviceschicago#catchbasinpumpingchicago#sewerlinerepairchicago#Youtube
1 note
·
View note
Video
Reasons Why You Need Professional Plumbers in Chicago
Your shower drain is clogged and so is your kitchen’s, and you have that feeling that you can fix it on your own. You see, as human beings, we have that pride in us that unintentionally grows whenever we get to fix something. It’s normal. But I suggest, DON’T. If plumbing is really in you, if you’re really into it then, by all means, go ahead and remove that clog. However, if you have no experience and tools, then might as well call a professional Chicago plumber to fix that clog.
Here are the reasons why a professional plumbing help is a must:
They have all the tools. These licensed plumbers don’t come unprepared. They have a car full of gear for your plumbing problem.
These licensed plumbers already know what to do to your problem before arriving. No more thinking, no more asking what needs to be done because as professionals, they were trained for more than 10,000 hours to troubleshoot all areas in plumbing.
No waste of resources and time. Since they already know what to do and what they need to address the issue, they can finish it without wasting any time and resources.
These are just some of the reasons why it is best to skip the DIY route and trust a reputable contractor in Chicago to fix your plumbing issue.
Just think of the money and time you’ll save compared to your loss if you do things your way.
0 notes
Text
I Didn’t Know That There Is Still A Trustworthy Plumber In Chicago!
After some bad experiences from contractors that I hired in the past, I concluded that the world is full of unqualified technicians trying to rip you off with extra service charges and inferior plumbing services. No wonder I have trust issues.
I was really in major shock when I discovered that there is still a trustworthy and respectable plumbing company in Illinois. I made the discovery one day when we experience a sewer backup in our master bathroom.

Even though I didn’t trust plumbers, I had no choice but to call a plumber in Chicago to help us with our problem. My older sister recommended Plumbers 911.
It doesn’t matter who we hire. They are all the same. This is what I was thinking when I called this company at (877) 445-6127.
In the end, I realized I was wrong. Not all service providers are the same. While some don’t even have the skills to fix plumbing issues, there are still some who are highly-skilled and a real professional.
Plumbers 911 in Illinois did a great job in detecting where the problem is. I have no plumbing skills whatsoever but I can see and experience the difference they made in our bathroom and the entire plumbing system. It was as if we hired them to fix EVERY undetected plumbing problem in our home. It has been more than 5 months and we haven’t felt any issue at all.
Did I say I was impressed? To say that I am Impressed is an understatement.
To all homeowners in Boston, my advice for you is this: The moment you feel like there is a problem with your septic tank, drain, toilet, or water heater, call Plumbers 911 immediately. It will save you a lot of headache and some serious cash.
Check out this video to learn more about them:
youtube
1 note
·
View note
Photo


Eric the Chicago Plumber,773-658-4259. All plumbing and drains. Fast service 7 days a week. Honest,transparent and clean service. Low rates!
#plumbing#chicago#erictheplumber#773-658-4259#chicagoplumber#catch basin#plumber#copperpipes#u-trap#plumbingrepair#sink#toilet#faucet#60628#60629#60615#60619#60620#grease trap#plumbing repair#cheap plumber
0 notes
Text
What Are the Signs You Require Emergency Plumbing Services?

Plumbing issues can be costly, inconvenient, and time consuming. Plumbing emergencies can arise suddenly and can be a major cause of disruption. Unfortunately, sometimes it can be difficult to know when plumbing issues require emergency service. This can result in costly and time consuming repairs. But, understanding the signs of emergency plumbing services can help you save time, frustration and money.
What Are Emergency Plumbing Services?
Emergency plumbing services are services that require immediate attention and should be handled by a qualified, licensed plumber. These include situations where there is a serious danger of flooding or property damage, or where pipes or fixtures are leaking or blocked and need to be rectified right away. Emergency services are not always available, depending on the type of plumbing failure. An emergency plumber should be called in to assess the issue when there is an immediate threat.
Signs You Need Emergency Plumbing Services
When issues arise, it can often be difficult to pinpoint whether an emergency plumbing service is required or not. Here are a few signs that you may require emergency service:
Your bathroom or kitchen has been flooded
You can hear the sound of running water from inside your walls
Your water heater is leaking
Your sink, toilet, or faucet is leaking, even after turning off the water supply
Your sewer line is blocked or backed up
Your drains are overflowing
You can smell a foul odor in your home, especially in the bathroom and kitchen
If any of these signs are present in your home, it is best to act quickly and call a professional emergency plumber to assess the situation and ensure that the problem is dealt with promptly.
What to Do in Case of an Emergency
If you are dealing with a plumbing emergency, the first thing you should do is turn off the water supply to the affected area. This will stop any further damage from occurring, and will also help to limit the potential contamination of the water supply. Once the water supply is turned off, you can call the emergency plumbing service. The operator will need to know the extent of the problem and the location, as well as any other relevant information such as the age of the pipe or fixture in question.
What Will the Emergency Plumber Do?
The emergency plumber will assess the situation and determine the cause of the emergency. Depending on what they find, they may need to use specialist equipment such as cameras, pipe locaters and line tracers to repair the damaged plumbing. They may also recommend the installation of preventative measures such as backflow preventer valves or sump pumps. After the repair is complete, the emergency plumber will ensure that the area is clean and safe.
Conclusion
Emergency plumbing services are essential in dealing with plumbing problems that require immediate attention. Knowing the signs that indicate the need for emergency plumbing can help homeowners take action before the situation becomes worse and more costly. If you have any concerns about plumbing problems in your home, it is always best to seek professional advice to avoid expensive and time-consuming repairs.
1 note
·
View note
Text
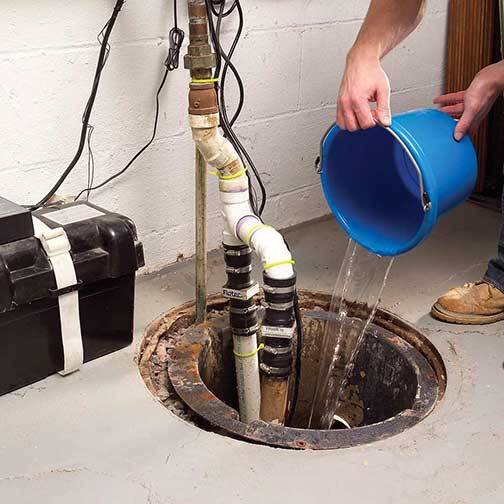
How to Clean Your Sump Pump
Having a basement or crawlspace in your home has numerous benefits. However, your basement may be prone to flooding or wetness. Natural water can migrate from the soil into your basement, or water may flood your basement from the drain.
Studies from the American society of home inspectors show that over 60% of properties experience moisture in their basements. A wet basement has several setbacks. It may:
Affect the property’s structural integrity
Cause pest infestation
Support the growth of mold
Cause health hazards
Render the property unfit for habitation
But that should not stop you from owning a property that has a basement. That is because sump pumps help prevent your basement from flooding. They send water from your basement into a dry well, municipal storm drain, or other places where it wouldn’t harm your property.
The sump pump may have a pressure sensor or float activator arm if it is automatic. In that case, it will turn on automatically to evacuate water from your basement. If situations demand, you can activate the automatic sump pump manually.
Sump pumps require regular cleaning and maintenance because of their benefits. We recommend that you clean your sump pump and sump pit at least once a year. Remove the sump pump and wash it. Use that opportunity to inspect your sump pit for debris and water. Clear the check valve and conduct other regular sump pump maintenance.
If you are wondering how to clean your sump pump, follow the tips below.
Things you will need for sump pump cleaning
You will need specific tools that will aid in cleaning your sub pump. They include:
A garden hose
A wet/dry rag
A tarp or plastic sheeting
A large bucket
A plastic scraper
Protective gloves
Precautions
Below are certain precautions you should take before cleaning the sump pump:
Ensure that it is not raining when you are performing the cleaning.
Water should not be flowing into the sump basin from appliances connected to it.
Wear protective gloves during the cleaning.
Steps on cleaning the sump pump
Disconnect and unplug the sump pump
Before cleaning the sump pump, you need to unplug it and turn off the power supply on the circuit breaker. Also, disconnect the sump pump from the discharge pipe. Sometimes, you may use a screwdriver to loosen the sleeve and pull it from the pipe.
Remove the pump from the basin
After disconnecting the sump pump, allow it to drain into the pit. When it is no longer dripping, put it into a bucket or cover it with a plastic tarp or sheeting to prevent spills and take it outside for the cleaning.
Clean the sump pump
With the help of a garden hose, rinse off the dirt from the sump pump. Inspect for grime and use a plastic scraper to scrape off the dirt. Clean the outer surface of the pump using a rag. Spray water on the pump again with a garden hose and leave it to dry.
Drain the check valve
Disassemble the check valve, rinse, dry, and reassemble it. Ensure that your bucket is nearby when draining the check valve.
Drain the sump pit
If there is any standing water in your sump pit, drain it. You can do this with a bucket or wet-dry vacuum. Clean the basin and remove any gravel, stone, or dirt. Doing this will prevent the risk of sump pump clogging or failure.
Clean the grate
It is essential to clean the grate if you have it in your sump pit. Remove the grate from the sump pump basin. Rinse it using a garden hose and wipe it off with a rag.
Clean the sump pump basin
With the help of a scraper and rag, clean the walls of your sump pump basin. Remove all dirt and grime. Ensure that nothing is clogging the drain holes. When your sump pump pit is clean, you will not notice any terrible smell.
Replace the sump pump
After cleaning and drying the sump pump, you can put it back. Ensure that the pump is at the appropriate level and position to enable its function. Check to ensure that the float arm can move freely without touching the basin walls.
Reconnect the pump
Reconnect your sump pump to the discharge pipe and tighten the sleeve. Ensure that there will be no leakage. However, avoid over-tightening it. Plug it back into the power supply and turn on the breaker.
Test the pump
This step is necessary to ensure that everything is functional after the cleaning. To do this, pour water into the basin until the sump pump activates. Inspect the sump pump as it is running to see if there is any fault.
The bottom line
Your sump pump also requires regular monthly maintenance aside from the annual cleaning. The monthly inspection and maintenance will ensure that your pump is functional whenever the need arises. If your pump fails, invite experts to assess and advise accordingly.
0 notes
Text
Reasons Why Your Toilet Keeps Clogging
The bathroom is a high-traffic area in any establishment. If there are issues with your bathroom plumbing system, it can affect the whole functionality and comfort of the room.
A toilet isn’t just an amenity; it’s a necessity. When the bathroom is experiencing problems, it’s essential to find the cause and repair it as quickly as possible. If no amount of flushing clears the issue, then there might be a more significant issue. It’s also possible that your routine is interfering with the functionality of your toilet.
A recurring toilet issue may be caused by flushing foreign objects, the toilet, or the plumbing system. If you have chronic problems with your toilet, it may be due to one of the following issues:
Older Low Flow Toilets
Many older products do not perform as well in modern times. To address this need, manufacturing companies continue to innovate by producing new designs or adding features to their existing lineup. Whether designing a new high-efficiency toilet or adding new features to roof hatches, the manufacturing world continues to adapt to the changing needs of the modern world.
If your building still has early model low-flow toilets, this may be the problem. Older low-flow toilets do not have enough pressure to push through the trap and drain. Weak flushing pressure can leave some material behind, which causes clogs. Sometimes, you need to fully open the supply valve so that there is enough water in the toilet tank, and the pressure can then clear the bowl. Check for leaks in the waterline and cracks in the fill valve and replace these if you notice they are worn.
To fix this, replacing your old low-flow toilet with a new model with high flush pressure is a sure-fire way to eliminate constant clogs. In the meantime, decrease the amount of toilet paper that’s flushed.
Flushing Non-Flushable Items
Using the toilet to dispose of non-flushable items is also a leading cause of clogs. You should never flush baby wipes, cotton balls, diapers, or other hygiene products down the toilet. Otherwise, drain clogs will form, and you will need to call a local plumber to deal with the situation.
Excessive Use of Toilet Paper
Although it is safe to flush away toilet paper, using too much will clog the drain. Excess toilet paper or some two or three-ply varieties won’t dissolve and will stick in the pipes.
Clogged Sewer Line
In some cases, there is no issue with your plumbing fixtures or individual drain lines; instead, the problem is with the main sewer line. Clogs in the sewer line are a hassle because they can impact the drainage and plumbing system’s ability to move waste, causing problems across your entire property. When this happens, you will need to call a plumbing or sewer service company to address outside factors, such as tree root penetrations, sewer line infiltrations, or breaks in the sewer line.
By following these simple suggestions, you can keep your toilets and plumbing systems in good working order, so you don’t have to keep calling your plumber for repairs.
0 notes
Text
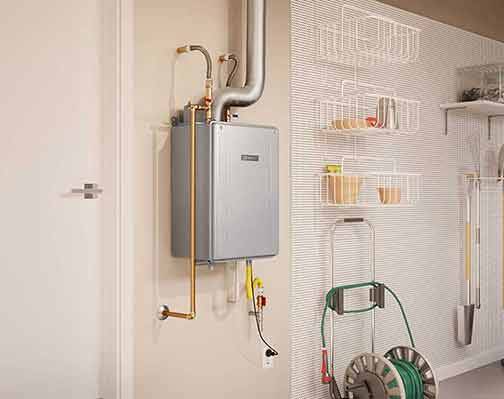
Traditional vs. Tankless Water Heaters – Which is Better?

Which one is better for your home, a tankless water heater or a traditional water heater? If you were to ask this question to ten different persons, you are likely to get ten different answers. But should it really matter which kind of water heater you choose for your home?
The answer is yes. Your choice of water heater influences your energy costs and the overall efficiency of your home, says Drew Doheny Property Management. That’s because water heaters are a big part of what makes your home function. The hot water you use for everyday tasks like washing and bathing comes from the water heater.
You want to be sure that any water heater you spend your hard-earned cash on will be able to meet your family’s needs. Will a tankless water heater meet your home’s requirements, or should you buy a traditional water heater? That depends on your specific situation.
Below we list the pros and cons of tankless and traditional water heaters. Based on the information you can make a decision on which system suits your home better.
Traditional water heaters vs Tankless water heaters
We access the two types of water heaters based on several criteria.
How the water heater works
Traditional water heaters
These continuously heat a tank of water to ensure a constant supply of hot water. The tank can contain between 30-60 gallons of water, with 50 gallons being the most common size. Because they heat water, even when you don’t need it, the cost of running a storage tank is slightly higher.
Tankless water heaters
These don’t need to store water because water is rapidly heated as it passes through the heat exchanger inside the unit. Tankless water heaters heat water on demand. Unlike, a storage tank, you won’t have to deal with standby energy loss. However, if the demand for hot water is high a tankless system may not be able to keep up.
Purchase price and installation costs
Traditional water heater
Storage water heaters are more affordable than tankless water heaters. A standard 50-gallon tank-style water heater will cost $570 – 600, for electric and gas systems respectively. Installing the tankless water heater system is fairly straightforward and will cost you an extra $600 – 800 if you use the existing hookups.
Tankless water heater
Tankless water heaters, being newer technology, are costlier. The cost of a unit is between $525 and $1,150. Depending on the water usage in your home, you may need more than one unit. Installing a tankless water heater cost anywhere from $800 to $1,500. In addition to installation costs for the system, you may need to upgrade your home’s electrical service to 200 amps.
Water heater energy usage and efficiency
Traditional water heater
For storage tanks that run on electricity, you can expect the unit to consume around $580 of electricity on average per year if the cost of electricity is $0.132 per kWh. Gas-powered storage tanks, on the other hand, has an annual operating cost of $245, whereas the average price of natural gas is $10.86 per 1,000 cubic feet. Gas-powered storage tanks are far more efficient than units that use electricity.
Tankless water heater
Generally, tankless water heaters are more efficient than storage tanks if both units use the same fuel type. Gas-operated tankless water heaters have lower operating costs than electric ones; with an annual cost of $195 versus $535. But this is really due to the higher cost of electricity; tankless water heaters that run on electricity are actually more efficient.
Water heater performance
Traditional water heater
Because storage tanks are constantly running, water is already hot by the time it is needed. There is no wait time when you use traditional water heaters. Regardless of whether the unit is gas or electricity-powered, a storage tank will always deliver a steady supply of water at your required temperature.
Tankless water heater
The rate at which a tankless water heater delivers hot water depends on the temperature of the groundwater and your home’s water demand. In most cases, it is not possible to run the dishwasher and washing machine at the same time that someone is taking a shower, when there is just one tankless water heater in the home.
Other considerations
Space
With a traditional water heater, you need space for the tank. Water heater tanks can be as high as 5 feet and 2 feet wide or more. Additionally, they must be installed in spaces with adequate ventilation. This is not a requirement for tankless water heaters.
Safety and maintenance
Traditional water heaters need repairs and maintenance more often than tankless water heaters. With storage tanks, there is always a risk of corrosion, leaks, and safety issues due to overheating. These issues do not exist with a tankless water heater.
Which water heater should you buy?
Tankless systems cost more in the beginning but less going forward. The reverse is true for traditional water heaters. If space is an issue for you, a tankless system clearly makes more sense. Another thing tankless systems have going for them is their superior energy usage and efficiency.
0 notes
Text
Important Questions to Ask a Chicago Plumber Before Hiring

Finding the right plumber when you have plumbing issues in your home is more than half the effort of solving the problem. A good plumber looks holistically at your plumbing systems, instead of simply focusing on the single issue you reported, as amateurs do. That plumber not only solves the plumbing problem but also helps you prevent future problems.
How do you find that kind of plumber?
Most homeowners wait until there is a pressing problem with their plumbing before they look for a plumber, says Envy Property Management. When you do this, chances are you won’t care much about the qualifications of the person you hire. You just want them to make the problem go away. This is one reason why plumbing problems in your home are never completely solved.
To find a qualified Chicago plumber, you should start the process long before there are issues with your home’s plumbing. This will help you avoid the anxieties that lead to hiring the wrong person.
So, what criteria should you use when trying to find a plumber for your home? If you live in the Chicago area, the list below will answer that question for you.
Are they local or national?
A national chain may have all the right people but the two things they lack are flexibility and a personal touch. These are important when looking for a plumber. You want a local company that you can build a long-term relationship with. That plumber should come to know your home’s plumbing intimately so that they can diagnose and solve problems quickly and economically.
What kind of plumbing services do they provide?
When looking for a local plumber for your home, you do not want to hire a commercial plumber in Chicago. Commercial and residential plumbing systems are very different, and a commercial plumber may not give you the kind of service you need in your home. Only hire a commercial plumber if they also provide residential plumbing services.
Ask about licensing, qualifications, and memberships
Plumbers in Chicago are required to have up-to-date licenses to practice in the city. Check that the plumber is properly licensed by the city. You will also want to know if they are members of the local chapter of their professional organization. The training of the employees who will be doing the work matters, so make sure to ask about that.
How long have they been in business?
Experience counts: not everything is learned in training. The longer a plumber has been in business, the more time they have had to gain the needed expertise to solve the most difficult plumbing issues. The other reason to hire an experienced plumber is you can use them as your sounding board; they become a trusted adviser on all plumbing issues.
Are they bonded and insured?
What kind of insurance do they have? How much insurance do they carry? The plumber’s insurance policy should include worker compensation for any worker who is injured while on your property, liability insurance to protect you from lawsuits, and property insurance if your property is damaged by their workers.
What do others say about them?
The company should have an online footprint that you can follow. Check online review sources to see what people are saying about them. Look out for negative reviews and pay particular attention to how the company responds to those. Some online sources where you can look for reviews are BBB (Better Business Bureau) and Yelp.
Can they provide references?
Ask the plumber for a verifiable list of people who have used their services in the last year. These should be people who live in Chicago. Ask the plumber’s permission to contact these references. Make sure to call some of the people on the list to find out what their experience of working with the plumber was like.
Do they offer a warranty on their work?
What happens if there are issues with a job the company did for you? Will they fix the problems at no cost to you? Will there be a warranty on the parts they supply? If there are warranties, you will want to know the terms and conditions attached to them. Warranties should be gotten in writing.
How will they estimate the cost of the job?
Will they provide a free estimate? How do they arrive at that estimate? Will you get a quote over the phone, or should you expect them to do a home inspection? You want your plumber to have the right information about a problem before quoting on the job. Do not work with plumbers who attempt to give you a quote over the phone.
How do they charge?
Do they use hourly rates or flat rates? With flat rates, you know what you are paying for a job, but hourly rates can be unpredictable. You also want to see the contract and payment terms. Do they expect you to pay upfront, halfway through the job, or after the work is completed?
0 notes
Text
How to Thaw and Prevent Frozen Water Pipes
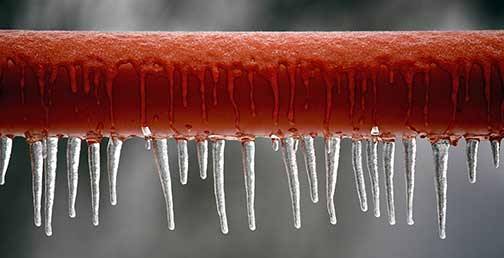
Frozen water pipes are a constant threat during winter. If the only issue with frozen pipes is the temporary disruption of water supply to parts of your home, the problem would be easier to endure. But frozen water in your pipes can leave you with damaged pipes and expensive repairs, warns Liberty Real Estate Services.
Water expands when it freezes and can exert pressures of over 2000 pounds per square inch. This is enough force to rupture your pipe or, at the very least, weaken them. Typically, you don’t even know this is happening until the ice thaws and your home is suddenly flooded.
The result is damaged walls, ceilings, and floors that cost tens of thousands of dollars to repair. This problem mostly happens to pipes that are connected to outside-facing walls, pipes in under-the-sink cabinets, unheated basements or crawlspaces, and outdoor faucets.
What can you do if a pipe in your home is frozen but not ruptured? Is there a way to thaw the frozen pipe without damaging it? Yes, you can thaw a frozen pipe without damaging it. Below are the steps to do this, depending on the location of the pipe inside your home.
Frozen pipes inside walls
Pipes embedded in the walls or ceilings of your home may become frozen. Unfreezing them is harder than thawing pipes that are exposed. If you find that one of the pipes inside the walls or ceilings of the house is frozen, here is what you can do:
Turn up the heat in your entire home – Ensure you leave the cabinet door open if the frozen pipe is in a wall inside your bathroom or beneath the base cabinet for your kitchen sink or vanity. This will let warm air in your home carry heat to the wall.
Open up the wall section – If you cannot wait to let the heated air in your home defrost the pipe, maybe because you think a burst pipe is looming, use this solution. Cut the section of wall or ceiling directly above the pipe and use the same methods you would use to thaw an exposed pipe (explained in the next section).
Thawing exposed pipes that are frozen
If it is an exposed pipe, thawing it is easier since you can apply the steps above directly to the pipe. There are three ways to thaw exposed pipes. Regardless of the one you choose, always start by applying the heat from the faucet side of the pipe or the side closest to the water main and move forward to the frozen area.
Using a hair dryer – This method is the easiest and safest. The items you need are things you already have in the home. To help direct the heat to the backside of the pipe, place a cookie sheet behind the pipe. When defrosting a frozen pipe with a water heater, apply the heat using a sweeping motion across the frozen pipe section.
Use a portable heater – You may also thaw frozen pipes with a space heater. Turn the space heater to its highest setting and let it warm the air around the frozen pipe. Remember to open the doors of the cabinet if the pipe is in a cabinet under the kitchen sink or bathroom vanity.
Use an electrical heat tape – The third way to thaw frozen pipes is with a heat cable; a freeze protection cable you place directly on pipes to unfreeze them. To use the tape, attach it to the copper or plastic pipe with electrical tape, making sure the thermostat is directly on the pipe to sense its temperature.
How to prevent your pipes from freezing
The best way to deal with frozen pipes in your home is to not have them at all. After thawing the pipe, here are a few simple steps you can take to make sure you don’t have this problem ever again.
Keep faucets dripping – If it gets really cold and you think a pipe in your home might freeze, leave the faucet dripping to keep the water inside the pipes moving. This will prevent freezing.
Open the cabinet doors – Keep cabinet doors open to let warm air from the rest of the house circulate into the colder areas inside the cabinet. This will usually be sufficient to keep pipes from freezing.
Wrap the pipe with electrical heat tape – If a pipe is in the habit of freezing, wrap it permanently with electrical heat tape and turn on the heat if the weather starts to get cold.
Add insulation to pipes – To keep pipes in unheated spaces like basements and crawlspaces from freezing, wrap them with foam insulation. But this will only work if the rest of the room is not cold.
Install a permanent space heater – Permanently installing a space heater in unheated spaces in the home – garage, basement, and crawlspace – will keep exposed pipes or pipes inside the walls from freezing.
Disconnect garden hose in winter – If your faucet is not frost-proof, it will be vulnerable to freezing. Prevent this by turning off the water supply to the faucet and removing the garden hoses connected to it.
0 notes
Text
3 Ways to Remove Bathroom Odors

Most people will struggle with bad bathroom odors at some point. Neglecting the bathroom is common for first-time homeowners and students or young people living alone for the first time. Unfortunately, you will rarely find a definitive list of important ways to remove the smell. Additionally, many online posts, such as the ones you can find on social media, are sponsored, and they are trying to sell a product. However, sometimes there is an emergency, and you will require an immediate solution for your home. Thankfully, you can rely on emergency plumbing services that cover Chicago and the more expansive Chicagoland suburbs. To help you keep your bathroom clean, we have compiled this full-proof list of helpful advice on the 3 best ways to remove bathroom odors. There are other things you can do, of course, but a healthy mix of these three actions will render those other ways unnecessary.
Use natural products
The first and most health-oriented way to remove bathroom odors is using natural products for your bathroom upkeep. Let’s go into further details so you can get some ideas on what to do and why. Commercial cleaning supplies are heavily processed and full of powerful acidic chemicals. While they help with a deep cleaning of your bathroom, they also leave a strong chemical residue in the air, which can make a very pungent odor. So, before you start trying to mask foul smells, avoid them entirely by using natural cleaning supplies. This is one of the best ways to remove bathroom odors that come from chemicals. There are many recipes online if you want to make them yourself, but you can also buy them in the store.
Cleaning supplies are commonly made with baking soda, vinegar, and lemon juice. Of course, it is essential to occasionally use stronger cleaning supplies for deeper cleaning. But at least do your best to avoid using them all the time, as they can also be very unhealthy.

You can also find recipes online to make your own natural cleaning product as one of the ways to remove bathroom odors.
Natural DIY air fresheners
Many air fresheners contain chemicals called phthalates. Along with other compounds which are toxic to living beings (especially your pets), they create a more moist atmosphere in your bathroom. Phthalates are supposed to make the effect long-lasting; however, this makes an even better area for mold to develop. In the short term, air fresheners will fix your bathroom odor problem. However, it will just worsen the situation in the long run. That is why avoiding them is one of the most significant ways to remove bathroom odors.
You can avoid chemical fresheners by making your do-it-yourself bathroom freshness spray. Mix 3/4 cup water, two tablespoons of rubbing alcohol, and five to six drops of essential oil in an eight-ounce spray bottle. There are many options, but our recommendations are:
orange,
lavender,
mint,
grapefruit,
lemon verbena.
Natural bathroom odor absorbers
If you want to use bathroom odor absorbers and neutralizers, we recommend choosing between bamboo charcoal and smokers’ candles. Bamboo charcoal is a product that absorbs both foul odors and any harmful chemicals that can be found in the air. Its other benefit is the fact that it helps with dehumidifying air. That, in turn, minimizes the risk of mold and mildew development. You can look for deodorizers and other products with this ingredient.
Smoker’s candles are candles that are specially designed to absorb the smell of cigarette smoke. The reason this is another one of the ways to remove bathroom odors is that it can also absorb any other bad smell. Keep in mind that fresheners and odor absorbers can only do so much. If you are looking for a long-term solution, you should consider checking your bathroom plumbing.

Hoarding cleaning products as a way to remove bathroom odors is absurd since it only makes more odors.
Decluttering is a great way to remove bathroom odors
Taking a couple of hours off your schedule to be able to throw away anything that you don’t need from your bathroom can help remove bad odors in many ways. We are all guilty of holding on to items in our bathroom that we do not need anymore in the hopes that they will come in handy one day. Whether it’s an almost empty mascara tube or an old toothbrush you plan on using for cleaning hard-to-reach small areas, you should throw it away if it takes up extra space right now. Hoarding can be especially unnecessary for things you know can easily be replaced later on.
Keeping your bathroom clutter free is important because the more unnecessary items you have in your bathroom, the harder it is to clean it properly. An example of this would be having too many self-care products (shampoos, shower gels, body lotions) in your shower. If these things are taking up an entire corner of your bathtub, you will probably skip out on cleaning that corner so you wouldn’t have to move all of it. Then the moisture and dirt give way to odors and mold.
If you are going to need it, put it away
Another smart thing to do as a way to remove bathroom odors is to put away anything you do not need in your bathroom right now. So if you like buying cleaning supplies and fabric detergent in bulk, finding a place to store it outside your bathroom will help tremendously. You can either use your shed or rent a storage unit where you can also store other items. Storage services can come in handy since they let you find an adequate place to keep excess items, and you will have fewer odors.
Cleaning regularly is one of the best ways to remove bathroom odors
Of course, the most obvious of ways to remove bathroom odors is also the most important one. Clean your bathroom often and well. Like dust and dirt, smells can accumulate over time. You can reduce bathroom odors and keep them in check by doing many small things. Clean your toilet brush with bleach, wipe down the floor and sink to eliminate hair and dander buildup, and scrub the toilet bowl regularly.
Some strong cleaning products can remove mold and mildew from bathroom surfaces. However, as previously stated, they also leave behind strong chemical odors. Those can lead to headaches and other health risks. You can eliminate mold naturally by spraying undiluted vinegar onto areas where you notice it developing. After that, wait an hour and rinse with hot water. It would be best if you also dried it with a towel after.

Ask your plumber to check your pipes for any clogs which can create bathroom odors.
Plumbing check-up for pipes
Regular plumbing check-ups can also significantly help remove bathroom odors. Ask your plumber to see if there is any clogging or excess dirt buildup in your pipes. He can also tell you whether it is time to get a new water heater, etc. Another tip is to ask your plumber if he can recommend some natural cleaning supplies and ways to remove bathroom odors.
In conclusion
As we have said, there is a lot you can do to make your bathroom smell nice. However, following these important ways to remove bathroom odors will be enough to make your bathroom smell good and render any additional work unnecessary.
0 notes
Text
How to Avoid DIY Plumbing Mistakes

If you want to save money on home maintenance and still be able to solve issues in your home fast, you must become good at DIY. Many of the problems you experience with various features in your home are easy to solve if you are willing to take the time to learn how to fix them, says Keyrenter North Dallas.
Solving minor home maintenance issues will save you money and make your technician’s job easier. You will be able to provide the expert with detailed information to help them narrow down to the root of the problem faster.
That being said, you should never attempt to DIY a problem unless you have first invested the effort to understand the issue entirely. Homeowners often worsen the existing problems in their homes when they try to fix them without first learning the right way to deal with the issues.
Nowhere is this more common than with plumbing problems. Plumbing issues often look easy to fix because of the internet’s many DIY plumbing videos. But one small mistake when solving a plumbing issue can leave your home flooded or without water.
What are homeowners’ common plumbing mistakes, and how can you avoid them?
Plumbing DIY mistakes and how to avoid them
Gluing a painted pipe
When connecting pipe fittings, do not apply glue to a pipe without first removing the paint on that end of the pipe. If there is a thin layer of paint between the two parts, the glue will not adhere properly, and the joint will leak. To avoid this problem, remove the paint on the end of the pipe with paint thinner.
Reusing flexible hoses
Flexible hoses are made of a rubber core within a stainless-steel jacket that protects them from damage. Flexible hoses are the weakest links in your home’s plumbing. They typically have a lifespan of five years and should never be reused.
Using the wrong plunger
It would help if you had separate plungers to remove clogs in your toilet and the kitchen sink. Toilet plungers have a different design than sink plungers. Sink plungers are ineffective for removing clogs in the bathroom because they do not have a flange and cannot seal the hole properly.
Cooling a soldered joint
Never use water to cool a soldered joint; it will defeat the entire purpose of soldering the joint. That is because the rapid temperature change will cause the soldering to crack. Instead of forcibly cooling the joint, give it 30-60 seconds to cool. To know if the solder has cooled, wait until it goes from a shiny to a matte color.
Not disconnecting an outside hose during winter
This is one of the quickest ways to ensure your pipes get frozen. When you fail to disconnect a hose connected to an outside faucet, the water inside the pipe does not drain. As temperatures get lower, the trapped moisture in the pipe freezes and expands until that pipe is damaged.
Soldering over a leaky joint without cleaning it
If a soldered joint is leaking, fusing over the existing solder might look like an easy fix. But this does not solve the issue long term since the solder does not penetrate the joint properly. The right way is to disassemble the joint and clean the pipes before soldering it.
Not isolating an external faucet
An exterior faucet is in contact with the cold air outside your home during winter. It can transfer the cold outside to the pipes inside the home, causing the water in them to freeze. To avoid this, isolate the exterior faucet by shutting it off from inside the house and draining all the water.
Failing to install a P-Trap
A P-trap is essential for keeping sewage odors from coming into the house. Failing to add this small detail to drain outlets for your sink, bathtub, washing machine, sinks, shower, and floor drain will leave your home at the mercy of foul odors from your drains.
Using the wrong glue
Glues are made for use with specific types of plumbing pipes. Just because a particular kind of glue can hold your pipes together doesn’t mean the pipes are thoroughly sealed. Pipes that are joined with the wrong type of glue will leak soon after the water passes through them.
Not sloping pipes correctly
A proper slope is necessary to keep wastewater flowing when installing drainpipes. Without the appropriate slope, water will stagnate in the pipes or flow in the wrong direction. Sloping your pipes also keeps them from siphoning air out of nearby P-traps, allowing sewer gases into the home.
0 notes
Text
What To Do When A Pipe Bursts?

Even though you don’t see them often, there are water pipes inside the walls, floors, and ceilings of almost every room in your home. These pipes make it possible to enjoy one of the biggest wonders of modern life; access to clean water on demand.
But just as your home’s plumbing can make your life convenient, the plumbing can also cause massive destruction to your home, warns RENEW Real Estate. This happens when a plumbing pipe ruptures and spills the water inside it into the home. Burst pipes are a constant possibility with modern plumbing.
Every year, 250,000 American homes suffer property damage due to a burst pipe, and the average insurance claim for each of those homes is $15,000. What causes water pipes to burst, and how can you prevent it? More importantly, what should you do when a pipe bursts?
What to do if a pipe bursts in your home
Follow these steps to minimize water damage to your home when a plumbing pipe bursts.
Step one: Find the main water shut-off valve and turn it off
This will turn off the water supply in your home. The main shut-off valve is usually located in the basement, near the water heater and after the water meter. Turning off the main shut-off valve will prevent further water damage to your home. If the burst pipe section has its own shut-off valve, you may also turn off the water supply at that point.
Step two: Turn off the electricity if necessary
If there is a chance that the spilled water may come into contact with a power outlet or an electrical feature in the house, you may want to disconnect the power supply to your home. This precautionary step will prevent electric shocks, short-circuiting, and damage to your home appliances.
Step three: Remove your personal belongings from the path of the water
If there are any items that the water may damage near the area of the leak, move them out of the reach of the water. This is important because if you have to make an insurance claim for damage caused by the leak, your insurer will not cover damage to those items. Removing them will reduce the cost of fixing the damage.
Step four: Take photos of the scene
You will need a visual record of what happened if you want to file an insurance claim. Take photos of the damaged pipe (or the general location of the leak if you don’t know where the burst pipe is) and the spilled water on the floor of your home. After you do the steps below (before and after you call your plumber), take photos of the scene.
Step five: Drain water from pipes
Open the faucets in your home to drain any water inside the system. Don’t do this step if you did not turn off the home’s water supply from the main shut-off valve. Only open your faucets if the water supply to the entire house is suspended. Draining the pipes will prevent accidental spillage when the damaged section of piping is either removed or repaired.
Step six: Dry up the water
Remove the water as quickly as possible by mopping it up with a mop bucket. Move items near the site of the spill to dry up any water that has collected beneath or behind them. Use a fan or dehumidifier to dry the area after mopping the water. The longer water remains on the surfaces, the more time it can penetrate and damage them; that’s why you want to be very thorough when drying your home.
Step seven: Call your plumber
Do not try to fix the damaged pipe by yourself. Repairing the damaged pipe yourself could expose your home to the risk of future water damage if that damaged section of plumbing is not mended correctly. You may not get compensation from your insurer if you fix the pipe yourself and it bursts again. You are better off letting a local plumber handle the issue to avoid future problems.
Step eight: Learn how to prevent pipes from bursting
To save yourself the aggravation of cleaning up your home, fixing a damaged pipe, and filling out insurance paperwork after a burst pipe, here are the things you can do to prevent the problem:
Be aware of where your main shut-off valve is. In the time you take to look for the main shut-off valve in the wrong places, water can do massive damage to your home.
Tag the main water shut-off valve and let everyone in your household know where it is and how to use it.
Take the right steps to protect your water pipes during winter. Many pipes burst due to frozen water inside them during winter.
0 notes
Text
5 Benefits of Professional Drain Cleaning Service

Plumbing systems are designed to withstand constant use throughout the year. But the resilience of your home’s plumbing system can also become a problem; as Paradise Management explains, it could be why you don’t view the plumbing as a top priority when cleaning the house or doing routine maintenance.
But just because your home’s plumbing doesn’t break down often doesn’t mean the system does not need regular care. Many of the plumbing issues you have had in the past or the ones you will have in the future are the results of minor problems you overlooked.
Plumbing systems will have problems and break down from time to time; that is normal. But if those issues become frequent or worsen with each occurrence, it indicates a long-term issue that has not been solved. Examples of such long-standing plumbing problems include:
Several drains inside your home are clogged simultaneously; the toilet, sink, and shower may have issues simultaneously. Or you may have clogs that persist for more than one week. These are signs of longstanding issues with the plumbing coming to the surface.
There are bad smells around the home, and they refuse to go away even after you clean your home. The usual cause of this problem is accumulated waste inside your drainpipes. The decaying materials release obnoxious gases that find their way into the house.
Gurgling sounds inside the drains. Air may become trapped inside your pipes as a clog forms within them. When water enters those pipes, that air is compressed and tries to find a way out through your drain opening. The escaping air causes the gurgling sound you hear.
Invasion by fruit flies. If you see a lot of drain flies inside your home, there must be some decaying matter inside the house. If you have checked and your trash does not cause the problem, the most likely cause is a blockage inside your drains.
What should you do when you have drain issues?
Most homeowners will use DIY solutions until the problem becomes so bad that the DIY solution doesn’t help anymore. Standard DIY solutions homeowners use include removing the clog with baking soda and vinegar or pouring a chemical drain cleaner into the drain to remove the clog.
But these DIY solutions do not really solve the problem; they only relieve the immediate symptoms. Even worse, some DIY solutions, such as chemical drain cleaners, worsen the situation. On the other hand, a professional drain cleaning service such as a drain rodding or hydro-jetting is always the best option for solving plumbing issues in your home.
Here is why.
Five benefits of hiring a professional drain cleaning service
Avoid hassles and complications
Your home’s plumbing issues will never stop when you use short-term ineffective solutions. Living with drains that need constant cleaning or toilets that must be plunged every week is a major pain. The emotional toll of the problem is just one part. In addition to the stress, these DIY solutions will cause complications in your plumbing system, costing you tens of thousands of dollars to fix.
Avoid unnecessary health issues
Increased respiratory problems and allergic reactions among family members or pets are some health problems resulting from not handling drain issues well. This is because mold and mildew take hold inside the home’s drains or chemical drain cleaners find their way into the water supply. Conversely, the methods used by professional drain cleaning services will not endanger humans or the environment.
Save money in the long run
The number one reason homeowners prefer DIY methods for their drain problems versus hiring a professional drain cleaning service is that they want to save money. But do DIY solutions save money when they don’t actually solve the problem from the root? The problem only worsens, and the cost of fixing it becomes much higher. This would not happen if a professional drain cleaning service were hired from the get-go.
Detect problems before they happen
DIY methods are only useful after a plumbing problem becomes evident in your home. They are reactive in nature. Hiring a professional drain cleaning service for your home’s plumbing works differently. The local plumber will not only correct the current issues with the plumbing, but they will also prevent future problems by detecting potential issues and taking preemptive steps to solve them.
Get professional advice
A professional plumber also plays the role of a consultant. They offer insights that can help you protect your home’s plumbing. This is important because many of the issues with your plumbing are caused by misuse of the system. A professional plumber will also help you take advantage of innovative plumbing products just entering the market. They will help you stay updated with changes to the building codes that may affect your building.
0 notes
Text
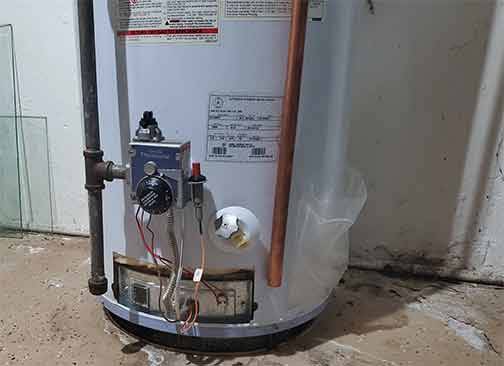
Troubleshooting an Electric Water Heater

Are you having trouble with your water heater and trying to figure out the problem? Water heater repairs are a big headache, and they can throw your entire home out of order. As JTS Management points out, knowing how to detect the root of the problem when a water heater malfunctions can be a great help.
How do you troubleshoot a water heater if it is not working? To do that, you must be familiar with the water heater’s components. You also need a step-by-step process for checking the water heater. This post provides the information you need to do all of these.
How to troubleshoot an electric water heater
Part one: Testing the water heater elements
Step one: Shut off the power
You need to locate the breaker that says “water heater,” “tank,” or “HWT” inside your circuit breaker box and flip it to the off position. You may also want to unplug the water heater from the wall if you can see the power outlet where it is plugged in.
Step two: Open the access panels
Remove the covers of the upper and lower access panels to reveal the element and thermostat. After you do this, you will want to remove the insulation. After, carefully remove the plastic cover over the part and thermostat.
Step three: Check that power is off
Before figuring out the problem with your water heater, you need to verify that the power is off. To do this, touch the electric wires inside the access panels with a volt-stick. If there is power in the water heater, the volt-stick will light up.
Step four: Test the upper element
Remove the two wires connected to the upper element and then do a resistance test to see if the upper part is working. For this, you will need a voltmeter. Simultaneously touch the voltmeter probes to the two terminals on the upper element where the wires were attached: one probe to one screw and the other probe to the second screw. If the meter registers resistance, the element is fine, but you need to replace the part if it registers no resistance.
Step five: Test the lower element
Repeat the above steps with the lower element
Step six: Test for grounded element
This test follows the same process as the ones already done. You will need the voltmeter, but you want to set it to ohms this time. Touch the probe to one of the terminals on the element and, instead of the other terminal, touch the second probe to the steel surface on the inner wall of the water heater behind the element. If the element is in good condition, the voltmeter will not register any resistance. If the voltmeter reads resistance, the element is grounded and needs to be replaced.
Part two: Testing the thermostat
The thermostat controls the heating element in the water heater. The thermostat maintains water temperature inside the tank by opening or closing the contacts that allow power to flow to the elements. If a water heater has two heating elements, it will also have two thermostats.
When testing the water heater thermostat for defects, you are looking for continuity. This is a continuous electrical path that should be present within the device. If there is no continuity, the thermostat is damaged and needs to be replaced. Here is how to test the thermostat in a water heater.
Step one: Getting ready
You will need a multimeter for this test. If using an analog multimeter, set the dial to the lowest level for ohms of resistance. Calibrate the meter by pinching the needles together and adjusting the needle to read zero. If using a digital multimeter, rotate the dial to the lowest level for ohms of resistance or resistance with tone.
Step two: Check the power supply and remove the access panel cover
Follow steps two and three in Part One above.
Step three: Reset the thermostat
The upper thermostat has a reset button; this can trip if the water in the tank is overheating. Overheating is often caused by thermostat contacts that have fused, shorted heating elements, or the thermostat is out of calibration. Push the reset button to reset the thermostat.
Step four: Test the thermostat
Isolate the thermostat from the circuit by disconnecting the wires. Note the position of each wire before you do this. Next, touch one multimeter probe to one left side terminal on the thermostat and the other probe to the other left side terminal. For digital meters, the thermostat is okay if the reading is zero (or almost zero) ohms. But if using an analog meter and there is no movement in the needle, the thermostat has no continuity and should be replaced.
0 notes
Text
5 Most Common Plumbing Problems in Chicago
Every home needs water. We need water for cooking, cleaning, and personal sanitation. It would be impossible to live in a modern home without water running inside its structures. But to have access to that water, you need a system to deliver clean water to the house and take away the dirty water. That is what the plumbing system in your home does.
A home’s plumbing system consists of hundreds of feet of pipes with valves, connections, and other components. It is one of the most complicated and most used systems in the home. As a result, problems with the plumbing system are among the most common issues homeowners in Chicago encounter.
Plumbing problems are one of Chicago homeowners’ biggest issues because:
They are hard to detect. The typical way homeowners discover an issue with their plumbing is when the water supply stops or water goes where it is not supposed to. But before the problem goes that far, it will show subtle signs that go undetected.
They cost a lot of money to fix: Plumbing issues often cost a lot of money to repair. That is not because of the cost of fixing the damaged components. Instead, it is due to the cost of repairing the damage the issue has done to the surrounding areas.
That is why plumbing problems are best discovered early and solved on time. Finding a problem before it causes damage to the structures of your home can save you hundreds of thousands of dollars, says Income Realty Corporation. To do this, you need to know the common plumbing problems you are likely to face in your Chicago home and what you can do to solve them.
Five most common plumbing problems in Chicago homes
These five problems top the list of plumbing issues occurring in Chicago homes.
Drain clogs
A drain clog is a common occurrence in the home, and it can happen in different parts of the plumbing system. Drains get clogged when an item or material obstructs drain pipes. That occurs in the kitchen sink or bathroom drain. Drain clogs can be minor issues requiring a few minutes to solve, or they can be leading problems that require special equipment and lots of time. You can clear most clogs by using a plunger, drain snake, or running the disposal unit. If these DIY solutions don’t work, it will be necessary to contact your local plumber.
Frozen pipes
Water has the odd behavior of expanding when it freezes. That can be a problem for your plumbing system. Frozen water inside pipes will not only cut off your water supply, but it can also cause the pipes to rupture. It takes only a few hours of below-freezing temperatures for pipes to freeze. The best way to keep pipes from freezing is to install PEX pipes in the home or take precautionary steps to keep water flowing through the pipes. If you find that the pipes in your home are frozen, the best solution is to call a plumber who specializes in repairing burst pipes.
Water leaks
Leaks are another major issue. This problem results from the highly mobile nature of water and its corrosive powers. Over time water will erode any material it is flowing. Water also carries particles and chemical substances that get deposited inside pipes. These two effects can result in pipes bursting or wearing out, causing leaks. Water leaks also happen when water pressure is too high or frozen pipes thaw out. Leaks are a crucial problem because they often occur inside the walls and damage your property. The best way to prevent leaks is to inspect the plumbing system regularly and install a leak-detection system.
Water heater issues
Water heater malfunctions are among the most annoying plumbing problems; think what it feels like to get cold water dumped on you when trying to take a warm shower in the morning. Water heater issues will also deny you access to warm water for washing dishes and clothes. Several issues can cause water heater malfunctions, leaks, water hardness issues, and faulty components. The best way to prevent issues with the water heater is to be aware of its life expectancy and know the telltale signs of problems with the equipment. Water heater issues should never be DIYed; always call your plumber for any kind of water heater repairs.
Sewer line problems
Sewer lines carry wastewater out of your home into the municipal sewers. Problems with the sewer line are not only frustrating and disgusting, but they are also potential health hazards. They will expose you to unsanitary materials that can harm your health. The most common sewer line problems you are likely to face are clogs and leaks. These are due to several issues: flushing prohibited items down the drains, old and worn pipes, or damage from tree roots. If you think there are issues with your sewer line, contact a professional plumber at once.
1 note
·
View note
Last Seen Blogs

papillionsoul
黒主 優姫

ingramerassistant-blog
Ingramer

magnoliacrowned
devoted.

pocket-watchprizes-org
Pocket watches

multi-kpop-fanfics
everyone calls me monster