
Don't wanna be here? Send us removal request.
Statistics
We looked inside some of the posts by chicagoplumbingexperts and here's what we found interesting.
Average Info
Notes Per Post
10
Likes Per Post
10
Reblog Per Post
0
Reply Per Post
0
Time Between Posts
5 hours
Number of Posts By Type
Text
17
Last Seen Tumblr Blogs


Fun Fact
Premium Tumblr themes are available from anywhere between $9 to $49.
Text
How to Recognize a Leaking Sewer Line

One of the more essential aspects of every home is the sewer line system. As you can imagine, or already know, having a leaking sewer line is not a walk in the park. It may cause some severe issues to your home and property. Maybe the worst thing of all is that it spreads odors from the lines. When it comes to sewer line leakage, many factors can lead to them. Recognizing them, on the other hand, is not an easy task. This is primarily due to the fact that most of the time, the source of the issue is somewhere deep in the lines beneath the ground. This article will discuss how to recognize a leaking sewer line and ways to address it.
A leaking sewer line
There are many factors contributing to the creation of a leaking point in a sewer line. Some of them are more serious than others and require more time and money to repair. Here are some more prominent factors:
old sewer line
debris got stuck in the line
cracked pipes
not durable pipe material
floods
According to experts, these are the usual “culprits” when it comes to leaks in sewer lines. They also state that as soon you act to mitigate the damage, the better. It can quickly become an even more severe problem and incur more property damage. That means putting even more time and resources into repairs.
Recognize a leaking sewer line by the sound
More often than not, you can recognize a leaking sewer line by the trickling sound it emits. Hearing the water running and ticking in the faucets and toilet when they are not in use points to a leaking sewer line. The sound of water trickling in the walls or above you also point to leaking sewer lines. Expert movers at allseasonmovers.com suggest you act as soon as possible and call experts to help. This can be crucial because these can be the early stages of the problem and should be stopped there and then. Damages and issues that occur if you leave this unchecked can be numerous.

Leaking sewer line can be recognized by the trickling sound
Moist floors can help recognize a leaking sewer line
The moist floor is a usual telltale sign that your property is suffering from a leaking sewer line. If the floor is very wet and feels spongy, it points to excessive water accumulating in it. Since the pipes run through the floor, if they start to leak, chances are that the floor will sponge all that water and become soaked. It can go through the floor and the surface when accumulating enough water. This can go to such lengths as the whole floor can be soaked wet. Sadly, this means that the damages it has caused are vast. This is why acting on time can prove to be crucial.
Cracks in the foundation
Another problem that is closely connected to the wet floors is the cracks appearing in the foundation. This problem is less visible, and the damages are more subtle. Still, if left unremedied, it can cause some severe damage to the foundation. If you have faulty sewer lines, the water can gather in small pools. Over time, these pools of water shift and change the foundation. They also incur cracks and swelling of the base surface. Needless to say, this means spending a lot of time, effort, and money in order to repair the damages. Sewage leaks can also lead to concrete sidewalks and driveways buckling.

Moist floors and cracks in the foundation point to a leaking sewer line
Plumbing inspection for new homes
When buying a new house, you should be extra careful with plumbing. It can be very beneficial to inspect all the systems before moving in. Plumbing inspections for new homes, in general, are the cheapest and most competent way to determine if there are any possible shortcomings in the plumbing system. They are also extremely important in order to keep your plumbing in check in the future. As the system gets older, more and more problems will have a chance to occur.
Odors are a way to recognize a leaking sewer line
Without any doubt, odors point to a leaking sewer line. If you approach the sink, toilet, or any faucet and are immediately put off by the unpleasant odor, you are suffering from a leaking sewer line. If left in the same place for a more extended period of time, water leakage in the pipes becomes an ideal ground for fungi to grow. This fungal growth is the source of unpleasant smells and odors coming from the pipes. Regular inspections, sewer camera inspections, and maintenance of the lines can locate and clear them. Another way to spot the water accumulating around the pipes is mold and a weak spot that it creates in the wall, for example.

An increase in water bills might be due to a faulty sewer line
Higher water bills
Sometimes leakage can be tracked or traced to its source. But you can definitely see it through your water bills. If you are getting unusually high water bills, it can point to a leaking spot or many, in fact. Spikes in water bills can be due to many other factors, but if you constantly keep getting higher water bills, then it might point to a leaking sewer line. This means you are paying for water that is not distributed to you but instead goes through the leaking holes into floors, walls, and other surroundings, making you pay more and end up not using that water.
Having a leaking sewer line can be quite a tough challenge to overcome. Recognizing a leaking sewer line is not an easy task either. Constant leakage, higher utility bills, and damage to walls, floors, and other parts of the property are just some of the indications that you have a problem with sewer leakage. It is always best to act on early warning signs, which will reduce the chance of damage occurring or spreading further and requiring a sewer line repair.
1 note
·
View note
Text
11 Spring Plumbing Tips

Okay, you know you should prepare your HVAC system and lawn for spring. But does your plumbing also need you to do anything to prepare it for spring? Yes, it does. These tips from TrueNest Property Management will help you avoid plumbing issues when winter is over, and spring is in full swing. In addition, it will get your home in shape for summer and avoid costly repairs.
Tips to help you get your plumbing ready for spring
Start with your yard
Ensure your storm drains can handle large amounts of draining water by clearing them of any leftover debris from fall. Doing this will help you avoid flooding. Look around your yard and remove any winter debris that could get washed into the storm drains to block them.
Check your external drainage system
Before the spring rains begin in earnest, you want to check the condition of your external drainage system. Check yard drains, roof gutters, and downspouts for signs of damage. Remove debris inside the gutter and make sure downspouts are facing away from the foundation of your house. Ensure the ground around your home slopes away from the base of the building to prevent flooding.
Check outdoor faucets and sprinklers
Pipes left outside may freeze during winter and break as a result. But you may not notice the damage until the weather gets warmer. Inspect outdoor pipes for signs of leaks. Check hose bibs and water supply lines for signs of cracking and splits. Do this before turning on the hose or faucet. While they are running, also check them for signs of damage.
Test the sump pump
You are about to enter the season when the sump pump in your basement is going to be called into action frequently. You want to make sure the equipment is ready to handle the demand. The sump pump has lain idle since the fall and may sustain damages. To avoid unpleasant sump pump failures, inspect and test-run the sump pump.
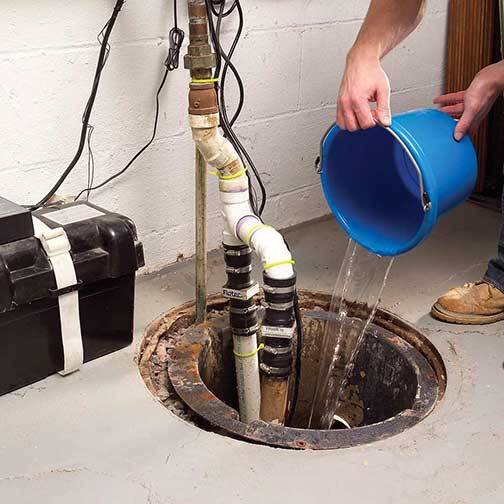
Check least used drain
Whether they are inside a guest room, the basement, or some infrequently used part of the house, you don’t want to overlook your least-used drains. To test them, pour a bucket of water into it and see how fast the water drains. That will also fill the trap with water and keep terrible odors out of your home. Listen for gurgling sounds when you do this.
Check the water heater
There are several steps you have to take to ensure the efficient function of the water heater. Firstly, you want to remove deposits that hamper the water heater’s efficiency by flushing the appliance. You also want to test the pressure relief valve by moving it up and down several times. Lastly, adjust the temperature settings to what is suitable for spring.
Check water valves in your home
Walk through your home and locate each water valve in the house. People often forget water valves until they have an emergency and need to shut off the water supply. But seldom-used valves can get stuck. You can prevent this by simply turning the valve off and on once in a while. It would be best to do this for controls outside the house.
Install or check flood alarms
If you don’t already have a flood alarm installed in your home, you need to do it ASAP. These simple devices can save a lot of money. Even if you have a reliable sump pump in the basement, you still need flood alarms for places like bathrooms. Check that installed flood alarms are working, and if they are not, you will need to replace their batteries.
Check your faucets
Go through your home and run every faucet in the house. Let them run at once and check the overall water pressure of the house. Run the faucets on cold and hot water if they have not used them for a while. Look for faucets running at low pressure; this could be a sign of leaks somewhere in your plumbing. Also, check faucets for damaged valves and aerators.
Inspect all exposed pipes
If you did not winterize the pipes under your bathrooms, kitchen sinks, water supply lines to appliances, and toilets, you need to inspect them. These exposed pipes are prone to freeze and burst during winter. But the damage is not always evident until much later. Early detection of any damage to your pipes will save you a lot of money.
Check your toilets
Check your toilet for leaks by dropping some food coloring in the tank and waiting ten minutes to see if the color finds its way into the toilet bowl. If you find coloring in the toilet bowl, there is a leak. You also want to check the flushing mechanism on the toilet to make sure it is working.
1 note
·
View note
Text
Sewer Tree Root Removal

Tree roots pose one of the greatest threats to your home’s sewer lines. Every time you bury a pipe in your yard, you run the risk of tree roots interfering with it. Underground sewer lines carry nutrient-rich wastewater, and tree roots love nothing more than a nearby source of nutrition.
Tree roots and sewer pipes are a “match made-in-heaven”. However, it can cause you major plumbing problems when the two meet.
Tree roots spread out in search of available nutrients. If they find a spot in your yard where nutrients are easily accessible, they will try to make the most of that food supply. Your sewer pipes can serve as that accessible source of nutrition.
It happens only if sewer pipes leak. That is because the water inside sewer pipes is not accessible to plant roots if there is no leak. But the tiniest crack in a pipe will be exploited by plants. Once the root works its way into the break, it is only a matter of time before it fills the entire pipe.
Tree roots intrusion into sewer lines is one of the most common causes of sewer line damage. Early signs that your sewer line has tree roots are slow draining water and gurgling sounds coming from the toilet every time you flush.
The chances of this problem happening in your home increase with the age of the house. Older homes with old pipes prone to corrosion are more exposed to this problem, explains Keyrenter Premier Property Management. Tree roots intrusion in sewer pipes is also more likely if there are trees within 20 meters of your sewer lines.
Is there a way to remove tree roots if they find their way into your sewer lines? What can you do to prevent the problem? There are two aspects to dealing with the issue of tree root intrusion into sewer lines. You must get rid of the roots and repair the damage to your pipes.
This post deals with tree root removal only.
How to remove tree roots from your sewer line pipes
Below are three DIY options for removing tree roots from a sewer line. These options only work for removing small tree roots. If you try them and the problem does not go away, you will have to go for the fourth solution; getting a professional to solve the issue.
Use rock salt
Rock salt is not coarse sea salt or table salt. It is that stuff you throw on icy sidewalks. Rock salt helps remove tree roots because it draws the water from them. If you deprive them of moisture, tree roots become dehydrated and die. Rock salt can be bought online or at a local store; you need 2 pounds of it.
To do this, follow these steps;
Pour ½ a pound of rock salt into your toilet.
Flush the toilet as many times as necessary to push the salt into the lines.
Once the salt is gone, let it sit inside the pipes for at least 12 hours.
During this time, do not flush your toilets. It will give the salt enough time to do its work.
Note that rock salt will kill tree roots, the tree, and surrounding vegetation. Rock salt can also corrode and weaken pipes.
Use copper sulfate
Copper sulfate, also known as bluestone, will kill the tree roots inside your sewer line pipes. You can buy this cheap herbicide/algaecide at your local hardware or garden supply store. You only need a half cup of copper sulfate.
To use it, follow these steps;
Pour half a cup of copper sulfate into the toilet.
Flush until all the crystals get into the lines.
Open the windows in your home and leave the house for a few hours, taking your kids and pets with you.
Flush the toilet when you return.
Warning: copper sulfate is toxic to pets; it can kill them on contact. It is banned in certain places; before you use it, check the local legislation.
Use foaming root killers
Foaming root killers kill tree roots and keep them from growing back. This powder foams when it comes in contact with water. Tree roots hate the active agent in the powder – dichlobenil – and will stay away if they detect the substance.
To use the powder, pour it into your toilet and flush. It will locate the tree roots and kill them. It also leaves a residue that prevents future tree root intrusion. You can repeat this every month to avoid future problems with tree roots.
Cut the tree roots
This solution requires you to call a local plumber, and it works for both small and large tree roots. The plumber will first do a camera inspection of your sewer lines to know the exact location of the tree roots. Afterward, they can get rid of the tree roots using any tree root removal method of their choice; hydro-jetting or sewer rodding.

High Pressure Water Streaming Known as Hydro-Jetting is the Best Way to Cut Through Tree Root Infiltration in your Sewer Line.
1 note
·
View note
Text
Plumbing Problems in Older Homes

An older house often means more work for its owner than a recently built one. Their systems and structures have seen more use than a new house. Therefore, you can expect more wear and tear on an older home than a new building.
As the owner of that older home, you must be aware of the greater risk of damage to the components of your home, says Property Plus USA. Having this knowledge and taking the appropriate steps to preserve the features of your home will let you get more use out of them and protect your wallet.
One of the systems of your home where you are most likely to experience trouble is with the plumbing. Ordinarily, the plumbing system in your home is one of the highest used, but when you add age to the equation, you can expect a lot of problems with this component of the house.
What are the plumbing issues you should expect as your home gets older?
Common plumbing problems in older homes
Outdated piping
Depending on the era the home was built, it could have one of these defective piping materials; lead, galvanized steel, or polybutylene. Lead was popular in homes until its ban in 1986. Galvanized steel, which replaced lead, was highly corrosive and later fell out of favor. The last material on the list – polybutylene – was not discovered to be defective until the early ‘90s. If your home was built during the periods when these materials were actively in vogue, they are still part of your plumbing system.
Worn-out and outdated fixtures/connections
The faucets, fixtures, and connections in your home may also have issues since most of them will be nearing or past their projected lifespan. One of the problems you will notice with worn-out fixtures is restricted water flow due to corrosion. Some of these issues may not be obvious because they happen gradually over time, and you may have become accustomed to how the fixtures function.
Issues with piping
You may experience the following problems with the pipes in your home:
Corrosion: Several older homes have metal pipes (galvanized steel and copper pipes) instead of PVC pipes popular in modern homes. These metal pipes corrode effortlessly. The chances that some of your plumbing pipes have rust are very high, and this is often evident in the number of leaks you have in the home. Metal pipes also make the water flowing through your home unsafe for drinking.
Pipe bellies: This problem results from movements in the soil surrounding underground piping. Gradual movements beneath your home – which is typical and often unnoticed – can force pipes to move upwards, sideways, or downwards. Sometimes these movements are severe enough to restrict the flow of water or stop it altogether. This problem can also cause leaks in water and sewer lines.
Leakages: Pipe leakages are also common in older homes due to the piping materials fitted in the homes. Polybutylene, for instance, tends to weaken over time. This piping material is easily-damaged by continuous exposure to water. If the pipes in your home are polybutylene or metal, you can expect to see a lot of leaks.
Low water pressure
Corroded old pipes clogged with deposits will reduce the water pressure in your home due to the smaller diameter of the pipes. Low water pressure will make simple everyday tasks like taking a shower or using home appliances – dishwasher and washing machine – difficult.
Tree root intrusion and sewer line issues
If the house is old, it is more likely that any trees in the yard have been there for a long time. Tree roots that have established themselves can easily damage underground piping. Typically, the roots seek out the pipes to get the nutrient-rich water inside them, but this mostly happens when a pipe is already leaking. Other times, tree roots may grow over or beneath a pipe and dislodge it. That may eventually cause the sewer line to leak, resulting in more tree roots growing in that part of the soil. Tree root intrusion leading to sewer line issues is widespread with old houses. Fixing this problem and generally working in your garden will also increase the value of your home.
Clogged drains
The common causes of clogged drains are food particles, grease & oil, hair, and soap scum. These may not cause problems in the short term, but over time, the continuous deposit of these materials inside the drains can increase the incidence of clogs. The probability of drains getting blocked also increases with rusty pipes in the plumbing system. Rusty pipes contain deposits that encourage the formation of clogs.
Improper installation
The probability of the existence of badly executed repairs and installations increases with the age of your plumbing system. That depends on how many people have worked on the plumbing, particularly when amateur plumbers meddle with the plumbing. A single terrible installation may not cause you problems, but the cumulative effect of several bad jobs done over some time can create serious issues.
4 notes
·
View notes
Text
How to Maintain an Older Water Heater
Old household appliances are more susceptible to breakdowns than new ones; all the years of use start to take their toll. The wear and tear on your equipment often mean you can’t get as much work from an old appliance as you can from a new one. Usually, the only way to deal with this loss of reliability is to replace the old water heater tank with a new one.
Along with your refrigerator, the water heater is one of the most used appliances in your home. Water heaters are indispensable for making simple things like taking a shower or washing dishes convenient. Without a reliable source of hot water in the house, it would be almost impossible to live in it. Water heater malfunctions are therefore one of the most distressing issues in the home.
Since an older water heater can mean more home maintenance issues, how can you reduce incidences of breakdowns with the older water heater in your home?
There are only two ways to deal with that old appliance. You can replace it with a new one or look for ways to extend its life. Is there any way to keep getting value out of your water heater even when it is old? The answer is yes. All water heaters have their expected lifespan, but you can extend the equipment’s life through proper maintenance, says Rollingwood Management Inc.
The steps for prolonging the life of a water heater are easy to do and affordable. They do not require special knowledge, and you can do them with the tools you already have in your home. All that is needed is to be timely in applying the steps and enlist the help of an expert when it is necessary. Here are the steps to keep your old water heater running smoothly.
Six steps for maintaining an older water heater
Test the TPR Valve
The TPR valve (temperature & pressure relief valve) keeps the water heater safe. It releases water and pressure if these get too high inside the tank. If the thermostat inside your appliance fails and the temperature gets too high, the valve lets the excess steam escape to prevent an explosion. The TPR valve should be tested twice a year by simply carrying it up and down several times. A gurgling sound should follow this action as water flows into the drain tube.
Insulate the pipes
By reducing the rate of condensation, insulated hot water pipes cut heat loss by as much as 45% and reduce your heating costs by 9% or more. To insulate the pipes, you need self-sticking 3/8-inch foam pipe insulation. The foam should match the diameter of your pipes. Slide the foam over the hot/cold water pipes as far as it will go. Then squeeze the end of the foam and tape it. Ensure at least 6 inches of space between the insulated pipe and the flue.
Insulate the water heater tank
Insulating your water heater will improve its efficiency, reduce heat loss and shave dollars off your heating bill. Insulating the water heater is as simple as wrapping the tank with an insulating blanket. Buy an insulating blanket that matches the size of your water heater tank. Turn the power off on the appliance and wrap the blanket tightly around the tank. Cut off those parts of the blanket that cover the valves and panels. Turn the power back on.
Setting the temperature
The optimal temperature setting for your water heater will let you maximize the appliance and prolong your water heater’s life. For the best results, set the temperature between 130F° and 140F°. Higher temperature settings can result in burns. Lower settings may encourage bacteria to grow inside the tank. To set the temperature, look for the temperature dial on the side of the tank. Unscrew the cover. Using a flathead screwdriver, adjust the dial to the required settings.
Flush the tank
All the mineral content and particles in the water entering your water heater can end up inside the tank. As the water gets heated and evaporates, it leaves sediments that can impair the performance of your appliance. Sediments also increase the risk of rust and explosions. To get rid of deposits, you should flush the tank twice a year. That is as simple as opening the drain cock and cold water supply valve. Let the water run for five minutes or until all sediment at the bottom of the tank washes out.
Check the anode rod
The anode rod protects your water heater from corrosion. It is the first thing the chemicals inside the water entering your home will attack. That is why the anode rod in your water heater gets eaten up. Without the anode rod, the corrosive elements in water will start attacking your water heater. Replacing the anode rod can save you the cost of buying a new water heater. Inspect the rod every year to ensure it is still in good shape.
1 note
·
View note
Text
5 Most Common Plumbing Problems in Chicago
Every home needs water. We need water for cooking, cleaning, and personal sanitation. It would be impossible to live in a modern home without water running inside its structures. But to have access to that water, you need a system to deliver clean water to the house and take away the dirty water. That is what the plumbing system in your home does.
A home’s plumbing system consists of hundreds of feet of pipes with valves, connections, and other components. It is one of the most complicated and most used systems in the home. As a result, problems with the plumbing system are among the most common issues homeowners in Chicago encounter.
Plumbing problems are one of Chicago homeowners’ biggest issues because:
They are hard to detect. The typical way homeowners discover an issue with their plumbing is when the water supply stops or water goes where it is not supposed to. But before the problem goes that far, it will show subtle signs that go undetected.
They cost a lot of money to fix: Plumbing issues often cost a lot of money to repair. That is not because of the cost of fixing the damaged components. Instead, it is due to the cost of repairing the damage the issue has done to the surrounding areas.
That is why plumbing problems are best discovered early and solved on time. Finding a problem before it causes damage to the structures of your home can save you hundreds of thousands of dollars, says Income Realty Corporation. To do this, you need to know the common plumbing problems you are likely to face in your Chicago home and what you can do to solve them.
Five most common plumbing problems in Chicago homes
These five problems top the list of plumbing issues occurring in Chicago homes.
Drain clogs
A drain clog is a common occurrence in the home, and it can happen in different parts of the plumbing system. Drains get clogged when an item or material obstructs drain pipes. That occurs in the kitchen sink or bathroom drain. Drain clogs can be minor issues requiring a few minutes to solve, or they can be leading problems that require special equipment and lots of time. You can clear most clogs by using a plunger, drain snake, or running the disposal unit. If these DIY solutions don’t work, it will be necessary to contact your local plumber.
Frozen pipes
Water has the odd behavior of expanding when it freezes. That can be a problem for your plumbing system. Frozen water inside pipes will not only cut off your water supply, but it can also cause the pipes to rupture. It takes only a few hours of below-freezing temperatures for pipes to freeze. The best way to keep pipes from freezing is to install PEX pipes in the home or take precautionary steps to keep water flowing through the pipes. If you find that the pipes in your home are frozen, the best solution is to call a plumber who specializes in repairing burst pipes.
Water leaks
Leaks are another major issue. This problem results from the highly mobile nature of water and its corrosive powers. Over time water will erode any material it is flowing. Water also carries particles and chemical substances that get deposited inside pipes. These two effects can result in pipes bursting or wearing out, causing leaks. Water leaks also happen when water pressure is too high or frozen pipes thaw out. Leaks are a crucial problem because they often occur inside the walls and damage your property. The best way to prevent leaks is to inspect the plumbing system regularly and install a leak-detection system.
Water heater issues
Water heater malfunctions are among the most annoying plumbing problems; think what it feels like to get cold water dumped on you when trying to take a warm shower in the morning. Water heater issues will also deny you access to warm water for washing dishes and clothes. Several issues can cause water heater malfunctions, leaks, water hardness issues, and faulty components. The best way to prevent issues with the water heater is to be aware of its life expectancy and know the telltale signs of problems with the equipment. Water heater issues should never be DIYed; always call your plumber for any kind of water heater repairs.
Sewer line problems
Sewer lines carry wastewater out of your home into the municipal sewers. Problems with the sewer line are not only frustrating and disgusting, but they are also potential health hazards. They will expose you to unsanitary materials that can harm your health. The most common sewer line problems you are likely to face are clogs and leaks. These are due to several issues: flushing prohibited items down the drains, old and worn pipes, or damage from tree roots. If you think there are issues with your sewer line, contact a professional plumber at once.
1 note
·
View note
Text
Why Hydro-Jetting is Important Before a Sewer Line Repair
The sewer lines in your home are designed to last a long time. It is not uncommon to find fully functional sewer lines that are twenty years old and over. This is because sewer systems, due to the type of content that passes through them, are designed to be sturdy.
However, even the most well built sewer line will eventually have problems. These issues can come from several sources. The sewer line in your home can get damaged because of misuse, warns Jilsa Management. Or it can lose some of its function through wear and tear or a natural accident.
Regardless of the origin of the issues in your sewer lines, you want to solve the problem and make sure it does not return. To get this result, you should know the best practice for fixing a damaged sewer line; the sewer line repair should be preceded by hydro-jetting.
What is hydro-jetting? What does it do? And why is hydro-jetting important during sewer line repair?
What Is hydro-jetting?
Hydro-jetting is a drain cleaning method that uses high-pressure water to blast away clogs and blockages inside the sewer lines. Water is delivered at a pressure of up to 60,000 PSI, which is enough force to remove tree roots, sludge, and other materials lodged inside the pipes.
The process of hydro-jetting is as follows:
As a first step, the plumber conducts a sewer camera inspection by installing a small camera on one end of a cable and inserting it into the sewer line.
The camera travels through the sewer line and sends back images of the interior of the pipes to a computer screen monitored by the plumber.
This initial process helps the plumber pinpoint the location of the problem and determine its severity. The inspection also tells the plumber if it is safe to go on with the next step.
If it is safe to proceed – that is, there is no possibility of the sewer line collapsing – the actual hydro-jetting process can now begin.
Hydro-jetting equipment consists of a large tank filled with water, a specialized high-pressure water hose, a super-strong nozzle, and equipment for pushing the water through the nozzle at high pressure.
The high-pressure water hose, with the nozzle at its head, is inserted into the sewer line until it reaches the point of the blockage.
The clog is blasted with just enough water pressure to break up the obstruction inside the pipe. Hydro-jetting can deliver enough water pressure to shear away plant roots.
The dislodged material is washed down the pipe and into the city’s main sewer lines.
Finally, another sewer camera inspection is done to view the results of the process and determine the condition of the pipes.
Hydro-jetting lets your plumber clear blockages inside the pipes without digging up the yard or exposing your pipes to the risk of damage. Hydro-jetting can be used to effectively remove the following kinds of blockage from a sewer line.
Sludge or grease, fat, and oil build: When you flush grease, fats, and oil into the drain, these materials cling to the sides of the pipes and trap dirt. A hydro jet will remove buildup.
Intruding tree roots: In a bid to find water and nutrients, the roots of nearby shrubs or trees can find their way into the sewer line. Hydro-jetting will solve this problem.
Pipe scale: Dissolved minerals in hard water are deposited on the interior surface of pipes, where they reduce the diameter of the pipe. Hydro-jetting will remove pipe scale.
Non-flushable objects: A range of items we use in the home find their way into the sewer line. Hydro-jetting can blast away these troublesome items.
Hydro-jetting is a powerful yet gentle method for cleaning drains. But why is it necessary to carry out this procedure before sewer line repair?
Why hydro-jetting is done before sewer line repair
To detect problems: Hydro-jetting the sewer line washes away the layers of filth inside the sewer line and exposes the actual surface of the pipes. This allows the plumber to see the true extent of the damage to the sewer line.
Improves the accuracy of repairs: By combining sewer camera inspection with hydro-jetting, the plumber can pinpoint the location of a problem. Hydro-jetting injects a high level of accuracy into sewer repair. It ensures the finished job is well done and long- lasting.
Reduce costs: There are other ways to clean a sewer line before it is repaired, but hydro-jetting is the quickest and most-effective method. Other methods will cost more in labor and time.
Improves sanitation and indoor air quality: Hydro-jetting the sewer before repairing helps the plumber do a more complete job. Hydro-jetting gets rid of the bacteria inside the drain that cause bad odors. Unless the sewer is cleaned with a hydro-jet, the bacteria inside them are not easily removed.
0 notes
Text
How Clogged Drains Affect Your Home Plumbing System

Clogged drains are not just a mild inconvenience as some people might consider. They can cause serious harm to the property, warns Whole Property Management. If you start to notice a clogged drain in your home, you need to respond urgently. But how do you identify a clogged drain?
Signs of clogged drains
Slow-moving drains
Pipes and drains do not block altogether at once. The blockage builds up gradually over time. As the debris keeps accumulating inside the drain, it slows down the movement of wastewater. So, if you notice that your drain is slowing down, it means a clog is developing in the drain.
However, if all your drains are slowing simultaneously, you may be dealing with a clogged sewer line. On careful observation, toilet drains are the first to slow down if the sewer line develops a clog. Water may hang on for a while before it gradually sinks as you flush the toilet following this occurrence.
Gurgling sounds
When clogs develop in your drain, they hinder the free flow of wastewater. Pipes conduct sound, and as a result, you may notice weird noises when wastewater drains through your plumbing fixtures. People commonly describe these noises as gurgling sounds when using the drain. Sometimes, you may observe it as bubbling, trickling, or hissing sounds. Cases that affect the main sewer line may experience these weird noises for a long time after you stop using the drain.
Clogged plumbing fixtures
A clogged plumbing fixture is a late sign. In this case, there is already a severe or complete blockage of the pipe. As a result, almost no water can flow through the drainpipe. You may notice this if your tub fills up as you are trying a shower or the sink overflows as you are using it.
The consequences of having a clogged drain
Unpleasant odors
Why do you experience unpleasant odors when you have a clogged drain? Remember that you pour or flush items into the drains. Such things may include waste, food, gunk, hair, etc. These items will accumulate within the pipe and lead to clogging.
As a result, bacteria will have a suitable environment to grow and cause decay. The decay will present itself as terrible odors emanating from your drain. In addition, these odors will not stay within the pipes alone. They will also spread to other areas of the home. Imagine perceiving an unpleasant odor throughout your property. It can be upsetting to guests and neighbors.
Pest infestations
Several types of pests may infest a property that is experiencing clogged drains. The reasons are that unpleasant odors from the drain will attract pests, and the stagnant water will provide a suitable environment for them to thrive. Mosquitos and other insects multiply by laying their eggs in stagnant water. If food particles clog the drain, they will serve as a food for the pest.
Clogged drains will attract the following insects:
Drain flies (moth flies)
Phorid flies
Cockroaches
Fruit flies
Health hazards
Clogged drains provide an unhealthy environment in the home. Remember that the pipes harbor bacteria and produce unpleasant odors. These bacteria can contaminate your drinking water and cause harmful infections.
Symptoms of such illnesses may present as fever, diarrhea, or vomiting. Common bacteria that may spread because of clogged drains include salmonella, campylobacter, helicobacter, etc. Unpleasant odors from clogged drains can cause nausea, vomiting, dizziness, headaches, anxiety, mood swings, and irritations to the throat, eyes, and nose.
Pest infestation during clogged drains also helps in spreading germs. After nesting inside clogged pipes, these pests may perch on your food, plates, or drinking water.
Molds also grow because of clogged drains. The effects of mold growths in your home may present as allergies or respiratory diseases.
Plumbing leaks
Water will always find a way to escape. When drains clog, the wastewater will back up within the pipes. After pooling for some time, water will start leaking through the pipe joints, seals, and caulking. Depending on the size of the leakage, some homeowners may not notice it immediately.
Structural damage
Gradual leakage of plumbing fixtures into the soil and surrounding structure can affect the property. If it happens close to the foundation, the structural integrity will weaken.
Severe drain clogs will cause wastewater to back up into your home. As a result, your home may experience flooding. Depending on the type of flooring, floods in the home may damage the floors. When this happens, the repairs are usually expensive.
The bottom line
It is advisable to treat a clogged drain as an emergency. When you notice that you are experiencing clogged drains, turn off the water supply to your home and call a professional local plumber. Plumbers have the appropriate tools, training, and skills to locate the problem or proffer possible solutions.
0 notes
Text
How to Clean Your Sump Pump
Having a basement or crawlspace in your home has numerous benefits. However, your basement may be prone to flooding or wetness. Natural water can migrate from the soil into your basement, or water may flood your basement from the drain.
Studies from the American society of home inspectors show that over 60% of properties experience moisture in their basements. A wet basement has several setbacks. It may:
Affect the property’s structural integrity
Cause pest infestation
Support the growth of mold
Cause health hazards
Render the property unfit for habitation
But that should not stop you from owning a property that has a basement. That is because sump pumps help prevent your basement from flooding. They send water from your basement into a dry well, municipal storm drain, or other places where it wouldn’t harm your property.
The sump pump may have a pressure sensor or float activator arm if it is automatic. In that case, it will turn on automatically to evacuate water from your basement. If situations demand, you can activate the automatic sump pump manually.
Sump pumps require regular cleaning and maintenance because of their benefits. We recommend that you clean your sump pump and sump pit at least once a year. Remove the sump pump and wash it. Use that opportunity to inspect your sump pit for debris and water. Clear the check valve and conduct other regular sump pump maintenance.
If you are wondering how to clean your sump pump, follow the tips below.
Things you will need for sump pump cleaning
You will need specific tools that will aid in cleaning your sub pump. They include:
A garden hose
A wet/dry rag
A tarp or plastic sheeting
A large bucket
A plastic scraper
Protective gloves
Precautions
Below are certain precautions you should take before cleaning the sump pump:
Ensure that it is not raining when you are performing the cleaning.
Water should not be flowing into the sump basin from appliances connected to it.
Wear protective gloves during the cleaning.
Steps on cleaning the sump pump
Disconnect and unplug the sump pump
Before cleaning the sump pump, you need to unplug it and turn off the power supply on the circuit breaker. Also, disconnect the sump pump from the discharge pipe. Sometimes, you may use a screwdriver to loosen the sleeve and pull it from the pipe.
Remove the pump from the basin
After disconnecting the sump pump, allow it to drain into the pit. When it is no longer dripping, put it into a bucket or cover it with a plastic tarp or sheeting to prevent spills and take it outside for the cleaning.
Clean the sump pump
With the help of a garden hose, rinse off the dirt from the sump pump. Inspect for grime and use a plastic scraper to scrape off the dirt. Clean the outer surface of the pump using a rag. Spray water on the pump again with a garden hose and leave it to dry.
Drain the check valve
Disassemble the check valve, rinse, dry, and reassemble it. Ensure that your bucket is nearby when draining the check valve.
Drain the sump pit
If there is any standing water in your sump pit, drain it. You can do this with a bucket or wet-dry vacuum. Clean the basin and remove any gravel, stone, or dirt. Doing this will prevent the risk of sump pump clogging or failure.
Clean the grate
It is essential to clean the grate if you have it in your sump pit. Remove the grate from the sump pump basin. Rinse it using a garden hose and wipe it off with a rag.
Clean the sump pump basin
With the help of a scraper and rag, clean the walls of your sump pump basin. Remove all dirt and grime. Ensure that nothing is clogging the drain holes. When your sump pump pit is clean, you will not notice any terrible smell.
Replace the sump pump
After cleaning and drying the sump pump, you can put it back. Ensure that the pump is at the appropriate level and position to enable its function. Check to ensure that the float arm can move freely without touching the basin walls.
Reconnect the pump
Reconnect your sump pump to the discharge pipe and tighten the sleeve. Ensure that there will be no leakage. However, avoid over-tightening it. Plug it back into the power supply and turn on the breaker.
Test the pump
This step is necessary to ensure that everything is functional after the cleaning. To do this, pour water into the basin until the sump pump activates. Inspect the sump pump as it is running to see if there is any fault.
The bottom line
Your sump pump also requires regular monthly maintenance aside from the annual cleaning. The monthly inspection and maintenance will ensure that your pump is functional whenever the need arises. If your pump fails, invite experts to assess and advise accordingly.
0 notes
Text
Signs Your Chicago Restaurant Grease Trap Needs Cleaning

As a Chicago restaurant owner, there are many things you’ll have to keep an eye on. One of them, there’s no doubt about it, is your trusty grease trap. It doesn’t sound like a lot of fun, right? Right. Luckily, we’ve decided to make the job easier for you. In other words: we’ve selected the most common signs your Chicago restaurant grease trap needs cleaning. Without further ado, let’s take a look at them!
What is a grease trap?
Here’s something you might want to call a standard definition of a grease trap: a plumbing device with a role to intercept a fair amount of greases and solids before they’re allowed entry into the wastewater disposal system. Once that process’s over, the smaller amounts of oil that have pushed through will enter the septic tanks (which also might need a deep clean) and certain treatment facilities. That way, the floating scum layers are formed.
Why should you keep your grease trap clean?
Needless to say, keeping your grease trap in proper condition (clean) is the best way to ensure there won’t be any foul odors inside your Chicago restaurant’s kitchen. Also, there’s another reason why a clean grease trap is very beneficial: you’ll rest assured knowing you’ve cleared any possibility of your kitchen being a health hazard to your employees, clients, or guests!
Will a faulty grease trap cause bad reviews?
As we’ve already said, an unkempt grease trap might be a health issue for your guests. Needless to say, they won’t be happy about it, so you can count on some bad reviews. Online reviews have a tremendous amount of power today, as professionals at usamovingreviews.com can attest. Nowadays, nobody chooses moving companies without reading plenty of reviews about them. And it’s the same with restaurants. More than once, bad reviews have resulted in businesses shutting down. So, you’ve got some good reasons to keep your kitchen clean as a whistle! Now that we’ve got that one out of the way, let’s see those signs your Chicago restaurant grease trap needs cleaning!

The grease trap is there to prevent most of the grease and solids that go through your restaurant from entering the wastewater disposal system.
#1 There’s a special kind of stench coming from the kitchen
This is one of the more obvious ways you can tell something’s wrong. As always, our sense of smell is there to tell the difference. Anyway, odors appearing suddenly that have no immediate explanation are probably a clear sign that your Chicago restaurant grease trap needs cleaning. For instance, you might think it’s coming from the garbage. So you throw the trash away, but the smell’s still there.
How does one recognize this “brand” of stench? You’ll want to know that a grease trap usually smells like a combo of cooking oil, food waste, grease, and sludge, all accumulated over time. If you notice a smell that seems to escape every explanation (except the one where there’s a grease trap involved), it must be the thing!
#2 When’s the last time you’ve cleaned the grease trap?
If you’ve got a hard time answering this one because you can’t quite remember the answer since it’s been a long time, it might just mean it’s time to clean your grease trap. Usually, you’ll want to clean your grease trap every three months or so. If it’s possible, organize the cleaning ordeal even more frequently! That’s especially important if you’re running a busy Chicago restaurant. You will “escape” specific issues related to your dirty grease trap and help make your kitchen fit the standard proposed by the EPA (Environmental Protection Agency) and Health Department.

Clean your grease trap every three months and you won’t have to worry about the signs that your Chicago restaurant grease trap needs cleaning.
#3 We’ve found grease in an unusual place
There probably isn’t a more visible sign that your Chicago restaurant grease trap could use some cleaning than grease appearing everywhere, even in the most unusual spots around your kitchen. It’ll leave you wondering: now, wait a minute, how’s this even possible? Here’s the answer: if the grease trap “decides” to clog up, the extra grease might find its way through the most accessible exit door such as sinks, sewer pipes, water lines, etc. Once that happens, it’s no wonder that grease ends up just about everywhere around the kitchen. If you notice this, make sure you always inspect if the grease trap’s causing the issue; clean the kitchen thoroughly of any grease deposits that might’ve built up!
#4 Blocked or slow drainage
What would you say is one of the main reasons some sink drains clog up? If you were to say a dirty grease trap, you’d be absolutely right! Remember the famous acronym called FOG (Fats, Oils, and Greases)? If so, you’ll want to know that they’ll start to solidify once they accumulate inside your grease trap. Some time passes, and you’re stuck with a trap that’s full of dense grease. That will make it difficult for water to flow through the sink drain, resulting in very slow waste movement. Eventually, this will lead to some significant issues. The worst of them might cause your restaurant to close temporarily.
There’s no need to emphasize that as soon as you notice excessive amounts of grease buildup inside the trap, it’s time you get professionals to assist you in handling the issue.

An unkempt grease trap might even result in your Chicago restaurant temporarily closing down, so think about that one!
Something of a conclusion
That’s about it on the signs that your Chicago restaurant grease trap needs cleaning! For the end, we’ve left a little suggestion you might find helpful when the time comes (and we hope it’ll never come, but you can never be too sure). As soon as you notice something’s not exactly right with your grease trap, your best bet is to call professionals to take care of the problem. There’s just no doubt about it! A trusty, professional plumbing crew is every restaurant owner’s dream!
0 notes
Text
How to Maximize the Life of Your Water Heater
The water heater is one of the most used plumbing fixtures in the home. Where there are clothes to be washed, dishes to be done and showers to be taken, the water heater is there to provide a fresh supply of warm or hot water.

But like most features of the home that are used daily, we often take the water heater for granted. In spite of how vital they are to the day-to-day functioning of the home, water heaters are mostly ignored until they malfunction.
When a water heater fails to work as it should, the effects are not only damaging to your comfort, but they can also hurt you financially or physically endanger your family. But the thing is water heaters are actually not that hard to maintain.
If you know the steps to keep the device in good shape and take them at the right time, your water heater will reward you with faithful service throughout its lifespan. Conversely, if you neglect your water heater, it will fail before the end of its life expectancy.
Most water heaters have a lifespan of 8-12 years, but a well-maintained unit can serve you for up to 15 years. During that time, NFI Property Management Solutions explains, the water heater will save you money in the short term (in the form of lower maintenance costs), as well as the long term (deferred replacement costs).
What should you do if you want your water heater to last longer than it is expected to?
How to maximize the life of your water heater
Firstly, you must familiarize yourself with the key parts of the water heater and the maintenance schedule for this plumbing fixture. The major features of a water heater that you need to know are:
Temperature/pressure-relief valve – helps release excess water pressure inside the tank.
Overflow pipe – safely drains excess heat/steam from the water heater.
Hot water outlet – where hot water exits the tank.
Cold water valve – for shutting off the water supply into the tank.
Anode rod – minimizes the risk of tank failure by preventing corrosion.
Dip tube – maintains uniform water temperature by circulating the water.
Drain valve – for releasing water from inside the tank.
The following steps will help you maximize the life of your water heater.
Follow a consistent maintenance routine
The most important step for getting your water heater to last beyond its projected lifespan is to maintain it with consistency. Here is an example of an annual water heater maintenance schedule:
Flush the water tank – every six months
Clean the entire water heater ��� yearly
Test the temperature relief valve – yearly
Replace anode rod – 2-5 years
Check the burner every year; for units that use gas – once a year
Check the TPR Valve
The temperature and pressure relief (TPR) valve prevent excessive heat or pressure buildup inside the tank. To check the TPR valve; turn off the heat source, open and close the valve a few times, while keeping an eye on the drainpipe. If water is released from the drainpipe when the valve is open, your TPR valve is okay.
Flush the water heater
This step will get rid of sediments inside the water heater tank. Sediments come from the mineral content of your water supply, as well as particles in the water. Flushing the tank requires a series of steps: turn off the heat supply, connect a garden hose to the drain valve, turn off the cold-water supply and open the drain valve.
Install a water softener
If your home is in an area where the water is hard – has high mineral content – you may want to install a water softener for the house. This will reduce the level of sedimentation inside the water heater tank, thereby improving efficiency and prolonging its life. The water softener may be installed for the entire home or for the water heater alone.
Check the anode rod
Also known as “sacrificial anode,” it protects the lining of the water heater by drawing corrosive minerals away from the unit’s components to itself. Instead of the tank’s lining being corroded, the anode rod is eaten up. Without the anode rod, the water heater tank would rust and start to leak very quickly. Anode rods should be replaced every 3-5 years.
Install an expansion tank
As you may know, water expands when it is heated. The frequent changes in pressure that come with this expansion, as well as severe temperature fluctuations inside the tank can put the water heater under enormous stress. An expansion tank provides an outlet where the water can go when it expands. This helps to reduce wear and tear on your water heater.
Create space around the unit
Your water heater needs a lot of room around it. There should be adequate space for air to move freely around the unit. This is vital for keeping the water heater’s temperature under control and preventing fires. Creating space around the unit also makes it easier to spot problems like leaking pipes around your water heater.
0 notes
Text
Identifying the Main Sewer Cleanout in Your House

Sewage backups and drain clogs are among the worst kind of plumbing emergencies to have in your home. Sewage backups not only expose your home to the possibility of being flooded by foul-smelling water, but they also endanger your family’s (or tenants’) health, warns First & Main Property Management.
Knowing how to prevent these issues or minimize their impact is vital for maintaining your sewer lines and protecting your property. To do this, one of the important things you must know is the location of the main sewer clean-out for your home or building.
What is the main sewer cleanout?
If you are like the typical homeowner, you wouldn’t know what a sewer cleanout is. The first time most homeowners hear the term “main sewer cleanout” is when they have a problem with their home’s plumbing and a plumber asks to know where the main cleanout is located.
What is the main sewer cleanout? In simplest terms, a sewer cleanout is a pipe on your property that offers easy access to your home’s sewer lines. The main sewer cleanout is not that hard to identify, just look for a large diameter pipe with a threaded plug on top of it.
What does the main sewer cleanout do?
The main sewer cleanout is the easiest way to gain access to your sewer lines when trying to clean the sewer lines or during emergencies. If your home lacks a sewer cleanout (often called a main house trap), you may need costly and time-consuming excavations to solve sewer line issues.
For instance, a sewer cleanout makes sewage backup issues easier to solve. When you have sewage backing up into your home, all plumbing fixtures in the home must go out of commission. Your home comes to a literal standstill if sewage is overflowing into the house.
The reason is that since water cannot go down the drain, you must cease all activities that release water into your home’s drain systems. You will be unable to use the shower, toilet, washing machine, kitchen sink, or dishwasher until the clog in your sewer line is removed.
The easiest and least expensive way for a plumber to gain access to your sewer line is through the main sewer cleanout. A sewer auger, snake, or hydro-jet is inserted into the sewer line through the main cleanout to quickly remove the clog causing the sewer backup.
This cleanout is located above ground, unlike the rest of the sewer line system. That’s why it is possible to gain access to the sewer lines without digging up your yard. Knowing where the main clean-out is will help you reduce the impact of plumbing emergencies on your home.
What does the main sewer cleanout look like?
In all likelihood, you have walked past the main sewer clean-out of your home several times, without knowing what it was or what it does. To find the main cleanout for the home, look around your yard for a pipe that matches the following description:
It is most often a 4” diameter pipe with a screw cap on top.
The screw cap will usually have a square knob or indentation to make it easy to unscrew the cap.
The pipe will often be flush with the ground or sticking above the ground.
The most probable location to find the pipe is on the side of the house closest to the bathroom.
Where to look for the main sewer cleanout for your house
The main cleanout should be located somewhere between the building’s foundation and the street, often close to the bathroom. Sometimes, however, you will not find the main sewer cleanout in this location. Other places where the main sewer clean-out may be found are:
Inside a ground box
If your home is built on a slab foundation, you should first look for the cleanout outside the building. It might be hidden by bushes or could be housed in a ground box. Look for a box recessed into the ground; this will often have a metal or plastic cover.
In the bathroom
If the cleanout is not outside, the first place you should look inside your home is the bathroom. Cleanouts are often found on the floor, close to the toilet. If this is the case with your home, you should find a threaded plug that is flush with the bathroom floor.
Other locations inside the home
If it is not in the bathroom, other places where the cleanout may be found inside the house are the garage and utility area. The cleanout will usually be flush-mounted or located on a short length of large diameter pipe.
In the basement
The final place to look for the main sewer cleanout is in the basement. In colder regions, a typical location for the cleanout is near a foundation wall inside the basement. Look for a short, large-diameter pipe with a threaded cap that is sticking up from the floor.
1 note
·
View note
Text
Everything You Need to Know About Sewage Ejector Pumps

Sewage backup is one of the most damaging plumbing emergencies you can have in your home. Imagine the horror of sewage flowing into your home, not only ruining your floors and belongings but also subjecting your home to terrible smells. If you’re a landlord, you already know this means your property will be deemed uninhabitable. This is a plumbing issue you can certainly do without.
One trusted way to prevent this problem in your home is to install a sewage ejector pump in the house. But what is a sewage ejector pump? How does it work? What do you need to know before installing a sewage ejector pump in your home?
What is a sewage ejector pump?
A sewage ejector pump operates on the same principle as a sump pump. Just like a basement sump pump, this system comprises of a pump housed inside a basin. This basin or holding tank, along with its pump, is located below ground inside the home.
But unlike a sump pump system, which is designed to remove floodwater entering the home, a sewage ejector pump system holds wastewater from the home before pumping it into the main sewer lines in the street.
How does a sewage ejector pump work?
Waste from the various plumbing fixtures in the home flows easily into the basin because the drain lines are sloped down into the sides of the basin.
For a moderate-sized home, the basin can hold up to 30 gallons of waste. This water will stay inside the basin until it reaches a certain level.
Inside the basin are movable floats that rise with the water level. When the water in the basin reaches the threshold, the flotation device triggers a switch to activate the pump.
The pump removes the wastewater by raising it to the level of the main sewer line in your home or the city sewer lines in the street.
Once the basin is emptied to a specified level, the pump shuts down.
But before the liquid is pumped out of the basin, it passes through a grinder inside the sewage ejector, which breaks apart the clumped solid waste.
Most sewage ejector systems have a water level alarm that triggers when the water in the basin rises to a certain level. If this alarm goes off, it means there is a problem with the pumping mechanism.
A lot of sewage ejector systems are equipped with a secondary pump which serves as a backup when the main pump fails or is being repaired.
Does your home need a sewage ejector pump?
Your home needs a sewage ejector pump if the bathroom, laundry, or any plumbing fixture in the house is located at a level below the main sewer lines in the street. Where the municipal lines are located higher than a fixture in the home, wastewater will not flow properly.
This is because the flow of wastewater from your home depends on gravity. In order to flow freely, water must be able to move in a downstream fashion. In other words, your home’s plumbing fixtures must be located at a higher level than the city’s sewer lines.
Ejector pumps are also needed in homes with a septic drain-field system, such as those found in rural areas. Without a sewage ejector system, homes that fit the above description run the risk of sewage backing up into the basement or sewer gas seeping into the home.
Before you install a sewer ejector pump system
What do you need to know or get before installing a sewage ejector pump system in your home?
A permit – In most locations, you will require a permit to install a sewage ejector pump system in your home. This is because of the potential damage to the city’s sewer lines if your home’s sewage ejection pump is not properly installed.
Pump size – Sewage ejector pumps come in a range of sizes. The right pump for your home depends on the amount of wastewater generated by the home. Typically, an average-sized home needs a pump with a ½ – ¾ hp motor.
Budget – Sewage ejector pumps cost anywhere from $400 to $1000. This price depends on the size and brand of the pump. If the pump system will not be subject to heavy use, you can get away with buying a less expensive one. But you really don’t want a system that you will have to repair often. Worse, if the pump fails it can cost you tens of thousands of dollars worth of damage.
Other system components – In order to function properly, the system needs the following:
A sump basin – The underground tank where sewage water is stored until it is removed.
Vents – Vents help to equalize air pressure and also provide an outlet for sewer gases.
Check valve – This is located between the outlet pipe and the main sewer line, to prevent backups.
The right contractor – Due to the critical role of the sewage ejector system, this is not a job you should attempt to do yourself. It is best to hire a skilled plumber for an ejector pump installation.
0 notes
Text
Sewer Back-Ups Causes and Quick Fixes
The sewer system is necessary for urban infrastructure because it helps maintain a healthy and safe environment. Carrying away wastewater helps keep the environment secure from flooding and helps stop the spread of water-borne diseases. Therefore, it could be troublesome if a sewer backup is in your home.
The sewage system is a vital component of your commercial building since it is responsible for adequately disposing of wastewater away from the property. By strategically discarding waste, it is crucial to keep it well-maintained to avoid issues affecting its functionality.
Although the primary function of a sewer is to circulate wastewater, a commercial system is complex and requires maintenance and professional services. Installing plastic access doors and panels will allow convenient access to these critical fixtures whenever there is a need for repairs and maintenance. But what are the common causes of backed-up sewers, and what can we do to fix and prevent it from happening again? Keep on reading to find out more!
Cause #1 Clogs or Blockages
Does your sink drain water slowly? Are there unfamiliar gurgling noises when you flush the toilet? These common signs could indicate clogged drains. Clogs mainly develop over time and are a product of a blockage that restricts the water flow from your drainpipes, impacting the plumbing throughout your entire home or establishment.
Clogged drains can affect multiple fixtures such as sinks, toilets, showers, bathtubs, and sprinkler systems. Raw sewage could travel back into your drainpipes and your plumbing fixtures from the septic tank or the main sewer lines if the clogs become severe. The situation can get messy, and you would want to contact your local plumber right away for a possible hydro-jetting service. Drain clogs are usually a long process of material buildup in your drains. Here are some of the common materials that can clog your pipes:
Hair
Solidified grease
Baby wipes and feminine hygiene products
Extra-thick toilet paper, facial tissues, towels, and other wiping products.
Dental floss and cotton swabs
Products labeled non-flushable
You can place a drain strainer in your bathroom drains or sinks to prevent materials from falling into your drainpipes to prevent clogs from occurring. Also, make sure to dispose of hygienic products properly and, as much as possible, minimize the amount of toilet paper that you flush down your toilet.
Cause #2 Tree Roots
Tree root invasion happens when trees and plant roots penetrate your sewage system, growing through your plumbing pipes or crawling around and crushing the lines, searching for the water that flows inside.
The tree root invasion process is usually slow, but it could speed up if your lines are in bad condition, with holes or cracks that conveniently allow the roots to enter the drain. To prevent yourself from dealing with this situation, you should estimate the suitable area if you’re planning to plant a tree within your property. It will vary depending on the type of plant and its growth rate. Ensure that the site you choose will not interfere with your plumbing pipes.
Cause #3 Main Sewer Line Blockage
A blockage in your sewer system usually occurs in the main sewer line owned and maintained by your city. The sudden backup caused by a clog is similar to what you experience during a household blockage. It can also be due to insufficient design capacity if your area encounters serious growth.
The problem becomes prominent if a community has difficulties with the sewers after heavy rainfall. The main sewer blockage will continuously affect your plumbing in the entire house or establishment, rather than affecting just one drain.
To decrease the damage, once there is a block in your main sewer line, shut off all water supplies in your home or establishment and shield drain openings with material that can absorb the liquid.
Final Thoughts
Although these valuable tips are practical and helpful, you should immediately contact a professional sewer cleaning plumber if nothing changes. There could potentially be a more severe cause for the blockage, which would require a possible sewer repair service.
0 notes
Text
Reasons Why Your Toilet Keeps Clogging
The bathroom is a high-traffic area in any establishment. If there are issues with your bathroom plumbing system, it can affect the whole functionality and comfort of the room.
A toilet isn’t just an amenity; it’s a necessity. When the bathroom is experiencing problems, it’s essential to find the cause and repair it as quickly as possible. If no amount of flushing clears the issue, then there might be a more significant issue. It’s also possible that your routine is interfering with the functionality of your toilet.
A recurring toilet issue may be caused by flushing foreign objects, the toilet, or the plumbing system. If you have chronic problems with your toilet, it may be due to one of the following issues:
Older Low Flow Toilets
Many older products do not perform as well in modern times. To address this need, manufacturing companies continue to innovate by producing new designs or adding features to their existing lineup. Whether designing a new high-efficiency toilet or adding new features to roof hatches, the manufacturing world continues to adapt to the changing needs of the modern world.
If your building still has early model low-flow toilets, this may be the problem. Older low-flow toilets do not have enough pressure to push through the trap and drain. Weak flushing pressure can leave some material behind, which causes clogs. Sometimes, you need to fully open the supply valve so that there is enough water in the toilet tank, and the pressure can then clear the bowl. Check for leaks in the waterline and cracks in the fill valve and replace these if you notice they are worn.
To fix this, replacing your old low-flow toilet with a new model with high flush pressure is a sure-fire way to eliminate constant clogs. In the meantime, decrease the amount of toilet paper that’s flushed.
Flushing Non-Flushable Items
Using the toilet to dispose of non-flushable items is also a leading cause of clogs. You should never flush baby wipes, cotton balls, diapers, or other hygiene products down the toilet. Otherwise, drain clogs will form, and you will need to call a local plumber to deal with the situation.
Excessive Use of Toilet Paper Although it is safe to flush away toilet paper, using too much will clog the drain. Excess toilet paper or some two or three-ply varieties won’t dissolve and will stick in the pipes.
Clogged Sewer Line
In some cases, there is no issue with your plumbing fixtures or individual drain lines; instead, the problem is with the main sewer line. Clogs in the sewer line are a hassle because they can impact the drainage and plumbing system’s ability to move waste, causing problems across your entire property. When this happens, you will need to call a plumbing or sewer service company to address outside factors, such as tree root penetrations, sewer line infiltrations, or breaks in the sewer line.
By following these simple suggestions, you can keep your toilets and plumbing systems in good working order, so you don’t have to keep calling your plumber for repairs.
0 notes
Text
How to Get Rid of Fruit Flies in Your Kitchen

There are few things as annoying and persistent as fruit flies during summer. It can sometimes seem downright impossible to eliminate all of them. To help cope with this issue, here’s how to get rid of fruit flies in your kitchen quickly and effectively!
Wash all produce thoroughly
The first step to getting rid of fruit flies is immediately washing the produce you buy and bring into your house. Even if no flies ever manage to get into your home through windows and doors, there is a very good chance you’d brought their eggs or larvae in with the stuff you’d bought. This means you would actually be contributing to the problem you are trying to solve. Thankfully, it is relatively easy to prevent this. All you need to do is carefully and gently scrub their surface under a stream of cold water. This is typically enough if the fruit is not starting to turn too ripe or damaged.
Throw away any fruit going bad immediately to get rid of fruit flies in your kitchen
On the subject of fruit going too ripe, you definitely want to throw away any you are not planning to eat immediately. There are few breeding grounds as good for fruit flies as fruit that’s starting to rot. In fact, the only thing that comes close is if your basement gets flooded during summer. Fruit flies love their humidity. Once again, though, so long as you are careful and pay attention to your fruit bowl, this is something that is relatively easy to stay ahead of. Alternatively, you can scale down the amount of fruit you are buying so you actually eat it quickly enough not to have to worry about it rotting.

Spoiled fruit attracts absolutely crazy amounts of fruit flies!
Keep your fruit in sealed dishes
Of course, fruit flies can be attracted even to the fruit which is not starting to go bad. In order to get rid of fruit flies in your kitchen completely, it is very much recommended to keep your fruit in sealed containers. There are plenty of interesting and pretty plastic dishes which can be used for this purpose. Just make sure to get transparent ones so you can easily keep an eye on the fruit’s condition. Note that the experts from verifiedmovers.com also strongly recommend this if you’re moving and planning to take some of your food with you. Fruit can easily get damaged during a move, not to mention get exposed to all sorts of insects. You would be guaranteed to take a ton of fruit flies into your home if you treat this process carelessly. Of course, it is better to just not take food with you during a move.
Just keep your kitchen clean
A very good way to discourage the presence of fruit flies is to just keep your kitchen spick and span. Any sort of leftovers, especially sweet ones or even breadcrumbs, can attract fruit flies if they lack more appealing targets. You especially need to carefully and quickly deal with any spills involving juice or alcohol. It is best to take care of them immediately since it is easy to forget they had happened if they’re minor and invite disaster in the form of a fruit fly swarm. It is equally important to regularly take out trash and never let it start to get smelly. Note that if you have issues with sewer exhaust getting into your home, it is best to immediately contact a reliable plumbing service. This problem can be fixed, and the smell can also attract fruit flies.

Cleaning is a surprisingly good way to get rid of all kinds of undesirable insects in your home.
Get rid of fruit flies in your kitchen with specialized products
Of course, if you are already swarmed by fruit flies and just want to decimate their population, there is nothing wrong with using store-bought products made for that exact purpose. There are plenty of very effective chemicals which can quickly kill off any fruit flies in your home. Unfortunately, most of them are rather toxic for humans too. This means that you want to either carefully follow instructions or do the same time you would if looking to move: Look up top movers in Chicago and rely on experts for this. Sometimes, calling an exterminator is preferable to trying to wing it on your own.
Try making a cunning trap
You may be surprised by how easy it is to get rid of fruit flies in your kitchen using homemade traps. In fact, the most straightforward and most recommended fruit fly trap requires just apple cider vinegar and plastic wrap. Well, and a rubber band. All you need to do is pour the sweet cider into a container, cover it with plastic wrap that you’ve poked a few very small holes in, and secure it in place with a rubber band. The flies will be attracted by the scent and squirm their way in, then either get drowned or get stuck. You can catch practically all the fruit flies buzzing around your kitchen this way. And there are also a ton of other traps you can try your hand at making. Just look them up online, and you’ll be all set to go! Of course, you can buy a pre-made trap too.

You can even raise a tiny little helpful plant to get rid of fruit flies in your kitchen
How often do I need to act?
One of the most frequent questions posed by people trying to get rid of fruit flies is: how quickly do they come back? Well, the depressing news is that fruit flies only take around twenty-four hours to hatch. Once you experience your first infestation, you will go through more frustrating than trying to figure out sewer backup causes and quick fixes on your own. So, it can seem like a bit of an uphill battle.
Final words
Learning how to get rid of fruit flies in your kitchen may seem a bit frustrating. And the process itself is infuriating. Still, you may be relieved to know that it is possible to eradicate them all! By following the advice we have laid out, you will eliminate their breeding grounds. You will stop attracting new fruit flies to your home. And you will even have reliable means of getting rid of the adult fruit flies. All you’ll need is a bit of time and patience.
0 notes
Text
Common Water Line Problems That Require Repair or Replacement
Have you ever imagined what life would be like if you did not have potable water running in your home? Would modern life exist if you had to dig a well and every time you needed water, go to the well and manually fetch water from it?
The water that flows in your home is a lifesaver and the pipes that make it possible for that water to reach your home are a lifeline. Without those pipes, you would not have the convenience of a modern home with water on demand, explains Keyrenter Hampton Roads.
But this fact is not always obvious because your home’s water line is out of sight. Homeowners tend to forget that this vital part of the home’s plumbing also requires attention. Your water line is subject to many of the same issues that the rest of your plumbing is.
The water line can get damaged. It can get old or the very water that runs through the water line can corrode the pipes and make them less efficient. If your water line collapses, your ability to do simple household tasks will come to an abrupt end.
But this doesn’t happen often because water lines are designed to be sturdy and can go for many years without any signs of trouble. But this is also why water line issues are costly to fix. The problem can build up for years, only to be discovered after it has done maximum damage.
This is why it is important to always make sure your water line is in good condition. You need a competent local plumber to inspect the system periodically and make sure everything is as it should be. You should also know the potential problems that can happen with your water line.
What are the common water line problems that require repair or replacement?
Old pipes or regular wear and tear
If your home is old and the pipes have not been replaced since the house was built, you can expect more water line problems. Firstly, your water line may have metal pipes that are more prone to corrosion. Secondly, a lot of the other factors listed below may be affecting the pipes.
Tree roots intrusion
Tree roots can damage your water line either by dislodging it or by penetrating the pipes. The latter problem is more common when the pipe already has a leak or weak point. But pipes that are dislodged by tree roots may eventually start to leak also.
Poor installation and human error
If pipes are not installed by a professional or according to the proper procedures, you will have issues with the water line. Water lines may also be damaged if heavy equipment is driven over the ground where pipes are buried. This can also happen if someone digs in the yard and accidentally damages the pipe.
High water pressure
Excessively high water pressure is more damaging to your plumbing than low water pressure, although the latter problem is more likely to get your attention. High water pressure causes vibrations inside pipes that can damage the water line or home appliances and cause leaks.
Soil movements
Upward or downward movement of the soil surrounding your water line can dislodge the pipes and cause you all kinds of problems. These movements are often unforeseen at the time the pipes were laid. Also, there may be no practical way to predict or prevent these ground movements or seismic activity.
Sediment buildup and mineral deposit
If the water in your city is hard, the water line will be more susceptible to this particular issue. The mineral content of water, along with other impurities, will be deposited inside your pipes as water travels through them. Over time this can narrow the diameter of the pipes and make them more likely to burst and leak.
Accumulation of dirt inside the water line
This does not typically happen unless the water line is broken. If the line is cracked anywhere along its length, dirt from the surrounding soil can find its way into the pipes. You can usually tell when you have this problem because the water coming into your home will be discolored.
Frozen water
This is a common issue in areas with harsh winters. If the water line has ever frozen or come close to freezing, the structural integrity of the pipes may be compromised. Freezing water will stress the pipe as the water inside the pipe expands, making the water line more likely to burst or leak.
Water leaks
The water line can leak as a result of the problems listed above or for unknown reasons. Water line leaks are not as easy to detect as leaks inside your home. If you notice spikes in your water bill without any changes in your water usage, you may have a leak in your plumbing systems, possibly in the water line.
Rodent damage
Burrowing animals, especially rodents, can damage your water line. They will damage the water line not just by digging around the pipes and dislodging them, but also by chewing on the pipes.
0 notes