#create custom object in lwc
Explore tagged Tumblr posts
Visit Tumblr Blog
Explore Tumblr blogs with no restrictions, modern design and the best experience.
Last Seen Tumblr Blogs


Fun Fact
US Tumblr user growth rate is estimated to slow down to 4.1%.
Text
The Rise of Salesforce AppExchange Development in the USA

Salesforce, the world’s best CRM platform, has transformed the way businesses manage customer relationships. But beyond its built-in capabilities lies a powerful ecosystem that’s fueling even greater innovation: Salesforce AppExchange.
Often called the “App Store for business,” AppExchange allows developers and companies to build, sell, and deploy custom applications that extend Salesforce's core functionality. And in recent years, there has been a notable surge in Salesforce AppExchange development across the USA—driven by demand for digital transformation, industry-specific solutions, and scalable business apps.
In this article, we explore the reasons behind this rise and how US-based companies are leveraging AppExchange to lead the next wave of CRM innovation.
What Is Salesforce AppExchange?
Launched in 2006, AppExchange is Salesforce’s official marketplace for business apps and consulting services. Companies can find and install apps that add functionality to their Salesforce instance—ranging from marketing automation tools to accounting connectors, analytics dashboards, AI assistants, and more.
For developers, AppExchange is a launchpad to build products that reach Salesforce’s massive global customer base. For businesses, it’s a hub of pre-built solutions that accelerate development, reduce costs, and drive efficiency.
Why AppExchange Development Is Booming in the USA
1. Growing Demand for Industry-Specific Solutions
US businesses operate in some of the most regulated and specialized markets—healthcare, finance, manufacturing, education, and government. Generic CRMs often fall short.
This has created a surge in demand for vertical-specific apps built on Salesforce. For example:
A HIPAA-compliant patient management app for healthcare providers
Loan processing and compliance tools for financial institutions
Public engagement platforms for local governments
US-based developers and Salesforce ISVs (Independent Software Vendors) are building these niche solutions and publishing them on AppExchange.
2. Shift Toward Composable Business Models
More US companies are adopting a modular, API-first approach to their digital ecosystems. Instead of investing in monolithic platforms, they’re choosing flexible apps that can be plugged into their CRM as needed.
AppExchange enables this by offering:
Modular solutions
Pre-verified security and compliance
Seamless integration with Salesforce data and workflows
This aligns perfectly with the agile and scalable approach modern US enterprises are striving for.
3. Salesforce’s Support for Developers and ISVs
Salesforce has made significant investments to support the AppExchange ecosystem, especially in the US:
Dedicated ISV Partner Programs
Trailhead training for app builders
AppExchange Security Review and Go-To-Market assistance
Visibility at events like Dreamforce and TrailblazerDX
This strong infrastructure makes the US a prime environment for AppExchange development to thrive.
4. Faster Time-to-Market and Lower Development Costs
Instead of building new solutions from scratch, US companies are turning to AppExchange apps to quickly deploy solutions for lead management, customer service, forecasting, and more.
For custom apps, US Salesforce developers are:
Building apps using Lightning Web Components (LWC)
Leveraging existing APIs and objects
Using DevOps tools for CI/CD in the Salesforce ecosystem
The result: faster innovation cycles and a higher return on investment.
5. Monetization Opportunities for US Startups and Product Teams
AppExchange has become an exciting new market for SaaS startups and digital product teams in the US. Instead of building a standalone SaaS tool and trying to acquire customers from scratch, they’re embedding directly within Salesforce—meeting customers where they already work.
This creates opportunities to:
Reach thousands of Salesforce customers
Monetize apps through flexible licensing models
Offer freemium versions and upsell premium features
The US startup ecosystem, combined with Salesforce’s global footprint, is creating new growth paths for product innovation.
Success Stories: US AppExchange Trailblazers
Several US-based companies have already made significant impacts with their AppExchange offerings, such as:
Conga – Contract lifecycle management tools
Docusign – E-signature and document workflows
nCino – A full digital banking platform built on Salesforce
TaskRay – Project management for Salesforce users
OwnBackup – Backup and recovery tailored for Salesforce data
These success stories show how AppExchange apps can scale rapidly, serve niche markets, and create recurring revenue streams.
The Future of AppExchange in the USA
As Salesforce continues to push into new areas—AI with Einstein, industry-specific clouds, and hyperautomation—AppExchange development will only become more important. US developers and companies are at the forefront of this evolution, driven by:
A strong innovation culture
Access to top development talent
A large and digitally mature customer base
Whether it’s custom solutions for internal use or commercial products for global distribution, AppExchange offers a strategic platform for US companies to innovate, scale, and lead.
Final Thoughts
The rise of Salesforce development services in the USA reflects a broader shift in how businesses build and consume technology: faster, more modular, and deeply integrated with platforms like Salesforce.
If you're a business looking to streamline operations or a product team aiming to break into the Salesforce ecosystem, now is the perfect time to explore the AppExchange opportunity. With the right development partner, the path from idea to impact is shorter than ever.
0 notes
Text
Master Salesforce Admin & Developer Skills with LWC: A Live Project Learning Experience

In today’s job market, Salesforce skills are not just a bonus—they're essential. Whether you’re a complete beginner or someone already working in tech, learning Salesforce opens the door to high-paying careers and exciting growth opportunities. But with so many online options, what makes a course truly effective?
If you're looking to learn Salesforce (Admin + Developer) with LWC Live Project, you want a learning experience that’s practical, industry-relevant, and future-ready. And that’s exactly what this course on Korshub delivers.
Let’s dive into why this course deserves your attention and how it can launch or elevate your Salesforce career.
Why Learning Salesforce Is a Smart Move in 2025
Salesforce dominates the global CRM market, used by over 150,000 companies—including Fortune 500s like Amazon, Google, and Coca-Cola. It powers sales, marketing, service, and analytics across multiple industries.
Here’s why Salesforce skills are in demand:
💼 Over 9 million new Salesforce-related jobs are projected by 2026
💸 Average salary for Salesforce Admins: $80K–$120K/year
🌍 Work-from-anywhere flexibility—Salesforce roles are perfect for remote careers
📈 Constant growth—Salesforce keeps adding new tools and features like Lightning Web Components (LWC), AI-powered automation, and DevOps integration
But knowledge isn’t enough. Employers are looking for real project experience. That’s where a Live Project course stands out.
What Makes This Salesforce Admin + Developer Course Unique?
Most courses will teach you theory. This one goes far beyond.
This is a complete learning journey where you will:
✔ Understand Salesforce fundamentals (Admin)
✔ Build custom apps using Apex, Visualforce, and Lightning Web Components (LWC)
✔ Work on a live project that mimics real-world business requirements
✔ Learn deployment, automation, and best practices
✔ Walk away with a portfolio-ready Salesforce project
Sounds exciting? Let’s break it down further.
1. Admin + Developer: Two Skill Sets, One Power Package
This course helps you become both an Administrator and a Developer, which means:
You learn to manage users, security, and workflows like a pro Admin
You master Apex programming, LWC components, triggers, and API integrations as a Developer
Being a hybrid talent gives you a serious competitive edge. Companies love hiring professionals who can do both.
2. Hands-On with Lightning Web Components (LWC)
LWC is the future of Salesforce development.
In this course, you’ll learn:
How to build and deploy LWCs
Real-world scenarios using LWC to build UI/UX-rich components
Integrating LWC with Apex and backend logic
Dynamic forms, event handling, and advanced inter-component communication
Even seasoned Salesforce pros are now upskilling in LWC. You’ll already be ahead of the curve.
3. The Live Project Advantage
Reading documentation and watching videos is one thing. Solving real-world problems is another.
The live project in this course simulates actual client requirements—just like in a real job. You’ll build a functional Salesforce application from the ground up:
Understand client requirements
Map them into Salesforce modules
Create custom objects, validation rules, automation, and flows
Write Apex classes, triggers, test classes
Build reusable LWCs to improve UI
This experience helps you confidently answer job interview questions and showcase practical experience.
4. Learn at Your Own Pace—But Never Alone
Even though this is a self-paced course, you're not left on your own.
✅ Active Q&A support
✅ Community for doubt-clearing
✅ Step-by-step guidance and walkthroughs
✅ Real instructor feedback for your project work
Whether you’re learning nights, weekends, or full-time, you’ll have support along the way.
5. From Resume to Real World: Career-Ready Skills
At the end of the course, you’ll be able to:
Set up and manage a Salesforce org
Create advanced automation using Flow Builder
Write scalable, reusable Apex code
Build LWC-based UI components
Deploy code between sandbox and production
Handle real-time errors and debugging like a professional
Deliver an end-to-end Salesforce project
These are the exact skills companies screen for in interviews—and the kind that get you job-ready.
Who Is This Course Perfect For?
This isn’t just for developers or admins. It’s ideal for:
👨💻 Beginners with zero Salesforce experience
👩🎓 Students looking to add practical skills to their resume
💼 Working professionals transitioning into tech
🔄 Manual testers or business analysts moving to Salesforce automation
🔝 Experienced Admins upgrading to Developer or LWC roles
If you're someone who believes in learning by doing, this course is your best bet.
How This Course Helps You Ace Salesforce Interviews
Real interviews often revolve around scenario-based questions, like:
"How would you handle a custom validation error during record update?"
"Can you explain how to handle component communication in LWC?"
"Walk me through the deployment process from sandbox to production."
You’ll learn how to confidently answer these—and more—because you’ve actually done it during the live project.
Also included are:
📄 Interview prep tips 📄 Sample questions 📄 Resume-building techniques 📄 Certification guidance
Built for 2025 and Beyond
Salesforce continues to evolve—and this course is future-focused.
It doesn’t just teach what Salesforce used to be; it equips you for what it is becoming:
AI-enabled tools (Einstein)
DevOps Center
LWC updates
Salesforce mobile development
Industry cloud integrations
This keeps your skills relevant for the long run.
No More Info Overload – Just What You Need
With so many learning platforms, it’s easy to feel overwhelmed. This course cuts the fluff and delivers focused, clear lessons in small, digestible chunks.
🎯 Direct-to-the-point explanations
📺 Engaging video lectures
🧠 Quizzes to reinforce concepts
💡 Code-along examples
📁 GitHub project access
All designed to help you actually learn—not just watch videos and forget.
Certification-Ready Training
Want to get Salesforce certified? This course lays the foundation for:
Salesforce Certified Administrator
Salesforce Platform Developer I
Salesforce Associate
You’ll gain a deep understanding of the topics covered in these certifications—plus the confidence that comes with hands-on experience.
What Past Learners Are Saying
“The live project part was a game changer. I could finally apply everything I learned.” — Priya S., now a Salesforce Admin in Bangalore
“The LWC tutorials were amazing. I finally understood how to build reusable components!” — Ahmed R., Salesforce Developer in Dubai
“I cracked two job interviews with the knowledge I got from this course.” — Neha T., switched careers from Testing to Salesforce
Why Choose This Salesforce Course via Korshub?
Korshub curates only high-value, proven courses. So when you learn Salesforce (Admin + Developer) with LWC Live Project, you’re not just clicking ‘Enroll’—you’re investing in your career.
🚀 Curated content that works 💻 Real projects, not just theory 🧩 Admin + Developer + LWC = Career-ready package 📈 Career acceleration from day one
Final Thoughts: Ready to Build Your Salesforce Future?
It’s time to take charge of your career. Whether you're dreaming of your first job in tech or looking to level up, Salesforce offers endless possibilities.
And when you have hands-on project experience, Admin and Developer skills, and LWC mastery—all in one course—you’re no longer just learning. You’re preparing to win.
So don’t wait. Join now and learn Salesforce (Admin + Developer) with LWC Live Project and transform your future, one project at a time.
0 notes
Text
Salesforce Lightning Development Solutions
VALiNTRY360 delivers innovative Salesforce Lightning Development solutions that help businesses transform their operations, improve user experience, and maximize ROI from their CRM investments. As a trusted Salesforce partner, VALiNTRY360 specializes in building custom Lightning Components and Lightning Web Components (LWC) that are scalable, efficient, and tailored to meet each client’s unique needs.
With the power of the Salesforce Lightning platform, VALiNTRY360 creates dynamic, mobile-friendly applications that streamline workflows and enhance productivity. Whether you’re upgrading from Salesforce Classic or launching a new Salesforce environment, their experienced developers ensure a smooth, strategic transition that aligns with your business objectives.
VALiNTRY360’s end-to-end Lightning development services include custom UI/UX design, third-party integrations, automation with Flow, and robust security implementation. Their team uses an agile approach to deliver high-quality solutions quickly while remaining flexible to changing requirements.
By leveraging the advanced features of Salesforce Lightning, VALiNTRY360 empowers organizations to deliver personalized user experiences, gain real-time insights, and scale their operations with confidence. Their focus on collaboration, innovation, and results ensures clients get the most out of their Salesforce investment.
For more info visit us��https://valintry360.com/services/salesforce-lightning-development
0 notes
Text
Seamless Amazon Payment Services Integration with Salesforce
Enhance your Salesforce payment processing with Amazon Payment Services, offering a secure, seamless, and efficient transaction experience. This integration enables businesses to streamline payment workflows, improve customer satisfaction, and maintain data security within the Salesforce ecosystem.
Step-by-Step Integration Guide:
1️⃣ Sign Up & Obtain API Credentials – Register for an Amazon Payment Services account and acquire necessary API credentials. 2️⃣ Configure Remote Site Settings – Add endpoint URLs in Salesforce to allow secure API communication. 3️⃣ Create Custom Objects & Fields – Store transaction details, payment statuses, and customer data. 4️⃣ Develop Apex Classes – Use Apex classes to handle transactions, API requests, and responses. 5️⃣ Build Lightning Web Components (LWC) – Design an intuitive user interface to collect payment details and trigger transactions. 6️⃣ Set Up Payment Workflows – Automate order creation, payment confirmations, and reconciliations within Salesforce. 7️⃣ Test Integration & Error Handling – Validate scenarios like successful payments, failed transactions, and error management for reliability.
Key Benefits of Integration:
💳 Enhanced Payment Experience – Provide a fast, secure, and seamless checkout for customers. 🔄 Easy Salesforce Integration – Manage payments and customer data all within Salesforce. 🔒 Security & Compliance – Amazon Payment Services follows strict security standards, ensuring data protection. 🌍 Versatile Payment Options – Accept credit cards, digital wallets, and multiple payment methods for flexibility.
Boost Your Business with Secure & Seamless Payments
Integrating Amazon Payment Services with Salesforce enhances operational efficiency, strengthens customer trust, and drives business growth.
0 notes
Text
Mastering Salesforce Development: What to Expect from the Salesforce Platform Developer 1 Course with TechForce Academy

Salesforce has emerged as one of the most powerful and sought-after CRM platforms, helping businesses enhance customer relationships, optimize workflows, and drive productivity. For aspiring Salesforce developers, gaining the right skills and certification is essential to thriving in this field. That’s where the Salesforce Platform Developer 1 (PD1) certification comes in. In this article, we’ll explore what you can expect from the Salesforce Developer Course offered by TechForce Academy, tailored specifically to prepare you for the Salesforce Platform Developer 1 certification (PD1).
Why Salesforce Development is Crucial
Salesforce development is crucial for companies looking to customize their Salesforce environments, automate complex processes, and create tailored solutions to meet their specific business needs. With Salesforce being widely adopted across industries, the demand for skilled developers is skyrocketing. TechForce Academy offers an in-depth Salesforce Developer Course designed to give professionals the tools and knowledge they need to succeed.
The Salesforce Platform Developer 1 certification is a key stepping stone for developers, validating their ability to build, deploy, and manage applications on the Salesforce platform. By mastering this certification through TechForce Academy, you can stand out in a competitive job market, develop crucial Salesforce skills, and position yourself as an expert in the field.
What is the Salesforce Platform Developer 1 (PD1) Certification?
The Salesforce Platform Developer 1 (PD1) certification is an entry-level credential designed to demonstrate a developer's understanding of building custom applications using Salesforce’s programmatic and declarative features. The PD1 certification covers essential development skills, including:
Writing Apex code
Building Visualforce pages
Using Lightning Web Components (LWC)
Implementing complex business logic
Managing data models and security configurations
At TechForce Academy, the Salesforce Platform Developer 1 course is structured to provide students with hands-on learning, ensuring they can apply these skills in real-world development scenarios.
What to Expect from TechForce Academy’s Salesforce Developer Course
TechForce Academy's Salesforce Developer Course for the PD1 certification is designed to guide students through every aspect of Salesforce development. This is a thorough explanation of what to anticipate.
1. Comprehensive Introduction to Salesforce
The course begins with an overview of Salesforce’s architecture, core functionalities, and cloud solutions. You’ll learn about:
Salesforce CRM and metadata: Understand the basics of Salesforce as a CRM and how metadata plays a crucial role in Salesforce development.
Declarative vs. programmatic development: Learn when to use Salesforce’s declarative tools (clicks) versus writing code (programmatic development).
Custom objects and fields: Create custom objects and fields, and understand how to model data in Salesforce.
Gaining a solid understanding of the Salesforce platform is the first step in becoming a successful developer, and TechForce Academy ensures students are well-prepared from the start.
2. Apex Programming
Apex is Salesforce’s proprietary programming language, used for writing backend logic and automating tasks.
Apex syntax and structure: Learn the basics of writing clean, efficient Apex code, including variables, operators, and loops.
SOQL (Salesforce Object Query Language): Master how to query Salesforce databases using SOQL to retrieve data, filter records, and implement custom searches.
DML operations: Get hands-on experience with Data Manipulation Language (DML) operations like inserting, updating, and deleting records.
Triggers: Understand how to write Apex triggers to automate workflows and perform complex operations when specific conditions are met.
Governor limits: Learn how to optimize your code to stay within Salesforce’s limits on resources, ensuring that your applications run efficiently.
Through practical exercises and real-world use cases, TechForce Academy ensures that students not only learn Apex but are able to apply it effectively in development projects.
3. Visualforce Pages and User Interfaces
While Salesforce’s newer Lightning framework has become increasingly popular, Visualforce remains an essential part of many Salesforce environments.
TechForce Academy’s course covers:
Visualforce pages: Learn how to build custom user interfaces that are tailored to specific business needs.
Custom controllers: Understand how to bind Apex code to Visualforce pages using controllers, providing dynamic, data-driven UI experiences.
Component-based design: Build reusable Visualforce components to simplify and streamline development.
This module ensures that students understand how to create engaging, functional UIs when the out-of-the-box Salesforce interface isn’t enough.
4. Salesforce Lightning and Lightning Web Components (LWC)
Lightning Web Components (LWC) are the future of Salesforce UI development. In this part of the course, TechForce Academy dives into:
Introduction to Lightning: Explore the components, tools, and best practices for developing applications using the Lightning framework.
Building Lightning components: Learn to create modular, reusable components that can enhance functionality across Salesforce apps.
Lightning Web Components: Develop dynamic and responsive web components that integrate seamlessly with Salesforce data.
As more organizations transition to Lightning, learning these cutting-edge development skills through TechForce Academy will give you a competitive edge.
5. Data Modeling and Security
Salesforce development isn’t just about writing code; it’s also about managing data efficiently and securely. TechForce Academy emphasizes best practices in data modeling and security:
Custom objects and relationships: Understand how to create and manage data relationships in Salesforce, from lookup to master-detail relationships.
Validation rules: Use validation rules to enforce data integrity and ensure data accuracy.
Profiles, roles, and permission sets: Configure permissions to control access to data and functionalities across users.
Record-level security: Learn Salesforce’s sharing and security model to protect sensitive information and restrict access where needed.
TechForce Academy prepares you to design scalable, secure data models that align with real-world business needs.
6. Testing and Debugging Apex Code
Testing is a critical aspect of Salesforce development, and TechForce Academy ensures that students understand how to:
Write unit tests: Develop Apex unit tests to verify that your code works as intended.
Use debug logs: Learn how to analyze debug logs for troubleshooting and performance optimization.
Achieve code coverage: Salesforce requires a minimum level of code coverage for all Apex classes and triggers before deployment. TechForce Academy helps students meet and exceed these requirements.
This module ensures you can confidently deploy your code, knowing that it has been thoroughly tested and debugged.
Benefits of Completing the Salesforce Developer Course with TechForce Academy
TechForce Academy’s Salesforce Developer Course offers numerous benefits, including:
Hands-On Learning: The course is designed to give you practical, hands-on experience with Salesforce development, ensuring that you’re ready to apply your knowledge in real-world scenarios.
Career Advancement: By earning your Salesforce Platform Developer 1 (PD1) certification, you position yourself for better job opportunities and higher earning potential in the Salesforce ecosystem.
Comprehensive Curriculum: TechForce Academy’s curriculum covers all major aspects of Salesforce development, from Apex programming and Visualforce to data modeling, security, and testing.
Industry-Recognized Certification: The Salesforce Platform Developer 1 certification is highly respected in the industry. Completing the course at TechForce Academy prepares you to pass the exam with confidence.
Advanced Learning Path: The PD1 certification is the first step toward more advanced Salesforce certifications, including the Salesforce Platform Developer 2 (PD2) and specialized certifications like Marketing Cloud Developer or Service Cloud Consultant.
Conclusion
Enrolling in the Salesforce Developer Course at TechForce Academy is a game-changing step for aspiring Salesforce developers. By mastering core development skills like Apex, Visualforce, Lightning Web Components, and data modeling, you’ll be well-equipped to pass the Salesforce Platform Developer 1 (PD1) certification exam and succeed in a competitive field.
With hands-on labs, expert instructors, and a carefully crafted curriculum, TechForce Academy offers one of the most comprehensive and effective training programs for Salesforce development. Whether you’re just starting your career or looking to advance your skills, this course provides everything you need to become a proficient Salesforce developer and unlock new career opportunities.
Don’t wait—start mastering Salesforce development today with TechForce Academy!
0 notes
Text
Record Lookup is an interface element that allows users to choose specific records from objects. To use a record Lookup in Lightning Web Component, we used to create custom lookup components like Generic Multi-Select Lookup Component. Although this is for multi-select lookup and it will still be used as there is no record picker component to select multiple records. For single record selection, Salesforce has introduced a new Record Picker control lightning-record-picker��to select object records in custom LWC (Lightning Web Component) screens. Now we don’t need to create a custom component for record lookup. This post will explain how to create a configurable record picker in LWC to make it more manageable in code.
0 notes
Text
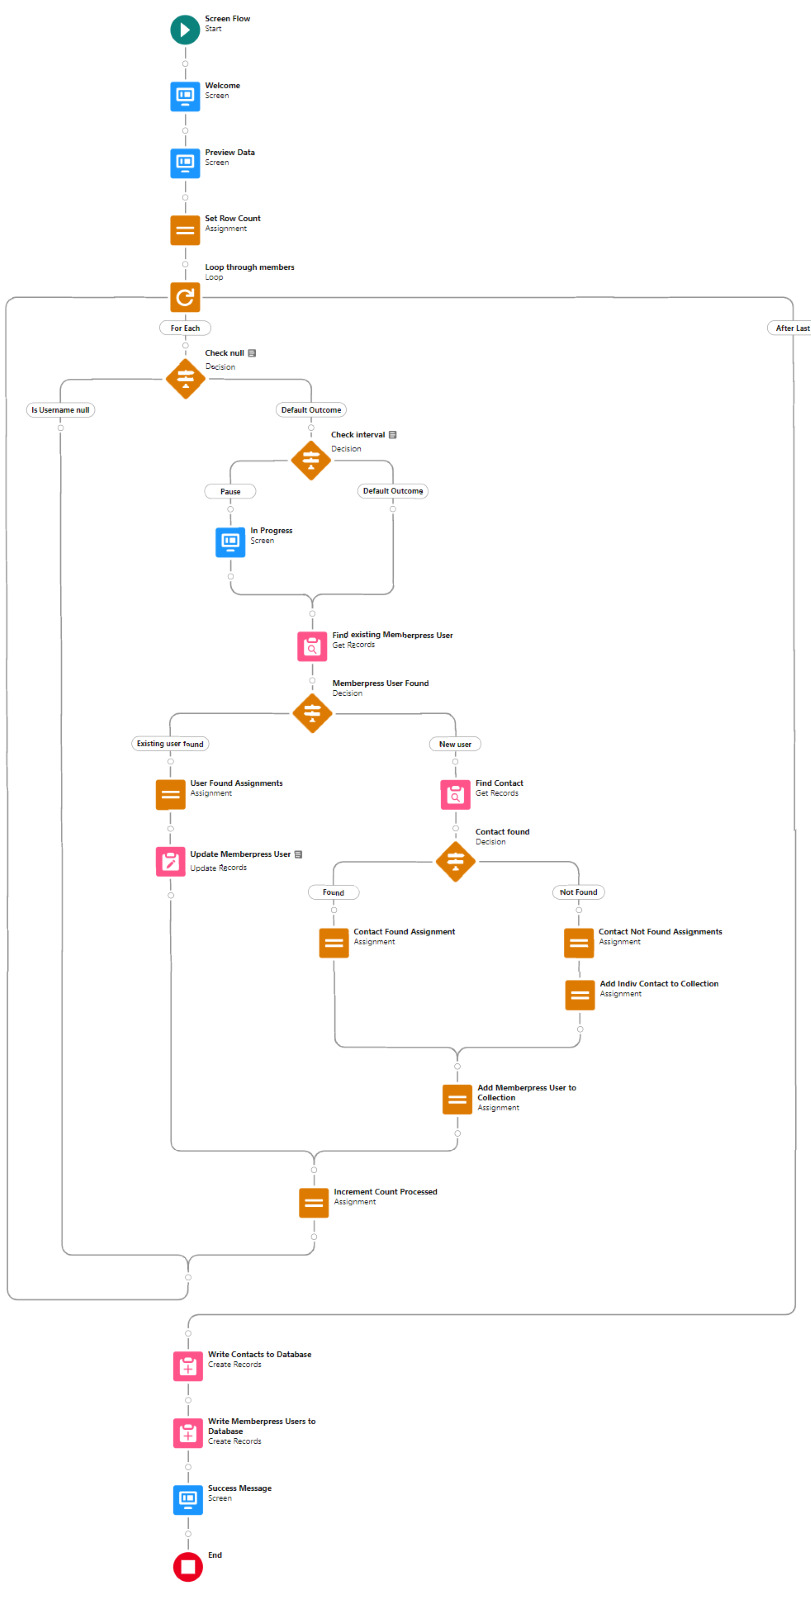
Enabling CSV data uploads via a Salesforce Screen Flow
This is a tutorial for how to build a Salesforce Screen Flow that leverages this CSV to records lightning web component to facilitate importing data from another system via an export-import process.
My colleague Molly Mangan developed the plan for deploying this to handle nonprofit organization CRM import operations, and she delegated a client buildout to me. I’ve built a few iterations since.
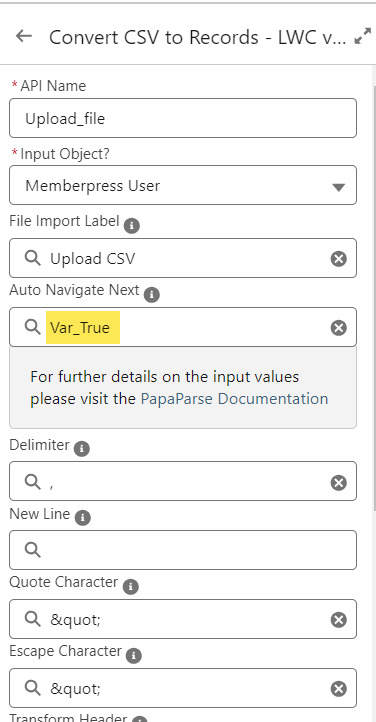
I prefer utilizing a custom object as the import target for this Flow. You can choose to upload data to any standard or custom object, but an important caveat with the upload LWC component is that the column headers in the uploaded CSV file have to match the API names of corresponding fields on the object. Using a custom object enables creating field names that exactly match what comes out of the upstream system. My goal is to enable a user process that requires zero edits, just simply download a file from one system and upload it to another.
The logic can be as sophisticated as you need. The following is a relatively simple example built to transfer data from Memberpress to Salesforce. It enables users to upload a list that the Flow then parses to find or create matching contacts.
Flow walkthrough
To build this Flow, you have to first install the UnofficialSF package and build your custom object.
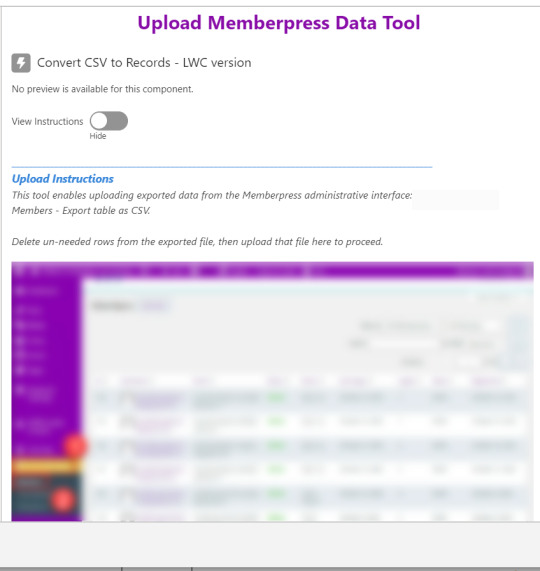
The Welcome screen greets users with a simple interface inviting them to upload a file or view instructions.

Toggling on the instructions exposes a text block with a screenshot that illustrates where to click in Memberpress to download the member file.
Note that the LWC component’s Auto Navigate Next option utilizes a Constant called Var_True, which is set to the Boolean value True. It’s a known issue that just typing in “True” doesn’t work here. With this setting enabled, a user is automatically advanced to the next screen upon uploading their file.
On the screen following the file upload, a Data Table component shows a preview of up to 1,500 records from the uploaded CSV file. After the user confirms that the data looks right, they click Next to continue.

Before entering the first loop, there’s an Assignment step to set the CountRows variable.

Here’s how the Flow looks so far..

With the CSV data now uploaded and confirmed, it’s time to start looping through the rows.
Because I’ve learned that a CSV file can sometimes unintentionally include some problematic blank rows, the first step after starting the loop is to check for a blank value in a required field. If username is null then the row is blank and it skips to the next row.

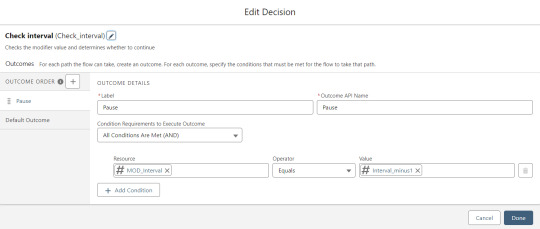
The next step is another decision which implements a neat trick that Molly devised. Each of our CSV rows will need to query the database and might need to write to the database, but the SOQL 100 governor limit seriously constrains how many can be processed at one time. Adding a pause to the Flow by displaying another screen to the user causes the transaction in progress to get committed and governor limits are reset. There’s a downside that your user will need to click Next to continue every 20 or 50 or so rows. It’s better than needing to instruct them to limit their upload size to no more than that number.

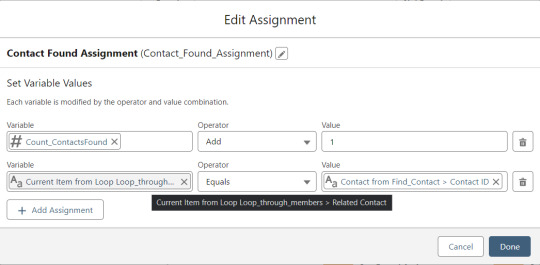
With those first two checks done, the Flow queries the Memberpress object looking for a matching User ID. If a match is found, the record has been uploaded before. The only possible change we’re worried about for existing records is the Memberships field, so that field gets updated on the record in the database. The Count_UsersFound variable is also incremented.

On the other side of the decision, if no Memberpress User record match is found then we go down the path of creating a new record, which starts with determining if there’s an existing Contact. A simple match on email address is queried, and Contact duplicate detection rules have been set to only Report (not Alert). If Alert is enabled and a duplicate matching rule gets triggered, then the Screen Flow will hit an error and stop.

If an existing Contact is found, then that Contact ID is written to the Related Contact field on the Memberpress User record and the Count_ContactsFound variable is incremented. If no Contact is found, then the Contact_Individual record variable is used to stage a new Contact record and the Count_ContactsNotFound variable is incremented.


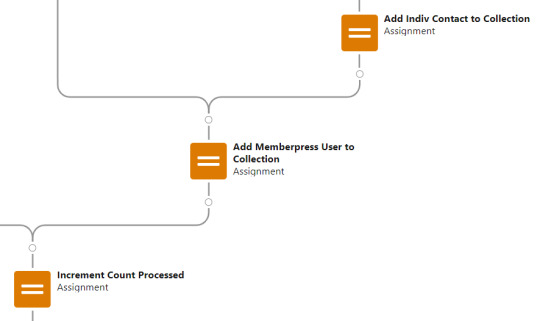
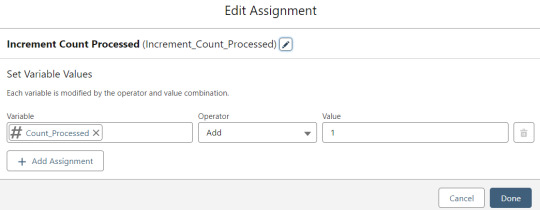
Contact_Individual is then added to the Contact_Collection record collection variable, the current Memberpress User record in the loop is added to the User_Collection record collection variable, and the Count_Processed variable is incremented.


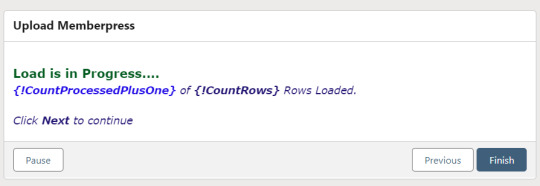
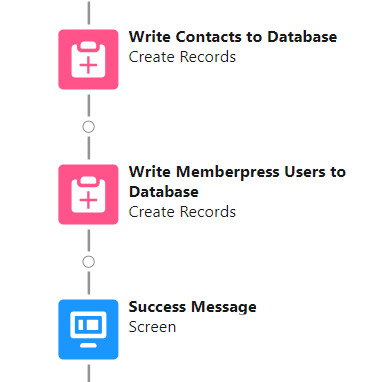
After the last uploaded row in the loop finishes, then the Flow is closed out by writing Contact_Collection and User_Collection to the database. Queueing up individuals into collections in this manner causes Salesforce to bulkify the write operations which helps avoid hitting governor limits. When the Flow is done, a success screen with some statistics is displayed.

The entire Flow looks like this:
Flow variables
Interval_value determines the number of rows to process before pausing and prompting the user to click next to continue.
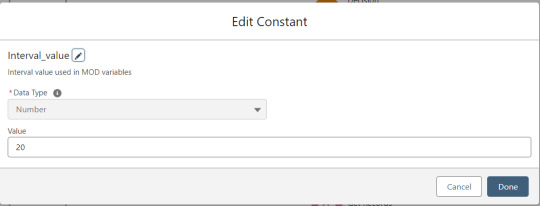
Interval_minus1 is Interval_value minus one.
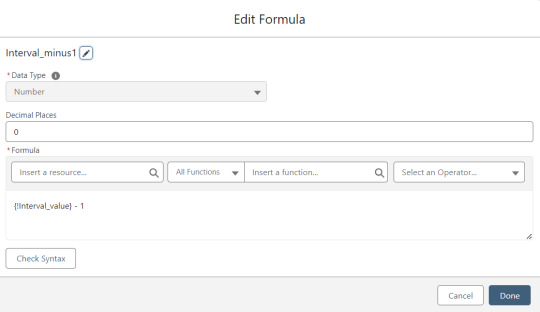
MOD_Interval is the MOD function applied to Count_Processed and Interval_value.

The Count_Processed variable is set to start at -1.

Supporting Flows
Sometimes one Flow just isn’t enough. In this case there are three additional record triggered Flows configured on the Memberpress User object to supplement Screen Flow data import operations.
One triggers on new Memberpress User records only when the Related Contact field is blank. A limitation of the way the Screen Flow batches new records into collections before writing them to the database is that there’s no way to link a new contact to a new Memberpress User. So instead when a new Memberpress User record is created with no Related Contact set, this Flow kicks in to find the Contact by matching email address. This Flow’s trigger order is set to 10 so that it runs first.
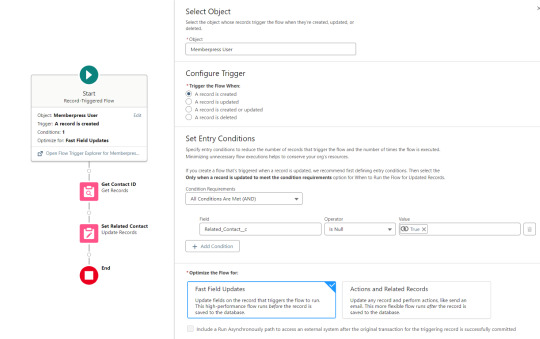
The next one triggers on any new Memberpress User record, reaching out to update the registration date and membership level fields on the Related Contact record

The last one triggers on updated Memberpress User records only when the memberships field has changed, reaching out to update the membership level field on the Related Contact record


0 notes
Text
An All-Inclusive Guide to Salesforce Developer Training
If you want to learn what goes behind the scenes of Salesforce, you have to enroll in the Salesforce Developer training.
Understand Why Would Someone Enroll for Salesforce Training
A vast ecosystem that is augmented with a diverse set of features and tools is known as Salesforce. To navigate this complex landscape seamlessly you must enroll for Salesforce developer training. Once you get enrolled you’ll get the needed expertise and knowledge regarding the same. They‘ll learn to equip the power of Salesforce integration capabilities, custom code development, and declarative features.
There is a huge demand for customized Salesforce solutions. This is why proper training is necessary, because it would allow us to build scalable applications customized to the specific needs of a business. They become proficient in creating custom objects, triggers, and Apex classes.
Salesforce Developers play a crucial role in enhancing customer experiences. By mastering Lightning Web Components, they create intuitive and responsive user interfaces that elevate user satisfaction and drive business growth.
Many organizations use Salesforce alongside other systems. Training helps developers integrate Salesforce with other platforms efficiently, facilitating smooth data flow and real-time information exchange.
Salesforce is a dominant player in the CRM market, and as businesses are adopting it at an exponential rate, the demand for skilled Salesforce Developers continues to soar. Proper training opens up numerous career opportunities, as organizations are eager to onboard competent professionals.
Key Components of this training
Fundamentals of Salesforce: Training typically starts with an overview of Salesforce and its primary functionalities, including navigating the interface, working with records, and understanding Salesforce data models.
Declarative Development: Developers learn to utilize point-and-click tools like Process Builder and Flow to automate business processes without writing code. This empowers them to build robust applications faster.
Apex and Visualforce: This part of the training delves into the world of custom code development using Apex (Salesforce's programming language) and Visualforce (a markup language for creating custom user interfaces). Trainees master the skills needed to create custom controllers, extensions, and Visualforce pages.
Lightning Web Components (LWC): With Lightning becoming the standard UI framework, LWC training has become essential. Developers learn to build dynamic and responsive applications using this modern, standards-based framework.
Integration and APIs: Salesforce is often integrated with other systems. Training covers the basics of integrating Salesforce with third-party applications using APIs like REST and SOAP.
Testing and Deployment: Proper testing and deployment processes are crucial for ensuring the stability and reliability of Salesforce solutions. Training covers best practices for unit testing, debugging, and deployment.
Salesforce Developer Training Has Numerous Benefits
The capabilities of Salesforce can efficiently be leveraged by trained developers. And that will lead to faster application development and business processes will get smoother.
With comprehensive training, developers can think outside the box and create innovative solutions to address unique business challenges.
Organizations that invest in Salesforce Developer training witness a significant return on investment through improved productivity and optimized Salesforce implementations.
For individuals, training paves the way for career advancement and higher earning potential in the rapidly growing Salesforce job market.
Conclusion:
Salesforce Developer training is a gateway to unlocking the full potential of Salesforce and harnessing its capabilities to build scalable, efficient, and innovative solutions.
0 notes
Text
How do I Create Custom Object Using Lightning Object Creator?
It is a low-code app development tool on the Salesforce Lightning Platform, called as Lightning Object Creator. Lightning Object Creator is a new tool that turns spreadsheets into apps with just a few clicks.
We are covering basic to advance level of concepts involved in our Salesforce Lightning Web Component Training. This course gives you in-depth conceptual knowledge of the new Lightning Web Component and programming model along with mini project to work on which helps candidate to implement all knowledge to finish project. After completion of the training the candidate has basic to advance understanding of Aura and lightning components onto the concepts that exist in the new framework programming model.
You will be learning:
What is Lightning Web Component?
Lightning Web Component Testing
Lightning Web Component Framework
Lightning Web Component Development
LWC & Aura Communication
With the Lightning Object Creator, it only takes a few steps to translate the columns of a spreadsheet into fields, define field types and import all the spreadsheet data. Take spreadsheets from Microsoft Excel, Google Sheets, or comma-separated value (CSV) files, and turn them into apps. We have really feasted on these tools to automate our business processes.
#custom object in lwc#create custom object in lwc#salesforce aura training classes#salesforce aura core concepts#salesforce LWC training online
1 note
·
View note
Text
Stripe Integration with Salesforce - Kizzy Consulting
So firstly what is a stripe? Stripe is the most commonly used payment gateway. Stripe is widely used by e-commerce, subscription-based services, and by many small as well as large-scale businesses to manage their payments and subscriptions. With the help of Rest API’s Stripe makes it easy for us to manage our payments.
While I was integrating Salesforce to stripe I faced many challenges, with the help of this article I would like to share my learning and the steps for Salesforce to Stripe integration using input from an LWC component. I have also attached the link to my GIT for reference to the code.
Some key use cases of Stripe:
Manage customers.
Manage their payment methods and also save the primary payment source.
Initiate transactions from Salesforce.
Key Challenge:
Despite detailed documentation provided by Stripe, integration with Stripe using Apex was challenging while passing the nested object structure in URL-encoded format.
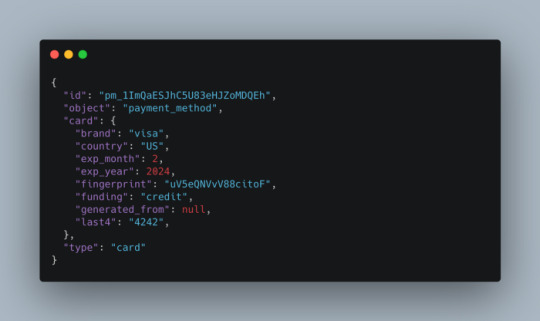
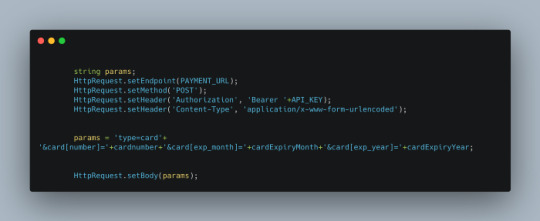
Steps to integrate Stripe with Salesforce.

Once you have the key you can store it in your environment(I used custom metadata to store it)
Creating a screen for the inputs required for the integration, which will be calling the Helper for creating the customer, and payment method and initiating the payments. I have shared the code which uses a Stripe helper to create the request and call Stripe API for customers, and payment methods, and then initiate the payments.

3. Once the payment is processed check your stripe account for all the records and store the transaction Id in Salesforce for future reference(eg. Lead, if making payments for a lead record.)
0 notes
Text
Learn Salesforce (Admin + Developer) with LWC Live Project

Introduction: Why Learn Salesforce in 2025?
Salesforce isn't just a buzzword—it's the backbone of CRM systems powering businesses across industries. Whether you’re eyeing a career switch, aiming to boost your tech resume, or already in the ecosystem, learning Salesforce (Admin + Developer) with Lightning Web Components (LWC) and Live Project experience can fast-track your growth.
In today’s digital-first world, companies want Salesforce pros who don’t just know theory—they can build, automate, and solve real business problems. That’s why this course—Learn Salesforce (Admin + Developer) with LWC Live Project—is gaining attention. It offers a perfect mix of foundational concepts, hands-on development, and real-world exposure.
What You’ll Learn in This Course (And Why It Matters)
Let’s break down what makes this course stand out from the crowd.
✅ Salesforce Admin Fundamentals
Before diving into development, you'll master the core essentials:
Creating custom objects, fields, and relationships
Automating processes with Workflow Rules and Flow
Building intuitive Lightning Pages
Managing users, roles, and security
Generating dashboards and reports for decision-making
These are the exact skills Salesforce Admins use daily to help businesses streamline their operations.
✅ Developer Skills You Can Use from Day One
This course bridges the gap between theory and practice. You’ll learn:
Apex programming (triggers, classes, SOQL, and more)
Visualforce basics
Building Lightning Components
Advanced LWC (Lightning Web Components) development
Unlike typical developer tutorials, you won’t just follow along. You’ll build actual components, debug real scenarios, and write scalable code that works.
✅ Lightning Web Components: The Future of Salesforce
If you want to stay relevant, LWC is a must-learn. This course helps you:
Understand how LWC works with core Salesforce data
Build reusable components
Interact with Apex backend using modern JavaScript
Implement events, component communication, and conditional rendering
These are hot skills employers are actively searching for—especially in 2025 and beyond.
The Power of Learning with a Live Project
You can’t call yourself job-ready without hands-on practice.
That’s why this course includes a Live Project, simulating how real-world businesses use Salesforce. You’ll:
Gather requirements like a real consultant
Build a working CRM or service app
Use Git, deployment tools, and testing strategies
Present your work just like in a client meeting
This turns your learning from passive watching to active doing, and makes your resume stand out.
Who Is This Course For?
Here’s the great part: this course is beginner-friendly but powerful enough for intermediates looking to level up.
It’s for:
Freshers or career changers wanting to break into tech
Working professionals looking to pivot into Salesforce roles
Aspiring developers who want to learn Apex + LWC
Admins who want to become full-stack Salesforce professionals
No coding background? You’ll still be able to follow along thanks to the step-by-step breakdowns and real-time guidance.
Why Salesforce Skills Are in Demand in 2025
A few fast facts to show just how hot the Salesforce job market is:
Over 150,000 new job openings expected globally in the Salesforce ecosystem this year
Salesforce Admins and Developers earn $80k–$140k+ USD annually
LWC and Apex skills are now required by 7 out of 10 Salesforce job listings
Remote roles and contract gigs are increasing, giving you flexible career options
With Salesforce constantly evolving, this course gives you an up-to-date skillset that companies are actively hiring for.
Trending Keywords Optimized in This Blog:
Learn Salesforce Admin and Developer
Salesforce LWC project-based course
Salesforce Admin certification training
Apex and Lightning Web Components
Salesforce Live Project training
Hands-on Salesforce course 2025
Real-world Salesforce LWC examples
Salesforce developer job-ready program
Master Salesforce with LWC in 2025
Salesforce for beginners to advanced
These keywords help ensure your blog ranks well for multiple search intents—course seekers, career switchers, and job-hunters.
The Benefits You’ll Walk Away With
Let’s be honest. You’re not here just to learn. You’re here to get results. This course gives you:
🔹 Real Confidence
You’ll go from "I think I get it" to "I know how to build this."
🔹 Portfolio-Ready Projects
Walk away with a live Salesforce app you can show recruiters and hiring managers.
🔹 Practical Experience
Understand how real clients work, think, and change requirements on the fly.
🔹 Certification Preparation
The course aligns with content from:
Salesforce Certified Administrator
Salesforce Platform Developer I
So you can study with purpose and even prep for exams on the side.
🔹 Interview Readiness
You’ll learn to speak confidently about your live project, troubleshoot in real-time, and answer technical questions.
How This Course Is Different from Others
There are tons of Salesforce courses out there. Here’s what makes this one stand out:
Feature
Other Courses
This Course
LWC Training
❌ Often missing or outdated
✅ Fully integrated
Live Project
❌ Simulated only
✅ Real-world use case
Admin + Dev in One
❌ Separate courses
✅ Full-stack in one path
Job Readiness
❌ No practical focus
✅ Build, deploy & present
Support
❌ Pre-recorded only
✅ Guided walkthroughs and community
How to Get Started Today
Whether you're brand new to Salesforce or ready to upskill, you can start learning in minutes:
👉 Sign up for the course: Learn Salesforce (Admin + Developer) with LWC Live Project 👉 Complete each module at your own pace 👉 Practice, build, and test real projects 👉 Join the course community for support 👉 Walk into your next interview with real answers and real skills
Final Thoughts: Your Salesforce Journey Starts Now
At Korshub, we believe that online learning should empower you to take action. This isn’t just another video playlist—it’s a real opportunity to build your skills, your confidence, and your future.
Salesforce is growing. Companies are hiring. And they’re not looking for textbook learners—they’re looking for people who can think, build, and solve problems.
So if you're ready to go from curious to certified, from stuck to skilled, this course is your launchpad.
Start your Salesforce journey with LWC and real-world experience today. You’ve got this. 🚀
0 notes
Text
Salesforce LWC (Lightning Web Component) with Live Project: A Comprehensive Guide

Salesforce is a cloud-based platform that has revolutionized customer relationship management (CRM) by offering a suite of tools to manage customer interactions. One of the most powerful features of Salesforce is the Salesforce Lightning Web Component (LWC) framework. The Salesforce LWC framework allows developers to build lightning-fast, reusable components that enhance the overall user experience of Salesforce applications. This blog will walk you through the Salesforce LWC (Lightning Web Component) with Live Project, covering everything from the basics to hands-on project implementation.
What is Salesforce LWC (Lightning Web Component)?
Salesforce LWC (Lightning Web Component) is a modern framework designed to build responsive, lightweight, and scalable applications on the Salesforce platform. It uses web standards like JavaScript, HTML, and CSS, making it an easier and faster alternative to the older Aura Components. By utilizing native browser APIs, Salesforce LWC reduces the need for heavy abstraction layers, which enhances performance.
Key Features of Salesforce LWC:
Web Standards: Uses native JavaScript, HTML, and CSS, enabling developers to leverage existing skills.
Modularity: Encourages component-based development, making it easy to reuse and maintain.
Performance: Reduces the reliance on third-party libraries, improving the overall performance of applications.
Faster Rendering: With virtual DOM and other techniques, Salesforce LWC provides faster page loads and a better user experience.
Integration: Easily integrates with Salesforce APIs, making it a natural fit for building apps in the Salesforce ecosystem.
The Importance of Lightning Web Components in Salesforce
Before Salesforce LWC, developers mainly used the Aura Component framework. Although Aura was effective, it had some limitations, such as performance issues due to the heavy abstraction layers. With the rise of modern web development practices, Salesforce LWC was introduced to make development faster and more aligned with industry standards.
Here’s why Salesforce LWC (Lightning Web Component) is crucial:
Faster Development: Developers can use modern web development languages they are already familiar with, such as JavaScript and CSS.
Improved Performance: Since LWC uses web standards, there is less need for Salesforce-specific libraries, which makes applications faster and lighter.
Cross-Browser Compatibility: LWC ensures that your components work across all modern browsers.
Seamless Salesforce Integration: As part of the Salesforce platform, LWC easily integrates with Salesforce objects, APIs, and Apex controllers.
Getting Started with Salesforce LWC (Lightning Web Component)
If you are a developer looking to implement Salesforce LWC (Lightning Web Component) with Live Project, you first need to understand the core concepts behind LWC.
Prerequisites
Basic Knowledge of JavaScript: Since Salesforce LWC is built using JavaScript, having a good grasp of ES6 (ECMAScript 6) and modern JavaScript concepts is essential.
Salesforce Environment: You need access to a Salesforce Developer Org to start building LWC applications.
Salesforce CLI: The Salesforce Command Line Interface (CLI) is used to create and deploy Lightning Web Components.
Visual Studio Code: VS Code with Salesforce Extensions is the preferred IDE for LWC development.
Setting Up Salesforce LWC
Follow these steps to set up your environment for Salesforce LWC:
Install Salesforce CLI: Download and install the Salesforce CLI from the official Salesforce website.
Set Up a Salesforce Developer Org: Sign up for a free Salesforce Developer Org where you can practice building Lightning Web Components.
Install VS Code: Install Visual Studio Code and the Salesforce Extension Pack.
Create an LWC Project: Use Salesforce CLI to create a new LWC project by running the following command:
bash
Copy code
sfdx force:project:create --projectname lwc-project
Once your environment is set up, you are ready to start building Salesforce LWC (Lightning Web Component) with Live Project.
Building a Simple Lightning Web Component
Let’s build a basic Lightning Web Component to display a list of Salesforce accounts. This example will help you understand how to work with LWC components, Apex controllers, and Salesforce data.
Step 1: Create an LWC Component
Create a folder in your lwc directory and add the necessary files: HTML, JavaScript, and CSS. The basic structure looks like this:
bash
Copy code
lwc
├── accountList
│ ├── accountList.html
│ ├── accountList.js
│ └── accountList.css
In accountList.html, you’ll define the template for your component:
html
Copy code
<template>
<lightning-card title="Account List" icon-name="standard:account">
<ul>
<template for:each={accounts} for:item="account">
<li key={account.Id}>
{account.Name}
</li>
</template>
</ul>
</lightning-card>
</template>
In accountList.js, you’ll fetch the account data from Salesforce:
javascript
Copy code
import { LightningElement, wire } from 'lwc';
import getAccounts from '@salesforce/apex/AccountController.getAccounts';
export default class AccountList extends LightningElement {
@wire(getAccounts)
accounts;
}
In AccountController.cls, you’ll create an Apex class to fetch data from Salesforce:
apex
Copy code
public with sharing class AccountController {
@AuraEnabled(cacheable=true)
public static List<Account> getAccounts() {
return [SELECT Id, Name FROM Account LIMIT 10];
}
}
Once this is done, deploy the component to your Salesforce org using the Salesforce CLI.
Step 2: Testing the Component in Salesforce
After deploying, go to App Builder in Salesforce and drag your new LWC component onto a Lightning Page. This simple example illustrates how easy it is to fetch and display Salesforce data using Salesforce LWC.
Live Project with Salesforce LWC (Lightning Web Component)
Now that we’ve covered the basics of Salesforce LWC, let’s move on to implementing a Live Project. The live project will involve building a Salesforce LWC application that allows users to search and display information about Contacts in Salesforce. This project will be more advanced, involving data binding, input fields, and interaction with the Salesforce backend using Apex.
Project Requirements
Search Component: A component that allows users to enter a search term to find Contacts.
List Component: A component that displays a list of Contacts matching the search term.
Detail Component: A component that shows detailed information about a selected Contact.
Step 1: Create the Search Component
The search component will allow users to input a name, which will be passed to an Apex controller to query Salesforce. Create a component called contactSearch:
contactSearch.html:
html
Copy code
<template>
<lightning-input label="Search Contacts" onchange={handleSearch}></lightning-input>
</template>
contactSearch.js:
javascript
Copy code
import { LightningElement } from 'lwc';
export default class ContactSearch extends LightningElement {
handleSearch(event) {
const searchEvent = new CustomEvent('search', {
detail: event.target.value
});
this.dispatchEvent(searchEvent);
}
}
Step 2: Create the List Component
The list component will display the results of the search. It will receive the search term from the parent component and call the Apex controller to retrieve the data.
contactList.js:
javascript
Copy code
import { LightningElement, api, wire } from 'lwc';
import getContacts from '@salesforce/apex/ContactController.getContacts';
export default class ContactList extends LightningElement {
@api searchTerm;
@wire(getContacts, { searchTerm: '$searchTerm' }) contacts;
}
Conclusion
By now, you should have a solid understanding of Salesforce LWC (Lightning Web Component) and how to implement a Live Project. This guide covered both the fundamental aspects of LWC and a hands-on live project, allowing you to experience the real-world application of this powerful framework.
Implementing Salesforce LWC in live projects is crucial for enhancing user interfaces and improving performance within Salesforce applications. Whether you are an experienced developer or a beginner, learning Salesforce LWC can open up new opportunities in the growing Salesforce ecosystem.
Embrace Salesforce LWC as your go-to tool for modern Salesforce development and start building efficient, high-performance web components today.
0 notes
Link
Content last updated December 2020. Roadmap corresponds to Summer ’21 projections. Our forward-looking statement applies to roadmap projections. Guide Overview Looking to build forms on the Salesforce Platform? You’ve got multiple options, spanning the entire low-code to pro-code continuum. Representing low-code, Dynamic Forms in Lightning App Builder and Screen Flows in Flow Builder. Hanging out in the middle of the continuum is the ability to extend Screen Flows with LWCs. And representing pro-code is the LWC framework and its ever-growing library of base components. Options are great, but how do you determine which one (or which combination) is the right option? That’s where this doc comes in. Takeaway #1: For basic create/edit forms on a Lightning record page on desktop, use Dynamic Forms. Takeaway #2: Use Flow to build multi-screen forms. If you need to also meet precise UX requirements, layer in LWCs. Takeaway #3: If you need test automation, start with LWC. You can write unit tests for any LWC, regardless of where you plan to embed it. This doc focuses on form-building. You’ll see a similar assessment in Architect’s Guide to Building Record-Triggered Automation on Salesforce. A bit later, we’ll go into depth on these use cases and more, including how to choose between click-based tools and code-based tools (and when to combine them), but here are the major considerations to start with when choosing between these three options. Low Code Pro Code Dynamic Forms1 Screen Flow Screen Flow + LWC LWC Custom Object on Desktop Available Available Available Available Any Object on Desktop Roadmap Available Available Available Dynamic Visibility Available Available Available Available Multi-Screen Form Not Available Available Available Not Ideal Cross-Object Not Available Available Available Available Logic or Actions Behind the Form Not Available Available Available Available Dynamic Event Handling Roadmap Not Available Available Available Pixel-Perfect Styling Not Available Not Available Available Available Unit Testing Not Available Not Available Available Available 1Dynamic Forms is a feature of Lightning Pages. Lightning Pages are declaratively configured with the Lightning App Builder. As part of Summer ‘20, Dynamic Forms is a non-GA preview feature, and we aim to GA it in Winter ‘21. Available: works fine with basic considerations. Not Ideal: possible but consider an alternative tool Roadmap: estimated to support by Summer ’21 (targeted go-live mid-June 2021). Our forward-looking statement applies to roadmap projections. Not Available: no plans to support in the next twelve months. tl;dr Quickly, let’s elaborate on the takeaways and table above. If Lightning Pages and Dynamic Forms meet your requirements, use them. That means you need a create or edit form for exactly one object on desktop, and you need to control field visibility. Lightning App Builder may be a declarative tool, but this is where it excels. If your requirements aren’t met by those constraints, keep reading. Either Flow or LWC will be a better fit. If you need additional logic or actions behind the form, use Flow or LWC. Both tools offer ways for your solution to do more than create or edit a single record. That “more” might be more advanced logic, such as branching or iteration, and it might be more actions like integrating with external systems, sending emails, or pushing notifications to a user’s mobile app. If you’re building a multi-page form or a wizard, start with Flow. Flow provides a linear navigation framework for orchestrating multiple forms together. You could use LWC to construct your own framework for navigating between forms, but we recommend letting Flow do the hard work for you, so that you can focus on the forms themselves. Got sophisticated UX requirements? Need to dynamically handle more than visibility? Build that stuff in a LWC. If your requirements can be achieved with simple theming and column-based layouts, you can build your forms directly in a low-code builder. For more fine-grained control over your form’s style, you’ll need the ultimate flexibility of LWC. Keep in mind, your choice doesn’t have to be an either/or – you can combine the power of multiple options. For example, if you need both Flow’s built-in navigation system and the full styling flexibility that LWC offers, use them together. What About Page Layouts? You may notice that Page Layouts are missing from our comparison in this document. Moving forward, the recommended way to configure record detail pages is Dynamic Forms in Lightning App Builder using Lightning Pages. It’s been a long time since we enhanced page layouts, and that trend will continue. Here’s why. Dynamic Forms are more flexible – you can place fields and sections wherever you want directly in Lightning App Builder, where you can take advantage of sections, tabs, and accordions. And just like you can do with components on the Lightning page, you can control the visibility of your fields and sections without defining multiple page layouts or record types. With Accordion and Tab components, you can restrict the amount of fields that are displayed initially. Guess what that means? Faster page load times. Layout management is simpler with Lightning Pages, since you can manage everything about your pages from Lightning App Builder – whether that’s the contents of the page or which users have access to the page. It’s no longer necessary to make updates in your page layout to make a change happen in your Lightning page. Not to mention, with the power of component visibility rules, you no longer have to create multiple pages (or page layouts) to control who sees which fields when. And that also means you only need to assign users a Lightning page rather than doing that and also assigning the page layout. As of this non-GA preview, Dynamic Forms has a handful of limitations. We recommend using Dynamic Forms wherever possible, and falling back to Page Layouts only when necessary. For reference, here are the high-level gaps we’re aware of and when we plan to fill them. Timeline for Lightning Pages & Dynamic Forms Support for standard objects Spring '21 Support on the Salesforce mobile app Summer '21 Support in Community record pages Far Future Configure tab visibility Summer '21 Show, hide, and collapse section headers Spring '21 Conditional formatting of fields Summer '21 Conditionally make a field required Summer '21 Conditionally make a field read-only Summer '21 What About Performance? Any performance considerations related to Dynamic Forms, screen flows, and LWC center on what framework those technologies themselves sit on. The ones that are based in LWC (besides, of course, an LWC) are going to outperform ones that are based in Aura. The LWC framework offers better performance because core features are implemented natively in web engines instead of in JavaScript via framework abstractions. If you’re not familiar give this blog post a read. Back in 2019, we did a case study comparing the performance of the same functionality in Aura vs. in LWC. As a result of converting DreamHouse from Aura to LWC, not only was the development experience far more aligned with current web front-end development standards and patterns, but the performance gains are significant. Lab measurements showed gains in the range of 2.4 percent to 24.7 percent for cold cache and gains in the range of 31.83 percent to 63.32 percent for warm cache on the same two pages. Now, which framework are our form technologies using? In other words, which form technologies benefit from this superior performance? Dynamic Forms, which is integrated in the Lightning pages metadata, are built on a brand new foundation that uses the LWC stack, which will enable us to implement some long-requested features. Building everything from ground up takes time, which is why Dynamic Forms currently has some limitations – like standard object and mobile experience support. Screen flows are built on a mixed stack. Today, the flow runtime client uses an Aura container application, and most of the individual components you can display in a flow screen are Aura. A few have been converted to LWC so far: Text, Checkbox, Date, and DateTime. The Flow team is committed to converting the flow runtime client to use 100% LWC components instead of Aura, with the exception of customer-created (that’s you!) Aura components. We can’t convert those for you, but there is an excellent Trailhead module that explains how to do so: Lightning Web Components for Aura Developers. It goes without saying: if you’re thinking about building a custom component for a screen flow or any other container, always go LWC. LWC is built on ... LWC of course. This is a freebie. 🤓 Navigating the Low-Code to Pro-Code Continuum Most of this doc focuses on helping you understand what functionality and level of customization is possible with Dynamic Forms, screen flows, and LWC. LWC is the most customizable and robust option for building a form, but it has the fewest guardrails in place. It’s up to you to build a component in a way that ensures security and scalability. Dynamic Forms is the least flexible, but there are far fewer opportunities for missteps. Flow sits somewhere in the middle – more powerful than Dynamic Forms but not quite at the level of LWC. By the same token, it has fewer guardrails than Dynamic Forms but is harder to break than custom code. If multiple tools fit the bill, the decision comes down to which tool is the right one for your team. Introducing the Salesforce Architect Decision Guides on the Salesforce Architects blog introduces some aspects to consider when making that decision. We won’t go into the details of each of those aspects here, but what we will do is interpret them for the specific tools this doc is assessing. Specialized Skills: What percentage of your team is already an expert in the tools you’re comparing? How many makers are well-versed and familiar with LWC or Javascript? How about makers who are experts in Flow Builder or have expressed an interest in dipping their toes? Generally speaking, Dynamic Forms and Flow are more attainable for a broader population of makers. Dynamic Forms is the most declarative form-building tool and will always be easier to learn than Flow. That said, the Flow team is committed to getting that bar as low as possible. Delegation of Delivery: Just because part of your requirements require LWC doesn’t mean the entire solution needs to be built with LWC. Consider how you can build your solution modularly, such that the bits that require LWC are coded, and the bits that don’t are built in a low-code solution. Doing so maximizes the impact of a diverse team and ensures that makers are solving problems appropriate for their specialization. Maintainability & Long-Term Ownership: If you anticipate this form will be maintained in the future by pro-code makers and your current team is highly familiar with Javascript frameworks, it makes sense to choose LWC as your solution of choice. If, on the other hand, low-code makers will be responsible for maintaining the form, consider how you can make the solution as configurable as possible for that audience. Diving Deeper As promised, we’re diving deep into a variety of comparison points and functional differences between Dynamic Forms, Screen Flows, Screen Flows with embedded LWCs, and the LWC framework itself. Available: works fine with basic considerations. Not Ideal: possible but consider an alternative tool. Requires ...: possible with help, such as from Apex. Roadmap: estimated to support by Summer ’21 (targeted go-live mid-June 2021). Our forward-looking statement applies to roadmap projections. Not Available: no plans to support in the next twelve months. Low Code Pro Code Dynamic Forms1 Screen Flow Screen Flow + LWC LWC Object Scope Single Object Available (Custom Objects) Available Available Available Cross-Object Not Available Available Available Available Object-Agnostic Not Available Available Available Available Form Scope Single-Screen Form Available Available Available Available Multi-Screen Form Not Available Available Available Not Ideal Location Lightning Record Page Available Available Available Available Lightning Home or App Page Not Available Available Available Available Communities Not Available Available Available Available Embedded Snap-Ins Not Available Available Available Available Utility Bar Not Available Available Available Available Object-Specific Action Not Available Available Available Roadmap Global Action Not Available Not Available Not Available Roadmap Salesforce Mobile App Not Available Available Available Available Field Service Mobile Not Available Available (Object-specific action) Not Available Roadmap Mobile SDK Not Available Not Available Not Available Roadmap External Sites & Apps Not Available Available Available Available Custom LWC Not Available Not Available Not Available Available Controller Logic & Actions Not Available Available Available Available Operation Within One Transaction Not Available Available Available Requires Apex Operate Across Multiple Transactions Not Available Available Available Available Integration Not Available Available Available Requires Apex Modular Design & Reuse Not Available Available Available Available Validation Respect System-Level Validation Available Available Available Available Custom Field Validation Specific to this Form Available Available Available Available Custom Form-Level Validation Not Available Not Available Available Available Security Elevate User Permissions Not Available Available Available Requires Apex Restrict Who Can Access Available Available Available Available Restrict Allowed Locations Not Available Not Available Not Available Available Interaction Design Conditional Visibility Available Available Available Available Conditional Requiredness Roadmap Not Available Available Available Conditional Formatting Roadmap Not Available Available Available Conditional Read-Only State Roadmap Not Available Available Available Standard Event Handling (such as onblur, onfocus) Not Available Not Available Available Available Custom Event Handling Not Available Not Available Available Available Styling Org and Community Themes Available Available Available Available Pixel-Perfect Styling Not Available Not Available Available Available Layout 2 Columns Available Available Available Available 4 Columns Roadmap Roadmap Available Available Beyond 4 Columns Roadmap Not Available Available Available Tab and Accordian Containers Available Not Available Available Available Translation Labels Entered in the Builder Roadmap Available Available* Not Available Labels in the Code Not Available Not Available Available Available UI Test Automation Unit Tests Not Available Not Available Available Available End-to-End Automation Requires Code Requires Code Requires Code Available Metrics Page Views Available Available Available Available* Time Spent on Form Not Available Not Available Available Requires Apex Time Form Completion Not Available Not Available Available Requires Apex Track Success Rate Not Available Not Available Available Requires Apex 1Dynamic Forms is a feature of Lightning Pages. Lightning Pages are declaratively configured with the Lightning App Builder. As part of Summer ‘20, Dynamic Forms is a non-GA preview feature, and we aim to GA it in Winter ‘21. Object Impact What objects will the form operate against? Just one object? Multiple objects? Dynamic Forms Screen Flow Screen Flow + LWC LWC Single Object Available (Custom Objects) Available Available Available Cross-Object Not Available Available Available Available Object-Agnostic Not Available Available Available Available If your form operates against a single Salesforce object, any of the tools we’re comparing will work. Things get a little more complicated with cross-object or object-agnostic forms. By object-agnostic, we mean inputs that don’t map to any Salesforce object. Perhaps your form represents a data structure that you’ll send to an external service, like Stripe or Docusign. Or perhaps you’re using several inputs in your form to calculate a value, and then committing that value to the database. For both cross-object and object-agnostic forms, Flow is a solid option. The components available in flow screens are agnostic by nature, so you can choose what to do with that data behind the scenes. For example, use the data entered in one form to create multiple records behind the scenes, or use the data to perform other actions like generating Chatter posts, sending emails, or connecting to external services. For simple cases, using existing LWC components like lightning-record-form can be a simple way to lower code needed to provide a robust solution. However, for scenarios where multiple objects are involved, Flow provides cohesive control for all objects and removes complexities of developers having to traverse complex relationships and dependencies. Form Scope Do you need a single screen, or will the user need to navigate between multiple screens to complete a task? Dynamic Forms Screen Flow Screen Flow + LWC LWC Single-Screen Form Available Available Available Available Multi-Screen Form Not Available Available Available Not Ideal If you can get all of your user’s inputs from a single-screen form, start with Dynamic Forms. If you need more functionality than what Dynamic Forms offers, the choice between Flow and LWC depends on a few other questions. What skills does your team have? For a more admin-heavy organization, we recommend starting with Flow. For a more developer-heavy organization, start with LWC. Is it OK to display a navigation bar at the bottom of your form? If the flow navigation bar is undesirable UX, swing towards LWC. What needs to happen behind the form? If you need the behavior to be configurable by an admin, build a flow. Otherwise, build a LWC. If you choose Flow, you may need to build a LWC anyway to achieve the right UX. If you’re already building a LWC to style your form correctly, consider whether embedding that component in a flow is overkill. If, on the other hand, your solution looks like a wizard, where the user navigates between multiple screens, think Flow. Flows come with a built-in navigation model, so you don’t have to build and maintain that yourself. The navigation is linear in nature, with forward-moving actions (Next and Finish), backward-moving actions (Previous), and a mechanism for saving the form for later (Pause). You can also build a form with non-linear navigation if it suits your purposes. For a great example of that, check out this Salesforce Labs package: Digital Store Audit. Location Where do you want to embed the form? Dynamic Forms Screen Flow Screen Flow + LWC LWC Lightning Record Page Available (Desktop) Available Available Available Lightning Home or App Page Not Available Available Available Available Communities Not Available Available Available Available Embedded Snap-Ins Not Available Available Available Available Utility Bar Not Available Available Available Available Object-Specific Action Not Available Available Available Roadmap Global Action Not Available Not Available Not Available Roadmap Salesforce Mobile App1 Not Available Available Available Available Field Service Mobile Not Available Available (Object-Specific Action) Not Available Roadmap Mobile SDK Not Available Not Available Not Available Roadmap External Sites & Apps Not Available Available Available Available Custom LWC Not Available Not Available Not Available Available 1 Flows and LWCs are supported in the Salesforce mobile app, but the Salesforce mobile app doesn’t support all the ways you can embed flows and LWCs. For example, object-specific actions are supported in mobile, but utility bar items are not. Since they require a record context, Dynamic Forms are supported only in Lightning Record pages. However, Dynamic Forms aren’t supported in Lightning Community pages. This limitation is in place because Lightning communities don’t use the underlying framework that Dynamic Forms depends on: Lightning Pages. We are definitely evaluating this as we do often hear feedback of wanting Dynamic Forms in Communities. Roadmap! Today, Dynamic Forms are supported only for custom objects on desktop, but Salesforce is actively working on supporting them for standard objects and the Salesforce mobile app as well. You can build flows that require a record context or flows that work globally. As such, you can embed flows in a variety of locations. For the record-contextual flows, that might be a Lightning record page, a Community record page, an object-specific action, or an Actions & Recommendations deployment. For the global flow, that might be the utility bar, other Lightning or Community pages, a snap-in, or an external application. Flows aren’t currently supported as global actions, but as a workaround you can wrap the flow in an Aura component. LWC supports a high degree of reusability, since you are creating components and able to associate with targets via metadata across Salesforce, Communities, and even in Open Source Projects. LWC components can also be embedded inside of your own website via Lightning Out. LWCs aren’t currently supported as quick actions (object-specific or global), but – much like you can with flows – as a workaround you can wrap the LWC in an Aura component. None of the form technologies covered in this doc are officially supported in Mobile SDK templates today. If Mobile SDK is paramount to your use case, you’re better off building your form in natively in your mobile application or building a Visualforce page. Roadmap! The Mobile SDK team is actively working on supporting LWCs within Visualforce pages. Controller What actions or logic do you want to be performed behind the scenes? Dynamic Forms Screen Flow Screen Flow + LWC LWC Logic & Actions Not Available Available Available Available Operate Within One Transaction Not Available Available Available Requires Apex Operate Across Multiple Transactions Not Available Available Available Available Integration Not Available Available Available Requires Apex Modular Design & Reuse Not Available Available Available Available Dynamic Forms is perfect if you need to use the values in your form to create or update a record. For anything beyond that capability, you’ll need to leverage Flow or LWC. That might be a layer of decisioning or iteration, or you might generate Chatter posts or emails using the inputs from the form. Flow offers standard actions for posting to Chatter, sending email, and interacting with Quip documents, so you don’t have to write code for the same operations. LWC offers rich interactions with single records and related objects through the use of wire adapters that interact with UI API. LWC can also interact with multiple records when using the wire for getListUi. Both Flow and LWC integrate with Apex, so you can easily close the gaps in whichever solution you choose. For example, if you require filtering records from an LWC you can always use the wire adapter for Apex to create complex SOQL queries. If you’re swayed by the click-based story, consider Flow as a viable alternative to an Apex controller for your server-side needs. A secondary question to answer here about the actions is whether you want to immediately commit them, or defer them to a particular part of your form. This is especially relevant if you’re in a multi-page form. Flow makes it easy to combine inputs from multiple forms (flow screens) and use them much later in the wizard (flow) to perform some operations. In fact, we recommend designing flows in just that way – perform actions at the end – in case the user bounces back and forth between screens, thereby changing their answers. Do you need to control which operations occur in which transaction? Transactions and governor limits are a way of life on the Salesforce Platform. If your use case is fairly simple, it may not be as important to control what transaction a particular operation occurs in. However, there are a few use cases where you might want to combine multiple operations into a single transaction rather than performing those across multiple transactions. Some examples: To Rollback Or Not to Rollback: That is the question. Let’s say your form creates multiple records behind the scenes. If the third record fails to be created, should the first two records be rolled back? If each of your actions are independent of each other, feel free to execute them in separate transactions. If they’re dependent, however, and you want the failure of one to also rollback the others, implement them in a single transaction. Downstream Impact on Governor Limits: Especially when your form creates or updates a record, consider what the downstream implications of that operation are. What processes, workflow rules, flow triggers, Apex triggers, or other items in the save order are going to fire based on this record change? And how do those collective changes impact the governor limits being consumed in that transaction? If a particular record change will result in a lot of downstream changes that impact your limits, consider isolating that record change into its own transaction. Batch Processing: Even in a UI context, you may need to batch multiple updates together. Let’s say your multi-screen form iterates over a large group of records. Rather than committing a record update after each screen, wait until you’ve collected the updates for all of the records and then submit one request to update all the records. When you use a Dynamic Form to create or edit a record, you’re only ever performing one operation, and that operation is always the start of a net-new transaction. When building a screen flow, you have significant control over what happens in a given transaction. Screens and Local Actions act as boundaries between transactions. Here’s a high-level summary of how transactions are managed in the screen flow architecture. The end user interacts with a screen, and then clicks Next. The client posts a request to the API with the inputs. The API receives the request, and a transaction and database connection are opened. The API then then calls the Flow engine to invoke the request. The Flow engine takes over and follows the appropriate path in the flow definition – until it hits a Screen or Local Action node. The engine then returns information about that node to the API. The API creates a response object that contains the details of the next screen to render, and returns that object to the client. At this point, database changes are committed (cue the save order execution), and the database connection and transaction are closed. The client uses the API response to render the next screen for the user to interact with. Rinse and repeat. In other words, screens “break” transactions. When that happens, any pending actions or DML are committed, the prior transaction is closed, and a new transaction is started. The right design – which operations you group into a given transaction – is your call. On the left, you can see a flow that collects inputs across multiple screens, and then performs several actions in one transaction. The flow on the right performs each operation in a separate transaction. For more details, check out these resources on Salesforce Help: Flows in Transactions and Flow Bulkification in Transactions. Your ability to control the transaction from an LWC comes down to the underlying services that LWC is using to perform its operations. If you’re using the lightning-record-form base component, the underlying operation (creating or updating the record) happen in a standalone transaction as soon as the form is submitted. In general, these rules apply: Each UI API call is isolated into its own transaction. If you need to perform multiple operations within a single transaction, send the inputs off to a server-side technology like an Apex controller or a flow. The regular transaction rules for that technology apply. Do you need to integrate with external systems? Both Flow and LWC support API integrations with an assist from Apex. Additionally, Flow supports External Services – which enables you to declaratively generate process integration building blocks. Anyone can integrate with legacy systems or web apps, as long as those services can be described with an OpenAPI-compliant schema. For example, you can generate actions for integrating with Slack or Google Sheets, and then configure your flow to post to a Slack channel or add a row to a particular Google Sheet. The end-to-end solution involves touching zero lines of code. Regardless of whether you do so with custom Apex or an External Service, a callout is a callout. Here’s what you need to know. A callout can take a long time. When a callout is executed synchronously, it's performed while a database transaction is open. Salesforce doesn't let you keep a database transaction open if you've got pending database operations. The main limitation to keep in mind is the danger of what we call a dirty transaction, where you perform a create, update, or delete operation and then, in the same transaction, execute a callout. This pattern isn’t allowed because of consideration #3, which of course exists because of considerations #1 and #2. You can work around this limitation by breaking the transaction. As we mentioned above, screens and local actions both reintroduce the browser context, which breaks the transaction. Use a Screen to break a transaction if it makes sense to display a new form to the user prior to making the external callout. If it doesn’t, we recommend a no-op local action, like this one available to install from UnofficialSF. Not familiar with local actions? They’re Aura components with no markup; the flow executes the invoke() method in the component’s Javascript controller. They’re the only actions available in Flow that aren’t performed server-side. In addition to being useful for breaking transactions, local actions are great for performing browser-level actions like firing toasts or force navigating the user. On the left is a flow that updates a record, then uses a callout to request a list of Slack channels. This flow fails at runtime, because the callout occurs in the same transaction after a pending database operation (the record update). To the right is a flow that updates a record, executes a no-op local action, and then uses a callout to request a list of Slack channels. This flow succeeds at runtime, because the callout is performed in a separate transaction from the record update. The impact of callouts on the transaction is less complicated with LWC. Generally speaking, you’ll perform your data operations using the Lightning Data Service, and then use an Apex controller to make the external callout. This design protects you from dirty transactions, since the LDS call is isolated in its own transaction separate from the Apex callout. What are your requirements for reusability and modularity? Dynamic Forms doesn’t support reuse. Each Dynamic Form is tied to a specific Lightning record page for a specific object. Though you can assign that Lightning record page to multiple apps, profiles, and so on. Much like you can write libraries, utilities, and components that are intended to be used across multiple other components, you can apply similar design patterns when creating flows with the power of subflows. Save your flows in smaller, more modular buckets, and then call them from other flows by using the Subflow element. If your design calls for it, you can build a flow that both stands on its own and is useful as a subflow of another one. Flow and LWCs can both be built for reuse, such that you can embed them in a variety of locations including external sites and Lightning Out applications. Validation What are your validation requirements? Dynamic Forms Screen Flow Screen Flow + LWC LWC Respect System-Level Validation Available Available Available Available All technologies that attempt to create or update a record adhere to system-level validation – whether those are classic validation rules or custom validation built into an Apex trigger. No matter what technology you use to perform a record change, every change goes through the save order. That means in addition to validation rules, the record change is processed by any number of before- or after-save flows, before or after triggers, escalation rules, assignment rules, and more. If you haven’t already, now’s a good time to bookmark and familiarize yourself with the Order of Execution. Inputs on a flow screen are by nature unbound, so the screen itself doesn’t natively adhere to system-level validation associated with a particular object. Whatever values you use to Create or Update records, however, are processed by the save order, which means they pass through the object’s system-level validation. Dynamic Forms Screen Flow Screen Flow + LWC LWC Custom Field-Level Validation Specific to this Form Available* Available Available Available Custom Form-Level Validation Not Available Not Available Available Available Just like page layouts, Dynamic Forms let you set requiredness and read-only state at the page level. However, you can’t override system-level settings. Flow provides flexibility for customizing validation on a form’s inputs. While some checks are performed in the client (like flagging missing required fields or incompatible values), none of the client-side validation blocks the user from trying to navigate. The real stuff happens on the server. When a user clicks Next, Flow sends the inputs to the server for validation. If any inputs are returned as invalid, navigation is blocked and the appropriate error is displayed. The server validates the inputs by checking: The input’s requiredness setting, or whether the entered value is compatible with the underlying data type. Custom validation on that input: Several standard components (Checkbox, Currency, Date, Date/Time, Long Text Area, Number, Password, and Text) support custom validation on a per-screen basis. Supply a Boolean formula expression and an error message to display when the formula expression isn’t met. Custom validation on the underlying component: If you’re building a custom LWC for a flow, add your own validation code to the validate() method. On the LWC side, most base components perform their own client-side validations. For example, lightning-record-form respects system-level requiredness, but not page-level requiredness. For your custom components, you can build your own validation mechanisms. Security What are your security requirements? Should the form check the user’s access before performing certain operations? (Especially important when building for guest users) Dynamic Forms Screen Flow Screen Flow + LWC LWC Elevate User Permissions Not Available Available* Available Requires Apex Do your users have field-level security to see this field? Do they have permission to create records for this object? What about access to this specific record, based on your org’s sharing rules? When something runs in user context, we enforce those access checks. Users can run a case update form only if they have the ability to update cases, the appropriate field-level security, and access to the record in question. But what if you don’t want to grant users a particular permission? What if you want users to be able to perform a particular operation when they're using your form, but not through any other form or interaction? That’s where system context comes in. System context is a way to elevate the running user’s permissions for the duration of the session, so that the user doesn’t need Update access to the Case object to successfully complete your case update form. This is especially useful for unauthenticated communities. Instead of granting guest users dangerous abilities, set your form to run in system context. Of course, system context is a double-edged sword and you should use it only when necessary. When a form runs in system context, every single CRUD operation bypasses object- and field-level security & sharing – not just the specific operation you care about. Note that system context has no bearing on who Salesforce considers the actor – the name you see in the Last Modified By field. For each operation that your form performs, such as the case update, the actor is the running user even if the form runs in a different context. Dynamic Forms always run in user context, and there’s no way to override this behavior. Screen flows run in user context by default, but you can set them to run in system context. It’s your choice whether the flow should grant access to all data or if it should still enforce record-level access like sharing. If you embed a Lightning component in a flow that runs in system context, the flow doesn’t override the component’s context. If you need to bypass user access checks, we recommend using the flow to perform those operations and pass the appropriate data into or out of the Lightning component. If your flow calls Apex actions, there are some more nuances to understand. If the Apex class is set to inherited sharing, it runs in system context with sharing no matter what the flow is set to. If the class has no explicit sharing declaration, it runs in system context without sharing no matter what the flow is set to. If the class is set to with sharing or without sharing, it does so and overrides the flow's context. Best practices: Leave the flow to run in its default context unless you need to elevate the running user’s access for a specific operation. If the flow performs a variety of operations and not all of them require elevated access, use a subflow to isolate the operations that should run in system context. LWCs run in user context by default, but you can override that in an Apex controller. Operations performed through the UI API are run in user context. Operations performed through an Apex controller depend on that class. To perform those operations in system mode, set the Apex class to with sharing or without sharing. Do you want to control who can access the form? Dynamic Forms Screen Flow Screen Flow + LWC LWC Restrict Who Can Access Available Available Available Available To address this requirement, often you can look to the container you’re embedding your form in. For example, you can assign Lightning pages to be available for particular apps, record types, or profiles. If particular inputs in your form are sensitive, use visibility rules to further control what is displayed to who – this feature applies to both Dynamic Forms and screen flows. You can restrict a flow to particular profiles or permission sets, much like you can an Apex class or Visualforce page. By default, flows are unrestricted, which means that any user with the Run Flows user permission can run it. Best Practices: If you’re exposing a flow to guest users, grant the guest user profile access to only the flows they need. You can add Run Flows to the guest user profile but we consider that a dangerous practice. Be especially careful with flows that operate in system context. We highly recommend you restrict those flows to a particular set of users, since they have fewer checks and balances in place to protect your data. For LWCs, you can check the running user’s permission assignments to confirm if they have a particular standard or custom permission. Directly from Javascript, you can import Salesforce permissions from the @salesforce/userPermission and @salesforce/customPermission scoped modules. Or you can use Apex to check the same. Do you want to control where the form can be embedded? Dynamic Forms Screen Flow Screen Flow + LWC LWC Restrict Allowed Locations Not Available Not Available Not Available Available Once a screen flow is activated, it’s available in all the locations that screen flows are supported, regardless of whether you intended it to be available everywhere or not. That said, Flow Builder supports multiple types of flows that have screens. The bread-and-butter type is Screen Flow, but there are a few other specialized types that are restricted to specific locations. For example, only Field Service Mobile Flows are supported in ... you guessed it, the Field Service mobile app. The same story goes for Contact Request Flows, which are supported only in communities. Regardless of the flow type, the individual making the flow has no control over where the flow can be embedded. The flow will be available in every location supported for that flow type. LWCs, on the other hand, are available in a given location only when it’s been added as a valid target. So you can make a component available on Record pages and not available as a utility bar item. Interaction Design Should your form react dynamically to interactions or conditions? Static forms are a thing of the past. Today, it’s all about dynamically updating the form with the right properties and values for this user, this time, this place. Let’s talk about what’s possible in this vein for Salesforce’s form-building tools. Dynamic Forms Screen Flow Screen Flow + LWC LWC Conditional Visibility Available Available Available Available Conditional Requiredness Roadmap Not Available Available Available Conditional Formatting Roadmap Not Available Available Available Conditional Read-only State Roadmap Not Available Available Available Visibility can be dynamically controlled in all three tools. Both Dynamic Forms and Flow Builder address this with features called Component Visibility. With this, you can declaratively show or hide fields based on other values on the form or whether the user is on a mobile device or not. With Dynamic Forms, you’re limited to fields on the associated object and there are some limitations on the supported field types and operators. With Flow, you can base a visibility rule on other inputs on the screen, as well as other resources populated earlier in the flow like formulas or values from other records. Device-based Rules: It’s not obvious from the get-go, but you can use a formula to show or hide a particular field when the user is on a mobile device. Write a flow formula that checks the value of the $User.UIThemeDisplayed global variable. If the value is Theme4t, the user is on the Salesforce mobile app. Evaluating Other Resources: Manual variable and formula references are evaluated only on the server. So whatever value that resource has when the screen first renders is the value it will have until you navigate to another screen. On navigation, the flow runtime submits a request to the flow engine (the server) and gets back the latest values of the manual variables and formulas. If you expect your visibility rule to update as the user passes through a single screen (aka onblur), make sure that you’re referencing only values from the other components on the screen. If you need to dynamically control any other properties, such as whether a field is required or read-only, your best bet in the short term is LWC, where you get full control. That’s especially true if you have bespoke requirements for what to do onblur or onclick. Roadmap! For Lightning Pages, which includes Dynamic Forms, we anticipate enabling conditional requiredness, conditional formatting, and conditionally setting an input to read-only in the next 12 months. Dynamic Forms Screen Flow Screen Flow + LWC LWC Standard Event Handling (such as `onblur`, `onfocus`) Not Available Not Available Available Available Custom Event Handling Not Available Not Available Available Available Now for custom events. If some of your inputs or the entire form need to communicate with something else in the page, LWC is your only option. For more details, check out Communicate with Events and Communicate Across the DOM in the Lightning Components Dev Guide. Styling How sophisticated is your desired styling and CSS? Dynamic Forms Screen Flow Screen Flow + LWC LWC Org and Community Themes Available Available Available Available Pixel-Perfect Styling Not Available Not Available Available Available Both Dynamic Forms and flows respect declarative theming features. If you need control beyond what Salesforce Themes or Community Branding Sets support, you need the wide open spaces of LWC. Reminder: You can embed Lightning components in flows. So if you need pixel-perfect control over the look-and-feel of your form but want to use the other benefits of flows, like the navigation model, you can have the best of both worlds. Layout What are the layout requirements for your form? Dynamic Forms Screen Flow Screen Flow + LWC LWC 2 Columns Available Available Available Available 4 Columns Roadmap Roadmap Available Available Beyond 4 Columns Roadmap Not Available Available Available Tab and Accordion Containers Available Not Available Available Available Dynamic Forms supports two-column layouts. Dynamic Forms can be broken up into individual sections with fields. These sections can be placed in components such as tabs and accordions to create easy to use and organized layouts. Flows can be rendered using a two-column layout. This feature is supported only when you add a flow to a Lightning or Community page, or when you use a direct flow URL, such as for a custom button. Due to our near-term roadmap, we recommend not using this feature. Roadmap! Salesforce is actively working on multi-column screens for Flow Builder. When this feature ships, you’ll be able to declarative configure screens with up to 4 columns. With LWC, you can use lightning-record-[edit|view]-form and the supporting lightning-[input|output]-field to control layout. The only layout restrictions are those from HTML/CSS. lightning-record-form respects the section configuration in the associated page layout – if a section is two-column in the page layout, it’s two-column in this component. Translation Does your form need to be localized to other languages? Dynamic Forms Screen Flow Screen Flow + LWC LWC Labels Entered in the Builder Roadmap Available Available* Not Available Labels in the Code Not Available Not Available Available Available If you’ve localized your custom fields, those translated labels are respected on Dynamic Forms. However, localization isn’t supported for labels that you add to components in the same Lightning page. For example, the label for a tab in the Tabs component. Roadmap! Salesforce is actively working on filling this gap. Soon, you’ll be able to reference Custom Labels for any string or rich text property in Lightning App Builder, such as to localize a custom Tab or Accordion label or the title you added to a Report component. With the power of Translation Workbench, Flow supports translation of user-facing labels for some, but not all, of the available screen components. For the following screen components, you can localize the label, help text, and error message: Text, Long Text Area, Number, Currency, Checkbox, Radio Buttons, Picklist, Multi-Select Picklist, Checkbox Group, Password, Date, and Date/Time. The other components don’t yet support translation, because they’re Lightning components under the hood and we don’t have a way of identifying which Lightning component attribute should map to label vs. help text vs. error message. The same issue applies for our out-of-the-box actions, like Send Email or Post to Chatter. However, there is a workaround! If you define the translated labels with a Custom Label, you can reference that custom label in the action or component when you configure it in Flow Builder. Create a flow formula that references the custom label, and reference that formula in the appropriate places in your flow. Now for LWC. Certain base components automatically inherit translations of the associated object’s fields, help text, and validation messages if they’ve been configured in Translation Workbench. For example lightning-record-form . If you need to introduce novel translatable labels in your code, Custom Labels are still the unsung hero. Declare the custom label you need, and then import it into your component from the @salesforce/label scoped module. UI Test Automation Do you need automated testing? Dynamic Forms Screen Flow Screen Flow + LWC LWC Unit Tests Not Available Not Available Requires Code Available End-to-End Automation Requires Code Requires Code Requires Code Available Consider your requirements for UI test automation. Unit tests enable more granular automation and validation that works with industry standard CI/CD systems and tools, which can test the components business logic, its Javascript controller, and its outputs. Going exclusively with low-code you will not be able to self author tests, but Salesforce rigorously tests our end-to-end offerings. If your component’s methods are complex enough that you want them to be tested individually, put the methods into dedicated JS files. That way you can import them into a LWC and into a Jest test with something like import { sort } from 'c/utils';. With end-to-end (Selenium) automation, you can simulate how the user interacts with your form. However, these tests can't verify the outputs of each method being performed. You can write these tests for any standard or custom UI – Lightning pages and screen flows inclusive. This recent blog post UI Test Automation on Salesforce compares the various options you have for building end-to-end automation on Salesforce. Included are considerations for when to use a no-code solution from an ISV, build your own custom test automation solution, or use an open source test framework like Selenium WebDriver or WebdriverIO. These solutions are valid for any UI interaction in Salesforce, whether that’s a Dynamic Form in a Lightning page, a screen flow in a utility bar, or an LWC in a flow in a quick action. Metrics Do you need to track usage of your form? Dynamic Forms Screen Flow Screen Flow + LWC LWC Page Views Available Available Available Available* Time Spent on Form Not Available Available Available Available Track Form Completion Not Available Available Available Available Track Success Rate Not Available Available Available Available If you need to track overall usage and adoption of your form, start with the low-code tools. Both Dynamic Forms and Screen Flows are trackable using out-of-the-box custom report types, though you’ll get more granularity from the Screen Flow tracking reports. If you need to track usage of a LWC, out-of-the-box availability depends on where you’re using that LWC. If it’s on a Lightning page, whatever is available for tracking Lightning page usage applies to your LWC. The same story goes for LWCs that are embedded in flows. Dynamic Forms themselves aren’t trackable out-of-the-box, though you can track the usage of the parent Lightning page through Lightning usage objects. To track the standard Lightning pages, use the Users with Lightning Usage by Page Metrics custom report type. For the same on custom Lightning pages, use the Users with Lightning Usage by FlexiPage Metrics custom report type. For tracking adoption of your specific form (not just the page it lives in), Flow’s got you covered. Use the “Sample Flow Report: Screen Flows” to answer questions like: What’s the completion rate for this form? Is it being well-adopted? How long does it take users to complete this form? Which screen do users spend the most time on? How often do users navigate backwards? How often do errors occur? If the standard report doesn’t meet your needs, clone it to make your own changes or build your own from scratch by using the Screen Flows report type. To track the same for an LWC that isn’t embedded in a screen flow or Lightning page, there’s no out-of-the-box option. You can build a DIY solution by using Apex. Closing Remarks Hello, and welcome to the end of this guide! 🏁 Kudos for making it through the equivalent of 9 double-sided pages. Have a good day and thanks for the read. Hope you learned something. Tell us what you think Help us make sure we're publishing what is most relevant to you: take our survey to provide feedback on this content and tell us what you’d like to see next.
0 notes
Link
When you’re composing custom web components, you need to understand how events bubble up through the DOM because that’s how children and parents communicate—props down, events up. When an event bubbles, it becomes part of your component’s API and every consumer along the event’s path must understand the event. Whether you’re composing a simple or complex component, it’s important to understand how bubbling works, so you can choose the most restrictive bubbling configuration that works for your component. This article covers two composition patterns: static and dynamic, which uses slots. In each pattern, a child component that sits at the bottom of the composition sends a custom event up through the component tree. I’ll look at how the event bubbles for every configuration of bubbles and composed, so you deeply understand how to configure events in your compositions. NOTE: This article applies to working with Lightning Web Components on Lightning Platform and Open Source. Because Salesforce supports older browser versions that don’t fully support native shadow DOM, Lightning Web Components on Lightning Platform uses a synthetic version of shadow DOM. On open source, you can choose to use synthetic or native shadow DOM. When there is a behavior difference between the two, we call it out. Due to the synthetic shadow, when you use Dev Tools to look at markup in a browser, you don’t see the #shadow-root tag. Shadow DOM If you’re already familiar with shadow DOM and slots, skip to the first pattern: Static Composition. Web components create and dispatch DOM events, but there are two things about web components that make working with events a little different: shadow DOM and slots. First I’ll explain shadow DOM and then slots. Every web component’s DOM is encapsulated in a shadow DOM that other components can’t see. When an event bubbles (bubbles = true), it doesn’t cross a shadow boundary unless you configure it to (composed = true). Shadow DOM enables component encapsulation. It allows a component to have its own shadow tree of DOM nodes that can’t be accidentally accessed from the main document and can have local style rules. The shadow root is the top-most node in a shadow tree. This node is attached to a regular DOM node called a host element. The shadow boundary is the line between the shadow root and the host element. It’s where the shadow DOM ends and the regular DOM begins. DOM queries and CSS rules can’t cross the shadow boundary, which creates encapsulation. The regular DOM is also called the light DOM to distinguish it from the shadow DOM. Whether a DOM is a light DOM or shadow DOM depends on the point of view. From the point of view of a component’s JavaScript class, the elements in its template belong to the light DOM. The component owns them; they’re regular DOM elements. From the point of view of the outside world, those same elements are part of the component’s shadow DOM. The outside world can’t see them or access them. I'm just a regular paragraph element, I'm part of the light DOM <!-- The c-child element is part of the light DOM. But everything below #shadow-root is hidden, because it's part of c-child's shadow DOM. #shadow-root In c-child, I'm light DOM. To everyone else, I'm shadow DOM. Slots A web component can contain elements. Other components can pass elements into a slot, which allows you to compose components dynamically. When a component has a , a container component can pass light DOM elements into the slot. I can host other elements via slots Passing you some Light DOM content. The browser renders the flattened tree, which is what you see on the page. The important thing to understand is that the DOM passed into the slot doesn’t become part of the child’s shadow DOM; it’s part of the container’s shadow DOM. #shadow-root #shadow-root I can host other elements via slots // To the outside world, // I'm not part of c-child-slot shadow DOM // I'm part of c-container shadow DOM To c-container, I'm light DOM. When we use slots, even though the content appears to be rendered inside the slot element, the actual element doesn’t get moved around. Rather, a “pointer” to the original content gets inserted into the slot. This is an important concept to understand in order to make sense of what’s happening with our events. Events To create events in a Lightning Web Component, use the CustomEvent interface, which inherits from Event. In Lightning Web Components, CustomEvent provides a more consistent experience across browsers, including Internet Explorer. When you create an event, define event bubbling behavior using two properties: bubbles and composed. bubbles A Boolean value indicating whether the event bubbles up through the DOM or not. Defaults to false. composed A Boolean value indicating whether the event can pass through the shadow boundary. Defaults to false. import { LightningElement } from 'lwc'; export default class MyComponent extends LightningElement { renderedCallback(){ this.dispatchEvent( new CustomEvent('notify', { bubbles:true, composed:true }) ); } } Important Events become part of your component’s API, so it’s best to use the least disruptive, most restrictive configuration that works for your use case. To get information about an event, use the Event API. event.target — A reference to the element that dispatched the event. As it bubbles up the tree, the value of target changes to represent an element in the same scope as the listening element. This event retargeting preserves component encapsulation. We’ll see how this works later on. event.currentTarget — A reference to the element that the event handler is attached to. event.composedPath() — Interface that returns the event’s path, which is an array of the objects on which listeners will be invoked, depending on the configuration used.d. Static Composition A static composition doesn’t use slots. Here we have the simplest example: c-app composes component c-parent, which in turn composes c-child. We fire an event, buttonclick, from c-child whenever a click action happens on its button element. We have attached event listeners for that custom event on the following elements: body c-app host c-parent host div.wrapper c-child host The flattened tree looks like this: Here is a visual representation: Now we’ll look at how the event bubbles with each event configuration. {bubbles: false, composed: false} With this configuration, only c-child gets to react to the buttonclick event fired from c-child. The event doesn’t bubble past the host. This is the recommended configuration because it provides the best encapsulation for your component. This is where you start, then from here you can start incorporating other more permissive configurations, as the ones we’re about to explore in the next few sections, to fit your requirements. If we inspect c-child handler’s we find these values on the event object: event.currentTarget = c-child event.target = c-child { bubbles: true, composed: false } With this configuration, the buttonclick event from c-child event travels from bottom to top until it finds a shadow root or the event gets canceled. The result, in addition to c-child, div.wrapper can also react to the event. Use this configuration to bubble up an event inside the component’s template, creating an internal event. You can also use this configuration to handle an event in a component’s grandparent. And again, here are what the events are telling us for each handler: c-child handler: event.currentTarget = c-child event.target = c-child div.childWrapper handler: event.currentTarget = div.childWrapper event.target = c-child { bubbles : false, composed : true } This configuration is supported for native shadow DOM, which means it isn’t supported on Lightning Platform. Even for LWC open source, this configuration isn’t suggested, but it’s helpful for understanding how events bubble in a shadow DOM context. Composed events can break shadow boundaries and bounce from host to host along their path. They don’t continue to bubble beyond that unless they also set bubbles:true. In this case, c-child, c-parent, and c-app can react to the event. It’s interesting to note that div.wrapper can’t handle the event, because the event doesn’t bubble in the shadow itself. Let’s see what the handler’s have to say about the event: c-child handler: event.currentTarget = c-child event.target = c-child c-parent handler: event.currentTarget = c-parent event.target = c-parent c-app handler: event.currentTarget = c-app event.target = c-app It’s interesting to note that div.wrapper can’t handle the event because even if the event propagates from shadow to shadow, it doesn’t bubble in the shadow itself. Let’s pause here and notice that even though the event was fired from c-child, when it gets to c-parent and c-app , it shows the host as both target and currentTarget. What’s happening? Event retargeting at its finest. As the buttonclick event leaves c-child‘s shadow, the event gets treated as an implementation detail and its target is changed to match the scope of the listener. This is one of the reasons why composed:true flags should be used with caution, since the semantics of c-child‘s event and its receiver don’t match. c-child fired the event, but to c-app, it looks like c-app fired it. Using the { bubbles:false, composed:true } configuration is an anti-pattern. The correct pattern is for receivers that are able to understand buttonclick to repack and send the event with the proper semantics. For example, c-parent could receive the event from c-child and expose a new custom event, so that elements on c-app‘s light tree could understand. { bubbles : true, composed : true } This configuration isn’t suggested because it creates an event that crosses every boundary. Every element gets the event, even the regular DOM elements that aren’t part of any shadow. The event can bubble all the way up to the body element. When firing events this way, you can pollute the event space, leak information, and create confusing semantics. Events are considered part of your component’s API, so make sure that anyone on the event path is able to understand and handle the event’s payload if it has one. Finally, let’s explore the event’s values: c-child handler: event.currentTarget = c-child event.target = c-child div.wrapper handler: event.currentTarget = div.wraper event.target = c-child c-parent handler: event.currentTarget = c-parent event.target = c-parent c-app handler: event.currentTarget = c-app event.target = c-app body handler: event.currentTarget = body event.target = c-app Dynamic Composition with Slots Now we’ll explore how events bubble in compositions that use slots. We have a c-parent element that accepts any content via the special element. Using c-app, we compose c-parent and we pass c-child as its child. The code fires an event from c-child named buttonclick : handleClick() { const buttonclicked = new CustomEvent('buttonclick', { // event options }); this.dispatchEvent(buttonclicked); } The code attaches event listeners on the following elements: c-child host slot c-parent host div.wrapper c-app host body This is the flattened tree as it looks in the browser’s Developer Tools. Remember that when we use slots, even though the content appears to be rendered inside the slot element, the actual element doesn’t get moved around. Rather, a “pointer” to the original content gets inserted into the slot. This is an important concept to understand in order to make sense of what’s happening with our events. This view of the flattened tree shows you where the content passed into the slot really sits in the DOM. c-child is part of c-app`’s shadow DOM. It isn’t part of c-parent’s shadow DOM. With that in mind, let’s look at the results we get with all the different configurations. {bubbles : false, composed : false} As with the previous composition example, the event doesn’t move past c-child, which is where it was fired. This is also the recommended configuration for dynamic compositions because it provides the best encapsulation for your component. c-child handler: event.currentTarget = c-child event.target = c-child {bubbles : true, composed : false} NOTE: This configuration behaves differently when you’re using native shadow DOM with Lightning Web Components: Open Source. With native shadow DOM, the event doesn’t pass out of the slot unless composed is also true. With this configuration, the connectedchild event fired from c-child event travels from bottom to top until it finds a shadow root or the event gets canceled. In our static example, we mention how an event with this configuration bubbles until it travels from bottom to top until it finds a shadow root or the event gets canceled. Let’s explore what event.composedPath() has to say about this use case: 0: my-child 1: slot 2: document-fragment // my-parent shadow root 3: my-parent 4: div.wrapper 5: document-fragment // my-app shadow root As you see, it looks as if the event would be able to break out of my-parent‘s #shadow-root and bubble up outside, even though, composed is set to false. Confused? You should be. Let’s look closer. There is a “double-bubble” effect here. Because slotted content doesn’t really move things around but rather creates pointers from the light DOM and into a particular slot, when we fire the buttonclick event, the event gets to travel from both places, which creates a composedPath like the one we just saw. Finally here is what our event handlers tell us about targets: c-child handler: event.currentTarget = c-child event.target = c-child c-parent handler: event.currentTarget = c-parent event.target = c-child div.wrapper handler: event.currentTarget = div event.target = c-child Notice how div.wrapper‘s target is still c-child, since the event technically never crossed c-parent‘s shadow root. {bubbles : false, composed : true} Like simple composition, this configuration is an anti-pattern and it isn’t supported on Lightning Platform, but it’s helpful for understanding how events bubble in a shadow DOM context. The event bounces from one host to another host as long as they’re in different shadows. In this case, c-child isn’t part of c-parent‘s shadow, but instead part of c-app’s shadow, so it jumps directly to c-app. The event.composedPath() results also throws some interesting results: 0: my-child 1: slot 2: document-fragment 3: my-parent 4: div.wrapper 5: document-fragment 6: my-test 7: body 8: html 9: document 10: Window It’s showing that when we set composed:true, the event can break out of every shadow root. In this case, it doesn’t, since the bubbles property is set to true. Instead, it jumps from host to host. Targets: c-child handler: event.currentTarget = c-child event.target = c-child c-app handler: event.currentTarget = c-app event.target = c-child Again, it’s helpful to look at this view of the flattened tree to remember that c-child in the slot is just a pointer. {bubbles : true, composed : true} This is the “brute force” scenario, and like our static composition example, the event bubbles everywhere, which is an anti-pattern. Every element on the event’s composed path can handle the event. c-child handler: event.currentTarget = c-child event.target = c-child c-parent handler: event.currentTarget = c-parent event.target = c-child div.wrapper handler: event.currentTarget = div event.target = c-child c-app handler: event.currentTarget = c-app event.target = c-app body handler: event.currentTarget = body event.target = c-app Conclusion Events are part of your API. Be mindful of the API’s consumers. Every consumer along the event’s path must understand the event and how to handle its payload. Be mindful when setting the composed and bubbles flags, since they can have undesired results. Use the least disruptive settings that work for your use case, with the least disruptive being (bubbles: false, composed: false). And finally, remember that dynamic compositions using slots introduce an extra level of complexity since you have to deal with assigned nodes inside your slot elements. About the author Gonzalo Cordero works as a software engineer at Salesforce. Github: @gonzalocordero
0 notes
Link
Deliver Scalable Experiences Without Limits Using Functions We’re proud to launch the Salesforce Functions Beta in our Summer ‘21 release, and we look forward to its GA in our Winter ’22 release. Salesforce Functions is a new service on the Salesforce Platform that enables you to deliver more scalable experiences by extending the data and workflows that you already have, making them more robust with the power of elastic compute and open language flexibility. You can now significantly accelerate developer productivity on trusted, managed Salesforce infrastructure through pre-authenticated and preconfigured access to Salesforce data and integration with low-code tools like Flow. Functions allows developers to write code that implements their business logic, which can then be assembled as building blocks in Flows or integrated with Lightning Web Components. Salesforce Functions amplifies low-code productivity with the power and flexibility of custom software, including access to open language ecosystems of libraries and packages. Let’s take a deeper look into what this actually means, and along the way, we’ll show you the updated Developer Tools experience. What’s new in the Salesforce Functions Beta Higher performance with no limits and elastic scale Build applications faster and without limits for more complex business logic or compute-intensive traffic/request activity. Salesforce Functions retains all the security and compliance you trust Salesforce to provide, so you no longer need to deal with VPNs, security tokens, Cloud IAM, and all the DIY complexity when you go off of the Salesforce Platform. Open languages and framework support in your SFDX project, including Java and Node.js Functions let you program in industry-standard languages, such as Node.js and Java. This brings the expressive power of these languages to your apps, as well as the entire ecosystem of tools, libraries, and developers to accelerate your time to market. Familiar tools and native low code integration Functions are fully integrated into the Salesforce Developer Experience and are invoked directly from Apex, making them easy to add to Flows and the simplest way to add complex business logic to your apps. One CLI for development The Salesforce CLI is being enhanced with a new global executable, sf, that simplifies how you build, manage, and deploy across Salesforce. Functions use case: running compute heavy and high-performance workloads In this blog post, we’re going to create a Java Function that processes a very large data set. Without Functions, it would be impossible to handle a data set this large in Apex, and many users would have had to implement complex workarounds to remain within their Apex limits. With Functions, you can overcome these kinds of computational limitations. In this example, the Function loads the complete six-thousand-record data set into memory. In the following example, we will use Functions to find a code school that is closest to a specific geographic point. It will also iterate over the data set to calculate the distance from a point of origin, sorting the results by distance, and then returning the ones that are closer to the provided location. This can be done in a few simple steps: Write a Function in an SFDX project Run and debug your Function locally to validate logic Deploy the Function to a Salesforce Org Integrate with low code: invoke the Function through Apex Done – you’ve leveraged the compute capabilities from declarative tools. Functions can be written in a Salesforce DX project by using the Salesforce CLI or Visual Studio Code editor with the Salesforce Extension Pack. To create a project with this new command structure using the Salesforce CLI, run: $ sfdx generate:project -n sfdx_functions_project The Visual Studio Code editor with the Salesforce Extension Pack will create a project with the necessary files to start developing for the Salesforce Platform. After creating the project, we can start writing our Functions, by using either Java or JavaScript. Let’s generate the processlargedata function in Java with the Salesforce CLI: $ sfdx generate:function -n processlargedata -l java Or using the Visual Studio Code SFDX: Create Function command: Generate a Function from Visual Studio Code This will generate a Java project under the functions folder with all the necessary files to write your Function and run tests locally. Let’s update the auto-generated Function with the use case we described above. The full source code for this project in the Functions Recipes Sample Application is available on Github.com. { school.setDistance( distance( latitudeSt, longitudeSt, school.getLatitude(), school.getLongitude())); return school; }) .sorted(Comparator.comparingDouble(School::getDistance)) .limit(length) .collect(Collectors.toList()); LOGGER.info("Function successfully filtered {} schools", schools.size()); return new FunctionOutput(schools); } // ... A Java Salesforce Function receives two parameters: an InvocationEvent that contains the input payload of the Function the Context, which has access to the authenticated Salesforce Org and the SDK. (Note: Node.js Functions contains a 3rd parameter Logger, which is used for logging operations). This ProcessLargeDataFunction receives a JSON payload with latitude, longitude, and length, and returns a list of the nearest schools to that starting point specified in the input payload. Now, let’s see how can we run this Function locally. Running your first Function A Salesforce Function can be executed locally by using the CLI, which is a useful way to develop and test your Function without deploying it to a Salesforce Org. Local execution can be also integrated with an authenticated Salesforce Org when doing the invocation. You can start this Function locally by running: $ sfdx run:function:start Or by using the Visual Studio Code SFDX: Start Function command: Start a Function from Visual Studio Code This will build and run the Function locally, and it will be ready to start receiving invocation requests. A Function running locally from Visual Studio Code Now that our Function is running locally, we will use a JSON payload to invoke the Function. Let’s create a payload.json in the function folder with the following information: { "latitude": "36.169090", "longitude": "-115.140579", "length": 5 } This payload information represents the point of origin and the number of results it will return. It will be received by the Function in the InvocationEvent object. You can invoke the Function with this input payload from the CLI by running: $ sfdx run:function --url=http://localhost:8080 [email protected] Or, you can do this from Visual Studio Code by opening the payload.json file, and clicking on the Invoke CodeLens action: Invoking a Function from Visual Studio Code with CodeLens You have seen how to generate, run, and invoke your first Salesforce Function using the Salesforce Developer Tools. Now it is time to connect to a Salesforce Organization, create a compute environment, and deploy the Function. Deploying your first Function We have been able to run our Function locally thanks to the Salesforce Developer Tools, but the real power of Salesforce Functions comes when they are running in our serverless compute environment. Let’s deploy our Function to a Salesforce Organization. To do that, we need to create a Compute Environment and connect it to an Org by running: $ sfdx env:create:compute -o connected_org_alias -a compute_env_alias Then, we need to deploy our Salesforce project and Functions. The upcoming sf CLI will allow you to deploy your project metadata along with the Function in a single command. But until then, we have to do that using sfdx in two steps: $ sfdx force:source:push $ sfdx project:deploy:functions -o connected_org_alias Now that our project is deployed, we can invoke the Function from Apex by using the new Function class: functions.Function fn = functions.Function.get('sfdx_functions_project.processlargedata'); functions.FunctionInvocation invocation = fn.invoke('{"latitude": "36.169090", "longitude": "-115.140579", "length": 5}'); String jsonResponse = invocation.getResponse(); System.debug('Got response' + jsonResponse); Triggering a Function with Apex from the Developer Console Integrating your Function with low-code tools Now that our Function can be invoked through Apex, we can integrate it with a Flow or Lightning Web Component. Let’s create an Apex class, FindCodeSchools.cls, that invokes the ProcessLargeData Function from a Flow. The full source code for this project in the Functions Recipes Sample Application repo is available on Github.com. input) { Input payload = input.get(0); // Get a Reference of the ProcessLargeData Function functions.Function fn = functions.Function.get( 'sfdx_functions_project.processlargedata' ); // Invoke the ProcessLargeData Function functions.FunctionInvocation invocation = fn.invoke( JSON.serialize(payload) ); String response = invocation.getResponse(); // Serialize the Response into an Object Output output = (Output) JSON.deserialize(response, Output.class); return output.schools; } // ... } With this Apex class with an @InvocableMethod, we will create a new Flow that triggers this method as an Apex action and use the output as we see fit. You can also trigger the Function from an LWC component by using the @AuraEnabled annotation. Invoke the FindSchools Apex Method from a Flow As you can see below, we seamlessly integrate the power of the compute capabilities of Salesforce Functions with the low-code simplicity of Flow. Flow integrated with a Salesforce Function Learn more We’re excited to see what you build using Salesforce Functions. Please nominate yourself for the Invite Beta. About the authors Julián Duque is a Lead Developer Advocate at Salesforce. Connect with him on Twitter @julian_duque. Khushboo Goel is a Sr. Product Marketing Manager at Salesforce. Connect with her on Twitter @kgoel31.
0 notes