#create iso from files free
Explore tagged Tumblr posts
Visit Tumblr Blog
Explore Tumblr blogs with no restrictions, modern design and the best experience.
Last Seen Tumblr Blogs


Fun Fact
130K people were victims of a chain letter scam that affected Tumblr in May 2011.
Text
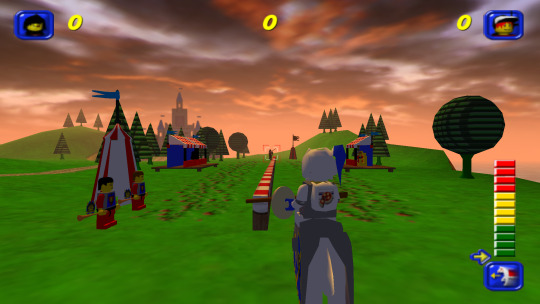
Capturing the ambience of LEGO Island 2 (2001)
This minigame-packed adventure explores many classic LEGO themes.
Running the game
There are two main versions of the game to chose from: the original 2001 release, and an improved 2007 version released as part of a two-pack. There is also apparently an unfinished, unreleased v1.1 with some bug fixes.
Curiously, the version hosted on MyAbandonware seems nearly identical to other 2001 releases I found. There appear to be minimal differences between the two.
All versions use a simple disk check; mounting an ISO with a tool like Daemon Tools suffices. There are also No-CD hex-edits available if you're interested.
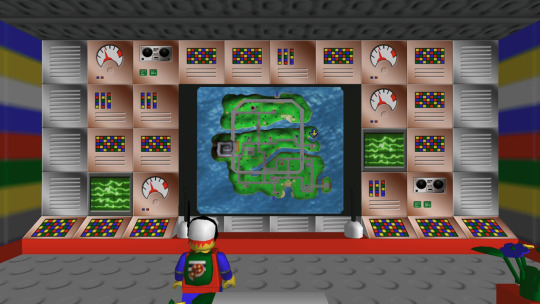
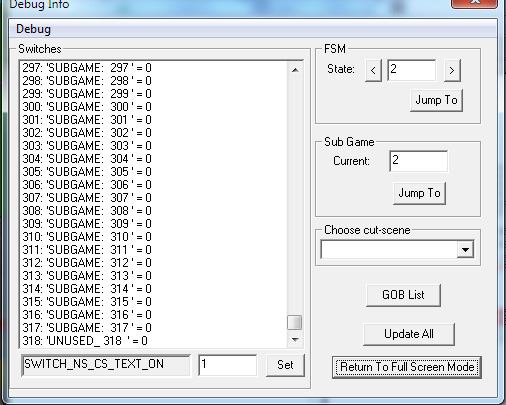
Debug menu and Level-select
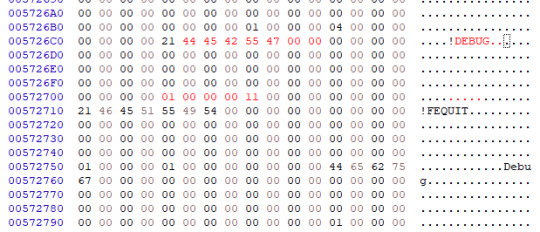
We can access LI2's debug menu by altering the main menu options. I found some hex-edits for this on RRU. If you're not comfortable with hex-edits you can try using a patcher or patch, or LI2 Mod Manager.
04 00 00 00 02 -> 01 00 00 00 11 43 52 45 44 49 54 53 -> 44 45 42 55 47 00 00
Widescreen
Use the resolution and widescreen hacks offered by LI2 Mod Manager. See this thread for more detail on how it works.
Hiding UI and Player-character
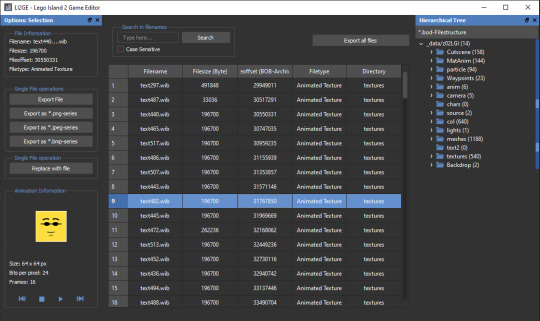
This is possible using Lego Island 2 Game Editor. It's a powerful albeit buggy application for modifying LI2 assets.
If LI2GE doesn't work, for example to edit fonts, you can use Lego Island 2 Extractor and/or Lego Island 2 Explorer. Once installed, be sure to disable automatic updates inside the program's INI to avoid startup crashes.
LI2 will prefer to load files from identically-named folders if they are present in the _data directory. For example, if a Fonts folder exists, its files will be used and Fonts.bob/bod won't be loaded.
We can also pause the game to remove the HUD, screenshot this state, and create a no-HUD overlay for our footage.
(Not) Free camera
A modder devised a way to summon a glider at any time.
Rendering ambience sequences
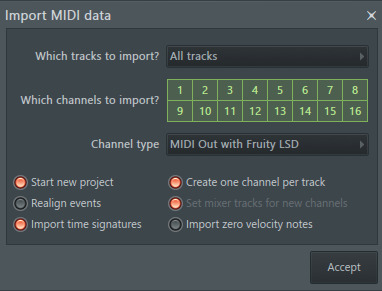
I recommend using the Fruity LSD effect with FL Studio. First, open the MID file in LEGO Island 2's level files, for example Fishing_Amb.mid. Be sure to select MIDI Out with Fruity LSD in the subsequent dialog.
Afterward, click the folder icon in the top left to specify a DLS file - use one found in your MID file's folder. Once it's loaded, populate each channel by clicking it, and picking the corresponding patch. Don't forget to populate the "percussive" one-shots as well (Channel 10 in the screenshot below).
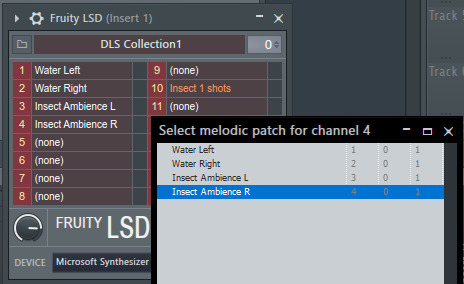
You are now ready to play your MID with the intended samples attached, or export it to a WAV file.
Appendix: Rendering music sequences
Download DirectMusic Producer. Supposedly this program allows you to export samples and sequence data. You could then render the pair using the MIDI renderer of your choice, such as OpenMPT or FL Studio's Directmusic plugin.
Appendix: Ambience sequence dead-ends
I tried VLC, with the DLS configured under FluidSynth, but this gave no output. I tried Miles Sound Tools with a DLS specified, but again - no output. I tried Winamp but seemingly couldn't get in_midi to use a custom DLS file, despite specifying one in the setting dialogs.
Appendix: Other LI2 developer tools
A soak test can be activated by pressing F8 while in windowed mode. You can also spawn a debugger window by pressing F9.
6 notes
·
View notes
Text
I'm no longer a Linux Mint user, I moved upstream to Debian, the distro Mint is based on. Now Debian was part of Linux's forbidding reputation of being difficult to install and use for non-tech-savvy users. Now this wasn't entirely unearned, as this video of trying to install a 1999 boxed edition of Debian demonstrates. Part of this was Debian's commitment to free software, so they didn't include proprietary drivers for hardware in the install, so you had to figure out how to get your wi-fi card to work on your own if you installed Debian on your laptop for example. They are actually one of the distros that call it "GNU/Linux"
The point of both Ubuntu and Mint back in the 00s was to take what Debian did well, but make it more user-friendly. And it worked, Ubuntu nowadays has declined with the Snap pacakage format, but it did do a lot for making desktop Linux user-friendly and more viable (Mint today is essentially what Ubuntu was pre-snap). Debian remains one of the biggest server OS out there, but on desktop Ubuntu by all accounts became way more popular.
However Debian has learned over the years and the latest release from June 2023, Debian 12 "Bookworm" is a massive improvement in user-friendliness. The install process is easy. There is both a slightly more complicated "net-installer" with all ISOs, and a simplified Calameres installer included with live systems that can be run off usbs to test things out. And even the net-installer is quite a simple process that is good at explaining what it does, and having sane defaults it encourages you to pick if you are unsure. This video about Debian 12 is a good counterpoint to the Debian 2.1 video linked above.
It did involve being more pragmatic about their approach to free software and including non-free firmware, so things like wi-fi now work without any problems for the end-user. Now I'm against proprietary software and hardware manufactures should have open source drivers for their shit, but I can't argue with how my laptop's wi-fi and bluetooth worked entirely without hassle.
Now Debian still requires more of the user than Mint does, like you have to figure out how to enable flatpak support and I did have to go into the terminal to install all the packages I wanted. That was a leesser part of the experience with Mint, I only had to do that to install 32bit libraries for my retro games and speciailized things like that.
(And you do want flatpak, the one thing you need to know it's a form of software package that works on basically all Linux distros, so a lot of developers package their programs as flatpaks instead of creating multiple versions for for all the various Linux file systems. So you get a lot of variety in software, and there are other positives as well)
I was happy for having a few months of training in how Linux works from Mint, it taught me how packages work. why flatpaks are useful (they are included by default in Mint and its package manager), how to use the terminal and other useful stuff. So if you are completely new to Linux, Mint is still the distro I recommend. I recently installed Mint on the computer of a 70-year old friend of mine, not Debian for a reason.
Still, It's nice to be at the distro that is the source rather than two steps downstream. Having to set up my Debian, instead of all the things the Ubuntu and Mint devs have added on top (even if what the Mint team adds does make for a smoother out-of-the-box experience). Again I'm not that technically proficient, but I find some enjoyment in tinkering. So setting up things like flatpak in Debian was a fun little challenge for me to do, made quite safe and easy by all the guides there are for such things.
I'm probably going to stick with Debian stable. I like long-term support distro way of doing updates, where you get important security updates, but other updates are released only after being tested for bugs. This ensures sytem stability. The other way is rolling release, where updates are constant. Package updates are released as soon as they are available, which might lead to bugs and other forms of system instability.
LTS does mean you won't get flashy new features for awhile, but I'm usually quite happy with the way I currently use my programs, my current workflow. Despite being a transgendered ultra-leftist, I'm creature of routine and habit (it's the autism), so LTS distros fit me quite well. If it ain't broke, don't fix it. So i'm probably not going to use arch btw, not because I'm afraid of not figuring it out, it might even be a fun challenge, but because I don't care about rolling release cycles.
And Debian is the best of LTS distros, the one most off them are based on. Also Debian is for lesbians.
22 notes
·
View notes
Text
(note to self— info helpful to save, copied text from a post not able to reblog)
“
get yourself a USB stick from any dollar store, install ubuntu with persistent storage on it. There is literally no reason not to, and it means that you now have a little computer of your very own that no one except those who physically get their hands on your USB stick can use (and you can password lock the OS) and that you can run from literally almost any PC with USB ports. Including public machines in libraries and, probably, school laptops.
Ubuntu is an operating system! It's the same kind of thing as Windows, basically-- the software your computer uses to run everything else you do on it, to put it simply. Unlike Windows, though, Ubuntu is totally free, and it's open source, which means anyone is free to look at and play with the code it's made of to write new things for it or even customize their own versions of it!
There's an official website where you can totally legally and safely download the iso you need for free! Then all you have to do is use something like a program called Rufus to install it onto a USB thumb drive!
It does work a little differently from Windows, and needs different file types sometimes, so it isn't an exact replacement, but once you learn a few basic things, it's easy to use, and the tradeoff of having to learn some new things for the improved performance (and the fact that getting a virus on linux is just. Not gonna happen) is worth it imo.
”
https://ubuntu.com/tutorials/create-a-usb-stick-on-windows#1-overview
2 notes
·
View notes
Photo


07.06.23
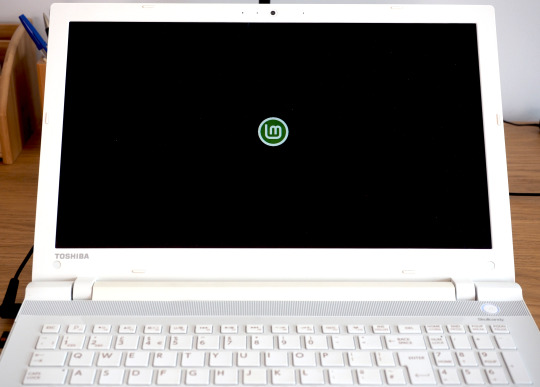
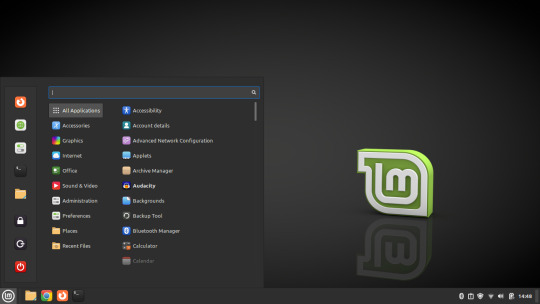
Linux Laptop Install 6
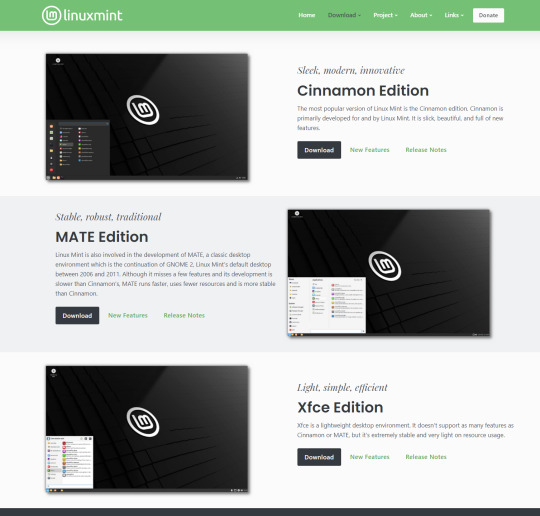
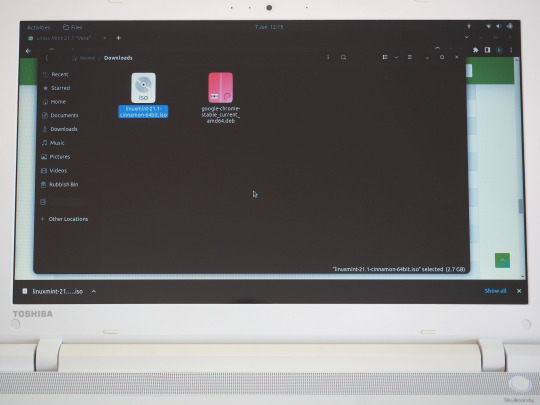
After trying Ubuntu 22.04 on this laptop, I decided to try a different distro. I chose to install Linux Mint 21.1 Cinnamon desktop edition.
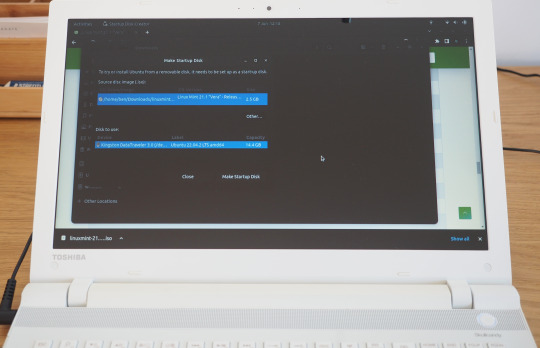
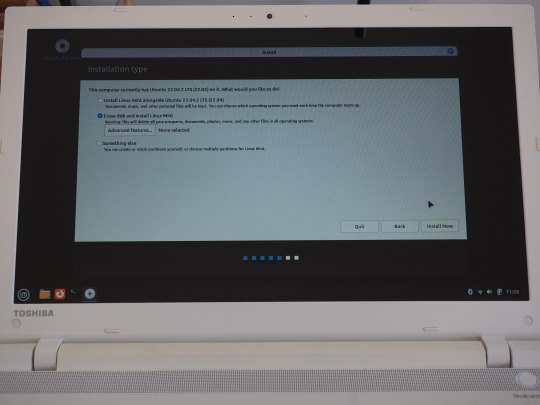
Linux Mint is a Linux distribution based on Ubuntu (which is in turn based on Debian), bundled with a variety of free and open-source applications. It is available with a range of desktop environments including Cinnamon, MATE and XFCE. It uses the Debian package manager and optionally Flatpak to install applications. The Linux Mint project was created by Clément Lefèbvre. See Wikipedia for more information: https://en.wikipedia.org/wiki/Linux_Mint I downloaded the Mint ISO file from: https://linuxmint.com/download.php I created a bootable Linux Mint USB stick using Ubuntu's Start-up Disk Creator. I then used the USB stick to install Linux Mint replacing the previous Ubuntu installation. I decided to name the laptop ‘Manfred’ during the early part of the set-up.
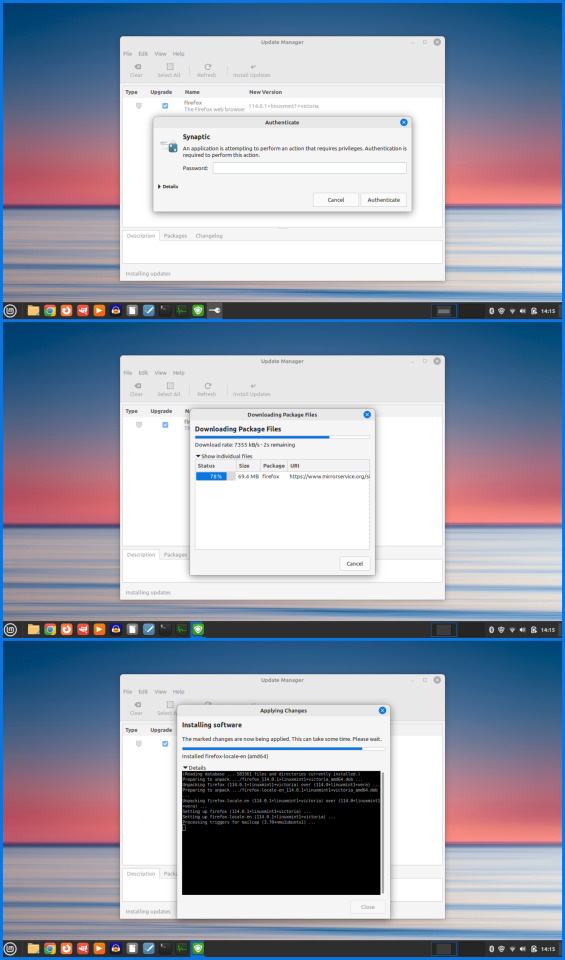
The installation went very smoothly and once it had installed, I used the Update Manager to check for updates. I checked the Driver Manager to see if there were any required drivers for the laptop. It found that no new drivers were needed.
3 notes
·
View notes
Text
Some of the comments are a little disconnected from everyday use, honestly.
I work in IT, I get it, in a fair and just world, we'd all be running Proxmox bare-metal and we'd be piling on VM after VM for the sake of freeing ourselves from the shackles imposed on us by corporate ecosystems. The thing is, you are not going to convince someone who's already tech-averse to go this deep, this quickly. Considering how most of my employees do everything on their phones and barely know how to turn their work rigs on or off - and most of them are in their twenties - there's a ton of ground to cover.
Here's a small - if still longish - taste of it all below. Click for more.
Start small. If anyone's curious and wants at least one solid stepping stone, consider checking whether or not your version of Windows contains the Hyper-V virtualization suite. To do so, open your Start menu, and start typing Turn Windows features on or off into the search bar. Pick the first item that pops up, and you'll access a window listing all of your OS' installed and pending features. You're looking for Hyper-V. Click on its box, then let your machine restart.
Congrats, it, uh... sort of looks like nothing's changed, right? That's good, actually. Now what you want to do is head to the Internet Archive and pick whatever operating system from your childhood that you happen to remember, or you could even go nuts and pick out one of the Enthusiast ISOs for Windows freaking 7 that some diehards are still putting together to this day. Pick a system, download its ISO file, and then search for and start Hyper-V.
Following the steps onscreen, you'll create your first virtual machine. For now, just hit Finish right off the bat, the program's going to pick best-case options that'll at least shield you from massive fuck-ups, seeing as this is your first time. Pick out your virtual machine in the main window, right-click on it and select Settings. Inside, you'll point its virtual CD-ROM drive to where you download your operating system's ISO.
If all goes well, you should see your operating system of choice's first boot screen in the window that pops up, once you boot up your VM. You can full-screen the program, if you want to fake running this natively a little more comfortably. Don't forget to (ahem) source a valid CD key through entirely legal means - you only really need to Google for this. If you're looking for a Microsoft key, you'll find Generic keys listed by the boatload. If you're trying out a MacOS install, you might have a little bit of a harder time finding the right serials, but it isn't impossible.
Of course, the easiest option is a Linux distro. Distros, barring a few exceptions, are typically free to use and have no copy-protection shenanigans to handle. If that's your course of choice, start with Linux Mint - it's designed to be as familiar as possible to people coming in from a Windows system. Once you've got the ball rolling, have fun with your now-sandboxed OS install. Revisit old favourites maybe, or even practice using Hyper-V's Guest tools to make your host PC and the virtual machine effectively "share" a network!
Later on, you'll realize that there's virtual machines dedicated to all sorts of things: you can run home automation servers, play games or run servers for said games - the sky's the limit, really. Running your VMs in instances on a bigger OS like Windows works on the short term, but sharing hardware resources like this is a huge pain. Eventually, you're going to want to run a hypervisor - that's a virtualization suite - directly on top of your hardware. That makes it much easier to divvy out resources as needed.
That, however, is neither here nor there if you're just starting out. If all you ever do is power on and shut off a PC, start by running the same version of Windows you're already familiar with on a separate VM. Then, poke at that sacrificial system to your heart's content. The fun thing about virtual machines is that irrecoverable fuck-ups do not exist. Save a state before doing dodgy shit, like you're playing a game on an emulator, and then go on right ahead.
Does the VM now refuse to boot? Reload its last save state. Bam, you're done. Learn that system from the inside out, and then try out its Server Edition, or jump to a Windows or a Mac, all depending. Try out Linux, too! You have no limits on the number of virtual machines you can run - none save your own hardware's limitations.
This is the best start to a home lab that you could possibly get, short of going fucking nuts for what's still just a hobby and speccing yourself a server-grade system to fuck around with.
If this really appeals to you, I'd advise picking up Windows Terminal commands, formerly known as MS-DOS prompts, and pairing that with some passing understanding of Bash. These two Command Prompt syntaxes are essential to start with. For maximum fun and chaos, set your newfangled server as a target, deploy a Kali Linux install, and start picking up Network Security basics by actually playing the part of a hacker.
If this speaks to you, you'll have enough on-hand to potentially make a career out of it. If you're just curious, you'll still know more about how to keep safe online than 99.9% of your fellow netizens.
Someone needs to inform the (rightly) pro-piracy tumblr users that it is no longer 2014 and some of the services they are recommending will turn ur computer in a broken microwave that serves bitcoins to shitheads.
70K notes
·
View notes
Text
Daemon Tools Ultra 2025 Crack key free Download
DOWNLOAD LINK
DAEMON Tools Ultra is a powerful and feature-rich disk image software for Windows that enables users to create, mount, and manage disk images. It is often used for creating virtual drives and handling image files (such as ISO, IMG, MDX, and more) without the need for physical disks. With a comprehensive set of tools, DAEMON Tools Ultra is widely used by gamers, IT professionals, and general users who need to work with disk images or emulate physical disks virtually.
Key Features of DAEMON Tools Ultra:
Create and Mount Disk Images:
DAEMON Tools Ultra supports creating disk images from physical disks, as well as mounting ISO, MDX, MDS, MDF, and many other image formats onto virtual drives. This enables users to run applications, games, and operating systems directly from disk images without needing the physical disk.
1 note
·
View note
Text
When you need to copy your DVDs onto discs, copy software programs can be hit or miss. If you are taking to the time to move or consolidate your collection, you will want to get the right software to do the job right the first time while protecting your original DVDs. Of course, we need to add a disclaimer that we do not condone copying anything that falls under copyright protections and you should never be copying material for commercial use. Check with your country’s copyright laws before proceeding with your copy project. Then, check with Selby Acoustics to make sure that you have the best sound system setup to see and hear your movies at their best! Here are 10 of the best DVD copy software programs on the market in 2107. WinX DVD Copy Pro This DVD copy software program is compatible with Windows 10 (32 & 64 bit), Windows 8/8.1 (32 & 64 bit), Windows 7 (32 & 64 bit), Windows XP / Vista (32 & 64 bit), and Windows 2003, 2000, NT, 98. It lets you copy to a blank writable DVD disc (DVD-/+R, DVD-/+RW, DVD RAM), ISO image and DVD folder at 1:1 ratio. The reason it tops #1 on our list is because of the copy features available and the fact that it maintains quality of the source; it even will repair bad sectors if the original DVD is scratched or has a minor crack. The copy speed is fast and the CPU usage is low, making it very efficient. A big plus for this program is that you can even burn your files to a new disc, without the original DVD. A negative of this software is that it doesn’t compress larger DVD files onto a smaller capacity disc. This product generally sells for about $49.95 US. System requirements 1 GHz Intel / AMD processor or above, 256 MB RAM (512 MB or above recommended), 100 MB free hard disk space, 256 MB RAM graphic card (512 MB recommended), and a DVD-ROM drive. DVD-Cloner This is a popular product, and has been for many years. It consistently is seen in top 10 lists for DVD copy software products. It is compatible with Windows 8 / 7 / XP / Vista (32 & 64 bit) operating systems. This is the best cloning software when it comes to movies. It preserves perfect quality at a 1:1 ratio and can be used for copying movies on DVD or Blu-ray to blank DVD disc, DVD folder or ISO file on a Windows computer. Another bonus is that it can extract only audio files if you choose, and you can select specific chapters or episodes to copy or back-up. This product generally sells for about $59.99 US. System requirements Pentium II 450 MHz (Intel Core2 CPU recommended), 64 MB of RAM (2GB of RAM recommended), 5 GB free hard disk space for DVD-5 (10GB free hard disk space for DVD-9), and DVD burners. 123 Copy DVD This is a versatile software program that can be used for more than just copying or cloning DVDs. you can convert, customise, and create new DVDs with the 123 Copy DVD. It is compatible with Windows 10 / 8 / 7.XP / Vista operation systems. The copy process is simple and straightforward. Users can copy movie or music downloads as well as local video files from their computer to DVD. It will copy scratched DVDs with a decryption plugin. The downsides are slow copy time (1 hour for exact copy quality) and a less than perfect quality ratio when compressing copies. This product generally sells for around $49.99 US. System requirements internet connection, 1.1GHz or faster CPU, 10 GB free hard drive space, 1 GB RAM (2GB+ RAM is recommended), and a DVD+/- R(W), DVD DL+/-R Drive (DVD burner required to write discs). DVDFab This DVD copy software product is compatible with Windows 10 / 8.1 / 8 / 7 / Vista (32 & 64 bit). It allows you to compress files with very little loss of quality. It makes quick work of your copy job, so you won’t be waiting around for long and then the quality is great. The only downside is that there is definitely a learning curve for this software program. This product generally sells for around $49.00 US. System requirements Pentium II 500 MHz, 512 MB of RAM, 20 GB of free hard disc space, A DVD-R(W) or DVD+R (W) Drive, and live internet connection to register DVDFab 10.
Xilisoft DVD Copy If price is a consideration, this product has a bit of a price drop from the others we already covered, it generally sells for about $39.95 US. This software is compatible with Windows XP (SP2 or later) and Windows Vista. It makes our list because it is very easy to use and makes a high quality copy in less than an hour. The compression quality is very high. Although it may be missing some of the bells and whistles in other software programs, for the price it comes with all of the most important features. It is a great value for the price. System requirements 1GHz Intel or AMD processor or above, 256 MB RAM (512 MB RAM or above is recommended), 30 MB free hard disk space for installation (10GB or more for temporary files), Recordable DVD drive, Input File Format Support: DVD-Video, DVD folder, ISO image file, Output File Format Support: DVD-Video, DVD folder ISO image file. Tipard DVD Cloner This program runs on Windows XP (SP2 or later), Windows Vista, Windows 7, and Windows 8. This mid-range DVD copy software made our list because it is great for making exact copies of DVDs with the right quality blank discs. It has useful tools but there are some quality problems that occur when compressing the DVD onto a smaller one. This product generally sells for around $55.00 US. System requirements 1.2GHz Intel or AMD CPU or above, and 1G Ram or higher recommended. Aimersoft DVD Copy This is a good choice for a budget copy software program. It only costs around $29.95 US, which is close to half the price of most others. It is missing some of the different tools and does not have the ability to allow you to split a sidc into two or merge two discs into one; however, it can make identical or compressed copies of DVD movies. It is compatible with Windows 200 / 2003 / XP / Vista / 7. System requirements Intel or AMD processor, 1GHz or above. 1Step DVD Copy This is another budget option on our list for copy software programs for DVDs and movies. It also costs around $29.99 US, which is also about half of some of the other top spots on our lists. The great thing about 1Step DVD Copy is that it can convert your movies into stand-alone video files on your computer in addition to making DVD copies onto disc. The downside is that it does not allow users to create virtual disks on the computer copying the DVD’s ISO file. It is compatible with Windows Vista x32, Vista x64, 2003 x32, Windows XP x32, Windows XP x64, Windows 7 x 32 / x64, and Windows 8 x 32 / x64. System requirements Microsoft’s MediaPlayer 9 or higher, Apple’s QuickTime 7.1 or higher, Real Player installed, and depends on original media files format. Magic DVD Copier Even though this DVD copy software is at the bottom of our list, it still makes the top 10 among hundreds of choices and it is one of the fastest copiers on the market. The downside is that you trade in speed for quality when compressing DVD copies. However, if you need to copy a DVD-9 to a DVD-5, this will do the job for you in only about 30 minutes. The Magic DVD Copier typically sells for about $52.90 US. It is compatible with Windows XP / 2000 / 2003 / Vista / WIndows 7 / Windows 8. System requirements 512 MB of RAM, 8 GB free hard disk space, and a DVD Writer Drive. 1Click DVD Copy Rounding out number 10 on our list is the 1Click DVD Copy program. This software does an excellent job producing great quality reproductions of DVDs for both compressed and uncompressed copies. It misses the mark in many of the customisation tools that other products have. It sells for about $59.00 US. It is compatible with Windows 8 or previous Windows systems. System requirements 500 MHz Intel or Pentium III processor or equivalent with 256MB of RAM, up to a 9 GB available hard disc space for DVD and temporary DVD files, DVD reader (DVD writer required for burning DVDs), and a DVD Writer DVD-R. However, DVD-RW, DVD+R and DVD+RWDVD RAM writers are not supported.
0 notes
Text
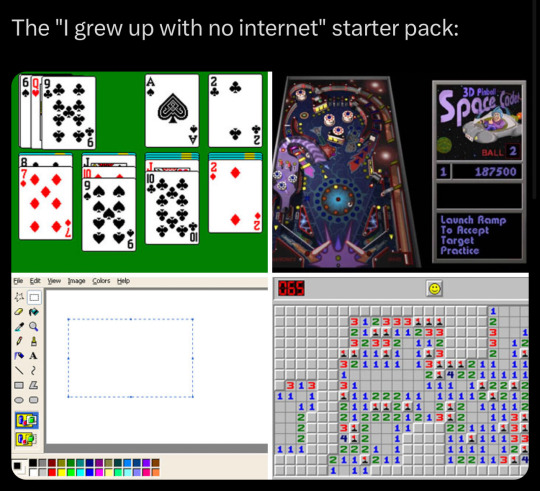
If anyone wants to play around with 'em: My games folder on google drive
The .dll files need to go in the same folder as the application files. Free Cell Hearts Minesweeper Same Game Solitaire Tetris Taipei (Mahjong)
Edit: since this is not intuitive: Oracle's Virtualbox is free Download the Win 3.1 VDI (Virtual Disk Image) from archive.org Import the VDI into Virtualbox (New -> Advanced -> Hard Disk -> Use existing hard disk file -> choose VDI file) Boot the server Type "win" to boot the OS To configure autoboot: Launch Accessories -> Notepad Select File -> Open Navigate to the root of the C: drive Change type to "all files" Open autoexec.bat to edit it Add win to the bottom of the file to automatically boot Windows 3.1 on system startup Select File -> Save Select Machine -> Reset -> Reset
As far as I can tell, to add new games, you're going to need to install a cd rom driver via floppy disk and upload a cd .iso of the games. This was an absolute nightmare to try to make work. The easier way is to download this Win 3.1 live cd iso and mount the GAMES.iso I made (AFTER server boot; before caused VM crashes consistently): Devices -> Optical Drives -> Choose / create a disk image. It should show up under the R drive and the games can be played off that. (half of 'em are games that require the "newer" OS, but tetris, samegame, and taipei all run with this setup.)
Dosbox / Dosbox-x had options to load in windows, but that was also a configuration nightmare.
Edit 2: Win 98 (full OEM, which does not require a second boot disk) with a product key from archive.org spun up by iso in VirtualBox with the GAMES.iso mounted as an optical drive and accessed via the cd rom - all games were playable.
9K notes
·
View notes
Video
youtube
Discover the EASY Way to Install LINUX Without the Hassle!
*Linux For DevOps:* https://www.youtube.com/playlist?list=PLGj4aMqxhpL6qwlxRuVljjIxvNoMy-W91 *Linux For DevOps: Beginner Level:* https://www.youtube.com/playlist?list=PLGj4aMqxhpL5bLDvXBIpOmS_Vh6U8tjM0 *Linux For DevOps: Intermediate Level:* https://www.youtube.com/playlist?list=PLGj4aMqxhpL79czyihLsCRXHePzY0zQuv ***************************** * Discover the EASY Way to Install LINUX Without the Hassle! * 🎥: https://youtu.be/V7ZOuK6o5KQ *****************************
Linux is a powerful, versatile operating system widely used for servers, development environments, and personal computing. If you're new to Linux, this guide will walk you through the installation process and initial setup to get you started.
Why Choose Linux? - Free and Open Source: Most Linux distributions are completely free to use. - Customizable: Tailor your operating system to your needs. - Secure and Reliable: Preferred for servers and development due to robust security. - Community Support: A vast, active community to help with troubleshooting and learning.
Step 1: Choose a Linux Distribution Popular Linux distributions include: - Ubuntu: Beginner-friendly and widely supported. - Fedora: Cutting-edge features for developers. - Debian: Stable and ideal for servers. - Linux Mint: Great for transitioning from Windows. - CentOS Stream: Suitable for enterprise environments.
Step 2: Download the ISO File 1. Visit the official website of your chosen Linux distribution. 2. Download the appropriate ISO file for your system (32-bit or 64-bit).
Step 3: Create a Bootable USB Drive To install Linux, you'll need a bootable USB drive: 1. Use tools like Rufus (Windows), Etcher, or UNetbootin to create a bootable USB. 2. Select the downloaded ISO file and the USB drive, then start the process.
Step 4: Install Linux 1. Insert the bootable USB into your computer and restart. 2. Access the BIOS/UEFI menu (usually by pressing `F2`, `F12`, `Esc`, or `Del` during startup). 3. Set the USB drive as the first boot device. 4. Follow the installation wizard to: - Select your language. - Partition your disk (use “Automatic” if unsure). - Create a user account and set a password.
Step 5: Perform Initial Setup After installation: 1. Update the System: ```bash sudo apt update && sudo apt upgrade -y # For Debian-based systems sudo dnf update # For Fedora-based systems ``` 2. Install Essential Software: - Text editors: `nano`, `vim`. - Browsers: `Firefox`, `Chromium`. - Development tools: `git`, `gcc`.
3. Enable Firewall: ```bash sudo ufw enable # Uncomplicated Firewall ```
4. Learn Basic Commands: - File navigation: `ls`, `cd`. - File management: `cp`, `mv`, `rm`. - Viewing files: `cat`, `less`.
Tips for Beginners - Experiment with a Live Environment before installing. - Use VirtualBox or VMware to practice Linux in a virtual machine. - Join forums like Ubuntu Forums, Reddit’s r/linux, or Linux Questions for support.
Linux installation, Linux beginner guide, Linux setup, how to install Linux, Linux for beginners, Linux distributions, Ubuntu installation, Linux Mint setup, Fedora installation guide, Linux tips
#Linux #LinuxForBeginners #Ubuntu #LinuxMint #Fedora #LinuxTips #OpenSource #LinuxInstallation #TechGuide #LinuxSetup #ClouDolus #ClouDolusPro
ubuntu,Getting Started with Linux Installation and Basic Setup,linux tutorial for beginners,open source,linux terminal,distrotube,ubuntu is bad,linux tutorial,linux for beginners,linux commands,Linux installation,Linux beginner guide,Linux setup,how to install Linux,Linux for beginners,Linux distributions,Ubuntu installation,Fedora installation guide,Linux tips,cloudolus,cloudoluspro,free,Linux,Linux for DevOps,Linux basics,DevOps basics,cloud computing,DevOps skills,Linux tutorial,Linux scripting,Linux automation,Linux shell scripting,Linux in DevOps,Ubuntu,CentOS,Red Hat Linux,DevOps tools,ClouDolus,DevOps career,Linux commands for beginners,Introduction to Linux for DevOps: Why It’s Essential,devops tutorial for beginners,learn devops,devops tutorial,Who Should Learn Linux for DevOps?,Why You Should Learn Linux for DevOps,Why Linux is Critical in DevOps,Why Linux Essential?,What Is Linux Overview?,What Linux Key Features?,What Linux Key Benefits?,What Is Linux Overview? Linux for DevOps,Linux for cloud,Linux training,devops tutorial Linux,Linux commands for beginners ubuntu,cloud computing Linux for DevOps
***************************** *Follow Me* https://www.facebook.com/cloudolus/ | https://www.facebook.com/groups/cloudolus | https://www.linkedin.com/groups/14347089/ | https://www.instagram.com/cloudolus/ | https://twitter.com/cloudolus | https://www.pinterest.com/cloudolus/ | https://www.youtube.com/@cloudolus | https://www.youtube.com/@ClouDolusPro | https://discord.gg/GBMt4PDK | https://www.tumblr.com/cloudolus | https://cloudolus.blogspot.com/ | https://t.me/cloudolus | https://www.whatsapp.com/channel/0029VadSJdv9hXFAu3acAu0r | https://chat.whatsapp.com/D6I4JafCUVhGihV7wpryP2 *****************************
*🔔Subscribe & Stay Updated:* Don't forget to subscribe and hit the bell icon to receive notifications and stay updated on our latest videos, tutorials & playlists! *ClouDolus:* https://www.youtube.com/@cloudolus *ClouDolus AWS DevOps:* https://www.youtube.com/@ClouDolusPro *THANKS FOR BEING A PART OF ClouDolus! 🙌✨*
#youtube#ubuntuGetting Started with Linux Installation and Basic Setuplinux tutorial for beginnersopen sourcelinux terminaldistrotubeubuntu is badlin
0 notes
Link
0 notes
Text
Sparkle and Shine: The Secrets of Jewelry Photography
Photographing jewelry is an art and a science. The right balance of showing the fine details, getting the shine just perfect, and portraying the true color and texture of a piece is the fine art of taking pictures that make potential buyers drool. Whatever the purpose of your photography—an e-commerce site, a social media platform, or your personal portfolio—learning how to shoot jewelry effectively can make a big difference in how your brand is perceived and how much you sell.
Jewelry is truly magnificent and requires a magic angle to capture its stardom. At UKClippingPath, we perceive each piece uniquely. We’ll cover the best methods for photographing jewelry from experts in the field, specifically how to catch the light, maximize the luster, and ensure your jewelry grips attention in a competitive market.
The Science Behind Lighting and Its Importance
Lighting in jewelry photography is one of the major factors. Non-traditional jewels (rings, necklaces, bracelets, and earrings) are usually reflective in nature and require good lighting to bring out their best. Fine jewelry can also look drab and lackluster with poor lighting.

Key Lighting Tips:
Make the Light Soft, Diffused: Direct light can cause hard shadows and reflections. It’s better to create soft light using a softbox or light diffuser to evenly illuminate the jewelry while reducing glare and reflections.
Steer Clear of Overexposure: Jewelry usually has delicate details and intricate textures that tend to disappear into overexposed photos. Ensure the piece shines but still retains its detail.
Think About Light Direction: The direction of light is important for highlighting certain elements of jewelry. Side lighting brings out textures, and backlighting can increase transparency and give your jewelry a ghostly glow.
Choosing the Proper Background
The background you select for your jewelry pictures significantly affects the final image. The proper background enhances the jewelry without distracting from it. Pools of light and stark space or neutral backgrounds usually do the trick, allowing the materials to take center stage.
Background Tips:
Neutral Backgrounds: White, black, or grey backgrounds offer a clean, distraction-free canvas and allow the jewelry to take center stage.
Textured Backdrops: For an artistic touch, try textured backgrounds, either fabric-based or made from natural materials like wood. Ensure the texture complements the jewelry without competing with it.
Use Non-Distracting Backgrounds: Avoid busy backgrounds or landscapes that steal focus from the intricate details of the jewelry. Simple backdrops enhance the jewelry’s appeal.
Using the Correct Camera Settings
Your camera and its settings can make or break your jewelry photography. Professionals often rely on DSLR or mirrorless cameras with manual settings for flexibility in manipulating image quality.

Recommended Camera Settings:
Maintain a Low ISO: A low ISO (100-200) reduces noise and grain. Jewelry photography demands finer details, and high ISO can blur or create a grainy effect.
Only RAW Files Keep More Info: Shooting in RAW retains details such as textures, colors, and lighting nuances far better than JPEG, providing greater post-processing possibilities.
Use a Small Aperture: A small aperture (high f-stop number, e.g., f/8 or f/11) leads to a greater depth of field, keeping your jewelry sharp and in focus from edge to edge.
Adjust Your White Balance: Different light sources create color casts. Adjust the white balance according to your light source (daylight, tungsten, etc.) for accurate color reproduction.
Zoom In: Close-ups and Macro Photography
Jewelry is all about the details—tiny stones, delicate settings, and intricate designs. These features need macro photography or close-up techniques to capture the piece’s essence.
Macro Photography Tips:
Go with a Macro Lens: A macro lens enables the closest focus and captures extreme details such as engravings, stones, or textures—essential for showcasing jewelry.
Focus on the Important Part: Ensure the focus highlights the right part of the jewelry. For example, when photographing a ring, ensure the stone or design is in sharp focus.
Take Quadrants of Shots: Photograph your work from various angles to ensure you capture an ideal version of the piece. Include shots from the top, side, and close-up for an all-around view.
Flaunt the Sparkle: Reflective Surfaces and Shimmers
The shine and sparkle are crucial aspects of jewelry photography. Jewelry is made using materials like diamonds, gold, or silver that are highly reflective, and capturing their brilliance requires precision.
Tips for Capturing Shine:
Use Reflective Surfaces: Placing your jewelry on a reflective surface (like glass or a mirror) can enhance its shine and create depth in your photos.
Use a Polarizing Filter: Control unwanted reflections and allow the sparkle to shine without filling the photo with distractions.
Avoid Too Much Glare: Adjust the angle to hide excessive reflections while maintaining the jewelry’s details.
Jewelry Photography: The Art of Styling
Proper styling can make the image more eye-catching and aesthetically pleasing. While jewelry photography is often simple, styling can further elevate the presentation.

Styling Tips:
Utilize Jewelry Stands or Props: Using props like a jewelry stand, wooden box, or fabric can enhance the presentation. Ensure the props complement the jewelry without overpowering it.
Think About Scale: For small items like rings or earrings, consider adding a hand model or prop to give viewers a sense of scale.
Showcase Versatility: Photograph jewelry in various contexts—on a model, paired with other pieces, or styled alongside complementary items.
Post-Processing: Enhancing the Image
The final stage of jewelry photography is post-processing, where you can refine your images to perfection. This step is vital for ensuring your jewelry looks crisp, professional, and true to its brilliance.
Key Post-Processing Steps:
Adjust Exposure and Contrast: Use editing software like Adobe Lightroom or Photoshop to adjust the exposure, contrast, and brightness, enhancing the piece’s true colors and shine.
Retouch Water Spots: Eliminate dirt or dust while maintaining the organic appearance of the jewelry.
Sharpen Details: Accentuate the features of intricate designs or gemstones without over-sharpening.
Color Correction: Ensure the jewelry’s colors are accurate, as lighting can alter their appearance in photos. Use color-correcting tools to align the image with the actual product.

Different Jewelry Styles and Materials
Jewelry comes in many styles and materials, from classic gold and silver to ornate designs with precious gemstones. Each style and material requires specific techniques to showcase its unique essence.
Finding the Right Angle:
Rings: Capture a tilted shot to highlight the width, stone, and engravings. Use a lightbox or soft lighting to avoid shadows.
Necklaces: Style necklaces on a mannequin or jewelry stand to show the pendant and chain in full view.
Bracelets: Photograph bracelets on a wrist (model’s or prop) to help buyers visualize the piece in real life.
Gemstone Jewelry: Highlight the sparkle and color of gemstones by directing light at various angles to emphasize their facets.
Conclusion
Jewelry photography is a demanding and fulfilling field that blends technical expertise with artistry. Using these tips—from selecting the proper background and camera settings to refining images with post-processing possibilities—can help you create stunning shots that highlight each piece’s brilliance. Whether you’re shooting for an e-commerce site, portfolio, or social media, these techniques ensure your jewelry shines.
For expert assistance, explore UKClippingPath’s jewelry retouching service and ecommerce image editing services. Together, we can ensure your jewelry captures attention and leaves the right impression on your audience. Reach out to us at ukclippingpath.com for a free trial and elevate your jewelry photography to the next level!
0 notes
Text
Guide to Financial Benefits of Udyam Registration for Small Business Owners
The Indian economy is a small business sector. The government takes several initiatives to encourage the growth of such small businesses. One of the most significant initiatives in this regard is Udyam Registration, which brings considerable financial and regulatory benefits to the small and medium business segments. In this regard, this article explains the financial advantages, compliance tips, and how to make Udyam Registration boost success for your business.
Financial Gains from Udyam Registration of Small Business:
Loans on Collateral-Free Credit from the government is extended to the MSME through the financial institutions under the Credit Guarantee Fund Scheme where the loan to MSMEs is not bound with personal and business assets.
Loan at Subsidized Interest The loan advanced by the government to Udyam registered business can get it on reduced interest; thus it helps in saving the interest on the loan and aids the company in liquidity management
Government Tenders The government tenders prefer the Udyam-registered businesses of the small enterprise. Categories and EMD exemptions create a level playing field for MSMEs.
Tax Concessions and Refunds The following tax concessions are available for the Udyam Registered business:
Exemptions under the Direct Tax Laws.
GST benefits, which can be a bonanza for cash-starved small businesses.
Subsidy and Incentive Eligibility Subsidies are available for the business for technological upgradation, ISO certifications, and digital marketing expenses. These schemes provide efficiency and competitiveness.
Low Fees for IP Protection MSMEs get low fees for filing trademarks and patents so that they can protect their intellectual property without any burden on their pocket. Compliance Tips for Udyam Registration: To get the best out of Udyam Registration, owners of small businesses have to fulfill the requirements placed by the government.
Keeping Proper Books of Accounts and Investment in Plant, Machinery, or Equipment Keeping proper books of accounts and investments in plant, machinery, or equipment is to be recorded because all such details are needed at the time of registration as well as every year.
PAN and GST Udyam registration has a linkage with your Aadhaar but when the business crosses the limit, PAN and GSTIN are to be mentioned.
Update the Information in Time Any investment change, turnover, or business category micro, small, or medium has to be updated on the Udyam portal to avoid penalty or suspension of benefits.
Periodic Eligibility Review MSMEs must examine their financial parameters which should fall in the criteria for MSME classification for availing the scheme. Small Businesses: Why is Udyam Registration Essential for Small Businesses Being Udyam Registered is not only a legalistic technicality but one step for growth because it gives small business undertakings their lifeline in terms of market opportunities and financial advantages. It helps entrepreneurs not lose the battle against increasing market competition by saving them both money and profit improvement or enlargement of operations. These small and medium-sized enterprises will be the backbone of India's economic development in the changing Indian business scenario. They add significantly to employment and GDP in India. Generally, the operations of such businesses are marred by finance, cumbersome compliance procedures, and aggressive competition. It was a game-changer for the initiative of the Udyam Registration taken up by the Indian government. Besides merely registering them, it gives them many financial, operational, and competitive benefits. Important Reasons Why Udyam Registration is Important
Credit Facilitation Finance is the lifeline of small businesses, yet a majority are unable to get it as they don't have security or even any formal proof. It has addressed problems of:
Access to credit guarantee without collateral through (CGTMSE).
That interest paid towards loans further decreases the cost.
Institutional recognition provides substantial credit history to businesses
Subsidy and Incentive Eligibility The government interventions for registered MSMEs under the scheme are mentioned below:
TUFS: Technology upgradation and infrastructural development
Provision of subsidies to make available ISO certification, quality enhancement, and energy-efficient technology
Export promotion incentive packages with an aim toward higher international access Such subsidies keep businesses updated in terms of competition while decreasing operational costs.
Government Procurement simplicity Government contracts are an excellent business opportunity for small businesses; however, the terms of tender discourage it. Udyam Registration removes such barriers in the following ways:
Only certain categories of government tenders are limited and available only to MSMEs.
The provision does away with EMD and offers preference. Such provision democratizes public sector project access and increases the scope of revenue generation.
Tax and Regulatory Advantage Taxation is a big issue for small-scale firms. Udyam-registered business enjoys the following tax advantages:
Exemption of income tax on some activities of the business
Relaxation in GST compliance for eligible businesses, saving the cost of administration These benefits make planning easier and free up resources to grow. Conclusion: Note that the financial benefits of Udyam Registration help small business entrepreneurs increase profit-making yet remain compliant. For the most part, it has been easy, and the rewards range from tax-exempted services to government tender services. Once your register is under Udyam along with keeping your compliance correct, you open your enterprise to a whole world of opportunities. Now start your Udyam Registration and begin moving forward on the road of financial empowerment and business success.
0 notes
Text
0 notes
Text
0 notes
Text
Forgot Windows 8.1 Local Admin Password No Reset Disk How to Resolve
How to get back into your Windows 8.1 computer if you have forgotten local administrator password no reset disk, how can you reset administrator password in Windows 8.1 without reset disk?

To resolve this problem, you can firstly try Offline NT Password Editor to help reset the forgotten Windows 8.1 administrator password without reset disk. Offline NT password Editor can help clear or reset Windows local account password via CD/DVD. The following procedure will show you the detailed walkthrough.
Trick 1: Use Offline NT Password Editor to Reset Windows 8.1 Local Admin Password (Work with CD/DVD).
When you forgot Windows 8.1 administrator password and a password reset disk was not created, “Offline NT Password Editor”, a free Windows password reset disk, can help you reset forgotten Windows 8.1 local account’s password without knowing it. Free download the ISO file from the official site. Extract the downloaded file and then burn the ISO file on to a writable CD/DVD. Once burning completed, you can use the CD/DVD which is bootable to crack Windows 8.1 Local Admin password.
Step 1: Power on your locked computer and then insert the bootable CD to the CD-ROM.
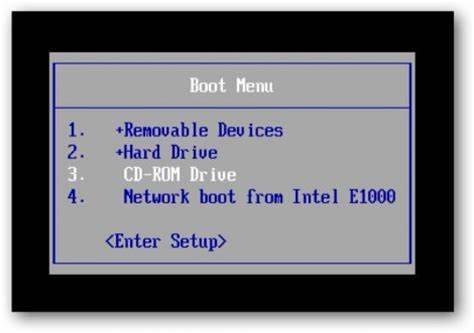
Step 2: Restart the computer to boot from CD/DVD. If it still boot into Windows, you may need to change device boot order in BIOS. Learn how to boot computer from CD/DVD.
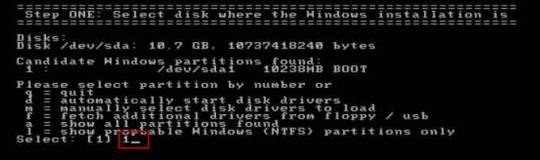
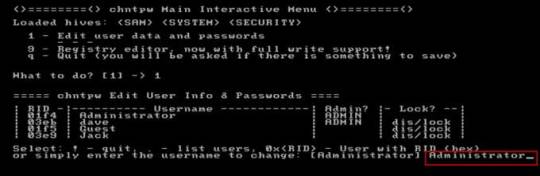
Step 3: When the computer boots from CD and loads Offline NT screen, press Enter until the “step one” appears. Type “1” and hit Enter.
Step 4: Select “Password reset”, type “1” and hit Enter.
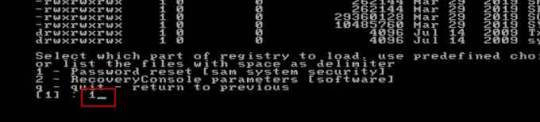
Step 5: Select “Edit user data and passwords, type “1” and hit Enter.
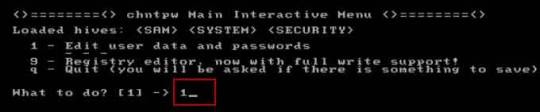
Step 6: Select a user account, type “administrator” and hit Enter.
Step 7: Select “Clear user password”, type “1” and hit Enter.
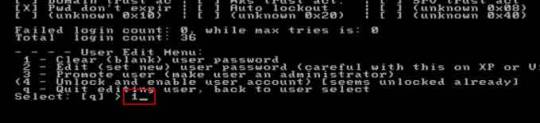
Step 8: Administrator’s password is cleared. Select “Quit editing user and back to user select”, type “!” and hit Enter.

Step 9: Select “Quit”, type “q” and hit Enter.
Step 10: Write back changes, type “y” and hit Enter.
Step 11: When it asks you if try again, type “n” and hit Enter.
Step 12: Now eject your CD and then press CTRL-ALT-DEL to restart the computer.
Step 13: When Windows 8.1 welcome screen appears, click the screen to automatically sign in administrator without password.
Another simple method to reset forgotten Windows 8/8.1 local admin password is using a password recovery program, Windows Password Rescuer, which is working fine for all Windows systems including Windows 11. Here is how to use the utility to reset a local admin password on Windows 8.1/8 PC without logging in.
Trick 2: Reset Windows 8.1 Administrator Password with Windows Password Rescuer Run from USB.
If you have forgotten Windows 8.1 administrator password and need to get back into the account, you can use Windows Password Rescuer to create a bootable USB disk and then use the disk to reset Windows 8.1 local administrator password easily without losing data. It also works perfectly for Windows 11, 10, 8.1, 8, 7, Vista, XP and Windows server 2022, 2019, 2016, 2012, 2008, 2003 etc.
Equipment required: Another Windows computer, USB flash drive.
Read more detailed steps: How to reset Windows 8.1 Admin Password with USB.
Step 1: Use another computer to download Windows Password Rescuer and then install the software.
Step 2: Plug in a blank USB flash drive to the computer and launch the software. Select “USB device” on the software screen.
Step 3: Pull down the drive list and select your plugged USB flash drive. Then click “Begin Burning” to create a bootable USB under a minute.
Step 4: Once the burning process is completed, unplug the USB flash drive and then connect it to your locked computer that you want to reset Windows 8.1 password.
Step 5: Power on the locked computer and press F12 as soon as possible to open “Boot Menu”. Press arrow key to highlight USB option and press Enter to boot from USB.
Step 6: Once the locked computer boots from USB and locates Windows Password Rescuer, you can reset administrator or other local user account passwords with several clicks. Now click “Administrator” from user list.
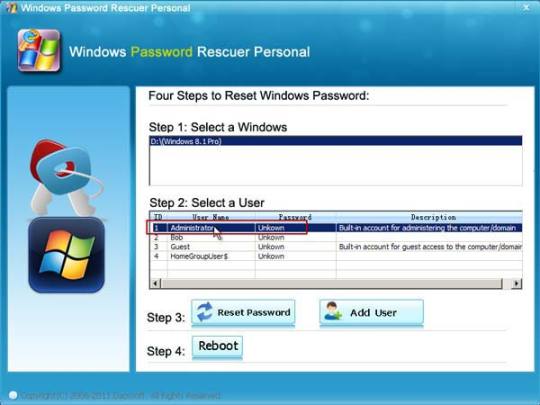
Step 7: Click “Reset Password”, when it asks you if reset administrator password to blank, click “Yes” to confirm it.
Step 8: Administrator password will be removed and shown blank in password list. It means that you will be able to sign in the account without password.
Step 9: Click “Reboot”. When it asks you to remove your USB, remove the USB from your computer and then click “Yes” to restart the computer.
Step 10: After restarting, you can log on administrator without password.

Methods in this article apply to any laptop and desktop computers such as Dell, HP, Toshiba, Acer, Lenovo, Asus etc.
0 notes