#diy wedding hairstyles for thin hair
Text
Hair Care and Beauty Tips for Bride
Hair care for a bride is just as important as skin care, as it will help you look perfect and oh-so-beautiful on your wedding day. Pre-wedding hair care from a professional is the easiest way to keep an eye on all the best products that get on your scalp and hair. You can also follow the bridal hair routine at home also given by your Hair & Makeup Artist. But make sure you start with all your pre-wedding hair care at least six to seven months before your wedding day to give your scalp and hair enough time to recover and maintain good health.
Hair Care Preparation Duration
You can start preparing six to seven months in advance to have shiny and luxurious hair that will truly be your crown on your special day. The best decision is that hire the Best Makeup & Hair Specialists in Pune. A specialist gives you the best advice that really works.
Bridal Hair Care Tips
Problem Detection: It is very important that you become aware of your hair characteristics and concerns a few months before your wedding so that you can work on problems like dandruff and thinning hair if you have any.
Spa Treatments: Make time for regular spa treatments at least twice a month, 2-3 months before your wedding. Helps with any hair problems such as dry and frizzy hair, limp and lifeless hair, and frizzy and unmanageable choose the right hair care based on your needs: Deep hair conditioning is the most popular and one of the best hair care options for brides. as it completely nourishes the hair. If you have an oily scalp, you may opt for an exfoliating treatment.
A Healthy Diet with Hair-Friendly Ingredients: This helps to improve not only the skin but also the hair. Fill your diet with green leafy vegetables and dried fruits. Almonds, cashews, dates, raisins, eggs, and amla juice will help you get shiny and beautiful hair before the day you get off. Drink plenty of water and fresh juices to keep your skin and hair hydrated. Look out for hair-friendly ingredients like biotin, folic acid, and omega.
Keep yourself Hydrated: One of the main rules for the skin and hair care of the bride is to drink at least 2 liters of water every day. Drinking water will add moisture to your hair from within. In addition, maintaining water balance flushes out toxins from the body, reduces scalp dryness, and promotes hair growth from the roots. When you have a well-hydrated body, it also improves the quality of your sleep, which ultimately promotes permanent hair growth.
Conclusion:
Pre-wedding hair care at home is the most important thing but if you have a proper suggestion then hire a Best Makeup & Hair Artist they will give you all the advice for hair care and gives you a stunning hairstyle. You can always follow some basic tips like hot oil hair massages, DIY hair masks, and basic hair washing and conditioning, that are suggested by your haircare specialist.
#best bridal look#best makeover artist in india#bridal makeup#bridal face look#bridal beauty services#best makeup artist in india
3 notes
·
View notes
Text
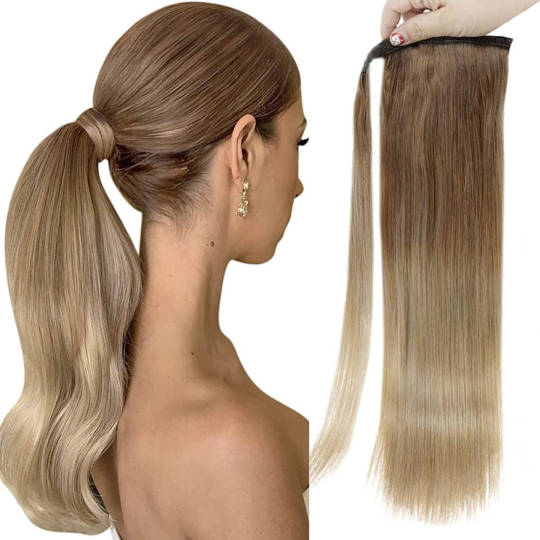
Full Shine 100% Human Hair Ponytail Extensions Balayage (#10/14)
Description
Hair Material: Remy Human Hair
Texture: Straight, and Have a Natural Wave When Wet or Left to Air Dry or Diffused
Color: #10/14 Balayage Lightest Brown Ombre Dark Blonde
Length: 12"-22"
12"-14": 70 gram
16"-22": 80 gram
Uniquely Design: Ponytail Clip In Hair Extensions With An Easy-To-Install Clip-On Comb And Hair Band With Magic Paste, Add Fullness And Length To Your Mane For A Beautiful Transformation In An Instant! Adopt Breathable Lace Net Design, No Bound Feeling And No Irritation To The Skin.
Healthy Hair: Full Shine Wrap Around Ponytail Hair Extensions Is Made Of Real Human Hair, Smooth Straight And No Tangle, It Can Be Treated & Styled Like Your Own Hair. It Works With Different Hair Lengths And Can Clip Into Thin Or Thick Hair, Blend Naturally With Your Own Locks And Virtually Undetectable, No One Find Your Secret!
Diy Fun: Create A High Ponytail, Medium Ponytail, Low Ponytail, Braid It Or Add The Ponytail Hairpiece To Create A Different Hairstyle. You Can Also Cut The Wrap Around Human Hair Ponytail Shorter, Thin It Out, Straighten Or Curl The Hairpiece.
Different Occasions: Ponytail Hair Is A Perfect Accessory For Any Occasion, Such As Daily Use, Dating, Meeting, Wedding, Party... Secure Well And Comfortable Whole Day. It Is Also A Fashionable Gift For Your Friends And Family.
0 notes
Text
Price: [price_with_discount]
(as of [price_update_date] - Details)
[ad_1]
Material Specification: Resin
Size(Approx.): 11.2cm x 13.6cm(W x H)
Package included 1 x Double Layer Twist Plait Headband
Item Name: Multi-layer Hollow Woven Headband
Color: Black, Brown
Size : 10 x 10 x 4 CM (L x W x H)
Condition: 100% Brand New & High Quality.
Good for going party or banquet Brings you a new hairstyle in seconds!Perfect for weddings, proms, party daily activities. This hairstyle hairpin is an exquisite gift for wives, girlfriends, daughters, and friends. The part of the headband in contact with the hair is designed with convex teeth, which can hold your hair more firmly and prevent it from loosening; The double-layer design on the top of the headband and hairpin is attractive and can make you look more elegant and charming.
Product Easy to use clip
? There are also 8 clips on the headband, you can choose any number, and the clips are free to shape.
? Feature Tooth design: The part of the headband that contacts the hair is designed with convex teeth, they can securely hold thick or thin hair, no-slip grip dots, without hurting your hair, bring you a good-looking hairstyle.
? Easy to use clip: There are also 8 clips on the headband, you can choose any number, and the clips are free to shape, Easy and convenient to DIY charming hairstyle.
? Package included 1 x Double Layer Twist Plait Headband.
Package Dimensions : 8 x 5 x 4 cm; 50 Grams
Date First Available : 22 March 2021
Manufacturer : VEDETIC
ASIN : B08ZNSB8JP
Item model number : hairband_01
Country of Origin : India
Manufacturer : VEDETIC
Item Weight : 50 g
Net Quantity : 1.00 count
🤕 Portable:-Double bangs hairband in the measurement of 13x10.5cm/5.1x4" is lightweight and easy to take out, just clip it on your bangs or other places, brings you a new hair style in seconds and make you look fashionable and attractive in the street.
🤕 Easy to Clip:-Easy and convenient to use, just put the headband on the head, grab a strand of hair, and curl and clip the hair with the hairpins of our headband, you can choose any number of clips, free to shape DIY charming hair style.
🤕 High Quality:-Made of premium acrylic, good durability and flexibility, not easy to deform or break. Notes: please do not stretch it excessively to prevent the breakage; it's better to store it on the ventilated place, and avoid the direct sunlight in case of damage and discoloration.
🤕 Tooth Design:-Package includes 1 pieces twist plait headbands in black and brown, and there are 8 pieces 3-teeth alligator clips on the headband, the double layer hair tools can securely hold thick or thin hair and braid hair bangs with non-slip and firm grip, and won't hurt your h
0 notes
Photo

Social media has numerous bridal makeup tips for brides for their D-day, but one tends to get confused on what to follow and what not. But, when experts are there to guide you, it becomes easy. Isn’t it?
Bridal Makeup Artists are magicians that work wonders on the wedding day for every bride- to -be. Therefore, choosing a bridal makeup artist is one of the most important decisions you will be making. Accordingly, we are sure that you would not want to make any mistakes with your bridal makeup look also because your wedding photographs last a lifetime. Therefore, we spoke to some of the leading makeup artists in the industry to get some amazing bridal makeup tips for brides that no one tells you about. Believe it or not, but these bridal makeup tips from famous bridal makeup artists will not only help you for your bridal makeup but for your post wedding looks as well.
So, let’s get started with some amazing bridal makeup tips for brides that no one tells you about (but, we will tell you!):
1. Healthy Skin Is The Best Foundation
The best and the most obvious bridal makeup tip that any bride-to-be will ever receive is that follow a proper skin care regime for healthy and glowing skin. It is highly advisable to follow a consistent and good day and night skincare routine at least 6 to 8 months before your wedding day. Most of the senior pro artists at Bobbi Brown advice that a good skincare regime “Will help with how makeup looks and stays onto the skin throughout the wedding day”.
Image Courtesy: Jasmeet Kapany
Most of the bridal makeup artists also advice, not to try out anything experimental close to the wedding day. In fact, leading bridal makeup artist Shagun Gupta, tells us that brides-to-be, “should not experiment with any fancy facials close to the wedding day”.
We have also found you the best Organic Skincare Brands and Products to check out for healthy skin and hair.
2. Grooming Tips
One thing every bride-to-be must keep in mind is, not to leave any grooming things for the last moment like threading and waxing as it can leave rashes or redness on the skin. So, it is best to get your grooming done at least a week prior to the wedding, to give your skin ample time to recover.
Image Courtesy: Jasmeet Kapany
Here are some tips to you must know before going for brazilian waxing.
3. Be The Best Version Of Yourself: Opt For Minimalistic & Natural Bridal Makeup
OTT and dramatic makeup is so passe. Unanimously, most bridal makeup artists recommend to go for simple, minimalistic and natural bridal makeup. Ace celebrity makeup artist Ojas Rajani suggests that brides-to-be should keep their bridal look soft and real, by choosing a natural bridal look. This is the biggest bridal makeup trend which is being followed all over the world.
Image Courtesy: Ojas Rajani
Infact, Shagun Gupta, advises her brides that experimenting with loud eyeshadow or lip shades is not recommended at all, for the wedding day. The biggest bridal makeup trend, which is definitely here to stay, is keeping the look fresh just like most brides all over the world. According to her, “It’s the broad smile and confidence which makes everything fall in place. A bride need not wear red lips just because it is her wedding day, certainly not if she is not comfortable wearing bright red lips.”
Image Courtesy: Shagun Gupta
Here are some great YouTube channels you must follow for makeup tutorials.
4. Prep Your Skin Prior To The Application Of Bridal Makeup
Celebrity makeup artist, Puja Taluja, tells us “Before the application of bridal make up starts, apply a cooling refreshing pack or mask, which helps in brightening the skin, closing the pores and pumping up the face”. The fundamental key for a smooth application is to wash, cleanse and moisturise before the makeup starts.
Image Courtesy: Puja Taluja
5. Hire A Bridal Makeup Artist Who Understands You Well
Bridal makeup artist, Shagun Gupta, gives the most sound and relevant advice. She recommends that finding a bridal makeup artist that suits and understand a bride-to-be, is far more important than anything else. She says, “Don’t hire someone because they’re lesser than your budget, or someone just because they’re famous. Hire someone whose work you like because your bridal makeup look is the most important aspect of your wedding day”.
Image Courtesy: Shagun Gupta
Also, check out Questions You Should Ask Your Makeup Artist, before hiring one.
6. Waterproof Mascara For Your Happy Tears
Wedding day is full of emotions, you will have a lot of happy tears in your eyes and for that you need a waterproof mascara which doesn’t spill over your face and spoil your wedding pictures. Here are some amazing mascara brands that you can trust on.
Image Courtesy:Ojas Rajani
7. Choosing Your Foundation
Bridal makeup artists all over the world reveal that the single most important bridal makeup tip for brides is choosing and finding the right shade of foundation and using the correct priming products. Puja Taluja reveals that “As the climate in our country is very extreme and it can get super hot, it is important for summer brides to prep the skin with an anti-shine water resistant primer like Becca’s Ever Matte Poreless Priming Perfector and to use a lightweight mattifying foundation like the Chanel Velvet Foundation or Georgio Armani light foundation as it gives a flawless look to the skin without getting heavy or cakey and feels light on the skin too and doesn’t melt away in summers”.
Image Courtesy:Ojas Rajani
Bridal makeup artist Jasmeet Kapany recommends to use your own creams and primers for the wedding look, which will help smoothen your skin and makeup application.
8. Proper Conditioning For Your Hair
It’s not just the face that needs all the attention on the wedding day. Brides-to-be, make sure you are treating your hair well before the wedding. And, for that you must go for deep conditioning hair masks regularly before the wedding. For girls who have dry hair must go for DIY hair packs that can make your hair smooth, may be banana pack or egg pack. Its tried and tested, it works!
Image Courtesy:Ojas Rajani
Check out hairstyles to give you a glam look at your reception.
9. Bridal Makeup Tips For Fuller Lips
Thin lips? We understand no lipstick looks good when your lips are thin, but we have got your back. We know a way to make your lips fuller and you can do it by using a skin colored lip liner and extend your natural lip line make sure not to go overboard with it, stick to ‘less is more’. Use shimmer on the center of the lower lip which creates an illusion of fuller lips. Thank us later!
Image Courtesy: Jasmeet Kapany
10. Keep Up The Brow Game
Make sure your brows are just perfect and not overdone. Never fill your brows with black use brown to make them look natural. So, the best way is, to use eye shadow or pencil and make it even with the eyebrow brush.
Image Courtesy: Puja Taluja
We felt these are some makeup tips for brides that no one will tell except for the experts and hope we were able to convey it to you in the best way possible. As promised we will bring you more and more makeup tips for your D-day that will help you glow, in your wedding photos. Do let us know your reviews about these tips and anything more you want the world needs to know about makeup.
The post Bridal Makeup Tips For Brides That No One Tells You About appeared first on ShaadiWish.
0 notes
Text
27 Beautiful DIY Side-Swept Hairstyles To Check Out In 2019
New Post has been published on http://healingawerness.com/getting-healthy/getting-healthy-women/27-beautiful-diy-side-swept-hairstyles-to-check-out-in-2019/
27 Beautiful DIY Side-Swept Hairstyles To Check Out In 2019
Anjali Sayee Hyderabd040-395603080 October 7, 2019
Side-swept hairstyles are a red-carpet favorite, and rightfully so! Be it side-swept hair or bangs, it is a hairstyle that works for all face shapes. Side-swept bangs cover a part of the forehead and cheeks. Side-swept hair accentuates the jawline, making it look more chiseled. If you want to know how to achieve a perfect side-swept hairdo, keep scrolling!
27 Beautiful DIY Side-Swept Hairstyles
1. Classy Side Sweep
Shutterstock
Simple and sweet, this side-swept hairstyle is easy to achieve. It does not require too much time to do, but still looks elegant.
What You Need
Rat-tailed comb
Straightening iron
Hairspray
Bobby pins
How To Do
If you have naturally straight hair, lucky you! You can move on to the next step. If you have curly or wavy hair, straighten your hair.
Use the rat-tailed comb to part your hair deeply on one side.
Comb your hair and pull it to one side.
Use the bobby pins to pin up the hair on the side of your parting with less hair.
Spritz on some hairspray to set your hairstyle in place.
2. Glamorous Side Sweep
Shutterstock
This is a classic hairstyle sported on Hollywood red carpets. Every actress has tried this look at award ceremonies. It is vintage and chic – perfect for any formal event.
What You Need
Round brush
Blow dryer
Hairspray
Bobby pins
How To Do
Wash your hair and let it air dry until it is damp.
Spritz on a good amount of hairspray.
Using the round brush and blow dryer, style your hair in light curls.
Part your hair in a deep side parting and sweep all your hair over your shoulder.
Set your hair in place with the help of hairspray and bobby pins.
3. Braided Side Updo
Shutterstock
This side-swept braided updo looks stunning. The side bun will flaunt your hair texture, while the braid adds a fashionable touch to your look.
What You Need
Curling iron
Hair clip
Elastic bands
Bobby pins
Hairspray
How To Do
Curl your hair from midway down using the curling iron.
Divide your hair diagonally into a top and a bottom section. Clip up the top section of hair.
Weave a Dutch braid with the bottom section of hair. Make sure it stays close to the scalp. Weave the braid until the back hairline and use an elastic band to secure it.
Pancake the braid, so it looks flatter and bigger.
Unclip the top section of hair and merge it with the remaining bottom section of hair.
Wrap the hair in a side bun, leaving the ends hanging out.
Secure the bun in place with an elastic band, some bobby pins, and hairspray.
4. Big Curls Side Sweep
Shutterstock
Curls give your hair a more voluminous and thicker look. Your hair will bounce more when curled. Instead of ringlets, opt for big open curls that add less bounce but more volume. This is a great side-swept hairstyle for weddings.
What You Need
Curling iron
Hair mousse
Hair brush
Hairspray
How To Do
Wash your hair and let it air dry until it is just a little damp (75% dry).
Apply a good amount of mousse to your hair.
Curl your hair from midway down.
Spritz on some hairspray and let them cool down.
With the brush, add some lift to your hair in the front.
Sweep all your hair to one side. Use bobby pins to keep it in place.
Finish off with a hit of hairspray.
5. Braided Side Bun
Shutterstock
Elegant and quick, the braided side bun is another favorite. If you have a formal event to attend, like prom or homecoming, this hairstyle should certainly be on your list.
What You Need
Bobby pins
Thin elastic bands
Hairspray
How To Do
Sweep all your hair to one side and divide it into two sections.
Weave each section into regular three-strand braids.
Secure the braids with thin elastic bands.
Pancake the braids to make them look bigger.
Roll one of the braids to form a bun, then roll the other braid around it to make the bun bigger.
Secure them in place with bobby pins.
Don’t forget that final hit of hairspray.
6. Loose Side Braid
Shutterstock
Nina Dobrev looks stunning in this loose side braid look. It’s messy – but not too much – while the braid itself is neat.
What You Need
Hair brush
Elastic band
Hairspray
How To Do
Pull your hair to one side and brush it to remove any tangles or knots.
Run your fingers through your hair to make it a little messy, allowing some strands to fall in the front.
Divide your hair into three sections and weave them into a braid.
Secure the end of the braid with an elastic band.
Pancake the braid by gently pulling each stitch apart.
Spritz some hairspray on the braid, and you are good to go.
7. Big Bouffant And Side Braids
Shutterstock
Every woman loves vintage style, so why not add a touch of vintage to your hairstyle?
What You Need
Comb
Elastic band
Bobby pins
Hairspray
How To Do
Divide your hair horizontally into two sections.
Leaving out some hair in the front, backcomb the hair in the top section to create a bouffant. Comb down the top of the bouffant neatly, leaving it messy underneath. This will give it a nice lift.
Pin the bouffant in place and spritz on some hairspray.
Part the hair in the front in a side parting.
Pull the bottom section of your hair to one side and weave it in a loose and messy braid. Secure the end with an elastic band.
Pancake the braid and give it one more hit of hairspray.
8. Messy Side Updo
Shutterstock
Emma Stone always surprises us with her red carpet hairstyles. Whether it’s going all blonde and sleek or this cute romantic side messy updo, she knows how to make heads turn.
What You Need
Hair rollers
Blow dryer
Elastic band
Bobby pins
Hairspray
How To Do
Wash your hair and let it air dry till it’s damp.
Spritz on a good amount of hairspray.
Wrap your hair in sections around the rollers.
Once all your hair is in rollers, blow dry it on a low setting.
Keep the rollers in your hair for half an hour to set the curls.
Remove the rollers and give your hair a hit of hairspray.
Part your hair in the front in a deep side parting.
Sweep all your hair to one side and wrap it in a bun, leaving just the ends out.
Secure it with the help of an elastic band and bobby pins.
9. Crimped Side Swept Updo
Shutterstock
Crimping seems to be making quite a comeback. Instead of being loud, like in the ‘90s, stylists are now adding crimped hair to other hairstyles.
What You Need
Crimping tool
Elastic band
Hairspray
How To Do
Crimp your hair with the crimping tool.
Comb your hair to one side of your head.
Weave your hair in a Dutch braid, making sure to align it with the side of your head.
Secure the end of the braid with an elastic band.
Pancake the braid and spritz on some hairspray.
10. Braided Faux Undercut
Shutterstock
To be honest, I love undercut and sidecut hairstyles, but I’m not on board with shaving my hair. This is a great hairstyle hack if you are like me.
What You Need
Rat-tailed comb
Thin elastic band
Hair mousse
How To Do
Part your hair in a deep side parting from the front to the back hairline.
Clip up the hair on the side of your parting with more hair.
Apply mousse to the loose hair.
Weave a Dutch braid with the moussed hair, keeping it close to the scalp. Use the tail end of the comb to add hair to the side sections. This will give your hairstyle a neater look.
Secure the ends of your braid with a thin elastic band.
Apply a little mousse on the hair right at the parting. This will lock each side in its place.
Spritz on some hairspray to set the hairstyle.
11. Pretty Side-Swept Updo
Shutterstock
Elizabeth Banks cleans up good! While she mostly plays characters who dress pretty normal, her red carpet hairstyles show us how stylish she really is. This hairstyle works great for medium-length hair.
What You Need
Hair brush
Bobby pins
Hairspray
How To Do
Brush your hair to remove any tangles and knots.
Part your hair with your fingers in a deep side parting.
Hold your hair as if it were a ponytail at the nape of your neck. With your other hand, pick up the ends of your hair and lift them over and under the first hand. This creates a circle of hair over your first hand. Depending on the length of your hair, you might have to do this a few times.
Pass the rest of your hair through the hair circle. Pin the hair circle in place and let the ends hang loose.
Finish off with some hairspray.
12. Classy Side Ponytail
Shutterstock
Lauren Conrad shows us how you can be stylish while keeping things simple with this hairstyle. This hairstyle can be achieved with long, medium, or short hair.
What You Need
Elastic band
Comb
Hairspray
How To Do
Spritz some hairspray all over your hair.
Part your hair at the front in a deep side parting.
Sweep all your hair to one side and tie it in a low ponytail.
Lock the hairstyle in with a little more hairspray.
13. Half Ponytail Side Sweep
Shutterstock
A half ponytail makes for a great side-swept hairstyle. It accentuates your cheekbones. This hairstyle is great if you are looking for a bridesmaid hairstyle or something for your winter formal.
What You Need
Barrette
Hair mousse
Hairspray
How To Do
Apply mousse to your hair.
Pull back the hair at the top of your head and loosen it a bit. Use your fingers to do this to create a messy parting.
Secure the half ponytail with a barrette.
Sweep all your hair to one side and use bobby pins to secure it in place.
14. Wavy Side Sweep
Shutterstock
Queen of music, Taylor Swift shows us why she’s numero uno even when it comes to style.
What You Need
Hair mousse
Comb
Round brush
Blow dryer
How To Do
Apply mousse to your tangle-free hair and brush it down.
Part your hair on one side.
Apply a little more mousse to the side with lesser hair and comb it down, sweeping the ends towards the other side. Use bobby pins to secure the sweep.
Roll your hair around the round brush in big sections and blow dry them to form curls.
Arrange your hair in place and spritz on some hairspray.
15. Natural Curly Side Sweep
Shutterstock
America’s sweetheart, Sandra Bullock, looks ravishing in this messy side-swept hairstyle.
What You Need
Comb
Thin hair rollers
Blow dryer
Hairspray
Bobby pins
How To Do
Wash your hair and let it air dry until it’s damp.
2Comb your hair to detangle it and part it in a slanted side parting.
Using the thin rollers, curl your hair in thin sections. Make sure to roll your hair from the ends up.
Blow dry the rolled hair on a medium setting.
Spritz on some hairspray.
Remove the rollers and brush your hair gently to make the curls look more natural.
Gather your hair and sweep it to the side, keeping it tucked behind your ear.
Pull out some hair from the front, so it falls gracefully.
Wrap the rest of your hair in a side bun. Use bobby pins to keep it in place.
Spritz on some hairspray to finish off the look.
16. Country Side Sweep
Shutterstock
Country music and curls go hand in hand. Taylor Swift’s long curls were iconic. This side-swept curly updo floored everyone.
What You Need
Comb
Curling iron
Hairspray
Bobby pins
How To Do
Wash your hair and let it air dry until it is damp.
Comb your hair to detangle it and part it in a slanted side parting.
Curl your hair in thin sections.
Spritz on some hairspray and let the curls cool down for a few seconds.
Sweep all your hair to one side.
Wrap your hair in a side bun and use bobby pins to secure it in place.
Spritz on some hairspray.
17. Simple Classy Side Bun
Shutterstock
You don’t always need to go big with your hair to make an impression. All you need is a classy and neat side bun.
What You Need
Comb
Hair mousse
Curling iron
Long steel clip
How To Do
Comb your hair to remove any knots and tangles.
Pump some mousse onto your palm and apply it to your hair.
Part your hair in a deep side parting.
Apply a little more mousse to your deep side-swept bangs.
Style your bangs in an S wave with the curling iron.
Keep your bangs in the curling iron for about 3 seconds, then pin them in place with the steel clip to achieve the S.
Pull the rest of your hair to the side and wrap it in a bun.
Remove the steel clip and spritz on some hairspray.
18. Messy Curls Side Sweep
Shutterstock
Lauren Conrad proves once again why she is at the top of her game with this chic hairstyle.
What You Need
Curling iron
Hair brush
Bobby pins
Hairspray
How To Do
Brush your hair to remove any knots.
Spritz hairspray all over your hair.
Using the curling iron, curl your hair in big sections.
Spritz on some more hairspray to lock the curls in place.
Brush down your curls gently, making sure to not disrupt them entirely. This will give your curls a flowy pattern.
Brush your hair to one side and secure it with pins.
Pull out some hair at the front to fall to one side.
Wrap the rest of your hair in a side bun and pin it in place.
Give the hairstyle one final hit of hairspray.
19. Slight Side Bubble
Shutterstock
Selma Hayek keeps things modern yet classy with this slight side bubble hairstyle.
What You Need
Comb
Elastic band
Bobby pins
Hairspray
How To Do
Comb your hair to remove any knots.
Leaving out your bangs, gather all your hair to the crown of your head.
Hold your hair as you would a ponytail, pulling it a little below the crown and to the side.
Pass an elastic band over the ponytail and twist it once.
Keeping the elastic band away, hold the base of your ponytail with the same hand.
With the first hand, fold the ponytail forward to form the bubble of the updo.
Pass the elastic band over the bubble to secure it, twist it, and pass it over again.
Wrap the ends of your hair around the base of the bubble to cover the elastic band.
Use bobby pins to secure the bubble and the base.
Pancake the bubble to make it look bigger.
Secure the hairstyle in place with some hairspray.
20. Three-Strand Side Braid
Shutterstock
Instead of a simple side braid, opt for this side braid that uses the French braid technique.
What You Need
Comb
Elastic band
Flower accessory
Curling iron
Hairspray
How To Do
Comb your hair to remove all tangles and knots.
Sweep all your hair to one side.
Weave a French braid with it, adding more hair from the sides to the side sections with each stitch of braid.
Secure the ends with an elastic band.
Pancake the braid to make it look flatter and bigger.
Curl your bangs with the curling iron.
Add in the flower to accessorize the braid.
Spritz on some hairspray to finish off the look.
21. Teased Side Braid
Shutterstock
Volume, volume, volume! That’s what women want! We want our braids to look big and not like rat tails. This hairstyle is a brilliant fix for that.
What You Need
Comb
Bobby pins
Elastic bands
Hairspray
How To Do
Pick up some hair from the top and tease it at the front to add some lift to it.
Weave a braid with the rest of that section of hair. Secure the end with an elastic band.
Tease the rest of your hair with the comb to make it look fuller.
Add more hair to the braid by passing it through the stitches of the braid. This will give it a mermaid braid look.
Use bobby pins to secure the hair in place.
Finish off with a hit of hairspray.
22. Double Side Braids
Shutterstock
Add a cool twist to a regular fishtail braid with this hairstyle!
What You Need
Comb
Bobby pins
Clip
Elastic bands
Hairspray
How To Do
Comb your hair and part it down the middle from the front to the back hairline. Clip up one section of hair.
From the open section of hair, pick up a little hair from the center at the front and weave a regular braid until the back hairline. Secure the ends with an elastic band.
Add in hair from both sides of the braid to create a mermaid braid.
Repeat the same with the other section of hair.
Secure the ends with elastic bands and spritz on some hairspray.
23. Pouf Side Updo
Shutterstock
Penelope Cruz has stunning hair. It is shiny and thick. And when she styles her hair in a side updo, you know you need to try it as well!
What You Need
Comb
Bobby pins
Elastic bands
Hairspray
How To Do
Comb your hair, so it falls behind your shoulders.
Tease the hair at the crown of your head. Comb the top neatly, so the mess underneath is not visible.
Gather all your hair and tie it into a side bun, leaving out the ends.
Push the bun higher to make the pouf bigger.
Secure the bun with bobby pins and hairspray.
24. Deep Side-Swept Bangs
Shutterstock
Reese Witherspoon is not just the poster child for blonde hair. She’s also the brand ambassador for side-swept bangs!
What You Need
Rat-tailed comb
Elastic band
Bobby pins
Hairspray
How To Do
Comb back all your hair while removing all tangles and knots.
Place the tail end of your comb near the end of your eyebrow and slide it up, to part your hair on one side.
Comb the hair on each side of the parting to create the side-swept bangs.
Tie your hair in a bun at the nape of your neck and spritz on some hairspray to finish off the look.
25. Slanted Tri-Knotted Bun
gettyimages
Knotted hairstyles are all the rage right now! So, of course, I had to add this stunning hairstyle to the list.
What You Need
Comb
Hair mousse
Bobby pins
How To Do
Apply some mousse to your comb and comb your hair back, so it falls behind your shoulders.
Divide your hair horizontally into three sections: top, center, and bottom.
Sweep the bottom section of hair to one side and knot it to form a bun. Use pins to keep it in place.
Sweep the middle section of hair slightly away from the bottom section. Knot it to form another bun. Use hairpins to secure it.
Comb the top section of hair and knot it into a bun slightly away from the middle section. Use bobby pins to secure the bun.
With some more bobby pins, merge the three buns to create the slanted updo.
26. Hollywood Side Updo
Shutterstock
Take Hollywood curls to the next level with this side updo!
What You Need
Round brush
Blow dryer
Hair mousse
Long steel clips
Bobby pins
Hairspray
How To Do
Apply mousse to your hair.
With the round brush and blow dryer, style your hair in waves and lock them in place with the long steel clips.
Spritz some hairspray on the clipped waves and leave them on for a few minutes.
Remove the clips without disrupting the waves.
Neatly arrange your hair, so it falls to one side.
Use bobby pins to fashion the waves into a side bun.
Arrange the wavy bangs on one side, and give the hairstyle a final hit of hairspray.
27. Wispy Side-Swept Bangs
Shutterstock
No one pulls off side-swept bangs like Reese Witherspoon. Side-swept bangs are God’s gift to people with a heart-shaped face.
What You Need
Rat-tailed comb
Sharp hair-cutting scissors
Hair clip
Straightening iron
How To Do
Blow dry your hair before you start. It will give your hair the needed texture and lightness for wispy bangs.
Gather the hair from the mohawk section and straighten it in thin sections.
Comb your hair down, allowing it to fall on your face. Arrange your hair as you would like the bangs.
You will be cutting your bangs according to where you would like them to rest. Take a thin section of hair at the center of the bangs. Make sure it’s close to your face, so it’s cut at the right height.
Take a pair of scissors and point it downwards. Open the scissors so that the hair is almost at the end. Open and close the scissors lightly as you move it down your hair, making sure to never close it fully. This will give your bangs a feathered look.
Cut the rest of your bangs in a similar manner, shorter in the middle and longer at the sides.
Once it is cut, comb and style it as you please.
Side-swept hairstyles can make some serious heads turn when done right. Which of these hairstyles would you like to try out? Comment below to let us know!
The following two tabs change content below.
Latest posts by Anjali Sayee (see all)
Anjali Sayee
Source: https://www.stylecraze.com/articles/diy-side-swept-hairstyles/
0 notes
Quote
Check out the smart cards on BEAUTY & FASHION at https://tinyurl.com/quick-cards-on-beauty
best base layer top
http://mixedbaginfo.blogspot.com/2019/01/smart-cards-on-beauty-fashion.html
0 notes
Text
A bridal MUA shares her best tips so you can do your own makeup on your wedding day
https://fashion-trendin.com/a-bridal-mua-shares-her-best-tips-so-you-can-do-your-own-makeup-on-your-wedding-day/
A bridal MUA shares her best tips so you can do your own makeup on your wedding day
Looking to do your own makeup for your wedding day?
Whether you’re quite talented with an eyeshadow palette, prefer a non-traditional bridal look, are looking to scale back your budget, or would just feel better keeping the fate of your face in your own hands, DIY is definitely an option.
Take note of these tips from Bobbi Brown PRO Artist, Zara Findlay, to help calm your nerves and completely nail your bridal beauty look…
And if you’re looking to do your own hair on the big day too, make sure to check out bridal hair accessories and wedding hairstyle inspiration.
1. Start with skincare
If you really want flawless, long-lasting makeup on your wedding day, you’ll need to start preparing well before.
“Make sure you are religious with your day and night skincare routine long before your wedding day,” says Zara.
A-Z Of Skincare: Everything you need to know for flawless, healthy skin
It can also be a good idea to book in for a facial or two in the lead-up, to ensure your skin is balanced and clear.
On the day, prep your skin with a good moisturiser-primer hybrid to create a flawless canvas. Zara recommends Vitamin Enriched Face Base, £43.
“Making sure you have the right base to suit your skin type is very important to ensure longevity throughout the day.”
2. Practice, practice, practice
Avoid any stressful stuff-ups by practising your look plenty of times beforehand.
“The best time to practice techniques is just before you take your makeup off in the evening as you have no pressure to make it look perfect”, says Zara.
To give you extra confidence, why not head into a counter or book yourself an appointment with your favourite brand to help you?
“Let the makeup artist teach you on one side of your face, and have a go yourself on the other so that the makeup artist can advise you on any techniques you’re unsure of”, says Zara.
3. Avoid SPF (the ONLY exception!)
You should definitely, no doubt about it, wear SPF every single day.
But if there was to be only one exception in the entire world, it would be your wedding day.
“Wearing a foundation without an SPF or no more than SPF 15 is so important to prevent flashback”, says Zara.
“Make sure your moisturiser [or anything else you put on your skin] doesn’t have one too.”
These are the makeup tips every bride needs to know ahead of her wedding day
4. Timeless, fool-proof shades
Want to cover your face in glitter before heading down the aisle? We’ll allow it.
Feeling a bright purple lip? We’re here for it.
There’s nothing we like more than fierce bridal looks, but if you are looking to keep it a bit more classic and timeless, Zara recommends ‘bronze, champagne, rose gold and soft grey tones’ saying all are “perfect timeless shades that complement many skin tones”.
Even if you don’t think you’re going to cry, it’s best to play it safe with waterproof.
If you have a favourite non-waterproof mascara you can bare to part with, Zara shares this trick:
“What we love doing at Bobbi Brown is using our best-selling mascara, Smokey Eye Mascara, to create perfect lashes and then apply a generous coating of our No Smudge Mascara as a ‘rain coat’ to stop mascara smudging.”
Waterproof mascaras you can swim, cry and sweat in
6. Take care with your eyeliner
Eyeliner can be the Achilles heel of wedding day makeup, especially if you’re dealing with a nervous, shaky hand.
Zara says to keep it classy and safe by smudging.
“I love doing a classic thin wedge liner on my brides and softly smudging the liner out with a similarly toned eyeshadow to create a soft, smokey liner.”
“This really softens the look, even on the boldest liners.”
The best liquid eyeliners to get that perfect line every time
7. Nail the bridal ‘glow’
If you’re really after that ‘lit from within’ glow, start your look with an illuminating primer.
“This will give you a subtle glow that makes the skin look healthy, awake and hydrated”, says Zara, who recommends Illuminating Moisture Balm, £44.50.
When applying blusher, “smile your biggest smile and sweep the blusher on the apples of the cheek, blending the excess towards the ears.”
And if you’re a real glow-getter bride, “add a pop of highlighter on all the high points of your face; cheekbone, tip and bridge of the nose and cupid’s bow.”
Not sure which highlighter to go for? Here are our favourites:
Check out our bridal beauty timeline and our cult wedding beauty products for more inspiration.
0 notes
Text
Nail art: How to get it right
New Post has been published on https://latestnews2018.com/nail-art-how-to-get-it-right/
Nail art: How to get it right
Glitter, rhinestones and beads, the new hand art that’s got everyone hooked, is a 90s reboot
For many of us, the lasting appeal of nail art is that we can express our tastes (no matter how wild or subdued) without the aesthetic confines of hair and make-up. It is a mini act of self-presentation.
“There’s specificity in how we choose to do our nails,” said Miss Pop, the artist who created these four looks. “Those choices are joyful.”
And now, the canvas is growing. The newest nail art, largely inspired by the giddiness of the 1990s, spills onto the fingers and hands. Glitter, rhinestones and beads make up most of the designs.
“This is a ‘90s reboot,” Miss Pop said. “It’s an evolution of that excessive aesthetic we’re seeing all over fashion and beauty.” And as anyone who has ever bedazzled a denim jacket knows, rhinestones create big visual impact but are surprisingly easy to wield.
“People find it very challenging to paint designs on nails,” she said. “But putting down some eyelash glue and sticking on a rhinestone? It’s so easy.”
Summer with its non-stop events — weddings, beach days, outdoor festivals — is the best season to introduce the nail-art-is-hand-art look. But before you get started, Miss Pop has a few general rules.
— Your hands should be oil free before applying hand art. Your work will last longer if your canvas is not moist.
— Be conservative with glue. If you apply too much, it will squeeze out at the sides when you top it with a bead. And it will not dry clear.
— When considering designs, think about how your hand art can complement your nails. But don’t worry about overdoing it. “This is about being extra,” Miss Pop said. “No matter where you are, it’s a conversation starter.”
Double rainbow
According to Miss Pop, this cheerful crystal design is an evolution of the bejewelled make-up and hairstyles seen recently on celebrities. She said she loves the jewels that Janelle Monáe has been wearing in her hair, done by her hairstylist Nikki Nelms.
To recreate this scattered pattern, mix about four crystal colours (any more than that will not look cohesive). Miss Pop used both baguettes and round shapes, which you can find at a bead and trim store or order online. “I used fancier glass ones here, but plastic is more bang for your buck and will still look good,” she said.
To apply, dot tiny beads of clear Duo Eyelash Adhesive ($9; Dh33) on your hand. Pick up each rhinestone with a wax pencil and press gently onto the glue, which takes five minutes to dry. Stagger the end points of each rhinestone trail. “The scattered pattern is so forgiving,” Miss Pop said. “When you start losing your rhinestones, no one will notice.”
On the nails, Miss Pop used a thin striper brush to paint each colour of the rainbow and filled in the other half of the nail with white polish. The horizontal coloured lines are the most difficult part of this manicure. “If the stripes are too hard, there’s no reason you can’t do some version of it, painting each nail a different colour or applying colour on just the tips of the nails,” she said.
Cut-out shapes
If you can use a felt-tipped liquid eyeliner, you can do this hand art, Miss Pop said. The main idea here is to repeat the shape on the nail on the hand. To get an even rectangle cut-out, use a striper brush to paint a thick horizontal line a third down the nail. Divide that line into thirds, with two vertical lines that end at the tip. Cross those two vertical lines with a second horizontal line slightly above the tip of the nail.
Polish around the rectangle created at the centre. With a liquid eyeliner pen, draw a rectangle starting at the cuticle. “The waterproof liner will survive several hand washes,” Miss Pop said.
Glitter dip
Ombre glittered hands are the easiest and longest lasting of all. “It looks like it would come right off, but it isn’t going anywhere unless you really want it to,” Miss Pop said. This very fine glitter sets durably with spirit gum adhesive. Paint your nails first. Miss Pop paired baby blue (“a classic ‘90s colour”) and soft yellow with holographic silver glitter.
“You have to use cosmetic grade glitter,” she said. “If it’s safe for your eyes and lips, it’s safe for your hands.” Brush a thin layer of spirit gum all around the finger. Make sure you get the pads right underneath the nails.
Then, using a flat brush, press the glitter onto the glue. To get the ombre effect, add a second layer of glitter tighter around the cuticle and fingertip, then brush the excess up the finger.
To remove the glitter without ruining your polish, wrap your fingers in cotton soaked in spirit gum remover for a few minutes, then rub off.
Bespoke beads
A mix of the Costume Institute’s “Heavenly Bodies” exhibition and a trip Miss Pop recently took to Versailles informed this ornate design. She applied each bead individually, which she acknowledges is a time-consuming and delicate task, particularly for a nail art novice.
The best DIY option is to buy beads in ready-made clusters, then create your own design with those. “Then this becomes fairly easy,” she said.
Plan your pattern on paper before placing the beads on your nails or hands. For the nails, use a combination base and topcoat specifically designed for rhinestones and beads, like China Glaze for Rhinestones Only, ($7). Place the beads right into the base coat. If you make a mistake in placement, the beads move around easily in the rhinestone polish. Polish over the design with the same clear polish.
On the hands, apply the beads with eyelash glue. To get the design creativity flowing, Miss Pop suggests looking to jewellery designs for inspiration.
0 notes
Text
Tips for Brides and Grooms to prepare for your Wedding Day
Preparing for a wedding is both stressful and exciting for brides and grooms as they work to finalize every last detail. From choosing and booking vendors to finding the perfect floral arrangements and menu lineup, there is a lot to cross off the checklist – not to mention the personal prep that goes into looking fabulous on the big day. You might think that personal prep mostly pertains to the bride, but grooms want to look and feel great too! So what can our newly engaged couples do to ensure they are ready for their day?
The dress and the dress code
{Source}
Bride: The path to finding the perfect dress can be very different from bride to bride. Whether it be wearing your mother’s gown, finding something casual at a thrift shop, or purchasing a designer dress while popping champagne, what’s most important is finding a dress that you will feel comfortable and beautiful in. A great place to start is selecting silhouettes and styles that you like beforehand and pulling some dresses from Pinterest that capture your eye!
Groom: The groom’s outfit typically centers around the bride’s dress and the color scheme of the entire wedding. Starting with the flowers is a great way to play with colors and get an idea of what vibe you’re looking for. From there, you have to figure out the details. Vest or no vest? Bowtie, pocket square, jacket, suspenders? If you’re struggling to find inspiration, check out real weddings to see what others have done to find details that you like and don’t like!
Personal health and fitness
Bride and Groom: Maintaining good health is always important, but if it’s something that you’ve been putting off, now is the time to pay special attention to your body as you embark on the next stage in your life. Get all of your yearly appointments out of the way and encourage your partner to do the same. At the same time, exercise regularly to help take care of your body, achieve fitness goals, combat stress, get the look you want for your big day and feel good about yourself. (Couples workouts are also a really fun way to sync up with your partner and squeeze some bonding time into your busy schedules!)
Hair plans
{Source}
Bride: Brides usually are working with a bit more hair than their grooms and might be looking for an intricate hairstyle. No matter what you choose, make sure you have a couple of practice runs in advance to see if it’s something you actually like and to give your hairdresser a chance to figure out how to complete the look that you want. The same can also go for your makeup, depending on how much you plan to wear and if you’re planning to have it done by an artist or do it yourself!
Groom: For some grooms, they don’t care a ton about their hairstyle. For others, they’re quite attached to their full head of hair. Either way, you’re probably going to want to make sure your hair is looking at its best, so you feel confident at your wedding and are ready to be photographed. Think proactively to prevent any balding or thinning by taking the right vitamins or even using hair loss shampoo. If you’re unsure if balding or thinning is in your future, check out this article to learn three signs of hair loss.
Last minute touch-ups
{Source}
Bride: As your wedding day gets closer, double check times, locations and details with your wedding party, family and vendors to make sure everyone is on the same page. Schedule any last-minute appointments you might need to get your hair trimmed, a quick tan, etc, and give yourself enough time to unwind and relax right before the big day.
Groom: Although most fittings will probably already be out of the way, make sure your wedding day outfit fits perfectly and get any alterations done that are needed (make sure all of your groomsmen do the same!). Figure out any person prep you’ll need to do, from a quick haircut to shaving the beard, and make sure you’re ready to look your best at the end of the aisle.
Keeping track of what you have to do in prep for your wedding can seem like a lot, but in the end, it will help guide the process and leave you feeling confident that everything is ready for saying “I do.” For any questions that pop up along the way, keep checking back with the FiftyFlowers blog for inspiration, DIY tips and more!!
Tips for Brides and Grooms to prepare for your Wedding Day published first on their blog to my feed
0 notes
Text
Top 10 Skin Care Tips For 2012 - Part 4
http://dermafiantiaging.net/
During teenage years, epidermis sometimes exfoliates every fourteen days. Your skin wants this natural exfoliation process to keep your skin looking young and radiant. However, if irrespective of how reduction of blood flow and oxygenation; your skin will become dry and dead.
Use diy skin care products that consist of ingredient like Extrapone Nutgrass and CynergyTK. Extrapone Nutgrass is known to reduce the melanin pigmentation and will be effective in clearing skin age regions. Cynergy TK is very effective maintaining skin cells healthy by replenishing the lost minerals and nutrients to skin treatment. It also helps in quicker re-growth of skin cells.
New acne-fighting gadgets will be on the market, claim that they can quickly and effectively eliminate acne within hours. While these devices have proven to treat acne, at substantially more than $100 each, they are overpriced and unnecessary. Especially is this the case when you find out that these machines work simply by directing intense heat in the offending chip.
Dry lips can be treated by spreading a thin layer of honey in it. Honey is very useful when it appears about healing dry, irritated skin. Could possibly apply honey on your face, especially during winter, when your skin is damaged by the cold ep. These beauty tips and tricks are great because will not need put all of the chemicals from commercial face creams and lotions on your skin.
Protect the hands and skin with gloves and a towel. Be thing in that step can be always to evenly distribute the colors. To do so, start originating from a back among the head and complete in forward. This way, you may have more control on essentially the most important part of your head. Reapply the product on forgotten areas when necessary.
Beauty is without a doubt general. Elegance is certainly from the eyesight globe beholder! Splendor can make sure naturally, several though noticing family. Keep the eyes open for potential splendor where you go. Attractiveness excellent and heartwarming, and a essential role of a fulfilling functional life.
Taking good care of your skin should the simple if you're treating it right. Most skin care tips could be seen as your the mother. Eat right, get enough sleep, drink enough fluid.
When picking a look for any makeup and hair, searching for wedding makeovers inside your web browser. Have in mind what your dress looks most notably. If you have a photo of the dress; have that in front of anyone. This totally helps giving you a visible of the complete look. Save any photos of the makeup and/or hairstyles find for deciding later on for your final look.
0 notes
Text
Wedding Hairstyles For Thin Hair
Wedding Hairstyles For Thin Hair
The wedding hairstyles for thin hair requires special requirement to add volume in thin hair. The fullness trick makes their thin hair look nice.
Bride with thin hair can have perfect wedding hairstyles. The best style for considering brides with wedding hairstyles for thin hair is keeping simple wedding hairstyle but still elegant.
The fine and thin hair is great to put up hair. Incorporate…
View On WordPress
#bengali bridal hairstyle for thin hair#cute thin wedding hairstyle#cute wedding hairstyles for thin hair#diy wedding hairstyles for thin hair#hairstyles for thin hair for indian wedding#simple wedding hairstyle for thin hair#simple wedding hairstyles for thin hair#thin hairstyle for wedding
0 notes
Last Seen Blogs

zombiepigeon
☢️ zombie ☢️

safeefragrance
Safee Fragrance

imitationdrow
i cant believe its another sideblog

coolcanva
Coolcanva