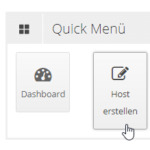
#dyndns
Explore tagged Tumblr posts
Visit Tumblr Blog
Explore Tumblr blogs with no restrictions, modern design and the best experience.
Last Seen Tumblr Blogs


Fun Fact
The “We are the 99%” Tumblr blog became the slogan for the Occupy Wall Street movement.
Link
0 notes
Text
Bitaxe Gamma: Datenzugriff von überall – ein Leitfaden

In diesem ausführlichen Beitrag zeige ich dir, wie du die Weboberfläche AxeOS deines Bitaxe Gamma von überall aus – egal, wo du dich befindest – erreichen kannst, solange du Zugang zum Internet hast. Alles, was du dazu brauchst, ist ein kostenloser DynDNS-Account und eine Portfreigabe in deinem Router. Keine Sorge, es klingt komplizierter, als es tatsächlich ist. Lies weiter und erfahre, wie du das in wenigen einfachen Schritten einrichtest. https://youtu.be/GI-bxnaSgno Disclaimer: Für diese Anleitung verwende ich die Fritz!Box 7590 mit dem aktuellen Fritz!OS 8.00 sowie den kostenfreien DynDNS-Service von no-ip.com. Es gibt natürlich auch viele andere kostenfreie DynDNS-Dienste, die ebenfalls geeignet sind. Ich habe mich jedoch für no-ip entschieden, da der Service einfach einzurichten ist und sich daher ideal für diesen Beitrag eignet. Bitte beachte, dass die Schritte bei anderen Routern oder DynDNS-Anbietern leicht abweichen können. Hinweis: Alle Daten, die in diesem Beitrag und im dazugehörigen YouTube-Video gezeigt werden, wie z. B. IP-Adressen, DynDNS-Einstellungen oder Portfreigaben, werden nach Fertigstellung des Beitrags vollständig gelöscht oder geändert. Dies dient der Sicherheit meines persönlichen Netzwerks. Ich empfehle dir ebenfalls, keine sensiblen Daten öffentlich zu teilen – insbesondere, weil AxeOS auf dem Bitaxe derzeit keine Benutzerauthentifizierung bietet. Um dein Netzwerk zu schützen, solltest du stets vorsichtig mit der Veröffentlichung solcher Informationen umgehen und zusätzliche Sicherheitsmaßnahmen wie VPNs in Betracht ziehen.
Einrichten eines Accounts bei no-ip.com
Im ersten Schritt legen wir uns einen Account bei no-ip.com ein. Wir haben hier die Möglichkeit über die Eingabe von Benutzername & Passwort oder wir wählen den einfachen Weg über ein vorhandenen Google Account. In meinem Fall nutze ich mein Google Account, da ich mir hier kein zusätzliches Passwort merken muss.
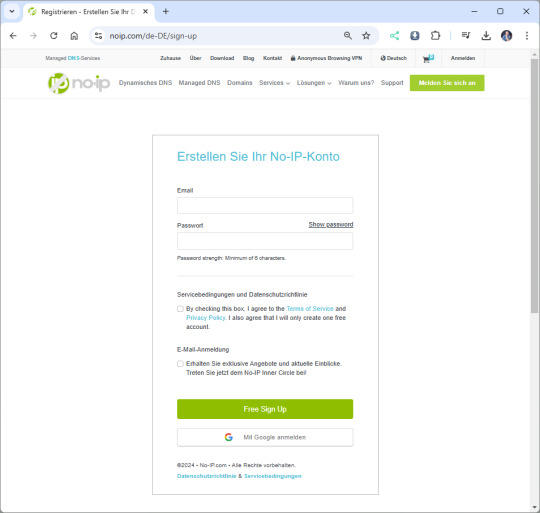
Anmelden / Registrieren an no-ip.com
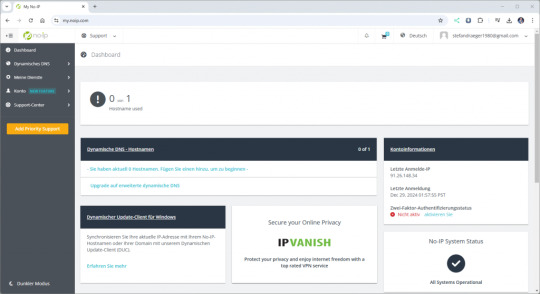
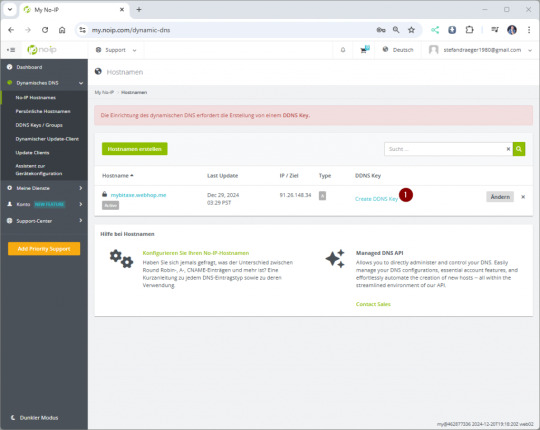
Dashboard von no-ip.com Wenn wir erfolgreich angemeldet wurden, dann sehen wir zunächst ein leeres Dashboard. Im nächsten Schritt erstellen wir uns eine Subdomain, von welcher wir später aus unser AxeOS aufrufen möchten.
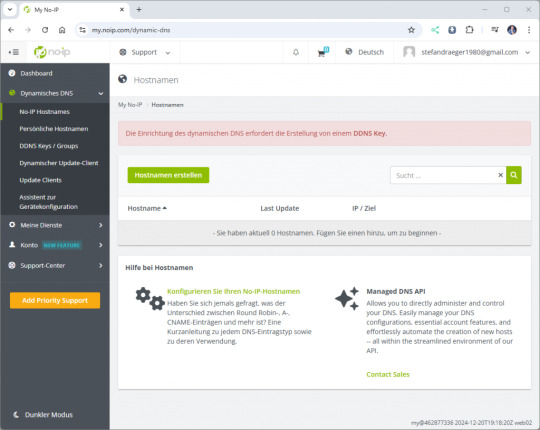
Erstellen einer Subdomain
Klicken wir im Dashboard zunächst auf "Hostname used", um anschließend einen Host einzurichten. Die angezeigte Meldung können wir zunächst erstmal vernachlässigen, diesen DDNSKey erstellen wir in einem späteren Schritt, da wir diesen für die Authentifizierung benötigen.
Einrichten einer Subdomain / eines Hosts
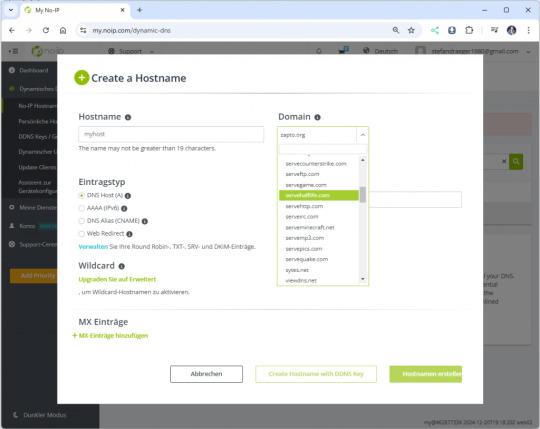
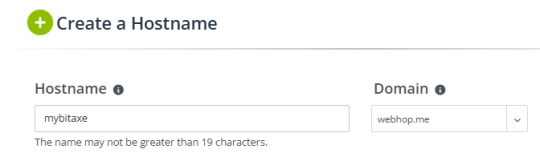
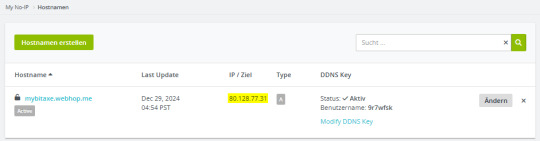
Konfiguration des neuen Hosts Wenn auf die Schaltfläche "Hostnamen erstellen" klicken, dann öffnet sich ein Dialog, in welchem wir diesen neuen Host konfigurieren können. Hostname: der Name der Subdomain Domain: die Adresse des Host IPv4Adresse: erkannte IP-Adresse des Clients (wird später aktualisiert) Die spätere Adresse des Bitaxe setzt sich aus dem Hostname sowie der Domain zusammen, in meinem Fall mybitaxe.webhop.me.
Aufbau der Adresse für das Gerät Wenn der Host erfolgreich angelegt wurde, dann wird dieser aufgeführt und man sieht zunächst die folgenden Daten: - Hostname - die Adresse des Gerätes - Last Update - letzte Aktualisierung der IP-Adresse - IP / Ziel - aktuell gesetzte IP-Adresse - DDNS Key - ein Link zum Erstellen eines DDNS Keys zur Authentifizierung

Konfiguration des neuen Hosts in no-ip.com
DDNS Key für die Authentifizierung anlegen
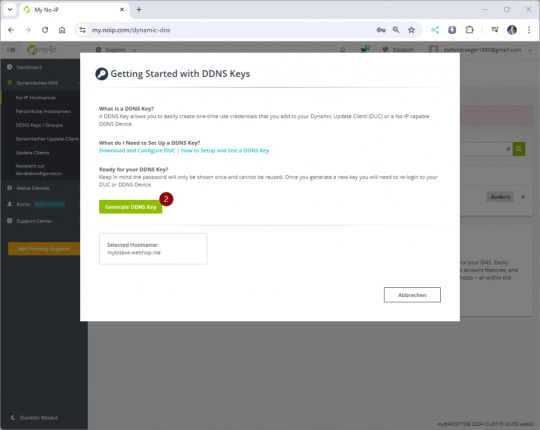
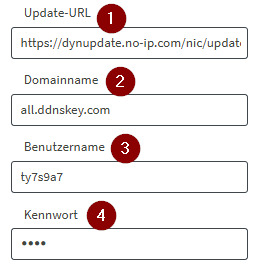
Wenn du auf den Link „Create DDNS Key“ (1) klickst, öffnet sich ein Dialogfenster. Dort kannst du mit einem weiteren Klick auf „Generate DDNS Key“ (2) deinen Schlüssel erstellen. Anschließend werden dir die benötigten Zugangsdaten angezeigt, die wir später in der Fritz!Box eintragen werden. Notiere dir unbedingt den Benutzernamen (3) und das Passwort (4) oder speichere diese in einer Textdatei. Beachte, dass das Passwort nach dem Schließen des Dialogs nicht erneut angezeigt wird!

Einrichten von DynDNS auf der Fritz!Box für den Bitaxe Gamma
Jeder Router erhält spätestens nach 24h eine neue IP-Adresse vom Provider. Über DynDNS können wir über einen selbst definierten Hostname auf den Bitaxe zugreifen und somit sind wir unabhängig von der IP-Adresse des Routers. Ermitteln der IP-Adresse des Bitaxe Gamma Damit wir auf die Weboberfläche AxeOS des Bitaxe zugreifen können, müssen wir die IP-Adresse sowie den Port freigeben. Die IP-Adresse kann man entweder aus dem Display des Bitaxe ablesen oder auch aus der Fritz!Box herausfinden.

Für die Ermittlung über die Fritz!Box navigieren wir über Heimnetz > Netzwerk und scrollen in der Tabelle zum Gerät.

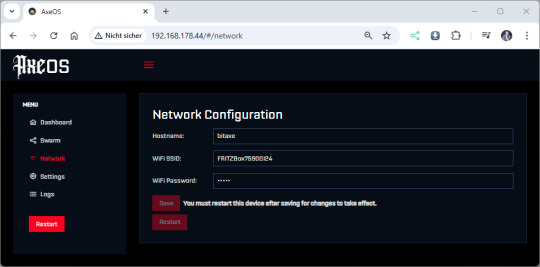
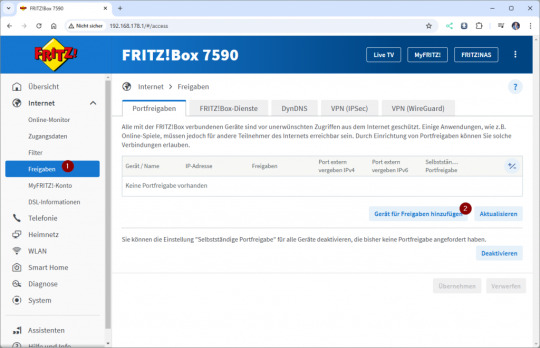
Den Gerätenamen wiederum können wir über AxeOS ermitteln. Einrichten einer Portfreigabe in der Fritz!Box Das Webfrontent AxeOS arbeitet über den "normalen" HTTP Port 80, daher können wir dieses recht einfach über die Adresse http:// aufrufen. Für die Portfreigabe navigieren wir in der Fritz!Box über Internet → Freigaben.

Im geöffneten Fenster klicken wir auf die Schaltfläche „Gerät für Freigaben hinzufügen“ (2) und wählen anschließend das gewünschte Gerät (3) aus. In den ausgegrauten Feldern werden dabei automatisch die IPv4- und IPv6-Adressen des Geräts angezeigt. Danach scrollen wir nach unten und klicken auf die Schaltfläche „Neue Freigabe“, um den Port freizugeben. Als Anwendung wählen wir „HTTP-Server“ (5) aus. Dadurch werden die relevanten Felder automatisch mit dem Port 80 (6) vorbelegt. Abschließend schließen wir dieses Fenster mit einem Klick auf „OK“ (7).

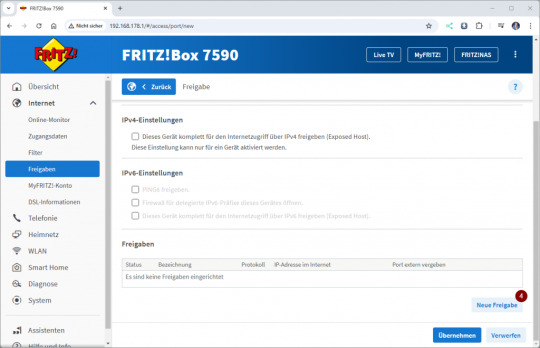

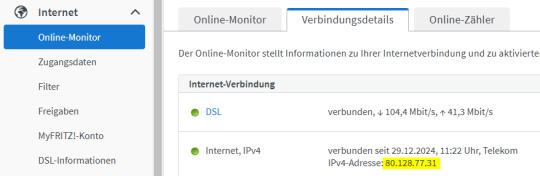
Wichtiger Sicherheitshinweis: Das Öffnen von Port 80 (HTTP) ist äußerst gefährlich, da dieser Port unverschlüsselten Datenverkehr ermöglicht und ein beliebtes Ziel für Angreifer ist. Durch eine offene Verbindung über Port 80 wird dein Gerät potenziellen Angriffen wie Brute-Force-Attacken oder Exploits ausgesetzt. Ich rate dringend davon ab, diesen Port zu verwenden, insbesondere da AxeOS auf dem Bitaxe keine Benutzerauthentifizierung bietet. Testen der Portfreigabe Wenn die Portfreigabe eingerichtet wurde, können wir diese bereits testen, dazu benötigen wir die IP-Adresse der Fritz!Box welche wir unter Internet → Online-Monitor im Reiter Verbindungsdetails.
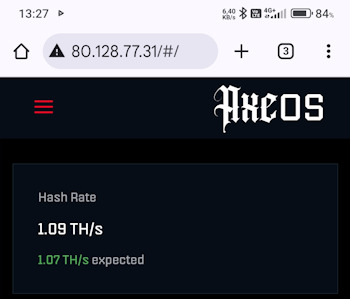
Diese IP-Adresse geben wir im Browser ein und sollten automatisch an den AxeOS vom Bitaxe weitergeleitet werden. Am einfachsten lässt sich dieses am Handy testen, indem die Verbindung zum lokalen WiFi Netzwerk getrennt wird.
Einrichten von DynDNS in der Fritz!Box
Abschließend richten wir nun DynDNS in der Fritz!Box ein, um später über diese auf den Bitaxe zugreifen zu können. Dazu benötigen wir die zuvor eingerichteten Zugangsdaten zu no-ip.com. Als Erstes navigieren wir über Internet → Freigaben zum Reiter "DynDNS". In meinem Fall werden bereits in den deaktivierten Feldern Daten angezeigt, da ich für die Vorbereitung des Beitrages das ganze ausprobiert habe.
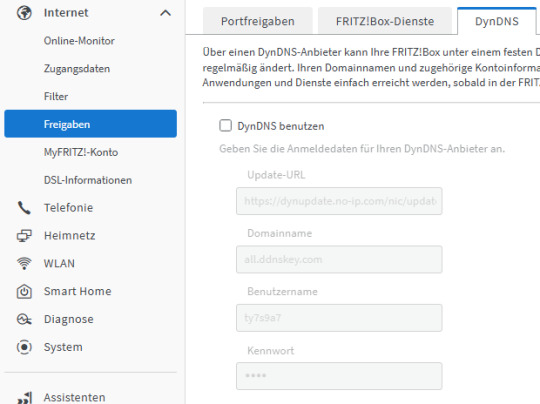
Um die Daten einzugeben, aktivieren wir die Checkbox "DynDNS benutzen" und geben die Daten wie folgt ein: - Update-URL* - Domainname > DDNS Key Hostname - Benutzername > Username vom DDNS Key - Kennwort > Passwort vom DDNS Key
*Die Update-URL lautet wie folgt: https://dynupdate.no-ip.com/nic/update?hostname=&myip=, Diese enthält die Platzhalter für Domain und IP-Adresse, welche automatisch von der Fritz!Box ergänzt werden! Über die Schaltfläche "Übernehmen" werden die Daten gespeichert und eine Verbindung aufgebaut. Du solltest jetzt im Menü "Hostname" bei no-ip.com die aktualisierte IP-Adresse deiner Fritz!Box finden.
Testen der Freigabe des Bitaxe über DynDNS
Wenn alle Schritte ausgeführt wurden, dann solltest du jetzt über die Adresse auf deinem Handy auf dein AxeOS zugreifen können.

Zugriff auf AxeOS via Freigabe über DynDNS
Troubleshooting
Logging in der Fritz!Box Sollte die IP-Adresse nicht automatisch aktualisiert werden, so kann man in das Log der Fritz!Box schauen, welches unter System → Ereignisse zu finden ist.

Read the full article
0 notes
Note
Aki igazán bátor, az az utcán se lát reklámokat, mert nem csak pihole van otthon, de a telefonjára rak LineageOS-t, megrootolja Magisk-al, rak rá AdAway-t, vesz saját router-t, rak rá openwrt-t, felrakja a WireGuard modult, rak a telefonjára is WireGuard-ot, csinál dynDNS-t, rak a telefonjára Tasker-t és leprogramozza, hogy ha a telefon nincs az otthoni wifin, akkor azonnal csatlakozik a WireGuard-ra és minden forgalmat oda irányít, tehát az AdAway mellett a pihole is védi.
Mármint elvileg, én természetesen senki ilyet nem ismerek.

31 notes
·
View notes
Link
#DNSconfiguration#DNSmanagement#DNSrequest#DNSsettings#DNStroubleshooting#domainmapping#dynamicIP#emailserver#IPaddress#PTRrecord#PTRupdate#reverseDNS#reverseDNSlookup#reverselookup#SMTPrelay#staticIP#Tier2support#Tier3support#Verizon#Verizonbusinessaccount#Verizonbusinesssupport#VerizonFios#Verizonnetwork#Verizonsupport#Verizontechnicalsupport
0 notes
Photo
TP-Link Archer AX20 AX1800 Dual Band Wifi 6 Router FEATURES: Dual-Band Wi-Fi 6: Equipped with the latest wireless technology, Wi-Fi 6, for faster speeds, greater capacity, and reduced network congestion Next-Gen 1.8Gbps Speeds: Enjoy smooth streaming, downloading, and gaming all without buffering with Wi-Fi speeds of 1.8Gbps Connect More Devices: Wi-Fi 6 technology communicates more data to more devices using revolutionary OFDMA technology while simultaneously reducing lag Quad-Core Processing: The 1.5GHz quad-core CPU ensures communications between your router and all connected devices are smooth Extensive Coverage: Beamforming, independent FEM, and four antennas combine to deliver focused reception to devices far away Increased Battery Life: Target Wake Time technology reduces your devices’ power consumption to extend their battery life USB Easy Sharing: A USB 2.0 Port enables easy file sharing within your network or building private Cloud Storage Easy Setup: Set up your router in minutes with the powerful TP-Link Tether App Backward Compatible: Supports all previous 802.11 standards and all Wi-Fi devices WIRELESS Standards Wi-Fi 6 IEEE 802.11ax/ac/n/a 5 GHz IEEE 802.11ax/n/b/g 2.4 GHz WiFi Speeds AX1800 5 GHz: 1201 Mbps (802.11ax) 2.4 GHz: 574 Mbps (802.11ax) WiFi Range 3 Bedroom Houses 4× Fixed High-Performance Antennas Multiple antennas form a signal-boosting array to cover more directions and large areas Beamforming Concentrates wireless signal strength towards clients to expand WiFi range High-Power FEM Improves transmission power to strengthen signal coverage WiFi Capacity High Dual-Band Allocate devices to different bands for optimal performance OFDMA Simultaneously communicates with multiple Wi-Fi 6 clients Airtime Fairness Improves network efficiency by limiting excessive occupation 4 Streams Connect your devices to more bandwidth Working Modes Router Mode Access Point Mode HARDWARE Processor 1.5 GHz Quad-Core CPU Ethernet Ports 1× Gigabit WAN Port 4× Gigabit LAN Ports USB Support 1× USB 2.0 Port Supported Partition Formats: NTFS, exFAT, HFS+, FAT32 Supported Functions: Apple Time Machine FTP Server Media Server Samba Server Buttons WPS/Wi-Fi Button Power On/Off Button LED On/Off Button Reset Button Power 12 V ⎓ 1.5 A SECURITY WiFi Encryption WPA WPA2 WPA3 WPA/WPA2-Enterprise (802.1x) Network Security SPI Firewall Access Control IP & MAC Binding Application Layer Gateway Guest Network 1× 5 GHz Guest Network 1× 2.4 GHz Guest Network VPN Server OpenVPN PPTP SOFTWARE Protocols IPv4 IPv6 Parental Controls URL Filtering Time Controls WAN Types Dynamic IP Static IP PPPoE PPTP L2TP Quality of Service QoS by Device Cloud Service Auto Firmware Upgrade OTA Firmware Upgrade TP-Link ID DDNS NAT Forwarding Port Forwarding Port Triggering DMZ UPnP IPTV IGMP Proxy IGMP Snooping Bridge Tag VLAN DHCP Address Reservation DHCP Client List Server DDNS TP-Link NO-IP DynDNS Management Tether App Webpage PHYSICAL Dimensions (W×D×H) 10.2 × 5.3 ×1.5 in (260.2 × 135.0 × 38.6 mm) Package Contents Wi-Fi Router Archer AX20 Power Adapter RJ45 Ethernet Cable Quick Installation Guide OTHER System Requirements Internet Explorer 11+, Firefox 12.0+, Chrome 20.0+, Safari 4.0+, or other JavaScript-enabled browser Cable or DSL Modem (if needed) Subscription with an internet service provider (for internet access) Certifications FCC, CE, RoHS Environment Operating Temperature: 0℃~40℃ (32℉ ~104℉) Storage Temperature: -40℃~70℃ (-40℉ ~158℉) Operating Humidity: 10%~90% non-condensing Storage Humidity: 5%~90% non-condensing TEST DATA WiFi Transmission Power CE:
0 notes
Text
Easy Remote Network Management with Mysk2 Dyndns Org
It automatically updates DNS records, making it a popular choice for applications like home security camera access, remote server management, and gaming.
For More Read Us: https://myscoopnews.com/mysk2-dyndns-org/
0 notes
Text
how to acess vpn server throug dyndns
🔒🌍✨ Ganhe 3 Meses de VPN GRÁTIS - Acesso à Internet Seguro e Privado em Todo o Mundo! Clique Aqui ✨🌍🔒
how to acess vpn server throug dyndns
Configuração VPN através do DynDNS
Uma das formas mais seguras de proteger a sua conexão de internet é configurar uma VPN (Rede Virtual Privada). Esta tecnologia permite criar uma rede privada virtual através de uma conexão pública, garantindo assim a confidencialidade dos seus dados e a sua segurança online.
Uma forma de configurar uma VPN de forma prática e acessível é através do DynDNS. O DynDNS é um serviço que permite atribuir um endereço de IP estático a um endereço de internet comum, tornando possível aceder remotamente a dispositivos ligados à mesma rede, como é o caso de um servidor VPN.
Para configurar uma VPN através do DynDNS, primeiro deve escolher um fornecedor de serviços VPN e seguir as instruções para configurar a rede privada virtual no seu dispositivo. Em seguida, deverá aceder à sua conta DynDNS e configurar um nome de domínio personalizado que apontará para o endereço IP do seu dispositivo VPN.
Após completar esta configuração, poderá aceder de forma segura à sua VPN através do endereço personalizado fornecido pelo DynDNS, sem a necessidade de se preocupar com alterações no seu endereço de IP dinâmico.
Configurar uma VPN através do DynDNS é uma forma simples e eficaz de garantir a privacidade dos seus dados e a segurança da sua conexão à internet, tornando a sua experiência online mais protegida e tranquila.
Acesso seguro ao servidor VPN com DynDNS
Uma das maneiras mais eficazes de garantir um acesso seguro ao servidor VPN é através da configuração do serviço DynDNS. O DynDNS, abreviação de Dynamic Domain Name System, é um serviço que permite atribuir um nome de domínio fácil de lembrar a um endereço IP dinâmico, ou seja, um endereço IP que pode mudar periodicamente.
Para utilizar o DynDNS com seu servidor VPN, você precisará primeiro se inscrever em um provedor de serviços DynDNS e configurar seu roteador ou servidor VPN para atualizar automaticamente o nome de domínio associado ao seu endereço IP dinâmico. Isso garantirá que, mesmo que seu endereço IP mude, você possa acessar seu servidor VPN digitando o nome de domínio fornecido pelo serviço DynDNS.
Essa configuração é especialmente útil para usuários que não possuem um endereço IP fixo e precisam acessar remotamente seu servidor VPN de forma segura e conveniente. Além disso, o uso do DynDNS ajuda a preservar a privacidade e a segurança das conexões VPN, uma vez que o nome de domínio é mais fácil de lembrar e mais seguro do que tentar acessar o servidor por meio de endereços IP complicados.
Portanto, se você deseja garantir um acesso seguro e confiável ao seu servidor VPN, considere utilizar o serviço DynDNS para simplificar o processo de conexão e manter suas informações protegidas durante o uso da VPN.
Estabelecer conexão VPN via DynDNS
Estabelecer uma conexão VPN é uma excelente maneira de garantir a segurança e privacidade dos dados transmitidos pela internet. Uma forma prática de configurar uma conexão VPN é utilizando o serviço DynDNS, que permite associar um nome de domínio fixo a um endereço IP dinâmico.
Para começar, é necessário ter um servidor VPN configurado e um cliente VPN instalado no dispositivo que deseja conectar. Em seguida, é preciso cadastrar uma conta no DynDNS e escolher um nome de domínio disponível. Após isso, é necessário configurar o roteador para se conectar automaticamente ao serviço DynDNS e atualizar o nome de domínio sempre que o endereço IP público for alterado.
Com a configuração do DynDNS concluída, é possível estabelecer a conexão VPN utilizando o nome de domínio criado no serviço. Basta acessar as configurações de conexão VPN no dispositivo cliente, inserir o endereço do servidor VPN (que agora pode ser o nome de domínio criado via DynDNS) e as credenciais de acesso fornecidas.
Dessa forma, ao estabelecer uma conexão VPN via DynDNS, é possível garantir a segurança e privacidade das comunicações online, além de facilitar o acesso remoto a recursos de rede de forma prática e segura. É importante sempre manter as configurações atualizadas e realizar testes regulares para garantir o bom funcionamento da conexão VPN.
Utilizar DynDNS para acessar servidor VPN
Utilizar o DynDNS para acessar um servidor VPN pode ser uma solução prática e eficaz para quem precisa se conectar de forma segura a uma rede privada a partir de diferentes locais. O DynDNS, também conhecido como Dynamic Domain Name System, é um serviço que permite associar um nome de domínio a um endereço IP dinâmico, facilitando o acesso remoto a dispositivos, como servidores VPN.
Ao utilizar o DynDNS em conjunto com um servidor VPN, torna-se mais fácil acessar a rede privada de qualquer lugar, sem a necessidade de saber o endereço IP atual do dispositivo. Isso é especialmente útil em casos onde o endereço IP do servidor VPN é alterado frequentemente, como em conexões de internet residencial.
Para configurar o DynDNS em um servidor VPN, é necessário primeiro escolher um provedor de serviço DynDNS e criar uma conta. Em seguida, deve-se configurar o serviço no roteador ou servidor onde o servidor VPN está hospedado, seguindo as instruções do provedor.
Uma vez configurado, o DynDNS automaticamente atualizará o nome de domínio sempre que o endereço IP do servidor VPN for alterado, garantindo que o acesso remoto permaneça disponível de forma contínua e simplificada.
Em resumo, a combinação do DynDNS com um servidor VPN é uma solução prática para aqueles que necessitam de conexões seguras e estáveis a uma rede privada de forma remota, independentemente das mudanças no endereço IP do dispositivo.
Guia passo a passo para acessar VPN por meio do DynDNS
Um guia passo a passo para acessar VPN por meio do DynDNS pode ser bastante útil para quem busca aumentar a segurança e privacidade de sua conexão à internet. Seguir esses passos garantirá que você possa acessar uma rede privada virtual de forma fácil e segura, permitindo a criptografia de dados e a navegação anônima.
Passo 1: Escolha um provedor de VPN confiável que ofereça suporte ao uso do DynDNS.
Passo 2: Registre uma conta no serviço DynDNS e escolha um nome de host para associar ao seu endereço IP.
Passo 3: Configure o seu roteador para suportar VPN, geralmente por meio dos protocolos PPTP, L2TP ou OpenVPN.
Passo 4: Acesse as configurações do seu roteador e encontre a opção de VPN. Insira as informações da sua conta DynDNS, como o nome de host e senha.
Passo 5: Escolha o servidor VPN ao qual deseja se conectar e insira suas credenciais de login.
Passo 6: Conclua a configuração e teste a conexão VPN para garantir que esteja funcionando corretamente.
Ao seguir esses passos, você poderá acessar uma VPN com facilidade e segurança, garantindo assim uma navegação mais protegida e privada na internet. Lembre-se sempre de escolher um provedor confiável e de manter suas configurações atualizadas para garantir a eficácia da sua conexão VPN.
0 notes
Text
como usa ddns do cloud mikrotik na vpn mk-auth
🔒🌍✨ Ganhe 3 Meses de VPN GRÁTIS - Acesso à Internet Seguro e Privado em Todo o Mundo! Clique Aqui ✨🌍🔒
como usa ddns do cloud mikrotik na vpn mk-auth
Configuração DDNS
Dynamic Domain Name System (DDNS) é um serviço que permite atualizar automaticamente o servidor de nomes de domínio (DNS) sempre que o endereço IP do dispositivo conectado à internet muda. Essa tecnologia é muito útil para usuários e empresas que precisam acessar remotamente dispositivos, como câmeras de segurança, servidores, entre outros.
A configuração do DDNS é um processo simples que envolve a criação de uma conta em um provedor de DDNS, como No-IP, DynDNS ou DuckDNS, e a vinculação do endereço IP do dispositivo à sua conta. Este endereço será um subdomínio fornecido pelo provedor de DDNS, que será atualizado automaticamente sempre que houver uma alteração no endereço IP.
Ao configurar o DDNS, os usuários podem acessar facilmente seus dispositivos remotamente, digitando o subdomínio fornecido pelo provedor, em vez de ter que digitar o endereço IP atualizado a toda hora, o que pode ser difícil de lembrar.
Além disso, o DDNS é uma solução eficaz para contornar possíveis problemas de conexão causados pela natureza dinâmica dos endereços IP fornecidos pelos provedores de internet. Dessa forma, garantindo que os usuários possam acessar seus dispositivos remotamente de forma mais estável e confiável.
Em resumo, a configuração do DDNS é uma solução prática e eficiente para garantir o acesso remoto a dispositivos conectados à internet, facilitando a vida de usuários individuais e empresas que dependem da conexão remota para suas operações diárias.
Cloud Mikrotik
Um Cloud Mikrotik é uma solução avançada e eficiente para gerenciamento e controle de redes, especialmente voltada para empresas e provedores de internet que necessitam de uma infraestrutura robusta e confiável. Este serviço combina a potência e flexibilidade dos roteadores Mikrotik com a praticidade e escalabilidade da computação em nuvem, oferecendo uma plataforma completa para a gestão de redes.
Com o Cloud Mikrotik, é possível centralizar o gerenciamento de diversos roteadores e dispositivos em uma interface intuitiva baseada na nuvem. Isso facilita a configuração, monitoramento e manutenção de redes de grande porte, tornando o trabalho dos administradores de rede mais eficiente e simplificado.
Além disso, o Cloud Mikrotik oferece recursos avançados de segurança, como firewalls e VPNs, garantindo a proteção dos dados e a privacidade das comunicações na rede. Com a possibilidade de escalabilidade conforme a demanda, essa solução se adapta facilmente ao crescimento do negócio, permitindo a expansão da infraestrutura de forma ágil e econômica.
Em resumo, o Cloud Mikrotik é uma ferramenta poderosa e versátil para o gerenciamento de redes, proporcionando maior controle, segurança e eficiência operacional para empresas e provedores de internet. Combinando o melhor das tecnologias de roteamento e computação em nuvem, essa solução atende às necessidades mais exigentes do ambiente de redes moderno.
VPN MK-Auth
Uma VPN (Virtual Private Network) é uma ferramenta essencial para garantir a segurança e privacidade dos dados online. O MK-Auth é um sistema de gerenciamento para provedores de serviços de internet que permite controlar e organizar diversos aspectos da rede. Quando combinado com uma VPN, o MK-Auth se torna uma poderosa ferramenta para garantir a segurança das conexões dos usuários.
Ao utilizar uma VPN em conjunto com o MK-Auth, os provedores de internet podem proteger as informações sensíveis de seus clientes, como dados de login, senhas e informações de pagamento. Além disso, a VPN também permite que os usuários acessem conteúdos geograficamente restritos com facilidade, ampliando as possibilidades de navegação na internet.
A segurança proporcionada pela VPN é essencial para proteger não apenas os dados dos usuários finais, mas também a integridade da rede como um todo. Com a criptografia oferecida por uma VPN, as informações trafegadas na rede ficam protegidas de possíveis invasores e garantem a confidencialidade das comunicações.
Portanto, ao adotar o MK-Auth em conjunto com uma VPN, os provedores de serviços de internet podem garantir uma maior segurança para seus clientes, protegendo seus dados e proporcionando uma experiência online mais segura e confiável. Esta combinação de ferramentas é uma escolha inteligente para quem busca proteção e privacidade online.
Utilização de DDNS
O DDNS, ou Sistema de Nomes de Domínio Dinâmico, é uma ferramenta utilizada para facilitar o acesso a dispositivos em redes com endereços IP dinâmicos. Em redes domésticas ou de pequenas empresas, é comum que o endereço IP fornecido pelo provedor de internet mude periodicamente, dificultando a conexão remota a dispositivos como câmeras de segurança, servidores ou roteadores.
Ao configurar um serviço de DDNS, é possível associar um nome de domínio fácil de lembrar a um endereço IP dinâmico, de forma que o acesso aos dispositivos se torne mais simples e prático. Assim, em vez de memorizar números de IP complicados e em constante mudança, basta utilizar o nome de domínio configurado no serviço DDNS.
A utilização de DDNS também é fundamental para permitir o acesso remoto a dispositivos e serviços em rede de forma segura, uma vez que evita a exposição de endereços IP públicos nas configurações dos aplicativos ou dispositivos. Dessa forma, a privacidade e a segurança da rede são preservadas, garantindo que apenas usuários autorizados possam acessar os recursos disponíveis.
Em resumo, o DDNS é uma solução prática e eficiente para contornar a questão dos endereços IP dinâmicos e facilitar o acesso remoto a dispositivos em redes domésticas e empresariais. Com sua utilização adequada, é possível manter a segurança e facilitar a administração de redes, tornando a experiência do usuário mais fluida e segura.
Mikrotik na VPN
Os roteadores Mikrotik são conhecidos por oferecer uma ampla gama de recursos avançados, incluindo suporte para VPN (Virtual Private Network). A utilização de VPN em dispositivos Mikrotik é uma solução segura e eficiente para garantir a privacidade e segurança das comunicações online.
Ao configurar uma VPN em um roteador Mikrotik, os usuários podem garantir que seu tráfego de dados seja criptografado e protegido contra interceptação por terceiros. Isso é especialmente importante ao acessar redes públicas ou ao trabalhar remotamente, pois evita que dados sensíveis sejam expostos a potenciais vulnerabilidades.
Além disso, a utilização de VPN em um roteador Mikrotik permite aos usuários contornar restrições geográficas e acessar conteúdo bloqueado em determinadas regiões. Isso é útil para assistir a serviços de streaming, acessar sites censurados ou proteger a identidade online.
A configuração de uma VPN em um roteador Mikrotik pode ser feita de forma relativamente simples, seguindo as instruções do manual do dispositivo ou contando com o suporte de profissionais especializados. Com a VPN ativada, os usuários podem desfrutar de uma conexão segura e privada em todos os dispositivos conectados à rede.
Em resumo, a utilização de VPN em roteadores Mikrotik é uma excelente maneira de garantir a segurança e privacidade das comunicações online, ao mesmo tempo em que oferece a flexibilidade de acessar conteúdos restritos.
0 notes
Text
como configurar ddns na vpn
🔒🌍✨ Ganhe 3 Meses de VPN GRÁTIS - Acesso à Internet Seguro e Privado em Todo o Mundo! Clique Aqui ✨🌍🔒
como configurar ddns na vpn
Configuração de DDNS
O Dynamic Domain Name System (DDNS) é uma ferramenta essencial para garantir o acesso remoto a dispositivos conectados à internet, como câmeras de segurança, servidores e roteadores. A configuração de um DDNS permite que você acesse esses dispositivos de qualquer lugar, sem a necessidade de saber o endereço IP atribuído pelo seu provedor de internet, que pode ser alterado periodicamente.
Para configurar um DDNS, você precisa primeiro escolher um serviço de DDNS confiável, como No-IP, DynDNS ou Duck DNS. Em seguida, você precisará criar uma conta nesse serviço e escolher um nome de host único que será associado ao seu endereço IP atual.
Depois de criar a conta e o nome de host, você precisará configurar o seu roteador para se conectar ao serviço de DDNS. A maioria dos roteadores possui uma seção dedicada nas configurações onde você pode inserir as informações da sua conta de DDNS e nome de host.
Após concluir a configuração, o seu roteador irá periodicamente atualizar as informações de IP do seu nome de host no serviço de DDNS, garantindo que você sempre possa se conectar aos seus dispositivos remotamente, mesmo que o seu endereço IP mude.
Em resumo, a configuração de um DDNS é uma maneira simples e eficaz de garantir o acesso remoto aos seus dispositivos conectados à internet, proporcionando maior conveniência e praticidade no seu dia a dia.
VPN
Uma VPN, ou Rede Privada Virtual, é uma ferramenta crucial para manter a privacidade e a segurança online. Com o crescimento da internet e o aumento das ameaças cibernéticas, a utilização de uma VPN tornou-se essencial para proteger os dados pessoais dos utilizadores.
Uma VPN funciona criptografando a conexão de internet do utilizador, proporcionando assim anonimato e impedindo que terceiros, como hackers ou agências governamentais, tenham acesso às suas informações confidenciais. Além disso, ao usar uma VPN, o endereço IP do utilizador é ocultado, o que impede que sites ou anunciantes rastreiem as suas atividades online.
Para além da segurança, as VPNs também permitem contornar restrições geográficas, possibilitando o acesso a conteúdos bloqueados em determinadas regiões. Esta funcionalidade é particularmente útil para quem gosta de consumir conteúdo de streaming, como filmes e séries, que podem não estar disponíveis em todos os países.
No entanto, é importante escolher uma VPN confiável e respeitável, uma vez que nem todas as VPNs oferecem o mesmo nível de proteção e privacidade. É aconselhável pesquisar e comparar diferentes serviços antes de fazer uma escolha.
Em resumo, uma VPN é uma ferramenta essencial para garantir a segurança e a privacidade online, permitindo aos utilizadores navegar na internet de forma segura e anónima. Se valoriza a sua privacidade e quer proteger os seus dados pessoais, considerar o uso de uma VPN é uma decisão inteligente.
Como configurar DDNS
O DDNS, ou Dynamic Domain Name System, é uma ferramenta essencial para usuários que desejam acessar dispositivos em suas redes locais de forma remota, como câmeras de segurança, servidores ou roteadores. Neste artigo, vamos abordar o passo a passo de como configurar o DDNS em seu roteador para facilitar o acesso externo aos seus dispositivos.
Passo 1: Acesse o painel de administração do seu roteador digitando o endereço IP padrão (geralmente 192.168.1.1) em seu navegador.
Passo 2: Faça login no painel de administração inserindo o nome de usuário e senha corretos.
Passo 3: Encontre a seção de configuração do DDNS no menu do roteador. Geralmente está localizada em uma seção de Configurações Avançadas ou Rede.
Passo 4: Selecione o serviço de DDNS de sua preferência (como No-IP, DynDNS ou No-IP) e crie uma conta se ainda não tiver uma.
Passo 5: Insira as informações da sua conta de DDNS no painel de configuração do roteador, como nome de usuário, senha e domínio personalizado.
Passo 6: Salve as configurações e verifique se o status do DDNS no painel do roteador está ativo.
Com o DDNS configurado corretamente, você poderá acessar seus dispositivos remotamente digitando o domínio personalizado fornecido pelo serviço DDNS em seu navegador. Certifique-se de manter as informações de conta do DDNS atualizadas para garantir o funcionamento contínuo do serviço.
Serviço DDNS
O Serviço DDNS, ou Serviço de Sistema de Nomes de Domínio Dinâmico, é uma ferramenta essencial para pessoas e empresas que desejam acessar dispositivos remotos, como câmeras de segurança, servidores ou roteadores, de forma prática e segura.
Quando um dispositivo se conecta à internet, ele recebe um endereço IP único. No entanto, os endereços IP dinâmicos podem mudar periodicamente, dificultando o acesso remoto. É aí que entra o DDNS. Este serviço permite associar um nome de domínio fácil de lembrar a um endereço IP em constante atualização, garantindo assim que você possa acessar seus dispositivos de qualquer lugar a qualquer momento.
Existem várias empresas que oferecem o serviço de DDNS gratuitamente ou por uma pequena taxa. Para começar a usar, basta registrar uma conta, escolher um nome de domínio disponível e configurar seu roteador ou dispositivo para se comunicar com o serviço DDNS. A partir daí, você poderá acessar seus dispositivos remotamente digitando o nome de domínio personalizado no navegador ou aplicativo designado.
Além de facilitar o acesso remoto, o Serviço DDNS também aumenta a segurança, uma vez que você não precisa divulgar o endereço IP real de seus dispositivos, evitando assim possíveis tentativas de invasão. Em resumo, o DDNS é uma ferramenta fundamental para quem precisa acessar dispositivos remotos de forma simples, prática e segura.
Configuração de VPN
Uma VPN, ou Virtual Private Network, é uma tecnologia que permite criar uma rede privada virtual usando uma rede pública, como a internet. É uma maneira segura de conectar dois dispositivos remotamente, garantindo que os dados transmitidos entre eles sejam criptografados e protegidos contra acessos não autorizados.
Para configurar uma VPN, geralmente é necessário seguir alguns passos simples. Primeiramente, é preciso escolher um provedor de VPN confiável e se inscrever em seus serviços. Em seguida, é necessário baixar e instalar o software da VPN em seu dispositivo, seja um computador, celular ou tablet.
Após instalar o software, você precisará configurar a conexão VPN. Isso geralmente envolve inserir as credenciais fornecidas pelo provedor de VPN, como nome de usuário e senha, e escolher o servidor ao qual deseja se conectar. Alguns provedores também oferecem a opção de configurar uma conexão VPN manualmente, o que pode ser útil em certas situações.
Uma vez que a conexão VPN esteja configurada e ativa, todos os dados transmitidos entre o seu dispositivo e o servidor VPN estarão protegidos. Isso é especialmente útil ao acessar a internet em redes públicas, como em cafés, aeroportos ou hotéis, onde os dados podem estar vulneráveis a ataques de hackers.
Em resumo, configurar uma VPN é uma maneira eficaz de garantir a segurança e privacidade de suas comunicações online. Com alguns passos simples, você pode desfrutar de uma conexão segura e protegida em qualquer lugar do mundo.
0 notes
Text
como configurar ddns na vpn do roteador
🔒🌍✨ Ganhe 3 Meses de VPN GRÁTIS - Acesso à Internet Seguro e Privado em Todo o Mundo! Clique Aqui ✨🌍🔒
como configurar ddns na vpn do roteador
Configuração DDNS
O DDNS (Dynamic Domain Name System) é uma ferramenta essencial para quem precisa acessar dispositivos remotamente, como câmeras de segurança, servidores, entre outros equipamentos. Por meio do DDNS, é possível associar um endereço de IP dinâmico a um nome de domínio fixo, facilitando o acesso aos dispositivos mesmo que o endereço de IP da rede local esteja em constante mudança.
A configuração do DDNS é simples e requer apenas alguns passos. Primeiramente, é necessário escolher um serviço de DDNS confiável, como No-IP, DynDNS ou DuckDNS, e criar uma conta. Em seguida, no painel de administração do roteador, basta acessar a seção de configurações de DDNS e inserir as informações da conta criada no serviço escolhido.
Após concluir esse processo, o roteador irá atualizar automaticamente o endereço de IP associado ao nome de domínio fixo fornecido pelo serviço de DDNS. Dessa forma, sempre que for necessário acessar remotamente um dispositivo da rede, basta utilizar o nome de domínio configurado, sem se preocupar com mudanças no endereço de IP.
É importante ressaltar que a utilização do DDNS pode contribuir significativamente para a segurança e praticidade no acesso remoto a dispositivos, pois elimina a necessidade de memorizar endereços de IP complexos e possibilita a conexão de forma mais simplificada e rápida.
Em resumo, a configuração do DDNS é uma solução eficiente e acessível para facilitar o acesso remoto a dispositivos em redes domésticas e empresariais, tornando o processo mais seguro e conveniente para os usuários.
VPN no roteador
Um VPN (Virtual Private Network) é uma ferramenta essencial para garantir a privacidade e a segurança dos dados transmitidos pela internet. Muitas pessoas optam por configurar um VPN em seus dispositivos individuais, como computadores ou smartphones, para proteger suas informações pessoais. No entanto, uma forma eficiente de proteger toda a rede doméstica é configurar um VPN diretamente no roteador.
Ao configurar um VPN no roteador, todos os dispositivos conectados à rede doméstica automaticamente terão seus dados criptografados e protegidos. Isso é especialmente útil para famílias com vários dispositivos conectados à internet, pois garante que todas as informações transmitidas estejam seguras e privadas.
Além da segurança, configurar um VPN no roteador também pode possibilitar o acesso a conteúdos restritos geograficamente, permitindo que os usuários contornem bloqueios regionais e acessem serviços de streaming, por exemplo, de qualquer lugar do mundo.
No entanto, é importante salientar que nem todos os roteadores oferecem suporte nativo para VPN, sendo necessário verificar a compatibilidade do dispositivo antes de realizar a configuração. Além disso, é recomendável utilizar um serviço de VPN de confiança para garantir a eficácia e a segurança da conexão.
Em resumo, configurar um VPN no roteador é uma maneira prática e eficiente de proteger toda a rede doméstica, garantindo a segurança e a privacidade dos dados transmitidos pela internet. É uma opção viável tanto para famílias quanto para pequenas empresas que desejam manter suas informações seguras e acessar conteúdos restritos com facilidade.
Como configurar DDNS
Configurar um serviço DDNS (Dynamic Domain Name System) é essencial para quem deseja acessar remotamente dispositivos em uma rede doméstica ou empresarial, como câmeras de segurança, servidores de arquivos ou sistemas de automação residencial. DDNS permite que você atribua um nome de domínio fixo a um endereço IP dinâmico, o que é útil quando seu provedor de Internet altera seu endereço IP regularmente.
Para configurar o DDNS, primeiro, você precisa de uma conta em um provedor de DDNS, como No-IP, DynDNS ou DuckDNS. Após criar sua conta, você receberá um nome de domínio gratuito ou pago, que será vinculado ao seu endereço IP dinâmico.
Em seguida, acesse a interface de administração do seu roteador. Geralmente, você pode fazer isso digitando o endereço IP do seu roteador em um navegador da web e fazendo login com suas credenciais de administrador. Procure por uma seção chamada "DDNS" ou "Dynamic DNS" nas configurações do roteador.
Dentro dessa seção, selecione o provedor de DDNS que você escolheu e insira as credenciais da sua conta, incluindo o nome de usuário, senha e o nome de domínio fornecido pelo provedor.
Depois de salvar as configurações, o roteador começará a atualizar automaticamente o endereço IP associado ao seu nome de domínio DDNS sempre que ele mudar.
Por fim, para acessar remotamente seus dispositivos, basta usar o nome de domínio DDNS em vez de um endereço IP. Você pode usar aplicativos ou programas específicos para acessar seus dispositivos de qualquer lugar com acesso à Internet, fornecendo mais flexibilidade e conveniência.
VPN com DDNS
Um VPN com DDNS (Dynamic Domain Name System) é uma combinação poderosa que oferece segurança e conveniência aos usuários que buscam proteger sua privacidade online. O uso de um VPN permite que os dados sejam criptografados e mascarados, tornando mais difícil para terceiros interceptarem informações confidenciais. Por outro lado, o DDNS ajuda a contornar o problema de endereços IP dinâmicos, fornecendo um nome de domínio constante que permite acesso remoto a dispositivos em uma rede doméstica.
Ao combinar um VPN com DDNS, os usuários podem desfrutar dos benefícios de ambas as tecnologias. O VPN garante que a conexão seja segura e privada, protegendo contra hackers, espionagem e restrições geográficas. Enquanto isso, o DDNS simplifica o acesso a dispositivos sem a necessidade de lembrar endereços IP complexos que podem mudar regularmente.
Empresas e usuários individuais podem se beneficiar do uso de um VPN com DDNS. Empresas podem garantir conexões seguras para funcionários remotos e proteger informações confidenciais, enquanto os usuários domésticos podem acessar de forma segura dispositivos em suas redes locais a partir de qualquer lugar do mundo.
Em resumo, um VPN com DDNS é uma solução inteligente para quem valoriza a segurança e a conveniência online. Ao combiná-los, os usuários podem proteger suas informações pessoais, contornar restrições geográficas e acessar dispositivos remotamente, tudo de forma segura e confiável.
Roteador e VPN
Os roteadores são dispositivos fundamentais para garantir a conectividade em redes locais, permitindo a distribuição de sinal de internet para vários dispositivos. Quando se trata de segurança e privacidade online, a utilização de uma rede privada virtual (VPN) se torna essencial.
Uma VPN oferece uma camada adicional de segurança ao criptografar o tráfego de internet, tornando-o mais seguro contra tentativas de espionagem ou roubo de dados. Ao utilizar um roteador com suporte a VPN, é possível configurar a conexão VPN diretamente no dispositivo, protegendo não apenas o dispositivo em si, mas todos os dispositivos conectados a ele.
Com a VPN configurada no roteador, todos os dados enviados e recebidos pela rede serão protegidos, garantindo a privacidade dos usuários e impedindo que terceiros monitorem suas atividades online. Além disso, uma VPN pode ser útil para acessar conteúdos restritos geograficamente, permitindo contornar bloqueios e garantir uma navegação mais livre e segura.
É importante ressaltar que nem todos os roteadores suportam a funcionalidade de VPN, sendo necessário verificar essa especificação ao adquirir um novo dispositivo. Configurar uma VPN em um roteador pode ser um processo técnico, exigindo conhecimentos básicos de redes, no entanto, muitos modelos oferecem tutoriais e suporte para facilitar a configuração.
Em resumo, a combinação de roteador e VPN é uma ótima opção para quem busca segurança e privacidade online, garantindo uma conexão mais protegida e confiável para todos os dispositivos conectados à rede.
0 notes
Text
does synology dsm vpn service reuire ddns
🔒🌍✨ Get 3 Months FREE VPN - Secure & Private Internet Access Worldwide! Click Here ✨🌍🔒
does synology dsm vpn service reuire ddns
Synology DSM VPN DDNS setup
Setting up a VPN and DDNS on your Synology DiskStation Manager (DSM) can provide a secure way to access your files and network remotely. With DSM's user-friendly interface, configuring a VPN and setting up a DDNS is a straightforward process.
To begin the setup, log in to your DSM interface and navigate to the Control Panel. Under Connectivity, select the Network tab and then go to Network Interface. Click on the Create button and choose Create VPN Profile. Follow the wizard to set up your VPN type, authentication method, and other preferences. Once the VPN profile is created, you can connect to your VPN server from anywhere securely.
Next, configure the DDNS settings to ensure your DiskStation can be accessed using a domain name, rather than a dynamic IP address. In the Control Panel, under External Access, select DDNS and click the Add button. Choose your DDNS provider, enter the required information, and apply the settings. Your Synology DiskStation will now update the DDNS provider with its current IP address automatically.
By setting up a VPN and DDNS on your Synology DSM, you can access your files, devices, and network securely from anywhere in the world. This added layer of security ensures that your data remains protected while enabling convenient remote access to your DiskStation.
Dynamic DNS requirement for Synology VPN
Dynamic DNS is a crucial component for setting up a VPN on a Synology device to ensure seamless and consistent remote access. A Virtual Private Network (VPN) allows users to securely connect to their network from anywhere in the world, providing a secure way to access files, applications, and other resources stored on the Synology NAS.
When setting up a VPN on a Synology device, having a Dynamic DNS service is essential due to the dynamic nature of most residential internet connections. Internet Service Providers assign dynamic IP addresses that can change periodically, making it challenging to keep track of the IP address needed to connect to the Synology device remotely.
By using a Dynamic DNS service, such as Synology's own DDNS service or third-party providers like No-IP or DynDNS, users can assign a domain name to their dynamic IP address. This domain name remains constant even when the IP address changes, ensuring that users can always connect to their Synology device without having to constantly update the IP address manually.
Having a Dynamic DNS service eliminates the need to remember or update the IP address every time it changes, providing a convenient and reliable way to access the Synology VPN remotely. It simplifies the remote connection process and enhances the overall accessibility of the network, making it a valuable requirement for anyone looking to set up a VPN on a Synology device.
DSM VPN without DDNS configuration
DSM VPN Without DDNS Configuration
When setting up a Virtual Private Network (VPN) on a DiskStation Manager (DSM) without Dynamic Domain Name System (DDNS) configuration, there are a few key considerations to keep in mind. While DDNS allows for easy remote access to your DSM VPN by mapping a domain name to your changing IP address, it is not always necessary for establishing a secure connection.
One alternative method for accessing your DSM VPN without DDNS is to manually enter the IP address of your network. By obtaining your external IP address through online tools or directly from your internet service provider, you can input this information into your VPN client to connect remotely to your DSM. While this method may require periodic updates as your IP address changes, it can be a straightforward solution for users without DDNS setup.
Another option to consider is using a static IP address provided by your internet service provider. Unlike dynamic IP addresses that change periodically, a static IP address remains constant, allowing for easy VPN access without the need for DDNS configuration. While this option may involve an additional cost, it offers a reliable and secure connection for remote access to your DSM.
In conclusion, while DDNS provides convenience in accessing your DSM VPN remotely, it is possible to establish a secure connection without this configuration. Whether by manually inputting your IP address or opting for a static IP from your ISP, there are alternatives available for users looking to set up a VPN on DSM without DDNS. By understanding these options and choosing the most suitable method for your needs, you can enjoy seamless and secure access to your DSM VPN.
Synology VPN service and DDNS necessity
Title: The Crucial Combination: Synology VPN Service and DDNS Necessity
In the realm of network security and remote access, Synology stands out as a reliable ally for both individuals and businesses. Synology offers a comprehensive VPN (Virtual Private Network) service coupled with DDNS (Dynamic Domain Name System), forming a potent combination that ensures secure remote connections and seamless accessibility.
A Synology VPN service provides a secure channel for users to access their network resources from remote locations. Whether it's accessing sensitive files, managing devices, or monitoring surveillance systems, the VPN encrypts data transmission, shielding it from prying eyes and potential cyber threats. This level of encryption is crucial, especially when connecting to public Wi-Fi networks or conducting business-critical tasks remotely.
However, for the VPN service to function effectively, a stable and identifiable connection point is essential. This is where DDNS comes into play. DDNS dynamically updates a domain name's IP address, ensuring that users can reliably connect to their Synology NAS (Network Attached Storage) or other devices from anywhere, even if their ISP-assigned IP address changes periodically. Without DDNS, users would have to manually track and update IP addresses, resulting in inconvenience and potential disruptions to remote access.
Moreover, the combination of Synology VPN service and DDNS adds an extra layer of convenience and security. Users can access their network resources with ease, knowing that their connections are encrypted and their access points are always accessible, regardless of IP address changes. This is particularly beneficial for businesses with remote employees or individuals who value privacy and security in their online activities.
In conclusion, the integration of Synology VPN service and DDNS is not just a convenience but a necessity in today's digital landscape. It ensures secure, reliable, and convenient remote access to network resources, safeguarding sensitive data and enhancing productivity for both individuals and businesses alike.
Setting up VPN on Synology DSM without DDNS
Setting up a VPN on Synology DSM without DDNS can provide you with a secure way to access your network remotely. While Dynamic Domain Name System (DDNS) is a common method to allow access to your network, there are alternative ways to set up a VPN on your Synology DiskStation Manager (DSM) without using it.
To begin, ensure that your Synology NAS is up and running and connected to the internet. Navigate to the Control Panel and select the 'VPN Server' option. Enable the VPN Server and choose the appropriate protocol that suits your needs, such as OpenVPN, L2TP/IPSec, or PPTP.
Next, configure the VPN settings according to your preferences, including setting up user accounts and passwords for VPN access. You can also customize the IP range for VPN clients to connect to your network securely.
Once you have configured the VPN settings, download and install a VPN client on your remote devices, such as your computer or smartphone. Enter the server IP address of your Synology NAS, along with the user credentials you set up earlier, to establish a secure connection to your network.
By setting up a VPN on Synology DSM without DDNS, you can ensure secure remote access to your network without the need for a dynamic domain name system. This method provides an added layer of security and privacy for your online activities.
0 notes
Text
can you set up vpn and ddns on a router
🔒🌍✨ Get 3 Months FREE VPN - Secure & Private Internet Access Worldwide! Click Here ✨🌍🔒
can you set up vpn and ddns on a router
VPN setup on router
Setting up a VPN on your router can enhance your online privacy and security by encrypting your internet connection and masking your IP address. This ensures that your data remains secure and your browsing activity is private from potential prying eyes. Here’s a step-by-step guide on how to set up a VPN on your router:
Choose a VPN Service: Select a reputable VPN provider that offers router support. Ensure the VPN service is compatible with your router model and supports the VPN protocol you prefer (e.g., OpenVPN, PPTP, L2TP/IPsec).
Access Router Settings: Log in to your router’s administrative interface. You can usually do this by entering the router’s IP address into your web browser and entering your login credentials (typically found on the router itself or in the user manual).
Install VPN Firmware (Optional): Some routers support custom firmware like DD-WRT, Tomato, or OpenWRT, which offer enhanced VPN functionality. If your router supports custom firmware, you may need to flash it with the appropriate firmware version compatible with your VPN provider.
Configure VPN Settings: Navigate to the VPN settings section in your router’s admin interface. Enter the VPN server address, username, and password provided by your VPN provider. Select the desired VPN protocol and encryption settings.
Connect to VPN: Save your VPN settings and restart your router if necessary. Once the router is back online, initiate a connection to the VPN server through the router’s settings. Upon successful connection, your router will encrypt all internet traffic passing through it.
Verify Connection: Confirm that your VPN connection is active by checking your router’s status or using online tools to verify your IP address and geolocation. You should see your VPN provider’s server location instead of your actual location.
Test Connectivity: Ensure all devices connected to the router can access the internet properly while connected to the VPN. Test various websites and applications to confirm that the VPN is functioning correctly.
By setting up a VPN on your router, you can safeguard your entire network and enjoy the benefits of enhanced online privacy and security across all your devices.
DDNS configuration on router
Dynamic Domain Name System (DDNS) configuration on a router allows users to access their network remotely using a domain name that automatically updates with the changing IP address assigned by their Internet Service Provider (ISP). This is especially useful for businesses or individuals who need to connect to their network remotely but do not have a static IP address.
To configure DDNS on a router, users first need to sign up for a DDNS service provider such as No-IP, DynDNS, or DuckDNS. After creating an account and selecting a hostname, users will then log in to their router's settings where they can locate the DDNS configuration section. Here, they will input their DDNS provider's information including the hostname, username, password, and update interval.
Once the DDNS settings are saved, the router will periodically update the IP address with the DDNS service provider, ensuring that the domain name always points to the correct IP address. This allows users to access their network remotely using an easy-to-remember domain name instead of having to remember a complex IP address that may change frequently.
Overall, configuring DDNS on a router is a straightforward process that provides convenience and reliability for users who require remote access to their network. By automating the update of IP addresses with a domain name, DDNS simplifies remote network connectivity and enhances accessibility without the need for a static IP address.
Router VPN and DDNS setup
To set up a VPN on your router, follow these steps to ensure secure and private internet connection for all devices on the network. By using a VPN, you can encrypt your internet traffic and hide your IP address, ensuring anonymity and security online.
Log in to your router's admin panel. You can usually access this by typing your router's IP address into a web browser and entering your credentials.
Look for the VPN tab in the router settings. If your router supports VPN connections, there should be an option to set up a VPN connection.
Choose the type of VPN protocol you want to use. Common options include OpenVPN, PPTP, and L2TP/IPsec. OpenVPN is preferred for its strong encryption and security features.
Enter the VPN server details provided by your VPN service provider. This includes the server address, username, password, and any other required information.
Save the settings and connect to the VPN server. Once connected, all internet traffic on your network will be encrypted and routed through the VPN server.
Setting up a Dynamic Domain Name System (DDNS) on your router allows you to access your network remotely using a domain name instead of an IP address that may change frequently.
Locate the DDNS settings in your router admin panel. Enter the DDNS service provider details and create a hostname for your network.
Choose a DDNS service provider such as No-IP, DynDNS, or DuckDNS. Sign up for an account and configure the DDNS settings in your router.
Save the settings and update the DDNS service. Your router will regularly update the DDNS service with your current IP address, ensuring your domain name always points to the correct address.
By setting up a VPN and DDNS on your router, you can enhance your online security and accessibility, allowing secure connections and remote access to your network from anywhere in the world.
Setting up VPN and DDNS on a router
Setting up a Virtual Private Network (VPN) and Dynamic Domain Name System (DDNS) on a router can enhance your online security and accessibility. VPN allows you to create a secure connection to another network over the internet, safeguarding your data and online activities from prying eyes. DDNS, on the other hand, enables you to access your network remotely using a domain name that constantly updates to your changing IP address.
To set up VPN and DDNS on your router, follow these steps. First, access your router's settings by entering its IP address in a web browser. Look for the VPN and DDNS options, which are usually located in the advanced settings or security section. Choose the VPN protocol that best fits your needs, such as OpenVPN or PPTP, and configure the settings accordingly.
Next, set up DDNS by selecting a service provider and creating a hostname for your network. This hostname will be used to access your network remotely. Input the DDNS credentials provided by the service provider into your router's settings. Ensure that the DDNS service is active and updating your IP address regularly.
Once both VPN and DDNS are set up, test the connections to ensure everything is working properly. Connect to the VPN from a remote location to verify the secure connection, and use the DDNS hostname to access your network externally.
By configuring VPN and DDNS on your router, you can enjoy increased security and accessibility while browsing the internet and accessing your network remotely. Take the time to set up these features correctly to make the most of your online experience.
Router VPN and Dynamic DNS installation
Title: Setting Up Router VPN and Dynamic DNS: A Comprehensive Guide
In today's digital landscape, ensuring privacy and security while browsing the internet is paramount. One effective way to achieve this is by setting up a Virtual Private Network (VPN) directly on your router, coupled with Dynamic Domain Name System (DNS) for seamless access. This comprehensive guide will walk you through the process of installing a VPN on your router and configuring Dynamic DNS to enhance your online privacy and accessibility.
Step 1: Choose a Compatible Router and VPN Service Ensure your router supports VPN installation and select a reliable VPN service provider. Look for routers that offer VPN client support, such as OpenVPN, PPTP, or L2TP/IPsec protocols, and check compatibility with your chosen VPN service.
Step 2: Access Router Settings Access your router's settings by typing its IP address into your web browser. Log in with your credentials and navigate to the VPN section. Here, you'll find options to configure VPN settings.
Step 3: Configure VPN Settings Enter the VPN server details provided by your VPN service provider, including the server address, username, and password. Choose the preferred VPN protocol and encryption level for optimal security.
Step 4: Install VPN Client on Router Follow the instructions provided by your router manufacturer to install the VPN client firmware. This process may vary depending on your router model.
Step 5: Enable Dynamic DNS Dynamic DNS allows you to access your home network remotely using a domain name instead of a dynamic IP address. Enable Dynamic DNS in your router's settings and create a hostname with your chosen Dynamic DNS provider.
Step 6: Finalize Configuration Save your VPN and Dynamic DNS settings and reboot your router to apply the changes. Once restarted, your router will establish a secure VPN connection, and Dynamic DNS will ensure seamless access to your home network from anywhere.
By following these steps, you can safeguard your online activities with a router VPN while maintaining accessibility through Dynamic DNS. Enjoy enhanced privacy and security without compromising on convenience.
0 notes
Text
Unraveling the Power of Dynamic DNS Address

Dynamic DNS Address-evolving landscape of the internet, maintaining a stable connection to your network resources is crucial. Dynamic DNS (Domain Name System) emerges as a powerful solution to the challenge of keeping your online presence accessible and reliable. In this blog post, we’ll delve into the world of Dynamic DNS, exploring its significance, functionality, and the myriad of benefits it offers to individuals and businesses alike.
Understanding Dynamic DNS: At its core, Dynamic DNS is a technology that enables the automatic updating of DNS records, associating domain names with changing IP addresses. In traditional setups, a static IP address is assigned to a device, ensuring a consistent link between the device and its domain name. However, in dynamic environments where IP addresses frequently change, maintaining this connection becomes challenging.
Dynamic DNS steps in to bridge this gap by providing a dynamic hostname that automatically updates as the IP address changes. This allows users to access their devices, servers, or cameras using a fixed domain name, irrespective of the underlying IP address fluctuations.
Key Components of Dynamic DNS: Client Software: Dynamic DNS relies on client software installed on the user’s device. This software monitors the device’s IP address changes and communicates them to the Dynamic DNS service provider. Dynamic DNS Service Provider: Users typically subscribe to a Dynamic DNS service provider, which offers the infrastructure to manage dynamic hostname updates. Famous providers include DynDNS, No-IP, and DuckDNS. Router Integration: Many modern routers come equipped with built-in Dynamic DNS support. This allows users to configure and manage Dynamic DNS settings directly from their router, streamlining the process. Benefits of Dynamic DNS: Remote Access: Dynamic DNS is a game-changer for individuals and businesses that require remote access to their network resources. Whether it’s accessing a home security camera or connecting to a company server, Dynamic DNS ensures a consistent and reliable link. Host Web Services: Hosting websites, gaming servers, or any online service becomes more accessible with Dynamic DNS. Users can use a custom domain name, even if their internet service provider assigns dynamic IP addresses. Security and Surveillance: For those leveraging IP cameras and surveillance systems, Dynamic DNS provides a means to monitor and manage these systems remotely. This is invaluable for home security or business surveillance, allowing users to stay connected regardless of their location. Email and File Servers: Dynamic DNS facilitates the hosting of email and file servers, enabling users to access their data securely from anywhere. This is particularly useful for businesses with remote teams or individuals who want to maintain control over their communication platforms. Challenges and Considerations: Update Frequency: The effectiveness of Dynamic DNS is contingent on how quickly it can update IP address changes. Some services may experience delays in propagating updates, potentially impacting the accessibility of network resources. Security Implications: While Dynamic DNS enhances accessibility, it’s crucial to implement robust security measures. Open ports and remote access should be secured with strong passwords and, when possible, additional encryption methods. Service Reliability: Users should choose reputable Dynamic DNS service providers to ensure reliability. Frequent downtime or service interruptions can undermine the purpose of having a dynamic hostname. Conclusion: Dynamic DNS emerges as a fundamental tool in the arsenal of individuals and businesses navigating the dynamic landscape of the internet. By seamlessly adapting to changing IP addresses, it empowers users to maintain a stable online presence, whether for remote access, hosting services, or enhancing security measures. As technology continues to advance, the role of Dynamic DNS is set to become even more prominent, providing a reliable link between users and their digital assets in our ever-connected world.
0 notes
Text
DynDNS Probleme nach Update auf Fritz!OS 7.50 (Lösung)
Seitdem das Fritz!OS 7.50 Update erschienen ist, machen viele Meldungen im Internet die Runde, dass die eingepflegten Anmeldedaten vom DynDNS-Anbieter nicht mehr funktionieren. Betroffen sind fast alle kostenfreien und kostenpflichtigen Services. Folglich sind die Server und Freigaben nicht mehr ohne Konfiguration über das Internet erreichbar...[Weiterlesen]
0 notes
Photo

TP-Link Archer AX20 AX1800 Dual Band Wifi 6 Router FEATURES: Dual-Band Wi-Fi 6: Equipped with the latest wireless technology, Wi-Fi 6, for faster speeds, greater capacity, and reduced network congestion Next-Gen 1.8Gbps Speeds: Enjoy smooth streaming, downloading, and gaming all without buffering with Wi-Fi speeds of 1.8Gbps Connect More Devices: Wi-Fi 6 technology communicates more data to more devices using revolutionary OFDMA technology while simultaneously reducing lag Quad-Core Processing: The 1.5GHz quad-core CPU ensures communications between your router and all connected devices are smooth Extensive Coverage: Beamforming, independent FEM, and four antennas combine to deliver focused reception to devices far away Increased Battery Life: Target Wake Time technology reduces your devices’ power consumption to extend their battery life USB Easy Sharing: A USB 2.0 Port enables easy file sharing within your network or building private Cloud Storage Easy Setup: Set up your router in minutes with the powerful TP-Link Tether App Backward Compatible: Supports all previous 802.11 standards and all Wi-Fi devices WIRELESS Standards Wi-Fi 6 IEEE 802.11ax/ac/n/a 5 GHz IEEE 802.11ax/n/b/g 2.4 GHz WiFi Speeds AX1800 5 GHz: 1201 Mbps (802.11ax) 2.4 GHz: 574 Mbps (802.11ax) WiFi Range 3 Bedroom Houses 4× Fixed High-Performance Antennas Multiple antennas form a signal-boosting array to cover more directions and large areas Beamforming Concentrates wireless signal strength towards clients to expand WiFi range High-Power FEM Improves transmission power to strengthen signal coverage WiFi Capacity High Dual-Band Allocate devices to different bands for optimal performance OFDMA Simultaneously communicates with multiple Wi-Fi 6 clients Airtime Fairness Improves network efficiency by limiting excessive occupation 4 Streams Connect your devices to more bandwidth Working Modes Router Mode Access Point Mode HARDWARE Processor 1.5 GHz Quad-Core CPU Ethernet Ports 1× Gigabit WAN Port 4× Gigabit LAN Ports USB Support 1× USB 2.0 Port Supported Partition Formats: NTFS, exFAT, HFS+, FAT32 Supported Functions: Apple Time Machine FTP Server Media Server Samba Server Buttons WPS/Wi-Fi Button Power On/Off Button LED On/Off Button Reset Button Power 12 V ⎓ 1.5 A SECURITY WiFi Encryption WPA WPA2 WPA3 WPA/WPA2-Enterprise (802.1x) Network Security SPI Firewall Access Control IP & MAC Binding Application Layer Gateway Guest Network 1× 5 GHz Guest Network 1× 2.4 GHz Guest Network VPN Server OpenVPN PPTP SOFTWARE Protocols IPv4 IPv6 Parental Controls URL Filtering Time Controls WAN Types Dynamic IP Static IP PPPoE PPTP L2TP Quality of Service QoS by Device Cloud Service Auto Firmware Upgrade OTA Firmware Upgrade TP-Link ID DDNS NAT Forwarding Port Forwarding Port Triggering DMZ UPnP IPTV IGMP Proxy IGMP Snooping Bridge Tag VLAN DHCP Address Reservation DHCP Client List Server DDNS TP-Link NO-IP DynDNS Management Tether App Webpage PHYSICAL Dimensions (W×D×H) 10.2 × 5.3 ×1.5 in (260.2 × 135.0 × 38.6 mm) Package Contents Wi-Fi Router Archer AX20 Power Adapter RJ45 Ethernet Cable Quick Installation Guide OTHER System Requirements Internet Explorer 11+, Firefox 12.0+, Chrome 20.0+, Safari 4.0+, or other JavaScript-enabled browser Cable or DSL Modem (if needed) Subscription with an internet service provider (for internet access) Certifications FCC, CE, RoHS Environment Operating Temperature: 0℃~40℃ (32℉ ~104℉) Storage Temperature: -40℃~70℃ (-40℉ ~158℉) Operating Humidity: 10%~90% non-condensing Storage Humidity: 5%~90% non-condensing TEST DATA WiFi Transmission Power CE:
0 notes
Text
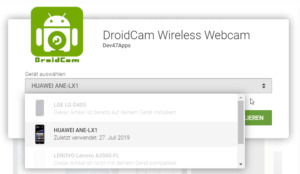
Android IP-Cam mit DDNSS.de & DroidCam

In diesem Beitrag möchte ich erläutern wie ich ein altes Android Handy mit Hilfe einer kleinen App sowie dem kostenfreien Dienst ddnss.de in eine IP-Cam verwandelt habe. Ziel dieses Projektes war es zunächst eine IP-Cam auf ein Zwergkaninchenstall zu richten.

Ansicht Android App "DroidCam" im Webbrowser
Was wird benötigt?
Als erstes benötigst du - ein ggf. altes Android Handy, ich verwende das LG L90, - ein Dreibein Stativ, - ein USB Ladekabel Als App verwende ich DroidCam, diese App ist kostenfrei im Google PlayStore erhältlich.
Installation
Google Konto Das Handy muss mit einem Google Konto verknüpft werden da man sonst nicht in den PlayStore gelangt daher richte ich ein neues Konto ein dieses ist in wenigen Minuten erledigt. DroidCam Wenn das Google Konto eingerichtet ist kann die App "DroidCam" installiert werden, dazu öffnet man den Google PlayStore und gibt in die Suchleiste DroidCam ein und wählt den ersten Eintrag.

Google PlayStore - DroidCam Alternativ kann man dieses auch bequem über den Computer machen in dem man sich im Browser bei Google einloggt und dann das Gerät auswählt auf welches die App installiert werden soll.
Google PlayStore - zuweisen einer App an ein Gerät Berechtigungen Wenn die App installiert ist müssen noch zwei Berechtigungen (Video & Audio) gegeben werden. Dazu erscheint jeweils ein Dialogfenster. Startbildschirm Wenn die Berechtigungen vergeben wurden, dann ist die App fertig konfiguriert und zeigt auf dem Startbildschirm eine IP-Adresse (IPv4) sowie einen Link zu einem Video an.

Android App DroidCam - Startbildschirm Leider unterstützt die App kein HTTPS für eine verschlüsselte Übertragung. Sicherheit Damit die IP-Cam nicht für jedermann aus dem Internet sichtbar ist, kann man unter den Einstellungen der Android App DroidCam einen Benutzernamen sowie ein Passwort vergeben. Die Seite "Settings" erreicht man über das Menü rechts oben. Der Menüpunkt lautet "Einstellungen" und die Seite "Settings". :)

Android App DroidCam - Einstellungen Nun kann man den Benutzername und das Passwort vergeben. Zugriff auf die IP-Cam per Webbrowser Nachdem nun die IP-Cam installiert und konfiguriert wurde, möchten wir zunächst aus dem selben Netzwerk zugreifen. Wenn man nun die IP Adresse inkl. Port in den Browser eingibt, wird eine Seite geladen wo das aktuelle Bild angezeigt wird. (In meinem Fall ist es http://192.168.178.23:4747)
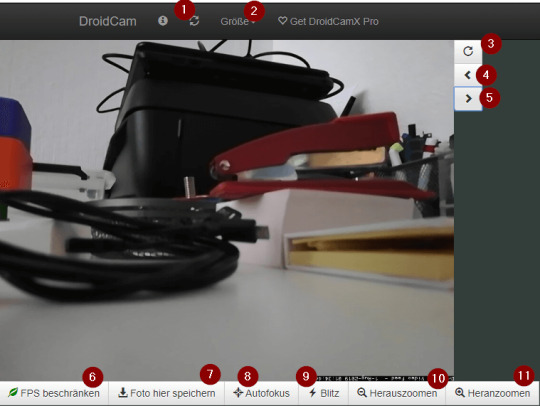
DroidCam - Ansicht im Webbrowser Neben dem Livebild gibt es diverse Funktionen welche ich kurz benennen und erläutern möchte - Aktualisieren der Ansicht - Auswahl der Größe und der Qualität des Livebildes, Je größer das Bild ist umso mehr Daten werden übertragen und somit kommt es je nach Netzwerkgeschwindigkeit zu rucklern. - Bild drehen, - Bild kleiner, - Bild größer, - Begrenzen der "Bilder pro Sekunde", Diese Einstellung bewirkt das die Anzahl der Bilder pro Sekunde begrenzt werden, dieses ist schonend für den Akku des Handys sowie auch wieder für die Datenübertragung. - Speichert das aktuelle Bild als JPG, - aktiviert den AutoFokus der Kamera, - aktiviert / deaktivert die LED der Kamera, - Zoom + an der Kamera, - Zoom - an der Kamera Zugriff auf die IP-Cam per VLC Media Player Der VLC Media Player kann einen Livestream wiedergeben, dazu kann man sich in der Browseransicht über das Infosymbol (1) eine Adresse (2) anzeigen lassen.

DroidCam - URL zum Livestream Wenn der VLC Media Player installiert ist, dann kann man über das Hauptmenü Medien > Netzwerkstream öffnen... zum Dialog "Medien öffnen" gelangen. Es wird nun die Adresse in das Eingabefeld eingetragen.

VLC Media Player - öffnen des Streams von DroidCam Wenn man nun die Schaltfläche Wiedergabe bestätigt wird der Stream der aktuellen Playlist hinzugefügt. Nun noch unten links auf die Schaltfläche "Play" drücken und schon wird der Stream gestartet.

VLC Media Player - Wiedergabe des Streams
Zugriff aus dem Internet per ddnss.de
Damit man von (fast) Standort aus Zugriff auf die IP-Cam aus seinem Netzwerk bekommt kann man diese Freigeben und wie man das macht möchte ich nun beschreiben. Im nachfolgenden erläutere ich, wie man dieses mit einer FritzBox realisiert. Solltest du einen anderen Router (zsbp. Speedport) verwenden so müßtest du in deinen Unterlagen prüfen. Aber generell sollte dieses auch für andere Geräte adaptierbar sein. Für den Zugriff benötigen wir eine Adresse, jedoch ändert sich die Adresse für den Router alle 24h (außer man hat eine Standleitung und somit eine feste IP Adresse). Und für genau dieses Problem gibt es eine Lösung mit Dynamischen Adressen ich nutze den Service der Seite ddnss.de. Dieser Service ist kostenfrei und der Hoster sitzt in Deutschland beides war mir für dieses kleine Projekt wichtig. Bei der Anmeldung ist zu beachten dass, das Passwort keine Sonderzeichen enthalten darf. Das ist leider sehr schade denn Passwörter sollten komplex sein und Sonderzeichen gehören meiner Meinung nach dazu. Neuen Host erstellen Wenn man sich Registriert und Angemeldet hat, muss man zunächst einen neuen Host erstellen.
DDNSS - neuen Host erstellen Zunächst vergibt man den Namen und wählt eine Endung aus. In meinem Beispiel wähle ich als Namen "meinTestHost" und als Endung wähle ich "ddnss.org" Diese Daten werde ich vor dem veröffentlichen des Beitrages löschen!
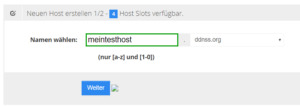
DDNSS - Neuen Host erstellen, Namen vergeben Nachdem die Eingabe sowie die Auswahl durch die Schaltfläche "Weiter" bestätigt wurde, gelangt man zum zweiten und letzten Schritt der Erstellung eines neuen Hosts zur IP Mode Einstellung.
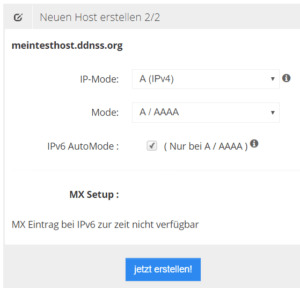
DDNSS - neuen Host erstellen, IP Mode einstellen Ich wähle bei IP Mode - "A (IPv4)", Mode "A / AAAA" und setze den Haken bei "IPv6 AutoMode" (siehe Grafik). Danach kann der neue Host mit der Schaltfläche "jetzt erstellen!" erstellt werden. Man wird sofort auf eine neue Seite weitergeleitet wo alle Host aufgelistet werden welche bereits registriert wurden.
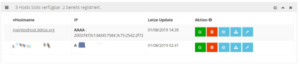
DDNSS - Seite erstellte Hosts Auf der rechten Seite der Tabelle gibt es 5 Schaltflächen. DDNSS - DynHosts Auflisten - Bearbeiten, - Löschen, - Port Check, - Update Link, - Konfiguration für die FritzBox In diesem Tutorial möchte ich nur darauf beschränken wie man diesen Service in der FritzBox einrichtet daher lasse ich die Punkte "Bearbeiten sowie PortCheck" außerhalb der Betrachtung. Zunächst öffnen wir die Seite der FritzBox über den Webbrowser per fritz.box, nach einer Anmeldung navigieren wir zum Menü Freigabe.

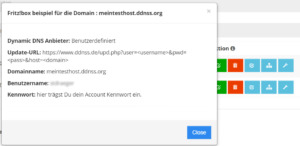
Fritzbox - Einrichten des Services DDNSS.de Als erstes Navigiert man über das Menü "Internet" (1), zum Unterpunkt "Freigaben" (2) auf der neuen Seite wählt man den Reiter "DynDNS" (3) aus und betätigt die Checkbox DynDNS benutzen (der Haken muss gesetzt sein). Zunächst muss als Anbieter "Benutzerdefiniert" (5) werden, die Daten für Update-URL (6), Domainname (7) und Benutzername (8) sowie Kennwort (9) bekommt man von der Seite ddnss.de.
Daten für die FritzBox Nachdem die Daten eingegeben wurden, werden diese mit der Schaltfläche "Übernehmen" bestätigt. Wenn man nun auf den Reiter "FRITZ!Box Dienste" wechselt sollte man sehen das die eingetragenen Daten übernommen wurden und durch ein zusätzlichen Port ergänzt wurden.
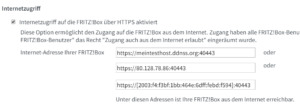
Fritz!Box - Internetzugriff Man kann also nun mit der Adresse https://meintesthost.ddnss.org:40443 auf die Fritz!Box zugreifen. Theoretisch! Wenn man diese Adresse in den Browser eingibt so erhält man bei Google Chrome folgende Fehlermeldung:
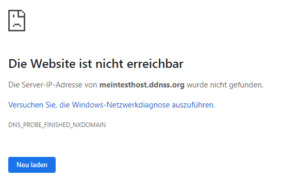
Google Chrome Fehlermeldung - Seite nicht erreichbar! Praktisch jedoch, dauert das ganze etwas. Bei mir hat das ca. 30min. gedauert bis der DNS Server sich aktualisiert hatte. Danach ist wie gewünscht die Fritz!Box über die Adresse https://meintesthost.ddnss.org:40443/ erreichbar.

Fritz!Box per Adresse über ddnss.de erreichbar Was jedoch auffällt ist dass, das SSL Zertifikat fehlt somit ist die Übertragung nicht sicher. Um ein SSL Zertifikat einzurichten benötigt man ein MyFritz!Konto dieses kann man sich kostenfrei einrichten. Wie dieses gemacht wird ist unter AVM - MyFRITZ Konto erstellen erläutert, danach kann man dann ein Zertifikat bei Let's encrypt bestellen und einrichten. Dieses ist völlig einfach und geht innerhalb weniger Minuten. Mir ist dabei aufgefallen das MyFritz auch eine DynDNS Adresse für die Fritzbox anbietet diese ist zwar nicht so schön zu lesen und damit schwer zu merken aber es ist im Service mit drin.
Freigabe der IP-Cam in der Fritzbox
Nachdem nun die Fritz!Box erreichbar ist muss die IP-Cam und der dazugehörige Port freigegeben werden, dazu navigieren wir in der Fritz!Box über den Menüpunkt "Internet" (1) zum Unterpunkt "Freigaben" (2) um dann auf der neuen Seite den Reiter "Portfreigaben" (3) anzuwählen (sollte eigentlich bereits vorselektiert sein).
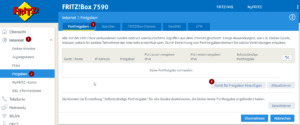
Fritz!Box - Portfreigabe Nun muss auf die Schaltfläche "Gerät für Freigaben hinzufügen" (4) geklickt werden. Auf der neuen Seite wählt man nun die RadioBox "Portfreigabe" (1) aus (ggf. ist dieses die einzige Einstellung wenn kein MyFRITZ! Konto eingerichtet ist), danach wählt man bei Anwendung "Andere Anwendung" (2) aus und vergibt eine sprechende Bezeichnung (3) (um später besser erkennen zu können wozu diese Freigabe dient), als Protokoll wir "TCP" (4) eingestellt. Als Port (5) wählt man nun den Port von der IP-Cam, bei DroidCam ist dieser per Default 4747, da dieses der einzige Port ist welchen wir Freigeben möchten ist so stellen wir diesen auch bei "bis Port" ein. Der Wert für "Port extern gewünscht" (6) lautet ebenfalls 4747. Diese Einstellungen übernehmen wir mit der Schaltfläche "OK" (7) und damit haben wir die Portfreigabe für die IP-Cam eingerichtet und können nun aus dem Internet auf die IP-Cam zugreifen.
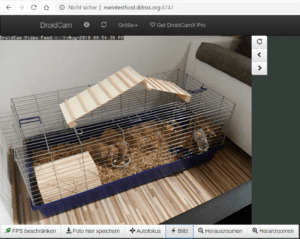
Zugriff auf die IP-Cam aus dem Internet mit dem Browser Google Chrome Read the full article
0 notes