#essential yoga poses to help you warm up
Text
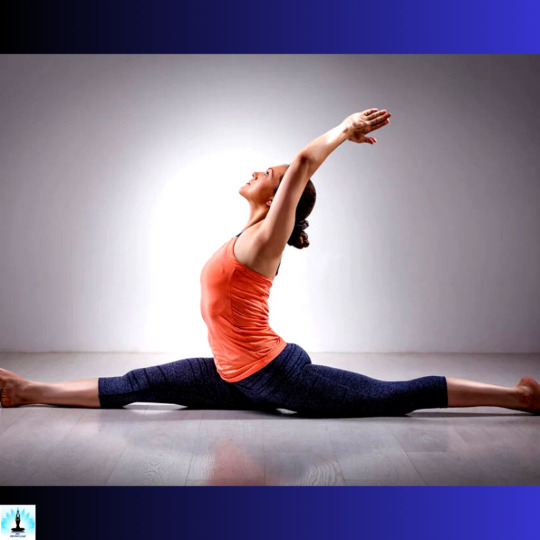
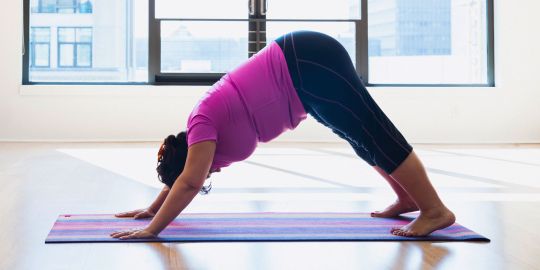
7 Essential Yoga Poses to Prepare You for the Splits
#yogini #yoga #yogapractice #yogi #yogainspiration #yogalife #yogalove #yogagirl #yogaeverydamnday #yogateacher #yogaeveryday #yogaeverywhere #yogapose #yogachallenge #namaste #meditation #yogisofinstagram #instayoga #asana #yogajourney #yogaposes #igyoga
1. Introduction – 7 Essential Yoga Poses to Prepare You for the Splits
Yoga is an ancient practice that has gained widespread popularity in recent years. It offers numerous physical and mental benefits, including increased flexibility, improved strength, and reduced stress.
If you have ever wanted to achieve the impressive feat of doing the splits, practicing specific yoga poses can help you…
View On WordPress
#benefits of practicing the splits in yoga#essential yoga poses to help you warm up#essential yoga poses to prepare you for the splits#preparing your body for the splits#proper alignment and technique for practicing the splits
0 notes
Text
Ultimate Guide to Home Yoga Workouts for Beginners
Hey there, fellow adventurer! Feeling stressed, stiff, or simply curious about the world of yoga? You've landed in the right place! This guide is your passport to a world of home yoga workouts designed specifically for beginners like you (and me, let's be honest!). So, ditch the intimidation, grab your comfiest clothes (PJs totally count!), and let's walk through this lit path together.
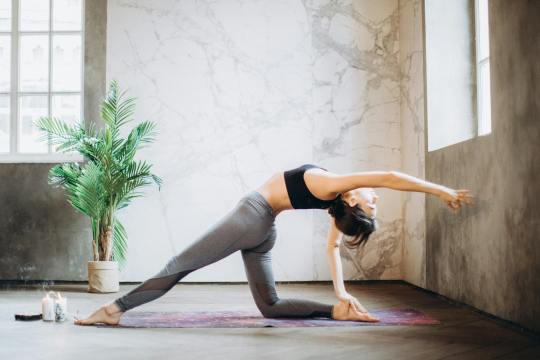
Why Yoga, You Ask?
Think of yoga as a magic carpet ride for your mind, body, and soul. It's more than just fancy poses (though some of them are pretty cool, gotta admit!). Yoga stretches and strengthens your body, calms your mind, and helps you connect with your inner peace guardian. Plus, it's incredibly beginner-friendly. No fancy equipment needed, just you, your mat (or a towel!), and a willingness to explore.
But I'm So Clumsy!
Hey, we all start somewhere!
Remember that adorable toddler trying to walk for the first time? Wobbly, right? But with each step, they got better. Same goes for yoga. Don't sweat the perfection – focus on the feeling. It's about connecting with your breath, finding some movement that feels good, and maybe even letting out a giggle or two (because hey, yoga can be fun!).
Getting Started: Your Yoga Essentials
1. Find Your Space: No fancy studio needed! Unroll your mat (or towel) in a quiet corner of your room, backyard, or even your living room (just warn your cat!). Make sure you have enough space to move freely without knocking over any priceless family heirlooms.
2. Comfy Clothes: Ditch the restrictive gym gear. Think loose-fitting clothes that allow you to move and breathe easily. Bonus points for comfy PJs that make you feel like you're floating on a cloud of relaxation.
3. The Open Mind: Leave your anxieties at the door. Yoga isn't about achieving perfect poses or comparing yourself to others. It's about exploration, self-acceptance, and finding joy in the journey.
Ready to Roll? Your Beginner-Friendly Yoga Flow
Remember, this is your practice. Listen to your body, take breaks when you need them, and don't be afraid to modify poses to fit your comfort level. Let's start with some gentle movements to warm up and awaken your body:
1. Easy Seated Pose: Sit comfortably on the floor or a chair, spine tall, and shoulders relaxed. Close your eyes (if you're comfortable) and take a few deep breaths, feeling your belly rise and fall with each inhale and exhale.
2. Neck Rolls: Gently roll your head in a circle, first one way, then the other, releasing any tension you might be holding.Shoulder Shrugs: Roll your shoulders up towards your ears, hold for a moment, then release them down with a sigh. Repeat a few times.
3. Arm Circles: Make small circles with your arms, forward and backward, feeling the stretch in your shoulders and upper back.
Now, let's move into some basic standing poses to build strength and balance:
1. Mountain Pose (Tadasana): Stand tall with your feet hip-width apart, ground yourself through your feet, and lengthen your spine. Feel like a majestic mountain rooted to the earth.
2. Tree Pose (Vrksasana): Start in Mountain Pose, then lift one foot and gently place it on your inner calf or shin (not on your knee!). Balance for a few breaths, then switch sides.
3. Warrior II Pose (Virabhadrasana II): Step one foot back, bend your front knee, and reach your arms out to the sides. Feel strong and powerful like a warrior ready to take on the world (or at least your next yoga pose).
Don't push yourself too hard, especially in the beginning. Modify poses if needed, and focus on the quality of your movement, not the quantity. It's not about how far you bend or twist, but how you feel while doing it.
Cooling Down and Finding Your Zen
After your flow, take some time to cool down and integrate the benefits of your practice. Here's how:
1. Child's Pose (Balasana): Kneel on the floor, sit back on your heels, and rest your forehead on the ground. Let your arms relax alongside your body and breathe deeply.
2. Corpse Pose (Savasana): Lie down on your back, arms by your sides, and palms facing up. Close your eyes and allow your body to completely relax. Take slow, deep breaths and savor the feeling of peace and relaxation washing over you. Stay here for as long as you like, letting go of any lingering tension or worries.
3. Cat-Cow Pose (Marjaryasana-Bitilasana):Start on your hands and knees with your hands shoulder-width apart and knees hip-width apart.
Inhale and arch your back, dropping your belly towards the floor and looking up. This is Cow Pose.
Exhale and round your spine, drawing your navel towards your spine and tucking your chin to your chest. This is Cat Pose.
Flow smoothly between Cat and Cow Pose, coordinating your breath with each movement.
Repeat for a few breaths, feeling the gentle stretch in your spine and core.
4. Seated Spinal Twist (Marjaryasana):
Sit comfortably on the floor with your legs crossed or knees bent.
Inhale and lengthen your spine.
Exhale and gently twist your torso to the right, placing your left hand on your right knee and your right hand behind you for support.
Look over your right shoulder and breathe deeply for a few breaths.
Inhale to come back to center, then exhale and twist to the other side.
5. Downward-Facing Dog (Adho Mukha Svanasana):
Start on your hands and knees with your hands shoulder-width apart and knees hip-width apart.
Press your hips back towards your heels, reaching your heels towards the floor (don't force it if they don't touch).
Lengthen your spine and neck, gaze softly between your legs.
Hold for a few breaths, then gently push back up to hands and knees.
6. Bridge Pose (Setu Bandhasana):
Lie on your back with your knees bent and feet flat on the floor, hip-width apart.
Lift your hips off the ground, pressing your feet into the mat.
Interlace your fingers beneath your body for support.
Relax your chest and shoulders, chin slightly tucked.
Hold for a few breaths, then slowly lower your back down to the floor.
Beyond the Basics: Exploring Your Yoga Journey
This is just the beginning of your yoga adventure! There are countless styles and poses to explore, each offering unique benefits for your body and mind. Here are some tips to deepen your practice:
1. Find a yoga class online or in your community: Having a guide can be helpful, especially as you explore new poses and techniques.
2. Set realistic goals: Don't try to become a pretzel overnight. Start small, be consistent, and celebrate your progress along the way.
3. Focus on your breath: Your breath is your anchor in your practice. Pay attention to its rhythm and how it connects to your movement.
4. Don't compare yourself to others: Remember, yoga is a personal journey. Celebrate your own unique body and abilities.
Most importantly, have fun! Yoga should be an enjoyable experience. If you're not having fun, try something new or don't be afraid to laugh at yourself (we all do it!).
Bonus Tip: Integrate yoga into your daily life. Take a few deep breaths during a stressful moment, stretch your body when you wake up, or practice mindfulness throughout the day. Yoga is more than just poses; it's a way of being.rate yoga into your daily life. Take a few deep breaths during a stressful moment, stretch your body when you wake up, or practice mindfulness throughout the day. Yoga is more than just poses; it's a way of being.
Namaste, fellow yogi! Now go forth and unroll your mat, one mindful breath at a time. Remember, you are capable of amazing things, both on and off the yoga mat.
Bear in mind, Yoga is a lifelong practice, with new poses, styles, and benefits to discover at every turn. So, keep exploring, have fun, and most importantly, be kind to yourself. The only competition on your mat is with your own limitations yesterday, not someone else's perfect pose today.
Now, spill the tea! What was your favorite pose in this beginner flow? Did any of them surprise you? Share your experience in the comments below, and let's chat!
2 notes
·
View notes
Text
What Are the Basic Steps to Do Yoga for a Beginner?
Yoga is a centuries-old practice that has gained immense popularity in recent years for its physical, mental, and spiritual benefits. If you're a beginner looking to embark on your yoga journey, you're in the right place. This step-by-step guide will walk you through the basic steps to start practicing yoga and explore this ancient discipline.
Step 1: Choose Your Yoga Style
The first step in beginning your yoga practice is to choose a yoga style that aligns with your goals and preferences. Yoga offers a variety of styles, each with its unique focus. Here are a few popular options:
Hatha Yoga: A gentle introduction to the most basic yoga postures.
Vinyasa Yoga: A dynamic and flowing practice that connects breath with movement.
Iyengar Yoga: Focuses on precise alignment and the use of props to perform postures.
Bikram Yoga: Practiced in a heated room with a set sequence of 26 postures and two breathing exercises.
Ashtanga Yoga: A rigorous style with a set sequence of postures and a strong focus on breath and movement.
Yin Yoga: Involves holding passive poses for an extended period to target deep tissues and improve flexibility.
Kundalini Yoga: Emphasizes breath control, meditation, and the release of Kundalini energy.
Restorative Yoga: A relaxing and healing practice using props for support in various postures.
Start by trying a few different styles to see which one resonates with you. You can attend classes at a local yoga studio or explore online resources.
Step 2: Gather Your Yoga Equipment
Yoga doesn't require much equipment, but having the right gear can enhance your practice. Here's what you'll need:
Yoga Mat: A non-slip yoga mat provides a comfortable and stable surface for your practice.
Comfortable Clothing: Wear breathable, flexible, and comfortable clothing that allows for a wide range of motion.
Props (Optional): Depending on your chosen style, you might benefit from props like yoga blocks, straps, and bolsters to support your practice.
Step 3: Create a Calm Space
Find a quiet and comfortable space where you can practice without distractions. Your yoga space doesn't need to be large; a small corner of a room can suffice. Ensure the area is clean and clutter-free, creating a peaceful environment for your practice.
Step 4: Warm-Up and Cool Down
Just like any physical activity, it's essential to warm up your body before diving into yoga postures. Gentle stretches and movements help prepare your muscles and prevent injury. Likewise, conclude your practice with a cool-down to relax your body and promote recovery.
Step 5: Learn Basic Yoga Poses
Yoga is all about postures or poses. Starting with the fundamentals can provide a strong foundation for your practice. Here are some basic yoga poses for beginners:
Mountain Pose (Tadasana): Stand tall with feet together, arms at your sides. It's the foundation for many standing poses.
Downward Dog (Adho Mukha Svanasana): Start in a plank position, then push your hips up and back to form an inverted "V" shape.
Child's Pose (Balasana): Kneel with your big toes touching and sit back on your heels, stretching your arms forward with your forehead resting on the ground.
Cobra Pose (Bhujangasana): Lie face down, place your hands under your shoulders, and lift your chest off the ground, arching your back.
Warrior I (Virabhadrasana I): Step one foot back, bend the front knee, and raise your arms overhead.
Tree Pose (Vrksasana): Stand on one leg and place the sole of your other foot against your inner thigh, balancing on one leg.
Bridge Pose (Setu Bandhasana): Lie on your back, bend your knees, and lift your hips while keeping your feet on the ground.
Corpse Pose (Savasana): Lie on your back with arms and legs extended, palms facing up. This is the relaxation pose at the end of your practice.
Step 6: Focus on Breath
Breath awareness is a fundamental aspect of yoga. Learning to synchronize your breath with your movements enhances your practice's effectiveness. The basic breath technique in yoga is "Ujjayi" breath, which involves deep, controlled inhalations and exhalations through the nose while constricting the back of your throat slightly to produce an audible sound.
Step 7: Practice Mindfulness
Yoga is not just about the physical postures; it's also about the mind-body connection. Pay attention to your body's sensations, thoughts, and emotions during your practice. Mindfulness can help you stay present and fully experience each moment on the mat.
Step 8: Start with Guided Sessions
As a beginner, consider starting with guided yoga sessions. You can attend classes at a local yoga studio, join online classes, or follow instructional videos. Having an experienced instructor guide you through poses and alignment ensures a safe and effective practice.
Step 9: Be Patient and Consistent
Yoga is a journey, and progress takes time. Be patient with yourself and stay consistent with your practice. Whether you practice for 10 minutes or an hour, the key is to make it a regular part of your routine.
Step 10: Listen to Your Body
Your body will guide you in your yoga practice. It's essential to respect your limitations and avoid pushing yourself too hard, especially as a beginner. Yoga is about self-care and self-discovery.
In conclusion, yoga for beginners can be a rewarding and transformative experience. Starting with the basics, finding your preferred style, and staying consistent will help you build a strong foundation for your practice. Yoga offers not only physical benefits but also mental and emotional well-being, making it a valuable addition to your daily routine.
4 notes
·
View notes
Text
20 EXCELLENT YOGA TIPS FOR BEGINNERS - OLIVIA CHRISTINA
Yoga has become increasingly popular over the years, as more people have recognized the physical and mental benefits that come with regular practice. It is a fantastic way to improve flexibility, balance, and strength, while also reducing stress and promoting overall well-being. For beginners, however, yoga can be intimidating and overwhelming, which is why we've compiled a list of 20 EXCELLENT YOGA TIPS FOR BEGINNERS by OLIVIA CHRISTINA to help you get started.
1. Find the right class
There are many different types of yoga, and each class may have a different focus, pace, and level of difficulty. As a beginner, it's important to find a class that is appropriate for your experience level and goals. Look for a class labeled "beginner" or "gentle" to start.
2. Get comfortable clothing
You'll want to wear comfortable, breathable clothing that allows you to move freely. Avoid wearing anything too baggy or restrictive, as this can get in the way of your movements.
3. Invest in a good yoga mat
A good yoga mat can help you maintain stability and prevent slips and falls. Look for a mat that is thick enough to provide cushioning, but not too bulky to carry around.
4. Start with the basics
Don't try to do advanced poses right away. Start with the basics, such as downward-facing dog, warrior, and child's pose. Focus on mastering these poses before moving on to more challenging ones.
5. Use props
Props, such as blocks, straps, and blankets, can help you achieve proper alignment and make poses more accessible. Don't be afraid to use them.
6. Don't compare yourself to others
Remember that yoga is a personal practice, and everyone's body is different. Don't compare yourself to others in the class, and don't push yourself too hard.
7. Breathe deeply
Breathing is an essential part of yoga. Focus on breathing deeply and fully, in through the nose and out through the mouth.
8. Listen to your body
Pay attention to how your body feels during each pose. If something feels uncomfortable or painful, ease up or modify the pose.
9. Stay hydrated
Drink plenty of water before, during, and after your yoga practice.
10. Practice regularly
Consistency is key when it comes to yoga. Try to practice at least two to three times a week to see progress.
11. Take breaks when needed
If you feel fatigued or overwhelmed, take a break or come out of a pose. It's okay to rest.
12. Focus on alignment
Proper alignment is crucial for getting the most out of each pose and preventing injury. Focus on aligning your body correctly, and don't rush through poses.
13. Don't eat a heavy meal before practice
Avoid eating a heavy meal at least two hours before your yoga practice. This will prevent discomfort and nausea.
14. Try different styles
There are many different styles of yoga, from hatha to vinyasa to restorative. Try out different styles to find what works best for you.
15. Don't be afraid to ask questions
If you're unsure about a pose or have a question, don't be afraid to ask the teacher or instructor.
16. Use online resources
There are many online resources, such as videos and tutorials, that can help you improve your practice and learn new poses.
17. Stay present
Yoga is a great way to be present and focus on the moment. Try to stay present and mindful during your practice.
18. Warm up before practice
Just like any other physical activity, it's important to warm up your body before starting your yoga practice. Spend a few minutes doing gentle stretches or a few rounds of sun salutations to get your body ready for the more intense poses.
19. Be patient
Yoga is a practice that takes time and patience to master. Don't get discouraged if you don't see progress right away. Keep practicing and trust that your body will gradually become more flexible and stronger.
20. Set realistic goals
Set realistic goals for your practice. Don't expect to be able to do advanced poses right away. Instead, focus on small goals, such as improving your flexibility or holding a pose for a few seconds longer.
2 notes
·
View notes
Text
How To Yoga Like a Model a Complete Guide
Yoga is often associated with relaxation and good health, but it can also be helpful for those in the modelling industry. One of the most important aspects of modelling is good posture and body language, especially for those who want to exude confidence and command attention. Yoga can help with this by teaching good alignment and improving core strength, both of which are essential for good posture. Yoga can also help to increase concentration and calmness, both of which are necessary for a successful shoot.
Before a shoot, yoga can help to loosen up the muscles and reduce stress levels. Especially for early morning shoots, a well thought through practice routine can help warm up the limbs and remove stiffness from the joints.
We asked our in-house model and yogi, Sandhya De Angelis to show us her before and after routine that she practices to support her modelling career.
There are many different yoga postures that one can practice to prepare for a long shoot day, but here are a few that are especially good for loosening the limbs and prepping the muscles and joints.
1. Seated Urdvabaddhaanguliya asana or upward bound hands pose is a great shoulder, arm and torso stretch. It also helps to open up the chest and expand the lungs.
2. Swastikasan twists or crosslegged seated twists works towards prepping the torso, waist and side body. The twist helps to extend the muscles and prepare them for the day ahead.
3. Gomukh asan or Cow face pose is a great way to widen the shoulders an open up the chest. It also helps to increase mobility in the shoulder and wrist joints. This posture can be practiced using a yoga belt to make it more accessible yet equally effective.
4. Parivrita trikonasan or twisted triangle pose is another excellent day starter. It helps to strengthen the legs and increase mobility in the hips while compacting the body. Use of a yoga block can help retain the benefits of the pose while making it more accessible.
5. Vrikshasan or tree pose is a great way to stretch out the legs and improve balance, concentration and alignment. Practicing this with your back against a wall is a good way to ease into the pose if balance is a challenge.
6. Virabhadrasan 1 or Warrior 1 pose is an excellent posture for strengthening the legs. It also helps to open up the chest while extending the arms and shoulders.
7. Ardhachandrasan or half moon pose is a great way to stretch out the entire body and improve balance. Use of a yoga block for the palm to support the top body is a good modification to try.
Try this routine out first thing in the morning before you start your day and let us know how you feel in the comments!
Sandhya is wearing the Padma wine shorts paired with the Pari raspberry cross back tank and Bharni forged iron bra. She practices on the Bengal mat.
2 notes
·
View notes
Link
0 notes
Text
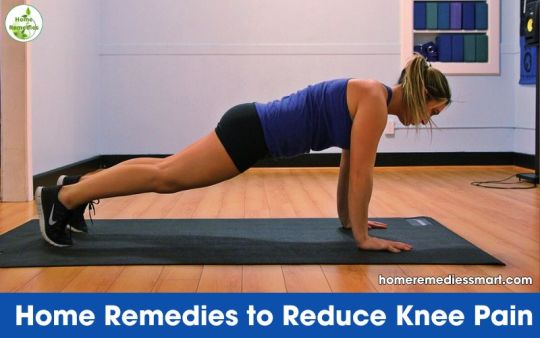
10 Natural Home Remedies to Reduce Knee Pain
Knee pain is a widespread issue affecting individuals across various age groups. Whether caused by injuries, arthritis, or the natural wear and tear of life, managing knee discomfort is crucial. While medical treatments are often necessary, numerous natural home remedies can help reduce knee pain and promote healing. Discover how to reduce knee pain naturally with these ten effective methods.

1. Weight Management: Maintain a Healthy Weight
Carrying extra weight puts undue pressure on your knee joints, worsening existing conditions and increasing the risk of injuries. By managing your weight effectively, you can significantly reduce the stress on your knees, alleviate pain, and prevent further damage.
How to Manage Your Weight Effectively
Balanced Diet: Embrace a diet rich in whole foods, including fruits, vegetables, and lean proteins.
Portion Control: Monitor your portions to avoid overeating.
Regular Exercise: Engage in physical activities tailored to your lifestyle to stay active.
2. Regular Exercise: Strengthen Supporting Muscles
Low-impact exercises help fortify the muscles around your knee, providing better support and reducing joint strain. Choose activities that are gentle on the knees, such as swimming, cycling, or gentle yoga.
Recommended Exercises
Cycling: Outdoor cycling or using a stationary bike.
Swimming: Water aerobics offers resistance without straining the joints.
Yoga: Enhances flexibility and strengthens muscles gently.
Watch video: 10 Natural Home Remedies to Reduce Knee Pain
youtube
3. Hot and Cold Therapy: Manage Swelling and Stiffness
Using ice packs and heat can be highly effective in managing knee pain. Apply an ice pack during acute flare-ups to reduce swelling, and use heat to relax muscles and ease stiffness.
Tips for Hot and Cold Therapy
Ice Pack: Apply for 15-20 minutes several times a day.
Warm Compress: Ideal for non-inflammatory pain to relax tight muscles.

4. Elevate and Rest: Reduce Swelling
Rest is essential when dealing with knee pain. Elevate your leg to minimize swelling and avoid activities that could worsen the discomfort.
Tips for Effective Rest
Elevation: Use pillows to prop up your leg comfortably.
Rest: Prioritize rest after strenuous activities.
5. Proper Footwear: Support Your Knees
Selecting appropriate footwear is crucial for managing knee pain. Choose shoes with good arch support and cushioning to reduce knee impact.
Footwear Suggestions
Supportive Sneakers: Ideal for everyday wear.
Orthotic Inserts: Customizable to address specific needs.
6. Dietary Changes: Anti-Inflammatory Foods
Incorporating anti-inflammatory foods into your diet can help reduce knee pain. Foods rich in omega-3 fatty acids, such as salmon and flaxseeds, and spices like turmeric, may decrease inflammation.
Foods to Consider
Green Leafy Vegetables
Berries and Cherries
Nuts and Seeds: Walnuts and chia seeds are great options.
7. Topical Remedies: Alleviate Knee Pain
Topical creams and ointments with ingredients like menthol, capsaicin, or arnica provide temporary relief from knee pain.
Effective Topical Treatments
Capsaicin Cream: Can be particularly effective for pain relief.
Menthol Gels: Provide a cooling sensation that soothes pain.
8. Use of Knee Support or Braces
Depending on the cause and severity of your knee pain, knee braces or supports can stabilize the joint and evenly distribute pressure.
Choosing the Right Support
Consultation: Seek advice from healthcare professionals to select suitable supports.
Consideration: Choose based on activity level and type of knee pain.
9. Yoga: Improve Flexibility and Balance
Yoga can increase flexibility, improve balance, and strengthen muscles, all of which help alleviate knee pain.
Recommended Yoga Practices
Gentle Poses: Focus on balance and strength without deep bends to avoid knee strain.
10. Hydrotherapy: Relax in Warm Water
Soaking in a warm bath can help relax muscles and joints, providing relief from knee pain. Adding Epsom salts or essential oils may enhance this relaxing experience.
Hydrotherapy Techniques
Warm Baths with Epsom Salts: To reduce muscle stiffness.
Essential Oils: Lavender oil can add an extra layer of relaxation.
Final Thoughts
Navigating knee pain effectively involves a thoughtful blend of activity, nutrition, and proactive measures such as using supportive footwear and topical remedies. While these ten natural home remedies to reduce knee pain can provide significant relief, consult with healthcare providers for a personalized approach. Remember, managing knee pain is a journey that may require adjustments but ultimately leads to a better quality of life.
Read more: Ageless Knees Review | Unlocking Vitality and Mobility for Aging Joints
#KneePainRelief#NaturalRemedies#HomeRemedies#ReduceKneePain#HealthyKnees#ExerciseForKnees#Hydrotherapy#HealthyLiving#ArthritisRelief#Youtube
1 note
·
View note
Text

Back pain is a common issue that affects millions of people worldwide. While modern medicine offers various treatments, many are turning to traditional methods like Kati Basti, an Ayurvedic therapy that provides relief from back pain. Combined with yoga, Kati Basti can offer holistic healing benefits. Let's explore what Kati Basti is, how it works, and how yoga can enhance its effectiveness.
What is Kati Basti?
Kati Basti is an Ayurvedic treatment specifically designed to address lower back pain. The term "Kati" refers to the lower back, and "Basti" means retaining something inside. In this therapy, a ring made of dough is placed on the lower back, and warm medicated oil is poured into this ring. The oil is retained in this area for a specific duration, allowing its healing properties to penetrate deeply into the muscles and tissues.
The warm oil used in Kati Basti helps to alleviate pain, reduce inflammation, and improve circulation. This therapy is particularly beneficial for conditions like sciatica, lumbar spondylosis, and chronic lower back pain.
How Yoga Enhances Kati Basti
Combining Kati Basti with yoga can significantly enhance the benefits of this Ayurvedic treatment. Yoga helps to strengthen the back muscles, improve flexibility, and promote overall spinal health. Here are some ways yoga complements Kati Basti:
Strengthening Muscles: Yoga poses such as Bhujangasana (Cobra Pose) and Salabhasana (Locust Pose) help to strengthen the muscles in the lower back, providing better support and reducing the risk of pain.
Improving Flexibility: Poses like Paschimottanasana (Seated Forward Bend) and Ardha Matsyendrasana (Half Lord of the Fishes Pose) improve the flexibility of the spine and surrounding muscles, making the back less prone to injuries.
Promoting Relaxation: Meditation and breathing exercises, often included in yoga classes, help to relax the mind and body, reducing stress-related back pain.
Enhancing Circulation: Yoga promotes better blood flow, which can help to deliver more nutrients to the back muscles and tissues, speeding up the healing process initiated by Kati Basti.
Finding the Right Yoga Class
To maximize the benefits of Kati Basti and yoga, it's essential to find the right yoga classes. Here are some tips to help you get started:
Yoga Classes Near Me: Search for "yoga classes near me" or "best yoga classes near me" to find reputable yoga centers in your area.
Yoga Center Near Me: Look for centers that offer personalized sessions and have experienced instructors.
Meditation Classes Near Me: Consider joining meditation classes as well, as they can enhance the relaxation benefits of yoga.
Yoga Classes in Viman Nagar: If you're in the Viman Nagar area, search for "yoga classes in Viman Nagar" or "yoga classes Viman Nagar" to find local options. Breathing Point Viman Nagar is a notable center that offers a range of yoga and meditation classes.
By integrating Kati Basti with regular yoga practice, you can achieve significant relief from back pain and improve your overall well-being. Whether you're looking for a yoga class near you or a specialized meditation center, taking the first step towards holistic health can transform your life.
For those seeking a comprehensive approach to back pain relief, combining the ancient wisdom of Ayurveda with the modern practice of yoga offers a powerful solution. Start your journey today by exploring yoga classes near you and experiencing the profound benefits of Kati Basti.
||BREATHiNG POiNT iNTEGRATiVE THERAPY'S || शरीरमाद्यं खलु धर्मसाधनम् ||
Address: Row House No.3, Siddhant Classic A, behind Bakers Gauges Company, opp. Digambar Jain Mandir, Clover Park, Viman Nagar, Pune, Maharashtra 411014
Phone: 095117 97416
#best yoga classes near me#meditation classes near me#yoga center near me#yoga classes in viman nagar#yoga classes viman nagar#yoga class near me#meditation centre near me
0 notes
Text
Unlocking Flexibility with Eliot Ferrer: Essential Stretches from Thai Massage
Flexibility plays a crucial role in maintaining overall well-being and preventing injuries, yet it's often overlooked in our daily routines. Thai massage offers a unique approach to enhancing flexibility through a series of gentle stretches and rhythmic movements. These stretches not only improve flexibility but also promote relaxation and release tension in the body. In this blog, we'll explore essential stretches derived from Thai massage with the help of massage therapists like Eliot Ferrer that can help unlock flexibility and promote physical health and vitality.
Introduction to Thai Massage
Thai massage, also known as Thai yoga massage, is a traditional healing practice that originated in Thailand over 2,500 years ago. It combines elements of yoga, acupressure, and assisted stretching to promote physical and emotional well-being. Unlike other forms of massage, Thai massage is performed on a mat on the floor, with the recipient fully clothed in comfortable attire. The massage therapist like Eliot Ferrer uses their hands, thumbs, elbows, knees, and feet to apply pressure and facilitate stretching movements along the body's energy lines, known as sen lines. Thai massage is not only therapeutic but also deeply relaxing, making it an ideal practice for promoting flexibility and overall health.
Benefits of Flexibility
Flexibility refers to the range of motion in joints and muscles, and it plays a crucial role in maintaining mobility, preventing injuries, and improving athletic performance. By regularly incorporating stretching exercises into your routine, you can increase flexibility and reduce the risk of muscle strains, stiffness, and joint pain. Improved flexibility also enhances posture, balance, and coordination, leading to better overall physical function and comfort in daily activities. Additionally, flexibility exercises can alleviate tension and promote relaxation, contributing to stress relief and mental well-being.
Essential Thai Massage Stretches
Thai massage stretches target specific muscle groups and joints, focusing on gradually increasing flexibility and mobility throughout the body. Some essential Thai massage stretches include the "cobra stretch," which elongates the spine and opens the chest, promoting better posture and respiratory function. Another beneficial stretch is the "hip opener," which targets the hip flexors and groin muscles, improving hip mobility and alleviating lower back pain. Additionally, the "pigeon pose" stretches the hips, thighs, and glutes, releasing tension and enhancing flexibility in the lower body. These stretches can be modified with the help of massage therapists like Eliot Ferrer to suit individual needs and abilities, making them accessible to people of all fitness levels.
Incorporating Thai Massage Stretches into Your Routine
Incorporating Thai massage stretches into your daily routine can be a simple and effective way to improve flexibility and promote overall well-being. You can perform these stretches in the morning to energize your body and prepare for the day ahead or incorporate them into your bedtime routine to promote relaxation and restful sleep. Additionally, Thai massage stretches can be integrated into your workout regimen to enhance warm-up and cool-down routines, improving flexibility and reducing the risk of injury during exercise. By making Thai massage stretches a regular part of your routine, you can reap the benefits of increased flexibility and mobility over time.
Precautions and Considerations
While Thai massage stretches offer numerous benefits, it's essential to practice them mindfully and listen to your body's cues. Avoid pushing yourself into discomfort or pain during stretches, as this can lead to injury. If you have any underlying health conditions or injuries, consult with a healthcare professional before attempting Thai massage stretches, as certain stretches may not be suitable for everyone. Additionally, pregnant individuals should exercise caution and seek guidance from a qualified prenatal care provider before performing Thai massage stretches. By practicing safely and responsibly under the guidance of massage therapists like Eliot Ferrer, you can enjoy the benefits of Thai massage stretches while minimizing the risk of injury.
Exploring Mind-Body Connection
Thai massage stretches not only promote physical flexibility but also cultivate awareness of the mind-body connection. As you engage in these stretches, focus on your breath and sensations in your body, fostering mindfulness and presence in the moment. By tuning into your body's signals and adjusting the intensity of stretches accordingly, you can deepen your practice and enhance the benefits of flexibility training. The mind-body connection nurtured through Thai massage stretches extends beyond the mat, empowering individuals to approach life with greater awareness, resilience, and vitality.
Long-Term Benefits and Sustainability
Incorporating Thai massage stretches into your lifestyle offers long-term benefits for overall health and wellness. Unlike quick-fix solutions, such as temporary pain relief medications or restrictive diets, Thai massage stretches provide sustainable results by promoting holistic well-being. Over time, consistent practice of these stretches can lead to lasting improvements in flexibility, mobility, and overall quality of life. By prioritizing self-care and investing in practices that support physical and emotional health, individuals can cultivate resilience and vitality that endure throughout their lives. Unlocking flexibility through Thai massage stretches is not just a short-term goal; it's a lifelong journey towards optimal health and well-being.
Unlocking flexibility through Thai massage stretches offers a holistic approach to improving physical health and well-being. By incorporating these gentle stretches into your routine with the help of massage therapists like Eliot Ferrer, you can increase flexibility, reduce tension, and enhance overall mobility. Whether you're looking to improve athletic performance, alleviate muscle stiffness, or simply promote relaxation, Thai massage stretches provide a versatile and effective solution. With regular practice and mindful attention, you can unlock the full potential of your body and experience the transformative benefits of enhanced flexibility.
0 notes
Text
Elevate Your Yoga Practice with the Best Yoga Clothing for Men

Yoga isn't just about the poses; it's a holistic practice that encompasses mind, body, and spirit. And when it comes to maximizing your yoga experience, the right clothing can make all the difference. Comfort, flexibility, and breathability are essential elements of yoga attire for men. Whether you're a seasoned yogi or just starting your journey, here are some of the Best Yoga Clothing for Men options to enhance your practice.
Yoga Pants:
Yoga pants are a staple in every yogi's wardrobe. Look for pants that are made from moisture-wicking and stretchy materials like nylon or polyester blends. These fabrics offer superior flexibility and keep you dry during intense sessions. Opt for styles with a tapered leg or elastic waistband for maximum comfort and mobility.
Yoga Shorts:
For those who prefer a little more freedom of movement, yoga shorts are an excellent choice. Look for shorts with a loose fit and a comfortable waistband that won't dig into your skin during deep stretches. Choose materials like spandex or bamboo fabric for breathability and moisture-wicking properties.
Yoga Tops:
When it comes to yoga tops, choose lightweight, breathable fabrics like cotton or bamboo. Tank tops and t-shirts are popular choices, providing ample flexibility and airflow during your practice. Look for tops with moisture-wicking properties to keep you cool and dry, even during the most intense yoga sessions.
Yoga Jackets:
For cooler weather or for warming up before your practice, a yoga jacket is essential. Look for jackets made from lightweight, stretchy materials that allow for a full range of motion. Opt for styles with zippered pockets to keep your essentials secure during your practice.
Yoga Socks:
Yoga socks are a great addition to your yoga wardrobe, especially if you practice on slippery surfaces. Look for socks with grippy soles that provide traction and stability during poses. Choose breathable materials like cotton or bamboo to keep your feet cool and comfortable.
Yoga Accessories:
In addition to clothing, there are a few accessories that can enhance your yoga practice. A yoga mat bag is essential for transporting your mat to and from the studio, while a yoga strap can help you deepen your stretches and improve flexibility. Don't forget a water bottle to stay hydrated during your practice!
Ethical and Sustainable Options:
When choosing yoga clothing, consider brands that prioritize ethical and sustainable practices. Look for companies that use eco-friendly materials, such as organic cotton, bamboo, or recycled polyester. Supporting these brands not only benefits the environment but also aligns with the principles of yoga.
In conclusion, the Best Mens Yoga Clothing prioritizes comfort, flexibility, and breathability. Whether you prefer yoga pants, shorts, tops, or jackets, choose materials that allow for a full range of motion and keep you cool and dry during your practice. Additionally, don't forget to consider ethical and sustainable options when selecting your yoga attire. With the right clothing, you can elevate your yoga practice and enjoy all the physical, mental, and spiritual benefits it has to offer.
0 notes
Text
What Clothes To Wear For Hot Yoga: Stay Cool & Comfortable

Ever stepped into a hot yoga class and wondered what everyone else was wearing? It can be a bit daunting, especially if you're new to hot yoga. But choosing the right outfit for what clothes to wear for hot yoga can make all the difference in your experience. The right clothes can help you stay cool and comfortable during your practice, allowing you to focus on your breath, your poses, and all the amazing benefits hot yoga has to offer.
What to Wear for Hot Yoga: Master the Basics
The key to dressing for hot yoga is choosing clothes that wick away sweat and allow you to move freely. Here's a breakdown of the absolute essentials:
- Fabric is Key: Look for moisture-wicking fabrics designed for exercise. These are usually synthetic blends or natural fibers like bamboo, which help sweat evaporate. Avoid 100% cotton – it traps moisture and makes you feel hot and soggy.
- Choose Your Fit: You want clothes that are fitted but not too tight. This prevents them from slipping out of place during inversions and helps your yoga teacher see your form properly.
- Consider Your Comfort: Above all, choose what feels good on your body. If something's distracting you, it's harder to focus on your workout.
Top Options for Hot Yoga
- Sports Bras: A supportive sports bra is essential for most women. Look for styles with minimal straps for maximum airflow.
- Tank Tops: Go for loose-fitting or cropped tanks that offer breathability.
- T-Shirts: Not as common, but if you prefer a T-shirt, make sure it's a performance version that wicks moisture.
Hot Yoga Bottoms: Comfort is King
- Leggings for the Win: Leggings are the most popular choice for hot yoga. Choose a high-waisted pair that won't roll down, in either capri or full length.
- Shorts: If you get extra warm, consider breathable workout shorts. Fitted styles offer the best freedom of movement.
Hot Yoga Essentials That Make a Difference
Besides the basics, a few extra items can take your hot yoga experience to the next level:
- Yoga Towel: Specially designed to absorb sweat and prevent you from slipping. It's a life-saver, especially on your mat!
- Water Bottle: Staying super hydrated is crucial. Bring a big bottle of water to class and sip throughout.
- Hair ties: If your hair's a distraction, a small hair tie or headband will help keep things tidy.
- Change of Clothes: You'll leave feeling amazing but totally soaked! Bring fresh clothes to change into.
Fact: Did you know hot yoga can burn roughly the same amount of calories as a brisk walk? It's a seriously good workout!
Quick Dos and Don'ts of Hot Yoga Outfits
DosDon'tsChoose moisture-wicking fabricsWear 100% cottonOpt for form-fitting, flexible stylesPick overly baggy or restrictive clothingConsider a sports bra for supportWear heavy makeup or lots of jewelryBring a yoga towel and water bottleForget to shower before class (be kind!)
Frequently Asked Questions (FAQs)
Q: Are leggings too hot for hot yoga?
A: Not if you choose the right ones! Look for moisture-wicking leggings designed for hot workouts. Some people prefer capris, but full-length leggings can offer more grip in certain poses.
Q: Is it better to do hot yoga in shorts or leggings?
A: That's totally up to you! Some people love the freedom shorts provide, while others prefer the coverage of leggings. If you're new, try both and see what feels best.
Q: What should I avoid before a hot yoga class?
A: Skip heavy meals, excess caffeine, and anything that seriously dehydrates you. Hot yoga is intense, so you want to feel light and energized.
Q: How do I keep from smelling in hot yoga?
A: Good hygiene is key! Shower beforehand, wear breathable clothes, and consider a light spritz of deodorant. Most importantly, remember everyone's there to sweat it out!
Myth Buster: You might hear people say you shouldn't wear socks for hot yoga. Truth is, grippy yoga socks can be helpful for some, especially in balancing poses!
Additional Tips for Feeling Your Best
- Listen to your body: If you get dizzy or lightheaded, take a break and hydrate.
- Start slow: Ease into hot yoga, especially if you're a beginner.
- Focus on your breath: Let your breath guide your movements, helping you stay calm under heat.
"The yoga pose is not the goal. The goal is to become calm and focused on yourself. "
Kino MacGregor
Here's the continued article with a focus on takeaways, resources, and addressing a first-timer's concerns:
Key Takeaways
- Fabrics matter – choose breathable, moisture-wicking materials.
- Fit is crucial – opt for form-fitting yet comfortable clothes.
- Prepare properly – hydrate before, during, and after your class.
- Listen to your body – hot yoga is challenging, so rest when needed.
Conclusion
Hot yoga is a fantastic way to boost your flexibility, get a great workout, and clear your mind. Now that you know what to wear, there's nothing stopping you! Choose clothes that make you feel good, step onto your mat, and enjoy all the amazing benefits hot yoga has to offer.
Have you tried hot yoga? What are your favorite outfits for the studio? Share your experiences in the comments below!
What to Expect in Your First Hot Yoga Class
Feeling a bit nervous about your first class? That's perfectly normal! Here's a little preview:
- The Heat Factor: Expect the room to be hot and humid. It takes some getting used to!
- The Flow: Classes usually follow a set sequence of poses, but variations exist.
- Modifications: Your instructor should offer modifications for beginners.
- The Aftermath: You'll leave sweaty but feeling fantastic! Replenish fluids afterwards.
Important: If you have any health concerns, talk to your doctor before trying hot yoga.
Feeling more prepared for your first hot yoga adventure? Let's hear it!
Disclaimer: The information provided on this website is not intended to be a substitute for professional medical advice. Always consult with a qualified healthcare professional before making any decisions about your health.
Read the full article
0 notes
Text


National Hot Tub Day
National Hot Tub Day is here, and you know what that means: you now have yet another excuse to enjoy relaxing in your hot tub.
But what if you want to do something more to celebrate? Here, we’ll show you five ways you can do just that:
Treat yourself to a new hot tub accessory.
Practice some hot tub yoga.
Indulge in aromatherapy.
Have a movie night.
Play some games with the whole family.
Ready to celebrate National Hot Tub Day the right way? Let’s dive in, first with why hot tubs are worth celebrating.
Why Hot Tubs Are Worth Celebrating
You probably know at least part of the answer to this question. After all, hot tubs have a reputation for being relaxing as well as therapeutic.
What you might not know is that hot tubs have a wealth of other benefits that make them worth celebrating:
Reduced stress: The warm water of a hot tub can help your body release feel-good stress-relieving endorphins.
Relaxation and pain relief: Whether you’re suffering from exercise-induced soreness, arthritis or another condition, hot tubs can help reduce pain, loosen muscles and take pressure off joints.
Better sleep: After taking a dip in your hot tub, you’ll likely be able to fall asleep faster and enjoy more restful sleep throughout the night.
5 Ways to Ring in National Hot Tub Day
1. Treat Yourself to a New Hot Tub Accessory
Hot tub accessories offer a fantastic way to spruce up your hot tub without breaking the bank.
For National Hot Tub Day, why not treat yourself to a hot tub accessory that can improve your overall experience in the long-run?
Here are our favorite types of hot tub accessories:
Cover lifters: No one wants to wrangle with a heavy cover when all they want to do is enjoy their hot tub. Make the process painless with a convenient cover lifter.
Steps: If you’re tired of slipping and sliding your way into your hot tub, a set of hot tub steps will be right up your alley. The right set of steps can not only make your entry and exit process much safer, but also serve as a perfect location to place your dry towel for easy access.
Pillows: If your hot tub sessions are getting dragged down by uncomfortable headrests or raggedy cushions, it’s high time you went for a new, deluxe pillow. By choosing the right size and shape for you, you can create a custom experience that’s tailored to your needs.
2. Practice Some Hot Tub Yoga
As a form of exercise that focuses on physical control as well as mental clarity and relaxation, yoga is a perfect match for your next hot tub session.
To get started, engage in some breathing exercises. Simply sit in your preferred seat and take a few deep breaths to begin. Then, focus on lengthening your spine, dropping your shoulders down and back, and noticing the sensation of the water on your skin.
If relaxation is all you’re looking for, you can simply continue that breathing exercise throughout the entirety of your session. Or, you can move onto some deeper stretches and muscle-strengthening poses. We recommend the seated spinal twist, cow face pose and boat pose.
For more info on each one, stay tuned for our Beginner’s Guide to Hot Tub Yoga.
3. Indulge in Aromatherapy
If you want to take your hot tub experience to the next level, you’d be wise to give aromatherapy a shot.
With hot tub aromatherapy, the scents of some of the world’s most prized and fragrant plants are infused in your hot tub water. You can achieve that either with the use of all-natural essential oils or pre-made bath crystals.
Traditionally, certain scents have certain benefits. For example:
Lavender relieves stress and may help you relax.
Eucalyptus
Thyme may reduce anxiety, fatigue and stress.
Keep an eye out for our upcoming post, The Secrets of Hot Tub Aromatherapy, for more information.
4. Have a Movie Night
Movie nights aren’t just for the couch. In honor of National Hot Tub Day, try watching your favorite flick in the hot tub instead.
There are a couple of easy ways you can do this:
Create a backyard movie theater with the help of a projector.
Set up a laptop or portable DVD/Blu-Ray player on a nearby table.
Plus, some of our highest-rated hot tubs, including the Dr. Wellness G-15 Tranquility Spa, come with built-in HDTVs to make your movie night even more fun.
5. Play Some Games With the Whole Family
If you’re not in the mood for a movie, trying playing some fun hot tub games for the whole family.
A few favorites include:
Waterproof cards and board games: If you have a set of waterproof cards or a waterproof board game lying around, you know what to do.
Rubber duck races: Push, blow and splash to see who’s duck can make it to the other side of the hot tub first.
Ping pong: Use plastic paddles to bounce a ping pong around. Whoever knocks the ball outside of the hot tub loses.
Hockey: Get your team’s “hockey puck” (a rubber duck or small floating ball will do just fine) to the other team’s side of the hot tub — no touching allowed.
How are you going to celebrate National Hot Tub Day?
No matter what you choose to do, you’re sure to have a fun and relaxing holiday with the help of your hot tub.
Source
#Allure of the Seas#cruise ship#Sutton Place Hotel#Revelstoke#Canada#Le Saint Pierre Auberge Distinctive#Quebec City#Québec#GTS Celebrity Constellation#National Hot Tub Day#NationalHotTubDay#28 March#original photography#travel#summer vacation#indoors#hotel room#AirBnB#Germany#architecture#vacation#USA
0 notes
Text
Natural Relief: Home Remedies for Hemorrhoids

Hemorrhoids, also known as piles, are swollen veins in the rectal area that can cause discomfort, itching, pain, and bleeding during bowel movements. While seeking medical advice is crucial for proper diagnosis and treatment, there are several effective home remedies that can provide relief from hemorrhoid symptoms. When combined with Ayurvedic treatments for piles, these natural remedies can offer holistic relief and promote healing. Let's explore each remedy in detail:
Warm Sitz Baths: A sitz bath involves sitting in a few inches of warm water to help alleviate discomfort and promote healing. The warm water helps to increase blood flow to the rectal area, reduce swelling, and soothe irritated hemorrhoids. To take a sitz bath, fill a bathtub or a special sitz bath basin with warm water (not hot) and sit in it for about 15-20 minutes. Repeat this several times a day, especially after bowel movements, to experience relief.
High-Fiber Diet: A diet rich in fiber is essential for maintaining regular bowel movements and preventing constipation, which can aggravate hemorrhoids. Fiber adds bulk to stools, making them softer and easier to pass, reducing strain on hemorrhoids. Include plenty of fruits, vegetables, whole grains, and legumes in your diet to ensure an adequate fiber intake. Aim for at least 25-30 grams of fiber per day and drink plenty of water to help fiber move through the digestive system smoothly.
Witch Hazel: Witch hazel is a natural astringent with anti-inflammatory properties that can help reduce swelling, itching, and pain associated with hemorrhoids. Apply witch hazel to the affected area using a cotton ball or soft cloth. You can also use pre-moistened witch hazel pads for convenience. Repeat this several times a day for relief from hemorrhoid symptoms.
Aloe Vera: Aloe vera is well-known for its soothing and anti-inflammatory properties, making it an excellent remedy for hemorrhoids. Apply pure aloe vera gel directly to the affected area to reduce inflammation, itching, and pain. Aloe vera gel can provide instant relief and promote healing of irritated skin. Make sure to use pure aloe vera gel without any added chemicals or fragrances for the best results.
Coconut Oil: Coconut oil is a natural moisturizer with anti-inflammatory properties that can help reduce swelling and discomfort associated with hemorrhoids. Apply a small amount of coconut oil to the affected area using clean hands or a cotton swab. The moisturizing properties of coconut oil can help soothe irritated skin and promote healing of anal fissures, which are common complications of hemorrhoids.
Triphala: Triphala is an Ayurvedic herbal remedy composed of three fruits: Amalaki (Emblica officinalis), Bibhitaki (Terminalia bellirica), and Haritaki (Terminalia chebula). It is known for its gentle laxative properties and can help regulate bowel movements, relieve constipation, and reduce the risk of hemorrhoid flare-ups. You can take Triphala powder or tablets as directed by a qualified Ayurvedic practitioner to promote digestive health and prevent hemorrhoids.
Buttermilk: Buttermilk is a fermented dairy product that contains probiotics, which are beneficial bacteria that support digestive health. Drinking buttermilk with a pinch of salt can aid digestion, promote bowel regularity, and reduce the risk of constipation, which is a common trigger for hemorrhoids. Incorporate buttermilk into your diet as a refreshing beverage or use it in smoothies and lassi for additional health benefits.
Yoga and Exercise: Engaging in regular physical activity, such as yoga, walking, or swimming, can improve circulation, stimulate bowel movements, and reduce the risk of constipation. Yoga poses that involve gentle stretching, twisting, and breathing techniques can help relieve tension in the abdominal area, promote relaxation, and improve overall digestive health. Practice yoga regularly to strengthen the muscles of the pelvic floor and prevent hemorrhoid development.
Conclusion
While these home remedies can provide temporary relief from hemorrhoid symptoms, it's essential to consult with a healthcare professional for proper diagnosis and treatment, especially if symptoms persist or worsen. Ayurvedic treatments for piles, such as herbal supplements, dietary modifications, and lifestyle changes, can complement home remedies and promote long-term healing and prevention of hemorrhoids. By adopting a holistic approach to hemorrhoid management, individuals can find relief from symptoms and improve their overall quality of life.
0 notes
Link
0 notes
Text
Winter Fitness: Skiing Exercises and Cold-Weather Workouts to Boost Your Snow Sports Performance

Winter is here, and that means it's time to hit the slopes and enjoy the thrill of skiing and other winter sports activities. But to make the most of your time on the mountains, it's essential to prepare your body with targeted exercises and cold-weather workouts. In this comprehensive guide, we'll explore a range of skiing exercises, snow fitness tips, winter sports training, and cold-weather workouts to help you enhance your performance, reduce the risk of injury, and make the most of your winter adventures.
1. Skiing Exercises:
1.1 Squats:
Squats are a fundamental exercise that targets the lower body muscles required for skiing. Stand with your feet hip-width apart, lower your body as if sitting back into a chair, and then return to the starting position. Add weights or resistance bands to increase the workout intensity.
1.2 Lunges:
Lunges strengthen the quads, glutes, and hamstrings while improving balance and stability. Step forward with one leg, lowering your body until both knees form 90-degree angles. Push back to the starting position and repeat with the other leg.
1.3 Wall Sits:
This exercise is excellent for building leg endurance, essential for holding skiing positions for extended periods. Lean against a wall with your feet hip-width apart and slide down until your knees are at a 90-degree angle. Hold this position for 30 to 60 seconds before standing back up.
1.4 Core Work:
A strong core is crucial for stability and control while skiing. Incorporate exercises like planks, side planks, Russian twists, and bicycle crunches into your routine to engage the abdominal muscles, obliques, and lower back.
2. Snow Fitness:
2.1 Cardiovascular Training:
Skiing requires cardiovascular endurance, so engage in activities like running, cycling, or swimming to build stamina and improve overall fitness. Aim for at least 150 minutes of moderate-intensity cardio exercises per week.
2.2 Plyometrics:
Plyometric exercises enhance explosive power and agility, both essential for navigating the slopes. Include jump squats, box jumps, and lateral jumps into your workout routine to boost strength, speed, and coordination.
2.3 Balance and Proprioception:
Improve balance and proprioceptive abilities by incorporating exercises like single-leg stands, Bosu ball exercises, and yoga poses like the Tree pose into your fitness regimen. This will help develop better stability and control while skiing.
3. Winter Sports Training:
3.1 Interval Training:
Skiing involves bursts of high-intensity activity, followed by periods of recovery. Mimic these demands by incorporating interval training into your workouts. Alternate between short bursts of intense activity (e.g., sprinting, jumping jacks) with periods of active recovery (e.g., walking, light jogging).
3.2 Strength Training:
Include compound exercises like deadlifts, kettlebell swings, and cable rows to improve overall strength and power. These exercises target multiple muscle groups and help enhance the functional movements required for winter sports.
3.3 Flexibility:
Keep your muscles supple and reduce the risk of injuries by incorporating stretching exercises into your routine. Focus on areas such as the legs, hips, and back to maintain flexibility and range of motion.
4. Cold-Weather Workouts:
4.1 Layering:
When exercising in the cold, layering is crucial to regulate your body temperature. Start with a moisture-wicking base layer, add an insulating mid-layer, and finish with a weather-resistant outer layer. Don't forget hats, gloves, and warm socks!
4.2 Warm-Up Properly:
Before hitting the slopes, warm up adequately to prepare your muscles for the cold weather. Perform dynamic stretches, such as leg swings, arm circles, and light jogging to increase blood flow and prevent injuries.
4.3 Hydration and Nutrition:
Staying hydrated is just as important in the cold as it is in warmer temperatures. Drink water regularly and maintain a balanced diet rich in carbs, protein, and healthy fats to fuel your body for optimum performance.
1. Skiing exercises
2. Snow fitness
3. Winter sports training
4. Cold-weather workouts
Conclusion:
By incorporating skiing exercises, snow fitness tips, winter sports training, and cold-weather workouts into your fitness routine, you can improve your skiing performance, reduce the risk of injuries, and make the most of your winter sports adventures. Remember to tailor your training regimen to your specific needs and consult with a professional if you're new to these activities. Stay active, stay safe, and enjoy the exhilarating winter sports season ahead!
Revitalize your diet with Puravive's Superfood Blend. Packed with essential nutrients, our blend is the perfect addition to your daily meals, supporting your diet and overall health. Experience the power of superfoods with Puravive. Check out the Puravive Superfood Blend Product Page.
Read the full article
0 notes
Last Seen Blogs

michiko-artz-blog
Ultra-Art

webuylandez
We Buy Land EZ

julexa18
julexa

huyumitsu
huyumitsu

the-jupiter-knight
feminine man, masculine woman, and knight