#flexlayout
Explore tagged Tumblr posts
Visit Tumblr Blog
Explore Tumblr blogs with no restrictions, modern design and the best experience.
Last Seen Tumblr Blogs


Fun Fact
Tumblr was named as a finalist in Lead411’s New York City Hot 125 in Aug 2010.
Text
CSS Flexbox Layout by Abdelfattah Ragab
CSS Flexbox Layout by Abdelfattah Ragab
Welcome to "CSS Flexbox Layout". In this book I explain the flexbox layout model. I explain the properties of containers and elements and show you how to use Flexbox to create modern and responsive web designs. By the end of this book, you will know everything about Flexbox, use it to create responsive designs and handle all kinds of scenarios. Let’s get started.
Available on https://shop.tredition.com and https://www.amazon.com
0 notes
Text
How to use FlexLayout with different sizes
In this new post, I want to show you via a simple project how to use in #MAUI #FlexLayout with children with different sizes. In this example, how to show your #skills
In this new post, I want to show you via a simple project how to use in MAUI FlexLayout with children with different sizes. FlexLayout in MAUI is a layout that can arrange its children horizontally and vertically in a stack. Also, it wraps its children if there are too many children to fit in a single row or column. FlexLayout can control orientation and alignment, and adapt to different screen…
0 notes
Text
Geppetto 1.0.0 alpha release
New in release 1.0.0-alpha:
Geppetto client factoring out. The web application was split out from the Java backend allowing Geppetto to be used also on other backends. (@rodriguez-facundo )
Initial support for FlexLayout (@ddelpiano)
Refactor Geppetto Demo application to use React declarative instantiation (@ddelpiano)
New menu component (@ddelpiano)
Javascript codebase linting (@rodriguez-facundo)
Typescript support (@ddelpiano)
Volatile simulations support (@jrmartin)
Canvas bug fixes (@jrmartin, @ddelpiano, @Robbie1977)


1 note
·
View note
Photo

4 Quickest Ways to Center Div with CSS http://ehelpdesk.tk/wp-content/uploads/2020/02/logo-header.png [ad_1] 4 quickest CSS Methods to center... #androiddevelopment #angular #c #css #cssalign-items #cssblock #csscenterdiv #csscenterdivinsidediv #csscentertext #csscentertextindiv #csscentervertically #csscenterverticallyandhorizontally #csscentering #cssflex #cssinline #cssinline-block #cssjustification #cssjustify #cssjustify-content #csstutorial #dataanalysis #datascience #deeplearning #development #docker #flexlayout #iosdevelopment #java #javascript #machinelearning #marginauto #node.js #python #react #unity #webdevelopment
0 notes
Photo

Build a Native Desktop GIF Searcher App Using NodeGui
NodeGui is an open-source library for building cross-platform, native desktop apps with Node.js. NodeGui apps can run on macOS, Windows, and Linux. The apps built with NodeGui are written using JavaScript, styled with CSS and rendered as native desktop widgets using the Qt framework.
Some of the features of NodeGui are:
native widgets with built-in support for dark mode
low CPU and memory footprint
styling with CSS including complete support for Flexbox layout
complete Node.js API support and access to all Node.js compatible npm modules
excellent debugging support using Chrome's DevTools
first-class TypeScript support
NodeGui is powered by the Qt framework, which makes it CPU and memory efficient compared with other Chromium-based solutions such as Electron. This means that applications written using NodeGui do not open up a browser instance and render the UI in it. Instead, all the widgets are rendered natively.
This tutorial will demonstrate how to install NodeGui and use it to build a meme searcher that lives in the system tray and communicates with the GIPHY API.
The full source code for this tutorial is available on GitHub.
Installation and Basic Setup
For this tutorial it’s assumed that you have Node.js v12 or greater installed. You can confirm that both Node and npm are available by running:
# This command should print the version of Node.js node -v # This command should print the version of npm npm -v
If you need help with this step, check out our tutorial on installing Node.
Install CMake and Compilation Tools
NodeGui requires CMake and C++ compilation tools for building the native C++ layer of the project. Make sure you install CMake >= 3.1 along with a C++ compiler that supports C++11 and up. The detailed instructions are a bit different depending on your operating system.
macOS
It’s recommended to install CMake using Homebrew. Run the following commands in a terminal after installing Homebrew:
brew install cmake brew install make
You can confirm the installation by running:
# This command should print the version of CMake which should be higher than 3.1 cmake --version make --version
Lastly, you need GCC/Clang to compile C++ code. Verify that you have GCC installed using this command:
gcc --version
If you don’t have GCC installed, make sure you install Command Line Tools for Xcode or XCode Developer tools from Apple's developer page.
Windows
You can install CMake on Windows by downloading the latest release from the CMake download page.
It’s strongly recommend you use Powershell as the preferred terminal in Windows.
You can confirm the CMake installation by running:
# This command should print the version of CMake which should be higher than 3.1 cmake --version
Lastly, you need a C++ compiler. One possibility would be to install Visual Studio 2017 or higher. It’s recommended you choose the Desktop development with C++ workload during the installation process.
Linux
We’ll focus on Ubuntu 18.04 for the purposes of this tutorial. It’s recommended to install CMake using the package manager. Run the following commands in a terminal:
sudo apt-get install pkg-config build-essential sudo apt-get install cmake make
You can confirm the installation by running:
# This command should print the version of CMake which should be higher than 3.1 cmake --version make --version
Lastly, you need GCC to compile C++ code. Verify that you have GCC installed using the command:
# gcc version should be >= v7 gcc --version
Hello World
In order to get started with our NodeGui meme app, we’ll clone the starter project.
Note: Running this requires Git and npm.
Open a terminal and run:
git clone https://github.com/nodegui/nodegui-starter memeapp cd memeapp npm install npm start
If everything goes well, you should see a working hello world NodeGui app on the screen.
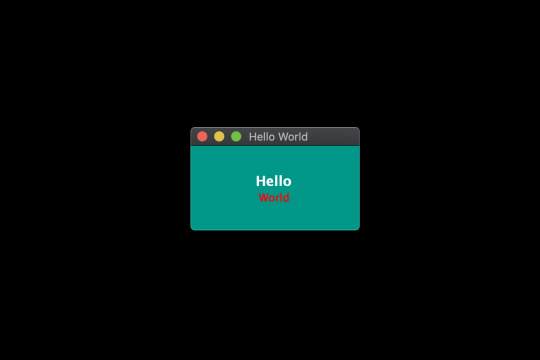
By default, the nodegui-starter project is a TypeScript project. However, in this tutorial we’ll be writing our application in JavaScript. In order to convert our starter to a JS project, we’ll make the following minor changes:
Delete the index.ts file in the src folder.
Create a new file index.js in the src directory with the following contents:
src/index.js
const { QMainWindow, QLabel } = require('@nodegui/nodegui'); const win = new QMainWindow(); win.setWindowTitle('Meme Search'); const label = new QLabel(); label.setText('Hello World'); win.setCentralWidget(label); win.show(); global.win = win;
As far as development is concerned, a NodeGui application is essentially a Node.js application. All APIs and features found in NodeGui are accessible through the @nodegui/nodegui module, which can be required like any other Node.js module. Additionally, you have access to all Node.js APIs and Node modules. NodeGui uses native components instead of web-based components as building blocks.
In the above example, we’ve imported QMainWindow and QLabel to create a native window that displays the text “Hello World”.
Now run the app again:
npm start
Now that we have our basic setup ready, let's start building our meme searcher 🥳.
Note: If something doesn't work while following this tutorial, check your package.json file to ensure that the starter project has pulled in the most up-to-date version of NodeGui.
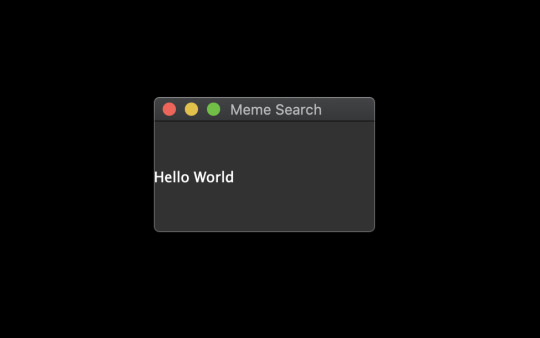
Displaying an Animated GIF
Since memes are generally animated GIFs, we’ll start by creating a basic window that displays a GIF image from a URL.
To do this, we’ll make use of QMovie along with QLabel. QMovie is not a widget but a container that can play simple animations. We’ll use it in combination with QLabel.
An example usage of QMovie looks like this:
const movie = new QMovie(); movie.setFileName('/absolute/path/to/animated.gif'); movie.start(); const animatedLabel = new QLabel(); animatedLabel.setMovie(movie);
Since, we want to load an image from a URL, we can’t use QMovie's setFileName method, which is reserved only for local files. Instead, we’ll download the GIF image using axios as a buffer and use the QMovie method loadFromData instead.
So let's start with the axios installation:
npm i axios
Now let's create a function that will take a URL as a parameter and will return a configured QMovie instance for the GIF:
async function getMovie(url) { const { data } = await axios.get(url, { responseType: 'arraybuffer' }); const movie = new QMovie(); movie.loadFromData(data); movie.start(); return movie; }
The getMovie function takes in a URL, tells axios to download the GIF as a buffer, and then uses that buffer to create a QMovie instance.
You can think of QMovie as a class that handles the inner logic of playing the GIF animation frame by frame. QMovie is not a widget, so it can't be shown on the screen as it is. Instead, we’ll use a regular QLabel instance and set QMovie to it.
Since getMovie returns a promise, we need to make some changes to the code. After some minor refactoring, we end up with the following.
src/index.js
const { QMainWindow, QMovie, QLabel } = require('@nodegui/nodegui'); const axios = require('axios').default; async function getMovie(url) { const { data } = await axios.get(url, { responseType: 'arraybuffer' }); const movie = new QMovie(); movie.loadFromData(data); movie.start(); return movie; } const main = async () => { const win = new QMainWindow(); win.setWindowTitle('Meme Search'); const label = new QLabel(); const gifMovie = await getMovie( 'https://upload.wikimedia.org/wikipedia/commons/e/e3/Animhorse.gif' ); label.setMovie(gifMovie); win.setCentralWidget(label); win.show(); global.win = win; }; main().catch(console.error);
The main function is our entry point. Here we create a window and a label. We then instantiate a QMovie instance with the help of our getMovie function, and finally set the QMovie to a QLabel.
Run the app with npm start and you should see something like this:

Fetching GIFs from the GIPHY API
Giphy.com has a public API which anyone can use to build great apps that use animated GIFs. In order to use the GIPHY API, you should register at developers.giphy.com and obtain an API key. You can find further instructions here.
We’ll be using the search endpoint feature for implementing our meme search.
Let’s start by writing a searchGifs function that will take a searchTerms parameter as input and request GIFs using the above endpoint:
const GIPHY_API_KEY = 'Your API key here'; async function searchGifs(searchTerm) { const url = 'https://api.giphy.com/v1/gifs/search'; const res = await axios.get(url, { params: { api_key: GIPHY_API_KEY, limit: 25, q: searchTerm, lang: 'en', offset: 0, rating: 'pg-13' } }); return res.data.data; }
The result of the function after execution will look something like this:
[ { "type": "gif", "id": "dzaUX7CAG0Ihi", "url": "https://giphy.com/gifs/hello-hi-dzaUX7CAG0Ihi", "images": { "fixed_width_small": { "height": "54", "size": "53544", "url": "https://media3.giphy.com/media/dzaUX7CAG0Ihi/100w.gif?cid=725ec7e0c00032f700929ce9f09f3f5fe5356af8c874ab12&rid=100w.gif", "width": "100" }, "downsized_large": { "height": "220", "size": "807719", "url": "https://media3.giphy.com/media/dzaUX7CAG0Ihi/giphy.gif?cid=725ec7e0c00032f700929ce9f09f3f5fe5356af8c874ab12&rid=giphy.gif", "width": "410" }, ... }, "slug": "hello-hi-dzaUX7CAG0Ihi", ... "import_datetime": "2016-01-07 15:40:35", "trending_datetime": "1970-01-01 00:00:00" }, { type: "gif", ... }, ... ]
The result is essentially an array of objects that contain information about each GIF. We’re particularly interested in returnValue[i].images.fixed_width_small.url for each image, which contains the URL to the GIF.
Showing a List of GIFs Using the API's Response
In order to show a list of GIFs, we’ll create a getGifViews function that will:
create a QWidget container
create a QMovie widget for each GIF
create a QLabel from each QMovie instance
attach each QLabel as a child of the QWidget container
return the QWidget container
The code looks like this:
async function getGifViews(listOfGifs) { const container = new QWidget(); container.setLayout(new FlexLayout()); const promises = listOfGifs.map(async gif => { const { url, width } = gif.images.fixed_width_small; const movie = await getMovie(url); const gifView = new QLabel(); gifView.setMovie(movie); gifView.setInlineStyle(`width: ${width}`); container.layout.addWidget(gifView); }); await Promise.all(promises); container.setInlineStyle(` flex-direction: 'row'; flex-wrap: 'wrap'; justify-content: 'space-around'; width: 330px; height: 300px; `); return container; }
Let’s break this down a bit.
First, we create our container widget. QWidgets are essentially empty widgets that act as containers. They’re similar to <div> elements in the web world.
Next, in order to assign child widgets to the QWidget, we need to give it a layout. A layout dictates how the child widgets should be arranged inside a parent. Here we choose FlexLayout.
Then, we use our getMovie function to create a QMovie instance for each GIF URL. We assign the QMovie instance to a QLabel (named gifView) and give it some basic styling using the setInlineStyle method. Finally, we add the QLabel widget to the container's layout using the layout.addWidget method.
Since this is all happening asynchronously, we wait for everything to resolve using Promise.all, before setting some container styles and returning the container widget.
The post Build a Native Desktop GIF Searcher App Using NodeGui appeared first on SitePoint.
by Atul Ramachandran via SitePoint https://ift.tt/2TBFBEA
0 notes
Video
youtube
xamarin > สอนใช้ FlexLayout in Xamarin Tutorial แบบเดียวกับ Flex-box in Web and React-Native | 2018-12-11T01:48:27.000Z
0 notes
Photo

Want to use a single code base for multiple platforms and devices? Of course you do. ...just posted to our Xamarin blog: Adaptive Mobile Designs with FlexLayout, https://t.co/ewr77HlE6h https://t.co/iaTtPtW6QM
0 notes
Text
[Xamarin.Forms] Primer vistazo a FlexLayout
[Xamarin.Forms] Primer vistazo a FlexLayout
View On WordPress
0 notes
Photo

💥 Software Akuntansi yang anda gunakan sekarang gak bisa diakses dari hape? ➡ Sistemnya gak online, hanya lokal antar komputer ➡ Lagi di rumah gak bisa ngintip omset dari hape, ribet kalo harus buka laptop ➡ Gak fleksibel padahal anda hobby-nya ketemu Client, jarang stay di kantor Makanya Pakai Beecloud.. 🚨Nggak cuma bisa monitor🔭 laporan, bahkan input data pun bisa dilakukan di Handphone📱 dengan cepat dan nyaman. Berkat teknologi FlexLayout™ yang dimiliki Beecloud, Tampilan form transaksi tetap nyaman digunakan di berbagai ukuran layar gadget📱 anda. https://www.instagram.com/p/B1tGYuOA3mq/?igshid=1he1eonetmxkq
0 notes
Video
youtube
xamarin > สอนใช้ FlexLayout in Xamarin Tutorial แบบเดียวกับ Flex-box in Web and React-Native | 2018-12-11T01:48:27.000Z
0 notes
Video
youtube
xamarin > FlexLayout for Xamarin.Forms Explained | The Xamarin Show | 2018-08-09T19:00:01.000Z
0 notes
Video
youtube
xamarin > Xamarin forms 3.0 FlexLayout Design [Tutorial 57] | 2018-07-07T18:18:12.000Z
0 notes
Video
youtube
xamarin > Xamarin.Forms 3.0 - FlexLayout | 2018-06-04T13:05:10.000Z
0 notes
Video
youtube
xamarin > Repeatable FlexLayout for Xamarin.Forms | 2018-05-26T11:31:33.000Z
0 notes