#freenas esxi
Explore tagged Tumblr posts
Visit Tumblr Blog
Explore Tumblr blogs with no restrictions, modern design and the best experience.
Last Seen Tumblr Blogs


Fun Fact
The average Tumblr user visits about 67 pages every month.
Text
New Post has been published on VMware Virtualization Blog
New Post has been published on https://www.tayfundeger.com/freenas-nedir.html
FreeNAS Nedir?
Merhaba,
FreeNAS Nedir? isimli bu yazımda sizlere homelab ortamında kullanabileceğiniz hem de opensource bir storage ürünü olan FreeNAS hakkında bilgi vereceğim. Öncelikle şunu söylemem gerekiyor ki ben de ilk başlarda FreeNAS’ı aşağıdaki ortamda kullandım.
VMware Home Lab
FreeNAS Nedir?
Makaleme başlamadan önce TrueNAS ve FreeNAS ‘dan bahsetmek istiyorum. FreeNAS’ın ismi yakın bir zamanda değişti ve TrueNAS Core ismini aldı. Tabiki FreeNAS ile aynı özelliklere sahip ancak FreeNAS’e ekstra olarak yeni özelliklerde içinde barındıracaktır. Bu konu ile iligli duyuruyu aşağıda görebilirsiniz.
https://www.ixsystems.com/blog/freenas-truenas-unification/
FreeNAS ilerleyen günlerde ismini değiştirecek ve TrueNAS Core ismini alacak. Ancak şuanda TrueNAS Core production ortamlarında kullanımda değil. Kısa süre içerisinde production ortamlarında kullanmaya başlayacağız.
FreeNAS Nedir?
Ben makaleme FreeNAS Nedir ile başlayacağım ancak bu isim yakın bir zamanda değişecek.
FreeNAS Nedir?
FreeNAS kesinlikle kullanmanız gereken opensource bir storage yazılımıdır. Hatta zaman geçtikçe aslında bir storage markası olmaya kadar ilerlemiştir. Freenas ilk olarak 2005 yılında Olivier Cochard-Labbé tarafından kendi file storage ihtiyacın karşılamak amacı ile yapılmıştır. FreeNAS o dönemde yapılırken, FreeBSD üzerinde geliştirilmiştir. Hatta FreeNAS ismide aslında buradan esinlenmiştir. O dönemlerde bu şekilde bir ürün çok çok fazla olmadığı için bu projeyi duyanlar hemen bu projeye ilgi gösterir ve FreeNAS ile ilgili bir canlı topluluk oluştu. Böylece FreeNAS gereçek bir ürün olarak şekillenmeye başladı. File Storage ihtiyacını karşılamak için oluşturulan ürün kısa bir zaman içerisinde, file sharing, media streaming özellikleride eklendi.
2010 yılından itibaren Cochard-Labbé, FreeNAS projesini devam ettirmek için artık yeterli zaman ve kaynak sağlayamadı, bu yüzden kontrolünü genel olarak open source diye tabir ettiğimiz açık kaynak yazılım desteği ve FreeBSD desteği ile tanınan bir şirket olan iXsystems’a verdi. Bunu, büyüyen bir FreeNAS geliştirme topluluğunun ihtiyaçlarını karşılamak için yazılımın güncellenmesi ve modernizasyonu ve proje altyapısının geliştirilmesini içeren önemli bir geliştirme çabası dönemi izledi. iXsystems geçtiğimiz günlerde
Kullanıcı arayüzü tamamen yeniden yapıldı ve ZFS pool‘lar için disk şifreleme ve kernel’de olmayan hizmetlerin kurulumunu destekleyen bir 3 party eklenti sistemi gibi özellikler eklendi. Bugün, FreeNAS, her sürüm için yüz binlerce indirme ile çok aktif bir geliştirme aşamasındadır – kuruluşundan bu yana toplamda 5,5 milyondan fazla indirme olmuştur.
Yazımın başından buraya kadar okudğunuzda FreeNAS sayesinde bir opensource storage oluşturabildiğini anlamış olmanız gerekiyor 🙂 FreeNAS ile evet storage ihtiyaçlarınızı çözebiliyorsunuz ancak iXsystems sadece FreeNAS’ı bize sunmuyor. FreeNAS, home ve SMB gibi ortamlarda tercih edilirken daha büyük ortamlarda kullanılmak üzere çıkarmış olduğu ürünlerde bulunmaktadır. Örneğin TrueNAS isimli ürünü ile kritik BT ortamında bulunan ihtiyaçlarınız karşılayabilirsiniz. TrueNAS kurumsal düzeyde bir depolama yani storage’dır. TrueNAS sayesinde, failover, performans ayarları, raporlama ve hem donanım hemde yazlım seviyesinde 7/24 destek ve bakım alabilirsiniz. Ancak yazımın başında da belirttiğim gibi FreeNAS’ın ismi artık TrueNAS Core olarak değişecektir. Ancak enterprise müşteriler için TrueNAS yine kullanılmaya devam edecek.
Ben bu yazımda FreeNAS Nedir? hakkında bilgi vereceğim, TrueNAS’ı ayrı bir makalede anlatırım eğer merak eden olursa 🙂 FreeNAS’ı aslında FreeNAS yapan yani başarılı bir opensource storage haline getiren ZFS ‘dir. ZFS diye burada bahsettiğim aslında dosya sistemidir.
FreeNAS’ın temel özelliği ZFS’dir (veya “Zettabyte” File System). Başlangıçta Sun Microsystems tarafından geliştirilen ZFS , büyük depolama kapasitesi ve silent data corruption, volume management ve RAID 5 “write hole” gibi birçok depolama sorununu ele almak için tasarlanmıştır.
ZFS’nin yazma üzerine kopyalama teknolojisi, çok etkileyicidir çünkü bu teknolojiden dolayı performans alınmaktadır.. Veriler diske yazılana kadar data block’lar güncellenmediğinden, tipik RAID write hole sorunu ZFS için geçerli değildir. ZFS ayrıca, snapshot alındığı sırada mevcut olan dosyaların bir parçası olan blokların silinmesini önleyerek çalışan bir snapshot özelliğini de destekler. Bu bloklar daha sonra değişmediği sürece, snapshot’ı korumak için neredeyse hiç alan kullanmaz. ZFS deduplication’a benzer bir şekilde çalışır ve hangi bloklarda hangi blokların kullanıldığı tabloları korur.
FreeNAS o kadar güzel bir ürün ki, grafik ara yüzünde nested olan ZFS dataset’lerinin yönetimini sağlayabilirsini ve bunu destekler. ZFS dataset’lerinde, her dataset için compression ve data deduplication’ı yapılandırabilirsiniz. Yani bu işlemleri dataset bağımsız yapabilirsiniz. Bunların zaten örneklerini ayrıca yazacağım. Ancak FreeNAS genel olarak sizin tüm ihtiyaçlarınıza cevap verebilecek düzeydedir. Örneğin ZFS dataset’leri üzerinde snapshot alabilir ve bunları zamanlayabilirsiniz.
FreeNAS sürümleri ile birlikte sürekli yeni özellikler gelmektedir ancak ben genel olarak FreeNAS’ın özelliklerinden kısaca bahsetmek istiyorum.
Yönetim arayüzü özellikleri;
Web tabanlı grafik arayüzü ve isteğe göre SSL encryption
Ortalama 20 adet dil desteği
Web, Console ve SSH erişiminin ayarlanması
Grafik performans raporu
S.M.A.R.T. disk diagnostics
Local sertifika yönetimi ve kendi içine bulunan Certificate Authority role.
Download edilebilir konfigurasyon dosyası
2 factor authentication desteği
Web-based graphical user interface with optional SSL encryption
Alarm desteği ve bunun özelleştirilebilmesi. Yani siz isterseniz bunu email ile raporlayabilirsiniz.
Dosya Sistemi Özellikleri:
Feature Flags (OpenZFS v5000) ve 16 Exabyte’lık teorik depolama sınırına sahip son derece esnek ZFS dosya sistemi. ZFS dosya sistemi özellikleri tamamen yapılandırılabilir.
Compression (lz4 ve gzip dahil),
Tam volume şifreleme (GELI ve AESNI hardware acceleration destekli disk encryption),
Snapshot
Data Deduplication
Kullanıcı kotaları
Fiziksel diskler tamamen taşınabilirdir ve veri kaybı olmadan diğer FreeNAS sunucularına veya OpenZFS’nin uyumlu bir sürümünü destekleyen herhangi bir İşletim Sistemine taşınabilir. Bu oldukça önemli bir özellik. Sadece buradan bence ayrı bir makale konusu çıkar.
Veri güvenilirliği yani Data reliability özellikleri – mirroring / RAID (ZFS RaidZ dahil), güvenilirlik için seçilen verilerin ve meta verilerin birden fazla kopyası ve gerektiğinde tüm sistem sağlama ve arka plan veri onarımı (scrubbing)
Server Güvenilirlik Özellikleri:
Replication ve Failover
Multi version boot – boot menüsü, FreeNAS’ın versiyonunu güncellediğinizde ve güncel versiyonda bir sorun yaşadığınızda tekrar eski versiyonunuza kolay bir şekilde dönebilirsiniz.
UFS2, NTFS, FAT32 ve EXT2 / 3 için disk read ve data import
Kullanıcı / Grup izinleri – Klasik Unix / Linux izinleri ve / veya ACL tabanlı (Microsoft dosya sistemleri için ACL’ler dahil)
Network hizmetleri ve özellikleri
Samba / SMB / CIFS (Microsoft ve diğer ağlar için), AFP (Apple), NFS, iSCSI, FTP / TFTP protokol destekleri
LDAP ve Active Directory desteği
Apple Time Machine ve Microsoft File History desteği
rsync data sync ve replikasyonu (sunucu / client)
Link aggregation ve failover
VLAN
Dynamic DNS Client
Remote syslogd yönlendirme
SNMP izleme
Bakır kablo, fiberoptik kablo, WiFi dahil FreeBSD tarafından desteklenen çok çeşitli ağ donanımı ve ortamları
UPS (Kesintisiz güç kaynağı) desteği
GUI tabanlı yönetim
iozon, netperf, OpenVPN, tmux ve diğer yardımcı programlar
FreeBSD depolarından 20.000’den fazla paket ve bağlantı noktası mevcut ve kurulabilir.
FreeNAS ‘ı peki hangi ortamlarda kullanabilirsiniz? Storage yatırımı yapmak istemiyorsanız ve ileri seviye ZFS ve Linux bilginiz var ise FreeNAS’ı kullanabilirsiniz. Özellikle VMware ortamlarında vSphere HA ve vSphere DRS gibi teknolojileri kullanmak istiyorsanız shared bir datastore’unuzun olması gerekir. Shared Datastore ihtiyaçlarınız isterseniz VSAN ile isterseniz External bir Storage ile isterseniz de fiziksel bir sunucu üzerinde diskleri ekledikten sonra FeeNAS ürününü kurup bir storage haline geetirebilirsiniz. Üstelik FreeNAS üzerinde hem ISCSI hemde Fibre Channel protokollerini kullanabilirsiniz.
https://www.ixsystems.com/blog/openzfs-keeps-your-data-safe
FreeNAS peki güvenilir mi? Buna şöyle cevap vermek istiyorum. FreeNAS’ın sağlamlığı aslında ZFS’den geliyor. ZFS çok sağlam bir dosya sisteim olduğu için FreeNAS’ı güvenli kılıyor. Yazımın başında da belirtitğim gibi FreeNAS’ın gelişmiş bir topluluğu bulunmaktadır. Burada sorularınızı sorailir ve hızlı bir şekilde cevap alabilirsiniz. Eğer isterseniz ücreti olarak support’da alabilirsiniz.
https://www.ixsystems.com/freenas-commercial-support/
Özellikle storage yatımı yapmak istemeyen kişilerin, firmaların hatta hosting firmalarının kullanması gereken bir ürün olduğunu düşünüyorum. VDS Satışı, VPS satışı, Cloud sunucu sataın hosting firmaları için ideal olduğunu düşünüyorum. Değerlendirmenizde fayda var 🙂
Kurulum gereksinimleri oldukça düşük ancak merak edenler aşağıdaki linki inceleyebilir. Zaten kurulum bölümünde ayrıca bunu anlatacağım. FreeNAS Nedir? isimli makalemi burada sonlandırıyorum.
https://www.freenas.org/hardware-requirements/
Umarım faydalı olmuştur.
İyi çalışmalar.
#açık kaynak kodlu#freenas esxi#freenas test#freenas vmware#freenas zfs#opensource storage#sanal freenas#truenas vs freenas
0 notes
Text
Контроллер домена на Ubuntu 18.04 - Ubuntu 18.04 AD-DC
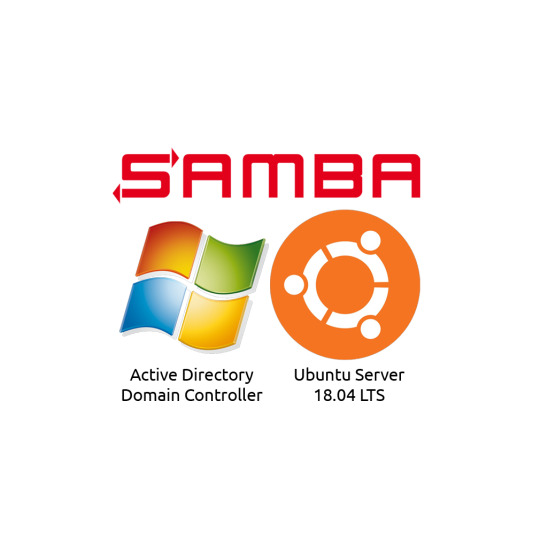
Думаю если вы попали н�� эту страницу, значит тем или иным путем пришли к выводу о том, что необходимо настроить систему централизованного управления учетными записями в локальной сети вашего предприятия, скорее всего это контроллер домена на Ubuntu или Windows. У вас как обычно 3 основных пути для реализации своего плана: Выкинуть деньги на ветер Сесть за пиратство Использовать какое-либо решение на базе линукса Если честно, есть еще 4-й вариант, и он очень даже неплох. Основывается он на Synology NAS, обладающих просто божественными возможностями даже в самых маленьких реализациях. Но вернемся к нашим реалиям. Наш вариант номер 3. В деталях он выглядит примерно так: У нас в сети нет ни одного серверного решения Microsoft Мы не хотим появления в нашей сети пиратских серверных решений Microsoft В большинстве своем наша сеть состоит из машин с ОС Ubuntu Desktop, но есть и пара ноутбуков с вендами. У нас есть необходимость централизованного управления учётными записями У нас есть одно или несколько сетевых хранилищ и мы хотим управлять доступом к хранимой на них информации, предоставляя его через протоколы NFS и CIFS(smb). Сетевые хранилища могут быть реализованы как на голых ubuntu server, так на различных решениях типа FreeNAS, NAS4Free и тд, так и на покупных решениях, типа QNAP, Synology и тд. Реализовывать контроллер домена на Ubuntu мы будем на хосте ESXi с примерно следующими характеристиками: CPU: 1 ядро на 2.2-2.8 Read the full article
0 notes
Text
VMware ESXi 6.5 Setup for Virtualized FreeNAS 9 Installation
VMware ESXi 6.5 Setup for Virtualized FreeNAS 9 Installation
Just a quick post today. Last week I wrote in detail about the NAS that I setup at the start of the year. It’s been a really fun project – in particular getting FreeNAS running smoothe and stable in a virtual machine using hardware pass-through.
As promised last week I’ve created some detailed videos that look at how to get a fresh ESXi 6.5 installation ready for my hardware (including…
View On WordPress
0 notes
Text
VMware ESXi virtuaalipalvelimen raudan valinta ja virheellisesti valitun raudan kirous
VMware ESXi virtuaalipalvelimen raudan valinta ja virheellisesti valitun raudan kirous
Puolisen vuotta sitten kasasin FreeNAS levypalvelimen. Tuohon koneeseen päätyi edellisen virtuaalipalvelimen emolevy, prosessori ja muistit. Uutta virtuaalipalvelinta varten tarvitaan luonnollisesti uudet osat.
VMware ESXi pyörii hyvin moninaisen raudan päällä, siitä huolimatta, vaikka komponentteja ei löytyisikään yhteensopivuusluettelosta. Yhteensopivuusluettelosta löytyy komponentit, jotka…
View On WordPress
0 notes
Photo

#Technology #IT Got iSCSI Setup in #FreeNAS. Then added the iSCSI Remote Storage to VMWare's ESXI. Will be upgrading NAS and moving all VM Guests from local to iSCSI Remote Storage this weekend! Ray Eason | www.RayEason.com
0 notes
Text
Home Lab - VMware ESXi 5.1 with iSCSI and freeNAS
Home Lab – VMware ESXi 5.1 with iSCSI and freeNAS
Recently I updated my home lab with a freeNAS server (post here). In this post, I will cover my iSCSI setup with freeNAS and ESXi 5.1.
Keep this in mind when reading – This Post is about my home lab. My Home Lab is not a high-performance production environment, its intent is to allow me to test and validate virtualization software. Some of the choices I have made here you might question, but keep…
View On WordPress
0 notes
Text
Home Lab computers, drives, etc for sale (ESXi compatible) (Louisville)
I am selling off my home lab gear that has served me faithfully for a long while. The NUC's were used as ESXi servers so I can verify their compatibility. I used the Microserver as FreeNas. And the towers were ESXi too - worked great with those intel [...] from Craigslist http://denver.craigslist.org/sop/6035464193.html Fraud Bloggs made possible by: http://circuitgenie.wix.com/techsupport
0 notes
Text
AsSaggio: Rii i10 Mini Keyboard per Smart TV, Console e Computer
L'anno scorso ho iniziato un percorso che riassumerei con il concetto di espansione degli orizzonti. Nel mio caso si è trattato più che altro del riprendere la vecchia e sana abitudine della sperimentazione, che Apple aveva sopito in me grazie ad un ecosistema semplice ed efficiente. Ma le esigenze non rimangono sempre le stesse e, ad un certo punto, qualcosa si è incrinato, lasciandomi intravedere un mondo di golose possibilità. Non ne faccio un discorso filosofico e non pretendo che si debba estendere a tutti, ma finora devo ammettere di averne avuto solo giovamento. Certo c'è voluto tempo, ma nel mio caso non è stato sprecato visto che tutte le mie esperienze verranno messe nero su bianco e potrebbero aiutare più di una persona. Tra le altre cose, negli ultimi mesi ho modificato interamente tutta l'infrastruttura di rete (vedi #ProgettoRete), assemblato un computer che mi permette di montare i video con più velocità (vedi #ProgettoWin) e ho quasi terminato un fileserver domestico (seguiranno i dettagli nell'imminente #ProgettoNAS). In parte per questo, in parte per la diffusione delle Smart TV e dei TV Box, mi sono trovato ad aver bisogno di strumenti di input rapidi e portatili, da spostare di volta in volta dove necessario. Mi riferisco a mouse e tastiere, in sostanza, che non è comodo (e neanche esteticamente bello) avere in vista nel salotto vicino al TV o sempre connessi a router o NAS, dove si usano molto di rado dopo la prima configurazione. Certe volte uso quelli tradizionali con il filo, ma per interventi al volo preferisco dispositivi compatti. Questi si possono collegare via Bluetooth ma, in genere, sono molto più comode le versioni Wireless RF 2.4 GHz, in quanto non richiedono alcuna configurazione e funzionano appena si collega il ricevitore.
Ne ho provati tantissimi e ogni tanto li avete intravisti anche nelle recensioni di altri prodotti, proposti come compagni ideali, ma vorrei dedicare un piccolo spazio ad ognuno di questi nei prossimi giorni. Inizio dalla Rii i10 Mini Keyboard, la quale include una tastiera ed un trackpad in circa 15 x 6 cm. Mi ha incuriosito in particolare la disposizione degli elementi, perché lo spazio per il trackpad sull'estrema destra è molto comodo da muovere con il pollice.
Sul retro troviamo un piccolo sportellino che nasconde il ricevitore USB, che si può connettere praticamente ad ogni dispositivo, basta supporti le tastiere. Io l'ho testato su Mac, Windows, Linux, FreeBSD, LG webOS 2 e 3, Samsung Tizen 2, Xbox One S, NVIDIA Shield TV e svariate Android TV. Non sempre si ottiene la piena compatibilità dei caratteri speciali senza configurazione, ma è scontato che un prodotto del genere non nasca per lunghe digitazioni. Sui server mi è utile per le poche volte in cui devo accedere all'UEFI, ma in realtà ci ho fatto anche tutti i lavori di installazione di svariati sistemi che ho testato, tra cui ESXi, FreeNAS e NAS4Free (tanto dopo i primi passaggi si controlla tutto in remoto). A differenza dei supporti Bluetooth, quelli con il proprio ricevitore RF funzionano sin da prima che parta il sistema operativo, cosa necessaria se si deve avere a che fare anche con BIOS o UEFI. Il limite è che la portata è leggermente inferiore e, in alcuni casi, si avverte un po' di lag, ma per l'esigenza a cui rispondono non lo considero un problema.
Sulle Smart TV o i TV Box servono in tante situazioni ma, in generale, il vantaggio si apprezza tutte le volte in cui si debbano digitare dati di accesso. Però è anche comodo per risolvere i problemi dovuti al porting di app per tablet su TV, visto che questi spesso richiedono il mouse (ne ho parlato recensendo WETEK.hub). La Mini Keyboard i10 di Rii ha un layout italiano, o almeno qualcosa di molto simile. In realtà molti tasti funzione sono ricollocati per contenere gli spazi, ma l'impronta principale è quella. Ci sono anche una serie di scorciatoie attivabili con il tasto Fn, come ad esempio la regolazione del volume, mentre sulla sinistra si trovano due tasti che riproducono clic sinistro e destro del mouse. Impugnandola con due mani questi risultano molto comodi e veloci da adoperare.
Altra cosa interessante di questo prodotto è la presenza di un puntatore laser, il cui raggio si attiva con la pressione di un pulsante circolare sul dorso. Grazie a questo pratico dispositivo, possiamo usare la tastiera con trackpad collegata al computer durante una presentazione ed avere sia la possibilità di controllare il computer che di indicare qualcosa sulla proiezione.
Conclusione
Compatta ed esteticamente gradevole, la Rii i10 Mini Wireless risolve tantissime situazioni. Non sarà mai l'unico dispositivo di input per un computer o un TV, ma è l'ideale da avere a casa o sempre con sé, pronti ad utilizzarla nelle situazioni più disparate. Ha una batteria interna la cui durata è difficile da definire, proprio perché non è un prodotto che si usa continuativamente, ma sembra comunque piuttosto longeva. Peccato che si ricarichi via Mini USB (e non Micro USB), perché ormai è sempre più difficile trovare cavi di questo tipo in giro. Tuttavia è comunque utile avere sempre a portata di mano il suo cavetto, perché funge sia da prolunga per il ricevitore che da ricarica per la tastiera. Complessivamente lo ritengo un buon prodotto, anche se il prezzo di 29,99€ non è propriamente economico. L'unica cosa strana che mi è capitata è che su Windows il trackpad si muoveva troppo lentamente costringendomi a modificarne le impostazioni.
PRO Molto compatta Comodo posizionamento del piccolo trackpad Funziona praticamente su ogni dispositivo Layout italiano (o qualcosa di simile) Puntatore laser integrato
CONTRO Non proprio economica
Articoli correlati:
Recensione: Rii mini i25, Air Mouse con Tastiera wireless per mini PC e Smart TV Vi è mai capitato di acquistare un prodotto pensando di...
Recensione: Apple Smart Keyboard per iPad Pro 9,7" e 12,9" Tra le cose che rendono "Pro" un iPad Pro ci...
Brevetti Apple: sensore d'impronte a micro-LED e Smart Keyboard con tasto per Siri L'argomento brevetti è molto spesso battuto su queste pagine, vuoi...
from AsSaggio: Rii i10 Mini Keyboard per Smart TV, Console e Computer
0 notes
Text
New Post has been published on VMware Virtualization Blog
New Post has been published on https://www.tayfundeger.com/truenas-core-kurulumu.html
TrueNAS Core Kurulumu
Merhaba,
TrueNAS Core Kurulumu isimli bu yazımda sizlere FreeNAS’in ismi değişerek yeni bir ürün haline gelen TrueNAS Core’un kurulumunu anlatacağım. Eğer FreeNAS ve TrueNAS Core ‘un ne olduğunu bilmiyorsanız öncelikle aşağıdaki makalemi okumanızı tavsiye ediyorum.
FreeNAS Nedir?
TrueNAS CORE ve FreeNAS
Sizler production ortamlarında TrueNAS Core‘u kurarken doğrudan fiziksel sunucu üzerine kurmanız gerekiyor. Ben bu makalemde VMwaer ESXi üzerinde bulunan bir virtual machine üzerine kuracağım. Amacım sadece kurulumu göstermek tabiki. Bu işlemi eğer isterseniz kendi home lab ortamlarınızda da kullanabilirsiniz. ESXi üzerinde kurduğunuz TrueNAS Core üzerinde oluşturduğunuz diskleri tekrar ESXi’a ISCSI olarak bağlayabilirsiniz.
TrueNAS Core‘un bir grafik arayüzü vardır yani GUI. Bunun üzerinden yönetebilirsiniz. Bunun için güncel bir browser üzerinden işlemlerinizi yapmanızı tavsiye ederim. TrueNAS Core’u doğru bir şekilde yapılandırdığınızda RAID disk hatalarına karşı gerekli korumayı sağlar. Ancak bu işlemi yaparken dikkatli olmanız gerekiyor çünkü bazı işlemleri geri alamazsınız. TrueNAS Core‘u kuracağınız sunucu üzerinde donanımsal bir RAID’e gerek yoktur. TrueNAS Core kuracağınız üzerinde kesinlikle ve kesinlikle bir raid grup yapılandırmayın. TrueNAS Core, FreeBSD üzerinde çalışıyor ve her nekadar universal bir ürün olsada, yani her donanım üzerine kurulabilsede desteklenen donanımlar yinede belirtilmiş. Bunun için aşağıdaki listeyi inceleyeblirsiniz. Açıkcası disk controller tarafına özellikle dikkat etmenizi rica ediyorum çünkü bütün herşey diskler üzerinden gerçekleşiyor, yani ürünün amacı storage 🙂
https://www.freebsd.org/releases/11.3R/hardware.html#disk
Ayrıca yine bu ürünü kurmanız için bazı donanım gereksinimlerini karşılamanız gerekiyor. TrueNAS Core’u çalıştırabilmeniz için minimum aşağıdaki gereksinimlerin karşılanması gerekir.
64 bit işlemci
TrueNAS Core kurulumu için minimum 8GB’lık bir alan. Burada isterseniz USB kullanabilrsiniz.
Eğer TrueNAS Core üzerinde 8 adet disk bulunuyor ise 8GB Memory yeterli olacaktır. Ancak memory tercihiniz her zaman ECC olması tavsiye ediliyor. Eğer ECC bulamıyorsanz veya yok ise normal memory kullanabilirsiniz. Her 1 disk için ek 1 GB memory önerilmektedir.
RAID işlevi devre dışı bırakılmış bir SATA ve SAS controller gerekiyor. Yani diskleri asla raid grubuna almamanız gerekiyor.
Yukarıdaki gereksinimlerin dışında özel bir gereksinim bulunmuyor.
TrueNAS Core‘u USB üzerine kurabilirsiniz ancak ben bunu önermiyorum. İsterseniz iki diskten bir raid grup oluşturabiilir ve kurulumu ona yapabilirsiniz. USB üzerine kurulum yaptığınızda USB bozulursa tekrar TrueNAS Core’u kurmak durumunda kalırsınız. Ancak disk üzerine kurarsanız disk bozulsa bile raid olduğu için diğer disk üzerinden işlem yapmaya devam edecektir.
TrueNAS Core Kurulumu
Aşağıdaki linkten TrueNAS Core ISO dosyasını download ediyoruz.
https://www.truenas.com/
Daha sonra bu ISO dosyası ile fiziksel sunucumuzu boot ediyoruz.
TrueNAS Core Kurulumu
Enter butonu ile TrueNAS Installer’ı başlatıyoruz.
Install/Upgrade seçeneğini seçiyorum ve OK butonu ile devam ediyorum.
TrueNAS’ın hangi diske kurulacağını seçiyoruz ve OK butonu ile devam ediyoruz.
Kurulum yapılacağı diskin silineceği ve yeniden formatlanacağı belirtiliyor. Yes butonu ile devam ediyoruz.
TrueNAS Core Kurulumu yaparken bize password soruyor. Burada belirteceğiniz password sayesinde browser üzerinden TrueNAS Core’a bağlanabileceğiz.
TrueNAS ‘ı boot ederken isterseniz EUFI isterseniz de BIOS ile boot ettirebilirsiniz. Ben geleneksel yöntem ile gidiyorum ve BIOS seçeneğini seçiyorum. Zaten eski bir sunucu üzerine kullanıyorsanız BIOS seçeneğini kullanmanız gerekiyor. Her sunucu UEFI desteklemiyor.
Kurulumu başlatıyoruz. Tabiki kurulum süresi sizin sunucunuzun ve disk’inizin performansına göre değişkenlik gösterecektir.
TrueNAS kurulumu tamamlandı artık ISO dosyasını Unmount edebilirsiniz. OK butonuna basıyoruz.
Reboot butonu ile TrueNAS Core’u reboot ediyoruz.
TrueNAS Core ‘u reboot ettikten sonra karşımıza yukarıdaki gibi bir ekran gelecektir. Eğer sizin network’unuzde bir DHCP var ise, otomatik olarak IP alacaktır. Ancak ortamınızda bir DHCP yok ise, yukarıdaki ekrandan network’u ayarlamanız gerekecektir. Eğer network ayarlamak istiyorsanız 1 butonuna basıp daha sonraki adımları takip etmeniz yeterli olacaktır. Zaten basit bir şekilde bu işlemleri yapabilirsiniz.
TrueNAS Core Kurulumu tamamlandı. Artık browser üzerinden vermiş olduğumuz IP ile giriş yapabiliriz. Kurulum sırasında belirtmiş olduğumuz şifre ile giriş yapıyoruz.
TrueNAS üzerinde artık işlemlerimizi yapmaya başlayabiliriz. Bundan sonraki bölümlerde TrueNAS Core üzerinde yapılacak işlemler hakkında detaylı bilgi vereceğim.
Umarım faydalı olmuştur.
İyi çalışmalar.
0 notes
Text
The Annual NAS Challenge
For some reason I like to build large storage arrays. I do tend to eat up a lot of storage and over time I’ve filled them up. For the last couple of years I’ve gone big and in 2016 I decided to just buy an off the shelf Drobo 5N filled with 5x 4TB SATA drives. It’s fine but there have been a few issues with it – the lack of active directory integration means I cannot securely use it to store virtual machine disk images for Hyper V Server and a lack of iSCSI and slightly lack-lustre out the box NFS implementation has left me with the same problem for VMWare ESXi virtual machines. I’ve ended up just using it to store all my old backups and ISOs but don’t feel I’m getting the most out of it.
I had some old parts sat around that I shared on Facebook a while ago – motherboards, CPUs, RAM and a lot of disks. Amongst them were 4x 4TB matched SAS drives and a SAS HBA I had used on a project a couple of years ago. At that time I was working on a NAS that I never quite felt happy with and then personal issues meant I had to leave it in an undesired state. Most of it got torn down but a few bits remained so this year is mostly a rebuild of a NAS from the past but with a clear intention on stability and performance – at least matching my Drobo 5N when it comes to network speed.
The last NAS had a number of issues:
Trying to get everything in to a 2U case proved extremely loud and messy
Consumer grade hardware posed issues with OpenIndiana, switched to FreeBSD
iSCSI stability issues – regularly lag spikes
Speed never ended up particularly high
Significant management overhead just to keep it running
I did however really enjoy working with ZFS and found iSCSI worked wonderfully for my virtualization needs. With a focus on backing virtual machines for my projects and learning from this build in the past this year’s requirements are:
iSCSI protocol
SMB with Active Directory integration
At least 100MBps sustained speed for an iSCSI read or write operation
Potential for link aggregation
ZFS implementation
Rapidly upgradeable NAS operating system
Low management overhead
Needs to look good and remain quiet on my desk as this won’t be in a data centre or rack mounted in my garage
A Virtual Solution
To meet my requirements the first thing I decided on way to go with an out-of-the-box FreeNAS installation. It handles iSCSI and ZFS but prevents me needing to look and manage everything under the hood if I don’t want to. It also comes with pretty good (apart from web authentication) integration with Active Directory which means it will be easy for me to setup and manage for iSCSI and SMB without installing a tonne of extra software. Having played with FreeNAS 9 and the beta of 10 during testing I decided to stick with the latest stable release of FreeNAS 9. I had a bunch of issues with the web interface and even the boot loader on FreeNAS 10. Whilst I think 10 is a landmark shift away from the issues I’ve always had with previous versions of FreeNAS it’s definitely not there for daily use yet.
The next big decision was how to manage upgrades. Knowing the issues I had testing FreeNAS what I didn’t want was to make a decision to upgrade FreeNAS at some point, or switch to another ZFS-based operating system, and end up with my NAS and consequentially virtual machines unavailable for a whole week. The solution – virtualising my NAS and using a bare metal hypervisor as the actual underlying operating system on the hardware.
Running FreeNAS in a virtual machine works and is supported but there are a few caveats – the main being that any disk which FreeNAS itself is sharing out needs to be as close to the physical hardware as possible. Creating a physical RAID array, having the RAID adapter setup in the hypervisor and then creating several disks for ZFS to be configured on in a FreeNAS virtual machine is the worst possible thing you can do. All the optimisations that ZFS does are negated but underlying technologies and it becomes a worst-of-all scenario.
I decided to go with VMWare ESXi 6.5 as my hypervisor. I’ve used 5.5 a lot and wanted to try the new version. I did consider Hyper V Server 2016 and gave it some testing but found a few limitations that frustrated me and decided (other than my desktop PC) I would stick to VMWare across all my virtualisations.
Using ESXI 6.5 left me with a simple solution. The 4TB SAS disks that will form my storage array are connected to a HBA which can, in turn, be directly passed through to the virtual machine. This makes my LSI SAS2008 card appear to FreeNAS as if it is installed locally. Because the card is where the disks are connected to VMWare never even sees the 4TB disks. The HBA itself is one I used a couple of years ago and blogged about at the time to make sure it just presents disks and does not RAID on top of them (note even JBOD). Passing through the HBA required enabling IOMMU in the motherboard and selecting the device in VMWare as a pass-through device. The mother board also has eSATA ports that I passed through even though I am not using them at this point.
For the FreeNAS boot disks I use SSDs. Unfortunately, I cannot pass these through and nor is there any underlying RAID on them. To give me some stability here I have two separate SSDs. I have created a virtual disk on each of these which are then configured in a ZFS mirror for the FreeNAS boot drive. Whilst this is not as ideal as having them directly passed through to VMWare it does mean that I have a mirror for protection against single drive failure and performance on them will be more than adequate to boot with. I also didn’t want to pass these through as I’d then lose some of the advantage of hot-swapping the underlying operating system unless I kept adding disks.
This virtualised solution means that I can configure FreeNAS with 16GB of RAM and 6 cores which will be fine for my daily use and then create a second VM with everything other than the PCI Express pass-through enabled. I can then get everything working and ready for migration. If I want to then switch to a different underlying operating system for my NAS I just shut down the initial VM, attach the PCI Express HBA to the new VM, start it up and import the ZFS volumes – this entire process will take a couple of minutes and can be dry-run through first. I am sacrificing some RAM here to FreeNAS but for my use case I think the versatility is better.
To complete this built I’m going to be using the hardware I have listed here. This includes a 6-core processor, 32GB RAM, an Intel quad gigabit NIC, a GTX 460 graphics card and most importantly an Aerocool DS200 case in fluorescent orange. I’d love to say I selected the case for the number of disk bays and noise dampening that it provides but the truth of it is I loved just how orange it is. I did a separate review of the case recently – it isn’t amazing but it is orange and works well for my purposes.
The Build
The build is detailed in full in the video at the top of this post and there will also be separate videos coming up showing how I configured FreeNAS and ESXi to enable this configure in full. Rather than rehashing everything here it all went pretty well though apart from a few issues that did crop up.
I started by almost bricking my SAS HBA. When swapping from a low-profile to full-sized bracket I got annoyed at a screw, removed its thread and almost snapped the PCB whilst trying to remove it. Thankfully everything still worked. Don’t get mad at your HBAs folks, it rarely ends well. There were a few issues with cable management – namely how little space this case provides behind the motherboard tray – and the graphics card makes more noisy than I’d like (but it does have an orange fan), however the physical build was fine other than these minor issues.
During the install of ESXI 6.5 I had a bunch of issues that I’d not encountered before. The first was with keyboards – a selection of modern gaming keyboards I had would not work once ESXi’s installer booted at all. I ended up using a late 1990s Sun Microsystems vintage keyboard I had lying around which seemed fine. I guess this is the first time I’ve tried ESXi with a consumer keyboard (rather than a basic Dell one in a rack) and didn’t spend much time investigating but something to look out for – no BIOS setting changes got anything working here.
The other really annoying thing with ESXi was its desire to not play ball with a USB-stick installation. One of the reasons I had selected ESXi over Hyper-V was so that I could install it on a USB stick. Many USB sticks were just not detected by the installer or would not partition – even one that I’d got ESXi 5.5 installed on. I eventually got it working on a USB stick I didn’t really want to use (it was a small collapsible one prone to falling out of machines) when eventually it started giving random errors during reboots. At this point I gave in and went with just using a small amount of SSD space on one of the datastore drives. I never got to the bottom of this, some of the drives could be fakes but I doubt all of them are – it’s more likely an issue between the consumer board and ESXi. I was able to work around this using SSD but never addressed the underlying issue. If you have this and must install on a USB stick my recommendation would be install ESXi as a VM in Windows (through VMWare Player) and then take that disk image and burn it to a USB stick (this also works for Hyper-V).
The final issue was the motherboard���s on-board Realtek network interface. The RTL8110 is no longer supported by VMware in ESXi 6.5. Whilst I had a separate Intel quad gigabit NIC (which worked perfectly) I wanted to use the Realtek one for management traffic and reserve the Intel card for iSCSI. To work around this you can install the other drivers from VMWare 5. This does work but is not supported. You can either merge these in to your ESXi 6.5 image before you start or do it via the other working cards afterwards (which is what I did).
To get your Realtek card working with ESXi 6.5 follow these steps:
Download the drivers from http://vibsdepot.v-front.de/depot/RTL/net55-r8168/net55-r8168-8.039.01-napi.x86_64.vib and upload to your datastore (we’ll refer to its name a DatastoreName below)
Enable SSH on the host
SSH in as root to the host
Type in the following two commands:
esxicli software acceptance set -level=CommunitySupported
esxcli software vib install /vmfs/volumes/DatastoreName/net55-r8168-8.039.01-napi.x86_64.vib
Reboot your host
This should all work magically – but a couple of caveats:
The first time I did this my Realtek NIC appeared but I lost the Intel ports. I never could get them back. They were detected and had a driver loaded but never mapped to an interface and no errors in any logs. A reinstallation worked fine.
Some people have repeated other odd errors – including the card running for months, freezing up and then working fine after a reboot. I wouldn’t use this port for anything production-worthy.
And with that the 2017 16TB NAS is ready for action.
Performance
I tested numerous configurations with both iSCSI and SMB. I ran drive configurations including two-parity disk RAIDZ2 (ZFS’ version of RAID 6), single-parity disk RAIDZ (ZFS’ version of RAID 5) and mirrored stripe and just striped configurations (ZFS’ versions of RAID 10 and RAID 0). I ran all these tests with the default synchronous write policy and compression disabled. I separately ran some compression tests and found a very small fluctuation in speeds with anything up to default levels of gzip compression (highest gzip did drop around 10MBps of transfer). I also ran tests to see if ZIL disks or additional RAM would significantly change performance figures – they didn’t.
From the main results it became obvious really early on that iSCSI out performed SMB but it had some odd issues including speeds peaking and then dropping significantly before peaking again. I was able to get 102.32MBps out of my tests (which did beat the Drobo 5N) but I wasn’t happy with the lag spikes – these can be fatal when you want low-latency for virtual machines.
I then did something many people would consider bad – I swapped to an asynchronous write policy. This definitely increases risk in your storage solution (a sudden power loss and I’ve potentially corrupted the disks far more than I otherwise would) and I would not recommend it in production unless you can take other precautions (keeping replicas, backups, and a stable UPS with graceful ZFS shutdown would be musts). That being said, I am not in a production system and the results smoothed out and gave me a big performance boost.
Switching as async writes with RAID Z over iSCSI gave me a whopping 125MBps – completely maxing out the gigabit Ethernet. Whilst I haven’t tested the impact of link aggregation yet I did do a test from another VM within the same host (in effect removing the NICs limitations). This was able to pull down more than 250MBps (2.5Gbps over the network) – and that was sat on top of a virtual disk in a datastore on top of the iSCSI itself.
I’m really happy with this NAS – it looks great, it’s quiet and I can happily get a 26% performance increase over my off-the-shelf Drobo 5N with a lot more versatility. Whilst these parts could cost a lot if purchased new everything other than disks could easily beat the price of a Drobo 5N if purchased second hand and there’s scope for many more disks and configurations here plus a fairly low power drag (I notice around 100W at the moment).
I’ll be doing some posts on the ESXi and FreeNAS configurations that I’ve used shortly but for now enjoy the video above which includes all the benchmarks and shows off the build a little more.
cof
cof
mde
sdr
With a new year comes a new NAS - check out my 2017 16TB build. Did I mention... it's orange? The Annual NAS Challenge For some reason I like to build large storage arrays. I do tend to eat up a lot of storage and over time I’ve filled them up.
0 notes