#godaddy.com login
Text
#godaddy email#godaddy email login#log in go daddy#godaddy login#go daddy email#godaddy webmail#godaddy webmail login#webmail godaddy#go daddy email login#go daddy webmail#go daddy login#www godaddy com login#godaddy.com login
0 notes
Text
filezilla javatpoint
MLM prospecting help is needed in the multi-level marketing industry. For network marketers like yourselves who to be able to build firm or downline as easy as possible, Using than using the internet to your advantage to combat some for the problems that 97% of distributors worldwide face and result in failure.
A tool that is in fact mandatory is having a net page. There are a ton of offers for various styles and types of websites that could be set up for you, but is there a need? GoDaddy, for example, has a product called Website Tonight that sets up your site design in a degree and click method. One typing one does yourself is adding give full attention to. That product if you want to keep it under five dollars a month is extremely limited.
It can work in secure mode, and has a 'keep-alive' succeed. It also has drag and drop, so you can find drag and drop files from your neighborhood PC on the server.
The first step to establishing an FTP account is to download and install your FTP client on personal computer. There undoubtedly few to settle on from a great number of are reduce. I use filezilla, which could be downloaded in Firefox and have been had no problems at all, as all my file transfers have prevailed.
Your phpBB files tend to be your forums directory regarding the server and also know your godaddy database IP (also username, dbname and password). Now you should start the install. To do this, just go to the URL you installed the files so that it will. Now all we need to do is do as instructed.
Go back to filezilla Full Crack .com, login to your account with consumer id and password you ought to have received with your e-mail. Then go to account manager and activate your hosting account and internet site. If you are having difficulties finding the precise buttons, browse the support area of GoDaddy.com and kind in your question, 4 to 5 guide you thru most of your questions as there is nothing complicated related.
14. built the settings as the administrator, registered users, create your forum friendly. Google 'setting up phpbb forum" for more detailed guides (there are also plenty of YouTube videos on this), but this really is easy.
1 note
·
View note
Text
How Place In Hosting For My Website
For those those people who are always trying sustain and protect their privacy can always turn to the world wide web for a fast and free service. This is where they can obtain a piece of the experience for free. All free proxies over the internet but may risk something more.
servers is also specialized. You may have a printer server where all of your printing projects go by using their server to print. You get an email server and a companies greater than a few employees do use an email server to process and "serve" up emails. This division of effort among servers creates an efficient and efficient way to local community.
STEP THIRTEEN: After you could have received your welcome e-mail login to any cpanel and take a moment to look it over once too just learn it in brief. Then remembering your name server's over welcome e-mail you were sent, get back and log in to your godaddy.com fund.To the right of where it shows your domain name, click the "(Details)" relate. on the left side, second within the top, you see the heading name servers just below that go through the "(Change)" internet site.
windows activator . Take your regular average check and increase it by 10%. tenorshare 4ukey crack how easy it would be to reach that goal by adding one appetizer or dessert to your order. But guaranteed that the goal is attainable. If it's too high, they won't try.
For this purpose it may use the IP address or the protocol. Should the demand the is legitimate and validated the server will provide it for. The server might change your request or provide you with the appropriate data without waiting for any response.
Seek time-- A measure of how long it takes for a hard disk drive to move its heads to the very best part for the platters inside your the data that the looking at. This is measured in milliseconds (ms). This will be somewhere around 10 ms, give or take 5 ms. The lower the figure, the faster the drive finds the information.
final cut pro x Crack would have to choose between managed and unmanaged hosting then. Once you unmanaged hosting, you will responsible for that server a lot of that goes along the planet. Unless you have associated with experience, or a team that can handle it, this most likely the option for you. Instead, you should choose managed web page. Your host can help you add up and manage the server, and also the only thing that you have to concern yourself with is the content of one's site and running on the web.
In short, to quantity output of your people, treat each individual as specific first so an employee second. Very best need among the food service industry today is teamwork by agreement. Our industry is a vast complex various different businesses and widely varied views. Yet our differences fade into insignificance many of us consider our many over-all mutual desires.
0 notes
Text
A Guide to WPC2027 Live login | The best method of selecting the best fighting cock is to:
Games, sports and competitions are everywhere in our daily lives However, are you aware of the "cock-fighting contest"? Wpit18.com is a website that organizes "Cockfighting events" throughout the Philippines as which is an Asian country. If you are familiar with WPC2027, you're Philippino. A Philippine website for cockfighting, called WPC2027, is dedicated the fans who organize this tournament, and the cocks will be fighting with each against each other. Along with betting on cockfights owners make money from the sport. Naturally it is part of the gambling.

If you visit the official WPC2027.live website, you will have two options to sign up to attend the event. If you already have an account on WPC2027, you can sign up for wpc2027 live login using the link offered. However in addition, you've met the prerequisites for registering for a brand new WPC2027 account. Make sure you fill in the entire registration form. A web-based platform to stream live
Cockfighting events and submitting for WPC2027 are one of the ways to apply for WPC2027 live Dashboard as well as wpc2027 log in live. Through the Live Dashboard you can swiftly learn about the upcoming competitions and events. In addition, you can join this page of WPC2027 via social media platforms , such as the Facebook page if aren't interested in using WPC2027's Dashboard. WPC2027 and the live login for WPC2027. Facebook and Twitter accounts for social media are controlled by the team of WPC2027. There is a chance that they are many questions asked:
When did registration for WPC2027 begin?
It was launched on February 3, 2021. The domain wpc2027 is managed through LLC as well as GoDaddy.com. The primary domain used by WPC2027 is due to expire the 3rd February 2026. Once you have registered, are able to utilize the live login feature of wpc2027 to log in.
What's the point for WPC2027 and the WPC2029?
WPC2027 WPC2027 is an organization which organizes "Cockfighting" lawfully and is registered for Philippians.
Follow these steps for making an account registration on your first attempt. Live login account WPC2027 with no errors:
Enter your "Username"
Enter your "Password"
Enter the details of your "First as well as Last Name"
Give the specifics of you "Birth Date" as well as "Activity."
Donate the donation from the "Income source."
Then step, select "Register."
Be sure to input the correct password in the WPC2027 login portal.
If you forget your login password wpc2027 login login passwords are very easy to change. If you wish for a change in your password, the only thing you need is the number of your mobile phone that you used to sign up. Make sure that your correct phone number must be used when you sign-up to sign up for an account for the first time. You must provide the name of your surname and initials below , as well as your mobile number. Also, provide the URL on the profile on Facebook. Facebook profile or profile name.
Your birthday and the date of birth should be in line with. Your source of income should be noted at the top of the form. The decision of which source of funding is the best one for you is entirely up to you. After the update has been downloaded, verify that the details are accurate Then hit "Register.".
The event that was held within WP2027 along with WP2029 was when the Filipinos from the Philippines organised an "cockfighting event" along with WPIT18. When you visit WPC2029. Live and you will be taken to Wpit18.live. A large portion of the WPC2027 contest includes a contest that harms birds, however the Philippians created the contest to ensure its successful and the enjoyment of their viewers.
The primary reason it is a blood sport is the physical harm that cockfighters inflict on one another. It is possible to increase the risk by linking metal spurs with their primary motivations. Although not every fight ends with death, the fighters may get serious physical injuries. However, Cockfighting is still a popular sport in some countries, but in other countries the practice is restricted by law, or even prohibited. The importance of culture and religion is frequently mentioned by those who promote the idea of an "age ancient sport" to continue the tradition of cockfighting as an athletic activity. Cockfighting in the past was a popular spectator sport. In the past, people of the Indus Valley Civilization was a fan of the sport of cockfighting as a pastime.
1. Make sure to check its eye.
2. Great sense of perceptual ability
3. With caring hands
Source: @ Pros Of Wpc 2027
#wpc2027#wpc2027.livelogin#wpc2027comlive#wpc2027live#wpc2027livedashboard#wpc2027livelogin#wpc2027register
2 notes
·
View notes
Text
http://serialkeysunlimited.com/reimage-pc-repair-license-key-crack/
Reimage repair key
Go to GoDaddy.com, login to your bank account with purchaser id and password you should have received inside your e-mail. Then go to account manager and activate your hosting account and arena. If you are having difficulties picking out the exact buttons, go to your support component of GoDaddy.com and type in your question, it needs to guide you thru most of your questions as there's nothing complicated included.
On your Download Youtube Videos have a call to action video game. The call to action is to subscribe to your list. These people have sat there watching the whole video, then you can certainly have piqued there attract.
There lots of other replacement of the Download Youtube Videos movies. You may want to download iTube, a freetool, and install it on pc. Open iTube and choose File following go to Options. Right after which below the Save Movies To: simply field enter the location in want conserve lots of the YouTube movie. Purchase choose if you want to convert the file giving you more options to download it on your iPod or if perhaps you simply want to MPEG for daily experience your home computer.
Reimage repair key
It costs $39.95 get and capture any YouTube videos too as any streaming flash videos and MP3 speaker. If you are a media junkie, this just may be pounds for an individual.
With an array of supported video formats, Any DVD Converter Professional can convert lots of video formats and rip DVD and DVD folder for your entire family.
Allow anyone to automatically Batch Download Youtube Videos provided time. And the download function is intended for both unregistered and registered users.
Once experience Safari attached to your machine, launch the browser and point it to the YouTube web sites. Next, search for flick that you wish to download and because the comes up in the search results click it. The video will begin playing. On this point you could either pause it or let it play. It matter. Press the following key combination on your Mac's keyboard: Command-Option-A. The "Command" key may the world "Command" or it might simply a good Apple symbol depending round the model of the keyboard.
Most likely one of Golden's assistants or some Temple media relations official is handling the actual writing, however still ought to have being confirmed.
Tips. Just drag the YouTube URL you want and drop it one of the the open application to downloading. Another download choice is to use the right-click feature with YouTube video browser to browse videos.
http://serialkeysunlimited.com/reimage-pc-repair-license-key-crack/
1 note
·
View note
Text
How to Create a Blog on WordPress in 10 Minutes? Free Full Guide
In today's time, everyone wants to earn money sitting at home from the Internet. Thousands of people are earning very well from the internet by working at home today. There are many ways to earn money from the internet, the most popular of which is blogging.

How to Create a Blog on WordPress?
In today's time, a lot of people are earning very well at home, so to do blogging, we have to create a website or say blog, now to create a professional blog, without coding (Coding) For this, you have to use WordPress, so in today's article, I will tell you How to Create a Blog on WordPress step by step? (How to make Professional WordPress Blog step by step guide) How to Create a Blog on WordPress?.
WordPress is a very popular name for creating websites and blogs, without coding, if you do not know the code at all, then you can take support of WordPress, this is software that helps you create a better website.
Or you can make money from the internet by becoming a professional blog, so to create a WordPress site, you need to have knowledge of some things like what is a domain name, web hosting ) What happens, etc. So let's know what is needed to build a website and How to Create a Blog on WordPress?? (How to Create a Blog on WordPress or a website).
How to Create a Blog on WordPress? Complete information on creating a website on WordPress
1. Purchase a domain name for your website blog
To create a professional WordPress blog or website, first of all, you have to have a name which we also call a domain name.
The domain name is the name of the website or blog. For example, our website name is CatchHow.com. So Similarly, for your blog, a single name will be required, so you can buy this name from godaddy.com, this website is quite popular in Indian to buy a domain name, so you can go here according to your name and according to your name If you want to keep the website, you can keep it, then you will have to buy it, buy your domain name for a year or two and after that, you can increase the debt by giving money again.

Domain Search
2. Web Hosting to Buy for Blog or Website
The next important thing that comes after purchasing the domain name is Web Hosting. Web Hosting is a place on the Internet where we will store our files documents that will be needed to create a website or blog, then we will store it in Web Hosting. To buy hosting, you will find many websites on the internet, some of which are popular websites, Bluehost, Hostgator, Godaddy, from here you can buy web hosting. Web hosting is a bit expensive and different.
so buy whatever hosting you need according to your needs. Read this:- Which 1 is best between SiteGround vs Bluehost?
Some Website for Web Hosting
- Bluehost
- Hostinger
- A2 Hosting
- DreamHost
- SiteGround
- GoDaddy Hosting
- GreenGeeks
- InMotion Hosting
- IONOS (1&1) Hosting
- HostPapa
3. Connect the domain name to the DNS server
After buying the domain name and web hosting, now you have to connect these two so that whatever you want to create your website or blog goes online, here you have to connect your domain name to the DNS server, so for this, you will have to You have to go to domain management and change the DNS of the domain and enter the DNS of your web hosting.
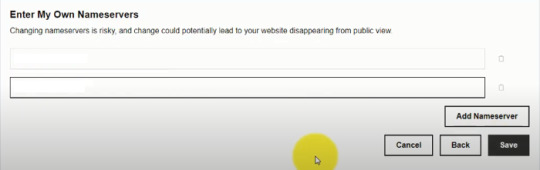
Nameserver
4. Now open the Control Panel and install WordPress
Now after connecting DNS, now you have to install WordPress to create your website or WordPress blog, so for this, when you buy web hosting, then you are given a control panel on their behalf from where you can use your website. If you can control this, then you can get the link of this control panel through email or you can open the control panel by going to the account of the web hosting where you have purchased it, then you can see it in the following screenshot here. How the control panel appears.
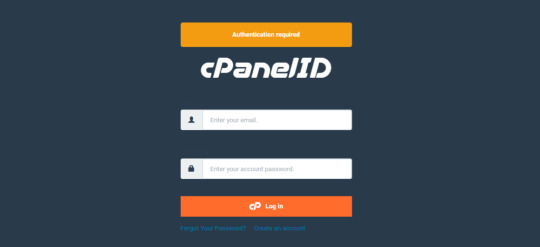
Cpanel login
So here you have to enter your username and password, whichever has been given to you, be careful not to share the username and password of this control panel with anyone, then now you have to install WordPress to create a WordPress blog. To do this, you have to click on the softaculous option in the control panel and install WordPress. How to install WordPress?
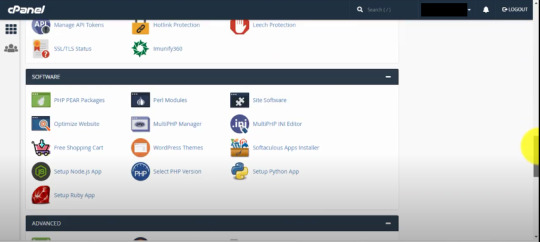
softaculous apps installer
- click on softaculous apps installer
- Now click on WordPress
- Click install
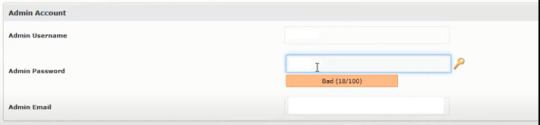
- Now enter the domain name in the URL
- After this, enter the login user name on the Admin user name so that when you log in on the WordPress blog, this is the user name you will need.
- Enter admin password, within this option you have to enter the password which you will have to enter when logging into the WordPress blog
- Now click on save installation details and save the details.
- WordPress user name and password

WordPress Step-up
WordPress Step-up
5. Now open WordPress blog
Now you have all already become a Ready Now you admin URL (Admin URL) from where the opening your WordPress blog ( WordPress Blog did) on the log must then URL where you will pay you to save installation details on click On top of that you will get the Admin URL, then click on the URL.
WordPress Step-up
So the login page of the WordPress website will open, then here you have to enter admin user and password, whatever you entered in the details above, only then you will be able to log in to the WordPress blog.

WordPress Login
So here you do not have to share this username and password with anyone, other than that you have to remember the admin URL so that whenever you have to open a WordPress blog or a website, you will need this admin URL Will to be required
6. Now install the theme for your blog or website
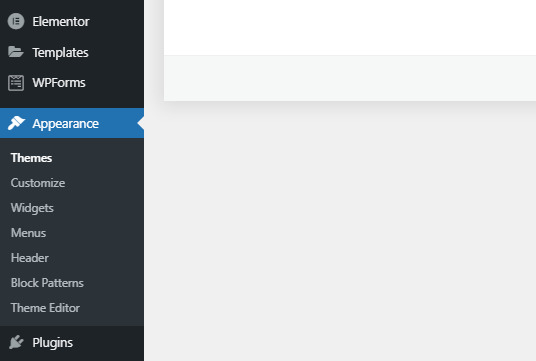
Now you have to design your WordPress blog, then for this, you will get many free themes or if you want, you can also buy some better WordPress themes, then after logging in here you have to click on the appearance And then you have to click on the themes and according to your theme, install any theme that you like and activate it, after that your website or blog will be created. Read this for theme choosing:- Top 10 Best Free WordPress Themes (Hand-Picked for 2021)
WordPress Theme
So after all these things, now you can write and publish your post by clicking on the post option, but before that, if you have to design your WordPress blog, then use widgets here can you that good, that according to the plugin installed can and can design your blog is such a professional WordPress blog ( WordPress Blog can make) or website.
Read this:- How to Create Backlinks Free | Dofollow or Nofollow (step by step)
Continue this course:- WordPress Course
Read the full article
#CreateaBlogonWordPress#HowtoCreateaBlog#HowtoCreateaBlogonWordPress#HowtoCreateaBlogonWordPressin10Minutes#howtomakeablogonwordpress#howtomakeawordpresswebsite
0 notes
Text
crazy people get paid ! duh
yep cnet and tumblr.com can’t run side by side.at least if you need a id change or password.
iode’o virus which is hardware takeover as sites like godaddy.com got no rights too. tell ya in minute.Well here it is goto start and then msdos
after this all you have to do is call up the ethernet to you computer thru jump route proceeder we can flag your computer as workstation and sell amny ISP which godaddy.com. and sells normally for 9.95 to aillioon dollars on market it’s your computer they sell not ISP.
just like tumblr.com has an isp route and isp route hardware <~~ more likely you been sold. goto msds in dos and find your ethernet nice ones tie into Wan why you can’t set up you internet wifi correctly. centrino trust i was test engineer on this one.
Breech yep and your bought into it by buying internet.
how big your signed, and your surfed. been known since 1980
so twiiter.com how hacker kicking people isp of hardware and wifi address or pausing there responses which isn’t hacking in communitcation inturuppt which Fbi says is legal. if there inturrupting connections. but reset them when down and use app app to block them not Asp or dos xm to stop them from accessing.
Trump you use it cause it came thru whitehousegov.com website as it attacked thats funny. as hacker attacked them blew them out of box software which isn’t hard. hillary clinton and melanie and employee’s of whitehousegov.com since monitors reported being attacked.on there personal government pages.
so how many companys can be hacked using this method many called harddrive recall by request inturrupt.
you dont’ know which disk its on but all looks like same disk just another number so instead of 4 disk we take and make a disk which is resized lik one’s i showed 15 mb to 556 mb testing disk to see how much it can handle, but ends up being 530 gb instead of smaller disk.
so more gb your have makes the disk bigger or smaller in data KB whcih is small no one every define size of it so we use stock market Square per stock
which is 64 tiolet bowls and 12 levels by 12 layers and then things make it work which if made is big harddrive. but since new kb is only m or mm then we have more how much 64 diveded by .0001 of data size of 1 mb to kilmillion and do math you get a big but small number minus if the software writer can handle that much in 4 by 4inch square drives.
Banks routers that are looped are hacked cause of loops coming back in undoing the fact the loop maybe your router or another computer reissuseing the name of device to interenet were cloneing internet maybe a cool way to hide the isp but is still login the provider log who isn’t to see the information. to were stoneing the outgoing and incoming message require a physical touch method of mouse logging and computer loggin this been thing that went away in programs tileing interfaces to actual deposits and taking money out of program of system making banking with small providers like verizon and att bad idea.normally owned by governement companys’ to were they would be protected by people who gagged or told not to talk to public unless told.
now with breaking computers is oldest method to hack which can not be detected by programs unless directed and thats reprograming harddrive function to relay or mirror information thru harddrive to a direct harddrive clones by a cloud data saver bank. which is second OS saved or backup copy saved to cloud which is illegal and can cause major server and computer damage just being done as it relates. idle computers and OS do react while waiting in progress and fire off since there no proper storage for OS which allows it to still receive informaiton on other OS as if preped can act like a spy program. being an OS for windows.
in that of complex it can get and be very damageing.
easy one even after fact is intel secure computing which is centrino mainly to keep bank files and credit cards safe for high amount travels.which USA uses for large number moves non currency. usb normally
0 notes
Text
How To Install WordPress

In this article we will tell you how to Install WordPress in 7 Easy Steps. If you are interested in building a WordPress website you will first need to know how to install WordPress and this is the definative Guide for Manual WordPress Installation.
About WordPress
WordPress (WordPress.org) is a Free open source content management system originally built for blogging. WordPress was released in 2003 by founders Matt Mullenweg and Mike Little. WordPress features a plugin and template based architecture and, over the years, has drawn thousands of developers to create custom plugins, and themes which can now be used to create rich and diverse array and types of websites for almost any application or business need.
WordPress is used on more than 60 million websites worldwide and, as of April 2019, and nearly 34% of the top 10 million global websites have been built using WordPress. Today, WordPress is the #1 website content management system in use globally.
Now that you know a little bit about WordPress, here is a step-by-step guide on how how to manually install and setup a WordPress site for your domain, if you have a desire to build a WordPress website of your own.
What You Need To Get Started
Domain Name
A domain name is your company’s online address. It is a repository for your company’s online business identity and the public face of your brand. Your domain name can be one of the most important decisions you will have to initially make when you are deciding to create an online identity for your business. There are tens of millions of domain names already in use out there, so finding the perfect domain name for your business is important and can require some creative thought. For example if your company name is “New Penny Plumbing” you might try to see if the domain newpennyplumbing.com, or newpennyplumbing.net or similar domain name is available.You can do searches for available domain names at a domain registrar such as GoDaddy.com.
WordPress Website Hosting
After you acquire a domain name, next you will need to find a Web Hosting Service where your website and all your site files will reside. There are dozens of WordPress Hosting Providers out there. Do a web search for WordPress Hosting and you will see many results. What are you are typically looking for is a WordPress Hosting company that offers what is called a CPanel where you can do things like setting up a SQL database for your WordPress site, set up personal emails for your domain, and which offers online caching, SSD Drives, plugins to help optimize images sizes and compression, SSL Certificates for online security, and other performance and backup capabilities. We recommend hosting services such as SiteGround.com and InMotion Hosting Services because of their High-Performance Hosting Service Capabilities.
Install WordPress in 7 Easy Steps
Now that you have acquired a Domain Name for your website, and a WordPress Hosting Account, and you are ready to now start installing WordPress, here are the 7 Steps for Installing WordPress.
1. Point your Domain to your new Hosting Account
When you get your new WordPress Hosting Account you will be provided with the nameservers for your site. You will need to go to your web registrar where you purchased your domain, login to your account and set the name servers to point to the name servers of your hosting account. One you have set those it will typically take a few hours to propagate through the Internet so all browsers every where know where your domain name points to, which is your hosting account. If you use a registrar such as GoDaddy.com it will typically propagate fairly quickly, within a few hours.
2. Download WordPress Software
As mentioned above WordPress is Free to download and install. Just go to https://wordpress.org/download/ and click the download button to get the latest copy of WordPress. Once you have downloaded WordPress, create a local directory on your hard disk, copy the wordPress-5.x.x.zip file to that local directory and unzip it to the root of that directory. If you don’t already have a ZIP utility such as the paid WinZip Utility, you can use a free Zip utility such as 7-Zip to unzip your WordPress files.

3. Use FTP Client to Upload WordPress Files to your Hosting Server
In order to upload the WordPress files to your hosting site you will need an FTP (File Transfer Protocol) Client and you will need FTP Information from you WordPress Hosting Provider so you can setup your FTP client to transfer the files. If you don’t already have an FTP client software application you use, you can find several free FTP clients. One popular FREE FTP Client is FileZilla. Click the following FileZilla Download link to get the FREE FileZilla FTP Client, and click the following link to view the FileZilla Documentation. We won’t go into how to use FileZilla in this article but you will need the following information in order to transfer your WordPress files to your server.
Host FTP Server Address – Typically an IP address or a server name
Username – Typically Username is same user name used to access your Cpanel.
Password – Typically Password is same password used to access your Cpanel.
Remote Directory – Typically the remote directory will be /public_html/
Local Directory – This is the directory where you have unzipped your WordPress files after you downloaded them (Example: C:/website/WordPress)
4. Get FTP Information from your WordPress Cpanel
When you signup for a WordPress Hosting account you should receive a welcome email with information on how to access your administrative account as well as information on how to access your CPanel account including URL, Username, and Password. Find that information from your hosting provider and login to your CPanel. and login to your CPanel. Your CPanel should look something like this:

You can see in the top Files area there is an item called FTP accounts. In there you can setup an FTP account to use with FileZilla or another FTP client. If you are unsure how to setup an FTP account or configure your FTP client you can talk to your Web Hosting Tech Support group and they can step you through it. Once you have your FTP client Configured, upload your WordPress Files to your hosting site.
5. Setup Your WordPress Database
Next you will need to setup a Database and a Database User and Password using your CPanel. Go into your CPanel as discussed above in the FTP section and find the Databases section. Select the MySQL Databases link. Clicking this link typically will initiate the MySQL Database Wizard.
STEP 1: Create a Database
A MySQL database name will typically have two parts. The first part, in this case “vids380_” is assigned by the Database Wizard and is your CPanel Username followed by an underscore. The second part, in this case “wp1” is the part that you will input. This can be any alphanumeric string you want. So, in this instance the full database name that I created is “vids380_wp1”.

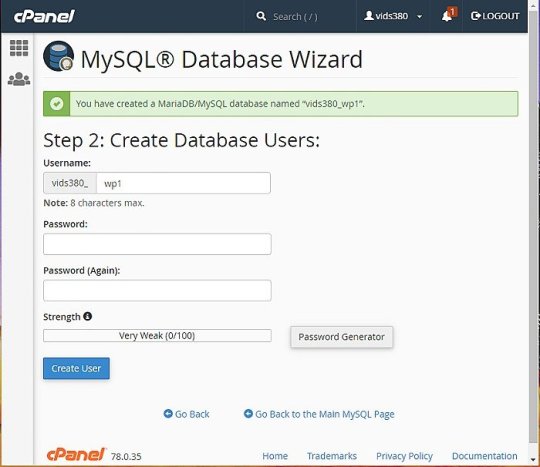
STEP 2: Create a Database User
A MySQL database username will again have two parts. The first part, in this case “vids380_” is again assigned by the Database Wizard and is your CPanel Username followed by an underscore. The second part, in this case “wp1” is the part that you will input. This can be any alphanumeric string you want. So, in this instance the full database name that I created is “vids380_wp1”. To keep things simple I typically name the database and the database user the same thing to keep things simple. Additionally, you will need to assign a password to the user. You can type in your own password or you can use the Password Generator Button to create your password.
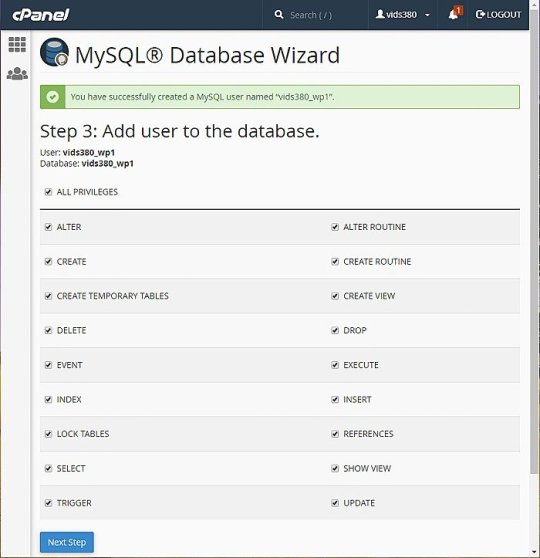
STEP 3: Assign the Username you have created to the Database You have Created
This is pretty self-explanatory, but you will see a table to assign privileges to the database. Select the “All Privileges” checkbox to select all privileges which is what we want.
6. Edit the wp-config.php file and upload to server
Now that you have created your WordPress Database, the next step is to create a wp-config.php file, edit it, and upload it to your server. We do this by going to the local folders where you have unzipped your WordPress files and in the root directory of that folder you will see a file called “wp-config-sample.php” We need to open this file and edit some entries in the top section where you will enter the Database Name, Username, and Password you created when you setup the Database above. You can use an application such as Adobe Dreamweaver or some other web development application, or if you don’t have any such application you can open the wp-config.sample.php file with a simple text editor such as Windows Notepad or whatever text editor you have on your computer. Open the file and enter the database name, username and password you created in the MySQL Settings area if the file. Then you must save this file in the same directory by the name of “wp-config.php”. Make sure you enter these names between the single quotes or you will get a database connection error. After saving the file, upload this single file to your WordPress Server using the FTP application you used to upload the other WordPress files as described above.

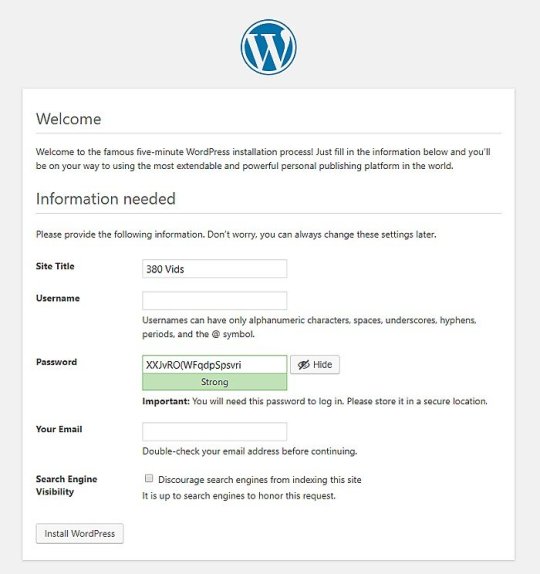
7. Now you are ready to smoke test your work
If you have setup your DNS Nameservers to point to your hosting account’s nameservers you should be able to open a broswer and type in “YourDomainName.com” (insert your actual domain name) and, if successful, you should see the following initial WordPress screen.

If you see this screen, Congratulations you have Successfully Installed WordPress!
If not, please go back through all the steps above. If you have gotten through these steps successfully, select the language that you wish to use on your site from the list above and click Continue. The next screen you will see will let you set your master administrative Username and Password. One important tip, select a username and password that only you could guess. DO NOT set your master Username as something simple like “Admin” or “YourSiteName”. WordPress is the #1 website platform in the world, and it is the #1 website platform target for global hackers. Set your username and password as something you can remember but that no one else could ever guess. Hacker bots are scouring the internet every day looking for WordPress sites and will start trying to hack your site within days or weeks using Brute Force attacks, so do yourself a Big Big Favor and pick a username and password that no one can guess. I would highly recommend that you let the WordPress Password generator generate a complex password for your site that no one would ever guess. (See image below)
WordPress Auto Installers
In this blog post we have covered how to procure a domain; how to select a hosting provider and setup a hosting account, how to point your domain to your hosting account, how to download WordPress files, how to unzip and upload those file to your hosting server via FTP, how to create a Database using your hosting CPanel; how to edit the wp-config.php file and upload that to your hosting site, and how to initialize your WordPress site and setup a master Username and Password. This has all been a tutorial on how to Manually Setup WordPress. This is how people have been installing and setting up WordPress since WordPress was introduces in 2003. But, WordPress Hosting providers have become more sophisticated in recent years, so if you are a novice to WordPress there are many hosting companies these day that do nothing but WordPress hosting that can help you install and setup WordPress for your, or in their CPanel they have a WordPress Auto-Installer that can do most of this work for you. You will still have to buy your domain and point your DNS nameservers to your hosting company’s nameservers, but outside of that they will do most of the work for you.
0 notes
Text
Configure Dedicated Server Manchester For Web Hosting
In the web hosting a dedicated hosting service is called a dedicated server. It is generally managed by the hosting service which is a type of internet hosting service managed by the clients in sharing the entire server with anyone. A quite effort has been made by an engineer who gives this server refers to the rental and exclusive use of a computer that includes a web server, related software, and connection to the internet.Do you want to learn more? Visit manchester hosting.
It has been observed that a dedicated server is usually needed for a website that may help in developing a considerable amount of traffic when a website gets a million hits by the people in a day. Since a dedicated server usually is configured and operated remotely from the client's company. As per the web hosting company, a dedicated server saves router, internet connection, network administration, security system and much more.
How do I configure the dedicated server?
Finally, we know that how to use the dedicated server with cPanel and it is also possible for the installation in just 5 steps ensure that we can indeed collect your entire websites. And thus you can guess that how we can use a dedicated server with the cPanle for an initial installation of your operating system and the configuration of network interfaces So for that you must check your cPanel is ready to perform the tasks or not. We are working here to fix the entire problem related to the server while configuring and setup dedicated server using web hosting as listed down.
-First of all, login to your Godaddy account using proper email address and password.
-Click on server button and press next to select account which you want to use.
-Click on manage button to review the end user license agreement and then click accept button.
-You can complete the following terms for the initial setup of cPanel and press next button.
-Select execute tab to update Apache to know the WHM security center.

-Click on settings button to confirm the configuration and then press submit button.
-You can take a back up of your dedicated server and can save the data at a safe place in your device.
Subsequently, in case, when you need to update your dedicated server you can follow the same procedure with the help of previously taken back up.
Let's know how to set up a dedicated server for web hosting:
-Login your Godaddy.com and press settings button to enable web hosting file.
-Go to the first page and choose a web hosting select setup option and enter the correct domain name.
-Select a dedicated server and start your search for the small and medium site online quickly.
-Select the easiest plane to set up and manage a server for the web hosting service.
-Click on the server management and use the features that help to complete the task instantly.
-Having completed click on save change button and enter the password and press on finish button at the end of the task.
For more help and information, you can directly contact its tech support team to get the issue fixed in no less than no time.
0 notes
Text
Benefits About Using A Shared Shared Internet Hosting Service
For those those people who are always trying sustain and protect their privacy can always turn to the world wide web for a fast and free service. This is where they can obtain a piece of the experience for free. All free proxies over the internet but may risk something more.
servers is also specialized. You may have a printer server where all of your printing projects go by using their server to print. You get an email server and a companies greater than a few employees do use an email server to process and "serve" up emails. This division of effort among servers creates an efficient and efficient way to local community.
STEP THIRTEEN: After you could have received your welcome e-mail login to any cpanel and take a moment to look it over once too just learn it in brief. Then remembering your name server's over welcome e-mail you were sent, get back and log in to your godaddy.com fund.To the right of where it shows your domain name, click the "(Details)" relate. on the left side, second within the top, you see the heading name servers just below that go through the "(Change)" internet site.
windows activator . Take your regular average check and increase it by 10%. tenorshare 4ukey crack how easy it would be to reach that goal by adding one appetizer or dessert to your order. But guaranteed that the goal is attainable. If it's too high, they won't try.
For this purpose it may use the IP address or the protocol. Should the demand the is legitimate and validated the server will provide it for. The server might change your request or provide you with the appropriate data without waiting for any response.
Seek time-- A measure of how long it takes for a hard disk drive to move its heads to the very best part for the platters inside your the data that the looking at. This is measured in milliseconds (ms). This will be somewhere around 10 ms, give or take 5 ms. The lower the figure, the faster the drive finds the information.
final cut pro x Crack would have to choose between managed and unmanaged hosting then. Once you unmanaged hosting, you will responsible for that server a lot of that goes along the planet. Unless you have associated with experience, or a team that can handle it, this most likely the option for you. Instead, you should choose managed web page. Your host can help you add up and manage the server, and also the only thing that you have to concern yourself with is the content of one's site and running on the web.
In short, to quantity output of your people, treat each individual as specific first so an employee second. Very best need among the food service industry today is teamwork by agreement. Our industry is a vast complex various different businesses and widely varied views. Yet our differences fade into insignificance many of us consider our many over-all mutual desires.
1 note
·
View note
Text
How to Start Your Own Blog in 15 Minutes
Believe it or not, I created the Money Peach Blog from my laptop at my kitchen table. I literally had no idea what I was doing, and my approach to initially getting started was the Ready, Fire, Aim approach.
It ended up working out pretty well, but there were a lot of bumps in the road and a lot of “oh crap, I shouldn’t have pushed that button….”
Since I went down the DIY road without a guide and have the scars to prove it, I can now show you exactly how to set up your own Blog or Website without the hiccups (ahem…. mistakes) when creating your own.
I don’t want you to make the same silly mistakes I did, therefore if you follow the exact steps that I share with you today, I promise you will be up and running in about 15 mins or less!
**Recommended: Click here to open in a new tab and follow along.
Step 1: Set Up an Account with Bluehost
Bluehost is the server that will host your blog or website.
To make this easy to understand, think of a server as the foundation of your home. It’s the first thing that you must have before you do anything else.
Then, think of your website as the walls and the roof of your home. The website sits on top of the server, just like your home sits on top of the foundation.
Why Bluehost?
There are many other servers out there that work well and I recommend Bluehost because this is how I got started, and I like what I know.
My feeling is if I use it and love it, then this is the one I will recommend to my friends and family.
But here’s also why I love Bluehost:
They’re available if you need help 24/7
There are NO CONTRACTS and you can cancel at any time
The Dashboard is extremely simple to understand and use
They’ve been around forever
Almost every blogger I know either uses Bluehost or started with Bluehost
*Note* There are other web hosting services out there that are free, but always remember you get what you pay for. Therefore, if you pay nothing…you pretty much get nothing.
If you want to bang your head against the wall and be consistently frustrated, use the free options out there. If you want to enjoy blogging, try out Bluehost.
Click here to open Bluehost in a new tab, and then follow me step-by-step through the entire process for creating your own blog/website with Bluehost. Let’s get started…
It’s simple, straightforward, and I promise you can do this!
Here we go…
Step 1: Select a Plan
Since you’re just starting out your Blog, you can choose “Basic” and be completely fine.
Step 2: Your Domain Name
There are two different options depending on whether or not your already have your domain name purchased.
Option 1: You Currently Don’t Have a Registered Domain Name
The first thing you need to do is to check the availability of the domain name you want through Bluehost.
I HIGHLY RECOMMEND you purchase a .COM domain. There are tons of other choices out there such as .net, .org, .co, .me, and .us to name a few, but people always remember .com.
You don’t want your future audience to miss out on you because they typed in yourblog.com instead of yourblog.net.
Option 2: You already purchased your domain from somewhere else
If you have already purchased your domain through sites such as GoDaddy.com, Hostgator.com, or Namecheap.com (there are a ton of places to purchase a domain), then you will need to transfer the domain name to Bluehost.
This is super simple and I don’t want you to get overwhelmed here.
First thing you need to do is to enter some information from the place where you purchased your domain (GoDaddy), so your current domain will be sent over to Bluehost.
This is called setting up your new nameservers.
Here is a link to show you exactly how to do this using GoDaddy, and it’s pretty much the exact same for anywhere else your current domain was purchased from: How to Set Up Name Servers
You will be asked to enter in your custom nameservers provided to you from Bluehost. I have them right here for you:Copy and Paste these into the option for Custom Nameservers
NS1.BLUEHOST.COM
NS2.BLUEHOST.COM
Note** It will take anywhere from 5 minutes to 8 hours for these changes to be reflected globally. However, you can immediately go into Bluehost and start the next steps below.
Enter Your Account Information
Step 3: Choosing the Best Package
Basically it is dirt cheap. Usually the cost is $7.99/month, but I have partnered up with Bluehost and they sent me a special link that takes that price down to $4.95/month!
This link was inside the button you clicked above and is also in the button right below:
Here is why I highly recommend 12 months at-a-time:
• Only $2.95/month for 36 months
• Goes to $3.95/month for 24 months
• Then $4.95/month for 12 months
• You can still get a refund at any time (no contracts)
• Full Refund within 30 days and prorated after that
• You get a free Domain Name with a 12 month or greater purchase
• You also have the option of month-to-month, but I will 100% tell you to stay away from this option.
Here is why I tell you to STAY AWAY from month-to-month billing:
• You will pay more than double over time
• If your card expires and you don’t catch it in time, a payment is missed and your website is shut down. All that work…gone
• You will not get a free .com domain
• You can still cancel your subscription anytime when purchasing in bulk and get a refund
What about all these Options?
You really don’t need any of them, however there is one I would recommend: Domain Privacy Protection.
The owner of every Domain is available to anyone on the internet. This means marketers will solicit your information and basically annoy the hell out of you because it is easy for them. If you decide to add on the privacy protection, your personal contact information is gone and is replaced with Bluehost’s.
I didn’t do this at first and my inbox was always full of annoying marketers from all over the world begging for me to hire them as my tech person. It’s worth the $1 each month.
SiteLock Security Find: This is great for any online business. This demonstrates to your customers that you are a trustworthy vendor/business by verifying your credentials such as email, phone number, and address.
Codeguard Basic is simply an automatic backup of your site every single day. This is a great feature because it would be pretty horrible if something happened and you lost everything on your blog or website that you have put so much effort into. However, this does cost $2/month and I will share with you a way you can also do this 100% free. Read further down to Must Have Plugins.
Enter Your Payment Info
Welcome to Bluehost!
Create Your Password
Login into your Bluehost Account
Note: When you get to this point, check your email with your Bluehost Login Credentials inside.
Step 4: Install WordPress
Now that you have a Bluehost account, it’s time to login to Bluehost using the login credentials they emailed you, and then setup your WordPress site. I use Wordpress and so do about 99% of all other bloggers. It has the most options and is the most user-friendly interface I have ever used. And…it’s fun!
Click “Wordpress Tools” at the top of the screen.
WordPress Starts Here:
Remember above where I told you the server was the foundation of your home. Well, now you can think of WordPress as the house that sits on top of that foundation.
WordPress is how you write blog posts, add a picture, create an about page, add a video, and basically anything you do to your website or blog. It is the control center for your entire site.
Next, click on “Install” and the watch the magic start to happen!
Note: I highly suggest to use something other than your email address for your Admin Username. This is to simply protect you from potential thieves out there who can find your email address and then are one step closer to logging into your website!
Next…
Step 5: Start Your Blog or Website
To login into your WordPress site, simply click on the link in your email you received once your install was completed.
This is the URL to login into your WordPress Site
yourdomain.com/wp-admin
example: moneypeach.com/wp-admin
Login into Your Website/Blog
Note: Bluehost will give you a great password that is very tough to remember. I would keep this password and WOULD NOT change your password to something easier to remember. I have over 200 failed login attempts from places all over the world trying to hack into my Dashboard.
Also, your username defaults to your email address by Bluehost and I also suggest you change this prior to installing WordPress to increase security. Once you choose your username, it can never be changed.
Once inside your Dashboard, you can start to customize your blog. However, before go any further, let me talk to you about Plugins.
The Other Blogging Stuff
If Bluehost is the foundation and WordPress is the house that sits on the foundation, then think of Plugins as the options you can have to customize your house. The tile, the window coverings, the paint, and all the other options you can think of for your home are essentially the plugins for a website or blog.
There are free plugins and paid for plugins. I currently have both, but since you’re starting off, I recommend you start off with the free ones first.
The MUST-HAVE FREE Plugins to Start
W3 Total Cache – Caching is a weird word but it essentially makes your site speed much faster for a better user experience
UpDraft Plus (Backup & Restore) – This plugin will automatically backup your website to Dropbox, Google Drive, Amazon S3, etc. A great safety net if something were to ever happen to your website.
Wordfence Security – This is a free security plugin to increase security to your blog. Believe it or not, you will have creepers from all over the world trying to break into your account. This plugin has great security features that will stop them from getting in.
Shareaholic – Have you ever seen the Facebook, Twitter, Pinterest, LinkedIn, etc. buttons on an article you have read on the Internet? Well, this plugin will add those to every post or page you want, and allows your readers to start sharing your content out to the world for you!
Page Builder – This plugin allows you to do easy drag and drop to build out your page or post for your blog. If you’re not using this, good luck trying to make your blog post look just the way you want it.
Akismet – You will have those same creepers from all over the world trying to post a comment on your blog to market and annoy the hell out of your readers. This is basically an anti-spam plugin.
Yoast SEO – This plugin is a great tool for Search Engine Optimization, however I think it is even more useful for helping your with your images. Have you ever shared something on Facebook and automatically had a nice picture, heading, and description pop up on your post? Well, this plugin will allow that to happen.
Contact Form 7 – Someone is going to want to get a hold of you and you probably don’t want your email address out there for the world to see. This form can go anywhere on your site and will allow someone to get in contact with you. It’s the same form I use here: https://www.moneypeach.com/contact
Your Blog’s Theme
WordPress comes with a bunch of free themes, but you do get what you pay for.
When I first started, I didn’t know any better and I would spend hours upon hours trying to make sure a picture would be on the left side of the page, the title would look a certain way, and the menu would match the design of my site.
Then a friend of mine suggested the drag-n-drop theme by Enfold. This is the only theme I use and the only theme I will ever recommend. It’s extremely simple to use and there is a support team on standby to answer any questions you may have. Unless you’re a whiz-kid behind the laptop, make your life easier with a theme that’s simple. Get Enfold Theme
Post vs Page
Think of a post as a blog post or an article you publish on your site, and think of a page as an About Page, a Contact Page, or a Resources Page.
A post will usually look like this:
https://ift.tt/36K8qDG
A page will have a link similar to this:
https://ift.tt/3eAW8QU
The Homepage
WordPress automatically makes your homepage a blog roll, which is absolutely awesome.
This is what you want when you’re getting started. A blog roll (not to be confused with a Spicy Tuna Sushi roll) is simply a list of all of the blog posts you have written starting from newest to oldest.
I started with a blog roll as my homepage for the first year I had my blog.
Why?
Because I needed content before I could build out my homepage to point, right?
The Money Peach Blog Roll
https://www.moneypeach.com/blog
After I had enough content built out, I started to break everything into categories and then transitioned to a static Homepage like you see below:
Money Peach Home Page
The Images
Pictures are literally worth 1,000 words, so make sure your pictures are awesome! You can use these free tools below to create amazing pictures for your own blog:
Canva
Pic Monkey
Note: Be very careful using images you find on the internet. Many of these are owned by someone else and you would technically be stealing from them if the images were copyrighted. Canva has over 1 million pics to search and they are all $1 each. Another great place to safely download amazing images is from Depositphotos.com
A blog post should always have a featured image. I recommend using the same size every single time so your blog looks cleaner. The image size I use for my featured image is: 560 x 315px.
Facebook and Google+ Images: The pixel size should be 1200 x 628px.
Twitter Images: The pixel size should be 1024 x 512px. You can actually take your Facebook image and do a little resizing in any program like Paint Windows or Paintbrush for Mac. Easy peasy.
Pinterest Images: The pixel size should be 735 x 1102px. Yes, Pinterest had to go out and be different.
Instagram Images: The pixel size should be 1080 x 1080px or 800 x 800px. If you’re smart, you will make sure your Facebook Image can be cropped for an awesome Instagram image. You can use Paint or Paintbrush to do this as well.
*Note: Canva has all of these image sizes as templates to choose from for free and the pixel sizes are also inside the Yoast SEO Plugin.
Please Have an About Page!
Every single time I go to a website or blog that I like, I head directly over to their About Page. Why? Because I want to know a little about this awesome person behind this incredible blog post I just read!
Need an idea for an About Page? Here is mine.
https://www.moneypeach.com/about
Note: You will see it at the very top anywhere you go on Money Peach.
Your Contact Page
What’s the most frustrating thing in the world? Having to search forever and day to find a way to contact someone! This is such an easy step too. Simply add a new page in WordPress, label it “Contact”, and copy and paste the code anywhere in the post from the plugin Contact Form 7 I told you about above.
This is how simple my Contact Page is:
https://www.moneypeach.com/contact
Last, But Not Least
You can have a beautiful website, the best artwork and images, and all those nifty plugins I mentioned above, however it all boils down to one thing: CONTENT.
People want to read, listen, watch, and absorb content that is not just good, but is awesome! I have seen some ah-mazing websites and as soon as I start reading through a blog post….I…..get……distracted…..because….oh look a squirrel!
The point is this: focus on why you wanted to start a blog in the first place. Your content is why your blog visitors will become fans, and why your fans will become customers. Don’t stress too much about the colors, the theme, or any of the “lipstick” of your blog.
When you deliver content that is awesome, your blog will be read, shared, and you will be providing real value. Don’t get lost in the technology portion because you really don’t need to worry about it. I have you covered inside this post
Final Thoughts
I recommend Bluehost to you because I started with them, I still use them, and I tell my friends and family to start with Bluehost. However, I want to be completely transparent with your and let you know that if you click a link or a button on this page and you purchase hosting with them, they will send me a little thank-you commission.
However, my link to Bluehost will also provide you with a little discount as well!
Get Started with Bluehost
How to Start Your Own Blog in 15 Minutes published first on https://justinbetreviews.tumblr.com/
0 notes
Text
How to Start Your Own Blog in 15 Minutes
Believe it or not, I created the Money Peach Blog from my laptop at my kitchen table. I literally had no idea what I was doing, and my approach to initially getting started was the Ready, Fire, Aim approach.
It ended up working out pretty well, but there were a lot of bumps in the road and a lot of “oh crap, I shouldn’t have pushed that button….”
Since I went down the DIY road without a guide and have the scars to prove it, I can now show you exactly how to set up your own Blog or Website without the hiccups (ahem…. mistakes) when creating your own.
I don’t want you to make the same silly mistakes I did, therefore if you follow the exact steps that I share with you today, I promise you will be up and running in about 15 mins or less!
**Recommended: Click here to open in a new tab and follow along.
Step 1: Set Up an Account with Bluehost
Bluehost is the server that will host your blog or website.
To make this easy to understand, think of a server as the foundation of your home. It’s the first thing that you must have before you do anything else.
Then, think of your website as the walls and the roof of your home. The website sits on top of the server, just like your home sits on top of the foundation.
Why Bluehost?
There are many other servers out there that work well and I recommend Bluehost because this is how I got started, and I like what I know.
My feeling is if I use it and love it, then this is the one I will recommend to my friends and family.
But here’s also why I love Bluehost:
They’re available if you need help 24/7
There are NO CONTRACTS and you can cancel at any time
The Dashboard is extremely simple to understand and use
They’ve been around forever
Almost every blogger I know either uses Bluehost or started with Bluehost
*Note* There are other web hosting services out there that are free, but always remember you get what you pay for. Therefore, if you pay nothing…you pretty much get nothing.
If you want to bang your head against the wall and be consistently frustrated, use the free options out there. If you want to enjoy blogging, try out Bluehost.
Click here to open Bluehost in a new tab, and then follow me step-by-step through the entire process for creating your own blog/website with Bluehost. Let’s get started…
It’s simple, straightforward, and I promise you can do this!
Here we go…
Step 1: Select a Plan
Since you’re just starting out your Blog, you can choose “Basic” and be completely fine.
Step 2: Your Domain Name
There are two different options depending on whether or not your already have your domain name purchased.
Option 1: You Currently Don’t Have a Registered Domain Name
The first thing you need to do is to check the availability of the domain name you want through Bluehost.
I HIGHLY RECOMMEND you purchase a .COM domain. There are tons of other choices out there such as .net, .org, .co, .me, and .us to name a few, but people always remember .com.
You don’t want your future audience to miss out on you because they typed in yourblog.com instead of yourblog.net.
Option 2: You already purchased your domain from somewhere else
If you have already purchased your domain through sites such as GoDaddy.com, Hostgator.com, or Namecheap.com (there are a ton of places to purchase a domain), then you will need to transfer the domain name to Bluehost.
This is super simple and I don’t want you to get overwhelmed here.
First thing you need to do is to enter some information from the place where you purchased your domain (GoDaddy), so your current domain will be sent over to Bluehost.
This is called setting up your new nameservers.
Here is a link to show you exactly how to do this using GoDaddy, and it’s pretty much the exact same for anywhere else your current domain was purchased from: How to Set Up Name Servers
You will be asked to enter in your custom nameservers provided to you from Bluehost. I have them right here for you:Copy and Paste these into the option for Custom Nameservers
NS1.BLUEHOST.COM
NS2.BLUEHOST.COM
Note** It will take anywhere from 5 minutes to 8 hours for these changes to be reflected globally. However, you can immediately go into Bluehost and start the next steps below.
Enter Your Account Information
Step 3: Choosing the Best Package
Basically it is dirt cheap. Usually the cost is $7.99/month, but I have partnered up with Bluehost and they sent me a special link that takes that price down to $4.95/month!
This link was inside the button you clicked above and is also in the button right below:
Here is why I highly recommend 12 months at-a-time:
• Only $2.95/month for 36 months
• Goes to $3.95/month for 24 months
• Then $4.95/month for 12 months
• You can still get a refund at any time (no contracts)
• Full Refund within 30 days and prorated after that
• You get a free Domain Name with a 12 month or greater purchase
• You also have the option of month-to-month, but I will 100% tell you to stay away from this option.
Here is why I tell you to STAY AWAY from month-to-month billing:
• You will pay more than double over time
• If your card expires and you don’t catch it in time, a payment is missed and your website is shut down. All that work…gone
• You will not get a free .com domain
• You can still cancel your subscription anytime when purchasing in bulk and get a refund
What about all these Options?
You really don’t need any of them, however there is one I would recommend: Domain Privacy Protection.
The owner of every Domain is available to anyone on the internet. This means marketers will solicit your information and basically annoy the hell out of you because it is easy for them. If you decide to add on the privacy protection, your personal contact information is gone and is replaced with Bluehost’s.
I didn’t do this at first and my inbox was always full of annoying marketers from all over the world begging for me to hire them as my tech person. It’s worth the $1 each month.
SiteLock Security Find: This is great for any online business. This demonstrates to your customers that you are a trustworthy vendor/business by verifying your credentials such as email, phone number, and address.
Codeguard Basic is simply an automatic backup of your site every single day. This is a great feature because it would be pretty horrible if something happened and you lost everything on your blog or website that you have put so much effort into. However, this does cost $2/month and I will share with you a way you can also do this 100% free. Read further down to Must Have Plugins.
Enter Your Payment Info
Welcome to Bluehost!
Create Your Password
Login into your Bluehost Account
Note: When you get to this point, check your email with your Bluehost Login Credentials inside.
Step 4: Install WordPress
Now that you have a Bluehost account, it’s time to login to Bluehost using the login credentials they emailed you, and then setup your WordPress site. I use Wordpress and so do about 99% of all other bloggers. It has the most options and is the most user-friendly interface I have ever used. And…it’s fun!
Click “Wordpress Tools” at the top of the screen.
WordPress Starts Here:
Remember above where I told you the server was the foundation of your home. Well, now you can think of WordPress as the house that sits on top of that foundation.
WordPress is how you write blog posts, add a picture, create an about page, add a video, and basically anything you do to your website or blog. It is the control center for your entire site.
Next, click on “Install” and the watch the magic start to happen!
Note: I highly suggest to use something other than your email address for your Admin Username. This is to simply protect you from potential thieves out there who can find your email address and then are one step closer to logging into your website!
Next…
Step 5: Start Your Blog or Website
To login into your WordPress site, simply click on the link in your email you received once your install was completed.
This is the URL to login into your WordPress Site
yourdomain.com/wp-admin
example: moneypeach.com/wp-admin
Login into Your Website/Blog
Note: Bluehost will give you a great password that is very tough to remember. I would keep this password and WOULD NOT change your password to something easier to remember. I have over 200 failed login attempts from places all over the world trying to hack into my Dashboard.
Also, your username defaults to your email address by Bluehost and I also suggest you change this prior to installing WordPress to increase security. Once you choose your username, it can never be changed.
Once inside your Dashboard, you can start to customize your blog. However, before go any further, let me talk to you about Plugins.
The Other Blogging Stuff
If Bluehost is the foundation and WordPress is the house that sits on the foundation, then think of Plugins as the options you can have to customize your house. The tile, the window coverings, the paint, and all the other options you can think of for your home are essentially the plugins for a website or blog.
There are free plugins and paid for plugins. I currently have both, but since you’re starting off, I recommend you start off with the free ones first.
The MUST-HAVE FREE Plugins to Start
W3 Total Cache – Caching is a weird word but it essentially makes your site speed much faster for a better user experience
UpDraft Plus (Backup & Restore) – This plugin will automatically backup your website to Dropbox, Google Drive, Amazon S3, etc. A great safety net if something were to ever happen to your website.
Wordfence Security – This is a free security plugin to increase security to your blog. Believe it or not, you will have creepers from all over the world trying to break into your account. This plugin has great security features that will stop them from getting in.
Shareaholic – Have you ever seen the Facebook, Twitter, Pinterest, LinkedIn, etc. buttons on an article you have read on the Internet? Well, this plugin will add those to every post or page you want, and allows your readers to start sharing your content out to the world for you!
Page Builder – This plugin allows you to do easy drag and drop to build out your page or post for your blog. If you’re not using this, good luck trying to make your blog post look just the way you want it.
Akismet – You will have those same creepers from all over the world trying to post a comment on your blog to market and annoy the hell out of your readers. This is basically an anti-spam plugin.
Yoast SEO – This plugin is a great tool for Search Engine Optimization, however I think it is even more useful for helping your with your images. Have you ever shared something on Facebook and automatically had a nice picture, heading, and description pop up on your post? Well, this plugin will allow that to happen.
Contact Form 7 – Someone is going to want to get a hold of you and you probably don’t want your email address out there for the world to see. This form can go anywhere on your site and will allow someone to get in contact with you. It’s the same form I use here: https://www.moneypeach.com/contact
Your Blog’s Theme
WordPress comes with a bunch of free themes, but you do get what you pay for.
When I first started, I didn’t know any better and I would spend hours upon hours trying to make sure a picture would be on the left side of the page, the title would look a certain way, and the menu would match the design of my site.
Then a friend of mine suggested the drag-n-drop theme by Enfold. This is the only theme I use and the only theme I will ever recommend. It’s extremely simple to use and there is a support team on standby to answer any questions you may have. Unless you’re a whiz-kid behind the laptop, make your life easier with a theme that’s simple. Get Enfold Theme
Post vs Page
Think of a post as a blog post or an article you publish on your site, and think of a page as an About Page, a Contact Page, or a Resources Page.
A post will usually look like this:
https://ift.tt/36K8qDG
A page will have a link similar to this:
https://ift.tt/3eAW8QU
The Homepage
WordPress automatically makes your homepage a blog roll, which is absolutely awesome.
This is what you want when you’re getting started. A blog roll (not to be confused with a Spicy Tuna Sushi roll) is simply a list of all of the blog posts you have written starting from newest to oldest.
I started with a blog roll as my homepage for the first year I had my blog.
Why?
Because I needed content before I could build out my homepage to point, right?
The Money Peach Blog Roll
https://www.moneypeach.com/blog
After I had enough content built out, I started to break everything into categories and then transitioned to a static Homepage like you see below:
Money Peach Home Page
The Images
Pictures are literally worth 1,000 words, so make sure your pictures are awesome! You can use these free tools below to create amazing pictures for your own blog:
Canva
Pic Monkey
Note: Be very careful using images you find on the internet. Many of these are owned by someone else and you would technically be stealing from them if the images were copyrighted. Canva has over 1 million pics to search and they are all $1 each. Another great place to safely download amazing images is from Depositphotos.com
A blog post should always have a featured image. I recommend using the same size every single time so your blog looks cleaner. The image size I use for my featured image is: 560 x 315px.
Facebook and Google+ Images: The pixel size should be 1200 x 628px.
Twitter Images: The pixel size should be 1024 x 512px. You can actually take your Facebook image and do a little resizing in any program like Paint Windows or Paintbrush for Mac. Easy peasy.
Pinterest Images: The pixel size should be 735 x 1102px. Yes, Pinterest had to go out and be different.
Instagram Images: The pixel size should be 1080 x 1080px or 800 x 800px. If you’re smart, you will make sure your Facebook Image can be cropped for an awesome Instagram image. You can use Paint or Paintbrush to do this as well.
*Note: Canva has all of these image sizes as templates to choose from for free and the pixel sizes are also inside the Yoast SEO Plugin.
Please Have an About Page!
Every single time I go to a website or blog that I like, I head directly over to their About Page. Why? Because I want to know a little about this awesome person behind this incredible blog post I just read!
Need an idea for an About Page? Here is mine.
https://www.moneypeach.com/about
Note: You will see it at the very top anywhere you go on Money Peach.
Your Contact Page
What’s the most frustrating thing in the world? Having to search forever and day to find a way to contact someone! This is such an easy step too. Simply add a new page in WordPress, label it “Contact”, and copy and paste the code anywhere in the post from the plugin Contact Form 7 I told you about above.
This is how simple my Contact Page is:
https://www.moneypeach.com/contact
Last, But Not Least
You can have a beautiful website, the best artwork and images, and all those nifty plugins I mentioned above, however it all boils down to one thing: CONTENT.
People want to read, listen, watch, and absorb content that is not just good, but is awesome! I have seen some ah-mazing websites and as soon as I start reading through a blog post….I…..get……distracted…..because….oh look a squirrel!
The point is this: focus on why you wanted to start a blog in the first place. Your content is why your blog visitors will become fans, and why your fans will become customers. Don’t stress too much about the colors, the theme, or any of the “lipstick” of your blog.
When you deliver content that is awesome, your blog will be read, shared, and you will be providing real value. Don’t get lost in the technology portion because you really don’t need to worry about it. I have you covered inside this post
Final Thoughts
I recommend Bluehost to you because I started with them, I still use them, and I tell my friends and family to start with Bluehost. However, I want to be completely transparent with your and let you know that if you click a link or a button on this page and you purchase hosting with them, they will send me a little thank-you commission.
However, my link to Bluehost will also provide you with a little discount as well!
Get Started with Bluehost
How to Start Your Own Blog in 15 Minutes published first on https://mysingaporepools.weebly.com/
0 notes
Text
GoDaddy Data Breach Affects 28,000 User Accounts
GoDaddy, the world’s largest domain registrar, has confirmed that 28,000 of its customers’ web hosting accounts were compromised following a security incident in October 2019.
Unfortunately, the web-hosting company only discovered the breach in late April and filed a breach notice with California’s Attorney General’s Office earlier this week.
An “unauthorized individual had access to your login information used to connect to SSH on your hosting account,” said Demetrius Comes, the company’s CISO. “This incident is limited in scope to your hosting account. Your main GoDaddy.com customer account, and the information stored within your customer account, was not accessible by this threat actor.”
Although the breach is said to be limited to hosting accounts, excluding customer accounts and personal information, GoDaddy also reset passwords and usernames for some of their customers.The company gave no additional details of the incident, so it’s unknown how the bad actor gained access to customer login credentials. However, the cybercriminal may have managed to steal credentials or use brute force attacks to guess the password of customers.
“We have proactively reset your hosting account login information to help prevent any potential unauthorized access,” the company said. After apologizing to customers, GoDaddy pledged to provide website security and malware removal services free of charge.
“On behalf of the entire GoDaddy team, we want to say how much we appreciate your business and that we sincerely regret this incident occurred,” the company said. “We are providing you one year of Website Security Deluxe and Express Malware Removal at no cost. These services run scans on your website to identify and alert you of any potential security vulnerabilities. With this service, if a problem arises, there is a special way to contact our security team and they will be there to help.”
This is not the company’s first security incident this year. In early March, a spear-phishing campaign targeted a GoDaddy employee, leading to the threat actors gaining access to customer records. The attackers were also able to change DNS settings for some hosted websites.
For the moment, the two incidents have not been linked, and users are advised to closely monitor their accounts, making sure not to use recycled passwords.
from HOTforSecurity https://ift.tt/2LeQRBy
0 notes
Photo

New Post has been published on http://simplemlmsponsoring.com/attraction-marketing-formula/email-marketing/8-domain-name-ownership-tips-for-your-web-design-clients/
8 domain name ownership tips for your web design clients

Dealing with domain names can be a daunting task for your
clients, especially if they are unaware of the subtleties of the
domain management process. Domain name ownership requires a bit of
knowledge in order to keep everything running smoothly and maintain
a secure site.
Related: DNS records — A beginner’s
guide
Follow these domain name ownership tips
Whether you’re working with first-time domain owners, or those
with well-aged domains and websites, consider offering these tips
to make their domain ownership as worry-free as possible:
Don’t select your registrar based on price.
Consolidate your domain portfolio.
Enable auto-renewal of your domains.
Renew for several years at once.
Register domains in your own name.
Keep your domains locked.
Pay for privacy.
Keep your domain contact information up to date.
Let’s look at each tip in detail.
1. Don’t select your registrar based on price
Sound bite: No matter how attractive it might
be, don’t select a registrar based on low price
alone.
Selling points
Perspective: Registrars won’t all charge the
same amount, but the difference is small, compared to the overall
cost of the website project, so other factors play a role in the
decision: consider customer support, responsiveness, and their full
set of product offerings.
Process: Time spent on the phone with technical
support can far outweigh any cost savings. For an item which runs
on average between $10 and $20 per year, realize that just 10
additional minutes of your time on the phone with support will eat
up any cost savings found via a cheaper registrar.
Related: How much does a domain name
cost? and How to select a domain name registrar for
your online venture
2. Consolidate your domain portfolio
Sound bite: Having all of your domains with one
provider has important business and security advantages.
Consolidating your domain portfolio (and other products and
services) means you can better manage all domains from one account,
reduce the number of people who have access, and deal with one
provider instead of many.
Selling points
Simplicity: With everything in one place, you
can better manage all domains from one account.
Efficiency: Multiple registrars means
remembering more logins and understanding different processes.
Dealing with one provider simplifies support, billing and
administration.
Security: Fewer vendors, accounts and logins
means your domains will be more secure, in terms
of who has access.
Continuity: If you ever sell your business,
having all domains together makes a change of control easier.
Expertise: With all domains in one place that
you trust, you know you can contact an expert who can solve all
issues.
Pro tip: All of the same points apply to
consolidating multiple services with the same vendor. Why stop with
domains, when you can consolidate hosting, email, SSLs, email marketing and more? Just
replace “domains” in every point above with
“products/services.”
Related: How to manage DNS and hosting for client
WordPress sites
3. Enable auto-renewal of your domains
Sound bite: Auto-renewal helps ensure that your
domain stays yours.
Selling points
Peace of mind: Auto-renewal relieves you from
remembering when to renew, and avoids the challenges of manual
renewal or recovery of an expired domain —
which can be expensive, complicated and time-consuming.
Risk of missed communication: While we hope
registrars notify customers of soon-to-expire domains, it’s also
possible that email renewal notifications will land in your junk
folder, get delivered to the wrong person, or even pass by
unnoticed.
Pro tip: When credit cards are changed, be sure
to update any vendors where auto-renewal has been enabled.
4. Renew for several years at once
Sound bite: “Set it and forget it” — and
avoid worry about losing your domain.
Selling points
Peace of mind: You don’t have to think about
renewal for a long time.
No potential financial loss: Even if you
transfer your domain to another
registrar later, the registration time paid for is not lost.
Fewer deceptive solicitations: There are folks
who figure out your domain registration renewal date and send you
phishing messages implying it’s time to pay them. If you
accidentally pay someone other than your registrar, that money is
lost. With a far-in-the-future expiration date, they don’t bother
trying to scam you.
Related: How to protect your business from
phishing scams
5. Register domains in your own name
Sound bite: You wouldn’t let someone else
register the license plate for your car, put their name on your
house deed, or be a cosigner on your bank account. The same logic
applies to your domain name.
Selling points
Long-term reliability: Your friend, child,
neighbor or web pro might say they are doing you a favor by setting
up the domain name. Problems are likely to occur when they are no
longer around to help, or forget to pay the renewal bills.
Challenges recovering control: The process to
resolve domain ownership disputes can be time-consuming and
difficult. Avoid it completely by insisting on owning your
domain.
Related: Why getting a domain name is a startup
essential — and how to do it right
6. Keep your domain locked
Sound bite: Do everything you can to prevent
unauthorized changes to your domain. Selling point
Discourage bad actors: The process to transfer
your domain from one registrar to another requires that the domain
be unlocked, so this provides a bit of extra protection, should
someone try to hijack your domain name.
Editor’s note: GoDaddy keeps domains
registered through our company locked to keep them secure. Locked
domains can’t be transferred to another registrar or account.
When you make changes to a domain’s settings, such as updating
nameservers or contact information, we automatically unlock and
re-lock the domain name. If necessary, here’s how to unlock a domain.
7. Pay for domain privacy
Sound bite: Starting at less than $10 per year,
the cost of private domain registration is a
bargain.
Selling points
Protection: This is an easy way to protect your
personal information. There’s enough data in a WHOIS domain record for someone to
be intentionally malicious.
Avoid unwanted solicitations: Having your
personal information available with your domain is an open
invitation to salespeople, con artists, spammers and more.
They’re especially eager to go after owners of new domains,
offering SEO services, social media marketing, content optimization
and more.
Prevent domain hijacking: Even with following
tip No. 6, hiding your personal information makes it that much more
difficult for someone to get key information that could help them
hijack your account.
Related: How to protect your domain name
8. Keep your domain contact information up to date
Sound bite: Any changes to a domain (including
renewal or transfer) will need to use the contact information
associated with the domain, so keep it current.
Selling points
Security: Outdated contact information means
someone might have access to your domain who should no longer have
it.
Continued access: With out-of-date contact
information on a domain, the chances of being locked out increase
— for example, if the contact is a former employee and there is
no longer access to their email.
Pro tip: If you receive a remind-o-gram from
your registrar to check and confirm that your contact info is up to
date, do it!
In conclusion
Let’s recap my favorite tips for helping clients ensure
worry-free domain management:
Don’t select your registrar based on price.
Consolidate your domain portfolio.
Enable auto-renewal of your domains.
Renew for several years at once.
Register domains in your own name.
Keep your domain locked.
Pay for domain privacy.
Keep your domain contact information up-to-date.
Keeping domain ownership free from strife isn’t difficult when
you keep these tips in mind — and share them with your
clients!
The post 8 domain name ownership tips for your web
design clients appeared first on Garage.
Read more: godaddy.com
0 notes
Text
to Find a Website Builder
I'd recommend starting with godaddy.com and viewing what their hosting packages look like so you can get an idea of what kind of prices you're looking at. They also have lots of features you may include with your package. Take a look at those to see what ideas may strike up to what you want to your customized website.
3) Are the company's goals consistent with yours? Many companies provide a Website merchandise and treat it as a commodity. When the site is developed pay half up you are on your own. The issue is there's no accountability. Findaw a company with a vested interest in your success.
Despite it's reputation, the web development industry isn't completely filled with "geeks". You will be using your website as a business tool, so be sure you are dealing with company or a person that has some understanding of marketing & business. As well, most "geeks" don't have much of a grasp on design and text- two crucial components of a website. Ask to see their portfolio and client references. In your first meeting if you find they are currently using lingo that is technical, make sure you tell them you do not understand. Shouldn't intimidate or confuse you.
Where do you start? That is where most people get overwhelmed. As a business owner, you likely don't have a large budget to spend on putting together a website, or vast amounts of time around when you don't know what you are really looking for, to attempt to muddle your way. You can hire an expert to do it, but you will be charged a high price by the majority of them, and you might not have. If you are one who wants to construct a website, but wants to be and remain in control of your own website, then these measures are for you.
As website owners and bloggers, we work hard to provide relevant content to our visitors, useful and even more difficult to get traffic. Many, although not all, people do it simply. We're passionate about our subject (or subjects) and find satisfaction in sharing our passion, knowledge and experiences with others. But, whether you are a hobbyist or entrepreneur, earning a revenue or blog, through means that is legitimate and honest, isn't a crime.
CSS webpages delivers page weight. Webpages load faster when the pages are linked to an external CSS file. Additionally, it uses less bandwidth. Using CSS from an outside document makes browsers to render a page faster as it divides the formatting from the HTML codes.
Its a fantastic idea to see your site with cookies disabled, since search engines, plus some browsers do not accept cookies when theyre investigating your site. The Devop Lab Toolbar enables you to easily delete, disable or clear cookies. Saving you time, and supplying an option to temporarily disable them to you, as opposed to deleting. Which is nice, as it keeps you against needing to re-enter various logins and passwords you could have had saved.
Website content is not news. It needs to be customized to match the demands of your visitors. The first step is obviously to identify the details of which are humongous to be covered in this subject, your clients. However, there are. The next step is to write to capture the imagination of your clients which requires insights.
0 notes
Text
How to Unlock the Domain Name of Your Dreams
Purchasing a custom internet domain name is a significant milestone in owning your own business. The domain name establishes your online presence, making a place for your customers to learn more about your product or brand.
But what exactly is a domain name?
A domain name is the part of a network address that identifies it as belonging to a particular domain.
To make the first impression of your organization’s web page a good one, follow these simple tips. Once you have a name in mind, scroll down to learn the easiest and cheapest ways to purchase your domain name of your dreams.
Helpful tips before you buy a domain name
1. Make your domain name easy to type
You want your domain name to be memorable, but you also don’t want to miss out on valuable visitor traffic by making your URL too complicated or difficult to understand.
With that said, avoid these in your domain:
slang
odd spellings of words
hyphens, especially multiple hyphens
numbers
2. Don’t make your domain name too long
Going back to tip #1, a memorable domain name is a simple domain name. A shorter domain name is not only easier to remember, but also reduces the risk of someone misspelling it when typing it in the address bar.
Most single domain names are taken for this reason. If there is a specific word you want that’s already taken, try getting creative by adding an adjective or verb before or after it. But make sure your domain name ultimately reflects your brand.
3. .com or .net? Does it matter?
In summary, yes and no. 75% of domains have the .com extension, with .net and .org coming in second and third place, according to Registrar Stats research.
With that said, most people are used to seeing com domain name in a web address and automatically assume that’s the norm. However, there are other websites that succeed with other domain extensions like .net, .info, or .org (think Wikipedia.org).
If your desired domain name is unavailable with a .com extension, and you really want it, then choosing .net or .org isn’t the end of the world. But if you do go outside the .com norm, be sure to remind your customers that you have a different domain name extension.
4. Don’t buy trademarked or similar domains
You don’t want to be too similar to trademarked or big brand names when creating your domain name. If you are, you run the risk of confusing people or worse, having a complaint filed against you and having to forfeit your domain name.
Avoid any legal challenges and competition by making your domain name unique in it’s own right.
5. Check if your domain is available on social media
Part of a successful online presence is a social media presence. Your domain name is a part of your brand, so you’ll want the name to be available as a username on social media so search engines and customers can put the two together.
So you’ve read the tips above and applied them to your branding guidelines, and now you have the perfect domain name for your website. What next?
Now, it’s time to bring your website to life by purchasing a domain name.
How to purchase a domain name
Congratulations, you’ve made it this far. Now rest easy knowing that you’ve overcome the hardest part – choosing a domain name (that’s available).
Domain name registration is surprisingly simple.
1. Make sure you have a web hosting service
To get your website live, you need a web hosting service and a domain name. Ideally, you should get these two items together. If you don’t have a service provider or a web developer, don’t worry. Here are a few options that offer both services:
If budget is a concern:
GoDaddy.com
BlueHost
HostGator
InMotion Hosting
DreamHost
Name.com
NameCheap
Squarespace.com
You’ll need to provide basic information such as contact information (i.e. an email address) and possibly a phone number.
Though these plans offer different things, any will be sufficient to bring your new website to life.
2. What if I want to change my domain name?
To change a domain name, you need to change your domain name system (DNS). Simply login to the domain name registrar that you used to register your domain name.
The process will vary depending on your registrar, but the steps will typically look like this:
Find the DNS manager within your registrar
Locate the DNS that you’d like to change
Look for an option such as, “Use custom nameservers” and select it
Then type in your desired new nameserver
3. Renew your domain name every year (or whenever it expires)
When you purchase your domain name, you’ll get an option of how long you want to purchase it. Typically this begins at one year and goes as long as ten years, and the longer you purchase it, the cheaper the annual fee is.
Most businesses recommend purchasing your domain name for at least two years. The longer time will help your SEO ranking in the long run and you won’t have to worry about renewing it for a short time.
However, make sure you don’t forget to renew your domain name or else, poof! Your website can go offline within seconds. And after a few weeks of going offline, your domain name will be available for purchase again.
4. Complement your new website with a professional business email
Every website has a contact section, whether it’s a separate page or in the footer. Legitimize your business even further with a professional business email.
With services like G Suite, you can have a business email like [email protected] instead of [email protected]. The former looks more official and will make your brand seem more accomplished.
Once you secure a business email, we recommend that you keep your proprietary information safe with encrypted email. Not only will you protect your business against spam and phishing attacks, you will look more professional to your customers or potential customers with military grade encryption protecting both your outbound and inbound emails.
Once you complete all these steps, then congratulations. You now have established your online presence with your own fully qualified domain name and professional business email.
0 notes
Last Seen Blogs


rumahtua
Rumah Tua

frankdeko
Frank Deko

ohipocondriaco
o hipocondríaco

charge-resource-bill-condition
Untitled