#honestly i just wanted to mess around in photoshop again bc its been a while
Text
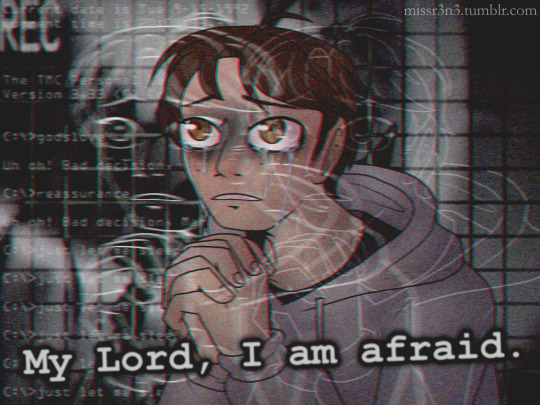

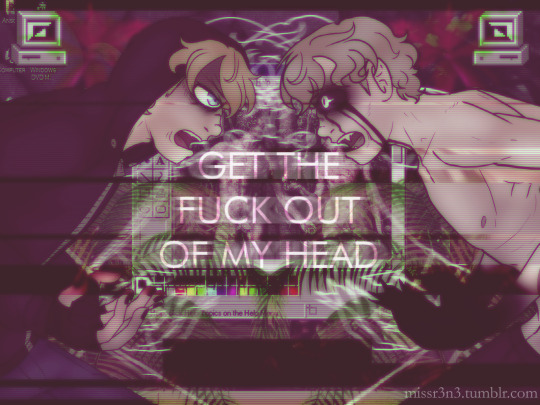
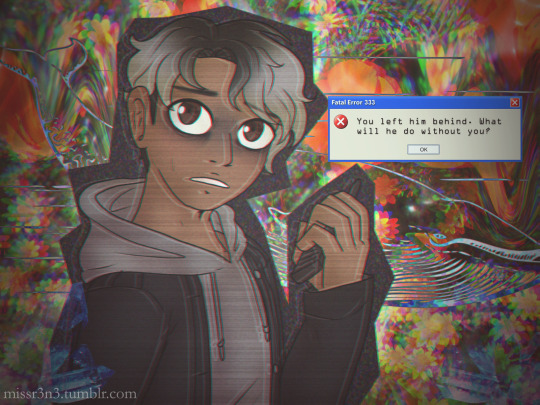
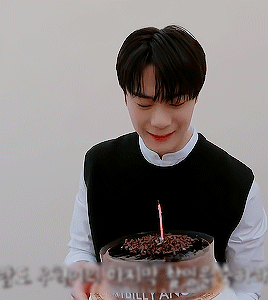
『e v e r y d a y g e t s b r i g h t e r』
(or: tmc victims as tumblr aesthetics i was obsessed with circa 2015)
#the mandela catalogue#mandela catalogue fanart#tmc fanart#mark heathcliff#tmc mark#cesar torres#alternate cesar#tmc cesar#adam murray#tmc adam#jonah marshall#tmc jonah#blood tw#eye strain tw#mandela catalyst spoilers#r3n3 art stuff#do people still make vaporwave style art? is that still a thing?#honestly i just wanted to mess around in photoshop again bc its been a while#shout out to all the kpop blogs that started following me when i used to make edits like this of [REDACTED]#i have no idea why so many of u have stuck around but thank u <3
141 notes
·
View notes
Note
hi! idk if you've already answered smth like this, but would you ever make a gif-making tutorial? i dont know where to start with gif-making >< but if not, it's totally cool! would you happen to know where i can learn how to make gifs like you? thank you!
sure! i absolutely would!! i’ll just do it under this ask haha
so for making gifs i use photoshop ( i run cc 2017 bc it was th only free version i cld get ldsfkhsdf) and vapoursynth!
first things first: getting the video you want to gif. obviously the better the quality of the video the better the quality of gif, so when im downloading from youtube i usually use a 4k video downloader
if its vlive i use soshistagram !!!
next step after youve downloaded your gif is to get the frame layers from the specific section that you want to gif. thats where vapousynth comes into play.
if you drag the video you downloaded into vapousynth, you choose the part within the video you want to gif, so say im remaking my last gifset id drag the video into vapoursynth put in like 00:05:40 (the starting time in the video where i wish to gif) and then like 00:00:03 (how many seconds of the video after the start i want vapoursynth to render) and then it’ll open up a tab that looks like this

from here this is where i usually do my cropping, sharpening and denoising – i use to use topaz labs but that shit hurt my computer like it would take so long for my computer to render it it wasnt even worth it. but i mean topaz labs is pretty good so if your computer is strong enough i definitely suggest looking into it. i just cant lmao.
okay after you choose the settings that you want (honestly the way i found my preferred settings was just by playing around w them!!), you copy and paste the coding in the white box in the right corner into the app that will open on your computer once you run vapoursynth it looks like this

you paste the code into the section that says ‘paste here what you copied from resizer’

and if the section of the video runs longer than you wanted (like the screen changes n u just want to cut it out) you can trim it in this app as well if you go to Script > Preview and find the first frame and last frame that you want in the gif. honestly i dont usually do this, i just delete frames in photoshop bc im lazy but then it obviously takes longer to render but . again. lazy.
ANYWAYS once you’re ready to render your video, you go to Script > Encode video and another screen will pop up. make sure you change the header section from ‘no header’ to ‘Y4M’ or it wont work. n then just press start and it’ll do its thing. on my computer it saves the video to my ‘output’ folder and its always titled ‘output.mov’ so it shouldnt be hard 2 find !!
ok !!!!!! hardest part is out of the way!!!!!!! wee!!!!!
now its time for photoshop *crowd boos*
once you’ve opened photoshop, you go to File > Import > Video Frames to Layers and find the video that you got from vapousynth ! once you do that this will come up

here you can cut down the video / limit the frames for its import. i usually limit frames only by 2 or i find it gets a lil weird, this helps a lot if your video is long and you want 2 get it all in the gif without missing parts while also staying under tumblrs gif limits (which i know have been made a lot bigger but i still try to keep mine around 3 MB). then once all thats Done just press OK n it’ll look like this !!

ok lets break this down
TIMELINE

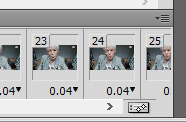
timeline is basically where u go to adjust the speed of your gif. if you press on the three lines on the right side and press Select All Frames then you can click on the time (in the screenshot its 0.02) and adjust it. i usually go with 0.05-0.06. but it depends. again its all up to your preferences. you can also delete frames n stuff, thats usually what i do to trim down a gif.
LAYERS SECTION OR WHATEVER ITS CALLED

ok so these are all ur layers !!! usually i select them all and group them so its easier to manage. but this is where you’d add your colouring PSDs or text PSDs to spice up ur gif.
at the top where it says ‘Add an adjustment’ is where you can edit the colour of your gif, you can obviously mess around and make your own psd or even go Crazy and make a new psd for every gifset. but personally, out of laziness, i just searched tumblr for gif PSDs and used the one i liked the most, and through that i adjust it depend on what i think looks best for the gif im working with. psds make the gif tbh

like the difference... the spice.... the vibrance... its beautiful.
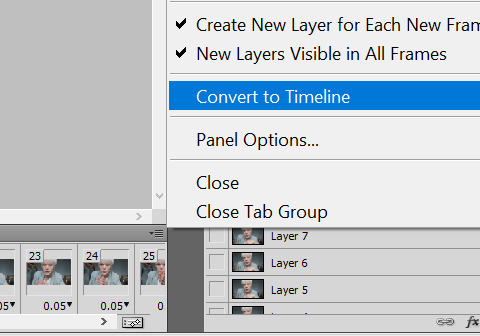
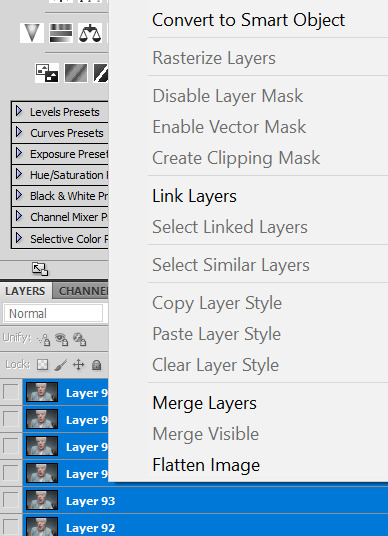
sometimes i use the sharpening action and in order to use the filters in photoshop you have to change it into a video timeline (see timeline section, at the left bottom corner theres that icon thingy beside where it says forever. just click that) then you select all your layers at the side and go to Filters > Convert for Smart Filters.
then you can go Sharpening and i usually use Smart Sharpen. and its again messing around until your satisfied with how the gif looks. this is my preset for it!

also through this you can blur out words in the gif (which obv u dont have to do its another preference thing i just personally prefer to do it) and once your gifs been converted for smart filters you can use the marquee tool to section off the part you want to blur and then go to Filter > Blur > Gaussain Blur and adjust the strength of the blur !
anyways. thats basically it???????? after your finished and you’re happy with how it came out go to File > Export > Save for Web (Legacy) and this will pop up

here you can see how many MB’s your gif is to ensure you dont go over. also adjust the presets on the side, thats just how i have mine obviously you can adjust yours to however you want them !
and make sure where it says “Looping Options” it says forever, or else your gif wont loop and you’ll want 2 rip ur hair out once u realize it.
n then boom
gif !
i hope this helped ???? n wasnt too confusing im rly bad at explaining things.. i also hope i didnt miss anything .. but i dont think i did. if you have any questions pls feel free to message me ill b happy 2 explain anything else im able to ^________^ !
1 note
·
View note
Note
A giffing tutorial would be great! I'm not at home atm and its been a while since i tried giffing so i dont have any specific qs to ask yet but i think i struggled with how to put them into frames? I think they sometimes froze and wouldnt move haha but yeah thx for much for the links and advice! I also rly struggled with finding good basic tuts so thats why i came to ask ^^
PLEASE DO A TUTORIAL ON GIFFING BC I SUCK AT IT SO MUCH PLEASE
fkdsjlfds alright!!! hopefully this is able to help u guys i know im not the best at explaining this but hopefully this will give you an idea :-) im going to do it using only photoshop (no kmplayer/vlc or any other software) and i use photoshop cs5 so depending on what version u have things might look a little different but it’ll be the same concepts!! anyway here’s a crash course in making a gif for the first time
1. get the video!!
this seems like a simple step i know but if u wanna just use photoshop and not any other software as well it’s a LOT easier if you download a shortened clip of the gif! usually i download clips between 3-10 seconds long in order to make sure i get the whole scene i want. the two best websites to trim and download into an mp4 in one step are clipconverter and video-download, they both work for youtube videos and vlive and a lot of major video websites! and of course downloading the highest quality of video available (preferably 1080p or 720p) will make your gifs look nicer
2. importing it into photoshop
file > import > video frames to layers ! i believe u need quicktime installed for this to work properly!

since your clip is already pretty short, you should be ok by just keeping it from beginning to end! if for some reason you were unable to shorten it or if you want to shorten it even more, you can select the range. dont limit the frames though! it will make the gif look choppy and less fluid!
3. adjust frames/timing
you should now see all of your frames in the animation bar at the bottom (if u dont see an animation bar go to window > animation and make sure its checked) and all of the frames as their own layers off to the right! on some part of the animation toolbar you should see something that looks like this:
when you click on the four lines with the arrow, you should see a list of options! play through the frames you have and determine if you need to delete any of them at the beginning or end and u can do so by selecting the frames u wanna delete and under those options select delete frames. once u have just the frames you want for the gif, select all frames and then on any frame click on that 0.04 with the arrow and for the delay, select “Other” and put in 0.05s (or whatever value u want but usually 0.05s looks the best once you save it!)
4. cropping

you can adjust the cropping size options at the top (it will look Something like this but it’ll depend on your version of photoshop!)

the width dimensions for tumblr are 540px for one gif, 268px 268px for two gifs next to each other and i Believe 177px 178px 177px for three gifs next to each other! so here i’ll assume i’m doing a 268px width gif and you can set the height to whatever you’d like. if you set the resolution to 1px/cm like it shows right there, it’ll automatically crop and resize the gif for you!
so at this point with the cropping and timing it’ll look something like this:

5. convert to smart object + sharpening
this might be where u had a problem with the frames freezing? so first using that menu in the animation toolbar convert to timeline animation! then, after this, select all of your layers on the righthand side and then right click convert to smart object!
after u convevrt to smart object it should only show as one layer! u should still be able to preview and play through the gif, if it’s frozen then u messed something up with the timeline animation part! so to sharpen here were the settings i used to use:
filter > sharpen > smart sharpen

a lot of people use 500% and 0.3px … personally i never liked that but its up to u to play around with it!!
here’s what the gif looks like after this:

if you compare this to the one above this one looks much nicer!
6. coloring
ok honestly i dont even Know enough to give u a coloring tutorial but that’s pretty much the only step remaining for ur basic gifmaking! honestly a lot of the time i only use brightness/contrast and color balance unless im trying to make a compilation set where everything looks super different but it’s mostly up to u to try different things out and see what looks good :-) or! you can find psds online where other people have shared their coloring settings!
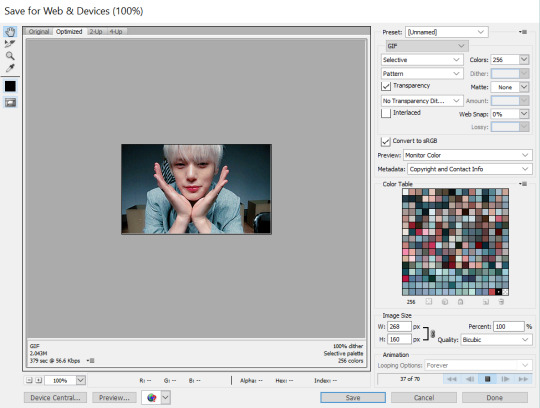
7. saving settings
honestly the only important thing is that ur gif Has to be under 3 mb or it won’t play right on tumblr! other than that u dont really have to worry about anything here as long as your settings look something like this
and then ur done! u have a gif! :-D

i know i use a lot of words fdmsfds but trust me once you’re able to get through it once you’ll be able to go through the whole process in minutes!! and there are lots of other ways to go about these methods as well (tbh i dont even really do this anymore) but this is a good starting point and as u can see the gifs look pretty nice (in my . humble opinion)
happy gifmaking !!! and again if u had any more questions about this or anything else let me know!!
#Anonymous#JFKDLSMFDSFDS why is this so long i barely even said anything.\#this is so funny i really dont know how to do tutorials
20 notes
·
View notes
Last Seen Blogs

wilbursprinkle
effortless manifestation

motivets
Untitled

waterriver1
𝒷𝒶𝒷𝓎 𝒸𝓊𝓅𝒾𝒹

sissy-willow
Sissy Willow

kavyaraj171
Kavya Raj