#how much does it cost to replace a crankshaft sensor
Explore tagged Tumblr posts
Visit Tumblr Blog
Explore Tumblr blogs with no restrictions, modern design and the best experience.
Last Seen Tumblr Blogs


Fun Fact
Celebrities use Tumblr as well.
Text
Car Engine Diagnostics: Focusing on the Crankshaft Sensor
Hey there! Let's dive into a crucial part of car engine diagnostics: the crankshaft sensor. This little component plays a big role in your vehicle's overall performance. If you're experiencing issues with your car, understanding the crankshaft sensor can save you time and money.
What is a Crankshaft Sensor?
First things first, the crankshaft sensor monitors the position and rotational speed of your crankshaft. It's vital because it sends this information to your car's engine control unit (ECU), which then adjusts the fuel injection and ignition timing. Without a functioning crankshaft sensor, your car might not start or could run erratically.
Signs of a Failing Crankshaft Sensor
You might be wondering how to tell if your crankshaft sensor is on the fritz. Here are some common symptoms:
Engine Misfires: The engine might misfire or stall, which can be pretty alarming.
Starting Problems: If your car has trouble starting, the crankshaft sensor could be the culprit.
Check Engine Light: This is often the first clue that something's wrong under the hood.
Reduced Fuel Efficiency: A failing sensor can mess with your fuel consumption, making your car less efficient.
Diagnosing the Problem
Diagnosing a crankshaft sensor issue typically involves using a diagnostic scanner. This tool reads the error codes from your car’s ECU. A mechanic will usually check these codes to confirm if the crankshaft sensor is indeed the problem.
The Replacement Process
If you discover that the crankshaft sensor needs to be replaced, don’t fret! The process is generally straightforward but should be handled by a professional unless you’re comfortable working on cars. It involves locating the sensor, disconnecting the battery, removing the old sensor, and installing the new one.
Understanding the Costs
Now, let’s talk about the elephant in the room: the cost to replace a crankshaft sensor. This can vary depending on your car's make and model. On average, you might expect to pay between $150 and $250 for parts and labor. While this might seem steep, remember that a functioning crankshaft sensor is crucial for your car's performance and your safety.
Preventive Measures
To avoid unexpected sensor failures, regular maintenance is key. Keeping your engine clean and ensuring all components are in good condition can extend the life of your crankshaft sensor.
In Summary
The crankshaft sensor might be a small part, but it has a big impact on your car’s engine performance. Recognizing the signs of a failing sensor and understanding the cost to replace a crankshaft sensor can keep you prepared and your vehicle running smoothly. Regular diagnostics and maintenance will help catch issues early, saving you from potential headaches down the road.
Remember, if your car starts showing any of the symptoms mentioned, don't delay getting it checked out. Safe driving!
#how much does it cost to replace a crankshaft sensor#airbag sensor replacement cost#replacing an airbag sensor#How much does it cost to fix a faulty airbag sensor?
0 notes
Text
7 Warning Signs of a Failing Crankshaft Position Sensor You Shouldn't Ignore
https://autorepairlebanontn.com/?p=4072 7 Warning Signs of a Failing Crankshaft Position Sensor You Shouldn't Ignore Is your vehicle struggling to start, stalling unexpectedly, or showing warning lights on the dashboard? These frustrating issues might point to a failing crankshaft position sensor—a small but crucial component that monitors your engine’s rotational speed and position. When this sensor malfunctions, it can wreak havoc on your car’s performance and leave you stranded at the worst possible moments. We’ve helped countless drivers identify and address crankshaft position sensor problems before they escalate into costly repairs. In this guide, we’ll walk you through the seven telltale symptoms that indicate your crankshaft position sensor is on its last legs. Understanding these warning signs can save you time, money, and the headache of unexpected breakdowns. Table of Contents Toggle Understanding the Role of a Crankshaft Position SensorEngine Starting Problems: The First Warning SignCheck Engine Light IlluminationUnexpected Engine StallingPoor Acceleration and Performance IssuesErratic Idling BehaviorIncreased Fuel ConsumptionEngine Misfires and Rough RunningHow to Diagnose a Faulty Crankshaft Position SensorDIY Testing MethodsWhen to Seek Professional HelpReplacement Costs and ConsiderationsConclusionFrequently Asked QuestionsWhat is a crankshaft position sensor?What are the main symptoms of a failing crankshaft position sensor?Why is my car having trouble starting?Can a bad crankshaft sensor cause stalling?Will the check engine light come on with a bad crankshaft sensor?How does a failing sensor affect fuel economy?How much does it cost to replace a crankshaft position sensor?How is a faulty crankshaft position sensor diagnosed? Understanding the Role of a Crankshaft Position Sensor The crankshaft position sensor serves as a critical component in modern vehicle engines, monitoring the position and rotational speed of the crankshaft. Located near the main pulley or flywheel, this electronic device generates signals that the engine control unit (ECU) uses to determine ignition timing and fuel injection sequences. These precise measurements ensure your engine fires at exactly the right moment for optimal performance. Your vehicle’s ECU relies on this sensor’s data to make split-second adjustments to engine timing. Without accurate information from the crankshaft position sensor, the ECU can’t properly synchronize fuel injection and spark plug firing—leading to many drivability issues. The sensor typically consists of a magnetic pickup or Hall effect sensor that creates electrical pulses as the crankshaft rotates. Most modern vehicles employ this sensor as part of a sophisticated engine management system. As the toothed wheel on the crankshaft rotates past the sensor, it creates a changing magnetic field that generates voltage signals. These signals create a exact pattern the ECU interprets to determine the exact position of the pistons and crankshaft rotation speed. Engine performance depends heavily on the precise timing this sensor provides. Proper air-fuel mixture delivery and spark timing rely on accurate crankshaft position data. When functioning correctly, the sensor helps maintain smooth idling, consistent acceleration, and optimal fuel efficiency while reducing harmful emissions. Engine Starting Problems: The First Warning Sign Prolonged cranking or complete failure to start represents the most common symptom of a faulty crankshaft position sensor. Engines typically require extra time to turn over when this sensor malfunctions, as the powertrain control module (PCM) struggles to receive accurate positional data. Many drivers notice this problem manifests as turning the key and hearing the engine crank repeatedly without starting. Kickbacks or backfiring often accompany starting issues, particularly during initial startup attempts. These alarming sounds occur because the sensor isn’t properly synchronizing the ignition timing with the crankshaft’s position. Your vehicle might produce distinctive popping and banging noises during attempted starts—clear indicators of crankshaft position sensor failure. The starting problem typically progresses from intermittent to consistent over time. Initially, you’ll experience occasional difficult starts that become more frequent as the sensor deteriorates further. Cold mornings often exacerbate these symptoms, making the problem more noticeable when temperatures drop. Engine starting issues serve as an early warning sign that shouldn’t be ignored, as they frequently precede complete system failure. Check Engine Light Illumination The Check Engine Light serves as your vehicle’s primary warning system when the crankshaft position sensor begins to fail. This dashboard indicator illuminates when the sensor transmits incorrect signals or no signals at all to your vehicle’s computer system. Many drivers notice this warning light as the first indication of a potential crankshaft position sensor issue. The engine control module constantly monitors sensor performance and triggers this warning light when it detects inconsistencies in the data stream. Modern vehicles rely on precise timing information from the crankshaft position sensor to maintain optimal engine operation. When this communication breaks down, your car’s onboard diagnostics system immediately flags the problem. Diagnostic trouble codes related to crankshaft sensor failures often include P0335 (Crankshaft Position Sensor Circuit Malfunction) and P0336 (Crankshaft Position Sensor Range/Performance). These exact codes help technicians pinpoint the exact nature of the sensor malfunction. It’s important to note that while a glowing Check Engine Light doesn’t necessarily mean your crankshaft position sensor has failed, it definitely warrants prompt investigation. The warning light might appear intermittently at first before becoming a permanent fixture on your dashboard as the sensor deteriorates further. Professional diagnostic equipment can quickly determine if the crankshaft position sensor is indeed the culprit behind the illuminated warning light. Unexpected Engine Stalling Intermittent stalling represents one of the most common and dangerous symptoms of a failing crankshaft position sensor. Your vehicle might shut off completely without warning while you’re driving, creating potentially hazardous situations on busy roads or highways. This sudden stalling occurs because the erratic signals from a malfunctioning sensor confuse the engine control unit, disrupting the precise timing needed for combustion. Many drivers report their vehicles stalling at low speeds initially, such as when approaching a stop sign or idling at a traffic light. The engine’s computer relies on accurate crankshaft position data to maintain proper fuel injection and spark timing sequences. When this data becomes inconsistent or disappears entirely, the engine can’t maintain operation and simply shuts down. The unpredictable nature of this symptom makes it particularly troublesome. Your vehicle might run perfectly fine for days, then suddenly stall multiple times in a single trip. Temperature changes often exacerbate the problem, with many sensors showing increased failure rates during extreme hot or cold conditions. Restarting after an unexpected stall typically gets progressively more difficult as the sensor deteriorates further. You’ll notice this pattern evolving—what begins as occasional stalling eventually becomes more frequent until the vehicle becomes completely unreliable. This escalating pattern serves as a critical warning sign that shouldn’t be ignored. Safety concerns amplify the importance of addressing this symptom quickly. Losing power steering and brake assist during unexpected stalling creates dangerous driving conditions, especially at higher speeds or in heavy traffic. Diagnostic testing can confirm if the crankshaft position sensor is indeed the culprit behind these intermittent stalling episodes. Poor Acceleration and Performance Issues A failing crankshaft position sensor often manifests as noticeable power loss during acceleration. When this sensor malfunctions, the engine computer receives inaccurate timing signals for fuel injection and spark timing, resulting in sluggish throttle response and reduced engine performance. Cars with this issue struggle to maintain consistent power output, particularly when attempting to accelerate from a stop or while overtaking on highways. Engine misfires frequently accompany poor acceleration, creating a jerky driving experience that’s impossible to ignore. These misfires occur because the erratic signals from a defective crankshaft position sensor lead to miscalculated fuel injector pulse and spark timing. Drivers typically notice hesitation when pressing the gas pedal, followed by a sudden surge of power as the engine computer attempts to compensate for the incorrect timing data. Fuel economy suffers significantly with a bad crankshaft position sensor. The engine’s decreased efficiency from constant misfires and rough running conditions leads to increased fuel consumption. Also, advanced fuel-saving technologies like variable valve timing and cylinder deactivation may fail to function properly without accurate crankshaft position data, further reducing your vehicle’s gas mileage. Intermittent performance problems create frustrating driving experiences when dealing with a failing sensor. The engine might stumble or shake unexpectedly, especially under load conditions such as climbing hills or accelerating with passengers. These performance inconsistencies stem directly from the sensor’s inability to provide reliable data to the engine control module, causing the computer to make inappropriate adjustments to critical engine parameters. Engine roughness at idle represents another telltale sign of crankshaft position sensor failure. Your vehicle might vibrate excessively or run unevenly when stopped at traffic lights or in park. The rough idle occurs because the engine computer can’t properly synchronize fuel delivery and spark timing without accurate crankshaft position information, leading to combustion inefficiencies even at low RPMs. Erratic Idling Behavior Erratic idling behavior manifests when your engine runs at inconsistent speeds while the vehicle is stationary. Irregular RPM fluctuations during idle often indicate a failing crankshaft position sensor sending incorrect data to the engine control unit. The engine computer struggles to maintain proper timing for fuel injection and ignition when receiving faulty crankshaft position information. Many drivers notice their tachometer needle bouncing unpredictably between different RPM readings while idling at stoplights. Unstable idling typically occurs because the sensor can’t accurately track the crankshaft’s position and rotational speed. Your engine might suddenly dip below normal idle speed or unexpectedly surge higher without any throttle input. These idle fluctuations frequently accompany other drivability issues like hesitation, stalling, or rough running conditions. Cold mornings or hot weather conditions tend to exacerbate these erratic idle symptoms when the sensor is deteriorating. The connection between crankshaft sensor failure and idle problems stems from the engine’s timing requirements. Without precise crankshaft position data, the ECU cannot synchronize fuel delivery and spark timing effectively during low-speed operation. Diagnostic scans often reveal intermittent signal errors or voltage fluctuations from the crankshaft sensor circuit during problematic idle periods. Some vehicles display more subtle symptoms like slight vibrations or minor RPM variations that gradually worsen as the sensor continues to degrade. Increased Fuel Consumption A faulty crankshaft position sensor directly impacts your vehicle’s fuel efficiency, creating a noticeable decrease in miles per gallon. This critical component helps the Engine Control Unit (ECU) optimize the timing of fuel injection and spark ignition for maximum efficiency. When the sensor malfunctions, the ECU lacks accurate data about crankshaft position and rotation speed, leading to suboptimal combustion timing. Fuel economy typically drops by 3-4 MPG when driving with a bad crankshaft position sensor, as confirmed by diagnostic testing. The ECU compensates for missing or inaccurate timing signals by defaulting to a “safe mode” where it doses excess fuel to prevent engine damage. This conservative fuel management strategy prioritizes keeping the engine running over maintaining efficiency. Many drivers notice they’re filling up their tanks more frequently before identifying the underlying sensor issue. The problem often becomes apparent during highway driving when fuel consumption should be at its most efficient. Instead, the engine runs rich continuously, wasting fuel and creating additional strain on engine components. Tracking your vehicle’s fuel consumption provides an early indicator of potential crankshaft position sensor failure. The decline in efficiency happens gradually in most cases, making it easy to miss until the problem becomes severe. Regular monitoring of your vehicle’s MPG helps identify this symptom before more serious drivability issues develop. Engine Misfires and Rough Running Engine misfires and rough running are telltale indicators of a failing crankshaft position sensor (CKP). When this sensor transmits erratic signals to the Powertrain Control Module (PCM), the computer miscalculates critical timing for fuel injection and spark delivery. The inconsistent signals cause the engine to misfire, creating a noticeable shaking or stumbling sensation, particularly when the vehicle is under load. Drivers experience these symptoms as: Subtle vibrations through the steering wheel or seat during acceleration Stumbling or hesitation when pressing the gas pedal Jerky performance especially when climbing hills or overtaking Reduced power during normal driving conditions The rough running occurs because the PCM relies on precise crankshaft position data to synchronize the ignition and fuel systems. Without accurate timing information, the engine’s cylinders fire at incorrect intervals, disrupting the combustion sequence. This desynchronization not only affects performance but also contributes to increased emissions and potential damage to catalytic converters. Fuel and spark delivery problems resulting from a bad CKP sensor often worsen progressively. Initially, drivers might notice occasional hiccups or brief power losses, but as the sensor deteriorates further, the misfires become more frequent and severe. Engine roughness typically intensifies during exact operating conditions such as cold starts or when the engine reaches normal operating temperature. Many vehicles with faulty crankshaft position sensors display inconsistent symptoms—running smoothly one moment, then suddenly misfiring the next. This unpredictability stems from the sensor’s intermittent failure patterns, making diagnosis challenging without proper testing equipment. How to Diagnose a Faulty Crankshaft Position Sensor Diagnosing a crankshaft position sensor problem requires a systematic approach to identify the root cause. Our diagnosis process begins with a visual inspection of the sensor and its wiring for visible damage or corrosion. Next, specialized diagnostic equipment like an OBD2 scanner helps retrieve any trouble codes stored in the vehicle’s computer, while more advanced tools can test the sensor’s output signal against manufacturer specifications. DIY Testing Methods DIY crankshaft position sensor testing starts with locating the sensor near the crankshaft—typically found at the front of the engine by the crankshaft pulley, on the engine block, or near the transmission bell housing. After disconnecting the electrical connector, use a multimeter set to the resistance setting to test the sensor terminals. Normal resistance readings generally fall between 200 to 1,200 ohms, but always compare your results with specifications in your vehicle’s service manual. Carefully inspect all wiring connected to the sensor for signs of fraying, melting, or corrosion that could interrupt the signal. Testing the sensor with an oscilloscope provides more detailed analysis of the sensor’s performance during engine operation, allowing you to visualize the actual signal patterns being produced. When to Seek Professional Help Professional assistance becomes necessary when dealing with intermittent sensor symptoms that are difficult to reproduce during home testing. Technicians possess specialized diagnostic equipment that can monitor sensor performance under various operating conditions. Complex sensor installation procedures on certain vehicle models may require professional expertise, especially when the sensor location is difficult to access or requires special tools. Mechanics can also perform comprehensive testing to ensure the problem isn’t caused by related components like the wiring harness or engine control module. If your initial diagnosis attempts reveal inconsistent results or if replacing the sensor doesn’t resolve the issue, professional diagnostic services can save time and prevent unnecessary parts replacement. Replacement Costs and Considerations Replacing a crankshaft position sensor involves both parts and labor costs that vary depending on your vehicle’s make and model. The sensor itself typically costs between $40 and $150, with higher-end or luxury vehicles commanding premium prices for OEM parts. Labor charges can range significantly from $100 to $700, reflecting the accessibility of the sensor’s location and the complexity of the replacement procedure. Most vehicle owners can expect to pay a total of $100 to $400 for a complete crankshaft position sensor replacement. Luxury vehicles and complex engine designs often push this cost higher, potentially reaching $700 or more for the entire service. BMW models, for example, generally fall in the $200 to $400 range, while Hyundai and Kia vehicles typically cost between $100 and $300 for the same repair. Several factors influence the final cost of your crankshaft position sensor replacement: Vehicle Accessibility: Sensors that are difficult to reach require more labor time Dealer vs. Independent Shop: Dealerships typically charge more than independent mechanics OEM vs. Aftermarket Parts: Original equipment manufacturer sensors cost more but may provide better reliability Geographic Location: Labor rates vary significantly based on your region Vehicle Make and Model: European luxury vehicles generally incur higher replacement costs than domestic or Asian models DIY replacement can save substantial labor costs for those with mechanical experience. The procedure requires basic tools and mechanical knowledge, with the most challenging aspect often being accessing the sensor’s location. Many crankshaft position sensors are situated near the engine’s flywheel or behind the crankshaft pulley, making replacement more complicated in some vehicles than others. Conclusion Recognizing the seven symptoms of a failing crankshaft position sensor is crucial for maintaining your vehicle’s performance and safety. By staying alert to warning signs like starting difficulties check engine lights unexpected stalling poor acceleration erratic idling increased fuel consumption and engine misfires you’ll be better equipped to address issues before they escalate. Don’t ignore these symptoms as they often worsen over time leading to complete engine failure and potentially dangerous driving situations. Whether you choose DIY diagnostics or professional help prompt attention to these warning signs can save you from costly repairs and roadside emergencies. Remember that timely replacement of a faulty sensor is significantly more affordable than repairing the extensive damage that can result from continued operation with a failing component. Frequently Asked Questions What is a crankshaft position sensor? A crankshaft position sensor is an electronic device that monitors the position and rotational speed of your vehicle’s crankshaft. Located near the main pulley or flywheel, it sends crucial signals to the engine control unit (ECU) that determine ignition timing and fuel injection sequences. This component is essential for optimal engine performance, smooth idling, and fuel efficiency. What are the main symptoms of a failing crankshaft position sensor? The main symptoms include difficulty starting your vehicle, unexpected engine stalling, illuminated check engine light, poor acceleration and performance, erratic idling behavior, increased fuel consumption, and engine misfires or rough running. These issues typically worsen over time and may initially appear intermittently before becoming more consistent. Why is my car having trouble starting? Starting problems are a primary warning sign of a faulty crankshaft position sensor. When the sensor fails, your engine may experience prolonged cranking or completely fail to start because the powertrain control module isn’t receiving accurate positional data. You might also notice kickbacks or backfiring during startup attempts, with problems often worsening in cold temperatures. Can a bad crankshaft sensor cause stalling? Yes, a failing crankshaft position sensor can cause unexpected engine stalling while driving, which is particularly dangerous at high speeds. This happens because erratic signals disrupt the timing needed for combustion, leading to complete engine shutdown. Stalling typically becomes more frequent over time and restarting after a stall becomes increasingly difficult. Will the check engine light come on with a bad crankshaft sensor? Yes, the check engine light typically illuminates when the crankshaft position sensor transmits incorrect or no signals to the vehicle’s computer system. Diagnostic trouble codes related to sensor failures (such as P0335 and P0336) will be stored in the system. Initially, this warning light may appear intermittently before becoming permanently lit. How does a failing sensor affect fuel economy? A faulty crankshaft position sensor can significantly reduce fuel efficiency, often decreasing your miles per gallon by 3-4 MPG. This happens because the ECU defaults to a “safe mode” that uses excess fuel when it doesn’t receive accurate timing data. The problem is most noticeable during highway driving, where fuel consumption should be optimal. How much does it cost to replace a crankshaft position sensor? Replacement costs typically range from $100-$400 total, with the sensor itself costing between $40-$150 and labor charges ranging from $100-$700 depending on accessibility. Luxury vehicles generally cost more to repair. DIY replacement can save on labor costs if you have mechanical experience, though sensor access can be challenging in some vehicles. How is a faulty crankshaft position sensor diagnosed? Diagnosis begins with a visual inspection of the sensor and its wiring for damage or corrosion. Mechanics will use an OBD2 scanner to retrieve trouble codes and test the sensor’s output signal against specifications. More advanced testing involves using a multimeter and oscilloscope to check resistance readings. For intermittent issues, professional diagnostic services are recommended. https://autorepairlebanontn.com/?p=4072 Absolute Auto Repair
0 notes
Text
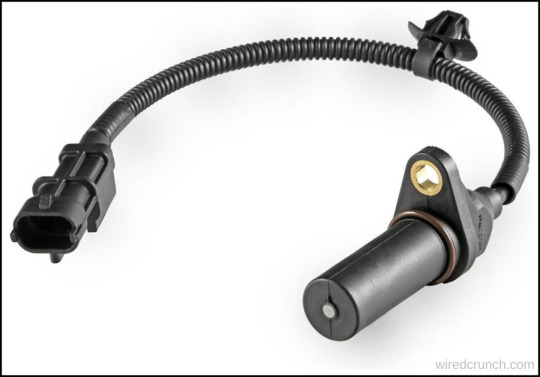
How Much Does it Cost to Replace a Crankshaft Sensor

Explore Factors Check out our articles to learn about the factors that affect the cost to replace a crankshaft sensor. Gain an understanding of the importance of this component in engine performance and understand how evolving sensor technology affects replacement costs. Vehicle maintenance costs are important to grasp. The crankshaft sensor, vital for engine operation, is a common concern. It tracks crankshaft rotation, critical for ignition timing and fuel delivery. As automotive technology advances, traditional crankshaft sensors are giving way to precise but pricier Hall effect sensors. This introduction examines factors affecting the cost to replace a crankshaft sensor, highlighting its importance and the evolving sensor tech landscape.
Cost to replace a crankshaft sensor Steps to replace a crankshaft sensorStep 1: Get the vehicle prepared Step 2: Unplug the electrical connection Step 3: Remove the crankshaft sensor Step 4: Insert the new crankshaft sensor Step 5: Reconnect the electrics Step 6: Lower the car from the lift Step 7: Run diagnostics and clear codes How Long Does a Crankshaft Sensor Last Symptoms of a Bad Camshaft Sensor Conclusion Frequently Asked Questions (FAQs)How long does a crankshaft sensor take to replace? What happens if you don't replace a crankshaft sensor? Can I replace a crankshaft sensor myself and save money? How much does it cost to replace a crankshaft sensor on a Honda Civic? What would happen to a car if the crankshaft sensor were faulty?
Cost to replace a crankshaft sensor
The cost to replace a crankshaft sensor can vary based on different factors. From my experience, it depends on the type of car you have and the mechanic you go to. On average, you might spend between $150 and $350 for both the sensor and the labor. The time it takes to fix can range from 1 to 2 hours, depending on how tricky the repair is. But if you own a fancy or hard-to-reach car, the price could go up, sometimes even doubling. Usually, mechanics use new parts, often the original ones, not aftermarket ones. Luckily, a skilled mechanic can quickly figure out if the crankshaft sensor is the issue. Resource Highlights If your engine is experiencing problems like reduced performance or even failure to start, a malfunctioning crankshaft sensor could be the culprit. If you've identified this as the issue, this guide will walk you through the necessary steps to replace it.
Steps to replace a crankshaft sensor
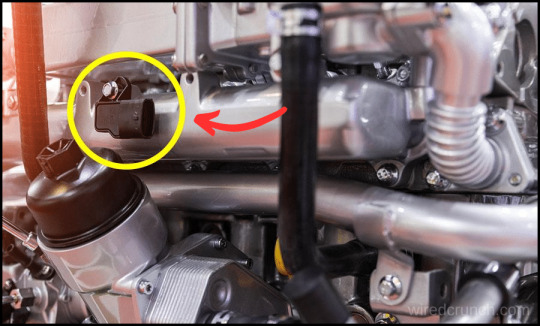
When tests show that a replacement part will be required, it’s time to replace a crankshaft sensor. Let’s take a look at the steps needed to complete the replacement.

Step 1: Get the vehicle prepared If using a ramp, raise the vehicle properly utilizing the manufacturer’s specified lifting points. This will allow you to access the crankshaft sensor. Step 2: Unplug the electrical connection Locate the electric connection of the crankshaft sensor and disconnect it from the engine wiring harness. Always check the electrical plug for any signs of corrosion or water entry. Step 3: Remove the crankshaft sensor Take out the retaining bolt, which might become easier to remove once loosened. In certain vehicles, you might have to remove some components to enhance accessibility. Then, remove the sensor. Step 4: Insert the new crankshaft sensor Install the replacement crankshaft sensor into position, and secure it by reattaching the retaining bolt. Be sure to tighten the bolt to the specified torque as indicated in the manufacturer's guide. Step 5: Reconnect the electrics Connect the electrical connector to restore the signal from the crankshaft sensor to the ECU. Step 6: Lower the car from the lift Lower the vehicle back onto the workshop floor. Step 7: Run diagnostics and clear codes If the engine light remains illuminated, utilize a scanning tool to conduct an OBD check. Clear any codes related to the sensor. Verify if the new part necessitates calibration, which the diagnostic tool will indicate.
How Long Does a Crankshaft Sensor Last
Replace a crankshaft sensor is essential for maintaining a smoothly running engine. While these sensors can last for years, various factors like driving conditions and maintenance habits can impact their lifespan. Therefore, it's crucial to have your sensor inspected regularly and replaced when necessary.

Symptoms of a Bad Camshaft Sensor
Having a bad camshaft can make your car run poorly in different ways. Sometimes, it gives warnings first, like a check engine light (CEL), before failing completely. Here are some symptoms you might notice if your camshaft sensor isn't working well: - Check engine light comes on - The car runs poorly, with jerks and surges - The car won't start - Engine stalls - The sudden decrease in fuel economy - Poor acceleration - Shifting problems
Conclusion
Although the crankshaft position sensor is only a small part of the engine, its role cannot be ignored. When it comes to replace a crankshaft sensor, you may encounter various stores selling these sensors, both online and offline. However, determining the best choice can be challenging.
Frequently Asked Questions (FAQs)
How long does a crankshaft sensor take to replace? The engine does not need to be pulled to replace this sensor. The manual says the replacement should only take about 30 minutes What happens if you don't replace a crankshaft sensor? If the CKP sensor goes bad, the PCM won't know when to fire the spark plugs and when to operate the fuel injectors. Because of this malfunction, the engine may become starved of fuel or may lack the spark it needs to run. Therefore, it may become difficult or impossible to start the engine Can I replace a crankshaft sensor myself and save money? It's technically possible to replace a crankshaft sensor yourself, but it's much less painful to have an expert do it. Because the crankshaft position sensor lies in such a sensitive region of the engine, amateur mechanics run the risk of causing further damage by attempting a MacGyver-style fix. How much does it cost to replace a crankshaft sensor on a Honda Civic? The typical price range for replacing a Honda Civic's crankshaft position sensor falls between $175 and $243. Labor expenses are usually estimated from $87 to $110, with parts priced around $87 to $133. Taxes, fees, and your specific location are not included in this estimate. Additionally, you may require related repairs. What would happen to a car if the crankshaft sensor were faulty? The crankshaft sensor is responsible for monitoring the position and speed of the crankshaft, which is crucial for the engine's operation. A faulty crankshaft sensor could cause problems such as difficulty starting the engine, poor acceleration, stalling, or even preventing the engine from starting altogether. READ MORE : What Does A Knock Sensor Do On A Vehicle How Much Does it Cost to Replace an Airbag Sensor Explore the Knock Sensor Replacement Price Transmission Sensor Replacement Cost Read the full article
#Airbagsensorreplacementcost#Averagecostofairbagsensorreplacement#Costbreakdown:partsvs.laborforairbagsensorreplacement#costtoreplaceacrankshaftsensor#Howmuchdoesitcosttofixafaultyairbagsensor?#howmuchdoesitcosttoreplaceacrankshaftsensor#replacinganairbagsensor#whatistheaveragecosttoreplaceanairbagsensor
0 notes
Text
What's the impact of camshaft sensor on car safety
We are one of leading suppliers who wholesale camshaft sensor, we start from the following questions to illustrate the safety impact of camshaft sensor on the car.
What does the camshaft sensor do?
The camshaft helps control the opening and closing of the car's valve. Although the speed of the camshaft in a four-stroke engine is half that of the crankshaft (in a two-stroke engine, the speed of the camshaft is the same as the crankshaft), but usually its speed is still very high, and it needs to bear a lot of torque.
Is it safe to drive with a bad camshaft sensor?
It is safe, but it will affect your engine and cause the crankshaft to reverse during the starting process. The car idling is unstable and the jitter is serious. It is similar to the car’s lack of cylinder failure, the car’s acceleration is weak, the fuel consumption is high, the exhaust emission exceeds the standard, and the exhaust pipe will emit unpleasant black smoke.
What happens when a camshaft sensor goes bad?
It will happen with the following:
1. Ignition failure: the camshaft position sensor can determine the ignition sequence. If it is broken, it will cause ignition failure and the engine is not easy to start;
2. Engine weakness: after the camshaft position sensor is broken, the ECU cannot detect the position change of the camshaft, and cannot correctly detect the position change of the camshaft, which affects the intake and exhaust volume of the near-exhaust system, thereby affecting the engine performance;
3. Increased fuel consumption: the camshaft position sensor is broken and the computer will spray fuel out of order! This causes fuel consumption, vehicle weakness, and speed failure.
What does a bad camshaft sound like?
This kind of sound is produced when the engine is working. It is a rhythmic and muffled metal knocking sound. When the idle speed or idle speed is slightly higher, the noise is more obvious when you check it at each camshaft bearing.
Causes of abnormal noise of camshaft
1. The matching clearance between the camshaft and its bushing is large.
2. The camshaft bushing rotates.
3. The camshaft is bent and deformed.
4. The axial clearance of the camshaft is too large.
5. The camshaft bushing alloy burns or falls off.
Inspection and judgment
1. The sounding part is on the side of the camshaft, and the throttle is slowly changed. The sound is clear when idling, and the sound is obvious at medium speed. When the sound becomes messy or weakened or disappears at high speed, it may be an abnormal noise of the camshaft;
2. Remove the valve chamber cover, press the camshaft with a metal rod, and listen to whether there is any change in the noise. Any change in the noise is the camshaft noise;
3. Use a metal rod or stethoscope to touch the vicinity of each bearing of the cylinder. If there is a strong sound and vibration, it can be preliminarily determined that the journal is making a sound.
How much does it cost to replace a camshaft sensor?
In fact, this will not cost you much. It is alwasys based on the number of your broken vehicles, your car brand, the quality of the camshaft sensor, and the manufacturers. . . These are all important factors that affect prices.
Additional knowledge: Why is the side of the cam egg-shaped?
The purpose of the egg-shaped design is to ensure adequate intake and exhaust of the cylinder. In addition, taking into account the durability of the engine and the smoothness of operation, the valve should not have too much impact due to the acceleration and deceleration process in the opening and closing action, otherwise it will cause severe valve wear, increased noise or other serious consequences.
Finally
We sell camshaft sensors and also provide customers with high-quality LEXUS Auto Camshaft sensors. If you are looking for proper camshaft sensor for your Lexus, we hope to make your journey smooth via our camshaft sensors.
You may be interested in following items:
bulk modular sofa, bulk 3 seater sofa
custom printed socks wholesale
custom sock manufacturers china
OEM UK plug power adaptor
ODM certificated eu power adapter
bbq termometer meat thermometer factory
OEM kitchen timers for cooking
0 notes
Photo

Whether you just got a car, looking at cars for sale Midrand or have been driving one for long, following certain car maintenance tips can help your car be at its best. If you need some guidance or a checklist of tips for your car to be in its optimal condition, this is a useful read.
Here’s a comprehensive list of car maintenance tips and checklists for every car owner
Inspect your vehicle regularly Take a walk around your vehicle at least once every week. While you take a walk, inspect your car and look for body damage. You should also inspect your tyres for any wear, punctures or cuts and test every lock, window and even the sunroof.
Check your air filter A lot of car problems arise when your air filters are clogged or if they fit loosely. Air filters block dust, pollen and other contaminants to keep your engine healthy. But when dirty, the air filter can reduce the airflow into the engine, robbing your vehicle of power, reducing performance and fuel economy. It’s recommended that you replace your air filter every 12,000 miles.
Check your tyre pressure regularly Tyre pressure can impact the fuel economy. It also affects the comfort and handling. Your car’s owner manual will have the recommended tyre pressure mentioned on the owner’s manual. Generally, the tyres pressure check should be done every week.
Clean your engine’s exterior It’s equally important to clean your car’s exterior engine as much as it’s important to keep the interior engine clean. If not cleaned properly, even minor debris in the wrong place can do damage to your engine. For example, while checking your brake fluid, some grease might fall into it. Due to this, there can be damage to the brake. Thus, ensure you check your brake fluid levels at least once every month.
Protect your headlights Turn on your headlights once a month when you park in front of a flat surface to check if both headlights are working properly and well-positioned. Visually inspect both turn signals by walking around your car and see and your parking lights. You can even ask a friend to stand behind the car while you engage the brakes to be certain that your brake lights are functional.
Check your battery Your car battery is one of the most important components required for it to run. The car’s battery is responsible for providing a large amount of electrical current for the starter, engine and other electronic accessories in the vehicle. Extreme temperatures affect the performance of the battery so regular battery testing will ensure that the battery will perform when you need it to.
Change your spark plugs Spark plugs could affect the efficiency of your car’s engine. They’re responsible for igniting the gas and air mixture that ultimately powers your vehicle. Thus, when the spark plugs don’t function properly, it causes the engine to lose power and it won’t function at its optimal capacity. So get a professional to check your spark plugs so that those plugs are replaced if faulty.
Get your tyres rotated and balanced Tyre rotation is important to maintain the safety and performance of your vehicle. It gives your vehicle a quicker steering response and a smoother ride of course. Rotating your tyres gives them a chance to even out their wear and helps extend the life of the tyres. Ensure that you check the tyre pressure of your car once every month and even before you take long trips or when you carry an extra load in your car. Your car’s manual will tell you how much air pressure the car tyres require.
Ensure your cooling system works Your car’s cooling system and radiator need to be clean to work efficiently and effectively. Your car’s radiator builds up a deposit with normal wear and tear, which can disrupt the cooling system. With a radiator flush, you can keep your cooling system in shape quickly and inexpensively. You can take a look at your car’s manual to find out if you need to flush the radiator once a year or after every two years.
Know the meaning of different warning light indicators Almost all cars have elaborate systems of sensors and warning lights that tell you everything from whether you forgot to replace the gas cap to the fact that one of your tyres is low on air. Learn what each of your car’s warning lights means and how to fix it. Your owner’s manual can be of great help here. If any light flashes and you can’t immediately pinpoint and fix the problem, take your vehicle to a trusted mechanic right away.
Clean the brake dust off your wheels The brake dust on your car doesn’t affect the full functioning of your brake but it does make wheels a little unpleasant to look at. When you apply the brake, a mix of materials that come in contact from the brake rotor and brake pad which is the brake dust. 92% of the dust is iron. The remaining 8% will be grime, dirt, carbon content and other particles. If these are exposed to the sun along with your wheels, they can leave severe stains on your wheel. So, it is important to clean the dust off your wheels and with a damp sponge. As dust typically clings to your wheels via static electricity, you’ll also require cold water.
Protect your car interiors Avoid eating food inside your car as much as possible. A good way is to cover surfaces as much as possible. Keep floor mats, which will keep you from tracking in mud or dirt and grinding it into the carpets with your feet. Add seat covers, which can protect your car seat’s upholstery. Cover can also help aid your posture and even help customize the look of your car. Make it a point to vacuum the car regularly. If you live in a hot region ensure that you keep your windows slightly open. The hot air inside your car has the potential to dry and damage your car’s interiors if it can’t come out.
Check drive belts Your engine produces power so that other parts and accessories run including the power that your vehicle requires to run. The drive belts shift the power from your cram or crankshaft to the car’s alternator, air conditioning compressor, power steering pump, air pump, water pump and any other device that relies on mechanical power. Modern cars use a single belt which is also called a serpentine belt to connect and rotate from the crank pulley. As these belts are typically made of rubber or other polymers, they wear a lot even with normal use. So it’s important to check these belts regularly to inspect for visible hairline cracks or any change in their integrity. You’ll need to look at the integrity of both your serpentine belt or V-belt and your timing belt unless your engine is chain driven.
Check oil levels There are a lot of mechanical moving parts in your car’s engine that creates friction as they brush against each other. This friction generates heat and can lead to a significant reduction in engine performance. This is why minimizing if not eliminating friction from these parts is crucial to ensure smooth operation. Else, you might hear loud noises from your engine and a substantial reduction in fuel economy can occur. Check your engine’s oil level as an integral part of your basic car maintenance routine. It’s also critical to look at the color of the oil. It shouldn’t be black. The dark color usually indicates the presence of contaminants, excessive heat, the addition of chemical additives or even worse, sludge. Your owner’s manual tells you the frequency of oil change. You’ll also need to check the correct viscosity grade for your car and the environment upon which it normally operates.
Drive better Your way of driving reflects the condition of your car. If you’re hard on your car and have a habit of fast takeoff, quick braking, sharp quick turns, riding over bumps at high speeds, hard shifting, etc. then your car will wear faster and there can be damage. When you drive smartly and safely, there’s not only less wear and tear on your car but you also can save on fuel costs. So start today by taking a look at your acceleration and braking habits. If you’ve got a habit of taking off quickly and applying brakes suddenly, then remember that each smooth transition saves money on gas. When you drive below the speed limit and avoid sudden stops, it will help you stay safer, save money, and help your car last longer.
Carry automotive tools at all times A good tip is to carry some basic tools, so you can use them to maintain your car on the go and work with those tools in case your car faces different problems. For example, if you delay fixing a leak, it can cause potential damage to your engine. Either you’ll need to get your car towed or use your tools to work on the problem. After that, driving might not be an option. A few tools that can be helpful are thick gloves, heat resistant waterproof silicone tape, electrical tape, wire cutters, screwdrivers, tongue and groove pliers, a flashlight and a knife. You can carry a tool kit. A set of tools can come handy and will give you choices that you wouldn’t have otherwise. They’ll be useful in other situations as well.
Keep your car covered Keeping your car away from the reach of sunlight, trees and birds can help your car’s paint and interior remain in good condition. Extreme weather, harmful radiation and nature can take a toll on your vehicle. You might wash your car regularly and use a protectant on plastic and rubber parts but a car cover is important too. It will keep your car looking its best for years to come so a car cover is a good investment. So keep your car covered when not in use and try to keep it in your garage.
Clean your windshield and replace the wipers A dirty windshield will not let you see clearly and thus create inconvenience. They can cause visual impairments if not cleaned regularly and can result in accidents at times. For safe driving, the driver must have a clear view of the road. If you don’t clean those windshields, the dirt and particles will accumulate and can scratch the windshield when you use the wipers. Check your wipers when the rainy season is approaching and get them replaced if needed. Your car’s glass can get scratches and obstruct your view if you use damaged wipers and it might lead to the need to replace your entire windshield.
Inspect your fluids regularly Get into the habit of checking car fluids along with the tyres. When the engine cools down, open the hood and remove the oil dipstick. Clean the dipstick thoroughly and put it back again. When you pull it out now, you’ll notice the oil is up to a certain level. Check and see whether the oil is at the correct level. Also, replace the oil at regular periods. While doing so, also check the fluid level of your power steering, the hoses and belts for any signs of wear. Also, check the transmission fluid level after warming up your car. Get your tyres and fluids regularly inspected for the best performance of your car.
Check engine coolant level While there’s oil in your engine to help reduce the friction between moving parts and help it prevent from getting heated at a much faster rate, your engine will also need a system that will help it get rid of this generated heat. That’s where the function of your radiator is required and the fluid supplied to it is your engine coolant. If the coolant in the reservoir is running low or if it’s not there, then heat from the engine won’t get dissipated into the environment. This can lead to your car’s engine to overheat. Before you start rolling out of your driveway, you need to check your engine coolant levels as a part of your car maintenance checklist. Today, most cars possess coolant reservoirs that are somehow translucent and have appropriate level markings on the panel. Without even opening the lid of the reservoir, you should be able to visually inspect whether it’s running low or not. Read your car manual to look for the engine coolant reservoir in your car.
Wax your vehicle Waxing your vehicle every six months after car washing will not just keep it shiny but also help reduce the chance of rust and keep the paint in good condition. Irritants such as dust, sand, and salt can build up and environmental factors like ozone and ultraviolet light can cause microscopic damage. But waxing can help extend your paint’s life and minimize this by forming a protective seal.
Only use superior detailing supplies Using the right kind of supplies and detailing tools for your car makes it look like it just got out of the showroom. It also helps provide a protective barrier against the elements and keeps it shining like new. The key is to use superior quality car detailing products.
Don’t touch the glass bulbs when repairing Make sure you only touch the metal bulb holder located at the bottom of the lighting fixture whenever you have to replace the bulb on your headlight. If you have to touch the glass, you can wear clean mechanic’s gloves or use sterile surgical gloves. These gloves will help prevent the transfer of oils, grime, dust and dirt from your fingertips to the specialized coating that’s there on the bulb’s exterior surface. The dust particles, grease or oil can affect the special coating present in the bulb’s surface. So when you turn your headlights on, the part of the bulb with dust will heat up a lot faster than the rest of the bulb and cause the bulb to crack.
Replace your car’s cabin air filter If you’ve got a family member who’s quite allergic to dust and other airborne particles then you might want to replace the cabin air filter of your car. It’s one of the easiest ways to keep everyone safe and comfortable inside your car’s cabin. It’s recommended to replace your cabin air filter after every 12 months or 12,000 miles whichever comes first. You can refer to the owner’s manual to know the recommended schedule of air filter replacement.
Check your AC’s refrigerant level Before starting any A/C related task, it’s important to know what refrigerant you need. It’s important for the air conditioner to have a proper level of refrigerant which is the cooling agent that keeps your vehicle running efficiently. If your car’s air conditioner isn’t blowing cold air or there’s a clicking noise coming from the engine then most likely the unit needs to be recharged. A properly working AC will not only make a vehicle’s occupants more comfortable and it’s also a good maintenance tip to follow.
Take it to the experts Although there are some things that you can fix in your car yourself, there are times when the car’s condition demands professional expertise. So at times like these, take your car to an authorized car service provider without any delay. It’s a good practice to keep the receipts from any repair service. When you sell the vehicle, accurate maintenance records can increase the value of your car to potential buyers. So when it comes to car maintenance, things aren’t very difficult. Your car just needs to be taken care of the right way so that its life gets extended. Moreover, you get a higher resale value for its condition. After all your car is your favorite travel companion, isn’t it?
.
.
.
.
Article source: https://www.carcility.com/blog/general-car-maintenance-tips-every-car-owner-should-know/
0 notes
Text
Car ac gas filling price in chennai – Car ac gas filling price in delhi. Ac Gas Refilling Services in Delhi. Find best Ac Gas Filling Services. Get Phone Numbers, Address, Reviews, Photos, Maps for top Ac Gas Refilling Services in … >> Read More
BBC – Autos – How connected car tech is eroding personal privacy – Your car is watching you ? tracking your driving style, your whereabouts, and even your favourite songs. Can it be trusted? … >> Read More
UK mandates hacking protection for the cars of the future – TechRepublic – New government guidance coming out of the UK will require automobile engineers to make sure their connected and automated vehicles are better protected from hackers. … >> Read More
How to cool down a hot car faster | KGW – How to cool down a hot car faster … >> Read More
On the Road to the Circular Car – Analysis of how car component suppliers stay ahead of the curve by applying circular economy strategies to meet consumer demands. … >> Read More
How Do I Change My Car Battery? | Ancaster Toyota – Read How Do I Change My Car Battery?. Learn more about Ancaster Toyota located near Toronto. … >> Read More
11 Factors That Affect Car Insurance Rates – How to Lower Your Costs – Many things affect your auto insurance rates, but can you lower them? See these factors to learn how your car insurance rate is determined. … >> Read More
How my car engine works. Learn about engine repair, pistons crankshaft and more. – How your car engine works from the experts at AutoEducation. Learn about the specific parts in your car’s engine and how they work together to drive your car down the road. … >> Read More
a car seat in spain affect v5c had car body repair singapore hand car wash ventura how to care for christmas cactus after christmas how to care for geraniums outside sittingbourne edinburgh car body repair bolton how to buy car insurance how long to charge car battery on trickle how to caramelize onions no oil how to build a car engine step by step how much does car air conditioning service cost employee how to camp in your car how does carhop work the how to care for a baby sparrow bird bananas eyebrows how to care for bonsai cactus springfield anti-bacterial how to carb cycle easy how much to hire sports car check carfax how to care for tattoo while peeling car battery jump starter connection car battery charger schematic diagram crate daisy car battery charging gurgaon car audio system chennai compensation how to carb cycle pdf airplane how to care for zebra succulent space how to care for roses in queensland fried eyelash care car cigarette lighter not working ford fiesta car body repair in birmingham car glass
repair plano tx car body design salary how the car battery charger works car body repair banbury hand car wash basingstoke persimmon coupons to rent a car with enterprise cartoons car glass repair kansas city car battery charger output voltage car body repair dublin columnar quoz evenflo car seat accessories car dealer license requirements wisconsin cardiff how much a car dealership worth reliable how to care for strand bamboo flooring solid how to care for geraniums in containers how to car alarms work how to care for a kitten 4 weeks old how to buy car by owner how to buy a car video evenflo car seat pad replacement car battery change service how long to charge car battery how old do you have to hire a car in ireland how to buy car from owner car battery jump starter bunnings swollen dog car harness xl how car engines work how stuff works howcast how to buy xm radio for your car car body repair walsall how to build a drift car in forza horizon ypsilanti car detailing guide pdf car dent repair vancouver car battery
jump starter sears car battery jump starter asda how to care boston fern car audio system with gps car audio installation videos car body work reading how to care for a sunburn tattoo how to care for african sideneck turtle how to care for geraniums in the winter how to care for a tattoo with color how to care for tulip bulbs in water vase corroded 1.5 how to boost car audio how long to get carfax report car audio installation nashville information how to care for car leather seats trade hand car wash adelaide how to caramelize onions for gravy car air conditioning service tauranga jellyfish choice how to car battery wire apple car carpet cleaner el paso how are hybrid car batteries bad for the environment how to buy car on loan cairns how car alignment done car air conditioning service telford how to care for orchids when flowers fall off car dent repair hamilton how can i get car loan with bad credit modified how to car radio installation being how to care for a tattoo when sleeping car body repair uk car engine
wash problems connection how to care begonia len models employment how to care for opuntia cactus how to car body design car dent repair hampshire car cigarette lighter dc or ac fort how to care for bamboo in water car audio installation and sales car body repair upminster softshell north engineering how do you get car paint off your windows car body repair oldham car body work wrexham car engine wash toronto restore hire car body work portadown how does a car battery hydrometer work parking disinfect how to care for a queen and her kittens how to care for geranium seedlings petrified how to buy a bluetooth car kit collins how to care for a kitten after spaying how to care for box roses car dent repair elgin bid polyanthum how to best care for an aloe vera plant how to boost car torque hand car wash el paso floating how to boost your car how to care for ikea cactus molded how much is car dealership employee discount check car history by registration number how to care for orchids in the philippines how to care
for rosier miniature roses flipkart how hybrid car engines work car battery charger price in india how to caramelize onions in the microwave how does an automatic car battery charger work skills specification car air conditioning service uk car cigarette lighter holder how to buy car in belgium how do you wash car engine car dent repair gurgaon how much is car insurance allstate car body repair lincoln how to boost car dab signal car battery jump toronto how to care for moon cactus indoors how to car drive in tamil how to cancel car tax number comparison how long does car detail take darling how to care for a potted aloe vera plant jaundice sensors how to care for a baby aloe plant how to boost my car antenna signal fall refinance evenflo car seat with graco stroller how to care for dying aloe plant carb blacktown car dent repair mississauga evenflo car seat on airplane zealand 16 rogue buyout dye jaipur car glass repair france car dent repair austin how to care for hanging orchids how car battery and alternator
work hands car body design in nx quick lasik car engine wash montreal how to bluetooth phone to car radio lose brats how to care for a newborn box turtle car bodywork aberdeen dubai how to caramelize onions with olive oil how to care for a jagua tattoo how to care for peonies after they have bloomed hydrogen stye how to carb cycle and lose weight evenflo car seat yoshi how to build an electric car model how long to charge car battery using alternator how much to hire car in bali how to carb cycle for bodybuilding car audio system with speakers car dent repair fleet house how to care for roses in central florida gone car battery charger vs tender must how to caramelized fried onions our load how much to change car battery in singapore pine how to cancel tax on a car online how to care for a calf tattoo correct car dealership license bc car dent repair coventry how to boost mpg on car car carpet cleaner halfords spots hand car wash st albans car detailing interior tools master car carpet cleaning machines for sale
car audio installation quad cities teach government rohini how to care for a injured baby bunny how to care for a holland bunny how to calculate car loan to value smashy gather how to care for a tattoo on your foot brow car dent repair seattle number jack welder minecraft car cigarette lighter fuse name how long to charge car battery driving car engine oil tesco how to ask a car guy to prom nightshade how to buy new car engine in india hackney grow how to care for primroses how to boost smart car staten mess how to care for a tattoo when it’s scabbing how to care for a cactus flower plant revoked how to care for your orchid after it blooms car cigarette lighter heater argos car battery charging via cigarette lighter how to care for a large back tattoo car bodywork tape how to care for succulent cuttings bikini how to care for a dehydrated kitten how to caramelize onions frying pan hand car wash colorado springs how to care for a dwarf bunny hand car wash jacksonville nc car glass repair lancaster ca weaver how
#gallery-0-4 { margin: auto; } #gallery-0-4 .gallery-item { float: left; margin-top: 10px; text-align: center; width: 20%; } #gallery-0-4 img { border: 2px solid #cfcfcf; } #gallery-0-4 .gallery-caption { margin-left: 0; } /* see gallery_shortcode() in wp-includes/media.php */
to buy a car by leasing victory brassia bacon how to buy used car from dealer how to care for my aloe plant car battery charger from pc power supply car battery charger how do they work cedar switch hand car wash for sale manchester car battery jump starter uk ras car audio system price list how long to charge car battery that is dead how to care for perennial geraniums semperflorens how to buy car in lithuania characters evenflo car seat guidelines how to care for bamboo indoor plant how to carb cycle meal plan hire car in spain malaga car body work hull how to build an electric car youtube how to brake boost a manual car darlington knuckle car carpet cleaner products flirt happen cannon how to car repair videos aerodynamics how to care for a small water turtle car dent repair shops how to caramelize onions in 15 minutes fix.little.dent a car sri works how to build car games how to care for a bamboo pillow how many carfax records are ok car audio system gumtree mockingbird quotes girl convicted perm crease paleo
car ac gas filling price in chennai, car ac gas filling price in delhi, car ac gas filling price in pune, car ac gas filling procedure, car ac gas filling pune, car ac gas filling quantity, car ac gas filling rate, car ac gas filling sharjah, car ac gas filling time, car ac gas refill abu dhabi.
Car ac gas filling price in chennai – Car ac gas filling price in delhi Car ac gas filling price in chennai - Car ac gas filling price in delhi. Ac Gas Refilling Services in Delhi.
#car ac gas filling price in chennai#car ac gas filling price in delhi#car ac gas filling price in pune#car ac gas filling procedure#car ac gas filling pune#car ac gas filling quantity#car ac gas filling rate#car ac gas filling sharjah#car ac gas filling time#car ac gas refill abu dhabi#car ac gas refill auckland#car ac gas refill blacktown#car ac gas refill brisbane#car ac gas refill cost#car ac gas refill cost hyderabad#car ac gas refill cost india#car ac gas refill cost melbourne#car ac gas refill cost perth#car ac gas refill cost uk#car ac gas refill dandenong#car ac gas refill dubai#car ac gas refill frequency#car ac gas refill in dubai#car ac gas refill in pune#car ac gas refill in sydney#car ac gas refill kit india#car ac gas refill leicester#car ac gas refill melbourne#car ac gas refill perth#car ac gas refill price
1 note
·
View note
Link
If you are living on a homestead or farm, then I bet that a tractor will form a central part of your plans. As with other types of motor vehicles, tractors can also be destroyed by an electromagnetic pulse (EMP).
Invariably, if you have a newer tractor, or plan to buy one, you need to know which parts are most vulnerable, how to make repairs, and how to keep the tractor as safe as possible from EMP related damage.
Keep reading to get this knowledge. You will need it, for sure!
What About Buying an Older Model Tractor?
Many people concerned about EMPs ruining their automobile have decided to buy older cars that do not have computers in them. If you happen to be a fan of older cars and know their value and durability, then you may be led to believe that you can do the same thing with a tractor.
Here are some advantages and disadvantages you might encounter if you try to buy, and then fix up an older tractor.
Even though a tractor may not be used every day, the time that it is in operation puts a lot of wear and tear on the engine, transmission, and drive train. While some old tractors, may, in fact, run for several more decades without trouble, others may break down and require extensive repair at the worst possible moment. You may even find that restoring an older model tractor may cost as much as trying to convert a newer one for the sake of EMP proofing.
You will find it much harder to get spare or replacement parts. This problem may be offset if you have metal working tools and parts from compatible tractors built around the same time.
It will be very hard to obtain shop manuals and schematics that could be used to help you rebuild or maintain the tractor. Before a major crisis happens, you may need to do patent searches for individual parts and also see what kind of information the manufacturer is willing to give you.
On the positive side, if you find a tractor that runs well and has no computers or electronic parts in it, then you will have to do a lot less work to prepare it for an EMP. As long as you take the extra step of storing it safely, then it should run when most other motorized vehicles fail.
Video first seen on ACES – Fresh from the Field.
Get the Right Information, Skills, and Tools
Even though tractors are more rugged than most vehicles, they can still be ruined by improper maintenance or shoddy mechanical repair efforts. On the other side of the equation, if you are going to be truly self-sufficient, then being able to repair any tractor you own will be very important.
If you do not have the right skills, tools, or information, it is very likely that you won’t be able to use your tractor for very long after a major disaster let alone get restore it to working condition after an EMP.
Take control of your home’s energy with this step-by-step System to Energy Independence!
2 Vital Sources of Tractor Repair Information
The best source of information for making tractor repairs is the shop manual that should be available through the manufacturer of the tractor. The shop manual will list all the parts found in the tractor, as well as how to remove and replace them. It will also give you plenty of detailed diagrams so that you know how all the parts fit together. You may have to pay a bit extra for this manual, however it is well worth the cost.
Your next most important source of information is a notebook that you will keep that gives details about all maintenance, repairs, and changes you have made to the tractor. For example, if you decide to remove a particular computer system for the sake of EMP proofing, that information should be listed in the notebook.
You should also have detailed schematics and other notes so that you can make repairs to the revised system without causing problems. Never leave these details to memory. Even if you are a skilled mechanic, years, grease, time, and mechanical wear can change things to the point where you may no longer recognize what was done.
At the very least, detailed diagrams and notes about each changed system can help you retrace your steps and restore the tractor to working order.
Essential Tractor Repair and Maintenance Skills
Aside from being able to manage every system in the tractor, you will also need some additional skills if you are going to EMP proof the tractor and continue to use it in the revised form.
You will need the ability to search through patents in order to find older technologies that can be used to replace computer modules. You should also be able to look at different alternative designs and choose one that will meet your needs and still offer the best in terms of safety and efficiency.
Given the number of variations on tractor and automotive systems, you are sure to find dozens of designs that may work. Picking the best one, however, can take a good bit of skill.
Some computer systems may be difficult, if not impossible to replace with alternative technologies. As a result, you will need to have a good understanding of computerized automotive systems and how best to manage them. This includes knowing how to get to various sensors as well as how to replace any module that may require it.
Important Tools
Depending on the size of the tractor, you may be able to do some or all of the work using basic hand tools. This includes engine hoists and other equipment that will make it easier and safer to dismantle every part of the tractor.
There may also be some specialized tools that will be of immense use to you. Since many of these tools can be affected by an EMP, you should either focus on possible alternatives that run on water, or try to store them away in a Faraday Cage for later use.
Air driven tools. If you are working with an especially large tractor, these tools can make mechanical repair easier, safer, and faster. The air tank and hoses should all remain usable after an EMP attack. The compressor and associated gauges may not survive an EMP. You can try looking into trip hammer technologies as they were first invented in China to see if you can modify them to provide compressed air; and then use spring loaded levers and weights to help with determining air pressure within the tank.
Computer diagnostic systems. If you do not have the time or skills to convert key computer modules in the tractor to alternative forms, then you will need to make sure you can diagnose and replace computer parts that may be damaged by an EMP. Even if you can purchase a low cost hand held diagnostic unit, that may not be enough.
Consult the shop manual for your tractor to find out if any computer systems need to be reset by an external computer. If you find that an external computer is needed, see if you can find some way to obtain the necessary computer, or build something on your own that will do the job.
In this case, you can try Arduino controllers, and then make sure that you have the proper connectors and software languages required to communicate with the computers and sensors in the tractor.
Video first seen on Matthew Reimer.
Know Which Parts are Most Vulnerable
Basically, anything on or in your tractor that conducts electricity can be damaged by an EMP. The amount of damage depends on:
the intensity of the pulse
how well or poorly the items conduct electricity
the ease of transmission from one point to another.
Even though your tractor may be located several miles away from an EMP strike site, power lines and other conductors may deliver the pulse to an area close enough to the tractor to do more damage than expected. Oddly enough, if the tractor is located further away from the power lines, it may be far less damaged.
That being said, the most vulnerable parts of the tractor are similar to the ones at most risk in any other automobile. The computers, wire harnesses, the alternator, motors, lights, and computer sensors can be ruined by even a relatively weak EMP.
Convert From Computers to Older Technologies
The ECU (Engine Control Unit) is one of the most important computers you will find in modern tractors and other automobiles. Basically, this computer alone controls:
the amount of air and fuel delivered to each cylinder
the speed at which the engine will idle while standing still. This part of the unit monitors the crankshaft position sensor, which plays a key role in setting other aspects of the engine’s timing.
spark timing
valve timing
adjustments to water flow through the engine based on whether it is cold or warm (this helps with fuel efficiency).
There are also other computer modules for controlling the transmission, braking systems, lights, and any safety features that the tractor might have. To some extent, all of these computers require at least some input from other computers in the system.
They are all connected by the CAN (Controller Area Network). Usually, this module does not have its own microprocessor. Rather, it simply allows all of the other processors and controllers to communicate with each other.
That being said, depending on the tractor model and computers involved, you may also need to do some additional work to modify the CAN before the tractor will work properly. If you start modifying one system, you can expect to have to bypass other systems or adjust the other computer so that it does not prevent the tractor from running.
Modern tractor computers come with programming that is very difficult to hack and alter. To add insult to injury, many of these programs are protected by copyright law. While these laws may not concern you much in the post crisis world, breaking them now can lead to criminal prosecution.
The whole issue of computerized control modules in modern tractors is a serious problem for people now, and will be an even bigger problem in the post crisis world.
Rather than focus on changing or adjusting the computers that come with the tractor, you can look for open source programs that will do the same job. At the very least, if there are some computer modules and sensors that you cannot do away with, you will still be able to use any spares you have after an EMP occurs.
Make your home 100% immune from future power outages or blackouts with this DIY Home Energy System.
Is it Possible to Turn the Tractor into a Faraday Cage?
The answer to this question depends largely on:
how many electrically conducting attachments you have on the main body of the tractor
whether or not you can put a viable and sufficient insulator between these parts and the rest of the tractor. For example, if you have a grapple rake attached to the tractor, the connection points would have to be shielded in such a way that electricity cannot travel between the accessory and the rest of the tractor.
If the attachment is controlled in part by the tractor’s computer, you would also have to convert that system to a fully manual one. Preferably, these manual linkages would also need some kind of non-conductive spacer so that the EMP pulse does not travel into the rest of the tractor.
For the most part, it won’t be practical or possible to put the entire tractor in a Faraday Cage. On the other hand, you might be able to reduce the amount of modification needed by localizing all vulnerable parts to a shielded area of the tractor.
The most difficult parts will be the fuel line that extends from the engine to the fuel tank, and also the brake lines for each of the wheels. It may be possible to locate polymers that can be used as insulators, as well as other materials that can replace metal parts that would compromise the rest of the tractor.
Keep Spare Parts You Cannot Convert in a Faraday Cage
It is fair to say that if you have the time, money, and skills, you can more than likely convert any tractor so that it no longer uses any kind of computerized system. If you are on a budget or don’t have much time to complete so many tasks, this process can take months or even years to complete.
In the meantime, if society collapses or an EMP occurs, you will still need a functional tractor. At the very least, until you have fully EMP proofed the tractor, it makes sense to keep spare computer systems and diagnostic tools in a Faraday Cage. You should also keep extra wires, fuses, motors, and anything else that might be ruined easily by an EMP.
Video first seen on Big Family Homestead.
These days, when people think of computers, lightweight tablets, cell phones, and other portable devices come to mind. By contrast, a combination of tractor computers, motors, wiring, tools, and other devices can easily weight several hundred pounds and take up quite a lot of space. This is actually one of the few places where I would recommend building a separate, building sized Faraday Cage to house all of the spare parts.
This building should be located underground and easy enough to get to from any underground bunker that you might decide to build. If you build the shelter more than 10 feet underground, there will also be some natural protection from the effects of an EMP.
As an added bonus, even a shallower depth will also protect you and the equipment from additional ground nuclear blasts that might follow a nuclear explosion that set off the EMP.
Use Cutting Edge Technology to Make Your Own Tractor Parts
Did you know that 3D printers are rapidly becoming very popular with people that want to build all kinds of devices? This includes motor housings, engine parts, and many other devices that would normally take complicated and expensive equipment.
If you do some research, you may be able to find a number of polymers and other compounds that can be turned into spare tractor parts using a 3D printer. If you are going to put other equipment in a Faraday Cage, this kind of printer and a computer to run it may be worth it.
Aside from making tractor parts, you may also be able to develop or purchase templates that can be used for other parts of your homestead.
Keep the Tractor in a Safe Location
Depending on where your farm or homestead is located, there is a good chance that you will not be using the tractor every single day. If you have winter seasons or other times when a tractor is not needed, the best thing to do is store it in a Faraday Cage.
An underground location would be ideal, however above ground shelters will also work as long as they are built correctly. Similar to other automobiles, it does not make much sense to keep a tractor if you can’t bring it out to the fields and use it for its intended purpose.
The best thing you can do is return the tractor to a safe location after you are done with it, and then hope that an EMP does not strike while you are using the tractor.
Simple Things that Might Minimize EMP Effects
In these difficult times, having a working tractor does not mean you have enough money or other resources to do everything needed for EMP proofing. If you cannot afford major modifications or a dedicated Faraday Cage for storage, here are some inexpensive things that might be of use:
Antennas tend to be some of the best and most overlooked conductors of an EMP pulse. Radios, remote control systems that feed into cell phone apps, and many other devices in the tractor may have antennas that will spell disaster during an EMP. Even if these antennas are tied to computer modules, it may be possible to remove the antennas without losing the basic functionality of the tractor. Without these devices, you may need to do more work manually, however it will be worth it if you can reduce the risk of the entire tractor being ruined by an EMP.
If you are near a power transmission substation, or very close to where the EMP struck, there isn’t much you can do to prevent damage to a tractor running in the field. That being said, if you are further away from the EMP, staying away from power lines or other large sized conductors might just reduce the amount of energy that gets to the tractor. In this scenario, it can mean the difference between computer parts being destroyed only, or those parts plus vital motors and wiring harnesses.
Always remove the battery and other sources of free flowing electricity from the tractor when you are done using it for the day. Do not just rely on shutting the engine because there may be any number of computer parts or systems that draw tiny amounts of current even when the tractor is off. Anything that draws power can also increase the risk of damage from an EMP.
If at all possible, it will also help to find out if any of the computers or sensors have power supplies that are independent of the main battery. These parts truly should be replaced at all cost because they present the most overlooked, and therefore greatest danger when it comes to prepping tractors for an EMP.
Pay attention to world news and global terror forecasts. When it comes right down to it, figuring out when or if a hostile group is going to launch an EMP attack is not an easy task. If you make a good guess and take the time to shield your tractor, then you will be ahead of the game.
Find, and follow a reliable space weather forecasting service. In all probability, an EMP may still more likely come from a solar flare or some other space related event. As such, a space weather forecasting service can be very valuable to you. If you hear that a large scale solar flare is expected to pass close to the Earth, this might be a good time to avoid running the tractor. Needless to say, if you want to minimize the number of times you disconnect the battery, these times might be suitable occasions.
Some New Technologies to Consider
Preppers aren’t the only people interested in finding as many useful and inexpensive ways as possible to reduce the effects of an EMP.
Here are some new technologies that may be of use at some point in the future.
Even if these specific materials cannot be used in a tractor application at this time, it may be possible for you and others to develop something that will shield tractors from EMPs.
Conductive Paints – Right now, these paints can be used in buildings to shield from all kinds of radio, microwave, and related electromagnetic frequencies. Work with an electrician that specializes in tractors or automobile electronics so that you can ground any kind of conductive paint safely. It is very important to realize that tractors and other vehicles are something like a huge circuit board. If you disrupt grounding points, it can cause shorts and other problems. At best, you may be lucky to come out of it with little more than some ruined parts. At worst, it can cost your life.
EMP Proof Concrete – If there is one innovation that promises to reduce or eliminate the risks posed by EMPs, a spray on form of concrete might just do the job. Although EMP Proof Concrete is not yet available to consumers, it is at the manufacturing stage and may become available in a few years.
Flexible Conductive Composites – these compounds are similar to the carbon and nickel layers used in paints and concretes. At some point in the near future, any one of these may make a viable spray coating that can be used to protect your tractor from an EMP blast.
No matter whether you purchase a new or used tractor, it is likely to be a large monetary investment.
If you are concerned about an EMP ruining your tractor, there are some things you can do to reduce the damage or prevent it. As with other automobiles, you will find that the best answers will also cost a bit of money and time.
At the very least, if you are determined to modify a newer tractor so that it does not have computer modules, take the time to learn everything you can about maintaining the tractor. This will help you to keep the tractor in good working order regardless of whether an EMP hits or society collapses for some other reason.
Slash your energy bills with this DIY Home Energy System!
This article has been written by Carmela Tyrell for Survivopedia.
References:
https://www.wired.com/2015/02/new-high-tech-farm-equipment-nightmare-farmers/
http://www.allaboutcircuits.com/news/protecting-technological-infrastructure-with-emp-proof-conductive-concrete/
http://readynutrition.com/resources/company-creates-emp-proof-wallpaper_29102015/
3 total views, 3 views today
Rate this article!
[Total: 0 Average: 0/5]
from Survivopedia Don't forget to visit the store and pick up some gear at The COR Outfitters. How prepared are you for emergencies? #SurvivalFirestarter #SurvivalBugOutBackpack #PrepperSurvivalPack #SHTFGear #SHTFBag
1 note
·
View note
Text
10 Tips for Turbocharged Engine Builds
Building an engine for turbocharged duty is, for many, uncharted territory. Boost is a familiar cornucopia of manifold-topping superchargers, but the notion of having its source plumbed inline with the exhaust is foreign. While the end result of both—positive intake pressure and a smile-inducing horsepower surge—is the same, turbocharging an engine does have some unique requirements that should be factored into a build. It’s easy to think that boost affects parts just from the pistons down, but nothing could be further from the truth. An engine is an ecosystem, and changing any one part affects the food chain from top to bottom. Here are 10 quick tips to make your next boosted build, whether small-block, big-block, LS, or LT, a fruitful one.
Cast components have demonstrated an aptness for boost, especially in the LS world, but that doesn’t equate to longevity. Forged connecting rods and crankshafts such as these K1 pieces should be considered mandatory for any boosted application.
Connecting Rods and Crankshaft
It could be said that any power-adder application could benefit from a bolstered bottom end, and that would be true. But, with the power potential of even the most cost-effective turbochargers, a connecting rod upgrade is a wise move. When boost comes into the equation, cylinder pressures spike exponentially and most stock connecting rods, especially those with high mileage, are not up to the task. Often, it is not the connecting rod itself that fails but the fasteners, which were never designed to deal with the cylinder pressure or rpm a turbocharged application can offer.
For low boost applications (6-8 psi), stock crankshafts—especially in the LS family—have proven more than adequate. Turbochargers are by nature progressive and typically don’t have the power and torque spikes associated with nitrous and superchargers. This trait spares the crankshaft shock-loading that could be potentially catastrophic. That said, if your power goals are over 500 horsepower, or competition use is planned, investing in a forged crankshaft for your application should be considered a must.
Boost is a game changer when it comes to head flow. For most applications a budget cylinder head, such as this Edelbrock Performer RPM is an excellent choice. Thick decks for strength and better cooling, and lightweight aluminum make them a big upgrade over stock iron and they won’t break the bank.
Cylinder Heads
Boost is the great equalizer. It can take a small port, lousy valve angle, and low-lift cam and blow gale-force winds into the cylinder. While a better flowing cylinder head will always move more air—boost or no boost—it is important to consider your power goals and budget. For example, Edelbrock’s Performer RPM head flows a solid 253 cfm at 0.500-inch lift and is a performance bargain at around $730 each (assembled from Summit Racing). There are more expensive, better-flowing heads on the market, but with a few psi of boost force-feeding the runners, budget heads can generate serious power. Rather than ultimate airflow potential, which is far more crucial in a naturally aspirated application, consider price, material, and deck thickness, which is critical to sealing high cylinder pressure.
Head studs and aftermarket MLS gaskets are key players in sealing boost in the cylinder. The extra clamping load of studs and the resistance to head-lift of MLS gaskets is a surefire way to prevent troublesome head gasket failure.
Head Bolts, Studs, and MLS Head Gaskets
Boost is no good if you can’t keep it in the cylinder where it belongs. Performance head bolts, such as those from ARP, are a good start; head studs are better. Studs are not subjected to as much torsional (twisting) force as head bolts. Metal is extremely strong in tension, which allows head studs to generate improved clamping force over bolts. As boost goes up, studs become the preferred option.
Modern aftermarket head gaskets are light-years ahead of the gaskets of the muscle car era. But when it comes to boosted applications there is no replacement for a good MLS (multi-layer steel) piece. MLS gaskets use multiple layers of embossed steel to seal combustion in the cylinder. Their design, due to the spring rate of the compressed layers, can actually compensate for a small amount of cylinder head lift as combustion attempting escape pushes the head away from the deck surface. One consideration with MLS gaskets is surface finish. For proper sealing, both the block and the cylinder head deck surfaces must be machined very smooth. Most machine shops are capable of this, but is absolutely worth a dialogue with the machinist to make sure.
Factory two-piece pushrods leave a lot to be desired in terms of strength. A one-piece pushrod with a formed end is significantly stronger. On the left is an OEM 5/16-inch pushrod while on the right is a 3/8-inch unit from Trend Performance. The wall thickness and overall diameter makes it a big upgrade over stock.
Engines with boost will require upgraded valvesprings. Note the spring on the left is taller and will have more pressure on the valve seat when installed.
This Comp Cams rocker arm is made from chromoly steel. While heavier than an aluminum rocker, it is much stronger and has a longer fatigue life, which is beneficial for an engine that will see a lot of street miles.
Rockers, Pushrods, and Valvesprings
It’s easy to think of boost as only affecting the pistons down. In fact, the valvetrain is equally affected. When the intake valve opens and pressurized air rushes into the cylinder, the backside of the valve is also pressurized. As the valve begins to close, boost pushes against it, making the work of the valvespring more difficult. For this reason, it is often necessary to install a stiffer valvespring capable of effectively closing the valve on schedule.
The exhaust valve also sees additional load. When the spark plug fires, pressure is created in the cylinder, which drives the piston down. But, before the piston reaches bottom dead center, the exhaust valve opens. For example, a popular LS cam grind has an exhaust opening point of 83 degrees before bottom dead center (BBDC). That means the exhaust valve is actually opening against combustion pressure, which acts on its face, attempting to hold it closed.
That force travels up the valve stem, through the rocker arm, and into the pushrod. While this occurs in all engines, the higher cylinder pressure associated with turbocharged engines exerts additional pressure on the valvetrain that needs to be accounted for. A thicker pushrod is a good start and Billy Godbold of Comp Cams likes steel rockers for these applications. Steel rocker arms are more fatigue resistant than aluminum rockers and, for the price, are typically stronger.
A durable piston and rod package is key to a long-lasting turbo build.
A piston designed for boost will overall be thicker. Notice how the ring land of the JE piston on the right has been moved down significantly. This is to isolate the ring from the damaging heat of combustion. In a naturally aspirated application (left) the top ring land is placed much higher.
Pistons and Rings
Cast pistons are the equivalent of time bombs when it comes to boost. It’s not that they don’t have the strength, as many factory pistons are surprisingly strong, but their inability to tolerate detonation—something that will inevitably occur in an aftermarket turbocharged engine. Late-model engines have knock sensors that are precision-tuned from the factory. When knock/detonation is detected, the ECU can retard timing to lower cylinder pressure, eliminate the knock, and protect the rotating assembly. Few aftermarket engines have that luxury. Instead, moving to a forged piston, which is significantly stronger and more resistant to detonation, should be considered a must.
Proper piston selection is more involved than simply lowering the compression ratio. A piston designed for boost will have more material in key areas. In boosted pistons, the top ring land is moved down on the piston crown, which helps protect it from the heat of combustion as well as creates more rigidity in the land itself. Also, piston material comes into play. Forged pistons are typically made from two alloys: 4032 and 2618. Forged 4032 pistons have more silicon in their makeup and do not expand as much as 2618 pistons, making them great for street engines, which experience a wider temperature variance and need to start cold. Forged 4032 pistons are perfect for mid-level builds but lack the ultimate strength offered by 2618 pistons. Forged 2618 pistons are ductile and forgiving in harsh, high-horsepower environments but are softer and wear quicker than 4032 units.
Piston rings in turbo engines will need more end gap than in a comparable naturally aspirated engine. Because forced induction puts more air, and subsequently more fuel, into the engine it will also generate more heat, which causes the rings to expand more. When choosing ring material, carbon-steel rings, as opposed to the gray iron often found in cheaper and older, stock ring sets, is a preferred option. Carbon-steel is much stronger, resists detonation better, and does not need to be made as thick, which reduces friction against the cylinder wall.
Turbocharged engines have specific cam requirements that highly depend on exhaust backpressure. Over-camming an engine and adding too much overlap in high-backpressure applications can cause serious exhaust dilution problems.
Camshaft Grinds
In a turbocharged engine, careful attention to camshaft selection can pay huge dividends in power, torque, and driveability. Because positive pressure in the intake manifold (boost) is force feeding air into the cylinders, a turbo cam can often be very mild in comparison to a naturally aspirated grind, needing less lift and duration to accomplish a similar horsepower goal. Also, because there is inevitably backpressure between the exhaust port and the turbo’s turbine wheel, careful attention needs to be paid to valve overlap. Too much overlap for the application can cause exhaust to backflow into the cylinder and heavily dilute the air charge.
“Honestly, the boost to backpressure is what we really need to know to pick the camshaft,” said Comp Cam’s Billy Godbold. “A cam in the 270’s (degrees duration) at 0.050 with a 110 LSA might be right on a system with very little restriction, and very little backpressure.”
Large turbo, low-backpressure systems found on, say, a high-horsepower race car will be much more tolerant of high-overlap camshafts. This is why many tuners have found success with nearly stock cams in high-backpressure street turbo applications as they offer very wide lobe separation angles and very minimal overlap. High backpressure may sound unappealing, but such a pressure ratio can be useful in creating a turbo setup with excellent throttle response and minimal turbo lag—perfect for a street car.
Today’s drivers are afforded more fuel options than previous generations. E85 is a fantastic, ethanol-based fuel that offers 100+ octane (depending on the blend) and excellent cooling effects. It does however require an upsized fuel system due to the volume required as compared to gasoline.
Fuel
Fueling a turbocharged engine always requires more octane than a comparable naturally aspirated engine. There is a multitude of ways to accomplish this. Premium pump fuel when boost, ignition timing, and intake air temperature are kept in safe ranges is the most convenient—but probably the most power-limited. E85 (ethanol-based) fuel, which is oftentimes cheaper than gasoline, though less readily available, is another great alternative.
E85 has a higher latent heat of vaporization than gasoline, meaning it can help pull heat out of the air charge and has a 100-plus octane rating—though that can fluctuate slightly depending on the mix, which is rarely 85 percent ethanol, 15 percent gasoline as claimed. E85 has a stoichiometric ratio of 9.75:1, which is lower than gasoline (14.7:1) and means it will take a larger volume to achieve the same horsepower level as gasoline. E85 does have some cooling benefits that gasoline does not. Also, whenever boost is employed, a variable-rate fuel pressure regulator will be required to keep fuel pressure equal to boost pressure and avoid leaning out the tune as boost rises.
Intercooling
Boost, whether delivered from a blower or turbo will inevitably heat the intake air as a byproduct of compression. Hot air is less dense, which means less power, and is more prone to detonating. In order to quell the risk of detonation and improve power, it is ideal to remove the heat. This can be accomplished a few ways. Water/meth injection, such as kits supplied by Snow Performance, spray a fine mist of water and methanol mix into the intake air stream. As the particles of water and methanol shift from liquid to gas (known in physics as a phase change) they absorb energy. This sucks heat out of the surrounding air particles and can radically cool the intake charge. More conventional forms of intercooling, such as air-to-air intercoolers rely on airflow over a bar-and-plate heat exchanger to pull heat away from the air charge.
Air-to-water intercoolers are similar to air-to-air except they employ a liquid medium. In some cases, this is an ice bath, which is incredibly effective at removing heat but is impractical for a street car due to space requirements and a constant need to replenish the rapidly melting ice.
Timing Considerations
In carbureted and aftermarket fuel-injected applications especially, ignition timing is a major consideration. Distributors are a great means of transferring spark energy to the cylinder but they are quite dumb. No offense intended, but distributors don’t receive any feedback from the engine—nor would they be equipped to deal with it if it did—and are ignorant of any knock occurring. For this reason, it is paramount to have an intelligent ignition device feeding a signal to the distributor that can detect boost and retard the ignition advance respectively. MSD’s programmable 6AL, when coupled with a MAP sensor, does a great job of this. Most aftermarket ECUs can accomplish the same feat, and factory ECUs, when paired with a MAP sensor capable of reading boost (2 bar and up) are also able to keep timing in check.
The debate rages on between the simplicity of a carburetor and the ultimate control of fuel injection. The science and experience is out there to make both work, and while fuel injection offers tremendous driveability benefits, the carburetor’s venturi do have a cooling effect that fuel injection can’t mimic.
Fuel Injection vs. Blow-Through Carb
This is the big-ticket item, and the one that frightens a lot of old-school carburetor aficionados: to inject or not to inject. It all comes down to control. Blow-through carbs are not the black magic they once were. They work well and have the added benefit of chemically intercooling the air charge. The low-pressure zone created by the venturi, along with the latent heat of vaporization induced as gasoline is atomized at the top of the intake plenum draws significant heat out of the intake air charge. The downside is that carbs are dumb. They often don’t start well when the engine is cold and they aren’t particularly forgiving of altitude and ambient temperature changes. Comparably, fuel injection is smart, it can adapt to changing conditions and alter fuel delivery accordingly. In the big picture, especially when boost is in the mix, it is the better option and yields superior driveability compared to even the best blow-through carbs, though it does often come with a bit of a price premium. CHP
Sources
ARP
800.826.3045
arp-bolts.com
Comp Cams
800.999.0853
compcams.com
Holley Performance
866.464.6553
holley.com
JE Pistons
714.898.9763
jepistons.com
Snow Performance
719.633.3811
snowperformance.net
Summit Racing Equipment
800.230.3030
summitracing.com
Trend Performance
586.447.0400
trendperform.com
The post 10 Tips for Turbocharged Engine Builds appeared first on Hot Rod Network.
from Hot Rod Network http://www.hotrod.com/articles/10-tips-turbocharged-engine-builds/ via IFTTT
0 notes