#how to install joomla in xampp step by step
Explore tagged Tumblr posts
Visit Tumblr Blog
Explore Tumblr blogs with no restrictions, modern design and the best experience.
Last Seen Tumblr Blogs


Fun Fact
Tumblr was attacked by a cross-site scripting worm deployed by the Internet troll group GNAA on Dec 3, 2012.
Text
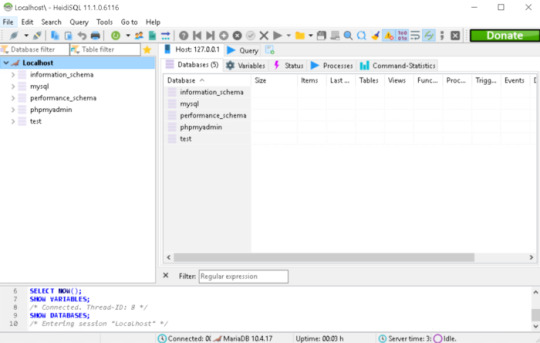
Joomla 4 installation on Localhost
This is Joomla 4 Installation and setup on Windows 10. You will learn how you can install Joomla Latest version 4.0.2 in localhost XAMPP. To install Joomla 4 you need PHP version 7.4+ and MySQL version 5.6+ if you have any issue with the installation or any other please comment, and I will try to help you.
youtube
View On WordPress
#how to install joomla#how to install joomla 4 in window 10#How to install joomla in localhost using xampp#how to install joomla in xampp#how to install joomla in xampp step by step#how to install joomla on windows 10#how to install joomla template on localhost#joomla 3 10 download#joomla 4#joomla 4 beta 8#Joomla 4 installations#joomla 4 templates#joomla overview#joomla review#JoomTech Solutions#Youtube
0 notes
Text
Xampp for windows server 2019

Xampp for windows server 2019 how to#
Xampp for windows server 2019 mac os#
Xampp for windows server 2019 install#
Xampp for windows server 2019 software#
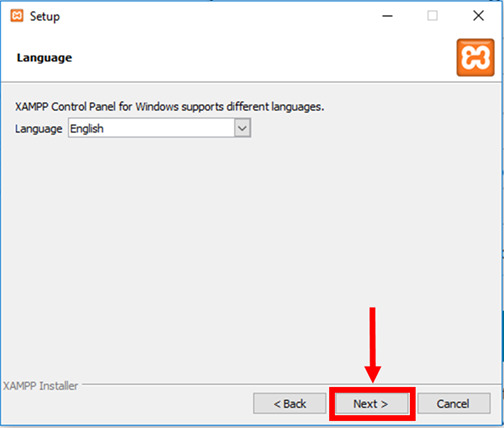
Whereas, on the right side, you can see the process ID number and port numbers every module is using. Once you start the modules, you should see their status turn to green. Or say you have successfully installed XAMPP locally. You have successfully installed XAMPP on Windows 10. Now click on the ‘Start’ button corresponding to Apache and MySQL. If the entire process of XAMPP installation went correctly, then the control panel would open smoothly. As of now, I am choosing the English language. After that click on the ‘Save’ button to confirm your selected language. It is up to you which language you choose.
Xampp for windows server 2019 install#
Step 3: Select your XAMPP Install LanguageĪs soon as you will click on the Finish button in the final step of install XAMPP process, you will be asked to select the preferred language between English and German. Once the installation is completed, you will be asked whether you would like to start the control panel now or not, displaying the message “Do you want to start the control panel now?” Check the box and click on the ‘Finish’ button and see if the XAMPP is working fine. Now just be patient and wait for the installation to complete. You just have to hit the ‘Next’ button to proceed. You will be shown a windows security alert. Select the installation directory where you want to install XAMPP. For most web apps you only need Apache, MySQL, PHP, and phpMyAdmin. Now you’ll see another window with a message “Setup is now ready to begin installing XAMPP on your computer” like shown below. Choose the components you want to install. WordPress, Joomla etc on your newly installed XAMPP. However, if you wish to learn more about the Bitnami, then you may check the box saying ‘Learn more about Bitnami for XAMPP.’īasically Bitnami is for installing open source applications i.e. Simply click on the ‘Next’ button to move further. Now will see a window showing you information about Bitnami. You can choose the default location or you can choose any location of your choice and choose the ‘Next’ button to move ahead. Now you need to choose the folder where you want to install the XAMPP. Now click on the ‘Next’ button to continue.
Xampp for windows server 2019 software#
These are the options which are necessary to run the software and will automatically be installed. You can see there are a few options which are light grey in color. Next, you need to check the components which you want to install and can uncheck or leave as it is which you don’t want to install. Now click on the ‘Next’ Button to proceed. Soon after you click on the downloaded file, the XAMPP setup wizard will open. But you would probably click ‘Yes’ to start the installation process. Step 2: Run the Installer to Install XAMPPĭuring the installation process, you may come across warning pop-ups.
Xampp for windows server 2019 how to#
Since we are discussing How to install XAMPP on Windows 10, therefore, we will choose the Windows option as shown below. You can skip FileZilla FTP Server, Mercury Mail Server, and. When selecting the components make sure to select Apache, MySQL, PHP and PHPMyAdmin. After the download is finished, Double click and run the.
Xampp for windows server 2019 mac os#
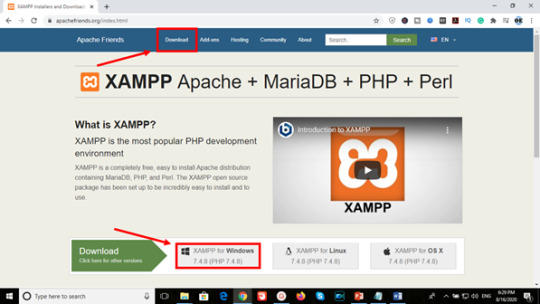
You will see XAMPP ready to download for cross-platform like Windows, Linux, Mac OS X. Download and save the windows version of the xampp installer to your PC. Make time for other users and experts to answer your questions.To download and install XAMPP, go to apachefriends downloads page, the official link to download XAMPP from. You can follow the Learn how to open a port on a Windows firewall.ĭear user, we hope you would enjoy this tutorial, you can ask questions about this training in the comments section, or to solve other problems in the field of Eldernode training, refer to the Ask page section and raise your problem in it as soon as possible. Then right-click on it and select Restart. In the window that opens, select the windows time option. Open the Services by searching in start menu or hitting on the windows key.Ģ. The following options explain the information about AnnounceFlags:ĭefault value for domain members and stand-alone clients and servers is 10.ġ. Recommended Article: Tutorial Configure NTP Server in Windows Server 2019
0 notes
Text
How to Easily Install Joomla 4.x
As you know, Joomla is one of the most popular open-source Content Management Systems in the world. In previous years, you are used to using Joomla 3 to manage and build up their sites. We offered you a way to install Joomla 3.x so that you can easily and simply install and use the Joomla 3 versions. However, currently, the Joomla! 4.x coming with many new features has been released, which means you need a guide on how to install Joomla 4.x. That is the reason why we give you the blog today. So, let's start to explore it now!
The technical requirements to install Joomla 4.x
If you want to install Joomla 4.x, you need to check the technical requirements first in order to ensure that you can smoothly install without any trouble. Let's have a look at the requirements below: - Server: Linux, Apache. Besides, you can also locally install it on your computer using WAMP/ JAMP/ MAMP/ XAMPP software. - PHP: 7.3, 7.4, or 8. - MySQL/ MySQLi 5.6+ or MariaDB. - PostgreSQL: 11 (if you install on localhost). - memory_limit = 128MB or more. - upload_max_file_size = 4M or more. - max_execitopm_time = 180 or more. - CURL library: your server works with url_fopen or curl. - OpenSSL Libraries: enabled. - PHP file_get_contents() function: available or unlocked.
How to install Joomla 4.x
There are 2 ways for you to install Joomla 4.x. Thus, we will find out both of them so that you can easily choose the most suitable one. Install Joomla 4.x on a web server First of all, before you install Joomla 4.x on the web server, you need to download the Joomla! 4 package from the official website. After you click on the download button, the Joomla 4 installation package will be downloaded and saved on your computer. Don't forget to unzip it to a new folder.

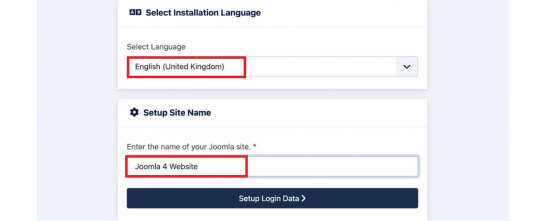
Set up the Database Now, it's time for you to generate a MySQL database, then assign a user with full permissions. In order to do that, let's follow the steps below: - Login to the cPanel. - Scroll down and select MySQL Databases in the Database section. - Create a new database by entering the name of the new database, then click on the Create Database button. - Generate a user for the database by filling out the username, password, confirmed password, and pressing the Create User button. Besides that, you can also add more users to the database in the Add User to Database section. - There will be a table of User Privileges, so check the All Privileges box at the top of the table to make sure the user will have all the privileges or full permissions. Install and set up Joomla 4 The next step you need to do is upload the Joomla files to your server via FTP Client. Let's ensure that you are utilizing an official release of an FTP Client so that there will no error during the Joomla 4 installation and setting process. Once uploading the Joomla package, we will start the installation by accessing your URL or domain you uploaded the Joomla 4 files before. For instance, it may be https://your-domain.com/folder-name. The interface will show you the language and site name setup first. Thus, simply choose the language, then fill out the name of your site. After that, you just need to click on the Setup Login Data button to move on to the next step.
Next, you need to enter the login data, including the Super User name, Super User account as well as password, and the email address of the Super User. Then, let's press the Setup Database Connection button.

Now, we will move on to the database configuration. So, you need to choose the database type first. After that, simply enter the hostname, username, password as well as database name. Besides that, you can fill out the table prefix randomly. Once everything was entered, let's click on the Install Joomla button.

Everything is done. You installed Joomla 4 successfully. There will be a congratulation message to ensure that. So, now, you can go to the admin backend dashboard or open the site without any difficulties.

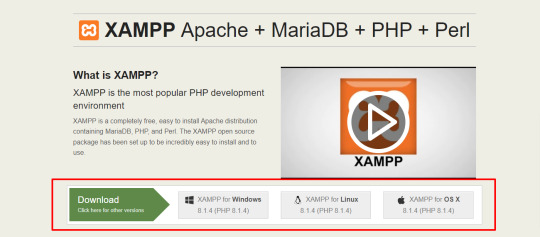
Install Joomla 4.x on Localhost with XAMPP If you don't want to install Joomla 4.x on a web server, you can also do it on Localhost via XAMPP. In order to do that, simply implement the following steps. First of all, you need to download and install XAMPP.
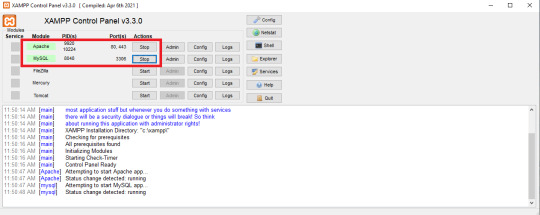
Once installed, it's time for you to start the XAMPP and turn on the two options including Apache and MySQL.
Next, let's open the browser and type localhost/phpmyadm, then click on the New option in the top left of the screen. Now, simply fill out the database name and press the Create button.

We will go on the process by downloading the Joomla 4 package and extracting it from the root of your site. For instance, it may be C drive -> Program Files (x86) -> Ampps -> www -> create a folder and unzip the package there. Now, you just need open the browser to access localhost/yourfoldername. So, this is the place where you moved the unzipped Joomla file. For example, it may be localhost/joomla-file-name. So, the interface will show you the language and site name setting. You just need to follow the Joomla 4 configuration steps we introduce to you above.
Wrap up
In conclusion, we hope that the two methods we bring you will help you install Joomla 4.x quickly and effectively. If you have any trouble or difficulties during the Joomla 4 installation, don't hesitate to leave your comment below so that we can support you as soon as possible. Besides, in case you try to install Joomla 4.x successfully after following the steps below, let's share it with others. Last but not least, once Joomla 4 installation, don't forget to give it an eye-catching and professional appearance. All you need to do is visit our site as well as explore a lot of high-quality, attractive, and responsive Joomla 4 Templates. Thanks for your reading and hope you enjoy the blog. See you the next time with many tutorial blogs related to Joomla 4. Read the full article
0 notes
Text
Xampp Download Success

Scroll down and find the portable version in.exe format. Click on the file name to begin the download. Once you have downloaded the XAMPP portable file, you need to double click on the file to run the installation. During the installation you will be asked to select the location where you want to install XAMPP.
I've covered installing XAMPP on your Mac or PC in another tutorial. If you don't already have it setup, go through that tutorial first. How to install WordPress in XAMPP from scratch: Make sure XAMPP Control is running; Create a new database; Create a folder in /xampp/htdocs/ Download WordPress to the folder.
Xampp App Download Windows 10
Xampp Download 64
Xampp Download For Windows 7
Xampp For Windows 10 Download
Download Xampp Apache Friends
This is a PHP/MYSQL Tutorial for beginners that teach you how to Download and install xampp server in your own pc. Their is Step by Step process.
XAMPPis a free and open-source cross-platform web server solution stack package. Apache Friends developed XAMPP. it consists mainly of the Apache HTTP Server, Maria Db database, and interpreters for scripts written in the PHP and Perl programming languages. Since most actual web server deployments use the same components as XAMPP, it makes transitioning from a local test server to a live server possible. XAMPP’s ease of deployment means a developer can install WAMP or LAMP stack quickly and simply on an operating system. With the advantage, a number of common add-in applications such as WordPress and Joomla! can also be installed with similar ease using Bitnami. here we teach how to Install Xampp in easy steps.
Read also: How to dual boot macOS Mojave and windows 10
Prerequisites
XAMPP requires only one zip, tar, 7z, or exe file to download and run, and little or no configuration. The Windows’ version of XAMPP requires Microsoft Visual C++ 2017 Redistributable. Because it is very easy to install and use, so many users recommend it.
How to Install xampp on windows?
1. Download and Install Visual Studio 2008 redistributable package because XAMPP will need this to run properly.
2. Download and Install XAMPP for PHP 5.X for Windows- Be sure to select the proper version of PHP as there are many choices.

3. Allow the program to make changes to your machine.
4. It is very important to install on the root of c:. If you don’t, some functions of XAMPP may have restrictions that will force you to adjust the settings in your UAC, which isn’t recommended.
5. Double-click on the new XAMPP Control Desktop shortcut. Use the Search feature in Windows 10 to find the XAMPP Control App, which opens up the XAMPP Control Panel Application. There you will see a column of “Start” buttons. Select the ones for MySQL and for Apache.
6. now see a green “Running” indicator
Step 1. Download the XAMPP installer
Xampp App Download Windows 10
Download XAMPP for Windows. The download file size is around 124 MB.
Step 2. Run the XAMPP installer
Once you run the installer, you will see Windows User access control asking for permission to go ahead with the installation. Click Yes and to start the installation process.
Step 3. Anti Virus Warning
Now you will see an anti-virus warning. You can disconnect from the internet and temporarily disable the internet. Before clicking on Yes.
I have Norton antivirus running on my system. I decided to ignore this warning and continue with the installation.
Step 4. User Access Control Warning
You will see a warning related to User access control is turned on. To get around this, we will have to install XAMPP in the root C directory instead of Program Files(x86) directory. Click yes to continue
XAMPP installation- UAC Warning

Step 5. Welcome to the setup wizard
Now you will see the actual setup wizard. Click next to continue.
Step 6. Select Component
In this dialog box, you have to select the components to install. I generally uncheck perl, tomcat, Filezilla and Mercury Mail server. But since you are starting out, leave everything as it is and click on next.
XAMPP installation- Select Component
Step 7. Select Installation Folder
Select the installation folder. Leave it as it is. If you plan to change this folder, please do not select Program Files directory. It will result in problems later on because these folders have certain restrictions imposed by Windows.
To be on a safe side, leave it as it is and click next.
XAMPP installation on Windows – Select Installation Folder
Step 8. Bitnami for XAMPP installation
Bitnami provides a free setup for WordPress, Drupal. But we can skip this for now. Click on next.
If you leave the Learn more about Bitnami for XAMPP, it will open a bitnami page in your browser after you click next. There is no harm in glancing over the page. Not necessary though.

Step 9. Ready to install xampp
Now the setup is ready to install xampp. Click next to start the installation process.
XAMPP installation on Windows – Ready to install
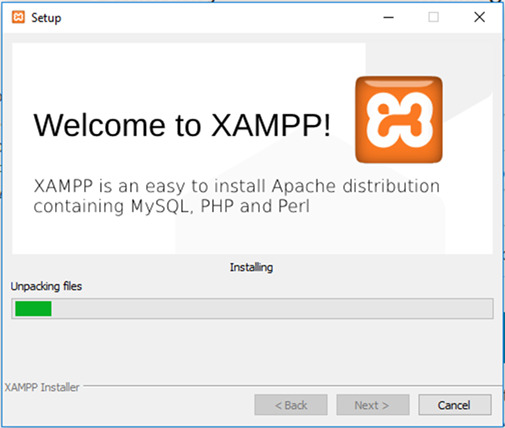
Wait for the installation process to complete.
XAMPP installation on Windows – Installation in Progress
Step 10. Installation of xampp has been completed
Xampp Download 64
Click on Finish to complete the installation. If you leave the “Do you want to start the Control Panel now? checked, XAMPP will start after you have clicked finish. You uncheck the box, you will have to start XAMPP manually.
Xampp Download For Windows 7
Leave it checked for now and see if XAMPP starts successfully.
Xampp For Windows 10 Download
XAMPP installation – Setup Wizard – Installation Complete
*XAMPP when it starts for the first time, it asks for application language. It for XAMPP only and not for PHP, MySQL, etc..
Download Xampp Apache Friends
I selected English. You can choose yours and clock on save. You have just two options anyways.
0 notes
Text
New Post has been published on Strange Hoot - How To’s, Reviews, Comparisons, Top 10s, & Tech Guide
New Post has been published on https://strangehoot.com/how-to-install-xampp-server-in-windows-10-xampp-guide/
How to install XAMPP server in Windows 10 - XAMPP Guide

You might be having an idea about what is a server, even if you are a newbie in the technical field. In this article, we are going to learn “How to install XAMPP server in Windows 10” with the help of simple steps.
Before fleeing to the steps of installing the XAMPP server, let’s get the idea about what truly a XAMPP server is?
XAMPP is an all-in-one server package that supports PHP and Perl server-side programming. It also involves an email and FTP server as well as a self-signed certificate to use the apache web server in HTTPs model.
This package is available for various platforms such as Linux, Windows, Mac, and Solaris. Among all the packages the XAMPP packages most prevalently used. It was mainly developed by the Apache friends organization to hype the use of the Apache web server in the web development environment. However, in this article, we are installing it in Windows 10.
Now, let’s learn how to install XAMPP server in windows 10, step by step.
STEP 1: Open your browser and go to www.apachefriends.org.
It is an official website of Apache friends organization, where you can find various server packages specifically for various platforms and apps.

STEP 2: Go to download category
Now, search for “Download” category in the menu or you can also click on the link for which Operating System you want to download the XAMPP server, here we are downloading for Windows 10.
STEP 3: Download the file
In the “XAMPP for Windows” section, choose the PHP version you want to download and click on the download button.

Once you click on the download button, it immediately pops a tab signifying that the automatic download will start soon but if it doesn’t work you can on the “click here” link.

In our case, it started downloading in one tap as shown in the image below.

STEP 4: Run the installer
After the download finishes, run the downloaded file, this will start the XAMPP installation wizard. If you encounter any warning asking “Do you want this application to making changes to the system”, Ignore the warning and click Yes. Now, click on next in the XAMPP setup window.

STEP 5: Choose components
The “select components” windows enables you to select which components in XAMPP you want to be installed in your system. There is no compulsion of installing everything contained in XAMPP package, but feel free to install the entire package and explore on your own.

Click next to continue the installation process.
STEP 6: Select installation folder
In this step, you are required to select the folder where you want to install XAMPP. The default location for windows is drive “C” and inside “program files 84x” folder. However, if you have received any “warning” regarding UAC because of an activated UAC on your system, you would rather choose to install to a folder outside the “program files 84x” folder. The alternate method is to disable UAC (User Account Control) as an administrator through the control panel. It will open a User account settings form where you have to drag the slider to never notify.

Select the folder and click on next.
STEP 7: Select the language
In the final step, once you complete the installation process, you have to select the language among English and German. The user can select the language in which S/he is comfortable with and click on save.
STEP 8: Bitnami for XAMPP
In this window, it will show you Bitnami’s pre-packaged web applications specifically for use in XAMPP such as Joomla, WordPress, Drupal. Apache friends organization has collaborated with Bitnami for providing these pre-packaged solutions.

You can learn more about Bitnami by leaving “learn more about Bitnami for XAMPP checkbox checked, or if you want to skip this step remove the checkmark from the checkbox, and click the Next button to continue.
STEP 9: Ready to install
Now, this is the last step for starting the installation process. Click on next.

STEP 10: Welcome to XAMPP wizard
Here the progress bar will show the status of the installation wait until the installation is finished.
STEP 11: Installation complete
As soon as the installation process accomplishes, it pops up a window asking the user whether he or she wants to start the control panel at the current instance. Check the box “Do you want to start the Control Panel now?”, if you wish to start it and uncheck the box if you don’t want to start it at that moment and tap finish.

STEP 12: Running the XAMPP
If the user follows the whole process in a proper manner, the XAMPP will be successfully installed and the control panel will start with ease. Now, tap on the start button corresponding to Apache and MySQL.
So, this is how you can install and run XAMPP successfully on windows 10.
Read: How To Choose The Best WordPress Theme For Business.
0 notes
Text
How To Secure Joomla Site From Hackers?
Joomla Security issues are constantly a hot issue unfortunately, there are a few mistakes that are repeated again and again making security issues that can without much of a stretch be maintained a strategic distance from. Here are the issues - the Joomla security problems and what web portal development companies in Bangalore ought to do to avoid them.

Top security issues in joomla
1. Cheap Hosting Providers
Never go for the cheapest hosting facilitating supplier ecommerce website Development Company in India can find. Ordinarily modest hosting providers utilize shared servers that have several different sites, some of which are low-quality malicious sites that can be easily hacked. Since they are on a similar IP typically, your site will be moderate, be in a "bad neighborhood" with a low reputation, and might get compromised off if different sites are hacked.
2. No Backups
Ensure you have normal Joomla backups. In the event that ecommerce website Company in Bangalore site gets hacked or something occurs, you will have the option to rebuild from scratch. We would suggest going for a blend of hosting based backups, for example, those offered by InMotion and afterward utilizing an 3rd party extension.
3. Install and forget
In the wake of installing ecommerce development services Bangalore brand new beautiful Joomla! - Powered site, check it routinely ensuring nothing has turned wrong. Lots of things can turn out badly and you can get a wide range of Joomla issues in the event that you don't keep up all the components of your Joomla installations.
4. Having no development server
All upgrades and extension installations ought to be first tried on a development server, before being done on the live website. On the off chance that something turns out badly on the development server, ecommerce website designers in Bangalore can avoid making a similar issue on the server, and you'll ensure your live website remains clean. You could utilize straightforward servers that can be installed locally, for example, XAMPP or MAMP.
5. Forgetting to keep your Joomla! site updated
In the wake of installing your brand new Joomla! - Powered website, stay up with the latest with any steady releases and update with each steady release. Most stable releases fix issues and vulnerabilities. Neglecting to update will leave ecommerce website developer Bangalore website presented to a wide range of Joomla issues. This likewise applies to any 3rd Joomla extensions you install.
6. Fix any cracked file and forget it
When joomla web development company Bangalore site's been cracked, fixing the damaged file isn't sufficient. Check your site's logs, change your old passwords, remove the whole registry and rebuild it from clean backups, and take every single precautionary activity! Genuine Joomla security issues can recur on the off chance that you don't restore from a clean backup since secondary passages can be available in ecommerce website designer Bangalore installation, which will be reactivated by hackers once you expel what you believe is the main infected file.
Things to Do to Secure Your Joomla Website
1. Rename the Joomla! admin account
This basic step hardens your site significantly. Again on the off chance that you are paranoid, ecommerce website design in Bangalore should utilize irregular characters both for the username and the password for the admin.
2. Ensure your configuration.php file is not writeable!
This step is critical, and a world writeable configuration.php file is a greeting for hacking. Ecommerce website developer can make this non-writable from inside Joomla. The configuration.php ought to be set marked as Unwriteable.
3. Continuously try to keep your Joomla installation upgraded to the recent version
Every Joomla update or new versions commonly adds security by closing any security gaps and exploits, or other found vulnerabilities. On the off chance that ecommerce website designer skip any update, no doubt about it "gap" open in your site's security and are risking getting hacked.
4. Never leave extra files running around
Guarantee that there are no unnecessary files on ecommerce developer web server. Erase any files leftover from the installation. Erase your installation folder and any compressed files which you may have uploaded to your webserver to install the Joomla! core. Expel any parts/modules/layouts that you are not utilizing. Continuously keep ecommerce web developers site as lean as could be allowed. Any additional files could turn into a risk.
5. Keep 3rd Party extensions updated
3rd Party Extensions are perhaps the best thing about Joomla! There is such a wide variety of extensions that you can most likely discover something previously written for website developer in Australia. Be that as it may, 3d party expansions come in all shapes and estimates and are not observed by the core team. This implies vulnerability exists which can compromise your installation. You should be incredibly cautious about introducing any expansions. Monitor the List of Vulnerable 3rd party Extensions. In the event that you install extensions ensure you monitor their releases and guarantee that you follow their security suggestions.
6. Check your site for vulnerabilities
There are various tools which test your Joomla for corrupt files, and vulnerable files. These are typically penetration testers that test for basic issues.
7. Backup! Backup! Backup!
Regardless of whether website developer in USA have found a way to guarantee that your site is 100% secure, vulnerabilities may even now lurk, holding back to be found and exploited. On the off chance that your website gets hacked, you MUST guarantee that it returns online as quickly as time permits with as little loss of content as possible. For this, you should guarantee that you have great working backups.
#joomla_web_design_company_Bangalore#ecommerce_website_developer_in_Australia#ecommerce_website_developer_India#online_store_developer#website#webdesign#webdevelopment#websitedesigner#webdesigner#web development
0 notes
Text
How to install the XAMPP server, install JOOMLA and load the index.php shell script on JOOMLA.
youtube
# 3 lessons in one This tutorial is also for our friends who use Windows
without errors please sign my step 1)install XAMPP server 2)install JOOMLA in XAMPP 2)upload shell script in JOOMLA
XAMPP: JOOMLA: Shell Script: Nguồn:https://phprealestatescript.com/ Xem Thêm Bài Viết Khác:https://phprealestatescript.com/lap-trinh-php
Share Tweet Share
The post How to install the XAMPP server, install JOOMLA and load the index.php shell script on JOOMLA. appeared first on PHP Realestate Script.
from PHP Realestate Script https://ift.tt/2Ofdnfy via IFTTT
0 notes
Text
How to design a complete website in WordPress just in 10 minutes
https://opix.pk/blog/how-to-design-a-complete-website-in-wordpress-just-in-10-minutes/ How to design a complete website in WordPress just in 10 minutes https://opix.pk/blog/how-to-design-a-complete-website-in-wordpress-just-in-10-minutes/ Opix.pk #buildawebsite #createawebsite #createawordpresswebsite #Eightsectheme #howtocreateawebsite #HowtodesignacompletewebsiteinWordPress #HowtodesignacompletewebsiteinWordPressjustin10minutes #howtomakeawebsite #howtomakeawordpresswebsite #makeawebsite #websitelearners #wordpress #wordpressforbeginners #Wordpresstutorial2018 #wordpresswebsite How to design a complete website in WordPress just in 10 minutes Eight sec theme: https://wordpress.org/themes/eight-sec/ install wordpress on xampp: https://youtu.be/RoFxcP5dl28 remove footer copyright text: https://youtu.be/FshJaPH64uc In this tutorial you will learn step by step method to design a complete website just in 10 minutes. Actually this tutorial is for WordPress beginners . WordPress is an online, open source website creation tool written in PHP. But in non-geek speak, it’s probably the easiest and most powerful blogging and website content management system (or CMS) in existence today. STEP 1 Choose the right platform for your website What is a Content Management System? A content management system (CMS) in simple terms, is a platform of sorts or a mechanism which permits you to create your content and publish it on a website. Let’s say that it is a coat hanger stand with the coat being your content. It is software that is installed on your host’s server. Your host provider will likely have a one click installation process to help you get your CMS installed. Once it is installed, you can log in to your site as the admin and add photos, text and other content. You can use the content you’ve added to create blog posts and other forms of content like a product page or display a work portfolio on your website. A CMS is way more than just a means to an end, you can install a theme which is a modified template to suit the specific niche and purpose of your site. With the template added, you can customize the appearance of your site. You can add plugins to add function to your site, for example a social sharing plugin to help spread the word about your site via social networks. All of this and more can be accomplished with a Content Management System. Which CMS is best for you? An overwhelming majority of websites use WordPress. The other two options that lag way behind in comparison to WordPress (certainly in popularity) are Joomla and Drupal. WordPress The ideal option for someone who’s creating his or her first website. It has considerable scalability and works well with low and medium traffic websites. We receive 1.5 million views every month and we run WordPress, so that gives you an idea of what medium traffic constitutes if you were wondering. Even large websites such as TIME Magazine, CNN, TED, Techcrunch, NBC and others use WordPress to server millions of pageviews each day. WordPress has a great number of points that can be made in favor of its use. Easy To Install: Most hosting services have one click installation options for WordPress given the number of people who use it. Strong Community & Open Source: It is free and used by a lot of people. There are a plethora of free themes and plugins that you can leverage for your site. Apart from the freebies, premium themes and plugins are cheap and come with excellent support services from their providers. If you ever have a doubt or a problem a simple Google search can answer your query. If fact, I’ll go so far as to say you’ll find the answer to your doubts answered by the first three results of a Google search. A strong community will aid in your WordPress initiation process should you ever encounter any hiccups. And you can always drop your comments here either Aigars or me will be sure to respond to the at the earliest opportunity. Ideal For Non tech savvy online entrepreneurs: Most of the products associated with WordPress, such as themes and plugins are fairly straightforward and intuitive to use. Installing a Content Management System like WordPress is only the first step of the process, there is much more to website creation beyond that. Like WordPress which is easy to install and configure, the tools that you’ll require to make your website whole are easy to handle. Two not so quite favorable things about WordPress One drawback of WordPress, it may become unwieldy if your site grows far too large and receives an enormous amount of daily traffic. The cost of your hosting goes up. But we are talking about traffic in the order of millions here and it isn’t something you should let bother you for now. Another potential problem is the quality of free plugins and themes. While most are good and have fairly high security standards, you’d should be wary of unknown third party plugins. WordPress is a secure platform out the box, but adding third party software while exercising poor judgement is a bad idea. That being said security vulnerabilities are generally fixed as soon as they are detected.source
0 notes
Text
How do I install a quickstart packages in Joomla?
Please read the complete article before we begin. What is Joomla? and What is Joomla Architecture?. To install new a quick start package correctly, you'll need a few files and information. Make sure that your Joomla site is version 3.9. That may seem self-evident, but quick start packages are a great way to get started. setup Joomla with the package and installing a 3.9 package on a 2.5 platform will not upgrade your site, this will break it.

Don't you know the difference between quickstart packages to templates? Take your time to read this.
What is a Quick Start Package, and how does it work?
Template providers offer pre-installed, ready-to-use Joomla instances. Sample data sets and a template are included in these "Quick Start" packages. When you buy a template, regardless of where it came from, you'll get download links for the installer packs. A Quick Start package is not the same as a standard template. Learn how to install a template in Joomla.
Quickstart.zip is a backup of the specific template's demo site.
It includes the following:
all Joomla standard files (Joomla CMS)
all of the extensions used on a demo site
a template that has been installed and configured
a template that has been installed and configured
Sample data (includes configured extensions, custom content etc.
You have the choice to download one of the following files using the download links provided when you purchased the template:
A Template without sample data only installs the template and lets you install all the add-on extensions and configure them yourself.
A Quick Start package means a template with sample data that makes your site look exactly like the demo of the template from the template developer with all the sample data and add-ons pre-configured.
What is a Joomla template?
A Joomla template is only in the management of the site's layout. Learn How to Create Joomla Template.
There are no sample data provided in Quickstart.
Customers who already have a live website use a template to redesign our website and want something new in layout. However, they will get a new look like other demo site layouts with the new template, thus all modules must be integrated into the new template layout.
NOTE: Joomla Template does not include a database, you will not install a demo setup by installing a template via Template Manager. If you have a clean Joomla setup installed already and want to get a demo copy, then you must delete all Joomla files from your server and install them manually.
Quick Start Package Installation
The first step is to download the Quickstart package zip file from the third-party Template provider.
We recommend that you first back up your website before installing the QuickStart package. Learn out how to create a backup of your website. We recommend you to delete your site files from the root folder to ensure that your quickstart installation is clean (root). You can achieve this in a number of ways. You can use your username or password administrator to connect to your root directory through SSH (Secure Shell) and remove all files from your root directory. You can also login to FTP using the root directory and choose and delete those files. It takes some time to delete the files over FTP, so be patient.
If you're using SSH, simply upload your zip file (through FTP) and then 'unzip' it after you've deleted your files. If you're using FTP, unzip the file on your computer and then upload the files to your root directory, which should be empty. Again, uploading all of those files and directories will take some time.
Each quickstart package will include an Installation folder, so when you see your website in your browser after uploading/unzipping the files, the Joomla installation will begin automatically. Install Joomla in a regular manner.
Joomla 4 : How to create override for Joomla layout in 2020?
Make sure you enter the correct information for a successful installation when asked for database details on the "Database Configuration" page. The correct database information (the database prefix) can be found in the configuration.php file you created before started. Make sure to click "Next" once you've finished entering the information.
This is what you'll need to check for in your configuration file.


Concentrate on the last page. Some template designers will have options here. Sometimes there will be a "Default" and a "Brochure" type, choose the "Default". Another popular option is "Theme" (name or #), which will serve as their sample data. We have chosen the last option Joomla tutorials data.

Complete the installation process by removing the installation folder from the root folder, as instructed in the final step of the Joomla installation.

Common problems encountered during quickstart installation
You may encounter issues while installing a quickstart package that prevents you from completing the installation successfully. Before checking, issues Learn how to enable error reporting in Joomla.
Here are some of the most common issues that our customers have reported to us in the past:
After the first step, the installation hangs and you see an infinite loading spinner.
The installation becomes stuck on one of the steps and you are unable to proceed to the next step (the next button does not work or reload the same step).
The installation is stopped while the sample data is being restored.
The installation does not begin, and you are displayed with a blank page.
Typically, such problems occur as a result of server configuration or corrupted files.
We've prepared a few steps to assist you in resolving any issues that may arise during the quickstart installation.
Step1: Check that your server fulfills the minimum requirements for running Joomla. https://docs.joomla.org/Technical_requirements
Step2: Make sure that you have properly uploaded files on your server. If any files are missing or corrupted, your installation will become stopped or your Joomla will not function properly.
Uploading the unpacked quickstart files to a live server can take a long time. We've also discovered that when our clients use FTP to upload data, they frequently have some missing or corrupted files. There are two simple ways to unzip the quickstart.zip package on your server. They can save you a lot of time and help you prevent file difficulties.
(a) Use Akeeba Kickstart to unpack the quickstart.zip package.
Download Akeeba Kickstart.
Upload Akeeba Kickstart and quickstart.zip to the same directory on your server.
Run Akeeba Kickstart in your browser by typing your domain and path to the file, for example: yourdomain.com/kickstart.php
Follow the onscreen instructions to unpack the package on your server.
After unpacking the package, you can move on to your site root to start installation: yourdomain.com
(b) Use cPanel to unpack the quickstart.zip package:
Upload quickstart.zip on your server
Go to cPanel of your site and open File Manager.
In File Manager select the quickstart package on your server and click on Extract from the toolbar:
After unpacking the package, you can move on to your site root to start installation: www.yourdomain.com
Step3: Clear your browser's cache and cookies, then restart the installation. This easy solution is often helpful.
Step4: Increase the values in your server's php.ini file.
If you are using a local environment, such as XAMPP, the php.ini file is located in the following directory:
C:\xampp\php\php.ini
If you are using a live server, I recommend that you check your hosting instructions or contact technical support directly to learn how to properly update the php.ini values on your server.
Edit the php.ini file using a text editor and locate the line that starts:
memory_limit
Change its value to at least 128M:
memory_limit=128M
Next, locate the line that starts:
max_execution_time
Change its value to at least 3000:
max_execution_time=3000
Step5: The final step frequently helps in the resolution of sample data restoration issues.
Find and change the following files in the unpacked files from the quickstart package.:
/installation/SQL/mysql/joomla.sql /installation/SQL/mysql/sample_jm_demo.sql
Replace all appearances of:
ENGINE=InnoDB
with
ENGINE=MyISAM
Save the files and run the installation once again.
You should read this also :
How do I enable Joomla PHP error reporting?
What is the Joomla control panel?
Joomla4: How to create a new module from the backend?
Joomla 4: How to create override for Joomla layout in 2020?
Why joomla is better than wordpress?
0 notes